Embed Size (px)
Citation preview

19
WEATHER STATION WS-9037U-IT
Contents Language Page ____________________________________________________
English 1 French 35 Spanish 71

20
TABLE OF CONTENTS Topic Page Inventory of Contents/ Additional Equipment 3 About WWVB 3 Quick Set Up Guide 4 Detailed Set Up Guide Battery Installation 5 Start Up Sequence 6 Explanation of LCD Information 7 Function Key Layout 8 Program Mode Overview of Programming Sequence 8 LCD Contrast Setting 8 Time Zone Setting 8-9 DST ON/OFF Setting 9 Radio-controlled Time ON/OFF Setting 9 12/24-hour Time Mode Setting 9-10 Setting the Time/Date Manually 10-11 Temperature Measuring Units (ºF/ºC) 11 Air Pressure Measuring Units (inHg/hPa) 11 Relative Pressure Setting 11-12 Forecast Sensitivity Setting 12 Features and Operation Time Alarm Setting and Operation 13 Moon Phase 14 Minimum/Maximum Temperature/Humidity 14-15 Multiple Remote Temperature/Humidity Sensors 15-16 Comfort Icon 16 Weather Forecast and Pressure Trend Indicators 16 Weather Icons 17 Weather Tendency Arrows 17 Barometric Air Pressure Reading 18 Air Pressure History Bar Chart 18 Mounting 19-20 Maintenance and Care 21 Troubleshooting Guide 22 Specifications 23 Warranty Information 24-25

21
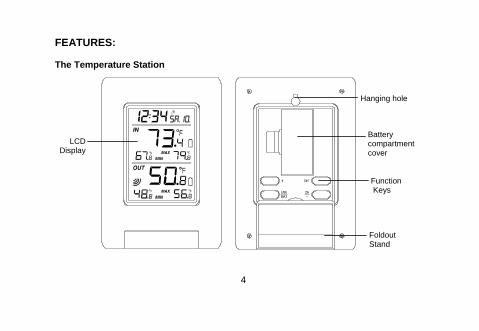
Stand
LCD display Function keys
WEATHER STATION Instruction Manual
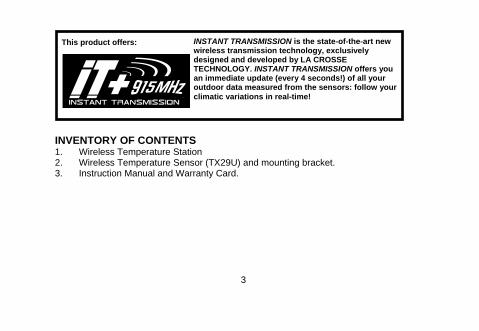
INVENTORY OF CONTENTS 1. Wireless Weather Station 2. Wireless Thermo-hygro Sensor (TX29UD-TH) and mounting bracket. 3. Instruction Manual FEATURES:
The Weather Station
Battery compartment
Hanging hole
This product offers: INSTANT TRANSMISSION is the state-of-the-art new wireless transmission technology, exclusively designed and developed by LA CROSSE TECHNOLOGY. INSTANT TRANSMISSION offers you an immediate update (every 16 seconds!) of all your outdoor data measured from the transmitters: follow your climatic variations in real-time!

22
• WWVB Radio controlled time with manual setting option • Time reception ON/OFF (user selectable) • 12/24 hour time display • Daylight saving time (On/OFF) • Time zone option ±12 hours • Weekday and day calendar display (year and month only in setting
mode) • Alarm setting with snooze function • Display 12 Moon phases throughout the year • Weather forecasting with weather tendency indicator • Indoor comfort indicator • Temperature display in ºC/ºF • Indoor and outdoor temperature display with MIN/MAX records and
time of reception • Humidity data display as RH% • Indoor and outdoor humidity display with MIN/MAX records • Relative air pressure hPa/ inHg with adjustable reference value • Weather icon sensitivity setting • Relative air pressure history for the past 24 hours (electronic
barometer with barometric pressure trend) • LCD contrast selectable • Wireless transmission at 915 MHz • Signal reception intervals at 4 seconds • Can receive up to 3 outdoor transmitters • LED back light • Low battery indicator • Table standing or wall mounting
Thermo-Hygro Transmitter • Remote transmission of outdoor temperature
and humidity to weather station by 915 MHz signals
• Alternate display of temperature and humidity display
• Water-resistant casing • Wall mounting case. (Mount in a sheltered
place. Avoid direct rain and sunshine)

23
SETTING UP
WHEN ONE TRANSMITTER IS USED 1. First, insert the batteries in the transmitter (see “How to install and
replace batteries in the Thermo-hygro outdoor transmitter” above).
2. Within 2 minutes of powering up the transmitter, insert the batteries in the Weather Station (see “How to install and replace batteries in the Weather Station” above). Once the batteries are in place, all segments of the LCD will light up briefly and a short signal tone will sound. Following the indoor temperature/humidity and the time as 12:00 will be displayed. If these information are not displayed on the LCD after 60 seconds, remove the batteries and wait for at least 60 seconds before reinserting them. Once the indoor data is displayed user may proceed to the next step.
3. After the batteries are inserted, the Weather station will start receiving data signal from the transmitter. The outdoor temperature and humidity data should then be displayed on the Weather station. If this does not happen after 2 minutes, the batteries will need to be removed from both units and reset from step 1.
4. In order to ensure sufficient 915 MHz transmission however, the distance between the Weather Station and the transmitter should not be more than 330 feet (100 meters) (see notes on “Positioning” and “915 MHz Reception”).
Note: In the event of changing batteries of the units, ensure the batteries do not spring free from the contacts. Always wait at least 1 minute after removing the batteries before reinserting, otherwise start up and transmission problems may occur. WHEN MORE THAN ONE TRANSMITTER IS USED 1. User shall remove all the batteries from the Weather Station and
transmitters, and wait 60 seconds. 2. Insert the batteries in the first transmitter. 3. Within 2 minutes of powering up the first transmitter, insert the
batteries in the Weather Station. Once the batteries are in place, all segments of the LCD will light up briefly and a short signal tine will sound. Following the indoor temperature/humidity and the time as 12:00 will be displayed. If these information are not displayed on the LCD after 60 seconds, remove the batteries from both units and wait for at least 60 seconds before reinserting them.
4. The outdoor temperature and humidity data from the first transmitter (channel 1) should then be displayed on the Weather Station. Also, the signal reception icon will be displayed. If this does not happen after 2 minutes, the batteries will need to be removed from both units

24
and reset from step 1. 5. Insert the batteries in the second transmitter as soon as the outdoor
temperature and humidity readings from the first transmitter are displayed on the Weather Station. Note : User shall insert the batteries into the second transmitter within 45 seconds after the Weather Station displays the information of the first transmitter.
6. The outdoor temperature and humidity from the second transmitter and the "channel 2" icon should then be displayed on the Weather Station. If this does not happen after 2 minutes, the batteries will need to be removed from all the units and reset from step 1.
7. Insert the batteries in the third transmitter as soon as the "channel 2" icon and outdoor data are displayed on the Weather Station. Then within 2 minutes, the channel 3 outdoor data from the third transmitter will be displayed and the channel icon will shift back to "1" once the third transmitter is successfully received. If this is not happen, user shall restart the setting up from step 1. Note : User shall insert the batteries into the third transmitter within 45 seconds after the Weather Station displays the information of the first transmitter. Or immediately after reception of the second transmitter is finished.
8. In order to ensure sufficient 915 MHz transmission however, the distance between the Weather Station and the transmitter should not be more than 330 feet (100 meters) (see notes on “Positioning” and “915 MHz Reception”).
IMPORTANT: Transmission problems will arise if the setting for additional sensors is not followed as described above. Should transmission problems occur, it is necessary to remove the batteries from all units and start again the set-up from step 1.
Note: • If the signal reception is not successful on the first frequency of
915MHz for 45 seconds, the frequency is changed to 920MHz and the learning is tried for another 45 seconds. If it is still not successful the reception is tried for 45 seconds on 910MHz. This will also be done during re-synchronization.
• When the weather station is receiving the WWVB time signal, the outdoor transmitter data signal will temporarily not be received by the weather station. During this short period of time, the outdoor readings shown on the weather station will not be renewed until the WWVB time signal is successfully received.

25
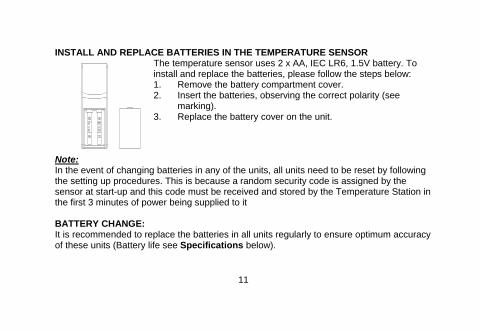
TO INSTALL AND REPLACE BATTERIES IN THE WEATHER STATION
The Weather Station uses 3 x AA, IEC LR6, 1.5V batteries. To install and replace the batteries, please follow the steps below: 1. Insert finger or other solid object in
the space at the bottom center of the battery compartment and lift up to remove the cover.
2. Insert batteries observing the correct polarity (see marking).
3. Replace compartment cover. TO INSTALL AND REPLACE BATTERIES IN THE THERMO-HYGRO TRANSMITTER
The Thermo-hygro transmitter uses 2 x AA, IEC, LR6, 1.5V batteries. To install and replace the batteries, please follow the steps below: 1. Remove the cover. 2. Insert the batteries, observing the correct polarity
(see marking). 3. Replace the battery cover.
Note: In the event of changing batteries in any of the units, all units need to be reset by following the setting up procedures. This is due to a random security code assigned by the transmitter at start-up. This code must be received and stored by the Weather Station in the first 3 minutes of power being supplied to the transmitter.
BATTERY CHANGE: It is recommended to replace the batteries in all units regularly to ensure optimum accuracy of these units (Battery life see Specifications below).
Please participate in the preservation of the environment. Return used batteries to an authorized depot.
RESETTING The Weather Station and the Thermo-hygro transmitter need to be reset when one of the following conditions occur: • Unsuccessful 915MHz signal reception.

26
• Malfunction on the units. • Batteries replacement.
For resetting, remove all batteries from the units. Wait at least for 1 minute before powering up the Weather station again. Proceed from step 1 in “Setting Up”.
ATOMIC TIME - WWVB RADIO CONTROLLED TIME The NIST (National Institute of Standards and Technology—Time and Frequency Division) WWVB radio station is located in Ft. Collins, Colorado, and transmits the exact time signal continuously throughout the United States at 60 kHz. The signal can be received up to 2,000 miles away through the internal antenna in the Weather Station. However, due to the nature of the Earth’s Ionosphere, reception is very limited during daylight hours. The wireless weather station will search for a signal every night when reception is best.
The WWVB radio station receives the time data from the NIST Atomic clock in Boulder, Colorado. A team of atomic physicists is continually measuring every second, of every day, to an accuracy of ten billionths of a second per day. These physicists have created an international standard, measuring a second as 9,192,631,770 vibrations of a Cesium-133 atom in a vacuum. For more detail, visit http://www.boulder.nist.gov/timefreq.htm. To listen to the NIST time, call (303)499-7111. This number will connect you to an automated time, announced at the top of the minute in “Coordinated Universal Time”, which is also known as Greenwich Mean Time (GMT). This time does not follow Daylight Saving Time changes. After the top of the minute, a tone will sound for every second. It is possible that your wireless weather station will not be exactly on the second due to the variance in the quartz. However, the clock will adjust the quartz timing over the course of several days to be very accurate; under 0.10 seconds per day.
FUNCTION KEYS:
Weather Station: The Weather Station has 5 easy to use function keys, located on the right side of the weather station:

27
IN key
OUT/+ key
ALM/DATE key
SET key
SNOOZE/CH key
SET key • Press and hold the key to enter manual setting modes: LCD contrast,
time zone, DST ON/OFF, time reception ON/OFF, 12/24 hour display, manual time setting, calendar, temperature °C/°F, pressure hPa/inHg, relative pressure value, and weather icon sensitivity setting
• Reset all MIN/MAX records • Stop the alarm during alarm ringing • Stop snooze mode • Back-light on ALM/DATE key • Press and hold key for 3 seconds to enter the alarm setting mode • Active/de-active the alarm time • Stop the alarm during alarm ringing • Stop snooze mode • Display date • Back-light on
IN key • Press to toggle between MAX/MIN and current indoor
temperature/humidity data • Press to set the alarm hour (inside alarm setting mode) • Decrease relative pressure value (within manual set mode) • Stop the alarm during alarm ringing • Stop snooze mode • Back-light on

28
OUT/+ key • Press shortly to toggle between MAX/MIN and current outdoor
temperature/humidity data • Increase, change, toggle all values in manual set mode • Press to set the alarm minute (inside alarm setting mode) • Stop the alarm during alarm ringing • Stop snooze mode • Back-light on
SNOOZE/CH key • Active snooze function during alarm ringing • Exit the manual set mode and alarm setting mode • Switch among display of channels (if more than 1 transmitter is used) • Back-light on

29
Moon phase icon
Weather tendency indicator
Calendar or alarm time
Indoor relative humidity in RH%
Time reception icon (for WWVB time)
Indoor temperature in ºC/ ºF
Weather forecast icon
Outdoor data signal reception indicator*
Outdoor temperature in ºC/ ºF Outdoor relative humidity in RH%
Comfort indicator icon
Relative air pressure history bar graph
Relative air pressure in hPa / inHg
Time
LCD SCREEN The LCD screen is split into 4 sections displaying the information for time/calendar/alarm/moon phase, indoor data, weather forecast and outdoor data. * When the signal is successfully received by the Weather Station, the outdoor transmission icon will be switched on. (If not successful, the icon will not be shown on LCD). The user can then easily see whether the last reception was successful (icon on) or not (icon off). On the other hand, the short blinking of the icon shows that a reception is currently taking place. MANUAL SETTINGS: The following manual settings can be changed when pressing the SET key for: • LCD contrast setting • Time zone setting • DST ON/ OFF setting (daylight saving time) • Time reception ON/OFF setting • 12/24-hour format setting • Manual time setting • Calendar setting
Low battery indicator

30
• °C/°F temperature setting • hPa / inHg pressure setting • Relative air pressure setting • Weather forecasting icon sensitivity setting
LCD CONTRAST SETTING: The LCD contrast can be set within 8 levels, from LCD 0 to LCD7 (Default setting is LCD 4): 1. Press and hold the SET key until the digit starts flashing. 2. Use the OUT/+ key to view all levels of contrast. 3. Select the desired LCD contrast. Confirm with the SET key and enter
in the Time Zone setting.
TIME ZONE SETTING: The time zone default of the Weather Station is “-5h”. To set a different time zone: 1. The current time zone value starts flashing. 2. Use the OUT/+ key to set the time zone. The range runs from 0 to -12
and then runs from +12 back to 0 in consecutive 1-hour intervals. 3. Confirm with the SET key and enter the Daylight saving time
ON/OFF setting.
DAYLIGHT SAVING TIME ON/ OFF SETTING Daylight time saving (DST) function can be set ON/OFF. Default setting “ON” 1. The digit “ON” will start flashing on the LCD. 2. Use the OUT/+ key to turn OFF the daylight time saving function. 3. Confirm with the SET key and enter the Time reception ON/OFF
setting.
Flashing
Last digit flashing
Digit flashing

31
TIME RECEPTION ON/OFF SETTING:
In area where reception of the WWVB time is not possible, the WWVB time reception function can be turn OFF. The clock will then work as a normal Quartz clock. (Default setting is ON). 4. The digit “ON” will start flashing on the LCD. 5. Use the OUT/+ key to turn OFF the time reception function. 6. Confirm with the SET key and enter the 12/24-hour format setting.
Note: If the Time Reception function is turn OFF manually, the clock will not attempt any reception of the WWVB time as long as the Time Reception OFF function is activated. The time reception icon and the “WWVB” icon will not be displayed on the LCD. 12/24-HOUR FORMAT SETTING:
The hour display can be selected to show hours in 12-hour or 24-hour settings. (Default 12-Hour) 1. Use the OUT/+ key to toggle between “12H” or “24H”. 2. Confirm with the SET key and enter the Manual time setting. MANUAL TIME SETTING: In case the Weather Station cannot detect the WWVB-signal (for example due to disturbances, transmitting distance, etc.), the time can be manually set. The clock will then work as a normal Quartz clock. 1. The hour digit will start flashing. 2. Use the OUT/+ key to set the hour.
Hour flashing
Minutes flashing
Flashing
Flashing

32
3. Press again the SET key to set the minutes. The minute digits start flashing.
4. Use the OUT/+ key to set the minutes. 5. Confirm with the SET key and enter the Calendar setting.
Note: The unit will still try to receive the signal between 0:00 and 6:00 am every day despite it being manually set, if the WWVB reception function has been set ON. When it does receive the signal, it will change the manually set time into the received time. During reception attempts the WWVB tower icon will flash. If reception has been unsuccessful, then the WWVB tower icon will not appear but reception will still be attempted the following hour. CALENDAR SETTING: The date default of the Weather station is 1. 1. 2006. Once the radio-controlled time signals are received, the date is automatically updated. However, if the signals are not received, the date can also be set manually. 1. The year starts flashing. 2. Use the OUT/+ key to set the year (between year 2003-2029). 3. Press the SET key again to confirm and to enter the month setting.
The month starts flashing. 4. Use the OUT/+ key to set the month. 5. Press the SET key again to confirm and to enter the date setting
mode. The date starts flashing. 6. Use the OUT/+ key to set the date. 7. Confirm all calendar settings with the SET key and enter the
Temperature unit setting. °C/°F TEMPERATURE SETTING:
The temperature display can be selected to show temperature data in °C or °F (Default °F). 1. Use the OUT/+ key to toggle between “°C” or “°F”.
Year
Date and month (24hr time format) Month and date (12hr time format)
Flashing

33
2. Confirm with the SET key and enter the Air pressure unit setting. hPa / inHg PRESSURE UNIT SETTING: The pressure display can be selected to show relative air pressure in hPa or inHg (default is “inHg”). 1. Use the OUT/+ key to toggle between “hPa” or “inHg” unit. 2. Confirm with the SET key and enter the Relative air pressure value
setting.
Note: Units of weather icon sensitivity and air pressure history are not affected. They are always expressed in hPa.
RELATIVE AIR PRESSURE VALUE SETTING The default relative pressure value is 29.92 inHg (1013 hPa). This can be manually set to another value within the range of 28.35 – 30.72 inHg (960 – 1040 hPa) for a better reference. 1. The current relative pressure value will start flashing 2. Use the OUT/+ key to increment and IN key to decrement the value. 3. Keep holding the key allows the value to advance faster. 4. Confirm with the SET key and enter the Weather forecast icon
sensitivity setting. WEATHER FORECASTING ICON SENSITIVITY SETTING: For locations with rapid changes of weather conditions, the weather icons sensitivity can be set to a different level for faster display of weather conditions.
Flashing
Flashing
Flashing

34
1. The current sensitivity value will start flashing. 2. Use the OUT/+ key to set the weather sensitivity level. There are 3
levels of setting: 2, 3 and 4. The value corresponds to the change of air pressure in hPa before the weather icon will switch to another state. Level 2 is the most sensitive setting, level 4 is the slowest recording setting (default setting is "3").
3. Confirm with the SET key and exit the Manual settings. TO EXIT THE MANUAL SETTING MODE To exit the manual setting mode anytime during the manual setting, press the SNOOZE/CH key or wait for automatic timeout. The mode will return to normal time display. ALARM SETTING:
The alarm time can be set when pressing the ALM/DATE key. 1. Press and hold the ALM/DATE key to enter the alarm set mode. The
alarm digits flash. 2. Use the IN key to set the alarm hour. 3. Use the OUT/+ key to set the alarm minute. 4. Confirm with SNOOZE/CH key and exit the Alarm setting. The icon
((●)) will be displayed along with the set alarm time.
Note: If the calendar is displayed in the Weather station, the alarm is NOT active. To view and active the alarm, press the ALM/DATE key. The alarm icon and the alarm time will be displayed, indicating that the alarm setting is activated. The maximum alarm ring duration is 2 minutes.
SNOOZE SETTING AND STOPPING THE ALARM: 10 minutes snooze function can be set when the alarm is ringing by pressing the SNOOZE/CH key.
When the alarm is snoozing, the alarm icon ((•)) will remain flashing indicating that the alarm is active but is in Snooze mode. To stop the snooze function when it is in snooze period, press any key except the SNOOZE/CH key.
To stop the alarm, press any key during alarm ringing, except the SNOOZE/CH key.
Alarm icons Alarm time

35
MOON PHASES SYMBOL The Moon icon of the Weather station will also display all 12 Moon phases throughout the year according to the set calendar.
INDOOR RELATIVE HUMIDITY AND INDOOR TEMPERATURE: The indoor temperature and humidity data, the indoor comfort indicator are automatically updated and displayed on the second section of the LCD.
THE COMFORT LEVEL INDICATOR: Comfortable : A happy face icon “☺” indicating a temperature level
between 20°C and 25.9°C and relative humidity reading between 45% and 65%.
Uncomfortable : A sad face icon “ ” indicating any value outside the comfortable range.
TOGGLING AND RESETTING THE INDOOR READINGS: 1. Press the IN key to toggle between the indoor current, MAX/MIN
temperature and humidity data. The time and dates of the recorded data will also be displayed in the time and calendar sections (for temperature data only). Once to show the MAX indoor temperature and humidity data with the recorded time and date. Twice to show the MIN indoor temperature and humidity data with the recorded time and date. Three times to return to the current displayed values
Indoor relative humidity in RH%
Indoor temperature in °C or ºF
MAX icon
New Moon
Small Waxing Crescent
Large Waxing Crescent
First Quarter
Small Waxing Gibbous
LargeWaxing Gibbous
Small Waning Crescent
Large Waning Crescent
Last Quarter
Small Waning Gibbous
LargeWaning Gibbous
Full Moon

36
FORECAST FORECAST FORECAST
2. Once the MIN or MAX data is displayed, press and hold the SET key for 3 seconds to reset the respective MIN or MAX record to current temperature and humidity data, and current time, date display.
Note: The MIN or MAX data needs to be reset individually. WEATHER FORECAST AND WEATHER TENDENCY:
WEATHER FORECASTING ICONS: Weather icons in the third section of LCD can be displayed in any of the following combinations:
Sunny Cloudy with sunny intervals Rainy
For every sudden or significant change in the air pressure, the weather icons will update accordingly to represent the change in weather. If the icons do not change, then it means either the air pressure has not changed or the change has been too slow for the Weather station to register. However, if the icon displayed is a sun or raining cloud, there will be no change of icon if the weather gets any better (with sunny icon) or worse (with rainy icon) since the icons are already at their extremes.
The icons displayed forecasts the weather in terms of getting better or worse and not necessarily sunny or rainy as each icon indicates. For example, if the current weather is cloudy and the rainy icon is displayed, it does not mean that the product is faulty because it is not raining. It simply means that the air pressure has dropped and the weather is expected to get worse but not necessarily rainy.
Note: After setting up, readings for weather forecasts should be disregarded for the next 12-24 hours. This will allow sufficient time for the Weather station to collect air pressure data at a constant altitude and therefore result in a more accurate forecast.
Common to weather forecasting, absolute accuracy cannot be guaranteed. The weather forecasting feature is estimated to have an accuracy level of about 75% due to the varying areas the Weather station has been designed for use. In areas that experience sudden changes in weather (for example from sunny to rain), the Weather station will be more accurate compared to use in areas where the weather is stagnant most of the time (for example mostly sunny).
If the Weather station is moved to another location significantly higher or lower than its initial standing point (for example from the ground floor to the upper floors of a house), discard the weather forecast for the next 12-24

37
hours. By doing this, the Weather Station will not mistake the new location as being a possible change in air-pressure when really it is due to the slight change of altitude.
WEATHER TENDENCY INDICATOR Working together with the weather icons is the weather tendency indicators (located on the left and right sides of the weather icons). When the indicator points upwards, it means that the air-pressure is increasing and the weather is expected to improve, but when indicator points downwards, the air-pressure is dropping and the weather is expected to become worse.
Taking this into account, one can see how the weather has changed and is expected to change. For example, if the indicator is pointing downwards together with cloud and sun icons, then the last noticeable change in the weather was when it was sunny (the sun icon only). Therefore, the next change in the weather will be cloud with rain icons since the indicator is pointing downwards.
Note: Once the weather tendency indicator has registered a change in air pressure, it will remain permanently visualized on the LCD.
AIR PRESSURE HISTORY (ELECTRONIC BAROMETER WITH BAROMETRIC PRESSURE TREND) The third section of the LCD also shows the relative air pressure value and the air pressure history.
The bar chart indicates the air pressure history trend over the last 24 hours in 7 steps, 0h, -3h, -6h, -9h, -12h, -18h, and -24h. The “0h” represents the current full hour air pressure recording. The columns represent the “hPa” (0, ±2, ±4, ±6) at specific time. The “0” in the middle of this scale is equal to the current pressure and each change (±2, ±4, ±6) represents how high or low in “hPa“ the past pressure was compared to the current pressure.
If the bars are rising it means that the weather is getting better due to the increase of air pressure. If the bars go down, it means the air pressure has dropped and the weather is expected to get worse from the present time “0h“.
Note: For accurate barometric pressure trends, the Weather Station should operate at the same altitude for example, it should not be moved from the
Air pressure over the last 24 hours

38
ground to the second floor of the house. Should the unit be moved to a new location, discard readings for the next 12-24 hours.
OUTDOOR TEMPERATURE/HUMIDITY DATA The fourth LCD section shows the outdoor temperature and humidity, the reception indicator, the transmitter identification number and the MIN/MAX outdoor data. TOGGLING AND RESETTING THE OUTDOOR DATA 1. To toggle between the outdoor current, MAX/MIN temperature and
humidity data and the times (for temperature data only) they were recorded press the OUT/+ key: Once to show the MAX outdoor temperature and humidity data with the recorded time and date. Twice to show the MIN outdoor temperature and humidity data with the recorded time and date. Three times to return to the current displayed values.
2. Once the MIN or MAX data is displayed, press and hold the SET key for 3 seconds to reset the respective MIN or MAX record to current temperature and humidity data, and current time, date display.
Note: The MIN or MAX data needs to be reset individually.
TO VIEW THE MIN/MAX DATA FROM DIFFERENT TRANSMITTERS When more than 1 transmitter used:
1. To toggle between transmitters, press the SNOOZE/CH key: Once to show transmitter 2 Twice to show transmitter 3 Three times to return to transmitter 1
2. Use OUT/+ key to view the MIN/MAX temperature and humidity data for the selected transmitter.
3. To reset the minimum and maximum temperature and humidity data, and the times at which they were recorded, press the SET key continuously for about 3 seconds. This will reset the MIN/MAX data recorded to the current time, date, temperature and humidity. The current time taken is the normal displayed time and does not regard the time zone set for the unit.
Note: the MIN/MAX data for each transmitter needs to be reset separately.
Outdoor temperature in °C/ °F
Outdoor relative humidity in RH%
Outdoor transmitter identification number MIN icon

39
BACK-LIGHT The back-light is automatically switched ON when any keys are pressed. The back-light will be switched on for approximately 8 seconds before automatically switching OFF.
LOW BATTERY INDICATOR Low battery indicator is displayed on the LCD when the batteries require changing.
ABOUT THE OUTDOOR TRANSMITTER The range of the Thermo-hygro transmitter may be affected by the temperature. At cold temperatures the transmitting distance may be decreased. Please bear this in mind when positioning the transmitters. Also the batteries may be reduced in power for the Thermo-hygro transmitter.
CHECKING FOR 915MHz RECEPTION If the outdoor temperature and humidity data are not being received within three minutes after setting up (or outdoor display always show “- -. -” in the outdoor section of the Weather station during normal operation), please check the following points: 1. The distance of the Weather station or transmitters should be at least
6 feet (2 meters) away from any interfering sources such as computer monitors or TV sets.
2. Avoid placing the transmitters onto or in the immediate proximity of metal window frames.
3. Using other electrical products such as headphones or speakers operating on the 915MHz-signal frequency may prevent correct signal transmission or reception. Neighbors using electrical devices operating on the 915MHz-signal frequency can also cause interference.
Note: When the 915MHz signal is received correctly, do not re-open the battery cover of either the transmitter or Weather station, as the batteries may spring free from the contacts and force a false reset. Should this happen accidentally then reset all units (see “Setting up” above) otherwise transmission problems may occur.
The transmission range is around 330 feet (100 meters) from the Thermo-hygro transmitter to the Weather station (in open space). However, this depends on the surrounding environment and interference levels. If no reception is possible despite the observation of these factors, all system units have to be reset (see “Setting up” above).

40
POSITIONING THE WEATHER STATION: The weather station has been designed to be hang on a wall or free standing.
For free standing: Simply attached the stand to the bottom of the unit and place onto a flat surface.
To wall mount Choose a sheltered place. Avoid direct rain and sunshine. Before wall mounting, please check that the outdoor temperature and humidity values can be received from the desired locations. To wall mount: 1. Fix a screw (not supplied) into the desired wall,
leaving the head extended out the by about 0.2” (5mm).
2. Hang it onto the screw. Remember to ensure that it locks into place before releasing.
POSITIONING THE THERMO-HYGRO TRANSMITTER The thermo-hygro transmitter is supplied with a holder that may be attached to a wall with the two screws supplied. The sensor can also be position on a flat surface by securing the stand to the bottom to the sensor.
To wall mount: 1. Secure the bracket onto a desired wall using the
screws and plastic anchors. 2. Clip the sensor onto the bracket.
Note: Before permanently fixing the sensor wall base, place all units in the desired locations to check that the outdoor

41
temperature and humidity readings are receivable. In event that the signal is not received, relocate the sensor(s) or move them slightly as this may help the signal reception. CARE AND MAINTENANCE: • Extreme temperatures, vibration and shock should be avoided as
these may cause damage to the unit and give inaccurate forecasts and readings.
• Precautions shall be taken when handling the batteries. Injuries, burns, or property damage may be resulted if the batteries are in contact with conducting materials, heat, corrosive materials or explosives. The batteries shall be taken out from the unit before the product is to be stored for a long period of time.
• Immediately remove all low powered batteries to avoid leakage and damage. Replace only with new batteries of the recommended type.
• When cleaning the display and casings, use a soft damp cloth only. Do not use solvents or scouring agents as they may mark the LCD and casings.
• Do not submerge the unit in water. • Special care shall be taken when handling a damaged LCD display.
The liquid crystals can be harmful to user's health. • Do not make any repair attempts to the unit. Return them to their
original point of purchase for repair by a qualified engineer. Opening and tampering with the unit may invalidate their guarantee.
• Never touch the exposed electronic circuit of the device as there is a danger of electric shock should it become exposed.
• Do not expose the units to extreme and sudden temperature changes, this may lead to rapid changes in forecasts and readings and thereby reduce their accuracy.
SPECIFICATIONS: Temperature measuring range: Indoor : 14.2ºF to 139.8ºF with 0.2ºF resolution -9.9ºC to +59.9ºC with 0.1°C resolution (“OF.L” displayed if outside this range) Outdoor : -39.8ºF to +139.8ºF with 0.2ºF resolution -39.9ºC to +59.9ºC with 0.1°C resolution (“OF.L” displayed if outside this range) Indoor humidity range : 1% to 99% with 1% resolution (Display “- -“ if temperature is OL.F; display “- -“ if < 1% and “99%” if > 99%) Outdoor humidity range : 1% to 99% with 1% resolution (Display “- -“ if outside temperature is OF.L; display 1% if < 1% and 99% if > 99%)

42
Interior data checking intervals Indoor Temperature : Every 15 seconds Humidity : Every 20 seconds Air pressure checking interval : Every 15 seconds Outdoor temperature and humidity data checking interval: Every 4 seconds (or every 15 minutes if data are lost and display “--.-“) Transmission range : up to 330 feet /100 meters (open space) Power consumption: (alkaline batteries recommended) Weather station : 3 x AA, IEC LR6, 1.5V Thermo-hygro transmitter : 2 x AA, IEC LR6, 1.5V Battery life : up to 24 months Dimensions (L x W x H): Weather station : 6.88” x 4.72” x 1.22” / 175 x 120 x 31 mm Thermo-hygro transmitter : 1.50" x 0.83" x 5.05"/ 38.2 x 21.2 x 128.3mm LIABILITY DISCLAIMER • The electrical and electronic wastes contain hazardous substances.
Disposal of electronic waste in wild country and/or in unauthorized grounds strongly damages the environment
• Please contact your local or/and regional authorities to retrieve the addresses of legal dumping grounds with selective collection
• All electronic instruments must from now on be recycled. User shall take an active part in the reuse, recycling and recovery of the electrical and electronic waste.
• The unrestricted disposal of electronic waste may do harm on public health and the quality of environment.
• This product must however not be thrown in general rubbish collection points.
• As stated on the gift box and labeled on the product, reading the “User manual” is highly recommended for the benefit of the user.
• The manufacturer and supplier cannot accept any responsibility for any incorrect readings and any consequences that occur should an inaccurate reading take place.
• This product is not to be used for medical purposes or for public information.
• This product is only designed to be used in the home as indication of the future weather and is not 100% accurate. Weather forecasts given by this product should be taken only as an indication and not as being totally accurate.
• The specifications of this product may change without prior notice. • This product is not a toy. Keep out of the reach of children. • No part of this manual may be reproduced without written consent of
the manufacturer.

43
WARRANTY La Crosse Technology, Ltd provides a 1-year limited warranty on this product against manufacturing defects in materials and workmanship.
This limited warranty begins on the original date of purchase, is valid only on products purchased and used in North America and only to the original purchaser of this product. To receive warranty service, the purchaser must contact La Crosse Technology, Ltd for problem determination and service procedures. Warranty service can only be performed by a La Crosse Technology, Ltd authorized service center. The original dated bill of sale must be presented upon request as proof of purchase to La Crosse Technology, Ltd or La Crosse Technology, Ltd’s authorized service center.
La Crosse Technology, Ltd will repair or replace this product, at our option and at no charge as stipulated herein, with new or reconditioned parts or products if found to be defective during the limited warranty period specified above. All replaced parts and products become the property of La Crosse Technology, Ltd and must be returned to La Crosse Technology, Ltd.
Replacement parts and products assume the remaining original warranty, or ninety (90) days, whichever is longer. La Crosse Technology, Ltd will pay all expenses for labor and materials for all repairs covered by this warranty. If necessary repairs are not covered by this warranty, or if a product is examined which is not in need or repair, you will be charged for the repairs or examination.
The owner must pay any shipping charges incurred in getting your La Crosse Technology, Ltd product to a La Crosse Technology, Ltd authorized service center.
Your La Crosse Technology, Ltd warranty covers all defects in material and workmanship with the following specified exceptions: (1) damage caused by accident, unreasonable use or neglect (including the lack of reasonable and necessary maintenance); (2) damage occurring during shipment (claims must be presented to the carrier); (3) damage to, or deterioration of, any accessory or decorative surface; (4) damage resulting from failure to follow instructions contained in your owner’s manual; (5) damage resulting from the performance of repairs or alterations by someone other than an authorized La Crosse Technology, Ltd authorized service center; (6) units used for other than home use (7) applications and uses that this product was not intended or (8) the products inability to receive a signal due to any source of interference. This warranty covers only actual defects within the product itself, and does not cover the cost of installation or removal from a fixed installation, normal

44
set-up or adjustments, claims based on misrepresentation by the seller or performance variations resulting from installation-related circumstances.
LA CROSSE TECHNOLOGY, LTD WILL NOT ASSUME LIABILITY FOR INCIDENTAL, CONSEQUENTIAL, PUNITIVE, OR OTHER SIMILAR DAMAGES ASSOCIATED WITH THE OPERATION OR MALFUNCTION OF THIS PRODUCT. THIS PRODUCT IS NOT TO BE USED FOR MEDICAL PURPOSES OR FOR PUBLIC INFORMATION. THIS PRODUCT IS NOT A TOY. KEEP OUT OF CHILDREN’S REACH.
This warranty gives you specific legal rights. You may also have other rights specific to your State. Some States do no allow the exclusion of consequential or incidental damages therefore the above exclusion of limitation may not apply to you. For warranty work, technical support, or information contact:
La Crosse Technology, Ltd 2809 Losey Blvd. S. La Crosse, WI 54601 Phone: 608.782.1610
Fax: 608.796.1020
e-mail: [email protected]
(warranty work)
[email protected] (information on other products)
web:
www.lacrossetechnology.com
Question? Instructions? Please visit: www.lacrossetechnology.com/9037
All rights reserved. This handbook must not be reproduced in any form, even in excerpts, or duplicated or processed using electronic, mechanical or chemical procedures without written permission of the publisher. This handbook may contain mistakes and printing errors. The information in this handbook is regularly checked and corrections made in the next issue. We accept no liability for technical mistakes or printing errors, or their consequences. All trademarks and patents are acknowledged.

WS-9080U-IT 915 MHz WIRELESS TEMPERATURE STATION
Instruction manual

Contents Language Page ___________________________________________________________________
English 1 French 41 Spanish 79
1

2
TABLE OF CONTENTS Topic Page Inventory of Contents 3 Features 4 Setting Up 6 Battery Installation 10 Function Keys 12 LCD Screen and Settings 14 Atomic Time -WWVB Radio Controlled Time 16 Manual Settings 17 Display of Indoor Temperature Reading 25 Display of Outdoor Temperature Reading 26 Display of Indoor Minimum and Maximum records 26 Display of Outdoor Minimum and Maximum records 28 Daily Indoor Minimum and Maximum Temperature display 29 Daily Outdoor Minimum and Maximum Temperature display 30 915 MHz Reception 31 Mounting 32 Care and Maintenance 34 Specifications 35 Warranty 36
INSTANT TRANSMISSION is the state-of-the-art new wireless transmission technology, exclusively designed and developed by LA CROSSE TECHNOLOGY. INSTANT TRANSMISSION offers you an immediate update (every 4 seconds!) of all your outdoor data measured from the sensors: follow your climatic variations in real-time!
This product offers:
INVENTORY OF CONTENTS 1. Wireless Temperature Station 2. Wireless Temperature Sensor (TX29U) and mounting bracket. 3. Instruction Manual and Warranty Card.
3
FEATURES:
4
The Temperature Station
Foldout Stand
Battery compartment cover
Function Keys
LCD Display
Hanging hole

5
• Atomic Time function (WWVB Radio controlled time) or manual time setting options • Atomic Time reception On/Off • Daylight Saving Time ON/OFF • 12/24 hour display • Hour and minute display • Calendar display • Time zone option ±12 hours • Wireless transmission at 915 MHz • Outdoor signal reception intervals at 4-second • Temperature display in degrees Fahrenheit (°F) or Celsius (°C) selectable • Indoor and Outdoor temperature display with MIN/MAX recording (records can be
reset) • Can receive up to 3 outdoor sensors • Daily minimum and maximum indoor temperature display • Daily minimum and maximum outdoor temperature display • Low battery indicator • LCD contrast adjustable • Table standing/ Wall mounting

The Outdoor Temperature Sensor
• Remote transmission of outdoor temperature to Temperature Station by 915 MHz
• Water-resistant casing • Wall mounting case (Mount in a sheltered place. Avoid
direct rain and sunshine)
SETTING UP: When one Sensor is used 1. First, insert the batteries into the temperature sensor. (see “Install and replace
batteries in the temperature sensor“). 2. Immediately after and within 30 seconds, insert the batteries into Temperature
Station (see “Install and replace batteries in the Temperature Station”). Once the batteries are in place, all segments of the LCD will light up briefly. Following the
6

7
time as 12:00 and the indoor temperature will be displayed. If these are not displayed after 60 seconds, remove the batteries and wait for at least 10 seconds before reinserting them.
3. After inserting the batteries into the sensor, the Temperature Station will start receiving data from the sensor. The outdoor temperature and the signal reception icon should then be displayed on the Temperature Station. If this does not happen after 5 minutes, the batteries will need to be removed from both units and reset from step 1.
4. In order to ensure sufficient 915 MHz transmission however, there should be no more than 330 feet (100 meters) between the final position of the Temperature Station and the sensor (see notes on “Mounting” and “915 MHz Reception”).
5. Once the remote temperature has been received and displayed on the Temperature Station, the WWVB time code reception is automatically started. This takes typically between 3-5 minutes in good conditions—but may take up to 4 nights.
When more than one sensor is to be used 1. User shall remove all the batteries from the Temperature Station and sensors and
wait 60 seconds if setting has been done with one sensor before. 2. Insert the batteries to the first sensor. 3. Within 30 seconds of powering up the first sensor, insert the batteries into to the
Temperature Station. Once the batteries are in place, all segments of the LCD will

8
light up briefly. Following time as 12:00 and the indoor temperature will be displayed. If they are not shown in LCD after 60 seconds, remove the batteries and wait for at least 60 seconds before reinserting them.
4. The outdoor temperature from the first sensor (channel 1) should then be displayed on the Temperature Station. Also, the signal reception icon will be displayed. If this does not happen after 2 minutes, the batteries will need to be removed from both units and reset from step 1.
5. Insert the battery into the second sensor immediately after (within 10 seconds after) the reading form the first sensor is shown on LCD.
6. The outdoor temperature from the second sensor and the "channel 2" icon should then be displayed on the Temperature Station. If this does not happen after 2 minute, the batteries will need to be removed from all the units and reset from step 1.
7. Insert the batteries into the third sensor immediately after (within 10 seconds after) ithe reading from the second sensor is shown on LCD.
8. Then within 2 minutes, the channel 3 outdoor data from the third sensor will be displayed and the channel icon will shift back to "1" once the third sensor is successfully received. If this is not happen, user shall restart the setting up from step 1.
9. In order to ensure sufficient 915 MHz transmission there should be a distance of no more than 330 feet (100 meters) between the final position of the Temperature Station and the sensor (see notes on “Mounting” and “915 MHz Reception”).

9
Note: • Transmission problems will arise if the setting for additional sensors is not followed as
described above. Should transmission problems occur, it is necessary to remove the batteries from all units and follow the set-up from step 1.
• If the signal reception is not successful on the first frequency (915MHz) for 45 seconds, the frequency is changed to 920MHz and the learning is tried for another 45 seconds. If still not successful the reception is tried for 45 seconds on 910MHz. This will also be done for re-synchronization.
10. Once the remote temperature has been received and displayed on the Temperature
Station, the WWVB time code reception is automatically started. This takes typically between 3-5 minutes in good conditions.
IMPORTANT: • Transmission problems will arise if the setting for additional sensors is not followed as
described above. Should transmission problems occur, it is necessary to remove the batteries from all units and follow the set-up from step 1.
• If after 10 minutes, the Atomic auto-set time (WWVB time) has not been received, press the SET key to manually enter a time initially.
• Daily WWVB reception is attempted at full hour between 12:00 am to 6:00 am. If the

reception is successful, there will no reception attempt until the following day. When this is successful, the received time will override the manually set time. The date is also updated with the received time. (Please refer also to notes on “Atomic auto-set time - WWVB Radio controlled Time” and “Manual Time Setting”).
BATTERY INSTALLATION INSTALL AND REPLACE BATTERIES IN THE TEMPERATURE STATION The Temperature Station uses 2 x AAA, IEC LR3, 1.5V batteries. To install and replace the batteries, please follow the steps below:
1. Remove the cover at the back of the Temperature Station. 2. Insert batteries observing the correct polarity (see marking). 3. Replace compartment cover.
10
INSTALL AND REPLACE BATTERIES IN THE TEMPERATURE SENSOR
11
The temperature sensor uses 2 x AA, IEC LR6, 1.5V battery. To install and replace the batteries, please follow the steps below: 1. Remove the battery compartment cover. 2. Insert the batteries, observing the correct polarity (see
marking). 3. Replace the battery cover on the unit.
Note: In the event of changing batteries in any of the units, all units need to be reset by following the setting up procedures. This is because a random security code is assigned by the sensor at start-up and this code must be received and stored by the Temperature Station in the first 3 minutes of power being supplied to it BATTERY CHANGE: It is recommended to replace the batteries in all units regularly to ensure optimum accuracy of these units (Battery life see Specifications below).

12
Please participate in the preservation of the environment. Return used batteries to an authorized depot.
FUNCTION KEYS: Temperature Station: The Temperature Station has four easy to use function keys.
SET key
MIN/ MAX key
+ key
CH/- key

13
SET key (Manual Setting): • Press and hold to enter the setting mode for the following settings: LCD contrast,
Time zone, Daylight saving time ON/OFF, Atomic Time Reception (RCC) ON/OFF, 12/24 hr format, Manual time, Year, Month, Day and °C/°F settings.
MIN/ MAX key • To toggle between the minimum/ maximum indoor and outdoor temperature records • Press to exit the setting mode • Press to reset the minimum and maximum or temperature records of the indoor and
the outdoor channel (will reset all records to current level) + key • To make a "positive" adjustment for various settings • In normal display, press to toggle between the display of the calendar data and
second of time in the time display of LCD CH/- key • To make a "negative" adjustment for various settings • To toggle between different outdoor channel display (when more than 1 outdoor
sensor is adopted)

14
LCD SCREEN AND SETTINGS:
Indoor Temperature
Time display "Weekday + Day" or Day + Month" or "Second" display
Receiver low battery icon
Outdoor Temperature
Time reception icon
Outdoor signal reception icon*
Sensor low battery icon
Daily indoor max temp
Daily outdoor max temp
Daily indoor min temp
Channel No. (Outdoor Sensor ID)
Daily outdoor min temp

*When the outdoor signal is successfully received by the temperature station, this icon will be switched on. (If not successful, the icon will not be shown in LCD) So user can easily see whether the last reception was successful (icon on) or not (icon off). On the other hand, the short blinking of the icon shows that a reception is currently taking place. Note: The Channel No. (Outdoor Sensor No.) will be shown when more than one outdoor sensor is adopted. For better distinctness the LCD screen is split into 3 sections displaying the information for time and date, Indoor data and outdoor data. Section 1 - TIME AND CALENDAR • In normal mode, display the time and "weekday + day". Press the + key once to
display the "day + month"; twice to display the second of time. • A signal reception symbol is shown indicating that Atomic auto-set time (WWVB
time) signal is received. Section 2 - INDOOR TEMPERATURE • Display current indoor temperature • Display daily minimum and maximum indoor temperature
15

16
Section 3 - OUTDOOR TEMPERATURE • Display current outdoor temp • Display daily maximum and minimum outdoor temperature ATOMIC TIME - WWVB RADIO CONTROLLED TIME The NIST (National Institute of Standards and Technology—Time and Frequency Division) WWVB radio station is located in Ft. Collins, Colorado, and transmits the exact time signal continuously throughout the United States at 60 kHz. The signal can be received up to 2,000 miles away through the internal antenna in the Temperature Station. However, due to the nature of the Earth’s Ionosphere, reception is very limited during daylight hours. The wireless weather station will search for a signal every night when reception is best. The WWVB radio station receives the time data from the NIST Atomic clock in Boulder, Colorado. A team of atomic physicists is continually measuring every second, of every day, to an accuracy of ten billionths of a second per day. These physicists have created an international standard, measuring a second as 9,192,631,770 vibrations of a Cesium-133 atom in a vacuum. For more detail, visit http://www.boulder.nist.gov/timefreq.htm. To listen to the NIST time, call (303)499-7111. This number will connect you to an automated time, announced at the top of the minute in “Coordinated Universal Time”, which is also known as Greenwich Mean Time (GMT). This time does not follow Daylight Saving Time changes. After the top of the minute, a tone will sound for every second. It is possible that your

17
Wireless Temperature Station may not be exactly on the second due to the variance in the quartz. However, the clock will adjust the quartz timing over the course of several days to be very accurate; under 0.10 seconds per day. MANUAL SETTINGS: The following manual settings can be done in the setting mode: • LCD Contrast setting • Time zone setting • Daylight Saving Time ON/OFF setting (DST) • Atomic Time reception ON/OFF setting (RCC) • 12/24 hour time format setting • Manual time setting • Calendar setting (Year, Month, Date) • °F/ °C temperature unit setting
Press and hold the SET key for about 3 seconds to advance to the setting mode:

LCD CONTRAST SETTING
flashing The LCD contrast can be set to 8 different levels (0 to 7) to suit the user’s needs (default LCD contrast setting is LCD 4). To set the desired contrast level: 1. The above display will be seen. Press the + key or CH/- key to select the level of
contrast desired. 2. Press the SET key to confirm and enter the “Time Zone setting” or exit the setting
mode by pressing the MIN/MAX key TIME ZONE SETTING:
flashing
18

The time zone default of the Temperature Station is -5 hr. To change to another time zone: 1. Using the + key or CH/- key, set the time zone. The range runs between -12 to +12
hour. 2. Press the SET key to confirm and enter the “Daylight Saving time ON/OFF setting”
or exit the setting mode by pressing the MIN/MAX key. DAYLIGHT SAVING TIME ON/OFF SETTING
flashing 1. The digit “ON DST” will start flashing on the LCD. 2. Use the + key or CH/- key to turn On or OFF the daylight saving time function. 3. Confirm with the SET key and enter the “Time reception On/Off setting” or exit the setting
mode by pressing the MIN/MAX key.
19

TIME RECEPTION ON/OFF SETTING
flashing
In area where reception of the WWVB time is not possible, the time reception function can be turned OFF. The clock will then work as a normal Quartz clock. (Default setting is ON). 4. The digit “ON” and the time reception icon will start flashing on the LCD. 5. Use the + key or CH/- key to turn OFF the time reception function. 6. Confirm with the SET key and enter the “12/24-Hour Display setting” or exit the
setting mode by pressing the MIN/MAX key. Note: If the Time Reception function is turned OFF manually, the clock will not attempt any reception of the WWVB time as long as the Time Reception OFF function is activated. The Time Reception icon will not be displayed on the LCD.
20

12/24 HOUR TIME DISPLAY SETTING
flashing 1. After setting time reception ON/OFF, press the SET key, “12 h” or “24 h” flashes in
the LCD. (default 12 h) 2. Press the + key or CH/- to select the “12 h” or “24 h” display mode. 3. Press the SET again to confirm and to enter the “Manual Time setting” or exit the
setting mode by pressing the MIN/MAX key. Note: When 24 h mode display is selected, the calendar format will be "date and month"
display. When 12 h mode display is selected, the calendar format will be "month and date" display.
21

MANUAL TIME SETTING In case the Temperature Station is not able to detect the Atomic time (WWVB) signal (disturbances, transmitting distance, etc.), the time can be manually set. The clock will then work as a normal Quartz clock.
Minutes (flashing)Hours (flashing)
To set the clock: 1. The hour digits start flashing in the time display section. 2. Use the + key or CH/- key to adjust the hours and then press SET key to go to the
minute setting. 3. The minute will be flashing. Press the + key or CH/- key to just the minutes. 4. Confirm with the SET key and enter the “Calendar Setting” or exit the setting mode
by pressing the MIN/MAX key
22

CALENDAR SETTING
"Date. Month." (for 24h time display) "Month. Date." (for 12h time display)
Year
23
weekday The date default of the temperature station is 1. 1. of the year 2006 after initial set-up. Once the radio-controlled time signals are received, the date is automatically updated. However, if the signals are not received, the date can also be set manually. To do this: 1. The year is flashing. Using the + key or CH/- key, set the year required. The range
runs from 2006 to 2029 (default is 2006).

2. Press the SET key to enter the month setting mode. 3. The month digit will be flashing. Press the + key or CH/- key to set the month and
then press the SET key to go to the day setting. 4. The day digit will be flashing. Press the + key or CH/- key to set the day. 5. Confirm with SET key and enter the “°F/°C TEMPERATURE UNIT SETTING” or exit
the setting mode by pressing the MIN/MAX key. Note: The weekday of calendar will be automatically set after the month and day value is input. °F/°C TEMPERATURE UNIT SETTING
flashing The default temperature reading is set to °F (degree Fahrenheit). To select °C (degree Celsius): 1. The “°F/ °C” will be flashing, use the + key or CH/- key to toggle between “°F” and
“°C”.
24

2. Once the desired temperature unit has been chosen, confirm with the SET key to exit the setting mode.
DISPLAY OF INDOOR TEMPERATURE READING: The indoor temperature is measured and displayed on the second section of the LCD.
Indoor Temperature in °F
Indoor Icon
25

DISPLAY OF OUTDOOR TEMPERATURE READING: The bottom LCD section shows the outdoor temperature.
Outdoor icon
Outdoor
Temperature in °F DISPLAY OF INDOOR MINIMUM AND MAXIMUM RECORDS: 1. In normal display mode, press the MIN/MAX key once, the minimum indoor
temperature will be shown in LCD. Also the time and date of recording this temperature will be displayed.
26

Indoor icon
Minimum indoor temp recorded
Time and date of record
2. Then press the MIN/MAX button one more time, the maximum indoor temperature will be shown in LCD. Also the time and date of recording this temperature will be displayed.
3. Press three more time the MIN/ MAX button to go back to the normal display.
27

DISPLAY OF OUTDOOR MINIMUM AND MAXIMUM RECORDS: 1. In normal display mode, Press the MIN/MAX button three times, the outdoor
minimum temperature and the time and date of recording this temperature will be displayed.
2. Press the MIN/MAX button once more, the outdoor maximum temperature and the time and date of recording this temperature will be displayed.
Outdoor icon
Outdoor Channel No.
Time and date of record
Maximum outdoor temp recorded
28

RESETTING THE INDOOR AND OUTDOOR MINIMUM /MAXIMUM RECORDS 1. In normal display mode, press the MIN/MAX button once to advance to the indoor
MIN temp display. 2. Press and hold the MIN/MAX key for about 3 seconds, this will reset the currently
shown indoor and outdoor minimum and maximum data to the current time, date and temperature.
3. Then press the MIN/MAX button three more times to return to the normal display. Note: The indoor minimum and maximum record, as well as the minimum and maximum records of all outdoor channels, will be reset at the same time. DAILY INDOOR MIN AND MAX TEMPERATURE DISPLAY This temperature station shows the daily minimum and maximum indoor temperature in normal display.
29
Min daily indoor temp
Max daily
indoor temp

30
Note: The daily minimum temperature record is reset automatically at 8:00 pm and the daily maximum temperature is reset automatically at 8:00 am every day. DAILY OUTDOOR MIN AND MAX TEMPERATURE DISPLAY This temperature station also displays the daily minimum and maximum outdoor temperature for each outdoor channel in normal display.
Channel No.
Min daily temp of the channel
Max daily temp
of the channel To view the daily MIN and MAX temperature of another channel, user shall press the CH key to shift to various channel display. Note: The daily minimum temperature record is reset automatically at 8:00 pm and the daily

31
maximum temperature is reset automatically at 8:00 am every day. 915 MHz RECEPTION The Temperature Station should receive the temperature data within 5 minutes after set-up. If the temperature data is not received 5 minutes after setting up (not successfully continuously, the outdoor display shows “- - -” ), please check the following points: 1. The distance of the Temperature Station or sensor should be at least 5 to 6.5 feet
(1.5 to 2 meters) away from any interfering sources such as computer monitors or TV sets.
2. Avoid positioning the Temperature Station onto or in the immediate proximity of metal window frames.
3. Using other electrical products such as headphones or speakers operating on the same signal frequency (915MHz) may prevent correct signal transmission and reception.
4. Neighbors using electrical devices operating on the 915MHz signal frequency can also cause interference.
Note: When the 915MHz signal is received correctly, do not re-open the battery cover of either the sensor or Temperature Station, as the batteries may spring free from the contacts and force a false reset. Should this happen accidentally then reset all units (see Setting up

above) otherwise transmission problems may occur. The transmission range is about 330 feet (100 m) from the sensor to the Temperature Station (in open space). However, this depends on the surrounding environment and interference levels. If no reception is possible despite the observation of these factors, all system units have to be reset (see Setting up). MOUNTING POSITIONING THE TEMPERATURE STATION: The Temperature Station has been designed to be hung onto wall or free standing.
To wall mount Choose a sheltered place. Avoid direct rain and sunshine. Before wall mounting, please check that the outdoor temperature values can be received from the desired locations.
1. Fix a screw (not supplied) into the desired wall, leaving the head
extended out the by about 5mm.
32
2. Remove the stand from the Temperature Station by pulling it away from the base and hang the station onto the screw. Remember to ensure that it locks into place before releasing.

Free standing With the stand, the Temperature Station can be placed onto any flat surface.
POSITIONING THE TEMPERATURE SENSOR: The sensor is supplied with a holder that may be attached to a wall with the two screws supplied. The sensor can also be position on a flat surface by securing the stand to the bottom to the sensor.
33

To wall mount: 1. Secure the bracket onto a desired wall using the screws and
plastic anchors. 2. Clip the sensor onto the bracket. Note: Before permanently fixing the sensor wall base, place all units in the desired locations to check that the outdoor temperature reading is receivable. In event that the signal is not received, relocate the sensors or move them slightly as this may help the signal reception.
CARE AND MAINTENANCE: • Extreme temperatures, vibration and shock should be avoided as these may cause
damage to the unit and give inaccurate forecasts and readings. • When cleaning the display and casings, use a soft damp cloth only. Do not use
solvents or scouring agents as they may mark the LCD and casings. • Do not submerge the unit in water.
34

35
• Immediately remove all low powered batteries to avoid leakage and damage. Replace only with new batteries of the recommended type.
• Do not make any repair attempts to the unit. Return them to their original point of purchase for repair by a qualified engineer. Opening and tampering with the unit may invalidate their guarantee.
• Do not expose the units to extreme and sudden temperature changes, this may lead to rapid changes in forecasts and readings and thereby reduce their accuracy.
SPECIFICATIONS: Temperature measuring range: Indoor : 32°F to +139.8°F with 0.2°F resolution (0ºC to +59.9ºC with 0.1ºC resolution, “OF.L” displayed if outside this range) Outdoor : -39.8°F to +157.8°F with 0.2°F resolution (-39.9ºC to +69.9ºC with 0.1ºC resolution, “OF.L” displayed if outside this range) Indoor temperature checking interval : every 15 seconds Outdoor data reception : approximately every 4 seconds Power supply: Temperature Station : 2 x AAA, IEC, LR3, 1.5V

36
Temperature Sensor : 2 x AA, IEC, LR6 1.5V
Battery life (Alkaline batteries recommended) Temperature Station : Approximately 12 months Temperature Sensor : Approximately 24 months
Dimensions (L x W x H) Temperature Station : 3.74" x 0.74" x 5.35" (95 x 18.8 x 136 mm) Temperature Sensor : 1.50" x 0.83" x 5.05" (38.2 x 21.2 x 128.3 mm) WARRANTY La Crosse Technology, Ltd provides a 1-year limited warranty on this product against manufacturing defects in materials and workmanship. This limited warranty begins on the original date of purchase, is valid only on products purchased and used in North America and only to the original purchaser of this product. To receive warranty service, the purchaser must contact La Crosse Technology, Ltd for problem determination and service procedures. Warranty service can only be performed by a La Crosse Technology, Ltd authorized service center. The original dated bill of sale must be presented upon request as proof of purchase to La Crosse Technology, Ltd or La Crosse Technology, Ltd’s authorized service center.

37
La Crosse Technology, Ltd will repair or replace this product, at our option and at no charge as stipulated herein, with new or reconditioned parts or products if found to be defective during the limited warranty period specified above. All replaced parts and products become the property of La Crosse Technology, Ltd and must be returned to La Crosse Technology, Ltd. Replacement parts and products assume the remaining original warranty, or ninety (90) days, whichever is longer. La Crosse Technology, Ltd will pay all expenses for labor and materials for all repairs covered by this warranty. If necessary repairs are not covered by this warranty, or if a product is examined which is not in need or repair, you will be charged for the repairs or examination. The owner must pay any shipping charges incurred in getting your La Crosse Technology, Ltd product to a La Crosse Technology, Ltd authorized service center. La Crosse Technology, Ltd will pay ground return shipping charges to the owner of the product to a USA address only. Your La Crosse Technology, Ltd warranty covers all defects in material and workmanship with the following specified exceptions: (1) damage caused by accident, unreasonable use or neglect (including the lack of reasonable and necessary maintenance); (2) damage occurring during shipment (claims must be presented to the carrier); (3) damage to, or deterioration of, any accessory or decorative surface; (4) damage resulting from failure to follow instructions contained in your owner’s manual; (5) damage resulting from the performance of repairs or alterations by someone other than an authorized La Crosse Technology, Ltd authorized service center; (6) units used for other than home use (7)
38
applications and uses that this product was not intended or (8) the products inability to receive a signal due to any source of interference.. This warranty covers only actual defects within the product itself, and does not cover the cost of installation or removal from a fixed installation, normal set-up or adjustments, claims based on misrepresentation by the seller or performance variations resulting from installation-related circumstances. LA CROSSE TECHNOLOGY, LTD WILL NOT ASSUME LIABILITY FOR INCIDENTAL, CONSEQUENTIAL, PUNITIVE, OR OTHER SIMILAR DAMAGES ASSOCIATED WITH THE OPERATION OR MALFUNCTION OF THIS PRODUCT. THIS PRODUCT IS NOT TO BE USED FOR MEDICAL PURPOSES OR FOR PUBLIC INFORMATION. THIS PRODUCT IS NOT A TOY. KEEP OUT OF CHILDREN’S REACH. This warranty gives you specific legal rights. You may also have other rights specific to your State. Some States do no allow the exclusion of consequential or incidental damages therefore the above exclusion of limitation may not apply to you.

39
For warranty work, technical support, or information contact:
La Crosse Technology, Ltd 2809 Losey Blvd. S. La Crosse, WI 54601 Phone: 608.782.1610 Fax: 608.796.1020
e-mail:
[email protected] (warranty work)
[email protected] (information on other products)
web: www.lacrossetechnology.com
Question? Instructions? Please visit: www.lacrossetechnology.com/9080
40
All rights reserved. This handbook must not be reproduced in any form, even in excerpts, or duplicated or processed using electronic, mechanical or chemical procedures without written permission of the publisher. This handbook may contain mistakes and printing errors. The information in this handbook is regularly checked and corrections made in the next issue. We accept no liability for technical mistakes or printing errors, or their consequences. All trademarks and patents are acknowledged.

79
TABLA DE CONTENIDO Tema Página Contenido 80 Funciones y características 81 Puesta en funcionamiento 83 Instalación de las pilas 88 Teclas de Funcionamiento 90 Pantalla LCD y Configuraciones 93 La Hora Radio-controlada WWVB 95 Configuraciones manuales 96 Visualización de la lectura de la temperatura en interiores 104 Visualización de la temperatura en exteriores 105 Visualización de los máximos y mínimos registros en interiores 106 Visualización de los máximos y mínimos registros en exteriores 107 Visualización de laMin Y Max temperatura en Interiores Registrada Diariamente
109
Visualización de laMin Y Max temperatura en exteriores Registrada Diariamente
110
Recepción de 915 MHz 111 Montaje o Instalación 112 Cuidado y mantenimiento 115

Especificaciones técnicas 116 Información sobre la garantía 117
TRANSMISION INSTANTANEA es lo último en tecnología de transmisión inalámbrica, este producto es diseñado y desarrollado exclusivamente por la ‘LA CROSSE TECHNOLOGY’. TRANSMISION INSTANTANEA, le ofrece una actualización inmediata (¡cada 4 segundos!) de todos los datos del tiempo en exteriores medidos por los transmisores: sigue las variaciones del clima!
Este producto le ofrece:
CONTENIDO 1. Estación de la temperatura Inalámbrica 2. Sensor de Temperatura Inalámbrico (TX29U-IT) y soporte de montaje. 3. Manual de Instrucciones y Tarjeta de la Garantía.
80

FUNCIONES Y CARACTERISTICAS: La Estación de la temperatura
81
• La hora radio-controlada WWVB con opción de ajuste manual • Encendido/apagado de la función de recepción de la hora ON/OFF
Stand desprendible
Cubierta del compartimiento de las pilas
Teclas de Funcionamiento
Pantalla LCD
Orificio para colgar

82
• Visualización de la hora en el formato de las 12/24 horas • Visualización de la hora y los minutos • Opción para seleccionar la zona horaria entre ±12 horas • Transmisión inalámbrica mediante frecuencia de 915 MHz • Recibe la señal de recepción en intervalos de 4 segundos • La temperatura puede ser vista en grados Fahrenheit (°F) o Centígrados (°C) • Muestra los datos de la temperatura con los MIN/MAX registros • Todos los MIN/MAX registros en interiores y exteriores muestran la hora y fecha en
que fueron registrados. • Todos los MIN/MAX registros pueden ser reajustados • Puede recibir la información de hasta tres Sensores en exteriores • Visualizacion de la Min Y Max temperatura registrada diariamente – interiores y
exteriores • Puede ajustar el contraste de la pantalla LCD • Indicador de pilas bajas • Se puede colgar en la pared o colocar sobre una mesa

Sensor de Temperatura en exteriores • Transmisión inalámbrica de la temperatura en exteriores a la
estación, vía 915 MHz • Cubierta a prueba de agua • Estuche para colgar en la pared • Cuélguelo en un lugar protegido. Evite la lluvia y sol directos.
PUESTA EN FUNCIONAMIENTO: Cuando se utiliza solamente un Sensor 1. Primero, inserte las pilas en el Sensor (lea las instrucciones sobre “Como instalar y
cambiar las pilas en el Sensor de Temperatura” anotadas más adelante). 2. Inmediatamente después y dentro de un periodo de 30 segundos, coloque las pilas
en la estación (lea las instrucciones sobre “Como instalar y Cambiar las pilas en la Estación”). Una vez que las pilas estén en su sitio, todos los segmentos de la
83

84
pantalla LCD se iluminarán brevemente. Luego se visualizarán los datos de la temperatura en interiores y la hora en las 12:00. Si estos datos no son visualizados después de 60 segundos, retire las pilas y espere por lo menos un minuto antes de reinsertarlas nuevamente.
3. Después de instalar las pilas en el Sensor, la estación empezará a recibir los datos del Sensor a distancia. Luego deberán visualizarse en la pantalla de la estación los datos de la temperatura exterior y el icono de la señal de recepción. Si esto no sucede después de 3 minutos, las pilas de ambas unidades deberán ser retiradas y las unidades deberán ser reinstaladas nuevamente desde el paso 1.
4. Recuerde que con el fin de asegurar una buena transmisión de la señal de 915MHz, la distancia de ubicación de las unidades bajo buenas condiciones de transmisión no debe ser superior a 330 pies (100 metros), contando la posición final entre la estación y el Sensor (lea las instrucciones sobre “Montaje/Instalación” y la señal de Recepción “915MHz”).
5. Una vez que la estación reciba y visualice los datos de la temperatura en exteriores, automáticamente se inicia la recepción de la radio señal de la hora WWVB. Esto habitualmente toma entre 3-5 minutos en buenas condiciones.
Cuando se va a utilizar más de un Sensor 1. El usuario debe retirar las pilas de la estación y el Sensor y esperar 60 segundos si
ya se ha hecho la instalación de un Sensor anteriormente.

85
2. Ponga las pilas en el primer sensor. 3. En un periodo de 30 segundos después de haber puesto las pilas en el primer
transmisor, ponga las pilas en la Estación de Temperatura. Una vez que las pilas estén en su sitio, todas las secciones de la pantalla se iluminarán brevemente. Acto seguido muestra los datos de la temperatura interior y la hora en las 12:00. Si estos datos no son mostrados en pantalla después de un minuto, quite las pilas y espere por lo menos un minuto antes de volver a colocarlas.
4. Luego deben visualizarse en la estación los datos de la temperatura exterior del primer sensor (canal 1). También el símbolo de la señal de recepción titila en la pantalla. Si estos datos no son mostrados en pantalla después de 2 minutos, quite las pilas de ambas unidades y vuelva a comenzar desde el paso 1.
5. Tan pronto como se vean en la pantalla de la estación los datos de la temperatura exterior del primer transmisor, ponga las pilas en el segundo sensor.
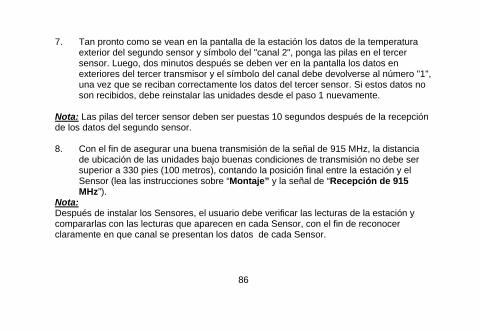
Nota: Las pilas del segundo sensor deben ser puestas 10 segundos después de la recepción de los datos del primer sensor. 6. Luego se deben ver en la pantalla de la estación los datos de la temperatura exterior
del segundo sensor y el símbolo del "canal 2". Si estos datos no son mostrados en pantalla después de 2 minutos, quite las pilas de ambas unidades y vuelva a comenzar desde el paso 1
86
7. Tan pronto como se vean en la pantalla de la estación los datos de la temperatura exterior del segundo sensor y símbolo del "canal 2", ponga las pilas en el tercer sensor. Luego, dos minutos después se deben ver en la pantalla los datos en exteriores del tercer transmisor y el símbolo del canal debe devolverse al número "1", una vez que se reciban correctamente los datos del tercer sensor. Si estos datos no son recibidos, debe reinstalar las unidades desde el paso 1 nuevamente.
Nota: Las pilas del tercer sensor deben ser puestas 10 segundos después de la recepción de los datos del segundo sensor. 8. Con el fin de asegurar una buena transmisión de la señal de 915 MHz, la distancia
de ubicación de las unidades bajo buenas condiciones de transmisión no debe ser superior a 330 pies (100 metros), contando la posición final entre la estación y el Sensor (lea las instrucciones sobre “Montaje” y la señal de “Recepción de 915 MHz”).
Nota: Después de instalar los Sensores, el usuario debe verificar las lecturas de la estación y compararlas con las lecturas que aparecen en cada Sensor, con el fin de reconocer claramente en que canal se presentan los datos de cada Sensor.

87
Si la señal de recepción no se puede recibir bajo la primera frecuencia de (915MHz) durante 45 segundos, la señal de frecuencia cambia a 920MHz y vuelve a intentar la recepción durante otros 45 segundos. Si aún así no es posible, se intentará nuevamente la recepción durante otros 45 segundos bajo la frecuencia de 910MHz. Este proceso también se hace al resincronizar la unidad. IMPORTANTE: Se pueden presentar problemas de transmisión si la instalación de los sensores adicionales no se hace tal como se indicó anteriormente. En caso de cualquier problema de transmisión retire las pilas de todas las unidades y empiece nuevamente el proceso de instalación desde el paso 1. 10. Una vez que la estación reciba y visualice los datos de la temperatura en exteriores,
automáticamente se inicia la recepción de la radio señal de la hora WWVB. Esto habitualmente toma entre 6-8 minutos en buenas condiciones.
Nota: Si después de 10 minutos, la señal de la hora WWVB no es recibida, pulse la tecla SET para poner la hora manualmente. Diariamente se hace un intento de recepción de la señal WWVB cada hora entre la medianoche (12:00 am) y las seis de la madrugada (6:00 am). Si la señal de recepción no

es recibida correctamente, no se hará ningún otro intento de recepción hasta el día siguiente a la misma hora. Cuando la señal de recepción es recibida correctamente, se borrará la hora puesta manual y cambiará a la hora de la radio-señal. La fecha también es actualizada junto con la hora recibida. (Por favor refiérase las instrucciones sobre “La radio- señal de la hora WWVB” y “Configuración Manual de la Hora”). INSTALLACION DE LAS PILAS INSTALACION Y CAMBIO DE LAS PILAS EN LA ESTACION DE LA TEMPERATURA La estación requiere 2 pilas del tipo AAA, IEC LR3, 1.5V. Para instalar y cambiar las pilas, por favor siga los siguientes pasos:
1. Retire la cubierta que esta en la parte trasera de la estación. 2. Instale las pilas siguiendo los signos de polaridad indicados
(vea las marcaciones). 3. Vuelva a colocar la cubierta.
88

INSTALACION Y CAMBIO DE LAS PILAS EN EL SENSOR DE TEMPERATURA La Sensor de Temperatura utiliza 2 baterías AA, IEC LR6, de 1.5V. Para instalar y cambiar las pilas, por favor siga los siguientes pasos:
89
1. Quite la tapa. 2. Inserte las baterías observando la polaridad correcta. 3. Vuelva a colocar la tapa de la batería en la unidad y asegúrela re-
atornillando nuevamente.
Nota: Cuando cambie las pilas en alguna de las unidades, todas las unidades del sistema necesitarán ser reajustadas/reconfiguradas siguiendo los pasos descritos para la puesta en funcionamiento. Esto se debe a que el Sensor asigna un código de seguridad aleatorio en el momento del inicio de su funcionamiento. Este código debe ser recibido y almacenado por la estación de la temperatura en los 3 primeros minutos después de haberle puesto las pilas.

CAMBIO DE LAS PILAS: Se recomienda cambiar las pilas en todas las unidades con regularidad para asegurar una optima exactitud de todas estas unidades (refiérase a las Especificaciones Técnicas anotadas más adelante).
90
Por favor participe en la conservación del medio ambiente. Deseche las pilas agotadas en un punto de reciclaje autorizado para este fin.
TECLAS DE FUNCIONAMIENTO: ESTACION DE LA TEMPERATURA La estación tiene cuatro teclas de funcionamiento de fácil manejo.
Tecla SET
Tecla MIN/ MAX
Tecla +
Tecla CH/-

91
Tecla SET (Configuración): Sirve para entrar en los siguientes programas de configuración manual: contraste de la pantalla LCD, zona horaria, configuración de la hora de verano encendido/ apagado, para encender/apagar la función de recepción de la hora radio-controlada, para escoger el formato de la hora en 12/24 horas, también para poner la hora manualmente, poner el año, mes, fecha, la unidad de temperatura en grados en °F/°C. Tecla MIN/ MAX • Sirve para intercambiar entre los registros de la mínima/ máxima temperatura
registrada en interiores y exteriores • Púlsela para salir del programa de configuración de la unidad. • Púlsela para reajustar todos los mínimos y máximos registros de la temperatura Tecla + • Para hacer un ajuste "positivo" (incremento) en varias configuraciones • En la forma de visualización normal, púlsela para intercambiar entre las lecturas del
calendario, los segundos de la hora, estos datos son mostrados en la sección de visualización de la hora.
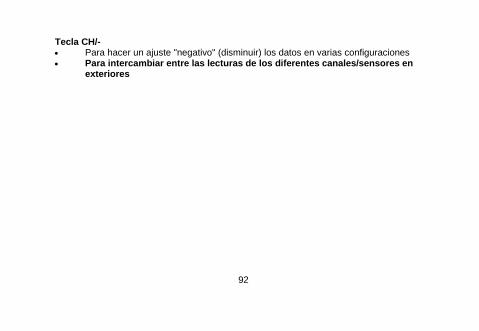
92
Tecla CH/- • Para hacer un ajuste "negativo" (disminuir) los datos en varias configuraciones • Para intercambiar entre las lecturas de los diferentes canales/sensores en
exteriores

PANTALLA LCD Y CONFIGURACIONES:
93
Max temperatura exterior registrada diariamente
Indicador de pilas bajas
Temperatura Exterior en °F
Señal de Recepción en Exteriores
Min temperatura exterior registrada diariamente
Muestra "Día de la semana + Día" o Día + Mes" o "Segundos"
Icono de recepción (para la hora WWVB)
No de Identificación del Transmisor (canal No.)
Icono Exterior
Icono interior
Min temperatura interior registrada diariamente Max temperatura interior
registrada diariamente

*Cuando la señal sea recibida correctamente, el icono se encenderá. (Si la señal no se recibe correctamente el icono no aparecerá en la pantalla.) De manera que el usuario pueda ver fácilmente los datos de la última recepción exitosa de la señal (icono encendido) ningún icono (icono apagado).de otra parte, el icono pequeño que titila en la pantalla señala que ya se recibió la recepción. Para una mejor distinción de los datos la pantalla está dividida en 3 secciones: una para visualizar los datos en interiores, el pronóstico del tiempo y los datos en exteriores. Para una mejor distinción de los datos la pantalla está dividida en 3 secciones: una para visualizar los datos de la hora y la fecha, otra para los datos en interiores y la última para los datos en exteriores. Sección 1 - HORA Y CALENDARIO • En el modo de visualización normal, muestra la hora y el "día de la semana + día".
Pulse la tecla + una vez para ver el formato de "día + mes"; púlsela dos veces para ver los segundos.
• Muestra el símbolo de la señal de recepción para indicar que la radio señal automática de la hora del reloj atómico (hora WWVB) ha sido recibida.
Sección 2 - TEMPERATURA INTERIOR • Muestra la lectura de la temperatura actual en interiores.
94

95
• Muestra el registro diario de la mínima y máxima temperatura registrada en interiores
Sección 3 - TEMPERATURA EXTERIOR • Muestra la lectura de la temperatura actual en exteriores • Muestra el registro diario de la mínima y máxima temperatura registrada en
exteriores • Muestra el símbolo de la señal de recepción en exteriores LA HORA RADIO CONTROLADA WWVB El NIST (National Institute of Standards and Technology—Time and Frequency Division) WWVB está ubicado en Ft. Collins, Colorado y transmite continuamente la señal de la hora y la fecha exactas a una frecuencia de 60 kHz en todo el territorio de los Estados Unidos. La señal puede ser recibida hasta una distancia o radio de 2,000 millas (3 200 Km.) con la ayuda de la antena incorporada en la Estación Meteorológica. Sin embargo, la recepción está muy limitada durante las horas diurnas debido a la naturaleza de la Ionosfera de la Tierra. La Estación Meteorológica buscará la señal durante la noche cuando se dan las mejores condiciones para recibir una buena recepción. La estación de radio WWVB deriva su señal de la estación del reloj Atómico NIST de Boulder, Colorado. Un equipo de físicos atómicos miden continuamente cada segundo de cada día hasta lograr una exactitud de diez billonésimos de segundo por día. Estos físicos

96
han creado una norma o estándar internacional, midiendo un segundo como 9,192,631,770 vibraciones de un átomo de Césium-133 al vacío. Para obtener mayor información sobre la señal WWVB y el reloj atómico, por favor visite nuestro sitio en la red del NIST, en la siguiente dirección: http://www.boulder.nist.gov/timefreq.htm. Para escuchar la hora del reloj NIST, llame al (303)499-7111. Este número lo conectará a una contestadora automática que le dará la hora, anunciada en el último minuto en “Coordinación con la Hora Universal”, el cual también es conocido como la Hora del Meridiano de Greenwich (GMT). Esta hora no sigue el cambio de hora por cambio de estación. Al llegar al minuto cerrado, se escuchará un tono por cada segundo. Es posible que su estación no tenga los segundos exactos debido a las variaciones en el cuarzo. Sin embargo, el reloj ajustará el horario del cuarzo en el transcurso de varios días para tener una total exactitud, bajo 0.10 segundos por día. CONFIGURACION MANUAL: Las siguientes configuraciones podrán ser hechas manualmente: • Contraste de la pantalla LCD • Configuración de la Zona Horaria • Configuración de la hora de verano encendido/ apagado • Se puede encender/apagar la función de recepción de la hora • Formato de visualización de la hora en 12/24-

• Ajuste Manual de la hora • Configuración del Calendario • Ajuste del formato de la temperatura en °F/ °C Pulse la tecla SET para pasar al modo de configuración manual: CONTRASTE DE LA PANTALLA LCD
Titilando El nivel de contraste de la pantalla LCD puede ser ajustado en 8 niveles diferentes, para ajustarse a las necesidades del usuario (viene preajustado en el nivel LCD 4). Para poner el nivel de contraste deseado: 1. Aparecerá el símbolo mostrado anteriormente. Pulse la tecla + o CH/- para
seleccionar el nivel de contraste deseado. 2. Pulse la tecla SET para confirmar y entrar en el modo de “Configuración de la
Zona Horaria” o salga del programa de configuración pulsando la tecla MIN/MAX.
97
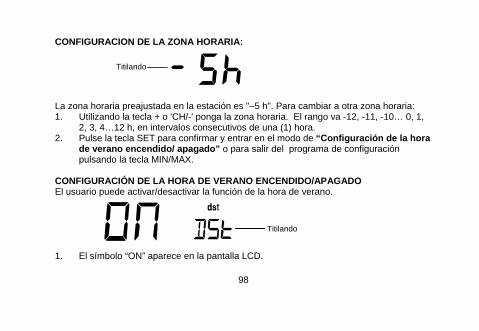
CONFIGURACION DE LA ZONA HORARIA:
Titilando La zona horaria preajustada en la estación es "–5 h". Para cambiar a otra zona horaria: 1. Utilizando la tecla + o 'CH/-' ponga la zona horaria. El rango va -12, -11, -10… 0, 1,
2, 3, 4…12 h, en intervalos consecutivos de una (1) hora. 2. Pulse la tecla SET para confirmar y entrar en el modo de “Configuración de la hora
de verano encendido/ apagado” o para salir del programa de configuración pulsando la tecla MIN/MAX.
CONFIGURACIÓN DE LA HORA DE VERANO ENCENDIDO/APAGADO El usuario puede activar/desactivar la función de la hora de verano.
Titilando
1. El símbolo “ON” aparece en la pantalla LCD.
98
2. Utilice la tecla + o CH/- para apagar esta función. 3. Confirme su ajuste con la tecla SET y entre en el modo/programa de Configuración
de la Función de Recepción de la Hora ON/OFF o para salir del programa de configuración pulsando la tecla MIN/MAX.
CONFIGURACION DE LA SENAL DE RECEPCION DE LA HORA ON/OFF Titilando
(Icono de recepción de la hora)
Titilando En áreas donde la estación no pueda detectar la señal de la hora WWVB, la función de recepción de la hora puede ser apagada OFF. El reloj trabajará entonces como un reloj de cuarzo normal. (Esta función viene preajustada en encendido ON). 1. El símbolo “ON” y el icono de recepción de la hora empiezan a relampaguear en la
pantalla. 2. Utilice la tecla + o CH/- para apagar la función de la recepción de la hora.
99

3. Confirme con la tecla SET y entre en el modo de ajuste del “Formato de Visualización de la Hora 12/24 Horas” o salga del programa de configuración pulsando la tecla MIN/MAX.
Nota: Si la función de recepción de la hora es apagada manualmente OFF, el reloj no intentará recibir la señal de recepción de la hora WWVB, mientras que esta función esta apagada. El icono de recepción no será visualizado. FORMATO DE VISUALIZACION DE LA HORA 12/24 HORAS
Titilando 1. Después de ajustar la recepción de la hora ON/OFF, pulse la tecla SET, “12h” o
“24h” titila en la pantalla LCD. (preajustado en 24 h) 2. Pulse la tecla + o CH/- para seleccionar el formato de las “12h” o “24h”. 3. Pulse la tecla SET nuevamente para confirmar y entrar en el modo de
100

“Configuración Manual de la Hora” o salga del programa de configuración pulsando la tecla MIN/MAX .
Nota: Cuando se selecciona el formato de las 24h, el formato del calendario será: día y mes. Cuando se selecciona el formato de las 12h, el formato del calendario será mes y día.
AJUSTE MANUAL DE LA HORA En caso que la estación de la temperatura no pueda detectar la señal de la hora WWVB (por ejemplo debido a interferencias, distancias de transmisión, etc.), la hora puede ser ajustada manualmente. El reloj trabajará entonces como un reloj de cuarzo normal.
Minutos (titilando)Horas (titilando)
Para ajustar el reloj: 1. Los dígitos de la hora y minutos empiezan a titilar en la sección de la hora. 2. Utilice la tecla + o CH/- para ajustar la hora y luego pulsar la tecla SET para pasar al
ajuste de los minutos. 3. Los minutos empiezan a titilar. Pulse la tecla + o CH/- para ajustar los minutos.
101
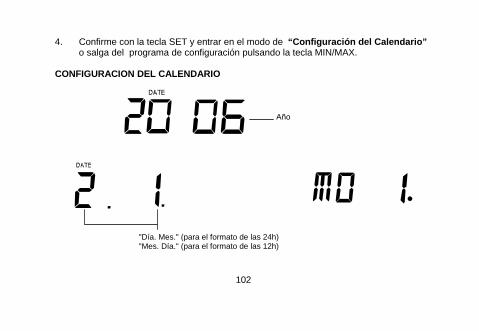
4. Confirme con la tecla SET y entrar en el modo de “Configuración del Calendario” o salga del programa de configuración pulsando la tecla MIN/MAX.
CONFIGURACION DEL CALENDARIO Año "Día. Mes." (para el formato de las 24h)
"Mes. Día." (para el formato de las 12h)
102

La fecha preajustada en la estación es: 1. 1. del año 2006. Una vez que la señal de la hora radio-controlada sea recibida, la fecha también es actualizada automáticamente. Sin embargo, si la radio-señal no es recibida, la fecha también puede ser ajustada manualmente. Para hacer esto: 1. Utilizando la tecla + o CH/- , ponga el año deseado. El rango va de 2006 a 2029
(preajustado en 2006). 2. Pulse a tecla SET para entrar en el modo de configuración del mes. 3. El dígito del mes empieza a titilar. Pulse a tecla + o CH/- para poner el mes y luego
pulse la tecla SET para pasar al modo de modo de configuración del día. 4. El dígito del día empieza a titilar. Pulse a tecla + o CH/- para poner el día. 5. Confirme con la tecla SET y entre en el modo de “CONFIGURACION DE LA
UNIDAD DE TEMPERATURA °F/°C” o salga del programa de configuración pulsando la tecla MIN/MAX.
Una vez que el usuario haya puesto los datos del año, mes y día, el día de la semana del calendario será ajustado automáticamente.
103

CONFIGURACION DE LA UNIDAD DE TEMPERATURA EN GRADOS °F/°C
Titilando La unidad de temperatura está preajustada en °F (grados Fahrenheit o Centígrados). Para seleccionar °C (grados Centígrados): 1. El símbolo “°C/ °F” empieza a titilar, use la tecla + ou CH/- para cambiar entre “°C” y
“°F”. 2. Una vez que haya seleccionado la unidad de temperatura deseada, confirme con la
tecla SET y salga del modo de Configuración Manual. VISUALIZACION DE LA TEMPERATURA EN INTERIORES: Los datos de la temperatura en interiores son medidos y visualizados en la 2nd sección de la pantalla.
104

105
VISUALIZACION DE LA TEMPERATURA EN EXTERIORES: La última sección de la pantalla muestra la temperatura en exteriores, y mostrará el número del canal debajo de esta lectura si se ha usado más de un Sensor.
Temperatura Interior en °F
Icono interior
Icono exterior
Número de identificación del transmisor
Temperatura Exterior en °F

VISUALIZACION DE LOS MINIMOS Y MAXIMOS REGISTROS EN INTERIORES: 1. En el modo de visualización normal, Pulse una vez la tecla MIN/MAX, para ver los
mínimos registros de la temperatura interior. También mostrará la hora y fecha del registro de esta temperatura.
106
2. Luego pulse la tecla MIN/MAX una vez más, la pantalla mostrará entonces la máxima temperatura registrada en interiores. También mostrará la hora y fecha del registro de esta temperatura.
Icono de interior
mínimos registros de la temperatura
interior
Hora de registro de la min. temperatura

107
3. Pulse la tecla MIN/ MAX tres veces más para devolverse al modo de visualización normal.
VISUALIZACION DE LOS MINIMOS Y MAXIMOS REGISTROS EN EXTERIORES: 1. En el modo de visualización normal, Pulse tres veces la tecla MIN/MAX, la pantalla
mostrará la mínima temperatura registrada en exteriores y también mostrará la hora y fecha del registro de esta temperatura.
2. Pulse la tecla MIN/MAX una vez más, la pantalla mostrará entonces la máxima temperatura registrada en exteriores y también mostrará la hora y fecha del registro de esta temperatura.

Icono de exterior
Canal No.
Hora de registro de la Max. Temperatura
Max. temperatura
3. Pulse la tecla MIN/ MAX una vez más para devolverse al modo de visualización normal.
REAJUSTE DE LAS MAXIMAS/MINIMAS LECTURAS REGISTRADAS EN EXTERIORES
108
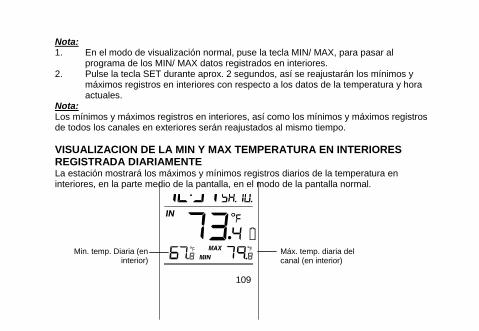
Nota: 1. En el modo de visualización normal, puse la tecla MIN/ MAX, para pasar al
programa de los MIN/ MAX datos registrados en interiores. 2. Pulse la tecla SET durante aprox. 2 segundos, así se reajustarán los mínimos y
máximos registros en interiores con respecto a los datos de la temperatura y hora actuales.
Nota: Los mínimos y máximos registros en interiores, así como los mínimos y máximos registros de todos los canales en exteriores serán reajustados al mismo tiempo. VISUALIZACION DE LA MIN Y MAX TEMPERATURA EN INTERIORES REGISTRADA DIARIAMENTE La estación mostrará los máximos y mínimos registros diarios de la temperatura en interiores, en la parte medio de la pantalla, en el modo de la pantalla normal.
109
Min. temp. Diaria (en interior)
Máx. temp. diaria del
canal (en interior)

VISUALIZACION DE LA MIN Y MAX TEMPERATURA EN EXTERIORES REGISTRADA DIARIAMENTE La estación mostrará los máximos y mínimos registros diarios de la temperatura en exteriores provenientes de cada uno de los canales, en la parte inferior de la pantalla, en el modo de la pantalla normal.
110
Para ver los máx. y mín. registros de la temperatura de otro canal, pulse la tecla CH/- en el modo de la pantalla normal.
No. del Canal
Min temp. diaria del canal
Máx. temp. diaria del canal
Nota: Los registros diarios de la mínima temperatura se reajustan automáticamente a las 8:00 (p.m.) de la tarde y los registros diarios de la máxima temperatura se reajustan automáticamente a las 8:00 (a.m.) de la mañana cada día.

111
RECEPCION DE LA SEÑAL DE 915 MHz La estación de la temperatura debe recibir los datos de la temperatura exterior dentro de 5 minutos después de la puesta en funcionamiento. Si los datos de la temperatura no son recibidos 5 minutos después de la puesta en marcha (si continuamente no puede recibir la señal de recepción la sección de datos en exteriores muestra el símbolo “- - -” ), por favor verifique los siguientes puntos: 1. La estación o el Sensor deben ser colocados a una distancia mínima de por lo
menos 1.5 a 2 metros entre cualquier fuente de interferencia y su lugar de ubicación, de aparatos tales como monitores de ordenadores o televisores.
2. Evite poner la estación de temperatura en marcos de ventanas metálicas o en sus alrededores.
3. La utilización de otros productos eléctricos como auriculares o altavoces que operen con la misma frecuencia de radio de (915MHz) puede causar interferencia en la transmisión o recepción correctas de la señal.
4. Vecinos que usen aparatos eléctricos que operan con la misma señal de frecuencia de 915MHz también pueden causar interferencia.
Nota: Cuando la señal de la hora 915MHz es recibida correctamente, no vuelva a abrir la tapa de las pilas del Sensor o de la estación, porque las pilas pueden quedar por fuera de los contactos y pueden llevarlo a hacer un reajuste innecesario de las unidades. Si esto

112
llegase a pasar accidentalmente reinstale todas las unidades (vea las notas sobre “Poniendo en Funcionamiento” anotadas anteriormente). De lo contrario podrán presentarse problemas de transmisión. La extensión o alcance de transmisión del Sensor a distancia hasta la Estación es de alrededor de 330 pies (100 metros) (en espacios abiertos). Sin embargo, esta distancia depende en gran medida del ambiente circundante y de los niveles de interferencia. Si no es posible recibir ninguna señal de recepción a pesar de la observación de los factores antes mencionados, todas las unidades del sistema tienen que ser reajustadas o reinstaladas (vea las notas sobre “Poniendo en Funcionamiento”) anotadas anteriormente. MONTAJE O INSTALACION INSTALACION DE LA ESTACIÓN DE LA TEMPERATURA: La estación de la temperatura viene diseñada de manera que puede ser colgada en la pared o colocada libremente sobre una mesa. Para colgar en la pared Escoja un lugar protegido. Evite que la unidad quede expuesta a la lluvia y sol directos. Antes de montar en la pared, por favor verifique que los datos de la temperatura al aire

libre puedan ser recibidos desde la ubicación deseada. 1. Fije un tornillo (no suministrado) en la pared deseada, dejando la
cabeza extendida por fuera aprox. 5mm. 2. Retire el stand/soporte de la estación halándolo de la base y
cuélguela en el tornillo. Recuerde que debe asegurarse que la unidad quede bien instalada en su sitio antes de soltarla.
Para apoyarla libremente sobre una superficie llana Con la ayuda del soporte desprendible, coloque la estación sobre cualquier superficie plana.
113

INSTALACION DEL SENSOR DE TEMPERATURA El Sensor de Temperatura viene suministrado con un soporte que puede ser instalado en una pared con la ayuda de los dos tornillos incluidos. El Sensor también puede ser colocado en cualquier superficie plana colocándole el soporte de montaje en la base, tal como lo muestra la figura.
Para colgar en la pared: 1. Asegure el soporte/travesaño en la pared deseada utilizando los
tornillos y las anclas plásticas. 2. Cuelgue el Sensor de temperatura en el soporte. Nota: Antes de fijar el Sensor permanentemente en la pared, haga una prueba de recepción, coloque todas las unidades en los lugares deseados y verifique que los datos de la temperatura puedan ser recibidos correctamente. En caso de que no puedan ser recibidos, re-
114

115
ubique todos los Sensores o muévalos ligeramente ya que esto puede ayudar para recibir la señal de recepción. CUIDADO Y MANTENIMIENTO: • Evite exponer las unidades a temperaturas extremas y vibraciones o choques
eléctricos, ya que estos factores pueden causar daño a las unidades y ocasionar pronósticos y lecturas inexactas.
• Cuando limpie las pantallas y cubiertas, use únicamente un paño limpio y suave. No use detergentes o agentes frotantes ya que estos pueden rayar la pantalla LCD y las cubiertas.
• No sumerja las unidades en agua. • Retire inmediatamente las pilas usadas para evitar goteo y daños. Cambie
únicamente con pilas nuevas del tipo recomendado. • No intente hacerle reparaciones a las unidades. Devuélvalas a su punto original de
compra para ser reparadas por un ingeniero calificado. Abriendo las unidades puede invalidar su garantía.
• No exponga las unidades a cambios extremos y repentinos de temperatura, esto puede ocasionar cambios rápidos en los pronósticos y de esta forma reducir la exactitud de las lecturas.

116
ESPECIFICACIONES TECNICAS: Rango de medición de la Temperatura: Interior : 32°F a +139.8°F con una resolución de 0.2°F (0ºC a +59.9ºC con una resolución de 0.1ºC, Se visualizará “OF.L” si esta por fuera de este intervalo)
Exterior : -39.8°F a+157.8°F con una resolución de 0.2°F (-39.9ºC a+69.9ºC con una resolución de 0.1ºC, Se visualizará “OF.L” si esta por fuera de este intervalo)
Intervalo de chequeo de la Temperatura en Interiores: Cada 15 segundos Recepción de los datos en exteriores : Cada 4 segundos
Fuente de Energía: Estación de la temperatura : 2 pilas AAA, IEC, LR3, 1.5V Sensor de temperatura : 2 pilas AA, IEC, LR, 1.5V Ciclo de duración de la pila (Se recomienda el uso de pilas alcalinas): Estación de la temperatura : aproximadamente 12 meses Sensor de temperatura : aproximadamente 24 meses Medidas (L x A x A) Estación de la temperatura : 3.74" x 0.74" x 5.35" Sensor de temperatura : 1.50" x 0.83" x 5.05"

117
INFORMACION SOBRE LA GARANTIA “La Crosse Technology, Ltd”, le otorga una garantía limitada de 1 año para este producto contra daños de los materiales y manufactura del producto. Esta garantía limitada comienza a partir de la fecha de compra, solamente es válida para productos comprados y usados en los Estados Unidos de Norte América y únicamente comprados al distribuidor original autorizado de este producto. Para obtener servicios de la garantía, el comprador debe contactar primero a ‘La Crosse Technology Ltd’ para que se le haga la evaluación del problema y para gestionar los tramites de servicio. Los servicios de la garantía deberán ser hechos por el centro autorizado de servicio al cliente de ‘La Crosse Technology, Ltd’. El recibo original de la compra del producto deberá ser incluido si este le es solicitado como prueba de la compra del producto por ‘La Crosse Technology, Ltd’ o por el centro de servicio autorizado de ‘La Crosse Technology’. ‘La Crosse Technology, Ltd’ le reparará o le cambiará este producto, bajo nuestra discreción y esto se hará gratuitamente, tal como esta estipulado en la presente, los arreglos se hacen con piezas o productos nuevos o reparados si se comprueba que estos tienen algún defecto durante el periodo cubierto por la garantía limitada especificado anteriormente. Todas las piezas y productos cambiados pasarán a ser propiedad de La

118
Crosse Technology, Ltd y deberán ser devueltos a La Crosse Technology, Ltd. Las piezas o productos cambiados seguirán cubiertos por la garantía original restante del producto o noventa (90) días, aplicará el periodo que tenga mayor duración. La Crosse Technology, Ltd pagará los gastos de mano de obra y materiales de todas las reparaciones cubiertas por esta garantía. Si hay alguna reparación necesaria que no este cubierta por esta garantía o si el producto es examinado y no necesita ninguna reparación el costo de la reparación o inspección del aparato le será cobrado al cliente. El propietario deberá pagar los costos de flete para enviar su producto de La Crosse Technology, Ltd hasta un centro de servicio autorizado de La Crosse Technology, Ltd. La Crosse Technology, Ltd pagará los gastos del envío de vuelta del producto al propietario por vía terrestre, solamente en una dirección dentro de los Estados Unidos. Su garantía de La Crosse Technology, Ltd cubre todos los defectos del material y fabricación del producto con las siguientes excepciones especificas: (1) daños causados por accidentes, uso inadecuado o negligencia (incluyendo la falta de mantenimiento razonable/adecuado y necesario del producto); (2) daños ocurridos durante el envío/transporte (los reclamos deberán ser hechos al transportador); (3) daños o deterioro de cualquier accesorio o superficie decorativa; (4) daños como resultado del no cumplimiento de las instrucciones contenidas en el manual de instrucciones del usuario; (5) daños ocasionados por la reparación o modificación efectuadas por personal no

119
autorizado hechas fuera del centro de servicio autorizado de La Crosse Technology, (6) unidades utilizadas para un uso diferente al doméstico en casa (7) las aplicaciones y usos para los cuales no está destinado este producto o (8) la incapacidad del producto de recibir la señal debido a cualquier fuente de interferencia. Esta garantía cubre solamente los defectos del producto mismo y no cubre los costos de instalación o desinstalación del mismo, ni la configuración/programación normal o los ajustes del producto, tampoco cubre los reclamos basados en malas interpretaciones del vendedor o las variaciones de funcionamiento resultantes de las circunstancias relativas a la instalación del producto. LA CROSSE TECHNOLOGY, LTD NO ASUMIRA NINGUNA RESPONSABILIDAD POR DAÑOS INCIDENTALES, CONSECUTIVOS, PUNITIVOS U OTROS DAÑOS SIMILARES RELACIONADOS CON LA UTILIZACION O EL MAL FUNCIONAMIENTO DE ESTE PRODUCTO. ESTE PRODUCTO NO DEBERA SER UTILIZADO PARA FINES MÉDICOS O PARA INFORMACION AL PÚBLICO. ESTE PRODUCTO NO ES UN JUGUETE. MANTÉNGALO FUERA DEL ALCANCE DE LOS NIÑOS. Esta garantía le confiere derechos legales específicos. Usted también puede tener otros derechos específicos de su Estado. Algunos Estados no permiten la exclusión de daños y perjuicios consecuenciales o incidentales, por lo tanto la anterior exclusión de limitación puede que no aplique en su caso.
120
La Crosse Technology, Ltd 2809 Losey Blvd. S. La Crosse, WI 54601 Phone: 608.782.1610
Fax: 608.796.1020
e-mail: [email protected]
(Para trabajos de la garantía)
[email protected] (Información sobre otros productos)
web: www.lacrossetechnology.com
¿Preguntas? ¿Instrucciones? Por favor visite nuestra página web:
www.lacrossetechnology.com/9080 Todos los derechos reservados. Este manual no puede ser reproducido de ninguna manera, ni siquiera en citas textuales, duplicarlo o procesarlo utilizando métodos electrónicos, mecánicos o químicos sin consentimiento por escrito del editor.

121
Este manual puede contener errores en su contenido y errores de mecanografía. La información de este manual se verifica regularmente y las correcciones necesarias se harán en la próxima edición. No aceptamos ninguna responsabilidad por los errores técnicos o de mecanografía o por sus consecuencias. Todas las marcas y patentes están reconocidas y registradas. FCC ID: OMO-TX29U (transmitter) FCC DISCLAIMER RF Exposure mobil: The internal / external antennas used for this mobile transmitter must provide a separation distance of at least 20 cm (8 inches) from all persons and must not be co-located or operating in conjunction with any other antenna or transmitter." Statement according to FCC part 15.19: This device complies with Part 15 of the FCC Rules. Operation is subject to the following two conditions: (1) this device may not cause harmful interference, and (2) this device must accept any interference received, including interference that may cause undesired operation.

Statement according to FCC part 15.21: Modifications not expressly approved by this company could void the user's authority to operate the equipment. Statement according to FCC part 15.105: NOTE: This equipment has been tested and found to comply with the limits for a Class B digital device, pursuant to Part 15 of the FCC Rules. These limits are designed to provide reasonable protection against harmful interference in a residential installation. This equipment generates, uses and can radiate radio frequency energy and, if not installed and used in accordance with the instructions, may cause harmful interference to radio communications. However, there is no guarantee that interference will not occur in a particular installation. If this equipment does cause harmful interference to radio or television reception, which can be determined by turning the equipment off and on, the user is encouraged to try to correct the interference by one or more of the following measures: • Reorient or relocate the receiving antenna. • Increase the separation between the equipment and receiver. • Connect the equipment into an outlet on a circuit different from that to which the
receiver is connected. • Consult the dealer or an experienced radio/TV technician for help
EJIN9080L211 122

41
TABLE DES MATIERES Sujet Page Inventaire du contenu 42 Caractéristiques 43 Montage 45 Installation des piles 49 Commandes 51 Ecran LCD et réglages 53 Heure radio-pilotée (signal horaire WWVB) 55 Réglages manuels 56 Affichage des relevés de température intérieures 63 Affichage des relevés de température extérieures 64 Affichages des maximum et minimum intérieurs enregistrés 64 Affichages des maximum et minimum extérieurs enregistrés 65 Affichage des MIN/ MAX quotidiens de la température intérieures 67 Affichage des MIN/ MAX quotidiens de la température extérieures 68 Réception 915 MHz 69 Mise en place 70 Entretiens 72 Specifications 73 Garantie 74

La TRANSMISSION INSTANTANEE est le summum en matière de technologie sans fil, conçue et développée exclusivement par LA CROSSE TECHNOLOGY. La TRANSMISSION INSTANTANEE actualise sans délai (toutes les 4 secondes!) toutes les données extérieures relevées par les émetteurs: vous suivrez les variations climatiques en temps réel!
Ce produit présente:
INVENTAIRE 1. Station de température sans fil 2. Capteur de température sans fil (TX29U-IT) et support. 3. Mode d’emploi et fiche de garanti 42

CARACTERISTIQUES: CARACTERISTIQUES:
43
Affichage LCD
Station de température Station de température
• Heure radio-pilotée (signal horaire WWVB) avec option de réglage manuel • Heure radio-pilotée (signal horaire WWVB) avec option de réglage manuel • Réception de l’heure actiovée/annulée • Réception de l’heure actiovée/annulée
Support amovible
Couvercle des piles
Commandes
• Réglage de l’heure d’été (DST) • Réglage de l’heure d’été (DST) • Affichage de l’heure en format 12/24 heures • Affichage de l’heure en format 12/24 heures

44
• Affichage des heures et minutes • Option de fuseau horaire ±12 heures • Transmission sans fil à 915 MHz • Réception des signaux toutes les 4 secondes • Affichage de la température en degrés Fahrenheit (°F) ou Celsius (°C) au choix • Affichage de la température intérieures et extérieures avec MIN/MAX enregistrés • Toutes données enregistrées intérieures et extérieures MIN/MAX avec heure et date de
réception (Toutes les données enregistrées MIN/MAX All MIN/MAX peuvent être remises à zéro)
• Peut recevoir jusqu’à trois capteur extérieurs • Affichage de MIN/ MAX quotidiens de la température intérieures • Affichage de MIN/ MAX quotidiens de la température extérieures • Contraste du LCD réglable • Indicateur de piles faibles • S’accroche au mur ou se pose sur une table.

Capteur de température • Transmission à distance de la température extérieures au
station de température par 915 MHz • Boîtier étanche • Support mural • Installer l’appareil dans un endroit abrité. Eviter la pluie directe
et les rayons du soleil.
MONTAGE: Avec un seul Capteur 1. Commencer par installer les piles dans capteur de température (voir “Installation et
remplacement des piles dans Capteur de température ”). 2. Dans les 30 secondes qui suivent la mise sous tension de Capteur, installer les piles
dans le station de température (voir “Installation et remplacement des piles dans le station de température”). Une fois que les piles sont en place, tous les segments du LCD s’allument brièvement, à la suite de quoi l’heure - 12:00 et le température intérieures affichent. S’ils ne s’affichent pas sur le LCD dans les 60 secondes, retirer les piles et attendre au moins 10 secondes avant de les remettre en place.
45

46
3. Quand les piles sont en place dans Capteur, le station commence à recevoir les données de Capteur. La température extérieures et l’icône de réception du signal devraient s’afficher sur le station de température. Si ceci ne se produit pas dans les 3 minutes qui suivent, retirer les piles des deux appareils et recommencer à partir de l’étape 1.
4. Pour assurer une transmission 915 MHz suffisante, la distance entre le poste de température et capteur ne devrait pas excèder 330 pieds (100m) (voir les notes sur la “Mise en place” et la “ Réception 915 MHz ”).
5. Une fois que la température est captée et affichée sur le station de température, la réception du code Heure radio-pilotée (signal horaire WWVB) est lancée automatiquement. Ceci prend généralement 6-8 minutes dans de bonnes conditions.
Quand plus d’un Capteur est utilisé 1. Retirer toutes les piles du poste de température et des capteur et attendre 60 secondes
si le réglage a été effectué précédemment avec un capteur. 2. Installer les piles du premier capteur. 3. Dans les 30 secondes qui suivent la mise sous tension du premier capteur, installer les
piles du poste de température. Une fois que les piles sont en place, tous les segments du LCD s’allument brièvement. Ensuite, la température intérieure et l’heure (12:00), s’affichent. Si elles ne s’affichent pas sur le LCD dans les 60 secondes qui suivent, retirer les piles et attendre au moins 60 secondes avant de les remettre en place.

47
4. La température extérieures du premier capteur (canal 1) devraient s’afficher sur le poste de température Si elles ne s’affichent pas dans les 2 minutes qui suivent, retirer les piles de tous les appareils et recommencer à partir de l’étape 1.
5. Installer les piles du deuxième capteur dès que les relevés de température extérieures du premier capteur s’affichent sur le poste de température.
Note: Installer les piles dans le deuxième capteur dans les 10 secondes qui suivent la réception du premier capteur.
6. La température extérieures du deuxième capteur et l’icône ”canal 2" devraient s’afficher sur le poste de température. Si elles ne s’affichent pas dans les 2 minutes qui suivent, retirer les piles de tous les appareils et recommencer à partir de l’étape 1.
7. Installer les piles dans le troisième capteur dès que l’icône "canal 2" et les données extérieures s’affichent sur le poste de température. Dans les 2 minutes qui suivent, les données extérieures du canal 3 du troisième capteur devraient s’afficher et le canal retourner à "1" après réception du troisième capteur. Sinon, recommencer le montage à partir de l’étape 1.
Note: Installer les piles dans le troisième capteur dans les 10 secondes qui suivent la réception du deuxième capteur. Cependant pour assurer une transmission 915 MHz suffisante dans de bonnes conditions, la distance entre le poste de température ey l’émetteur ne devraient pas excèder 330 pieds (100m) (voir les notes sur la “Mise en place” et “Réception 915 MHz”).

48
En cas de non réception du signal sur la première fréquence (915 MHz) dans les 45 secondes, la fréquence passe à 920MHz et un nouvel essai d’apprentissage est effectué pendant 45 secondes. En cas d’insuccès, un nouvel essai de réception est effectué pendant 45 secondes sur 910MHz. Ces essais sont aussi effectués pour re-synchronization. IMPORTANT: Des problèmes de transmission apparaissent si les capteurs supplémentaires ne sont pas montés conformément aux indications ci-dessus. En cas de problèmes de transmission, il faut retirer les piles de tous les appareils et recommencer à partir de l’étape 1. 8. Une fois que la température est captée et affichée sur le station de température, la
réception du code Heure radio-pilotée (signal horaire WWVB) est lancée automatiquement. Ceci prend généralement 6-8 minutes dans de bonnes conditions.
Note: En cas de non réception de l’heure WWVB dans les 10 minutes, appuyer sur SET pour entrer l’heure manuellement. Un essai de réception Heure radio-pilotée (signal horaire WWVB) est effectué quotidiennement toutes les heures justes entre minuit et 6h. Si la réception est réussie, aucun autre essai de réception n’est effectué jusqu’au lendemain. Quand la réception est réussie, l’heure captée supplante l’heure réglée manuellement. La date est actualisée en même temps que l’heure

reçue. (Se reporter aux notes des sections “ Heure radio-pilotée (signal horaire WWVB)” et “Réglage manuel de l’heure”). INSTALLATION DES PILES INSTALLER ET REMPLACER LES PILES DANS LE STATION DE TEMPERATURE Le station de température fonctionne avec 2 piles AAA, IEC LR3, 1.5V. Pour les installer ou les remplacer, suivre les étapes ci-dessous:
1. Retirer le couvercle à l’arrière du station de température. 2. Installer les piles en respectant les polarités (voir les
indications). 3. Remettre le couvercle en place.
49

INSTALLER ET REMPLACER LES PILES DANS CAPTEUR DE TEMPERATURE Capteur de température fonctionne avec 2 piles AA, IEC LR6, 1.5V . Pour l’installer ou la remplacer, suivre les étapes ci-dessous:
50
1. Retirez le couvercle. 2. Installer les piles en respectant les polarités (voir les
marques). 3. Remettre le couvercle et la vis en place.
Note: Quand on remplace les piles de l’un des appareils, il est nécessaire de réenclencher tous les appareils conformément aux procédures de montage. En effet, un code de sécurité est attribué de façon aléatoire par Capteur au moment de la mise en fonction et ce code doit être reçu et stocké en mémoire par le station de température dans les 3 minutes qui suivent la mise en place des piles.

REMPLACEMENT DES PILES: Il est recommandé de remplacer régulièrement les piles de tous les appareils pour en assurer un maximum de précision (Cycle de vie des piles - voir les Spécifications ci-dessous).
51
Participez à la protection de l’environnement et déposez toutes piles usagées dans une décharge autorisée.
COMMANDES: STATION DE TEMPERATURE: Le station de température possède quatre commandes faciles à utiliser.
Commande de réglage
Commande MIN/MAX
Commande ‘+’
Commande de canal/ ' -'
52
Commande SET (Réglage): • Pour entrer le mode de réglage des fonctions suivantes: contraste du LCD, fuseau
horaire, heure d'tete activee/ annulee, réception de l’heure activée/ annulée, affichage 12/24 heures, réglage manuel de l’heure, année, mois, date et °F/°C réglages.
Commande MIN/ MAX • Pour alterner entre les relevés minimum/ maximum de température intérieure et
extérieure • Appuyer pour sortir du mode de réglage • Appuyer sans lâcher pour réenclencher les reléves de température minimum et
maximum Commande + • Pour faire faire un ajustement “positif" dans différents réglages • Dans l’affichage normal, appuyer pour alterner entre l’affichage du calendrier et les
secondes de l’affichage de l’heure du LCD. Commande CH/- • Pour faire faire un ajustement “négatif" dans différents réglages • Pour alterner entre les affichages des différents canaux extérieurs

ECRAN ET REGLAGES LCD :
Temp. max. quot. du canal
Témoin de piles faibles
Température extérieure en °F
Signal de réception extérieure*
Identification de capteur (N° de canal)
Affiche "Jour + Quantième” ou “Jour + Mois” ou “secondes”
Icône de réception du signal horaire (pour WWVB)
Icône extérieure
Icône intérieure
Temp. min. quot. Temp. max. quot.
Temp. min. quo. du canal
53

* Lorsque le signal est réceptionné par la station de température, indicateur de réception du signal extérieur reste affichée à l’écran (l’icône ne sera pas affichée si la réception échoue). L’utilisateur peut ainsi s’assurer de la bonne réception du signal (icône affichée) ou de l’échec de réception (icône absente). Un signal de réception qui clignote indique une réception en cours des données extérieures. Pour une lecture plus facile, l’écran LCD est divisé en trois sections pour affichent l’heure et la date, les données intérieures et extérieures. Section 1 - HEURE ET CALENDRIER • Dans le mode normal, affiche l’heure et le “jour+quantième”. Appuyer une fois sur + pour
afficher le “jour+mois”, deux fois pour afficher les secondes. • Un symbole de réception de signal indique que le signal atomique auto-réglé (WWVB
time) est en cours de réception Section 2 - TEMPERATURE INTERIEURE • Affiche la température intérieure actuelle. • Affiche la température intérieure quotidienne minimum et maximum. Section 3 - TEMPERATURE EXTERIEURE • Affiche la températire extérieure actuelle. • Affiche la température extérieure quotidienne minimum et maximum.
54
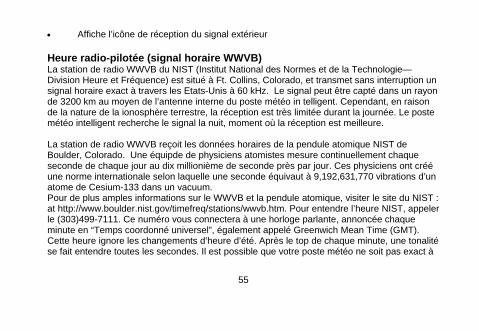
55
• Affiche l’icône de réception du signal extérieur Heure radio-pilotée (signal horaire WWVB) La station de radio WWVB du NIST (Institut National des Normes et de la Technologie—Division Heure et Fréquence) est situé à Ft. Collins, Colorado, et transmet sans interruption un signal horaire exact à travers les Etats-Unis à 60 kHz. Le signal peut être capté dans un rayon de 3200 km au moyen de l’antenne interne du poste météo in telligent. Cependant, en raison de la nature de la ionosphère terrestre, la réception est très limitée durant la journée. Le poste météo intelligent recherche le signal la nuit, moment où la réception est meilleure. La station de radio WWVB reçoit les données horaires de la pendule atomique NIST de Boulder, Colorado. Une équipde de physiciens atomistes mesure continuellement chaque seconde de chaque jour au dix millionième de seconde près par jour. Ces physiciens ont créé une norme internationale selon laquelle une seconde équivaut à 9,192,631,770 vibrations d’un atome de Cesium-133 dans un vacuum. Pour de plus amples informations sur le WWVB et la pendule atomique, visiter le site du NIST : at http://www.boulder.nist.gov/timefreq/stations/wwvb.htm. Pour entendre l’heure NIST, appeler le (303)499-7111. Ce numéro vous connectera à une horloge parlante, annoncée chaque minute en “Temps coordonné universel”, également appelé Greenwich Mean Time (GMT). Cette heure ignore les changements d’heure d’été. Après le top de chaque minute, une tonalité se fait entendre toutes les secondes. Il est possible que votre poste météo ne soit pas exact à

la seconde près en raison des variations du quartz. La pendule mettra quelques jours à ajuster le quartz pour afficher l’heure avec une précision : 0,10 seconde près par jour. REGLAGES MANUELS: Les réglages manuels suivants peuvent être effectués dans le mode de réglage: • Réglage du contraste du LCD • Réglage du fuseau horaire • Réglage de l’heure d’été • Activation/annulation de la réception de l’heure • Réglage 12/24 heures • Réglage manuel de l’heure • Réglage du calendrier • Réglage °F/°C Appuyer sur SET pour avancer au mode de réglage. REGLAGE DU CONTRASTE DU LCD
clignotant
56

Le contraste du LCD peut être réglé sur 8 niveaux différents au choix de l’utilisateur (le réglage par défaut est LCD 4). Pour règler le niveau de contraste désiré: 1. Quand l’affichage ci-dessus apparaît, appuyer sur ‘+’ ou 'CH/-' pour sélectionner le
niveau de contraste désiré. 2. Appuyer sur SET pour confirmer et entrer le “Réglage du fuseau horaire” ou sortir du
mode de réglage en appuyant sur MIN/MAX. REGLAGE DU FUSEAU HORAIRE:
clignotant Le réglage par défaut du fuseau horaire est " –5h". Pour règler un fuseau horaire différent: 1. Utiliser ‘+’ ou 'CH/-' pour règler le fuseau horaire: -12, -11, -10… 0, 1, 2, 3, 4…12 h, par
intervalles consécutifs d’une heure. 2. Confirmer avec SET et entrer le “Réglage de l’heure d’été (DST)” ou sortir du mode de
réglage en appuyant sur MIN/MAX.
57

REGLAGE DE L'HEURE D’ETE (DST) ACTIVEE/ANNULEE clignotant 1. Le signe “DST ON” se met à clignoter sur le LCD. 2. Utiliser ‘+’ ou 'CH/-' pour activer ou annuler la fonction d’heure d’été. 3. Confirmer avec SET et entrer le “réglage de la réception de l’heure” ou sortir du mode
de réglage en appuyant sur MIN/MAX. REGLAGE DE LA RECEPTION DE L’HEURE (Icône de réception de
l’heure) clignotant clignotant Dans les zones dans lesquelles la réception de l’heure WWVB n’est pas possible, on peut déasctiver la fonction de réception de l’heure. La pendule fonctionne alors comme une pendule
58

à quartz normale (réception de l’heure activée par défaut). 4. Le signe “ON” et l’icône de réception de l’heure se mettent à clignoter sur le LCD. 5. Utiliser ‘+’ ou 'CH/-' pour désactiver la fonction de réception de l’heure. 6. Confirmer avec SET et entrer le “réglage de l’affichage 12/24-heures” ou sortir du
mode de réglage en appuyant sur MIN/MAX. Note: Si la fonction de réception de l’heure est désactivée manuellement, la pendule ne tente aucun essai de réception WWVB tant que cette fonction reste désactivée. L’icône de réception de l’heure ne s’affiche pas sur le LCD. REGLAGE DE L’AFFICHAGE 12/24 HEURES
clignotant 1. Après avoir activé/annulé la réception de l’heure, appuyer sur SET. “12h” ou “24h”
clignote sur le LCD. (réglage par défaut 12 h) 2. Appuyer sur + ou CH/- pour sélectionner le mode d’affichage “12h” ou “24h”. 3. Appuyer encore une fois sur SET pour confirmer et entrer le “Réglage manuel de
59

l’heure” ou sortir du mode de réglage en appuyant sur MIN/MAX.
Note: Quand le mode 24h est sélectionné, le calendrier s’affiche en format date-mois. Avec l’affichage 12h, le calendrier s’affiche en format mois-date. REGLAGE MANUEL DE L’HEURE Si le station de température ne réussit pas à capter le signal WWVB (interférences, distance de transmission, etc), il est possible de régler l’heure manuellement. La pendule fonctionne alors comme une pendule à quartz normale.
Heures (clignotent)
Minutes (clignitent)
Pour règler la pendule: 1. Les chiffres des heures se mettent à clignoter sur la section d’affichage de l’heure. 2. Utiliser la commande ‘+’ ou 'CH/-' pour règler les heures, puis appuyer sur SET pour
règler les minutes. 3. Les minutes se mettront à clignoter. Appuyer sur ‘+’ ou 'CH/-' pour règler les minutes. 4. Confirmer en appuyant sur SET et entrer le “Réglage du calendrier” ou sortir du mode
de réglage en appuyant sur MIN/MAX. 60

Note: Bien que l’appareil ait été réglé manuellement, il continue à essayer de recevoir le signal toutes les heures justes. Quand il reçoit le signal, l’heure captée supplante l’heure réglée manuellement. REGLAGE DU CALENDRIER Année
"Date-Mois" (pour affichage 24h) "Mois-Date." (pour affichage 12h)
61

La date par défaut du station de température est 1. 1. de l’année 2006 après le montage initial. Quand l’appareil reçoit les signaux radio-commandés, la date est actualisée automatiquement. Cependant, en cas de non réception des signaux, il est possible de règler la date manuellement. Pour ce faire ;
1. Utiliser la commande ‘+’ ou 'CH/-' pour règler l’année, de 2006 à 2029 (réglage par défaut: 2006).
2. Appuyer sur SET pour entrer le mode de réglage du mois. 3. Les chiffres du mois se mettent à clignoter. Appuyer sur ‘+’ ou 'CH/-' pour règler le mois,
puis sur SET pour passer au réglage du quantième. 4. Les chiffres des quantièmes se mettent à clignoter. Appuyer sur ‘+’ ou 'CH/-' pour règler
la date. 5. Confirmer avec SET et entrer le “°REGLAGE DE L’UNITE DE TEMPERATURE EN
°F/°C” ou sortir du mode de réglage en appuyant sur MIN/MAX. Note: Une fois que l’année, le mois et la jour ont été entrés par l’utilisateur, le calendrier est réglé automatiquement. REGLAGE DE L’UNITE DE TEMPERATURE EN °F/°C
62
clignotant

Le relevé de la température par défaut est réglé en °F (degrés Fahrenheit). Pour sélectionner les °C (degrés Celsius): 1. “°C/ °F” clignotera. Utiliser la commande ‘+’ ou 'CH/-' pour alterner entre “°F” et “°C”. 2. Après avoir sélectionné l’unité de température désirée, confirmer avec SET et sortir du
mode de Réglages manuels. AFFICHAGE DES RELEVES DE TEMPERATURE INTERIEURES: La température intérieures sont relevées etr affichées sur la 2nd section du LCD.
Température intérieure en °F
Icône intérieure
63

AFFICHAGE DES RELEVES DE TEMPERATURE EXTERIEURES:
64
La 3rd section du LCD affiche la température extérieure et un numéro de canal dessus la température indique si plus d’un capteur est utilisé.
Icône extérieure
N° d’identification de capteur quand plus d’un
capteur est utilisé
Température exterieures en °F
AFFICHAGE DES DONNEES INTERIEURES MINIMUM AND MAXIMUM : 1. Dans le mode d’affichage normal, appuyer une fois sur MIN/MAX pour afficher la
température intérieure minimum sur le LCD. L’heure et la date d’enregistrement de la température s’afficheront aussi.

Icône intérieure
Température intérieure minimum
L’heure et la date d’enregistrement de la température
2. Appuyer sur MIN/MAX encore une fois pour afficher la température intérieure maximum sur le LCD. L’heure et la date d’enregistrement de la température s’afficheront aussi..
3. Appuyer trois fois de plus sur MIN/ MAX pour retourner à l’affichage normal. AFFICHAGE DES DONNEES EXTERIEURES MINIMUM AND MAXIMUM : 1. Dans le mode d’affichage normal, appuyer trois fois sur MIN/MAX pour afficher la
température extérieure minimum sur le LCD. L’heure et la date d’enregistrement de la température s’afficheront aussi.
2. Appuyer sur MIN/MAX encore une fois pour afficher la température extérieure maximum sur le LCD. L’heure et la date d’enregistrement de la température s’afficheront aussi..
65

Icône extérieure
N° d’identification de capteur
L’heure et la date d’enregistrement de la température
Température extérieure max.
3. Appuyer une fois de plus sur MIN/ MAX pour retourner à l’affichage normal. REENCLENCHEMENT DES DONNEES INTERIEURES ET EXTERIEURES MINIMUM /MAXIMUM ENREGISTREES 1. Dans le mode d’affichage normal, appuyer sur MIN/ MAX pour passer à l’affichage des
données MIN/MAX enregistrées.
66

2. Appuyer sans lâcher sur MIN/MAX pendant 3 secondes environ pour remettre toutes les données de température intérieur et extérieure max. et min. enregistrées aux niveaux actuels.
Note: Les données intérieures minimum et maximum enregistrées, ainsi que les données minimum et maximum de tous les canaux extérieurs seront réenclenchés simultanément.
67
AFFICHAGE DES MIN MAX QUOTIDIENS DE LA TEMPERATURE INTERIEURE Note: La température minimum quotidienne est réenclenchée automatiquement à 20h, et la température maximum à 8h chaque jour.
Temp. min. quot.
Temp. max. quot.
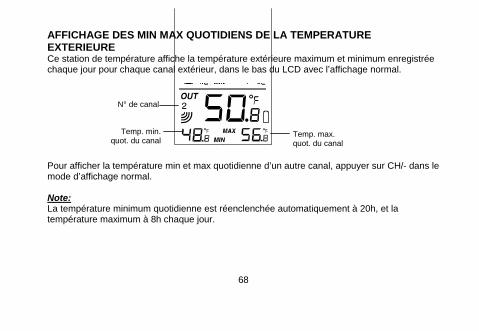
AFFICHAGE DES MIN MAX QUOTIDIENS DE LA TEMPERATURE EXTERIEURE Ce station de température affiche la température extérieure maximum et minimum enregistrée chaque jour pour chaque canal extérieur, dans le bas du LCD avec l’affichage normal.
68
Pour afficher la température min et max quotidienne d’un autre canal, appuyer sur CH/- dans le mode d’affichage normal.
N° de canal
Temp. min. quot. du canal
Temp. max. quot. du canal
Note: La température minimum quotidienne est réenclenchée automatiquement à 20h, et la température maximum à 8h chaque jour.

69
VERIFICATION DE LA RÉCEPTION 915MHz Le station de température devrait recevoir la température dans les 15 minutes qui suivent le montage. En cas de non réception des données de température (et d’humidité dans les 15 minutes qui suivent le montage (l’affichage indique “- - -”), vérifier les points suivants: 1. Le station de température ou capteur devrait être situé à 1,5-2 mètres au moins de
toutes sources d’interférences telles que les moniteurs d’ordinateurs ou téléviseurs. 2. Eviter de positionner le capteur sur ou à proximité immédiate de cadres de fenêtres
métalliques. 3. L’utilisation d’autres appareils électriques tels que des casques ou enceintes
fonctionnant sur la même fréquence de signal (915MHz) peut empêcher une bonne transmission et réception du signal.
4. Des voisins utilisant des appareils électriques sur la fréquence de signal 915MHz peuvent aussi brouiller la transmission des données.
Note : Quand la réception du signal 915MHz est correcte, ne pas rouvrir le couvercle des piles de capteur ou du station de température à projection car les piles risquent de se dégager de leurs contacts et de forcer un faux réenclenchement. Dans un tel cas, réenclencher tous les appareils (voir « Montage » ci-dessus) afin d’éviter les problèmes de transmission.

Le rayon de transmission du capteur au station de température à projection est d’environ 330 pieds (100m), en espace dégagé. Cependant, ceci dépend de l’environnement et des niveaux d’interférence. Si la réception reste impossible alors que tous ces facteurs ont été respectés, réenclencher tous les appareils (voir « Montage » ci-dessus). MISE EN PLACE MISE EN PLACE DU Station de température: Le Station de température est conçu pour s’accrocher à un mur ou se poser sur une table. Fixé au mur Choisir un endroit abrité. Eviter d’exposer l’appareil à la pluie et aux rayons du soleil. Avant de fixer l’appareil en place, s’assurer de la bonne transmission des données de température à partir de l’endroit sélectionné.
1. Fixer une vis (non fournie) sur le mur désiré en laissant la tête dépasser de 5mm environ.
70
2. Retirer le support du station de température en le tirant du socle et accrocher le poste à la vis. S’assurer qu’il tient bien en place avant de le lâcher.

Posé Grâce à son support amovible, le station de température peut se poser sur n’importe quelle surface plate.
71
MISE EN PLACE DE L’ CAPTEUR DE TEMPERATURE:
Capteur est fourni avec un support qui peut se fixer au mur à l’aide des deux vis fournies. On peut aussi le poser sur une surface plate et fixant le support à la base de capteur.

Fixé au mur: 1. Fixer le support au mur désiré à l’aide des vis et chevilles fournies. 2. Encastrer le capteur de température dans le socle. Note: Avant de fixer capteur au mur de façon définitive, placer tous les appareils aux endroits désirés et s’assurer de la bonne réception de la température extérieure. En cas de non réception du signal, changer les capteur de place ou les déplacer légèrement, ce qui peut aider à la réception du signal.
ENTRETIEN: • Eviter les températures excessives, vibrations et chocs qui risquent d’endommager
l’appareil et de produire prévisions et relevés inexacts. • Nettoyer l’affichage et les boîtiers avec un chiffon doux et humide uniquement. Ne pas
utiliser de dissolvants ou de produits abrasifs qui risquent de rayer le LCD et les boîtiers. • Ne pas plonger l’appareil dans l’eau. • Retirer sans délai toutes les piles faibles afin d’éviter fuites et dégâts. Ne les remplacer
que par des piles neuves du type recommandé.
72

73
• Ne pas tenter de réparer l’appareil. Si nécessaire, retourner l’appareil au lieu d’achat pour le faire réparer par un technicien qualifié. Ouvrir et réparer soi-même l’appareil risque d’annuler la garantie.
• Ne pas soumettre les appareils à des changements de température soudains et extrêmes. Ceci entraînerait un changement rapide des prévisions et des relevés, ce qui en diminuerait la précision.
SPECIFICATIONS: Rayon de relevé de température: Intérieure : 32°F à ‘+’139,8°F à 0,2°F près (0ºC à ‘+’59,9ºC à 0,1ºC près, “OF.L” affiché en-dehors de ce rayon) Extérieur : -39,8°F à ‘+’157,8°F à 0,2°F près (-39,9ºC à ‘+’69,9ºC à 0,1ºC près, “OF.L” affiché en-dehors de ce rayon) Relevé de la température intérieure : toutes les 15 secondes Relevé de la température extérieure : toutes les 4 secondes Alimentation: Station de température : 2 x AAA, IEC, LR3, 1,5V Capteur de température : 2 x AA, IEC, LR6, 1,5V

74
Cycle de vie des piles (piles alcalines recommandées) Station de température : Approximativement 12 mois Capteur de température : Approximativement 24 mois Dimensions (L x l x H) Station de température : 3,74" x 0,74" x 5,35" Capteur de température : 1,50" x 0,83" x 5,05"
GARANTIE La Crosse Technology Ltd assure un an de garantie limitée sur cet appareil contre tout défaut de matériel et fabrication. Cette garantie limitée qui entre en vigueur à partir de la date d’achat de l’appareil n’est valide que pour les produits achetés et utilisés en Amérique du Nord, et uniquemement pour l’acheteur d’origine. Pour recevoir les services de la garantie, contacter La Crosse Technology pour déterminer la nature du problème et la procédure à suivre. Les services de la garantie ne peuvent être effectués que par un service après-vente approuvé par La Crosse Technology, Ltd. La facture d’origine datée doit être présentée sur demande en preuve que l’appareil a été acheté auprès de La Crosse Technology, Ltd ou d’un dépositaire agréé par La Crosse Technology, Ltd.

75
La Crosse Technology, Ltd réparera ou remplacera ce produit, à notre choix et gratuitement avec des pièces neuves ou reconditionnées si le produit est jugé défectueux durant la période de la garantie limitée décrite ci-dessus. Toutes les pièces ou appareils remplacés deviennent la propriété de La Crosse Technology, Ltd et doivent lui être retournés. Les pièces et appareils remplacés sont soumis à la garantie d’origine restante ou une période de garantie de quatre-vingt-dix (90) jours, la période la plus longue étant en vigueur. La Crosse Technology, Ltd paiera tous les frais de main d’oeuvre et de pièces couverts par cette garantie. Si les pièces nécessaires ne sont pas couvertes par cette garantie, ou si un produit examiné ne requiert aucune réparation, les frais de transport et d’inspection encourus vous seront facturés. Tous les frais de transport encourus pour faire parvenir le produit au service après-vente de La Crosse Technology, Ltd sont à la charge du propriétaire. La Crosse Technology, Ltd paiera les frais de renvoi du produit à son propriétaire aux Etats-Unis exclusivement. Votre garantie La Crosse Technology, Ltd couvre tous les défauts de matériaux et de fabrication avec les exceptions ci-dessous: (1) dommage causé par accident, usage abusif ou négligence (y compris le manque d’un entretien raisonnable et nécessaire); (2) dommage encouru durant le transport (les réclamations doivent être présentées au transporteur); (3) endommagement ou détérioration de tout accessoire ou surface décorative; (4) dommage résultant de la non-observation des instructions contenues dans le mode d’emploi; (5) dommage résultant de réparations ou modifications effectuées par une personne autre qu’un technicien agréé par La Crosse Technology, Ltd; (6) appareils utilisés pour un usage autre que personnel ; (7) applications et usages pour lesquels cet appareil n’est pas conçu ou (8)

76
incapacité de l’appareil à recevoir un signal en raison de sources d’interférence. Cette garantie ne couvre que les défauts du produit même et ne couvre pas les frais d’installation ou de déplacement d’une installation fixe, montage normal ou réglages, demandes basées sur une représentation fallacieuse du vendeur ou variations dans le fonctionnement résultant de circonstances liées à l’installation. LA CROSSE TECHNOLOGY, LTD DECLINE TOUTE RESPONSABILITE POUR TOUS DOMMAGES FORTUITS, INDIRECTS, SECONDAIRES OU SIMILAIRES ASSOCIES A L’UTILISATION OU AU MAUVAIS FONCTIONNEMENT DE CE PRODUIT. CE PRODUIT NE DOIT PAS ETRE UTILISE DANS UN BUT MEDICAL OU POUR L’INFORMATION DU PUBLIC. CE PRODUIT N’EST PAS UN JOUET. LE GARDER HORS DE LA PORTEE DES ENFANTS. Cette garantie vous donne des droits spécifiques. Vous pouvez aussi avoir d’autres droits spécifiques à votre Etat. Certains Etats n’autorisent pas l’exclusion de dommages indirects ou fortuits auquel cas, les restrictions ci-dessus ne s’appliquent pas.

77
Pour tout travail de garantie, support technique ou information, contacter:
La Crosse Technology, Ltd 2809 Losey Blvd. S. La Crosse, WI 54601 Phone: 608.782.1610
Fax: 608.796.1020
courriel: [email protected]
(travaux sous garantie)
[email protected] (information sur les autres produits)
Toile:
www.lacrossetechnology.com
Questions? Instructions? Visitez: www.lacrossetechnology.com/9080

78
Tous droits réservés. Ce livret ne peut pas être reproduit sous aucune forme, y compris extraits, ni dupliqués ou traités par procédé électronique, mécanique ou chimique sans l’autorisation écrite de l’éditeur. Ce livret peut contenir des erreurs ou fautes d’impression. Les informations qu’il contient sont vérifiées régulièrement et corrigées nécessairement dans l’édition suivante. Nous déclinons toute responsabilité pour tout défaut technique ou erreur d’imprimerie ou leurs conséquences.