Embed Size (px)
DESCRIPTION
READ THIS FIRST!!!! – With The Web Copy Cat System You’ll Have Multiple Niches To Choose From…The set up instructions will be the same for each niche, however you’ll first need to determine which niche you’re setting up (Go ahead and decide this now). We’ve chosen the most profitable niches for you to make money with online (the list of niches is available below) Also, know that we’ll be adding a new niche every month for you! - Clickbank will e-mail you your password
Citation preview
WEB COPY CAT READ ALONG INSTRUCTION GUIDE READ THIS FIRST!!!! – With The Web Copy Cat System You’ll Have Multiple Niches To Choose From…The set up instructions will be the same for each niche, however you’ll first need to determine which niche you’re setting up (Go ahead and decide this now). We’ve chosen the most profitable niches for you to make money with online (the list of niches is available below) Also, know that we’ll be adding a new niche every month for you! Whether you’re building your system yourself or having us do it for you, you’ll need to determine the niche (or niches) you want to have a website for before you continue! If you want to set up the Web Copy Cat System for multiple niches, then that’s fine…however you’ll still need to do ONE NICHE at a time. Here are the current niches that the system offers: Make Money Online MLM/Network Marketing Weight Loss Real Estate Investing Self-Improvement Sports Betting Debt Relief Get A Job Stocks/Trading Parenting Please also note Keep in mind the WebCopyCat (WCC) username you just created for yourself. Write this down as you’ll need it during this setup process.
STEP 1: Print out this page and then go back to the home page of your Web Copy Cat (A.K.A “WCC”) Members Back Office area (the page you were just at). The videos on the home page correspond with the instructions on this print out.. Do not continue to the next step UNTIL you have finished the previous step!
STEP 2 (& VIDEO 2): One of the main ways you’ll be making money is by promoting other people’s products that have already been proven to convert (i.e. “sell”) well. To do this we’ll need to sign up for Clickbank (this is free). If you already have a Clickbank I.D then you can skip this step and move on to step #3…If not, please do the following:
- Go to http://clickbank.com
- Click on the “Sign Up” Link at the very top of the page
- Fill out all of the pertinent information (make sure you pick a username that is easy for you to remember…you may even want to use the same username as you’re using for WebCopyCat)
- Clickbank will e-mail you your password
- Jot down your Clickbank ID/Username as you will need it throughout the set up of your new WCC system
STEP 3 (& VIDEO 3): You’ll need to get an auto-responder (this is CRITICAL to your success…think of it like the engine that runs your car). Press the “CLICK HERE” button in step 3 of your member’s area (or just go here: http://bit.ly/9peE5n )
- A new window will open up.
- Once you get to the “home page” for the auto responder company you’ll want to click on the green “order” button in the upper right hand corner of the page
- You can scroll down and choose any of the 3 payment options. This is one tool that you will NEVER stop using so if you want to save money in the long run by paying for a few months up-front, that’s cool. But if you’re short on funds then you can just use the $1 trial (then $19/month) option
- Once you’ve signed up for your auto-responder then check your e-mail as they will have sent you a username & password. Keep it in a safe place!
- If you currently have another auto-responder that you don’t use or doesn’t have a lot of subscribers in it, then GET RID OF IT!! This is the only auto-responder you’ll ever need. If you MUST use this system with another auto-responder (not recommended) then contact our offices.
(At this point you can determine whether or not you want to have us to set everything else up for you…if you do, then just click the “Done For You” button in
your Web Copy Cat Members Area and fill out the appropriate information)
STEP 4 (& VIDEO 4): Now it’s time to set up your auto-responder. Here’s how to make it happen (follow along with the video if need be)
- Log into your Aweber account using the username and password you were just sent
- Press the “Create & Manage Lists” wording underneath the “Home” tab
- Click on the “+ Create A New List” wording on the right hand side of the page
- Fill out the “List Name” form: (just name it something simple like: “NIcheYourInitials” …so if your name is John Smith and the niche you chose was Weight Loss…then just put “weightlossjs” don’t worry about capital letters and don’t use spaces. If the list name is already taken then just add a number to the end of it: “weightlossjs1”. The reason we’re doing this is because the auto-responder is making us…do not get caught up on the name because no-one will ever see it except for you! Just pick something that makes sense!
- Fill out the “List Description” form: Just put “Weight Loss List” (or something simple like that, assuming you’ve chosen weight loss as a niche)…again, no one
will ever see this except for you. If you chose “Debt Relief” as a niche then put “Debt Relief List” in the Description Field
- Fill out the “From Address” Fields with your name and the e-mail that you want to show up when you contact the people who have opted in on you page. If you’d like to make an e-mail specifically for people on your list, then the easiest thing to do is just get a free G-Mail Account and the get the email address “(YourNiche)with(YourName)@gmail.com. Example – [email protected] This idea of getting a new email address is TOTALLY optional! I currently use just 1 email address for all of my business stuff.
- If you have a “Company Name” “Website URL” or “Logo URL” then you can fill in these fields…if not, then don’t worry about it (I NEVER do company logo)…these 3 sections are completely optional and wont have an affect on anything if you don’t fill them in.
- Go to the “Email Signature” box and type the following Warmest Regards, (Insert Your Name) (Insert Another website/opportunity ONLY if you have one) (Insert Your Twiiter/Facebook/YouTube links ONLY if you have them) ======= Legal Stuff ======= This message is never sent without your request. If you would like to lose your competitive advantage in the marketplace then you can opt out by clicking the link at the bottom of this e-mail Keep in mind you will lose access to all upcoming emails and bonuses Please note for the FTC: There are times when I may recommend a product/service and this may stick $ in my pocket. This is always done so with the utmost integrity
- You don’t need to worry about “Notifications” But In case you’re curious as to what it is…It’s the function that will send you an e-mail to let you know that someone opted in to your list. It’s fun to get notifications at first but It get’s REALLY annoying after about 5 minutes…so I would just leave it blank.
- Click the “Save List Settings” button at the bottom
- Click the “Go To Step 2” button at the bottom

- Click the “OFF” Option under ‘Confirmed Opt-In Status’ option. If it asks you to confirm that you want to disable, say YES!
- Don’t worry about anything else on the page,
- Click the “Save List Settings” button at the bottom of the page
STEP 5 (& VIDEO 5): Now that you’ve saved your list settings, it’s time to add your follow up message sequence to the auto-responder: The Good news is that we’ve already written all of the messages for you, all you have to do use the “automatic load” function and then edit them!
- Put your mouse over the “Messages” tab and click the option that says “Follow-up”
- Find the red button that says “Load Campaign” (at the bottom of the page) …to the left of this button is a white box…inside that white box put the following code depending on your niche Make Money Online Niche: wccswipeonline-d465b-$F Weight Loss Niche: wccswipeweight-2c8b4-$F Self-Improvement Niche: wccswipepdev-2dc06-$F Debt Relief Niche: wccswipedebt-f0337-$F Stock Niche: wccswipestocks-d29fe-$F MLM Niche: wccswipemlm-96b83-$F Real Estate Investing Niche: wccswiperei-a7230-$F Sports Betting Niche: wccswipesports-bef28-$F Get A Job Niche: wccswipegetjob-bf181-$F Parenting Niche: wccswipeparents-d433f-$F
- Once you’ve inserted the appropriate text/code into the white box, click the “Load Campaign” button. This should insert a series of 5-8 pre-written messages (depending on the niche)
- You should see a list of 5-8 follow up messages on your screen. If you don’t, just click the “Home” tab, and then put your mouse over the “messages” tab and then click “follow-up”
- These messages have already been written for you and are pretty much ready to go. The only thing that will need to be done is a little bit or personalization. In other words, there are certain areas of each message that you’ll need to personalize with one of the following pieces of information Your Name Your WCC Username Your E-mail
Your Clickbank ID/username (always lower case and no spaces)
- In order to edit a message you’ll need to click on the “Subject” of the message. For example: If you’re niche is weight loss, you should see that the 1st subject (for message #1 is: “Welcome To The Weight Loss Secrets Newsletter”) You would actually need to click on that wording,
- Once you’ve clicked on the wording the message itself should open up. You should see this page divided into 3 main sections -Subject -HTML Message -Plain Text Message You’ll notice that all of the “HTML” message fields are blank. This is on purpose! Make sure this field stays blank. The only field you’ll need to make changes in is the “Plain Text Message” Field.
- As you look in the plain text message field you should notice areas in all caps that say things like (YOUR NAME HERE) or (YOUR CLICKBANK ID) or (YOUR WCC USERNAME). These are the areas that you’ll need to change. For each e-mail message there is an average of 1-2 personalization changes that need to be made. After you’ve made the appropriate changes, you’ll simply need to click the green “Save Message” button at the bottom of the page Then, simply click on the subject line of the next message you need to edit, make the necessary changes, and repeat the process until all of the auto-responder follow-up messages have been completely personalized.
- To make this easier for you I’ve gone ahead and made a list of all of the changes you’ll need to make for each niche market e-mail series. Please find the appropriate niche you’ve decided to build. And make the changes as necessary! IMPORTANT: IF during the personalization process (when you’re saving your messages after you’ve personalized them) Aweber gives you a pink error box that says “Invalid Links”…Don’t worry about it Just check the box next to “Ignore Invalid links and save message” If it doesn’t’ happen, then don’t worry about it!
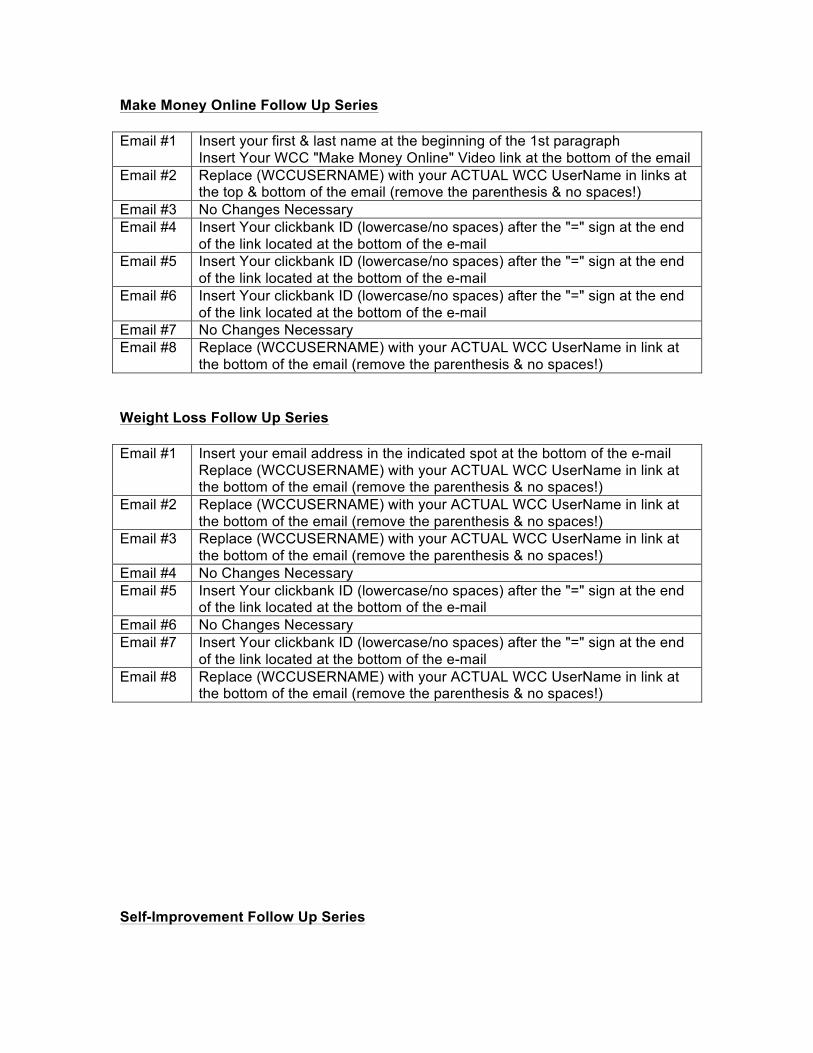
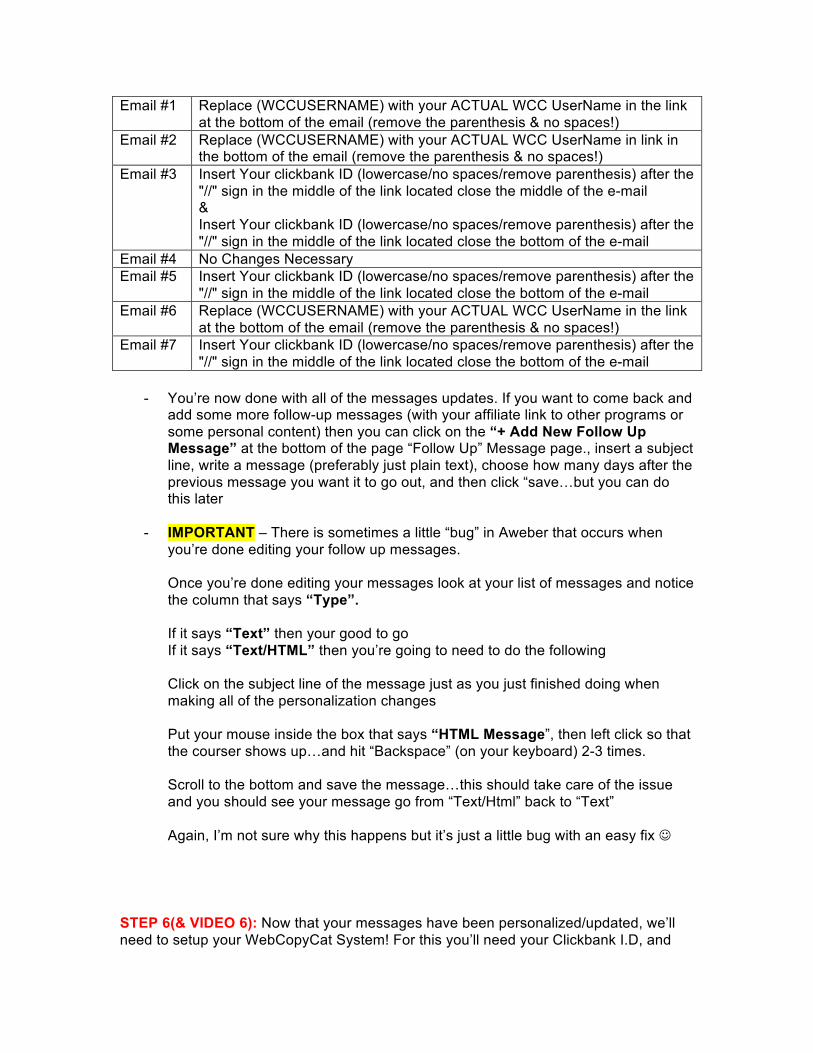
Make Money Online Follow Up Series
Email #1 Insert your first & last name at the beginning of the 1st paragraph Insert Your WCC "Make Money Online" Video link at the bottom of the email
Email #2 Replace (WCCUSERNAME) with your ACTUAL WCC UserName in links at the top & bottom of the email (remove the parenthesis & no spaces!)
Email #3 No Changes Necessary Email #4 Insert Your clickbank ID (lowercase/no spaces) after the "=" sign at the end
of the link located at the bottom of the e-mail Email #5 Insert Your clickbank ID (lowercase/no spaces) after the "=" sign at the end
of the link located at the bottom of the e-mail Email #6 Insert Your clickbank ID (lowercase/no spaces) after the "=" sign at the end
of the link located at the bottom of the e-mail Email #7 No Changes Necessary Email #8 Replace (WCCUSERNAME) with your ACTUAL WCC UserName in link at
the bottom of the email (remove the parenthesis & no spaces!)
Weight Loss Follow Up Series
Email #1 Insert your email address in the indicated spot at the bottom of the e-mail Replace (WCCUSERNAME) with your ACTUAL WCC UserName in link at the bottom of the email (remove the parenthesis & no spaces!)
Email #2 Replace (WCCUSERNAME) with your ACTUAL WCC UserName in link at the bottom of the email (remove the parenthesis & no spaces!)
Email #3 Replace (WCCUSERNAME) with your ACTUAL WCC UserName in link at the bottom of the email (remove the parenthesis & no spaces!)
Email #4 No Changes Necessary Email #5 Insert Your clickbank ID (lowercase/no spaces) after the "=" sign at the end
of the link located at the bottom of the e-mail Email #6 No Changes Necessary Email #7 Insert Your clickbank ID (lowercase/no spaces) after the "=" sign at the end
of the link located at the bottom of the e-mail Email #8 Replace (WCCUSERNAME) with your ACTUAL WCC UserName in link at
the bottom of the email (remove the parenthesis & no spaces!)
Self-Improvement Follow Up Series
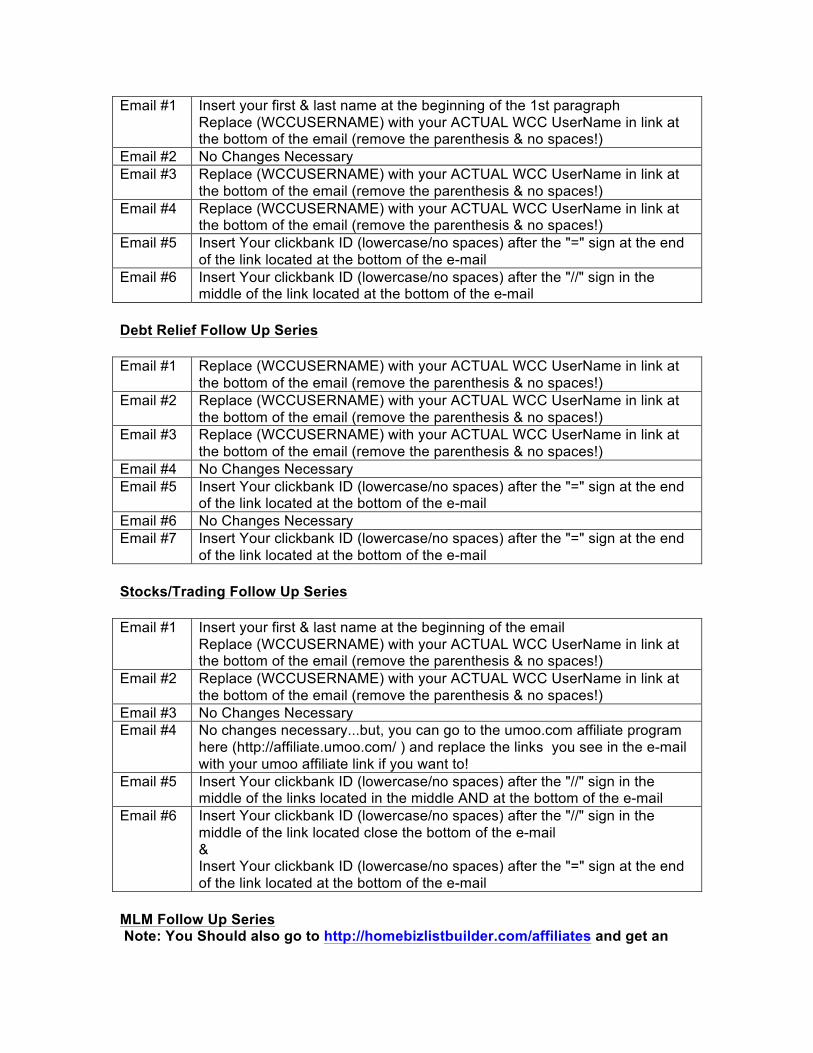
Email #1 Insert your first & last name at the beginning of the 1st paragraph Replace (WCCUSERNAME) with your ACTUAL WCC UserName in link at the bottom of the email (remove the parenthesis & no spaces!)
Email #2 No Changes Necessary Email #3 Replace (WCCUSERNAME) with your ACTUAL WCC UserName in link at
the bottom of the email (remove the parenthesis & no spaces!) Email #4 Replace (WCCUSERNAME) with your ACTUAL WCC UserName in link at
the bottom of the email (remove the parenthesis & no spaces!) Email #5 Insert Your clickbank ID (lowercase/no spaces) after the "=" sign at the end
of the link located at the bottom of the e-mail Email #6 Insert Your clickbank ID (lowercase/no spaces) after the "//" sign in the
middle of the link located at the bottom of the e-mail
Debt Relief Follow Up Series
Email #1 Replace (WCCUSERNAME) with your ACTUAL WCC UserName in link at the bottom of the email (remove the parenthesis & no spaces!)
Email #2 Replace (WCCUSERNAME) with your ACTUAL WCC UserName in link at the bottom of the email (remove the parenthesis & no spaces!)
Email #3 Replace (WCCUSERNAME) with your ACTUAL WCC UserName in link at the bottom of the email (remove the parenthesis & no spaces!)
Email #4 No Changes Necessary Email #5 Insert Your clickbank ID (lowercase/no spaces) after the "=" sign at the end
of the link located at the bottom of the e-mail Email #6 No Changes Necessary Email #7 Insert Your clickbank ID (lowercase/no spaces) after the "=" sign at the end
of the link located at the bottom of the e-mail
Stocks/Trading Follow Up Series
Email #1 Insert your first & last name at the beginning of the email Replace (WCCUSERNAME) with your ACTUAL WCC UserName in link at the bottom of the email (remove the parenthesis & no spaces!)
Email #2 Replace (WCCUSERNAME) with your ACTUAL WCC UserName in link at the bottom of the email (remove the parenthesis & no spaces!)
Email #3 No Changes Necessary Email #4 No changes necessary...but, you can go to the umoo.com affiliate program
here (http://affiliate.umoo.com/ ) and replace the links you see in the e-mail with your umoo affiliate link if you want to!
Email #5 Insert Your clickbank ID (lowercase/no spaces) after the "//" sign in the middle of the links located in the middle AND at the bottom of the e-mail
Email #6 Insert Your clickbank ID (lowercase/no spaces) after the "//" sign in the middle of the link located close the bottom of the e-mail & Insert Your clickbank ID (lowercase/no spaces) after the "=" sign at the end of the link located at the bottom of the e-mail
MLM Follow Up Series Note: You Should also go to http://homebizlistbuilder.com/affiliates and get an
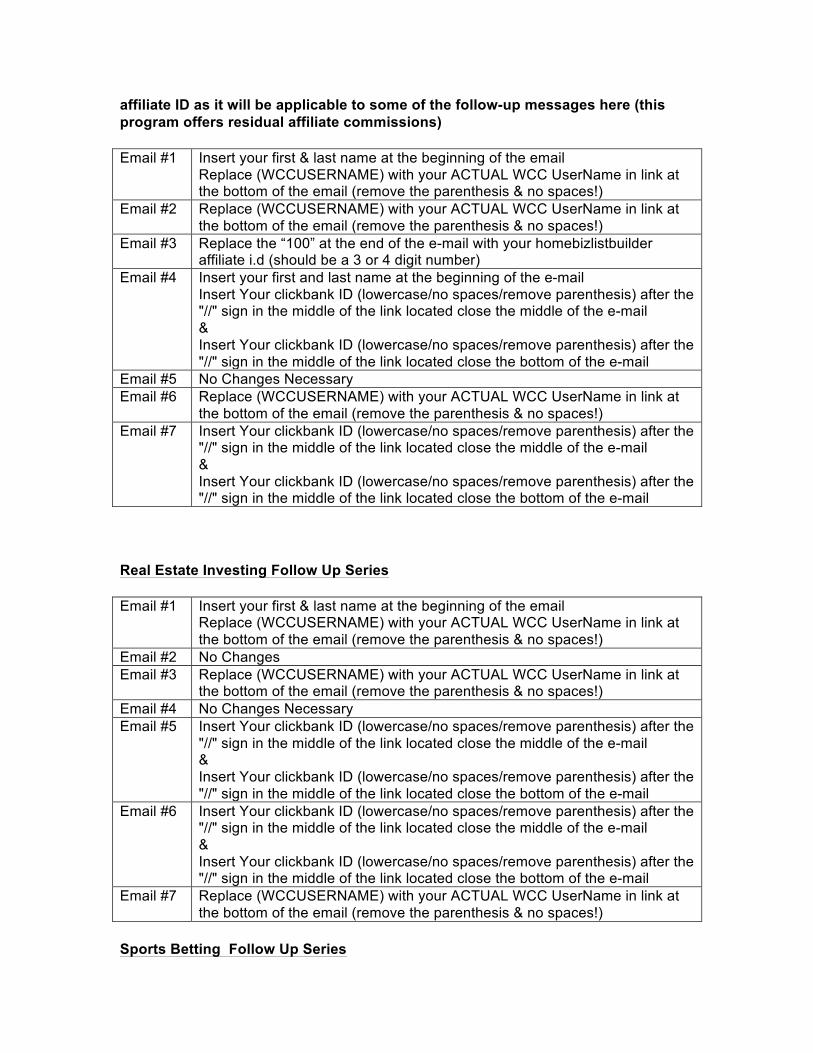
affiliate ID as it will be applicable to some of the follow-up messages here (this program offers residual affiliate commissions)
Email #1 Insert your first & last name at the beginning of the email Replace (WCCUSERNAME) with your ACTUAL WCC UserName in link at the bottom of the email (remove the parenthesis & no spaces!)
Email #2 Replace (WCCUSERNAME) with your ACTUAL WCC UserName in link at the bottom of the email (remove the parenthesis & no spaces!)
Email #3 Replace the “100” at the end of the e-mail with your homebizlistbuilder affiliate i.d (should be a 3 or 4 digit number)
Email #4 Insert your first and last name at the beginning of the e-mail Insert Your clickbank ID (lowercase/no spaces/remove parenthesis) after the "//" sign in the middle of the link located close the middle of the e-mail & Insert Your clickbank ID (lowercase/no spaces/remove parenthesis) after the "//" sign in the middle of the link located close the bottom of the e-mail
Email #5 No Changes Necessary Email #6 Replace (WCCUSERNAME) with your ACTUAL WCC UserName in link at
the bottom of the email (remove the parenthesis & no spaces!) Email #7 Insert Your clickbank ID (lowercase/no spaces/remove parenthesis) after the
"//" sign in the middle of the link located close the middle of the e-mail & Insert Your clickbank ID (lowercase/no spaces/remove parenthesis) after the "//" sign in the middle of the link located close the bottom of the e-mail
Real Estate Investing Follow Up Series
Email #1 Insert your first & last name at the beginning of the email Replace (WCCUSERNAME) with your ACTUAL WCC UserName in link at the bottom of the email (remove the parenthesis & no spaces!)
Email #2 No Changes Email #3 Replace (WCCUSERNAME) with your ACTUAL WCC UserName in link at
the bottom of the email (remove the parenthesis & no spaces!) Email #4 No Changes Necessary Email #5 Insert Your clickbank ID (lowercase/no spaces/remove parenthesis) after the
"//" sign in the middle of the link located close the middle of the e-mail & Insert Your clickbank ID (lowercase/no spaces/remove parenthesis) after the "//" sign in the middle of the link located close the bottom of the e-mail
Email #6 Insert Your clickbank ID (lowercase/no spaces/remove parenthesis) after the "//" sign in the middle of the link located close the middle of the e-mail & Insert Your clickbank ID (lowercase/no spaces/remove parenthesis) after the "//" sign in the middle of the link located close the bottom of the e-mail
Email #7 Replace (WCCUSERNAME) with your ACTUAL WCC UserName in link at the bottom of the email (remove the parenthesis & no spaces!)
Sports Betting Follow Up Series
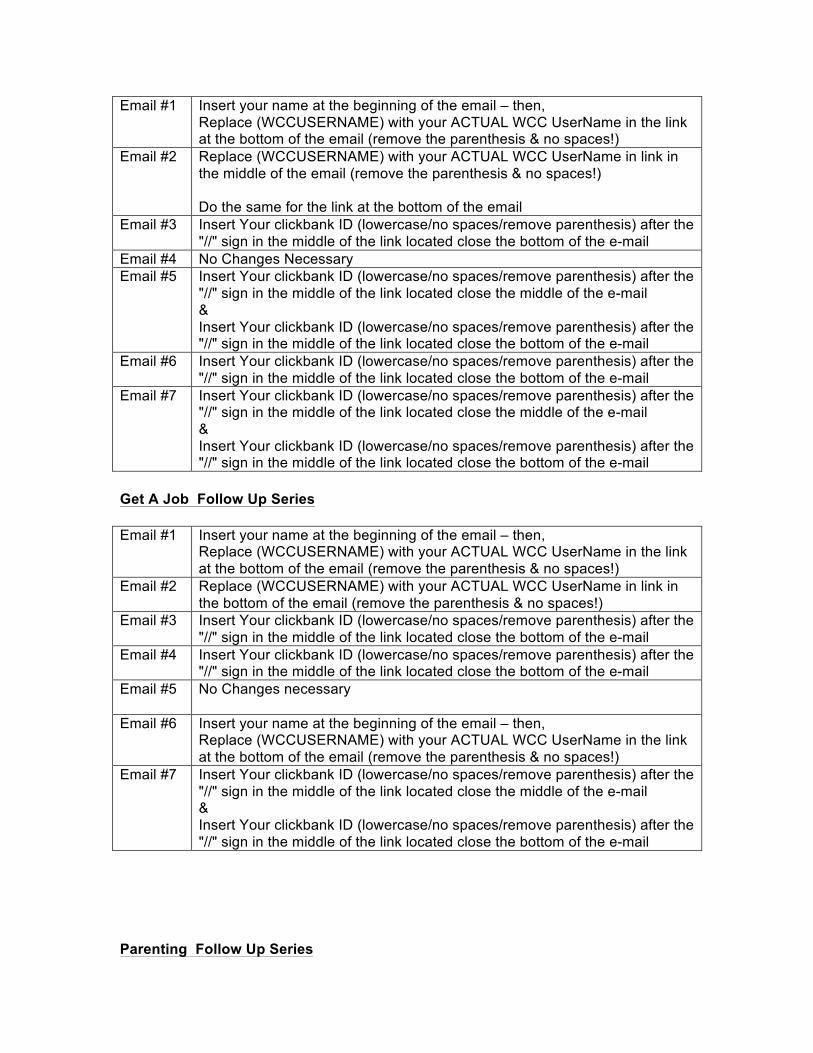
Email #1 Insert your name at the beginning of the email – then, Replace (WCCUSERNAME) with your ACTUAL WCC UserName in the link at the bottom of the email (remove the parenthesis & no spaces!)
Email #2 Replace (WCCUSERNAME) with your ACTUAL WCC UserName in link in the middle of the email (remove the parenthesis & no spaces!) Do the same for the link at the bottom of the email
Email #3 Insert Your clickbank ID (lowercase/no spaces/remove parenthesis) after the "//" sign in the middle of the link located close the bottom of the e-mail
Email #4 No Changes Necessary Email #5 Insert Your clickbank ID (lowercase/no spaces/remove parenthesis) after the
"//" sign in the middle of the link located close the middle of the e-mail & Insert Your clickbank ID (lowercase/no spaces/remove parenthesis) after the "//" sign in the middle of the link located close the bottom of the e-mail
Email #6 Insert Your clickbank ID (lowercase/no spaces/remove parenthesis) after the "//" sign in the middle of the link located close the bottom of the e-mail
Email #7 Insert Your clickbank ID (lowercase/no spaces/remove parenthesis) after the "//" sign in the middle of the link located close the middle of the e-mail & Insert Your clickbank ID (lowercase/no spaces/remove parenthesis) after the "//" sign in the middle of the link located close the bottom of the e-mail
Get A Job Follow Up Series
Email #1 Insert your name at the beginning of the email – then, Replace (WCCUSERNAME) with your ACTUAL WCC UserName in the link at the bottom of the email (remove the parenthesis & no spaces!)
Email #2 Replace (WCCUSERNAME) with your ACTUAL WCC UserName in link in the bottom of the email (remove the parenthesis & no spaces!)
Email #3 Insert Your clickbank ID (lowercase/no spaces/remove parenthesis) after the "//" sign in the middle of the link located close the bottom of the e-mail
Email #4 Insert Your clickbank ID (lowercase/no spaces/remove parenthesis) after the "//" sign in the middle of the link located close the bottom of the e-mail
Email #5 No Changes necessary
Email #6 Insert your name at the beginning of the email – then, Replace (WCCUSERNAME) with your ACTUAL WCC UserName in the link at the bottom of the email (remove the parenthesis & no spaces!)
Email #7 Insert Your clickbank ID (lowercase/no spaces/remove parenthesis) after the "//" sign in the middle of the link located close the middle of the e-mail & Insert Your clickbank ID (lowercase/no spaces/remove parenthesis) after the "//" sign in the middle of the link located close the bottom of the e-mail
Parenting Follow Up Series
Email #1 Replace (WCCUSERNAME) with your ACTUAL WCC UserName in the link at the bottom of the email (remove the parenthesis & no spaces!)
Email #2 Replace (WCCUSERNAME) with your ACTUAL WCC UserName in link in the bottom of the email (remove the parenthesis & no spaces!)
Email #3 Insert Your clickbank ID (lowercase/no spaces/remove parenthesis) after the "//" sign in the middle of the link located close the middle of the e-mail & Insert Your clickbank ID (lowercase/no spaces/remove parenthesis) after the "//" sign in the middle of the link located close the bottom of the e-mail
Email #4 No Changes Necessary Email #5 Insert Your clickbank ID (lowercase/no spaces/remove parenthesis) after the
"//" sign in the middle of the link located close the bottom of the e-mail Email #6 Replace (WCCUSERNAME) with your ACTUAL WCC UserName in the link
at the bottom of the email (remove the parenthesis & no spaces!) Email #7 Insert Your clickbank ID (lowercase/no spaces/remove parenthesis) after the
"//" sign in the middle of the link located close the bottom of the e-mail
- You’re now done with all of the messages updates. If you want to come back and add some more follow-up messages (with your affiliate link to other programs or some personal content) then you can click on the “+ Add New Follow Up Message” at the bottom of the page “Follow Up” Message page., insert a subject line, write a message (preferably just plain text), choose how many days after the previous message you want it to go out, and then click “save…but you can do this later
- IMPORTANT – There is sometimes a little “bug” in Aweber that occurs when you’re done editing your follow up messages. Once you’re done editing your messages look at your list of messages and notice the column that says “Type”. If it says “Text” then your good to go If it says “Text/HTML” then you’re going to need to do the following Click on the subject line of the message just as you just finished doing when making all of the personalization changes Put your mouse inside the box that says “HTML Message”, then left click so that the courser shows up…and hit “Backspace” (on your keyboard) 2-3 times. Scroll to the bottom and save the message…this should take care of the issue and you should see your message go from “Text/Html” back to “Text” Again, I’m not sure why this happens but it’s just a little bug with an easy fix
STEP 6(& VIDEO 6): Now that your messages have been personalized/updated, we’ll need to setup your WebCopyCat System! For this you’ll need your Clickbank I.D, and
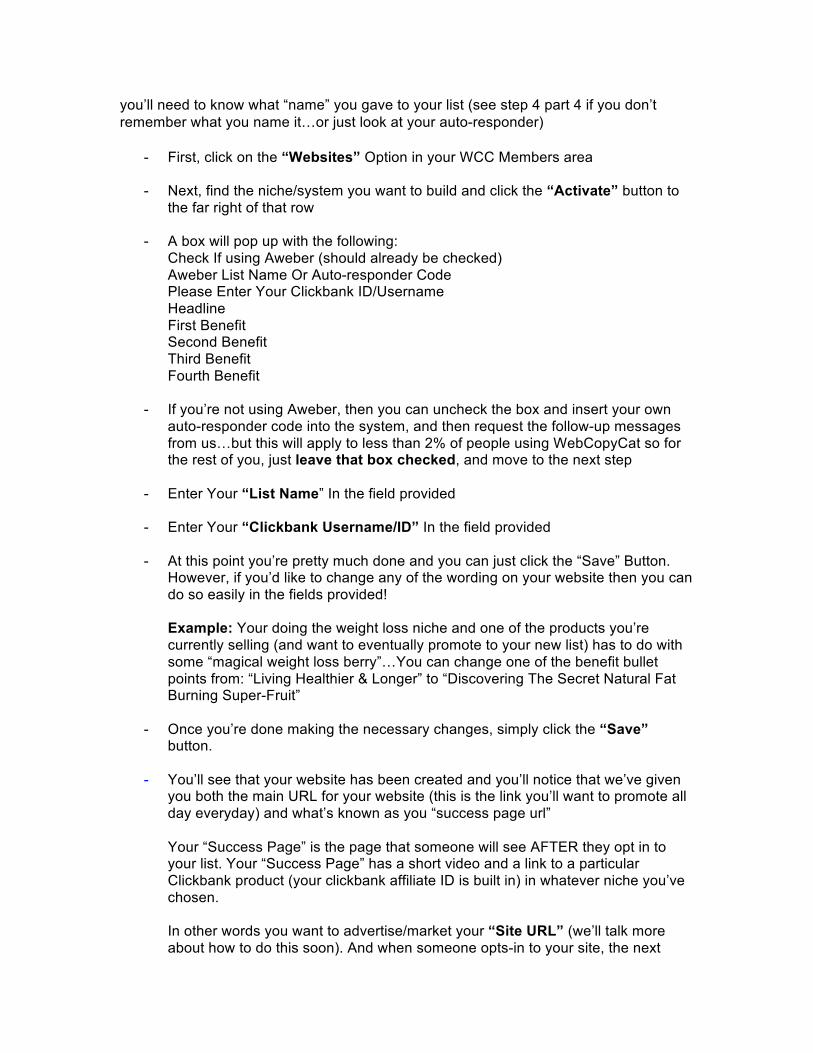
you’ll need to know what “name” you gave to your list (see step 4 part 4 if you don’t remember what you name it…or just look at your auto-responder)
- First, click on the “Websites” Option in your WCC Members area
- Next, find the niche/system you want to build and click the “Activate” button to the far right of that row
- A box will pop up with the following: Check If using Aweber (should already be checked) Aweber List Name Or Auto-responder Code Please Enter Your Clickbank ID/Username Headline First Benefit Second Benefit Third Benefit Fourth Benefit
- If you’re not using Aweber, then you can uncheck the box and insert your own auto-responder code into the system, and then request the follow-up messages from us…but this will apply to less than 2% of people using WebCopyCat so for the rest of you, just leave that box checked, and move to the next step
- Enter Your “List Name” In the field provided
- Enter Your “Clickbank Username/ID” In the field provided
- At this point you’re pretty much done and you can just click the “Save” Button. However, if you’d like to change any of the wording on your website then you can do so easily in the fields provided! Example: Your doing the weight loss niche and one of the products you’re currently selling (and want to eventually promote to your new list) has to do with some “magical weight loss berry”…You can change one of the benefit bullet points from: “Living Healthier & Longer” to “Discovering The Secret Natural Fat Burning Super-Fruit”
- Once you’re done making the necessary changes, simply click the “Save” button.
- You’ll see that your website has been created and you’ll notice that we’ve given you both the main URL for your website (this is the link you’ll want to promote all day everyday) and what’s known as you “success page url” Your “Success Page” is the page that someone will see AFTER they opt in to your list. Your “Success Page” has a short video and a link to a particular Clickbank product (your clickbank affiliate ID is built in) in whatever niche you’ve chosen. In other words you want to advertise/market your “Site URL” (we’ll talk more about how to do this soon). And when someone opts-in to your site, the next
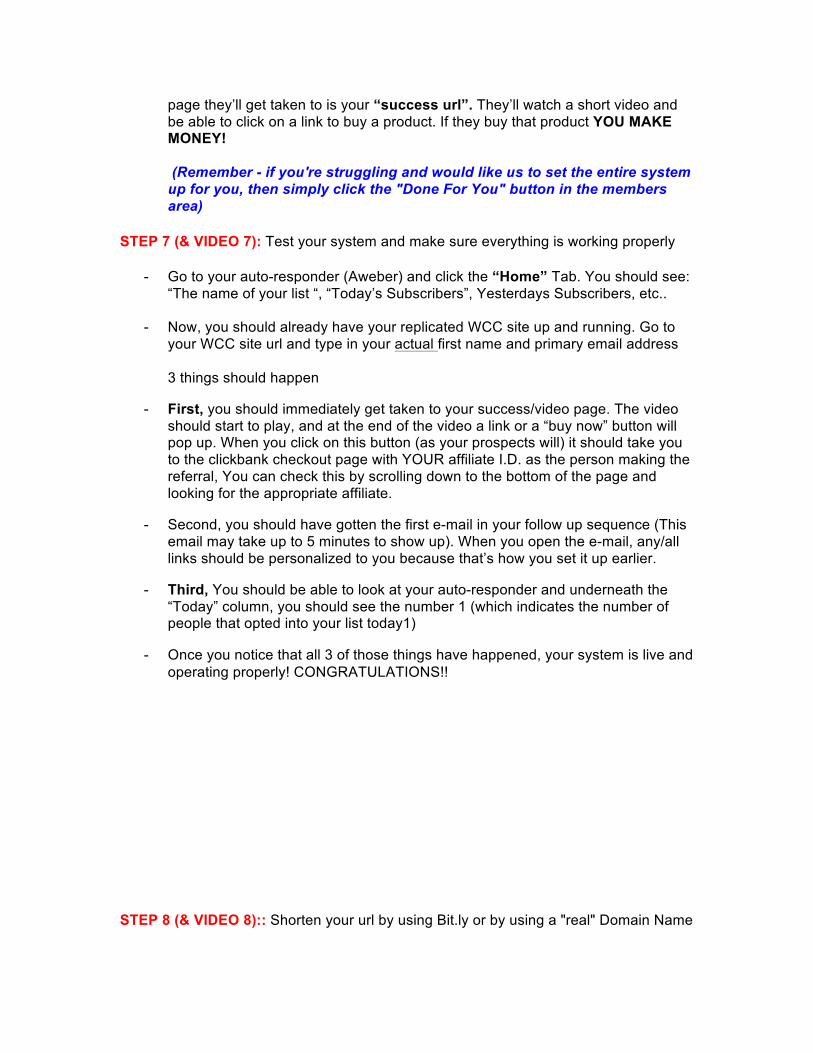
page they’ll get taken to is your “success url”. They’ll watch a short video and be able to click on a link to buy a product. If they buy that product YOU MAKE MONEY! (Remember - if you're struggling and would like us to set the entire system up for you, then simply click the "Done For You" button in the members area)
STEP 7 (& VIDEO 7): Test your system and make sure everything is working properly
- Go to your auto-responder (Aweber) and click the “Home” Tab. You should see: “The name of your list “, “Today’s Subscribers”, Yesterdays Subscribers, etc..
- Now, you should already have your replicated WCC site up and running. Go to your WCC site url and type in your actual first name and primary email address 3 things should happen
- First, you should immediately get taken to your success/video page. The video should start to play, and at the end of the video a link or a “buy now” button will pop up. When you click on this button (as your prospects will) it should take you to the clickbank checkout page with YOUR affiliate I.D. as the person making the referral, You can check this by scrolling down to the bottom of the page and looking for the appropriate affiliate.
- Second, you should have gotten the first e-mail in your follow up sequence (This email may take up to 5 minutes to show up). When you open the e-mail, any/all links should be personalized to you because that’s how you set it up earlier.
- Third, You should be able to look at your auto-responder and underneath the “Today” column, you should see the number 1 (which indicates the number of people that opted into your list today1)
- Once you notice that all 3 of those things have happened, your system is live and operating properly! CONGRATULATIONS!!
STEP 8 (& VIDEO 8):: Shorten your url by using Bit.ly or by using a "real" Domain Name
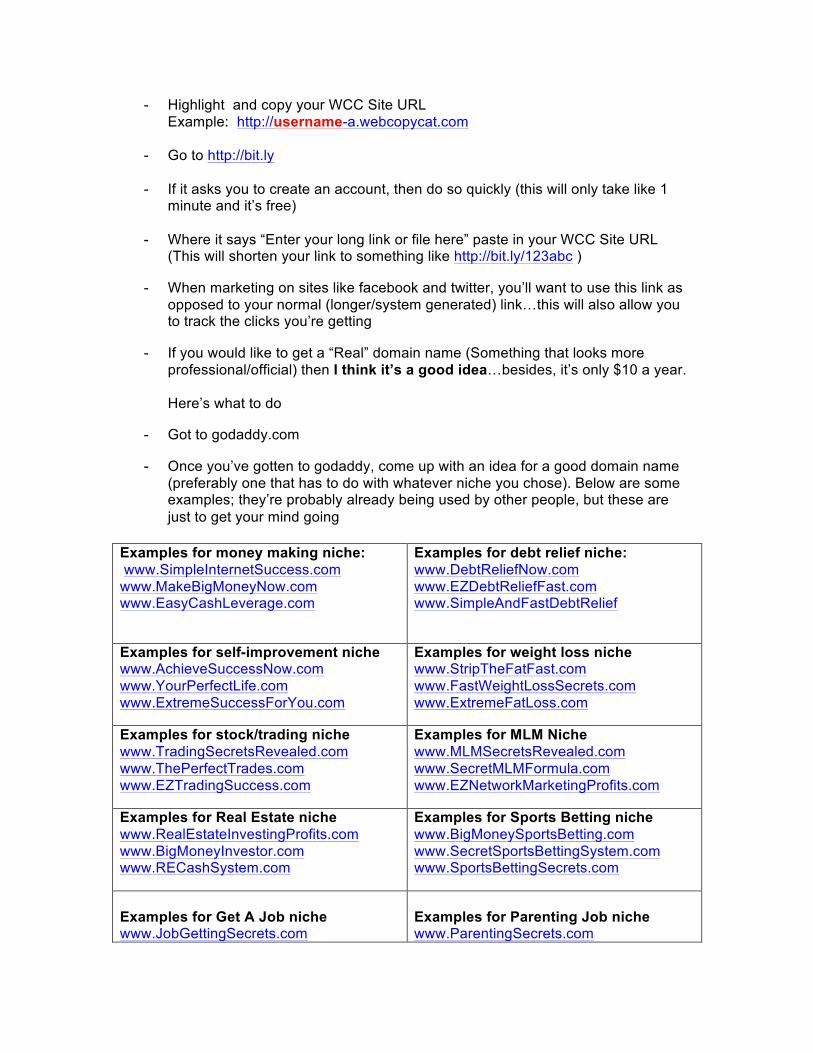
- Highlight and copy your WCC Site URL Example: http://username-a.webcopycat.com
- Go to http://bit.ly
- If it asks you to create an account, then do so quickly (this will only take like 1 minute and it’s free)
- Where it says “Enter your long link or file here” paste in your WCC Site URL (This will shorten your link to something like http://bit.ly/123abc )
- When marketing on sites like facebook and twitter, you’ll want to use this link as opposed to your normal (longer/system generated) link…this will also allow you to track the clicks you’re getting
- If you would like to get a “Real” domain name (Something that looks more professional/official) then I think it’s a good idea…besides, it’s only $10 a year. Here’s what to do
- Got to godaddy.com
- Once you’ve gotten to godaddy, come up with an idea for a good domain name (preferably one that has to do with whatever niche you chose). Below are some examples; they’re probably already being used by other people, but these are just to get your mind going
Examples for money making niche: www.SimpleInternetSuccess.com www.MakeBigMoneyNow.com www.EasyCashLeverage.com
Examples for debt relief niche: www.DebtReliefNow.com www.EZDebtReliefFast.com www.SimpleAndFastDebtRelief
Examples for self-improvement niche www.AchieveSuccessNow.com www.YourPerfectLife.com www.ExtremeSuccessForYou.com
Examples for weight loss niche www.StripTheFatFast.com www.FastWeightLossSecrets.com www.ExtremeFatLoss.com
Examples for stock/trading niche www.TradingSecretsRevealed.com www.ThePerfectTrades.com www.EZTradingSuccess.com
Examples for MLM Niche www.MLMSecretsRevealed.com www.SecretMLMFormula.com www.EZNetworkMarketingProfits.com
Examples for Real Estate niche www.RealEstateInvestingProfits.com www.BigMoneyInvestor.com www.RECashSystem.com
Examples for Sports Betting niche www.BigMoneySportsBetting.com www.SecretSportsBettingSystem.com www.SportsBettingSecrets.com
Examples for Get A Job niche www.JobGettingSecrets.com
Examples for Parenting Job niche www.ParentingSecrets.com
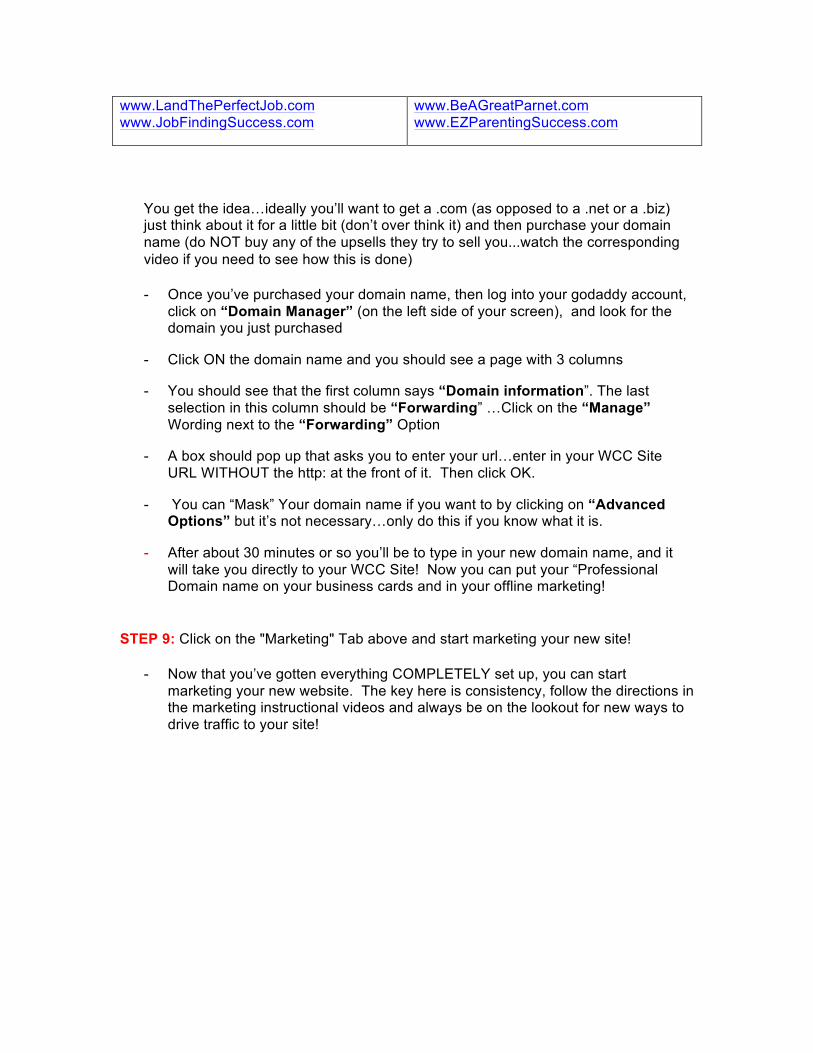
www.LandThePerfectJob.com www.JobFindingSuccess.com
www.BeAGreatParnet.com www.EZParentingSuccess.com
You get the idea…ideally you’ll want to get a .com (as opposed to a .net or a .biz) just think about it for a little bit (don’t over think it) and then purchase your domain name (do NOT buy any of the upsells they try to sell you...watch the corresponding video if you need to see how this is done)
- Once you’ve purchased your domain name, then log into your godaddy account, click on “Domain Manager” (on the left side of your screen), and look for the domain you just purchased
- Click ON the domain name and you should see a page with 3 columns
- You should see that the first column says “Domain information”. The last selection in this column should be “Forwarding” …Click on the “Manage” Wording next to the “Forwarding” Option
- A box should pop up that asks you to enter your url…enter in your WCC Site URL WITHOUT the http: at the front of it. Then click OK.
- You can “Mask” Your domain name if you want to by clicking on “Advanced Options” but it’s not necessary…only do this if you know what it is.
- After about 30 minutes or so you’ll be to type in your new domain name, and it will take you directly to your WCC Site! Now you can put your “Professional Domain name on your business cards and in your offline marketing!
STEP 9: Click on the "Marketing" Tab above and start marketing your new site!
- Now that you’ve gotten everything COMPLETELY set up, you can start marketing your new website. The key here is consistency, follow the directions in the marketing instructional videos and always be on the lookout for new ways to drive traffic to your site!


