Embed Size (px)
Citation preview
1.
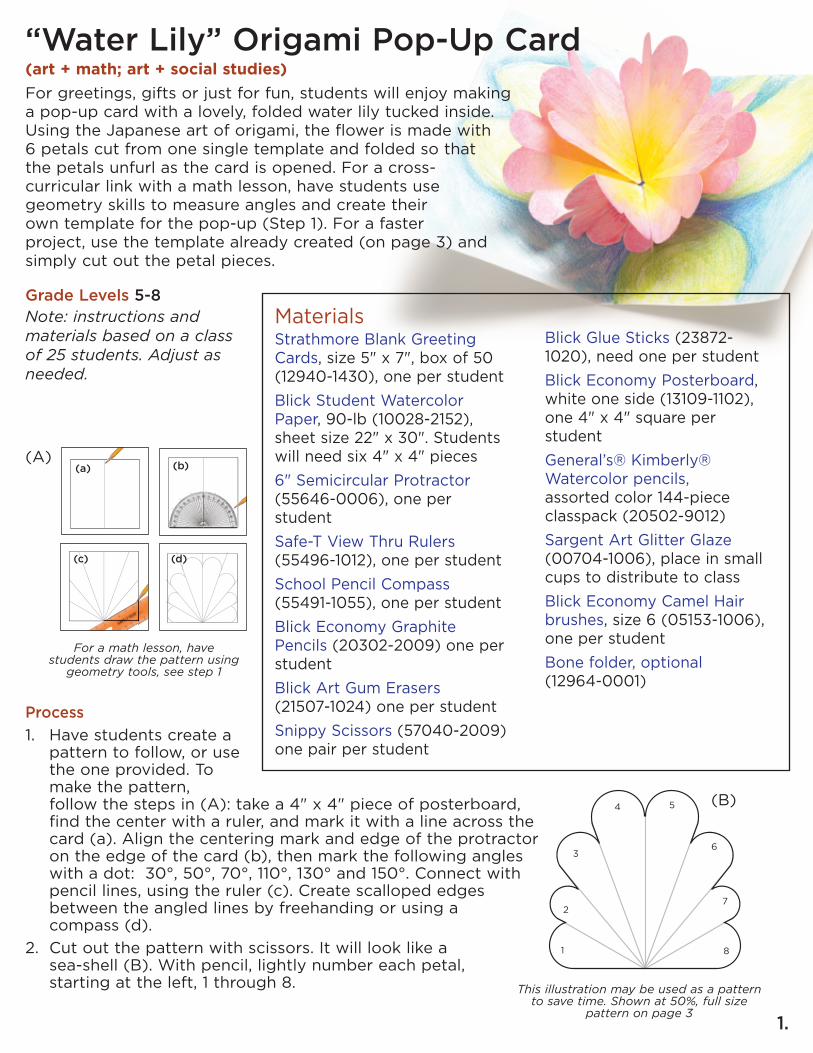
“Water Lily” Origami Pop-Up Card(art + math; art + social studies)
For greetings, gifts or just for fun, students will enjoy makinga pop-up card with a lovely, folded water lily tucked inside.Using the Japanese art of origami, the flower is made with6 petals cut from one single template and folded so thatthe petals unfurl as the card is opened. For a cross-curricular link with a math lesson, have students usegeometry skills to measure angles and create theirown template for the pop-up (Step 1). For a fasterproject, use the template already created (on page 3) andsimply cut out the petal pieces.
Grade Levels 5-8Note: instructions andmaterials based on a classof 25 students. Adjust asneeded.
Process
1. Have students create apattern to follow, or usethe one provided. Tomake the pattern,follow the steps in (A): take a 4" x 4" piece of posterboard,find the center with a ruler, and mark it with a line across thecard (a). Align the centering mark and edge of the protractoron the edge of the card (b), then mark the following angleswith a dot: 30°, 50°, 70°, 110°, 130° and 150°. Connect withpencil lines, using the ruler (c). Create scalloped edgesbetween the angled lines by freehanding or using acompass (d).
2. Cut out the pattern with scissors. It will look like a sea-shell (B). With pencil, lightly number each petal, starting at the left, 1 through 8.
C
For a math lesson, havestudents draw the pattern using
geometry tools, see step 1
(a) (b)
(c) (d)
(A)
MaterialsStrathmore Blank GreetingCards, size 5" x 7", box of 50(12940-1430), one per student
Blick Student WatercolorPaper, 90-lb (10028-2152),sheet size 22" x 30". Studentswill need six 4" x 4" pieces
6" Semicircular Protractor(55646-0006), one per student
Safe-T View Thru Rulers(55496-1012), one per student
School Pencil Compass(55491-1055), one per student
Blick Economy GraphitePencils (20302-2009) one perstudent
Blick Art Gum Erasers(21507-1024) one per student
Snippy Scissors (57040-2009)one pair per student
Blick Glue Sticks (23872-1020), need one per student
Blick Economy Posterboard,white one side (13109-1102),one 4" x 4" square perstudent
General’s® Kimberly®Watercolor pencils, assorted color 144-piece classpack (20502-9012)
Sargent Art Glitter Glaze(00704-1006), place in smallcups to distribute to class
Blick Economy Camel Hairbrushes, size 6 (05153-1006),one per student
Bone folder, optional (12964-0001)
(B)
1
2
3
4 5
6
7
8
This illustration may be used as a patternto save time. Shown at 50%, full size
pattern on page 3
Process, continued
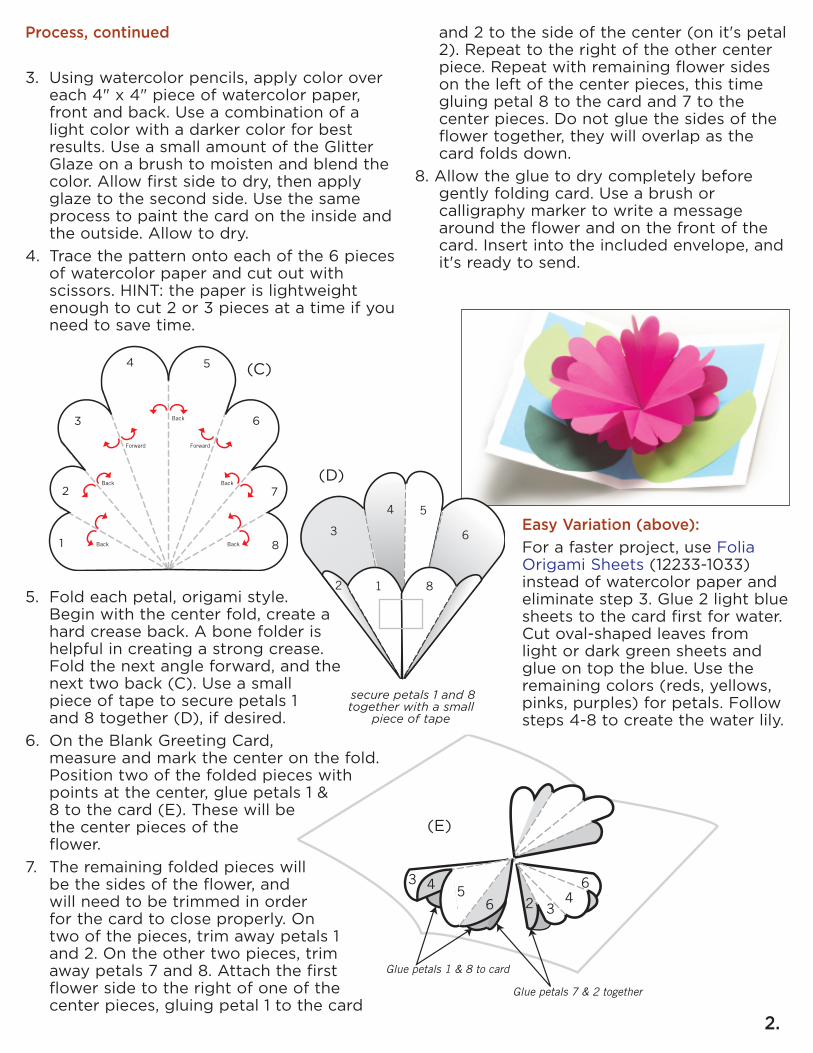
3. Using watercolor pencils, apply color overeach 4" x 4" piece of watercolor paper,front and back. Use a combination of alight color with a darker color for bestresults. Use a small amount of the GlitterGlaze on a brush to moisten and blend thecolor. Allow first side to dry, then applyglaze to the second side. Use the sameprocess to paint the card on the inside andthe outside. Allow to dry.
4. Trace the pattern onto each of the 6 piecesof watercolor paper and cut out withscissors. HINT: the paper is lightweightenough to cut 2 or 3 pieces at a time if youneed to save time.
5. Fold each petal, origami style.Begin with the center fold, create a hard crease back. A bone folder is helpful in creating a strong crease. Fold the next angle forward, and the next two back (C). Use a smallpiece of tape to secure petals 1and 8 together (D), if desired.
6. On the Blank Greeting Card,measure and mark the center on the fold.Position two of the folded pieces withpoints at the center, glue petals 1 &8 to the card (E). These will bethe center pieces of theflower.
7. The remaining folded pieces willbe the sides of the flower, andwill need to be trimmed in orderfor the card to close properly. Ontwo of the pieces, trim away petals 1and 2. On the other two pieces, trimaway petals 7 and 8. Attach the firstflower side to the right of one of thecenter pieces, gluing petal 1 to the card
and 2 to the side of the center (on it's petal2). Repeat to the right of the other centerpiece. Repeat with remaining flower sideson the left of the center pieces, this timegluing petal 8 to the card and 7 to thecenter pieces. Do not glue the sides of theflower together, they will overlap as thecard folds down.
8. Allow the glue to dry completely beforegently folding card. Use a brush orcalligraphy marker to write a messagearound the flower and on the front of thecard. Insert into the included envelope, andit's ready to send.
Easy Variation (above):
For a faster project, use FoliaOrigami Sheets (12233-1033)instead of watercolor paper andeliminate step 3. Glue 2 light bluesheets to the card first for water.Cut oval-shaped leaves fromlight or dark green sheets andglue on top the blue. Use theremaining colors (reds, yellows,pinks, purples) for petals. Followsteps 4-8 to create the water lily.
2.
Back
Back Back
Back Back
Forward Forward
1
2
3
4 5
6
7
8
(C)
6543
Glue petals 1 & 8 to card
Glue petals 7 & 2 together
2 34
6
(E)
12
3
4 5
6
8
(D)
secure petals 1 and 8together with a small
piece of tape

3.
Copyright © 2005 Dick Blick Art Materials. All rights reserved. JD
template
National Standards:Content Standard #1 — Understanding andapplying media, techniques and processes
• 5-8 Students intentionally takeadvantage of the qualities andcharacteristics of art media, techniques andprocesses to enhance communication of their experience andideas.
Content Standard #6 — Makingconnections between visual arts and other disciplines
• 5-8 Students describe ways in which theprinciples and subject matter of otherdisciplines taught in the school areinterrelated with the visual arts.


![The Water Lily in Maya Art: A Complex of Alleged Asiatic ... · WATER LILY IN MAYA ART-RANDS . 81. NO. 34] of . Nymphaea ampla, the large, showy, white water lily of the Maya, exist](https://img.pdfslide.us/doc/110x75/5faccb7d0e49991527244909/the-water-lily-in-maya-art-a-complex-of-alleged-asiatic-water-lily-in-maya.jpg)