Embed Size (px)
Citation preview
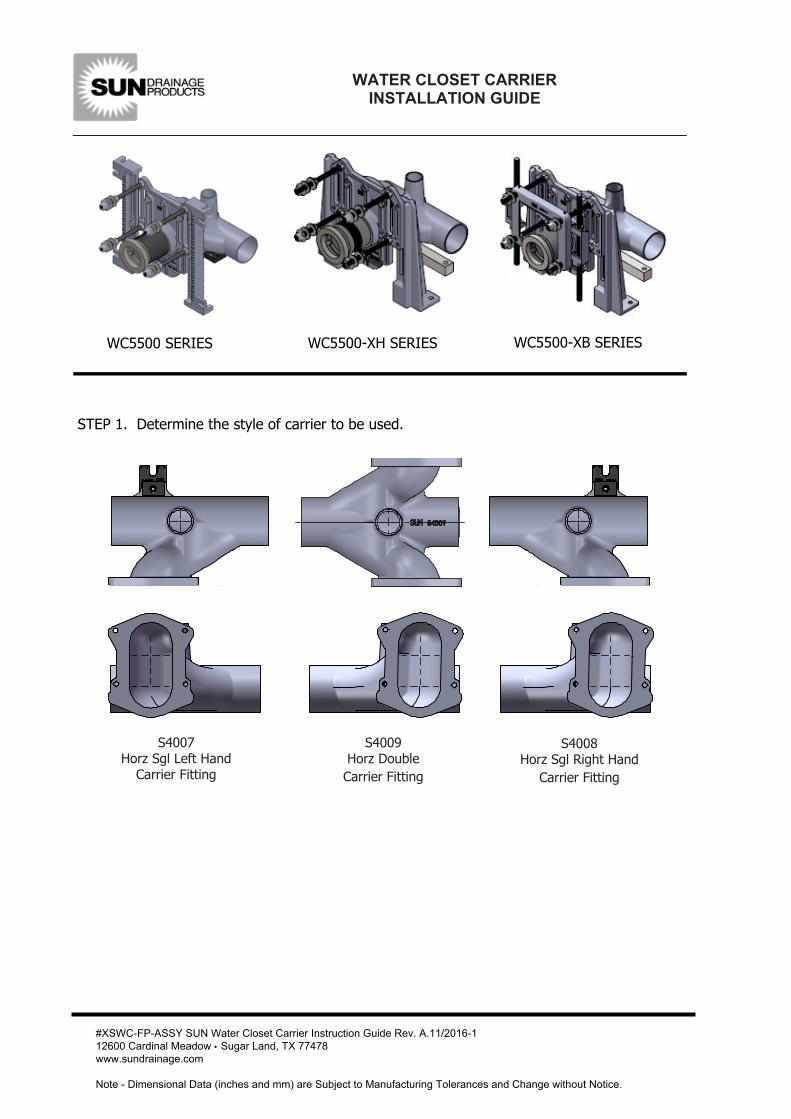
WATER CLOSET CARRIER INSTALLATION GUIDE
#XSWC-FP-ASSY SUN Water Closet Carrier Instruction Guide Rev. A.11/2016-112600 Cardinal Meadow • Sugar Land, TX 77478 www.sundrainage.com
Note - Dimensional Data (inches and mm) are Subject to Manufacturing Tolerances and Change without Notice.
S4007Horz Sgl Left Hand
Carrier Fitting
S4009 Horz Double Carrier Fitting
S4008 Horz Sgl Right Hand
Carrier Fitting
STEP 1. Determine the style of carrier to be used.
WC5500 SERIES WC5500-XB SERIESWC5500-XH SERIES
WATER CLOSET CARRIERINSTALLATION GUIDE
#XSWC-FP-ASSY SUN Water Closet Carrier Instruction Guide Rev. A.11/2016-212600 Cardinal Meadow • Sugar Land, TX 77478 www.sundrainage.com
Note - Dimensional Data (inches and mm) are Subject to Manufacturing Tolerances and Change without Notice.
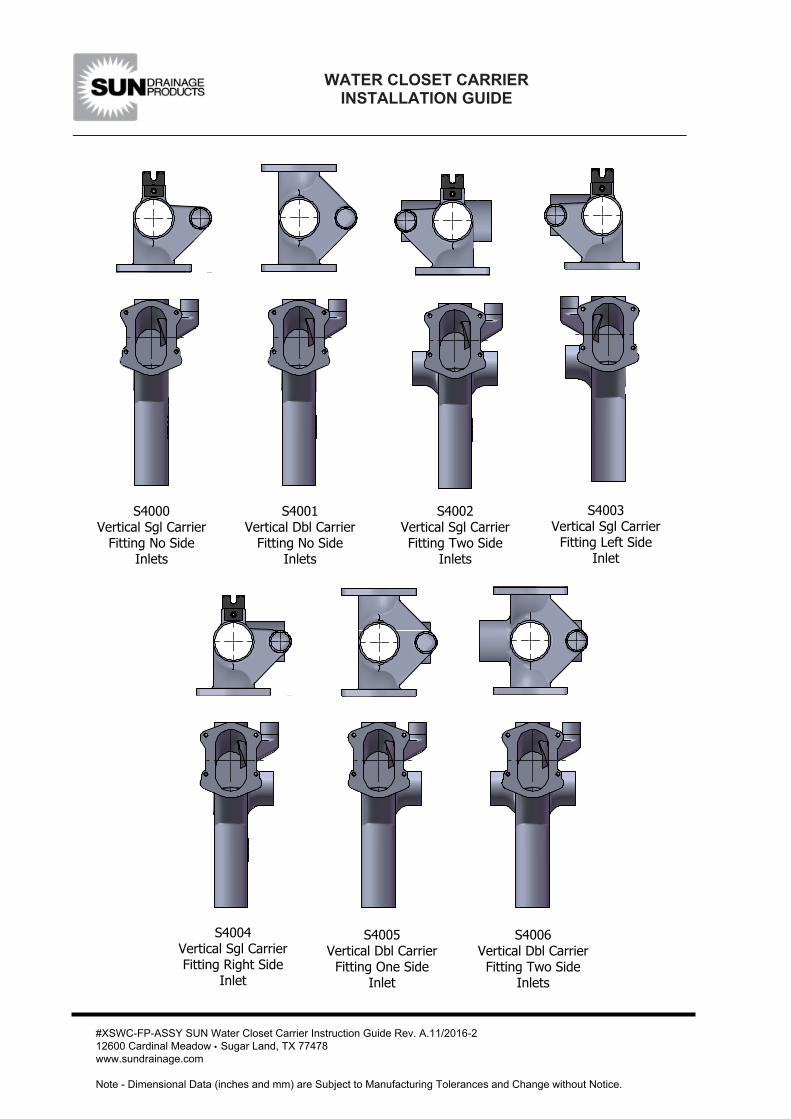
S4000 Vertical Sgl Carrier
Fitting No Side Inlets
S4001 Vertical Dbl Carrier
Fitting No Side Inlets
S4002 Vertical Sgl Carrier Fitting Two Side
Inlets
S4003 Vertical Sgl Carrier
Fitting Left Side Inlet
S4004 Vertical Sgl Carrier Fitting Right Side
Inlet
S4005 Vertical Dbl Carrier
Fitting One Side Inlet
S4006 Vertical Dbl Carrier Fitting Two Side
Inlets
WATER CLOSET CARRIERINSTALLATION GUIDE
#XSWC-FP-ASSY SUN Water Closet Carrier Instruction Guide Rev. A.11/2016-3 12600 Cardinal Meadow • Sugar Land, TX 77478 www.sundrainage.com
Note - Dimensional Data (inches and mm) are Subject to Manufacturing Tolerances and Change without Notice.
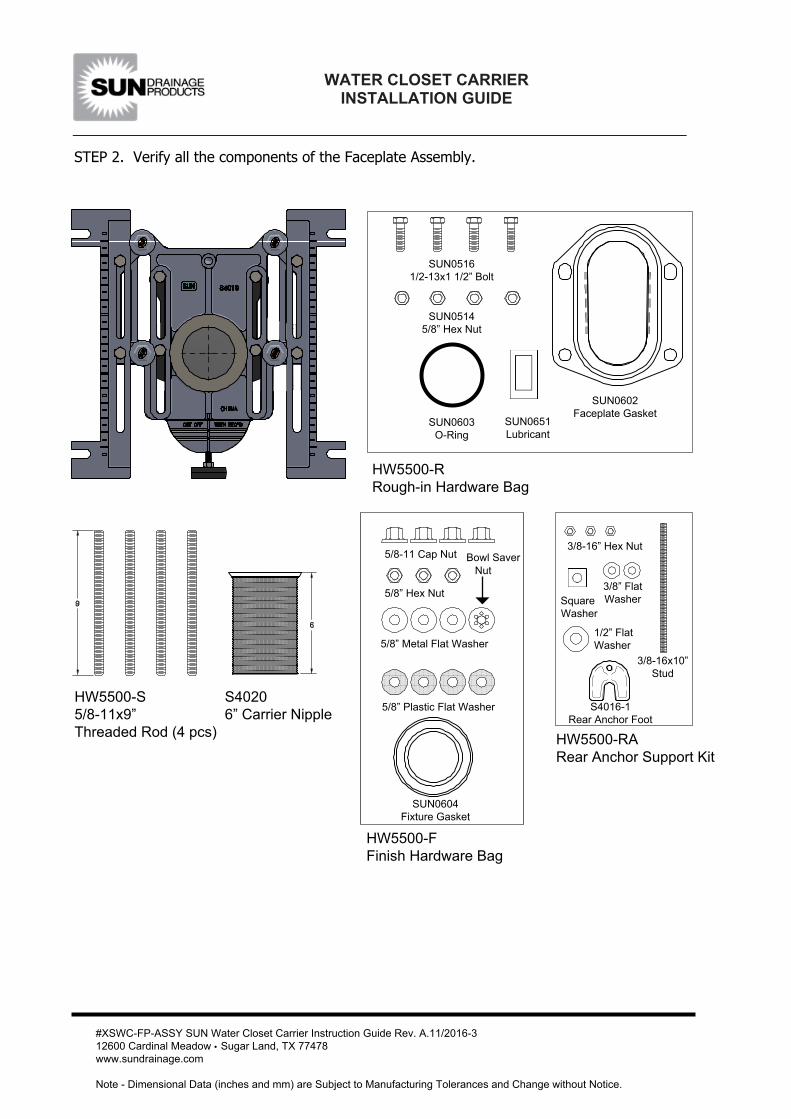
HW5500-S5/8-11x9”Threaded Rod (4 pcs)
S40206” Carrier Nipple
HW5500-FFinish Hardware Bag
HW5500-RARear Anchor Support Kit
HW5500-RRough-in Hardware Bag
SUN0603O-Ring
SUN0604Fixture Gasket
SUN0602Faceplate Gasket
SUN05145/8” Hex Nut
SUN05161/2-13x1 1/2” Bolt
Bowl Saver Nut
S4016-1Rear Anchor Foot
3/8-16x10”Stud
Square Washer
3/8” FlatWasher
1/2” FlatWasher
3/8-16” Hex Nut5/8-11 Cap Nut
5/8” Hex Nut
5/8” Metal Flat Washer
5/8” Plastic Flat Washer
STEP 2. Verify all the components of the Faceplate Assembly.
SUN0651Lubricant
WATER CLOSET CARRIERINSTALLATION GUIDE
#XSWC-FP-ASSY SUN Water Closet Carrier Instruction Guide Rev. A.11/2016 12600 Cardinal Meadow • Sugar Land, TX 77478 www.sundrainage.com
Note - Dimensional Data (inches and mm) are Subject to Manufacturing Tolerances and Change without Notice.
STEP 3. Layout all of the closet fittings on the floor and connect with the proper length of pipe between adjoining fittings. Support each pipe segment for correct pitch and elevation. Ensure all fitting faces are parallel and aligned.
STEP 4. Remove faceplate gasket from box and place on the carrier fitting face. Locate the ribs on the gasket and align onto the oval opening of the fitting. Ensure the four holes in the gasket properly align with the four tapped holes in the carrier fitting.
STEP 5. From the fixture manufacturer’s rough-in sheet, determine the recommended rough-in height to the closet horn. Remove the lugs on the bottom of the faceplate to achieve the correct height.
STEP 6. Bolt faceplate onto fitting using provided hardware. Hand tighten.
STEP 7. Adjust feet on faceplate assemblies so that the bottom of the feet are parallel to the faceplate. Securely tighten the bolts with a wrench. Subsequent fittings and faceplates should be aligned lower to allow for proper drainage pitch. After this adjustment is made, tighten all bolts uniformly until the gasket is sufficiently compressed.
STEP 8. Move the carrier system into the desired position. Verify the carrier alignments and leveling and connect to waste stack. Confirm closet outlets are in proper position horizontally and vertically. Secure to floor using ½” bolts (supplied by others).
STEP 9. If the carriers are single fittings, install the rear anchor foot assembly. Screw the threaded rod into the foot and secure with locknut. Place the assembly into position with the anchor slot on the rear of the carrier fitting. Secure with two washers and two hex nuts. Adjust and tighten so that the anchor foot remains in contact with concrete floor. Securely fasten anchor foot to floor using ½” bolt(s), supplied by others.
STEP 10. Insert O-ring into the recess of the threaded opening of the faceplate. Lubricate the O-ring generously with the included petroleum jelly. Screw the threaded coupling into the faceplate. Recognize the change in tension as the coupling and O-ring meet. Use a coupling wrench for final adjustments. The threads of the coupling should be protected to prevent grout adherence and allow adjustments when installing fixture. The coupling should extend past the finish wall using the formula below:
STEP 11. Using the 5/8” hex nuts provided, thread onto the threaded studs and screw into the threaded holes on the faceplate. Tighten the hex nuts with a wrench. The threaded rods should remain covered with the plastic sleeve until the fixture is installed. The stud should extend past the finish wall using the formula below.
WATER CLOSET CARRIERINSTALLATION GUIDE
#XSWC-FP-ASSY SUN Water Closet Carrier Instruction Guide Rev. A.11/2016-512600 Cardinal Meadow ▪ Sugar Land, TX 77478 www.sundrainage.com
Note - Dimensional Data (inches and mm) are Subject to Manufacturing Tolerances and Change without Notice.
STEP 12. After the finished wall is complete, install the remaining washers and hex nuts onto the top two fixture support studs and one of the bottom studs. The remaining stud receives the provided bowl saver nut. The coupling and studs can now be cut to length. Verify the stud and coupling dimensional data due to the variations in gasket recesses and water closet flanges.
STEP 13. Fully remove the integral test cap from the threaded coupling prior to installation of the closet to the carrier.
STEP 14. After the fixture support studs (threaded rod) and closet coupling have been adjusted to the proper dimensions, install the neoprene bowl gasket onto the coupling. Adjust the nuts and washers to allow for a slight 1/16” gap between the fixture and the finished wall. The bowl saver nut should be adjusted further back. Install the fixture, aligning the holes with the support studs and ensuring the gasket seats into the fixture recess. Install three cap nuts onto the studs. Tighten securely. Reach into the cavity between the fixture hole and support stud to rotate the bowl saver nut to bring the washer in contact with the fixture flange. Install the remaining cap nut and tighten.
Note: The carrier is designed to support the fixture only. Piping must be supported by other means.
WATER CLOSET CARRIERINSTALLATION GUIDE
#XSWC-FP-ASSY SUN Water Closet Carrier Instruction Guide Rev. A.11/2016-6 12600 Cardinal Meadow • Sugar Land, TX 77478 www.sundrainage.com
Note - Dimensional Data (inches and mm) are Subject to Manufacturing Tolerances and Change without Notice.
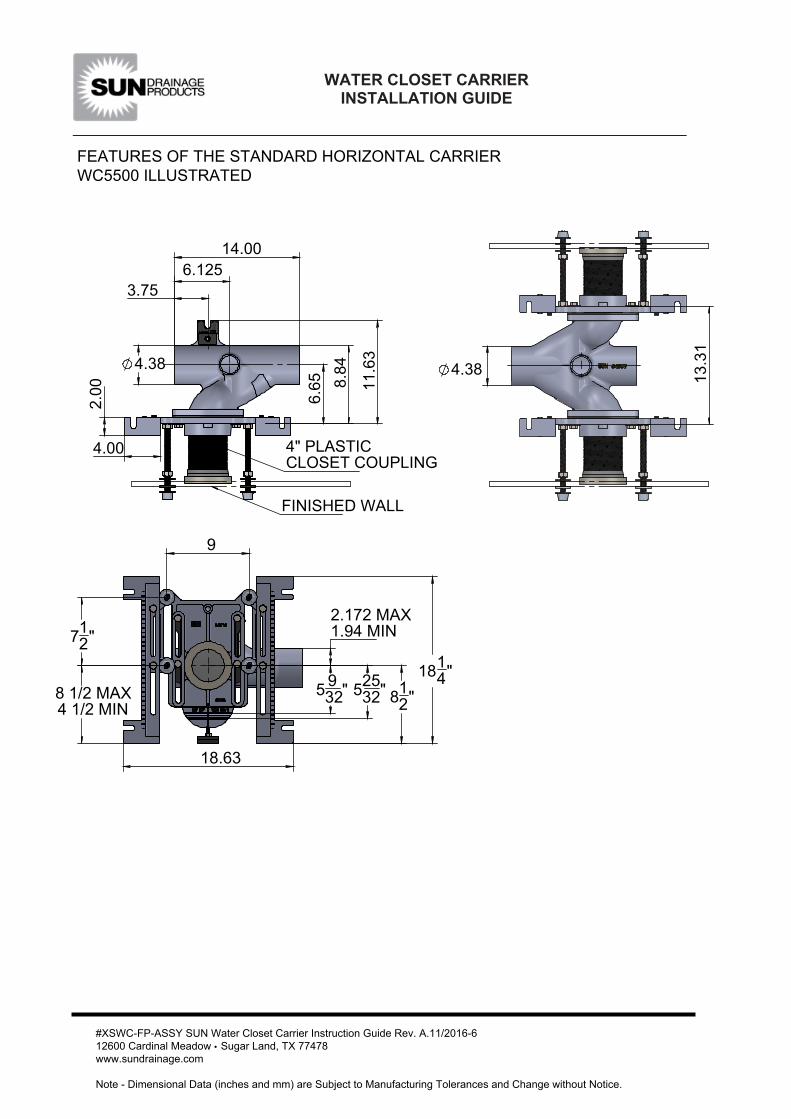
3.756.
65 11.6
3
6.12514.00
4.00
2.00
4.38 4.38
8.84
FINISHED WALL
4" PLASTICCLOSET COUPLING
13.3
1
712"
8 1/2 MAX4 1/2 MIN
9
1814"
18.63
812"
2.172 MAX1.94 MIN
5 932" 525
32"
FEATURES OF THE STANDARD HORIZONTAL CARRIERWC5500 ILLUSTRATED

WATER CLOSET CARRIERINSTALLATION GUIDE
#XSWC-FP-ASSY SUN Water Closet Carrier Instruction Guide Rev. A.11/2016-7 12600 Cardinal Meadow • Sugar Land, TX 77478 www.sundrainage.com
Note - Dimensional Data (inches and mm) are Subject to Manufacturing Tolerances and Change without Notice.
1814"
8 1/2
18.63
8 1/2" MAX4 1/2" MIN
712"
9"
5932"
52532"
6.65310.125 "11
.62
L
FINISHED WALL
2" VENT
4" PLASTICCLOSET COUPLING
13.81
6.653
2
4.00
FEATURES OF THE STANDARD VERTICAL CARRIERWC5600 ILLUSTRATED