Embed Size (px)
Citation preview
1

2
For Even Better Results, Check Out The Warrior Warm Up Video
Series. With Over 4 Hours Of Video Footage The Warrior Warm
Up Video Series Includes 14 Videos Detailing Every Exercise
Highlighted In The Warrior Warm Up E-Book. Click The Link
Below To Learn More.
http://www.thewarriorwarmup.com/
To Get Instant Access To the 14 Video Series Click Here
http://www.thewarriorwarmup.com/

3
The Warrior Warm Up
By Tyler J. Bramlett
All Rights ReservedCopyright © 2012, Tyler Bramlett
www.thewarriorwarmup.com
www.garagewarrior.com
No portion of this book may be reproduced or transmitted in any form or by any means,
electronic or mechanical, including photocopying, recording, or by any information storage
and retrieval system, without the express written permission of the publisher.
Manufactured in the United States of America Published by:Tyler Bramlett.Santa Cruz,
California
I’m sad to have to include a disclaimer but here it is.
DISCLAIMER STATEMENT: The Warrior Warm Up Program reflects the authors experience
and is provided for educational purposes and general reference. It is not be a substitute for
medical advice or counseling.
The reader assumes all risks from the use, non-use or misuse of the information in this
book. The Warrior Warm Up focuses on movement quality in a step-by-step format.
Neither the author nor publisher assumes any responsibility for the use or misuse of the
information contained in this book. Please consult a Physician before beginning any
nutrition and exercise program.

4
TABLE OF CONTENTS
Introduction Page 4
10 Things The Warrior Warm Up Replaces Page 5
The 7 Steps To An Effective System Page 8
How To Get The Best Results Page 10
Breathing Page 12
Standing Torso Page 19
Lower Body Page 26
Kneeling Torso Page 41
Upper Body Page 54
Bridging Page 69
Rolling Page 83
Conclusion Page 91
5
INTRODUCTION
Thank you so much for investing in The Warrior Warm Up. I hope to dazzle you with all the
steps your going to take as you go through the program. From the Level One all the way
through Level Five I will make sure you get the best results with The Warrior Warm Up.
Before you get started I wanted to share with you why I created The Warrior Warm Up
series. For the last ten years, I’ve been practicing dozens of different systems, trying them
out, finding out exactly what worked, and what didn't work so well. And in that time I’ve
been trying to condense every single one of those systems into something that took much
less time that anyone could apply.
About three years ago I had invented the First Edition of The Warrior Warm Up. It
contained joint mobility, wrestling skills from Indian wrestling, yogic postures, breathing,
dynamic warm ups, and static stretching. The real reason I finally decided to develop it into
a real system for you to use, is that I showed it to one of my friends and he said, “Holy crap.
You’ve got to share this with people.”
The truth is you don't need an hour a day of this, an hour a day of that. You don't need to do
the stretching here, the joint mobility there, and the yoga there. You can combine it all into
one system that will get you better results in much less time.
The Warrior Warm Up is designed to take less than 15 minutes and only be performed a
few days a week. Now let me share with you what exactly The Warrior Warm Up is hoping
to replace in your daily life and how that's going to benefit you.
6
THE 10 THINGS THE WARRIOR WARM UP
REPLACES IN YOUR TRAINING
The Warrior Warm Up was originally designed to replace a bunch of different things. Here
is a list the things we're trying to replace so you have a good understanding of how you
combine it all together in The Warrior Warm Up.
The first thing we're going to work on is proper breathing. Breathing is the foundation of
almost all of your athletic skills. We're going to work on how to activate the
parasympathetic nervous system through proper breathing and how to relax, breathe
through the belly and not chest breathe like you do all the time. Proper breathing is first.
Yoga postures are second. Yoga is fantastic and I really do enjoy it!! But, oftentimes when I
was doing more yoga it took up a lot of time. You have to drive down to the yoga studio,
take an hour or an hour and a half class, and drive home. By the time you get home it's been
an hour and a half to two hours and the day is gone. You did all this so you could get your
mind centered and feel a good stretch in your body, not because you wanted to waste your
day.
The Warrior Warm Up takes the best yoga exercises and breaks them down to the smallest,
easiest format for you to use and puts them into this program. This way you can get the
benefits of yoga training without the two-hour time investment.
Third is static stretching. Everyone likes static stretching. I’m somewhat a fan of static
stretching too, but here's the deal. You don't have to sit there and do an hour straight of
static stretching. You can target the muscles you know are tight on your body and you can
7
work them little by little until they loosen up. This way you make baby progress every day
rather then going through periods of stretching and periods of not stretching.
The fourth thing is balance. Something you miss in a lot of our training is balance. You
should be learning how to balance on our hands, learning how to balance on one foot, and
learning how to balance with good posture. It’s really important and that's the fourth thing
we're addressing with The Warrior Warm Up program.
Next is core stability and mobility. It's really important with the core that you first get
stability. Stability meaning the ability to keep our spine in one place against loads from
different directions. That's the first thing you focus on with The Warrior Warm Up. The
second is learning how to go into more dangerous or not so neutral positions like bends
and bridges and still be able to have stability in those positions. The Warrior Warm Up does
first things first with stability. Then The Warrior Warm Up teaches mobility so you can
learn how to stay stable in those mobilized positions.
The next is the dynamic warm up. This is what you see in a lot of sports studios. People are
doing things like side lunges, Frankenstein walks, and hurdle steps. Dynamic warm ups are
incredible. The Warrior Warm Up takes them a step further and put it all together with the
breathing, the yoga, the balance, the core stability, and mobility so you don't have to waste
15 minutes doing a dynamic warm up you don't necessarily need.
The next thing is inversion training. This is really important. Most people don't understand
that by flipping yourself upside down you create awesome blood flow in the body. You
really increase your balance potential. And it also does amazing things for your cells and
your longevity. Inversion training is something The Warrior Warm Up takes care of in the
upper body hand balancing sequence.
The next thing is gymnastic skill work. Now I love gymnastics training. If you’ve known me
for a while you know I absolutely love gymnastic training. The skill work of getting into a
good postural position and getting into good mobilized positions of the spine is really
important. The problem is nobody tells you exactly what you need to do in order to get
from Point A to Point B. That's what The Warrior Warm Up is trying to accomplish.
The next is joint mobility. You might have been a fan of doing all the arm circles and this
and that. Those are great especially when you're starting in the beginning. However, it
takes a lot of time and it’s not necessarily the best use of your time. The Warrior Warm Up
combines joint mobility exercises with everything else you already talked about in order to
make sure you're getting the best results in the least amount of time. That’s the real goal
here.

8
Last is learning more body control and awareness. The more you learn how to move your
body, especially in different positions, the more likely you are to succeed in almost
anything you do in the gym. It’s not about getting stronger or more conditioned necessarily,
it's about moving better. You want to train the movements until The Warrior Warm Up
becomes effortless and fluid.
Those are the ten things you will address with The Warrior Warm Up. The Warrior Warm
Up combines them all and brings them from what it would take 10 hours to do, to
something that takes more like one hour or less for a whole week. Now that’s efficiency!

9
THE 7 STEPS TO AN EFFECTIVE SYSTEM
Now that you know what The Warrior Warm Up is trying to accomplish, replacing those ten
things with The Warrior Warm Up series, I want to cover what you're going to go through
on each one of the sequences contained in this book.
The first is the breathing sequence. It's important to know that breathing is the foundation
of athletic excellence. I believe it was Martin Farmer Burns who said, “Deep breathing has
made many a weak man strong, and many a sick man well.” There is also the old Sanskrit
saying, “Breathe. For breath is life.” That's really important!!
You’re going to learn how to breathe effortlessly into your belly and how you can also
breathe unilaterally where you will be able to breathe through your right side and your left
side in even proportion. The whole goal with this is to activate your parasympathetic
nervous system. That is the rest and digest mode that basically relaxes your body, calms it
down, takes it out of stress mode, and puts it into relaxation mode.
Breathing is really important. All of The Warrior Warm Up programs start with breathing,
and finish with breathing. In the first sequence you're going to learn the beginning and end
breathing sequences for levels one, two, three, four and five.
Next is our standing core series. This is very important because the Chinese have a saying,
“You're only as young as your spine.” With the standing core series you begin to interject a
little mobility and stability work to make sure you have a strong core and a very mobile
spine at the same time.

10
It’s important that you follow this program because you most likely sit at computer desks
all day long. Your shoulders hunch forward, your spine bends forward, and you lose the
ability to move properly through your spine. You're going to work on moving properly
through your spine in the standing torso series.
The next thing is the lower body sequence. I really like the lower body sequence because it
combines a lot of dynamic mobility, a lot of yoga drills, and a lot of balance drills. The whole
goal is to open up your hips, make sure your knees are moving properly, and make sure
your ankles are nice and mobile.
I also want to get you from where you are now to the Level Five program on the lower body
series. Level five is challenging full leg balancing series as well as full split switches. It will
totally replace your dynamic warm up or your regular routine and it's totally going to open
your hips up like you’ve never had before!
Next is the kneeling torso sequence. In this sequence you take you down to your hands and
knees and teach you how to move through your core unilaterally and contra-laterally. You
want to make sure your body is functioning properly. You will also get your shoulders, your
t-spine and everything else warmed up during this series.
From there you will learn the upper body sequence which contains a lot of one of my
favorite activities called hand balancing. In this sequence you’re going to learn how to
create shoulder mobility, tons of awareness and body control, tons of balance, and build a
heck of a lot of strength at the same time while doing just your warm up drills.
After the upper body sequence you take you into another one of my favorite sequences
called the bridging sequence. The bridging sequence is going to start you with really basic
drills and work you into doing extreemly advanced bridging mobility exercises.
The key here isn't to have maximum crazy strength. The key here is to have a really strong,
supple spine that can move in a lot of different directions, as well as making sure your neck
is nice and strong, and everything is as stable as it can be against anything, making you as
injury proof as possible.
The last thing you will learn is the rolling sequence. This is another thing people forget how
to do. You're going to use your body with motion. You’ll be learning how to roll using
momentum to make it happen and making sure you feel comfortable and natural flowing in
the rolling positions.
Those are the sequences you will learn with The Warrior Warm Up. They are breathing,
standing core, lower body, kneeling torso sequence, upper body, bridging, and the rolling
sequence.

11
Each one of those sequences has five different levels. What you're going to do is start at the
first level and work our way through to the fifth one. You will get the best results by
patiently moving all the way to Level Five of The Warrior Warm Up program.
HOW TO GET THE BEST RESULTS
Next you need to know the things you need to do in order to get the absolute best results,
and what you need to do right now in order to get started with The Warrior Warm Up
program.
The rule of thumb is to do this two to three times per week. That’s the key. If you can get
this thing in two to three times per week, over the long haul you're going to see some very
significant changes. I'm going to preach about consistency in a second because consistency
is the key to getting lasting results.
One of the best times to do The Warrior Warm Up is right before your workout. Break it out
for 10-15 minutes and then get straight to your workout. Your body is going to be totally
warmed up, it’s going to feel really good, you’re going to be mobilized and you're even
going to have some strength work already done before you even start your workout.
Another good time to do The Warrior Warm Up is first thing in the morning. If you wake up
in the morning and have a little time before you go to your job, this takes about 15 minutes
or so. Follow along through The Warrior Warm Up level, whatever level you're currently
working on, and do it first thing in the morning to get your day started feeling really, really
good.

12
The next good time to do The Warrior Warm Up is on an off day for recovery. If you're
working out on Mondays Wednesdays and Fridays on a typical routine, try adding in The
Warrior Warm Up on Tuesdays, Thursdays and Saturdays as a recovery work out.
Start by following the Level One sequences and follow along with it until you get
experienced at doing all of the Level One exercises. This is an important note, I don't
want you to move to Level Two when Level One feels very challenging and difficult. Follow
along with Level One until it feels effortless, and then move up to Level Two.
Here’s another important note. You might be better at some things and worse at other
things. Identify the problem areas you're having. For example, if you don't have enough
hamstring mobility or groin mobility when you're doing the lying leg stretch series, and
that's one of your big issues, work on that more frequently.
You can do the regular follow along, and then afterwards hammer away on the one thing
you know is preventing you from moving up to the next level. It's important to add in some
practice of the skills we're not very good at afterwards, in between, or on separate days.
That's how you need to do it. Start at Level One, work on the skills you know are hard for
you in between, following along with Level One drills. Then, once you feel effortless on
Level One you can move on to Level Two. The same applies from two to three, three to four,
and four to five. That's what you need to do as far as following along with the The Warrior
Warm Up, exposing your problem drills, and practicing them.
The last part is consistency. I cannot tell you how important consistency is. Picture this…
You only do The Warrior Warm Up ten times a month. That's an average of two to three
days a week during the month. During that ten times you're going to spend 15 minutes or
less doing The Warrior Warm Up. Ultimately what we're talking about is less than three
hours of your time each month dedicated to doing The Warrior Warm Up.
That is less than half of one percent of your available time in one month. Here's the deal.
Imagine where you would be after ten months of doing The Warrior Warm Up 100 times.
There's no way you could ever stay at Level One, or probably even Level Two, or Level
Three at that point. Most likely you're going to get all the way to the end if you can practice
this program consistently.
Mark your calendar for one year from now and say, “If I’m not at Level Five one year from
now, what did I do wrong?" Follow along to the Level One warm up two to three times a
week, master those, and then move up to Level Two. That’s all you need to do to apply this
program.

13
Work on your weaknesses a little bit in between and eventually you'll be doing the full
Level Five routine. Once you get there, the sky is the limit. You can keep you moving
forward with more advanced exercises.
For the most part, just focus on getting to Level Five and use that as a warm up before your
exercise routines, first thing in the morning, or as you're recovery work out between days.
Let's get you started on the Level One exercises with the breathing positions. We’ll work on
the breathing first and then go through all the stuff to make sure you understand what it is.
Then you can access the follow along Level One series until it feels easy, and you've
mastered it. Let’s get you started right away…
BREATHING
BREATHING LEVEL 1
To begin with the level one, place your right hand on your chest and your left hand on your
stomach. The goal for this is for you to be able to push out your hand on your stomach
without actually moving the hand on your chest. This type of breathing is referred to as
belly breathing.

14
From a side view this is what it should look like: chest stays still, belly expands. The more
you can expand that belly from the bottom of your pelvis all the way up into your rib cage,
the more air you're going to fill inside those lower lungs and the more you're going to
activate your parasympathetic nervous system.
Inhale for a count of three, exhale for a count of three, and slow your breathing down as
much as you possibly can. Start with five breaths in and five breaths out, focusing on
keeping your chest back and moving your belly.
From there you can learn how to use one side of our body at a time. Place your hands on
either side of your belly button. Inhale into your right side trying to keep your left side still.
Inhale into your left side trying to keep your right side still.
This control of one side of your body to the other is a great way to determine if you are
constantly breathing in one side. If you are constantly breathing into one side and have
trouble breathing into the other side practice this skill until you feel like you can control
both sides evenly.
Next, you move to a lying breath. With your hands in the same position as standing we’re
going to practice this breathing pattern in a lying position. Same thing: slow breath keeping
the chest down, inflating the belly, and starting as low as possible. Take the biggest breath
15
you can in, and then just passively let the breath come out of the body.
Inhale, two, three. Exhale, two, three. Try to relax. We’re just prepping our body for the
work ahead. Try to slow it down and work through your breathing. Your goal is to do 10
nice, slow, and controlled lying breaths.
Work on mastering this type of breathing. Master the belly breath without moving your
chest. Master it so it becomes natural. Master it so that when you're sitting in your car
driving this is the way you now breathe.
The only time you should avoid breathing in a relaxed state like this is when partaking in
some high-intensity activities or some exercise. Take your time and master this breathing
pattern and it will benefit you dramatically in the long run.
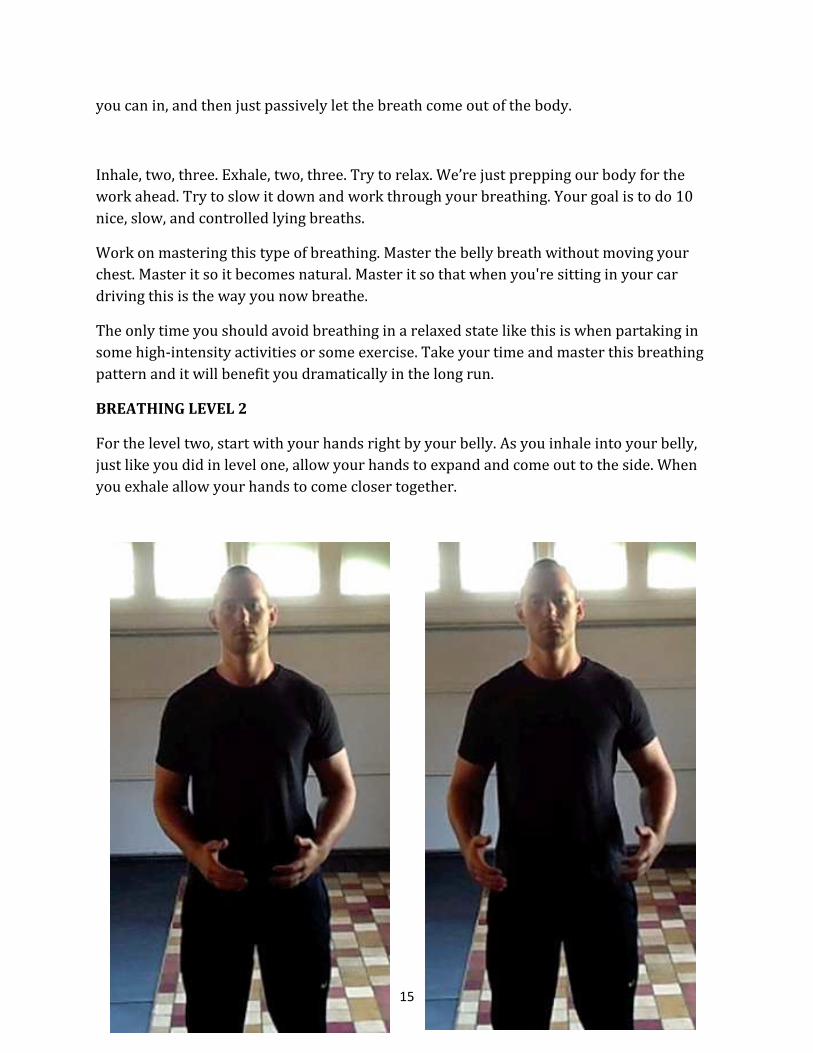
BREATHING LEVEL 2
For the level two, start with your hands right by your belly. As you inhale into your belly,
just like you did in level one, allow your hands to expand and come out to the side. When
you exhale allow your hands to come closer together.

16
A great visual for this is that as you pull your hands apart you’re expanding a ball of energy
and as you press your hands together you are compressing that ball of energy. Don’t worry
about the rhythm; just try to breathe as slow as possible, inhaling trying to bring that
energy out, exhaling trying to push that energy in. Take five slow and controlled breaths
and then move to your back.
With palms facing toward the sky, working on the same belly breathing you did in level
one. Inhale as slow and controlled as possible and then allow your body to exhale for you.
This is the exact same motion you did in level one only we’re not using our hands as guides
and we’re focusing on total body relaxation to make this happen.
This is an excellent drill to do anytime you're feeling stress, after a workout, and you prefer
to do these breathing patterns at the end of the Warrior Warm Up rather than at the
beginning. Breathe, relax, master these two breathing patterns and they will benefit you
greatly in the long run.
Take your time and complete all 10 reps lying in this position. Once you complete all 10
reps and you feel like you have mastered this stage of breathing then it is time for you to
move on to the level three breathing exercises.
BREATHING LEVEL 3

17
For the level three breathing series, start in the same position as the level two (see level 2
pictures). The thing you’re going to add in the level three is a rhythm to your breathing.
Going to a one second count, you want you to inhale for three and exhale for three.
It’s going to look like this: exhale, two, three, inhale, two, three, exhale, two, three, inhale,
two, three. Repeat this breathing pattern for 10 full standing breaths.
Once you master the standing breathing it’s time to lie down on your back and we’re going
to stick to the same breathing rhythm with palms toward the sky. Inhale, two, three, exhale,
two, three, inhale, two, three, exhale, two, three.
By keeping a subtle count in your head this will help you to master your breathing rhythm.
If you can do this without feeling like you're winded or exhausted then you will know you
are well on your way towards mastering your breathing.
Be patient with your breathing. Focus on the way your belly moves. Relax and let
everything go. The most important part when practicing deep breathing is to make sure
you let everything go. Master this step and then move on to the level four breathing.
BREATHING LEVEL 4
For the level four breathing, you take it from a three-count and extend our count outward
twice as long making it a full six-count. At first this may be challenging so take your time
and master the three-count first. If you have to you can always move to a four, then a five,
and then a six-count.

18
With your arms by your sides you’re going to inhale your arms up over head to a count of
one, two, three, four, five, six, exhale, one, two, three, four, five, six. Take your time
breathing nice and slow. Control your breathing making sure you're breathing into your
belly on every single rep and relaxing your chest.
As you do this you can imagine yourself pulling energy up and then compressing all the
energy into your center, visualizing that energy coming up from the ground and from all of
your surroundings and then pushing it into your center.
Breathing this way is extremely important because it will give you better energy
throughout the day, better focus, and more strength and power. Finish a minimum of five
standing breaths and then you will move to the lying position.
Begin the lying position the same way you began in level three (see level 2 pictures). As
with the standing breathing we’re going to inhale to a six-count and exhale to a six-count,
trying to let go of everything and focus on nothing.
Exhale, two, three, four, five, six, inhale, two, three, four, five, six. Stay with your breath.
Focus on nothing but your breath. One of the best ways to practice deep breathing is to
count the breaths that you’re focused on. As you go through 10 lying breaths, try to say one
for the first one in your mind without focusing on anything else. If anything else comes
through your mind let it go. We’re trying to get ourselves into a deep meditative state so
that we’re well focused for the workout ahead.
As you count from one to 10 try to get everything out of your head and let it go. At the point
you can count from one to 10 without anything else entering your head you will be
achieving mastery when it comes to this breathing practice.
Finish 10 slow breaths to a six-count in and a six-count out and then begin with the next
step.
BREATHING LEVEL 5
For the last and final step towards mastering your breath begin in the same way as you did
in the levels before with your hands by your sides (see level 4 pictures). As you inhale
we’re going to go to a six-count. As you exhale you will also go to a six-count. As you inhale
make sure to visualize you pulling energy from your surroundings. Inhale, two, three, four,
five, six, exhale, two, three, four, five, six.
The better you get at this the more you will be able to actually feel the energy you are
cultivating through your deep breathing practice. Some of the best martial arts masters in
the world swear that deep breathing is what gives them their power. It’s not exercise, it’s

19
not mental powers, and it’s the ability to focus and center their breath and cultivate energy
that gets them their power and strength. I want this for you as I want this for me.
Take 10 slow, deep breaths going to that six-count. If you master 10 deep breaths to a six-
count you can always move up to a seven, eight, nine, ten, eleven or twelve-count. The
slower, the more controlled, the better. The more energy you can feel radiating out of your
palms, radiating out of your center, the more likely this is to do amazing things for your
health and performance.
Finish 10 deep breaths in this manner and then move to the lying position.
Lie down on your back to begin your lying breathing (see level 2 pictures). As with the
other steps, get comfortable first finding that deep relaxation in your body. We’re going to
breathe in the same manner you did in level four, taking it in as slowly as possible aiming
for a six-count or longer for the inhalation and a six-count or longer for the exhalation.
As with before, one of the best ways to relax your body, cultivate energy, and cultivate
focus is to count your breaths. Don’t underestimate how challenging this can actually be.
Breathe in for a six-count as you say one. Exhale for a six-count. Breathe in for a six-count
as you say two then exhale for a six-count. When you can master the step with no thoughts
entering your head other than the numbers that you are counting you will be achieving
mastery with your breathing and you will no doubt be feeling this energy practice in your
strength, in your vitality, and in your health.
Finish a minimum of 10 breaths in order to center your body, focus your mind, and prepare
you for the rest of the Warrior Warm Up

20
STANDING TORSO
STANDING TORSO LEVEL 1
For the first level of the standing torso sequence, place your hands on your hips, come
forward from the hips, trying to keep your back flat as long as possible until the very end,
then roll your spine out one vertebra at a time return to the top and then open your chest
and lean backwards.
21
Be careful and move slowly as you roll the spine forward and then roll the spine up,
stacking one vertebra at a time. As you open your chest, make sure not to let the shoulder
blades move out and go forward, but rather pull them back and down to their proper place.
As you’ll notice, pulling them back and down is going to open up the chest more and
increase our flexibility more. Go back and forth, nice and controlled, for five total reps of
the front and back bends. Inhale before you go backwards and exhale as you forward into
the front bend.
Take your time. Make it slow and controlled. Then move to the side bend sequence.
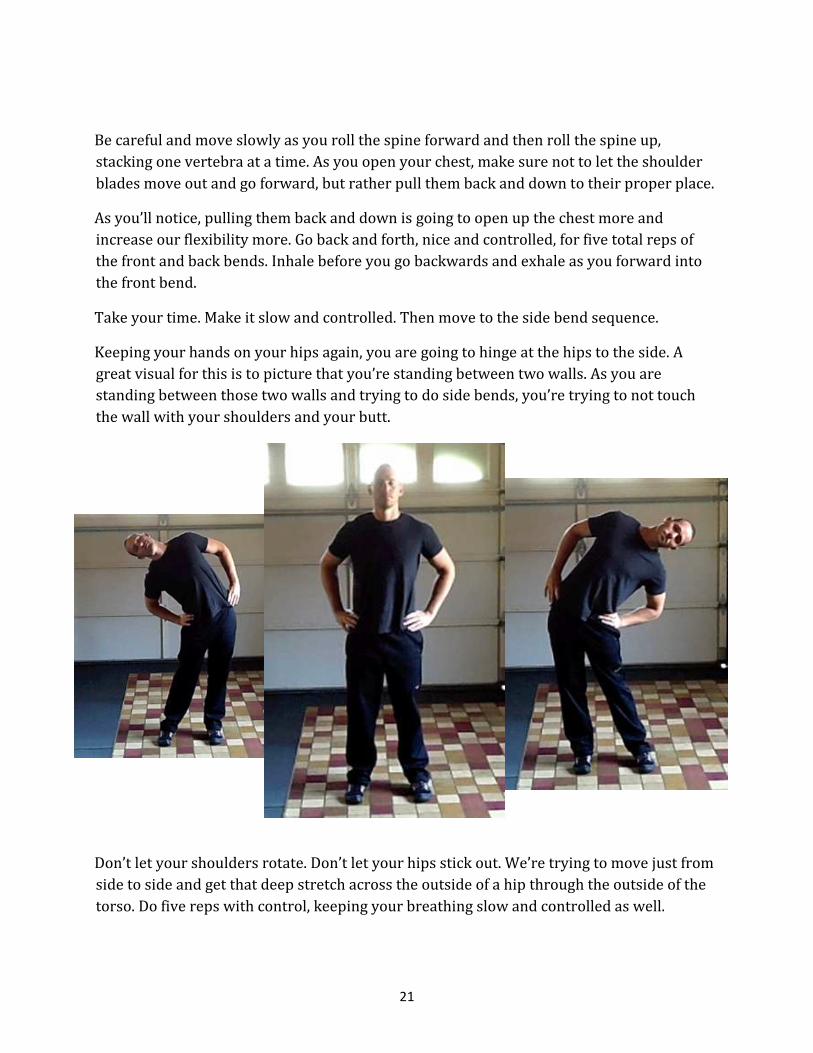
Keeping your hands on your hips again, you are going to hinge at the hips to the side. A
great visual for this is to picture that you’re standing between two walls. As you are
standing between those two walls and trying to do side bends, you’re trying to not touch
the wall with your shoulders and your butt.
Don’t let your shoulders rotate. Don’t let your hips stick out. We’re trying to move just from
side to side and get that deep stretch across the outside of a hip through the outside of the
torso. Do five reps with control, keeping your breathing slow and controlled as well.

22
STANDING TORSO LEVEL 2
Moving forward in the standing torso sequence, you are going to perform the same exercise
with your hands on the back of your head. Hinging forward at the hips and letting the spine
slowly roll down, then rolling up the spine one vertebra at the time, stacking on top of each
other, coming into a full back bend. Go back and forth on what is called the prisoner front
and back bends for five reps.
As you do this exercise, make sure when you are doing the back bend to squeeze your
glutes and open up your elbows backwards like you are trying to touch your elbows
together behind your head. This will make sure you get the most flexibility out of this
exercise and the most stability and core strength as well.
23
As you bend forward, keep reaching further and further, not by pulling on your neck but by
using your core muscles to try to drag your head closer towards your shins on each and
every rep. Exhale as you go down and inhale as you come up, making sure to hold your
breath on your back bend.
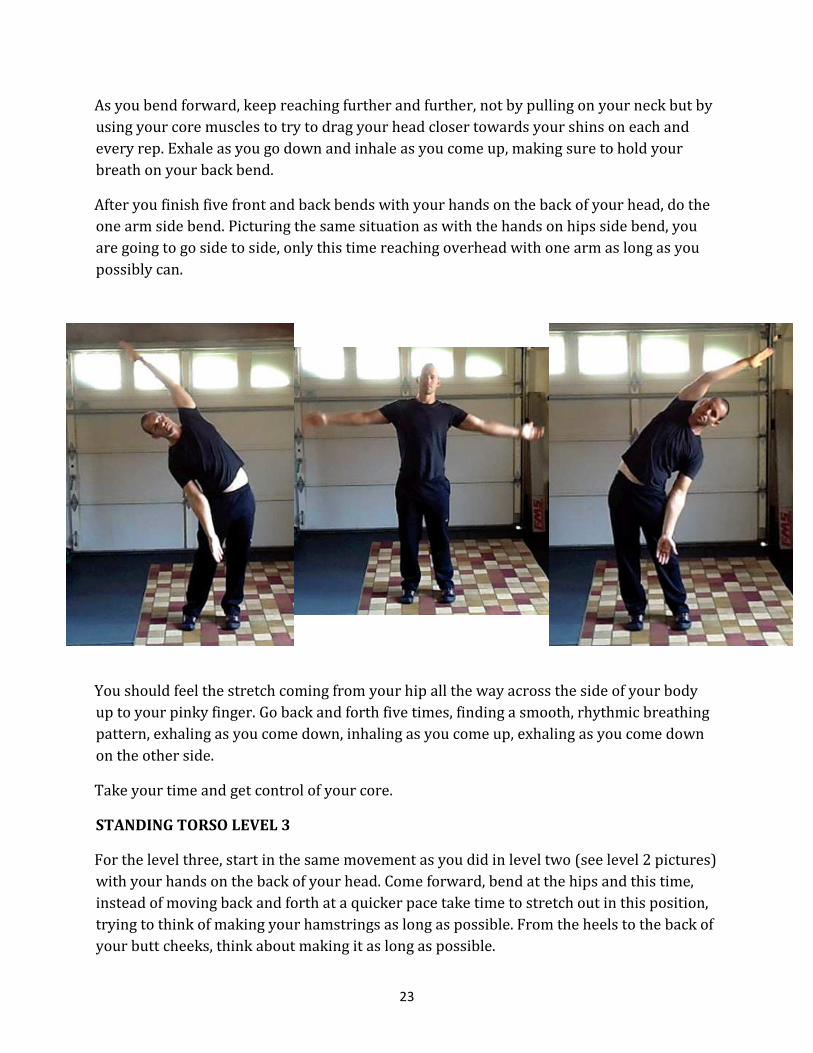
After you finish five front and back bends with your hands on the back of your head, do the
one arm side bend. Picturing the same situation as with the hands on hips side bend, you
are going to go side to side, only this time reaching overhead with one arm as long as you
possibly can.
You should feel the stretch coming from your hip all the way across the side of your body
up to your pinky finger. Go back and forth five times, finding a smooth, rhythmic breathing
pattern, exhaling as you come down, inhaling as you come up, exhaling as you come down
on the other side.
Take your time and get control of your core.
STANDING TORSO LEVEL 3
For the level three, start in the same movement as you did in level two (see level 2 pictures)
with your hands on the back of your head. Come forward, bend at the hips and this time,
instead of moving back and forth at a quicker pace take time to stretch out in this position,
trying to think of making your hamstrings as long as possible. From the heels to the back of
your butt cheeks, think about making it as long as possible.

24
Roll it up one vertebra at a time, open the chest, squeeze the glutes and bend backwards.
And again this time, you’re going to hold. Hold, hold, hold for about 15 seconds. Before you
bring it forward again, really thinking about lengthening the back side of your legs and not
pulling on your neck but rather using your core muscles to try to squeeze your body closer
to your thighs in the front bend position.
Next, turn to the side and you are going to do the same one arm side bend (see level 2
pictures) you did in level two, only this time you are going to hold in the side bend position.
One important thing is to make sure you’re not putting your hand that is down on your
thigh. I want to make sure that you are getting a great stretch through your torso but that
you are also generating great stability through the side of your body.
Stretch out but don’t rest your arm on your leg making it easier on you. Go back and forth
two times, holding each position for about 15 seconds. Breathe shallow as you come to the
side to make sure you maintain spinal stability. Air in your stomach usually equals a safe
back. But also, relax so that you can go deeper and deeper into the side bending stretch.
STANDING TORSO LEVEL 4
For the level four side bends, you are going to bring both arms overhead, clasping hands
and pointing your index fingers like a pistol. Come forward and reach towards the ground
with your arms, the slowly roll up the spine open the chest, squeeze the gluts and lean
backwards.

25
Go back and forth five times, trying to reach the apex of your range of motion on each rep.
Make sure you go back and forth slow and controlled, exhaling as you come down, inhaling
as you roll up and holding your breath just slightly as you do a quick back bend.
Next, place your arms overhead the same way you did for our front and back bends. Lock
out the arms, clasp the fingers together and point the index fingers toward the sky.
Reaching toward the sky the whole time, pressing your shoulder blades up towards your
ears, come from side to side, trying to reach the full apex of your mobility in the standing
arms over head side to side bend.

26
Inhale as you stand tall, exhale as you come to each side, and really try to feel that deep
stretch coming from your hip all the way across your lat and through the arm. Take your
time and master this exercise before moving on to the level five standing torso sequence.
STANDING TORSO LEVEL 5
For the level five, bring your hands overhead one more time, clasping your fingers together
and pointing your index fingers (see level 4 pictures). Bend forward at the hips as far as
you can until you have to round your spine and reach, reach, reach, reach. Your goal is to
fold your body in half as much as possible. Hold for 10-15 seconds, roll it up one vertebra at
a time and go into a back bend with arms overhead, fully extended and hold, hold, hold for
10-15 seconds.
Repeat this at least one more time, coming forward and reaching forward with the hands,
reaching your bellybutton towards your thighs, trying to fold yourself in half, holding that
position thinking long hamstrings. Then rolling it up one vertebra at a time, opening your
chest and going into one more back bend.
Our goal is to be bent all the way to a horizontal position right here so that you have both
mobility and stability in the core, which will help to strengthen and injury-proof your spine.
From there, inhale as you take both arms overhead. Clasp the hands together and point the
fingers toward the sky (see level 4 pictures). Again, press your shoulders up towards the
sky and come into a side bending position. Breathe shallow, keeping air in your stomach to
support your spine but also trying to relax the muscles on the side of your body so that you
get a mean stretch on the outside of your body.
Come to the other side and hold again for 15 seconds. An important thing to note here is to
think about reaching toward the ceiling as much as you can with the entire outside of your
body. From your heel, all the way to your hands, you are trying to bend like a bow while
you are trying to think long spine.
As with the front and back bends, your goal is to come to a full 90-degree position, parallel
to the ground, with your torso. Practice this exercise and work up, holding the side bend for
up to a minute in order to get awesome spine mobility.
27
LOWER BODY
LOWER BODY LEVEL 1
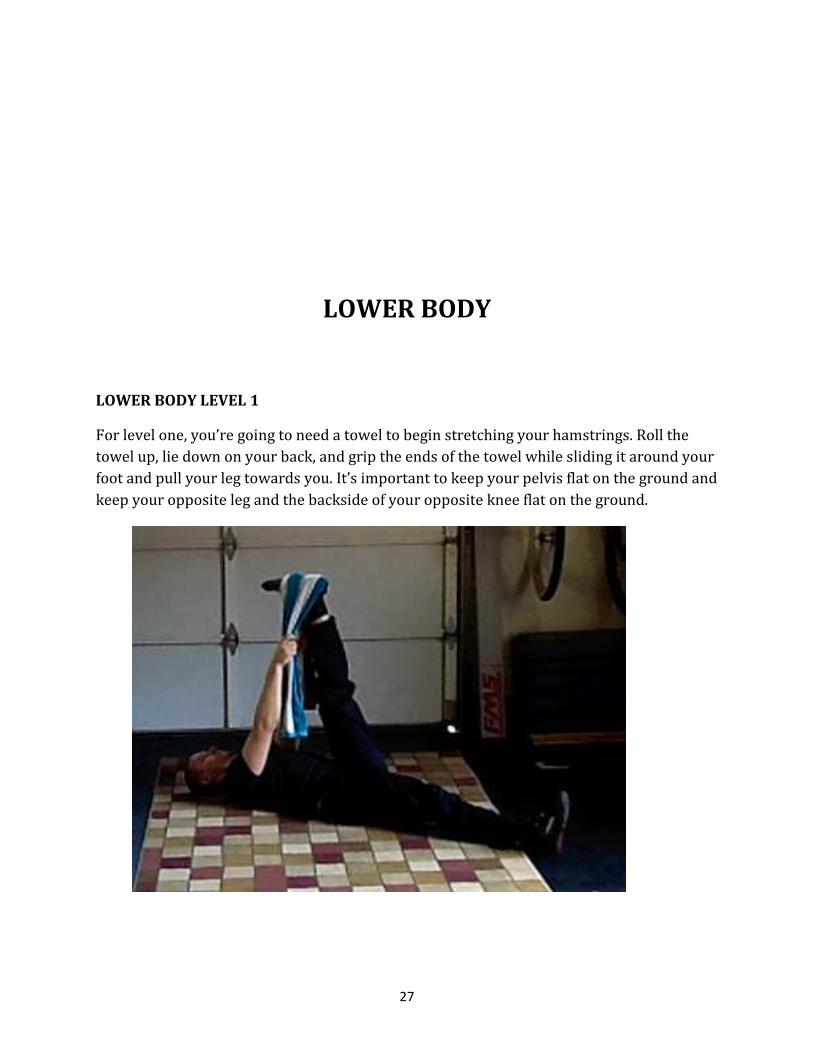
For level one, you’re going to need a towel to begin stretching your hamstrings. Roll the
towel up, lie down on your back, and grip the ends of the towel while sliding it around your
foot and pull your leg towards you. It’s important to keep your pelvis flat on the ground and
keep your opposite leg and the backside of your opposite knee flat on the ground.
28
As your hamstring loosens up, walk your hands up the towel and get a better stretch out of
that position. From there, shift the towel into the same side hand as leg is up. If your right
leg is up, shift it to your right hand. Then let your hips open up to the outside.
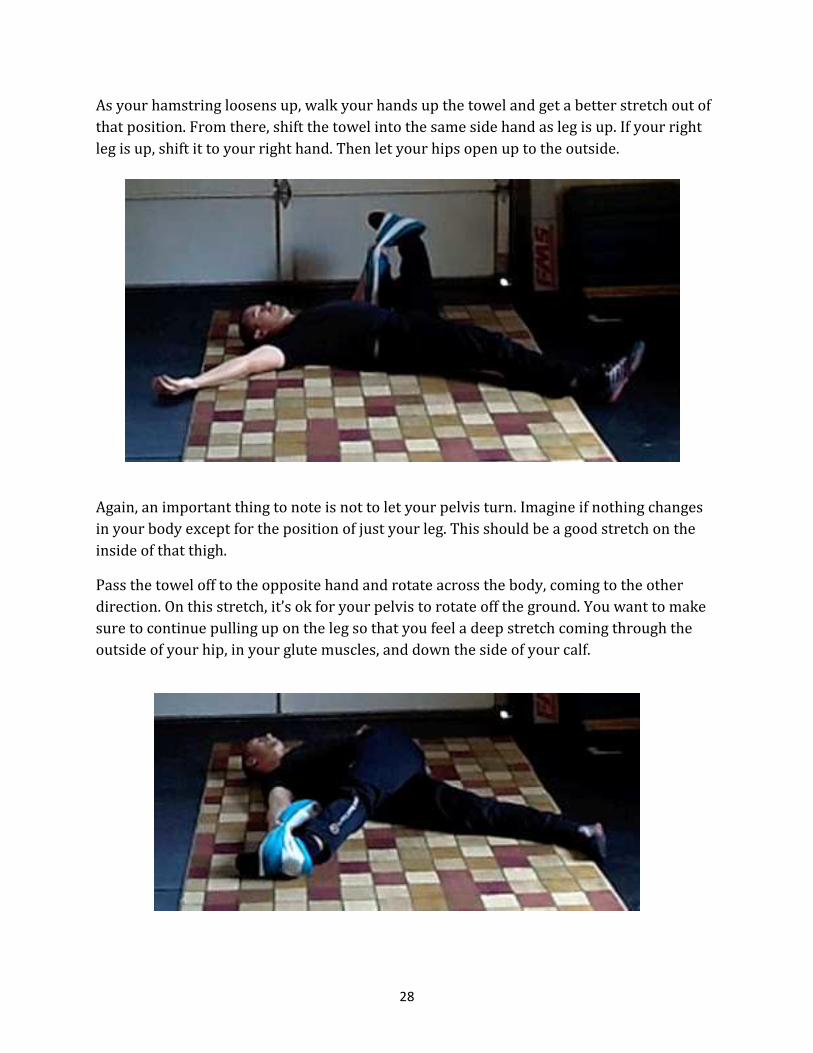
Again, an important thing to note is not to let your pelvis turn. Imagine if nothing changes
in your body except for the position of just your leg. This should be a good stretch on the
inside of that thigh.
Pass the towel off to the opposite hand and rotate across the body, coming to the other
direction. On this stretch, it’s ok for your pelvis to rotate off the ground. You want to make
sure to continue pulling up on the leg so that you feel a deep stretch coming through the
outside of your hip, in your glute muscles, and down the side of your calf.
29
From there, switch legs. Get the towel over the whole surface of the leg and go into your
hamstring stretch.
When stretching statically like this, there are a few important things to note. I don’t want
you stretching to 100% of your intensity. It’s important, when trying to relax in a stretch
that you maintain sub-maximal stretches.
What you want you to do is hold the stretch at 90% intensity until that 90 becomes 80. As
you breathe and relax, let it go deeper and deeper back into 90. Then let it relax back into
80. Again, don’t go to that 100% intensity. Go to 90. Hang out. Breathe and relax it.
Hold each of these positions for 20 to 60 seconds, depending on how tight your hips and
groin area. If you are extremely tight in the hamstrings and hips, you can do this exercise
multiple times a day in order to build up that flexibility that you’ll need in order to get to
level two.
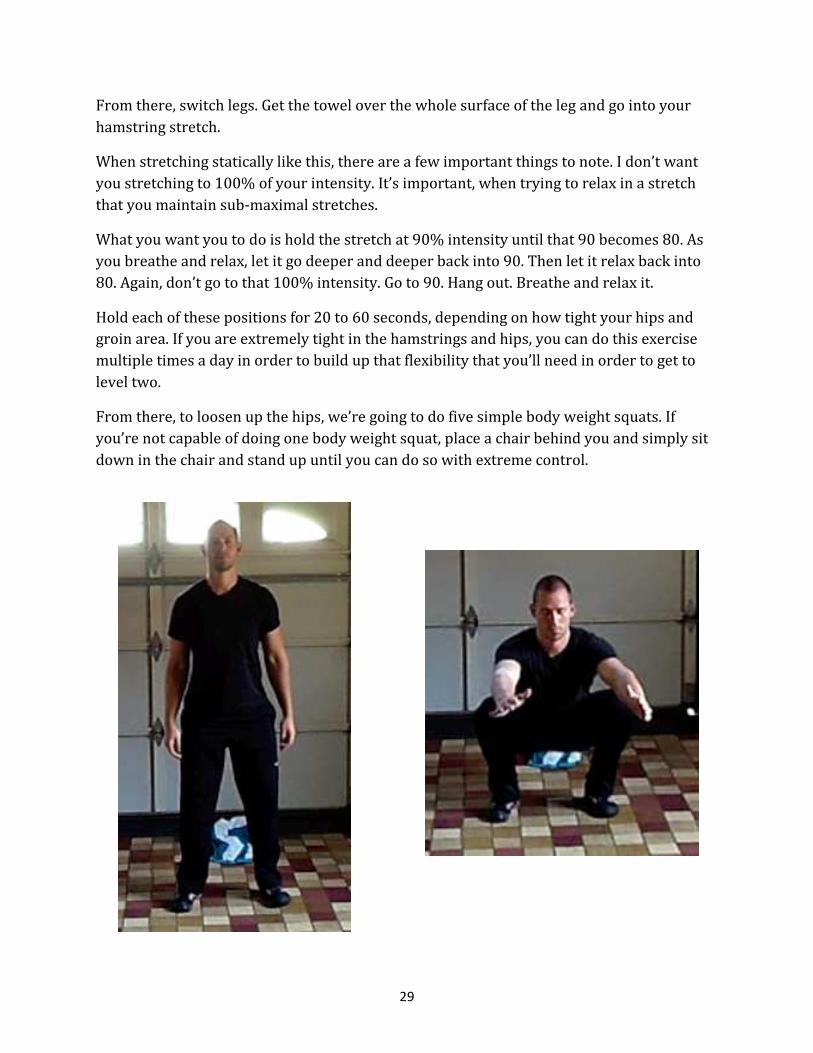
From there, to loosen up the hips, we’re going to do five simple body weight squats. If
you’re not capable of doing one body weight squat, place a chair behind you and simply sit
down in the chair and stand up until you can do so with extreme control.

30
A few important things to note about the body weight squat. Don’t lean forward like you’re
bowing forward from the hips. Make sure your knees are going the same direction as your
toes. Don’t let them cave in or push too far out. Keep your head tall. Visualize your hips or
your thighbones pulling out of your pelvis as you go down.
The idea for flexibility and mobility is to create space inside the joints. Move slowly and
controlled. Loosen up those hips.
LOWER BODY LEVEL 2
In order to begin the level two, you should be able to grab your foot while on your back in
the lying hamstring stretch position with one or both hands. My favorite way to do this
exercise is to use your opposite arm as leg to stretch in the front position.
Grab your foot and hold it out front, stretch and hold for 20 to 30 seconds, breathing and
relaxing your hamstring. Then transfer it to the same side arm and let it come to the
outside. Keeping the rest of your body in the same position.
31
Again, if you do not have the adequate flexibility to hold onto your toes in each of these
positions, then you need to work with the towel until you are genuinely ready to go onto
the level two exercises.
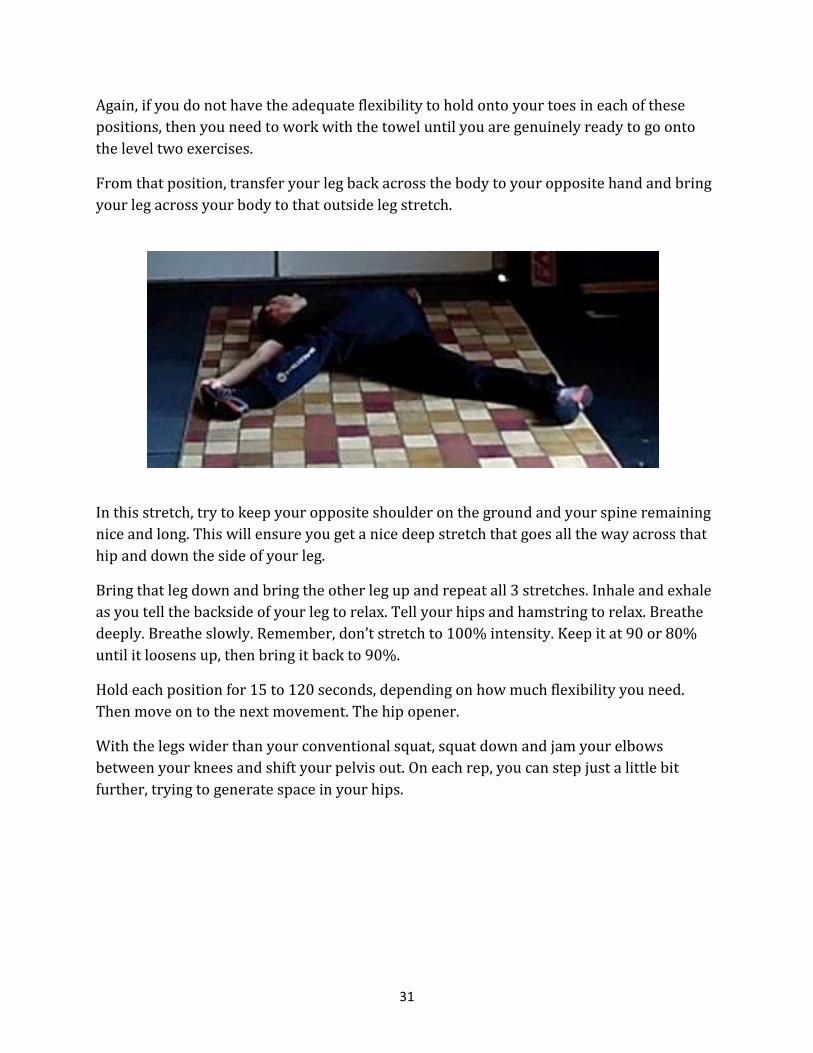
From that position, transfer your leg back across the body to your opposite hand and bring
your leg across your body to that outside leg stretch.
In this stretch, try to keep your opposite shoulder on the ground and your spine remaining
nice and long. This will ensure you get a nice deep stretch that goes all the way across that
hip and down the side of your leg.
Bring that leg down and bring the other leg up and repeat all 3 stretches. Inhale and exhale
as you tell the backside of your leg to relax. Tell your hips and hamstring to relax. Breathe
deeply. Breathe slowly. Remember, don’t stretch to 100% intensity. Keep it at 90 or 80%
until it loosens up, then bring it back to 90%.
Hold each position for 15 to 120 seconds, depending on how much flexibility you need.
Then move on to the next movement. The hip opener.
With the legs wider than your conventional squat, squat down and jam your elbows
between your knees and shift your pelvis out. On each rep, you can step just a little bit
further, trying to generate space in your hips.
32
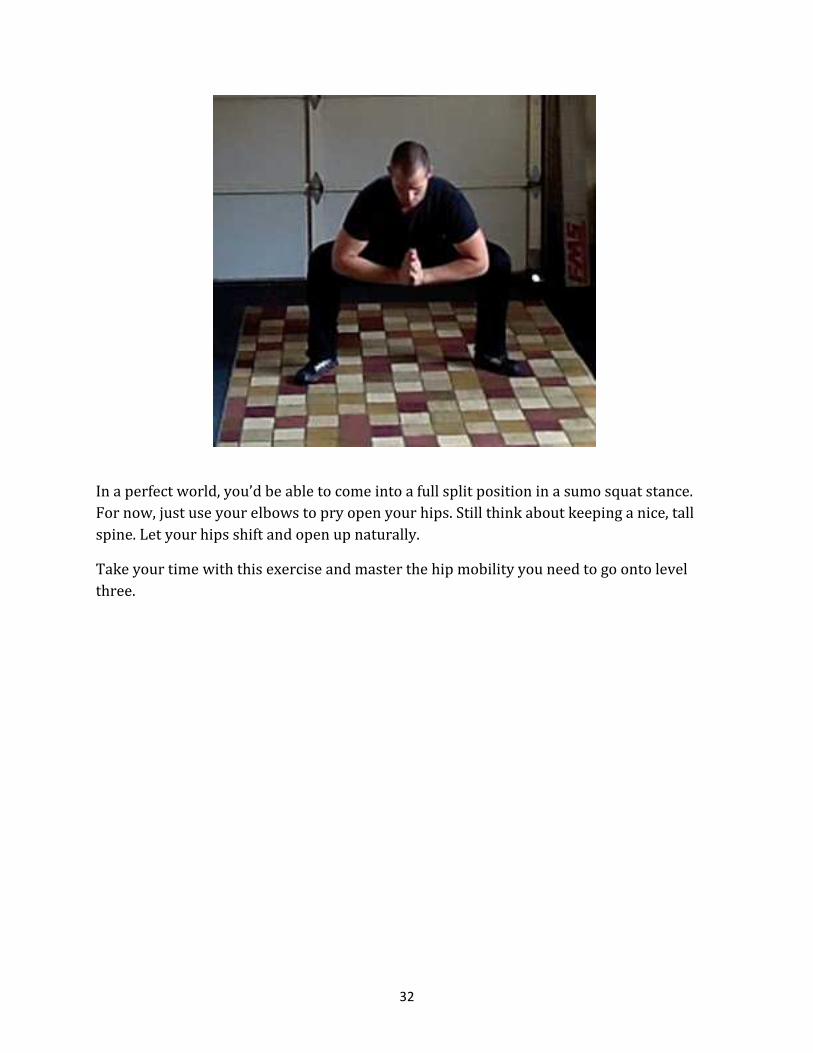
In a perfect world, you’d be able to come into a full split position in a sumo squat stance.
For now, just use your elbows to pry open your hips. Still think about keeping a nice, tall
spine. Let your hips shift and open up naturally.
Take your time with this exercise and master the hip mobility you need to go onto level
three.

33
LOWER BODY LEVEL 3
For level three, you begin your standing balances by learning how to stand on one foot
properly. You should have adequate flexibility by now in order to do the level five
exercises. However, you must first make sure you have the adequate stability at the same
time.
Start by standing on one foot and bringing your hands up behind your knee. Hold it in front
of you. From there, move it to the side position and grab the inside of your thigh with the
same side arm, holding the bent leg groin stretch.

34
From there, bring the foot behind you and hold a simple quad stretch. Bring your heel to
your butt, think long and tall and find your balance on your opposite leg. Get a nice stretch
through your quad muscle.
From this position, bring the leg around to the front and grab onto the shin. Try to drag
your leg up towards your hip as high as possible, giving you a stretch in the outside of the
hip.
Your goal on this exercise is to maintain balance the entire set. Once you’ve mastered this
set to the point where you can maintain balance through the entire series, you know you’ll
be ready to move on to the next level.
Switch sides and be sure to hold each position for a minimum of 15 seconds.

35
From there, go into a nice, wide straddle position and begin the first variation on the side
lunge.
Move from side to side, down to roughly parallel, making sure to drive your knee and toe
out. A few important things here are that your bent knee leg keeps a foot flat on the ground,
not to roll up on your toes. On that same bent leg, make sure your thigh and knee are
pointed the same direction as your toes.

36
The toes on the other foot on the straight leg should be pointing towards the sky and
rotating upward, the knee and the toes rotating towards the sky. This should loosen your
hips up and make sure you’re well-prepared for moving on to the next level.
LOWER BODY LEVEL 4
For level four, you get you 100% prepared for being able to do the level five exercises.
Bring your knee up to your chest. This time, grab the bottom of your foot rather than your
thigh. Hold this position for 15 seconds while breathing nice and slow.
Grab the inside of that foot with the same side arm and open your hip to the outside as you
stand tall and find your balance. Breathe, relax, and hold this position for 15 seconds.

37
Bring that leg around back behind you. Hook the toes into your hand. Bring your other arm
out in front of you. Come into a quad stretch with a partial front bend. Think about just
bowing forward from that hip that’s planted on the ground, so that you get a deeper stretch
in your hip flexor and in your quad.
Bring your foot around to the front. This time, grab your ankle and your foot. Bring it up
higher into your pelvis, or as high up into your belly as you possibly can, keeping a nice tall,
straight spine.
Switch sides, finding your perfect balance point. Repeat each of these exercises on your
opposite side.
38
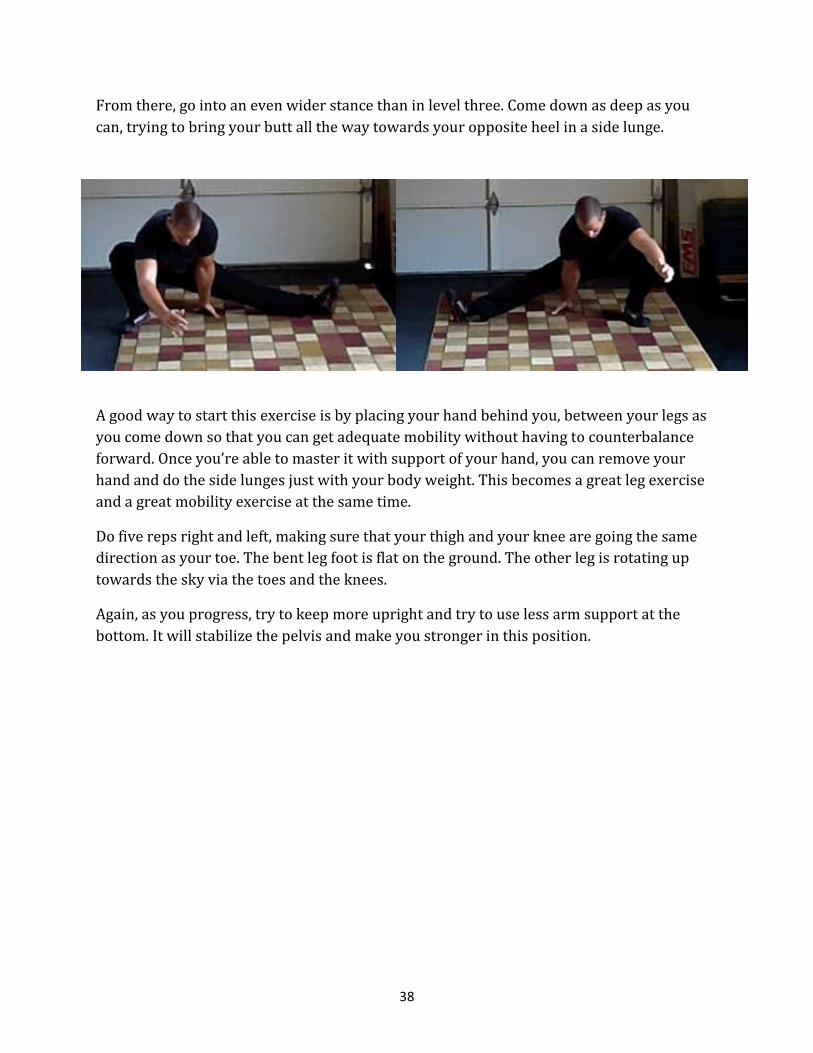
From there, go into an even wider stance than in level three. Come down as deep as you
can, trying to bring your butt all the way towards your opposite heel in a side lunge.
A good way to start this exercise is by placing your hand behind you, between your legs as
you come down so that you can get adequate mobility without having to counterbalance
forward. Once you’re able to master it with support of your hand, you can remove your
hand and do the side lunges just with your body weight. This becomes a great leg exercise
and a great mobility exercise at the same time.
Do five reps right and left, making sure that your thigh and your knee are going the same
direction as your toe. The bent leg foot is flat on the ground. The other leg is rotating up
towards the sky via the toes and the knees.
Again, as you progress, try to keep more upright and try to use less arm support at the
bottom. It will stabilize the pelvis and make you stronger in this position.

39
LOWER BODY LEVEL 5
Finally, for the Level Five, bring your foot up and grab the bottom of your foot, just like you
did in level four. This time, press out from the backside of your leg and fully extend your leg
into a full standing hamstring stretch position and hold for 15 seconds.
Bring your leg in, grab the instep of your foot with the same side arm and stretch your leg
to the outside. This should feel very similar to the way you were stretching on your back in
levels one and two, only with the stability component of standing on one leg. Hold for 15
seconds.
40
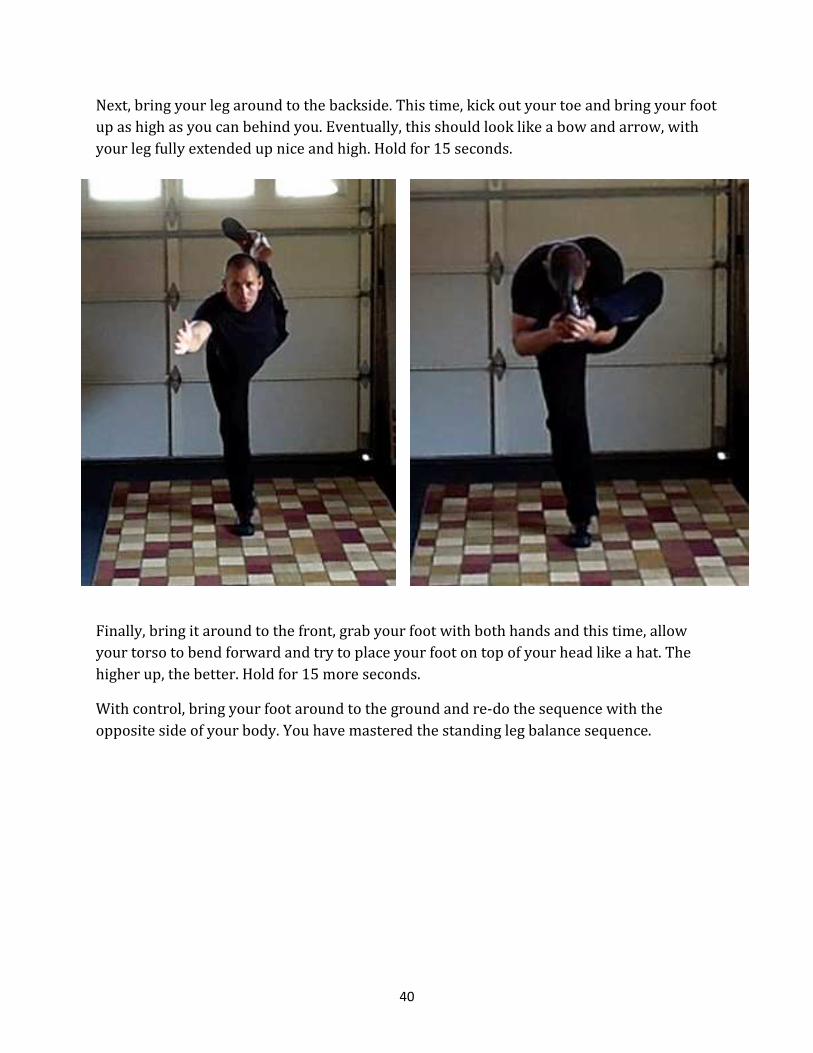
Next, bring your leg around to the backside. This time, kick out your toe and bring your foot
up as high as you can behind you. Eventually, this should look like a bow and arrow, with
your leg fully extended up nice and high. Hold for 15 seconds.
Finally, bring it around to the front, grab your foot with both hands and this time, allow
your torso to bend forward and try to place your foot on top of your head like a hat. The
higher up, the better. Hold for 15 more seconds.
With control, bring your foot around to the ground and re-do the sequence with the
opposite side of your body. You have mastered the standing leg balance sequence.

41
Finally, slide the legs out in the middle split position. Rotate all the way through bringing
your pelvis forward to a front split position on one side. Slowly come back to the middle,
and then move to the front split on the other side.
As you go through what’s called a split switch here, try to lower your pelvis towards the
ground on each rep. Try to bring yourself into that full gymnastics split position.
What you will find is that it’s challenging for you to go one direction over the other. Or it
might be more challenging for you to do the middle splits over the front splits on either
side.
Take your time and use this time to pry your hips out. As you master this exercise, you
should be able to do it in a full front split, rolling to a middle split, rolling all the way
through to the full front split on the other side. When you’re capable of doing that, you will
have enough hip mobility for just about anything you want to be able to do.

42
KNEELING TORSO
KNEELING TORSO LEVEL 1
Start on the ground with your hands in front of your knees in the kneeling position. Start at
your pelvis and tuck your pelvis like you’re trying to point your tailbone towards the
ground to initiate the rounding of your spine. Tuck the tailbone. Tuck the spine. Push out
through the shoulder blades and then finally tuck the head.
To initiate the arching of your spine do the opposite movement. Pour your pelvis out as if it
was a bowl of water and you’re trying to pour it out as quickly as possible. Shift your
tailbone towards the sky. Arch your lumbar spine into your thoracic spine, into your
shoulder blades, and into your neck finishing with your eyes to the sky.
Take your time to master this movement. Slowly do it for five reps of flexion and five reps
of extension.
This is also a good time to continue working on your breathing practice. Exhaling as you
press everything away from the carpet and inhaling as you look up at the sky and expand
your rib cage.

43
Next, do what is called a bird-dog. In the same position as you were for the cat-dogs. Extend
your right leg and your left arm. From there bring your elbow towards your knee, making
contact in the center-line of your body.
It’s important that you try not to rotate your hips and your shoulders. You’re trying to keep
the core and the pelvis stable and in one plane of motion while you go back and forth
performing the bird dogs.
From a side view you’re trying to push your heel and you hand as far away from each other
as possible.
I like to tell my private clients, you don’t get a reward for how high your arm and your leg
go but for how far apart they are. Extend out as far as you can, keeping everything
balanced, and then bring it back keeping everything as balanced as possible.
Take your time on this exercise and practice five reps on one side and then five reps slow
and controlled on the other side.

44
From there, come into a kneeling position, tuck your pelvis, and squeeze your core muscles
as you drop yourself down into a kneeling hover plank position. In this position a few
things are important. One, is that you DON’T feel this in your lower back, if you do then you
are not doing it correctly. You want to make sure that you’re squeezing your glutes tightly,
tucking your pelvis under which means pointing your tailbone towards the ground and
keeping your core muscles very tight, not allowing your back to go into extension or to
bend backwards or sag through the hips.
Lastly, slide your head back nice and tall, pull your shoulder blades back, and also drag
your elbows towards your knees. This is a very important last queue because when you fire
your lats by actively pulling your elbows towards your knees you will fire your core much
harder.
KNEELING TORSO LEVEL 2
For Level 2 we’re going to start with what yogi’s call downward dog. Trying to bring your
bellybutton towards your thighs, opening your shoulder blades, and taking special note of
maintaining a flat lower back.
I want you to NOT go for the calf stretch on the downward dog but to go for the hamstring
and the shoulder stretch and eventually work your heels down to the ground.
It’s important to come all the way up on your toes first to make sure you’re getting maximal
stretch out of your hips, hamstrings, and shoulders and then come down to your heels
second.

45
From there, drop your knees and come through to what’s called an up-dog or a cobra
position with your hips on the ground, your back arched, your shoulder blades pulled back
and use your hands to bend your spine towards the sky.
Come back on your knees, tuck your toes, come back up to a downward dog position. Go
back and forth between the downward dog to the upward dog several time to loosen up
your shoulders, your hamstrings, and your hips.
Hold each position for 10 to 30 seconds until you feel a good stretch and you feel like you’re
increasing your flexibility, mobility, and control of your body.

46
After your last and final cobra, come into a kneeling position on your knees and on your
hands and do what’s called a peeing dog. Place your left hand on the back of your neck and
lift your right leg up to the outside just like you guessed it, a peeing dog. Our goal is to keep
our pelvis and our spine stable and exercise the abduction of the leg and the retraction of
the shoulder.
After you do five reps, switch sides and do five reps on the opposite side. Always making
sure you’re doing your right arm, left leg and left arm, right leg.
Finish your five reps of the peeing dog on both sides and then rotate to a side position and
begin to strengthen the outsides of your core stability by performing what’s called a
kneeling side plank.

47
Curl your heels up behind you and placing your knees on the ground or on a soft surface.
Come into a straight body position holding your body up on your elbow and just your knee.
A couple of important notes for this position are to think about keeping your chest open
and think about keeping your head tall on your spine. Essentially, you want you to have as
much length as possible in your spine.
Another thing you can visualize is driving backwards from your elbow. If you place your
elbow on the ground and your knee on the ground a few feet apart from it, try to think
about dragging your elbow towards your knee in order to fire you lat and your peck
muscles. Again, when you fire those muscles in any plank or stability position it tends to
cause your core muscles to work harder. I’d rather see you hold an awesome active plank
for 30 seconds then a lazy shitty plank for 10 minutes. Practice this exercise and master the
side plank.
KNEELING TORSO LEVEL 3
We’re going to start with what is called a pracatchka. Coming from a downward dog,
without dropping your knees and keeping your arms straight, move through a pushup
position and into an upward dog position.

48
It’s hard to see on this image but I’m trying to extend my spine as much as I can in the
upward dog position without letting my core go. I want to make sure you maintain some
core tension to prevent your lower back from getting injured or feeling strained.
From the downward dog, come through with straight arms to the upward dog. Inhale as
you look up at the sky and you pull your shoulder blades back and down into their sockets
and exhale slow in control as you come through that position and work your chest and
bellybutton towards your thighs.
Perform five or more slow and controlled reps, going back and forth between the
downward dog position and the upward dog position to adequately strengthen and stretch
your shoulders, your core, your hips, and the back sides and front sides of your legs.
Finish your five reps of the pracatchka and then move into what’s called the hover plank.
Drop your elbows towards the ground holding a pushup position. Make sure your hips,
shoulder blades, and back of your head are all in one straight line. A great way to do this is
to place a dowel or a PVC pipe on your back so that it makes contact with your tailbone,
between your shoulder blades, and the back of your head. This way you have a physical
queue for making sure your plank is perfect.
If you get bored like I do in a plank position, you can drag yourself forward and backward,
primarily from the elbows working your core out slightly harder and keeping that solid
position. Again, make sure you drag the elbows back towards the toes to the fire the pecs
and the lats in order to cause your core to engage much more.

49
KNEELING TORSO LEVEL 4
Now, let’s take your downward dog progression to the next level! First, in a front bend
position walk your arms out as far as you can well beyond a pushup position and then
when you reach your max distance, walk your hands back up to a front bend position.
Make sure you walk your hands out in what’s called the inchworm as far as you can to the
point where you feel like you’re almost going to slip out and then keeping your core solid
move through your shoulders and your core muscles walking yourself back up to the tall
position.

50
In the inchworm it’s important that you keep the glutes tight, you keep the core tight, and if
you feel our lower back hurting, you are not prepared to go to this level yet. Make sure you
hold the hover plank and make sure the last level is solid before moving on to these level 4
torso exercises.
To warm-up our spine we’re going to take the pracatchka to the next level in an exercise
called the Hindu pushup. For the Hindu pushup, start in that downward dog position. This
time bend the elbows, pause in the bottom of a pushup, and then press up into an upward
dog position. This should be very smooth. It should flow very nicely and it should feel great
on your shoulders, your core, your hips, your hamstrings, pretty much your whole body.
Perform five slow and controlled reps, inhaling as you look up at the sky, exhaling as you
look back at your toes.

51
Finally, come onto your elbow on the left side and move up to a full side plank. The last side
plank you did was with our knees tucked. For this side plank, stack your feet on top of each
other, lift your hips off the ground, and place the majority of your pressure across your left
forearm and on the outside of your left foot. Again, keep your chest open. Keep your head
and spine long and tall and hold this position for 30 seconds or more.
Alternate sides as soon as you hold that position for a full 30 seconds.
Another key to remember as you did in the last side plank is to visualize dragging your
elbow towards your toe. I don’t want your arm to actually move anywhere. Keep it glued to
the ground. Just pull from that elbow towards your toes so you activate your lat and your
pec. It’s going to stabilize that side of your body making you much stronger much faster.
52
KNEELING TORSO LEVEL 5
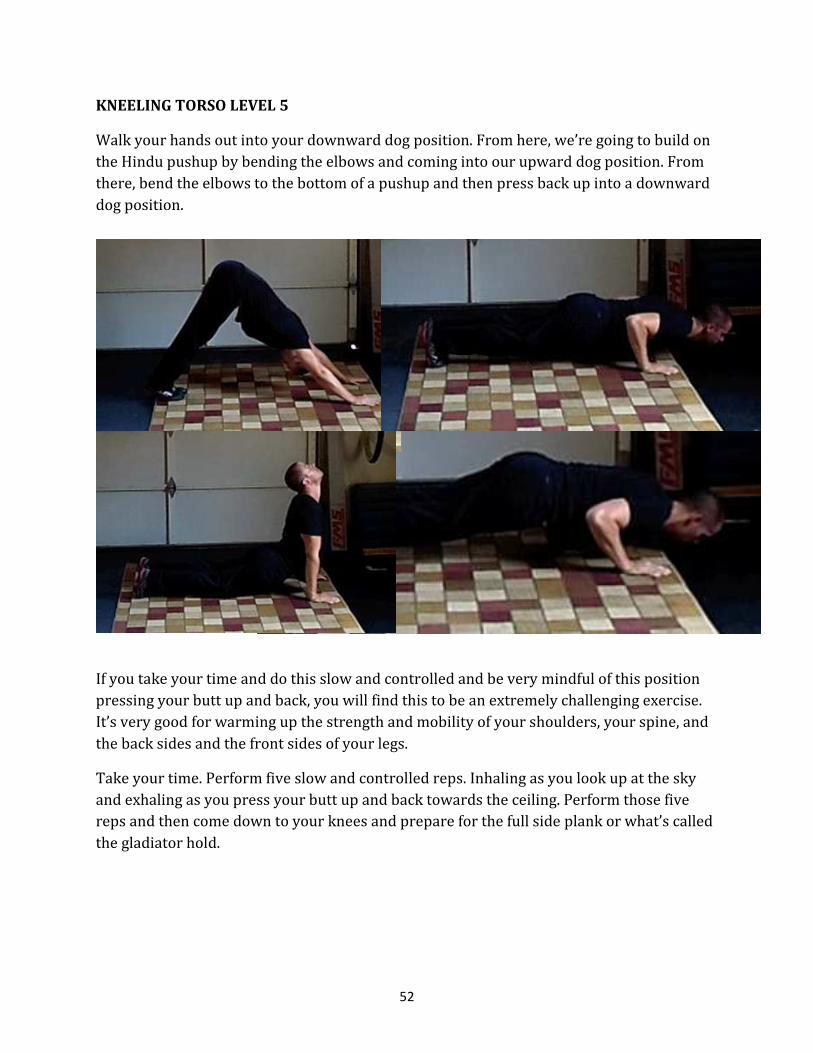
Walk your hands out into your downward dog position. From here, we’re going to build on
the Hindu pushup by bending the elbows and coming into our upward dog position. From
there, bend the elbows to the bottom of a pushup and then press back up into a downward
dog position.
If you take your time and do this slow and controlled and be very mindful of this position
pressing your butt up and back, you will find this to be an extremely challenging exercise.
It’s very good for warming up the strength and mobility of your shoulders, your spine, and
the back sides and the front sides of your legs.
Take your time. Perform five slow and controlled reps. Inhaling as you look up at the sky
and exhaling as you press your butt up and back towards the ceiling. Perform those five
reps and then come down to your knees and prepare for the full side plank or what’s called
the gladiator hold.

53
Stacking your feet on top of each other and having your hand underneath your shoulder,
come into the full side plank or gladiator hold. In this position, it’s important to continue
that same lat activation that we’ve continued for all the other plank drills by trying to drag
your palm towards your foot to activate the lat and to activate the pec.
In addition, think about having a very long extended spine as you hold the side plank
position. Don’t let your shoulders come close together on the front side but rather think
about staying open-chested and wide-armed like you’re trying to expand and open your
chest as much as possible.
Hold this position for 20 to 30 seconds, trying to keep your body nice and rigid. Again, I’d
rather have you hold a perfect plank with extremely active core, active lat, active pec for 30
seconds then hold a lousy plank for a long period of time.
54
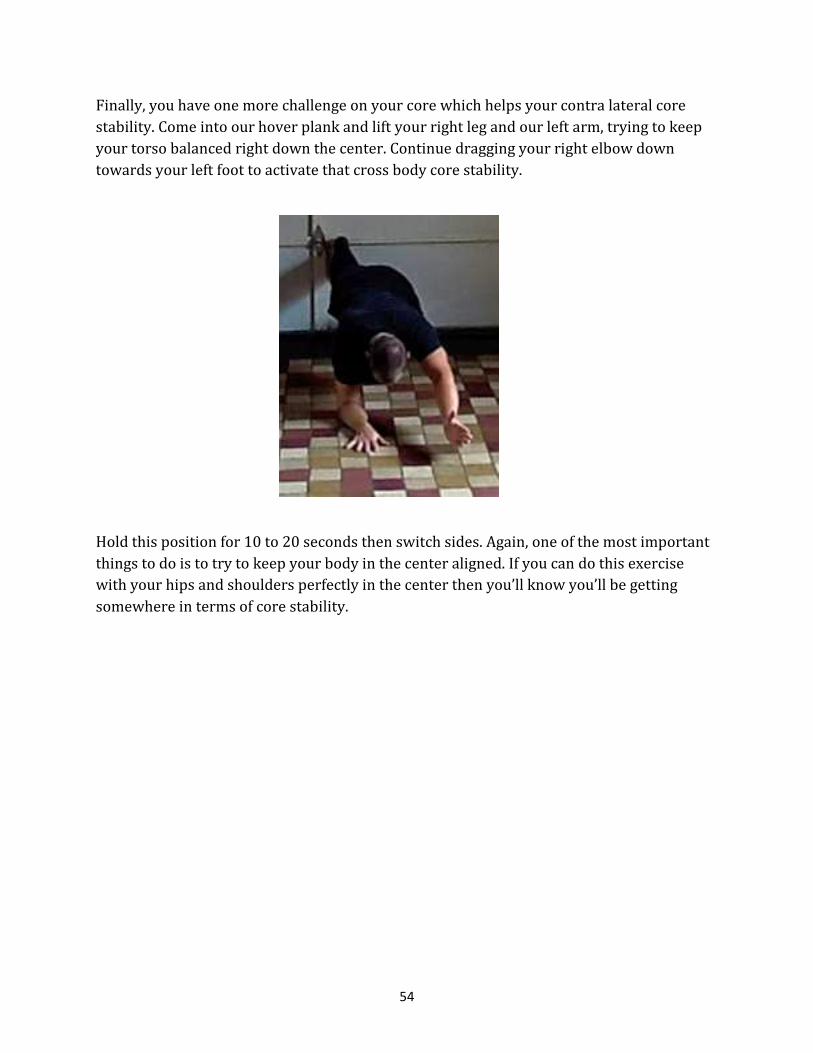
Finally, you have one more challenge on your core which helps your contra lateral core
stability. Come into our hover plank and lift your right leg and our left arm, trying to keep
your torso balanced right down the center. Continue dragging your right elbow down
towards your left foot to activate that cross body core stability.
Hold this position for 10 to 20 seconds then switch sides. Again, one of the most important
things to do is to try to keep your body in the center aligned. If you can do this exercise
with your hips and shoulders perfectly in the center then you’ll know you’ll be getting
somewhere in terms of core stability.

55
UPPER BODY
UPPER BODY LEVEL 1
For the level 1 upper body sequence it’s important to prep our body by properly stretching
your wrists. Bring your wrists back towards your body with your opposite hand and then
place it on your thigh and stretch that wrist by pressing your palm down on your thigh.
Once you’re able to get the palm of your hand flat on your thigh in this wrist stretch you
should have adequate mobility for all of the upper body drills you will be doing in this
Warrior Warm Up Sequence.
56
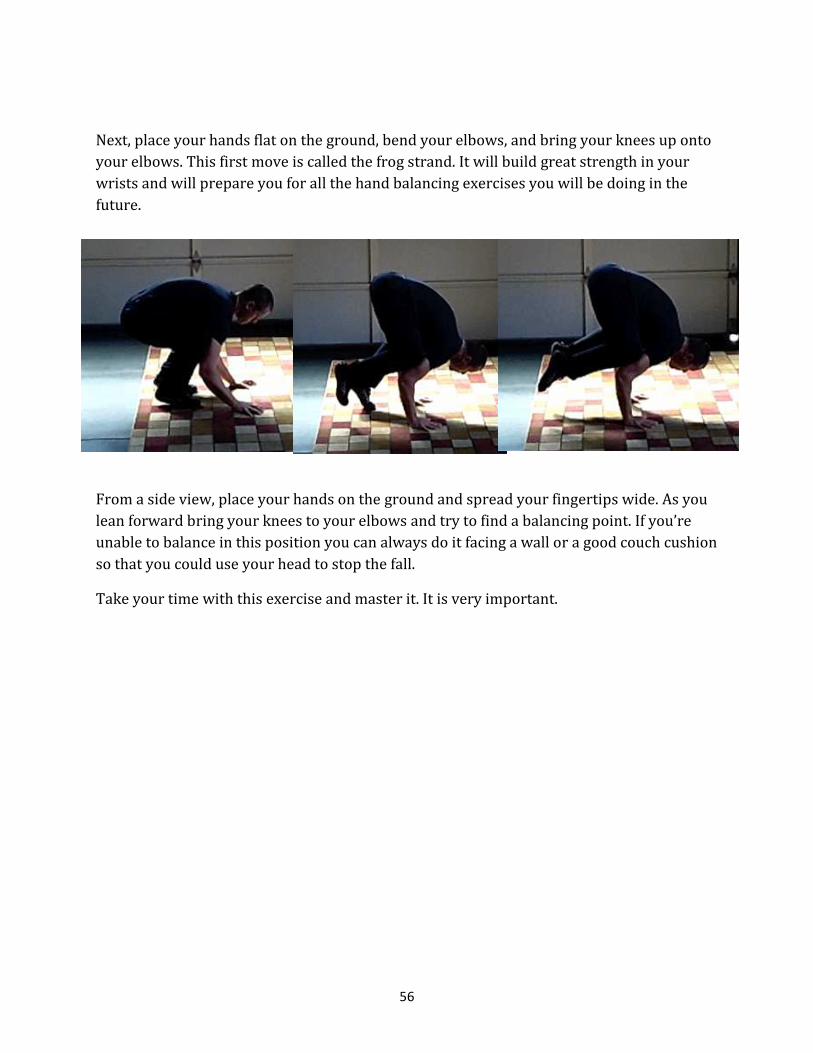
Next, place your hands flat on the ground, bend your elbows, and bring your knees up onto
your elbows. This first move is called the frog strand. It will build great strength in your
wrists and will prepare you for all the hand balancing exercises you will be doing in the
future.
From a side view, place your hands on the ground and spread your fingertips wide. As you
lean forward bring your knees to your elbows and try to find a balancing point. If you’re
unable to balance in this position you can always do it facing a wall or a good couch cushion
so that you could use your head to stop the fall.
Take your time with this exercise and master it. It is very important.

57
Next is the headstand. Placing your hands in front of your shoulders and your head on the
ground with your back against the wall, kick up to the wall using one leg and hold the
headstand position. It’s important to use something underneath your head for padding at
first as you build more toughness in the bones and muscles around your skull.
Hold this position as you deep breathe in your belly for 10 seconds, 30 seconds, 45 seconds,
or even longer. The more you build strength in this position the more it will help you in
Level Two, Three, Four, and Five exercises.
58
UPPER BODY LEVEL 2
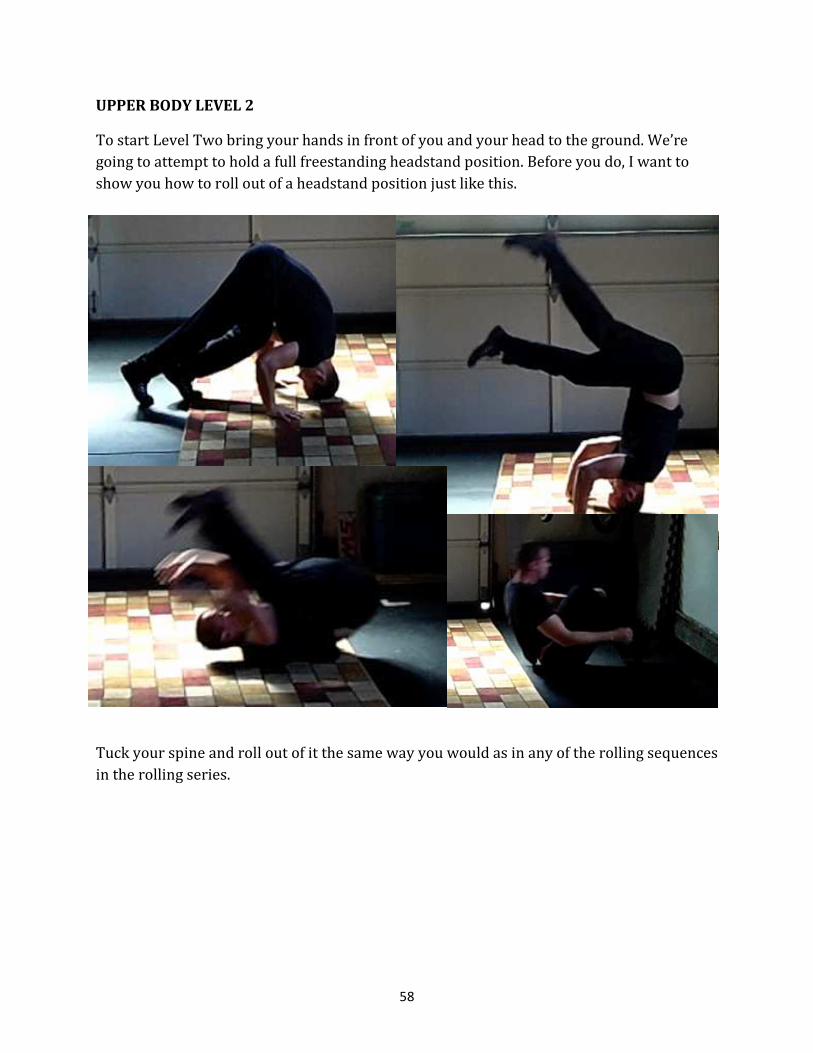
To start Level Two bring your hands in front of you and your head to the ground. We’re
going to attempt to hold a full freestanding headstand position. Before you do, I want to
show you how to roll out of a headstand position just like this.
Tuck your spine and roll out of it the same way you would as in any of the rolling sequences
in the rolling series.
59
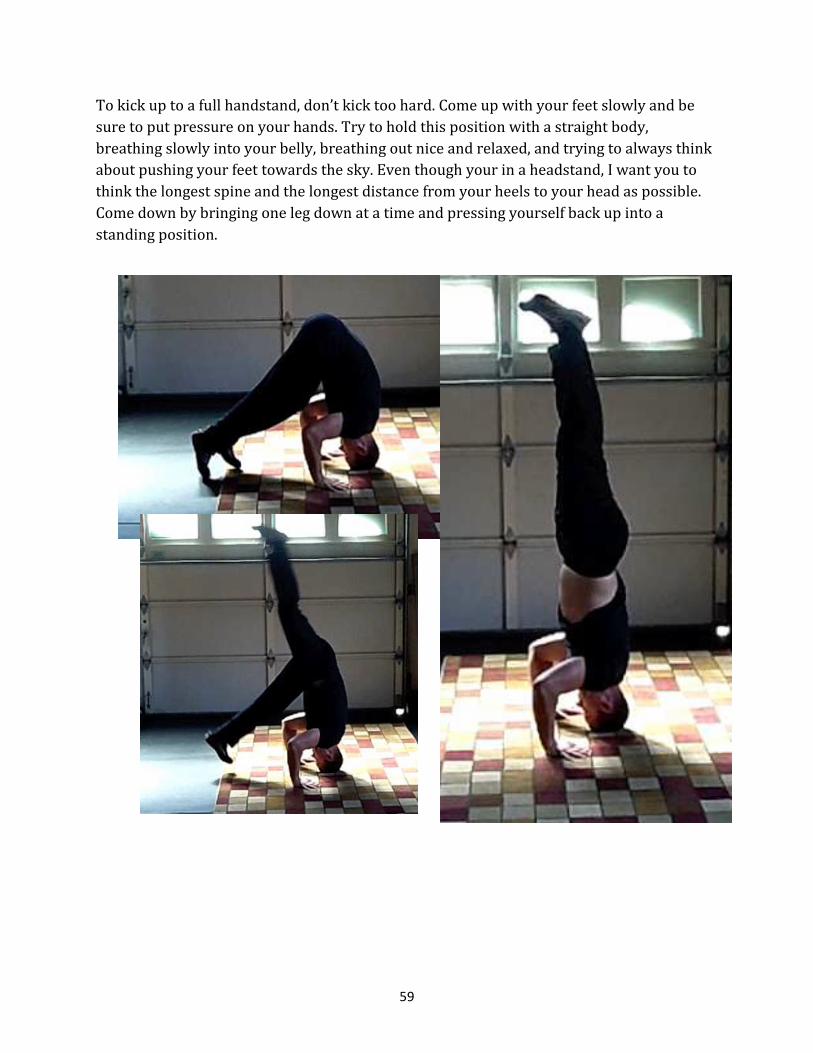
To kick up to a full handstand, don’t kick too hard. Come up with your feet slowly and be
sure to put pressure on your hands. Try to hold this position with a straight body,
breathing slowly into your belly, breathing out nice and relaxed, and trying to always think
about pushing your feet towards the sky. Even though your in a headstand, I want you to
think the longest spine and the longest distance from your heels to your head as possible.
Come down by bringing one leg down at a time and pressing yourself back up into a
standing position.

60
The next exercise your going to do to warm-up your upper body is the handstand against a
wall. To do the handstand, place your hands on the ground. Just like getting up into a
headstand against the wall, kick up into a full handstand.
The most important thing you can do is to remember to keep your elbows locked before
kicking up to that handstand. If you keep your elbows locked you will be nice and safe. As
you progress in this exercise bring your fingers closer to the wall and try to keep your body
as straight as possible while you hold the handstand anywhere from 10 seconds to 30
seconds or longer.
61
UPPER BODY LEVEL 3
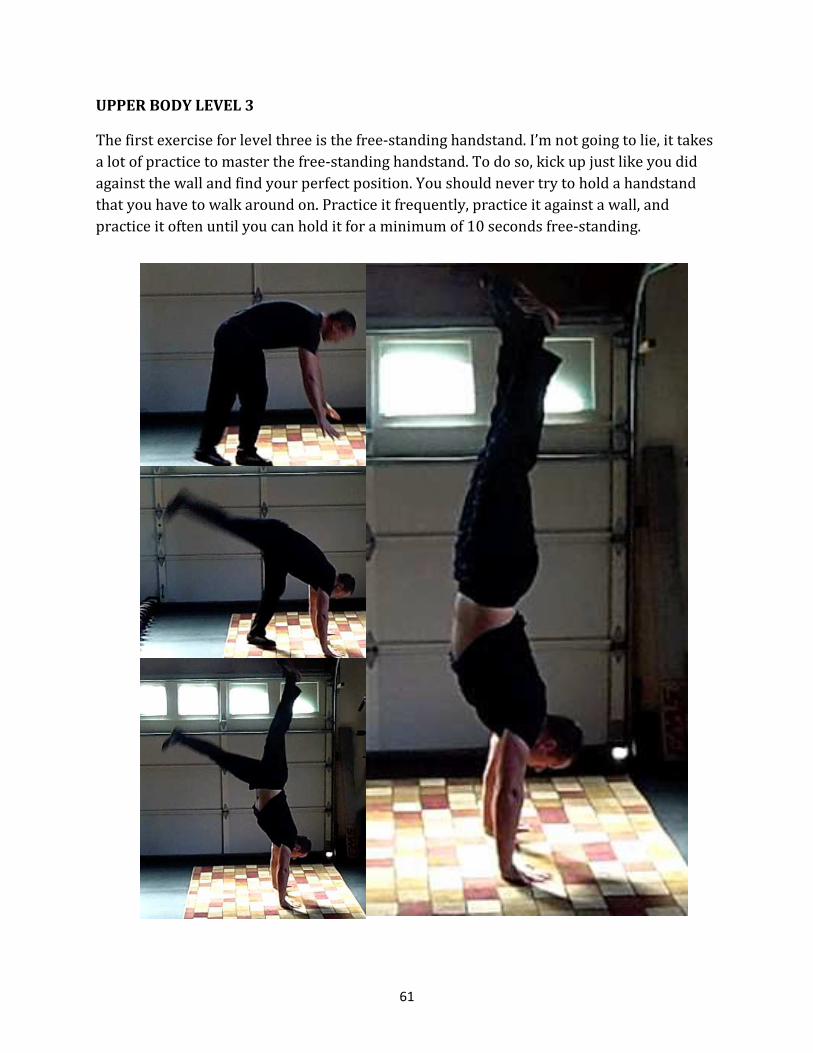
The first exercise for level three is the free-standing handstand. I’m not going to lie, it takes
a lot of practice to master the free-standing handstand. To do so, kick up just like you did
against the wall and find your perfect position. You should never try to hold a handstand
that you have to walk around on. Practice it frequently, practice it against a wall, and
practice it often until you can hold it for a minimum of 10 seconds free-standing.

62
The next is our yoga headstand. Bring your hands behind your head and your elbows in
front of you. Kick up slowly into the yoga headstand. Press your legs out towards the sky
and keep your spine nice and long. You will find this variation of the headstand is
extremely challenging to hold because your balance points have gotten much closer
together. Holding this position will help strengthen your core muscles and will help
strengthen your balance for being able to perform a longer handstand.

63
The last exercise you need to do for this level is to start improving your shoulder strength.
The best way to do this is to work on the handstand pushup. Take a stack of phonebooks,
three or more to start with. Kick up against a wall in the handstand position. Bring your
head down to the phonebooks and back up.
From there take one phonebook off at a time and do another rep. The closer your head gets
to the ground the more challenging this is going to be. The real key though is to start easy
doing sets of five or ten reps and work your way down in range of motion a little bit each
week until you’re able to do five to ten reps nice and easy. This will prepare your strength
for level 4.
64
UPPER BODY LEVEL 4
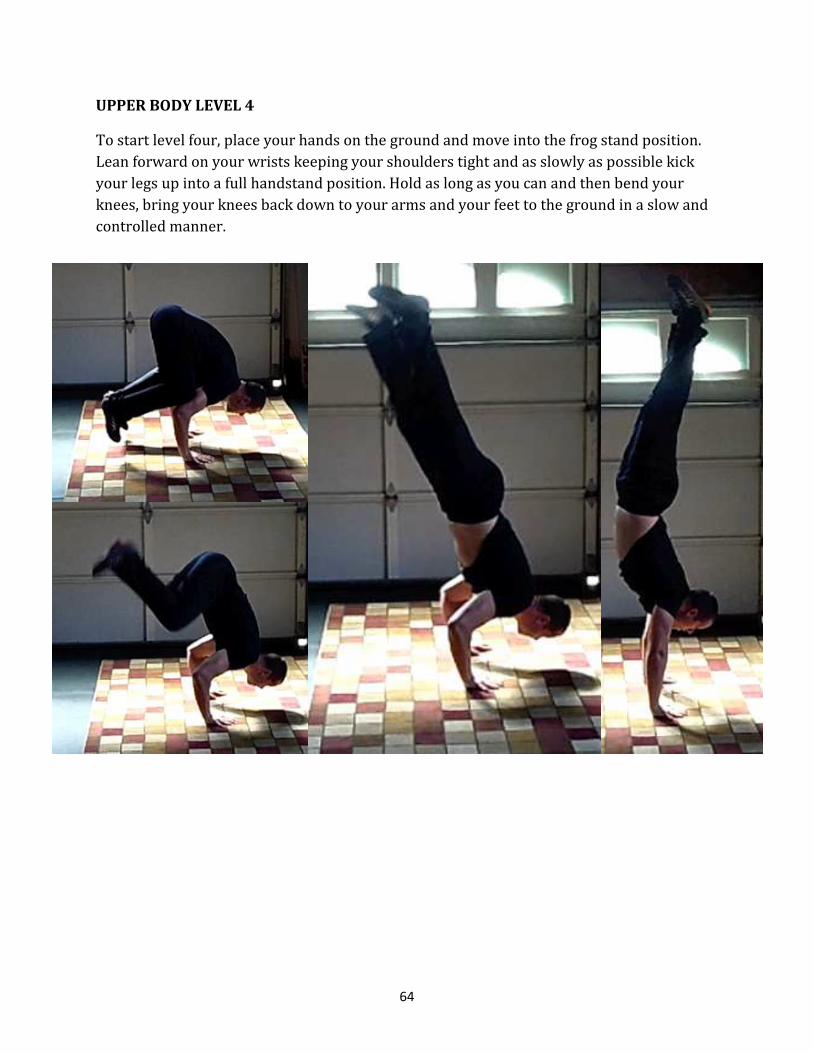
To start level four, place your hands on the ground and move into the frog stand position.
Lean forward on your wrists keeping your shoulders tight and as slowly as possible kick
your legs up into a full handstand position. Hold as long as you can and then bend your
knees, bring your knees back down to your arms and your feet to the ground in a slow and
controlled manner.

65
From there, place your head on the ground in the tripod position. Instead of kicking up,
slowly lift your legs to the outside and into the center position, performing the straddle
pressed headstand. Hold this position as long as possible, breathing into your belly while
holding the freestanding headstand position. Finally bring your legs back down to the
ground in a controlled manner.

66
From there, place your elbows flat on the ground with your wrists pressing to the ground
and try to kick up into what’s called a forearm stand. As with all the other hand balancing
exercises, this is a very challenging drill to kick up to at first.
Find your balance and it’s okay to have a little bit more arch in your spine. Hold for a
minimum of 10 seconds before moving on to the next level.

67
UPPER BODY LEVEL 5
For the final level five sequence spread your legs and place your hands on the ground. Lean
your body weight forward onto your fingertips and try to slowly lift your legs off the
ground and together into a handstand position. The bent arm straddle press to handstand
takes great strength and will take a while to master. Be sure to master the frog press to
handstand and your handstand holds before mastering this exercise. Return to the ground
in a slow and controlled manner.

68
Next, combine the yoga headstand with the straddle press headstand. Place your hands on
the ground clasping behind your head as you did in the level 3, yoga headstand and slowly
lift your legs off the ground. This will take tremendous balance and core strength. Bringing
them up and together into a nice tall headstand position. Hold this position and think long,
long, long through the spine, breathing slowing and try to find perfect balance in the center.

69
Once you hold this position for an adequate amount of time, take your hands off of your
head, place your wrists onto the ground, shift your weight towards your hands, curl your
heels towards your head, and come in to a forearm stand position.
Hold this position for as long as you can and then move into the bridging sequence by
falling into a bridge.
70
BRIDGING
BRIDGING LEVEL 1
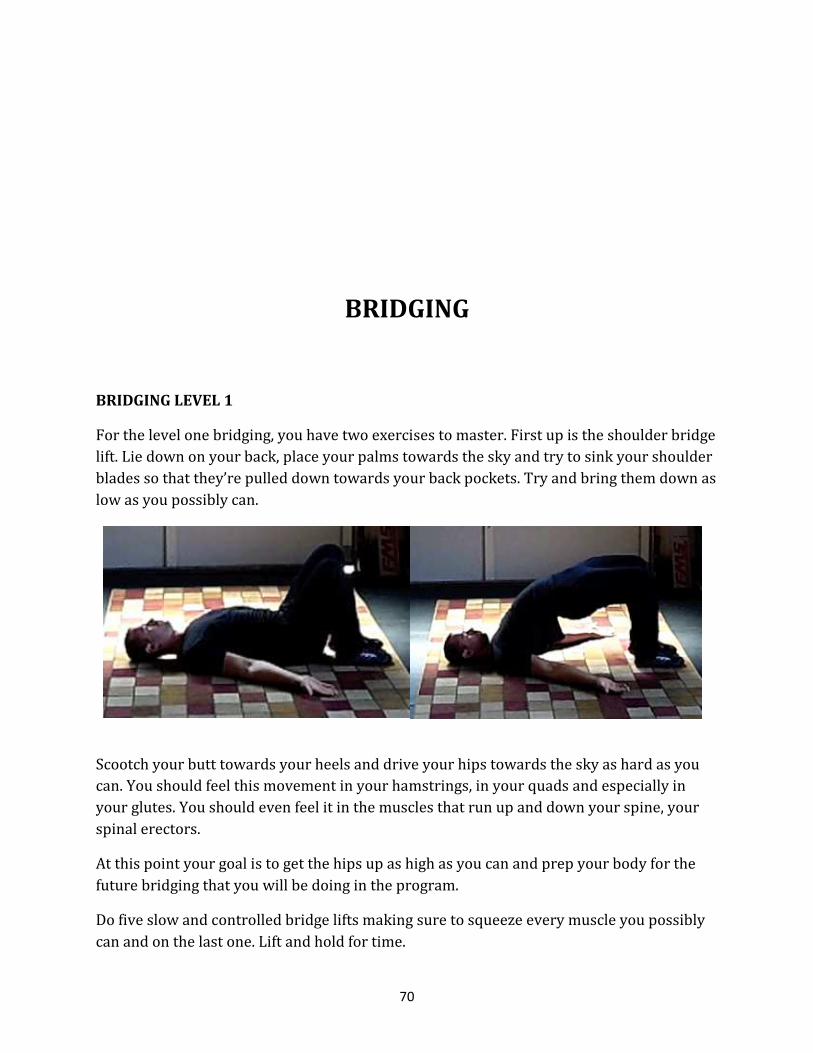
For the level one bridging, you have two exercises to master. First up is the shoulder bridge
lift. Lie down on your back, place your palms towards the sky and try to sink your shoulder
blades so that they’re pulled down towards your back pockets. Try and bring them down as
low as you possibly can.
Scootch your butt towards your heels and drive your hips towards the sky as hard as you
can. You should feel this movement in your hamstrings, in your quads and especially in
your glutes. You should even feel it in the muscles that run up and down your spine, your
spinal erectors.
At this point your goal is to get the hips up as high as you can and prep your body for the
future bridging that you will be doing in the program.
Do five slow and controlled bridge lifts making sure to squeeze every muscle you possibly
can and on the last one. Lift and hold for time.
71
A reasonable goal to shoot for when mastering the level one bridging on the shoulder
bridge lift would be to hold this position for about 30 to 90 seconds. When you’ve mastered
that bridge we’ll be ready to start working on the next level.
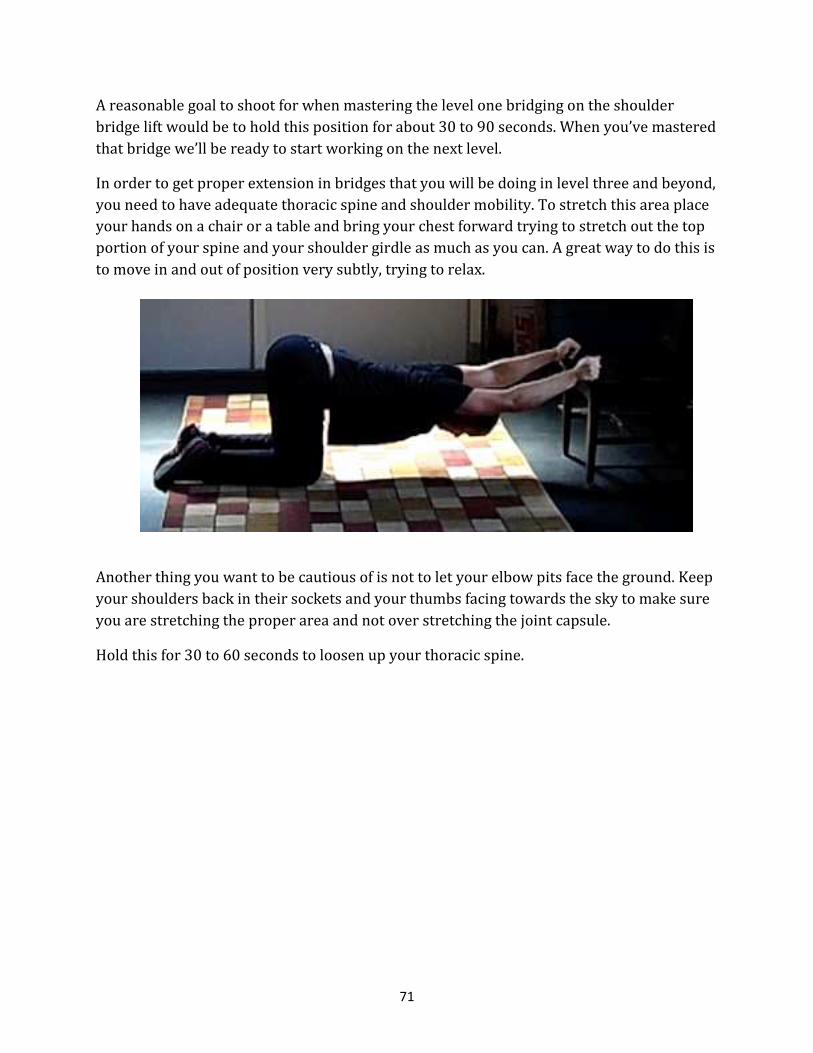
In order to get proper extension in bridges that you will be doing in level three and beyond,
you need to have adequate thoracic spine and shoulder mobility. To stretch this area place
your hands on a chair or a table and bring your chest forward trying to stretch out the top
portion of your spine and your shoulder girdle as much as you can. A great way to do this is
to move in and out of position very subtly, trying to relax.
Another thing you want to be cautious of is not to let your elbow pits face the ground. Keep
your shoulders back in their sockets and your thumbs facing towards the sky to make sure
you are stretching the proper area and not over stretching the joint capsule.
Hold this for 30 to 60 seconds to loosen up your thoracic spine.
72
BRIDGING LEVEL 2
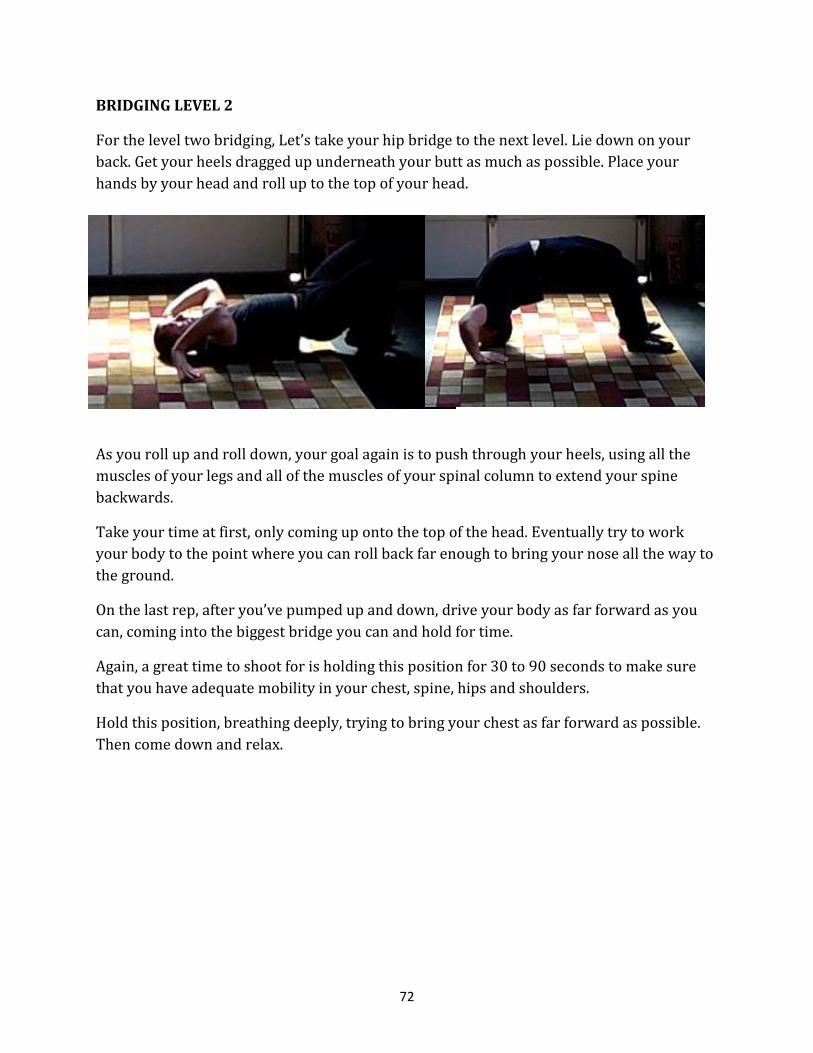
For the level two bridging, Let’s take your hip bridge to the next level. Lie down on your
back. Get your heels dragged up underneath your butt as much as possible. Place your
hands by your head and roll up to the top of your head.
As you roll up and roll down, your goal again is to push through your heels, using all the
muscles of your legs and all of the muscles of your spinal column to extend your spine
backwards.
Take your time at first, only coming up onto the top of the head. Eventually try to work
your body to the point where you can roll back far enough to bring your nose all the way to
the ground.
On the last rep, after you’ve pumped up and down, drive your body as far forward as you
can, coming into the biggest bridge you can and hold for time.
Again, a great time to shoot for is holding this position for 30 to 90 seconds to make sure
that you have adequate mobility in your chest, spine, hips and shoulders.
Hold this position, breathing deeply, trying to bring your chest as far forward as possible.
Then come down and relax.

73
In order to counter balance the exercise you just did, flip over and start in a straddle
position with both feet on the ground, spread out, and both hands in front of you. Bring
your head to the ground and lean forward onto your head as if you are about to go into a
headstand.
In this position you can perform tiny rocks in order to stretch and strengthen your neck
muscles in this front bridge position.
Again hold for 30 to 90 seconds trying to strengthen and stretch the neck in the opposite
position of the bridge.

74
BRIDGING LEVEL 3
For the level three you will begin your dynamic bridging movements. For this, you will
learn to use the wrestler’s bridge position that you did in level two. Only each time you roll
back and up, I want you to extend the other leg, imagining that you’re going to kick over
with your body.
Extend up all the way and then come down with control. Alternate the legs, extending up
and coming down, trying to push explosively through the leg that’s planted on the ground.
Try and do five each side, making sure you lift the other leg as high as you can and
explosively pushing through the leg on the ground.

75
As you progress with this, you can move from just lifting the leg and pushing through the
heel, to physically jumping off the ground with the planted foot.
To do this, kick the leg up, letting the other leg leave the ground. Your goal is to kick up as
high as possible as long as your head, neck and spine feel 100% comfortable.
Take your time with this exercise improving your intensity gradually and making sure to
not injure yourself in the process.
If you do this right, you will have a strong healthy spine. If you do this wrong, it won’t be a
strong healthy spine. It could potentially injure you so take your time.
76
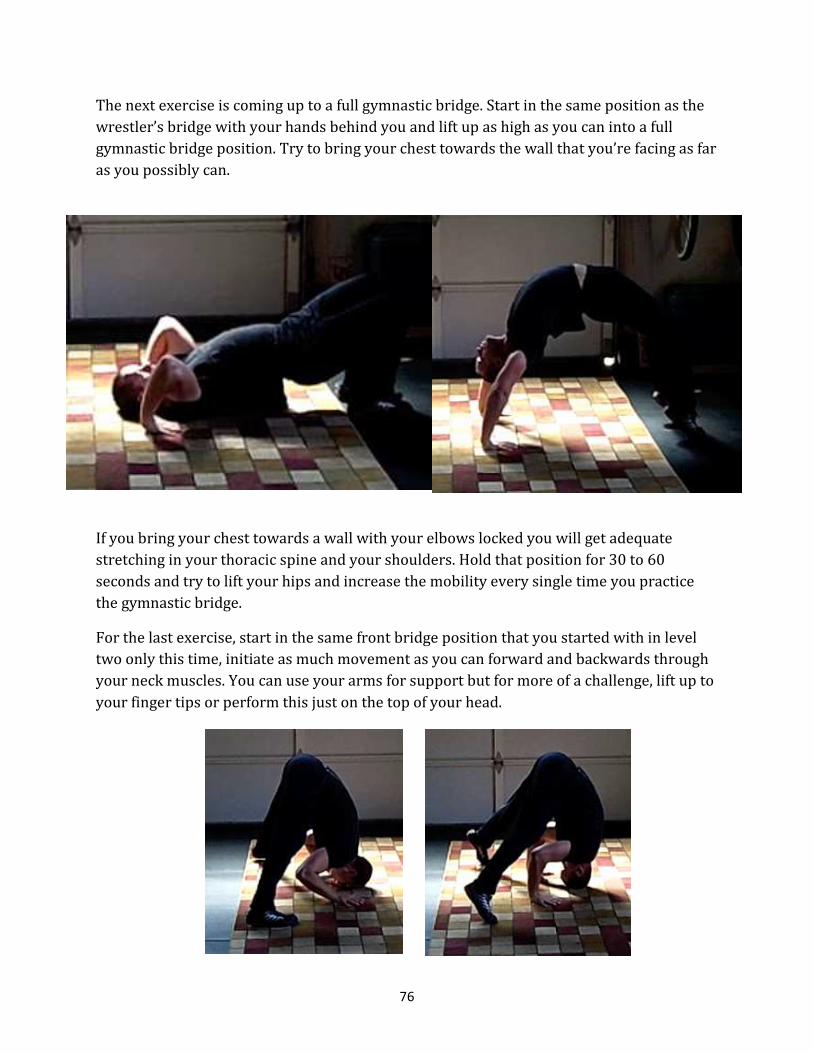
The next exercise is coming up to a full gymnastic bridge. Start in the same position as the
wrestler’s bridge with your hands behind you and lift up as high as you can into a full
gymnastic bridge position. Try to bring your chest towards the wall that you’re facing as far
as you possibly can.
If you bring your chest towards a wall with your elbows locked you will get adequate
stretching in your thoracic spine and your shoulders. Hold that position for 30 to 60
seconds and try to lift your hips and increase the mobility every single time you practice
the gymnastic bridge.
For the last exercise, start in the same front bridge position that you started with in level
two only this time, initiate as much movement as you can forward and backwards through
your neck muscles. You can use your arms for support but for more of a challenge, lift up to
your finger tips or perform this just on the top of your head.

77
From there change the direction of your motion and go side to side instead of front to back
in order to make sure to adequately stretch and strengthen your neck in all the positions.
Perform five to ten front to back and five to ten side to side to build adequate strength for
your neck muscles.

78
BRIDGING LEVEL 4
In the level 4 series you are going to begin what’s called a wrestler’s bridge kick-over.
Here’s where the fun really starts to happen!! Use a chair from your house or a sturdy
object that’s roughly 16 to 18 inches in height. Bring your feet on top of the chair and come
into the wrestler’s bridge position.
Now, before starting this, you should have mastered the kick-ups in level three. From here,
I want you to push your chest forward, kick over with one leg, and make sure you come all
the way over.
It’s a good idea to get someone to spot you on your first few times trying this exercise by
propping your legs up. They can basically help you push the leg that’s kicking over the
other side to make sure you have good confidence in this movement and to make sure that
you don’t injure yourself.
It’s important to alternate legs on each route so that you have adequate mobility and
stability on both sides of the body.
This in order to progress from using a chair or a piece of furniture towards getting all the
way down to the ground in our level 5 wrestler’s bridge kick-overs.

79
You can always use some steps or some wooden blocks. Some great ideas are to use some 2
x 12 lumber or some 4 x 12 lumber that you can stack up against a wall to kick off of.
Always make sure there’s a solid surface behind whatever you’re kicking off of so
that it doesn’t slide out from underneath you.
The lower the surface you’re kicking off, the better the results you’re going to have getting
all the way to the ground. You want to make sure it’s lower and lower until you are able to
do a full kick over.
For the next position, let’s take your gymnastic bridge to the next level. Lying down on your
back drag your heels underneath your butt as much as you can. Bring your hands over your
shoulders in the gymnastic bridge position. Press up to our gymnastic bridge that you
should have mastered from level three.

80
From here, shift your weight to one arm and lift the other arm and hold in the same
position. Try to make sure that your pelvis stays in the center and that your spine stays in
the center.
Take your time as it’s easy to go off balance for this exercise.
Hold each side for somewhere between 15 and 30 seconds in order to maximize the
strength and stability you can gain from the one-armed gymnastic bridge.
For the last exercise, we’re going to master our neck and spine mobility by working on
front bridge turns. By lifting one leg and letting it roll over, you’re going to come from a
front bridge into a wrestler’s bridge.
Then by moving you arm and rolling that leg back over, you’re going to turn from a
wrestlers bridge back to a front bridge. Take your time to master this as it is a very
challenging skill.

81
BRIDGING LEVEL 5
Finally, on to the level five bridging is where mastery of bridging realistically begins. Come
into a wrestler’s bridge push off the ground and bring your leg over kicking over into a
front bridge.
From there, kick back over and alternate sides. Remember, you always want to make sure
to do both your right and left side as you do the kick overs.
At first, it may seem slow and controlled. As you become more experienced with it, you can
kick back and forth, going from right leg to left rather quickly.
It should only take you 30 seconds to go back and forth five times. You will have adequate
mobility, strength and stability in your spine from performing the wrestler’s bridge kick-
over.
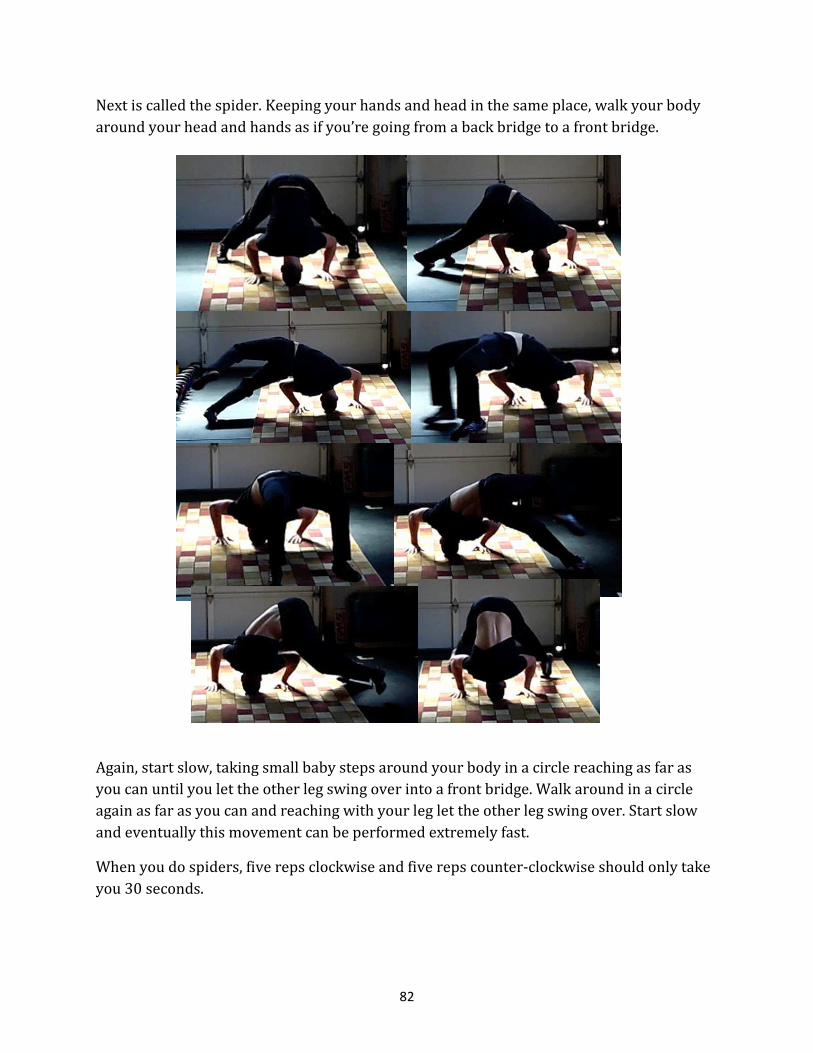
82
Next is called the spider. Keeping your hands and head in the same place, walk your body
around your head and hands as if you’re going from a back bridge to a front bridge.
Again, start slow, taking small baby steps around your body in a circle reaching as far as
you can until you let the other leg swing over into a front bridge. Walk around in a circle
again as far as you can and reaching with your leg let the other leg swing over. Start slow
and eventually this movement can be performed extremely fast.
When you do spiders, five reps clockwise and five reps counter-clockwise should only take
you 30 seconds.

83
Last is a gymnastic bridge turn. Placing your hand facing the outside of your body in a bear
crawl position, plant the hand and roll over allowing the shoulders to rotate until your
body is in a gymnastic bridge. Then roll over the opposite way to the other side.
Perform this by properly shifting your weight to your outside hand the slowly roll the leg
over, rotate the shoulder and bring the other hand into the bridge position from there just
reverse the motion and rotate back to the start.

84
ROLLING
ROLLING LEVEL 1
To begin the level one rolling sequence lie down on your back and roll over to your right
side. Then slowly roll back over to your left side.
Your goal is to be able to do this exercise with your hands and feet remaining off the
ground as you roll through one direction and roll through the other direction. Take your
time and master this skill because it will build tremendous core control.

85
Next, tuck your knees into your chest and from a sitting position rock backwards on your
back, touching your head to the ground and then back to your start position. Try to get a
nice smooth controlled roll going as this will be the foundation of all the other rolling drills
you’re going to do over your shoulder and over your spine.
From here, start to learn directional rolling. Kick your left leg up and touch it over your
right shoulder. Then your right leg up and touch it over your left shoulder. Then go back
and forth alternating sides to loosen up your spine and like I said, get you prepared for
rolling in Levels Two through Five.

86
ROLLING LEVEL 2
For level two, take your left arm and tuck it underneath your right arm in the kneeling
position and roll over your left shoulder. From there, back track and come through the
exact same direction into the kneeling position. Tuck through the hole, roll over the
shoulder, roll back over that same shoulder, and come through into the start position.
Practice this until you’re able to roll forward and backward, each time ending up in the
exact same position that you started in.
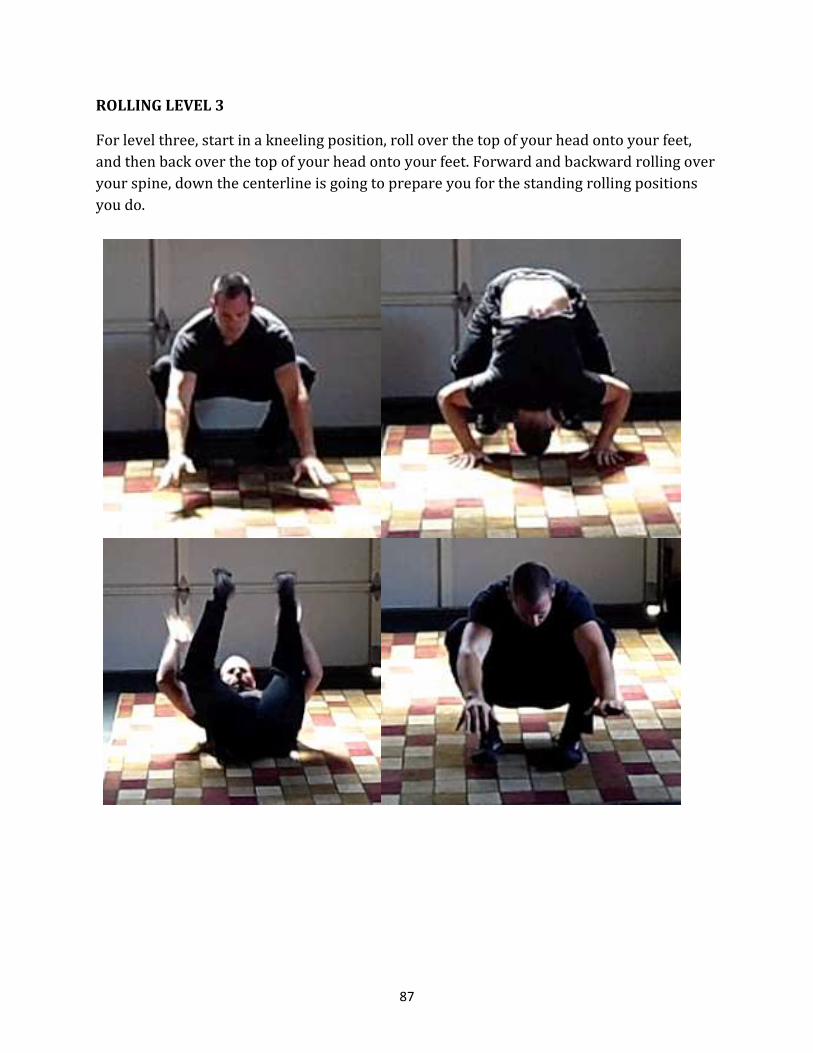
87
ROLLING LEVEL 3
For level three, start in a kneeling position, roll over the top of your head onto your feet,
and then back over the top of your head onto your feet. Forward and backward rolling over
your spine, down the centerline is going to prepare you for the standing rolling positions
you do.

88
ROLLING LEVEL 4
For level four tuck the arm just like you did in the level 3 exercise only roll around the
shoulders so that you end up facing your start position like it was a mirror. This roll
eventually becomes faster and becomes a very useful skill when learning to master your
movement. Eventually you will build more speed and it will become second nature.

89
ROLLING LEVEL 5
For the level five rolling sequence, lie down on your back, lift your legs over your head,
drop your knees to the ground, and roll your head underneath your arms to one direction
and then underneath your arms to the other direction, rolling your legs back over.
The more skilled you get at this movement, the more fluid it will become. Another way to
add intensity and difficulty to it is instead of dropping to your knees, just to let your legs
slide out all the way so that you’re rolling on your stomach. From a side view this is what it
should look like.
On your back, palms to the sky, use your core muscles to bring your legs over your head
and drag your head underneath your shoulder, through the middle, around to the other
side, and then bring your body back over to a flat position.
Take your time in mastering this movement. It’s very challenging.

90
Next, from a standing position, take your left arm and aim for the outside of your right foot
from there do a standing roll over your shoulder to finishing in a standing position. Return
to the start by coming backwards over that same shoulder and going all the way through to
a full standing position. Start slow. Master this movement over each shoulder and then
eventually you’ll be able to move much faster doing full standing rolls and full standing dive
rolls at a much quicker pace allowing you the momentum to stand up much quicker.

91
SPECIAL NOTE: A great way to practice your deep breathing lying on your back is to finish
the rolling sequence by performing one front roll onto your spine and letting your spine
unfold long, long, long as you come to the ground.
From there, cool down from your warm up for the minute or two that it takes to do some
deep breathing, deep breathe into your stomach just like you practiced on any of the levels
in the breathing sequences.
This is a great way to finish your Warrior Warm Up and leaves you prepared for whatever
workout you’re about to start.
92
CONCLUSION
If you follow The Warrior Warm Up CONSISTENTLY, there is no way you can’t progress
through these levels. The exercises contained in The Warrior Warm Up can at first seem
impossible, in fact there was a time many years ago when I considered EVERY move in the
Level 5 routine possible. But, with patience, persistence, determination and a good
progressive routine to follow I was able to accomplish all of the exercises in the level 5
routine and now I am free to work on improving myself by learning even more complicated
movements and becoming more and more a master of my body every day.
I want this for you as well!! I want you to use The Warrior Warm Up to it’s upmost
potential, I wanna see you on youtube sporting your new mastery of movement and I want
to see you succeed. So stick to it, be patient and never give up!
If there’s anything I can do to help you on your fitness journey please don’t hesitate to
email me and ask [email protected]

93
For Even Better Results, Check Out The Warrior Warm Up Video
Series. With Over 4 Hours Of Video Footage The Warrior Warm
Up Video Series Includes 14 Videos Detailing Every Exercise
Highlighted In The Warrior Warm Up E-Book. Click The Link
Below To Learn More.
http://www.thewarriorwarmup.com/
To Get Instant Access To the 14 Video Series Click Here
http://www.thewarriorwarmup.com/