Embed Size (px)
Citation preview
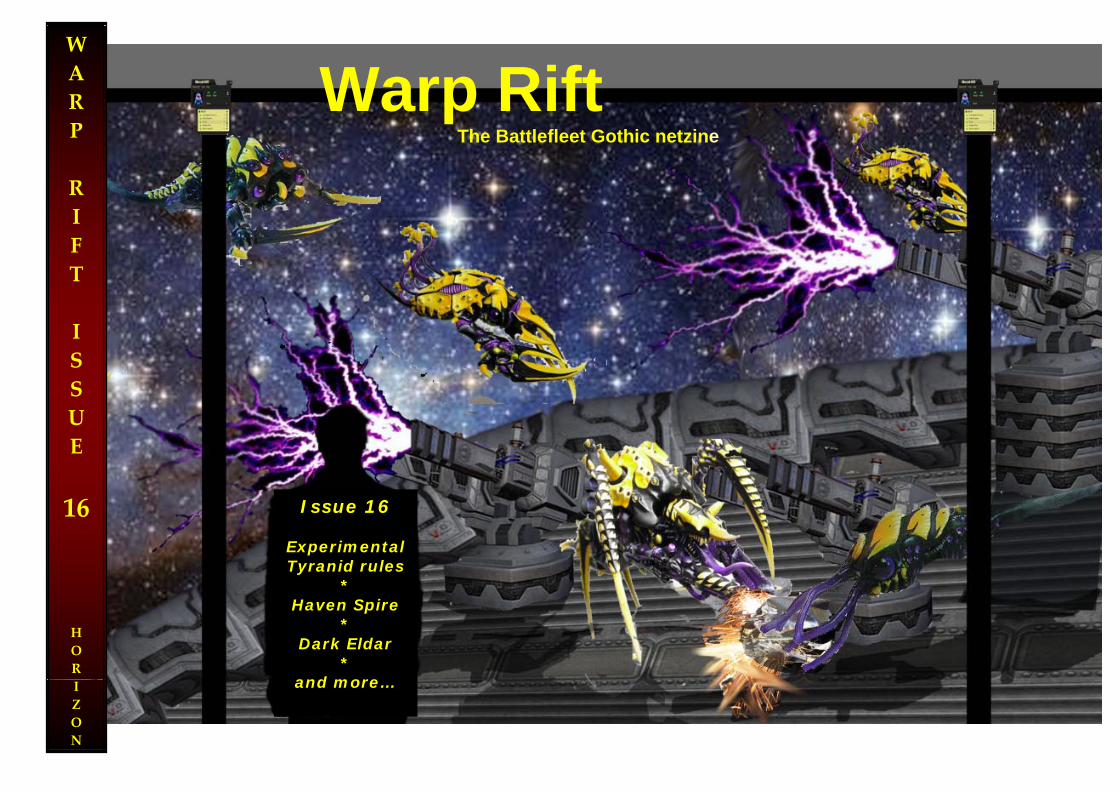
Issue 16
Experimental Tyranid rules
* Haven Spire
* Dark Eldar
* and more…
Warp Rift The Battlefleet Gothic netzine
W A R P R I F T I S S U E 16 H O R I Z O N
2
Warp Rift is not endorsed, nor does it endorse, Games Workshop, and it is not an official publication of Games Workshop. Any words, phrases orimages are used without permission and no challenge is intended as a result of such a usage, including the use of these words, phrases andimages without the appropriate symbols of copyright. Additionally, these pages – including content, design and images – are copyright (exceptwhere copyright should infringe other such rights). Licensed names, images and logos are copyright their respective companies or authors. Nopart of these pages may be ‘borrowed’ or reproduced, and no articles or rules should be considered ‘official in any way.
Please register your support for this publication.
Download your copy direct from the official web site, at:
www.epic40.co.uk/bfgmag/
Submissions All types of article are desperately needed, to keep this publicationalive. In some cases, submission includes inclusion on the web siteat: www.epic40k.co.uk, or through www.tacticalwargames.net.Please include a note with your submission if you would like thisclarified. Submission via e-mail implies approval for publication. Send your submissions to: [email protected] or [email protected]
Warp Rift Publication Team Roy (Horizon) Amkreutz – Void Stalker II Iain (Cybershadow) – Watcher in the Dark Ray Bell – Admirality Reg Steiner – Tyranid War Veteran Credits: Cover Picture – Models: Giulio Taverna - Photoshop Magician: Hotwire Additional Graphics & Pictures – Giulio Taverna, Nate Montes,
Canucks Fan, Roy Amkreutz, one second of insanity, Jim Weightman, Zhai Morenn
Lord Chronos, Norman David Morris, James Ward Warp Rift:
Issue Sixteen January 2008
EDI TORIAL
From the Nexus Publishing House
3
EDI TORIAL
+++ All One Mind +++ Before I start of rambling on all the
great content of this issue I would firstlike to thank all the people whoresponded to the picture requests I haveplaced in the last couple of months.
Many thanks for submitting all thosegreat pictures. And if you don’t find yoursback in this issue there will always be amoment when I can use them in a futureissue.
This issue sparks the start of a sort of
sister publication to Warp Rift. I will go infurther detail in a separate box on thispage.
What can I tell about this issue? Very
easy: it is filled with Xenos. And thenmostly with those nasty creatures fromanother Galaxy: the Tyranids. Theyappear with some delicate craftedexperimental rules, a really great andextensive conversion guide plus a mayorappearance in the new Warp Riftaddendum (as said, see the other box…)
The other alien race which has a main
feature this time around are the pointyeared Eldar.
For the Dark Eldar we have an additionto the fleet list as presented in theArmada book. The Eldar feature in a twin-linked scenario based around the Haven Spire.
But humans should not worry too muchabout all these Xenos as in the Depths of Space heroic Captains defend the borders and brave Admirals explore new stars for mankind.
This applies to Xenos (ha!) as well, likethe Tau.
Warp Rift 17 will feature an article called‘Patrol Fleet Rules’ by MKG. This ties in very nicely with the ‘In Depth of Space Article’ about which I am talking.
Happy Battlefleet Gothic in 2008,Roy
Issue Sixteen – Contents:
Encyclopedia Gothica
Dark Eldar addendum 4 Tyranid Experimental Rules 8
Tactical Command In the Depth of Space 18
Dry Dock
Tyranid conversion article 23
Void Stalker Twin linked Haven Spire scenario 47
A TYRANID WAR
As I mentioned in the editorial this issueof Warp Rift sees the start of a separate document, closely linked with Warp Rift.
This new add on is, for all I can see now, a temporary one.
Why a separate document in the first
place? It all started as Reg Steiner contacted me
and told me about a story he had written. Since Warp Rift has a section called the Officer’s Mess which feautures short stories of course I was interested. But as soon as Iset eye on the story I realised it would be much too large to simply publish in standard Warp Rift format.
The fact issue 17 contains some reallycool Tyranid articles was a motivation for me to find a way to give this story dealing
with the Space bugs the attention it deserves. So after some pondering I opted to make a separate PDF for the story. All spiced up with some cool artwork and a splendid cover. For which I really thank everyoneinvolved.
So with all this introduction on my side I can only say you should download the PDF called ‘A Tyranid War’ , the story written by Reg Steiner. This month features chapters one to four. Next time further chapters will be published.
I really hope you appreciate and like this
additional instalment to Warp Rift. Happy Reading,
Roy
4
Encyclopaedia Gothica Fleets of the Galaxy
Additional rules
Additional Rules for the Dark Eldar By Jim ‘Kavok’ Weightman (with an addition from Zhai Morenn)
The following Dark Eldar fleet additions are meant to be integrated with the Armada Dark Eldar Pirates fleet list.
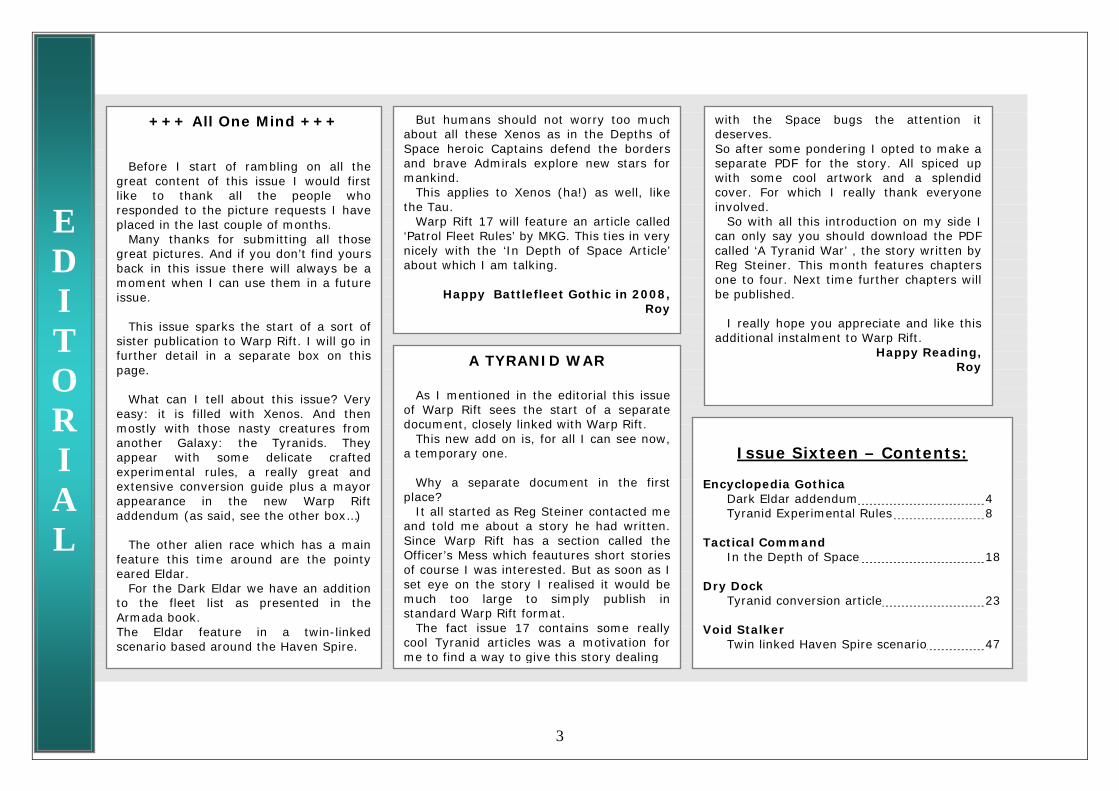
Dark Eldar Subjugation class Light Cruiser…………………...130 pts
TYPE/HITS SPEED TURNS SHIELDS ARMOUR TURRETS Cruiser/4 35cm 90º Shadowfield 5+ 0
ARMAMENT RANGE/SPEED FIREPOWER/STR FIRE ARC
In addition, Subjugation class cruisers may be equipped with one of the following weapons from the list below.
Prow Torpedo tubes 30cm 4 F Prow phantom lance 30cm 2 F
In addition, Subjugation class cruisers may add one hardpoint weapon from the list below at the indicated points cost.
Prow weapons battery 30cm 5 F Prow Torpedo tubes 30cm 2 F Prow Phantom lance 30cm 2 F Impaler Attack Craft 30cm Special F
Prow weapons battery: +25 pts Prow torpedo tubes: +20 pts Prow phantom lance: +30 pts Prow Impalar module: +20 pts
Notes: The Subjugation class is commonly modified for use by Wych cults and other splinter groups of Dark Eldar. Any number of Subjugations may become Wych cult ships at no extra cost. These ships increase their speed to 40cm, reduce their armour to 4+. They also ignore the effects of turrets on an opposing ship when conducting a boarding action. The Wych cult ships may replace prow torpedo tubes for a small launch bay at +10 points. This bay has strength 2 but may only launch assault boats. “Weapons damaged” criticals will damage the ‘free’ weapons choices, “Prow armament damaged” knocks out the hardpoint systems. Wych cult ship assault boat bays cannot be repaired if damaged. Subjugation class cruisers operate alone as much as they form partof fleets. Every 2nd Subjugation taken counts as a ‘cruiser’ for thepurposes of requiring escorts.
E N C Y C L O P A E D I A G O T H I C A
5
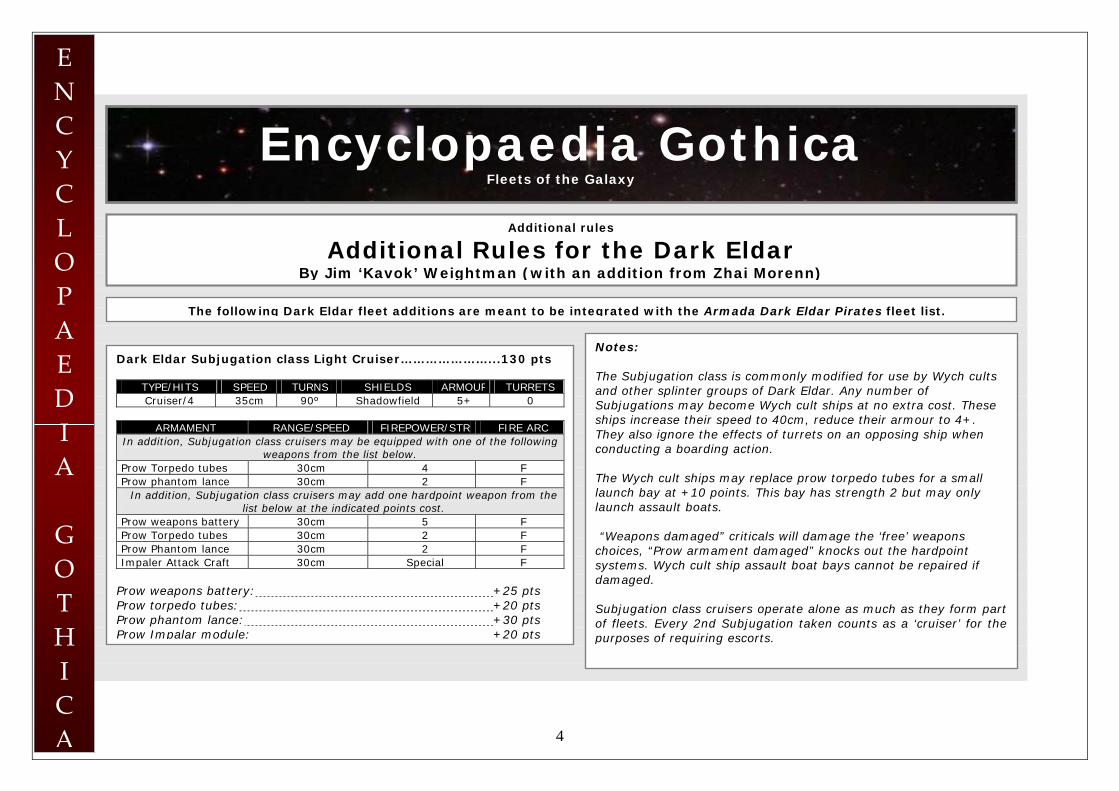
Dark Eldar Mortalitas class Grand Cruiser……………………...260 pts
TYPE/HITS SPEED TURNS SHIELDS ARMOUR TURRETS Cruiser/6 35cm 90º Shadowfield 5+ 0
ARMAMENT RANGE/SPEED FIREPOWER/STR FIRE ARC
Prow weapons battery 30cm 10 F In addition, Mortalitas class cruisers may be equipped with two of the following weapons from the list below. The effects from multiples are cumulative. These weapons will both be disabled if the vessel suffers a prow armament critical hit.
Prow weapons battery 45cm 5 F Prow Torpedo tubes 30cm 4 F Prow Phantom lance 45cm 2 F Impaler Attack Craft 30cm Special F
Launch Bays Fighters – 30cm Bombers – 20cm
Assault boats – 30cm
2 2 3
-
Prow weapons battery: +25 pts Prow torpedo tubes: +25 pts Prow phantom lance: +35 pts Prow Impalar module: +10 pts Prow Launch bays: +30 pts
Notes: The Mortalitas cruiser is a very rare vessel and the personal property of the most powerful Dark Eldar Commanders. Only 1 may befielded in a Dark Eldar Fleet of any size, and must be commanded by aDread Archon. A Mortalitas cruiser equipped with Launch Bays may launch TorpedoBombers at no extra cost.
The largest type of vessel ever conceived by the Dark Eldar, theMortalitas class is the generic name given to the largest and mostpowerful cruisers fielded only as personal transports for a Kabal Archon or Wych Lord. The ‘class’ covers heterogeneous vesselsusually built to the diabolical whims of the DE masters, and doesnot conform to any known design specifications or designations.
The DE have never represented a battlefleet as such, and thus
their capacity to build, or need for, vessels any larger seems slim.However, with the next generation of Lords rising from the murderof their former masters, perhaps one day the construction of aneven more intimidating vessel may begin.
mperial vessels have never reported combat with a Mortalitas,
though transmissions monitored after the Battle of Gethsemaneindicated that a large Dark Eldar vessel, possibly of this type, hadovercome and destroyed the Eldar Void Stalker Candle of Hope and its escorts after the former had already sustained moderatedamage in combat with the forces of Chaos.
E N C Y C L O P A E D I A G O T H I C A
6
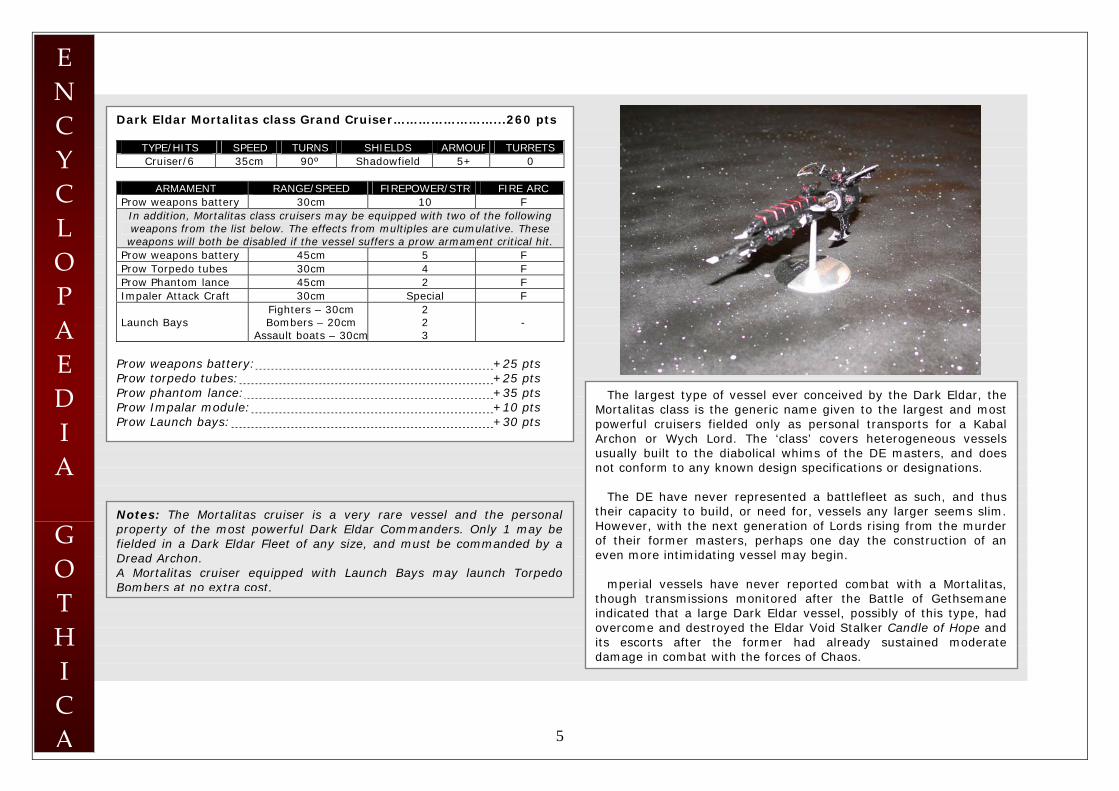
Dark Eldar Slaver Corsair……………………………………………...50 pts
TYPE/HITS SPEED TURNS SHIELDS ARMOUR TURRETS Escort/1 25cm 90º Shadowfield 4+ 0
ARMAMENT RANGE/SPEED FIREPOWER/STR FIRE ARC
Weapons battery 30cm 2 F Slave Hold Special Special Special
Designer's Note: This vessel counts as a transport for any missions as is required. This craft is best used in conjunction with the special campaign rules known as "Goya's Masterpiece" on the Port Maw forums ( http://portmaw.com/e107_plugins/forum/forum_viewforum.php?15 ) where raiders benefit from bringing transports with them on their raids for carrying loot/slaves off. The Dark Eldar Slaver variant Corsair may conduct hit and run teleport attacks, but instead of rolling on the critical hits table, they simply gain the DE player an additional 10 victory points, up to a maximum of 50 per Slaver. This attack may only be conducted against escorts and crippled capital ships/ defences. The Dark Eldar would never risk their own lives to preserve a holdfilled with livestock (Mon-Keigh) and thus the Slaver variant Corsair may make a leadership test during the beginning of any of the DarkEldar player's turns. If it is passed the Slaver increases it's speedfrom 25cm to 40cm but effectively has jettisoned the slave holdand thus will bring no resources back to it's pirate base. At the end of the scenario the vessel is back to it's original profile of 25cmspeed and being able to carry a standard transport's load of cargo.This special rule is only applicable to campaigns conducted with"Goya's Masterpiece"
E N C Y C L O P A E D I A G O T H I C A

7
DE Slaver Corsairs may take mimic engines at 20pts, Light cruisers at +30pts, Grand cruisers and battleships at +60pts.
Dark Eldar upgrades The following upgrades are added to theDark Eldar pirates fleet list. 0-2 Dracon………………………………………... 25pts Any capital ship may carry a Dracon, theDark Eldar sub commander, increasing theships’ Leadership by +1. Incubi bodyguard……………………………….10pts An Archon or Dracon may be accompaniedby a retinue of their most proficientwarriors known as ‘Incubi’. Instead of thenormal DE boarding modifiers, a ship withan Incubi bodyguard adds +2 in the firstround, but no modifier applies thereafter. Wych cult light cruisers may not upgradewith Incubi, as they can carry WychArchites or Dracites (counting as Archonand Dracon as normal) who rely onexperienced Wyches to perform the sametasks.
In addition, roll a D6 in any boarding actioninvolving Incubi: On a 5+, the Incubi achieve their primaryobjectives of seizing their opponents'commanders and dragging them back to the dubious hospitality of the Dark Eldarvessel. The opposing ship suffers a 'bridgesmashed' critical in addition to any otherdamage caused. The Dark Eldar score 10bonus victory points. If the bridge hasalready been destroyed, treat this as anormal Dark Eldar hit & run attack (D6+1on the critical hits table) On a roll of 1, one of the Incubi sees theirchance to seize control of the Kabal or tousurp a greater position within it. The DEship suffers a 'commanders slain' critical.Any unspent re-rolls will die with their arrogant and foolish owner!
E N C Y C L O P A E D I A G O T H I C A

8
Alternative Rules
Experimental Tyranid Rules By Ray Bell
E N C Y C L O P A E D I A G O T H I C A
Synaptic Control
Leadership Only Hive Ships have leadership, which is at a fixed value of Leadership 9 that canonly be improved by the Hive Mind Power‘Imperative’ to leadership 10. A Tyranid squadron, including single Hive Ships andCruisers, must pass a leadership testagainst a Hive Ship’s leadership at the start of a turn to gain ‘Synaptic Control’: ignoringinstinctive behaviour and being able to goon any special order you wish and attemptto perform any possible action (e.g. comingto new heading and then boarding). Theorder of Tyranid squadrons to take thisleadership test is up to the Tyranid player.
If there is any other reason why aleadership test must be taken (e.g. testingto ram) use a Hive Ship’s leadership in thesame manner. Imperative: +2 hits. +1 Ld for any shipsusing the Hive Ships leadership (including the Hive Ship)
Leadership tests will have the following modifiers: • If a member of the squadron and/or the
Hive Ship has a Blast marker in contact= -1Ld
• If no member of the squadron is within 15cm= -1Ld* If no member of the squadron is within 30cm= -2Ld*
• If no member of the squadron is within 45cm= You may not use the Hive Ships leadership.*
* Only apply the worst result! A re-roll maybe used on any ships using aHive Ship’s leadership (including the HiveShip) if the Hive Ship has the Hive MindPower ‘Influence’. When a squadron fails the leadership testto gain ‘Synaptic Control’ no othersquadrons may use that Hive Shipsleadership to gain ‘Synaptic Control’ thisturn, other Hive Ships leaderships maybeused however. Influence: 1 re-roll to be used on any ships using the Hive Ships leadership (including the Hive Ship)
Vanguard squadrons Squadrons of Vanguard Drones and Kraken act more independently and are more intimately linked to the Hive Mind than other Tyranid squadrons, and so have a basic leadership of 5 that can be used instead of a Hive Ship’s leadership. Every Vanguard Drone in the squadron improves the squadron’s leadership by +1. (Up to a maximum of 10)
Special Rules
Instinctive behaviour If a squadron failed to gain ‘Synaptic Control’ it must act according to the following conditions. Condition 1: Board nearest possible vessel with normal movement. If the ship can’t board any enemy vessel obey condition 2. Condition 2: Reload ordnance if possible, move half speed straight ahead, shoot nearest target for each weapon (order of weapons fire chosen by the Tyranid player). Ordnance may only be launched if attacking in the same ordnance phase (including if attackingordnance).
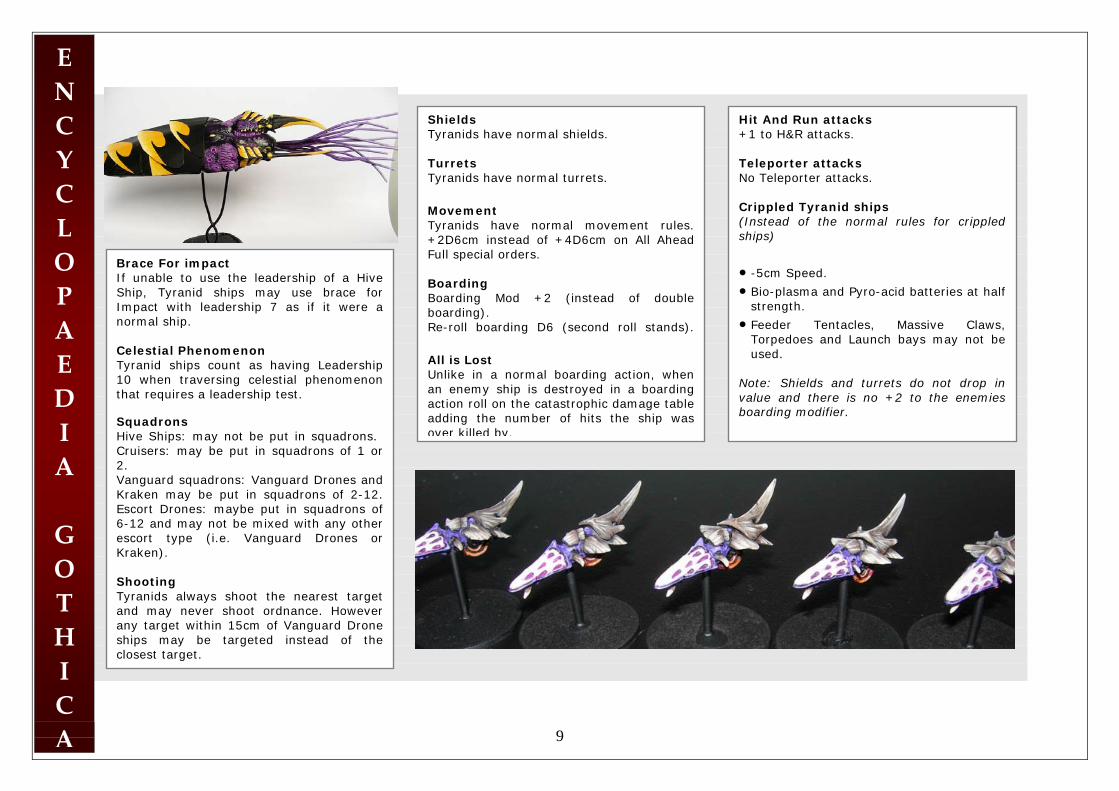
Brace For impact If unable to use the leadership of a HiveShip, Tyranid ships may use brace forImpact with leadership 7 as if it were anormal ship. Celestial Phenomenon Tyranid ships count as having Leadership10 when traversing celestial phenomenonthat requires a leadership test. Squadrons Hive Ships: may not be put in squadrons. Cruisers: may be put in squadrons of 1 or 2. Vanguard squadrons: Vanguard Drones andKraken may be put in squadrons of 2-12. Escort Drones: maybe put in squadrons of6-12 and may not be mixed with any otherescort type (i.e. Vanguard Drones orKraken). Shooting Tyranids always shoot the nearest target and may never shoot ordnance. Howeverany target within 15cm of Vanguard Droneships may be targeted instead of theclosest target.
ShieldsTyranids have normal shields. Turrets Tyranids have normal turrets. Movement Tyranids have normal movement rules.+2D6cm instead of +4D6cm on All Ahead Full special orders. Boarding Boarding Mod +2 (instead of doubleboarding). Re-roll boarding D6 (second roll stands). All is Lost Unlike in a normal boarding action, whenan enemy ship is destroyed in a boardingaction roll on the catastrophic damage table adding the number of hits the ship wasover killed by.
E N C Y C L O P A E D I A G O T H I C A
Hit And Run attacks +1 to H&R attacks. Teleporter attacks No Teleporter attacks. Crippled Tyranid ships (Instead of the normal rules for crippled ships) • -5cm Speed. • Bio-plasma and Pyro-acid batteries at half
strength. • Feeder Tentacles, Massive Claws,
Torpedoes and Launch bays may not be used.
Note: Shields and turrets do not drop in value and there is no +2 to the enemies boarding modifier.
9
E N C Y C L O P A E D I A G O T H I C A
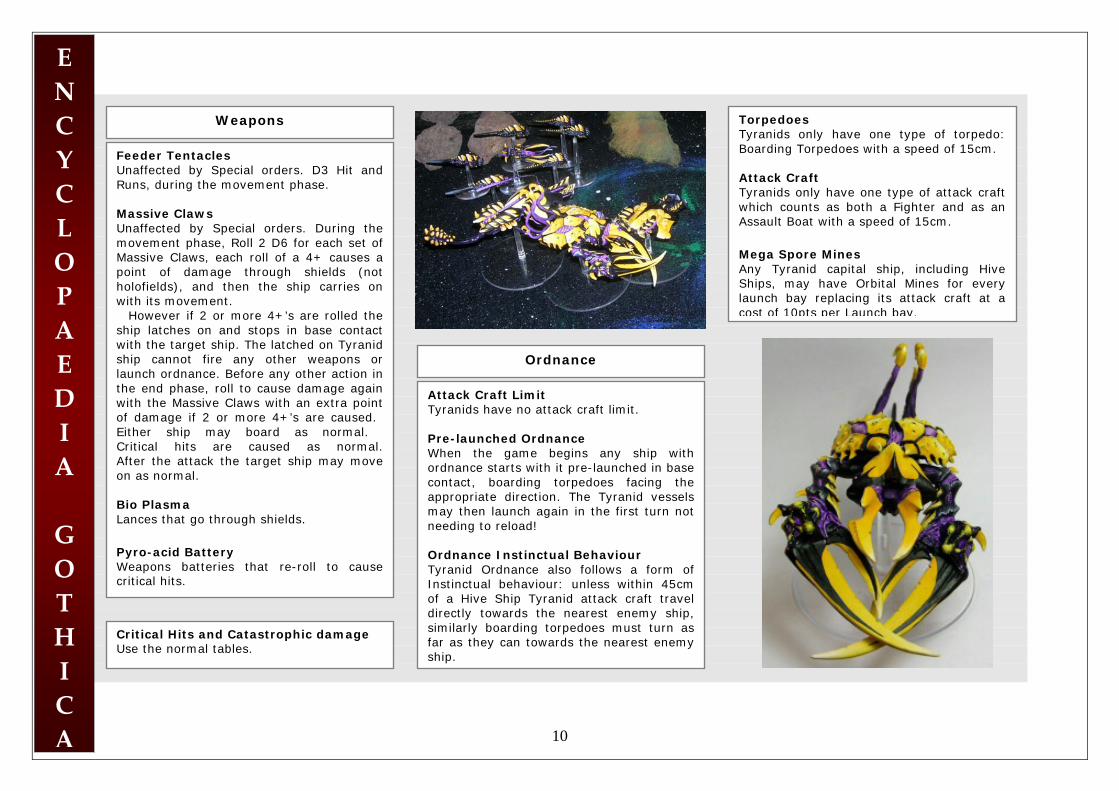
Weapons Torpedoes Tyranids only have one type of torpedo: Boarding Torpedoes with a speed of 15cm. Attack Craft Tyranids only have one type of attack craft which counts as both a Fighter and as an Assault Boat with a speed of 15cm. Mega Spore Mines Any Tyranid capital ship, including Hive Ships, may have Orbital Mines for every launch bay replacing its attack craft at a cost of 10pts per Launch bay.
Feeder Tentacles Unaffected by Special orders. D3 Hit andRuns, during the movement phase. Massive Claws Unaffected by Special orders. During the movement phase, Roll 2 D6 for each set ofMassive Claws, each roll of a 4+ causes apoint of damage through shields (notholofields), and then the ship carries onwith its movement.
However if 2 or more 4+’s are rolled theship latches on and stops in base contactwith the target ship. The latched on Tyranidship cannot fire any other weapons orlaunch ordnance. Before any other action inthe end phase, roll to cause damage againwith the Massive Claws with an extra pointof damage if 2 or more 4+’s are caused. Either ship may board as normal. Critical hits are caused as normal.After the attack the target ship may moveon as normal.
Bio Plasma Lances that go through shields. Pyro-acid Battery Weapons batteries that re-roll to causecritical hits.
Ordnance
Attack Craft Limit Tyranids have no attack craft limit. Pre-launched Ordnance When the game begins any ship withordnance starts with it pre-launched in basecontact, boarding torpedoes facing theappropriate direction. The Tyranid vesselsmay then launch again in the first turn not needing to reload! Ordnance Instinctual Behaviour Tyranid Ordnance also follows a form ofInstinctual behaviour: unless within 45cmof a Hive Ship Tyranid attack craft traveldirectly towards the nearest enemy ship,similarly boarding torpedoes must turn as far as they can towards the nearest enemyship.
Critical Hits and Catastrophic damageUse the normal tables.
10
*
E N C Y C L O P A E D I A G O T H I C A
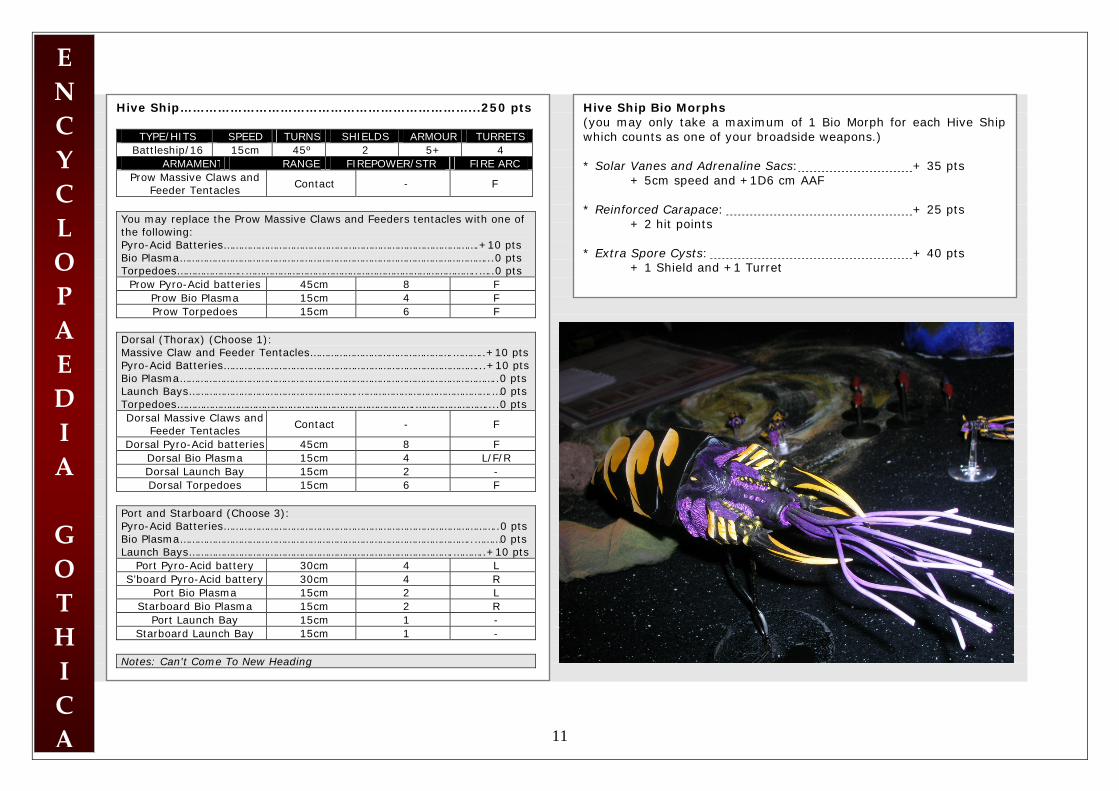
Hive Ship……………………………………………………………...250 pts
TYPE/HITS SPEED TURNS SHIELDS ARMOUR TURRETS Battleship/16 15cm 45º 2 5+ 4
ARMAMENT RANGE FIREPOWER/STR FIRE ARC Prow Massive Claws and
Feeder Tentacles Contact - F
You may replace the Prow Massive Claws and Feeders tentacles with one of the following: Pyro-Acid Batteries…………………………………………………………………………….+10 pts Bio Plasma……………………………………………………………………………………………...0 pts Torpedoes…………………..……………………………………………………………………..…..0 pts
Prow Pyro-Acid batteries 45cm 8 F Prow Bio Plasma 15cm 4 F Prow Torpedoes 15cm 6 F
Dorsal (Thorax) (Choose 1): Massive Claw and Feeder Tentacles………………………………………….………..+10 pts Pyro-Acid Batteries……………………………………………………………………………...+10 pts Bio Plasma………………………………………………………………………………………………..0 pts Launch Bays………………………………………………….……………………………………….…0 pts Torpedoes……………………………………………………………………….……………………....0 ptsDorsal Massive Claws and
Feeder Tentacles Contact - F
Dorsal Pyro-Acid batteries 45cm 8 F Dorsal Bio Plasma 15cm 4 L/F/R Dorsal Launch Bay 15cm 2 - Dorsal Torpedoes 15cm 6 F
Port and Starboard (Choose 3): Pyro-Acid Batteries…………………………………………………………………………………..0 pts Bio Plasma………………………………………………………………………………………..………0 pts Launch Bays……………………………………………………………………………….………..+10 pts
Port Pyro-Acid battery 30cm 4 L S’board Pyro-Acid battery 30cm 4 R
Port Bio Plasma 15cm 2 L Starboard Bio Plasma 15cm 2 R
Port Launch Bay 15cm 1 - Starboard Launch Bay 15cm 1 -
Notes: Can't Come To New Heading
Hive Ship Bio Morphs (you may only take a maximum of 1 Bio Morph for each Hive Shipwhich counts as one of your broadside weapons.) * Solar Vanes and Adrenaline Sacs: + 35 pts
+ 5cm speed and +1D6 cm AAF * Reinforced Carapace: + 25 pts
+ 2 hit points
* Extra Spore Cysts: + 40 pts + 1 Shield and +1 Turret
11
E N C Y C L O P A E D I A G O T H I C A
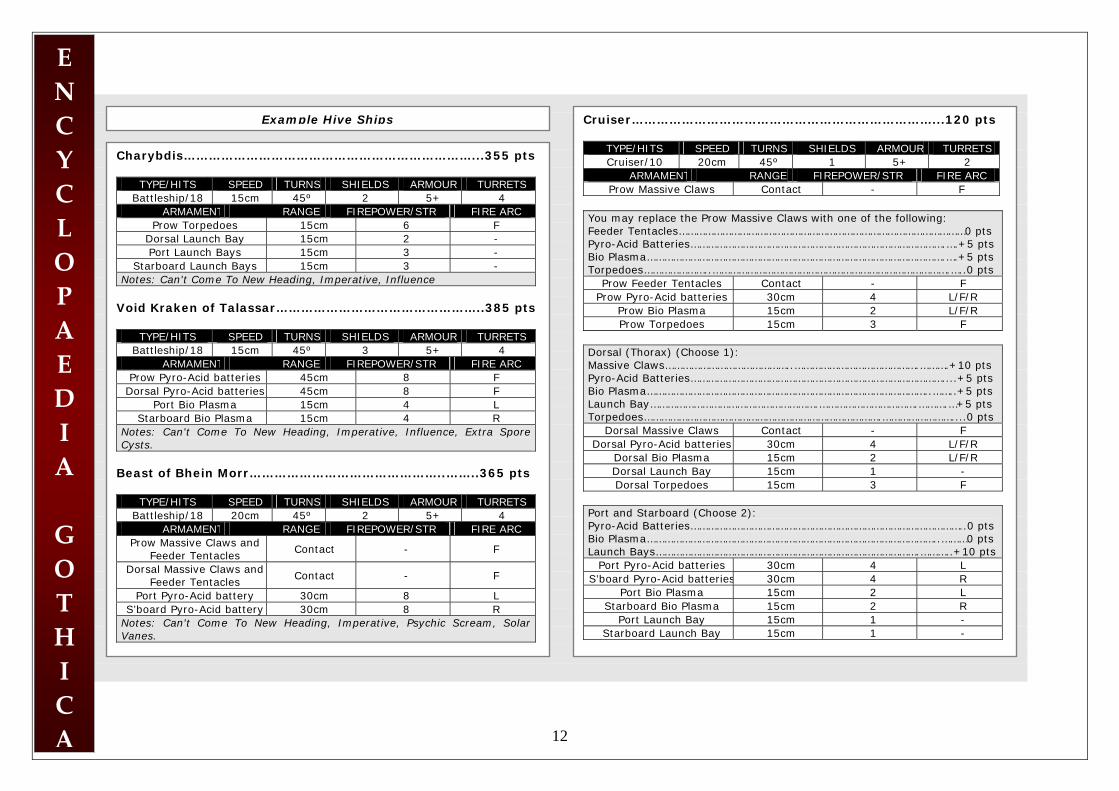
Cruiser………………………………………………………………...120 pts
TYPE/HITS SPEED TURNS SHIELDS ARMOUR TURRETS Cruiser/10 20cm 45º 1 5+ 2
ARMAMENT RANGE FIREPOWER/STR FIRE ARC Prow Massive Claws Contact - F
You may replace the Prow Massive Claws with one of the following: Feeder Tentacles………………………………………………………………………………………0 pts Pyro-Acid Batteries…………………………………………………………………………….….+5 pts Bio Plasma………………………………………………………………………………………….….+5 pts Torpedoes…………………..……………………………………………………………………….…..0 pts
Prow Feeder Tentacles Contact - F Prow Pyro-Acid batteries 30cm 4 L/F/R
Prow Bio Plasma 15cm 2 L/F/R Prow Torpedoes 15cm 3 F
Dorsal (Thorax) (Choose 1): Massive Claws……………………………………..…………………………………….……….+10 pts Pyro-Acid Batteries……………………………………………………………………………....+5 pts Bio Plasma……………………………………………………………………………………..……..+5 pts Launch Bay………………………………………………….…………………………….……….…+5 pts Torpedoes……………………………………………………………………….……………………....0 pts
Dorsal Massive Claws Contact - F Dorsal Pyro-Acid batteries 30cm 4 L/F/R
Dorsal Bio Plasma 15cm 2 L/F/R Dorsal Launch Bay 15cm 1 - Dorsal Torpedoes 15cm 3 F
Port and Starboard (Choose 2): Pyro-Acid Batteries…………………………………………………………………………………..0 pts Bio Plasma………………………………………………………………………………………..………0 pts Launch Bays……………………………………………………………………………….………..+10 pts
Port Pyro-Acid batteries 30cm 4 L S’board Pyro-Acid batteries 30cm 4 R
Port Bio Plasma 15cm 2 L Starboard Bio Plasma 15cm 2 R
Port Launch Bay 15cm 1 - Starboard Launch Bay 15cm 1 -
Charybdis……………………………………………………………...355 pts
TYPE/HITS SPEED TURNS SHIELDS ARMOUR TURRETS Battleship/18 15cm 45º 2 5+ 4
ARMAMENT RANGE FIREPOWER/STR FIRE ARC Prow Torpedoes 15cm 6 F
Dorsal Launch Bay 15cm 2 - Port Launch Bays 15cm 3 -
Starboard Launch Bays 15cm 3 - Notes: Can't Come To New Heading, Imperative, Influence
Void Kraken of Talassar…………………………………………..385 pts
TYPE/HITS SPEED TURNS SHIELDS ARMOUR TURRETS Battleship/18 15cm 45º 3 5+ 4
ARMAMENT RANGE FIREPOWER/STR FIRE ARC Prow Pyro-Acid batteries 45cm 8 F
Dorsal Pyro-Acid batteries 45cm 8 F Port Bio Plasma 15cm 4 L
Starboard Bio Plasma 15cm 4 R Notes: Can't Come To New Heading, Imperative, Influence, Extra Spore Cysts.
Beast of Bhein Morr………………………………………..……..365 pts
TYPE/HITS SPEED TURNS SHIELDS ARMOUR TURRETS Battleship/18 20cm 45º 2 5+ 4
ARMAMENT RANGE FIREPOWER/STR FIRE ARC Prow Massive Claws and
Feeder Tentacles Contact - F
Dorsal Massive Claws and Feeder Tentacles
Contact - F
Port Pyro-Acid battery 30cm 8 L S’board Pyro-Acid battery 30cm 8 R
Notes: Can't Come To New Heading, Imperative, Psychic Scream, Solar Vanes.
Example Hive Ships
12
E N C Cruiser Bio Morphs Example Cruisers
(you may only take a maximum of 1 Bio Morph for each cruiser whichcounts as one of your broadside weapons.) Y Pyroclaster…………………………………………………………...150 pts * Solar Vanes and Adrenaline Sacs: + 20 pts
C L O P A E D I A G O T H I C A
+ 5cm speed and +1D6 cm AAF * Reinforced Carapace: + 15 pts
+ 2 hit points
* Extra Spore Cysts: + 20 pts + 1 Shield and +1 Turret, large flying base
TYPE/HITS SPEED TURNS SHIELDS ARMOUR TURRETS Cruiser/10 20cm 45º 2 5+ 3
ARMAMENT RANGE FIREPOWER/STR FIRE ARC Prow Pyro-Acid battery 30cm 4 L/F/R
Dorsal Pyro-Acid battery 30cm 4 L/F/R Port Pyro-Acid battery 15cm 4 L
S’board Pyro-Acid battery 15cm 4 R Notes: Extra Spore Cysts
Razorfiend………………………………………………….………..150 pts
TYPE/HITS SPEED TURNS SHIELDS ARMOUR TURRETS Cruiser/10 25cm 45º 1 5+ 2
ARMAMENT RANGE FIREPOWER/STR FIRE ARC Prow Bio Plasma 15cm 2 L/F/R
Dorsal Bio Plasma 15cm 2 L/F/R Port Bio Plasma 15cm 2 L
Starboard Bio Plasma 15cm 2 R Notes: Solar Vanes and Adrenaline Sacs
Terrifex…………………………………………………………..……..150 pts
TYPE/HITS SPEED TURNS SHIELDS ARMOUR TURRETS Cruiser / 10 25cm 45º 2 5+ 4
ARMAMENT RANGE FIREPOWER/STR FIRE ARC Prow Massive Claws Contact - F
Dorsal Massive Claws Contact - F Port Pyro-Acid battery 30cm 4 L
S’board Pyro-Acid battery 30cm 4 R Notes: Solar Vanes and Adrenaline Sacs
13
E N C Kraken……………………………………………………………….…...45 pts
Y C L O P A E D I A G O T H I C A
TYPE/HITS SPEED TURNS SHIELDS ARMOUR TURRETS Escort/2 25cm 90º 4+ Save* 5+ 0
ARMAMENT RANGE FIREPOWER/STR FIRE ARC Choose one of the following: Feeder Tentacles (Stalker)……………………………………………………………….………0 pts Massive Claws (Ramsmitter)……………………………………………………….…….….+5 pts Pyro-Acid Batteries (Death Burner)….……………………………………………….….+5 pts Bio Plasma (Smeltfeaster)…..…………………………………………………………….….+5 pts Torpedoes (Thornborer)……….…………………………………………………………….…..0 pts
Feeder Tentacles Contact - F Massive Claws Contact - F
Pyro-Acid batteries 30cm 4 F Bio Plasma 15cm 2 F Torpedoes 15cm 3 F
Notes: Kraken have a 4+ save as if on Brace for Impact special orders but can’t use the special order the normal way.
Vanguard Drone Ship………………………………………….…..35 pts
TYPE/HITS SPEED TURNS SHIELDS ARMOUR TURRETS Escort/1 25cm 90º 1 5+ 2
ARMAMENT RANGE FIREPOWER/STR FIRE ARC Choose one of the following: Feeder Tentacles………………..…………………………………………………………….………0 pts Pyro-Acid Batteries (Prowler)….………………………………………………………………0 pts Bio Plasma……….…………………………..…………………..….…………………………….…..0 pts
Feeder Tentacles Contact - F Pyro-Acid batteries 30cm 2 F
Bio Plasma 15cm 1 F Notes: Enemy, excluding ordnance, within 15cm of a Vanguard Drone ship can always be targeted by other Tyranid ships. +1 Leadership to the Vanguard squadron per Drone Ship.
Escort Drone…………………………………………..………….…..15 pts
TYPE/HITS SPEED TURNS SHIELDS ARMOUR TURRETS Escort/1 15cm 45º 1 4+ 1
ARMAMENT RANGE FIREPOWER/STR FIRE ARC Choose one of the following: Feeder Tentacles………………..…………………………………………………………….………0 pts Pyro-Acid Batteries……………………..……………………………………………………….….0 pts Bio Plasma……….………………………………………………..….…………………………….…..0 pts
Feeder Tentacles Contact - F Pyro-Acid batteries 30cm 3 F
Bio Plasma 15cm 2 F
14
E N C Y C
Using the Splinter Fleet Tyranid Splinter Fleet List The Tyranid Splinter Fleet is suitable for use in the following scenarios: Cruiser Clash, The Bait, The Raiders, Blockade Run, Surprise Attack, Fleet Engagement.
Hive Ships & Escort Drones Fleet Commander Hive Ships and Escort drones are bought
together as one Hive Ship and a singlesquadron of 6-12 Escort Drones.
Instead of fleet commanders, the TyranidFleet has Hive Ships. Each Hive Ship cantake Hive Mind Powers as shown below:
Subplots Tyranids use two subplot tables the one below using subplots from both Legacies of War and Chance Circumstances tables. The other being the full Secret ploys subplot table from the rulebook. Roll for subplots randomly as normal, using a D2 to pick the table. 1 Meteor Storm (Chance circumstances: 1)
Tyranid Hive Ship…………....250 pts or moreEscort Drone……………………....15 pts L Hive Mind Powers (you may take any Hive Mind Powers once
for each Hive Ship)
O P A E
Cruisers You may include up to two Cruisers forevery Hive Ship. Imperative: +2 hits. +1 Ld for any ships
using the Hive Ships leadership (includingthe Hive Ship)……..……………………….…..50 pts
Tyranid Cruiser…………………..120 pts or more Vanguard Squadrons Influence: 1 re-roll to be used on any ships
using the Hive Ships leadership (includingthe Hive Ship)…………………………………..25 pts
2 Gunnery Practice (Legacies of War: 1) You may include any number of VanguardSquadrons.
3 No Quarter! (Legacies of War: 5) 4 Vendetta (Legacies of War: 6) D 5 Navigational hazards (Chance Psychic scream: Enemy ships within 15cm
of the Hive Ship suffer -2 to their leadershipvalue………………………………………………...20 pts
Vanguard Drone Ship………….35 pts circumstances: 4)
I A G
Kraken………………………………...45 pts or more 6 Unexpected help (Chance circumstances: 3)
O T H I C A 15
E N C Y
Ship Experience Appeals Campaigns Tyranids follow all the normal rules for Appeals with the following clarifications:
Tyranid vessels don't gain experience likeother races. Instead they mutate or simplyage, growing bigger or more efficient.
Tyranids in campaigns are played asRaiders but lack a Pirate base and have analtered set of scenarios for play.
When appealing for a Hive Ship it has to come with escort drones so you will have to use 2 successful reinforcement rolls at the same time! So you'll only be able to do this with a renown of 11 or more!
C At the end of each battle roll 2D6 on theEvolution table for each capital ship thattook part and was not crippled (even if itstarted the game crippled), cruisers have a-1 modifier. Escort squadrons roll 1D6 onthe table after each battle, as long thesquadron wasn't crippled.
The Scenarios in a campaign to be playedby a Splinter Fleet (Raiding Fleet) should beas follows:
L O P A E
1. Cruiser Clash
A Refit would be a further roll on the Evolution (experience) table for any capital ship. There is no extra value added to the ship, just as with normal rolls on the Evolution table.
2. The Bait 3. The Raiders
No result can be taken more than once, if a duplicate is rolled it counts as a failedevolution! If a ship becomes crippled itloses an evolution, the Tyranid player picksthe evolution to be discarded.
4. Blockade Run 5. Surprise Attack 6. Fleet Engagement *If a Major Raid is rolled for roll 2D6 andtake the highest! D
I A G
Promotions Table Repairs and Withdrawals Tyranid Escort Drones (not VanguardSquadrons) are numberless, as such Tyranid escorts drones are replaced after abattle with no expenditure of repair points.
Unlike most other fleets Tyranids don'thave a fleet commander. Instead the whole fleet receives the following bonuses as if acampaign fleet commander were present: Renown 1-5 : 2 repair points, 1 reroll.
Other than this exception Tyranids follow allthe normal rules for Repairs andWithdrawals. O 6-10 : 3 repair points, 1 reroll. 11-20 : 4 repair points, 1 reroll.
T H I C
21-30 : 6 repair points, 2 rerolls. 31-50 : 9 repair points, 2 rerolls.
51+ : 12 repair points, 3 rerolls.
A 16
E N Evolution Table
C 1-2 FAILED Evolution: no change. 3 Independence: Automatically pass Synaptic control once per game.
Y 4 Celestial fins: Not slowed by BM’s or Gas/Dust clouds. Hive Fleet Campaigns The ship has developed a streamlined set of fins and constrictor
muscles, making it easier to navigate through debris or gaseousterrain.C
A full Hive Fleet encroaching on a meresub-sector would be impossible torepresent with the Campaign rules here and in the rulebook. Should anyone wish to playa campaign where Tyranids are moving infull force I would suggest the followingScenarios:
5 Selective Evolution: Roll 3D6 and discard the highest when rollingfor leadership checks of a specific special order. Pick the desiredspecial order!
L O 6 FAILED Evolution: no change.
7 Tenacity: When on AAF, BR, CTNH, weapons strength isunaffected.P
The creature has evolved the capability of effectively bringing itsweapons to bear on its enemies even when following the prerogativeof the Hive Mind. When on All Ahead Full, Burn Retros or Come toNew Heading special orders, it’s Pyro-acid batteries and Bio-plasma are unaffected.
Raids:
A 1. Cruiser Clash 2. The Bait
E 3. The Raiders 4. Blockade Run 8 Reinforced Carapace: +1 hit.
D 5. Surprise Attack The creature has grown to an inordinate size with correspondinglyreinforced endostructures and additional ablative carapace,increasing its total mass and capacity to sustain damage. The shipgains one hit.
6. Fleet Engagement
I Battles: 1. Major Raid (roll again on the Raid Tableplaying a Major Raid)
9 Accelerated healing: Ignore blast markers when healing (repairing critical hits). A 2-3. Exterminatus (Tyranids as defenders)
/Planetary Assault(Tyranids as attackers)The bio-ship has enhanced its ability to heal when in a conflict having a honeycomb of secondary carapaces filling with healing enzymes orsmaller creatures when critical damage is sustained. 4. Surprise Attack
5-6. Fleet Engagement 10 More Discharge vents: Reduces turning distance by 5cm.
G The number of discharge vents along the beast’s length hasincreased dramatically. The creature reduces the distance it needs tomove before turning by 5cm.
*A vast category of extra (galactic) specialrules need to written to accommodate a Full Hive Fleet in a campaign, but the playerswho would wish to play this sort ofcampaign must be enthusiastic andimaginative sorts, so I'll leave it to them!
O 11 Extra spore cysts: + 1 shield, +1 turret.
T 12 Hive Mind Nexus: Range of Hive Mind increased to 60cm (but –1 Ld over 45cm). The Hive ships connection to the Hive Mind has grown exceptionallystrong able to relay thoughts and override instincts at greatdistances. This extra range is not applicable to ordnance instinctual behaviour.
H
I C A 17
18
Tactical Command Tactics & Strategy
Different Fleet Operations
In the Depth of Space By Roy ‘Horizon’ Amkreutz
Small Scale Battles
Forget about all the fleet restrictions you
know and have learned. I would like tointroduce small scale battles withexploration or patrol fleets centred arounda Battleship.
My inspiration for this article is the old computer game Wing Commander (madeby Origin back in the days) and backgroundstories about deep space patrols which canbe found through out the Battlefleet Gothicrulebooks, for example the Oberon andDespoiler.
Not always ships gather en masse and fight in large battles. On many occasionsthey may be part of a small fleet patrollinga sector’s border or being assigned to anexpedition consisting of just a few ships.
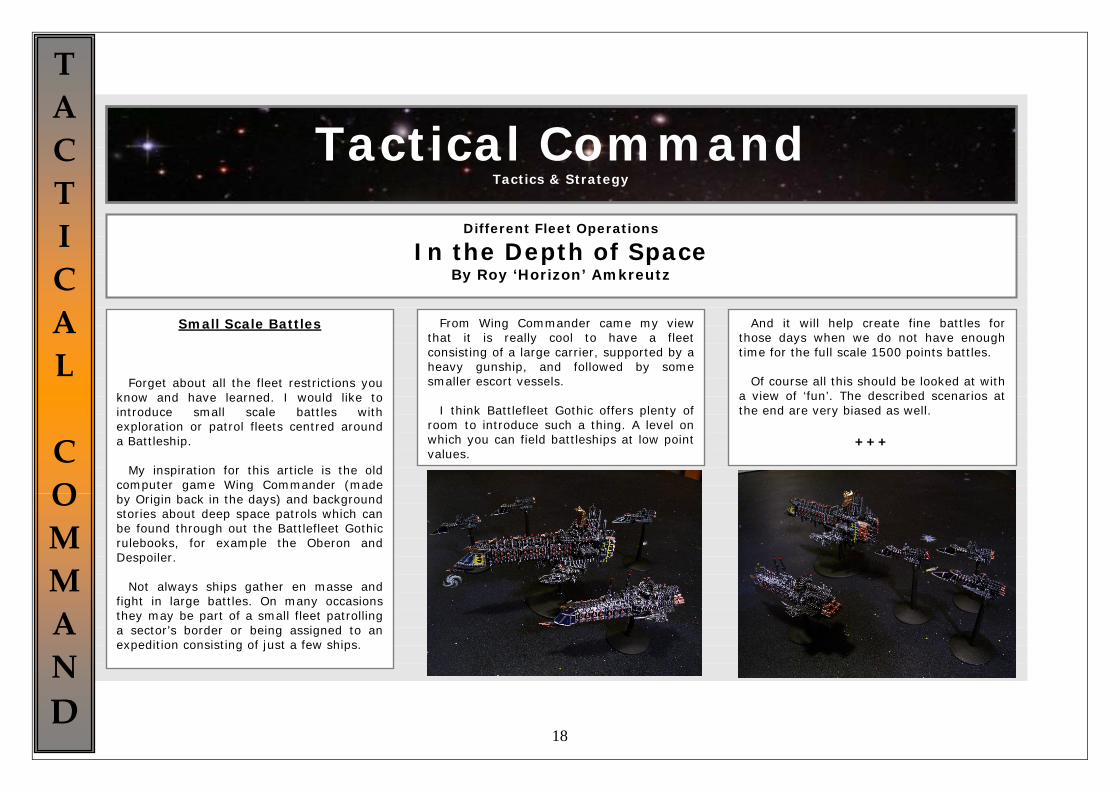
From Wing Commander came my viewthat it is really cool to have a fleetconsisting of a large carrier, supported by aheavy gunship, and followed by somesmaller escort vessels.
I think Battlefleet Gothic offers plenty ofroom to introduce such a thing. A level onwhich you can field battleships at low pointvalues.
And it will help create fine battles for those days when we do not have enough time for the full scale 1500 points battles.
Of course all this should be looked at with
a view of ‘fun’. The described scenarios at the end are very biased as well.
+++
TACT I C A L COMMAND

19
TACT I C A L COMMAND
Within these games there are only a selectfew races who apply to the use of Patrol & Exploration fleets:
o Imperial Navy o Tau (either Commerce Protection Fleet
or Exploration & Commerce Fleet) o Chaos / Renegade o Rogue Traders o Space Marines o Adeptus Mechanicus
(In a later issue of Warp Rift I am planningto do a separate article on something Eldarrelated.)
Of course these patrol and exploration fleets can battle against each other. But, of course, they will encounter a variety of opponents. So, they can encounter enemies like the Eldar, Tyranids, Orks and others. People who would rather field their own raider fleets should follow the following guidelines for a more ‘balanced’ small scale battle against the Exploration fleet. Alternatively raiders could play against each other as well: o An Admiral, Commander or Pirate is
optional and not needed. o The maximum fleet size is 750 points. o Up to three capital ships may be
chosen. The remaining points should be spent on escort vessels.
o Give every ship and squadron a name. o Don’t let official races hold you back as
this is an interesting setting to use and test various smaller races designed by yourselves or other people. As an example you could use the Tobari Raiders or Q’orl Swarmhood from Warp Rift 11.
In order to create a Patrol or Explorationfleet the following requirements must beadhered to: o The maximum fleet size is 750 points.
The ships are chosen from one list.(Example: if you take the Armageddonlist only ships from the Armageddon listcan be taken).
o Take the cheapest possible Admiral orCommander for your fleet and give hima name.
o Select One Battleship or Grand Cruiserfrom your chosen fleet. Rogue Tradersmay make use of their standard fleetlist. A Demiurg Stronghold may bechosen as the Tau ECF battleship.
o After the battleship and Admiral orCommander are taken you must spendat least 40% of the remaining points onescort vessels.
o The remaining points may be spent onother vessels available to the chosenfleet.
o Name every ship and squadron. o It is entirely possible to use fan made
lists, like the Diasporex or other (alien)Races made up by yourselves.
The Guidelines
20
TACT I C A L COMMAND
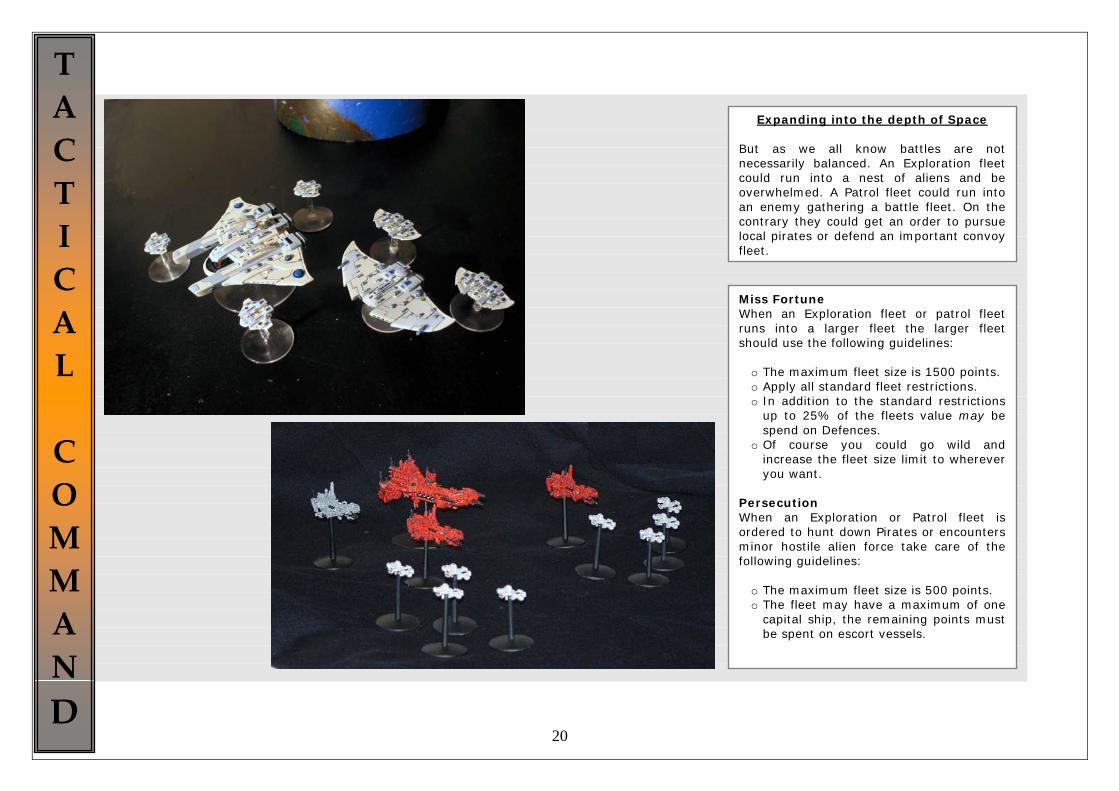
Expanding into the depth of Space But as we all know battles are not necessarily balanced. An Exploration fleet could run into a nest of aliens and be overwhelmed. A Patrol fleet could run into an enemy gathering a battle fleet. On the contrary they could get an order to pursue local pirates or defend an important convoy fleet.
Miss Fortune When an Exploration fleet or patrol fleet runs into a larger fleet the larger fleet should use the following guidelines: o The maximum fleet size is 1500 points. o Apply all standard fleet restrictions. o In addition to the standard restrictions
up to 25% of the fleets value may be spend on Defences.
o Of course you could go wild and increase the fleet size limit to wherever you want.
Persecution When an Exploration or Patrol fleet is ordered to hunt down Pirates or encounters minor hostile alien force take care of the following guidelines: o The maximum fleet size is 500 points. o The fleet may have a maximum of one
capital ship, the remaining points must be spent on escort vessels.

21
TACT I C A L COMMAND
Patrol Fleets & Exploration fleets Specific Scenarios
Given the selection of the Patrol orExploration fleets plus the selection of theenemy fleets it is quite possible they will be unsuited to certain scenarios as opposed tofleets specifically designed to battle orbreakthrough.
Below are some suggestions on howthese scenarios can be perceived.
The Old fashioned Show-Down Two Exploration or Patrol fleets run intoeach other. These things can happen allover the galaxy. As such these battles canhappen anywhere. Create a battlefield at random using the rulebook. Of course if you are doing moreof a narrative game the setting can beprearranged: for example; near a planet, aboard filled with lots of asteroid fields, neara certain mysterious anomaly, etc. The deployment can be done just like thegood old ‘Cruiser Clash’ scenario.Alternatively you may change zones a little.For example one fleet in the top left cornerand the other in the opposite down rightcorner. Feel free in such things.
The Prize This for two Exploration fleets against eachother, but it can also be played against oneof the Raider fleets. Place an interesting cool object, ship, hulkor even a planet in the centre of the table.Deploy both fields opposite of each other,entering from the long table edges. Thefleet which first manages to get in contactwith the object (or in an area of ~10cm)and stay there for 1-2 turns gets the ‘prize’. And of course has to head out of it. The Mark A Patrol fleet gets the order of HighCommand to hunt down a notorious piratein a certain area or a similar opponent. A modified The Hunter, Prey scenario fromWhite Dwarf 233 would do. Or a slightlymodified The Bait from the official rulebook. As long as the pirates are in a gooddefensive position and the Patrol fleet isforced to engage & search the scenario willbe fitting.
Merchantmen A Patrol or Exploration fleet is ordered to protect a large convoy. The convoy fleet should consist of all kind of Merchants, (Heavy) Transports, Freighters, etc. For Tau Explorers with launch bays stripped down would work as well. This convoy fleet should cost a maximum of 500 points. The fleet needs to protect the convoy from short edge to short edge (180cm). Another Exploration fleet or a Raiding fleet tries to pick of the convoy ships in search of information, technology, loot etc. The convoy needs to survive with at least 50% intact.
22
TACT I C A L COMMAND
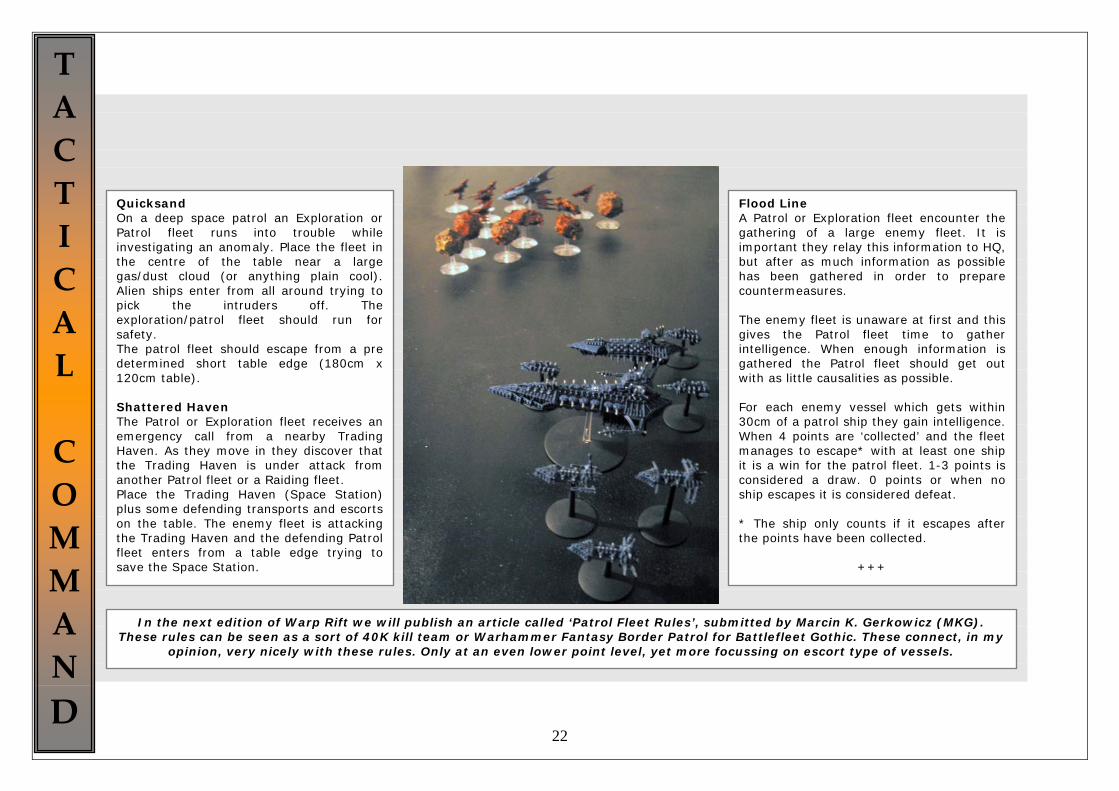
Quicksand On a deep space patrol an Exploration orPatrol fleet runs into trouble whileinvestigating an anomaly. Place the fleet inthe centre of the table near a largegas/dust cloud (or anything plain cool).Alien ships enter from all around trying topick the intruders off. Theexploration/patrol fleet should run forsafety. The patrol fleet should escape from a predetermined short table edge (180cm x120cm table). Shattered Haven The Patrol or Exploration fleet receives anemergency call from a nearby TradingHaven. As they move in they discover that the Trading Haven is under attack fromanother Patrol fleet or a Raiding fleet. Place the Trading Haven (Space Station)plus some defending transports and escortson the table. The enemy fleet is attackingthe Trading Haven and the defending Patrolfleet enters from a table edge trying tosave the Space Station.
Flood Line A Patrol or Exploration fleet encounter the gathering of a large enemy fleet. It is important they relay this information to HQ, but after as much information as possible has been gathered in order to prepare countermeasures. The enemy fleet is unaware at first and this gives the Patrol fleet time to gather intelligence. When enough information is gathered the Patrol fleet should get out with as little causalities as possible. For each enemy vessel which gets within 30cm of a patrol ship they gain intelligence. When 4 points are ‘collected’ and the fleet manages to escape* with at least one ship it is a win for the patrol fleet. 1-3 points is considered a draw. 0 points or when no ship escapes it is considered defeat. * The ship only counts if it escapes after the points have been collected.
+++
In the next edition of Warp Rift we will publish an article called ‘Patrol Fleet Rules’, submitted by Marcin K. Gerkowicz (MKG). These rules can be seen as a sort of 40K kill team or Warhammer Fantasy Border Patrol for Battlefleet Gothic. These connect, in my
opinion, very nicely with these rules. Only at an even lower point level, yet more focussing on escort type of vessels.
23
Tyranids
Tyranid Conversion Guide By Guilio Taverna
D R Y D O C K
Dry Dock Vessels of the Galaxy
Index 1.Intro 1a. wysiwyg 1b. ebay 2. Escorts 2a. bodies 2b. biomorphs 3. Light Cruisers 2a. "Moana" 2b. "Cancello" 4. Heavy Cruisers 4a. "Patella" 4b. "Aragosta" 4c. "Granchio" 5. Hiveships 5a. "La Cicciona" 5b. The Transformer Hivefex
1. Intro Hi everybody, and welcome to this little tutorial of mine about putting together a 'nid fleet from conversion job andscratch building. Along with describing what i did on myHivefleet Imenoth void faring creatures, I'll try to give somegeneral suggestion about 'nid converting. You'll find out that this emotionless race of abominations from beyond the starsoffers the possibility to obtain very good looking and uniqueminis, no matter if you just add the right biomorph in theright place, using few centimetres of metal wire and a handdrill, or if you scratch build and entire Hiveship from foam,plasticard and bitz. I hope this series of tutorials and suggestions will be useful tobeginners as well as expert hobbyists, and anyone inbetween :). You'll notice that most of the ships pictured here look good from normal playing and viewing angles, but quite messy andunfinished when observed from below. This is because allthese ships are game models and not exposition or paintingcontest level miniatures, and it was useless to waste timeplacing details that would never be looked upon. Sorry forthat!
24
1.b Ebay When talking about WH40K 'nids, I usually advise you to be very careful when buying from ebay, because even if it's easy to find good deals, people tend to overkill minis with strong glues, strong (and poorly applied) paints, ridiculous postures, and so on. However, BFG gives you the opportunity to trip freely with fantasy about the shape of your vessels, as the official range is so poor (and, personally, I don't like most of it). Moreover, having cheap "raw" 'nid material to work on gives you the possibility to try and experiment, which I wouldn't have the guts to do with the incredibly expensive GW boxes. So, YES! hit ebay and search for that huge lot of poorly-painted concrete-glued Tyranid warriors and gaunts, you'll surely find a creative way to make a use for all that stuff after cutting and grinding, and your wallet will thank you for sure.
1a. wysiwyg Many hardcore players know what this acronymmeans, and act accordingly when building theirfleet/army. For those new to the concept, that’s an acronym for "what you see is what you get", and is a general fair play rule in tournaments, used to avoidconfusion in your opponent on what you're playingwith. In my country (Italy, btw), BFG is quite an elitephenomenon, there are neither tournaments norofficial events, and single or two-days events are just starting to appear lately. This is one of the reasons why I've never cared thatmuch about that rule. Even if you're a lucky fellowliving in a place where BFG is popular and the gamingcommunity is widespread and active, if you plan to prepare a Tyranid fleet there's no need to worry thatmuch about wysiwyg, because the official range ofminiatures GW produces is far away from covering all'nid rule options, and hey! everyone knows how anova cannon or a lance battery looks like, but there's no official scheme showing how a bio-plasma shooting organ is made, or how long a feedertentacle must be, so feel free to use any nightmare-spawned shape you like for anything you want. Keep in mind, though, that it’s more suitable to use the same bits for the same purpose in a fleet. This isto avoid generating confusion both in you and youropponent, once the pieces are deployed on the table.If you like chaos and variety, and really can't wait touse all your different little plastics from the bits box, at least try to keep homogeneity within the variousship classes. No one said that escort sized massiveclaws must look the same as battleships' ;).
D R Y D O C K
25
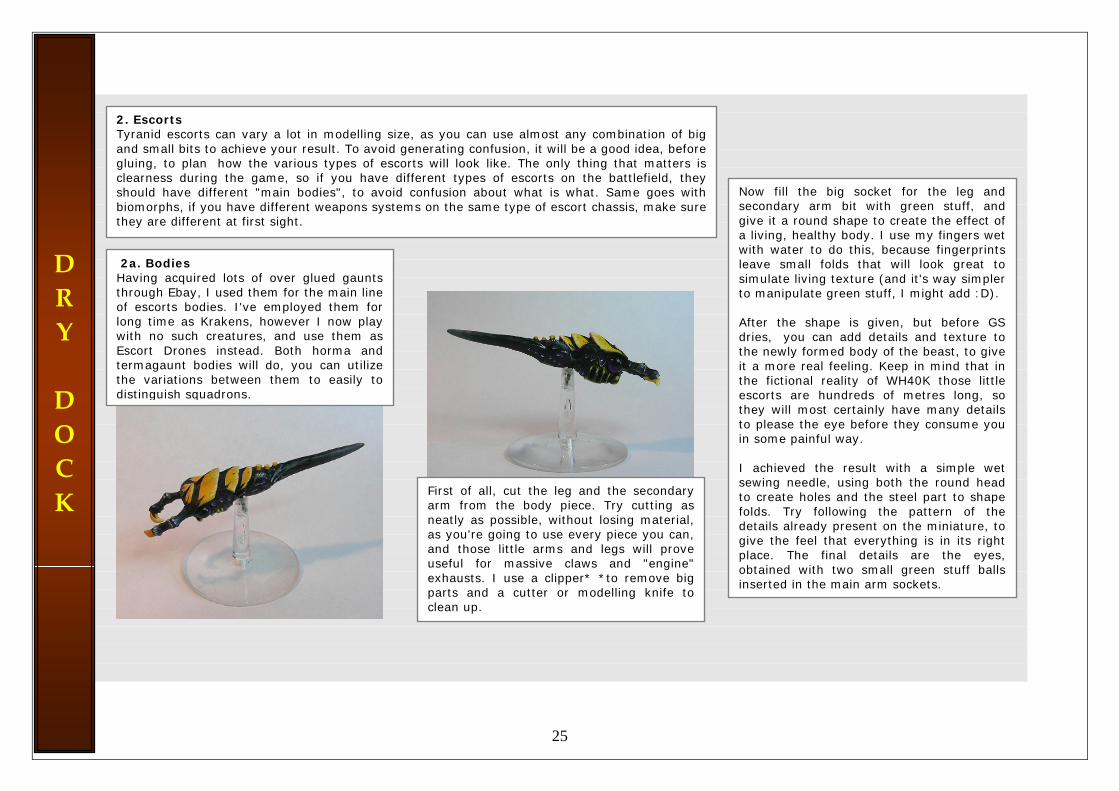
2. Escorts Tyranid escorts can vary a lot in modelling size, as you can use almost any combination of big and small bits to achieve your result. To avoid generating confusion, it will be a good idea, beforegluing, to plan how the various types of escorts will look like. The only thing that matters is clearness during the game, so if you have different types of escorts on the battlefield, theyshould have different "main bodies", to avoid confusion about what is what. Same goes withbiomorphs, if you have different weapons systems on the same type of escort chassis, make surethey are different at first sight.
Now fill the big socket for the leg and secondary arm bit with green stuff, and give it a round shape to create the effect of a living, healthy body. I use my fingers wet with water to do this, because fingerprints leave small folds that will look great to simulate living texture (and it's way simpler to manipulate green stuff, I might add :D). After the shape is given, but before GS dries, you can add details and texture to the newly formed body of the beast, to give it a more real feeling. Keep in mind that in the fictional reality of WH40K those little escorts are hundreds of metres long, so they will most certainly have many details to please the eye before they consume you in some painful way. I achieved the result with a simple wet sewing needle, using both the round head to create holes and the steel part to shape folds. Try following the pattern of the details already present on the miniature, to give the feel that everything is in its right place. The final details are the eyes, obtained with two small green stuff balls inserted in the main arm sockets.
2a. Bodies Having acquired lots of over glued gauntsthrough Ebay, I used them for the main lineof escorts bodies. I've employed them forlong time as Krakens, however I now play with no such creatures, and use them asEscort Drones instead. Both horma andtermagaunt bodies will do, you can utilizethe variations between them to easily todistinguish squadrons.
First of all, cut the leg and the secondaryarm from the body piece. Try cutting asneatly as possible, without losing material,as you're going to use every piece you can,and those little arms and legs will proveuseful for massive claws and "engine" exhausts. I use a clipper* *to remove bigparts and a cutter or modelling knife toclean up.
D R Y D O C K
26
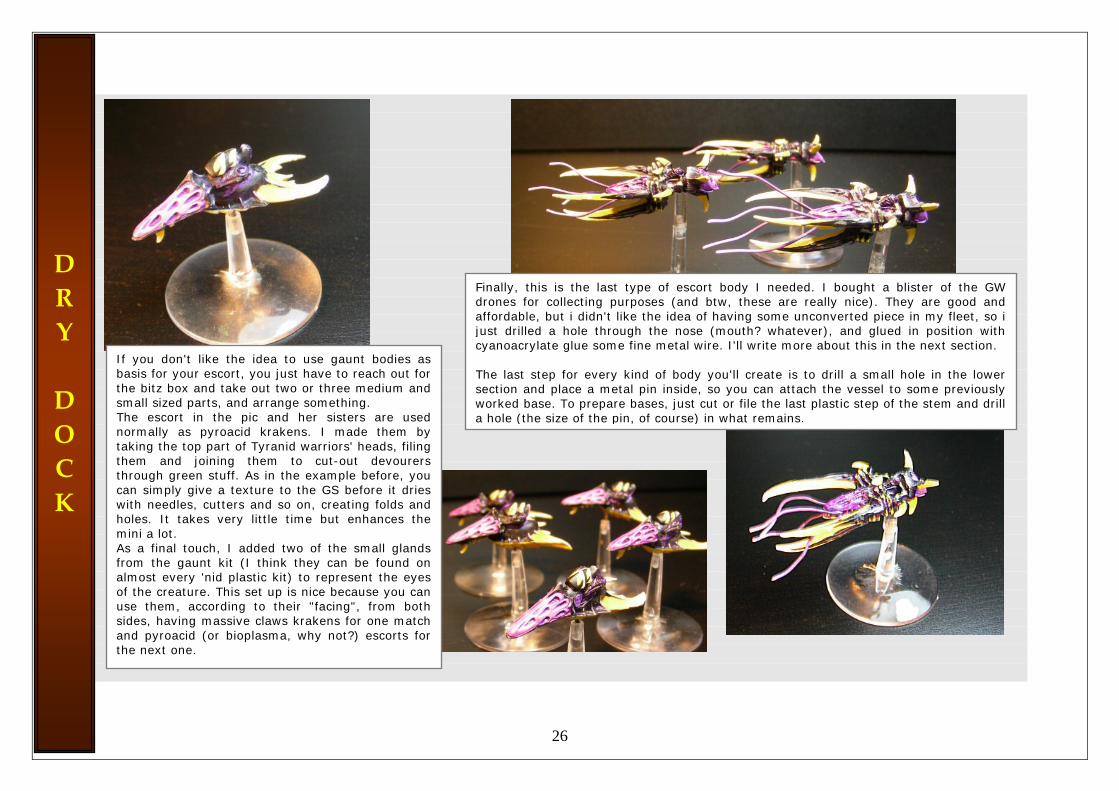
If you don't like the idea to use gaunt bodies asbasis for your escort, you just have to reach out forthe bitz box and take out two or three medium andsmall sized parts, and arrange something. The escort in the pic and her sisters are usednormally as pyroacid krakens. I made them bytaking the top part of Tyranid warriors' heads, filing them and joining them to cut-out devourers through green stuff. As in the example before, youcan simply give a texture to the GS before it drieswith needles, cutters and so on, creating folds andholes. It takes very little time but enhances themini a lot. As a final touch, I added two of the small glandsfrom the gaunt kit (I think they can be found onalmost every 'nid plastic kit) to represent the eyesof the creature. This set up is nice because you canuse them, according to their "facing", from both sides, having massive claws krakens for one matchand pyroacid (or bioplasma, why not?) escorts forthe next one.
Finally, this is the last type of escort body I needed. I bought a blister of the GWdrones for collecting purposes (and btw, these are really nice). They are good and affordable, but i didn't like the idea of having some unconverted piece in my fleet, so ijust drilled a hole through the nose (mouth? whatever), and glued in position withcyanoacrylate glue some fine metal wire. I'll write more about this in the next section. The last step for every kind of body you'll create is to drill a small hole in the lowersection and place a metal pin inside, so you can attach the vessel to some previouslyworked base. To prepare bases, just cut or file the last plastic step of the stem and drill a hole (the size of the pin, of course) in what remains.
D R Y D O C K
27
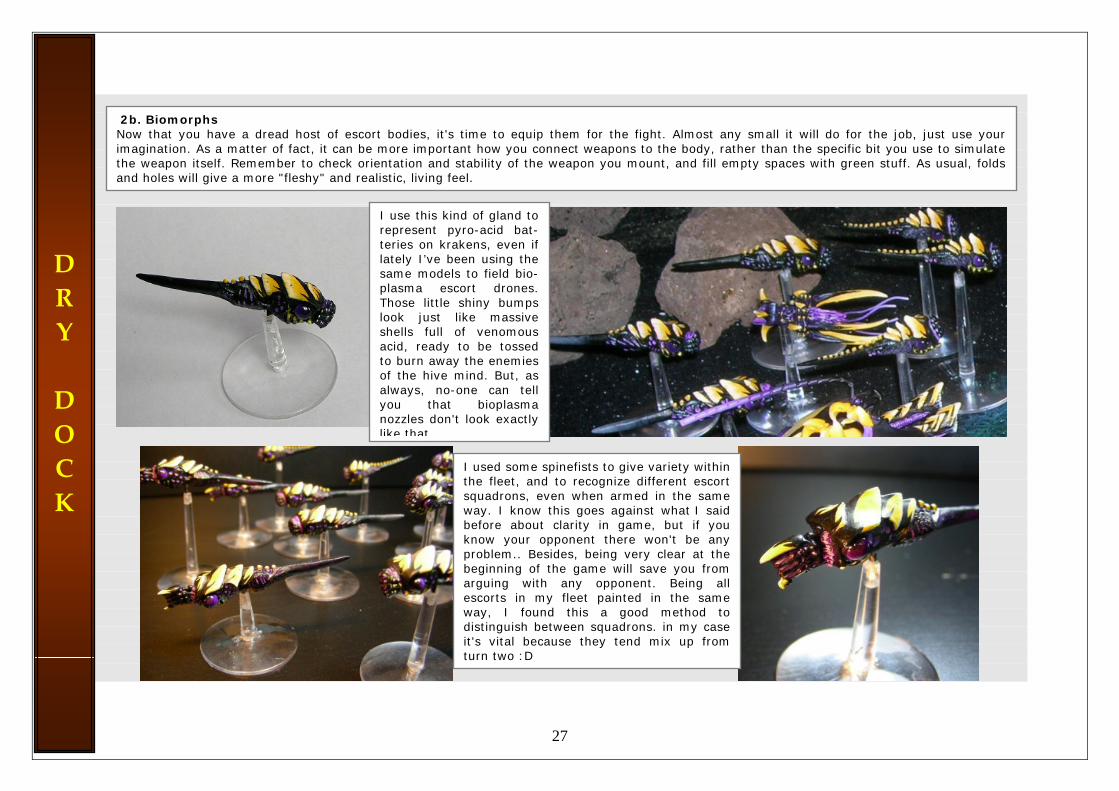
I use this kind of gland to represent pyro-acid bat-teries on krakens, even if lately I’ve been using the same models to field bio-plasma escort drones. Those little shiny bumps look just like massive shells full of venomous acid, ready to be tossed to burn away the enemies of the hive mind. But, as always, no-one can tell you that bioplasma nozzles don't look exactly like that
2b. Biomorphs Now that you have a dread host of escort bodies, it's time to equip them for the fight. Almost any small it will do for the job, just use your imagination. As a matter of fact, it can be more important how you connect weapons to the body, rather than the specific bit you use to simulatethe weapon itself. Remember to check orientation and stability of the weapon you mount, and fill empty spaces with green stuff. As usual, folds and holes will give a more "fleshy" and realistic, living feel.
I used some spinefists to give variety within the fleet, and to recognize different escort squadrons, even when armed in the same way. I know this goes against what I said before about clarity in game, but if you know your opponent there won't be any problem.. Besides, being very clear at the beginning of the game will save you from arguing with any opponent. Being all escorts in my fleet painted in the same way, I found this a good method to distinguish between squadrons. in my case it's vital because they tend mix up from turn two :D
D R Y D O C K
28
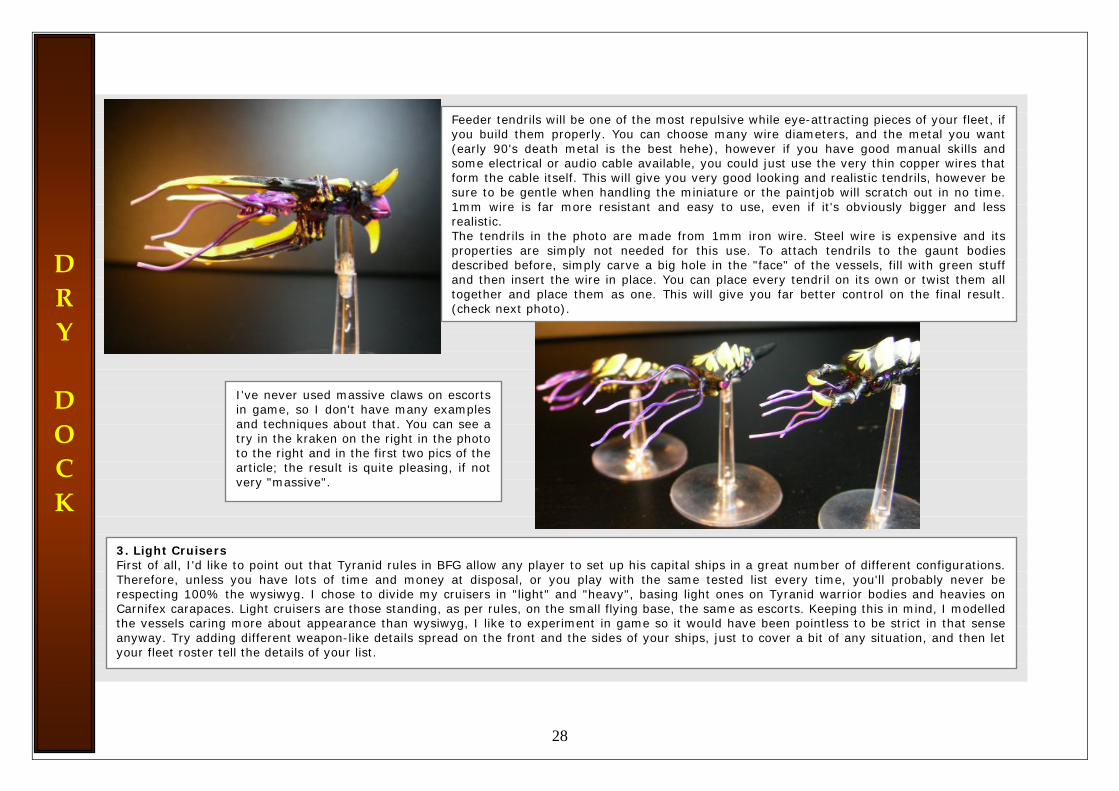
I've never used massive claws on escortsin game, so I don't have many examplesand techniques about that. You can see atry in the kraken on the right in the phototo the right and in the first two pics of the article; the result is quite pleasing, if notvery "massive".
Feeder tendrils will be one of the most repulsive while eye-attracting pieces of your fleet, if you build them properly. You can choose many wire diameters, and the metal you want (early 90's death metal is the best hehe), however if you have good manual skills andsome electrical or audio cable available, you could just use the very thin copper wires thatform the cable itself. This will give you very good looking and realistic tendrils, however be sure to be gentle when handling the miniature or the paintjob will scratch out in no time.1mm wire is far more resistant and easy to use, even if it's obviously bigger and lessrealistic. The tendrils in the photo are made from 1mm iron wire. Steel wire is expensive and its properties are simply not needed for this use. To attach tendrils to the gaunt bodiesdescribed before, simply carve a big hole in the "face" of the vessels, fill with green stuffand then insert the wire in place. You can place every tendril on its own or twist them alltogether and place them as one. This will give you far better control on the final result.(check next photo).
D R Y D O C K
3. Light Cruisers First of all, I'd like to point out that Tyranid rules in BFG allow any player to set up his capital ships in a great number of different configurations. Therefore, unless you have lots of time and money at disposal, or you play with the same tested list every time, you'll probably never berespecting 100% the wysiwyg. I chose to divide my cruisers in "light" and "heavy", basing light ones on Tyranid warrior bodies and heavies onCarnifex carapaces. Light cruisers are those standing, as per rules, on the small flying base, the same as escorts. Keeping this in mind, I modelledthe vessels caring more about appearance than wysiwyg, I like to experiment in game so it would have been pointless to be strict in that senseanyway. Try adding different weapon-like details spread on the front and the sides of your ships, just to cover a bit of any situation, and then let your fleet roster tell the details of your list.
29
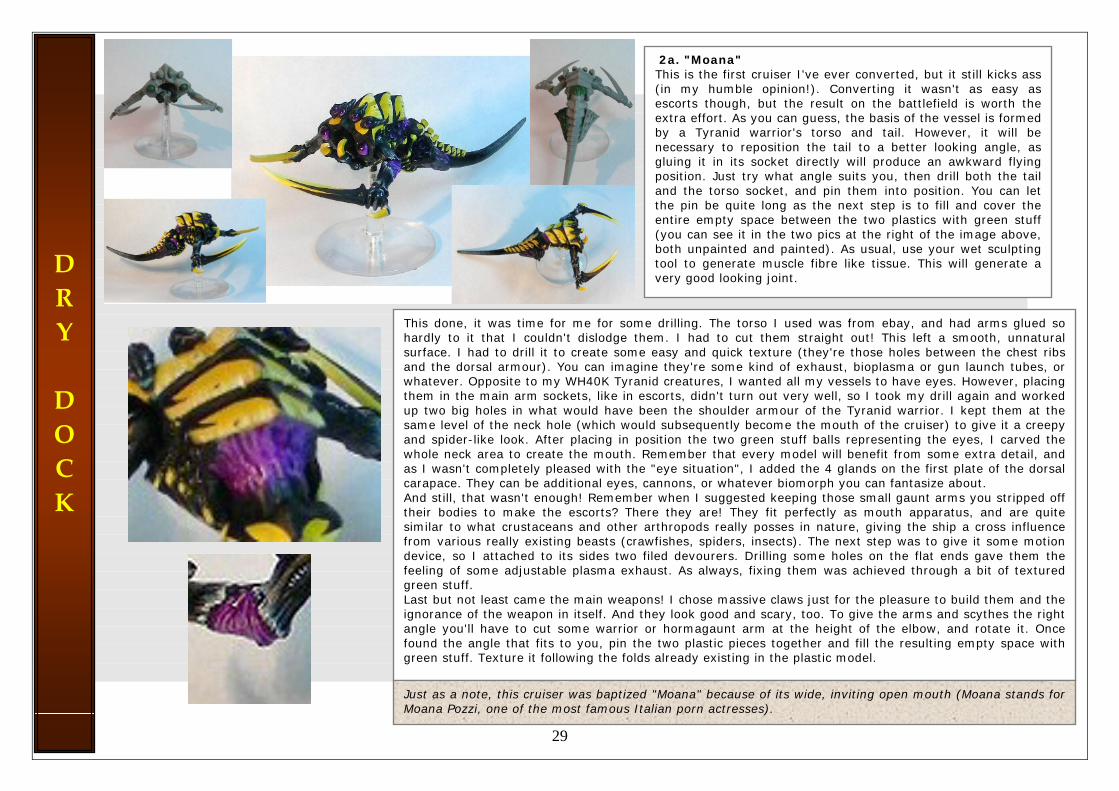
This done, it was time for me for some drilling. The torso I used was from ebay, and had arms glued so hardly to it that I couldn't dislodge them. I had to cut them straight out! This left a smooth, unnaturalsurface. I had to drill it to create some easy and quick texture (they're those holes between the chest ribsand the dorsal armour). You can imagine they're some kind of exhaust, bioplasma or gun launch tubes, orwhatever. Opposite to my WH40K Tyranid creatures, I wanted all my vessels to have eyes. However, placingthem in the main arm sockets, like in escorts, didn't turn out very well, so I took my drill again and worked up two big holes in what would have been the shoulder armour of the Tyranid warrior. I kept them at thesame level of the neck hole (which would subsequently become the mouth of the cruiser) to give it a creepy and spider-like look. After placing in position the two green stuff balls representing the eyes, I carved thewhole neck area to create the mouth. Remember that every model will benefit from some extra detail, andas I wasn't completely pleased with the "eye situation", I added the 4 glands on the first plate of the dorsalcarapace. They can be additional eyes, cannons, or whatever biomorph you can fantasize about. And still, that wasn't enough! Remember when I suggested keeping those small gaunt arms you stripped off their bodies to make the escorts? There they are! They fit perfectly as mouth apparatus, and are quitesimilar to what crustaceans and other arthropods really posses in nature, giving the ship a cross influencefrom various really existing beasts (crawfishes, spiders, insects). The next step was to give it some motiondevice, so I attached to its sides two filed devourers. Drilling some holes on the flat ends gave them thefeeling of some adjustable plasma exhaust. As always, fixing them was achieved through a bit of textured green stuff. Last but not least came the main weapons! I chose massive claws just for the pleasure to build them and theignorance of the weapon in itself. And they look good and scary, too. To give the arms and scythes the right angle you'll have to cut some warrior or hormagaunt arm at the height of the elbow, and rotate it. Oncefound the angle that fits to you, pin the two plastic pieces together and fill the resulting empty space withgreen stuff. Texture it following the folds already existing in the plastic model.
2a. "Moana" This is the first cruiser I've ever converted, but it still kicks ass (in my humble opinion!). Converting it wasn't as easy as escorts though, but the result on the battlefield is worth the extra effort. As you can guess, the basis of the vessel is formed by a Tyranid warrior's torso and tail. However, it will be necessary to reposition the tail to a better looking angle, as gluing it in its socket directly will produce an awkward flying position. Just try what angle suits you, then drill both the tail and the torso socket, and pin them into position. You can let the pin be quite long as the next step is to fill and cover the entire empty space between the two plastics with green stuff (you can see it in the two pics at the right of the image above, both unpainted and painted). As usual, use your wet sculpting tool to generate muscle fibre like tissue. This will generate a very good looking joint.
D R Y D O C K
Just as a note, this cruiser was baptized "Moana" because of its wide, inviting open mouth (Moana stands forMoana Pozzi, one of the most famous Italian porn actresses).
30
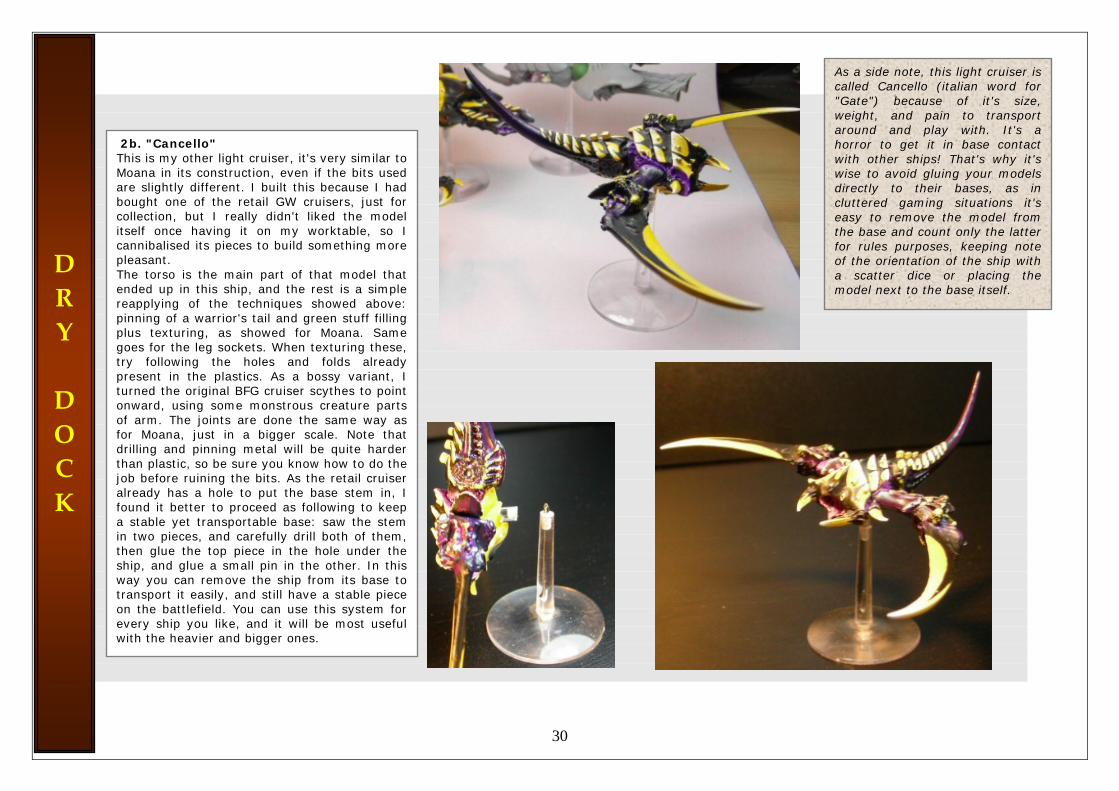
2b. "Cancello" This is my other light cruiser, it's very similar toMoana in its construction, even if the bits usedare slightly different. I built this because I hadbought one of the retail GW cruisers, just forcollection, but I really didn't liked the modelitself once having it on my worktable, so Icannibalised its pieces to build something more pleasant. The torso is the main part of that model thatended up in this ship, and the rest is a simplereapplying of the techniques showed above:pinning of a warrior's tail and green stuff fillingplus texturing, as showed for Moana. Samegoes for the leg sockets. When texturing these, try following the holes and folds alreadypresent in the plastics. As a bossy variant, Iturned the original BFG cruiser scythes to pointonward, using some monstrous creature partsof arm. The joints are done the same way as for Moana, just in a bigger scale. Note thatdrilling and pinning metal will be quite harderthan plastic, so be sure you know how to do thejob before ruining the bits. As the retail cruiseralready has a hole to put the base stem in, Ifound it better to proceed as following to keep a stable yet transportable base: saw the stemin two pieces, and carefully drill both of them,then glue the top piece in the hole under theship, and glue a small pin in the other. In thisway you can remove the ship from its base totransport it easily, and still have a stable pieceon the battlefield. You can use this system forevery ship you like, and it will be most usefulwith the heavier and bigger ones.
D R Y D O C K
As a side note, this light cruiser is called Cancello (italian word for "Gate") because of it's size, weight, and pain to transport around and play with. It's a horror to get it in base contact with other ships! That's why it's wise to avoid gluing your models directly to their bases, as in cluttered gaming situations it's easy to remove the model from the base and count only the latter for rules purposes, keeping note of the orientation of the ship with a scatter dice or placing the model next to the base itself.
31
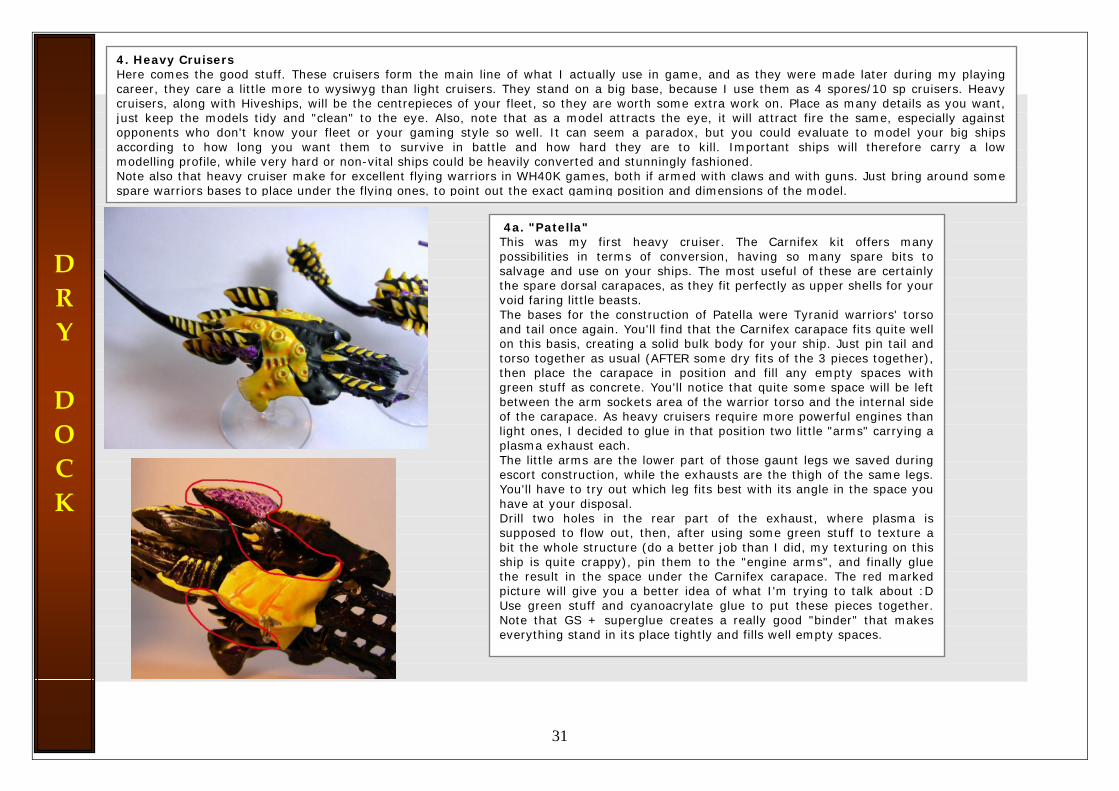
4a. "Patella" This was my first heavy cruiser. The Carnifex kit offers manypossibilities in terms of conversion, having so many spare bits tosalvage and use on your ships. The most useful of these are certainly the spare dorsal carapaces, as they fit perfectly as upper shells for yourvoid faring little beasts. The bases for the construction of Patella were Tyranid warriors' torsoand tail once again. You'll find that the Carnifex carapace fits quite well on this basis, creating a solid bulk body for your ship. Just pin tail andtorso together as usual (AFTER some dry fits of the 3 pieces together),then place the carapace in position and fill any empty spaces withgreen stuff as concrete. You'll notice that quite some space will be leftbetween the arm sockets area of the warrior torso and the internal sideof the carapace. As heavy cruisers require more powerful engines thanlight ones, I decided to glue in that position two little "arms" carrying a plasma exhaust each. The little arms are the lower part of those gaunt legs we saved duringescort construction, while the exhausts are the thigh of the same legs.You'll have to try out which leg fits best with its angle in the space you have at your disposal. Drill two holes in the rear part of the exhaust, where plasma issupposed to flow out, then, after using some green stuff to texture abit the whole structure (do a better job than I did, my texturing on thisship is quite crappy), pin them to the "engine arms", and finally gluethe result in the space under the Carnifex carapace. The red markedpicture will give you a better idea of what I'm trying to talk about :DUse green stuff and cyanoacrylate glue to put these pieces together. Note that GS + superglue creates a really good "binder" that makeseverything stand in its place tightly and fills well empty spaces.
4. Heavy Cruisers Here comes the good stuff. These cruisers form the main line of what I actually use in game, and as they were made later during my playing career, they care a little more to wysiwyg than light cruisers. They stand on a big base, because I use them as 4 spores/10 sp cruisers. Heavycruisers, along with Hiveships, will be the centrepieces of your fleet, so they are worth some extra work on. Place as many details as you want,just keep the models tidy and "clean" to the eye. Also, note that as a model attracts the eye, it will attract fire the same, especially againstopponents who don't know your fleet or your gaming style so well. It can seem a paradox, but you could evaluate to model your big shipsaccording to how long you want them to survive in battle and how hard they are to kill. Important ships will therefore carry a lowmodelling profile, while very hard or non-vital ships could be heavily converted and stunningly fashioned. Note also that heavy cruiser make for excellent flying warriors in WH40K games, both if armed with claws and with guns. Just bring around somespare warriors bases to place under the flying ones, to point out the exact gaming position and dimensions of the model.
D R Y D O C K

32
D R Y D O C K
If you want your ship to have eyes, you could evaluate some solution taken from the natural world, like some eye attachments similar to those of crabs :
Once this is done, add the other pair of engine exhausts in the leg sockets of the tail part of the creature. As for most of the other exhaust I made on my ships, they're done using the armoured thigh of gaunts, warriors or Carnifexes (choose the size you need). Remember to drill the actual exhaust hole. Adjusting these shouldn't be much trouble; green stuff alone should be enough for the job. Finally, you can choose the weapons for your ship. I wanted some shooting cruiser in my roster, so I took the GW Tyranid cruiser's cannon set, drilled it and pinned it in position, in the neck hole of the warrior's torso. You'll have to file a bit here and there to make things fit right. I wanted also side cannons, but was in a hurry to complete the ship,so the best thing I managed to do was adding that purple, weird looking texture on the higher engines. Please, do better than I did XD. You'll probably already have noticed that this ship has no eyes. This detail, combined with the particular shape and texture of the outer carapace,made me christen her "Patella", which is the Italian name for the limpet:
33
D R Y D O C K
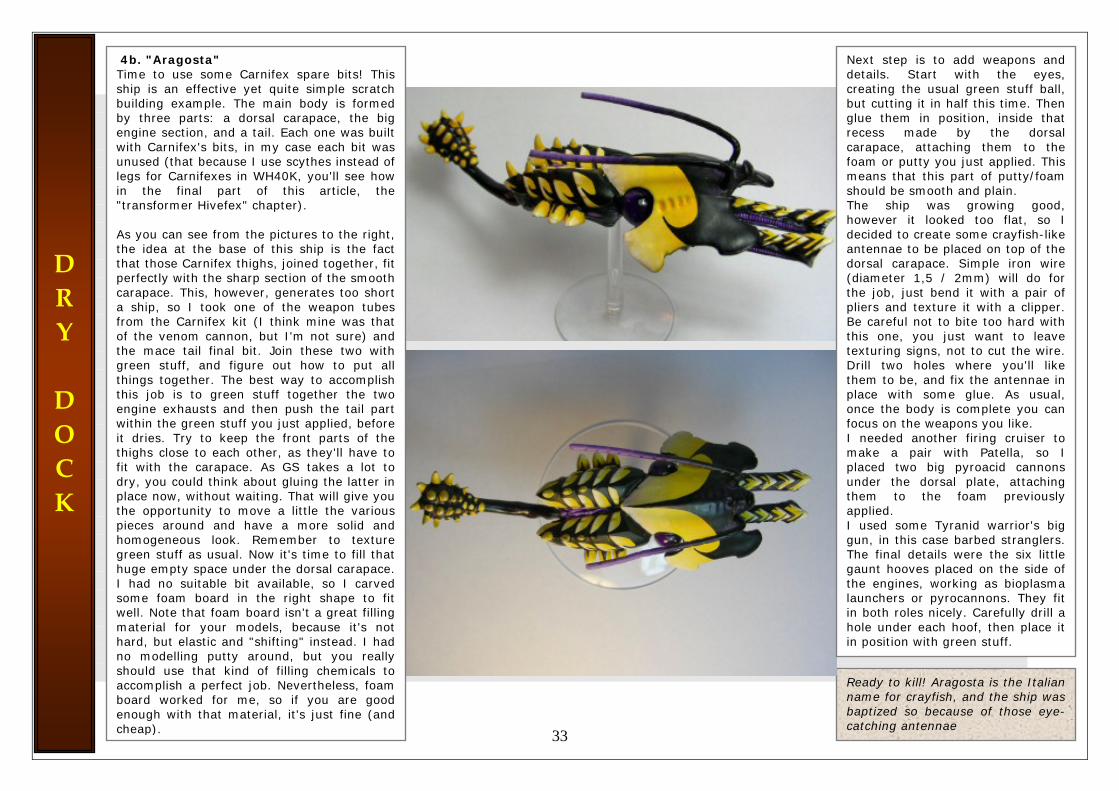
Ready to kill! Aragosta is the Italian name for crayfish, and the ship was baptized so because of those eye-catching antennae
4b. "Aragosta" Time to use some Carnifex spare bits! Thisship is an effective yet quite simple scratchbuilding example. The main body is formedby three parts: a dorsal carapace, the bigengine section, and a tail. Each one was builtwith Carnifex's bits, in my case each bit wasunused (that because I use scythes instead oflegs for Carnifexes in WH40K, you'll see howin the final part of this article, the "transformer Hivefex" chapter). As you can see from the pictures to the right,the idea at the base of this ship is the factthat those Carnifex thighs, joined together, fitperfectly with the sharp section of the smoothcarapace. This, however, generates too shorta ship, so I took one of the weapon tubesfrom the Carnifex kit (I think mine was thatof the venom cannon, but I'm not sure) andthe mace tail final bit. Join these two withgreen stuff, and figure out how to put all things together. The best way to accomplishthis job is to green stuff together the twoengine exhausts and then push the tail partwithin the green stuff you just applied, beforeit dries. Try to keep the front parts of thethighs close to each other, as they'll have tofit with the carapace. As GS takes a lot todry, you could think about gluing the latter inplace now, without waiting. That will give youthe opportunity to move a little the variouspieces around and have a more solid andhomogeneous look. Remember to texture green stuff as usual. Now it's time to fill thathuge empty space under the dorsal carapace.I had no suitable bit available, so I carvedsome foam board in the right shape to fitwell. Note that foam board isn't a great fillingmaterial for your models, because it's nothard, but elastic and "shifting" instead. I hadno modelling putty around, but you reallyshould use that kind of filling chemicals toaccomplish a perfect job. Nevertheless, foamboard worked for me, so if you are good enough with that material, it's just fine (andcheap).
Next step is to add weapons and details. Start with the eyes, creating the usual green stuff ball, but cutting it in half this time. Then glue them in position, inside that recess made by the dorsal carapace, attaching them to the foam or putty you just applied. This means that this part of putty/foam should be smooth and plain. The ship was growing good, however it looked too flat, so I decided to create some crayfish-like antennae to be placed on top of the dorsal carapace. Simple iron wire (diameter 1,5 / 2mm) will do for the job, just bend it with a pair of pliers and texture it with a clipper. Be careful not to bite too hard with this one, you just want to leave texturing signs, not to cut the wire. Drill two holes where you'll like them to be, and fix the antennae in place with some glue. As usual, once the body is complete you can focus on the weapons you like. I needed another firing cruiser to make a pair with Patella, so I placed two big pyroacid cannons under the dorsal plate, attaching them to the foam previously applied. I used some Tyranid warrior's big gun, in this case barbed stranglers. The final details were the six little gaunt hooves placed on the side of the engines, working as bioplasma launchers or pyrocannons. They fit in both roles nicely. Carefully drill a hole under each hoof, then place it in position with green stuff.
34
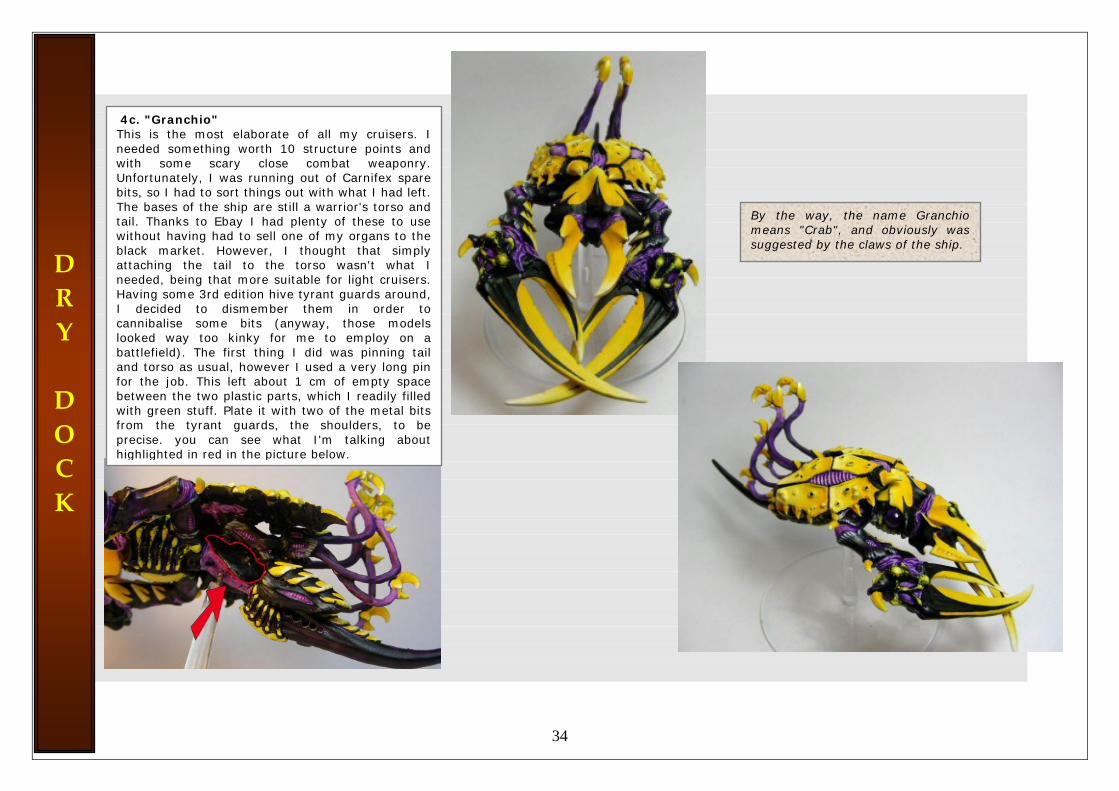
4c. "Granchio" This is the most elaborate of all my cruisers. I needed something worth 10 structure points andwith some scary close combat weaponry.Unfortunately, I was running out of Carnifex sparebits, so I had to sort things out with what I had left.The bases of the ship are still a warrior's torso andtail. Thanks to Ebay I had plenty of these to usewithout having had to sell one of my organs to theblack market. However, I thought that simplyattaching the tail to the torso wasn't what Ineeded, being that more suitable for light cruisers.Having some 3rd edition hive tyrant guards around, I decided to dismember them in order tocannibalise some bits (anyway, those modelslooked way too kinky for me to employ on abattlefield). The first thing I did was pinning tailand torso as usual, however I used a very long pin for the job. This left about 1 cm of empty spacebetween the two plastic parts, which I readily filledwith green stuff. Plate it with two of the metal bitsfrom the tyrant guards, the shoulders, to beprecise. you can see what I'm talking abouthighlighted in red in the picture below.
D R Y D O C K
By the way, the name Granchio means "Crab", and obviously was suggested by the claws of the ship.
35
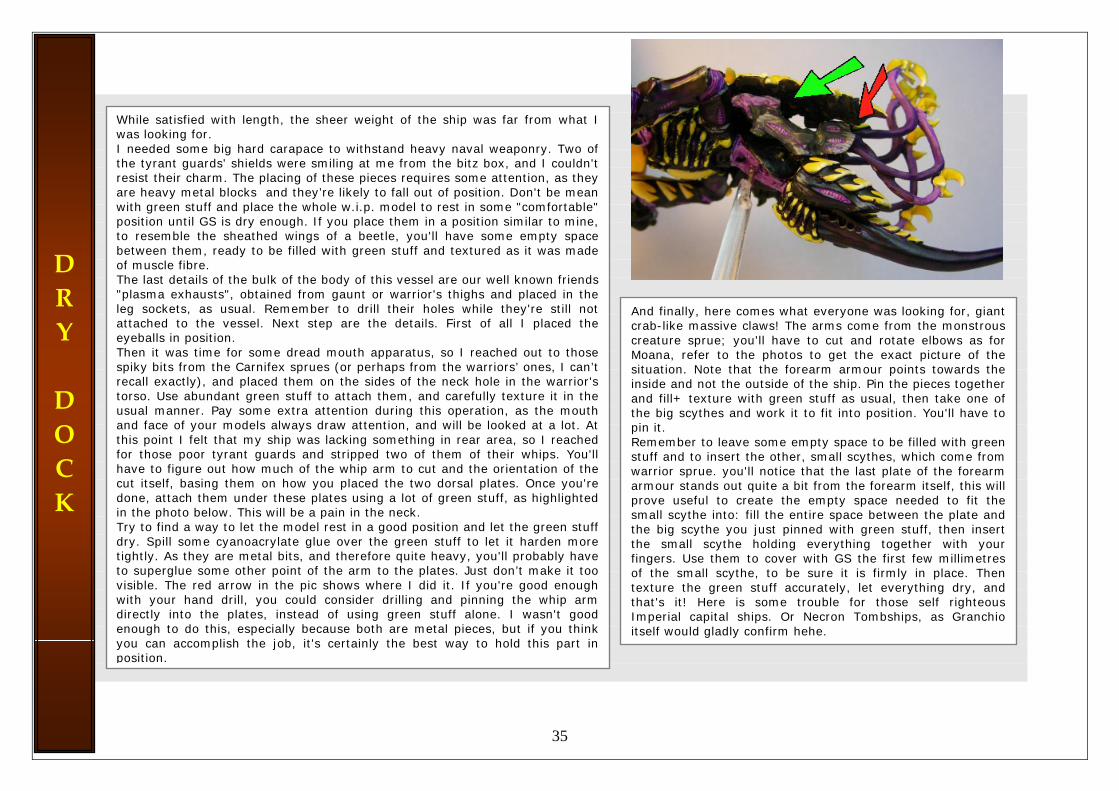
And finally, here comes what everyone was looking for, giantcrab-like massive claws! The arms come from the monstrous creature sprue; you'll have to cut and rotate elbows as for Moana, refer to the photos to get the exact picture of thesituation. Note that the forearm armour points towards theinside and not the outside of the ship. Pin the pieces togetherand fill+ texture with green stuff as usual, then take one ofthe big scythes and work it to fit into position. You'll have to pin it. Remember to leave some empty space to be filled with greenstuff and to insert the other, small scythes, which come fromwarrior sprue. you'll notice that the last plate of the forearmarmour stands out quite a bit from the forearm itself, this will prove useful to create the empty space needed to fit thesmall scythe into: fill the entire space between the plate andthe big scythe you just pinned with green stuff, then insertthe small scythe holding everything together with your fingers. Use them to cover with GS the first few millimetresof the small scythe, to be sure it is firmly in place. Thentexture the green stuff accurately, let everything dry, andthat's it! Here is some trouble for those self righteous Imperial capital ships. Or Necron Tombships, as Granchioitself would gladly confirm hehe.
While satisfied with length, the sheer weight of the ship was far from what Iwas looking for. I needed some big hard carapace to withstand heavy naval weaponry. Two ofthe tyrant guards' shields were smiling at me from the bitz box, and I couldn'tresist their charm. The placing of these pieces requires some attention, as theyare heavy metal blocks and they’re likely to fall out of position. Don't be meanwith green stuff and place the whole w.i.p. model to rest in some "comfortable"position until GS is dry enough. If you place them in a position similar to mine,to resemble the sheathed wings of a beetle, you'll have some empty space between them, ready to be filled with green stuff and textured as it was madeof muscle fibre. The last details of the bulk of the body of this vessel are our well known friends"plasma exhausts", obtained from gaunt or warrior's thighs and placed in the leg sockets, as usual. Remember to drill their holes while they're still notattached to the vessel. Next step are the details. First of all I placed theeyeballs in position. Then it was time for some dread mouth apparatus, so I reached out to those spiky bits from the Carnifex sprues (or perhaps from the warriors’ ones, I can’trecall exactly), and placed them on the sides of the neck hole in the warrior'storso. Use abundant green stuff to attach them, and carefully texture it in theusual manner. Pay some extra attention during this operation, as the mouth and face of your models always draw attention, and will be looked at a lot. Atthis point I felt that my ship was lacking something in rear area, so I reachedfor those poor tyrant guards and stripped two of them of their whips. You'll have to figure out how much of the whip arm to cut and the orientation of thecut itself, basing them on how you placed the two dorsal plates. Once you'redone, attach them under these plates using a lot of green stuff, as highlighted in the photo below. This will be a pain in the neck. Try to find a way to let the model rest in a good position and let the green stuffdry. Spill some cyanoacrylate glue over the green stuff to let it harden moretightly. As they are metal bits, and therefore quite heavy, you'll probably have to superglue some other point of the arm to the plates. Just don’t make it toovisible. The red arrow in the pic shows where I did it. If you're good enoughwith your hand drill, you could consider drilling and pinning the whip arm directly into the plates, instead of using green stuff alone. I wasn't goodenough to do this, especially because both are metal pieces, but if you thinkyou can accomplish the job, it's certainly the best way to hold this part in position.
D R Y D O C K
36
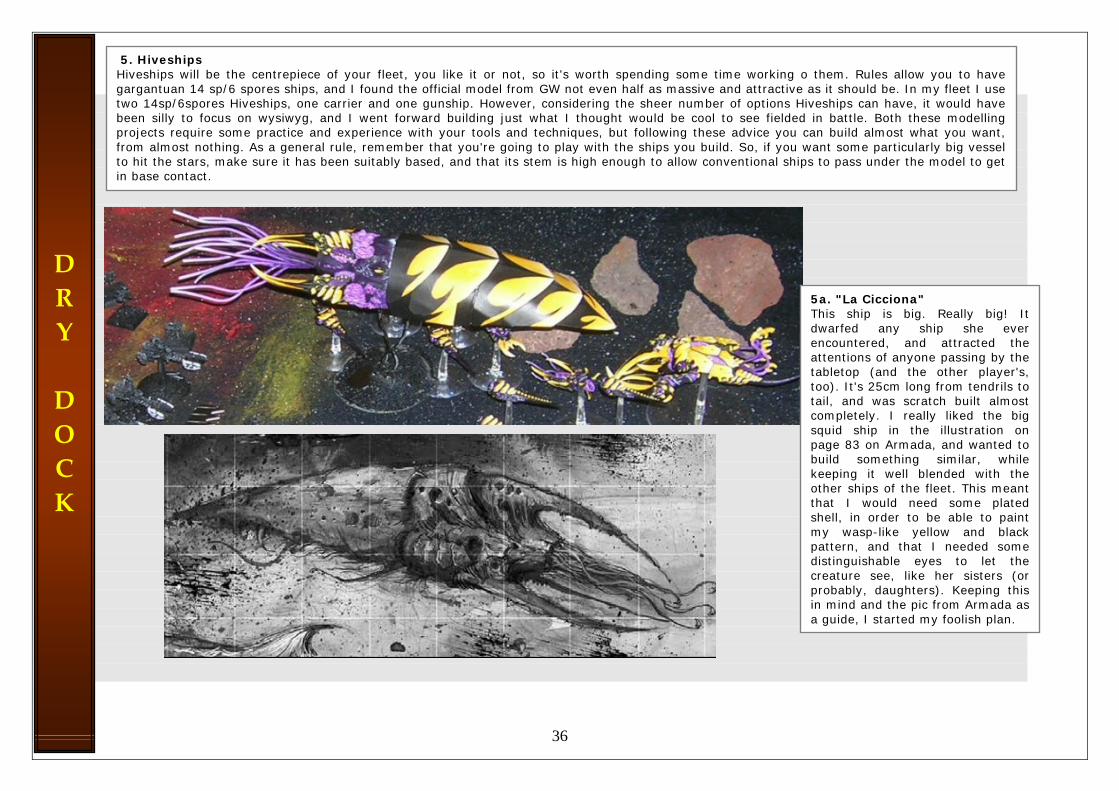
5a. "La Cicciona" This ship is big. Really big! It dwarfed any ship she ever encountered, and attracted the attentions of anyone passing by the tabletop (and the other player's, too). It's 25cm long from tendrils to tail, and was scratch built almost completely. I really liked the big squid ship in the illustration on page 83 on Armada, and wanted to build something similar, while keeping it well blended with the other ships of the fleet. This meant that I would need some plated shell, in order to be able to paint my wasp-like yellow and black pattern, and that I needed some distinguishable eyes to let the creature see, like her sisters (or probably, daughters). Keeping this in mind and the pic from Armada as a guide, I started my foolish plan.
5. Hiveships Hiveships will be the centrepiece of your fleet, you like it or not, so it's worth spending some time working o them. Rules allow you to havegargantuan 14 sp/6 spores ships, and I found the official model from GW not even half as massive and attractive as it should be. In my fleet I usetwo 14sp/6spores Hiveships, one carrier and one gunship. However, considering the sheer number of options Hiveships can have, it would havebeen silly to focus on wysiwyg, and I went forward building just what I thought would be cool to see fielded in battle. Both these modellingprojects require some practice and experience with your tools and techniques, but following these advice you can build almost what you want, from almost nothing. As a general rule, remember that you're going to play with the ships you build. So, if you want some particularly big vesselto hit the stars, make sure it has been suitably based, and that its stem is high enough to allow conventional ships to pass under the model to get in base contact.
D R Y D O C K
37
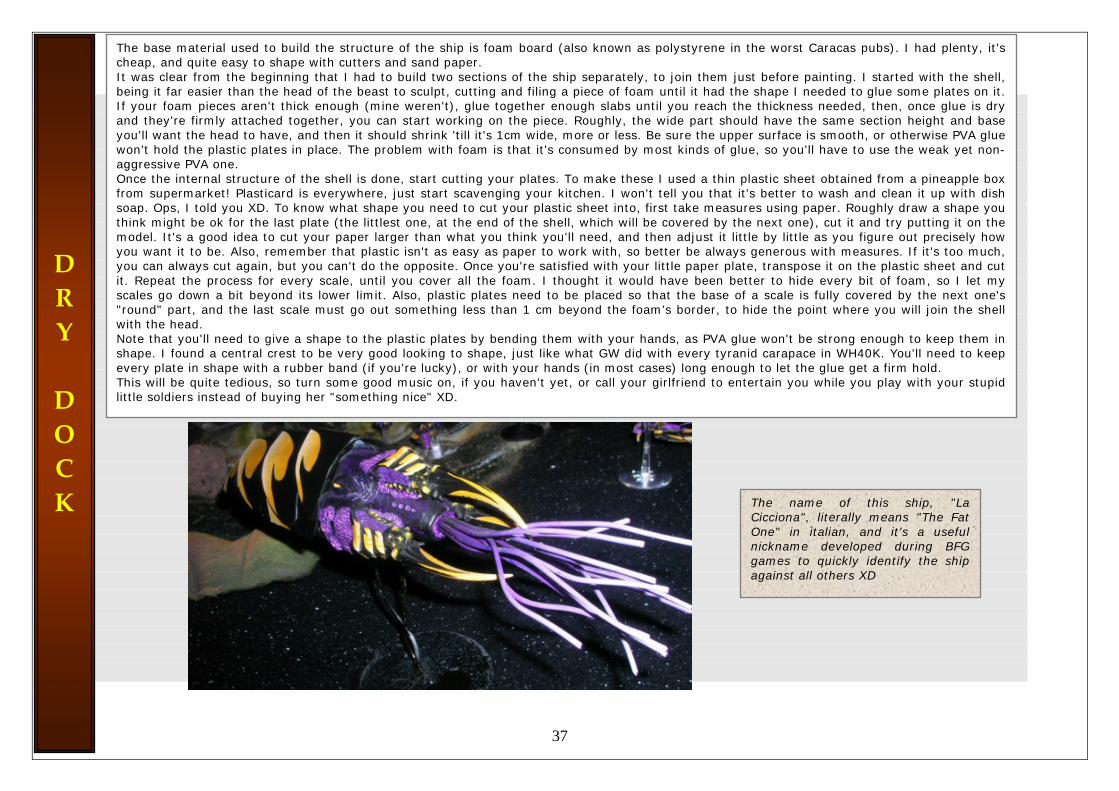
The base material used to build the structure of the ship is foam board (also known as polystyrene in the worst Caracas pubs). I had plenty, it's cheap, and quite easy to shape with cutters and sand paper. It was clear from the beginning that I had to build two sections of the ship separately, to join them just before painting. I started with the shell,being it far easier than the head of the beast to sculpt, cutting and filing a piece of foam until it had the shape I needed to glue some plates on it.If your foam pieces aren't thick enough (mine weren't), glue together enough slabs until you reach the thickness needed, then, once glue is dry and they're firmly attached together, you can start working on the piece. Roughly, the wide part should have the same section height and baseyou'll want the head to have, and then it should shrink 'till it's 1cm wide, more or less. Be sure the upper surface is smooth, or otherwise PVA glue won’t hold the plastic plates in place. The problem with foam is that it's consumed by most kinds of glue, so you'll have to use the weak yet non-aggressive PVA one. Once the internal structure of the shell is done, start cutting your plates. To make these I used a thin plastic sheet obtained from a pineapple box from supermarket! Plasticard is everywhere, just start scavenging your kitchen. I won't tell you that it's better to wash and clean it up with dishsoap. Ops, I told you XD. To know what shape you need to cut your plastic sheet into, first take measures using paper. Roughly draw a shape youthink might be ok for the last plate (the littlest one, at the end of the shell, which will be covered by the next one), cut it and try putting it on the model. It's a good idea to cut your paper larger than what you think you'll need, and then adjust it little by little as you figure out precisely howyou want it to be. Also, remember that plastic isn't as easy as paper to work with, so better be always generous with measures. If it's too much,you can always cut again, but you can't do the opposite. Once you're satisfied with your little paper plate, transpose it on the plastic sheet and cutit. Repeat the process for every scale, until you cover all the foam. I thought it would have been better to hide every bit of foam, so I let myscales go down a bit beyond its lower limit. Also, plastic plates need to be placed so that the base of a scale is fully covered by the next one's "round" part, and the last scale must go out something less than 1 cm beyond the foam's border, to hide the point where you will join the shellwith the head. Note that you'll need to give a shape to the plastic plates by bending them with your hands, as PVA glue won't be strong enough to keep them in shape. I found a central crest to be very good looking to shape, just like what GW did with every tyranid carapace in WH40K. You'll need to keepevery plate in shape with a rubber band (if you're lucky), or with your hands (in most cases) long enough to let the glue get a firm hold. This will be quite tedious, so turn some good music on, if you haven't yet, or call your girlfriend to entertain you while you play with your stupidlittle soldiers instead of buying her "something nice" XD.
D R Y D O C K The name of this ship, "La
Cicciona", literally means "The Fat One" in italian, and it's a useful nickname developed during BFG games to quickly identify the ship against all others XD
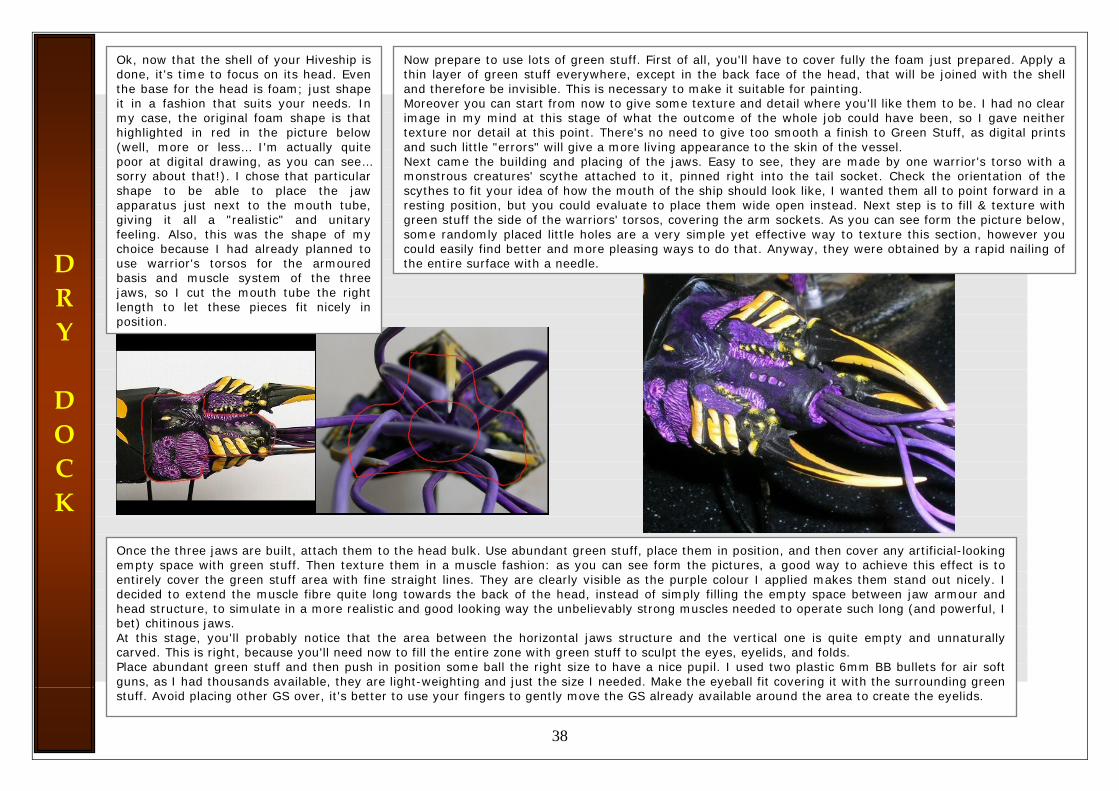
Once the three jaws are built, attach them to the head bulk. Use abundant green stuff, place them in position, and then cover any artificial-looking empty space with green stuff. Then texture them in a muscle fashion: as you can see form the pictures, a good way to achieve this effect is toentirely cover the green stuff area with fine straight lines. They are clearly visible as the purple colour I applied makes them stand out nicely. I decided to extend the muscle fibre quite long towards the back of the head, instead of simply filling the empty space between jaw armour andhead structure, to simulate in a more realistic and good looking way the unbelievably strong muscles needed to operate such long (and powerful, Ibet) chitinous jaws. At this stage, you'll probably notice that the area between the horizontal jaws structure and the vertical one is quite empty and unnaturallycarved. This is right, because you'll need now to fill the entire zone with green stuff to sculpt the eyes, eyelids, and folds. Place abundant green stuff and then push in position some ball the right size to have a nice pupil. I used two plastic 6mm BB bullets for air soft guns, as I had thousands available, they are light-weighting and just the size I needed. Make the eyeball fit covering it with the surrounding greenstuff. Avoid placing other GS over, it's better to use your fingers to gently move the GS already available around the area to create the eyelids.
Now prepare to use lots of green stuff. First of all, you'll have to cover fully the foam just prepared. Apply athin layer of green stuff everywhere, except in the back face of the head, that will be joined with the shell and therefore be invisible. This is necessary to make it suitable for painting. Moreover you can start from now to give some texture and detail where you'll like them to be. I had no clearimage in my mind at this stage of what the outcome of the whole job could have been, so I gave neithertexture nor detail at this point. There's no need to give too smooth a finish to Green Stuff, as digital printsand such little "errors" will give a more living appearance to the skin of the vessel. Next came the building and placing of the jaws. Easy to see, they are made by one warrior's torso with amonstrous creatures' scythe attached to it, pinned right into the tail socket. Check the orientation of thescythes to fit your idea of how the mouth of the ship should look like, I wanted them all to point forward in aresting position, but you could evaluate to place them wide open instead. Next step is to fill & texture withgreen stuff the side of the warriors' torsos, covering the arm sockets. As you can see form the picture below, some randomly placed little holes are a very simple yet effective way to texture this section, however youcould easily find better and more pleasing ways to do that. Anyway, they were obtained by a rapid nailing of the entire surface with a needle.
Ok, now that the shell of your Hiveship isdone, it's time to focus on its head. Eventhe base for the head is foam; just shapeit in a fashion that suits your needs. Inmy case, the original foam shape is that highlighted in red in the picture below(well, more or less… I'm actually quitepoor at digital drawing, as you can see…sorry about that!). I chose that particularshape to be able to place the jawapparatus just next to the mouth tube,giving it all a "realistic" and unitary feeling. Also, this was the shape of mychoice because I had already planned touse warrior's torsos for the armouredbasis and muscle system of the threejaws, so I cut the mouth tube the rightlength to let these pieces fit nicely in position.
D R Y D O C K
38
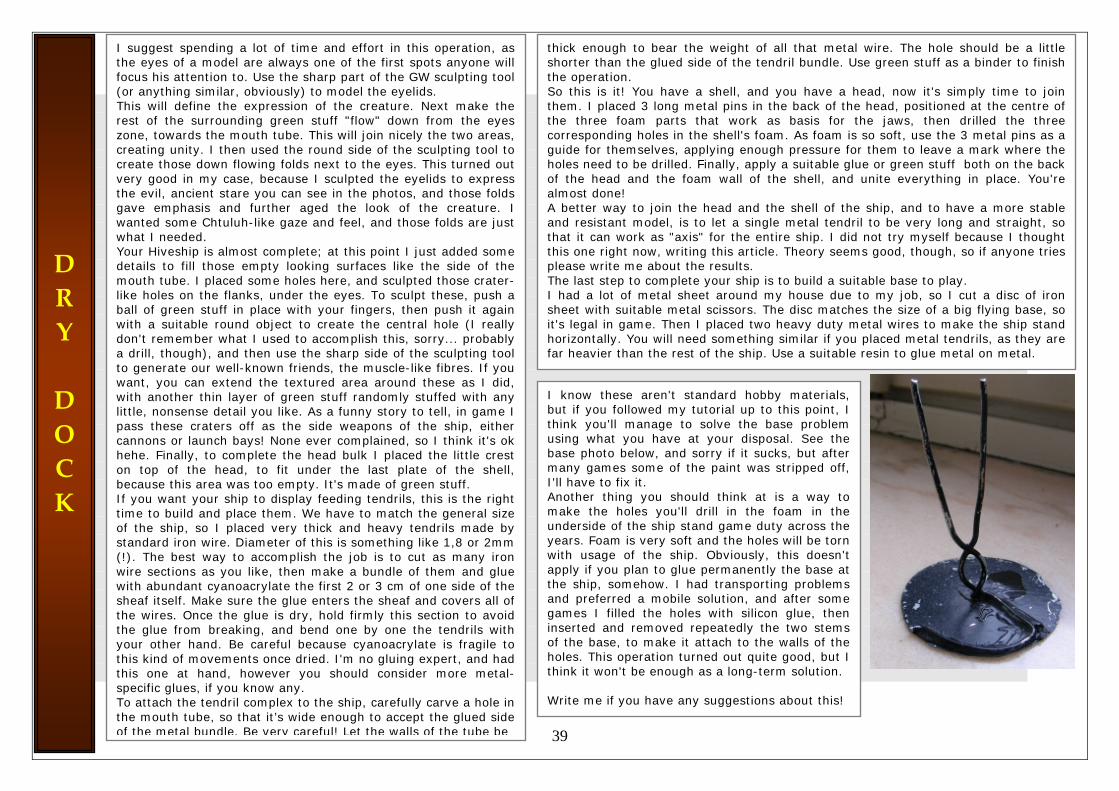
D R Y D O C K
I suggest spending a lot of time and effort in this operation, asthe eyes of a model are always one of the first spots anyone willfocus his attention to. Use the sharp part of the GW sculpting tool (or anything similar, obviously) to model the eyelids.
thick enough to bear the weight of all that metal wire. The hole should be a littleshorter than the glued side of the tendril bundle. Use green stuff as a binder to finishthe operation. So this is it! You have a shell, and you have a head, now it's simply time to join them. I placed 3 long metal pins in the back of the head, positioned at the centre ofthe three foam parts that work as basis for the jaws, then drilled the threecorresponding holes in the shell's foam. As foam is so soft, use the 3 metal pins as a guide for themselves, applying enough pressure for them to leave a mark where theholes need to be drilled. Finally, apply a suitable glue or green stuff both on the back of the head and the foam wall of the shell, and unite everything in place. You're almost done!
This will define the expression of the creature. Next make therest of the surrounding green stuff "flow" down from the eyeszone, towards the mouth tube. This will join nicely the two areas, creating unity. I then used the round side of the sculpting tool tocreate those down flowing folds next to the eyes. This turned outvery good in my case, because I sculpted the eyelids to expressthe evil, ancient stare you can see in the photos, and those folds gave emphasis and further aged the look of the creature. Iwanted some Chtuluh-like gaze and feel, and those folds are justwhat I needed.
A better way to join the head and the shell of the ship, and to have a more stableand resistant model, is to let a single metal tendril to be very long and straight, sothat it can work as "axis" for the entire ship. I did not try myself because I thought this one right now, writing this article. Theory seems good, though, so if anyone triesplease write me about the results.
Your Hiveship is almost complete; at this point I just added somedetails to fill those empty looking surfaces like the side of the mouth tube. I placed some holes here, and sculpted those crater-like holes on the flanks, under the eyes. To sculpt these, push aball of green stuff in place with your fingers, then push it againwith a suitable round object to create the central hole (I reallydon't remember what I used to accomplish this, sorry... probablya drill, though), and then use the sharp side of the sculpting toolto generate our well-known friends, the muscle-like fibres. If you want, you can extend the textured area around these as I did,with another thin layer of green stuff randomly stuffed with anylittle, nonsense detail you like. As a funny story to tell, in game Ipass these craters off as the side weapons of the ship, eithercannons or launch bays! None ever complained, so I think it's ok hehe. Finally, to complete the head bulk I placed the little creston top of the head, to fit under the last plate of the shell,because this area was too empty. It's made of green stuff.
The last step to complete your ship is to build a suitable base to play. I had a lot of metal sheet around my house due to my job, so I cut a disc of ironsheet with suitable metal scissors. The disc matches the size of a big flying base, soit's legal in game. Then I placed two heavy duty metal wires to make the ship standhorizontally. You will need something similar if you placed metal tendrils, as they arefar heavier than the rest of the ship. Use a suitable resin to glue metal on metal.
I know these aren't standard hobby materials,but if you followed my tutorial up to this point, I think you'll manage to solve the base problemusing what you have at your disposal. See thebase photo below, and sorry if it sucks, but aftermany games some of the paint was stripped off,I'll have to fix it. Another thing you should think at is a way to make the holes you'll drill in the foam in theunderside of the ship stand game duty across theyears. Foam is very soft and the holes will be tornwith usage of the ship. Obviously, this doesn'tapply if you plan to glue permanently the base atthe ship, somehow. I had transporting problemsand preferred a mobile solution, and after somegames I filled the holes with silicon glue, theninserted and removed repeatedly the two stemsof the base, to make it attach to the walls of theholes. This operation turned out quite good, but Ithink it won't be enough as a long-term solution.
If you want your ship to display feeding tendrils, this is the righttime to build and place them. We have to match the general sizeof the ship, so I placed very thick and heavy tendrils made bystandard iron wire. Diameter of this is something like 1,8 or 2mm(!). The best way to accomplish the job is to cut as many iron wire sections as you like, then make a bundle of them and gluewith abundant cyanoacrylate the first 2 or 3 cm of one side of thesheaf itself. Make sure the glue enters the sheaf and covers all ofthe wires. Once the glue is dry, hold firmly this section to avoid the glue from breaking, and bend one by one the tendrils withyour other hand. Be careful because cyanoacrylate is fragile tothis kind of movements once dried. I'm no gluing expert, and hadthis one at hand, however you should consider more metal-specific glues, if you know any.
Write me if you have any suggestions about this! To attach the tendril complex to the ship, carefully carve a hole inthe mouth tube, so that it’s wide enough to accept the glued sideof the metal bundle. Be very careful! Let the walls of the tube be
39
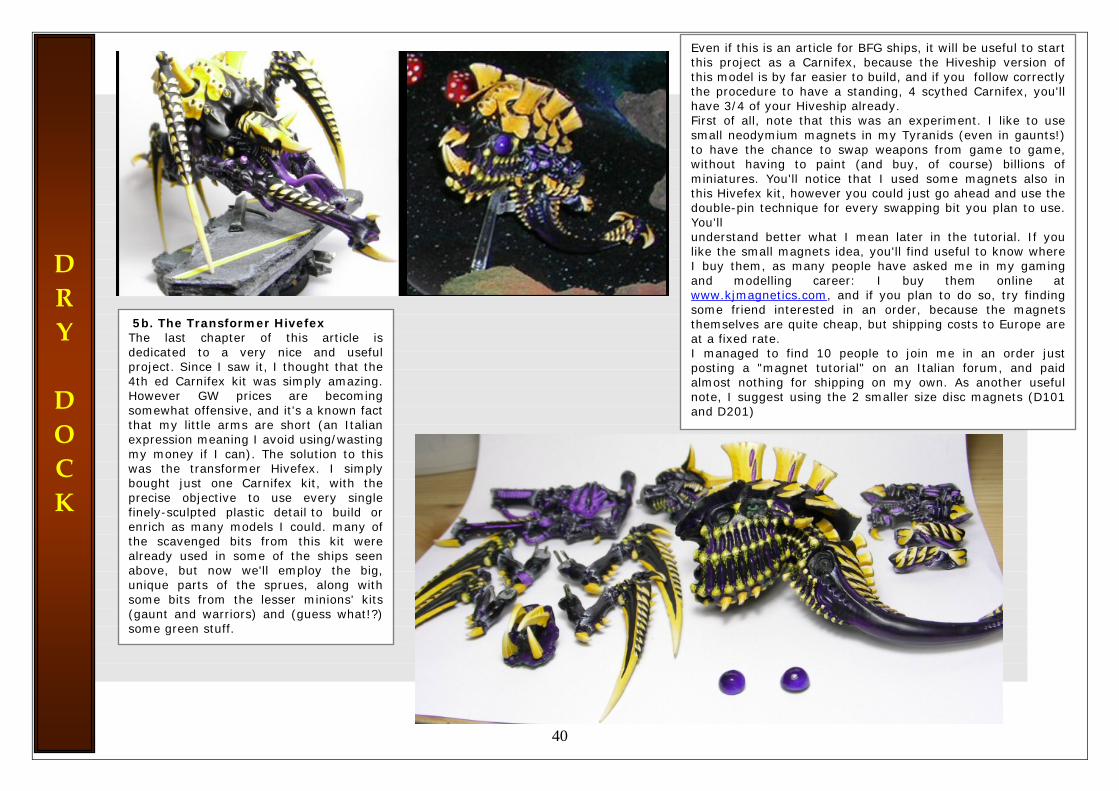
Even if this is an article for BFG ships, it will be useful to start this project as a Carnifex, because the Hiveship version of this model is by far easier to build, and if you follow correctly the procedure to have a standing, 4 scythed Carnifex, you'll have 3/4 of your Hiveship already.
First of all, note that this was an experiment. I like to use
small neodymium magnets in my Tyranids (even in gaunts!) to have the chance to swap weapons from game to game, without having to paint (and buy, of course) billions of miniatures. You'll notice that I used some magnets also in this Hivefex kit, however you could just go ahead and use the double-pin technique for every swapping bit you plan to use. You'll understand better what I mean later in the tutorial. If you like the small magnets idea, you'll find useful to know where I buy them, as many people have asked me in my gaming and modelling career: I buy them online at
D R www.kjmagnetics.com
Y D O C K
, and if you plan to do so, try finding
some friend interested in an order, because the magnets themselves are quite cheap, but shipping costs to Europe are at a fixed rate.
5b. The Transformer Hivefex The last chapter of this article isdedicated to a very nice and usefulproject. Since I saw it, I thought that the 4th ed Carnifex kit was simply amazing.However GW prices are becomingsomewhat offensive, and it's a known factthat my little arms are short (an Italianexpression meaning I avoid using/wastingmy money if I can). The solution to thiswas the transformer Hivefex. I simply bought just one Carnifex kit, with theprecise objective to use every singlefinely-sculpted plastic detail to build or enrich as many models I could. many ofthe scavenged bits from this kit werealready used in some of the ships seen above, but now we'll employ the big,unique parts of the sprues, along withsome bits from the lesser minions' kits(gaunt and warriors) and (guess what!?)some green stuff.
I managed to find 10 people to join me in an order just posting a "magnet tutorial" on an Italian forum, and paid almost nothing for shipping on my own. As another useful note, I suggest using the 2 smaller size disc magnets (D101 and D201)
40

The basis for both the Carnifex and the Hiveship is what you can see in the photo above. No need for atutorial here, because it's just the standard Carnifex set up. The base idea of every Carnifex in my Tyranid army is that they walk on 4 scythes instead of their standard legs. This would be easy enoughto accomplish in a standard modelling situation, where you just glue the various bits together and thengo and play at the nearest club. This is a transformer Carnifex however, and you'll need to havescythed legs that can be removed, yet able to withstand the weight of the model and the handling itneeds in game.
Take the 4 scythes and start figuring out how you want them to be positioned to make your modelstand up in an aggressive attitude (or any posture you like, btw). This part of the modelling job is quiteimportant, and will affect heavily the final result, so spend some good time thinking and positioning. You could evaluate the usage of some rubber material like blu-tack or similar, to be able to make things stand in the desired position without gluing anything.
D R Y D O C K
Once you're done with your positioning and observation, start filling the leg and middle arm sockets with green stuff, to obtain a smooth, plainsurface. Now it's time to cut flat the round part behind the shoulders of the scythed arms, like in the pictures above. Be careful though: the angle which you cut the round part into must be precise if you want the scythed leg to stand as you planned, because this flat part will join withthe flat green stuff you placed into the sockets. If you cut parallel to the axis of the arm (0 degrees), you'll have a scythe that stands too closeto the body, and the model won't stand in place. Opposite, if you cut too wide an angle (90° or above), you'll have your legs standing too far from the body, giving a weird and funny look to your creature. It will be very stable, however, so it's better to start with a high angle cut, and then file finely until you reach what you desire. AsI said before, if you cut too few, you can cut again, if you cut too much, you're f****d hehe. Follow the scheme below : place the leg in the angle you desire (the red line), avoid positioning it too close to the green lines, and then cut theplastic parallel to the axis of the flat green stuff in the socket (yellow line). My resulting cuts are highlighted by the arrows in the pictures above. The scheme refers to the back scythes, viewed from below. Mirror it to make it help you positioning the front scythes.
41
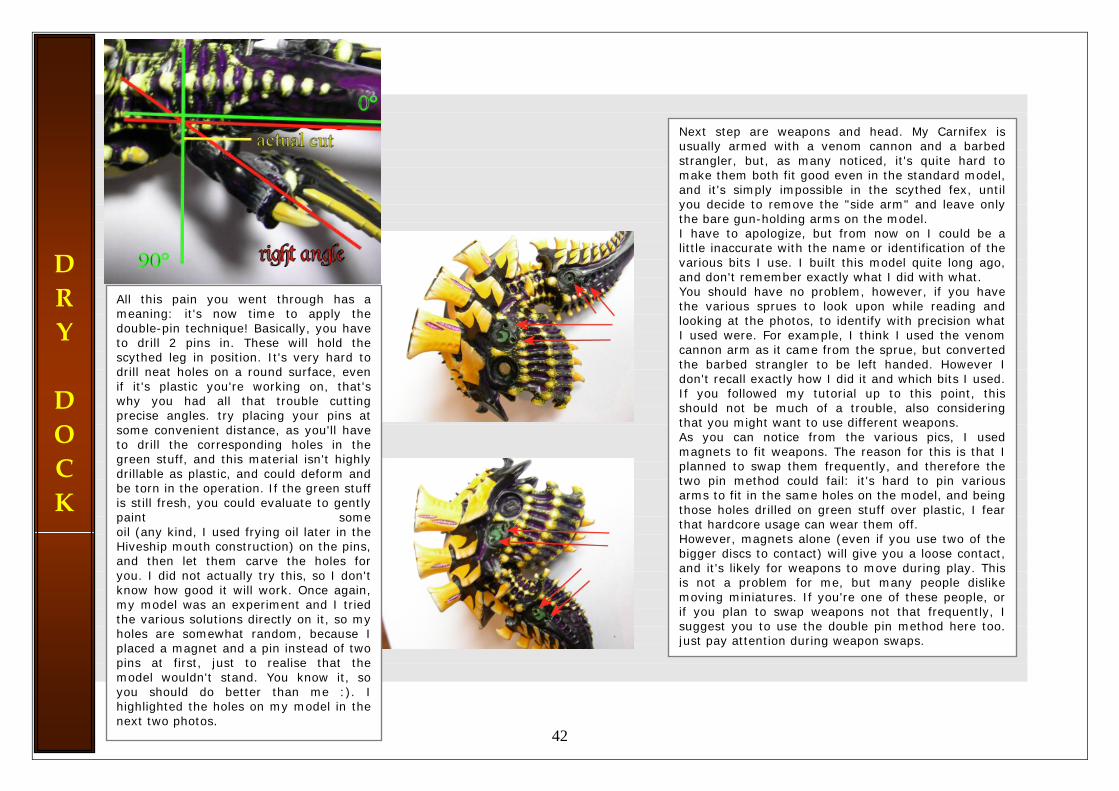
Next step are weapons and head. My Carnifex is usually armed with a venom cannon and a barbed strangler, but, as many noticed, it's quite hard to make them both fit good even in the standard model, and it's simply impossible in the scythed fex, until you decide to remove the "side arm" and leave only the bare gun-holding arms on the model. I have to apologize, but from now on I could be a little inaccurate with the name or identification of the various bits I use. I built this model quite long ago, and don't remember exactly what I did with what. You should have no problem, however, if you have the various sprues to look upon while reading and looking at the photos, to identify with precision what I used were. For example, I think I used the venom cannon arm as it came from the sprue, but converted the barbed strangler to be left handed. However I don't recall exactly how I did it and which bits I used. If you followed my tutorial up to this point, this should not be much of a trouble, also considering that you might want to use different weapons. As you can notice from the various pics, I used magnets to fit weapons. The reason for this is that I planned to swap them frequently, and therefore the two pin method could fail: it's hard to pin various arms to fit in the same holes on the model, and being those holes drilled on green stuff over plastic, I fear that hardcore usage can wear them off. However, magnets alone (even if you use two of the bigger discs to contact) will give you a loose contact, and it's likely for weapons to move during play. This is not a problem for me, but many people dislike moving miniatures. If you're one of these people, or if you plan to swap weapons not that frequently, I suggest you to use the double pin method here too. just pay attention during weapon swaps.
Al this pain you went through has ameaning: it's now time to apply thedouble-pin technique! Basically, you haveto drill 2 pins in. These will hold thescythed leg in position. It's very hard todrill neat holes on a round surface, evenif it's plastic you're working on, that'swhy you had all that trouble cutting
l
precise angles. try placing your pins atsome convenient distance, as you'll haveto drill the corresponding holes in thegreen stuff, and this material isn't highlydrillable as plastic, and could deform andbe torn in the operation. If the green stuffis still fresh, you could evaluate to gentlypaint someoil (any kind, I used frying oil later in theHiveship mouth construction) on the pins,and then let them carve the holes foryou. I did not actually try this, so I don'tknow how good it will work. Once again,my model was an experiment and I triedthe various solutions directly on it, so myholes are somewhat random, because Iplaced a magnet and a pin instead of twopins at first, just to realise that themodel wouldn't stand. You know it, soyou should do better than me :). Ihighlighted the holes on my model in thenext two photos.
D R Y D O C K
42

If you want to go ahead and usemagnets, follow this easy method : firstof all, fill the remaining 2 arm socketswith green stuff, but be careful not tooverfill, as you'll have to push a magnetin. Then take one of the drills, and let amagnet attach to its flat end. This wayyou're sure that the face this magnet isshowing is always the same (positive ornegative, but always the same). Now let another magnet to be attractedby this one, and use the whole lot (drill+ 2 magnets) to push the latter magnetinto the green stuff. Once the magnet isinside enough, it will stay in this placewhile you move away the drill with the other magnet attached to it. Use yourfingers to hold the magnet directlyattached to the drill if it stays in contactwith the one beneath green stuff whenyou try to move it away. Choose a drillwide enough to apply pressurecomfortably.
the magnet. You can see the magnets inserted in the round part behind the shoulders of my Carnifex in the pictures below. If you're good enough, you can drill a suitable hole right into the round plastic, or you can cut the round part, cover it with green stuff and reconstruct it once the magnet is in its place. Independently from the method you choose, let a magnet be attracted by the one in the socket you're working on: in example, the right socket, that will hold the venom cannon in my model. Let a very tiny drop of cyanoacrylate into the hole you drilled behind the shoulder, and catch the new magnet attached to the other in the glued hole. This way you'll be sure that the right magnet face will be pointing outside the arm: you place the magnet in its hole directly from the right position (that is, attracted by the one in the socket), so there is no chance you turn it for mistake. If you chose to use green stuff instead of drilling a hole, simply catch the "arm magnet" attached to the socket one pushing the green stuffed shoulder against it. Once again, this way you'll be sure that the final result is attracted and not repelled by the magnet in the socket. Give the green stuff a suitable shape with your fingers, let it dry, and there you are! your guns are ready for action.
Then attract another magnet to the one
at the base of the drill, and push it into the other green stuffed socket.
This strange operation gives you the certainty that the two magnets in the sockets show the same polarity to the outside.
This is important to swap weapons, following a procedure will save you from building a nicely converted magnetic arm and find out just in the end that it's not attracted, but repelled by the magnet in the arm socket. That happened to me a few times, and it's incredibly annoying, so follow a "magnetic method", either mine or another that suits you more.
D R Y
Make the socket surface with the magnet smooth and plain, then let the green stuff dry. While you wait, take the weapon arms you want the Carnifex to have, and prepare a socket to accept
As a side note, once you build one model with magnets inside,
use this one as a magnet polarity reference for any other model you plan to place magnets into. This way any weapon arm you’ll build will be attracted by every magnetic socket in your army, giving you great freedom and letting you build and paint far less miniature pieces.
D O C K
43
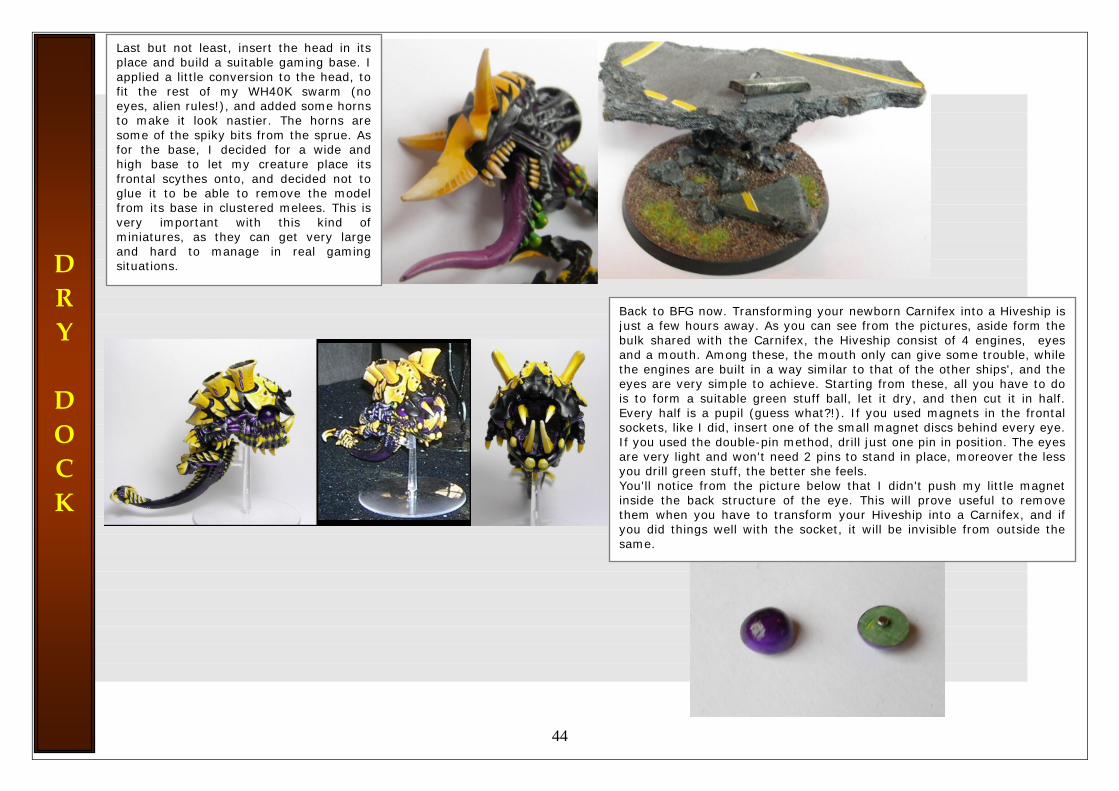
Back to BFG now. Transforming your newborn Carnifex into a Hiveship isjust a few hours away. As you can see from the pictures, aside form thebulk shared with the Carnifex, the Hiveship consist of 4 engines, eyesand a mouth. Among these, the mouth only can give some trouble, while the engines are built in a way similar to that of the other ships', and theeyes are very simple to achieve. Starting from these, all you have to dois to form a suitable green stuff ball, let it dry, and then cut it in half. Every half is a pupil (guess what?!). If you used magnets in the frontalsockets, like I did, insert one of the small magnet discs behind every eye.If you used the double-pin method, drill just one pin in position. The eyes are very light and won't need 2 pins to stand in place, moreover the less you drill green stuff, the better she feels. You'll notice from the picture below that I didn't push my little magnetinside the back structure of the eye. This will prove useful to removethem when you have to transform your Hiveship into a Carnifex, and if you did things well with the socket, it will be invisible from outside thesame.
Last but not least, insert the head in itsplace and build a suitable gaming base. Iapplied a little conversion to the head, tofit the rest of my WH40K swarm (noeyes, alien rules!), and added some hornsto make it look nastier. The horns aresome of the spiky bits from the sprue. Asfor the base, I decided for a wide andhigh base to let my creature place its frontal scythes onto, and decided not toglue it to be able to remove the modelfrom its base in clustered melees. This isvery important with this kind ofminiatures, as they can get very largeand hard to manage in real gamingsituations.
D R Y D O C K
44
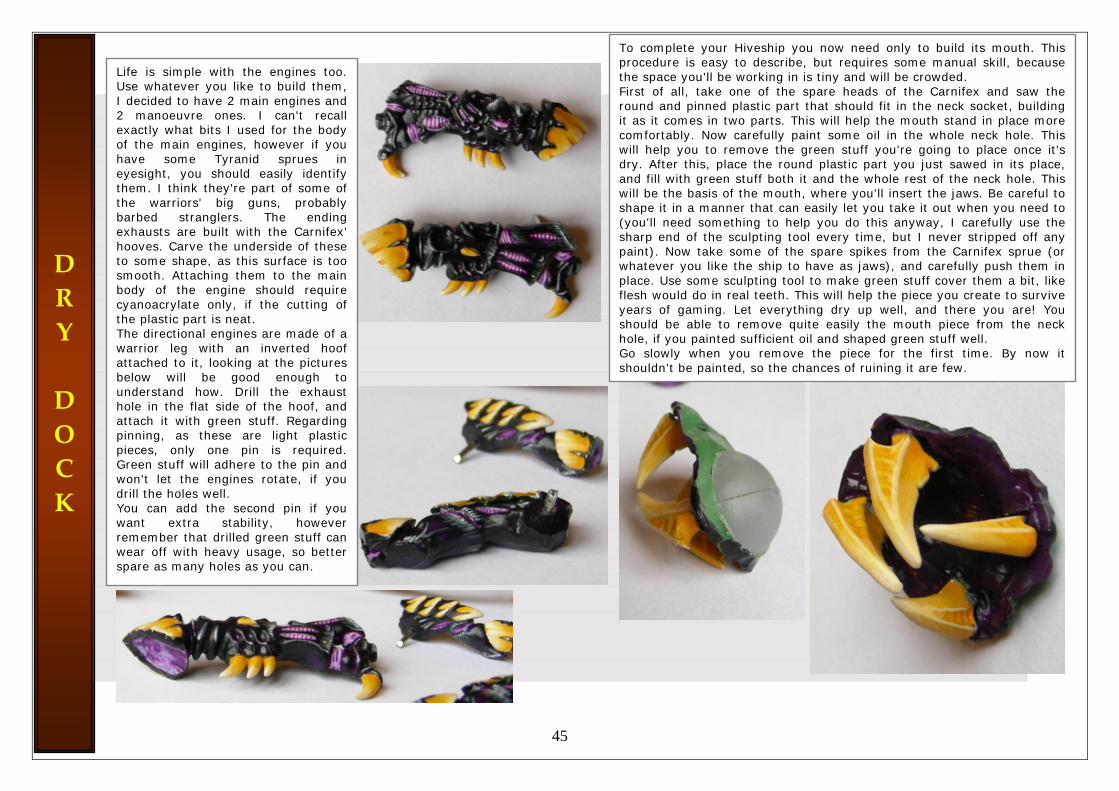
D R Y D O C K
Life is simple with the engines too.Use whatever you like to build them,I decided to have 2 main engines and2 manoeuvre ones. I can't recallexactly what bits I used for the bodyof the main engines, however if youhave some Tyranid sprues ineyesight, you should easily identifythem. I think they're part of some ofthe warriors' big guns, probablybarbed stranglers. The endingexhausts are built with the Carnifex'hooves. Carve the underside of these to some shape, as this surface is toosmooth. Attaching them to the mainbody of the engine should requirecyanoacrylate only, if the cutting ofthe plastic part is neat. The directional engines are made of awarrior leg with an inverted hoofattached to it, looking at the pictures below will be good enough tounderstand how. Drill the exhausthole in the flat side of the hoof, andattach it with green stuff. Regardingpinning, as these are light plasticpieces, only one pin is required.Green stuff will adhere to the pin and won't let the engines rotate, if youdrill the holes well. You can add the second pin if youwant extra stability, howeverremember that drilled green stuff canwear off with heavy usage, so betterspare as many holes as you can.
To complete your Hiveship you now need only to build its mouth. Thisprocedure is easy to describe, but requires some manual skill, becausethe space you'll be working in is tiny and will be crowded. First of all, take one of the spare heads of the Carnifex and saw the round and pinned plastic part that should fit in the neck socket, buildingit as it comes in two parts. This will help the mouth stand in place morecomfortably. Now carefully paint some oil in the whole neck hole. This will help you to remove the green stuff you're going to place once it'sdry. After this, place the round plastic part you just sawed in its place,and fill with green stuff both it and the whole rest of the neck hole. Thiswill be the basis of the mouth, where you'll insert the jaws. Be careful to shape it in a manner that can easily let you take it out when you need to(you'll need something to help you do this anyway, I carefully use thesharp end of the sculpting tool every time, but I never stripped off any paint). Now take some of the spare spikes from the Carnifex sprue (orwhatever you like the ship to have as jaws), and carefully push them inplace. Use some sculpting tool to make green stuff cover them a bit, likeflesh would do in real teeth. This will help the piece you create to survive years of gaming. Let everything dry up well, and there you are! Youshould be able to remove quite easily the mouth piece from the neckhole, if you painted sufficient oil and shaped green stuff well. Go slowly when you remove the piece for the first time. By now itshouldn't be painted, so the chances of ruining it are few.
45
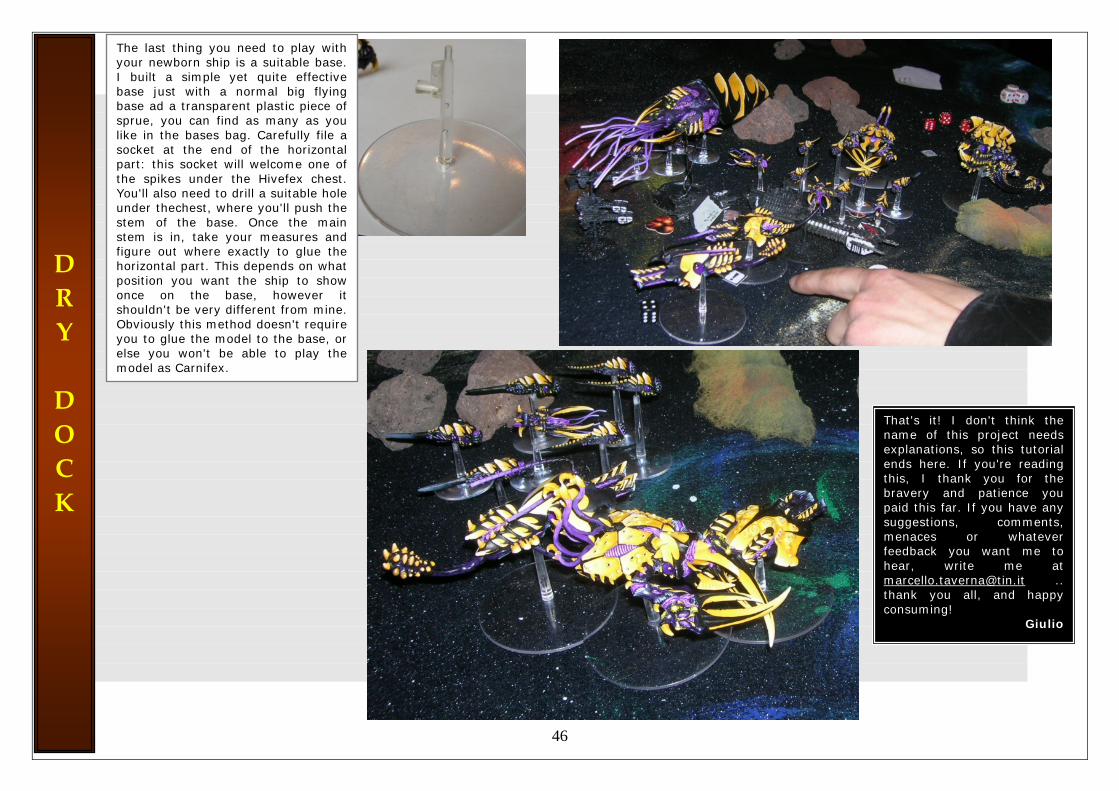
The last thing you need to play withyour newborn ship is a suitable base. I built a simple yet quite effectivebase just with a normal big flyingbase ad a transparent plastic piece ofsprue, you can find as many as youlike in the bases bag. Carefully file asocket at the end of the horizontalpart: this socket will welcome one of the spikes under the Hivefex chest.You'll also need to drill a suitable holeunder thechest, where you'll push thestem of the base. Once the mainstem is in, take your measures andfigure out where exactly to glue thehorizontal part. This depends on what position you want the ship to showonce on the base, however itshouldn't be very different from mine.Obviously this method doesn't requireyou to glue the model to the base, orelse you won't be able to play themodel as Carnifex.
D R Y
D
That's it! I don't think thename of this project needsexplanations, so this tutorialends here. If you're readingthis, I thank you for thebravery and patience youpaid this far. If you have anysuggestions, comments,menaces or whateverfeedback you want me tohear, write me at
O C K
[email protected] ..thank you all, and happyconsuming!
Giulio
46
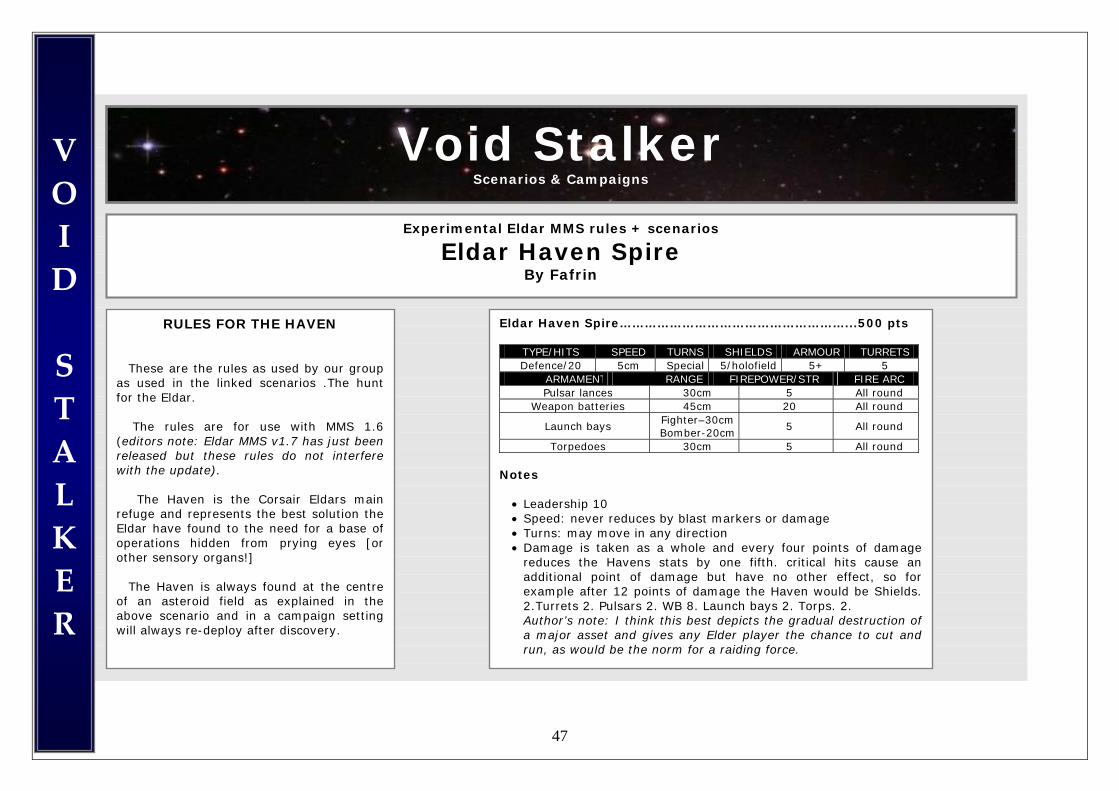
Void Stalker Scenarios & Campaigns
Experimental Eldar MMS rules + scenarios
Eldar Haven Spire By Fafrin
RULES FOR THE HAVEN
These are the rules as used by our group
as used in the linked scenarios .The huntfor the Eldar.
The rules are for use with MMS 1.6
(editors note: Eldar MMS v1.7 has just beenreleased but these rules do not interferewith the update).
The Haven is the Corsair Eldars main
refuge and represents the best solution theEldar have found to the need for a base ofoperations hidden from prying eyes [orother sensory organs!]
The Haven is always found at the centre
of an asteroid field as explained in theabove scenario and in a campaign settingwill always re-deploy after discovery.
Eldar Haven Spire………………………………………………...500 pts
TYPE/HITS SPEED TURNS SHIELDS ARMOUR TURRETS Defence/20 5cm Special 5/holofield 5+ 5
ARMAMENT RANGE FIREPOWER/STR FIRE ARC Pulsar lances 30cm 5 All round
Weapon batteries 45cm 20 All round
Launch bays Fighter–30cm Bomber-20cm
5 All round
Torpedoes 30cm 5 All round Notes
• Leadership 10 • Speed: never reduces by blast markers or damage • Turns: may move in any direction • Damage is taken as a whole and every four points of damage
reduces the Havens stats by one fifth. critical hits cause an additional point of damage but have no other effect, so for example after 12 points of damage the Haven would be Shields. 2.Turrets 2. Pulsars 2. WB 8. Launch bays 2. Torps. 2.
47
Author’s note: I think this best depicts the gradual destruction of a major asset and gives any Elder player the chance to cut and run, as would be the norm for a raiding force.
V O I D S T A L K E R
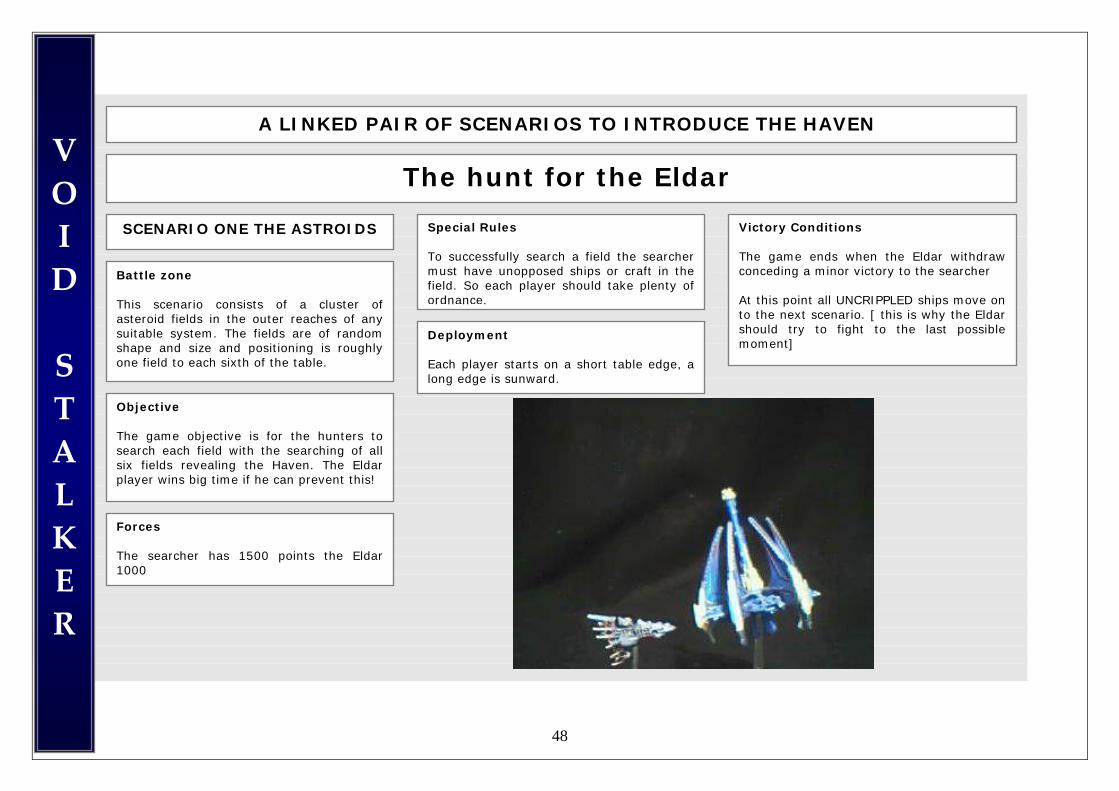
48
A LINKED PAIR OF SCENARIOS TO INTRODUCE THE HAVEN
The hunt for the Eldar
SCENARIO ONE THE ASTROIDS
Battle zone This scenario consists of a cluster ofasteroid fields in the outer reaches of anysuitable system. The fields are of randomshape and size and positioning is roughlyone field to each sixth of the table.
Objective The game objective is for the hunters tosearch each field with the searching of allsix fields revealing the Haven. The Eldarplayer wins big time if he can prevent this!
Forces The searcher has 1500 points the Eldar1000
Special Rules To successfully search a field the searchermust have unopposed ships or craft in thefield. So each player should take plenty of ordnance.
Deployment Each player starts on a short table edge, along edge is sunward.
Victory Conditions The game ends when the Eldar withdraw conceding a minor victory to the searcher At this point all UNCRIPPLED ships move on to the next scenario. [ this is why the Eldar should try to fight to the last possible moment]
V O I D S T A L K E R
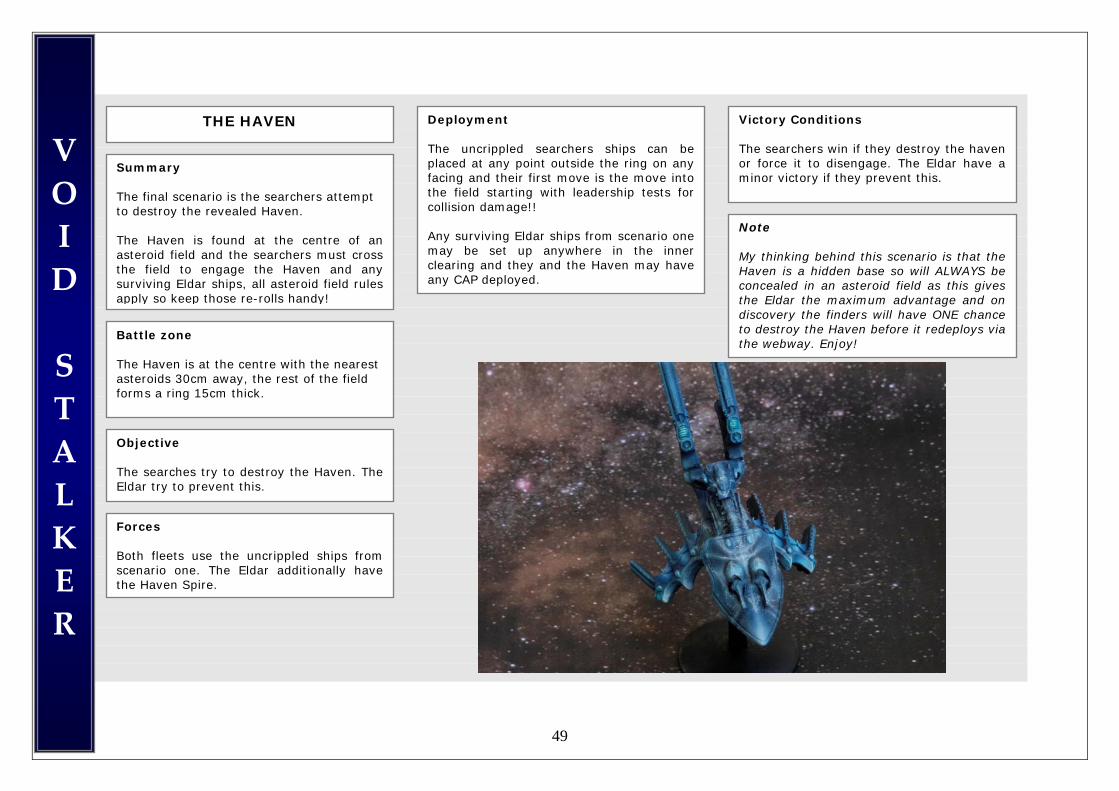
49
THE HAVEN
Battle zone The Haven is at the centre with the nearest asteroids 30cm away, the rest of the field forms a ring 15cm thick.
Objective The searches try to destroy the Haven. TheEldar try to prevent this.
Forces Both fleets use the uncrippled ships fromscenario one. The Eldar additionally havethe Haven Spire.
Deployment The uncrippled searchers ships can be placed at any point outside the ring on anyfacing and their first move is the move intothe field starting with leadership tests forcollision damage!! Any surviving Eldar ships from scenario onemay be set up anywhere in the innerclearing and they and the Haven may haveany CAP deployed.
Victory Conditions The searchers win if they destroy the haven or force it to disengage. The Eldar have a minor victory if they prevent this.
Summary The final scenario is the searchers attempt to destroy the revealed Haven. The Haven is found at the centre of an asteroid field and the searchers must crossthe field to engage the Haven and anysurviving Eldar ships, all asteroid field rulesapply so keep those re-rolls handy!
Note My thinking behind this scenario is that the Haven is a hidden base so will ALWAYS be concealed in an asteroid field as this gives the Eldar the maximum advantage and on discovery the finders will have ONE chance to destroy the Haven before it redeploys via the webway. Enjoy!
V O I D S T A L K E R
FLAME ON! BATTLEFLEET GOTHIC TOURNAMENT
The 'Flame On! Battlefleet Gothic [of the chumps] Tournament 2007' takes place at Warhammer World, Lenton (Nottingham, UK - GW HQ!) on the 21st of June 2008.
v1 Rules Packs and further information and discussion is available from the Flame On! website at
http://www.flameon.co.uk/forum/viewtopic.php?t=5124.
T O U R N A M E N T