Embed Size (px)
Citation preview
Wa r f a r e i n t h e M i d d l e A g e s
RULE BOOK
GMT Games, LLCP.O. Box 1308, Hanford, CA 93232-1308www.GMTGames.com
Table of Contents
Rules Version 1.2 (1.1 in red, 1.2 in blue)
1.0 Introduction ...................................................... 22.0 The Components .............................................. 23.0 Sequence of Play .............................................. 44.0 Activation and Continuity ................................ 45.0 Movement ........................................................ 46.0 Facing ............................................................... 57.0 Zones of Control (ZOC) ................................... 68.0 Stacking ............................................................ 69.0 Missile Fire ....................................................... 7
10.0 Shock .............................................................. 811.0 Charging ......................................................... 1012.0 Combat Results .............................................. 1113.0 Rallying Units ................................................ 1214.0 Special Units and Tactics ............................... 1315.0 Leaders ........................................................... 1316.0 Victory ............................................................ 1417.0 Index ............................................................... 15Extended Sequence of Play .................................... 16
Men of Iron
© 2005 GMT Games, LLC Living Rules Version 1.2 05/11/2013
2
1.0 INTRODUCTION Men of Iron is a play-oriented series of games covering the wide spectrum of land battles from The Dark Ages to the arrival of gunpowder.
The first volume in the series, “The Rebirth of Infantry” focuses on the major battles of the earlier years of the 14th century in Western Europe, mostly before the Black Plague wiped out much of the available manpower. This era also saw a revival in the supremacy of foot troops, using defensive tactics and missile weapons against the massive power of charging, heavily armored cavalry.
The purpose of the Men of Iron series is to provide gamers with accessible, fast-playing, fun games of low complexity. To that end, much detail has been either omitted or factored in to the overall mechanics. We have tried to provide as much period flavor and historical accuracy as we can, within that stated focus.
Getting into the Game: Veteran gamers will find most of the rules quite familiar, as they use concepts basic to almost all simulation games. The sections on Continuity and some of the combat mechanics are not quite so familiar. Gamers new to the hobby should read once through the rules, so they know the basic premises, pick out a scenario, and play a few player turns to see how everything works.
Style of Play: Because of the nature of warfare at this time— al-most all battles were set piece affairs; meeting engagements were almost unknown, and thus you have one mobile attacker and one stand-in-place defender—the battles lend themselves quite well to solitaire play. This doesn’t mean they aren’t competitive. We’re just letting you know that, in many cases, the defender historically made little movement.
Each game includes: • Two 22” x 32” map sheets containing 6 game-maps • 700 counters on 3 sheets • 3 Play Aid cards • 1 Rules Booklet • 1 Battle Book • 2 ten-sided dice
2.0 THE COMPONENTS 2.1 THE MAPS The game maps cover the area over which the battles (suppos-edly) were fought. The map is overlaid with a grid of hexagons— hexes—that are used to regulate movement and fire.
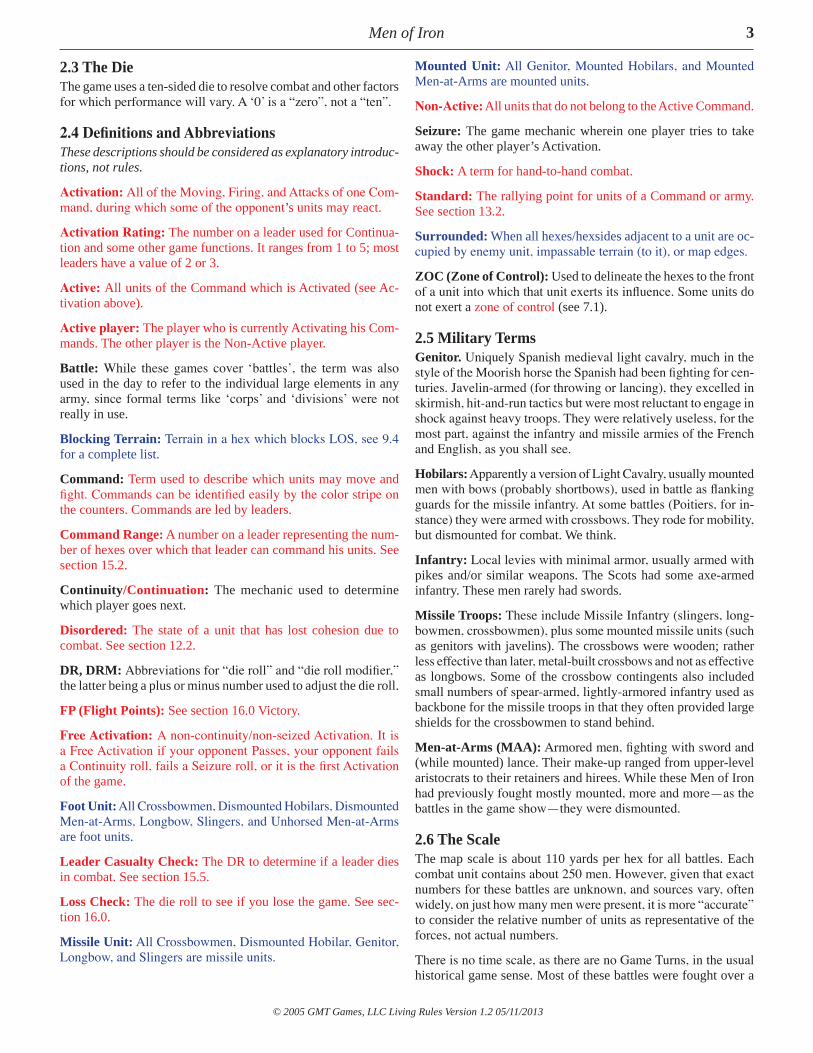
2.2 THE COUNTERS There are four types of counters: Leaders, Combat units, Stan-dards, and Status markers (Retired, Disordered, etc.).
There are eight different types of combat units: Missile Infantry, Pike Infantry, Axe Infantry, Mounted men-at-Arms, Unhorsed Men-at-Arms, Dismounted Men-at-Arms, Hobilars and Genitors.
Mounted Men-at-Arms (MM)
Unhorsed Men-at-Arms (UH)
Dismounted Men-at-Arms (DM)
Crossbowmen(CB)
ActivationCommand RangeMovement Allowance
Name
Sample Leader
Shock DRMLB = LongbowMovement Allowance
Unit ID Number
Command Stripe
Sample Combat Unit (Missile Infantry)Front
Disordered Symbol–1 Fire DRM reminder
Back (disordered side)
ShieldWall
Out ofCommand
Flight Points
Retired Standard Wagon(Poitiers)
Bombard(Crecy)
Schiltron
Genitors(GE)
Slingers(SL)
Pike Infantry(PK)
Markers
Other Combat Units
© 2005 GMT Games, LLC Living Rules Version 1.2 05/11/2013
Men of Iron 3
2.3 The DieThe game uses a ten-sided die to resolve combat and other factors for which performance will vary. A ‘0’ is a “zero”, not a “ten”.
2.4 Definitions and Abbreviations These descriptions should be considered as explanatory introduc-tions, not rules.
Activation: All of the Moving, Firing, and Attacks of one Com-mand, during which some of the opponent’s units may react.
Activation Rating: The number on a leader used for Continua-tion and some other game functions. It ranges from 1 to 5; most leaders have a value of 2 or 3.
Active: All units of the Command which is Activated (see Ac-tivation above).
Active player: The player who is currently Activating his Com-mands. The other player is the Non-Active player.
Battle: While these games cover ‘battles’, the term was also used in the day to refer to the individual large elements in any army, since formal terms like ‘corps’ and ‘divisions’ were not really in use.
Blocking Terrain: Terrain in a hex which blocks LOS, see 9.4 for a complete list.
Command: Term used to describe which units may move and fight. Commands can be identified easily by the color stripe on the counters. Commands are led by leaders.
Command Range: A number on a leader representing the num-ber of hexes over which that leader can command his units. See section 15.2.
Continuity/Continuation: The mechanic used to determine which player goes next.
Disordered: The state of a unit that has lost cohesion due to combat. See section 12.2.
DR, DRM: Abbreviations for “die roll” and “die roll modifier,” the latter being a plus or minus number used to adjust the die roll.
FP (Flight Points): See section 16.0 Victory.
Free Activation: A non-continuity/non-seized Activation. It is a Free Activation if your opponent Passes, your opponent fails a Continuity roll, fails a Seizure roll, or it is the first Activation of the game.
Foot Unit: All Crossbowmen, Dismounted Hobilars, Dismounted Men-at-Arms, Longbow, Slingers, and Unhorsed Men-at-Arms are foot units.
Leader Casualty Check: The DR to determine if a leader dies in combat. See section 15.5.
Loss Check: The die roll to see if you lose the game. See sec-tion 16.0.
Missile Unit: All Crossbowmen, Dismounted Hobilar, Genitor, Longbow, and Slingers are missile units.
Mounted Unit: All Genitor, Mounted Hobilars, and Mounted Men-at-Arms are mounted units.
Non-Active: All units that do not belong to the Active Command.
Seizure: The game mechanic wherein one player tries to take away the other player’s Activation.
Shock: A term for hand-to-hand combat.
Standard: The rallying point for units of a Command or army. See section 13.2.
Surrounded: When all hexes/hexsides adjacent to a unit are oc-cupied by enemy unit, impassable terrain (to it), or map edges.
ZOC (Zone of Control): Used to delineate the hexes to the front of a unit into which that unit exerts its influence. Some units do not exert a zone of control (see 7.1).
2.5 Military TermsGenitor. Uniquely Spanish medieval light cavalry, much in the style of the Moorish horse the Spanish had been fighting for cen-turies. Javelin-armed (for throwing or lancing), they excelled in skirmish, hit-and-run tactics but were most reluctant to engage in shock against heavy troops. They were relatively useless, for the most part, against the infantry and missile armies of the French and English, as you shall see.
Hobilars: Apparently a version of Light Cavalry, usually mounted men with bows (probably shortbows), used in battle as flanking guards for the missile infantry. At some battles (Poitiers, for in-stance) they were armed with crossbows. They rode for mobility, but dismounted for combat. We think.
Infantry: Local levies with minimal armor, usually armed with pikes and/or similar weapons. The Scots had some axe-armed infantry. These men rarely had swords.
Missile Troops: These include Missile Infantry (slingers, long-bowmen, crossbowmen), plus some mounted missile units (such as genitors with javelins). The crossbows were wooden; rather less effective than later, metal-built crossbows and not as effective as longbows. Some of the crossbow contingents also included small numbers of spear-armed, lightly-armored infantry used as backbone for the missile troops in that they often provided large shields for the crossbowmen to stand behind.
Men-at-Arms (MAA): Armored men, fighting with sword and (while mounted) lance. Their make-up ranged from upper-level aristocrats to their retainers and hirees. While these Men of Iron had previously fought mostly mounted, more and more—as the battles in the game show—they were dismounted.
2.6 The Scale The map scale is about 110 yards per hex for all battles. Each combat unit contains about 250 men. However, given that exact numbers for these battles are unknown, and sources vary, often widely, on just how many men were present, it is more “accurate” to consider the relative number of units as representative of the forces, not actual numbers.
There is no time scale, as there are no Game Turns, in the usual historical game sense. Most of these battles were fought over a
Men of Iron
© 2005 GMT Games, LLC Living Rules Version 1.2 05/11/2013
4
short period of time in one day.
3.0 SEQUENCE OF PLAY There are no game-turns in Men of Iron. The game starts and keeps going until one player wins. To do this, the system uses a Continuation Activation mechanic; see 4.0.
3.1 When It Is Your Activation When activated, a Command’s units may Move and/or Fire, and, after all Movement/Fire is completed, they may Shock Attack.
3.2 When an Activation is Finished When a Command has finished, that player selects another of his Commands (but not the Command that just went), giving his opponent the opportunity to Seize Continuity (see 4.0), and rolls the die:
1. If the DR is the same as or lower than the selected Command leader’s Activation Rating, that Command is Activated.
2. If the DR is higher than that rating, “play” passes to his oppo-nent, who now has a Free Activation that he may use to Activate any one Command he wishes, no DR necessary.
Play continues in this manner until one or both players fail their Loss Check (see 16.0).
3.3 Commands Commands for each battle are identified by the color stripe across the counter bottom, corresponding to that atop the leader’s counter.
3.4 Who Starts the Game? The player/army that goes first is listed for each battle in The Battle Book.
4.0 ACTIVATION AND CONTINUITY4.1 Activation When a Command is activated, all units and leaders in the Acti-vated Command may Move and/or Fire. After all movement/fire has been completed, units eligible to do so may Shock Attack or Charge.
When the player designates a Command for activation, the player may use some or all of that Command’s units, regardless of where they are on the map. See 15.2 for Command Range restrictions.
A Player may always “Pass”, instead of activating a Command. If he does that, it is treated as if he failed a Continuity dieroll.
4.2 Continuity After the Active player has completed his Activation, he may at-tempt to continue his “turn” by selecting another of his Commands to Activate. The selected Command may not be the Command that just completed Activation, unless the player has only one Command. A player may instead Pass; this is treated as a Failed Continuation DR. After the Active player has made his selection,
his opportunity to Seize Continuity (see 4.3). If the Non-Active player declines, the Active player notes the Activation Rating of the Command’s leader and rolls the die:
1. If the dieroll is the same as or lower than the selected Com-mand leader’s Activation Rating, that Command is activated.
2. If the dieroll is higher than that rating “play” passes to his opponent, who may now activate any one Command he wishes, no DR necessary.
After his first successful Continuation DR, a player adds one (+1) to his Continuation DR for each new such attempt. This penalty resets when he fails a Continuation DR, his opponent attempts to Seize Continuity (successfully or not), or he passes.
4.3 Seizing Continuity If a Player is about to DR for Continuity, his opponent may at-tempt to Seize the Continuity before the former rolls the die. Instead, the Non-Active player announces with which Command he will attempt the Seizure, rolls the die, and consults that Com-mand’s leader’s Activation Rating:
• If the DR is the same as or lower than that rating, the dierolling player has Seized play from his opponent, and the selected Command may undertake actions, and that Player now has the “initiative”.
PLAY NOTE: You cannot Seize a Seizure.
• If the DR is higher, there is no Seizure. In addition, the original activated Player gets a Free Activation (2.4) and may activate even the Command that just went—without dierolling.
EXAMPLE: [Crecy] The French start Crecy by activating Cross-bowmen under Doria’s command. They perform their actions, and the French Player now decides to activate Grimaldi’s Crossbow-men. However, he rolls a ‘7’, which is higher than Grimaldi’s Activation Rating, so play—and a free Activation— passes to the English. The English player now activates (without any dieroll) Godfrey’s Longbow troops. They complete their actions, and the English player decides he wants to move King Edward’s com-mand. However, before he can roll, the French Player elects to Seize play with Alencon’s Mounted Men-at-Arms. He rolls a ‘5’, though, and the Seizure fails. The English, given a free activation by this failure, now activate, again, Godfrey’s Longbow.
5.0 MOVEMENT5.1 Movement ProcedureUnits and leaders Move and/or Fire in the Move/Fire Phase. Indi-vidual units from the Activated Command may move in whatever order the player wishes; each unit, and any stacked leader moving with it, must complete its Move and/or Fire before another may begin its movement. See 9.0 for when missile units may Fire.
Each unit and leader has a Movement Allowance, representing the number of Movement Points (MP) a unit may expend in one Activation. The costs to enter the various types of hexes and cross certain types of hexsides are listed on the Terrain Effects Chart for the individual battle. Roads negate other terrain in the hex for movement, except elevation changes.
© 2005 GMT Games, LLC Living Rules Version 1.2 05/11/2013
Men of Iron 5
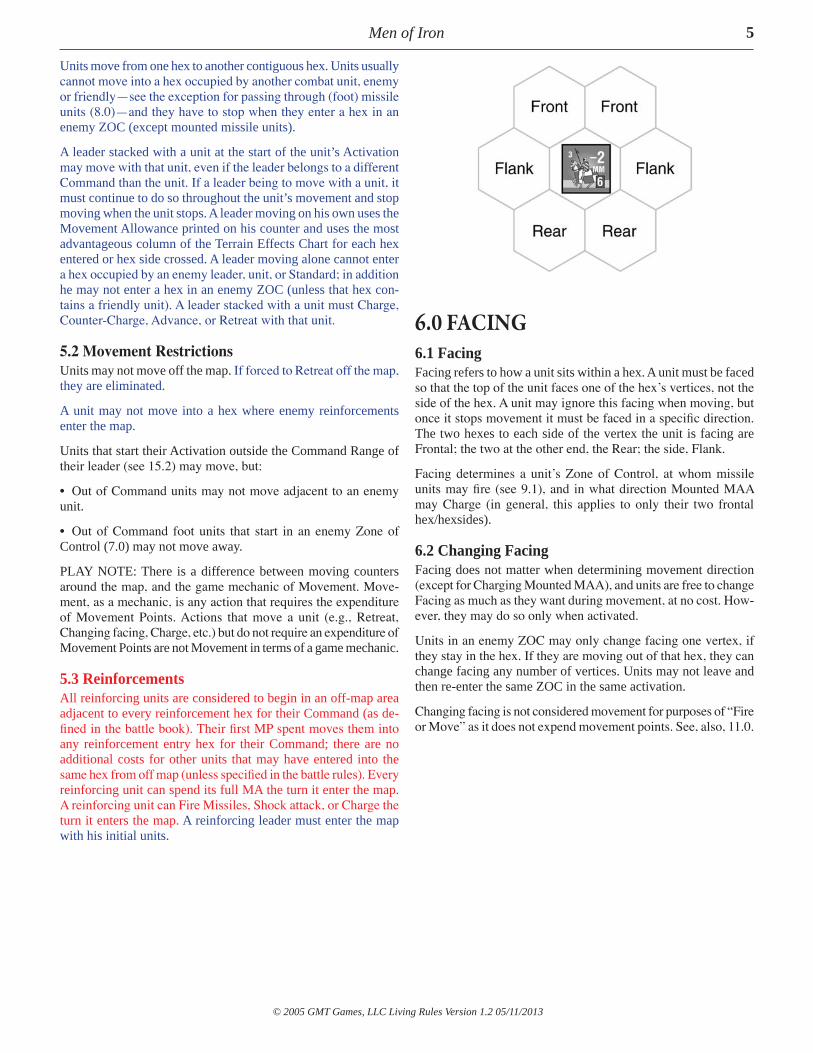
6.0 FACING 6.1 Facing Facing refers to how a unit sits within a hex. A unit must be faced so that the top of the unit faces one of the hex’s vertices, not the side of the hex. A unit may ignore this facing when moving, but once it stops movement it must be faced in a specific direction. The two hexes to each side of the vertex the unit is facing are Frontal; the two at the other end, the Rear; the side, Flank.
Facing determines a unit’s Zone of Control, at whom missile units may fire (see 9.1), and in what direction Mounted MAA may Charge (in general, this applies to only their two frontal hex/hexsides).
6.2 Changing Facing Facing does not matter when determining movement direction (except for Charging Mounted MAA), and units are free to change Facing as much as they want during movement, at no cost. How-ever, they may do so only when activated.
Units in an enemy ZOC may only change facing one vertex, if they stay in the hex. If they are moving out of that hex, they can change facing any number of vertices. Units may not leave and then re-enter the same ZOC in the same activation.
Changing facing is not considered movement for purposes of “Fire or Move” as it does not expend movement points. See, also, 11.0.
Units move from one hex to another contiguous hex. Units usually cannot move into a hex occupied by another combat unit, enemy or friendly—see the exception for passing through (foot) missile units (8.0)—and they have to stop when they enter a hex in an enemy ZOC (except mounted missile units).
A leader stacked with a unit at the start of the unit’s Activation may move with that unit, even if the leader belongs to a different Command than the unit. If a leader being to move with a unit, it must continue to do so throughout the unit’s movement and stop moving when the unit stops. A leader moving on his own uses the Movement Allowance printed on his counter and uses the most advantageous column of the Terrain Effects Chart for each hex entered or hex side crossed. A leader moving alone cannot enter a hex occupied by an enemy leader, unit, or Standard; in addition he may not enter a hex in an enemy ZOC (unless that hex con-tains a friendly unit). A leader stacked with a unit must Charge, Counter-Charge, Advance, or Retreat with that unit.
5.2 Movement Restrictions Units may not move off the map. If forced to Retreat off the map, they are eliminated.
A unit may not move into a hex where enemy reinforcements enter the map.
Units that start their Activation outside the Command Range of their leader (see 15.2) may move, but:
• Out of Command units may not move adjacent to an enemy unit.
• Out of Command foot units that start in an enemy Zone of Control (7.0) may not move away.
PLAY NOTE: There is a difference between moving counters around the map, and the game mechanic of Movement. Move-ment, as a mechanic, is any action that requires the expenditure of Movement Points. Actions that move a unit (e.g., Retreat, Changing facing, Charge, etc.) but do not require an expenditure of Movement Points are not Movement in terms of a game mechanic.
5.3 ReinforcementsAll reinforcing units are considered to begin in an off-map area adjacent to every reinforcement hex for their Command (as de-fined in the battle book). Their first MP spent moves them into any reinforcement entry hex for their Command; there are no additional costs for other units that may have entered into the same hex from off map (unless specified in the battle rules). Every reinforcing unit can spend its full MA the turn it enter the map. A reinforcing unit can Fire Missiles, Shock attack, or Charge the turn it enters the map. A reinforcing leader must enter the map with his initial units.
Men of Iron
© 2005 GMT Games, LLC Living Rules Version 1.2 05/11/2013
6
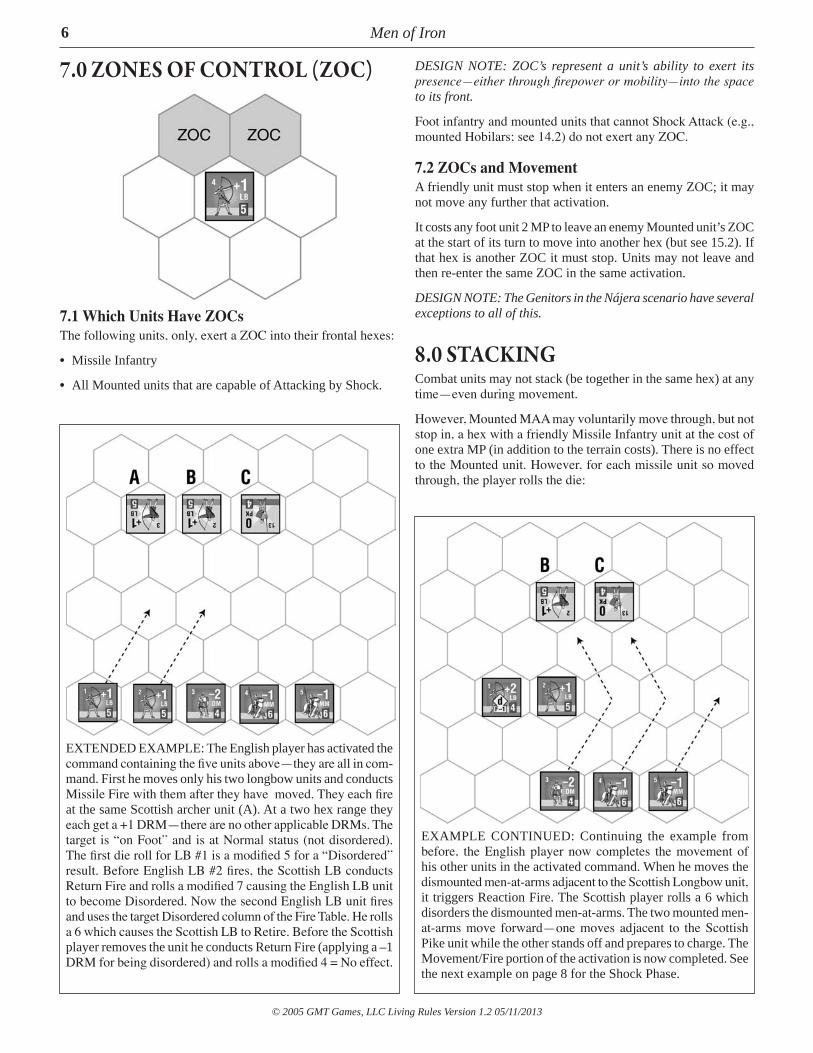
7.0 ZONES OF CONTROL (ZOC)
7.1 Which Units Have ZOCs The following units, only, exert a ZOC into their frontal hexes:
• Missile Infantry
• All Mounted units that are capable of Attacking by Shock.
DESIGN NOTE: ZOC’s represent a unit’s ability to exert its presence—either through firepower or mobility—into the space to its front.
Foot infantry and mounted units that cannot Shock Attack (e.g., mounted Hobilars; see 14.2) do not exert any ZOC.
7.2 ZOCs and Movement A friendly unit must stop when it enters an enemy ZOC; it may not move any further that activation.
It costs any foot unit 2 MP to leave an enemy Mounted unit’s ZOC at the start of its turn to move into another hex (but see 15.2). If that hex is another ZOC it must stop. Units may not leave and then re-enter the same ZOC in the same activation.
DESIGN NOTE: The Genitors in the Nájera scenario have several exceptions to all of this.
8.0 STACKING Combat units may not stack (be together in the same hex) at any time—even during movement.
However, Mounted MAA may voluntarily move through, but not stop in, a hex with a friendly Missile Infantry unit at the cost of one extra MP (in addition to the terrain costs). There is no effect to the Mounted unit. However, for each missile unit so moved through, the player rolls the die:
EXTENDED EXAMPLE: The English player has activated the command containing the five units above—they are all in com-mand. First he moves only his two longbow units and conducts Missile Fire with them after they have moved. They each fire at the same Scottish archer unit (A). At a two hex range they each get a +1 DRM—there are no other applicable DRMs. The target is “on Foot” and is at Normal status (not disordered). The first die roll for LB #1 is a modified 5 for a “Disordered” result. Before English LB #2 fires, the Scottish LB conducts Return Fire and rolls a modified 7 causing the English LB unit to become Disordered. Now the second English LB unit fires and uses the target Disordered column of the Fire Table. He rolls a 6 which causes the Scottish LB to Retire. Before the Scottish player removes the unit he conducts Return Fire (applying a –1 DRM for being disordered) and rolls a modified 4 = No effect.
EXAMPLE CONTINUED: Continuing the example from before, the English player now completes the movement of his other units in the activated command. When he moves the dismounted men-at-arms adjacent to the Scottish Longbow unit, it triggers Reaction Fire. The Scottish player rolls a 6 which disorders the dismounted men-at-arms. The two mounted men-at-arms move forward—one moves adjacent to the Scottish Pike unit while the other stands off and prepares to charge. The Movement/Fire portion of the activation is now completed. See the next example on page 8 for the Shock Phase.
© 2005 GMT Games, LLC Living Rules Version 1.2 05/11/2013
Men of Iron 7
• If that dieroll is a 0–4, the Missile Unit is Disordered. If it is already Disordered, it is Retired.
• If that dieroll is a 5–9, nothing happens.
This rule does not apply to Retreats (which have a separate ap-plication; see below) or Retire results.
HISTORICAL NOTE: Virtually all Men at Arms—knights—of this era were aristocrats. Foot units, and especially archers of all types, came from classes far lower than that, and the knights treated archers with undisguised contempt. (Killing from a dis-tance was not manly). Knights felt absolutely no compunction on riding through masses of their own archers or crossbowmen— as occurred, for example, at Creçy—and, if necessary, riding them down.
Leaders stack freely with any unit. Standards and markers have no effect on stacking.
9.0 MISSILE FIRE 9.1 Missile units Longbow, Crossbow, Genitors and the Spanish Slingers are capable of firing at enemy units (not lone leaders). The Range for each type of missile weapon, listed on the Fire DRM Table, is the maximum number of hexes over which that unit may fire. You count the target hex, but not the firing hex. Missile units may fire through their frontal and flank hexsides (6.0), although when using Reaction fire, that is limited to Frontal hex fire. A LOS that passes down a hex spine between Flank and Rear counts as Rear for missile fire, this means that a missile unit may not fire down those hex spines or use Return Fire if it is fired at down those hex spines. Archers may fire over other units (see 9.4).
HISTORICAL NOTE: Jim Bradbury, author of the excellent study of the “Medieval Archer,” states that the term “Longbow” applied not to a different type of bow-and-arrow system, but to a bow that was simply longer (taller) than what we would call a Shortbow. They worked just the same. (The Asian steppe tribe bows were shortbows, but they were constructed somewhat differently than European bows.) Exactly when a Shortbow became a Longbow is an open question. It is most likely that, by the time of this game, all bows in the armies in question were “longbows”.
9.2 When Units may Fire Mounted Missile units may fire before, as part of (during), or after Movement. Missile infantry may fire only after they have finished Movement.
There are three opportunities for Missile Fire, each one avail-able depending on the unit type: Active Fire, Return Fire and Reaction Fire. Longbows, Genitors and Slingers may fire: • Active Fire: when they are Activated. A unit may fire once
when its Command is activated.
• Return Fire: When fired at by an enemy Missile unit, if the latter is within Range. The Return Fire and the Active Fire are resolved simultaneously, before any results are applied. A Missile unit cannot Return Fire if shot at through a Rear hex.
• Reaction Fire: When any enemy unit moves (expends move-ment points) or Charges (including Counter-Charge) into its adjacent ZOC/frontal hexes. This applies to each enemy unit that does so. Retreat, Advance, or Continued Attack do not trigger Reaction Fire.
Crossbow Units may fire:
• Active Fire: when they are Activated. A unit may fire once when its command is activated.
• Reaction Fire: When an enemy unit moves (expends move-ment points) or Charges into its adjacent ZOC/frontal hexes. This applies to only one enemy unit that does so in a given activation. Retreat, Advance, or Continued Attack do not trig-ger Reaction Fire.
Crossbows may not use Return Fire.
PLAY NOTE: Hobilars are not included in this list because they carry one of the listed bow types. And, while it looks like the unavailability of return fire to Crossbows is not that significant (relatively), it has major effect on the tactics employed.
HISTORICAL NOTE: The rate of fire for Longbows was markedly greater than that of Crossbows, from 3–1 to 7–1, depending on who you read. The above rules reflect that difference. We note, tan-gentially, that the rate of fire for Asian Steppe tribe shortbows was much greater than that of their European longbow counterparts.
Each unit fires individually, and each unit may fire at only one target (within range and Line of Sight—see below) at a time. Non-Active units using Reaction or Return Fire may fire at each enemy unit that becomes “eligible,” as per above (exception: Crossbows). When a missile unit prompts Reaction Fire, the reacting unit gets to fire BEFORE the activated unit gets to fire because it is reacting to the movement.
DESIGN NOTE: These mechanics represent the more efficient usage missiles had defensively than on the attack.
9.3 Resolving Fire To Fire, check the range and consult the Fire Range Chart. The Chart gives any DRM for that status at that Range. Example: A Longbow firing at a range of 1 hex gets a DRM of +2.
Now roll one die, noting whether the target is Mounted or on foot, and Disordered or in normal status, and using the appropriate section of the table. The Fire Table lists all of the circumstances that provide additions or subtractions (DRM) from the dieroll.
Compare the adjusted dieroll to the Fire Table to get the result, as defined in 12.0.
If a target is being fired at by more than one unit, results are applied for each individual firing unit as they occur, but they are cumula-tive. During Reaction Fire, if multiple units react to a single unit, the firing player chooses the order of fire resolution and results are applied immediately, as they occur. The instant the unit is no longer in the hex that caused the Reaction Fire (due to Retreat, Retire, or Elimination), Reaction Fire ends.
EXAMPLE: Target being Reaction Fired at by 3 units. First result is a Disorder. Second result uses the Disorder portion of the Fire Table and is a Retreat. The target must Retreat and the 3rd unit
Men of Iron
© 2005 GMT Games, LLC Living Rules Version 1.2 05/11/2013
8
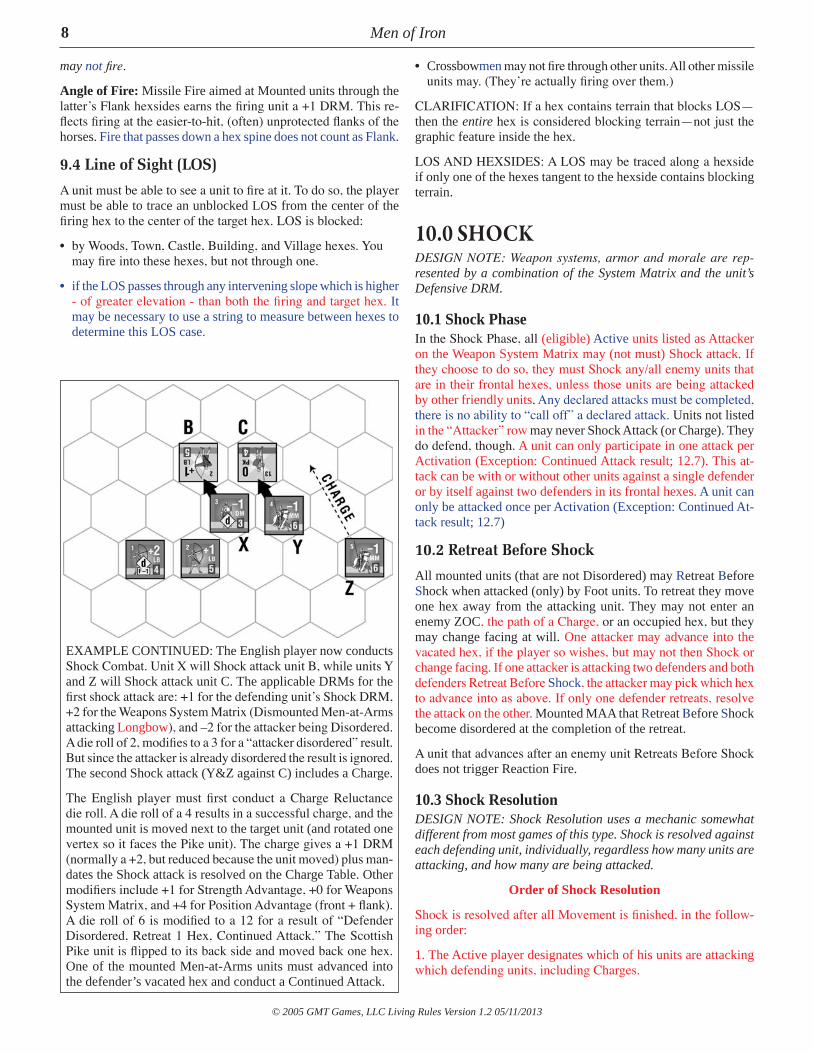
EXAMPLE CONTINUED: The English player now conducts Shock Combat. Unit X will Shock attack unit B, while units Y and Z will Shock attack unit C. The applicable DRMs for the first shock attack are: +1 for the defending unit’s Shock DRM, +2 for the Weapons System Matrix (Dismounted Men-at-Arms attacking Longbow), and –2 for the attacker being Disordered. A die roll of 2, modifies to a 3 for a “attacker disordered” result. But since the attacker is already disordered the result is ignored. The second Shock attack (Y&Z against C) includes a Charge.
The English player must first conduct a Charge Reluctance die roll. A die roll of a 4 results in a successful charge, and the mounted unit is moved next to the target unit (and rotated one vertex so it faces the Pike unit). The charge gives a +1 DRM (normally a +2, but reduced because the unit moved) plus man-dates the Shock attack is resolved on the Charge Table. Other modifiers include +1 for Strength Advantage, +0 for Weapons System Matrix, and +4 for Position Advantage (front + flank). A die roll of 6 is modified to a 12 for a result of “Defender Disordered, Retreat 1 Hex, Continued Attack.” The Scottish Pike unit is flipped to its back side and moved back one hex. One of the mounted Men-at-Arms units must advanced into the defender’s vacated hex and conduct a Continued Attack.
may not fire.
Angle of Fire: Missile Fire aimed at Mounted units through the latter’s Flank hexsides earns the firing unit a +1 DRM. This re-flects firing at the easier-to-hit, (often) unprotected flanks of the horses. Fire that passes down a hex spine does not count as Flank.
9.4 Line of Sight (LOS)
A unit must be able to see a unit to fire at it. To do so, the player must be able to trace an unblocked LOS from the center of the firing hex to the center of the target hex. LOS is blocked:
• by Woods, Town, Castle, Building, and Village hexes. You may fire into these hexes, but not through one.
• if the LOS passes through any intervening slope which is higher - of greater elevation - than both the firing and target hex. It may be necessary to use a string to measure between hexes to determine this LOS case.
• Crossbowmen may not fire through other units. All other missile units may. (They’re actually firing over them.)
CLARIFICATION: If a hex contains terrain that blocks LOS— then the entire hex is considered blocking terrain—not just the graphic feature inside the hex.
LOS AND HEXSIDES: A LOS may be traced along a hexside if only one of the hexes tangent to the hexside contains blocking terrain.
10.0 SHOCK DESIGN NOTE: Weapon systems, armor and morale are rep-resented by a combination of the System Matrix and the unit’s Defensive DRM.
10.1 Shock Phase In the Shock Phase, all (eligible) Active units listed as Attacker on the Weapon System Matrix may (not must) Shock attack. If they choose to do so, they must Shock any/all enemy units that are in their frontal hexes, unless those units are being attacked by other friendly units. Any declared attacks must be completed, there is no ability to “call off” a declared attack. Units not listed in the “Attacker” row may never Shock Attack (or Charge). They do defend, though. A unit can only participate in one attack per Activation (Exception: Continued Attack result; 12.7). This at-tack can be with or without other units against a single defender or by itself against two defenders in its frontal hexes. A unit can only be attacked once per Activation (Exception: Continued At-tack result; 12.7)
10.2 Retreat Before Shock
All mounted units (that are not Disordered) may Retreat Before Shock when attacked (only) by Foot units. To retreat they move one hex away from the attacking unit. They may not enter an enemy ZOC, the path of a Charge, or an occupied hex, but they may change facing at will. One attacker may advance into the vacated hex, if the player so wishes, but may not then Shock or change facing. If one attacker is attacking two defenders and both defenders Retreat Before Shock, the attacker may pick which hex to advance into as above. If only one defender retreats, resolve the attack on the other. Mounted MAA that Retreat Before Shock become disordered at the completion of the retreat.
A unit that advances after an enemy unit Retreats Before Shock does not trigger Reaction Fire.
10.3 Shock Resolution DESIGN NOTE: Shock Resolution uses a mechanic somewhat different from most games of this type. Shock is resolved against each defending unit, individually, regardless how many units are attacking, and how many are being attacked.
Order of Shock Resolution
Shock is resolved after all Movement is finished, in the follow-ing order:
1. The Active player designates which of his units are attacking which defending units, including Charges.
© 2005 GMT Games, LLC Living Rules Version 1.2 05/11/2013
Men of Iron 9
2. One at a time, the Active player moves each Charging unit adjacent to its target. Any Reaction fire caused by this move is re-solved. If required, the Charging unit makes a Charge Reluctance roll. Any Retreat Before Combat by the defender is resolved at this time. The defender attempts any Counter-Charges of which he is capable.
3. The Active player resolves all his Shock and Charge attacks, in any order he wishes. The Charge Table is used as long as at least half of the units in an individual attack succeeded in Charging (not Disordered by Reaction Fire, not Reluctant, not Counter-Charged); otherwise the Shock Table is used. Advances are taken and Continued Attacks are noted. When multiple attacking units are involved in an attack, any negative combat results apply to all attacking units (Disorders, etc.).
PLAY NOTE: Attacks by a single attacker against multiple de-fenders are resolved at the same time, and they are considered to be going on simultaneously, with results (which can be cumula-tive) applied after both attacks are resolved.
4. All Continued Attacks are now resolved. Begin again at Step 1, except that only units that earned a Continued Attack Shock and they must Shock; Charging and Counter-Charging is not allowed.
EXAMPLE 1: If 1 unit is attacking 2 units, the attacker will roll twice, each with a –1 DRM, and undergo possibly cumulative adverse results.
EXAMPLE 2: A Mounted MAA unit Charges two Pike units. In resolving each defender separately, the Mounted MAA gets a Continue Attack against the first, but is Disordered in the second combat. The Mounted MAA must then Continue Attacking as Shock, but Disordered.
10.4 Shock DRMs Apply any DRMs attained from the following situations.
1. Strength Advantage2. Position Advantage 3. The Defender’s Defense DRM 4. Charging/Counter-Charging Mounted Men-at-Arms 5. Leader Presence 6. Weapon System Matrix 7. Attacker Status (Disorder) 8. Defender Retired 9. Defensive Formations
1. Strength Advantage: The player with the higher number of units receives the differential between the number of units as a DRM.
EXAMPLE: One Men-at-Arms unit attacks two Missile units. There is a –1 Strength (dis-) Advantage DRM to both rolls of the Shock resolution.
2. Position Advantage: There are 3 types:
A. ANGLE OF ATTACK: This reflects the advantage of attacking from an angle other than (only) frontally:
• If any Shock/charge attacking units are attacking through a defender’s Flank, there is a +2 DRM.
• If any Shock/charge attacking units are attacking through a Defender’s Rear, there is a +3 DRM.
• If the attackers are attacking through two or more sides (Front, Rear, Left Flank, or Right Flank) there is a +4 DRM (not cu-mulative with the other two DRMs above).
B. TERRAIN: See the individual Battle rules for the effects of Terrain on combat. The row for the defender’s terrain is used with the column for the attacker’s unit type (i.e. Mounted or Foot) to find the modifier for each attack. In some battles there are also modifiers for the attacker’s terrain. If more than one unit is being attacked, because the attacker is rolling the die separately for each defender, the attacker applies the terrain which that particular unit is in for that resolution. If there are two attackers to a single defending unit and each of the attackers would generate a different terrain DRM (Example: one Shocking unit is attacking across a river or slope and the other one is over clear ground), then the terrain DRM most favorable to the defender is used.
C. HEIGHT ADVANTAGE: The attacker suffers a –1 DRM if all attacking units are on lower level than the defending unit.
3. Shock Defense Rating: the defending unit’s—not the at-tacker’s—individual Shock Defense DRM Rating is added.
EXAMPLE: Men-at-Arms are attacking a Missile unit with a Defense DRM of +1. Add one to the Shock dieroll.
4. Charging/Counter-Charging Mounted Men-at-Arms: If any Mounted MAA unit is successfully charging (11.0), add two (+2) to the dieroll. However, if any Charging unit moved during its Activation, the DRM is +1 instead. Be sure to account for any successful Counter-Charges.
5. Leader Presence: If a leader is stacked with a Charging (or Counter-Charging) Mounted MAA unit there is a +1 DRM. This DRM only applies if the Mounted MAA is still marked with a Charge marker after Counter-Charges have been completed.
6. Weapon System Matrix: The Attacker uses the Weapons System Matrix to compare his Attacking unit type to that of the Defender. The matrix provides the appropriate DRM. If an attacker is doing so with multiple units of different types, he may use the DRM with the best benefit for the Attacker.
EXAMPLE: An axe-armed infantry attacking an Unhorsed Men-at-Arms unit would earn a +2 DRM. However, if an Unhorsed Men-at-Arms attacked an Axe unit, it would incur a –1 DRM.
7. Attacker Disorder: If one or more of the Attackers are Disor-dered, there is a –2 DRM. (Defender’s disorder status is covered by the chart itself.)
8. Defender Retired: If Defender is Retired, add two (+2) to the Attacker’s dieroll.
9. Defensive Formations: Units defending using Shield Wall or Schiltron get a negative DRM; see the individual rules for these.
All of the above are cumulative; “+” DRMs favor the Attacker; “ -” the Defender.

Men of Iron
© 2005 GMT Games, LLC Living Rules Version 1.2 05/11/2013
10
EXAMPLE CONTINUED: The Scottish Pike unit Retreated one hex and became Disordered. One of the Mounted MAA units must Advance (maintaining its facing [12.7]) and conduct a “Continued Attack.” The English player chooses unit Z which must make a Shock attack against all enemy units in its frontal hexes—the Longbow and the Disordered Pike unit. Note that the enemy Longbow unit cannot conduct Reaction Fire against a Continued Attack. This Shock attack must be resolved as two separate (but simultaneous) Shock Attacks vs. LONGBOW: The applicable DRMs are –1 for Strength Advantage (the Mounted MAA is attacking two units), +1 for the Longbow’s Shock DRM, +2 for a Shock Attack against a defender’s flank, and +3 for Weapon System Matrix. A die roll of 3 modifies to a 8 for a “Defender Disordered, Retreat 1 Hex” result. vs. PIKE: The applicable DRMs are –1 Strength Advantage, and +1 Defender’s Shock DRM. The defender is Disordered so the Disordered column is used. A die roll of 6 gives a “Defender Retired” result. The Pike unit is picked up and placed as close as possible to its Standard.
Since both defending units vacated their hexes, the Mounted Men-at-Arms unit must Advance into one of those vacated hexes (attacker’s choice).
10.5 Advance after Combat Advance is part of combat resolution and is undertaken after a unit has finished all of its attacks, if a defender vacates a hex as a result of a Shock or Charge attack. The attacker must, if possible, Advance one of his eligible attacking units into that hex. A unit is ineligible to Advance if:
• It is Disordered and did not earn a Continued Attack result (12.7).
• It would have to cross or enter terrain that it is prohibited from moving across or into.
If more than one unit attacked follow the priorities below to determine which unit must Advance.
1. A Charging unit2. A Mounted unit3. A non-Disordered unit
If a unit attacked more than one defender and both hexes are vacated, the attacker chooses which hex to Advance into. The
advancing unit may change its facing as it wishes after such advance (unless a Continued Attack resulted, in which case no facing change is allowed).
11.0 CHARGING DESIGN NOTE: This is the one rules section that you could con-sider complex. This is a result of the many and varied possibilities inherent in cavalry charges.
11.1 Charging in General For Mounted MAA to be truly effective they must Charge. Charge is not Movement; it is part of combat. A Mounted MAA that starts adjacent to an enemy unit may Shock that unit, but it is not charging. Disordered Mounted MAA may not Charge; they may Shock without a Charge. A Mounted MAA that starts its Activation adjacent to an enemy unit may not Charge during that Activation.
It helps to remember that Charge is just another form of Shock that uses a different Combat Results Table.
11.2 Benefits of Charge Charging Mounted MAA receive a +2 DRM when resolving combat, and the attack is resolved on the Charge Table (not the Shock Table). However, if the unit moved during its Activation, the DRM is only +1.
11.3 Charge Procedure To Charge, a Mounted MAA unit must start the Shock Phase with either one or two hexes between it and the target unit and have a LOS to the target hex. The path to the target must be through the unit’s frontal hexes and it may only change facing one vertex to reach the target which must end in the Charging unit’s frontal hexes. A Charge is a special form of Shock that targets only one unit, an exception to 10.1. If a Charging unit is Disordered during its Charge, the attack is resolved as a Shock attack against the original target of the Charge, the Disordered unit is not required to attack all units in its frontal hexes.
All Charges are designated prior to actually resolving any one Charge, along with other Shock attacks in Step 1 of the Shock Phase. Charges are resolved by moving the Charging unit adjacent to the target, in Step 2 of the Shock Phase. (Remember, this is not actual game Movement, so there is no use of Movement Points.)
Mounted MAA may not Charge across rivers or steep slope hexsides, nor may they Charge a unit in a Woods, Marsh, City, or Rough hex. Mounted MAA may not Charge into or across terrain which they are prohibited from moving into. They may Shock into/across those hexes/sides without a Charge (see 10.0 SHOCK), as long as there is not an NA in the Shock/Charge column of the TEC for mounted units. A Charge may not cross a hex in an enemy ZOC, but may end in a ZOC hex.
The Charging unit must have a path free of friendly or enemy combat units to the target at the time the Charge is declared. The path cannot be shared with other Charging units. This path must include the hex, adjacent to the target, in which the Charging unit will end its Charge.
© 2005 GMT Games, LLC Living Rules Version 1.2 05/11/2013
Men of Iron 11
11.4 Charge Reluctance Horses, even the highly trained and formidably sized medieval ones, do not like to “charge” a heavily defended line of infantry (showing much more common sense than their riders). To reflect this, whenever Mounted MAA are charging a dismounted (not Unhorsed) MAA unit or pike-armed (not axe-armed) infantry through its frontal hex, the charging player rolls the die after the unit is moved adjacent to the target during the Charge Combat.
• If the DR is a 0–4, the attacking unit successfully Charges
• If the DR is a 5-9, the Charge is blunted by the reluctance of the horses to close, and the unit must attack/Shock without the benefit of the Charge DRM and must use the Shock portion of the Resolution Table. In addition, if there are multiple such defending units, and Charging Mounted MAA is Reluctant against one, it is Reluctant against all.
PLAY NOTE: Hedges add +1 DRM to Charge Reluctance.
DESIGN NOTE: Pike-armed infantry produces Reluctance where Axe-armed does not, because the former are specifically designed to do so. Axe-armed infantry are attack-oriented in nature and not well-suited for defense.
11.5 Counter-Charge Non-Active Mounted MAA may Counter-Charge when Charged, Shock attacked, or fired at through their front or flank hex sides. Disordered Mounted MAA or Mounted MAA units that began the Activation in the ZOC of another enemy unit and are still in that ZOC may not attempt to Counter-Charge.
A defending, Mounted MAA unit may change facing one vertex, after making a successful Counter-Charge attempt dieroll (11.6), in order to effect Counter-Charge, but may not change facing during the Counter-Charge. The Counter-Charge path must be through its frontal hexes and the Counter-Charged unit(s) must end in the unit’s frontal hexes. Unlike a Charge, a Mounted MAA unit can Counter-Charge a unit in an adjacent hex. Counter-Charges must meet all restrictions in 11.3 paragraphs 3 and 4. A unit which passes a Counter-Charge DR does not roll for Charge Reluctance.
Each Mounted MAA unit is limited to one Counter-Charge at-tempt per enemy Activation. If a unit is attacked by enemy units using both Shock and Charge combat, the owner may choose to Counter-Charge either the Shocking Attackers or the Charging Attackers (but not both). A unit may Counter-Charge more than one unit, but all Counter-Charged units must end in the Counter-Charging unit’s frontal hexes.
11.6 Successful Counter-Charge
To Counter-Charge, the defender rolls the die;
• add the Counter-Charging unit’s Shock Defense DRM;
• if the Counter-Charging unit must change facing to effect the Counter-Charge add one (+1) to the DR.
If the adjusted DR is 4 or less, the unit has successfully Counter-Charged.
• If it is Counter-Charging against a Charging Mounted MAA, it negates the Charge of that attacker and the Charge marker is replaced with a Shock marker. The original Attacker is still the Attacker. If at least half the Attackers are still marked with a Charge marker, the Attacker uses the Charge Table, otherwise he must use the Shock Table when resolving the attack. The Charg-ing Mounted MAA DRM may still apply if at least one Attacker is still marked with a Charge marker.
• If it is Counter-Charging against a Shock attack, the original Attacker is still the Attacker, but now he must subtract two (–2) from his DR when resolving the attack.
• If it is Counter-Charging against missile fire, the Counter-Charge die roll is made before the missile fire is resolved, the mis-sile fire is resolved, then if the Counter-Charge DR was successful the Mounted MAA is moved adjacent to the firing missile unit and the Mounted MAA performs a Charge attack (with the +2 DRM for Charging) against the firing missile unit. There must be a clear Charge path or the unit may not Counter-Charge. The Counter-Charge ends the movement of the missile unit, even if it would still otherwise be eligible to move after firing (mounted missile units). If the successfully Counter-Charging unit is Disordered during its Counter-Charge, the Counter-Charge is still undertaken, but is resolved as a normal Shock attack, rather than a Charge. Any Continued Attacks that result from a Counter-Charge Against Fire should be resolved immediately. Treat this as a mini-Shock Phase for just this unit. The Continuing unit must attack all units in its frontal hexes, those units can Retreat Before Combat, and there can be more Advances and/or Continued Attacks.
11.7 Unsuccessful Counter-Charge If the dieroll was a 5 or higher, the Counter-Charge attempt fails and the unit does not change facing it is was attempting to do so as part of the Counter-Charge.
12.0 COMBAT RESULTS Look at the Fire, Shock and Charge Combat Results Tables while reading this section.
12.1 Combat Results Tables Charging Mounted MAA use the Charge Table. All other Shock attacks use the Shock Table.
The Shock and Charge combat results column used depend on whether the defending unit is Normal or Disordered. Missile fire results also depend on whether the target is mounted or dis-mounted (on foot).
PLAY NOTE: Remember, Shock is resolved separately for each, individual, Defending unit.
12.2 Disordered When a unit is Disordered, flip the counter to its “Disordered” side. The effects of being Disordered are:
• –1 to the Movement Allowance, (as noted on the counter). • A reduced Shock Rating (as noted on the counter).
Men of Iron
© 2005 GMT Games, LLC Living Rules Version 1.2 05/11/2013
12
• Disordered Firing units subtract one (–1) from that DR (as noted on the counter).
• Disordered units that Shock incur a –2 DRM. • Disordered units may not Charge or Counter-Charge (but see
11.6).
Additional Disorders have no effect on a unit already Disordered.
12.3 Retreat A unit that must Retreat must move one hex away from the unit(s) inflicting the result. It must end its retreat one hex from every unit which participated in the attack that caused the retreat. It may not stack and it may not move into an enemy-occupied hex. Any leader stacked with the unit must retreat with it. It may move into an enemy ZOC and it may change facing. If its retreat is blocked by a friendly Missile infantry unit, it may retreat through that unit an extra hex. If it does so, the Missile unit is Disordered; if already Disordered, it is Retired. Any leader stacked with the Retired missile unit must make a Leader Casualty Check (15.4) as if the unit suffered a Retire result from Shock combat.
If it cannot retreat, satisfying the above conditions, it is eliminated. Any leader stacked with the unit must make a Leader Casualty Check (15.4) as if the unit suffered an Eliminated result from Shock combat.
12.4 Retire Pick up the unit and place it as close to its Standard as you can (use the “Retired” markers to indicate such status), unless that unit is unable to trace a route to its Standard not blocked by enemy units, enemy ZOCs, and/or impassable terrain. In that case the Retiring unit is, instead Eliminated.
Retired units have a Movement Allowance of 1 hex per activation, and they may only move towards their Standard. If a Retired unit is attacked or fired upon, treat it as Disordered and add two (+2) to the Combat Resolution dieroll. Any negative combat result suffered by a Retired unit—Retreat, Disorder, whatever—elimi-nates that unit.
PLAY NOTE: Retired units are activated along with other units in their Command. Retired units have no ZOC and may not Shock or Fire.
12.5 Unhorsed Replace the Mounted MAA with an Unhorsed MAA unit in Disordered status. Unhorsed units are all the same, rating-wise. Once unhorsed a unit stays Unhorsed for the rest of the battle. You can rally the Unhorsed unit from its Disordered status, as per the rules for Rally, below.
DESIGN NOTE: Unhorsed status is an involuntary and negative combat result, and indicates a great loss in ability to function militarily. It is very different from the intentional use of dismounted men-at-arms, as is reflected by their DRMs on the Shock Matrix.
12.6 Eliminated The unit is no longer effective as a fighting force and is finished for the day. Remove it from the board.
12.7 Continued Attack After all combats are resolved, another Shock Phase is conducted for all units that earned a Continued Attack. During this Shock Phase these units must Shock attack, no Charges or Counter-Charges are allowed, otherwise it is resolved identically to 10.0. If any unit that has earned a Continued Attack obtains another Continued Attack result, conduct another Shock Phase for all of those units. Continue this procedure until no unit earns a Con-tinued Attack.
When resolving a Continued Attack, subtract one (–1) from the Resolution DR for each previous Attack undertaken by that unit in that Activation.
PLAY NOTE: The DRM reflects the ongoing loss of formation and impetus such attacks are subject to.
PLAY NOTE: There is no limit to the number of times a unit can obtain a Continued Attack result. We recommend using some kind of marker to denote units that earn a Continued Attack result (perhaps the Continued Attack markers from Infidel).
PLAY NOTE: If a Pike unit in Schiltron is not Retired or elimi-nated and does not retreat when a Continued Attack results against it, the attacker does not Advance, but must continue to attack.
13.0 RALLYING UNITS 13.1 Rally DISORDERED: Disordered units may cure their Disorder sta-tus by spending their entire Activation doing nothing. Flip the Disordered unit to its normal side, if they are not adjacent to an enemy unit after all combat has concluded and they have neither moved, changed facing, fired missiles, rearmed, attacked, nor been attacked that Activation.
Note: The unit may have started the Activation adjacent to an enemy unit, but can still Rally if there are no enemy units adjacent after combat.
RETIRED: Retired units that are in or within one hex of their Standard may be Rallied if that Standard is Activated (see 13.2). When activated, remove the Retired marker and make sure the unit is in Disorder status.
Units may not Rally if adjacent to an enemy unit. Units may Rally if within range of an enemy Missile unit or Out of Command.
13.2 Standards The Standards of the various leaders were the rallying point for units. Any unit that is Retired and is within one hex of its Standard, and not adjacent to an enemy unit, when the Standard is activated has its status changed from Retired to Disordered.
© 2005 GMT Games, LLC Living Rules Version 1.2 05/11/2013
Men of Iron 13
Standards may be Activated only in a Free Activation; they may not be Activated by DR. A Standard is Activated instead of a Command. When a Standard is Activated, the player may either move the Standard (and just the Standard, not any units near it) or Rally Retired units.
A Standard may be moved to any hex on the game-map. However, when doing so, any Retired units that are within 1 hex of the Standard prior to its being moved must check to see what effect this has on them. Roll one die; add the unit’s Disordered Shock Defense DRM. If the adjusted DR is a 5 or higher, that Retired unit is now Eliminated.
Standards may be captured by the enemy, if an enemy combat unit enters a hex occupied solely by the Standard. When a Com-mand (or Army if there is only one Standard) loses its Standard, Eliminate all currently Retired units; thereafter all Retired results become Eliminated for that Command (or Army). Standards may not Retreat Before Combat.
14.0 SPECIAL UNITS AND TACTICS 14.1 Shield Wall Many a defensive plan was based on having its infantry stand firm and fast, without moving. To augment this, upon specific orders from their leader, infantry would go into Shield Wall, putting a solid front of shields and pikes against incoming cavalry.
The only units that may be eligible to use Shield Wall are Pike Infantry and Dismounted MAA. Their leader may, at the begin-ning of the game (during setup) or upon activation (and before doing anything else), order these units in his command into (or out of) Shield Wall. Place (or remove) a Shield Wall marker atop all (eligible) units in his command (even if Out of Command) to so indicate. The effects of Shield Wall are: • The unit may not move, and it may not Shock attack. • It may change facing only one vertex per activation. • It earns a –1 DRM, when Shock attacked or fired on through
a Frontal hexside. • Mounted units may not Charge through the Frontal hexside of
a Shield Wall unit; they may Shock normally. • A Disordered unit cannot form Shield Wall. However, units in
Shield Wall that become Disordered can remain in Shield Wall. • If a unit in Shield Wall is forced to move because of adverse
combat results, it loses Shield Wall status.
The use of Shield Wall is limited; see individual battles.
DESIGN NOTE: The specialized Scots version of Shield Wall, a schiltron, is found in the rules for battles with Scots.
HISTORICAL NOTE: Most cavalry of the era, or any other era, would refuse to charge into a solid wall of men, especially a wall with bristling pikes. This phenomenon was shown and repeated many times before some armies realized the futility of such a charge. To do so, however, the mounted knights had to overcome deeply ingrained social beliefs and prejudices.
14.2 Hobilars Hobilar is a period term that referred to missile-armed infan-try units that used horses to speed movement to the scene of combat. They never (What never? Well, hardly ever) fought or fired mounted; they dismounted to act as missile infantry. When mounted they are treated as Hobilars (no missile capability, no ZOC, cannot Shock Attack); dismounted as whatever type of missile or foot unit they are when not mounted.
It takes 3 Movement Points for a Hobilar to mount or dismount, which they may expend at any time during movement. They may do this in any hex that is neither adjacent to an enemy unit or within Missile Fire range of an enemy unit. They may not fire in any turn they move (or dismount).
15.0 LEADERS Leaders are not considered units and the rules for units do not apply to them.
A leader that has had his entire Command eliminated is removed from play without penalty, as long as he would not qualify for the capture rule (15.5) in his current hex. He rides off into the sunset to fight again another day.
15.1 Commands Every unit in the game belongs to a Command, as noted above. Each Command is commanded by a leader. Commands and their leaders are identified by their color stripe. When a Command is Activated, all units and leaders in that Command may move and fight.
15.2 Command Range A leader’s Command Range is traced in hexes, not Movement Points, from the leader to the combat unit and does not need to be a straight line. Command status is determined at the start of Activation and stays with the unit throughout that Activation. You cannot trace Command range through an enemy unit, an enemy ZOC (7.0) hex not occupied by a friendly unit, or a hex(side) impassable to all unit types.
A combat unit not actually within Command Range but adjacent to a unit that is (or one that is considered in Command by virtue of this specific rule) is considered to be in Command (in a chain effect).
OUT OF COMMAND EFFECTS: Units that start activation outside their leader’s Command Range may not:
• Move adjacent to or Charge an enemy unit. • Move into a hex with an enemy Standard or enemy leader.• Move if in an enemy ZOC (7.0). This applies to foot units
only—mounted units may move away.
15.3 Shock Resolution DRM Mounted MAA stacked with their leader gain a +1 DRM during an attack when such unit is Charging (or effectively Counter-Charging), but at no other time.
Men of Iron
© 2005 GMT Games, LLC Living Rules Version 1.2 05/11/2013
14
15.4 Leader Casualties Leaders can get killed. (In game terms, that encompasses being Captured and other no-so-hot events).
By Fire: Anytime an adjusted Fire DR of 9 or more occurs, and there is a leader in the target hex, roll the die. If the DR is an ‘8’ or ‘9’ the leader is killed. Otherwise, there is no effect. If the combat unit the leader is stacked with is Retired or Eliminated by missile fire the owning player places the leader with the nearest unit from his Command, unless he is surrounded in which case he is killed.
By Shock or Charge: Any time a leader is stacked with a unit that receives either a Disordered, Retired or Eliminated result, roll the die for the leader, subtracting his Activation Rating. If the adjusted DR is 3 or higher that leader has been killed. If he survives, but the combat unit does not, the owning player places him with the nearest unit from his Command, unless he is sur-rounded in which case he is killed.
15.5 Leader Capture If an enemy unit moves into a hex with only a leader(s), move the leader and place him with the nearest unit from his command (or any other friendly unit if none from his command are left). If he is surrounded—by enemy units and/or ZOC—he is captured, no dieroll necessary.
15.6 Replacement Leaders When a leader is killed or captured, at the start of that player’s next activation - but after the Command for that Activation has been chosen and rolled for (if necessary) - flip the dead leader to its Replacement leader side and place it with any combat unit from that Command. Replacement leaders may return to play as often as necessary.
16.0 VICTORY At the end of each Free Activation each player determines their Flight Points and makes a Loss Check. Each player rolls one die and adds the player’s Flight Point total (see below). If the DR plus Flight Points are greater than the Flight Level of that player in this battle, he loses. If both players’ totals exceed their Flight Level the battle is a draw. For much of the early parts of the game, Loss Checks will be unnecessary as players will be unable to exceed their Flight Level with the roll of one die.
The following Flight Points are added to the DR:
• 3 points for each Eliminated MAA unit, mounted or not, or for a King.
• 2 points for each other type unit and/or leader who is not a King that/who is Eliminated.
• 1 for each Retired unit, regardless of type.
Some battle will have special rules for additional FPs (see Battle Book for details).
PLAY NOTE: While the loss of your Standard does not reflect in the FP count, it does prevent a side from bringing back its retired units. It also causes the loss of all Retired units that use that Standard.
© 2005 GMT Games, LLC Living Rules Version 1.2 05/11/2013
Men of Iron 15
Game CreditsGAME DESIGN: Richard Berg
GAME DEVELOPER: Jack Polonka
ART DIRECTOR: Rodger MacGowan
BOX ART AND PACKAGE DESIGN: Rodger MacGowan
GAME MAPS: Knut Grünitz
COUNTERS: Mike Lemick, Rodger MacGowan, andMark Simonitch
PLAY TESTERS: Tim Chambers, Shannon Cooke, KimMeints, and Elias Nordling
PROOF READERS: Steve Carey, Kevin Duke
PRODUCTION COORDINATION: Tony Curtis
PRODUCERS: Tony Curtis, Rodger MacGowan, Andy Lewis, Gene Billingsley and Mark Simonitch
GMT Games, LLCP.O. Box 1308, Hanford, CA 93232-1308
www.GMTGames.com
Shock 3, 8Stacking 6Standard(s) 3, 12TTerrain 4, 8, 9UUnhorsed 12VVictory 14WWeapon System Matrix 9ZZone of Control 3, 6
17.0 INDEXAActivation 3, 4Advance After Combat 10Angle of Attack 9Angle of Fire 8CCharge 10Charge Reluctance 11Combat Results 11, 12Command 3, 13Command Range 3, 13Continuation/Continuity 3, 4Continued Attack 12Counter-Charge 11DDisordered 3, 11EEliminated 12FFacing 5Flight Points 3, 14Free Activation 3HHobilars 13LLeaders
Leader 3, 13Leader Casualty Check 3, 14Presence (combat) 9Replacement Leaders 14
Line Of Sight 8Loss Check 3, 14MMissile Fire
Active Fire 7Reaction Fire 7Return Fire 7
Movement 4, 5OOut of Command 5, 13RRally 12Reinforcements 5Retired 12Retreat 11Retreat Before Shock 8SSeizure/Seizing Continuity 3, 4Sequence of Play 4, 16Shield Wall 13
Men of Iron
© 2005 GMT Games, LLC Living Rules Version 1.2 05/11/2013
16
Extended Sequence of PlayA. Activation Phase: Choose a Command to Activate (4.1), Standard (13.2), or Pass.
• If a Standard is Activated skip to Phase D or move the Standard (13.2).• Place any replacement leaders (15.6) at the end of the Activation Phase.
B. Move/Fire Phase: Move (5.0) and/or Fire (9.0) with any or all of the units in the Activated Command.
• Before moving any units check Command status for all Activated units. • A mounted missile unit may fire at any point during its move.• A foot missile unit may fire only at the end of its move.• A unit may fire without moving.• Each unit must finish its movement/firing before another unit may begin to move/fire.• The Non-Active player’s units may qualify for Reaction/Return fire (9.2) or Counter-Charge (11.5) depending on the Active
player’s actions.
C. Shock Phase: After all movement/firing for the Activated Command is complete, Shock combat (10.0) and Charges (11.0) may be initiated.
1. The Active Player designates which of his units are attacking which defending units, including Charges.
2. One at a time, the Active player moves each Charging unit adjacent to its target. Any Reaction fire caused by this move is re-solved. If required, the Charging unit makes a Charge Reluctance roll. Any Retreat Before Shock by the defender is resolved at this time. The defender attempts any Counter-Charges of which he is capable.
3. The Active player resolves all his Shock and Charge attacks, in any order he wishes. The Charge table is used as long as at least half of the units in an individual attack succeeded in Charging (not Disordered by Reaction fire, not Reluctant, not Counter-Charged), otherwise the Shock table is used. Advances are taken and Continued Attacks are noted. When multiple attacking units are involved in an attack, any negative combat results apply to all attacking units (Disorders, etc.).
Play Note: Attacks by a single attacker against multiple defenders are resolved at the same time, and they are considered to be going on simultaneously, with results (which can be cumulative) applied after both attacks are resolved.
4. All Continued Attacks are now resolved. Begin again at Step 1, except that only units that earned a Continued Attack Shock and they must Shock; Charging and Counter-Charging is not allowed.
D. Rally Phase: Rally (13.0) any Disordered units that did nothing for the entire Activation and that are currently not adjacent to an enemy unit. If a Standard was Activated, Rally (13.0) any Retired unit belonging to that Command within one hex of that Standard.
E. Continuation Phase: If the completed Activation was a Free Activation, both players make a Loss Check (16.0). If the game does not end due to Loss Check, Pass or choose to Continue with a Command.
• This cannot be the Command that just Activated, unless the Active player has only have one Command.• The Non-Active player may attempt to Seize Continuity (4.3). If so, he chooses one of his leaders to Activate and rolls the die
adding any modifiers and compares it to his leader’s Activation Rating. If successful, he Activates that Command and proceeds from Phase B. If not, the Active player gets a Free Activation, proceed to Phase A, this Free Activation may even be used to Activate the Command that just completed Activated.
• If no Seizure attempt occurs, roll the die adding any modifiers and compare it to the chosen leader’s Activation Rating. If successful, Activate that Command and proceed from Phase B. If not, the Non-Active player gets a Free Activation and proceeds to Phase A.