Embed Size (px)
Citation preview

Indiana Public Retirement System (INPRS) One North Capitol Avenue, Suite 001 Indianapolis, IN 46204
Indiana Public Retirement System (INPRS) Employer Reporting and Maintenance
(ERM) Wage and Contribution User Manual - Employer

Employer Reporting and Maintenance (ERM) Wage and Contribution User Manual - Employer Approved: 08/09/2017 Effective: 01/01/2018 Version: 6.0
Page 2 of 77
Table of Contents Introduction to Wage and Contribution for Employer Users ............................................................ 6
Glossary of Important ERM Terms ..................................................................................................... 7
ERM Home Screen ............................................................................................................................... 8
Figure 1: ERM Home Screen ................................................................................................ 8 Access the Home Dashboard ........................................................................................................... 8
Figure 2: Home Dashboard on the ERM Home Screen ........................................................ 9 Access and View Wage and Contribution Options ........................................................................... 9
Figure 3: Wage and Contribution Options Menu ................................................................. 10 Table 1: Actions Available for Wage and Contribution Options Menu ................................. 10
Upload Wage and Contribution, Adjustment Missed Regular Wage and Contribution, and Settlement Adjustment Files ....................................................................................................... 11
Figure 4: Upload Wage and Contribution, Adjustment, Missed Regular Wage and Contribution or Settlement Adjustment File Process Flow ............................................. 11
Upload a Wage and Contribution, Adjustment, Missed Regular Wage and Contribution or Settlement Adjustment File....................................................................................................... 11
Figure 5: Wage and Contribution > File Upload Screen ...................................................... 12 Upload a Wage and Contribution or Adjustment File ................................................................ 14
Figure 6: Wage & Contribution File Upload Screen............................................................. 15 Figure 7: Access the Payroll Calendar ................................................................................ 15 Figure 8: Select Multiple Frequencies for a Submission Unit .............................................. 16 Figure 9: Explorer Window for Wage & Contribution Or Adjustment File Upload ................ 17 Figure 10: Skipped Payroll Date Notification ....................................................................... 18 Figure 11: Wages & Contribution File Upload Confirmation Notification .............................. 18
Upload a Settlement Adjustment File ....................................................................................... 19 Figure 12: Settlement Adjustment File Upload Screen ........................................................ 19 Figure 13: Explorer Window for Settlement Adjustment File Upload ................................... 20 Figure 14: Settlement Adjustment File Upload Confirmation Notification ............................ 22
Upload a Missed Regular Wage and Contribution File ............................................................. 22 Figure 15: Wage & Contribution File Upload Screen ........................................................... 22 Figure 16: Explorer Window for Missed Wage and Contribution Adjustment File Upload .... 23 Figure 17: Missing Regular Wage and Contribution File Upload Confirmation Notification.. 25
Enter Wage and Contribution Online ............................................................................................... 26
Figure 18: Enter Wage and Contribution Online Process Flow ........................................... 26 Complete an Online Wage and Contribution Entry ......................................................................... 26
Select a Submission Unit ......................................................................................................... 26 Figure 19: Select Submission Unit Screen for Wage and Contribution Online Entry ........... 27

Employer Reporting and Maintenance (ERM) Wage and Contribution User Manual - Employer Approved: 08/09/2017 Effective: 01/01/2018 Version: 6.0
Page 3 of 77
Select a Payroll Frequency and a Payroll Date ......................................................................... 28 Figure 20: Select Payroll Date Screen ................................................................................ 28 Figure 21: Confirm Skipped Payroll Notification .................................................................. 28
Select a Type of Report Entry .................................................................................................. 29 Figure 22: Type of Report Entry Screen: New or Previous Report ...................................... 29 Figure 23: Type of Report Entry Screen: Saved Report ...................................................... 29
Create a Wage and Contribution Online Entry Report .................................................................... 29 Figure 24: Enter Report Information Screen ....................................................................... 30
Add a New Record to an Online Entry Report .......................................................................... 30 Figure 25: Add Wage & Contribution Transaction Pop-Up Box ........................................... 30
Add Members to an Online Entry Report .................................................................................. 32 Figure 26: Add Members Pop-Up Box ................................................................................ 32
Add All Active Members to an Online Entry Report .................................................................. 33 Complete the Online Entry Report ............................................................................................ 33
Figure 27: Enter Report Information Screen’s Update Required Column ............................ 34 Figure 28: Modify Wage & Contribution Transaction Pop-Up Box ....................................... 36 Figure 29: Confirm Remove Pop-Up Box ............................................................................ 37 Figure 30: Validation Confirmation Notification ................................................................... 37
Complete an Online Wage and Contribution Adjustment ............................................................... 38
Figure 31: Conduct Online Wage and Contribution Adjustment Process Flow .................... 38 Complete a Wage and Contribution Adjustment ............................................................................. 38
Select a Submission Unit ......................................................................................................... 39 Figure 32: Select Submission Unit Screen for Wage and Contribution Online Adjustment .. 39
Enter a Payroll Date ................................................................................................................. 40 Figure 33: Select Payroll Date Screen ................................................................................ 40
Select an Adjustment Type....................................................................................................... 40 Figure 34: Select Adjustment Type Screen ......................................................................... 41
Adjustment Type: By Member – For Adjustment to Previously Submitted Information .................... 41 Figure 35: Search Member Screen ..................................................................................... 41 Figure 36: Adjustment Report Screen ................................................................................. 43 Figure 37: Add Adjustment Transaction Pop-Up Box .......................................................... 44
Adjustment Type: Missed Wage and Contributions ....................................................................... 45 Figure 38: Create Adjustment Report Screen ..................................................................... 45 Figure 39: Enter Report Information Screen ....................................................................... 46 Figure 40: Add Member Pop-Up Box .................................................................................. 46 Figure 41: Modify Wage & Contribution Transaction Pop-up Box ....................................... 47
Adjustment Type: By Report .......................................................................................................... 48 Figure 42: Search Report Screen ....................................................................................... 48 Figure 43: Adjustment Report Screen ................................................................................. 49 Figure 44: Add Adjustment Transaction Pop-Up Box .......................................................... 50 Figure 45: New Adjustment Transaction Section on the Adjustment Report Screen ........... 52
Adjustment Type: Settlement ......................................................................................................... 52

Employer Reporting and Maintenance (ERM) Wage and Contribution User Manual - Employer Approved: 08/09/2017 Effective: 01/01/2018 Version: 6.0
Page 4 of 77
Figure 46: Create Adjustment Report Screen ..................................................................... 52 Figure 47: Enter Report Information Screen ....................................................................... 53
Cancel, Save, or Validate the Wage and Contribution Adjustment ................................................. 53 Figure 48: Validation Confirmation Notification ................................................................... 54
View Validation Results .................................................................................................................. 54
Manage Submission Reports ............................................................................................................ 55
Access Submission Reports ........................................................................................................... 55 Figure 49: Submission Report Select Submission Unit Screen ........................................... 56
Manage Submission Reports ......................................................................................................... 57 Figure 50: Search Reports Screen ..................................................................................... 57
View Submission Reports ........................................................................................................ 58 Figure 51: Report Summary Screen ................................................................................... 58
View Transactions in Submission Reports ................................................................................ 59 Figure 52: Transactions That Passed Validations Pop-Up Box ........................................... 59 Figure 53: Transactions That Failed Validations Pop-Up Box ............................................. 60
Resolve Errors in Submission Reports ..................................................................................... 60 Figure 54: Resolve Transactions Screen ............................................................................ 61 Figure 55: Modify Transaction for Wage and Contribution Transactions with Errors ........... 62
Process Submission Reports for Payment ............................................................................... 62 Figure 56: Process for Payment Screen for PERF Hybrid, PA, JU, CE, 77 ......................... 63 Figure 57: Process for Payment Screen (TRF Only) ........................................................... 65 Figure 58: Process for Payment Screen (My Choice) ......................................................... 66 Figure 59: Pending Transactions for Undecided Members Pop Up Screen (My Choice) .... 67 Figure 60: Pending Transactions Due Now Pop Up Screen (My Choice) ............................ 67 Figure 61: Confirm Payment Screen ................................................................................... 68 Figure 62: Payment Confirmation Page .............................................................................. 69 Figure 63: Report Summary Screen (for PERF My Choice and PERF Hybrid participants
only) ............................................................................................................................. 70 Access Report Summary Screen Buttons ................................................................................. 70
Figure 644: Report Summary Screen ................................................................................. 71 Delete Submission Reports ...................................................................................................... 71 Edit Payment Dates.................................................................................................................. 71
Figure 65: Edit Future Payment Screen .............................................................................. 72 Release Payments ................................................................................................................... 72 View Summary, Detailed, and Payment Reports ...................................................................... 72
Manage the Wage and Contribution Exception Queues ................................................................. 74
Figure 66: Home Dashboard Screen .................................................................................. 74 Figure 67: Wage and Contribution or Adjustment Exception Queue ................................... 75 Figure 68: Transaction Summary Screen ........................................................................... 76

Employer Reporting and Maintenance (ERM) Wage and Contribution User Manual - Employer Approved: 08/09/2017 Effective: 01/01/2018 Version: 6.0
Page 5 of 77
Appendix: Wage and Contribution Exception Queue Troubleshooting ......................................... 77

Employer Reporting and Maintenance (ERM) Wage and Contribution User Manual - Employer Approved: 08/09/2017 Effective: 01/01/2018 Version: 6.0
Page 6 of 77
Introduction to Wage and Contribution for Employer Users Employer Users may enter and maintain wage and contribution information in the Employer Reporting and Maintenance (ERM) application. Based their security roles, Employer Users can perform these wage and contribution functions:
• Upload Wage and Contribution, Adjustment and Settlement Adjustment files.
• Enter wage and contribution online.
• Complete an online wage and contribution adjustment.
• View and manage wage and contribution submission reports.
• Process wage and contribution submission reports for payment.
• Resolve wage and contribution errors in the Exception Queue.
This user manual introduces all the features and screens associated with wage and contribution management in the ERM application.
NOTE: Wage and contribution reports must be entered and paid in sequential order, according to payroll dates. A payroll date may be skipped if the Submission Unit does not have any transactions for that period.
NOTE: It is very important to keep the Exception Queue clear and resolve errors in a timely manner. If there are any transactions that have been in the Exception Queue for 30 days or more, wage and contribution reports for payment cannot be submitted until those errors are resolved.

Employer Reporting and Maintenance (ERM) Wage and Contribution User Manual - Employer Approved: 08/09/2017 Effective: 01/01/2018 Version: 6.0
Page 7 of 77
Glossary of Important ERM Terms See the Glossary of Important ERM Terms document for a complete list and definitions.

Employer Reporting and Maintenance (ERM) Wage and Contribution User Manual - Employer Approved: 08/09/2017 Effective: 01/01/2018 Version: 6.0
Page 8 of 77
ERM Home Screen On the left side of the ERM Home screen is the Navigation Menu, as shown in Figure 1. The selections in the Navigation Menu are:
• Home
• Employer
• Member
• Wage and Contribution
• Administration
• PERF Links
• Employer Reports
Several of these selections have drop-down menus. The options available to Employer Users vary by security role. Any options that Employer Users cannot access appear grayed out in the Navigation Menu.
Figure 1: ERM Home Screen
Access the Home Dashboard To access the Home Dashboard for a Submission Unit:
1. Select a Submission Unit from the grid on the ERM Home screen.

Employer Reporting and Maintenance (ERM) Wage and Contribution User Manual - Employer Approved: 08/09/2017 Effective: 01/01/2018 Version: 6.0
Page 9 of 77
2. Click the Next button. The Home Dashboard for the selected Submission Unit opens, as shown in Figure 2.
Figure 2: Home Dashboard on the ERM Home Screen
The Home Dashboard displays the following for the selected Submission Unit:
• Notifications
• Exceptions Summary
• Payroll Calendar
• Missing Member Report
Access and View Wage and Contribution Options To view all wage and contribution options, click the arrow to the left of Wage and Contribution in the Navigation Menu to open a drop-down menu, as shown in Figure 3. Actions associated with each option are described in Table 1.

Employer Reporting and Maintenance (ERM) Wage and Contribution User Manual - Employer Approved: 08/09/2017 Effective: 01/01/2018 Version: 6.0
Page 10 of 77
Figure 3: Wage and Contribution Options Menu
Table 1: Actions Available for Wage and Contribution Options Menu Menu Option Action
File Upload Upload Wage and Contribution, Adjustment, Missed Regular Wage and Contributions or Settlement Adjustment files to the ERM application.
Online Entry Enter wage and contribution information directly into the ERM application.
Online Adjustment Enter a wage and contribution settlement adjustment, an adjustment by member or an adjustment by report directly into the ERM application.
Submission Reports View and manage wage and contribution submission reports and process those reports for payment.
Service Credit Adjustment Enter, submit and approve service credit adjustments (INPRS Staff User-only).
Transfer Funds Transfer a member’s wage and contribution information from PERF to TRF or from TRF to PERF (INPRS Staff User-only).
Manual Adjustment Enter, submit and approve adjustments to transactions that were submitted prior to January 1, 1991, for TRF and prior to January 1, 1987, for JU Fund, PERF and ‘77 Fund (INPRS Staff User-only).
Override Validation Clears errors that should not have been presented during the wage and contribution reporting process for all funds. (INPRS Staff User-only)
Employer Reporting and Maintenance (ERM) Wage and Contribution User Manual - Employer Approved: 08/09/2017 Effective: 01/01/2018 Version: 6.0
Page 11 of 77
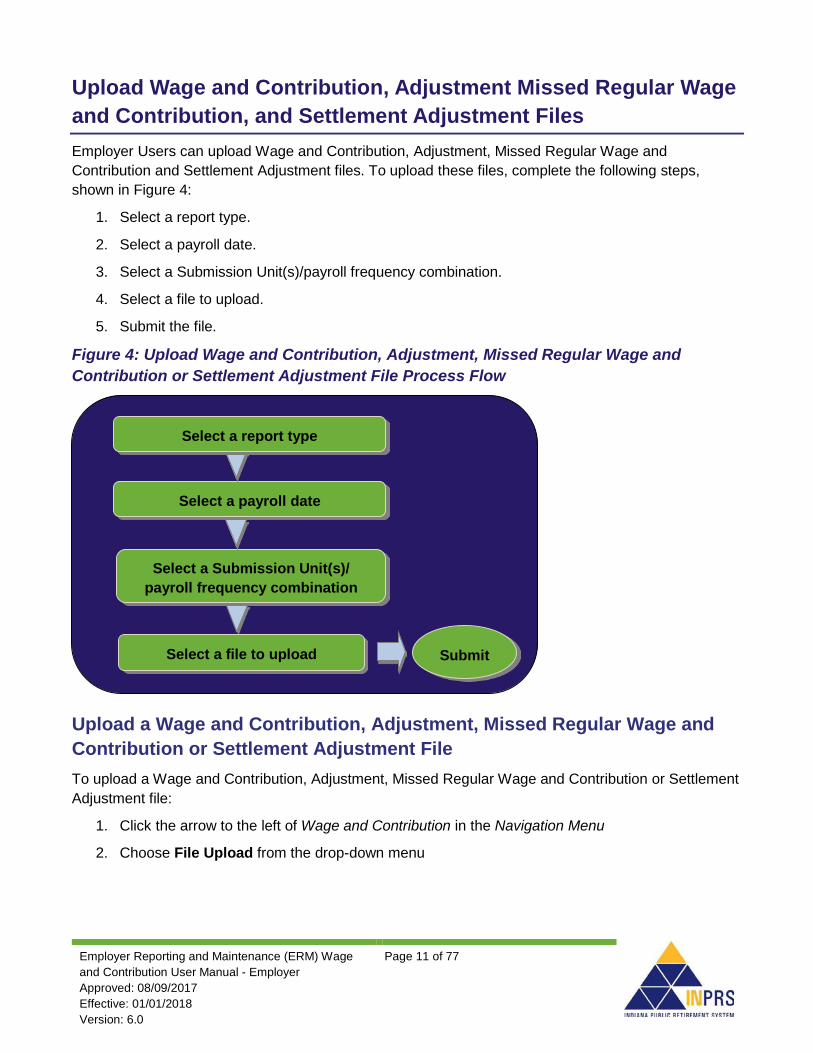
Upload Wage and Contribution, Adjustment Missed Regular Wage and Contribution, and Settlement Adjustment Files Employer Users can upload Wage and Contribution, Adjustment, Missed Regular Wage and Contribution and Settlement Adjustment files. To upload these files, complete the following steps, shown in Figure 4:
1. Select a report type.
2. Select a payroll date.
3. Select a Submission Unit(s)/payroll frequency combination.
4. Select a file to upload.
5. Submit the file.
Figure 4: Upload Wage and Contribution, Adjustment, Missed Regular Wage and Contribution or Settlement Adjustment File Process Flow
Upload a Wage and Contribution, Adjustment, Missed Regular Wage and Contribution or Settlement Adjustment File To upload a Wage and Contribution, Adjustment, Missed Regular Wage and Contribution or Settlement Adjustment file:
1. Click the arrow to the left of Wage and Contribution in the Navigation Menu
2. Choose File Upload from the drop-down menu
Submit
Select a Submission Unit(s)/ payroll frequency combination
Select a payroll date
Select a file to upload
Select a report type

Employer Reporting and Maintenance (ERM) Wage and Contribution User Manual - Employer Approved: 08/09/2017 Effective: 01/01/2018 Version: 6.0
Page 12 of 77
Choose the File Upload option and the Wage and Contribution > File Upload screen displays as shown in Figure 5.
Figure 5: Wage and Contribution > File Upload Screen
The Wage and Contribution > File Upload screen contains four sections that allows uploading of the Wage and Contribution, Adjustment, or Missed Wage and Contribution or Settlement Adjustment file:
• Use the radio buttons in the Select File Upload Type section to identify the type of file to be uploaded.
o The Wage & Contribution Or Adjustment File Upload Or Missed Wage and Contribution radio button allows the Wage and Contribution or Adjustment file or Missed Wage and Contribution to be uploaded.
o The Settlement Adjustment File Upload radio button allows the Settlement Adjustment file to be uploaded.
o The Missed Regular Wage and Contribution Only radio button allows the Missed Regular Wage and Contirbution file to be uploaded.
• Use the Payroll Context section to identify the payroll date for the Wage and Contribution, Adjustment, Missed Regular Wage and Contribution or Settlement Adjustment file.
• Use the Select Submission Unit(s) section to identify the Submission Unit(s)/payroll frequency combinations that are included in the file. Press the CTRL key to select more than one Submission Unit/payroll frequency combination from the grid.

Employer Reporting and Maintenance (ERM) Wage and Contribution User Manual - Employer Approved: 08/09/2017 Effective: 01/01/2018 Version: 6.0
Page 13 of 77
Use the File Upload section to identify the location of the Wage and Contribution, Adjustment, Missed Regular Wage and Contribution or Settlement Adjustment File and upload it to the ERM application.
A sample of the required file format can be found at http://www.in.gov/inprs/erm_file_templates.htm.
The file type is a pipe delimited ( | ) text file (.txt extension). The file layout includes the following fields:
• A header containing the following required fields:
o Payroll Date
o Row Count
• A body containing the following fields for each member (required fields are marked with an asterisk):
o Submission Unit Number*
o Submission Unit Fund*
o Social Security Number (SSN) (Require at least 2 of the following: SSN, Pension ID or Last Name of Member)
o Pension ID (Require at least 2 of the following: SSN, Pension ID or Last Name of Member)
o Last Name of Member (Require at least 2 of the following: SSN, Pension ID or Last Name of Member)
o Pensionable Wages
o Mandatory Post-tax Contributions
o Mandatory Pre-tax Contributions
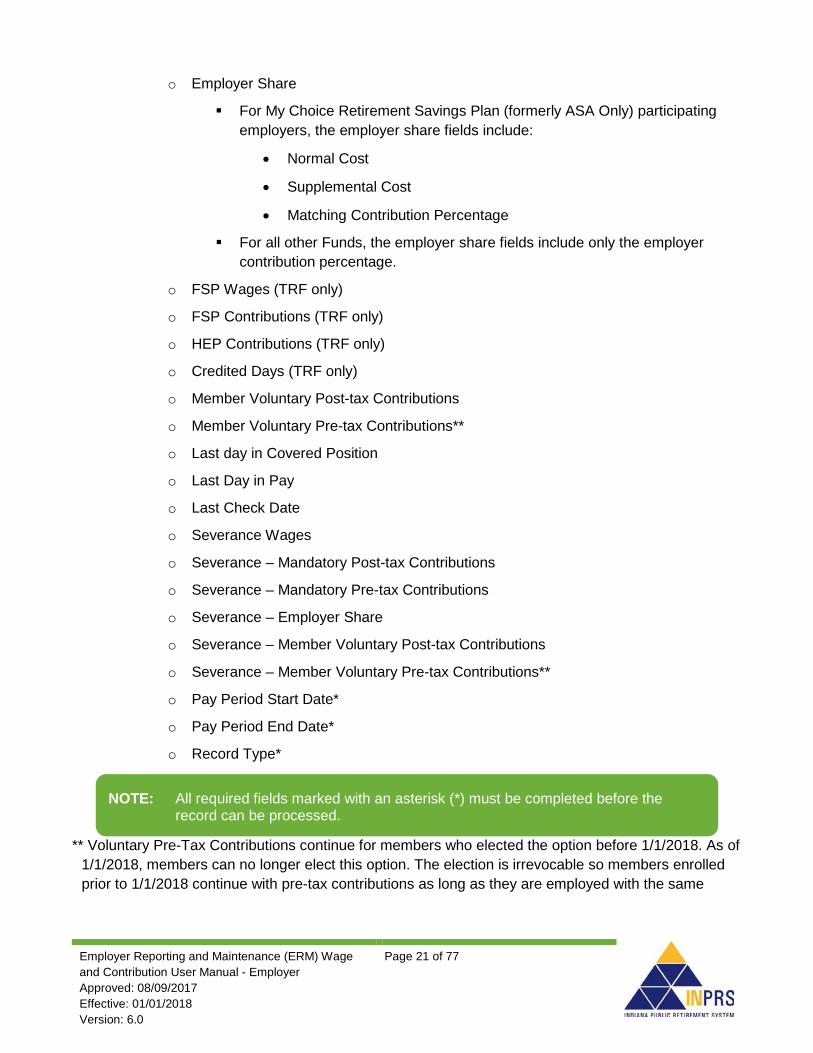
o Employer Share
For My Choice Retirement Savings Plan (formerly ASA Only) participating employers, the employer share field includes:
• Normal Cost
• Supplemental Cost
• Matching Contribution Percentage
For all other Funds, the employer share field includes only the employer contribution percentage.
o FSP Wages (TRF only)
NOTE: Certain adjustment transactions may be included on the same file as regular wage and contribution transactions if they are for the same payroll date.

Employer Reporting and Maintenance (ERM) Wage and Contribution User Manual - Employer Approved: 08/09/2017 Effective: 01/01/2018 Version: 6.0
Page 14 of 77
o FSP Contributions (TRF only)
o HEP Contributions (TRF only)
o Credited Days (TRF only)
o Member Voluntary Post-tax Contributions
o Member Voluntary Pre-tax Contributions**
o Last Day in Covered Position
o Last Day in Pay
o Last Check Date
o Severance Wages
o Severance – Mandatory Post-tax Contributions
o Severance – Mandatory Pre-tax Contributions
o Severance – Employer Share
o Severance – Member Voluntary Post-tax Contributions
o Severance – Member Voluntary Pre-tax Contributions**
o Pay Period Start Date*
o Pay Period End Date*
o Record Type*
** Voluntary Pre-Tax Contributions continue for members who elected the option before 1/1/2018. As of
1/1/2018, members can no longer elect this option. The election is irrevocable so members enrolled prior to 1/1/2018 continue with pre-tax contributions as long as they are employed with the same employer in an INPRS-covered position. Members who elected the Voluntary Pre-Tax Contribution option, who leave employment and return to the same employer are required to continue with voluntary pre-tax contributions because the election is irrevocable.
Upload a Wage and Contribution or Adjustment File To upload a wage and contribution or adjustment file:
1. Click the Wage & Contribution or Adjustment File Upload or Missing Wage and Contribution radio button in the Select File Upload Type section of the Wage & Contribution or Adjustment File Upload screen, as shown in Figure 6.
NOTE: All required fields marked with an asterisk (*) must be completed before the record can be processed.

Employer Reporting and Maintenance (ERM) Wage and Contribution User Manual - Employer Approved: 08/09/2017 Effective: 01/01/2018 Version: 6.0
Page 15 of 77
Figure 6: Wage & Contribution File Upload Screen
2. Enter the payroll date for the wage and contribution or adjustment in the Payroll Date field by
typing the date or clicking on the calendar icon as shown in Figure 7. Available payroll dates display in bold font on the calendar. Only payroll dates that are applicable to the Submission Unit(s) the employer has access to are available for entry.
Figure 7: Access the Payroll Calendar

Employer Reporting and Maintenance (ERM) Wage and Contribution User Manual - Employer Approved: 08/09/2017 Effective: 01/01/2018 Version: 6.0
Page 16 of 77
3. Choose the Submission Unit(s)/payroll frequency combinations that are included in the file from the list displayed in the grid in the Select Submission Unit(s) section of the screen as shown in Figure 8. To select multiple Submission Units, or multiple payroll frequencies of the same Submission Unit, press the CTRL key and make selection(s).
Figure 8: Select Multiple Frequencies for a Submission Unit
4. Click the Browse button next to the Upload File field in the File Upload section of the screen.
5. An explorer window opens, as shown in Figure 9. Browse for and select the wage and contribution or adjustment file to be uploaded. Click the file name to populate the Upload File field.
NOTE: When a payroll date is selected, ERM filters the Submission Unit grid for all payroll frequencies that fall on that date. This allows a single file upload to contain payroll data for multiple payroll frequencies. For example, an employer may pay some employees weekly and others bi-weekly. On payroll dates where those two cycles fall on the same date, a single payroll file may be uploaded to ERM containing wage and contribution data for both. However, they may be submitted separately.
NOTE: For multiple payroll frequencies that pay on the same payroll date, upload a file for each payroll frequency, or upload a single file containing multiple frequencies. Uploading a file containing multiple frequencies, each frequency included in the file must be selected from the grid. This can be done by holding down the CTRL key and clicking on each applicable frequency in the grid.

Employer Reporting and Maintenance (ERM) Wage and Contribution User Manual - Employer Approved: 08/09/2017 Effective: 01/01/2018 Version: 6.0
Page 17 of 77
Figure 9: Explorer Window for Wage & Contribution Or Adjustment File Upload
6. Select the file to be uploaded, click the Upload button. This begins a structural validation process that ensures the file meets the file layout specifications provided by INPRS.
7. When the file name displays above the Upload File field, click the Submit button to submit the Wage and Contribution or Adjustment file.
NOTE: If adjustments are included with regular wage and contribution transactions, they must be paid on the same payroll date as the regular wage and contribution transactions. If they are being paid on an off-cycle payroll, they must be entered online using the Online Adjustment section of the ERM application.
NOTE: If a payroll date is skipped, the notification screen displays, as shown in Figure 10. This notification asks the Employer User to do one of the following:
• Acknowledge that the Employer User intended to skip a payroll date because there is nothing to report for the payroll date
• Cancel the wage and contribution submission and submit wage and contribution transactions for the skipped payroll date if the Employer User did not intend to skip a payroll date.

Employer Reporting and Maintenance (ERM) Wage and Contribution User Manual - Employer Approved: 08/09/2017 Effective: 01/01/2018 Version: 6.0
Page 18 of 77
Figure 10: Skipped Payroll Date Notification
8. Once the file is submitted, the confirmation notification is received, as seen in Figure 11. This
confirmation screen states that the file is beginning the validation process and the validation results can be viewed from the Submission Reports Status grid.
Figure 11: Wages & Contribution File Upload Confirmation Notification
NOTE: If an uploaded file contains both regular wage and contribution and adjustment transactions, separate reports will be created for the wage and contribution transactions and adjustment transactions by Submission Unit.

Employer Reporting and Maintenance (ERM) Wage and Contribution User Manual - Employer Approved: 08/09/2017 Effective: 01/01/2018 Version: 6.0
Page 19 of 77
Upload a Settlement Adjustment File To upload a settlement adjustment file:
1. Click the Settlement Adjustment File Upload radio button, as shown in Figure 12.
Figure 12: Settlement Adjustment File Upload Screen
2. Enter the payroll date the settlement adjustment is being paid in the Payroll Date field. Click the
Payroll Date field, a pop-up bubble displaying the required date format for the field displays.
3. Choose the Submission Unit included in the file from the list displayed in the grid in the Select Submission Unit(s) section of the screen.
4. Click the Browse button next to the Upload File field in the File Upload section of the screen.
5. An explorer window opens, as shown in Figure 13. Browse for and select the file to be uploaded. Click the file name to populate the Upload File field.
NOTE: Only the Submission Units that you have access to view appear in the grid.
NOTE: Submitting the file to the application does not mean it has been submitted for payment. To submit for payment any wage and contribution or adjustment reports entered via file upload, access the report through the Submission Reports section of the ERM application.

Employer Reporting and Maintenance (ERM) Wage and Contribution User Manual - Employer Approved: 08/09/2017 Effective: 01/01/2018 Version: 6.0
Page 20 of 77
Figure 13: Explorer Window for Settlement Adjustment File Upload
6. Selected the file to be uploaded and click the Upload button. This begins a structural validation process that ensures the file meets the file layout specifications provided by INPRS, which can be found at http://www.in.gov/inprs/erm_file_templates.htm. The file type is pipe delimited ( | ) text file (.txt extension). The file layout includes the following fields:
• A header containing the following required fields:
o Payroll Date
o Row Count
• A body containing the following fields for each member (required fields are marked with an asterisk):
o Submission Unit Number*
o Submission Unit Fund*
o Social Security Number (SSN) (Require at least 2 of the following: SSN, Pension ID or Last Name of Member)
o Pension ID (Require at least 2 of the following: SSN, Pension ID or Last Name of Member)
o Last Name of Member (Require at least 2 of the following: SSN, Pension ID or Last Name of Member)
o Pensionable Wages
o Mandatory Post-tax Contributions
o Mandatory Pre-tax Contributions
NOTE: All transactions included in the settlement adjustment file must be tied to the same settlement (with the same settlement date). Multiple year settlements must be split by fiscal year (TRF only) for each member.
Employer Reporting and Maintenance (ERM) Wage and Contribution User Manual - Employer Approved: 08/09/2017 Effective: 01/01/2018 Version: 6.0
Page 21 of 77
o Employer Share
For My Choice Retirement Savings Plan (formerly ASA Only) participating employers, the employer share fields include:
• Normal Cost
• Supplemental Cost
• Matching Contribution Percentage
For all other Funds, the employer share fields include only the employer contribution percentage.
o FSP Wages (TRF only)
o FSP Contributions (TRF only)
o HEP Contributions (TRF only)
o Credited Days (TRF only)
o Member Voluntary Post-tax Contributions
o Member Voluntary Pre-tax Contributions**
o Last day in Covered Position
o Last Day in Pay
o Last Check Date
o Severance Wages
o Severance – Mandatory Post-tax Contributions
o Severance – Mandatory Pre-tax Contributions
o Severance – Employer Share
o Severance – Member Voluntary Post-tax Contributions
o Severance – Member Voluntary Pre-tax Contributions**
o Pay Period Start Date*
o Pay Period End Date*
o Record Type*
** Voluntary Pre-Tax Contributions continue for members who elected the option before 1/1/2018. As of 1/1/2018, members can no longer elect this option. The election is irrevocable so members enrolled prior to 1/1/2018 continue with pre-tax contributions as long as they are employed with the same
NOTE: All required fields marked with an asterisk (*) must be completed before the record can be processed.
Employer Reporting and Maintenance (ERM) Wage and Contribution User Manual - Employer Approved: 08/09/2017 Effective: 01/01/2018 Version: 6.0
Page 22 of 77
employer in an INPRS-covered position. Members who elected the Voluntary Pre-Tax Contribution option, who leave employment and return to the same employer are required to continue with voluntary pre-tax contributions because the election is irrevocable.
7. When the file name displays above the Upload File field, click the Submit button to submit the Settlement Adjustment file.
8. Once the file is submitted, the confirmation notification shown in Figure 14 is received. This confirmation screen states that the file begins the validation process and can beview the validation results from the Submission Reports Status Grid.
Figure 14: Settlement Adjustment File Upload Confirmation Notification
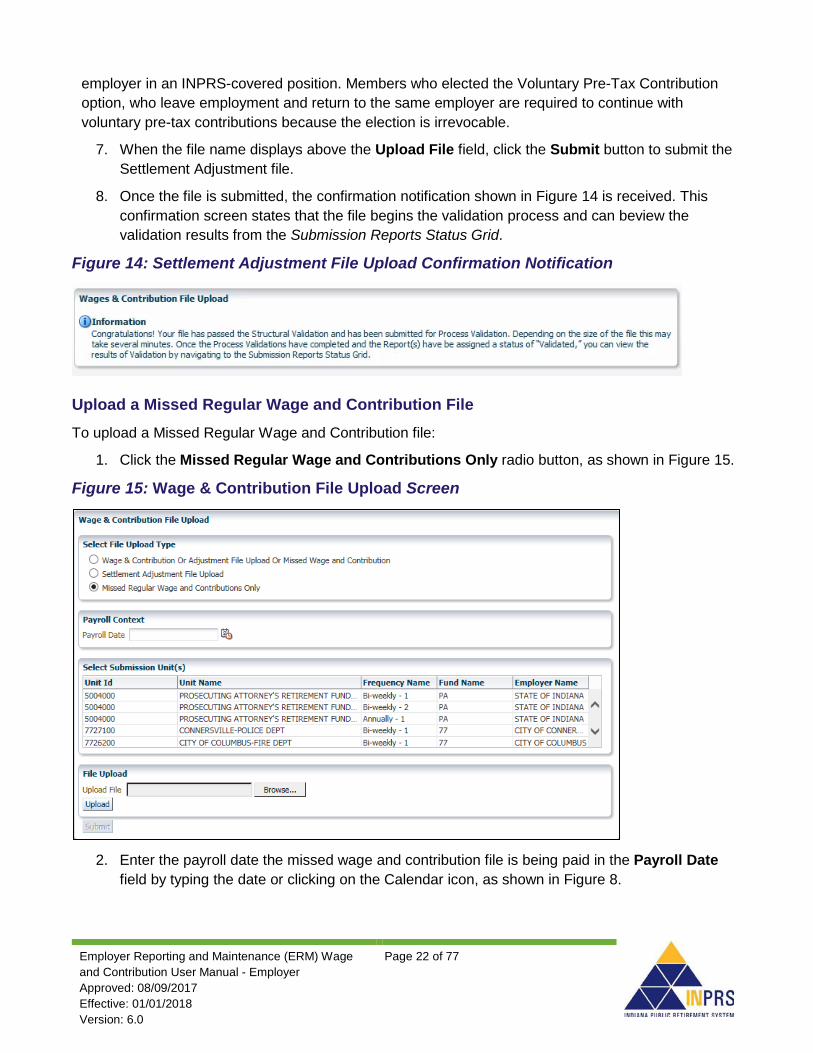
Upload a Missed Regular Wage and Contribution File To upload a Missed Regular Wage and Contribution file:
1. Click the Missed Regular Wage and Contributions Only radio button, as shown in Figure 15.
Figure 15: Wage & Contribution File Upload Screen
2. Enter the payroll date the missed wage and contribution file is being paid in the Payroll Date
field by typing the date or clicking on the Calendar icon, as shown in Figure 8.

Employer Reporting and Maintenance (ERM) Wage and Contribution User Manual - Employer Approved: 08/09/2017 Effective: 01/01/2018 Version: 6.0
Page 23 of 77
3. Choose the Submission Unit included in the file from the list displayed in the grid in the Select Submission Unit(s) section of the screen.
4. Click the Browse button next to the Upload File field in the File Upload section.
5. An explorer window opens, as shown in Figure 16. Browse for and select the file to be uploaded. Click the file name to populate the Upload File field.
Figure 16: Explorer Window for Missed Wage and Contribution Adjustment File Upload
6. Select the file to be uploaded then click the Upload button. This begins a structural validation
process that ensures the file meets the file layout specifications provided by INPRS, which can be found at http://www.in.gov/inprs/erm_file_templates.htm. The file type is pipe delimited ( | ) text file (.txt extension). The file layout includes the following fields:
• A header containing these required fields:
o Payroll Date
o Row Count
• A body containing these fields for each member (required fields are marked with an asterisk):
o Submission Unit Number*
o Submission Unit Fund*
o Social Security Number (SSN) (Require at least two of the following: SSN, Pension ID or Last Name of Member)
o Pension ID (Require at least two of the following: SSN, Pension ID or Last Name of Member)
NOTE: Only the Submission Units that the Employer User has access to view display in the grid.

Employer Reporting and Maintenance (ERM) Wage and Contribution User Manual - Employer Approved: 08/09/2017 Effective: 01/01/2018 Version: 6.0
Page 24 of 77
o Last Name of Member (Require at least two of the following: SSN, Pension ID or Last Name of Member)
o Pensionable Wages
o Mandatory Post-tax Contributions
o Mandatory Pre-tax Contributions
o Employer Share
For My Choice participating employers, the employer share field includes:
• Normal Cost
• Supplemental Cost
• Matching Contribution Percentage
For all other Funds, the employer share field includes only the employer contribution percentage.
o FSP Wages (TRF only)
o FSP Contributions (TRF only)
o HEP Contributions (TRF only)
o Credited Days (TRF only)
o Member Voluntary Post-tax Contributions
o Member Voluntary Pre-tax Contributions**
o Last day in Covered Position
o Last Day in Pay
o Last Check Date
o Severance Wages
o Severance – Mandatory Post-tax Contributions
o Severance – Mandatory Pre-tax Contributions
o Severance – Employer Share
o Severance – Member Voluntary Post-tax Contributions
o Severance – Member Voluntary Pre-tax Contributions**
o Pay Period Start Date*
o Pay Period End Date*
o Record Type*

Employer Reporting and Maintenance (ERM) Wage and Contribution User Manual - Employer Approved: 08/09/2017 Effective: 01/01/2018 Version: 6.0
Page 25 of 77
** Voluntary Pre-Tax Contributions continue for members who elected the option before 1/1/2018. As of 1/1/2018, members can no longer elect this option. The election is irrevocable so members enrolled prior to 1/1/2018 continue with pre-tax contributions as long as they are employed with the same employer in an INPRS-covered position. Members who elected the Voluntary Pre-Tax Contribution option, who leave employment and return to the same employer are required to continue with voluntary pre-tax contributions because the election is irrevocable.
7. When the file name displays above the Upload File field, click the Submit button to submit the Wage and Contribution or Adjustment file to ERM.
8. Once the file is submitted, the notification screen shown in Figure 17 is received. This confirmation screen states that the file begins the validation process and the validation results can be viewed from the Submission Reports Status grid.
Figure 17: Missing Regular Wage and Contribution File Upload Confirmation Notification
NOTE: Submitting the file to the application does not mean it has been submitted for payment. To submit any wage and contribution or adjustment report(s) entered via file upload for payment, access the report through ERM’s Submission Reports section.
NOTE: All required fields marked with an asterisk (*) must be completed before the record can be processed.
Employer Reporting and Maintenance (ERM) Wage and Contribution User Manual - Employer Approved: 08/09/2017 Effective: 01/01/2018 Version: 6.0
Page 26 of 77
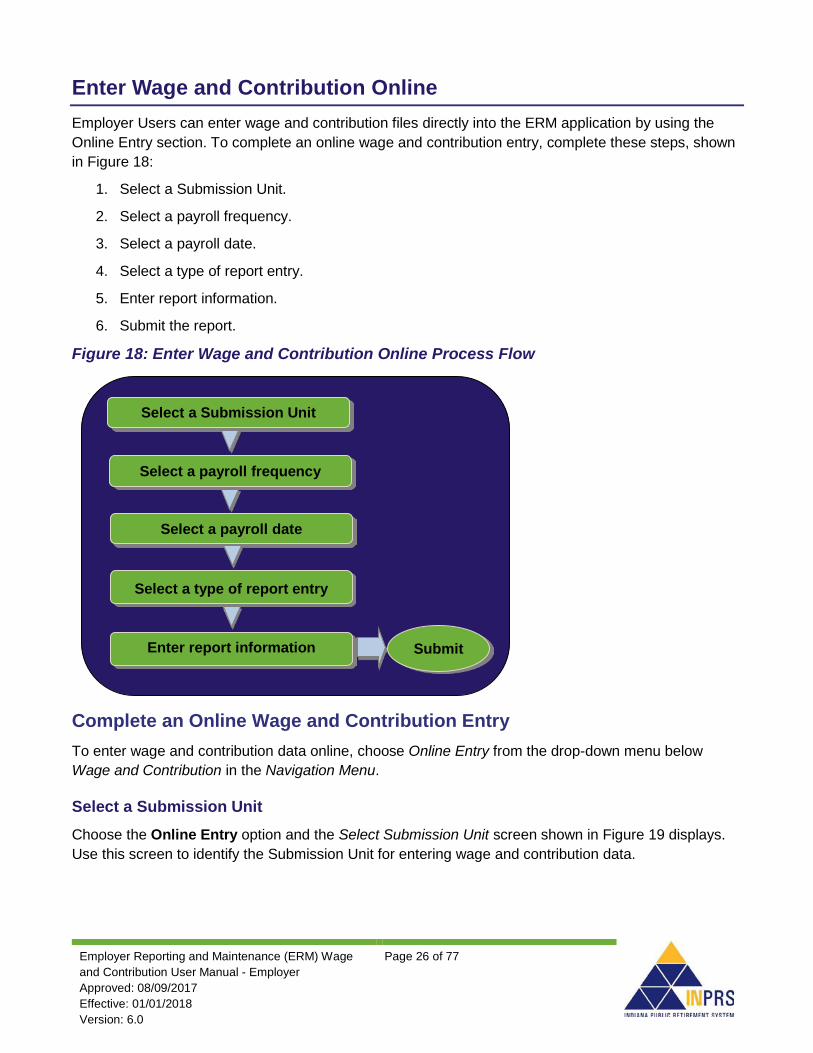
Enter Wage and Contribution Online Employer Users can enter wage and contribution files directly into the ERM application by using the Online Entry section. To complete an online wage and contribution entry, complete these steps, shown in Figure 18:
1. Select a Submission Unit.
2. Select a payroll frequency.
3. Select a payroll date.
4. Select a type of report entry.
5. Enter report information.
6. Submit the report.
Figure 18: Enter Wage and Contribution Online Process Flow
Complete an Online Wage and Contribution Entry To enter wage and contribution data online, choose Online Entry from the drop-down menu below Wage and Contribution in the Navigation Menu.
Select a Submission Unit Choose the Online Entry option and the Select Submission Unit screen shown in Figure 19 displays. Use this screen to identify the Submission Unit for entering wage and contribution data.
Submit
Select a type of report entry
Enter report information
Select a Submission Unit
Select a payroll date
Select a payroll frequency

Employer Reporting and Maintenance (ERM) Wage and Contribution User Manual - Employer Approved: 08/09/2017 Effective: 01/01/2018 Version: 6.0
Page 27 of 77
Figure 19: Select Submission Unit Screen for Wage and Contribution Online Entry
The Select Submission Unit screen contains two search fields that locate a Submission Unit by Submission Unit ID or Submission Unit name.
To search for a Submission Unit by ID:
1. Type the Submission Unit ID in the Submission Unit ID field.
2. Click the Search button.
To search for a Submission Unit by name:
1. Type the name of the Submission Unit in the Submission Unit Name field.
2. Click the Search button.
To select a Submission Unit from the scrollable grid:
1. Scroll through the grid until the correct Submission Unit for wage and contribution information entry is visible.
2. Click the Submission Unit name.
3. Click the Next button to continue the online entry.
NOTE: Only the Submission Unit(s) that the Employer User has access to view displays in the grid. If the Employer User has access to one Submission Unit, it displays in the grid and no search is needed.

Employer Reporting and Maintenance (ERM) Wage and Contribution User Manual - Employer Approved: 08/09/2017 Effective: 01/01/2018 Version: 6.0
Page 28 of 77
Select a Payroll Frequency and a Payroll Date Clicking the Next button on the Select Submission Unit screen opens the Select Payroll Date screen, shown in Figure 20.
Figure 20: Select Payroll Date Screen
To select a payroll frequency and a payroll date:
1. Click the to the right of the Payroll Frequency field. Choose a payroll frequency from the drop-down menu.
2. Click the to the right of the Payroll Date field. Choose a payroll date from the drop-down menu.
3. Click the Next button.
Figure 21: Confirm Skipped Payroll Notification
NOTE: If a payroll date is skipped, the notification screen displays, as shown in Figure 21. This notification asks for one of the following:
• Acknowledge, by clicking the checkbox in the notification, that skipping a payroll date is intentional because there is nothing to report for the skipped payroll date.
• Click the Cancel button, and then submit wage and contribution transactions for the skipped payroll date because skipping a payroll date was not intended.

Employer Reporting and Maintenance (ERM) Wage and Contribution User Manual - Employer Approved: 08/09/2017 Effective: 01/01/2018 Version: 6.0
Page 29 of 77
Select a Type of Report Entry After clicking the Next button on the Select Payroll Date screen, displays one of the two Type of Report Entry screens.
If there are no previous online wage and contribution entry reports for the selected payroll date the screen shown in Figure 22 displays.
Figure 22: Type of Report Entry Screen: New or Previous Report
If there are previously saved wage and contribution online entry reports for the selected payroll date the screen shown in Figure 23 displays.
Figure 23: Type of Report Entry Screen: Saved Report
The Type of Report Entry screens contain radio buttons for selecting a type from these online wage and contribution reports:
• New Report – Creates a new report with no information populated.
• Create New from Previous Report – Pulls all member ID information from the last report that was submitted for payment. Wage and contribution information must be updated for each member. Any terminated members must be removed from the report, and new members added, if applicable.
• Saved Report – If the report was saved instead of submitted for validations, the information previously entered on the report can be accessed.
To select a type of report entry:
1. Click the radio button to the left of the desired type of report entry.
2. Click the Next button.
Create a Wage and Contribution Online Entry Report Select a radio button on the Type of Report Entry screen. The Enter Report Information screen displays as shown in Figure 24.

Employer Reporting and Maintenance (ERM) Wage and Contribution User Manual - Employer Approved: 08/09/2017 Effective: 01/01/2018 Version: 6.0
Page 30 of 77
Figure 24: Enter Report Information Screen
Use this screen to add new records, new members or all active members from a Submission Unit to an online entry report.
Add a New Record to an Online Entry Report To add a new wage and contribution record to the online entry report:
1. Click the Add New Record button. This opens the Add Wage & Contribution Transaction pop-up box, as shown in Figure 25.
Figure 25: Add Wage & Contribution Transaction Pop-Up Box

Employer Reporting and Maintenance (ERM) Wage and Contribution User Manual - Employer Approved: 08/09/2017 Effective: 01/01/2018 Version: 6.0
Page 31 of 77
The Add Wage & Contribution Transaction pop-up box contains the following fields:
o Pension ID*
o SSN*
o Last Name*
o Wages*
o Wages - Mandatory Pre-Tax Contribution
o Wages - Mandatory Post-Tax Contribution
o Wages - Voluntary Pre-Tax Contribution**
o Wages - Voluntary Post-Tax Contribution
o Wages - Employer Contribution Share
For My Choice participating employers, the employer share field includes:
• Normal Cost
• Supplemental Cost
• Matching Contribution Percentage
For all other Funds, the employer share field includes only the employer contribution percentage.
o Severance Wages
o Severance - Mandatory Pre-Tax Contribution
o Severance - Mandatory Post-Tax Contribution
o Severance - Voluntary Pre-Tax Contribution**
o Severance - Voluntary Post-Tax Contribution
o Severance - Employer Contribution Share
o FSP Wages (TRF only)
o FSP Contribution (TRF only)
o HEP Contribution (TRF only)
o Service Days (TRF only)*
o Last Day in Covered Position
o Last Day in Pay
o Period Start Date*
o Period End Date*
o Last Check Date (required if Last Day in Pay is entered)
Employer Reporting and Maintenance (ERM) Wage and Contribution User Manual - Employer Approved: 08/09/2017 Effective: 01/01/2018 Version: 6.0
Page 32 of 77
** Voluntary Pre-Tax Contributions continue for members who elected the option before 1/1/2018. As of 1/1/2018, members can no longer elect this option. The election is irrevocable so members enrolled prior to 1/1/2018 continue with pre-tax contributions as long as they are employed with the same employer in an INPRS-covered position. Members who elected the Voluntary Pre-Tax Contribution option, who leave employment and return to the same employer are required to continue with voluntary pre-tax contributions because the election is irrevocable.
2. Complete all applicable fields in the pop-up box.
3. Click the Add Record button.
4. The new record displays in the grid on the Enter Report Information screen.
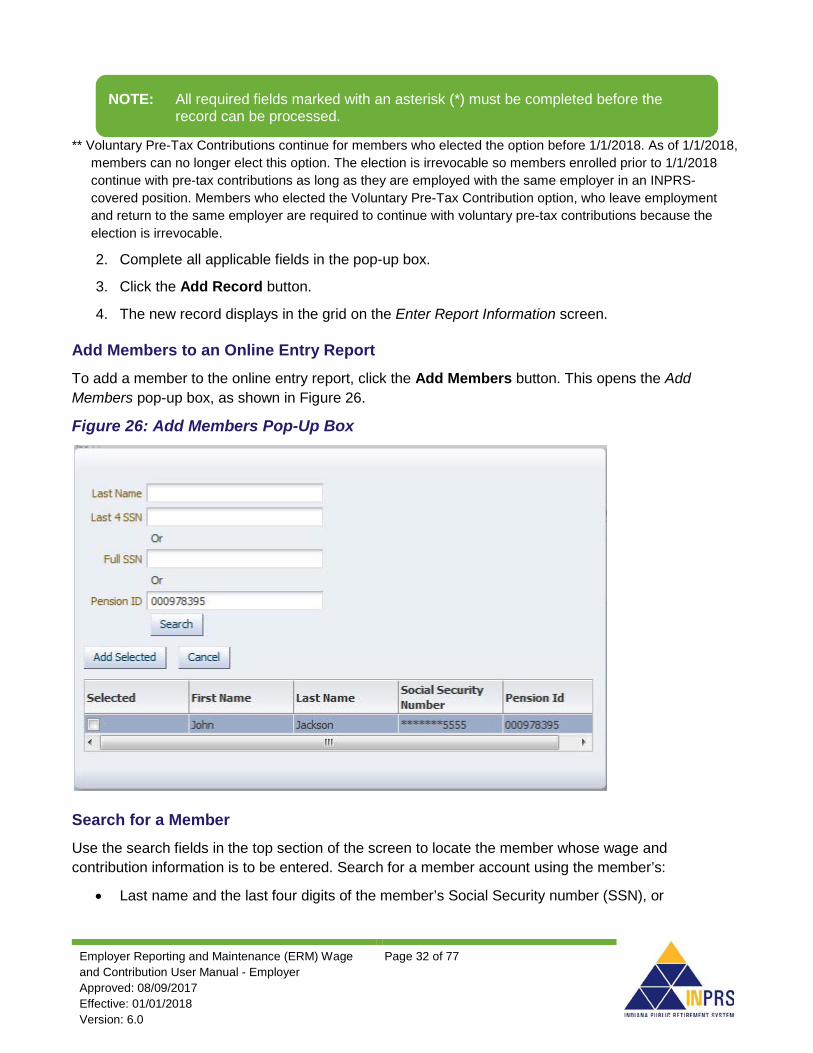
Add Members to an Online Entry Report To add a member to the online entry report, click the Add Members button. This opens the Add Members pop-up box, as shown in Figure 26.
Figure 26: Add Members Pop-Up Box
Search for a Member Use the search fields in the top section of the screen to locate the member whose wage and contribution information is to be entered. Search for a member account using the member’s:
• Last name and the last four digits of the member’s Social Security number (SSN), or
NOTE: All required fields marked with an asterisk (*) must be completed before the record can be processed.

Employer Reporting and Maintenance (ERM) Wage and Contribution User Manual - Employer Approved: 08/09/2017 Effective: 01/01/2018 Version: 6.0
Page 33 of 77
• Full SSN, or
• Pension ID
To search for a member using the member’s last name and partial SSN:
1. Enter the member’s last name into the Last Name field
2. Enter the last four digits of the member’s SSN into the Last 4 SSN field
3. Click the Search button
To search for a member using the member’s full SSN:
1. Enter the member’s SSN, without the dashes, into the Full SSN field
2. Click the Search button
To search for a member using the member’s Pension ID:
1. Type the member’s nine-digit Pension ID into the Pension ID field
2. Click the Search button
The member’s first and last name, Social Security Number, and nine-digit Pension ID number appear in a grid below the search field.
To select a member:
1. Click the checkbox next to the member’s record in the grid
2. Click the Add Selected button to add the member(s) to the report. The Add Members pop-up box closes and is redirected to the Enter Report Information screen to enter wage and contribution information for each member.
To add more members to the report, repeat this process, beginning with entering search criteria into the fields in the Add Members pop-up box.
Add All Active Members to an Online Entry Report To add all active members of a Submission Unit to an online entry report, click the Add All Members from Submission Unit button.
The grid populates with member identification information for every active member of the selected Submission Unit.
Complete the Online Entry Report Once the required members to the online entry report have been added, the wage and contribution information for each member must be entered.
NOTE: Only members with an active membership record display in the search results.

Employer Reporting and Maintenance (ERM) Wage and Contribution User Manual - Employer Approved: 08/09/2017 Effective: 01/01/2018 Version: 6.0
Page 34 of 77
First, check the Update Required column of the grid, as shown in Figure 27. If the value of this column is Yes for any member, enter wage and contribution data for that member.
Figure 27: Enter Report Information Screen’s Update Required Column
Enter Report Data To enter wage and contribution information for a member:
1. Click the Modify link in the Action column of the grid. This opens the Modify Wage & Contribution Transaction pop-up box, as shown in Figure 28. This pop-up box shows the selected member’s Pension ID, SSN and last name, and contains the following additional fields:
o Wages*
o Wages - Mandatory Pre-Tax Contribution
o Wages - Mandatory Post-Tax Contribution
o Wages - Voluntary Pre-Tax Contribution**
o Wages - Voluntary Post-Tax Contribution
o Wages - Employer Contribution Share
For My Choice participating employers, the employer share field includes:
Normal Cost
Supplemental Cost
Matching Contribution Percentage
For all other Funds, the employer share field includes only the employer contribution percentage.
o Severance Wages
o Severance - Mandatory Pre-Tax Contribution

Employer Reporting and Maintenance (ERM) Wage and Contribution User Manual - Employer Approved: 08/09/2017 Effective: 01/01/2018 Version: 6.0
Page 35 of 77
o Severance - Mandatory Post-Tax Contribution
o Severance - Voluntary Pre-Tax Contribution**
o Severance - Voluntary Post-Tax Contribution
o Severance - Employer Contribution Share
o FSP Wages (TRF only)
o FSP Contribution (TRF only)
o HEP Contribution (TRF only)
o Service Days (TRF only)*
o Last Day in Covered Position
o Last Day in Pay
o Period Start Date*
o Period End Date*
o Last Check Date (required if Last Day in Pay is entered)
** Voluntary Pre-Tax Contributions continue for members who elected the option before 1/1/2018. As of 1/1/2018, members can no longer elect this option. The election is irrevocable so members enrolled prior to 1/1/2018 continue with pre-tax contributions as long as they are employed with the same employer in an INPRS-covered position. Members who elected the Voluntary Pre-Tax Contribution option, who leave employment and return to the same employer are required to continue with voluntary pre-tax contributions because the election is irrevocable.
NOTE: All required fields marked with an asterisk (*) must be completed before the record can be processed.

Employer Reporting and Maintenance (ERM) Wage and Contribution User Manual - Employer Approved: 08/09/2017 Effective: 01/01/2018 Version: 6.0
Page 36 of 77
Figure 28: Modify Wage & Contribution Transaction Pop-Up Box
2. Complete all applicable fields in the pop-up box. All required fields, marked with an asterisk (*),
must be completed before the transaction can be added to the report.
Remove Members from an Online Entry Report Occasionally, a member who does not belong on a certain report is added to the grid on the Enter Report Information screen. Remove this member from the online entry report.
To remove a member:
1. Click the Remove link in the Action column of the grid. The Confirm Remove pop-up box opens, as shown in Figure 29.
NOTE: When entering a transaction with only severance information enter at least a zero into the Wages field.

Employer Reporting and Maintenance (ERM) Wage and Contribution User Manual - Employer Approved: 08/09/2017 Effective: 01/01/2018 Version: 6.0
Page 37 of 77
Figure 29: Confirm Remove Pop-Up Box
2. Click the OK button to remove the member from the report.
Validate an Online Entry Report Once the wage and contribution information for all member records requiring updates has been entered, and removed any members who needed to be removed from the report, either save the report for later validation or submit the report to the ERM application for validation.
1. To save the report, click the Save Report button.
2. To validate the online entry report, click the Validate button on the Enter Report Information screen. A validation confirmation displays, as shown in Figure 30.
Figure 30: Validation Confirmation Notification
NOTE: Once the report is validated, you can view the validation results and submit the report for payment through the Submission Report section of ERM.
Employer Reporting and Maintenance (ERM) Wage and Contribution User Manual - Employer Approved: 08/09/2017 Effective: 01/01/2018 Version: 6.0
Page 38 of 77
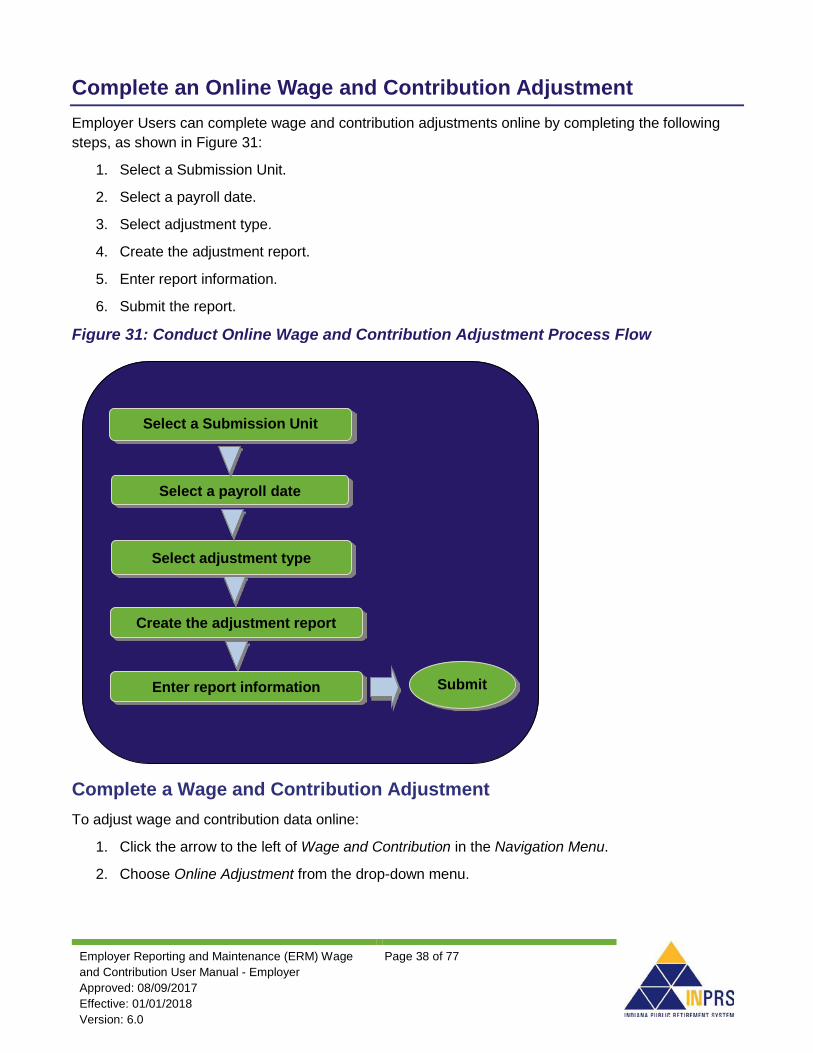
Complete an Online Wage and Contribution Adjustment Employer Users can complete wage and contribution adjustments online by completing the following steps, as shown in Figure 31:
1. Select a Submission Unit.
2. Select a payroll date.
3. Select adjustment type.
4. Create the adjustment report.
5. Enter report information.
6. Submit the report.
Figure 31: Conduct Online Wage and Contribution Adjustment Process Flow
Complete a Wage and Contribution Adjustment To adjust wage and contribution data online:
1. Click the arrow to the left of Wage and Contribution in the Navigation Menu.
2. Choose Online Adjustment from the drop-down menu.
Submit
Select adjustment type
Create the adjustment report
Select a Submission Unit
Select a payroll date
Enter report information

Employer Reporting and Maintenance (ERM) Wage and Contribution User Manual - Employer Approved: 08/09/2017 Effective: 01/01/2018 Version: 6.0
Page 39 of 77
Regardless of the type of wage and contribution adjustment, the first steps are the same:
1. Select a Submission Unit.
2. Select a payroll date.
Select a Submission Unit Choose Online Adjustment, the Select Submission Unit screen displays, as shown in Figure 32. Use this screen to identify the Submission Unit for the wage and contribution adjustment entry.
Figure 32: Select Submission Unit Screen for Wage and Contribution Online Adjustment
The Select Submission Unit screen contains two search fields to locate a Submission Unit by Submission Unit ID or name.
To search for a Submission Unit by ID:
1. Type the Submission Unit ID in the Submission Unit ID field
2. Click the Search button
To search for a Submission Unit by name:
1. Type the name of the Submission Unit in the Submission Unit Name field
2. Click the Search button

Employer Reporting and Maintenance (ERM) Wage and Contribution User Manual - Employer Approved: 08/09/2017 Effective: 01/01/2018 Version: 6.0
Page 40 of 77
All Submission Unit records that match the search criteria, and that the Employer User has permission to view, display in the scrollable grid found below the search fields.
To select a Submission Unit from the scrollable grid:
1. Scroll through the grid until the Submission Unit for the wage and contribution adjustment entry is visible.
2. Click the Submission Unit name.
3. Click the Next button to continue the online adjustment entry.
Enter a Payroll Date Clicking the Next button on the Select Submission Unit screen opens the Select Payroll Date screen, shown in Figure 33.
Figure 33: Select Payroll Date Screen
To enter a payroll date:
1. Type the payroll date into the Payroll Date field. Click the Payroll Date field and the required format for the field displays in a pop-up bubble.
2. Click the Next button to continue with the online adjustment.
Additional process steps are required once a payroll date is selected, but they vary depending upon the adjustment type selected.
Select an Adjustment Type Clicking the Next button on the Select Payroll Date screen opens the Select Adjustment Type screen, shown in Figure 34.
There are four types of wage and contribution online adjustments. They are:
• By Member - for adjustment to previously submitted information
• Missed Wage and Contributions
NOTE: Only the Submission Unit(s) that the Employer User has access to view are displayed in the grid. If the Employer User has access to one Submission Unit , it displays in the grid. Search is not needed.

Employer Reporting and Maintenance (ERM) Wage and Contribution User Manual - Employer Approved: 08/09/2017 Effective: 01/01/2018 Version: 6.0
Page 41 of 77
• By Report (for adjustment to transactions previously submitted on a wage and contribution report)
• Settlement (for an adjustment to wage and contribution information based on a legal decision)
Figure 34: Select Adjustment Type Screen
To select an adjustment type:
1. Click the radio button in front of the adjustment type.
2. Click the Next button.
Adjustment Type: By Member – For Adjustment to Previously Submitted Information Select the By Member - for adjustment to previously submitted information radio button and the Search Member screen opens as shown in Figure 35.
Figure 35: Search Member Screen

Employer Reporting and Maintenance (ERM) Wage and Contribution User Manual - Employer Approved: 08/09/2017 Effective: 01/01/2018 Version: 6.0
Page 42 of 77
Search for a Member Use the search fields in the top section of the screen to locate the member whose wage and contribution information to be adjusted. Search for a member account using the member’s:
• Last name and the last four digits of the member’s Social Security number (SSN), or
• Full SSN, or
• Pension ID
To search for a member by last name and last four digits of the member’s SSN:
1. Enter the member’s last name into the Last Name field.
2. Enter the last four digits of the member’s SSN into the Last 4 SSN field.
3. Click the Search button.
To search for a member using the member’s full nine-digit SSN:
1. Enter the member’s SSN into the Full SSN field.
2. Click the Search button.
To search for a member using the member’s Pension ID:
1. Type the member’s nine-digit Pension ID into the Pension ID field.
2. Click the Search button.
The member’s first and last name, Social Security Number, and nine-digit Pension ID number displays in a grid below the search field.
To select a member, click the member’s name in the grid so that the row is highlighted.
Locate the Transaction to Adjust and Create the Adjustment Report Identify the member, enter the pay period date range for the transaction to be adjusted.
To enter the date range, as shown in Figure 35:
1. Enter the pay period start date into the From Payroll Date field.
2. Enter the pay period end date into the To Payroll Date field.
3. When all the required fields are complete, click the Create Adjustment Report button. The Adjustment Report screen displays, as shown in Figure 36.
Employer Reporting and Maintenance (ERM) Wage and Contribution User Manual - Employer Approved: 08/09/2017 Effective: 01/01/2018 Version: 6.0
Page 43 of 77
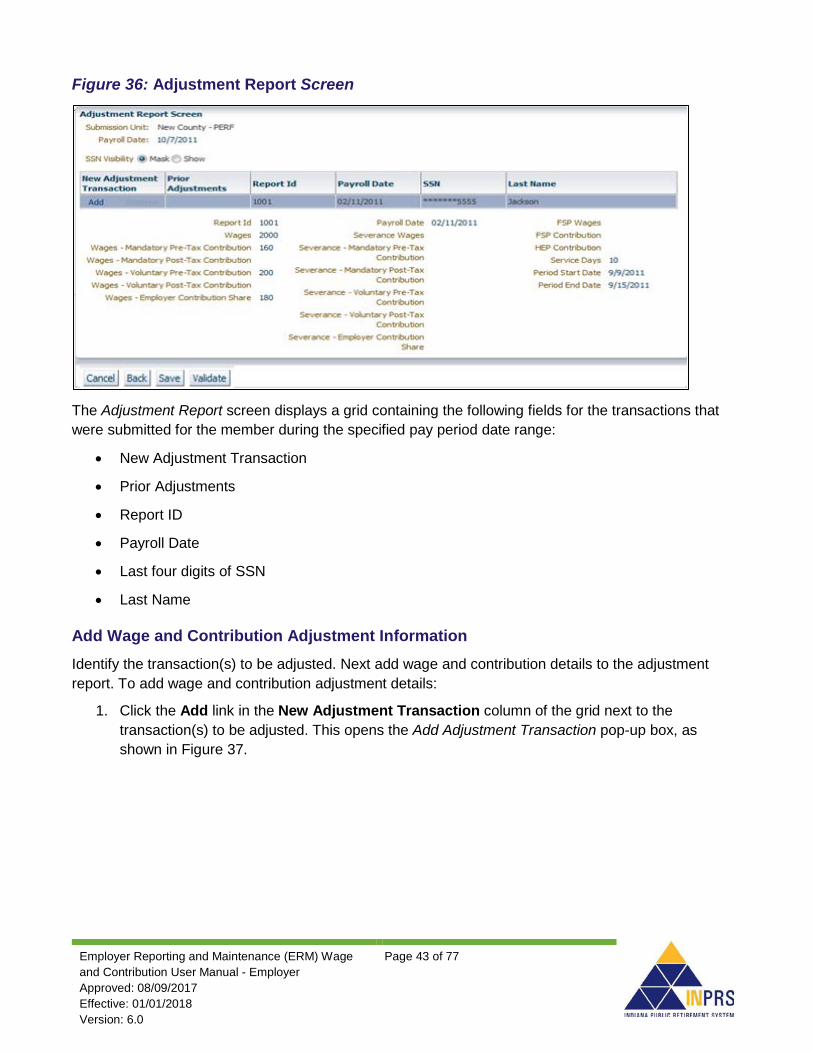
Figure 36: Adjustment Report Screen
The Adjustment Report screen displays a grid containing the following fields for the transactions that were submitted for the member during the specified pay period date range:
• New Adjustment Transaction
• Prior Adjustments
• Report ID
• Payroll Date
• Last four digits of SSN
• Last Name
Add Wage and Contribution Adjustment Information Identify the transaction(s) to be adjusted. Next add wage and contribution details to the adjustment report. To add wage and contribution adjustment details:
1. Click the Add link in the New Adjustment Transaction column of the grid next to the transaction(s) to be adjusted. This opens the Add Adjustment Transaction pop-up box, as shown in Figure 37.

Employer Reporting and Maintenance (ERM) Wage and Contribution User Manual - Employer Approved: 08/09/2017 Effective: 01/01/2018 Version: 6.0
Page 44 of 77
Figure 37: Add Adjustment Transaction Pop-Up Box
The Add Adjustment Transaction pop-up box shows the selected member’s Pension ID, last four digits of SSN and last name, and contains the following additional fields:
• Wages
• Wages - Mandatory Pre-Tax Contribution
• Wages - Mandatory Post-Tax Contribution
• Wages - Voluntary Pre-Tax Contribution**
• Wages - Voluntary Post-Tax Contribution
• Wages - Employer Contribution Share

Employer Reporting and Maintenance (ERM) Wage and Contribution User Manual - Employer Approved: 08/09/2017 Effective: 01/01/2018 Version: 6.0
Page 45 of 77
• Severance Wages
• Severance - Mandatory Pre-Tax Contribution
• Severance - Mandatory Post-Tax Contribution
• Severance - Voluntary Pre-Tax Contribution**
• Severance - Voluntary Post-Tax Contribution
• Severance - Employer Contribution Share
• FSP Wages (TRF only)
• FSP Contribution (TRF only)
• HEP Contribution (TRF only)
• Service Days (TRF only)
** Voluntary Pre-Tax Contributions continue for members who elected the option before 1/1/2018. As of 1/1/2018, members can no longer elect this option. The election is irrevocable so members enrolled prior to 1/1/2018 continue with pre-tax contributions as long as they are employed with the same employer in an INPRS-covered position. Members who elected the Voluntary Pre-Tax Contribution option, who leave employment and return to the same employer are required to continue with voluntary pre-tax contributions because the election is irrevocable.
2. Type information only into the fields that need to be adjusted. Upon exiting a field, the value entered is added to the current value in the grid at the bottom of the screen and displays the field’s new value.
3. When changes have been entered, click the Add Adjustment button.
Adjustment Type: Missed Wage and Contributions Select the By Missed Wage and Contributions radio button, the Create Adjustment Report screen displays, as shown in Figure 38.
Figure 38: Create Adjustment Report Screen
If the selected Submission Unit, payroll date and adjustment type shown on the screen are correct, click the Create Adjustment Report button to continue with the adjustment report.
The Enter Report Information screen opens, as shown in Figure 39.
NOTE: To enter a negative adjustment use the negative sign (-) in front of the value.

Employer Reporting and Maintenance (ERM) Wage and Contribution User Manual - Employer Approved: 08/09/2017 Effective: 01/01/2018 Version: 6.0
Page 46 of 77
Figure 39: Enter Report Information Screen
Add Members to the Adjustment Report Use the Enter Report Information screen to add a member to the adjustment report. To add a member:
1. Click the Add Members button. The Add Member pop-up box opens, as shown in Figure 40.
Figure 40: Add Member Pop-Up Box
2. Search for the member to be added to the report using the member’s:
• Last name and the last four digits of the member’s Social Security number (SSN), or
• Full SSN, or
• Pension ID
3. Enter search criteria into the search fields and click the Search button. The member’s first and last name, last four digits of SSN and nine-digit Pension ID number appear in a grid below the search field.

Employer Reporting and Maintenance (ERM) Wage and Contribution User Manual - Employer Approved: 08/09/2017 Effective: 01/01/2018 Version: 6.0
Page 47 of 77
4. To select a member, click the member’s record in the grid. Click the Add Selected button to add the member to the adjustment report. The Add Member pop-up box closes and the Enter Report Information screen displays for entering enter wage and contribution adjustment information for the member.
Enter Wage and Contribution Adjustment Details To add wage and contribution details to the adjustment report:
1. Click the Modify link next to the member’s name in the grid. This opens the Modify Wage and Contribution Transaction pop-up box, as shown in Figure 41.
Figure 41: Modify Wage & Contribution Transaction Pop-up Box
The Modify Wage and Contribution Transaction pop-up box shows the selected member’s Pension ID, partial SSN and last name, and contains the following additional fields:
• Wages
• Wages - Mandatory Pre-Tax Contribution
• Wages - Mandatory Post-Tax Contribution
• Wages - Voluntary Pre-Tax Contribution**

Employer Reporting and Maintenance (ERM) Wage and Contribution User Manual - Employer Approved: 08/09/2017 Effective: 01/01/2018 Version: 6.0
Page 48 of 77
• Wages - Voluntary Post-Tax Contribution
• Wages - Employer Contribution Share
• Severance Wages
• Severance - Mandatory Pre-Tax Contribution
• Severance - Mandatory Post-Tax Contribution
• Severance - Voluntary Pre-Tax Contribution**
• Severance - Voluntary Post-Tax Contribution
• Severance - Employer Contribution Share
• FSP Wages (TRF only)
• FSP Contribution (TRF only)
• HEP Contribution (TRF only)
• Service Days (TRF only)
** Voluntary Pre-Tax Contributions continue for members who elected the option before 1/1/2018. As of 1/1/2018, members can no longer elect this option. The election is irrevocable so members enrolled prior to 1/1/2018 continue with pre-tax contributions as long as they are employed with the same employer in an INPRS-covered position. Members who elected the Voluntary Pre-Tax Contribution option, who leave employment and return to the same employer are required to continue with voluntary pre-tax contributions because the election is irrevocable.
2. Complete all applicable fields in the pop-up box and click the Save button.
Adjustment Type: By Report Select the By Report radio button and the Search Report screen opens as shown in Figure 42.
Figure 42: Search Report Screen
The search fields on the screen can locate a report using:

Employer Reporting and Maintenance (ERM) Wage and Contribution User Manual - Employer Approved: 08/09/2017 Effective: 01/01/2018 Version: 6.0
Page 49 of 77
• Report Number (this number is automatically generated by the application and can be found in the Submission Reports section of ERM)
• From Payroll Date
• To Payroll Date
Locate a Report to Adjust To locate the report to be adjusted:
1. Enter data for the report into the fields and click the Search button. A list of reports that match the criteria entered into the search fields displays in the grid below the search fields.
2. Click the record for the report that is needed.
3. Click the Create Adjustment Report button. The Adjustment Report screen opens, as shown in Figure 43.
Figure 43: Adjustment Report Screen
Add Adjustment Transaction Details Clicking the Add link in the New Adjustment Transaction column, next to the transaction to be adjusted, opens the Add Adjustment Transaction pop-up box, as shown in Figure 44. Use this screen to add the wage and contribution adjustment details to the report.

Employer Reporting and Maintenance (ERM) Wage and Contribution User Manual - Employer Approved: 08/09/2017 Effective: 01/01/2018 Version: 6.0
Page 50 of 77
Figure 44: Add Adjustment Transaction Pop-Up Box
The pop-up box shows the selected member’s Pension ID, last four digits of SSN and last name, and contains the following additional fields:
• Wages
• Wages - Mandatory Pre-Tax Contribution
• Wages - Mandatory Post-Tax Contribution
• Wages - Voluntary Pre-Tax Contribution**
• Wages - Voluntary Post-Tax Contribution
• Wages - Employer Contribution Share
• Severance Wages
• Severance - Mandatory Pre-Tax Contribution
• Severance - Mandatory Post-Tax Contribution

Employer Reporting and Maintenance (ERM) Wage and Contribution User Manual - Employer Approved: 08/09/2017 Effective: 01/01/2018 Version: 6.0
Page 51 of 77
• Severance - Voluntary Pre-Tax Contribution**
• Severance - Voluntary Post-Tax Contribution
• Severance - Employer Contribution Share
• FSP Wages (TRF only)
• FSP Contribution (TRF only)
• HEP Contribution (TRF only)
• Service Days (TRF only)
** Voluntary Pre-Tax Contributions continue for members who elected the option before 1/1/2018. As of 1/1/2018, members can no longer elect this option. The election is irrevocable so members enrolled prior to 1/1/2018 continue with pre-tax contributions as long as they are employed with the same employer in an INPRS-covered position. Members who elected the Voluntary Pre-Tax Contribution option, who leave employment and return to the same employer are required to continue with voluntary pre-tax contributions because the election is irrevocable.
To add wage and contribution adjustment details:
1. Type information only into the fields that need to be adjusted. Enter the information and exit the field. The value is added to the current value in the grid at the bottom of the screen to show the new value.
2. When the changes are complete, click the Add Adjustment button.
Clicking the Add Adjustment button returns to the Adjustment Report screen. A new section, the New Adjustment Transactions section, displays on this screen, as shown in Figure 45. This section contains the details for the adjustments added to the report.
NOTE: To enter a negative adjustment use the negative sign (-) in front of the value.

Employer Reporting and Maintenance (ERM) Wage and Contribution User Manual - Employer Approved: 08/09/2017 Effective: 01/01/2018 Version: 6.0
Page 52 of 77
Figure 45: New Adjustment Transaction Section on the Adjustment Report Screen
Adjustment Type: Settlement Select the Settlement radio button and the Create Adjustment Report screen displays as shown in Figure 46.
Figure 46: Create Adjustment Report Screen
To create the adjustment report, click the Create Adjustment Report button. This opens the Enter Report Information screen as shown in Figure 47.

Employer Reporting and Maintenance (ERM) Wage and Contribution User Manual - Employer Approved: 08/09/2017 Effective: 01/01/2018 Version: 6.0
Page 53 of 77
Figure 47: Enter Report Information Screen
Add Members to the Adjustment Report Use the Enter Report Information screen to add members to the adjustment report. To add a member:
1. Click the Add Members button. The Add Member pop-up box opens.
2. Search for the member(s) to add to the report by using the member’s:
• Last name and the last four digits of the member’s Social Security number (SSN), or
• Full SSN, or
• Pension ID
3. Click the Search button. The member’s first and last name, last four digits of Social Security number, and nine-digit Pension ID number appear in a grid below the search field.
4. To select the member(s), click the checkbox next to the member’s record in the grid. Click the Add Selected button to add the member(s) to the adjustment report. The Add Member pop-up box closes and the Enter Report Information screen displays. Enter wage and contribution information to the adjustment report.
5. All active members can be added to the report. Click the Add All Members from Submission Unit button and all members are added.
Enter Settlement Adjustment Details To add wage and contribution details to the adjustment report:
1. Click the Modify link next to the member’s name in the grid. This opens the Modify Wage & Contribution Transaction pop-up box.
2. Complete all applicable fields in the pop-up box and click the Save button. All required fields, marked with an asterisk (*) must be completed before saving.
Cancel, Save, or Validate the Wage and Contribution Adjustment After all the wage and contribution adjustment information for all the members included in the adjustment report have been added, either cancel the report, save it for processing later, or submit the report to the ERM application for validation by completing the following:

Employer Reporting and Maintenance (ERM) Wage and Contribution User Manual - Employer Approved: 08/09/2017 Effective: 01/01/2018 Version: 6.0
Page 54 of 77
1. Click the Cancel button to return to the Main Menu. Confirm this action. Notification that the online adjustment is cancelled displays. The adjustment report is not saved.
2. Click the Back button to return to the previous screen.
3. Click the Save button to save the report to ERM and submit it for processing at a later date.
4. Validate the data in the report by clicking the Validate button. The confirmation notification shown in Figure 48 displays.
Figure 48: Validation Confirmation Notification
View Validation Results Once the report is sent for validation, access the Submission Reports section of ERM to view the validation results. In the Submission Reports section, review the following information for any report sent for validation:
• The number of transactions that passed validation • The number of transactions that passed validation with only warnings • The number of transactions that failed with only errors • The number of transactions that failed with both warnings and errors • The total number of transactions processed • The transactions that passed validation and have been submitted for payment • The transactions that have not been submitted for payment
Any transaction that fails validation is placed into the Exception Queue.
NOTE: All settlement adjustment transactions that are sent to the Exception Queue must be resolved before a settlement adjustment report can be processed for payment. Before a settlement adjustment report can be processed for payment, INPRS Staff must review it and release it from settlement hold status.

Employer Reporting and Maintenance (ERM) Wage and Contribution User Manual - Employer Approved: 08/09/2017 Effective: 01/01/2018 Version: 6.0
Page 55 of 77
Manage Submission Reports Once wage and contribution, adjustment, or settlement adjustment transactions for validation have been submitted, access the report through the Submission Reports section of the ERM application to view the validation results and process the report for payment.
Use the Submission Reports section to complete the following:
• View wage and contribution reports submitted for validation.
• Resolve errors in wage and contribution reports.
• Process validated wage and contribution reports for payment.
• Edit payment dates for wage and contribution reports in Future Payment Status.
• View detailed wage and contribution reports.
• View wage and contribution summary reports.
• Delete wage and contribution reports.
Access Submission Reports To access submission reports:
1. Click the to the left of Wage and Contribution in the Navigation Menu.
2. Choose Submission Reports from the drop-down menu.
The Select Submission Unit screen, as shown in Figure 49 opens.

Employer Reporting and Maintenance (ERM) Wage and Contribution User Manual - Employer Approved: 08/09/2017 Effective: 01/01/2018 Version: 6.0
Page 56 of 77
Figure 49: Submission Report Select Submission Unit Screen
The Select Submission Unit screen contains two search fields that allow locating a Submission Unit by Submission Unit ID number or name.
To search for a Submission Unit by ID:
1. Type the Submission Unit ID in the Submission Unit ID field.
2. Click the Search button.
To search for a Submission Unit by name:
1. Type the name of the Submission Unit in the Submission Unit Name field.
2. Click the Search button.
To select a Submission Unit from the scrollable grid:
1. To view wage and contribution submission reports, scroll through the grid until the Submission Unit is visible.
2. Click the Submission Unit name.
3. Click the Next button.
NOTE: Only the Submission Units that the Employer User has access to view are those displayed in the grid.

Employer Reporting and Maintenance (ERM) Wage and Contribution User Manual - Employer Approved: 08/09/2017 Effective: 01/01/2018 Version: 6.0
Page 57 of 77
Manage Submission Reports Once you have selected a Submission Unit, the Search Reports screen opens, as shown in Figure 50. Use this screen to locate the Submission Report you want to view.
Figure 50: Search Reports Screen
The top portion of the Search Reports screen contains a group of fields used to locate a submission report. Search for submission reports using:
• Report Number
• Report Type
• Payroll Date Range – From Date
• Payroll Date Range – To Date
• Status Date Range – From Date
• Status Date Range – To Date
• Report Status
Enter search criteria into the appropriate fields and click the Search button.

Employer Reporting and Maintenance (ERM) Wage and Contribution User Manual - Employer Approved: 08/09/2017 Effective: 01/01/2018 Version: 6.0
Page 58 of 77
A list of submission reports matching the search criteria appear in the grid in the Select Report section of the Search Reports screen.
When a report is selected from the grid, a summary displays in the Report Summary section below the grid.
View Submission Reports To view a submission report:
1. Locate the report to be viewed in the Select Report grid.
2. Click the View link in the Action column. The Report Summary screen opens, as shown in Figure 51. The fields displayed on the Report Summary screen can differ if an employer participates in the My Choice Plan. See Figures 56 through 60 for additional details on the report summary screen.
Figure 51: Report Summary Screen
The Report Summary screen provides a detailed overview of the wage and contribution report including report number, report status, payroll date, report type and a summary of the contributions included on the report.
The Validation Results grid on the screen shows the results of the validation process for the selected report, including the number of transactions included in the report, the number of transactions that passed validations, the number of transactions that failed validations, the number of transactions that have been submitted for payment and the number of transactions that have not been submitted for payment.

Employer Reporting and Maintenance (ERM) Wage and Contribution User Manual - Employer Approved: 08/09/2017 Effective: 01/01/2018 Version: 6.0
Page 59 of 77
View Transactions in Submission Reports Use the Report Summary screen to view any transactions in the selected report. View transactions that passed validation and those that failed.
To view a transaction that passed validation:
1. Click the View link in the View column of the Validation Results table, as shown in Figure 51. A pop-up box with transaction information displays on the screen. See Figure 52 for an example of the pop-up box for transactions that passed validation.
2. Click the OK button at the bottom of the pop-up box to return to the Report Summary screen.
Figure 52: Transactions That Passed Validations Pop-Up Box
NOTE: If any transactions in the chosen report failed validation, the Process for Payment button at the bottom of the screen is grayed out. Review each failed transaction and confirm that these transactions have been reviewed before the button becomes active and a report can be processed for payment.
NOTE: To understand the difference between ERRORS and WARNINGS, see the Glossary of Important ERM Terms document for a complete list and definitions. This document is available on the INPRS website.

Employer Reporting and Maintenance (ERM) Wage and Contribution User Manual - Employer Approved: 08/09/2017 Effective: 01/01/2018 Version: 6.0
Page 60 of 77
To view transactions that failed validation:
1. Click the View link in the View column of the Validation Results table, as shown in Figure 51. A pop-up box containing a list of all the transactions in the chosen report that failed validation displays on the screen, as shown in Figure 53.
2. Choose a transaction from the grid at the top of the screen. Data for the chosen transaction displays in the fields below the grid.
3. Click the checkbox at the bottom of the screen to confirm that each transaction that failed validation has been reviewed.
4. Click the OK button to return to the Report Summary screen.
Figure 53: Transactions That Failed Validations Pop-Up Box
Resolve Errors in Submission Reports After viewing the transactions in the report, resolve errors for transactions that failed validation.
To resolve errors in submission reports:
1. Click the Resolve link in the Resolve column of the Validation Results grid for Transactions That Passed Validations With Warnings Only, Transactions That Failed Validations with Errors Only and Transactions That Failed Validations With Errors and Warnings, as shown on Figure 51. This opens the Resolve Transactions screen, as shown in Figure 54.
NOTE: Before a report can be processed for payment, each transaction that failed validation must be reviewed.

Employer Reporting and Maintenance (ERM) Wage and Contribution User Manual - Employer Approved: 08/09/2017 Effective: 01/01/2018 Version: 6.0
Page 61 of 77
Figure 54: Resolve Transactions Screen
2. Click the Resolve link in the grid. This opens the transaction to modify, as shown in Figure 55.
3. The error(s) associated with the transaction are listed in a table in the upper right of the Summary screen.
4. Locate a data field that contains an error.
5. Type the corrected information into each field that contains an error.
6. Click the Save and Revalidate button. The summary screen closes, and the Resolve Transactions screen returns.
7. To delete the transaction because it was entered erroneously, click the Delete button. A pop-up box displays confirming that the transaction is to be deleted.
NOTE: For assistance troubleshooting errors in wage and contribution transactions, see the User Manual Appendix for a list of error codes and the requirements for resolving the error.

Employer Reporting and Maintenance (ERM) Wage and Contribution User Manual - Employer Approved: 08/09/2017 Effective: 01/01/2018 Version: 6.0
Page 62 of 77
Figure 55: Modify Transaction for Wage and Contribution Transactions with Errors
Process Submission Reports for Payment Once a wage and contribution or adjustment report is validated and confirmed that each transaction that failed validation has been reviewed, process the wage and contribution report for payment.
To process a Submission Report for payment, first locate the report to be processed.
To locate a Submission Report:
1. Click the to the left of Wage and Contribution in the Navigation Menu.
2. Choose Submission Reports from the drop-down menu.
3. Search for a report using Section 1 of the Search Reports screen, as shown in Figure 50.
4. Select a report from the grid on the Search Reports screen.
5. Click the View link in the Action column next to the report to be viewed. The Report Summary screen opens, as shown in Figure 51.

Employer Reporting and Maintenance (ERM) Wage and Contribution User Manual - Employer Approved: 08/09/2017 Effective: 01/01/2018 Version: 6.0
Page 63 of 77
To process a report for payment, click the Process for Payment button to process the transactions that passed validation. The Process for Payment screen opens, as shown in Figure 56.
Figure 56: Process for Payment Screen for PERF Hybrid, PA, JU, CE, 77
The Process for Payment screen has two sections:
• The top section displays the report number, report status, payroll date and report type. It also contains a line item breakdown of the total payments contained in the report.
NOTE: If there are transactions that have remained in the Exception Queue for 30 days or more, you will be unable to submit reports for payment until you resolve these errors. It is very important to keep the Exception Queue clear and resolve errors in a timely manner. Before a report can be processed for payment, confirm that all transactions that failed validation have been reviewed. If the report is a settlement adjustment, all transactions that failed validations must be resolved before the report can be submitted for payment.
NOTE: If the report is being submitted late for payment, interest may be added to the report.

Employer Reporting and Maintenance (ERM) Wage and Contribution User Manual - Employer Approved: 08/09/2017 Effective: 01/01/2018 Version: 6.0
Page 64 of 77
• The bottom section contains four fields that display detailed information about the report being submitted for payment:
o The Invoice Amount field shows the total amount due for the selected report.
o The Account Balance field shows the credit or debit balance of the Submission Unit’s account.
If the amount shown in this field displays in red, the amount is a credit and automatically applies toward the payment being made.
If the amount shown in this field is in black, the amount is a debit. Debits are added to the amount due on the report being submitted for payment.
o The Total Amount Due field shows the invoice amount plus any debit balance or minus any credit balance.
o The Amount Unassigned field shows any remaining balance that has not yet been assigned for payment.
This section also contains fields used to assign payment amounts for each bank account (if applicable).
To assign payments:
1. Select an account number from the drop-down menu in the Account Number field.
2. Identify the amount to be paid from the chosen account in the Amount field.
3. Click the add button to add the payment to the Bank Account Number table in the Assign Payments section of the screen.
4. To make payments from more than one account, identify another bank account using the Account Number field, then identify the amount to be paid in the Amount field.
5. When the value in the Amount Unassigned field is zero, click the Submit For Payment button.
In the process for payment screen, the assign payments section for TRF submission units detail pre-1996 and 1996 amounts, as shown in Figure 57.
NOTE: If there is a credit on the Submission Unit account, it is automatically applied to the submitted report, reducing the total amount owed.
NOTE: Credits created in the TRF 1996 and Pre-1996 accounts can only be used towards payments in the same fund. Credits created in the My Choice Plan and the PERF Hybrid fund can only be used towards payments in the same fund.

Employer Reporting and Maintenance (ERM) Wage and Contribution User Manual - Employer Approved: 08/09/2017 Effective: 01/01/2018 Version: 6.0
Page 65 of 77
Figure 57: Process for Payment Screen (TRF Only)
In the process for payment screen for PERF My Choice and PERF Hybrid participating submission units, the Assign Payments section details the invoice amount, applied balance, and net payment due for both the Hybrid and My Choice Plan, as shown in Figure 58.

Employer Reporting and Maintenance (ERM) Wage and Contribution User Manual - Employer Approved: 08/09/2017 Effective: 01/01/2018 Version: 6.0
Page 66 of 77
Figure 58: Process for Payment Screen (My Choice)
Line items for Retro Contributions include links to reflect the breakdown of cost per member:
• Total Retro Contributions Due for Undecided Members link
o The cost detail is shown per member, per plan to reflect what would be owed depending on the member’s choice, since the member has yet to make an election to participate in the PERF Hybrid Fund or PERF My Choice Plan. The employer cost could differ if the member chooses the Fund or Plan, as shown in Figure 59.

Employer Reporting and Maintenance (ERM) Wage and Contribution User Manual - Employer Approved: 08/09/2017 Effective: 01/01/2018 Version: 6.0
Page 67 of 77
Figure 59: Pending Transactions for Undecided Members Pop Up Screen (My Choice)
• Total Retro Contributions Due Now
o The cost detail is shown per member according to the election that has been made since the last report was submitted. This link provides cost details reflecting only what is owed now, since the election has been made, as shown in Figure 60.
Figure 60: Pending Transactions Due Now Pop Up Screen (My Choice)
Click the Submit For Payment button on the Process for Payment screen and the Confirm Payment screen displays as shown in Figure 61.
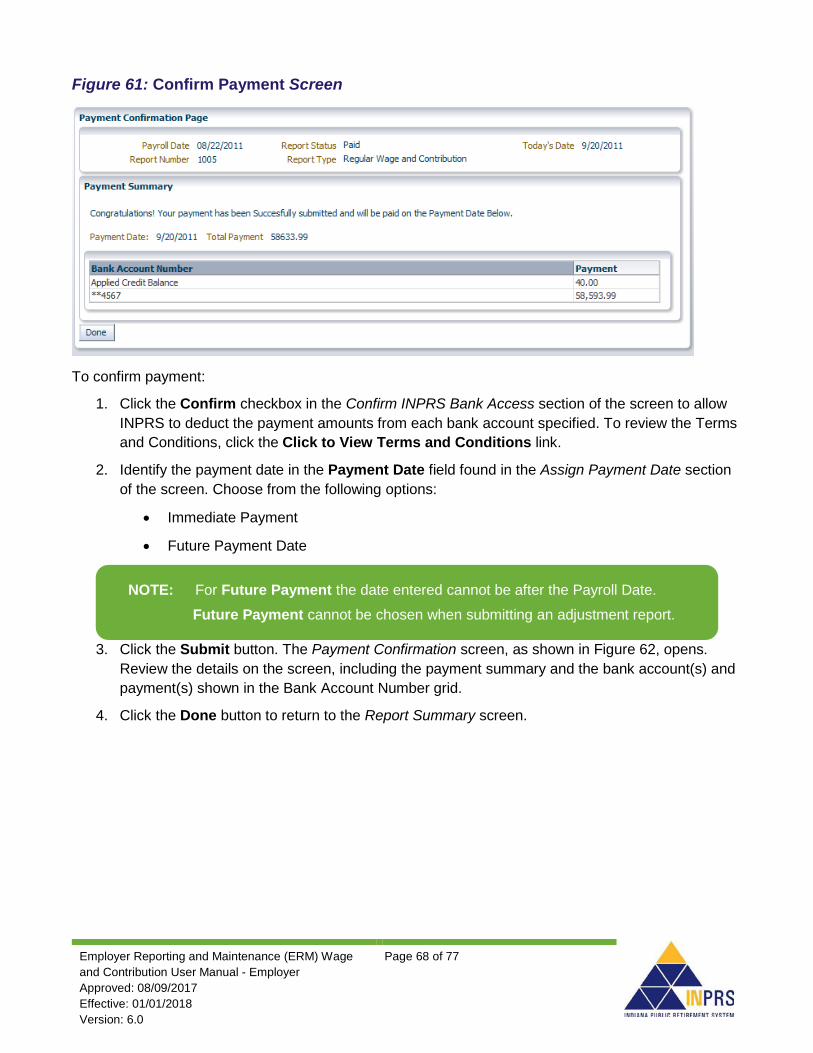
Employer Reporting and Maintenance (ERM) Wage and Contribution User Manual - Employer Approved: 08/09/2017 Effective: 01/01/2018 Version: 6.0
Page 68 of 77
Figure 61: Confirm Payment Screen
To confirm payment:
1. Click the Confirm checkbox in the Confirm INPRS Bank Access section of the screen to allow INPRS to deduct the payment amounts from each bank account specified. To review the Terms and Conditions, click the Click to View Terms and Conditions link.
2. Identify the payment date in the Payment Date field found in the Assign Payment Date section of the screen. Choose from the following options:
• Immediate Payment
• Future Payment Date
3. Click the Submit button. The Payment Confirmation screen, as shown in Figure 62, opens. Review the details on the screen, including the payment summary and the bank account(s) and payment(s) shown in the Bank Account Number grid.
4. Click the Done button to return to the Report Summary screen.
NOTE: For Future Payment the date entered cannot be after the Payroll Date. Future Payment cannot be chosen when submitting an adjustment report.

Employer Reporting and Maintenance (ERM) Wage and Contribution User Manual - Employer Approved: 08/09/2017 Effective: 01/01/2018 Version: 6.0
Page 69 of 77
Figure 62: Payment Confirmation Page
The Report Summary screen for PERF My Choice and PERF Hybrid employers reflects additional fields in the table. As illistrated in Figure 63, Normal Cost, Supplemental Cost, Matching Contribution, and Hybrid ER Share show in the scrollable grid, which are distinct to employers participating in both plans. All employers, including PERF My Choice and Hybrid employers, see fields in the grid summarize Wage and Severance Wage amounts in the following categories:
• Mandatory Pre-Tax Contributions
• Mandatory Post-Tax Contributions
• Voluntary Pre-tax Contributions**
• Voluntary Post-Tax Contributions
• Employer Contribution Share
• Total
** Voluntary Pre-Tax Contributions will continue for members who elected the option before 1/1/2018. As of 1/1/2018, members can no longer elect this option. The election is irrevocable so members enrolled prior to 1/1/2018 will continue with pre-tax contributions as long as they are employed with the same employer in an INPRS-covered position. Members who elected the Voluntary Pre-Tax Contribution option, who leave employment and return to the same employer will be required to continue with voluntary pre-tax contributions because the election is irrevocable.
NOTE: If a wage and contribution payment is overdue, the Payment Date field does not appear in the Assign Payment Date section of the screen. Instead, a notification that the payment due date has been exceeded displays and the payment is processed on the date the report is submitted.

Employer Reporting and Maintenance (ERM) Wage and Contribution User Manual - Employer Approved: 08/09/2017 Effective: 01/01/2018 Version: 6.0
Page 70 of 77
Figure 63: Report Summary Screen (for PERF My Choice and PERF Hybrid participants only)
Access Report Summary Screen Buttons Use the additional buttons at the bottom of the Report Summary screen as shown in Figure 64, to carry out additional activities on wage and contribution reports.

Employer Reporting and Maintenance (ERM) Wage and Contribution User Manual - Employer Approved: 08/09/2017 Effective: 01/01/2018 Version: 6.0
Page 71 of 77
Figure 644: Report Summary Screen
Delete Submission Reports
Any reports that have not been submitted for payment can be removed from the ERM application.
To delete a Submission Report:
1. Click the Delete Report button as shown in Figure 64. A Confirm Delete pop-up box opens.
2. Click the OK button to delete the report.
Edit Payment Dates For reports with a Future Payment status, meaning a wage and contribution payment is set for a future date, the payment date can be changed.
Click the Edit Payment Date button, as shown in Figure 64, to open the Edit Future Payment screen, as shown in Figure 65.

Employer Reporting and Maintenance (ERM) Wage and Contribution User Manual - Employer Approved: 08/09/2017 Effective: 01/01/2018 Version: 6.0
Page 72 of 77
Figure 65: Edit Future Payment Screen
Complete any of the following using the sections on the Edit Future Payment screen:
1. Change the future payment date to a new future date (not past the payroll date).
2. Remove the future payment date and send the payment immediately.
3. Remove the future payment date, which would return the report to a Validated status. All payment information is removed from the report. At this point, the Employer User can edit the report as they would any Validated status report and then process it for payment.
Release Payments The Release Payment button is used by INPRS Staff Users to release settlement adjustments for payment by Employer Users. The button becomes active when a Submission Unit has submitted a settlement adjustment report.
Once an INPRS Staff User has reviewed the settlement information and the settlement report, they release the settlement adjustment for payment by the Submission Unit.
View Summary, Detailed, and Payment Reports Additional reports can be viewed by pressing the buttons at the bottom of the Report Summary screen, as shown in Figure 64.
• Click the Summary Report button to view a summary of the wage and contribution transactions submitted for payment.
NOTE: All settlement adjustments submitted by Employer Users automatically go into a settlement hold status until an INPRS Staff User reviews and approves the settlement information and releases the settlement adjustment for payment. Only then can the Employer User submit the settlement adjustment for payment.

Employer Reporting and Maintenance (ERM) Wage and Contribution User Manual - Employer Approved: 08/09/2017 Effective: 01/01/2018 Version: 6.0
Page 73 of 77
• Click the Detailed Report button to view a detailed report of the wage and contribution transactions submitted for payment.
• Click the Payment Report button to view an invoice-like report of the line items you have submitted for payment.

Employer Reporting and Maintenance (ERM) Wage and Contribution User Manual - Employer Approved: 08/09/2017 Effective: 01/01/2018 Version: 6.0
Page 74 of 77
Manage the Wage and Contribution Exception Queues For any wage and contribution transaction that fails validation, the error must be resolved before the transaction is accepted and can be processed for payment.
To access the Exception Queue:
1. Select the applicable Submission Unit on the ERM Home screen.
2. Click the Next button. The Home Dashboard screen for the Submission Unit opens, as shown in Figure 66.
Figure 66: Home Dashboard Screen
3. To view one of the Wage and Contribution Exception Queues, click a Wage and Contribution
or Adjustment or Wage and Contribution Settlement Adjustment link in the Exception Type column of the Exceptions Summary section of the Home Dashboard.
4. The wage and contribution exceptions appear in the table, as shown in Figure 67.
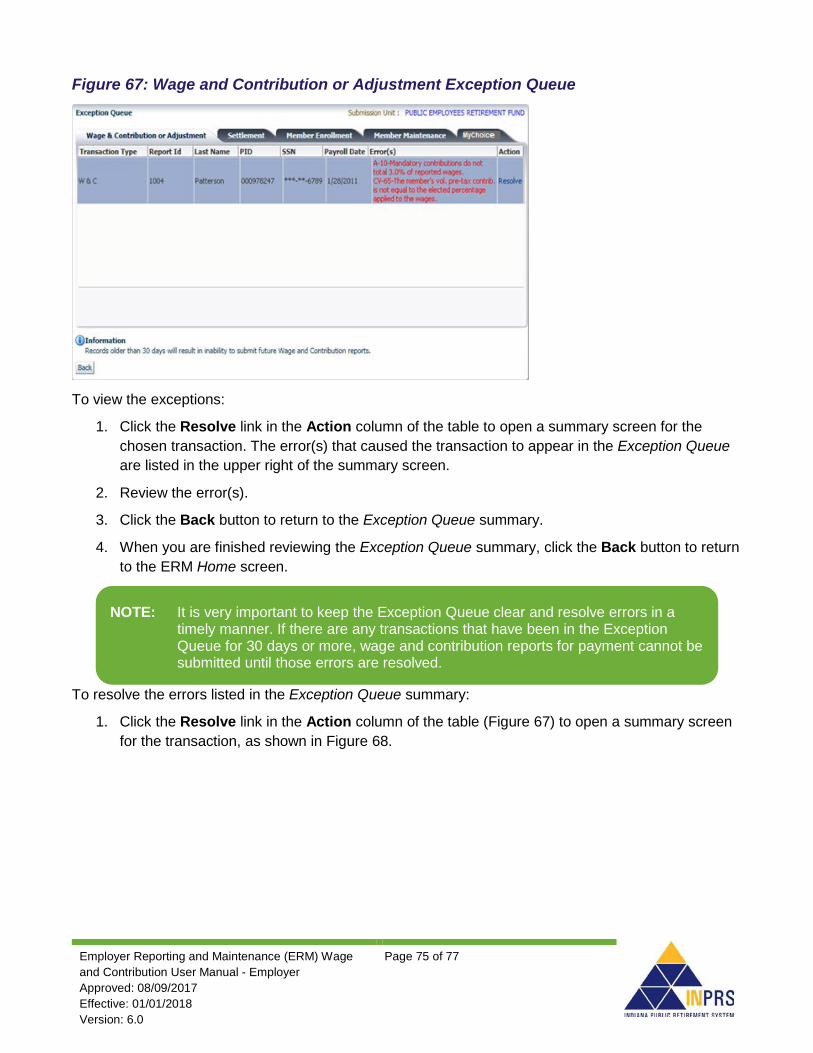
Employer Reporting and Maintenance (ERM) Wage and Contribution User Manual - Employer Approved: 08/09/2017 Effective: 01/01/2018 Version: 6.0
Page 75 of 77
Figure 67: Wage and Contribution or Adjustment Exception Queue
To view the exceptions:
1. Click the Resolve link in the Action column of the table to open a summary screen for the chosen transaction. The error(s) that caused the transaction to appear in the Exception Queue are listed in the upper right of the summary screen.
2. Review the error(s).
3. Click the Back button to return to the Exception Queue summary.
4. When you are finished reviewing the Exception Queue summary, click the Back button to return to the ERM Home screen.
To resolve the errors listed in the Exception Queue summary:
1. Click the Resolve link in the Action column of the table (Figure 67) to open a summary screen for the transaction, as shown in Figure 68.
NOTE: It is very important to keep the Exception Queue clear and resolve errors in a timely manner. If there are any transactions that have been in the Exception Queue for 30 days or more, wage and contribution reports for payment cannot be submitted until those errors are resolved.

Employer Reporting and Maintenance (ERM) Wage and Contribution User Manual - Employer Approved: 08/09/2017 Effective: 01/01/2018 Version: 6.0
Page 76 of 77
Figure 68: Transaction Summary Screen
2. Type the corrected information into each field that contains an error.
3. Click the Save and Revalidate button. The Transaction Summary screen closes, and the Exception Queue summary screen returns.
4. To delete the transaction because it was entered erroneously, click the Delete button. A pop-up box displays to confirm that the transaction is to be deleted.

Employer Reporting and Maintenance (ERM) Wage and Contribution User Manual - Employer Approved: 08/09/2017 Effective: 01/01/2018 Version: 6.0
Page 77 of 77
Appendix: Wage and Contribution Exception Queue Troubleshooting See the ERM Application Wage and Contribution Exception Queue Troubleshooting QRG – Employer for the complete list of Error Codes, Messages, and Actions.