Embed Size (px)
Citation preview

3D0025600B
W-600RStereo Double Cassette Deck
OWNER’S MANUALMANUEL DU PROPRIETAIRE
Thanks for buying a TEAC. Read this manual carefully to get the best performance from this unit.
Nous vous remercions pour l’achat d’un appareil TEAC. Lire ce manuel avec attention pour obtenir lesmeilleures performances possibles de cet appareil.

ENGLISH FRANÇAIS2
Lire ceci avant de faire fonctionner l'appareil
< Choisir avec soin l'endroit où vous placerez votre appareil.Eviter de le placer directement au soleil ou près d'une sourcede chaleur. Eviter aussi les endroits sujets à des vibrations, àde la poussière excessive, à la chaleur, au froid ou à l'humidité.Toujours le garder éloigné de sources de bourdonnementstelles que des transformateurs ou moteurs.
< Ne pas ouvrir le coffret car ceci risquerait de provoquer desdommages aux circuits ou des chocs électriques. Si un objetrentre dans l'appareil, contacter votre revendeur.
< Lors du débranchement du cordon d'alimentation de la prisemurale, toujours tirer sur la fiche et non sur le cordon.
< Ne pas essayer de nettoyer l'appareil avec des solvantschimiques car ceci pourrait endommager le fini de l'appareil.Utiliser un chiffon propre et sec.
< Garder soigneusement ce manuel d'instructions pour uneréférence ultérieure.
Read this before operation
< Choose unit installation location carefully. Avoid placing it indirect sunlight or close to a source of heat. Also avoid locationssubject to vibrations and excessive dust, heat, cold or moisture.Keep away from sources that hum, such as transformers ormotors.
< Do not open the cabinet as this might result in damage to thecircuitry or electrical shock. If a foreign object should get intothe set, contact your dealer.
< When removing the power plug from the wall outlet, always pulldirectly on the plug, never yank the cord.
< Do not attempt to clean the unit with chemical solvents as thismight damage the finish. Use a clean, dry cloth.
< Keep this manual in a safe place for future reference.
CAUTION
< DO NOT REMOVE THE PROTECTIVE HOUSING USINGSCREWDRIVER.
< USE OF CONTROLS OR ADJUSTMENTS OR PERFORMANCE OFPROCEDURES OTHER THAN THOSE SPECIFIED HEREIN MAYRESULT IN HAZARDOUS RADIATION EXPOSURE.
< IF THIS PRODUCT DEVELOPS TROUBLE, MAKE A CONTACTWITH OUR SERVICEMAN, AND DO NOT USE THE PRODUCT INA TROUBLED STATE.
AC POWER CORD CONNECTIONCAUTION:
TO PREVENT ELECTRIC SHOCK, MATCH WIDE BLADE OF PLUGTO WIDE SLOT, FULLY INSERT.
For CANADACORDE DE CONNEXION CAATTENTION:
POUR ÉVITER LES CHOCS ÉLECTRIQUES, INTRODUIRE LA LAMELA PLUS LARGE DE LA FICHE DANS LA BORNECORRESPONDANTE DE LA PRISE ET POUSSER JUSQU’AU FOND.
Pour le CANADA
WARNING: TO PREVENT FIRE OR SHOCK HAZARD, DO NOT EXPOSE THIS APPLIANCE TO RAIN OR MOISTURE.
CAUTION: TO REDUCE THE RISK OF ELECTRIC SHOCK, DO NOT REMOVE COVER (OR BACK). NO USER-SERVICEABLE PARTS INSIDE. REFER SERVICING TO QUALIFIED SERVICE PERSONNEL.Y
E
RTHE EXCLAMATION POINT WITHIN AN EQUILATERAL TRIANGLE IS INTENDED TO ALERT THE USER TO THE PRESENCE OF IMPORTANTOPERATING AND MAINTENANCE (SERVICING) INSTRUCTIONS IN THE LITERATURE ACCOMPANYING THE APPLIANCE.
THE LIGHTNING FLASH WITH ARROWHEAD SYMBOL, WITHIN AN EQUILATERAL TRIANGLE, IS INTENDED TO ALERT THE USER TO THEPRESENCE OF UNINSULATED "DANGEROUS VOLTAGE" WITHIN THE PRODUCT’S ENCLOSURE THAT MAY BE OF SUFFICIENT MAGNITUDETO CONSTITUTE A RISK OF ELECTRIC SHOCK TO PERSONS.
Before Use Avant Utilisation

CAUTION< Read all of these Instructions.< Save these Instructions for later use.< Follow all Warnings and Instructions marked on the audio equipment.
1) Read Instructions — All the safety and operating instructions shouldbe read before the product is operated.2) Retain Instructions — The safety and operating instructions shouldbe retained for future reference.3) Heed Warnings — All warnings on the product and in the operatinginstructions should be adhered to.4) Follow Instructions — All operating and use instructions should befollowed.5) Cleaning — Unplug this product from the wall outlet before cleaning.Do not use liquid cleaners or aerosol cleaners. Use a damp cloth forcleaning.6) Attachments — Do not use attachments not recommended by theproduct manufacturer as they may cause hazards.7) Water and Moisture — Do not use this product near water — forexample, near a bath tub, wash bowl, kitchen sink, or laundry tub; in awet basement; or near a swimming pool; and the like.8) Accessories — Do not place this product on an unstable cart, stand,tripod, bracket, or table. The product may fall, causing serious injury toa child or adult, and serious damage to the product. Use only with acart, stand, tripod, bracket, or table recommended by the manufacturer,or sold with the product. Any mounting of the product should follow themanufacturer’s instructions, and should use a mounting accessoryrecommended by the manufacturer.9) A product and cart combination should be movedwith care. Quick stops, excessive force, and unevensurfaces may cause the product and cart combinationto overturn.
10) Ventilation — Slots and openings in the cabinet are provided forventilation and to ensure reliable operation of the product and toprotect it from overheating, and these openings must not be blocked orcovered. The openings should never be blocked by placing the producton a bed, sofa, rug, or other similar surface. This product should not beplaced in a built-in installation such as a bookcase or rack unlessproper ventilation is provided or the manufacturer’s instructions havebeen adhered to.11) Power Sources — This product should be operated only from thetype of power source indicated on the marking label. If you are not sureof the type of power supply to your home, consult your product dealeror local power company. For products intended to operate from batterypower, or other sources, refer to the operating instructions.12) Grounding or Polarization — This product may be equipped with apolarized alternating-current line plug (a plug having one blade widerthan the other). This plug will fit into the power outlet only one way. Thisis a safety feature. If you are unable to insert the plug fully into theoutlet, try reversing the plug. If the plug should still fail to fit, contactyour electrician to replace your obsolete outlet. Do not defeat the safetypurpose of the polarized plug.13) Power-Cord Protection — Power-supply cords should be routed sothat they are not likely to be walked on or pinched by items placed uponor against them, paying particular attention to cords at plugs,convenience receptacles, and the point where they exit from theproduct.14) Outdoor Antenna Grounding — If an outside antenna or cablesystem is connected to the product, be sure the antenna or cablesystem is grounded so as to provide some protection against voltagesurges and built-up static charges. Article 810 of the National ElectricalCode, ANSI/NFPA 70, provides information with regard to propergrounding of the mast and supporting structure, grounding of the lead-in wire to an antenna discharge unit, size of grounding conductors,location of antenna-discharge unit, connection to grounding electrodes,and requirements for the grounding electrode.
Note to CATV system installer:This reminder is provided to call the CATV system installer’s attention toSection 820-40 of the NEC which provides guidelines for propergrounding and, in particular, specifies that the cable ground shall beconnected to the grounding system of the building, as close to the pointof cable entry as practical."
15) Lightning — For added protection for this product during a lightningstorm, or when it is left unattended and unused for long periods of time,unplug it from the wall outlet and disconnect the antenna or cablesystem. This will prevent damage to the product due to lightning andpower-line surges.16) Power Lines — An outside antenna system should not be located inthe vicinity of overhead power lines or other electric light or powercircuits, or where it can fall into such power lines or circuits. Wheninstalling an outside antenna system, extreme care should be taken tokeep from touching such power lines or circuits as contact with themmight be fatal.17) Overloading — Do not overload wall outlets, extension cords, orintegral convenience receptacles as this can result in risk of fire orelectric shock.18) Object and Liquid Entry — Never push objects of any kind into thisproduct through openings as they may touch dangerous voltage pointsor short-out parts that could result in a fire or electric shock. Never spillliquid of any kind on the product.19) Servicing — Do not attempt to service this product yourself asopening or removing covers may expose you to dangerous voltage orother hazards. Refer all servicing to qualified service personnel.20) Damage Requiring Service — Unplug this product from the walloutlet and refer servicing to qualified service personnel under thefollowing conditions:a ) when the power-supply cord or plug is damaged.b ) if liquid has been spilled, or objects have fallen into the product.c ) if the product has been exposed to rain or water.d ) if the product does not operate normally by following the operatinginstructions. Adjust only those controls that are covered by theoperating instructions as an improper adjustment of other controls mayresult in damage and will often require extensive work by a qualifiedtechnician to restore the product to its normal operation.e ) if the product has been dropped or damaged in any way.f ) when the product exhibits a distinct change in performance _ thisindicates a need for service.21) Replacement Parts — When replacement parts are required, besure the service technician has used replacement parts specified bythe manufacturer or have the same characteristics as the original part.Unauthorized substitutions may result in fire, electric shock, or otherhazards.22) Safety Check — Upon completion of any service or repairs to thisproduct, ask the service technician to perform safety checks todetermine that the product is in proper operating condition.23) Wall or Ceiling Mounting — The product should be mounted to awall or ceiling only as recommended by the manufacturer.24) Heat — The product should be situated away from heat sourcessuch as radiators, heat registers, stoves, or other products (includingamplifiers) that produce heat.
ANTENNALEAD INWIRE
ANTENNADISCHARGE UNIT(NEC SECTION 810-20)
GROUNDING CONDUCTORS(NEC SECTION 810-21)
GROUND CLAMPSPOWER SERVICE GROUNDINGELECTRODE SYSTEM(NEC ART 250. PART H)NEC - NATIONAL ELECTRICAL CODE
ELECTRICSERVICEEQUIPMENT
Example of Antenna Groundingas per National ElectricalCode, ANSI/NFPA 70
GROUNDCLAMP
Important Safety Instructions
3

ENGLISH FRANÇAIS
Connections Connexions
4
AC Power outletPrice secteur CA
W-600R
REC PLAY
LINE IN OUTPUT
L
R
L
R
VOLTAGESELECTOR
LINE IN OUTPUT
L
R
L
R
B
A
AmplifierAmplificateur
TAPECAUTION
Do not plug the power cord of anycomponent into AC outlets and do not turntheir POWER switches on until allconnections have been performed.
ATTENTIONNe pas brancher aucun composants et nepas les allumer jusqu'à temps que toutesles connextions soit faites.
LINE IN/OUTPUT jacksConnect the LINE IN/OUTPUT jacks to theamplifier by audio signal connectioncords.
< Make sure to connect :white plug w white jack(L:left)red plug w red jack(R:right)
< Be sure to insert each plug securely. Toprevent hum and noise, do not bundle theconnection cords with the power cord orspeaker cord.
AConnecteurs LINE IN/OUTPUT Branchez ces prises sur l’Amplificateur àl’aide du câble à fiches coaxiales.
< Assurez vous de connecter:Fiche blanche
w connecteur blanc (L:gauche)Fiche rouge
w connecteur rouge (R:droit)< Assurez-vous que chaque fiche est
enfoncée bien à fond. Pour éviter leronflement, éloignez les câbles deraccordement du cordon d’alimentation etdes câbles des haut-parleurs.
A
Les têtes et le chemin de la bande doiventêtre nettoyés et démagnétiséspériodiquement.
Nettoyage du chemin de bande< Appliquer un liquide de nettoyage de tête
sur le cotontige spécial ou sur un chiffondoux et frotter légèrement les têtes,cabestans et toutes les pièces de métaldu chemin de bande.
< Nettoyer aussi le galet presseur avec unliquide de nettoyage pour caoutchouc.
Démagnétisation des têtesS'assurer que l’alimentation est coupée,puis démagnétiser les têtes avec ledémagnétiseur.Pour plus de détails sur son utilisation, lireson manuel d’instructions.
AttentionSi la surface de l'appareil devient sale,nettoyer celle-ci à l'aide d'un chiffon douxou utiliser un liquide de nettoyage neutre.La nettoyer entièrement. Ne pas utiliserde diluant, de benzine ou d'alcool car ilsrisquent d'endommager la surface del'appareil.
The heads and tape path should becleaned and demagnetized periodically.
Cleaning Tape Path< Apply head cleaning fluid to a cotton swab
or soft cloth, and lightly rub the heads,capstan and all metal parts in the tapepath.
< Also clean the pinch roller using rubbercleaning fluid.
Demagnetizing HeadsBe sure that the power is off, thendemagnetize the heads using ademagnetizer. For details of its use, readits instructions.
Caution:If the surface of the unit gets dirty, wipewith a soft cloth or use diluted neutralcleaning liquid. Be sure to remove anyfluid completely. Do not use thinner,benzine or alcohol as they may damagethe surface of the unit.
Voltage Conversion(General export models only)Be sure to remove the power cord fromthe AC outlet before repositioning thevoltage converter switch.
1. Locate the voltage selector on the bottomof the main unit.
2. Using a flat-bladed screwdriver, set to theappropriate 230V or 120V positionaccording to your area.
IN NORTH AMERICA USE ONLY ON 120 V SUPPLY.
B
Maintenance Entretien
Changement de tension (Modèles s'exportation générale seulement)Bien débrancher le cordon d'alimentationde la prise secteur avant de repositionnerle sélecteur de changement de tension.
1. Localiser le sélecteur de tension par lefond du appareil.
2. En utilisant un tournevis à lame plate,régler sur la position appropriée 230V ou120V en fonction de la tension locale.
DANS L'AMÉRIQUE DU NORD: UTILISABLESUR 120 V D'ALIMENTATION UNIQUEMENT.
B

5ENGLISH FRANÇAIS
Cassette Tape Bandes
A
Tape HandlingUse your finger or a pencil to turn thecassette's hub and take up any slacktape.
< Avoid touching the tape. Fingerprintsattract dust and dirt.
Do not store tapes in the following places:< On top of heaters, exposed to direct
sunlight or in any other places with hightemperatures.
< Near speakers, on TV sets or amplifiers orwhere they would be exposed to strongmagnetic fields.
< Where humidity is high and in dirty, dustyplaces.
< Avoid dropping or subjecting cassettes toexcessive shocks.
< As C-120 tapes are physically weak andcould become entangled in the transportmechanism, do not use them.
B
b
c
a
Ne pas entreposer des bandes dans lesendroits suivants:< Sur des radiateurs, au soleil ou dans un
endroit où la température est élevée.< Près de haut-parleurs, sur des téléviseurs
ou amplificateurs ou encore près dechamps magnétiques puissants.
< Dans des endroits où l'humidité estélevée ou poussiéreux et sales.
< Eviter d’échapper ou soumettre lescassettes à des chocs excessifs.
< Comme les bandes des cassettes C120sont physiquement faibles et peuventfacilement se coincer dans le mécanismede transport, ne pas les utiliser.
Choix de bandePour que le choix automatique de bandefonctionne correctement, les bandesmétals ou chromes (cobalt) doiventposséder des trous d’identification.
< Cet appareil permet d' utiliser descassettes Normales (type! ) ou CrO2(type@).
A
Manipulation des bandesUtiliser un doigt ou un crayon pourtourner le moyeu de la cassette etrattraper le jeu de la bande.
< Eviter de toucher la bande. Lesempreintes digitales attirent la poussièreet les saletés.
B
B
Normal / Normale (Type!)CrO2 (Type@)Metal / Métal (Type!%)c
ba
Basic description of Dolby NRDuring low-level program material, DolbyNR acts to boost high-frequency signals.During playback, these signals arerestored to their original level. Any noiseintroduced in between these processes(during recording) will be reduced inplayback. Dolby NR also employs theprinciple of least treatment, leaving high-level signals unprocessed since thelouder program material serves toeffectively mask any tape hiss.
Principe de fonctionnement du Dolby NRLe dispositif de réduction de bruit DolbyNR fonctionne en renforçant les signauxde fréquence élevée lorsque leprogramme est à un niveau faible. A lalecture, ces signaux sont ramenés à leurniveau d’origine. Tout bruit introduit entreces deux processus, c’est-à-dire pendantl’enregistrement, sera réduit à la lecture.Le dispositif Dolby NR obéit également auprincipe de traitement minimum, c’est àdire en ne traitant pas les signaux deniveau élevé puisqu’un niveau sonoreplus élevé a pour effet de masquersuffisamment tout sifflement sur la bande.
Dolby noise reduction manufactured underlicense from Dolby Laboratories LicensingCorporation. "DOLBY" and the double-D symbol U aretrademarks of Dolby LaboratoriesLicensing Corporation.
Réduction de bruit Dolby fabriquée souslicence de Dolby Laboratories LicensingCorporation. DOLBY et le symbole double-D U sontdes marques de Dolby LaboratoriesLicensing Corporation.
Tape SelectionMetal and chrome (cobalt) tapes haveidentification holes.
< You can use normal(Type!) or CrO2(Type@)tape.
A

ENGLISH FRANÇAIS
Playback (1) Lecture (1)
6
1
4
3
2
5 Press the PLAY button of DECK !(y) orDECK @(hory) to start playback.
< Adjust the volume with the amplifier'svolume control.
5
u: One Side Playingj: SideA q SideB q Stopp: qSideA q SideB
The tape will stop after 5 cycles.
Load a pre-recorded cassette tape inDECK ! or @. Push the cassette holder to open, load acassette tape with its exposed side facingdown, and close the holder.
< You can use normal(Type! ) orCrO2(Type@) tape.
< You can choose either DECK ! or DECK @for playback.
Set the REVERSE MODE switch to therequired tape travel mode(DECK @ only).
3
2 Mettre une cassette dans l'appareil.Appuyez sur le compartiment cassettepour l'ouvrir; introduire une cassette, côtévisible de la bande vers le bas, puisrefermez le compartiment cassette.
< Cet appareil permet d'utiliser descassettes normales (de type !) ou CrO2(de type @).
< Pour lire la cassette, sélectionnez laplatine correspondante(DECK ! ou DECK @).
Mettre la commande REVERSE MODE surla position requise(DECK @ uniquement).
3
2
u: Lecture d'une facej: FaceA q FaceB q Arrêtp: qFaceA q FaceB
La cassette s'arrête après 5 cycles.
Appuyez sur la touche PLAY de la DECK! (y ) ou de la DECK @ (houy ) pourlancer la lecture.
< Régler le volume avec la commande del’amplificateur.
5
ON:Select for the tape recorded with DOLBY B NR.
OFF:Select for the tape recorded without DOLBY NR.
ON:sélectionner ce mode pour les cassettesenregistrées en DOLBY B NR.
OFF:sélectionner ce mode pour les cassettesenregistrées sans DOLBY NR.
Sélectionnez ON ou OFF de Dolby NR.4Select ON or OFF of Dolby NR.4
22 4
1 5 5 3
Press the POWER switch. 1 Mettre l’appareil sous tension.1
DECK ! DECK @
7ENGLISH FRANÇAIS
Playback (2) Lecture (2)
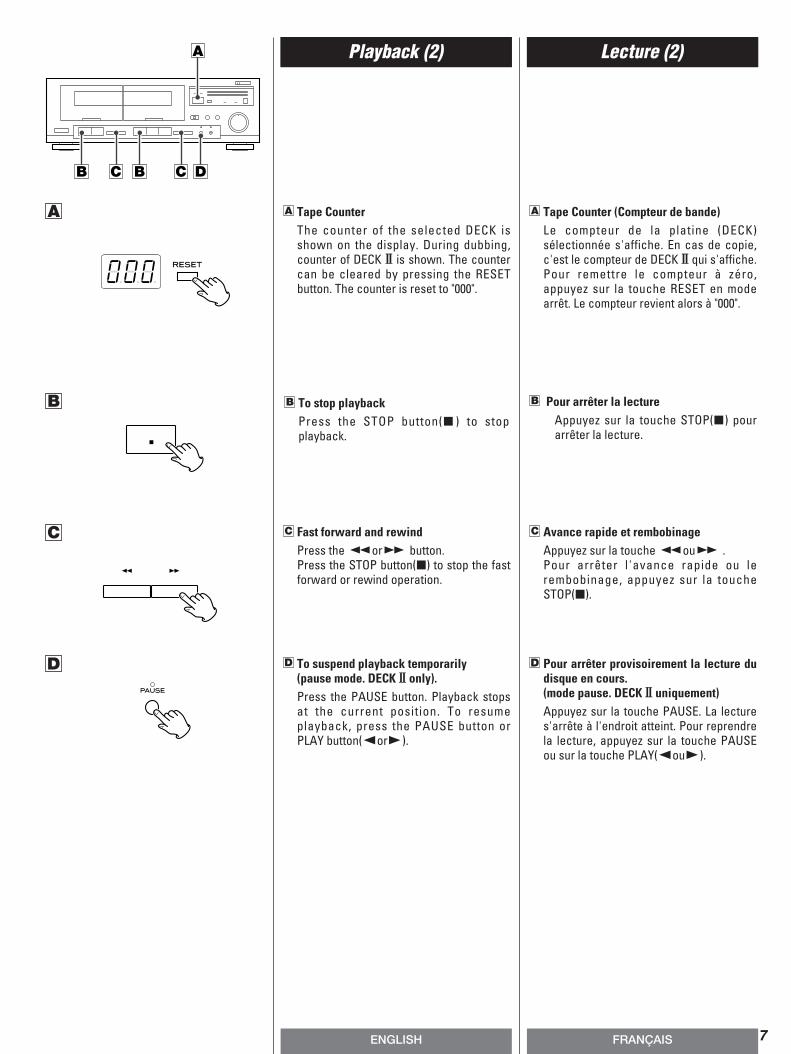
Tape Counter (Compteur de bande)Le compteur de la platine (DECK)sélectionnée s'affiche. En cas de copie,c'est le compteur de DECK @ qui s'affiche.Pour remettre le compteur à zéro,appuyez sur la touche RESET en modearrêt. Le compteur revient alors à "000".
A
To stop playbackPress the STOP button(H ) to stopplayback.
B
C
D
A
B
A
BC C DB
Tape CounterThe counter of the selected DECK isshown on the display. During dubbing,counter of DECK @ is shown. The countercan be cleared by pressing the RESETbutton. The counter is reset to "000".
A
To suspend playback temporarily (pause mode. DECK @ only).Press the PAUSE button. Playback stopsat the current position. To resumeplayback, press the PAUSE button orPLAY button(horG).
D Pour arrêter provisoirement la lecture dudisque en cours.(mode pause. DECK @ uniquement)Appuyez sur la touche PAUSE. La lectures'arrête à l'endroit atteint. Pour reprendrela lecture, appuyez sur la touche PAUSEou sur la touche PLAY(houG).
D
Avance rapide et rembobinageAppuyez sur la touche mou, . Pour arrêter l'avance rapide ou lerembobinage, appuyez sur la toucheSTOP(H).
C
Pour arrêter la lectureAppuyez sur la touche STOP(H) pourarrêter la lecture.
B
Fast forward and rewindPress the mor, button. Press the STOP button(H) to stop the fastforward or rewind operation.
C

ENGLISH FRANÇAIS
Continuous Playback Lecture Continue
8
1 Insert cassette tapes into DECK ! andDECK @.
1 Mettre une cassette dans chacune desdeux platines (DECK ! et DECK @).
1
3
2
4
11 3
4 2
Side A Start EndDECK !
DECK @Side A Start
Side A
Side B
Side A
Side B
Side A and B of DECK @ will be playedback 5 times in total, then this functionwill stop.
< To stop continuous playback, press theSTOP button(H) of the deck being played.
Face A début
Face A début
fin
Face A
Face B
Face A
Face B
DECK !
DECK @
Face A et B de DECK @ sont lues un totalde 5 fois, puis cette fonction s’arrête.
< Pour arrêter la lecture continue avant queles bandes(DECK @ ) soient lues 5 fois,appuyer sur la touche STOP(H) d’une desplatines.
Press the PLAY button(y) of DECK !.When the playback of DECK !(Side A)isfinished, DECK @ starts playback.
4
Select ON or OFF of Dolby NR.3
Set the REVERSE MODE switch to theCONTINUOUS PLAYBACK position.
2
Appuyez sur la touche PLAY(y) de DECK !.A la fin de la lecture de DECK ! (Face A), la lecture de DECK @ démarreautomatiquement.
4
Sélectionnez ON ou OFF de Dolby NR.3
Mettre la commande REVERSE MODE surla position CONTINUOUS PLAYBACK.
2

9ENGLISH FRANÇAIS
Recording(DECK II only) Enregistrement (DECK II uniquement)
1
2
3
4
0 dB
5
7
6
Erasing
Anything previously recorded on the tapewill be automatically erased when youmake a new recording on it. It can also beerased by "recording" on it with the RECLEVEL control set to "0".
Recording from a Stereo System
Press the POWER switch.Select the source of the stereo system tobe recorded.
Select ON or OFF of Dolby NR.
Select the desired reverse mode.3
2
1
u:one side recording (Side A or Side B)j:Side AqSideBqstop
Load a recordable cassette tape intoDECK @.
< You can use normal(Type! ) orCrO2(Type@) tape.
< If the safety tabs of the cassette tapehave been broken off, cover the holeswith adhesive tape.
Press the RECORD button.Then the RECORD indicator will light upand the tape direction indicators willblink.
Adjust the recording level with the RECLEVEL control. The loudest sound should briefly reacharound the "0 dB" point.
Select the recording direction by thePLAY button(hory). Recording will start.
< To record both sides of the tape, selsectj and press the forward PLAYbutton(y). If you press the reverse playbutton(h ), only the back side will berecorded.
< To stop recording temporarily, press thePAUSE button. To restart the tape, pressthe PAUSE button or PLAY button(hory).
< To stop recording, press the STOPbutton(H).
7
6
5
4
u:Enregistrement Face A ou Face Bj:Face AqFaceBqArrêt
Enregistrement à partir d’une chaîne stéréo:
Mettre l’appareil sous tension.Apprêtez-vous à enregistrer la source.
Sélectionnez ON ou OFF de Dolby NR.
Sélectionnez le mode d’inversionsouhaité.
3
2
1
Placez une cassette vierge dans laplatine @ (DECK @).
< Cet appareil permet d' utiliser descassettes Normales (type! ) ou CrO2(type@).
Appuyez sur la touche RECORD.
Le voyant de direction clignote et lesvoyants RECORD (enregistrement)s’allument.
Régler le niveau d’enregistrement à l’aidede la commande de réglage REC LEVEL demanière que l’indicateur de niveauatteigne brièvement le point “0 dB” à l’en-registrement des signaux ayant le niveaule plus élevé.
Choisissez le sens de l’enregistrement àl’aide de la touche PLAY (houy).L’enregistrement commence.
< Sélectionnez le mode d’inversionjetappuyez sur la touche Lecture Avant(y)pour enregistrer sur les deux facesde la cassette. Si vous appuyez sur latouche de Reprise Automatique en SensInverse(h), l’enregistrement ne se feraque sur la seconde face de la cassette.
< Pour interrompre l’enregistrement, ap-puyer sur la touche PAUSE. Appuyer unedeuxième fois pour relancer la bande.
< Pour arrêter l’enregistrement, appuyer surla touche STOP(H).
7
6
5
4
Effacement
Tous les matériaux précédemment en-registrés sur une bande seront effacéspar un nouvel enregistrement. Il estégalement possible d’effacer une bandeen “enregistrant” avec la commande deréglage du niveau REC LEVEL mise sur "0".
4 2
1 7 3 65

ENGLISH FRANÇAIS
Dubbing (1) Copie (1)
10
Load a pre-recorded cassette tape intoDECK ! and a recordable cassette tapeinto DECK @.You can use normal(Type! ) orCrO2(Type@) tape.
1
(Copying from DECK ! to DECK @)
< After dubbing is completed, both decksstop automatically in accordance with thesetting of the REVERSE MODE. To stopdubbing, press the STOP button(H ) ofDECK ! or DECK @.
< If one of the tapes reaches the end, bothdecks will stop.
< The peak level meter indicates the DECK !signal levels. Recording level of DECK @cannot be changed.
< Fast forward nor rewind isn’t possibleduring dubbing.
NORMAL: Dubbing is performed at normal speed.
HIGH:Dubbing is performed at high speed.
(Copie de la DECK ! sur la DECK @)
NORMAL:la copie est effectuée à la vitessenormale
HIGH:la copie est exécutée à vitesse rapide
Mettre une cassette préenregistrée dansla platine !(DECK !) et une cassette pourenregistrement dans la platine@(DECK @).Cet appareil permet d' utiliser descassettes normales (type! ) ou CrO2(type@).
1
< Une fois que la copie est terminée, lesdeux platines s’arrêtent automatiquementen fonction du réglage de la commandeREVERSE MODE. Pour arrêter la copie,appuyer sur la touche STOP(H).
< Si une des deux bandes arrivent à la fin,les deux platines s'arrêteront.
< L’indicateur PEAK PROGRAM LEVELMETER indique le niveau des signaux dela DECK !; le niveau d’enregistrement dela DECK @ sera réglé automatiquement(au même niveau que la DECK !).
< Les fonctions d'avance rapide et derembobinage ne sont pas utilisablespendant la copie.
11
2 3
1
2
3 Press the DUBBING START button(NORMAL or HIGH) to start dubbing.
3
Set the REVERSE MODE switch to thedesired position.
u:Dubbing will be performed for one side only.
j:Dubbing will be stopped after both sides of DECK @ have been dubbed.
< Since DECK ! is not an auto reverse deck,the dubbing process will be stopped whenDECK ! reaches the end of the first side.
2
Appuyez sur la touche de copie (dubbing)(HIGH = élevée ou NORMAL = normale)pour lancer la copie.
3
Mettre la commande REVERSE MODE surla position voulue:
u:Copie d’une seule face.j:La copie s’arrêtera à la fin de la face
inverse(DECK @).
< Comme le DECK ! n'est pas auto reverse,la copie s'arrête dès que le DECK ! atteintla fin de la première face.
2
Important Dubbing Note:Since DECK ! is not an auto reverse deck,the dubbing process will be stopped whenDECK ! reaches the end of the first side.
Remarques:Comme le DECK ! n'est pas auto reverse, lacopie s'arrête dès que le DECK ! atteint lafin de la première face.

11ENGLISH FRANÇAIS
Dubbing (2) Copie (2)
CAUTION: Recording pre-recorded tapes, records, orother published or broadcast material mayinfringe copyright laws. Check beforerecording.
Manual Editing with PAUSE
During normal-speed dubbing, you canedit the dubbed tape as required using thePAUSE button. For example, you canrecord only the required tracks from DECK! to DECK @ skipping unwanted tracks.
Press the PAUSE button to enter therecord-pause mode. DECK ! continuesplayback. When DECK ! reaches a sectionyou want to dub, press the PAUSE buttonagain to restart recording on DECK @.
Notes:
< The settings of the REC LEVEL control andDOLBY NR switch are ignored duringdubbing as they have no effect.
< During NORMAL speed dubbing, only theSTOP(H ) button of DECK ! , and theSTOP(H) and PAUSE buttons of DECK @work.
< During HIGH speed dubbing, only theSTOP(H) button works.
< The sound quality of the dubbed tape maybe slightly worse than that of the originaltape. For this reason, multigenerationdubbing is not recommended.
< If there is a TV set near the deck duringhigh speed dubbing, the TV's horizontalscanning frequency may be recorded onthe tape. In this case, dub at normalspeed, switch off the television or keepthe deck away from the TV.
ATTENTION:L’enregistrement de bandes préenre-gistrées, de disques, ou de tout autrematériau enregistré ou diffusé peutcontrevenir à la réglementation sur lesdroits d’auteur. Se renseigner avantd’enregistrer.
Montage manuel avec PAUSE
Il est possible de monter une bandependant la copie à vitesse normale, enutilisant la touche PAUSE. On peut, parexemple, n’enregistrer que certainsmorceaux de la DECK ! sur la DECK @ ensautant les morceaux non désirés.
Pendant la copie à vitesse normale,lorsque la touche PAUSE est enfoncée, laDECK @ entre en mode de pause àl’enregistrement alors que la DECK !continue la lecture. Ecouter la bande de laDECK ! et appuyer une deuxième fois surla touche PAUSE au début du morceauqui doit être copié pour relancerl’enregistrement sur la DECK @.
Remarques:
< Le réglage de la commande de niveauREC LEVEL et celui du commutateurDOLBY NR seront ignorés pendant lacopie du fait qu’ils n’ont aucun effet.
< Pendant la copie à vitesse normale(NORMAL), seule la touche STOP(H) de laDECK ! fonctionne ainsi que les touchesSTOP(H) et PAUSE de la DECK @.
< Pendant la copie à vitesse rapide (HIGH),seule la touche STOP(H) fonctionne.
< La qualité sonore de la bande de copiepeut être légèrement moins bonne quecelle de la bande d’origine. Pour cetteraison, il n’est pas conseillé de faire descopies de copie.
< Si un récepteur de TV se trouve àproximité du W-600R, il est possible que lafréquence de balayage horizontal de TVsoit enregistrée sur la bande pendant lacopie rapide. Si ce phénomène se produit,ou pour éviter qu'il se produise,enregistrer à vitesse normale et couperl'alimentation du récepteur de TV, ouéloigner les deux appareils I'un de l'autre.

Trouble Shooting
No powereCheck the connection to the AC power supply.
No sound from speakers.eCheck the connection to the stereo system.eAdjust the volume of the amplifier.eThe input selector of the amplifier should be "TAPE".e If a blank tape is used, change it to prerecorded tape.
The cassette holder cannot be closed. TAPE buttons don’t work.e Insert a cassette tape securely.
Sound is distorted or noisy.eClean and demagnetize the heads.eSelect the correct DOLBY NR type according to how the tape
was recorded.
Cannot record.e If the safety tabs of the cassette tape have been broken off,
cover the holes with adhesive tape.eClean and demagnetize the heads.
In case of trouble with the unit, please take the trouble to lookthrough this chart and see if you can solve the problem yourselfbefore you call your dealer or TEAC service center.
En cas de problème, commencer par chercher dans ce tableau pourvoir si on peut trouver soi-même la solution avant de contacter lerevendeur ou le centre de service client TEAC.
Guide de dépannage
L'appareil ne s'allume pas.eVérifiez que l'appareil est bien branché à la source
d'alimentation CA.
Pas de son. Aucun son ne sort par les haut-parleurs.eVérifiez que les haut-parleurs sont bien branchés.eRéglez le volume.eSélectionnez la source voulue.eSi vous avez placé une cassette vierge, la remplacer par une
cassette préenregistrée.
Impossible de fermer le compartiment cassette. Les touches TAPEne fonctionnent pas.ePlacez une cassette dans l'appareil.
Son déformé ou parasité.eNettoyez et démagnétisez les têtes de lecture.eLa position du commutateur DOLBY NR nest pas correct. Le
changer de position.
Impossible d'enregistrer.eSi les languettes de sécurité de la cassette ont été cassées,
recouvrir les trous à l'aide d'un ruban adhésif.eNettoyez et démagnétisez les têtes de lecture.
ENGLISH FRANÇAIS12

ENGLISH FRANÇAIS
Système de pistes . . . . . . . . . . . . . . . . . .stéréo à 4 pistes et 2 canauxTêtes . . . . . . . . . . . . . . . . . . . . . . . . . . . . . . . . . . . . . .DECK !: lecture x 1
DECK @: effacement x 1, enregistrement/lecture x 1(rotative) Type de bande . . . . . . . . . . . . . .Cassettes C-60 et C-90 (type Philips)Vitesse de défilement . . . . . . . . . . . . . . . . . . . . . . . . . . . . . . . . .4,8 cm/sMoteur . . . . . . . . . . . . . . . . . . . . . . . . . . . . . . . . . . . . . . . . . .moteur à CCRéponse en bande passante :
Cassette normale . . . . . . . . . . . . . . . . . . . . . . . . . . . .40 à 14.000 HzCassette à CrO2 . . . . . . . . . . . . . . . . . . . . . . . . . . . . . .40 à 15.000 Hz
Temps d’avance rapide/rembobinageEnviron 100 secondes (avec bande de cassette C-60)
Pleurage et scintillement . . . . . . . . . . . . . . . . . . . . . . . . .0,3% (WRMS)Rapport signal/bruit
avec Dolby B NR, plus de 5 kHz . . . . . . . . . . . .65 dB (CCIR/ARM)sans Dolby NR, niveau DHT 3%, pondéré . . . .56 dB (CCIR/ARM)
Consommation d’énergie . . . . . . . . . . . . . . . . . . . . . . . . . . . . . . . . .15 WAlimentation . . . . . . . . . .120V CA, 60Hz (modèle Etats-Unis,Canada)
120/230V CA, 50-60Hz (modèle d'exportation générale)Dimensions (Largeur x Hauteur x Profondeur) . . 435 x 145 x 290 mm
(17-1/8"x5-11/16"x11-7/16")Poidst . . . . . . . . . . . . . . . . . . . . . . . . . . . . . . . . . . . . . . . .3,8 kg(8-3/8 lbs.)
Câbles de branchement du signal audio x 2
Track System . . . . . . . . . . . . . . . . . . . . . . . . 4-track, 2-channel stereoHeads . . . . . . . . . . . . . . . . . . . . . . . . . . . . . . . . . .DECK !: Playback x 1
DECK @: Erase x 1, Record/Playback x 1(rotating) Type of Tape . . . . . . . . . .Cassette tape C-60 and C-90 (Philips type)Tape Speed . . . . . . . . . . . . . . . . . . . . . . . . . . . . . . . . . . . . . . .4.8 cm/secMotor . . . . . . . . . . . . . . . . . . . . . . . . . . . . . . . . . . . . . . . . . . . .DC motorFrequency Response
Normal . . . . . . . . . . . . . . . . . . . . . . . . . . . . . . . . . . . . .40 - 14,000 HzCrO2 . . . . . . . . . . . . . . . . . . . . . . . . . . . . . . . . . . . . . . . .40 - 15,000 Hz
FF and REW timeApproximately 100 seconds (C-60 cassette tape)
Wow/Flutter . . . . . . . . . . . . . . . . . . . . . . . . . . . . . . . . . . .0.3% (WRMS)S/N Ratio
Dolby B NR ON, over 5 kHz . . . . . . . . . . . . . . . .65 dB (CCIR/ARM)Dolby NR OFF, 3% THD level, weighted . . . . .56 dB (CCIR/ARM)
Power Consumption . . . . . . . . . . . . . . . . . . . . . . . . . . . . . . . . . . . . .15 WPower Supply . . . . . . . . . . . . .120V AC, 60Hz (U.S.A./Canada Model)
120/230V AC, 50-60Hz (General Export Model)Dimensions (WxHxD) . . . . . . . . . . . . . . . . . . . . . . .435 x 145 x 290 mm
(17-1/8"x5-11/16"x11-7/16")Weight . . . . . . . . . . . . . . . . . . . . . . . . . . . . . . . . . . . . . .3.8 kg(8-3/8 lbs.)
Audio signal cord x 2
< Design and specifications are subject to change without notice.< The illustrations may differ slightly from production models.
Specifications
< Des améliorations peuvent produire des changements dans lescaractéristiques et fonctions sans préavis.
< Les illustrations peuvent différer légèrement des modèles deproduction.
Spécifications
DECK (for recording/playback)
GENERAL
Standard Accessories
Caractéristiques PLATINE (enregistrement ou lecture)
Caractéristiques générales
Accessoires standard
13

PRINTED IN CHINA 0899・MA-0278B
This appliance has a serial number located on the rear panel. Please recordthe model number and serial number and retain them for your records.
Model number Serial number
TEAC CORPORATION 3-7-3, Nakacho, Musashino-shi, Tokyo 180-8550, Japan Phone: (0422) 52-5081
TEAC AMERICA, INC. 7733 Telegraph Road, Montebello, California 90640 Phone: (323) 726-0303
TEAC CANADA LTD. 5939 Wallace Street, Mississauga, Ontario L4Z 1Z8, Canada Phone: (905) 890-8008
TEAC MEXICO, S.A. De C.V Privada De Corina, No. 18, Colonia Del Carmen Coyoacon, Mexico DF 04100 Phone: (5) 658-1943
TEAC UK LIMITED 5 Marlin House, Marlins Meadow, The Croxley Centre, Watford, Herts. WD1 8YA, U.K. Phone: 01923-819699
TEAC DEUTSCHLAND GmbH Bahnstrasse 12, 65205 Wiesbaden-Erbenheim, Germany Phone: 0611-71580
TEAC FRANCE S.A. 17, Rue Alexis-de-Tocqueville, CE 005 92182 Antony Cedex, France Phone: (1) 42.37.01.02
TEAC NEDERLAND BV Perkinsbaan 11, 3439 ND Nieuwegein, Nederland Phone: 03-402-30229
TEAC ITALIANA S.p.A. Via C. Cantù 11, 20092 Cinisello Balsamo, Milano, Italy Phone: 02-66010500
TEAC AUSTRALIA PTY., LTD. 106 Bay Street, Port Melbourne, Victoria 3207, Australia Phone: (03) 646-1733
A.C.N. 005 408 462