Embed Size (px)
Citation preview

VW SCIROCCO TWINTERCOOLER
INSTALLATION INSTRUCTIONS
Tools needed:
T25 torx driver
Small flat head screwdriver
12mm & 13mm socket, with ratchet
Dremel or similar with cut off disc
Large Phillips screwdriver (PH3 or 4)
Drill with 4mm HSS drill bit
Jack and axle stands
6mm allen key
1. Raise the front of the car on a jack and support on axle stands in such a way that both front
wheels can be turned and you have full access to the undertray of the vehicle.
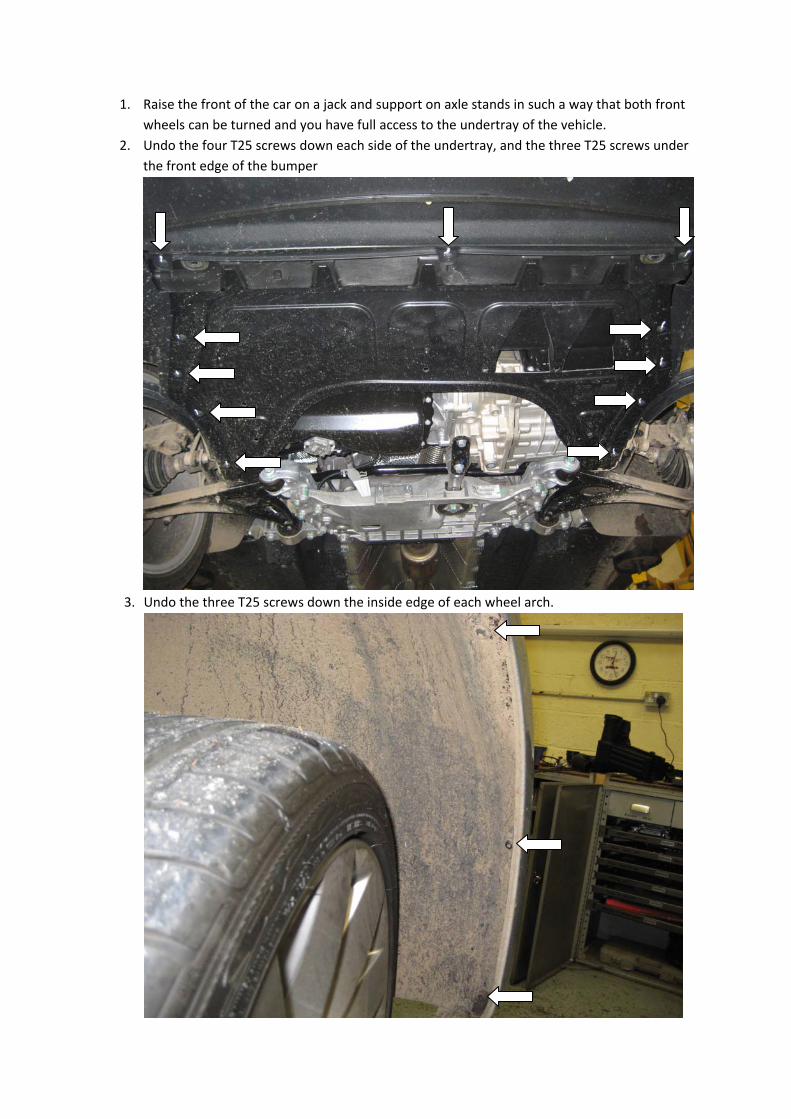
2. Undo the four T25 screws down each side of the undertray, and the three T25 screws under
the front edge of the bumper
3. Undo the three T25 screws down the inside edge of each wheel arch.
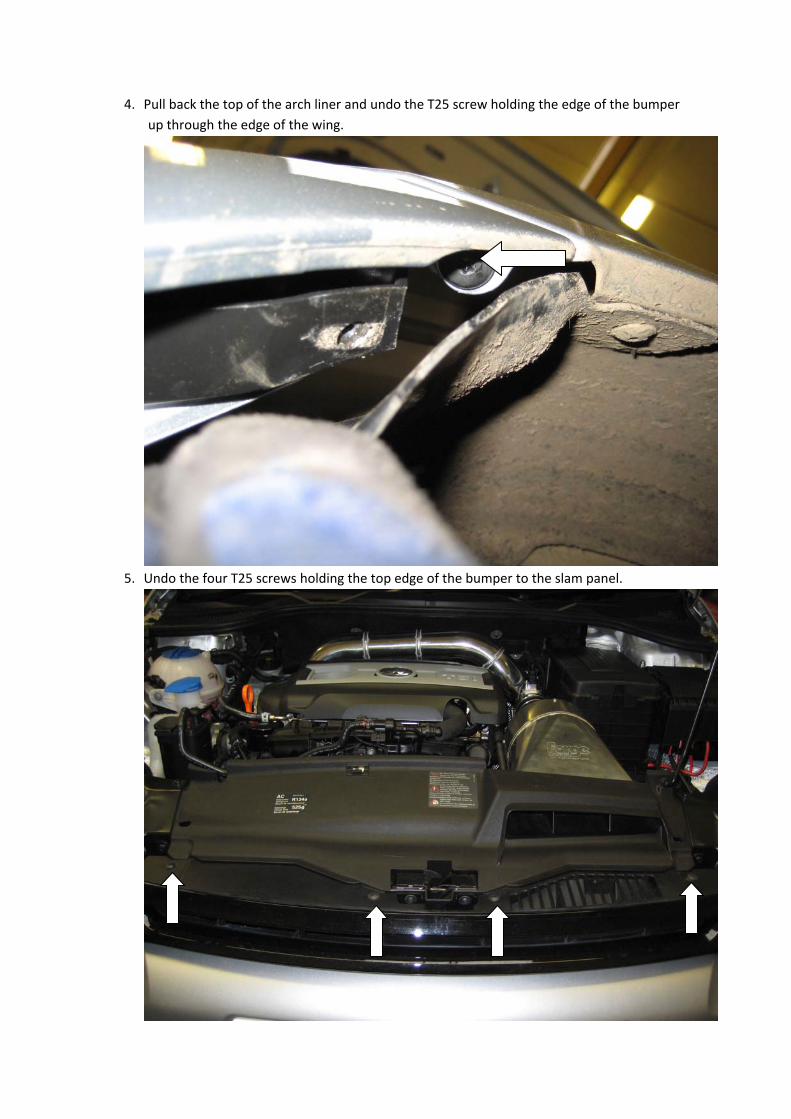
4. Pull back the top of the arch liner and undo the T25 screw holding the edge of the bumper
up through the edge of the wing.
5. Undo the four T25 screws holding the top edge of the bumper to the slam panel.
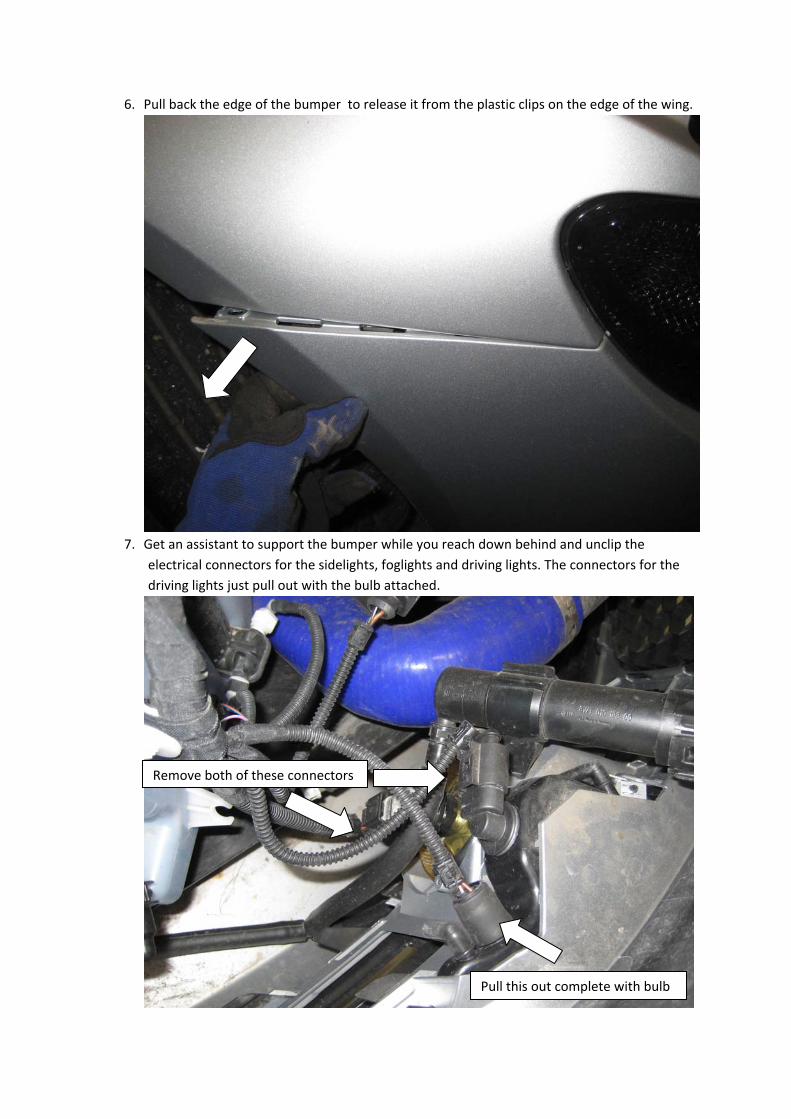
6. Pull back the edge of the bumper to release it from the plastic clips on the edge of the wing.
7. Get an assistant to support the bumper while you reach down behind and unclip the
electrical connectors for the sidelights, foglights and driving lights. The connectors for the
driving lights just pull out with the bulb attached.
Remove both of these connectors
Pull this out complete with bulb

8. You can now rotate the whole bumper to the drivers side of the car where it’s still attached
via the headlamp washers (if fitted).
9. Place a bucket under the washer fluid reservoir and locate the bayonet fitting on the
headlamp washer hose, then squeeze it to release and drain the fluid into the bucket. This
will empty the whole washer reservoir (5 litres) so be sure you have something that can
hold that amount. The bumper can be stored safely away for the time being.
Bayonet quick
release fitting

10. Working under the front of the car, remove both of the hoses that connect to the
intercooler, by pushing a small screwdriver though the raised section of the c‐clip and
pulling to release the clip. The pipes can then be removed. Note that one connection is
actually a jubilee clip which must be removed.
Insert screwdriver
here and lever back

11. Working at the front of the car, cut the plastic air guides on both sides at the point marked
below. Unclip the air temperature sensor on the drivers side by pushing all three tabs
together on the underside, and remove the sensor.
12. On the drivers side, cut out a small section of the lower lip in front of the radiator to assist in
fitting the intercooler.

13. Offer up the intercooler to the front of the car, making sure the inlet/outlet pips are behind
the metal supports for the bumper that are welded to the front crash bar. The intercooler
should naturally sit on the lower lip that you removed a section of in the last picture, and be
about 5‐10mm below the bottom of the crash bar.
14. Mark the positions of the two screw holes at each end of the intercooler, then using a small
4mm drill, start a small hole, enough to get the self tapping screws started. DON’T DRILL
MORE THAN 30mm DEEP. When you’re finished, try starting the screw thread in the holes
with the self tapping stainless steel screws provided.

15. Offer the intercooler back up to the car, and make sure the holes line up, then screw the
screws until they are all nearly tight, then screw each one in a little at a time to make sure
the intercooler is flush against the radiator cowl. Don’t worry about screwing in too far (see
bottom picture). Push the air temp sensor onto its mounting until it clicks in place.
FOR REFERENCE – the screws aren’t deeper than the reinforcement on the back of the
radiator cowl (picture from the back of the radiator cowl showing back of intercooler)
Screws

16. The horns on the left and right must be slightly relocated. On the drivers side, undo the
12mm bolt that holds the horn to the car, then the 13mm nut holding it to the bracket, and
simply reposition the horn on the top of the bracket and retighten the nut.
On the passenger side, remove the 12mm bolt that holds the horn bracket to the car and
then using the right angled bracket provided, together with the M8x12 bolt, M8 washer and
M8 nut, mount the bracket as shown below.
Bracket mounts here
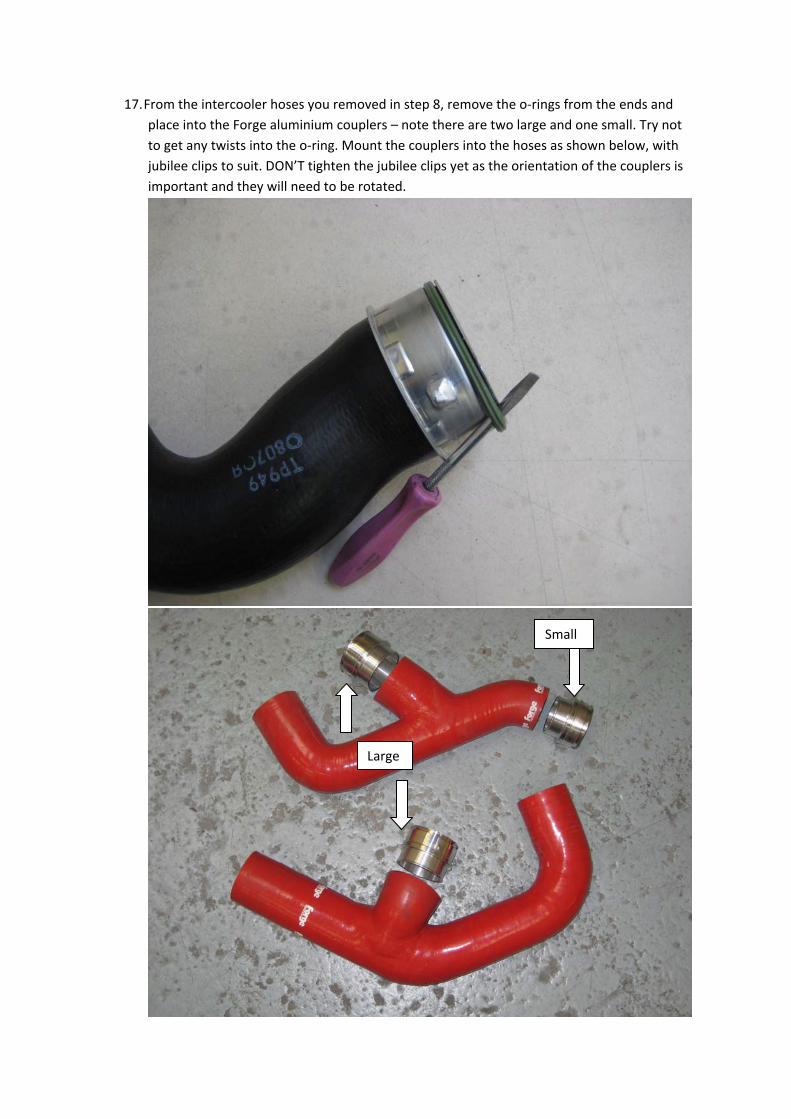
17. From the intercooler hoses you removed in step 8, remove the o‐rings from the ends and
place into the Forge aluminium couplers – note there are two large and one small. Try not
to get any twists into the o‐ring. Mount the couplers into the hoses as shown below, with
jubilee clips to suit. DON’T tighten the jubilee clips yet as the orientation of the couplers is
important and they will need to be rotated.
Large
Small
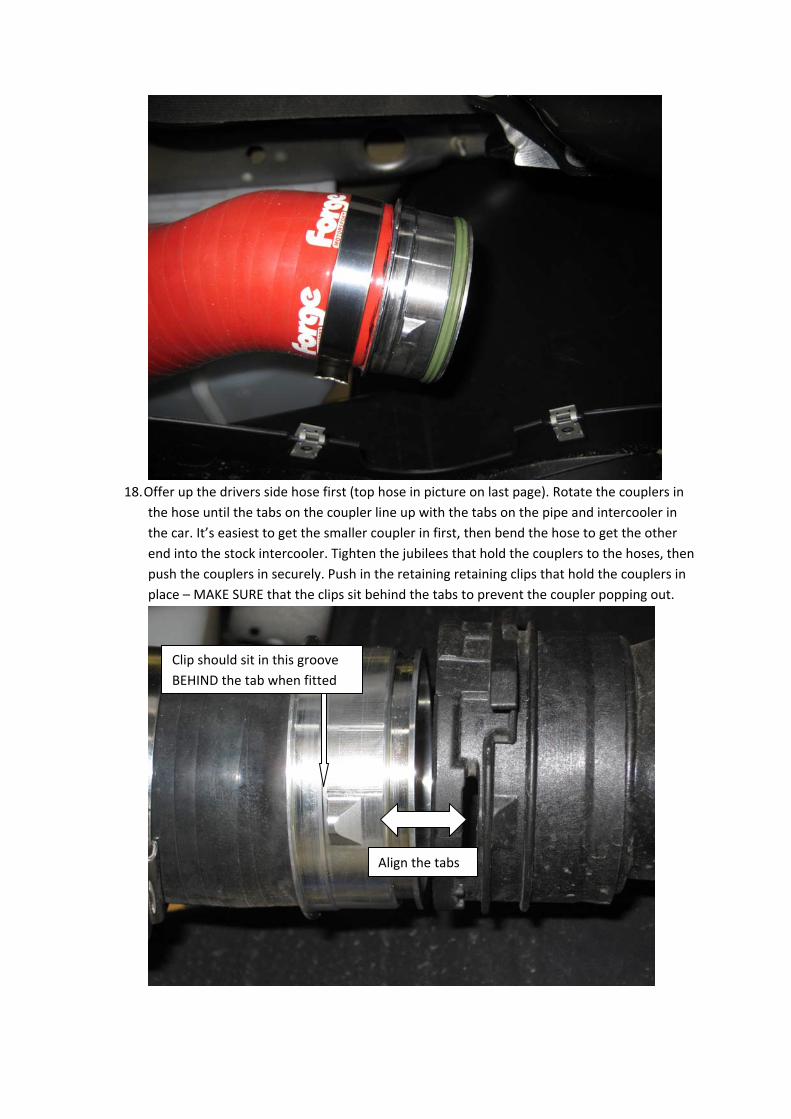
18. Offer up the drivers side hose first (top hose in picture on last page). Rotate the couplers in
the hose until the tabs on the coupler line up with the tabs on the pipe and intercooler in
the car. It’s easiest to get the smaller coupler in first, then bend the hose to get the other
end into the stock intercooler. Tighten the jubilees that hold the couplers to the hoses, then
push the couplers in securely. Push in the retaining retaining clips that hold the couplers in
place – MAKE SURE that the clips sit behind the tabs to prevent the coupler popping out.
Align the tabs
Clip should sit in this groove
BEHIND the tab when fitted

Place a jubilee clip on the front part of the hose, then connect it to the twintercooler and
secure with a jubilee clip.
19. Repeat for the passenger side which is easier as there is only one aluminium coupler to
contend with. Use a jubilee clip on the end to the intercooler and the end which goes to the
throttle body. Tighten all the jubilee clips.

20. Retrieve the bumper from storage and remove the bayonet connection from the passenger
side headlamp washer, and remove the connector from the end of the hose. Unclip the
washer hose where it passes along the length of the bumper and pull it off the tee piece
under the drivers side washer. These can both be a tight fit.

21. To facilitate fitting of the intercooler, we need to relocate the headlight washer tube. Using
the supplied silicone hose, connect to the bayonet fitting and plug this in to the passenger
washer. Secure it with one of the supplied cable ties. Route the hose as shown below,
around the back of the foglight, and clip it in along the bottom of the bumper.
On the drivers side, connect the new silicon hose in to the tee piece, securing it with a cable
tie, and route the hose as shown below.

22. Installation is now complete ! Follow steps 9‐1 in reverse order to refit the bumper. Lower
the car to the ground and enjoy your new found performance!
ENGINEERED FOR PERFORMANCE
Please contact your nearest Forge Motorsport distributor for our other products for the
Volkswagen Scirocco, or visit our website www.forgemotorsport.co.uk