Embed Size (px)
Citation preview
INSTALLATION AND USER GUIDE
vThunder Pay-as-you-Go Licensing5 April 2017
© 2017 A10 Networks, Inc. Confidential and Proprietary - All Rights Reserved
Information in this document is subject to change without notice.
Patent Protection
A10 Networks products are protected by patents in the U.S. and elsewhere. The following website is provided to satisfy the virtual pat-ent marking provisions of various jurisdictions including the virtual patent marking provisions of the America Invents Act. A10 Net-works' products, including all Thunder Series products, are protected by one or more of U.S. patents and patents pending listed at:
https://www.a10networks.com/company/legal-notices/a10-virtual-patent-marking
Trademarks
A10 Networks trademarks are listed at:
https://www.a10networks.com/company/legal-notices/a10-trademarks
Confidentiality
This document contains confidential materials proprietary to A10 Networks, Inc. This document and information and ideas herein may not be disclosed, copied, reproduced or distributed to anyone outside A10 Networks, Inc. without prior written consent of A10 Networks, Inc.
A10 Networks Inc. Software License and End User Agreement
Software for all A10 Networks products contains trade secrets of A10 Networks and its subsidiaries and Customer agrees to treat Soft-ware as confidential information.
Anyone who uses the Software does so only in compliance with the terms of the End User License Agreement (EULA), provided later in this document or available separately. Customer shall not:
1. reverse engineer, reverse compile, reverse de-assemble or otherwise translate the Software by any means
2. sublicense, rent or lease the Software.
Disclaimer
This document does not create any express or implied warranty about A10 Networks or about its products or services, including but not limited to fitness for a particular use and non-infringement. A10 Networks has made reasonable efforts to verify that the information contained herein is accurate, but A10 Networks assumes no responsibility for its use. All information is provided "as-is." The product specifications and features described in this publication are based on the latest information available; however, specifications are sub-ject to change without notice, and certain features may not be available upon initial product release. Contact A10 Networks for current information regarding its products or services. A10 Networks’ products and services are subject to A10 Networks’ standard terms and conditions.
Environmental Considerations
Some electronic components may possibly contain dangerous substances. For information on specific component types, please con-tact the manufacturer of that component. Always consult local authorities for regulations regarding proper disposal of electronic com-ponents in your area.
Further Information
For additional information about A10 products, terms and conditions of delivery, and pricing, contact your nearest A10 Networks loca-tion, which can be found by visiting www.a10networks.com.

page 3 | Document No.: GLM-PAYGLIC - Apr 05 2017
Table of Contents
vThunder Pay-as-you-Go Licensing Overview .............................................................................. 5
Pay-As-You-Go Billing with Global License Manager (GLM) ........................................................ 7Rental Billing Model 8Utility Billing Model 8Getting Started 9Signing Into the Global License Manager for License Pools 10Creating a RBM/UBM License Pool on the GLM 11Enabling your vThunder Instance 13
CLI Commands for vThunder Instances ....................................................................................... 17vThunder Configuration Commands 17
Local License Proxy (LLP) .............................................................................................................. 27System Requirements 27Setting up LLP 28Associating LLP with GLM 28
HTTP/HTTPS Proxy for LLP ........................................................................................................... 31Setting up HTTP/HTTPS Proxy for LLP 31Disabling an active HTTP/HTTPS Proxy Server 31
Using the Local License Proxy ...................................................................................................... 33Sign In ....................................................................................................................................................................34Overview ..............................................................................................................................................................35License Pools .......................................................................................................................................................36Appliances ...........................................................................................................................................................37Usage .....................................................................................................................................................................38Account Features ...............................................................................................................................................38Activity ..................................................................................................................................................................38Download Logs ..................................................................................................................................................39Upgrade ................................................................................................................................................................39New User ..............................................................................................................................................................39Reset Password ..................................................................................................................................................40Logout ...................................................................................................................................................................41
Using the GLM GUI for Pay-As-You-Go Licensing ....................................................................... 43
vThunder Pay-as-you-Go Licensing - Installation and User Guide
Contents
Document No.: GLM-PAYGLIC - Apr 05 2017 | page 4
License Pools Page 43License Pool Page 44
Overview ..............................................................................................................................................................45Edit License Pool ................................................................................................................................................45Appliances ...........................................................................................................................................................46CLI Commands ...................................................................................................................................................47Revoke ...................................................................................................................................................................47
License and Open Source Acknowledgments ............................................................................. 49Acknowledgments for LLP 49
LLP Installation Examples ............................................................................................................ 51Installing LLP with VMware ESXi 5.5 51Installing LLP with OpenStack 52
page 5 | Document No.: GLM-PAYGLIC-001 - Apr 05 2017
vThunder Pay-as-You-Go Licensing Overview
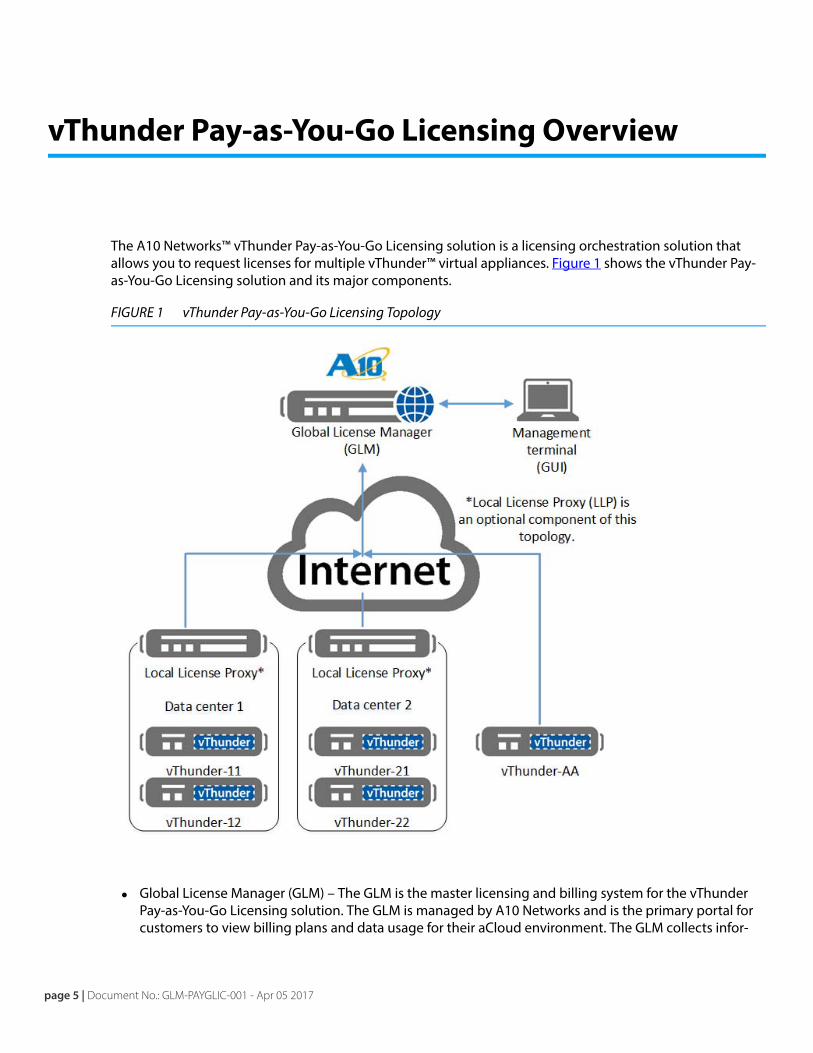
The A10 Networks™ vThunder Pay-as-You-Go Licensing solution is a licensing orchestration solution that allows you to request licenses for multiple vThunder™ virtual appliances. Figure 1 shows the vThunder Pay-as-You-Go Licensing solution and its major components.
FIGURE 1 vThunder Pay-as-You-Go Licensing Topology
• Global License Manager (GLM) – The GLM is the master licensing and billing system for the vThunder Pay-as-You-Go Licensing solution. The GLM is managed by A10 Networks and is the primary portal for customers to view billing plans and data usage for their aCloud environment. The GLM collects infor-
vThunder Pay-as-you-Go Licensing - Installation and User Guide
Document No.: GLM-PAYGLIC-001 - Apr 05 2017 | page 6
mation from vThunders, LLP servers and issues licenses for the vThunder instances upon request. The GLM provides a web portal to verify admin login credentials and manage all functions of the GLM for billing, data usage, and license pool creation.
• Local License Proxy (LLP) – The LLP is a software-based proxy that is installed and running in the cloud at the customer premises. It sits in the datacenter between the vThunder virtual appliances and the Global Licensing Manager (GLM), with the Internet between them. The LLP sits between the two enti-ties, gathering usage statistics from the vThunder virtual appliances, performing metering operations, and monitoring for a constant connection with the GLM (with whom it shares all collected data).
LLP is an optional component for setting up an aCloud environment, but is strongly encouraged for streamlining effectiveness of communication between multiple vThunder appliances and the GLM.
• vThunder – The vThunder is a virtualized, software-only version of an SLB appliance or an IPv6 Migra-tion device. The vThunder instances support most of the same features as standard hardware-based ACOS devices, but the set of supported features may vary based on whether vThunder is running an SLB release or an IPv6 Migration release.
NOTE: You can download the latest vThunder image from the following URL underthe Software section of the page. You must enter your support account cre-dentials prior to downloading the file:
http://www.a10networks.com/support/index.php
page 7 | Document No.: GLM-PAYGLIC - Apr 05 2017
Pay-As-You-Go Billing with Global License Manager (GLM)
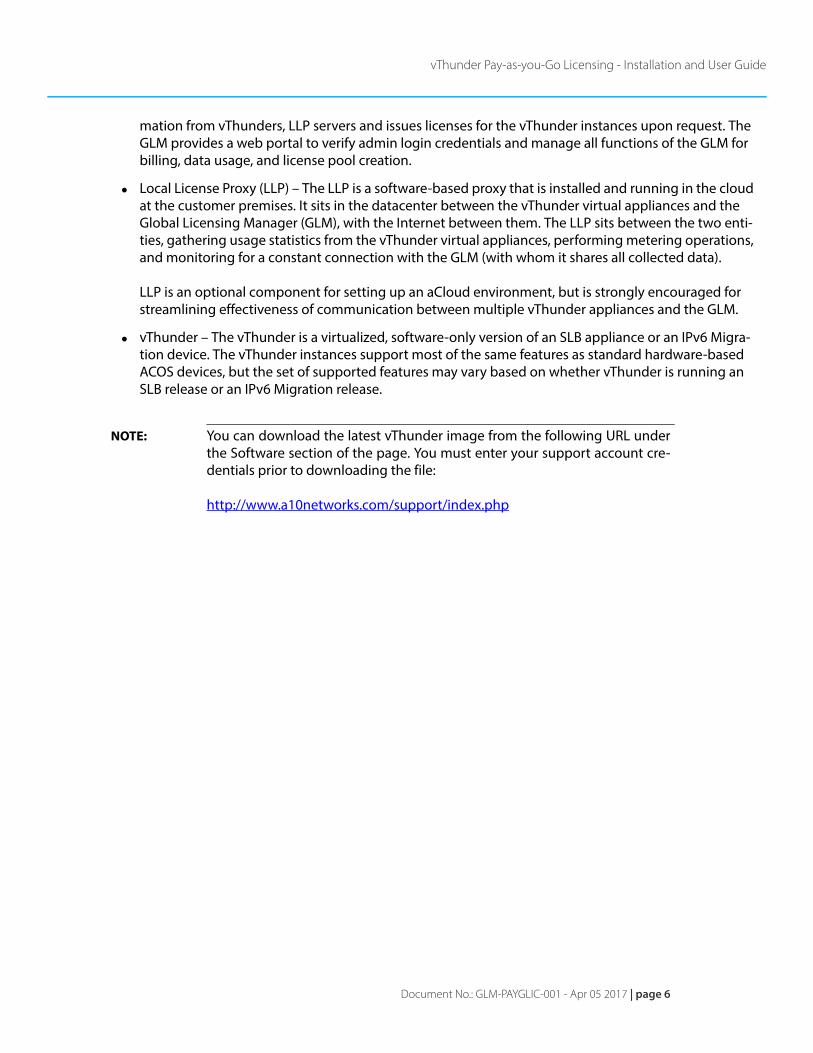
The A10 Networks vThunder Pay-as-You-Go Licensing solution offers the following two billing models: the Rental Billing Model (RBM) and the Utility Billing Model (UBM).
• “Rental Billing Model” on page 8
• “Utility Billing Model” on page 8
FIGURE 2 RBM/UBM deployment

vThunder Pay-as-you-Go Licensing - Installation and User Guide
Rental Billing Model
Document No.: GLM-PAYGLIC - Apr 05 2017 | page 8
Rental Billing Model The Rental Billing Model (RBM) is designed for cloud service providers (CSPs) who offer Advanced Delivery Controller (ADC) services. This model enables such providers to bill their customers for a fixed amount of bandwidth, as well as adding surcharges for extra bandwidth consumed.
RBM provides the following features:
• Flexibility to configure bandwidth in multiple tiers.
• Support for overage usage in bytes.
• Ability to charge for provisioned bandwidth and overage.
• Capability to generate a monthly bill.
• Ability to gather hourly, daily, and monthly usage information to be able to generate reports.
• Cost predictability. RBM offers fixed pricing for plans with an optional overage rate for traffic that exceeds the plan.
• Hard limits: RBM offers the ability to configure bandwidth maximums, such that traffic beyond the allowable limit is not forwarded.
• Ability to configure for burst traffic. Knowing traffic patterns and being able to identify when the traffic is at its peak allows you to configure an overage limit designed for peak-time data usage.
• Ability to configure the bandwidth that will be allocated to each vThunder instance.
Utility Billing ModelThe Utility Billing Model (UBM) is based on actual data usage, in bytes, in which unlimited vThunder instances can be deployed and in which no bandwidth settings are required. Licensing acquisition and reporting is done through a global license manager (GLM) or local license proxy (LLP). UBM provides the fol-lowing key features:
• It eliminates the need to configure bandwidth settings.
• Cost of services is based on actual data usage (Gigabytes).
• Can deploy an unlimited number of vThunder instances.
• Bills for data usage can be generated on a monthly basis.
• Granular usage information is reported to the GLM on an hourly, daily, or monthly basis.
• With UBM, there is no predetermined limit on the number of vThunder instances that are deployed, which means the amount of traffic can be highly variable, as well as the associated costs. While this billing model might be suitable for customers with variable traffic flows, the RBM approach might be better for customers who wish to impose granular limits on the amount of data used.
page 9 | Document No.: GLM-PAYGLIC - Apr 05 2017
vThunder Pay-as-you-Go Licensing - Installation and User Guide
Getting Started
Calculating Costs
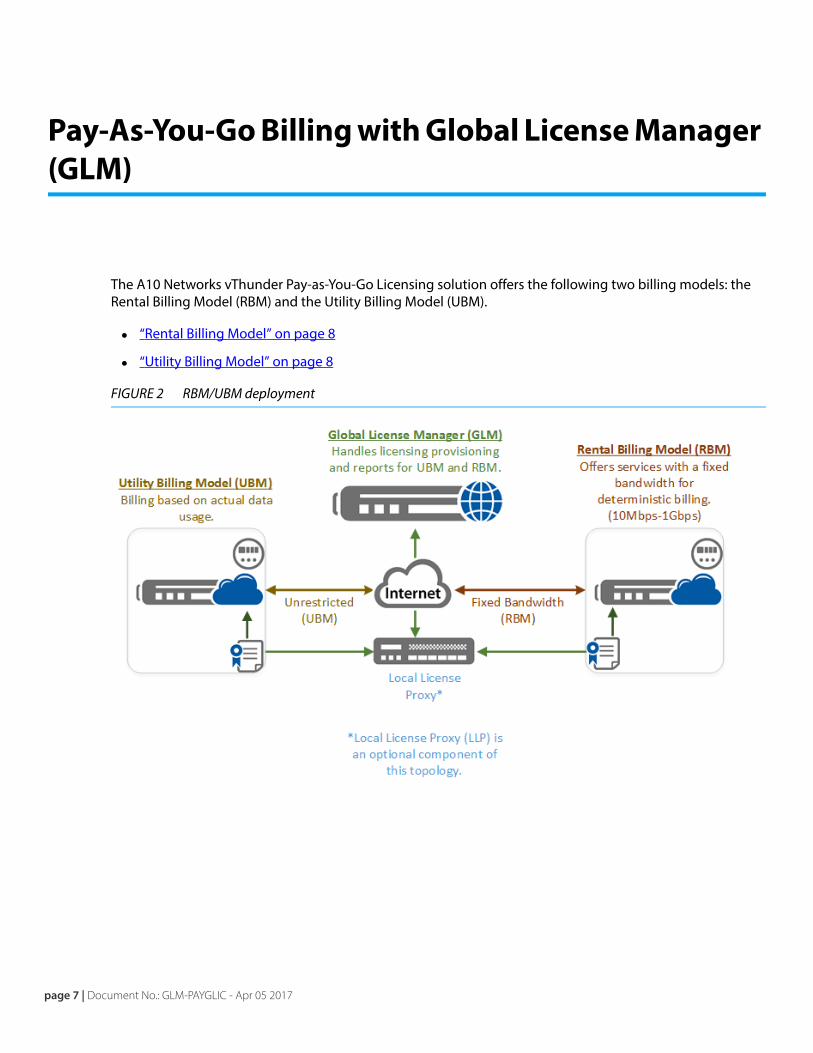
Costs are calculated by counting the bytes at Layer 2 egress, which is the traffic between the client and server. As shown in Figure 3, the cost would be the sum of B and D.
FIGURE 3 Illustration of traffic flow and costs in UBM deployment
Getting StartedThe user can set up a RBM or UBM type of billing using the Global License Manager (GLM). Prior to enabling your vThunder appliance, a choice to have the data usage sent directly to GLM or to a Local License Proxy (LLP) should be made. Should you choose to use a LLP, which is completely optional, you will need to install the LLP software and associate the LLP with GLM. This requires an established account on GLM. Information about LLP, including installation and associating it with GLM is provided here:
vThunder Pay-as-you-Go Licensing - Installation and User Guide
Signing Into the Global License Manager for License Pools
Document No.: GLM-PAYGLIC - Apr 05 2017 | page 10
• “Local License Proxy (LLP)” on page 27
The steps required for setting up the license pools follows:
• “Signing Into the Global License Manager for License Pools” on page 10
• “Creating a RBM/UBM License Pool on the GLM” on page 11
• “Enabling your vThunder Instance” on page 13
Signing Into the Global License Manager for License Pools
Upon purchase of a Pay-as-You Go Licensing Solution, you will receive an email from [email protected] listing the following:
• GLM Account Username
• GLM Account Number
• Link to GLM
• Registration Link to request A10 Networks Support and Services
1. Finalize your account setup by going to https://glm.a10networks.com/ and complete the following steps:
a. In the Email field, provide your email address.
b. In the Password field, enter a password for your account.
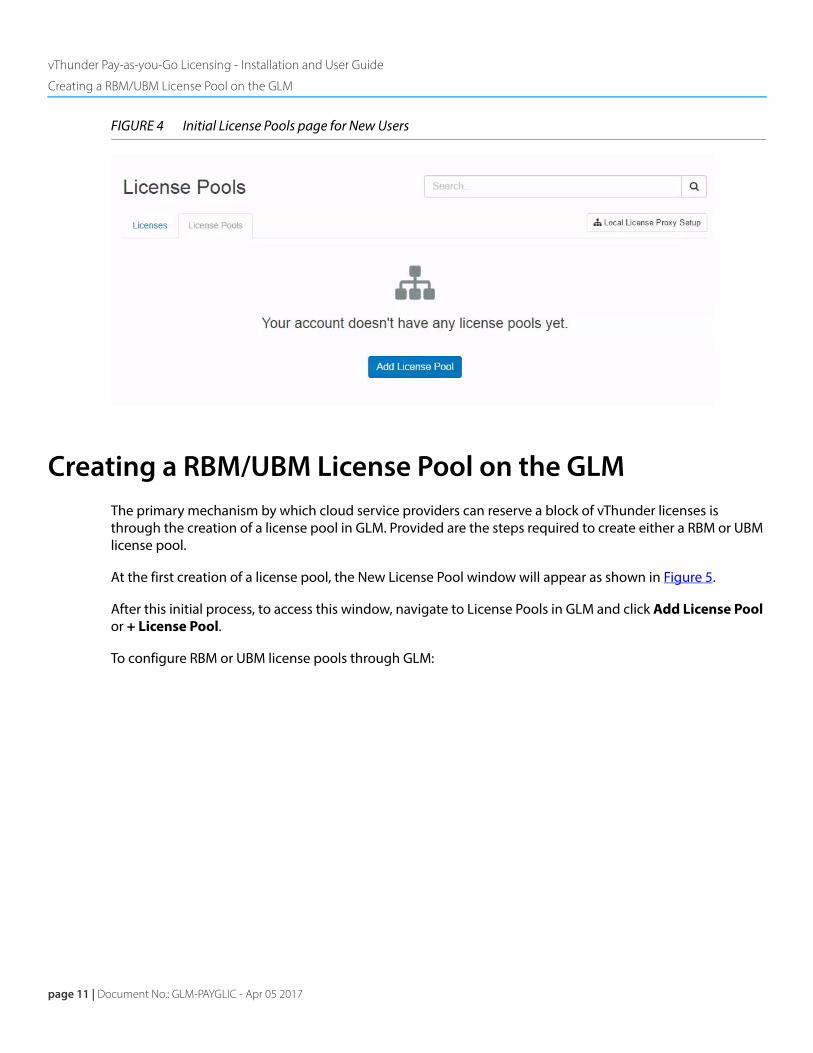
2. From the Licenses page, click on the License Pools tab. Click on the Add License Pool button as shown in Figure 4. In the future, you may click on the + License Pool button to create any additional license pools.
3. Proceed to “Creating a RBM/UBM License Pool on the GLM” on page 11.
NOTE: To return to the Licenses page at any time, click on the A10 Networks logo onthe top left-hand corner. The User icon on the top far right-hand corner pro-vides a drop-down list for editing Profile, Billing Info, and Account Info., andlogging out.
page 11 | Document No.: GLM-PAYGLIC - Apr 05 2017
vThunder Pay-as-you-Go Licensing - Installation and User Guide
Creating a RBM/UBM License Pool on the GLM
FIGURE 4 Initial License Pools page for New Users
Creating a RBM/UBM License Pool on the GLMThe primary mechanism by which cloud service providers can reserve a block of vThunder licenses is through the creation of a license pool in GLM. Provided are the steps required to create either a RBM or UBM license pool.
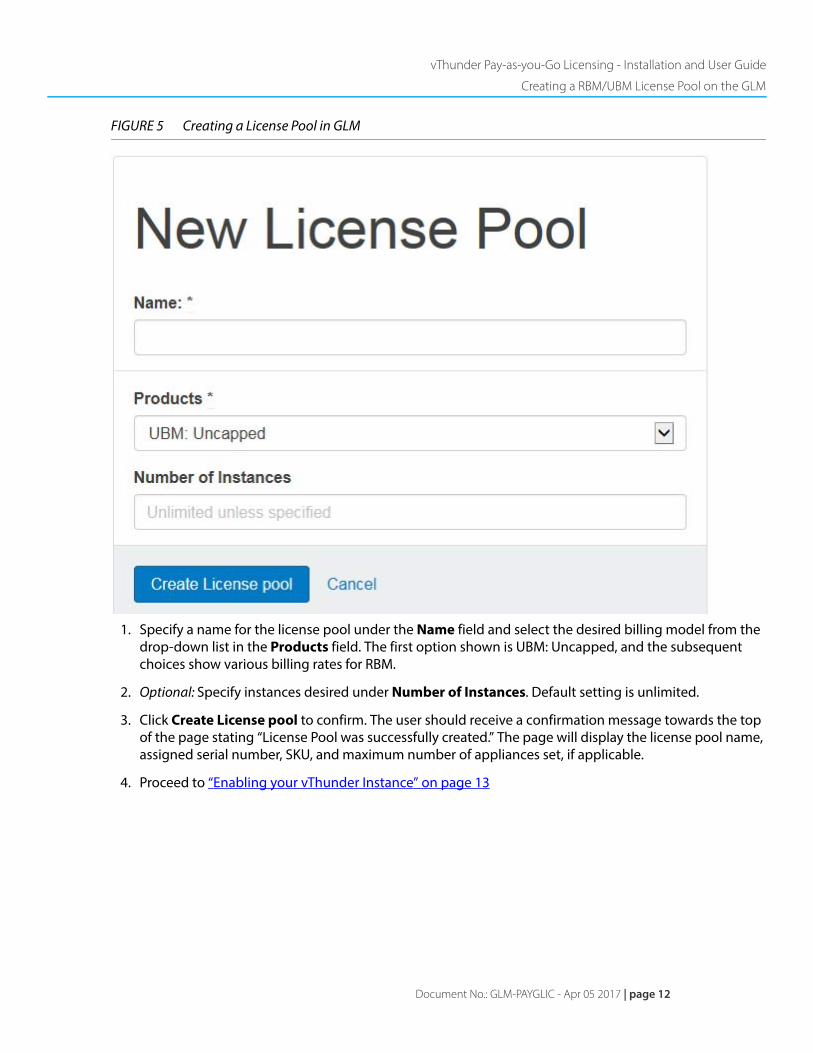
At the first creation of a license pool, the New License Pool window will appear as shown in Figure 5.
After this initial process, to access this window, navigate to License Pools in GLM and click Add License Pool or + License Pool.
To configure RBM or UBM license pools through GLM:
vThunder Pay-as-you-Go Licensing - Installation and User Guide
Creating a RBM/UBM License Pool on the GLM
Document No.: GLM-PAYGLIC - Apr 05 2017 | page 12
FIGURE 5 Creating a License Pool in GLM
1. Specify a name for the license pool under the Name field and select the desired billing model from the drop-down list in the Products field. The first option shown is UBM: Uncapped, and the subsequent choices show various billing rates for RBM.
2. Optional: Specify instances desired under Number of Instances. Default setting is unlimited.
3. Click Create License pool to confirm. The user should receive a confirmation message towards the top of the page stating “License Pool was successfully created.” The page will display the license pool name, assigned serial number, SKU, and maximum number of appliances set, if applicable.
4. Proceed to “Enabling your vThunder Instance” on page 13
page 13 | Document No.: GLM-PAYGLIC - Apr 05 2017
vThunder Pay-as-you-Go Licensing - Installation and User Guide
Enabling your vThunder Instance
Enabling your vThunder Instance To use a vThunder with a created license pool, the vThunder appliance must be registered with the license pool. This is done through the use of a set of CLI commands. The provided CLI commands allow you to pro-vide vThunder data usage directly to GLM or optionally, to a Local License Proxy (LLP).
Note: If you wish to use a LLP, one must be set up. See “Local License Proxy (LLP)” on page 27
To enable your vThunder instance with either GLM or an LLP, take the following steps:
1. If not already logged onto GLM, log onto GLM and go to the Licenses page.
2. Ensure you are on the License Pools page. Click on the Pay As You Go tab if it has not been selected.
3. From the License Pools page, click on the License Pool you wish to use.
4. Click on CLI Commands.
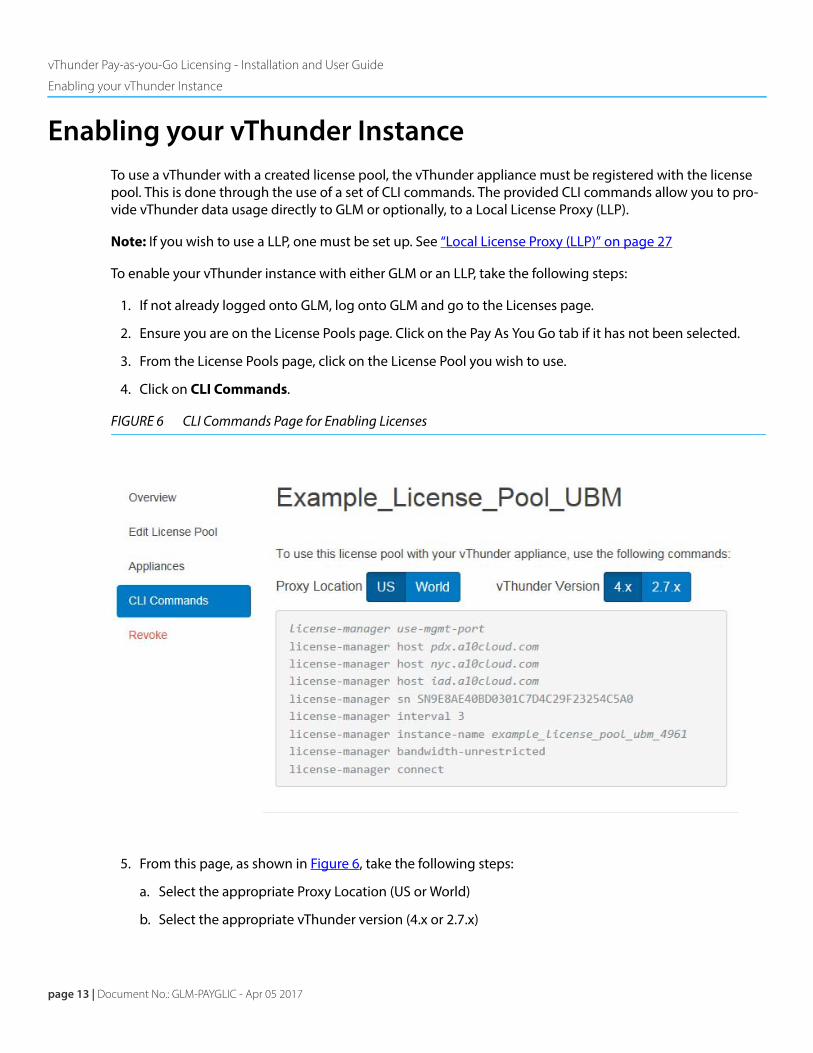
FIGURE 6 CLI Commands Page for Enabling Licenses
5. From this page, as shown in Figure 6, take the following steps:
a. Select the appropriate Proxy Location (US or World)
b. Select the appropriate vThunder version (4.x or 2.7.x)

vThunder Pay-as-you-Go Licensing - Installation and User Guide
Enabling your vThunder Instance
Document No.: GLM-PAYGLIC - Apr 05 2017 | page 14
The set of CLI commands will automatically adjust to match the choices made for step a and step b.
6. Depending on whether you plan to have your vThunder appliance provide its data usage directly to GLM or LLP, take one of the following steps:
Note: For information on the CLI commands and configurable parameters, see “CLI Commands for vThunder Instances” on page 17.
Providing Data Usage directly to GLM
Take the provided CLI commands from GLM and apply them to the vThunder appliance.
Note: Ensure your vThunder instance network configuration has been set up.
For example, if the CLI Commands field provided the following CLI commands:
license-manager use-mgmt-port
license-manager host pdx.a10cloud.com
license-manager host nyc.a10cloud.com
license-manager host iad.a10cloud.com
license-manager sn SN9E8AE40BD0301C7D4C29F23254C5A0
license-manager interval 3
license-manager instance-name example_license_pool_ubm_4961
license-manager bandwidth-unrestricted
license-manager connect
The italicized text portion of the commands can be inputted as displayed sequentially.
Providing Data Usage to an LLP
If you are planning on having a vThunder appliance you wish to use to provide its data usage to an LLP, then the set of CLI commands that have been provided will require some minor changes.
Note: Ensure your vThunder instance network configuration has been set up and that your LLP has been associated with GLM. See “Associating LLP with GLM” on page 28 for more information.
For example, if the CLI Commands field provided the following CLI commands:
license-manager use-mgmt-port
license-manager host pdx.a10cloud.com
license-manager host nyc.a10cloud.com
license-manager host iad.a10cloud.com
license-manager sn SN9E8AE40BD0301C7D4C29F23254C5A0
license-manager interval 3
license-manager instance-name example_license_pool_ubm_4961
license-manager bandwidth-unrestricted
license-manager connect
page 15 | Document No.: GLM-PAYGLIC - Apr 05 2017
vThunder Pay-as-you-Go Licensing - Installation and User Guide
Enabling your vThunder Instance
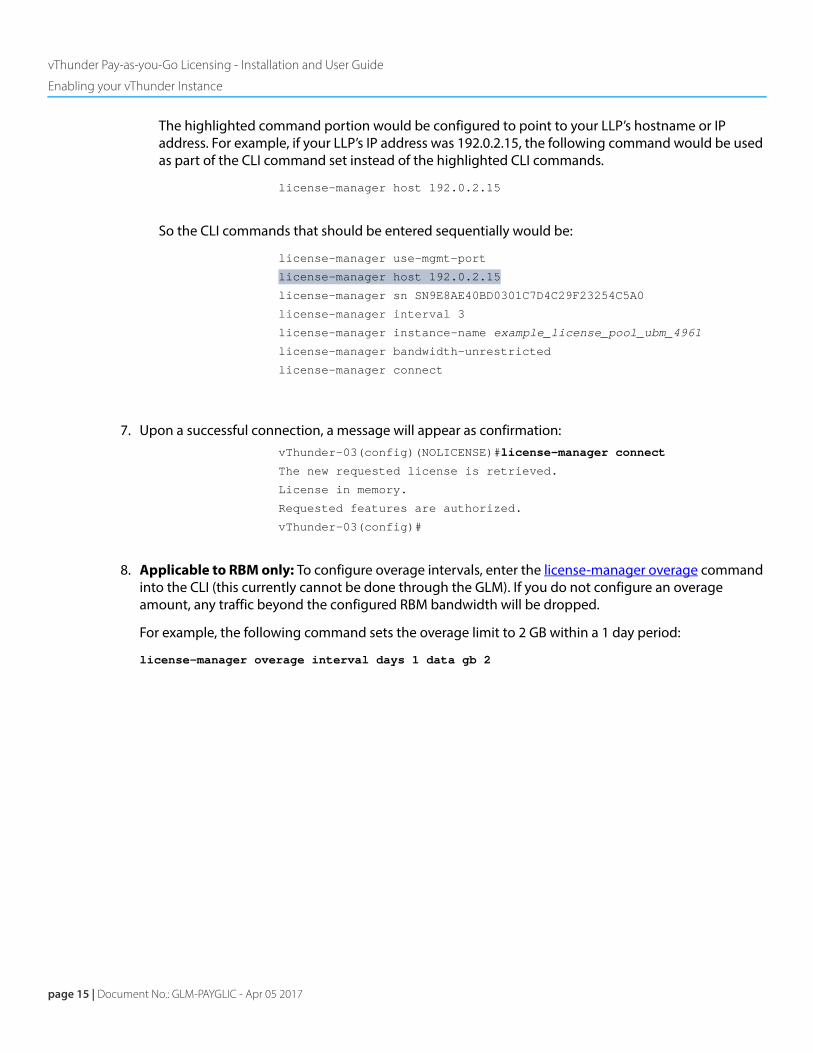
The highlighted command portion would be configured to point to your LLP’s hostname or IP address. For example, if your LLP’s IP address was 192.0.2.15, the following command would be used as part of the CLI command set instead of the highlighted CLI commands.
license-manager host 192.0.2.15
So the CLI commands that should be entered sequentially would be:
license-manager use-mgmt-port
license-manager host 192.0.2.15
license-manager sn SN9E8AE40BD0301C7D4C29F23254C5A0
license-manager interval 3
license-manager instance-name example_license_pool_ubm_4961
license-manager bandwidth-unrestricted
license-manager connect
7. Upon a successful connection, a message will appear as confirmation:vThunder-03(config)(NOLICENSE)#license-manager connect
The new requested license is retrieved.
License in memory.
Requested features are authorized.
vThunder-03(config)#
8. Applicable to RBM only: To configure overage intervals, enter the license-manager overage command into the CLI (this currently cannot be done through the GLM). If you do not configure an overage amount, any traffic beyond the configured RBM bandwidth will be dropped.
For example, the following command sets the overage limit to 2 GB within a 1 day period:
license-manager overage interval days 1 data gb 2

vThunder Pay-as-you-Go Licensing - Installation and User Guide
Enabling your vThunder Instance
Document No.: GLM-PAYGLIC - Apr 05 2017 | page 16

page 17 | Document No.: GLM-PAYGLIC - Apr 05 2017
CLI Commands for vThunder Instances
The commands in this chapter configure global settings for vThunder instances.
vThunder Configuration CommandsThis section describes the license manager configuration commands.
license-manager bandwidth_base
Description Using the Rental Billing Model (RBM), indicate the desired bandwidth in incre-ments of 1 Mbps. This billing model enables cloud service providers (CSPs) to offer their customers fixed pricing for a fixed amount of bandwidth. The com-mand also offers the CSPs the ability to configure usage maximums, such that traffic beyond this limit is dropped.
Using the Unlimited Billing Model (UBM), use this command to set the bandwidth to provide data access with a byte-count limit. This billing model is suitable for customers with variable traffic flows. Billing is based on actual data usage, in bytes, in which unlimited vThunder instances can be deployed. The bandwidth settings you indicate with this command will provide a finite byte-count limit.
Syntax license-manager bandwidth_base bandwidth-in-Megabytes
For users running ACOS 4.x:
license-manager bandwidth-base bandwidth-in-Megabytes
Default None
Mode Configuration
Usage None
Example The following command sets the bandwidth to 1000 Megabytes:
Parameter Descriptionbandwidth-in-Megabytes Indicate the desired bandwidth in Mbps. The sup-
ported range is 10-102400 Megabytes.
vThunder Pay-as-you-Go Licensing - Installation and User Guide
vThunder Configuration Commands
Document No.: GLM-PAYGLIC - Apr 05 2017 | page 18
vTh(config)(NOLICENSE)# license-manager bandwidth_base 1000
Request bandwidth base: 1000
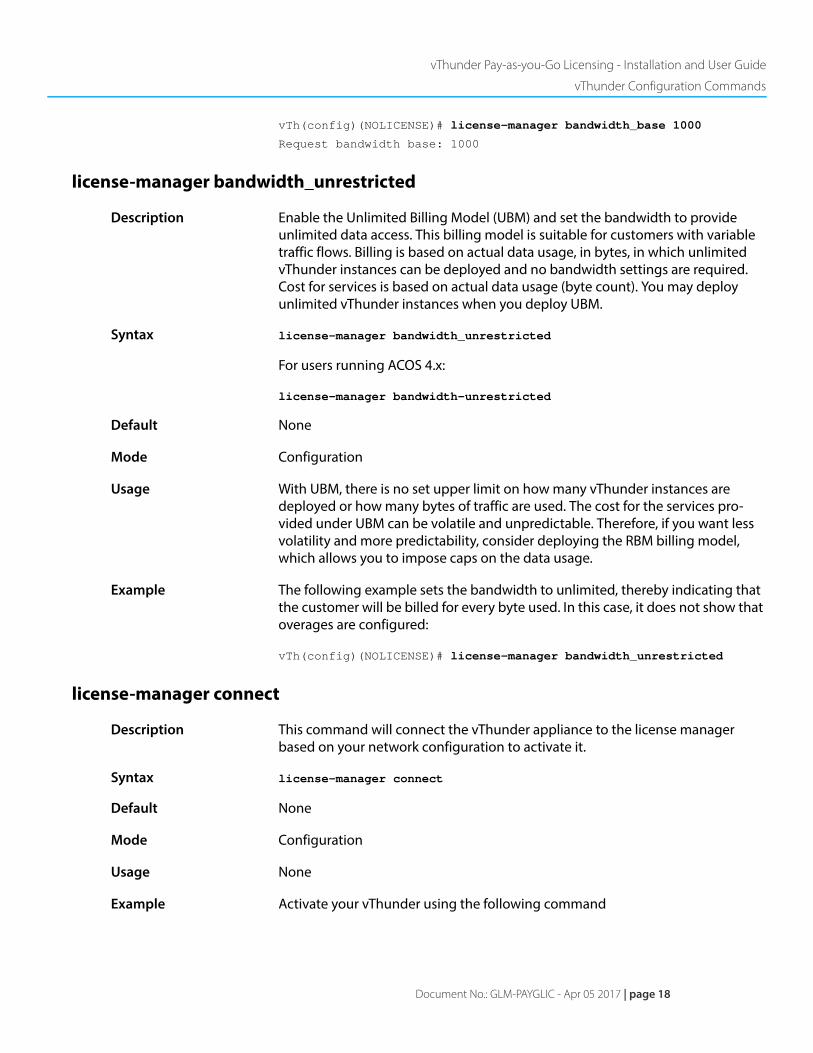
license-manager bandwidth_unrestricted
Description Enable the Unlimited Billing Model (UBM) and set the bandwidth to provide unlimited data access. This billing model is suitable for customers with variable traffic flows. Billing is based on actual data usage, in bytes, in which unlimited vThunder instances can be deployed and no bandwidth settings are required. Cost for services is based on actual data usage (byte count). You may deploy unlimited vThunder instances when you deploy UBM.
Syntax license-manager bandwidth_unrestricted
For users running ACOS 4.x:
license-manager bandwidth-unrestricted
Default None
Mode Configuration
Usage With UBM, there is no set upper limit on how many vThunder instances are deployed or how many bytes of traffic are used. The cost for the services pro-vided under UBM can be volatile and unpredictable. Therefore, if you want less volatility and more predictability, consider deploying the RBM billing model, which allows you to impose caps on the data usage.
Example The following example sets the bandwidth to unlimited, thereby indicating that the customer will be billed for every byte used. In this case, it does not show that overages are configured:
vTh(config)(NOLICENSE)# license-manager bandwidth_unrestricted
license-manager connect
Description This command will connect the vThunder appliance to the license manager based on your network configuration to activate it.
Syntax license-manager connect
Default None
Mode Configuration
Usage None
Example Activate your vThunder using the following command
page 19 | Document No.: GLM-PAYGLIC - Apr 05 2017
vThunder Pay-as-you-Go Licensing - Installation and User Guide
vThunder Configuration Commands
vThunder-03(config)(NOLICENSE)#license-manager connect
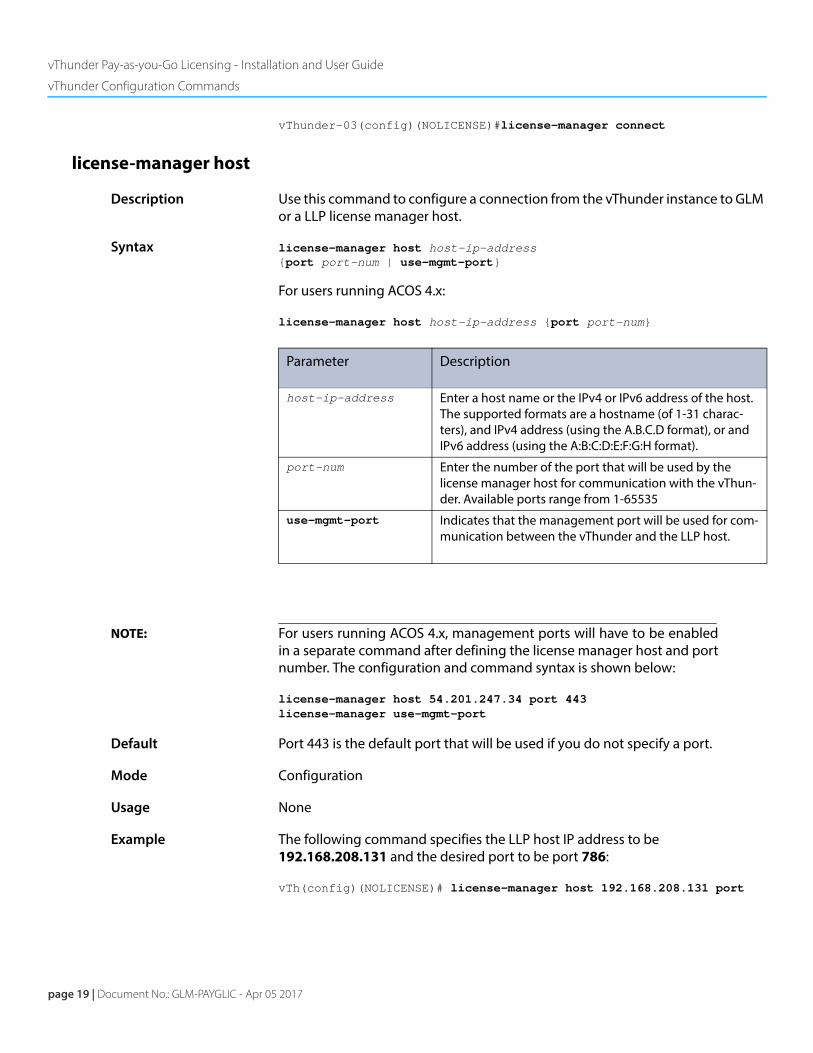
license-manager host
Description Use this command to configure a connection from the vThunder instance to GLM or a LLP license manager host.
Syntax license-manager host host-ip-address {port port-num | use-mgmt-port}
For users running ACOS 4.x:
license-manager host host-ip-address {port port-num}
NOTE: For users running ACOS 4.x, management ports will have to be enabledin a separate command after defining the license manager host and portnumber. The configuration and command syntax is shown below:
license-manager host 54.201.247.34 port 443 license-manager use-mgmt-port
Default Port 443 is the default port that will be used if you do not specify a port.
Mode Configuration
Usage None
Example The following command specifies the LLP host IP address to be 192.168.208.131 and the desired port to be port 786:
vTh(config)(NOLICENSE)# license-manager host 192.168.208.131 port
Parameter Description
host-ip-address Enter a host name or the IPv4 or IPv6 address of the host. The supported formats are a hostname (of 1-31 charac-ters), and IPv4 address (using the A.B.C.D format), or and IPv6 address (using the A:B:C:D:E:F:G:H format).
port-num Enter the number of the port that will be used by the license manager host for communication with the vThun-der. Available ports range from 1-65535
use-mgmt-port Indicates that the management port will be used for com-munication between the vThunder and the LLP host.
vThunder Pay-as-you-Go Licensing - Installation and User Guide
vThunder Configuration Commands
Document No.: GLM-PAYGLIC - Apr 05 2017 | page 20
786
Example The following command sets the LLP host called testhost to use the manage-ment port for communications:
vTh(config)(NOLICENSE)# license-manager host testhost use-mgmt-port

page 21 | Document No.: GLM-PAYGLIC - Apr 05 2017
vThunder Pay-as-you-Go Licensing - Installation and User Guide
vThunder Configuration Commands
license-manager instance_name
Description Configure the name of the vThunder instance that will be used during communi-cations with the GLM and the LLP.
Syntax license-manager instance_name instance-name
For users running ACOS 4.x:
license-manager instance-name instance-name
Default None
Mode Configuration
Usage None
Example The following command helps a particular vThunder instance register with the GLM:
vTh(config)(NOLICENSE)# license-manager instance_name 192.168.208.209
Instance name: 192.168.208.209
license-manager interval
Description Configure the time interval profile using the following command. The interval refers to the frequency with which vThunder sends usage data to the LLP.
Syntax license-manager interval {1 | 2 | 3}
Default None
Parameter Descriptioninstance-name ACOS 2.7.x
Indicate the unique name of the vThunder instance. The range for this name is 1-63 characters or a string.
ACOS 4.x
Indicate the unique name of the vThunder instance. The range for this name is 7-63 characters or a string.
Parameter Description1 Sets a monthly interval.
2 Sets a daily interval.
3 Sets an hourly interval.
vThunder Pay-as-you-Go Licensing - Installation and User Guide
vThunder Configuration Commands
Document No.: GLM-PAYGLIC - Apr 05 2017 | page 22
Mode Configuration
Usage None
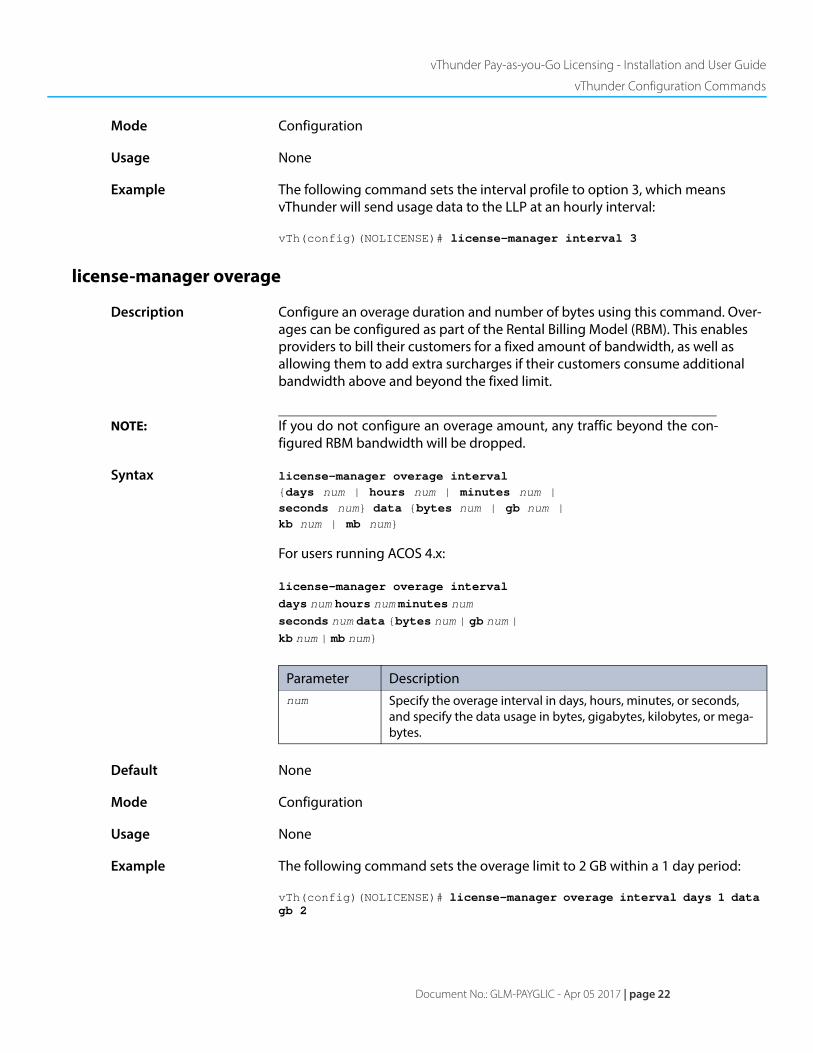
Example The following command sets the interval profile to option 3, which means vThunder will send usage data to the LLP at an hourly interval:
vTh(config)(NOLICENSE)# license-manager interval 3
license-manager overage
Description Configure an overage duration and number of bytes using this command. Over-ages can be configured as part of the Rental Billing Model (RBM). This enables providers to bill their customers for a fixed amount of bandwidth, as well as allowing them to add extra surcharges if their customers consume additional bandwidth above and beyond the fixed limit.
NOTE: If you do not configure an overage amount, any traffic beyond the con-figured RBM bandwidth will be dropped.
Syntax license-manager overage interval {days num | hours num | minutes num | seconds num} data {bytes num | gb num | kb num | mb num}
For users running ACOS 4.x:
license-manager overage interval days num hours num minutes num seconds num data {bytes num | gb num | kb num | mb num}
Default None
Mode Configuration
Usage None
Example The following command sets the overage limit to 2 GB within a 1 day period:
vTh(config)(NOLICENSE)# license-manager overage interval days 1 data gb 2
Parameter Descriptionnum Specify the overage interval in days, hours, minutes, or seconds,
and specify the data usage in bytes, gigabytes, kilobytes, or mega-bytes.

page 23 | Document No.: GLM-PAYGLIC - Apr 05 2017
vThunder Pay-as-you-Go Licensing - Installation and User Guide
vThunder Configuration Commands
Similarly, you can configure an overage amount for different time intervals, such as configuring an extra 1 GB per minute or 10 GB per hour.
vThunder Pay-as-you-Go Licensing - Installation and User Guide
vThunder Configuration Commands
Document No.: GLM-PAYGLIC - Apr 05 2017 | page 24
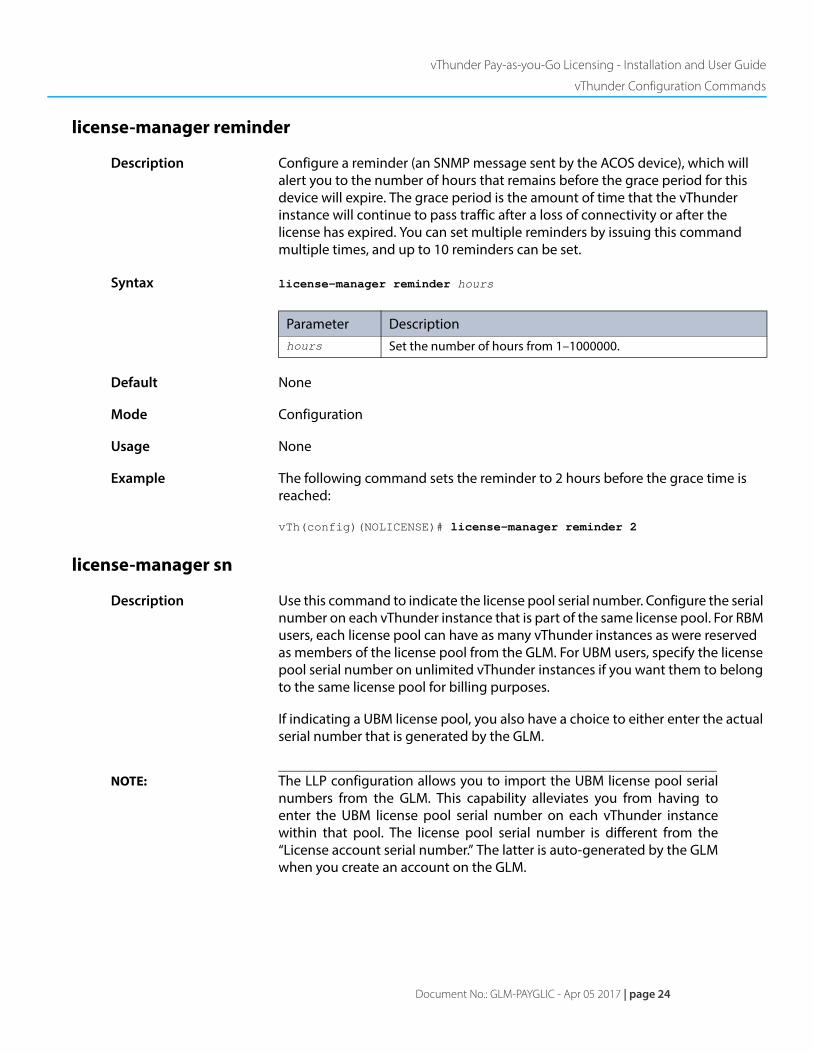
license-manager reminder
Description Configure a reminder (an SNMP message sent by the ACOS device), which will alert you to the number of hours that remains before the grace period for this device will expire. The grace period is the amount of time that the vThunder instance will continue to pass traffic after a loss of connectivity or after the license has expired. You can set multiple reminders by issuing this command multiple times, and up to 10 reminders can be set.
Syntax license-manager reminder hours
Default None
Mode Configuration
Usage None
Example The following command sets the reminder to 2 hours before the grace time is reached:
vTh(config)(NOLICENSE)# license-manager reminder 2
license-manager sn
Description Use this command to indicate the license pool serial number. Configure the serial number on each vThunder instance that is part of the same license pool. For RBM users, each license pool can have as many vThunder instances as were reserved as members of the license pool from the GLM. For UBM users, specify the license pool serial number on unlimited vThunder instances if you want them to belong to the same license pool for billing purposes.
If indicating a UBM license pool, you also have a choice to either enter the actual serial number that is generated by the GLM.
NOTE: The LLP configuration allows you to import the UBM license pool serialnumbers from the GLM. This capability alleviates you from having toenter the UBM license pool serial number on each vThunder instancewithin that pool. The license pool serial number is different from the“License account serial number.” The latter is auto-generated by the GLMwhen you create an account on the GLM.
Parameter Descriptionhours Set the number of hours from 1–1000000.
page 25 | Document No.: GLM-PAYGLIC - Apr 05 2017
vThunder Pay-as-you-Go Licensing - Installation and User Guide
vThunder Configuration Commands
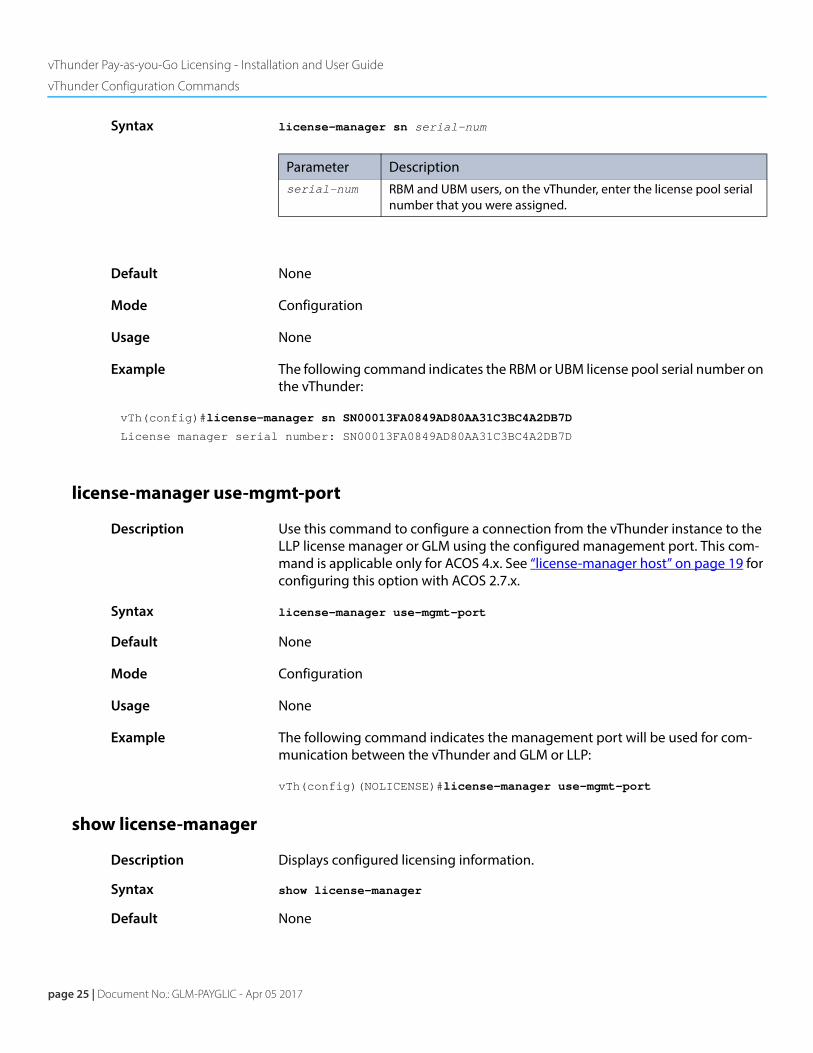
Syntax license-manager sn serial-num
Default None
Mode Configuration
Usage None
Example The following command indicates the RBM or UBM license pool serial number on the vThunder:
vTh(config)#license-manager sn SN00013FA0849AD80AA31C3BC4A2DB7D
License manager serial number: SN00013FA0849AD80AA31C3BC4A2DB7D
license-manager use-mgmt-port
Description Use this command to configure a connection from the vThunder instance to the LLP license manager or GLM using the configured management port. This com-mand is applicable only for ACOS 4.x. See “license-manager host” on page 19 for configuring this option with ACOS 2.7.x.
Syntax license-manager use-mgmt-port
Default None
Mode Configuration
Usage None
Example The following command indicates the management port will be used for com-munication between the vThunder and GLM or LLP:
vTh(config)(NOLICENSE)#license-manager use-mgmt-port
show license-manager
Description Displays configured licensing information.
Syntax show license-manager
Default None
Parameter Descriptionserial-num RBM and UBM users, on the vThunder, enter the license pool serial
number that you were assigned.
vThunder Pay-as-you-Go Licensing - Installation and User Guide
vThunder Configuration Commands
Document No.: GLM-PAYGLIC - Apr 05 2017 | page 26
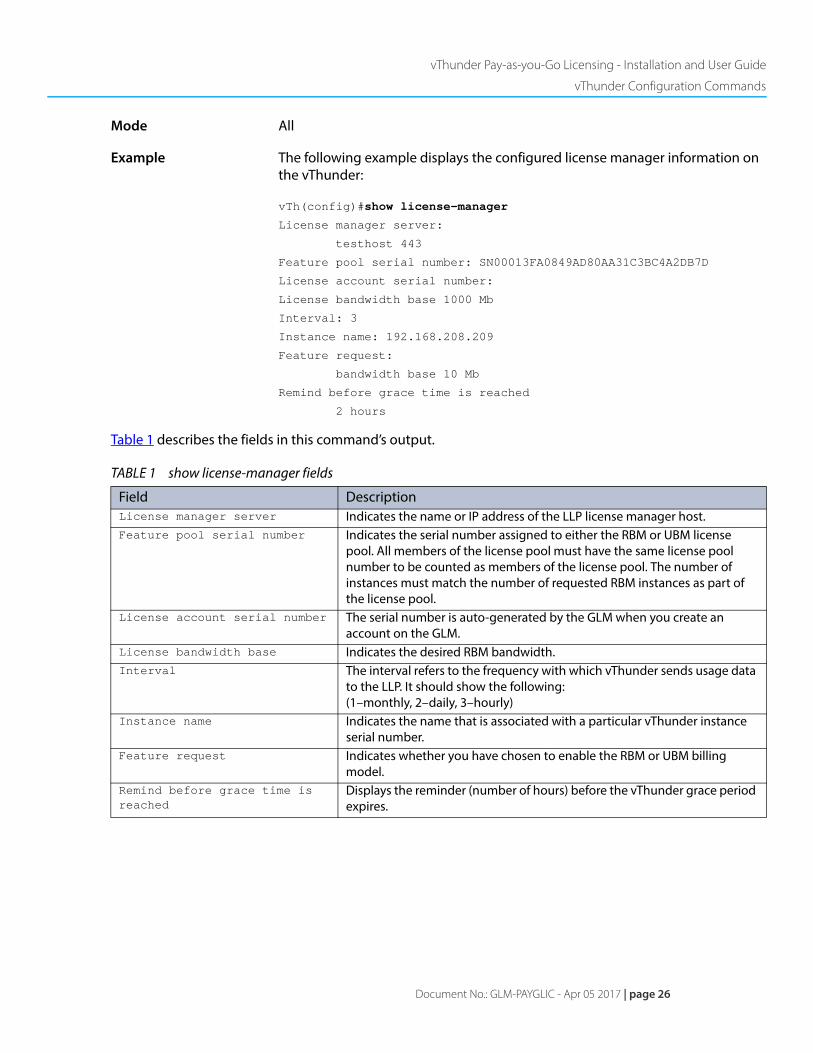
Mode All
Example The following example displays the configured license manager information on the vThunder:
vTh(config)#show license-manager
License manager server:
testhost 443
Feature pool serial number: SN00013FA0849AD80AA31C3BC4A2DB7D
License account serial number:
License bandwidth base 1000 Mb
Interval: 3
Instance name: 192.168.208.209
Feature request:
bandwidth base 10 Mb
Remind before grace time is reached
2 hours
Table 1 describes the fields in this command’s output.
TABLE 1 show license-manager fields
Field DescriptionLicense manager server Indicates the name or IP address of the LLP license manager host. Feature pool serial number Indicates the serial number assigned to either the RBM or UBM license
pool. All members of the license pool must have the same license pool number to be counted as members of the license pool. The number of instances must match the number of requested RBM instances as part of the license pool.
License account serial number The serial number is auto-generated by the GLM when you create an account on the GLM.
License bandwidth base Indicates the desired RBM bandwidth.Interval The interval refers to the frequency with which vThunder sends usage data
to the LLP. It should show the following: (1–monthly, 2–daily, 3–hourly)
Instance name Indicates the name that is associated with a particular vThunder instance serial number.
Feature request Indicates whether you have chosen to enable the RBM or UBM billing model.
Remind before grace time is reached
Displays the reminder (number of hours) before the vThunder grace period expires.
page 27 | Document No.: GLM-PAYGLIC - Apr 05 2017
Local License Proxy (LLP)
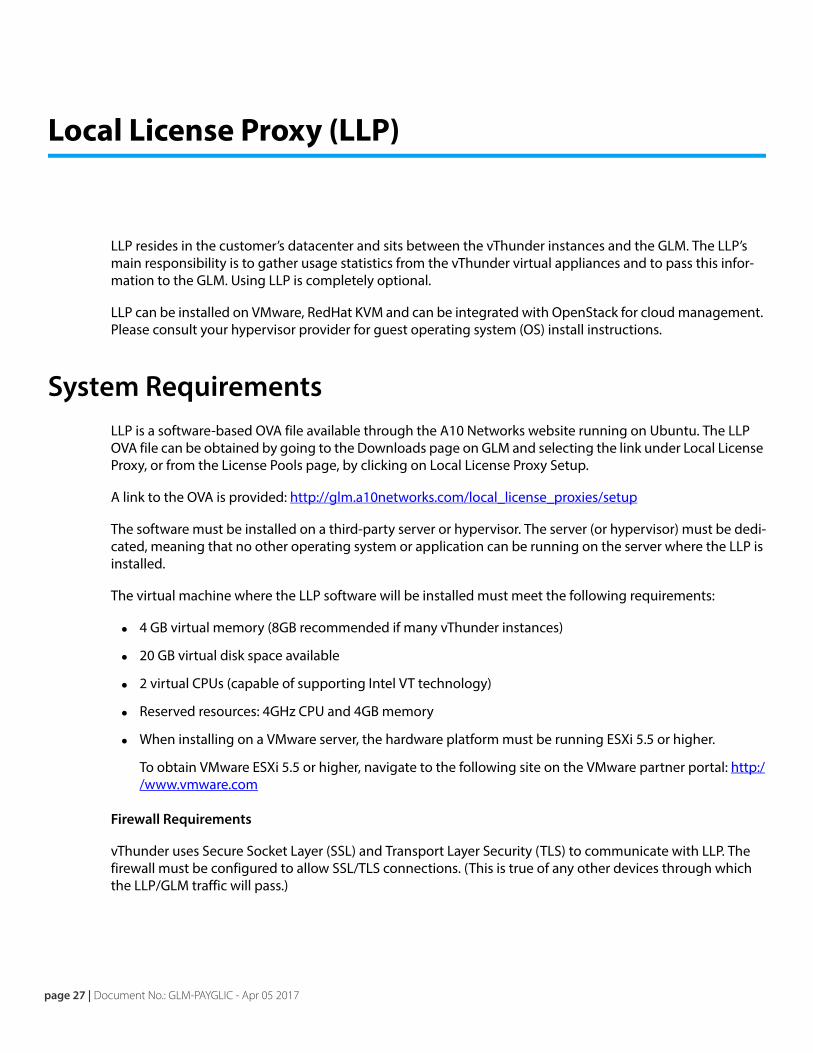
LLP resides in the customer’s datacenter and sits between the vThunder instances and the GLM. The LLP’s main responsibility is to gather usage statistics from the vThunder virtual appliances and to pass this infor-mation to the GLM. Using LLP is completely optional.
LLP can be installed on VMware, RedHat KVM and can be integrated with OpenStack for cloud management. Please consult your hypervisor provider for guest operating system (OS) install instructions.
System Requirements LLP is a software-based OVA file available through the A10 Networks website running on Ubuntu. The LLP OVA file can be obtained by going to the Downloads page on GLM and selecting the link under Local License Proxy, or from the License Pools page, by clicking on Local License Proxy Setup.
A link to the OVA is provided: http://glm.a10networks.com/local_license_proxies/setup
The software must be installed on a third-party server or hypervisor. The server (or hypervisor) must be dedi-cated, meaning that no other operating system or application can be running on the server where the LLP is installed.
The virtual machine where the LLP software will be installed must meet the following requirements:
• 4 GB virtual memory (8GB recommended if many vThunder instances)
• 20 GB virtual disk space available
• 2 virtual CPUs (capable of supporting Intel VT technology)
• Reserved resources: 4GHz CPU and 4GB memory
• When installing on a VMware server, the hardware platform must be running ESXi 5.5 or higher.
To obtain VMware ESXi 5.5 or higher, navigate to the following site on the VMware partner portal: http://www.vmware.com
Firewall Requirements
vThunder uses Secure Socket Layer (SSL) and Transport Layer Security (TLS) to communicate with LLP. The firewall must be configured to allow SSL/TLS connections. (This is true of any other devices through which the LLP/GLM traffic will pass.)
vThunder Pay-as-you-Go Licensing - Installation and User Guide
Setting up LLP
Document No.: GLM-PAYGLIC - Apr 05 2017 | page 28
In vThunder Pay-as-You-Go Licensing deployments, connections are always established from the network elements at the bottom of the topology to those at the top. (See Figure 1 on page 5 for an vThunder Pay-as-You-Go Licensing diagram.) Therefore, it is recommended that TCP port 443 be kept open on devices through which the bi-directional SSL traffic will pass.
Connections between vThunder Pay-as-You-Go Licensing modules are initiated from the lower-level mod-ules to those above, so connections are established from the vThunder to the GLM, or from the LLP to the GLM.
The firewall can be configured to block connection requests coming from the wrong direction, such as a con-nection request sent to the LLP that originates from the public Internet. Controlling the flow of information in this manner enhances the security of the vThunder Pay-as-You-Go Licensing solution.
The LLP will need to be able to reach the GLM on outbound port 443. This is necessary to ensure that LLP can retrieve licenses configured on the GLM and push usage and account information.
Setting up LLP Setting up LLP is done through the following steps.
1. Install LLP onto a third party server or hypervisor. Examples of installing LLP on two different environ-ments are provided in the following section:
• “LLP Installation Examples” on page 51
2. Associate the LLP with GLM
• “Associating LLP with GLM” on page 28
3. Enable vThunder with the LLP
• “Enabling your vThunder Instance” on page 13
Associating LLP with GLMWhen LLP has been installed onto an appropriate environment, it will need to be associated with GLM.
Note: You must have a Pay-As-You Licensing GLM account set up prior to this step in the process.
Take the following steps:
1. Using a web browser such as Internet Explorer, Chrome or Firefox, access the IP for your LLP. An Associ-ate Local License Proxy page, shown in Figure 7, should appear.
page 29 | Document No.: GLM-PAYGLIC - Apr 05 2017
vThunder Pay-as-you-Go Licensing - Installation and User Guide
Associating LLP with GLM
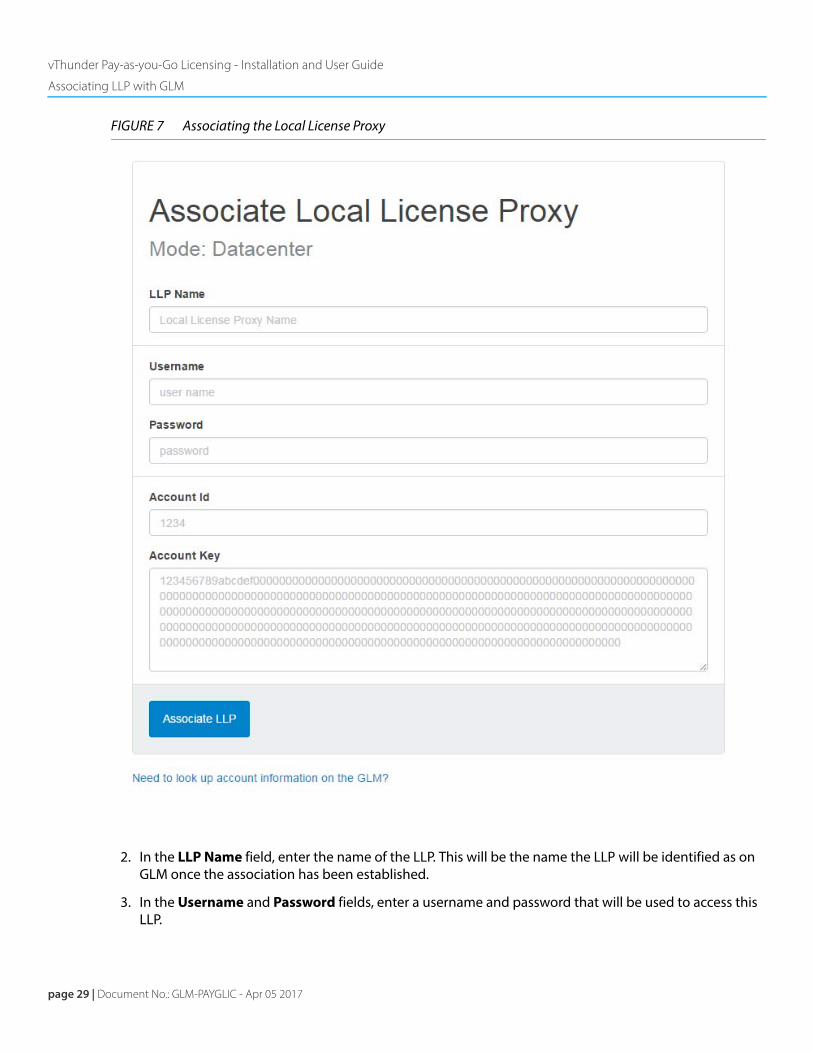
FIGURE 7 Associating the Local License Proxy
2. In the LLP Name field, enter the name of the LLP. This will be the name the LLP will be identified as on GLM once the association has been established.
3. In the Username and Password fields, enter a username and password that will be used to access this LLP.
vThunder Pay-as-you-Go Licensing - Installation and User Guide
Associating LLP with GLM
Document No.: GLM-PAYGLIC - Apr 05 2017 | page 30
After this portion has been filled out, GLM account information will be needed to complete the rest of the form. Take the following steps:
1. Log onto GLM. A hyperlink that will take you to GLM is available at the bottom of the page.
2. Click on Account.
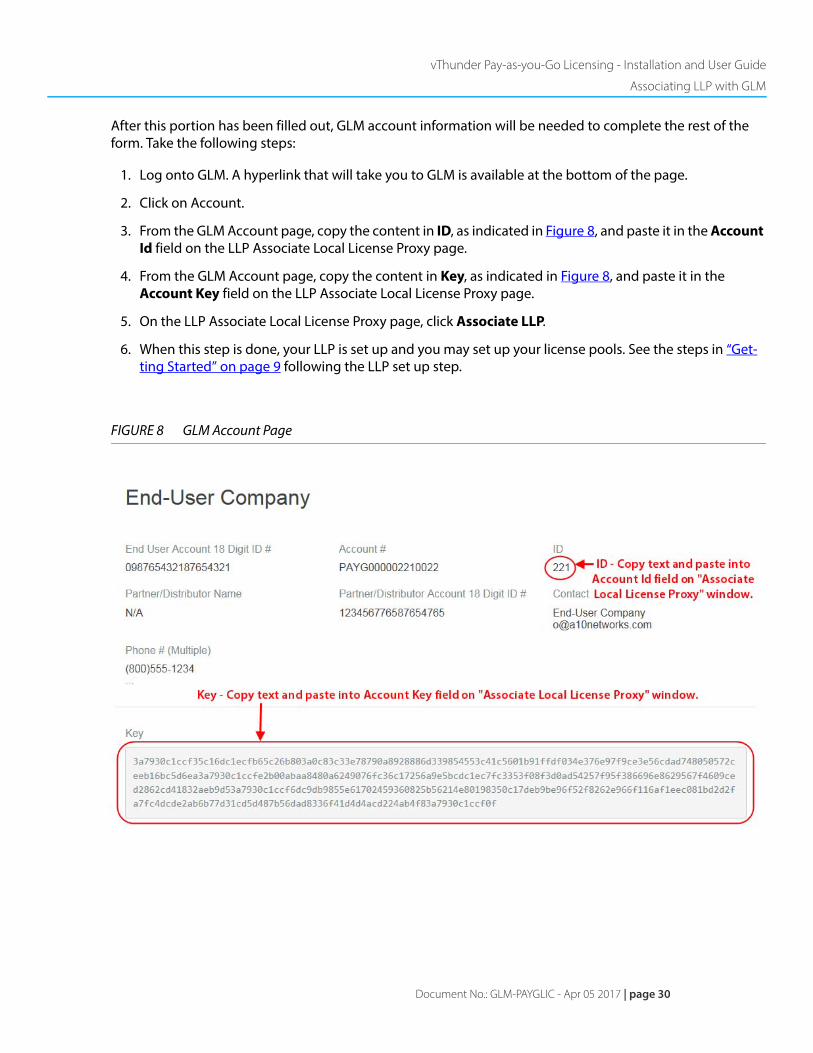
3. From the GLM Account page, copy the content in ID, as indicated in Figure 8, and paste it in the Account Id field on the LLP Associate Local License Proxy page.
4. From the GLM Account page, copy the content in Key, as indicated in Figure 8, and paste it in the Account Key field on the LLP Associate Local License Proxy page.
5. On the LLP Associate Local License Proxy page, click Associate LLP.
6. When this step is done, your LLP is set up and you may set up your license pools. See the steps in “Get-ting Started” on page 9 following the LLP set up step.
FIGURE 8 GLM Account Page
page 31 | Document No.: GLM-PAYGLIC - Apr 05 2017
HTTP/HTTPS Proxy for LLP
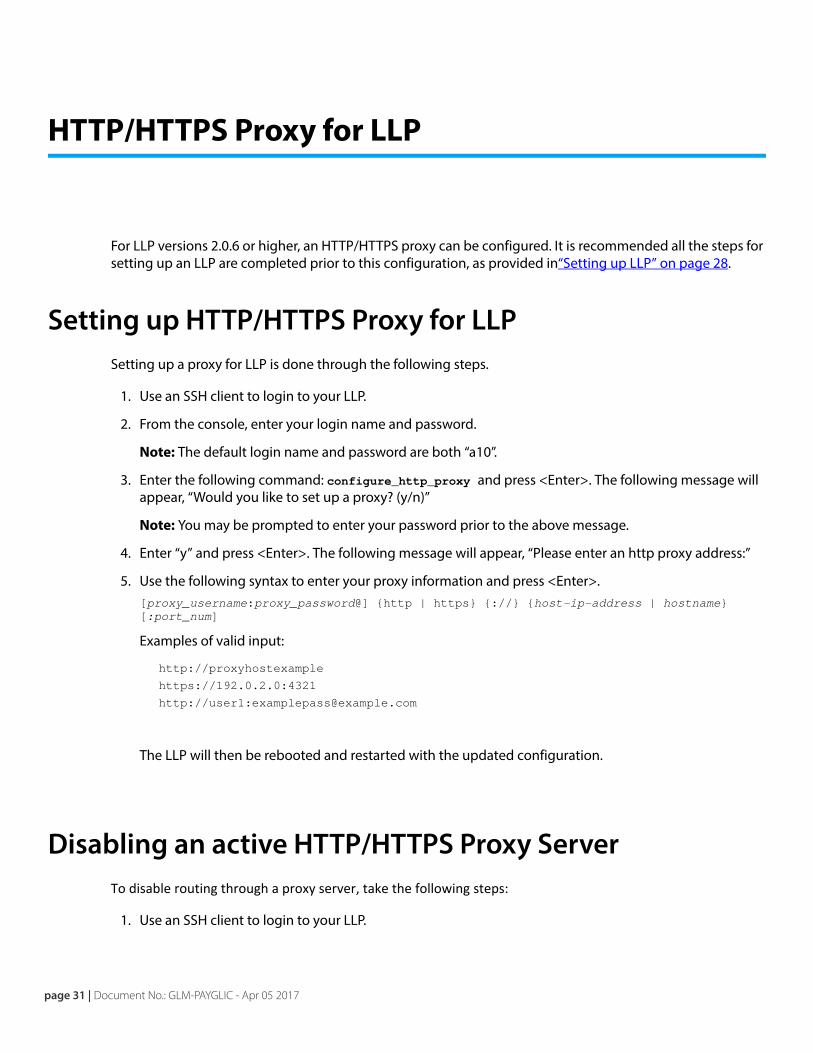
For LLP versions 2.0.6 or higher, an HTTP/HTTPS proxy can be configured. It is recommended all the steps for setting up an LLP are completed prior to this configuration, as provided in“Setting up LLP” on page 28.
Setting up HTTP/HTTPS Proxy for LLP Setting up a proxy for LLP is done through the following steps.
1. Use an SSH client to login to your LLP.
2. From the console, enter your login name and password.
Note: The default login name and password are both “a10”.
3. Enter the following command: configure_http_proxy and press <Enter>. The following message will appear, “Would you like to set up a proxy? (y/n)”
Note: You may be prompted to enter your password prior to the above message.
4. Enter “y” and press <Enter>. The following message will appear, “Please enter an http proxy address:”
5. Use the following syntax to enter your proxy information and press <Enter>.[proxy_username:proxy_password@] {http | https} {://} {host-ip-address | hostname} [:port_num]
Examples of valid input:
http://proxyhostexample
https://192.0.2.0:4321
http://user1:[email protected]
The LLP will then be rebooted and restarted with the updated configuration.
Disabling an active HTTP/HTTPS Proxy ServerTo disable routing through a proxy server, take the following steps:
1. Use an SSH client to login to your LLP.
vThunder Pay-as-you-Go Licensing - Installation and User Guide
Disabling an active HTTP/HTTPS Proxy Server
Document No.: GLM-PAYGLIC - Apr 05 2017 | page 32
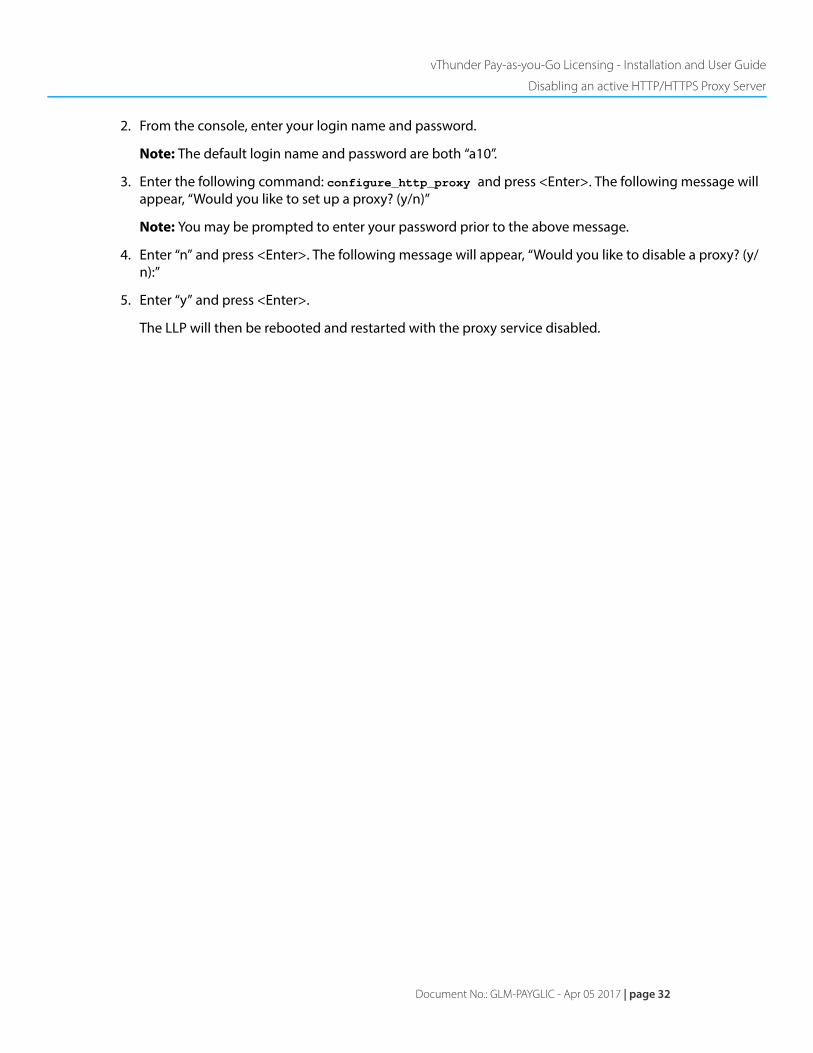
2. From the console, enter your login name and password.
Note: The default login name and password are both “a10”.
3. Enter the following command: configure_http_proxy and press <Enter>. The following message will appear, “Would you like to set up a proxy? (y/n)”
Note: You may be prompted to enter your password prior to the above message.
4. Enter “n” and press <Enter>. The following message will appear, “Would you like to disable a proxy? (y/n):”
5. Enter “y” and press <Enter>.
The LLP will then be rebooted and restarted with the proxy service disabled.
page 33 | Document No.: GLM-PAYGLIC - Apr 05 2017
Using the Local License Proxy
This chapter contains the following features available on an LLP:
Main LLP GUI
• Sign In
• Overview
• License Pools
• Appliances
• Usage
Account Features
• Activity
• Download Logs
• Upgrade
• New User
• Reset Password
• Logout
Note that prior setup of the LLP IP address is required to carry out tasks in this chapter. For more information, see “Local License Proxy (LLP)” on page 27.

vThunder Pay-as-you-Go Licensing - Installation and User Guide
Document No.: GLM-PAYGLIC - Apr 05 2017 | page 34
Sign In
FIGURE 9 Sigh In page
When you initially go to your LLP via a web browser, a sign in page will appear. Enter your username and password LLP information and click Log In.
page 35 | Document No.: GLM-PAYGLIC - Apr 05 2017
vThunder Pay-as-you-Go Licensing - Installation and User Guide
Overview
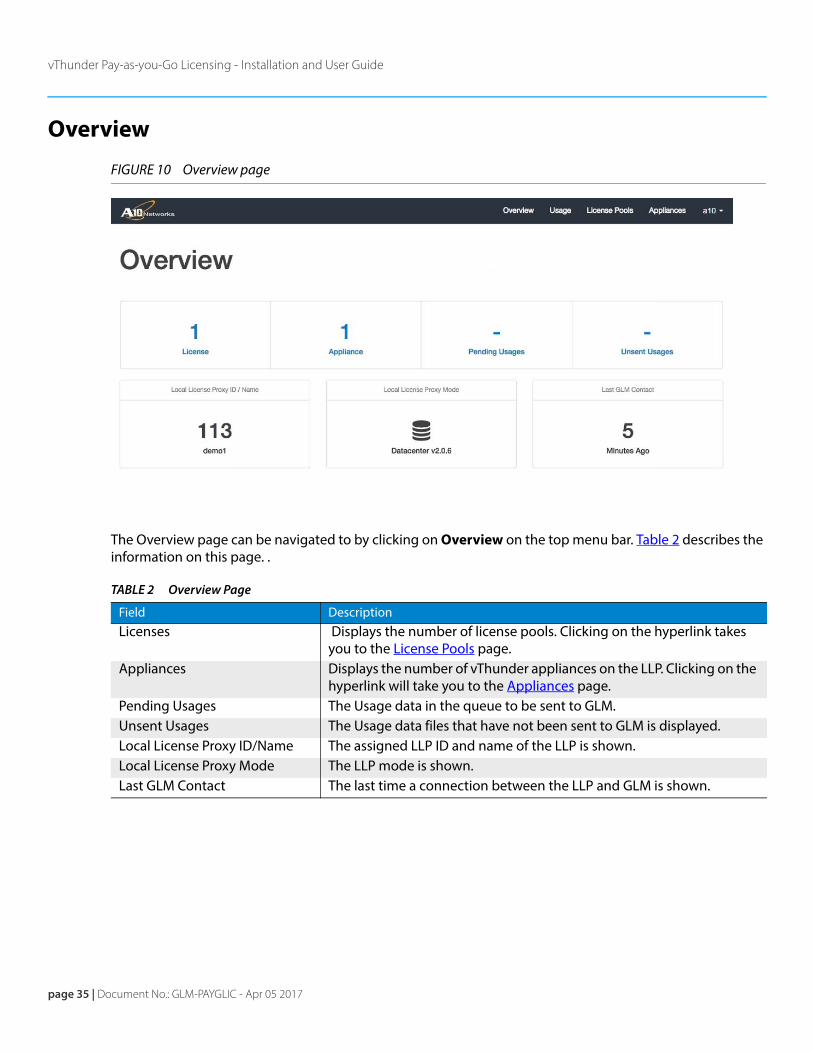
FIGURE 10 Overview page
The Overview page can be navigated to by clicking on Overview on the top menu bar. Table 2 describes the information on this page. .
TABLE 2 Overview Page
Field DescriptionLicenses Displays the number of license pools. Clicking on the hyperlink takes
you to the License Pools page.Appliances Displays the number of vThunder appliances on the LLP. Clicking on the
hyperlink will take you to the Appliances page.Pending Usages The Usage data in the queue to be sent to GLM.Unsent Usages The Usage data files that have not been sent to GLM is displayed.Local License Proxy ID/Name The assigned LLP ID and name of the LLP is shown.Local License Proxy Mode The LLP mode is shown.Last GLM Contact The last time a connection between the LLP and GLM is shown.
vThunder Pay-as-you-Go Licensing - Installation and User Guide
Document No.: GLM-PAYGLIC - Apr 05 2017 | page 36
License Pools
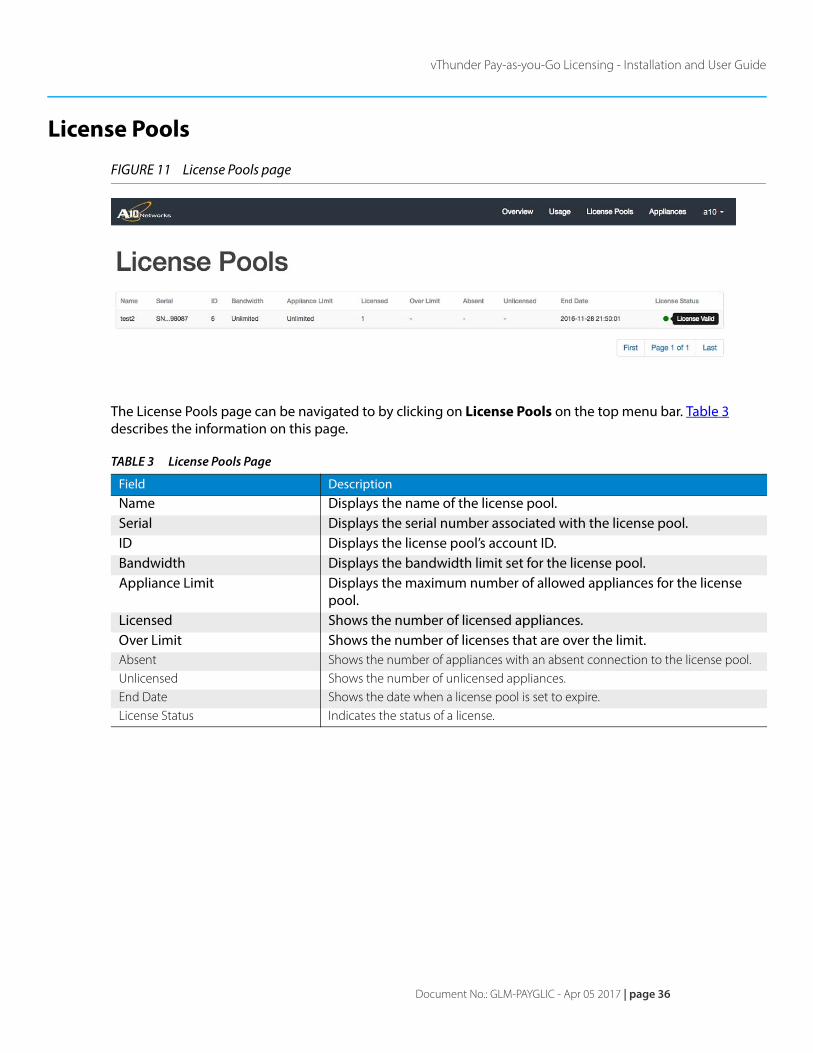
FIGURE 11 License Pools page
The License Pools page can be navigated to by clicking on License Pools on the top menu bar. Table 3 describes the information on this page.
TABLE 3 License Pools Page
Field DescriptionName Displays the name of the license pool.Serial Displays the serial number associated with the license pool.ID Displays the license pool’s account ID.Bandwidth Displays the bandwidth limit set for the license pool.Appliance Limit Displays the maximum number of allowed appliances for the license
pool.Licensed Shows the number of licensed appliances.Over Limit Shows the number of licenses that are over the limit. Absent Shows the number of appliances with an absent connection to the license pool.Unlicensed Shows the number of unlicensed appliances.End Date Shows the date when a license pool is set to expire.License Status Indicates the status of a license.
page 37 | Document No.: GLM-PAYGLIC - Apr 05 2017
vThunder Pay-as-you-Go Licensing - Installation and User Guide
Appliances
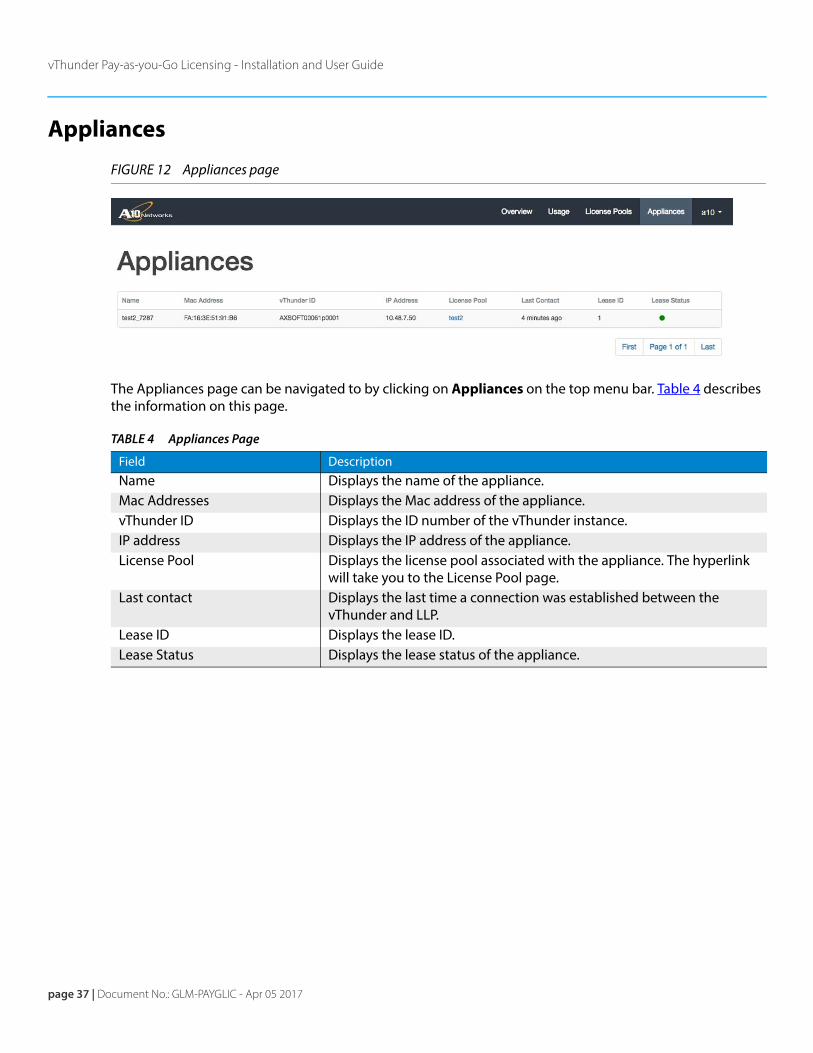
FIGURE 12 Appliances page
The Appliances page can be navigated to by clicking on Appliances on the top menu bar. Table 4 describes the information on this page.
TABLE 4 Appliances Page
Field DescriptionName Displays the name of the appliance.Mac Addresses Displays the Mac address of the appliance.vThunder ID Displays the ID number of the vThunder instance.IP address Displays the IP address of the appliance.License Pool Displays the license pool associated with the appliance. The hyperlink
will take you to the License Pool page. Last contact Displays the last time a connection was established between the
vThunder and LLP.Lease ID Displays the lease ID. Lease Status Displays the lease status of the appliance.
vThunder Pay-as-you-Go Licensing - Installation and User Guide
Document No.: GLM-PAYGLIC - Apr 05 2017 | page 38
Usage
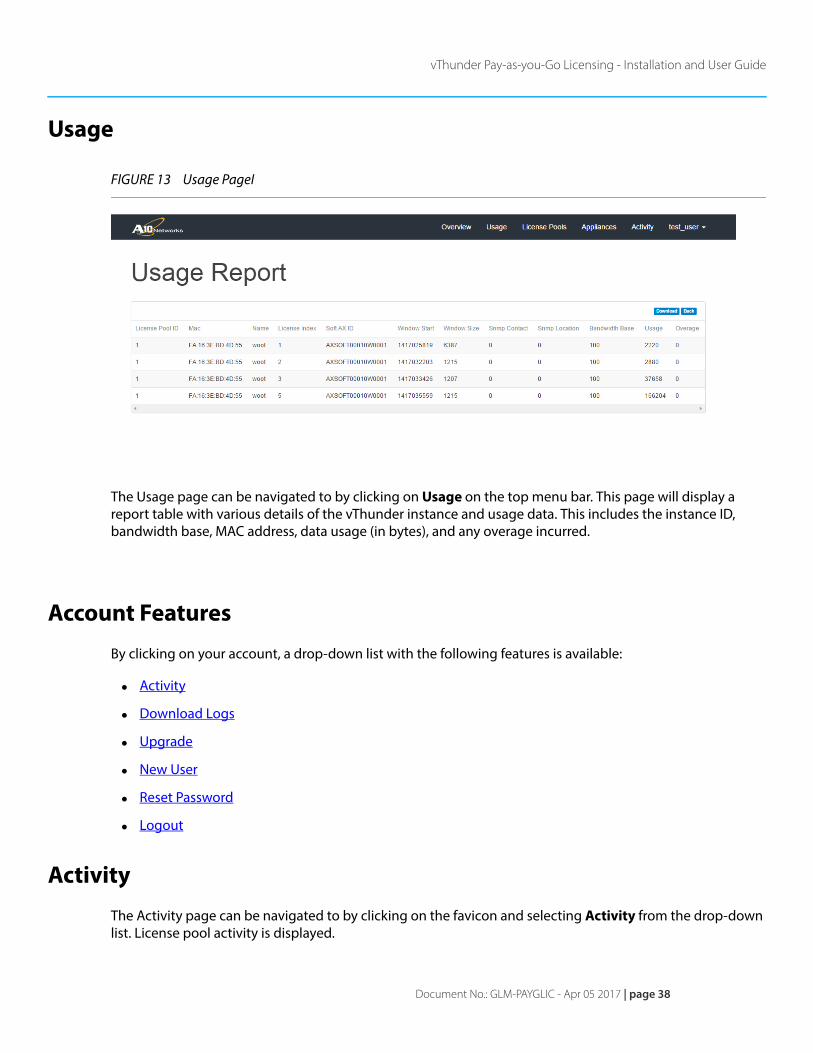
FIGURE 13 Usage PageI
The Usage page can be navigated to by clicking on Usage on the top menu bar. This page will display a report table with various details of the vThunder instance and usage data. This includes the instance ID, bandwidth base, MAC address, data usage (in bytes), and any overage incurred.
Account Features
By clicking on your account, a drop-down list with the following features is available:
• Activity
• Download Logs
• Upgrade
• New User
• Reset Password
• Logout
Activity
The Activity page can be navigated to by clicking on the favicon and selecting Activity from the drop-down list. License pool activity is displayed.
page 39 | Document No.: GLM-PAYGLIC - Apr 05 2017
vThunder Pay-as-you-Go Licensing - Installation and User Guide
Download Logs
The Download Logs page can be navigated to by clicking on the favicon and selecting Download Logs from the drop-down list. Click on Download to download the log file.
Upgrade
The Upgrade page can be navigated to by clicking on the favicon and selecting Upgrade from the drop-down list. If an upgrade is available, you can update your LLP by clicking on Upgrade.
Read all the information on this page prior to performing an upgrade to ensure continued functionality.
New User
The New User page can be navigated to by clicking on the favicon and selecting New User from the drop-down list. This allows you to create a new LLP user account.
To create a new LLP user account, do the following:
1. Enter the new user’s username in the Username field.
2. Enter a password for the new user’s account in the Password field.
After a username and password have been entered, GLM account information will be needed to complete the rest of the form. Take the following steps:
1. Log onto GLM. A hyperlink that will take you to GLM is available at the bottom of the page.
2. Click on Account.
3. From the GLM Account page, copy the content in ID, as indicated in Figure 14, and paste it in the Account Id field on the New User page.
4. From the GLM Account page, copy the content in Key, as indicated in Figure 14, and paste it in the Account Key field on the New User page.
5. On the New User page, click Create User.
vThunder Pay-as-you-Go Licensing - Installation and User Guide
Document No.: GLM-PAYGLIC - Apr 05 2017 | page 40
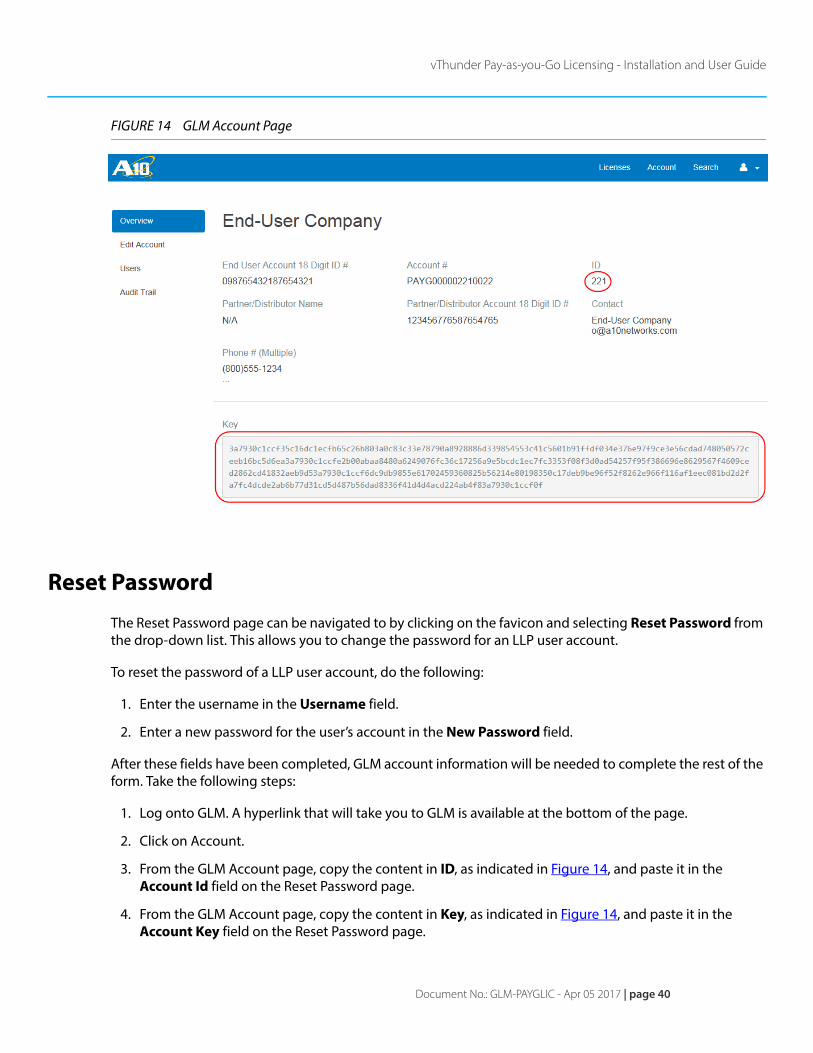
FIGURE 14 GLM Account Page
Reset Password
The Reset Password page can be navigated to by clicking on the favicon and selecting Reset Password from the drop-down list. This allows you to change the password for an LLP user account.
To reset the password of a LLP user account, do the following:
1. Enter the username in the Username field.
2. Enter a new password for the user’s account in the New Password field.
After these fields have been completed, GLM account information will be needed to complete the rest of the form. Take the following steps:
1. Log onto GLM. A hyperlink that will take you to GLM is available at the bottom of the page.
2. Click on Account.
3. From the GLM Account page, copy the content in ID, as indicated in Figure 14, and paste it in the Account Id field on the Reset Password page.
4. From the GLM Account page, copy the content in Key, as indicated in Figure 14, and paste it in the Account Key field on the Reset Password page.
page 41 | Document No.: GLM-PAYGLIC - Apr 05 2017
vThunder Pay-as-you-Go Licensing - Installation and User Guide
5. On the Reset Password page, click Reset Password.
Logout
To log out of the LLP, select Logout from the drop-down list.

vThunder Pay-as-you-Go Licensing - Installation and User Guide
Document No.: GLM-PAYGLIC - Apr 05 2017 | page 42
page 43 | Document No.: GLM-PAYGLIC - Apr 05 2017
Using the GLM GUI for Pay-As-You-Go Licensing
This chapter contains the following topics for using GLM with Pay-As-You Go Licensing.
• License Pools Page
• License Pool Page
License Pools Page
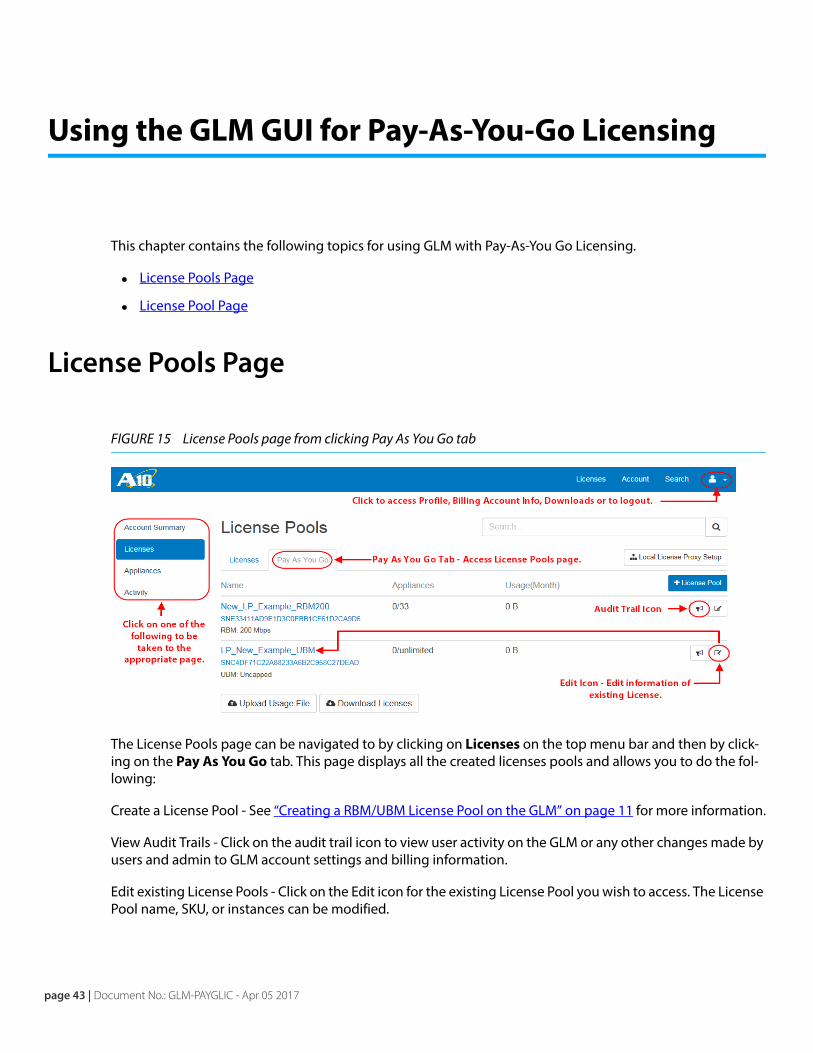
FIGURE 15 License Pools page from clicking Pay As You Go tab
The License Pools page can be navigated to by clicking on Licenses on the top menu bar and then by click-ing on the Pay As You Go tab. This page displays all the created licenses pools and allows you to do the fol-lowing:
Create a License Pool - See “Creating a RBM/UBM License Pool on the GLM” on page 11 for more information.
View Audit Trails - Click on the audit trail icon to view user activity on the GLM or any other changes made by users and admin to GLM account settings and billing information.
Edit existing License Pools - Click on the Edit icon for the existing License Pool you wish to access. The License Pool name, SKU, or instances can be modified.
vThunder Pay-as-you-Go Licensing - Installation and User Guide
License Pool Page
Document No.: GLM-PAYGLIC - Apr 05 2017 | page 44
View Appliance information - Click on the Appliances button on the left side menu to view data for appli-ances. See “Appliances” on page 46 for more information.
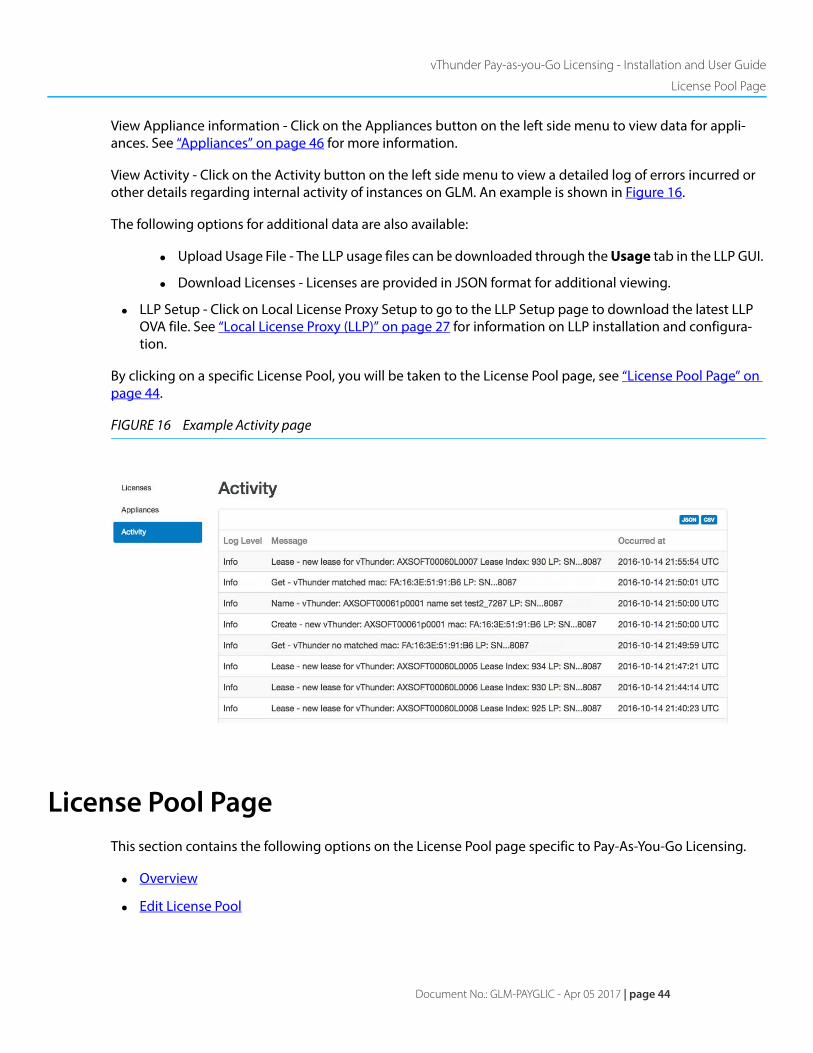
View Activity - Click on the Activity button on the left side menu to view a detailed log of errors incurred or other details regarding internal activity of instances on GLM. An example is shown in Figure 16.
The following options for additional data are also available:
• Upload Usage File - The LLP usage files can be downloaded through the Usage tab in the LLP GUI.
• Download Licenses - Licenses are provided in JSON format for additional viewing.
• LLP Setup - Click on Local License Proxy Setup to go to the LLP Setup page to download the latest LLP OVA file. See “Local License Proxy (LLP)” on page 27 for information on LLP installation and configura-tion.
By clicking on a specific License Pool, you will be taken to the License Pool page, see “License Pool Page” on page 44.
FIGURE 16 Example Activity page
License Pool PageThis section contains the following options on the License Pool page specific to Pay-As-You-Go Licensing.
• Overview
• Edit License Pool
page 45 | Document No.: GLM-PAYGLIC - Apr 05 2017
vThunder Pay-as-you-Go Licensing - Installation and User Guide
License Pool Page
• Appliances
• CLI Commands
• Revoke
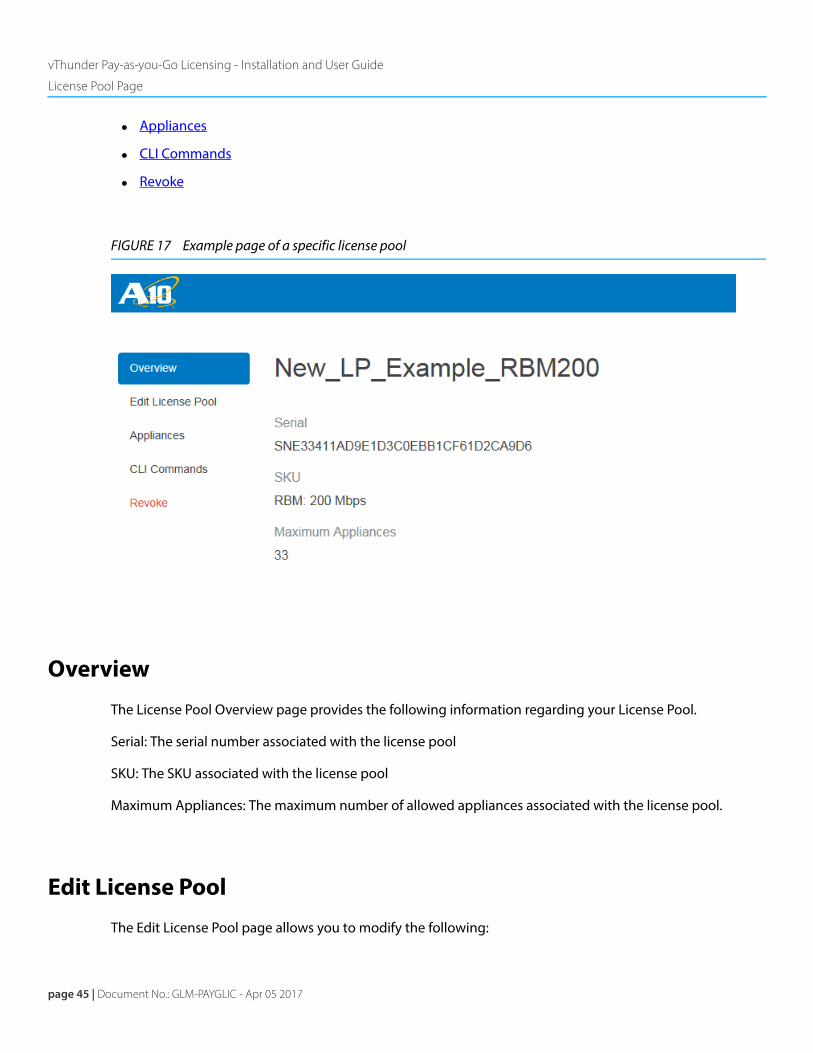
FIGURE 17 Example page of a specific license pool
Overview
The License Pool Overview page provides the following information regarding your License Pool.
Serial: The serial number associated with the license pool
SKU: The SKU associated with the license pool
Maximum Appliances: The maximum number of allowed appliances associated with the license pool.
Edit License Pool
The Edit License Pool page allows you to modify the following:
vThunder Pay-as-you-Go Licensing - Installation and User Guide
License Pool Page
Document No.: GLM-PAYGLIC - Apr 05 2017 | page 46
Name - Change the name of the license pool.
Products - Change the license pool SKU.
Number of Instances - Change the maximum number of allowed appliances.
When you are ready to finalize your changes, click on Update License pool or click Cancel to abort current changes.
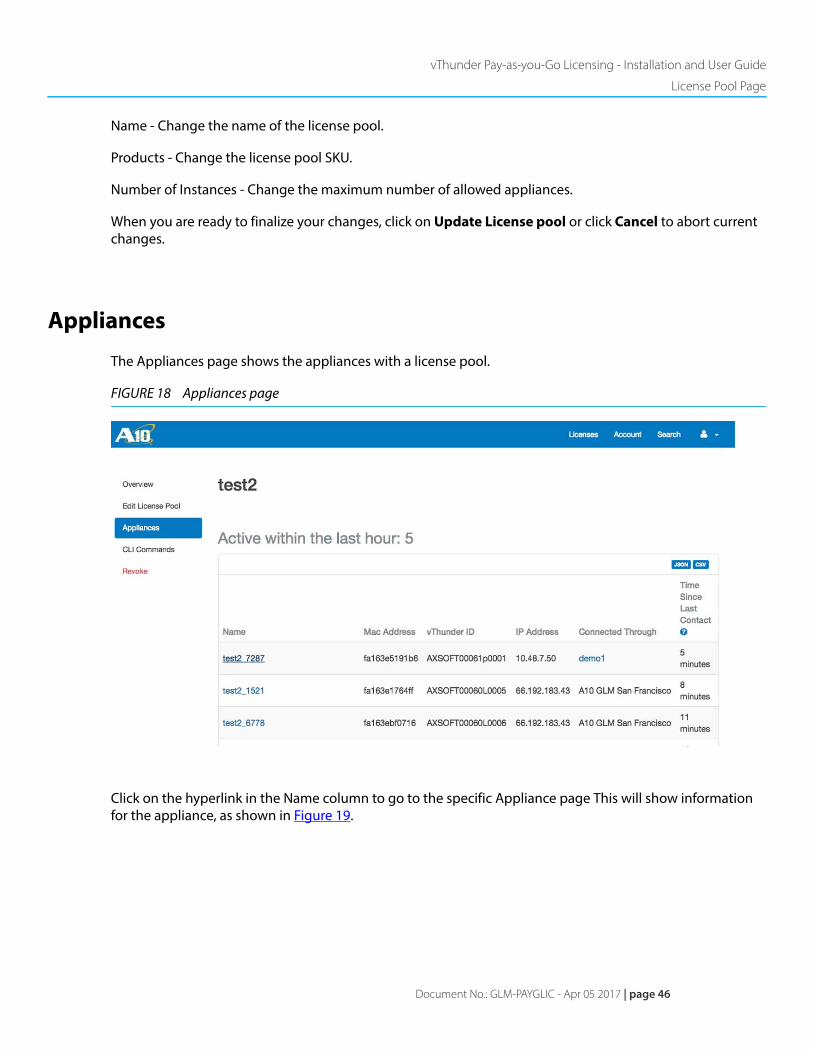
Appliances
The Appliances page shows the appliances with a license pool.
FIGURE 18 Appliances page
Click on the hyperlink in the Name column to go to the specific Appliance page This will show information for the appliance, as shown in Figure 19.
page 47 | Document No.: GLM-PAYGLIC - Apr 05 2017
vThunder Pay-as-you-Go Licensing - Installation and User Guide
License Pool Page
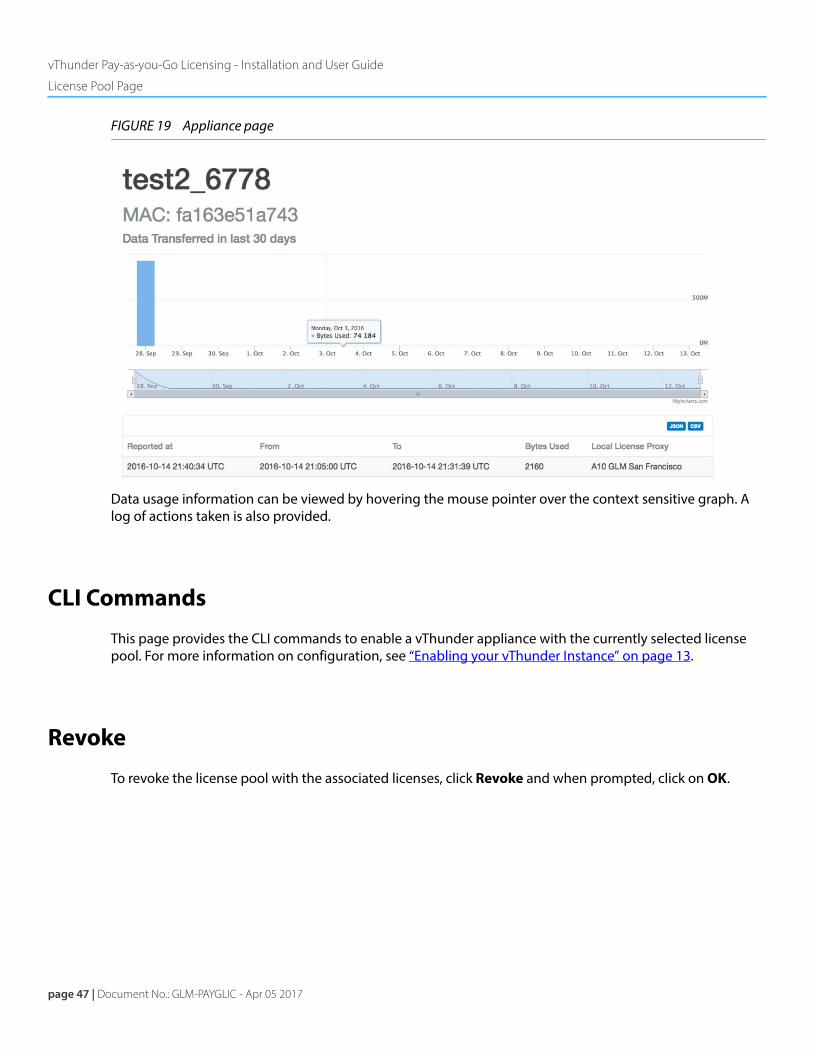
FIGURE 19 Appliance page
Data usage information can be viewed by hovering the mouse pointer over the context sensitive graph. A log of actions taken is also provided.
CLI Commands
This page provides the CLI commands to enable a vThunder appliance with the currently selected license pool. For more information on configuration, see “Enabling your vThunder Instance” on page 13.
Revoke
To revoke the license pool with the associated licenses, click Revoke and when prompted, click on OK.

vThunder Pay-as-you-Go Licensing - Installation and User Guide
License Pool Page
Document No.: GLM-PAYGLIC - Apr 05 2017 | page 48
page 49 | Document No.: GLM-PAYGLIC - Apr 05 2017
License and Open Source Acknowledgments
A10 Networks, Inc. acknowledgment of open source GPL and other open source licensing based on program entity, file entity, user entity, and any other types and variations of licensing whatsoever, either explicitly or implicitly implied in the following acknowledgment list.
Acknowledgments for LLP Open Source Tools:
• Ubuntu/Debian
• Python
• openssl
• swig
• nginx
• pip
• virtualenv
• git
• PostreSQL
Python Packages:
• django, requests, djangorestframework, markdown,
• django-filter, gunicorn,
• south, M2Crypto, django-twitter-bootstrap,
• django-jquery, usethis-django-bootstrap,
• dj-database-url, pyyaml, psycopg2, tornado,
• netiface

vThunder Pay-as-you-Go Licensing - Installation and User Guide
Acknowledgments for LLP
Document No.: GLM-PAYGLIC - Apr 05 2017 | page 50
page 51 | Document No.: GLM-PAYGLIC - Apr 05 2017
LLP Installation Examples
Examples for installing LLP on two different environments are provided.
• “Installing LLP with VMware ESXi 5.5” on page 51
• “Installing LLP with OpenStack” on page 52
After installation is completed, the LLP will need to be associated with your GLM account, see “Associating LLP with GLM” on page 28, and then the vThunder instance will need to be configured to connect with the LLP, see “Enabling your vThunder Instance” on page 13.
Installing LLP with VMware ESXi 5.5This shows the procedure using VMware’s ESXi 5.5 vSphere client on a Windows-based system, although this same procedure could also be performed on a Linux system with only minor variations.
1. To begin, verify you are in compliance with the listed system requirements.
2. Download the LLP OVA file, if you have not done so and save to a secure location.
3. Launch the vSphere client and log into the IP of the ESXi server with the appropriate admin credentials.
4. Select File > Deploy OVF Template. This will open a wizard in which the user will have to upload the LLP OVA file. Click Browse to locate the file and then click Next.
5. Confirm the OVF template details and then click Next.
6. Specify a desired name for the aCloud LLP and then click Next.
7. Set the disk format to Thin Provision, and then click Next.
8. Complete the wizard by clicking Finish and wait for the OVF template to be loaded onto the VM.
9. Power on the VM by clicking on the OVF template name under the IP address of the ESXi server in the left-hand directory of vSphere Client.
10.Select Power on the virtual machine.
11.Access the Console tab to log into the VM. The user will have to enter the LLP credentials in order to exe-cute commands. The default login name and password is “a10” for both fields.
12.The LLP will need to associated with GLM, see “Associating LLP with GLM” on page 28,
13.The LLP will need to be registered through the use of CLI commands. See “Enabling your vThunder Instance” on page 13 regarding configuration.
vThunder Pay-as-you-Go Licensing - Installation and User Guide
Installing LLP with OpenStack
Document No.: GLM-PAYGLIC - Apr 05 2017 | page 52
Installing LLP with OpenStackThis section provides an example of installing LLP on OpenStack.
1. To begin, verify you are in compliance with the listed system requirements, and ensure a Flavor exists with the minimum requirements.
2. Download the LLP OVA file, if you have not done so and save to a secure location.
3. Click on Launch Instance.
4. Ensure you are in the Details tab and take the following steps:
a. Enter a name in the Instance Name field.
b. Select the flavor that meets the minimum requirements for the LLP in the Flavor drop-down list.
c. From the Instance Boot Source drop-down list, select “Boot from image”, and in the Image Name drop-down list, select the LLP image.
5. Click on the Networking tab and take the following steps:
a. Drag an available network to the Selected networks field.
6. Click Launch.
7. Click on your Instance Name followed by a click on the Console tab.
8. From the console, enter the default login name and password, which are both “a10”.
9. The LLP will need to associated with GLM, see “Associating LLP with GLM” on page 28,
10.The LLP will need to be registered through the use of CLI commands. See “Enabling your vThunder Instance” on page 13 regarding configuration.
Additional Configuration Tips
• If DHCP setup has not been set up and a manual configuration for the LLP IP address is needed, follow the steps below:
a. Enter setup_interfaces into the console to begin setup of the LLP IP address.
b. Select either a loopback or ethernet interface by choosing “0” for loopback or “1” for ethernet.
c. Specify whether the interface will run IPv4 or IPv6 by selecting “1” or “2.”
d. Select “Static” as the IP address method.

page 53 | Document No.: GLM-PAYGLIC - Apr 05 2017
vThunder Pay-as-you-Go Licensing - Installation and User Guide
Installing LLP with OpenStack
e. Enter the desired IP address, subnet mask, and default gateway.
The interface should be created and the LLP will now use the designated IP address. To confirm, typelist_interfaces to check if the IP address is shown.
• Enter ifconfig to display the IP address of the LLP. Use a web browser to connect to the IP address of the LLP to continue with set up. See “Associating LLP with GLM” on page 28.
• To change the password, enter change_password into the console and specify a new password.
• To change the hostname for the LLP, type change_hostname and enter a desired hostname.
Note: Names must be all text to be valid.

vThunder Pay-as-you-Go Licensing - Installation and User Guide
Installing LLP with OpenStack
Document No.: GLM-PAYGLIC - Apr 05 2017 | page 54

page 55 | Document No.: GLM-PAYGLIC - Apr 05 2017
vThunder Pay-as-you-Go Licensing - Installation and User Guide

Document No.: GLM-PAYGLIC | Apr 05 2017
5