Embed Size (px)
Citation preview
8/6/2019 VS2010 Tutorial 2 Step-1
http://slidepdf.com/reader/full/vs2010-tutorial-2-step-1 1/19
VS2010 Tutorial: Build a WPF App (Step 1)
• 15
For this post I’m going to build a WPF application from scratch using VS2010 Beta 1. Along the
way I’m going to show off a few new features of the product. I built this demo using the Beta 1
build on Windows 7 RC, but it should work fine on other systems as well.
If you haven’t already downloaded the software, you can find a great walk through of how to do
that on Channel 9 from Brian Keller . Brian explains how to install the entire product, including
TFS. TFS is not required for Step 1 (this tutorial), but will be for Step 2.
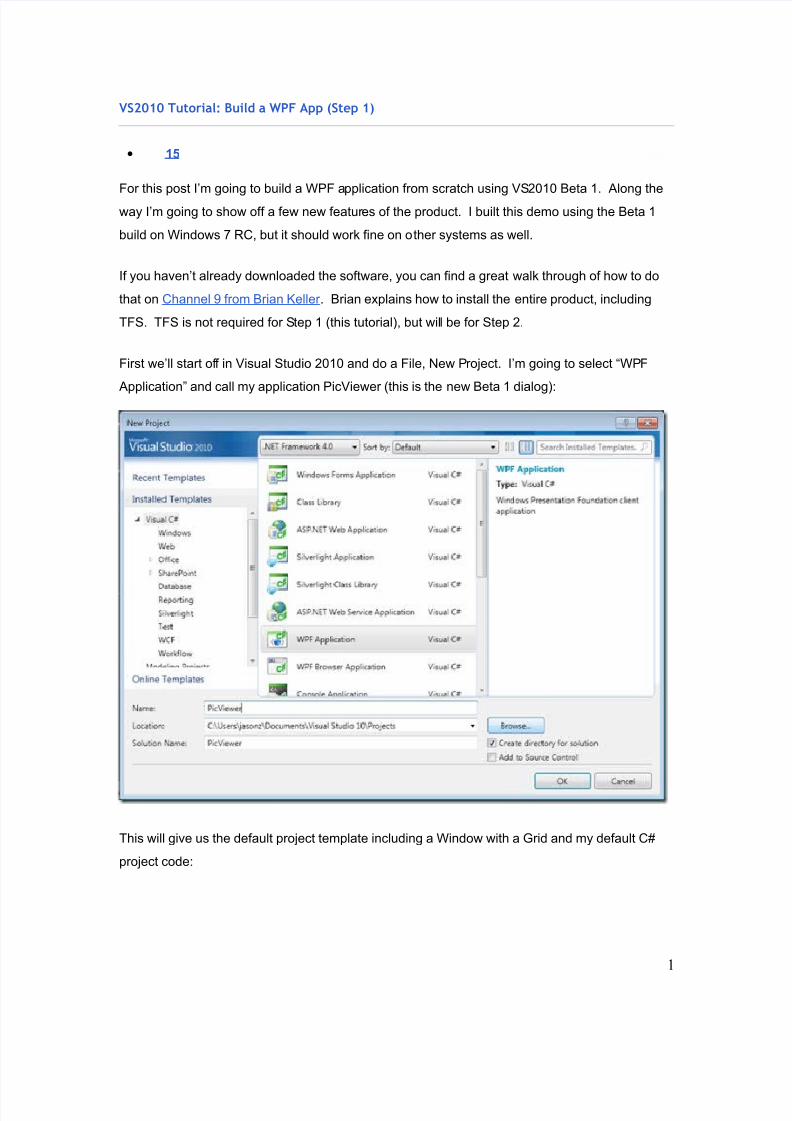
First we’ll start off in Visual Studio 2010 and do a File, New Project. I’m going to select “WPF
Application” and call my application PicViewer (this is the new Beta 1 dialog):
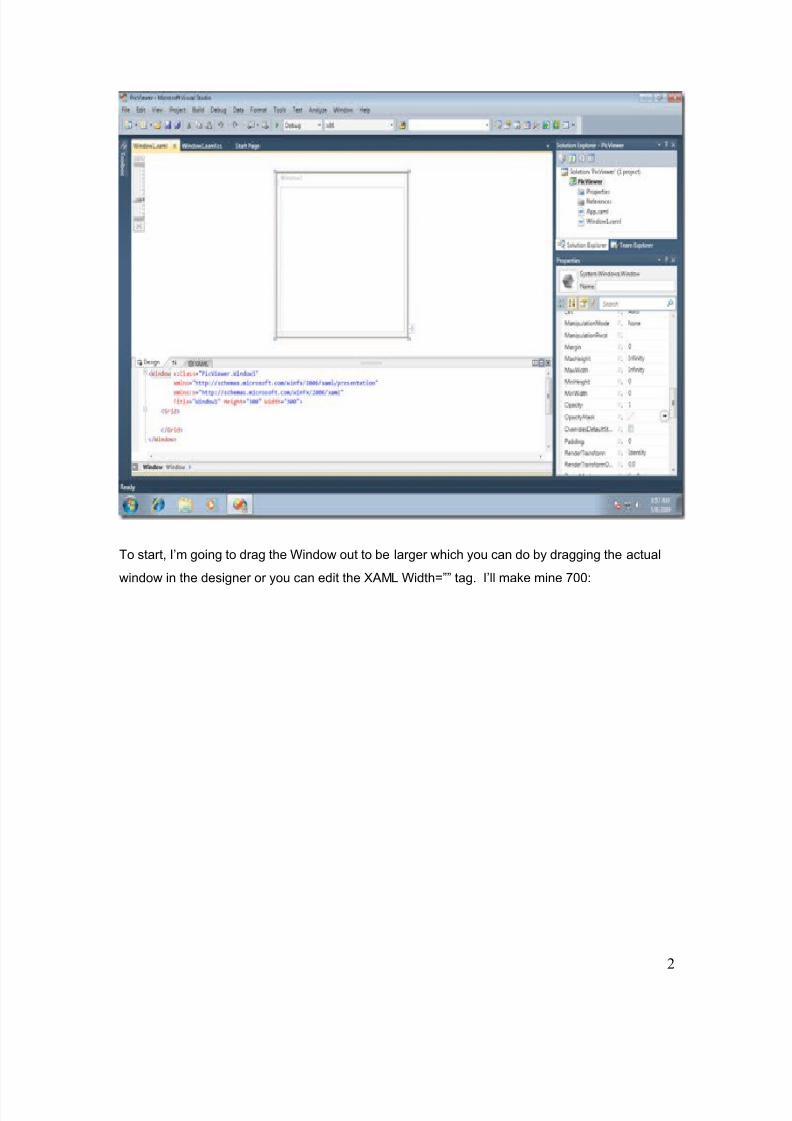
This will give us the default project template including a Window with a Grid and my default C#
project code:
1
8/6/2019 VS2010 Tutorial 2 Step-1
http://slidepdf.com/reader/full/vs2010-tutorial-2-step-1 2/19
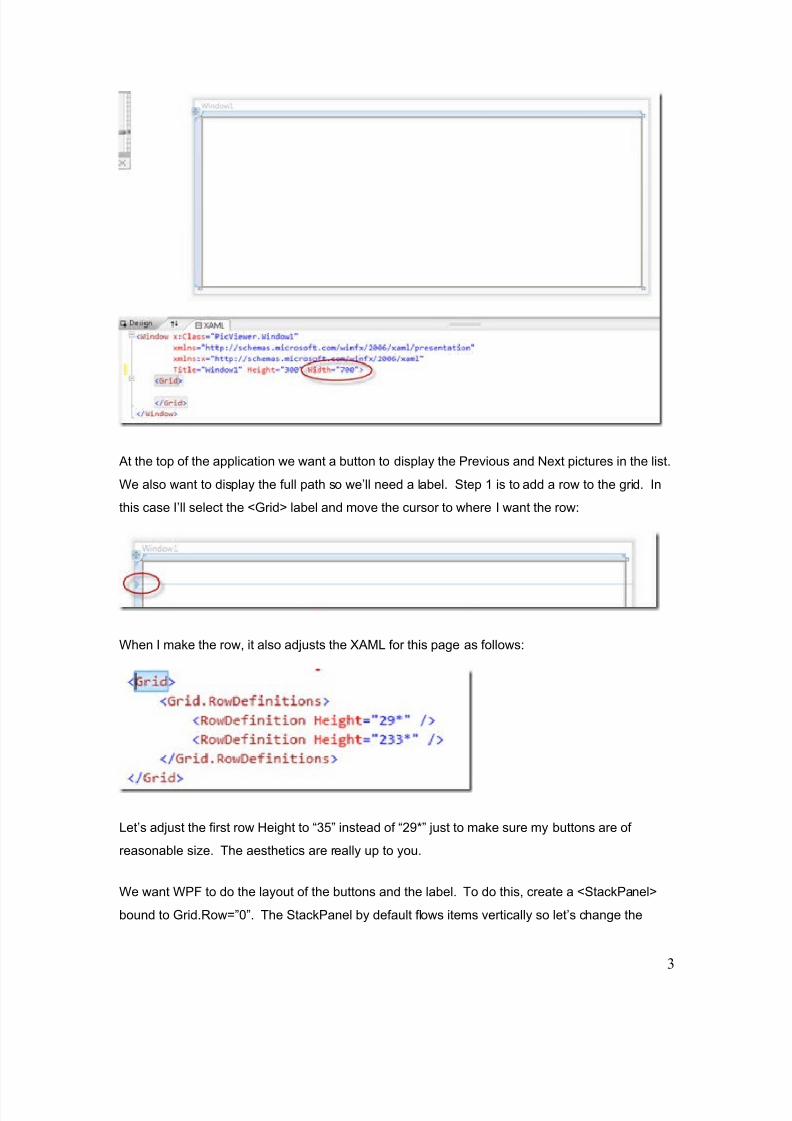
To start, I’m going to drag the Window out to be larger which you can do by dragging the actual
window in the designer or you can edit the XAML Width=”” tag. I’ll make mine 700:
2
8/6/2019 VS2010 Tutorial 2 Step-1
http://slidepdf.com/reader/full/vs2010-tutorial-2-step-1 3/19
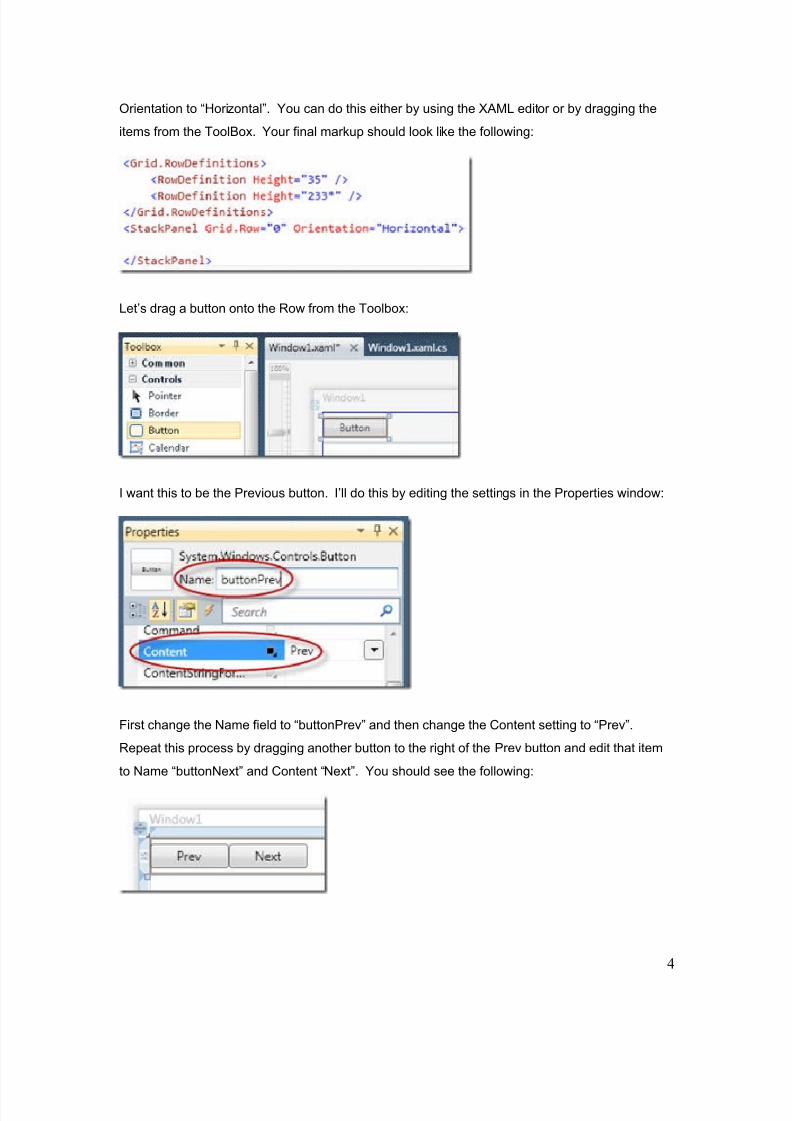
At the top of the application we want a button to display the Previous and Next pictures in the list.
We also want to display the full path so we’ll need a label. Step 1 is to add a row to the grid. In
this case I’ll select the <Grid> label and move the cursor to where I want the row:
When I make the row, it also adjusts the XAML for this page as follows:
Let’s adjust the first row Height to “35” instead of “29*” just to make sure my buttons are of
reasonable size. The aesthetics are really up to you.
We want WPF to do the layout of the buttons and the label. To do this, create a <StackPanel>
bound to Grid.Row=”0”. The StackPanel by default flows items vertically so let’s change the
3
8/6/2019 VS2010 Tutorial 2 Step-1
http://slidepdf.com/reader/full/vs2010-tutorial-2-step-1 4/19
Orientation to “Horizontal”. You can do this either by using the XAML editor or by dragging the
items from the ToolBox. Your final markup should look like the following:
Let’s drag a button onto the Row from the Toolbox:
I want this to be the Previous button. I’ll do this by editing the settings in the Properties window:
First change the Name field to “buttonPrev” and then change the Content setting to “Prev”.
Repeat this process by dragging another button to the right of the Prev button and edit that item
to Name “buttonNext” and Content “Next”. You should see the following:
4
8/6/2019 VS2010 Tutorial 2 Step-1
http://slidepdf.com/reader/full/vs2010-tutorial-2-step-1 5/19
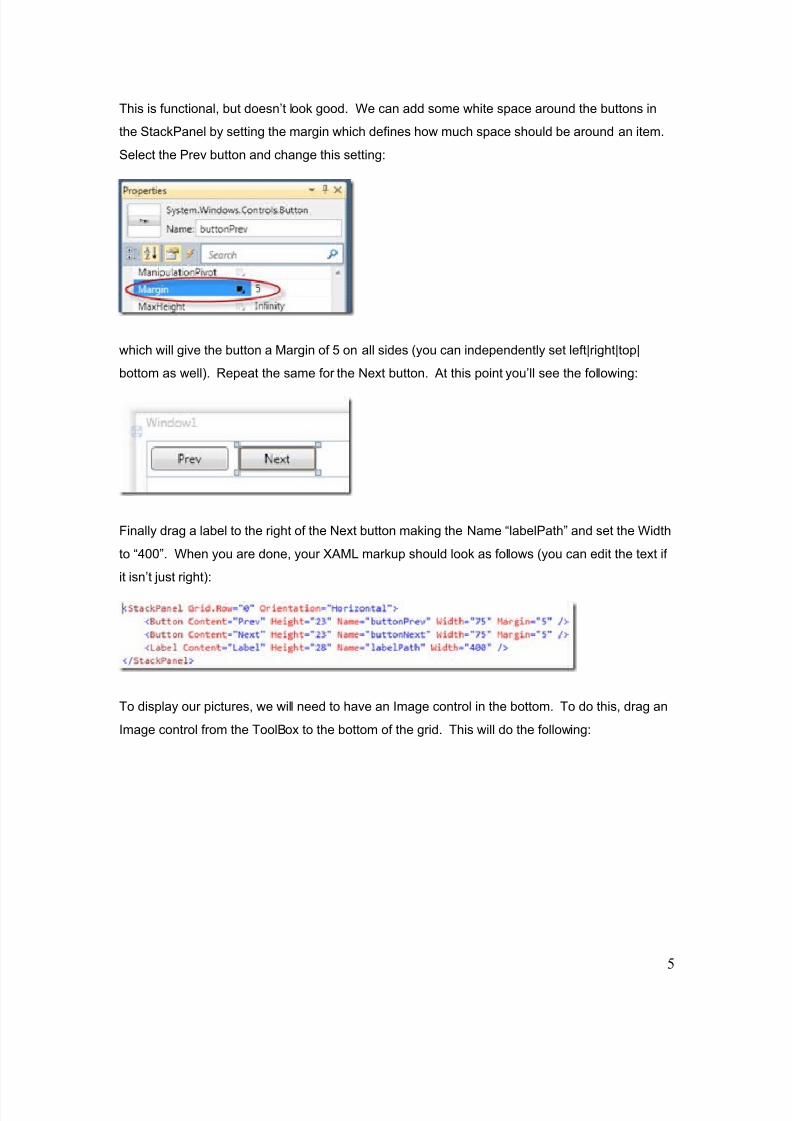
This is functional, but doesn’t look good. We can add some white space around the buttons in
the StackPanel by setting the margin which defines how much space should be around an item.
Select the Prev button and change this setting:
which will give the button a Margin of 5 on all sides (you can independently set left|right|top|
bottom as well). Repeat the same for the Next button. At this point you’ll see the following:
Finally drag a label to the right of the Next button making the Name “labelPath” and set the Width
to “400”. When you are done, your XAML markup should look as follows (you can edit the text if
it isn’t just right):
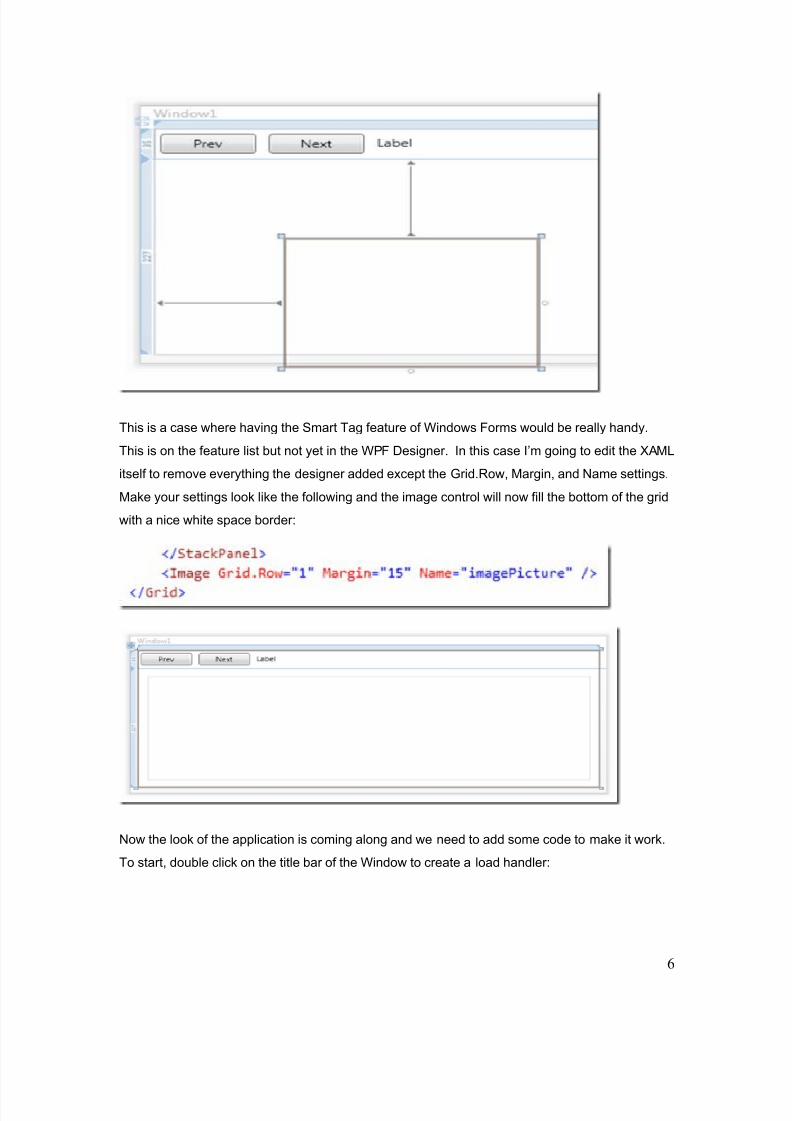
To display our pictures, we will need to have an Image control in the bottom. To do this, drag an
Image control from the ToolBox to the bottom of the grid. This will do the following:
5
8/6/2019 VS2010 Tutorial 2 Step-1
http://slidepdf.com/reader/full/vs2010-tutorial-2-step-1 6/19
This is a case where having the Smart Tag feature of Windows Forms would be really handy.
This is on the feature list but not yet in the WPF Designer. In this case I’m going to edit the XAML
itself to remove everything the designer added except the Grid.Row, Margin, and Name settings.
Make your settings look like the following and the image control will now fill the bottom of the grid
with a nice white space border:
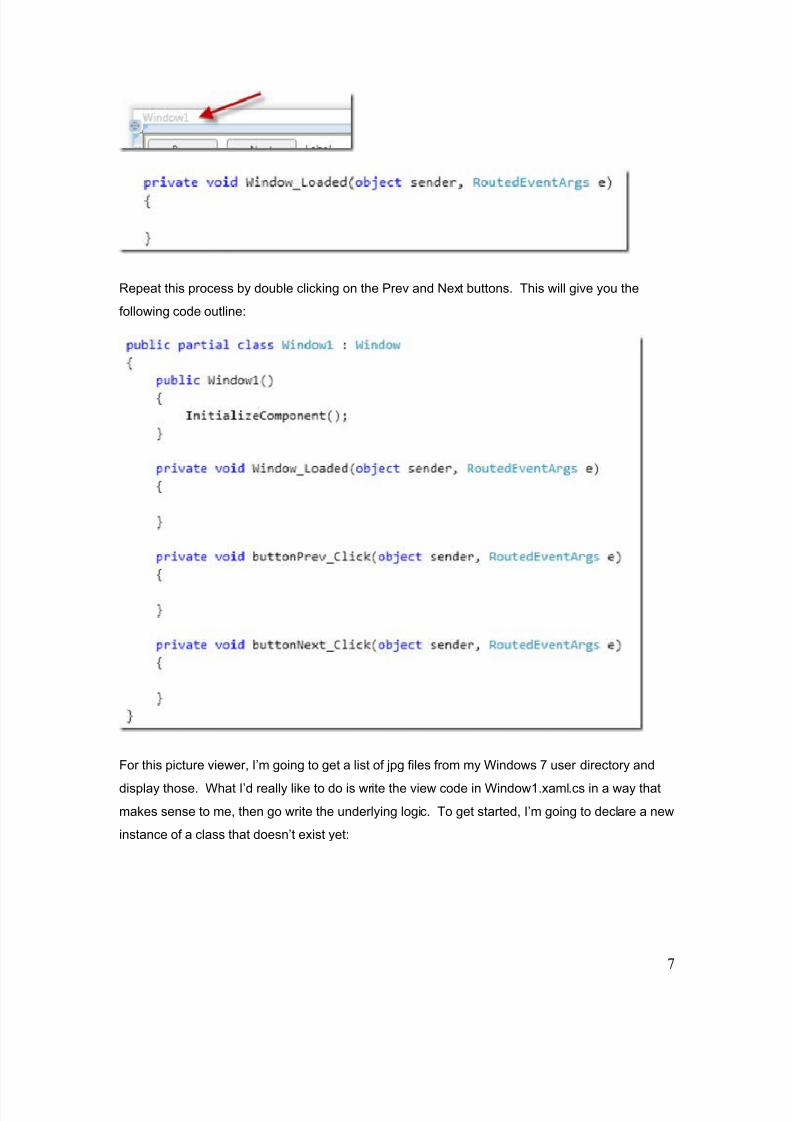
Now the look of the application is coming along and we need to add some code to make it work.
To start, double click on the title bar of the Window to create a load handler:
6
8/6/2019 VS2010 Tutorial 2 Step-1
http://slidepdf.com/reader/full/vs2010-tutorial-2-step-1 7/19
Repeat this process by double clicking on the Prev and Next buttons. This will give you the
following code outline:
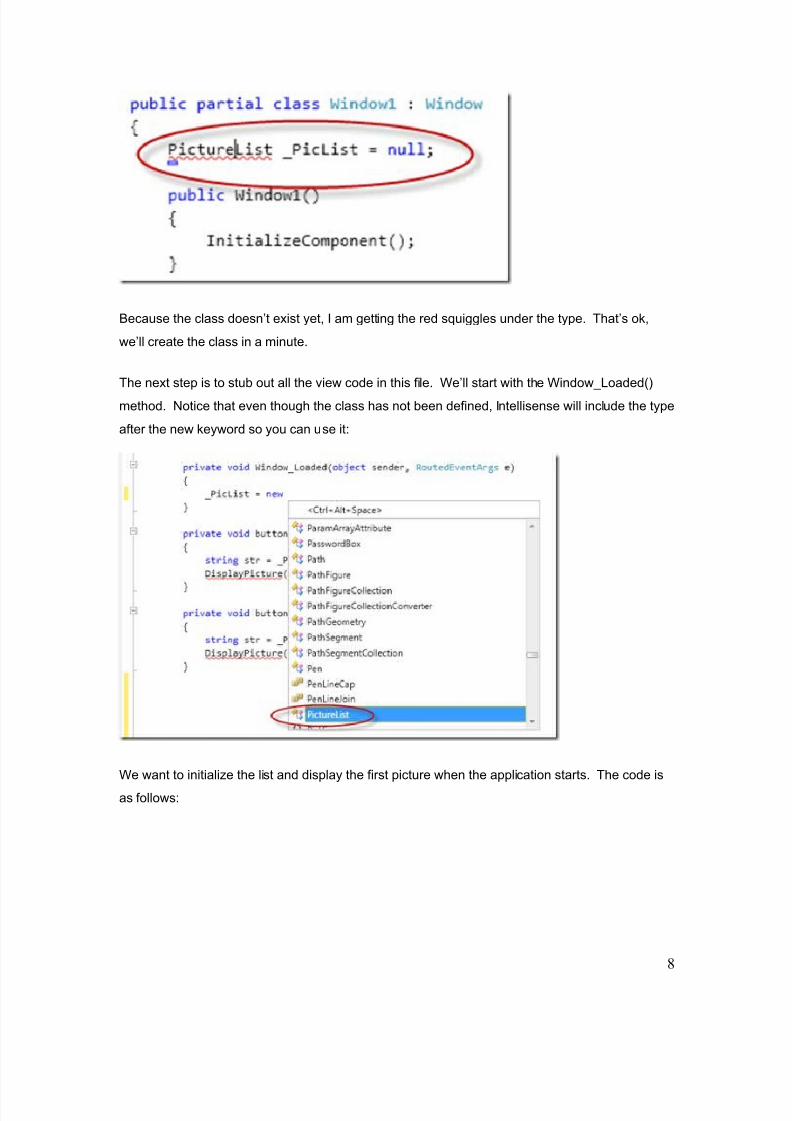
For this picture viewer, I’m going to get a list of jpg files from my Windows 7 user directory and
display those. What I’d really like to do is write the view code in Window1.xaml.cs in a way that
makes sense to me, then go write the underlying logic. To get started, I’m going to declare a new
instance of a class that doesn’t exist yet:
7
8/6/2019 VS2010 Tutorial 2 Step-1
http://slidepdf.com/reader/full/vs2010-tutorial-2-step-1 8/19
Because the class doesn’t exist yet, I am getting the red squiggles under the type. That’s ok,
we’ll create the class in a minute.
The next step is to stub out all the view code in this file. We’ll start with the Window_Loaded()
method. Notice that even though the class has not been defined, Intellisense will include the type
after the new keyword so you can use it:
We want to initialize the list and display the first picture when the application starts. The code is
as follows:
8
8/6/2019 VS2010 Tutorial 2 Step-1
http://slidepdf.com/reader/full/vs2010-tutorial-2-step-1 9/19
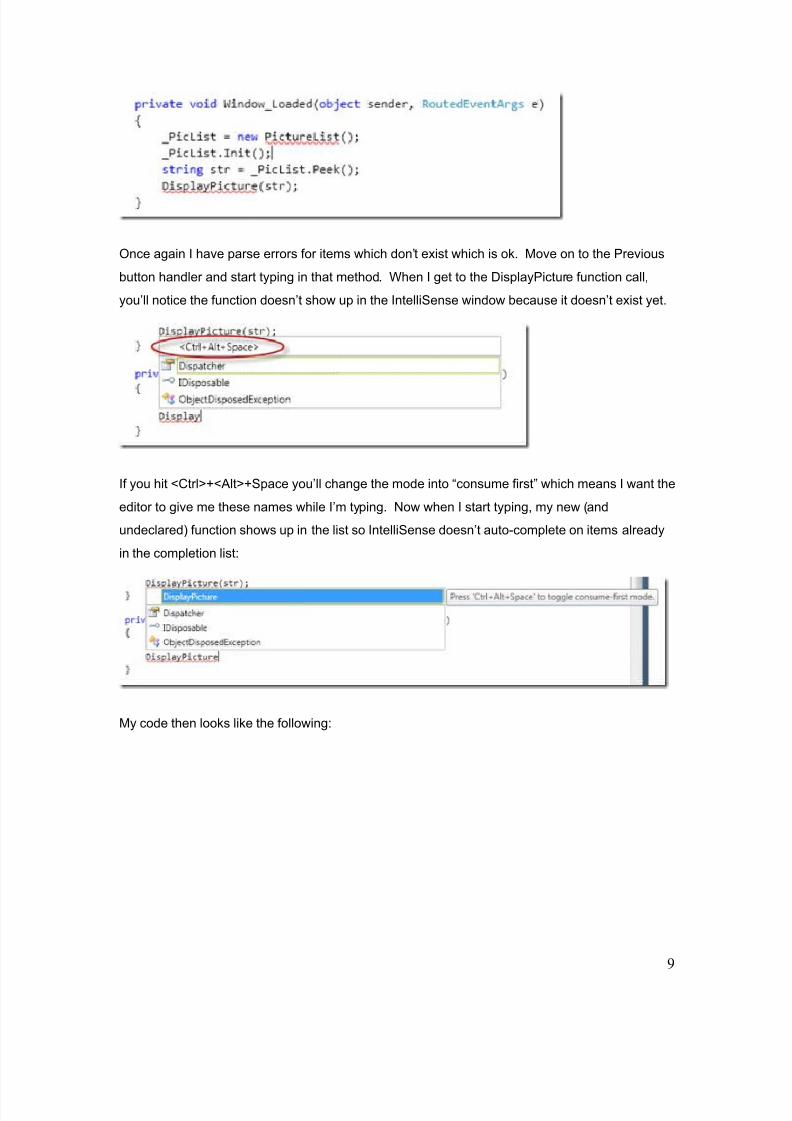
Once again I have parse errors for items which don’t exist which is ok. Move on to the Previous
button handler and start typing in that method. When I get to the DisplayPicture function call,
you’ll notice the function doesn’t show up in the IntelliSense window because it doesn’t exist yet.
If you hit <Ctrl>+<Alt>+Space you’ll change the mode into “consume first” which means I want the
editor to give me these names while I’m typing. Now when I start typing, my new (and
undeclared) function shows up in the list so IntelliSense doesn’t auto-complete on items already
in the completion list:
My code then looks like the following:
9
8/6/2019 VS2010 Tutorial 2 Step-1
http://slidepdf.com/reader/full/vs2010-tutorial-2-step-1 10/19
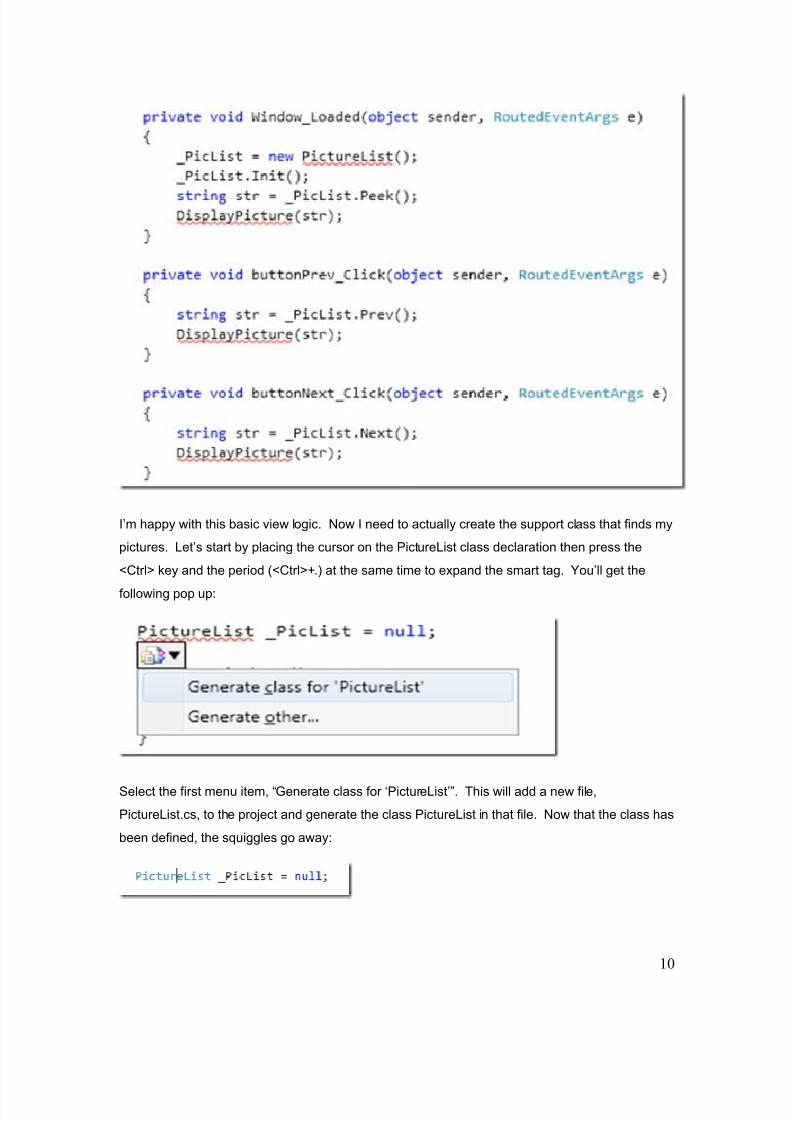
I’m happy with this basic view logic. Now I need to actually create the support class that finds my
pictures. Let’s start by placing the cursor on the PictureList class declaration then press the
<Ctrl> key and the period (<Ctrl>+.) at the same time to expand the smart tag. You’ll get the
following pop up:
Select the first menu item, “Generate class for ‘PictureList’”. This will add a new file,
PictureList.cs, to the project and generate the class PictureList in that file. Now that the class has
been defined, the squiggles go away:
10

8/6/2019 VS2010 Tutorial 2 Step-1
http://slidepdf.com/reader/full/vs2010-tutorial-2-step-1 11/19
You will then notice all the methods you have invoked on the class are showing up as syntax
errors. Put your cursor in the Init() method and press <Ctrl>+. to get the following:
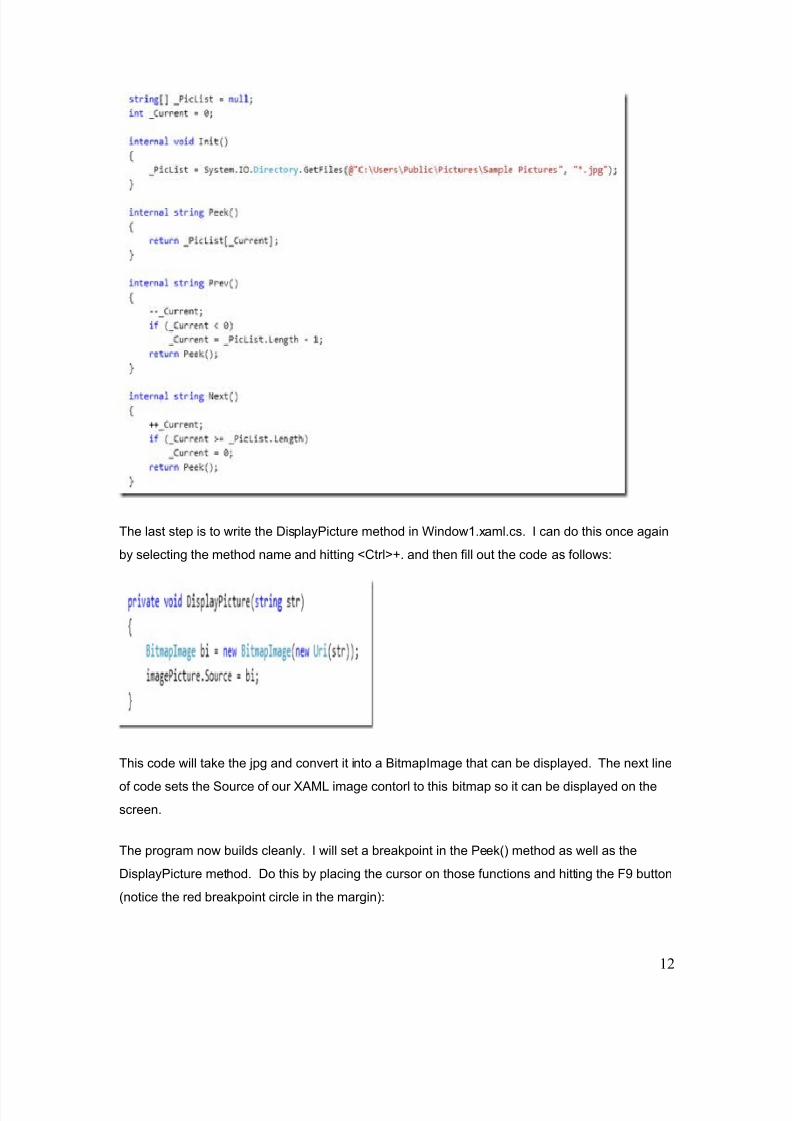
Select the menu item so the code is generated for you. Repeat this process for the Peek(),
Prev(), and Next() methods. If we then open PictureList.cs file, you will find the following code
stubbed out for you:
Notice that because the code we wrote to consume methods like _PicList.Peek() expect a string
back, the editor has automatically given the methods a return type of ‘string’.
Now I’ll add the logic to retrieve a list of jpg’s from the Windows install and give me the ability to
walk through them:
11
8/6/2019 VS2010 Tutorial 2 Step-1
http://slidepdf.com/reader/full/vs2010-tutorial-2-step-1 12/19
The last step is to write the DisplayPicture method in Window1.xaml.cs. I can do this once again
by selecting the method name and hitting <Ctrl>+. and then fill out the code as follows:
This code will take the jpg and convert it into a BitmapImage that can be displayed. The next line
of code sets the Source of our XAML image contorl to this bitmap so it can be displayed on the
screen.
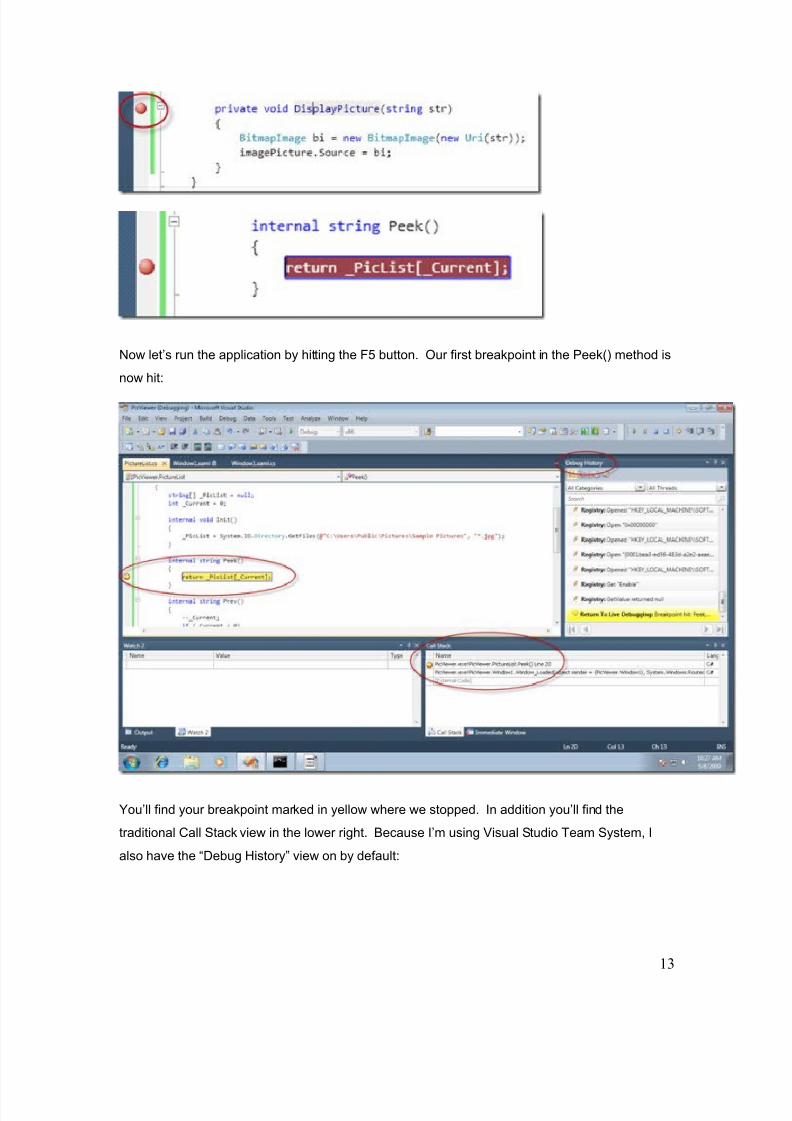
The program now builds cleanly. I will set a breakpoint in the Peek() method as well as the
DisplayPicture method. Do this by placing the cursor on those functions and hitting the F9 button
(notice the red breakpoint circle in the margin):
12
8/6/2019 VS2010 Tutorial 2 Step-1
http://slidepdf.com/reader/full/vs2010-tutorial-2-step-1 13/19
Now let’s run the application by hitting the F5 button. Our first breakpoint in the Peek() method is
now hit:
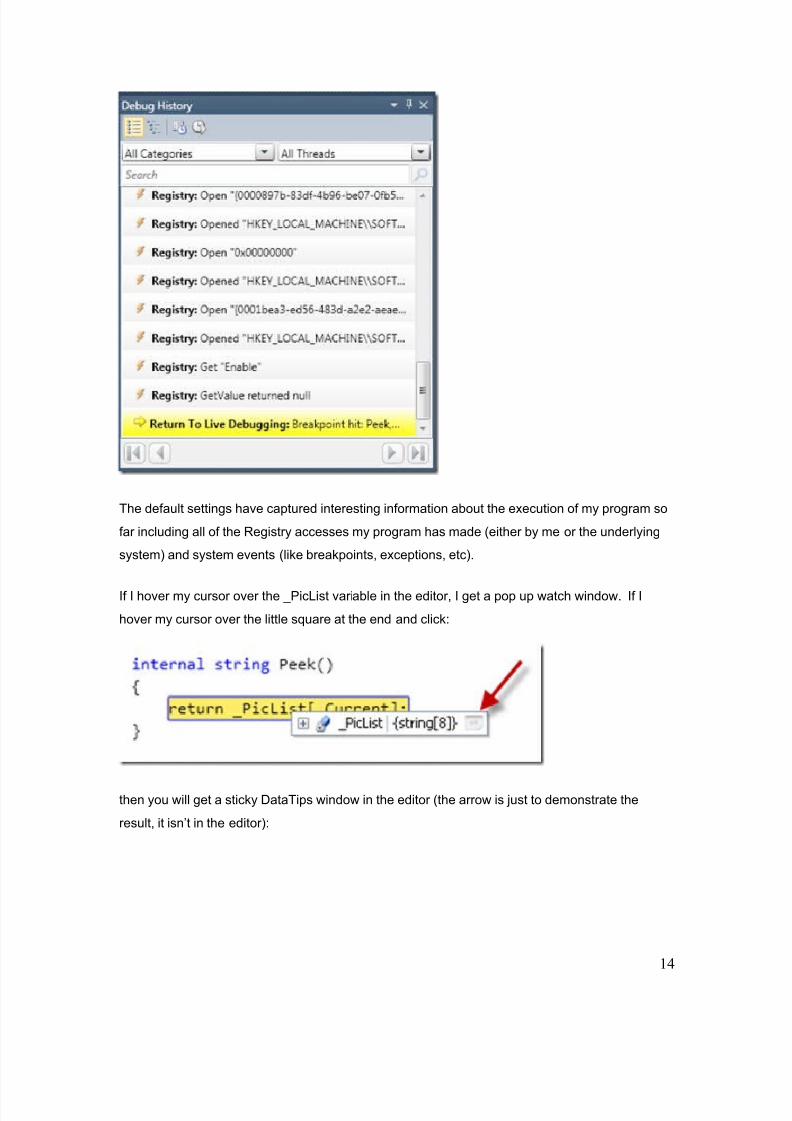
You’ll find your breakpoint marked in yellow where we stopped. In addition you’ll find the
traditional Call Stack view in the lower right. Because I’m using Visual Studio Team System, I
also have the “Debug History” view on by default:
13
8/6/2019 VS2010 Tutorial 2 Step-1
http://slidepdf.com/reader/full/vs2010-tutorial-2-step-1 14/19
The default settings have captured interesting information about the execution of my program so
far including all of the Registry accesses my program has made (either by me or the underlying
system) and system events (like breakpoints, exceptions, etc).
If I hover my cursor over the _PicList variable in the editor, I get a pop up watch window. If I
hover my cursor over the little square at the end and click:
then you will get a sticky DataTips window in the editor (the arrow is just to demonstrate the
result, it isn’t in the editor):
14
8/6/2019 VS2010 Tutorial 2 Step-1
http://slidepdf.com/reader/full/vs2010-tutorial-2-step-1 15/19
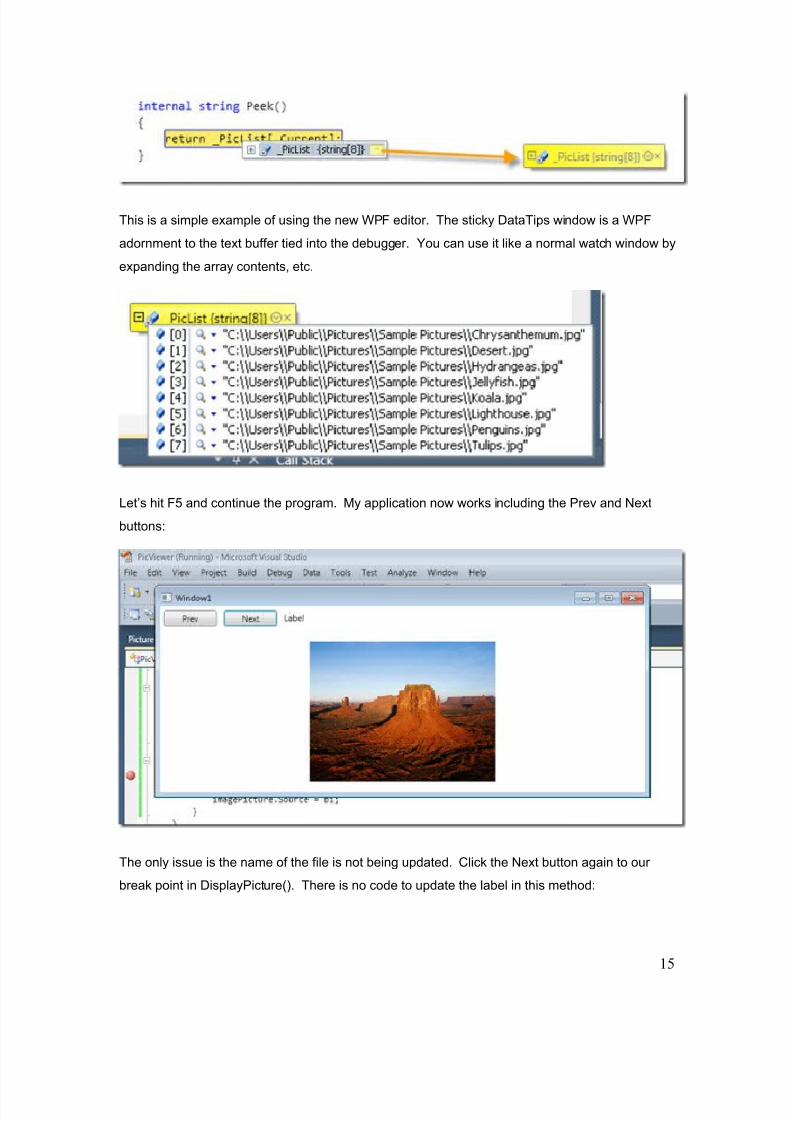
This is a simple example of using the new WPF editor. The sticky DataTips window is a WPF
adornment to the text buffer tied into the debugger. You can use it like a normal watch window by
expanding the array contents, etc.
Let’s hit F5 and continue the program. My application now works including the Prev and Next
buttons:
The only issue is the name of the file is not being updated. Click the Next button again to our
break point in DisplayPicture(). There is no code to update the label in this method:
15
8/6/2019 VS2010 Tutorial 2 Step-1
http://slidepdf.com/reader/full/vs2010-tutorial-2-step-1 16/19
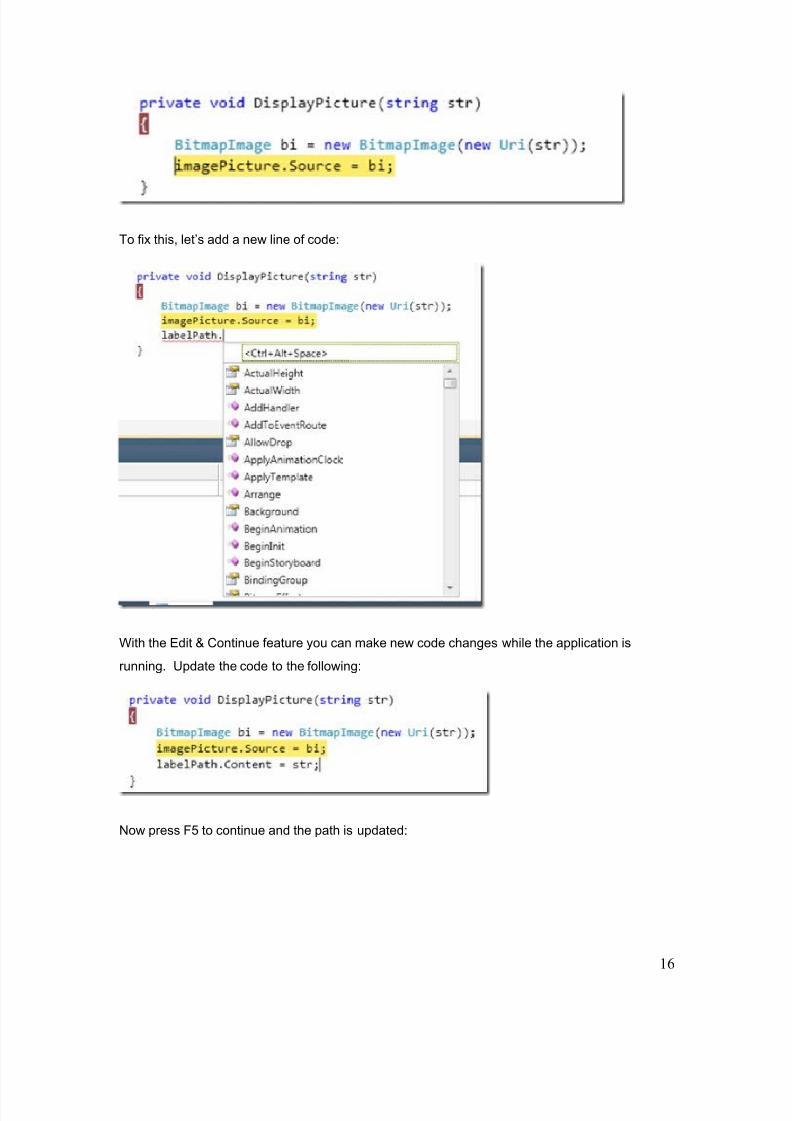
To fix this, let’s add a new line of code:
With the Edit & Continue feature you can make new code changes while the application is
running. Update the code to the following:
Now press F5 to continue and the path is updated:
16
8/6/2019 VS2010 Tutorial 2 Step-1
http://slidepdf.com/reader/full/vs2010-tutorial-2-step-1 17/19
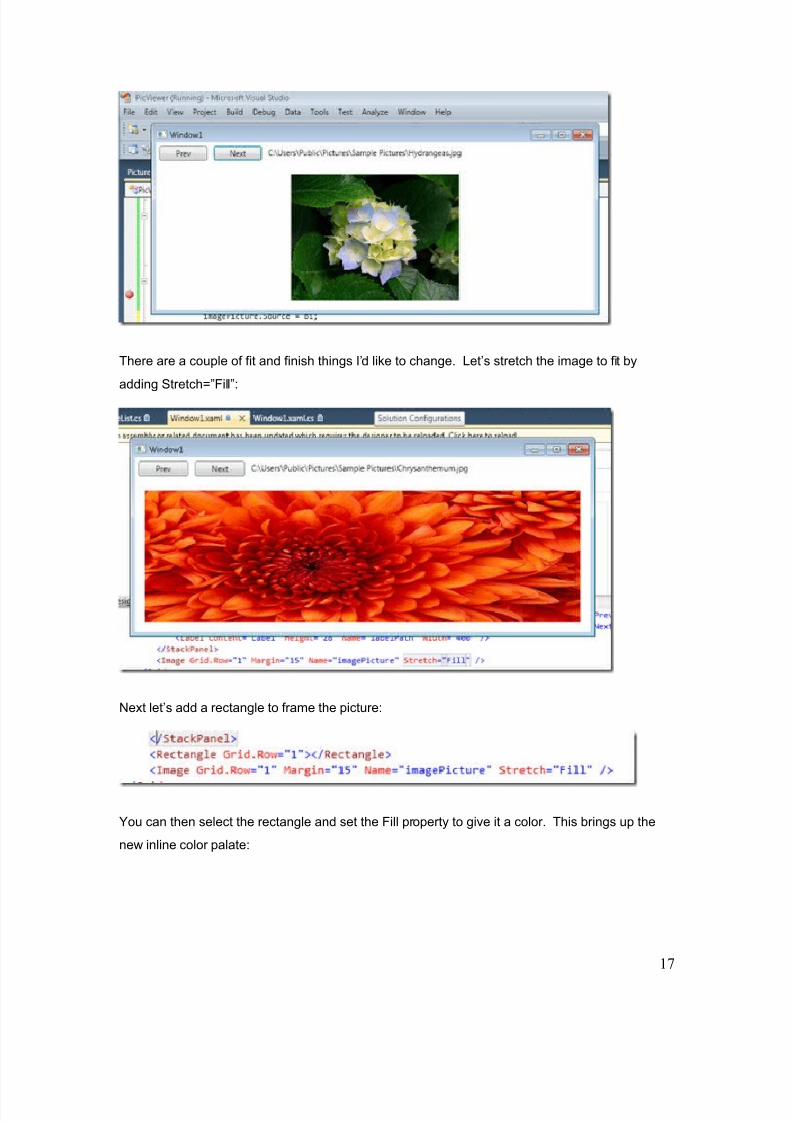
There are a couple of fit and finish things I’d like to change. Let’s stretch the image to fit by
adding Stretch=”Fill”:
Next let’s add a rectangle to frame the picture:
You can then select the rectangle and set the Fill property to give it a color. This brings up the
new inline color palate:
17
8/6/2019 VS2010 Tutorial 2 Step-1
http://slidepdf.com/reader/full/vs2010-tutorial-2-step-1 18/19
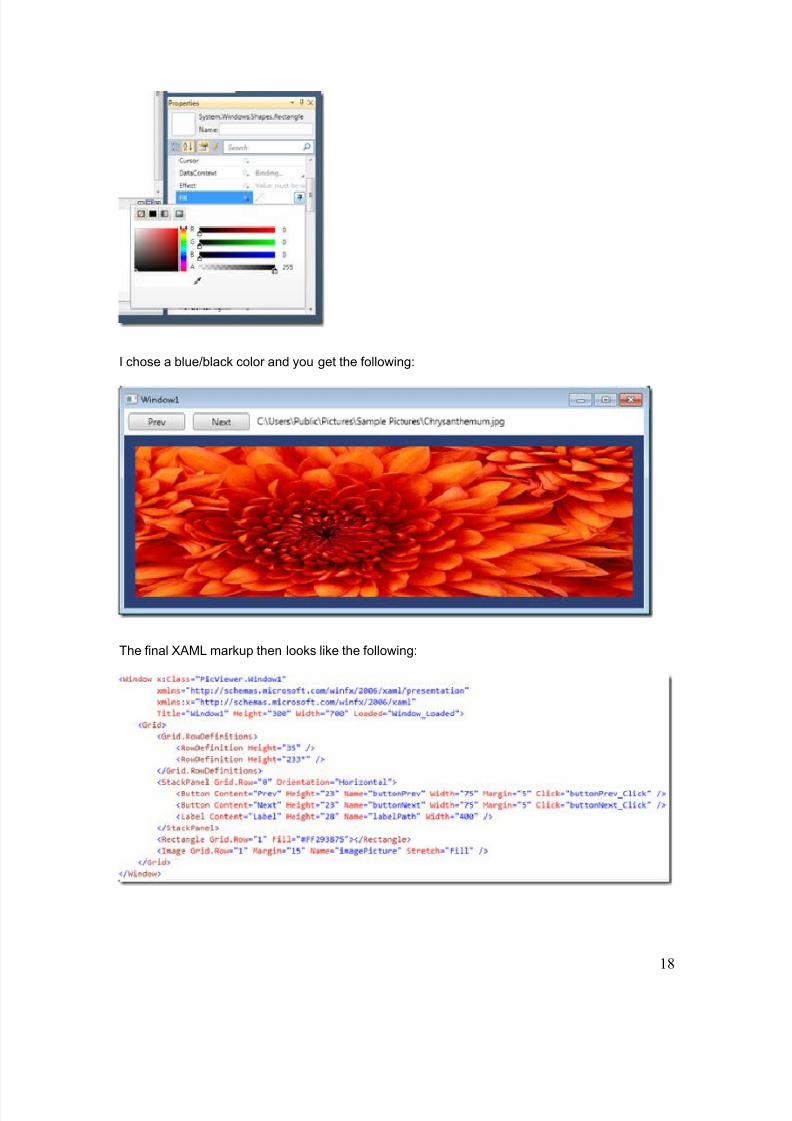
I chose a blue/black color and you get the following:
The final XAML markup then looks like the following:
18

8/6/2019 VS2010 Tutorial 2 Step-1
http://slidepdf.com/reader/full/vs2010-tutorial-2-step-1 19/19
This sample could be improved in a number of ways, including using data bound controls to
enumerator classes, adding all the proper try/catch logic, etc. But my main goal here was to
show off some editor / designer features so I’ll leave that as an exercise to the user.
19