Embed Size (px)
Citation preview

VRay materials
Some basic steps to explore the Material Editor of VRay for trueSpace

VRay basic material creation for trueSpace 7.x
In another chapter it is shown that change of different VRay params can change the look of materials quite drastic. How is a new VRay material generally created for trueSpace ?
Of course we already have a library with predefined VRay materials. We can change one or the other param of such a material so that it looks different. But that is still limited so we will take a look how to create totally new VRay materials. Generally this process is not different from the way we used to create materials for trueSpace so far. VRay also has a material editor and some shaders to support the work. Let us take a look what we have there. For reference always check the params which are described in one chapter of the VRay manual.
VRay material editor, the basics
To get in the basic mode of the material editor we first click on the ME tools which can be found in
Workspace on our tool bar. This now opens the material editor. There we find left sided some tools, then a window with a sphere showing what the material looks like and four smaller spheres which represent the shaders for Color, Reflectance, Transparency and Displacement.
To get the editor in basic mode we make a right mouse button click on one of the 4 tools and select the poping up Reset. Now we should have the editor look like shown in the picture right. On top is the main editor view followed by the shaders as there are Color, Reflectance, Transparency and Displacement.
Color is light grey, for the Reflection shader a few standard params are set while Transparency shader and Displacement shader have none. Inspecting the Reflection params later we will see why those params that are already set have to be there.
Let us first try a simple task, change the color from grey to green. For this we just have to make a double click on the small grey rectangle inside the Color shader.
This opens the color selection window, where we now select our green.

After a click on OK we then already see the effect. The material sphere has changed to green.
Above it was said that the preset Reflection params would get explained later. This is now a good moment to do so and find out what effects they have.
So first we will change the value of ambient and immediately see the effect, the color gets lightened up if we change like in the example left to a value of 0.629
Just play a little bit around by either typing in a value or by using the orange sliders with your mouse for changing.
Next one to try out is the diffuse param. Here we notice very fast that it can not be changed to any value, there are limits for it, either 0.000 as minimum or as maximum value 1.000
The picture to the right shows the look for both min/max values. It shows that if you want to see something of an object this param needs mostly at least a minimum value set.
With the param specular we now bring some specularity into our material. How this looks later inside a scenerey depends of course on the lights around the object that can be reflected to give us those shiny spots.
Try also different values to see how the glancy area changes and the outlook of the material appears quite different. You can make a small area or the whole sphere reflective.
There is another param that coincidences with specular, it is exponent, our last param in the Reflection shader. The picture to the right shows his influence, he sets as an exponential value the strenght of reflection from the middle of the reflective spot to the outer borders.
Now you should try to play a little bit around with the above effects to get an in depth feeling for it. The other shaders will be partly much mor complex so the basics are an important fundamental.

VRay material editor, the Color shaders
Besides the always needed standard Reflection shader there are quite a few others that have been prepared by Caligari to create most effective all kind of VRay materials. These shaders can be modified from us and will be more and more expanded in later versions of VRay released by the Caligari team.
We will start with the Color shader which so far gave in the editor status only the grey rectangle which we used above by double click to get the color changed.
Changing the color is indeed only a basic function. Color can be more, like different ways of being textured, mix of several colours and last not least all of this modified by different params up to final mathematical calculations to get procedural materials.
A double click on the blue Color shader sphere opens the VRay Shaders – Colorwith all available predefined shaders of this type. We will make a double click on the Turbulent shader ( red sqare marks it in the picture ).
The material sphere changes it's outlook and if we create a sphere right after this it will look like the big upper sphere shown in Workspace above.
What has changed now also is our Color shader below the editor window. It now contains some more params. As before we see a rectangle containing a color and additional values which we now can change.
The small Turbulent shader sphere in the VRay Shaders – Color library looked like granite, but the sphere we just created doesn't look like it. So we will change the values for scale and detail to get it modified. Trying out you find that smaller value for scale reduces the spot size and higher value for detail puts in more of those small defilements, typical for granite structures.
The params contrast and ampl. Also show some effect, just change them to a value of 1.000 to see what happens.
Creating a new sphere with values shown above we get something like the lower sphere in Workspace shown above. This comes already closer to granite and if you imagine you put some more reflection to it you can already create the marble for the tiles in your next bath room scenery.
Not only a few params can be changed, but also the colour of the background ( initialy white). Looking at some of the other similar shaders like for example Wood or Solid Clouds we see that there also the influence is limited to a few values and partly a few more colors. Reason is that all these shaders have a formular for their image creation that can in it's basics not be changed from us. Anyway we will see later that in connection with other shaders an uncountable number of modifications is possible.

Wood shader offers 3 different colors that are mixed up. The other params like gnarl, grain, fuzz....., open the way to create different structures of this mix up so that all kind of woods can be imitated.
Much simpler is the simple woodshader where params are almost the same as for the Turbulent shader. But here we can change both colors. What in comparison is missing here are the params contrast and ampl.
Because we can change the colors in the color window we can make there a selection that fits our contrast needs. Ther is also another difference between the two shaders. While Turbulence is kind of spot oriented wood shaders are kind of fiber oriented which is in fact typically for wood. If you take a look at the cylinder in the image you can see that there it looks like spot structure. This is accomplished by changing the direction and point colors in the simple wood shader as shown above. Additionally we used the Cylindric UV projection tool so that appearance with help of turning and resizing gave us above result.
It is up to you to decide which shader you use. The last sample showed that a lot of work was necessary to get the spot kind structure so you will only use it if some other material appearance effects you want are worth it to go the long way.
VRay material editor, the Color shader: Texture
This shader is generally not very complicated but if you want to create something like the above scenery you will need it. Let us go with a few steps through the creation process.
In this scenery also a DX9 material was used to see if there is a difference between VRay material and the DX9 ones. On the plate on which the picture stands the DX9 material NPR stroke hatch ist taken. The picture above originates from Workspace so later after it is rendered with VRay we will see how it all looks. The wall has some selfcreated VRay material.
So create a picture frame with the tools of your desire ( here Bevel tool was used and the canvas is shifted a bit backwards) The whole picture frame was given then the Shiny Gold from our VRay material library. After this the front of the outer frame was changed by using the blue marble shader and as we have a small frame area there to cover, the scale is changed to a value of 0.25
Next now we need the picture itself and here we use the Texture shader. With drag and drop we can put an image on the area where as standard the Caligari logo is shown. It is also possible to click on the file picker and load an image.
After selecting the face that is planned for the canvas we put the image with the Paint face tool on it's place. Mostly the image will not fit exactly and it will look similar like the picture shown right. But there is the way to use the available params like S repeat, T repeat,... to fit it correct in.
Since we here want the whole image to cover the selected face we simply use the Cubic UV projection tool to put it right. Ok then, ready to let VRay render.

Depending on what you use you should get a similar output. For above image all lights were deleted and GI was set ON, left with it's standard params. What can be seen now is that the DX9 material doesn't appear quite as we would have expected. So collecting your own library of VRay materials is almost a duty whenever you are experiementing or creating any new VRay material.
You should mess around a bit with all the other color shaders to get a feeling what is there and how you can influence appearance by changing the available params.
VRay material editor, the Reflectance shaders
With these shaders all kind of reflections can be handled, from metall to glass, from mirror to Sub Surface Scatter which is the way of reflectance you find for example when handling skin. They are very complex but we will go through a few examples giving an idea how they can be used.
A good one to start with is the Fresnel Shader. It is similar the glass shader but has quite a few more params we can change. A double click on the Fresnel shader ( after reseting our Material Editor) gives us a status of it as shown right.
First we create a simple flat cube in the form as shown below, which gets the material that is initiated by the fresnel shader. That would give us now a flat cube looking like a glass plate. We want to put now a picture on the back side of this glass plate to see if it really has the effect of glass when we will render it with VRay.
For this we Reset the material, call up our Color shaders again and double click the texture shader with the Caligari logo. Then we load an image, in this sample a 100 year old photograph and put this with the Paint face tool on the backside. What follows is the Cubic UV projection tool to fit it exactly to the backside of our glass picture frame.
What follows is creating a little base plate where the glass can be placed on and putting it all in scenery.

Let us see what we have. There is the base plate with our glass plate on it which shows the picture which we placed on the backside of it. Good proove that we really have a glass there is the shiny yellow which lets us see the baseplate which is behind the glass and we can also see there what is on the photograph, like on a photo negativ that you are looking through.
Is there another way to accomplish this ? Yes shure , we can first call the Color Texture shader, insert our image and then double click on the Fresnel shader. This way our texture material changes into a ”glass texture material“.
But there are differences in the appearance and you should experiment also with different lights to experience the difference. What follows is just one more example that should hopefully encourage for experimenting. This was done by putting the image on the lower
backside left quarter face of subdivided cube faces. Notice the optical effect that happens in the middle. The upper quarters were colored with different saturations and as there was a darker touch used for the second one it seems to be placed in front of the left cube. Glass in variations with colours and different saturations opens wide fields of optical effects.
Again, experimenting is the key to diversity !

Besides the Fresnel shader there is also a Glass shader so we will inspect a little bit more in depth both of them now to see the differences as both seems to be quite similar on first sight. We start with a view into a treasure chest to see if there is something adequate for inspecting the differences.
These three gem stones seem to be useful examples to explore how refraction, reflection, IOR and transmission influence the appearance of glass like objects. With them we have the main params that are used by both of.
At first sight they seem to be similar but as mentioned before there is a difference between them which can be well demonstrated in some examples rendered with above gem stones.
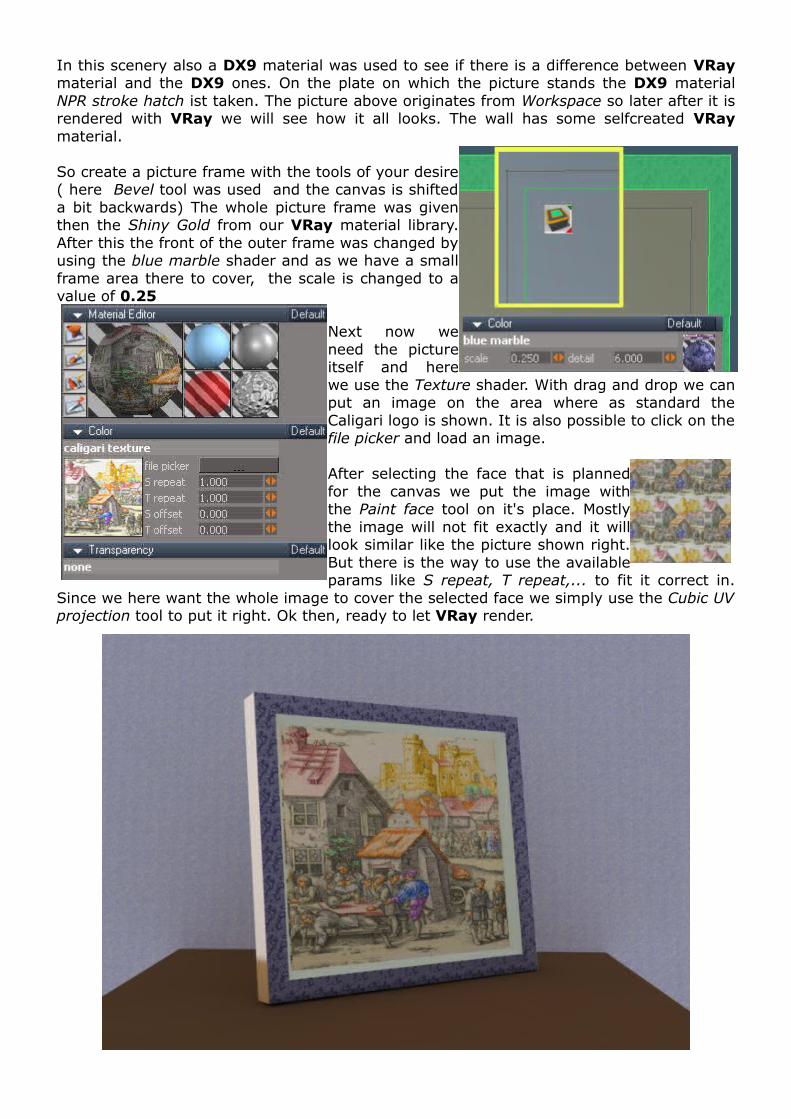
What follows is a row of pictures where you should take a look at the included shader params. Inspect especially the result of the small facetted areas in their appearance. First we will try the refraction appearance that can be manipulated with the IOR param. All three stones are adjusted with the same values, only color and view angle is different
Especially the blue stone looks with the glass shader like real polished glass while the fresnel example needs some phantasy to be interpreted immediately as glass material. Color strenght is also different as the red stone demonstrates while the green one shows a little bit more of refraction in the fresnel picture.
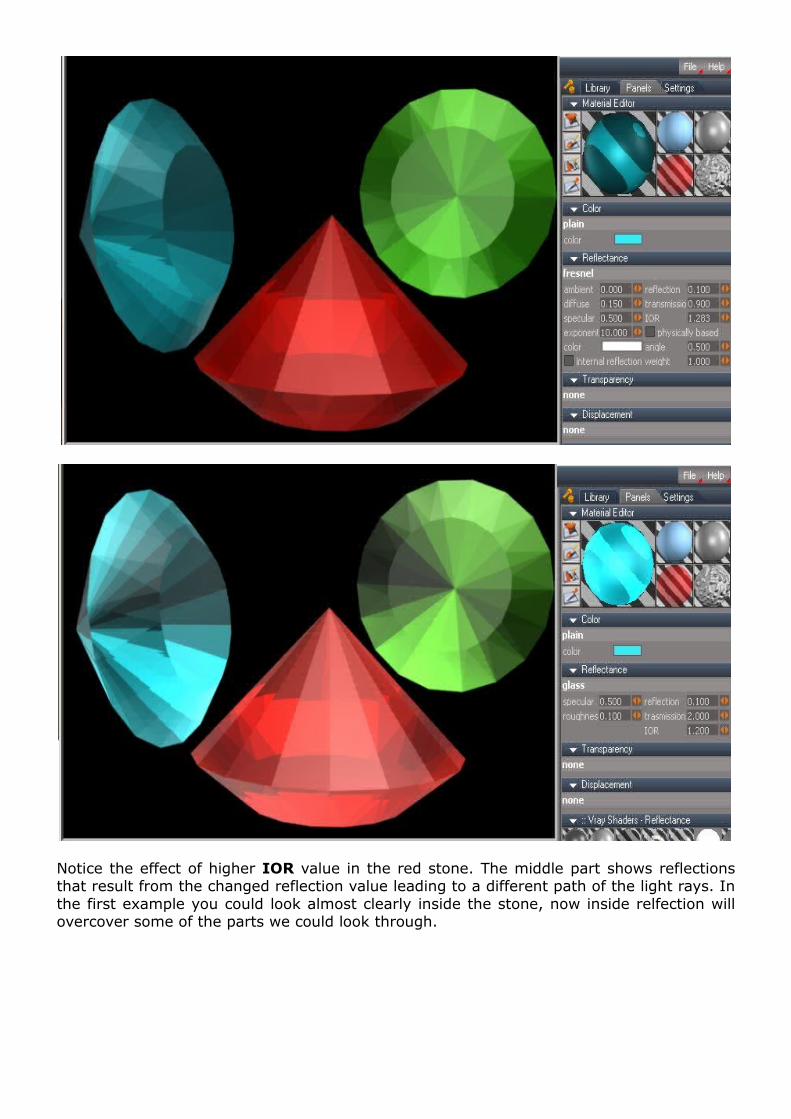
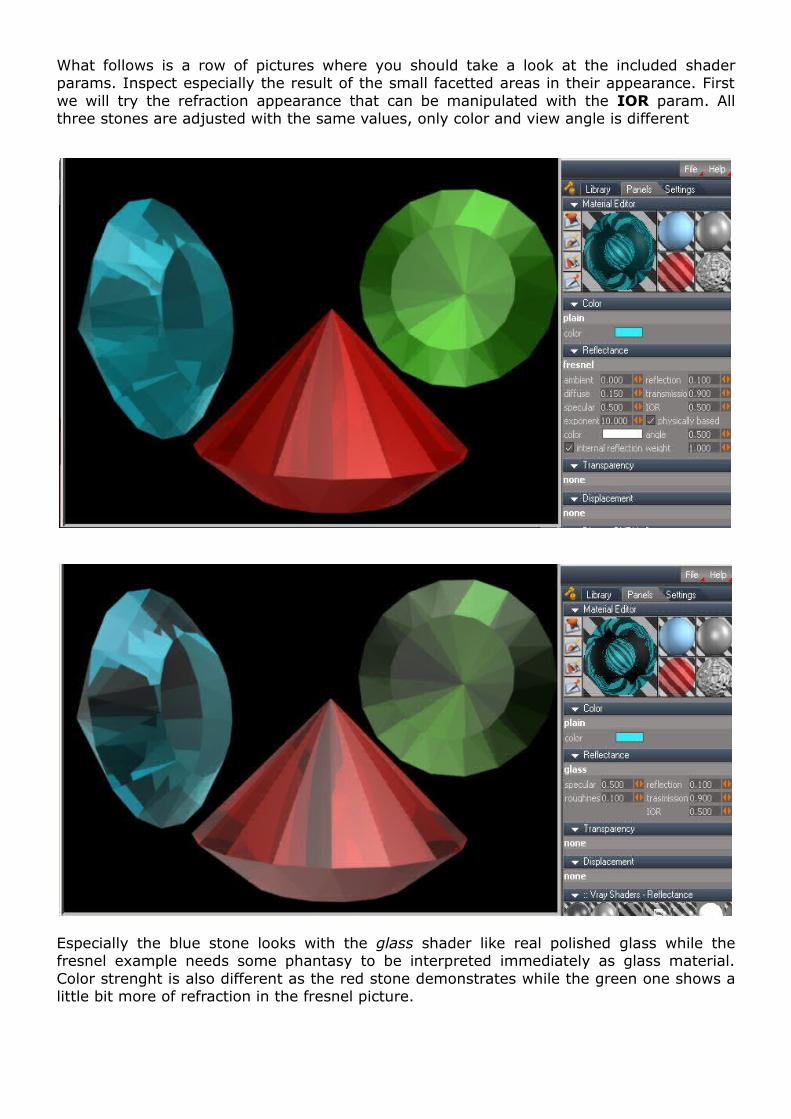
Notice the effect of higher IOR value in the red stone. The middle part shows reflections that result from the changed reflection value leading to a different path of the light rays. In the first example you could look almost clearly inside the stone, now inside relfection will overcover some of the parts we could look through.
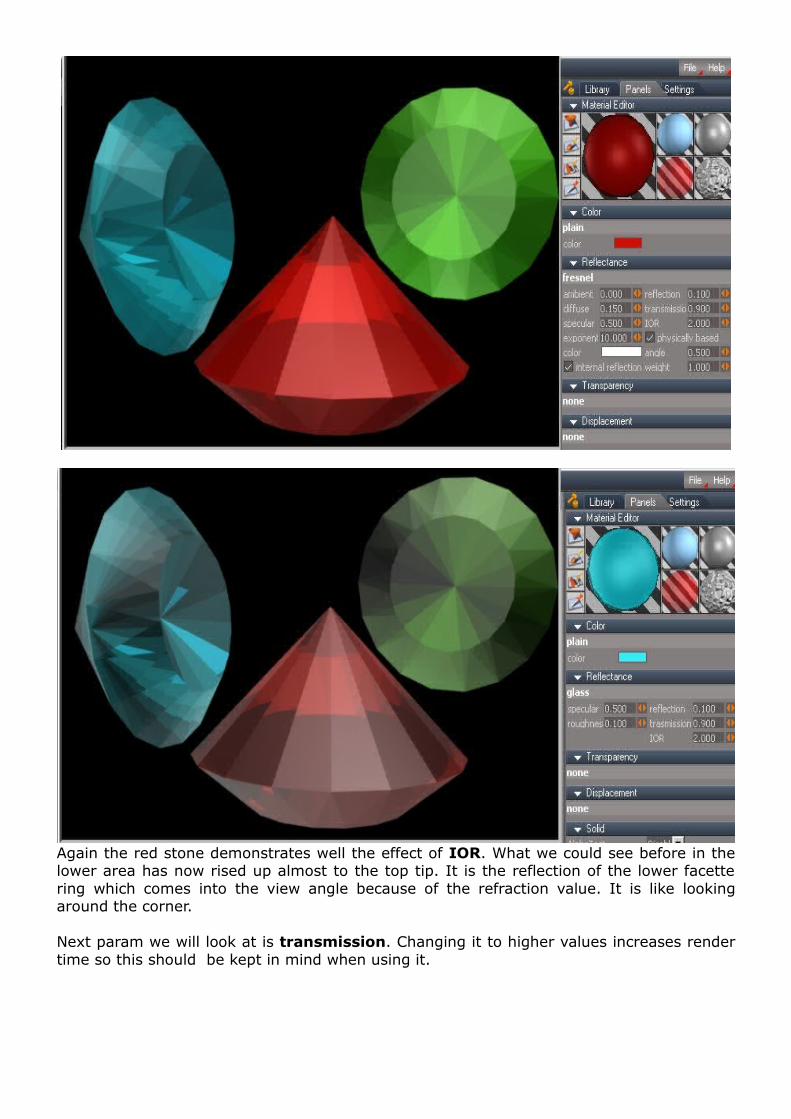
Again the red stone demonstrates well the effect of IOR. What we could see before in the lower area has now rised up almost to the top tip. It is the reflection of the lower facette ring which comes into the view angle because of the refraction value. It is like looking around the corner.
Next param we will look at is transmission. Changing it to higher values increases render time so this should be kept in mind when using it.
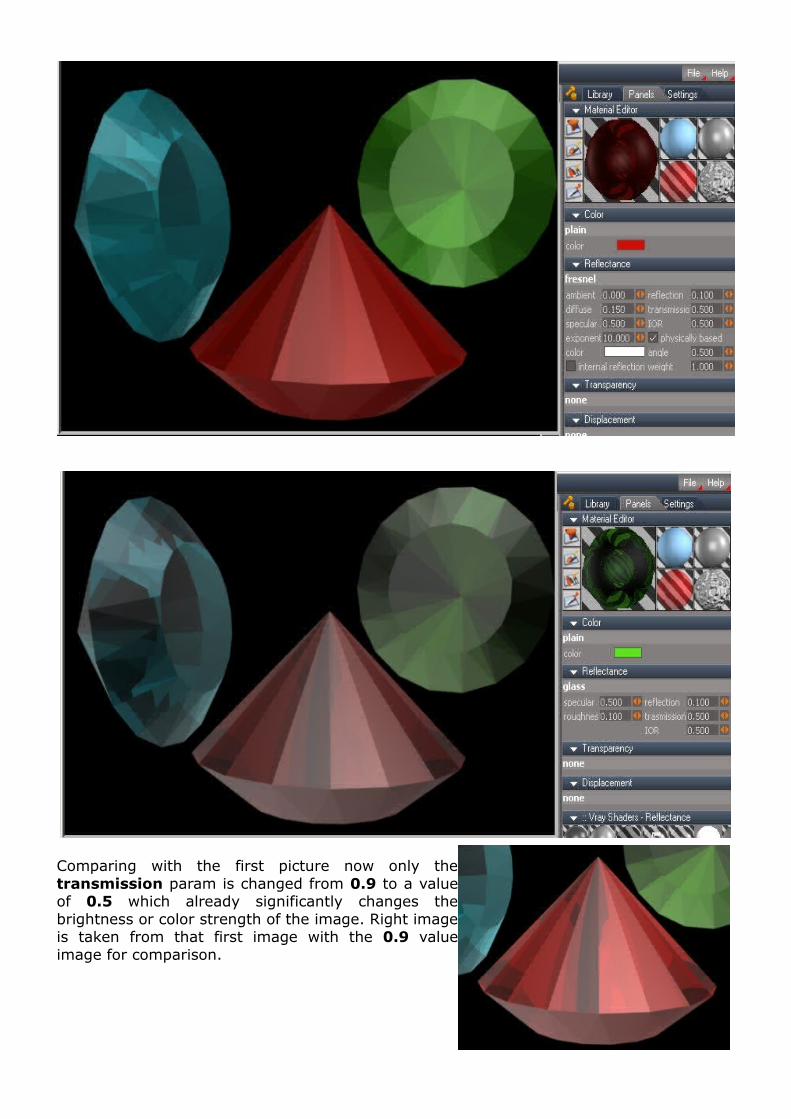
Comparing with the first picture now only the transmission param is changed from 0.9 to a value of 0.5 which already significantly changes the brightness or color strength of the image. Right image is taken from that first image with the 0.9 value image for comparison.
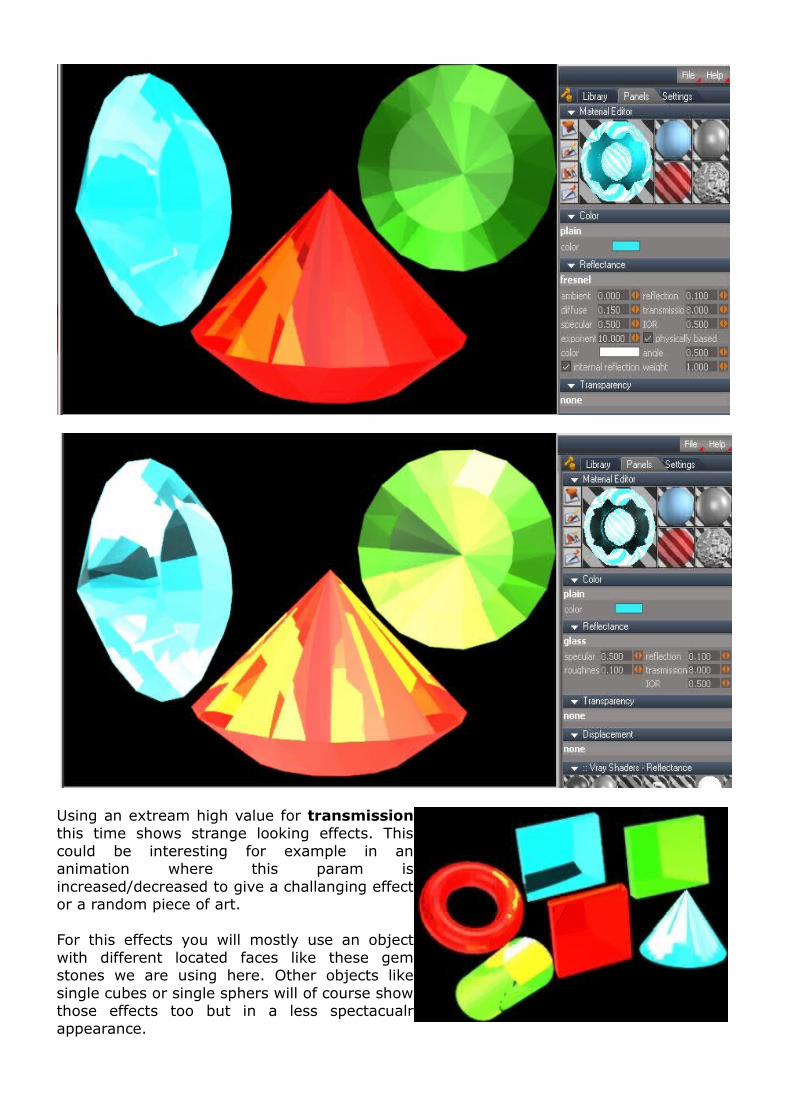
Using an extream high value for transmission this time shows strange looking effects. This could be interesting for example in an animation where this param is increased/decreased to give a challanging effect or a random piece of art.
For this effects you will mostly use an object with different located faces like these gem stones we are using here. Other objects like single cubes or single sphers will of course show those effects too but in a less spectacualr appearance.
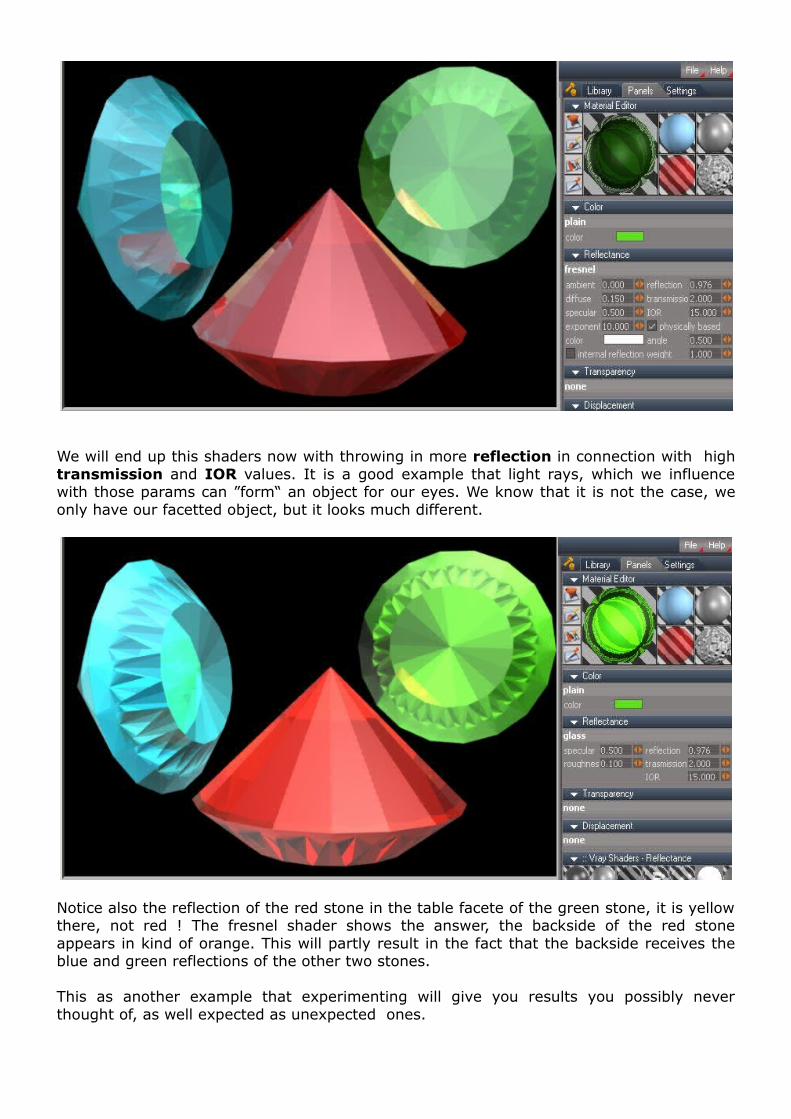
We will end up this shaders now with throwing in more reflection in connection with high transmission and IOR values. It is a good example that light rays, which we influence with those params can ”form“ an object for our eyes. We know that it is not the case, we only have our facetted object, but it looks much different.
Notice also the reflection of the red stone in the table facete of the green stone, it is yellow there, not red ! The fresnel shader shows the answer, the backside of the red stone appears in kind of orange. This will partly result in the fact that the backside receives the blue and green reflections of the other two stones.
This as another example that experimenting will give you results you possibly never thought of, as well expected as unexpected ones.
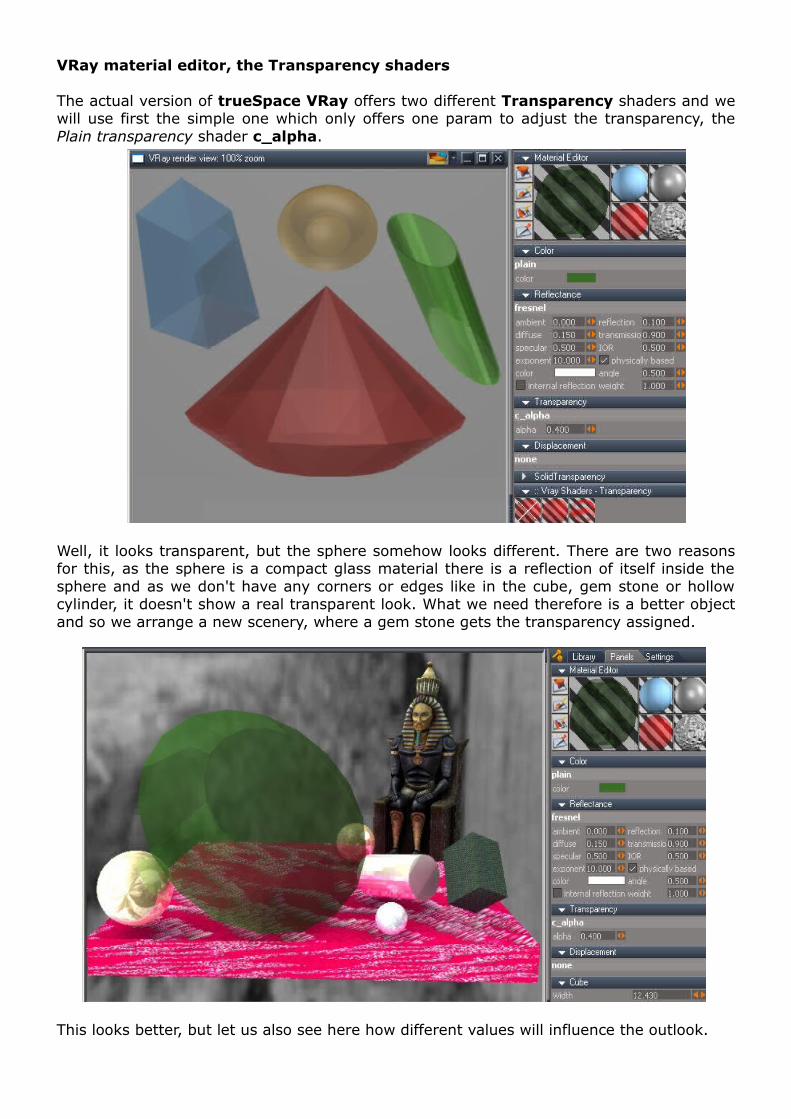
VRay material editor, the Transparency shaders
The actual version of trueSpace VRay offers two different Transparency shaders and we will use first the simple one which only offers one param to adjust the transparency, the Plain transparency shader c_alpha.
Well, it looks transparent, but the sphere somehow looks different. There are two reasons for this, as the sphere is a compact glass material there is a reflection of itself inside the sphere and as we don't have any corners or edges like in the cube, gem stone or hollow cylinder, it doesn't show a real transparent look. What we need therefore is a better object and so we arrange a new scenery, where a gem stone gets the transparency assigned.
This looks better, but let us also see here how different values will influence the outlook.

Just a small inclrease from 0.4 to 0.6 for the alpha value cuts down the transparency very drastic. Watch also the mirroring in the sphere to the left which shows now a sharper reflected image of the gem stone. But we still have a slight transparency as the following image shows where a pearl was just placed inside the gem stone
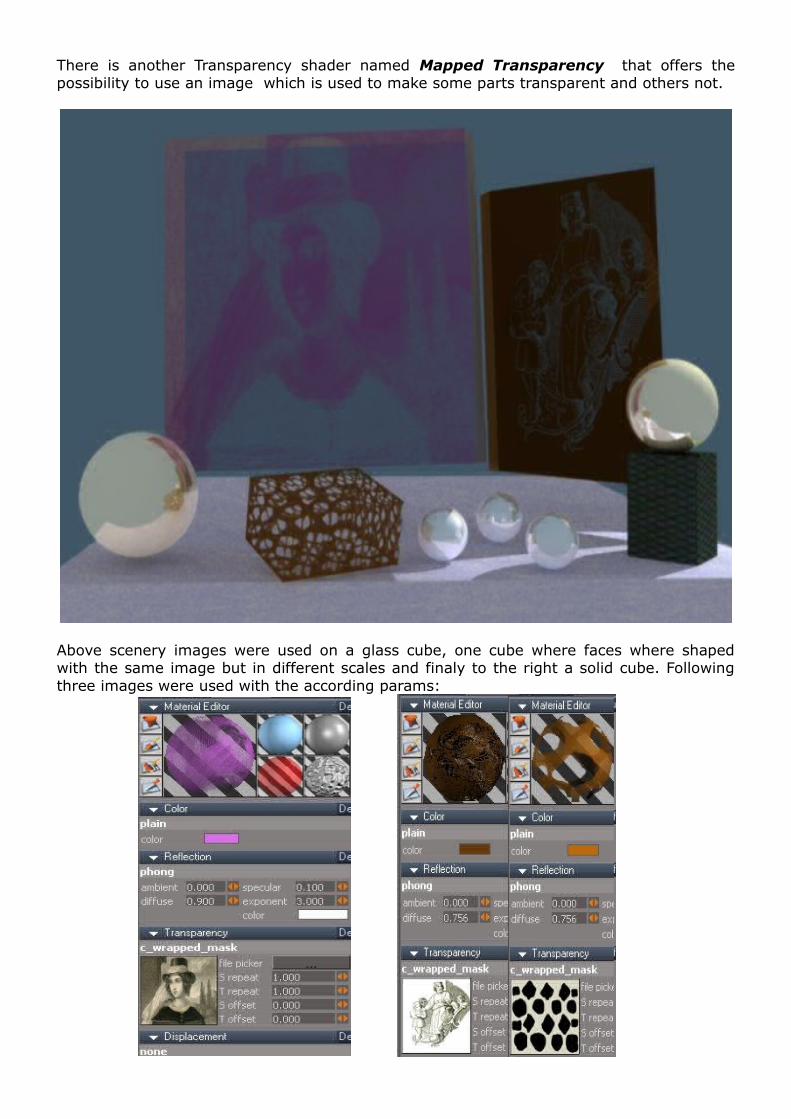
There is another Transparency shader named Mapped Transparency that offers the possibility to use an image which is used to make some parts transparent and others not.
Above scenery images were used on a glass cube, one cube where faces where shaped with the same image but in different scales and finaly to the right a solid cube. Following three images were used with the according params:

Arranging the scenery a bit with some spot lights and one more object we will discuss the effects that appearwhne using this shader.
We will take this to explain where you have to watch out when using transparency maps.
The cube to the front left was created with the paint faces tool of the Material Editor. The image was scaled different so that the holes are of different size per face. Spot lights were placed so that you can inspect the shadows, the light shines through the object !
On the cone the material was just dropped, so you find equally sized holes there.
An effect has to be taken care for if you use transparency mapping on glass objects. You see above that a black and white very detailed engraving was used. It was placed on the front face of a violett glass object. Depending how the light falls on this now it appears like a negative or positve image. That is so in real life too. You can try it by turning slowly a negative, with some light shining on it, until it turns into a positive.
In the third object we have a very low detailed image on a solid object. This means the light or some reflections have to shine or be reflected through the small lines. In our first scenery above lights and reflective objects were exactly placed so that you can see the whole image through the brown colored solid object.
These three samples show already it is not simply the job to put an image on an object, it rather has to be planed and thought about possible effects. So especially when using more detailed objects some experimenting will be necessary.
Rearanging the scenery we now get another sample where the glass object appears as we mostly will plan it, as the positive, like a normal picture.

Here an enlarged version of the image, as negative and as positive
If you come close enough with the camera you will see it this detailed. Truespace and VRay work very precise with the image you give them for use. So all it depends on, is the reslolution of the scan you did for your image.An artist like Edward Finden who created engravings in this technique 150 years ago in his book „Beauties of Moore“, can so be duplicated in the same details within a mouse click. Edward needed years to learn it and weeks to finish such engravings.

VRay material editor, Displacement – Normal map shader
We will use the above scenery modifyd a bit for the Normal map shader that can be found in the Displacement group. The same effect appears here that the texture is shown as a negative one. We will use it to show that light is the key for this effect and so a spot light is positioned as shown.
Running VRay we see the influence of light. The part covered by the light beam of the spotlight is shown as we would usually expect a texture, as a normal positiv picture.

VRay material editor, the Subsurface Scatter shader
This shader opens as described in the trueSpace VRay manual besides other effects the oportunity to create skin like appearance. Skin is something very sophisticated and if you take a look on the inside and on the outside of your hands for example you will notice a difference. Inside the hand you will find thin lines, shaped different from human to human. On the outside then you will find the skin as you usually imagin in first thought. Reason is you will mostly look at a person and those moments where you look into the inside of your hand or the hand of anyone else will be rather seldom
We can use our ladys image from above as in the engraving some areas have thin lines and dots that look very similar to what one finds in his hands. If you ever get a hand on old 3D embossing engraving ( yes, they could do that already 200 years ago by hand too) then don't hesitate to scan it for future characters you could need it.
The color settings for Red, Green, Blue should be skin color like, reflection is set up a bit higher and the amplitude for the bump is also raised up a bit.
In the VRay manual the SubSurfaceScatter shader is explained very well so here just a few samples showing some more effects. For this a hollow cylinder is used. Above the cylinder a cone is placed so that it looks all together similar like a candle.
It says in the manual already that light is one of those components that pays a major role with this material. Therefore different variations of lights are used.
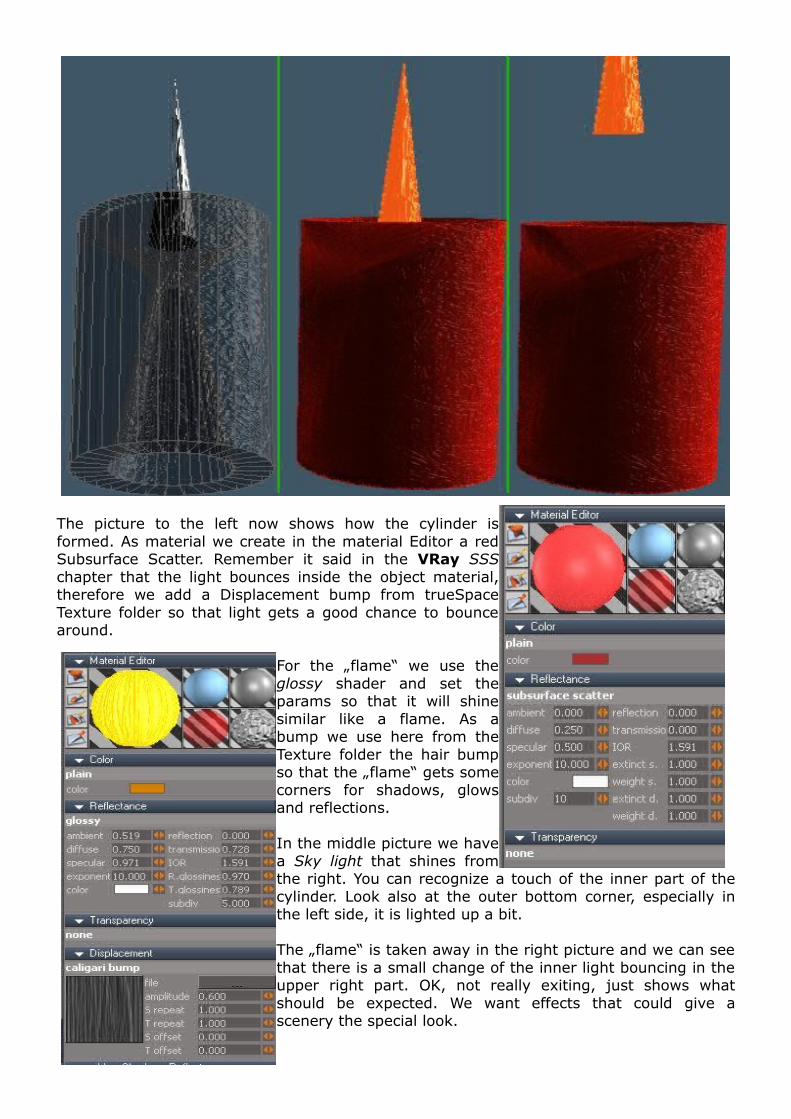
The picture to the left now shows how the cylinder is formed. As material we create in the material Editor a red Subsurface Scatter. Remember it said in the VRay SSS chapter that the light bounces inside the object material, therefore we add a Displacement bump from trueSpace Texture folder so that light gets a good chance to bounce around.
For the „flame“ we use the glossy shader and set the params so that it will shine similar like a flame. As a bump we use here from the Texture folder the hair bump so that the „flame“ gets some corners for shadows, glows and reflections.
In the middle picture we have a Sky light that shines from the right. You can recognize a touch of the inner part of the cylinder. Look also at the outer bottom corner, especially in the left side, it is lighted up a bit.
The „flame“ is taken away in the right picture and we can see that there is a small change of the inner light bouncing in the upper right part. OK, not really exiting, just shows what should be expected. We want effects that could give a scenery the special look.

So we delete all lights place a dark background behind the object and place a spotlight in the lower part of the „flame“ that points inside the cylinder. Watch the corona at the top and bottom corners of the cylinder that is now much sharper to see than in the first example above, partly also on the right and left side. This effect can be amplified if you place more spotlights inside the cylinder.
The right picture now has added a skylight additionally to the spotlight that is still placed inisde. The brighness of the cylinder depends on how much you turn the skylight towards it. We also can see that the „flame“ gets some light beams now from the externaly shining light source.
If we turn the scenery of tha last picture so that we can look inside the upper part we get the result shown left. The cylinder was created as segmented and we can well see the segments because the light bounces produce a dark and an enlighted segment.
To close up this chapter we will produce something that can be the inside of a vulcano. Glowing hot lava is a good example to show inner light bouncings. For this we delete the „flame“ and change the value of the extinct s. and extinct d. param.
– hollow object where a spot light is placed inside,– outside face formed with a Displacement bump structures– change of two params, here extinct s./d.
This all together gives us this nice result

VRay material editor, Reflection, the Plastic shader
Plastic is one of those materials you will find often in our modern world. A shader that is already prepared to give this look to an object can be found between the Reflection shaders, plastic. Below we have a head that is simply textured with a stand color shader to get the blue color on one head and the Wrapped Polka color on the other one.
In the next scenery the blue is lighted up and plastic ball was added. This time a mapped Transparency waas added so that we get the look of a beach ball. The params we have in the plastic shader are very similar to the glass shader, but transmission param is missing. With the Transparency shader we can get thoug a plastic that you can look through.

VRay material editor, Reflection, the Metal shader
This shader needs some attention as some conditions have to be true so that it appears as what it is told to us, as metal. As a sample a plate with an engraving will be created. Hard work if done by handicracft, but just a few mouseclicks with trueSpace and the help of VRay materials. So just setting up the Reflectance shader caligari metal, adding the Displacement shader caligari bump und dropping an an image that shell be „engraved“
The scenery has one spotlight shining from the left. It can be clearly seen that on the places that are not reached by the light beam you cant see any details, yes even the right edge of the cube can't be recognized. So this is important, for metal you will always need some kind of light.
OK, so here we added a Sky light to the left and now thw whole front can be completly seen . Notice the right side face, which is in the shadow, has no clear structures. An old
printing with hand made paper was used. It has a coarse structure on the white areas and so we get a typical bronze like looking at our cube.

So far we only combined shaders that VRay would offer us. Time to do now a little excursion and expand the creation process to get materials far out of normal ways.
At first sight looks as a somehow textured sphere, but it isn't. We have a construction of three spheres, one inside the other, each one a little bit smaller. One easy way to get them is creating one sphere, copy this one twice with Strg C and then enter the LE. There now make a right mouseclick on the Matrix aspect and select Expand. This opens the way to edit the params of a sphere.
Of importance are two of them, at first the same position of all spheres, given by tx, ty, tz and the Radius value. We have to shift the spheres a bit so that we can assign a material to them. We shifted them in ty direction and after assigning the material just changed the ty value back.
Next step is to change the Radius value, in this example to 5.132 for the outer, 5.130 for the middle and 5.128 for the inner sphere.
Now set up the scenery, in this example with one spotlight, GI set to ON status and a HDRI image as a background. All set up on a base plate which gets a standard plain color material from after Reset.
– the inner sphere now got the VRay material plain color with the Reflectance glossy shader as can be seen above right side of the sphere image
– for the outer sphere we select a Mapped Transparency shader that allows to look into the inside through the outer sphere
– since there is a third sphere, the inner one, we also need a mapped Transparency shader for the middle sphere

Left sided is the outer sphere material. Kind of a rusty look should come out so we select a brown color. As a transparency mask we use from the texture folder one of the BW clouds images. This texture is additionally taken into a graphics program and the white areas are expanded a bit and then the brightness level is lifted up a bit. Result of this is what we load into the Displacement bump map. If you look at the two images above you should notice the differences.
Above, at the right side we have the material setup for the middle sphere. For the transparency mask we take the same image so that almost the same areas will overlay and so that we can look through. But for the bump map we use this time another image from the Texture folder.
At the right side the Transparent + wireframe mode is switched on. This way one can control how much identical the material is positioned.
As can be seen above not only the material is shown and has an influence on how it appears. The close positiones of the spheres has some influence too. Following picture shows that small change has already effects.

Middle sphere Radius is changed form 5.130 to 5.129 so coming closer to the inner and a bit larger distance to the outer. Compare it to first picture above for the changes.
Materials like this can of course not be used liek normal ones. We must save them as „one“ material construct. Stunning effect appears with such constructed material objects if you use them in an animation where you change some of the params stepwise. As a final example we still have the outer sphere, deleted the middle one and put from the standard VRay material library the Cool Chroma on the inner sphere.
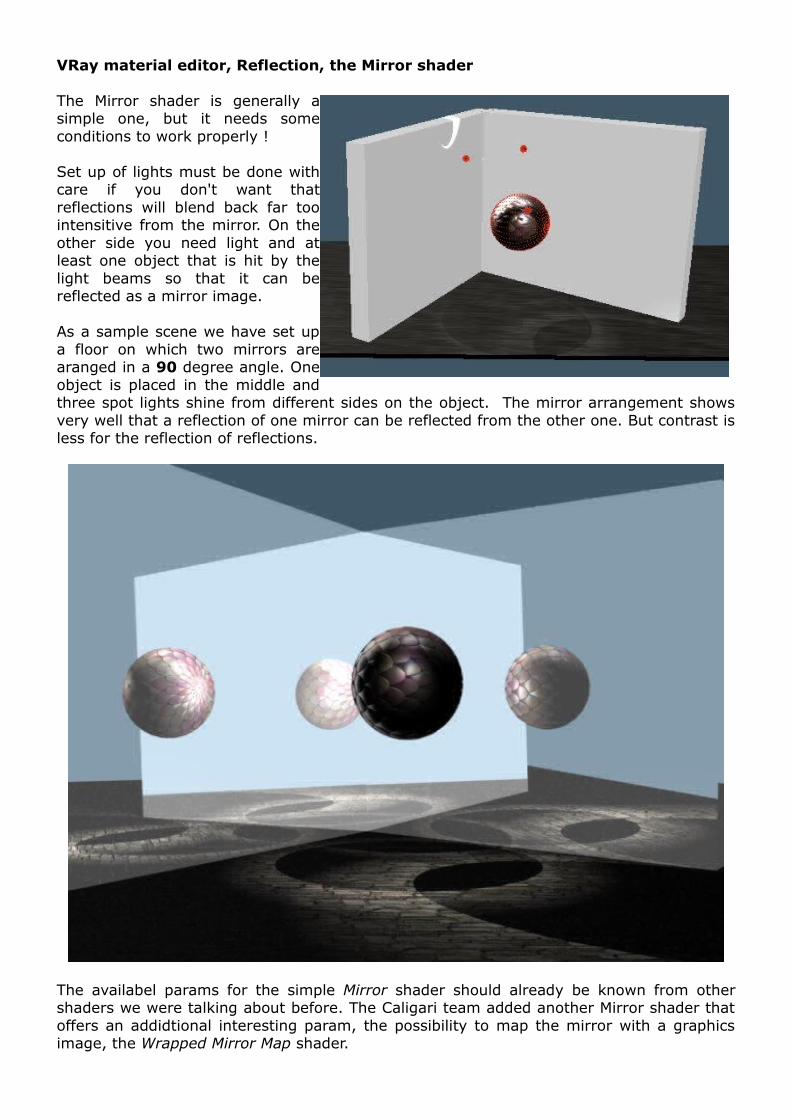
VRay material editor, Reflection, the Mirror shader
The Mirror shader is generally a simple one, but it needs some conditions to work properly !
Set up of lights must be done with care if you don't want that reflections will blend back far too intensitive from the mirror. On the other side you need light and at least one object that is hit by the light beams so that it can be reflected as a mirror image.
As a sample scene we have set up a floor on which two mirrors are aranged in a 90 degree angle. One object is placed in the middle and three spot lights shine from different sides on the object. The mirror arrangement shows very well that a reflection of one mirror can be reflected from the other one. But contrast is less for the reflection of reflections.
The availabel params for the simple Mirror shader should already be known from other shaders we were talking about before. The Caligari team added another Mirror shader that offers an addidtional interesting param, the possibility to map the mirror with a graphics image, the Wrapped Mirror Map shader.

An image can be added that is projected on the mirror so that mirrored objects and the image are interferenced. Notice in the lower right of the right mirror you can see a part from one of the spotlights. It is reflected like on a usual wall. This effect comes from the roughness param that is set up here to 0.063 in connection with the value of 16.750 for the specular param. The values depend on the darkness of your image. Below for example they would have to be set be set higher for achieving same level of spot reflection.

VRay material editor, Reflection, the Glossy shader
To show an example what the Glossy shader could be used for we will transform a 200 years old black and white engraving (mezzotinto). First we give it a bit color. Before we place it into the caligari texture Color shader.
We add a Displacement bump image to imitate the touch of a canvas. Additionally we put in the HDRI house image from the truespace texture folder to demonstrate what else the glossy effect does. The warm appearing of the image results from the glossy reflection of the HDRI image, where we have the yellow tinted house and the sunny daylight with the blue sky. This, and not color lightnings give the warm touch to the final picture.
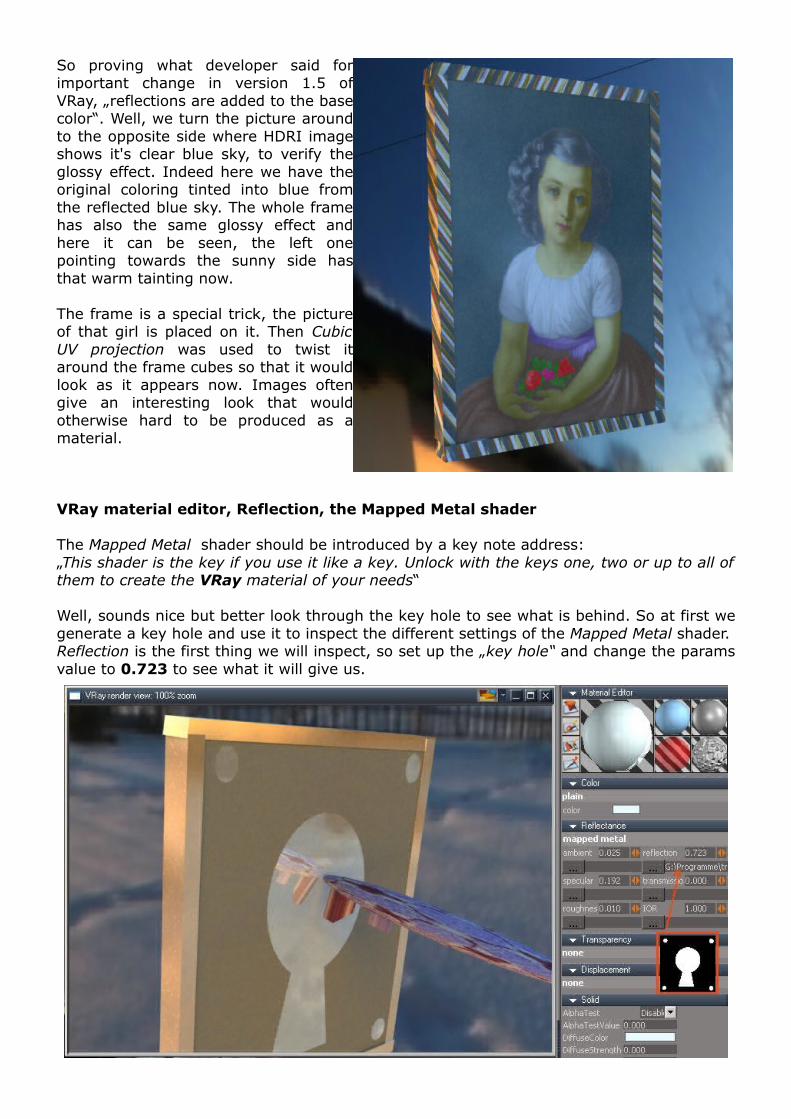
So proving what developer said for important change in version 1.5 of VRay, „reflections are added to the base color“. Well, we turn the picture around to the opposite side where HDRI image shows it's clear blue sky, to verify the glossy effect. Indeed here we have the original coloring tinted into blue from the reflected blue sky. The whole frame has also the same glossy effect and here it can be seen, the left one pointing towards the sunny side has that warm tainting now.
The frame is a special trick, the picture of that girl is placed on it. Then Cubic UV projection was used to twist it around the frame cubes so that it would look as it appears now. Images often give an interesting look that would otherwise hard to be produced as a material.
VRay material editor, Reflection, the Mapped Metal shader
The Mapped Metal shader should be introduced by a key note address: „This shader is the key if you use it like a key. Unlock with the keys one, two or up to all of them to create the VRay material of your needs“
Well, sounds nice but better look through the key hole to see what is behind. So at first we generate a key hole and use it to inspect the different settings of the Mapped Metal shader.Reflection is the first thing we will inspect, so set up the „key hole“ and change the params value to 0.723 to see what it will give us.

This was one key, let us try some more. We rearange the scenery for this. In front of a key is a flat cube and positioned in front of this is a sphere. One spotlight gives the light to the scenery. Finally a HDRI is set up.
Now we will try the transmission to see how it works. Usually this param should allow to set the transmission level, means how much visible or invisible is everything behind the object which gets assigned this material.
The flat cube is our object for the material experiments, which means we have to set up two different ones on the front face that we look at and on the back face that we want to look through. So the backface gets assigned a simple glass shader with the params as shown here.
For the front face we set up now a mapped metal shader. The level for transmission is set to 0.5 and as an image we use the checkered.bmp from the trueSpace Texture directory.
As can be seen in the preview it is kind of a look through material,
that's what we expected from transmission.
Time to do a little render with VRay and see what comes out.

Looks as expected, but couldn't that be done with other shaders too, what advantage does the mapped metal give us ? Let us use one more of the params, now again our „key hole“ that we used above. So set up for reflection the key hole image and raise the value for reflection to 1.0. In the scenery there was also a sphere set up and it is positioned so that it should reflect inside the key hole, if it works.
Now we have a combination that would not be that easy to set up if we use several single shaders . But what we have here is also the possibility to use images as kind of key to switch on or of each bit of the scenery by an image. Each functionaltity is used similar like one layer on the other. Through the key hole you still see the checkerd transmission areas.

Experiences of trueSpace material - effects with combinations of shaders
It will often happen that while experimenting with the program one will get an effect that can not be seen directly from what the manuals say. So this is just a collection of some effects with a description of the according params that were used.
Combination of material is like cooking with different ingrediences which turns out different results. Following is a combination of three textures in three shaders. It was used a cube where the backside was painted with a clear fresnel material so that you can see through it. Inspect how the params are set in the transparency shader. The values for repeat define how small or large the structure will look.
In Workspace one gets already a good impression how the rendered result will look
this is how final rendered picture looks like
Playing with masking
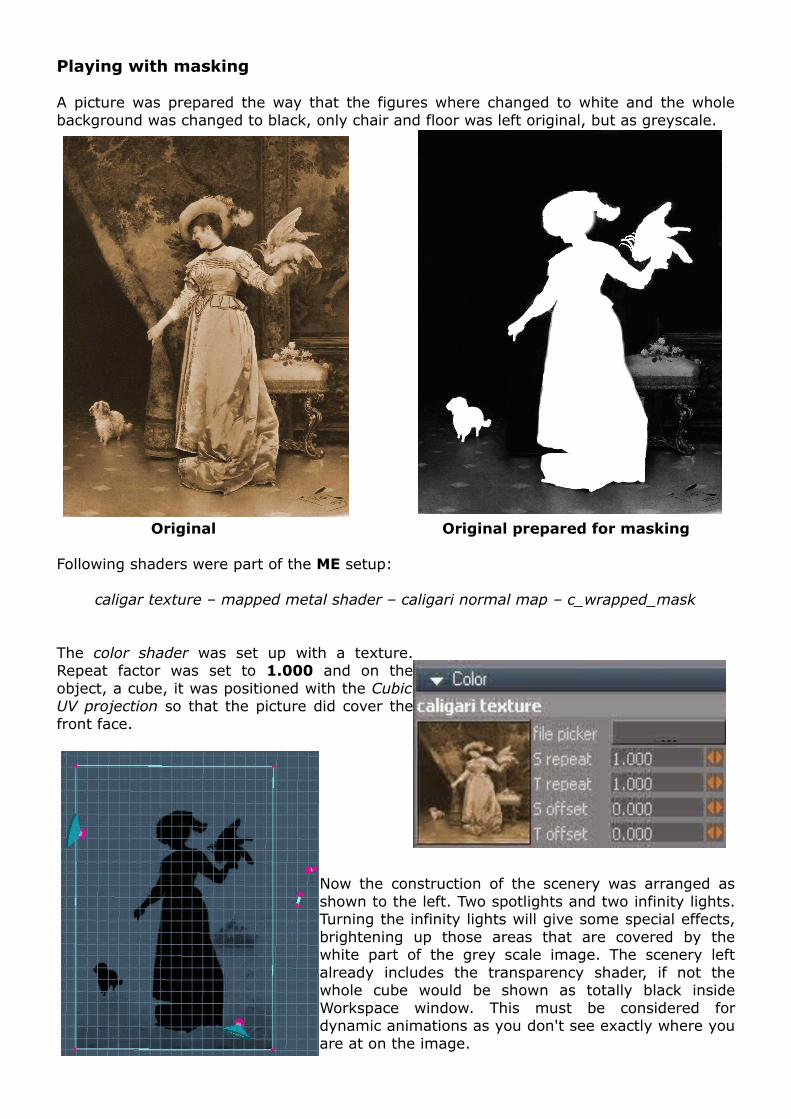
A picture was prepared the way that the figures where changed to white and the whole background was changed to black, only chair and floor was left original, but as greyscale.
Original Original prepared for masking
Following shaders were part of the ME setup:
caligar texture – mapped metal shader – caligari normal map – c_wrapped_mask
The color shader was set up with a texture. Repeat factor was set to 1.000 and on the object, a cube, it was positioned with the Cubic UV projection so that the picture did cover the front face.
Now the construction of the scenery was arranged as shown to the left. Two spotlights and two infinity lights. Turning the infinity lights will give some special effects, brightening up those areas that are covered by the white part of the grey scale image. The scenery left already includes the transparency shader, if not the whole cube would be shown as totally black inside Workspace window. This must be considered for dynamic animations as you don't see exactly where you are at on the image.

Setting up the Reflectance shader Mapped metal as shown to the right, with a mapping texture for ambient and roughness together with the shown values, gives an interesting effect.
With a spot light you can light up the spot area, this way you can light up very deficile outlined areas of a picture. Depending on how the infinity lights are turned towards the picture it looks very different.
After finally including also the Displacement shader with a normal map texture, which is also the greyscale image, everything from a shadow to lighted in the dark can be produced.
In this example two infinity lights were used which allow a wider range of effects when placed in some distance to each other.
It is very important that all textures have an equally set S / T repeat factor !

Another interesting effect happens when adding a mapped transparency shader. Again with the greyscale image from before, we now influence the parts of the image that can be seen. According to the lights settings we have a shadow or the image. Doing the light changes in steps looks like a developing process of a film, like they were used before digital cameras pushed them aside.
Now we see already in the Workspace window what will show up in the finally rendered image.
An interesting other effect can be seen here. The chair and the floor were not changed to black as the rest of the background and so they can be seen as kind of soft details.
To get the black shadow effect it is necessary to prepare the objects as shown below. The side faces of the cube must be colored with black so that no light can go through. The infinity lights must be turned parallel to the cube. In this example the cube was formed almost like a thin plate, but that is not really necessary.
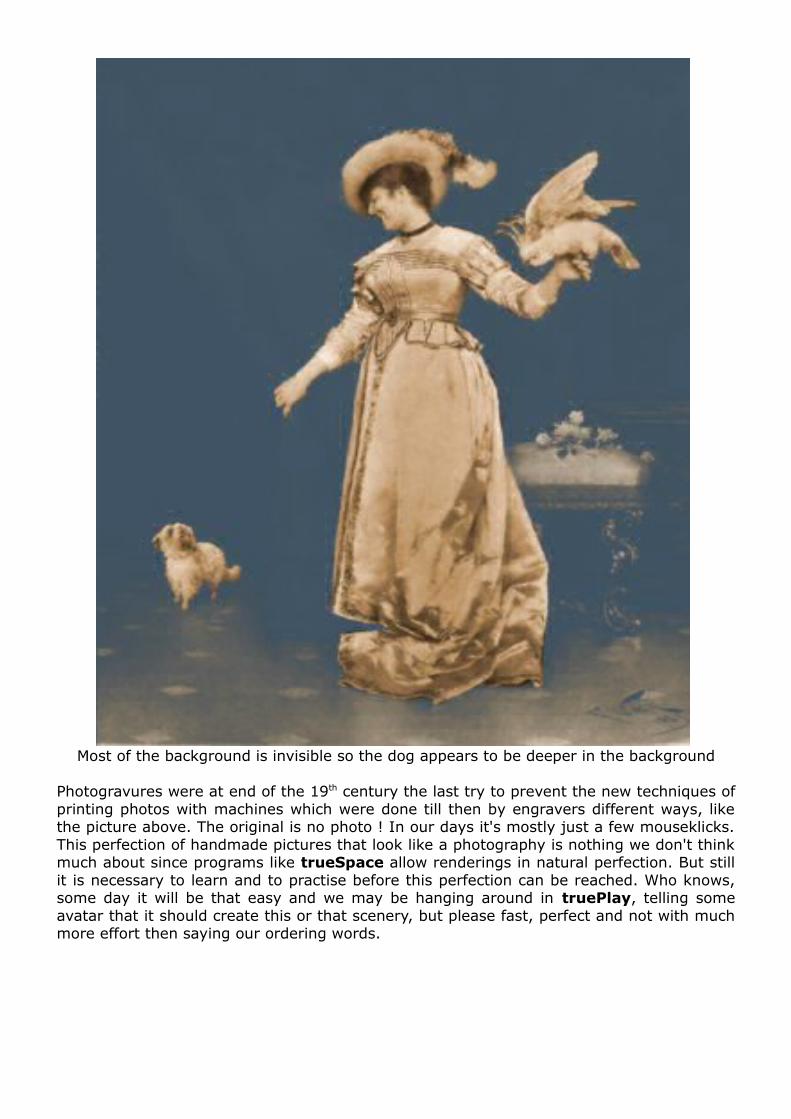
Most of the background is invisible so the dog appears to be deeper in the background
Photogravures were at end of the 19th century the last try to prevent the new techniques of printing photos with machines which were done till then by engravers different ways, like the picture above. The original is no photo ! In our days it's mostly just a few mouseklicks. This perfection of handmade pictures that look like a photography is nothing we don't think much about since programs like trueSpace allow renderings in natural perfection. But still it is necessary to learn and to practise before this perfection can be reached. Who knows, some day it will be that easy and we may be hanging around in truePlay, telling some avatar that it should create this or that scenery, but please fast, perfect and not with much more effort then saying our ordering words.

More samples for combinated materials: an outlined „wallpaper“
We will look at some more samples what effects combination of material come up with. What the ME shows as prerender can give us already an idea of what shaders will most probably have been used in thit material. There is definitely something like a transparency or an alpha shader involved. Also reflection seems to take part and some kind of displacement if we inspect the surface
Above we had a black hole for the masked area, here now depending on view angle and light angele one can see more or less of the real image, depending on the strenght of white areas. So parts of the chair and floor for example is more visible while the real white areas show the caligari texture.
To be continued, still working on it