Embed Size (px)
Citation preview

VR Manager™
User Manual
MaxACD 7.0
March 2016

WARNING!Toll fraud is committed when individuals unlawfully gain access to customer telecommunication systems. This is a criminal offense. Currently, we do not know of any telecommunications system that is immune to this type of criminal activity. AltiGen Communications, Inc., will not accept liability for any damages, including long distance charges, which result from unauthorized and/or unlawful use. Although AltiGen Communications, Inc., has designed security features into its products, it is your sole responsibility to use the security features and to establish security practices within your company, including training, security awareness, and call auditing.
NOTICEWhile every effort has been made to ensure accuracy, AltiGen Communications, Inc., will not be liable for technical or editorial errors or omissions contained within the documentation. The information contained in this documentation is subject to change without notice.This documentation may be used only in accordance with the terms of the AltiGen Communications, Inc., License Agreement.AltiGen Communications, Inc.679 River Oaks ParkwaySan Jose, CA 95134Telephone: 888-AltiGen (258-4436)Fax: 408-597-9020E-mail: [email protected] site: www.altigen.com
TRADEMARKSMaxACD, MaxACD Administrator, MaxAgent, MaxSupervisor, MaxInSight, MaxReports, VR Manager, and Enterprise Manager are trademarks or registered trademarks of AltiGen Communications, Inc.All other brand names mentioned are trademarks or registered trademarks of their respective manufacturers.Copyright © AltiGen Communications, Inc. 2016. All rights reserved.
VR Manager User Guide i
Contents
CHAPTER 1Installing VR Manager . . . . . . . . . . . . . . . . . . . . . . . . . . . . . . . 1
Requirements . . . . . . . . . . . . . . . . . . . . . . . . . . . . . . . . . . . . . . . . . . 1Installing the VR Manager Service . . . . . . . . . . . . . . . . . . . . . . . . . . 2Installing VR Manager for Clients . . . . . . . . . . . . . . . . . . . . . . . . . . . 3Setting Access Privileges . . . . . . . . . . . . . . . . . . . . . . . . . . . . . . . . . 3
CHAPTER 2Using VR Manager Admin . . . . . . . . . . . . . . . . . . . . . . . . . . . 5
The User Tab . . . . . . . . . . . . . . . . . . . . . . . . . . . . . . . . . . . . . . . . . . 5Adding Users. . . . . . . . . . . . . . . . . . . . . . . . . . . . . . . . . . . . . . . . . 6Editing Users . . . . . . . . . . . . . . . . . . . . . . . . . . . . . . . . . . . . . . . . . 7Changing the Admin Password . . . . . . . . . . . . . . . . . . . . . . . . . . . 7
The Pooling Tab . . . . . . . . . . . . . . . . . . . . . . . . . . . . . . . . . . . . . . . . 7The Storage Tab . . . . . . . . . . . . . . . . . . . . . . . . . . . . . . . . . . . . . . . . 8The Log Tab . . . . . . . . . . . . . . . . . . . . . . . . . . . . . . . . . . . . . . . . . . 11The MaxACD Tab . . . . . . . . . . . . . . . . . . . . . . . . . . . . . . . . . . . . . . 12
Adding Servers . . . . . . . . . . . . . . . . . . . . . . . . . . . . . . . . . . . . . . 13Changing the FTP Server Directory . . . . . . . . . . . . . . . . . . . . 14
CHAPTER 3Using VR Manager Client . . . . . . . . . . . . . . . . . . . . . . . . . . . 15
VR Manager Client Main Window . . . . . . . . . . . . . . . . . . . . . . . . . . 15Menu Bar . . . . . . . . . . . . . . . . . . . . . . . . . . . . . . . . . . . . . . . . . . . . 16Quick Access Toolbar . . . . . . . . . . . . . . . . . . . . . . . . . . . . . . . . . . . 17File Menu . . . . . . . . . . . . . . . . . . . . . . . . . . . . . . . . . . . . . . . . . . . . 17
Saving Files. . . . . . . . . . . . . . . . . . . . . . . . . . . . . . . . . . . . . . . . . 17Exporting to Files. . . . . . . . . . . . . . . . . . . . . . . . . . . . . . . . . . . . . 18Changing the Password . . . . . . . . . . . . . . . . . . . . . . . . . . . . . . . 18
Edit Menu . . . . . . . . . . . . . . . . . . . . . . . . . . . . . . . . . . . . . . . . . . . . 18Searching Voice Records . . . . . . . . . . . . . . . . . . . . . . . . . . . . . . 18Searching for All an Agent’s Voice Records . . . . . . . . . . . . . . . . 20Playing Voice Records . . . . . . . . . . . . . . . . . . . . . . . . . . . . . . . . 20Displaying Columns. . . . . . . . . . . . . . . . . . . . . . . . . . . . . . . . . . . 20Sorting . . . . . . . . . . . . . . . . . . . . . . . . . . . . . . . . . . . . . . . . . . . . . 21Media Player Option . . . . . . . . . . . . . . . . . . . . . . . . . . . . . . . . . . 22
Report Menu . . . . . . . . . . . . . . . . . . . . . . . . . . . . . . . . . . . . . . . . . . 22

ii VR Manager User Guide
VRManager Manual 1
C H A P T E R 1
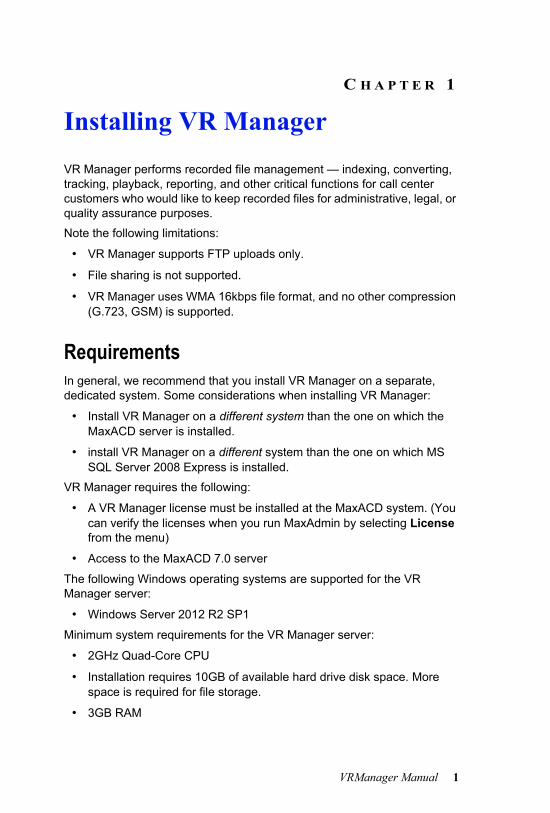
Installing VR ManagerVR Manager performs recorded file management — indexing, converting, tracking, playback, reporting, and other critical functions for call center customers who would like to keep recorded files for administrative, legal, or quality assurance purposes. Note the following limitations:
• VR Manager supports FTP uploads only.
• File sharing is not supported.
• VR Manager uses WMA 16kbps file format, and no other compression (G.723, GSM) is supported.
RequirementsIn general, we recommend that you install VR Manager on a separate, dedicated system. Some considerations when installing VR Manager:
• Install VR Manager on a different system than the one on which the MaxACD server is installed.
• install VR Manager on a different system than the one on which MS SQL Server 2008 Express is installed.
VR Manager requires the following:
• A VR Manager license must be installed at the MaxACD system. (You can verify the licenses when you run MaxAdmin by selecting License from the menu)
• Access to the MaxACD 7.0 server
The following Windows operating systems are supported for the VR Manager server:
• Windows Server 2012 R2 SP1
Minimum system requirements for the VR Manager server:
• 2GHz Quad-Core CPU
• Installation requires 10GB of available hard drive disk space. More space is required for file storage.
• 3GB RAM
2 VRManager Manual
The following Windows operating systems are supported for the VR Manager client:
• Windows 10 or Windows 8.1 64-bit
Minimum system requirements for the VR Manager client:
• Intel 2GHz Pentium 4 or equivalent
• 40GB available hard drive disk space
• 2GB RAM
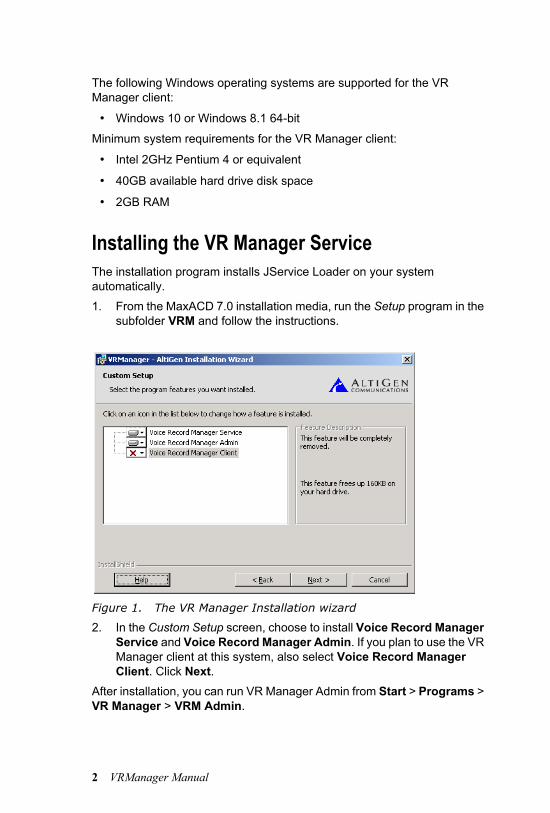
Installing the VR Manager ServiceThe installation program installs JService Loader on your system automatically. 1. From the MaxACD 7.0 installation media, run the Setup program in the
subfolder VRM and follow the instructions.
Figure 1. The VR Manager Installation wizard
2. In the Custom Setup screen, choose to install Voice Record Manager Service and Voice Record Manager Admin. If you plan to use the VR Manager client at this system, also select Voice Record Manager Client. Click Next.
After installation, you can run VR Manager Admin from Start > Programs > VR Manager > VRM Admin.
VRManager Manual 3
Installing VR Manager for ClientsTo install VR Manager for a client system: 1. From the MaxACD installation media, run the Setup program in the
subfolder VRM and follow the instructions as they appear on the screen.
2. In the Custom Setup screen, choose Voice Record Manager Client.If you install VR Admin on a client system, some Browse buttons will not appear.
After installation, you can run VR Manager Client from Start > Programs > All Programs > VRManager > VRM Admin (or VRM Client).Note: If VR Manager is run behind a firewall, open TCP port 10040.
(VR Manager may not work behind NAT.)
Setting Access PrivilegesThe directory of centralized records in the MaxACD server must be shared fully with the VR Manager user. This user requires privileges to read/write to the shared folder, and also to read/write to the local folder.The destination of the backup location must be accessible in the local computer or remote computer. The user must have full privilege to read/write to the shared and local folders.

4 VRManager Manual
VRManager Manual 5
C H A P T E R 2
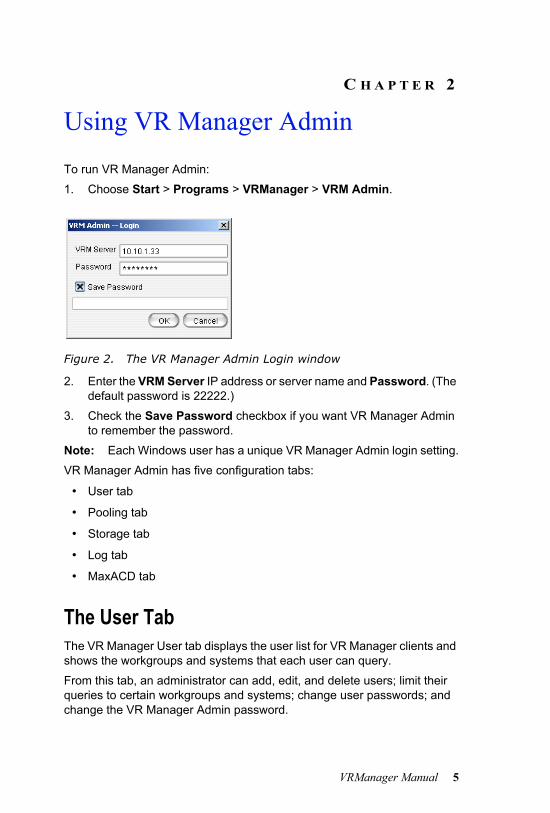
Using VR Manager AdminTo run VR Manager Admin:1. Choose Start > Programs > VRManager > VRM Admin.
Figure 2. The VR Manager Admin Login window
2. Enter the VRM Server IP address or server name and Password. (The default password is 22222.)
3. Check the Save Password checkbox if you want VR Manager Admin to remember the password.
Note: Each Windows user has a unique VR Manager Admin login setting.VR Manager Admin has five configuration tabs:
• User tab
• Pooling tab
• Storage tab
• Log tab
• MaxACD tab
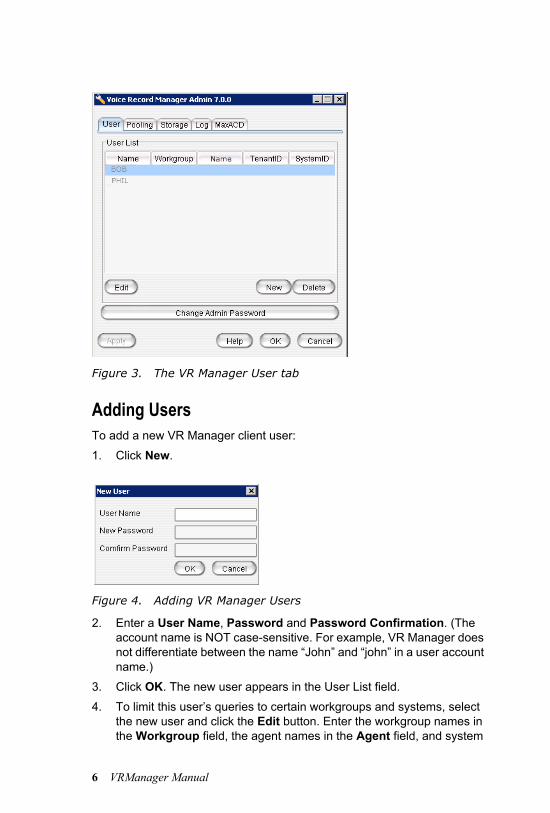
The User TabThe VR Manager User tab displays the user list for VR Manager clients and shows the workgroups and systems that each user can query. From this tab, an administrator can add, edit, and delete users; limit their queries to certain workgroups and systems; change user passwords; and change the VR Manager Admin password.
6 VRManager Manual
Figure 3. The VR Manager User tab
Adding UsersTo add a new VR Manager client user: 1. Click New.
Figure 4. Adding VR Manager Users
2. Enter a User Name, Password and Password Confirmation. (The account name is NOT case-sensitive. For example, VR Manager does not differentiate between the name “John” and “john” in a user account name.)
3. Click OK. The new user appears in the User List field.4. To limit this user’s queries to certain workgroups and systems, select
the new user and click the Edit button. Enter the workgroup names in the Workgroup field, the agent names in the Agent field, and system
VRManager Manual 7
IDs in the System ID field. Separate entries with a comma. (To allow the user to query all workgroups or all extensions, leave those text boxes empty.)
Editing UsersTo edit a user:1. Select the user on the User tab and click the Edit button.2. Make your changes, and click OK.
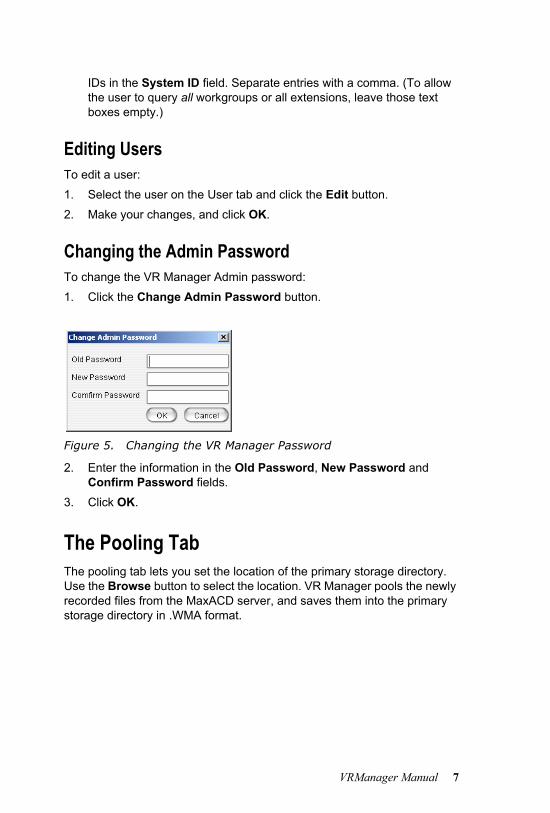
Changing the Admin PasswordTo change the VR Manager Admin password:1. Click the Change Admin Password button.
Figure 5. Changing the VR Manager Password
2. Enter the information in the Old Password, New Password and Confirm Password fields.
3. Click OK.
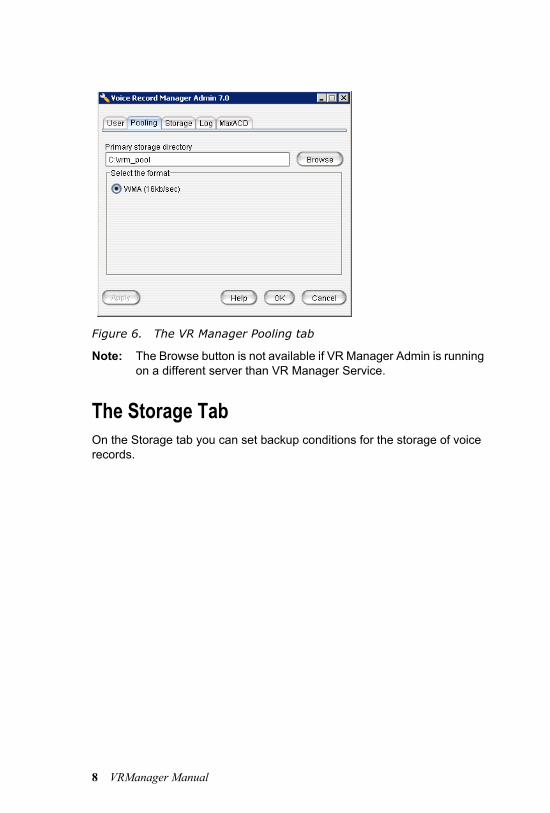
The Pooling TabThe pooling tab lets you set the location of the primary storage directory. Use the Browse button to select the location. VR Manager pools the newly recorded files from the MaxACD server, and saves them into the primary storage directory in .WMA format.
8 VRManager Manual
Figure 6. The VR Manager Pooling tab
Note: The Browse button is not available if VR Manager Admin is running on a different server than VR Manager Service.
The Storage TabOn the Storage tab you can set backup conditions for the storage of voice records.
VRManager Manual 9
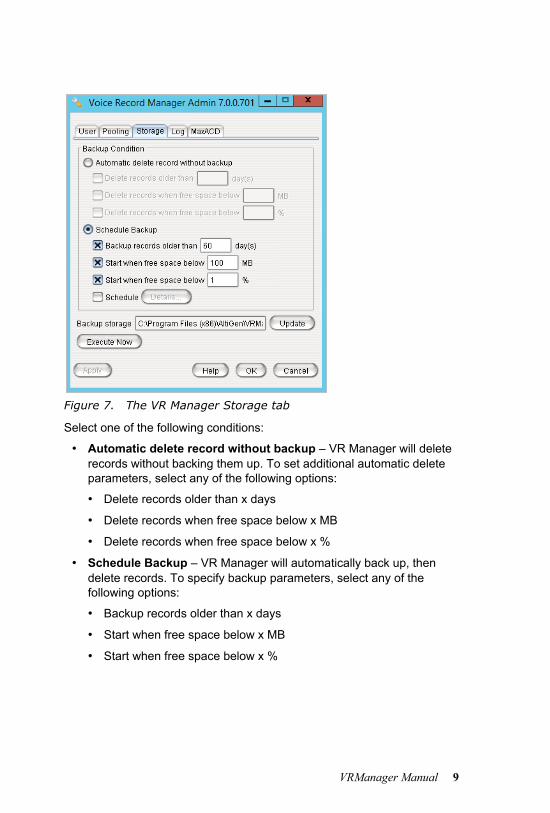
Figure 7. The VR Manager Storage tab
Select one of the following conditions:
• Automatic delete record without backup – VR Manager will delete records without backing them up. To set additional automatic delete parameters, select any of the following options:
• Delete records older than x days
• Delete records when free space below x MB
• Delete records when free space below x %
• Schedule Backup – VR Manager will automatically back up, then delete records. To specify backup parameters, select any of the following options:
• Backup records older than x days
• Start when free space below x MB
• Start when free space below x %
10 VRManager Manual
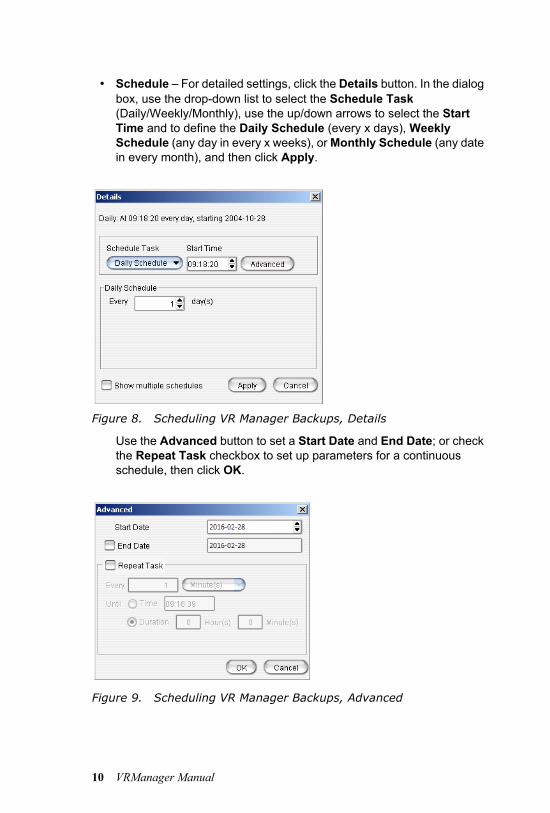
• Schedule – For detailed settings, click the Details button. In the dialog box, use the drop-down list to select the Schedule Task (Daily/Weekly/Monthly), use the up/down arrows to select the Start Time and to define the Daily Schedule (every x days), Weekly Schedule (any day in every x weeks), or Monthly Schedule (any date in every month), and then click Apply.
Figure 8. Scheduling VR Manager Backups, Details
Use the Advanced button to set a Start Date and End Date; or check the Repeat Task checkbox to set up parameters for a continuous schedule, then click OK.
Figure 9. Scheduling VR Manager Backups, Advanced
VRManager Manual 11
Check the Show multiple schedules checkbox to display and set up more than one schedule. You can add new multiple schedules, then modify them.
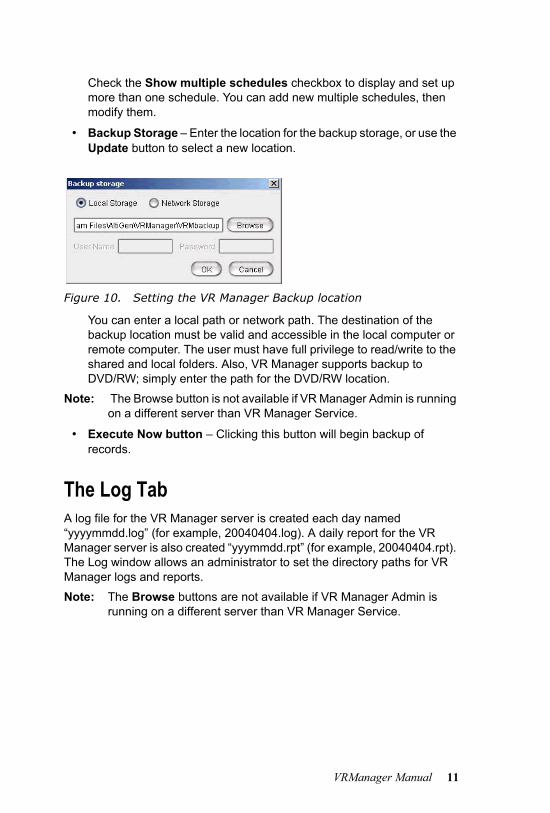
• Backup Storage – Enter the location for the backup storage, or use the Update button to select a new location.
Figure 10. Setting the VR Manager Backup location
You can enter a local path or network path. The destination of the backup location must be valid and accessible in the local computer or remote computer. The user must have full privilege to read/write to the shared and local folders. Also, VR Manager supports backup to DVD/RW; simply enter the path for the DVD/RW location.
Note: The Browse button is not available if VR Manager Admin is running on a different server than VR Manager Service.
• Execute Now button – Clicking this button will begin backup of records.
The Log TabA log file for the VR Manager server is created each day named “yyyymmdd.log” (for example, 20040404.log). A daily report for the VR Manager server is also created “yyymmdd.rpt” (for example, 20040404.rpt). The Log window allows an administrator to set the directory paths for VR Manager logs and reports.Note: The Browse buttons are not available if VR Manager Admin is
running on a different server than VR Manager Service.
12 VRManager Manual
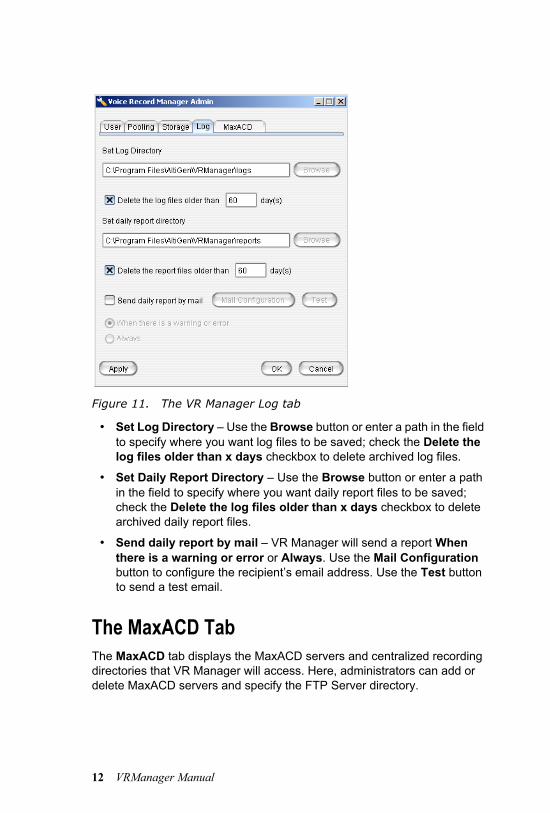
Figure 11. The VR Manager Log tab
• Set Log Directory – Use the Browse button or enter a path in the field to specify where you want log files to be saved; check the Delete the log files older than x days checkbox to delete archived log files.
• Set Daily Report Directory – Use the Browse button or enter a path in the field to specify where you want daily report files to be saved; check the Delete the log files older than x days checkbox to delete archived daily report files.
• Send daily report by mail – VR Manager will send a report When there is a warning or error or Always. Use the Mail Configuration button to configure the recipient’s email address. Use the Test button to send a test email.
The MaxACD TabThe MaxACD tab displays the MaxACD servers and centralized recording directories that VR Manager will access. Here, administrators can add or delete MaxACD servers and specify the FTP Server directory.
VRManager Manual 13
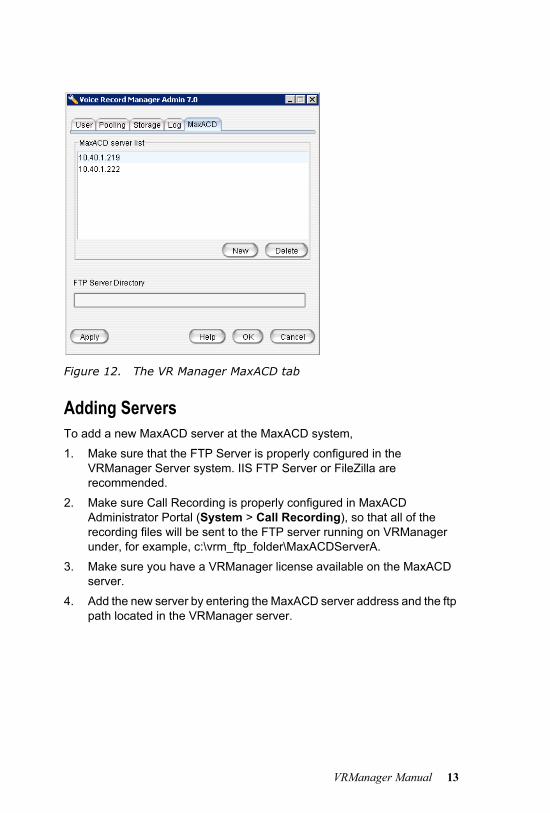
Figure 12. The VR Manager MaxACD tab
Adding ServersTo add a new MaxACD server at the MaxACD system,1. Make sure that the FTP Server is properly configured in the
VRManager Server system. IIS FTP Server or FileZilla are recommended.
2. Make sure Call Recording is properly configured in MaxACD Administrator Portal (System > Call Recording), so that all of the recording files will be sent to the FTP server running on VRManager under, for example, c:\vrm_ftp_folder\MaxACDServerA.
3. Make sure you have a VRManager license available on the MaxACD server.
4. Add the new server by entering the MaxACD server address and the ftp path located in the VRManager server.
14 VRManager Manual
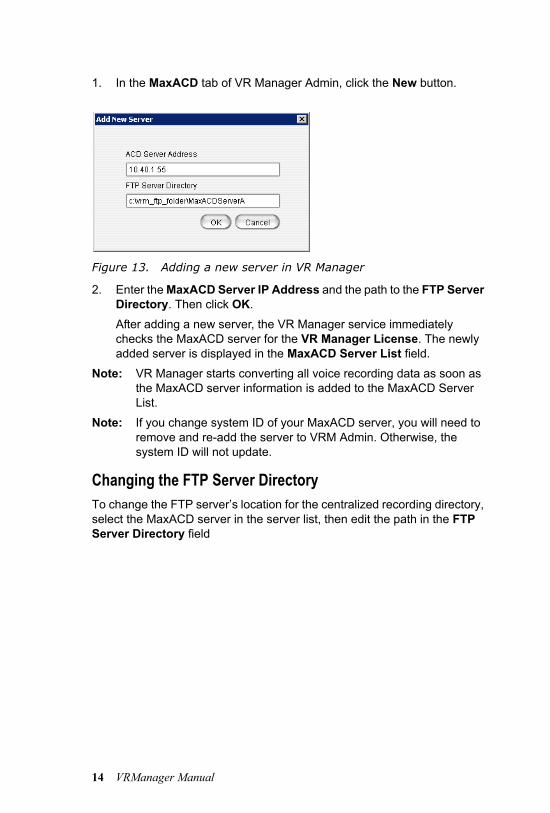
1. In the MaxACD tab of VR Manager Admin, click the New button.
Figure 13. Adding a new server in VR Manager
2. Enter the MaxACD Server IP Address and the path to the FTP Server Directory. Then click OK. After adding a new server, the VR Manager service immediately checks the MaxACD server for the VR Manager License. The newly added server is displayed in the MaxACD Server List field.
Note: VR Manager starts converting all voice recording data as soon as the MaxACD server information is added to the MaxACD Server List.
Note: If you change system ID of your MaxACD server, you will need to remove and re-add the server to VRM Admin. Otherwise, the system ID will not update.
Changing the FTP Server DirectoryTo change the FTP server’s location for the centralized recording directory, select the MaxACD server in the server list, then edit the path in the FTP Server Directory field
VRManager Manual 15
C H A P T E R 3
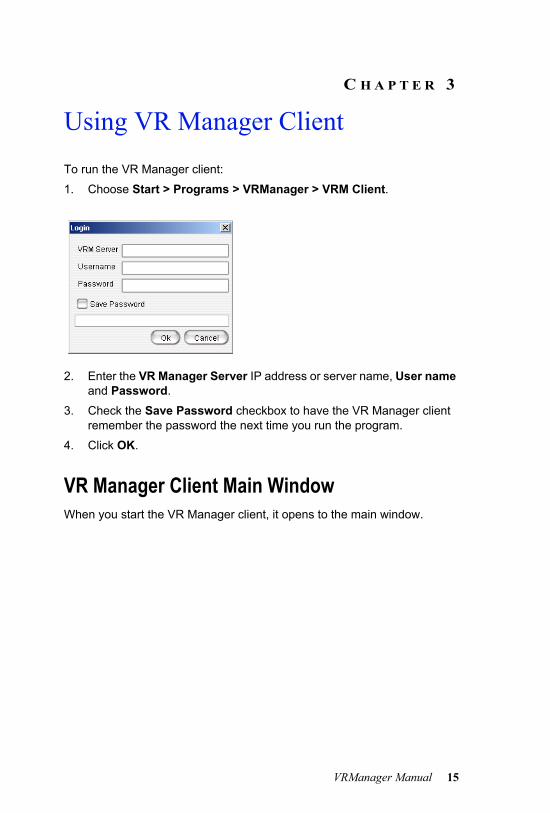
Using VR Manager ClientTo run the VR Manager client:1. Choose Start > Programs > VRManager > VRM Client.
2. Enter the VR Manager Server IP address or server name, User name and Password.
3. Check the Save Password checkbox to have the VR Manager client remember the password the next time you run the program.
4. Click OK.
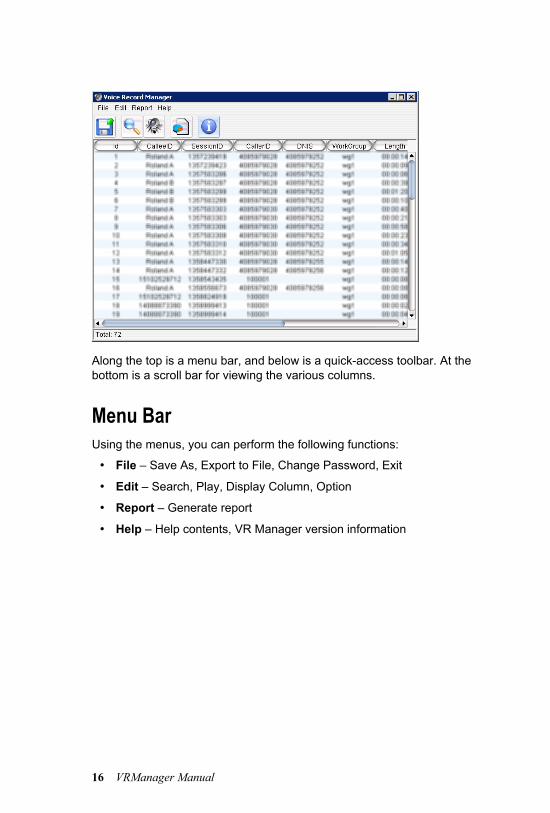
VR Manager Client Main WindowWhen you start the VR Manager client, it opens to the main window.
16 VRManager Manual
Along the top is a menu bar, and below is a quick-access toolbar. At the bottom is a scroll bar for viewing the various columns.
Menu BarUsing the menus, you can perform the following functions:
• File – Save As, Export to File, Change Password, Exit
• Edit – Search, Play, Display Column, Option
• Report – Generate report
• Help – Help contents, VR Manager version information

VRManager Manual 17
Quick Access ToolbarThe toolbar contains buttons that are menu shortcuts:
File MenuThis section describes the commands on the File menu.
Saving FilesTo save a file, click on a voice record in the main window to highlight it, and click the Save As button. You can also right-click a voice record, and select Save As, or click a voice record and choose File > Save As from the menu.
Saves the selected voice recording to a specified location
Plays the selected voice recording
Opens the Report Generation dialog box
Opens client version information
Opens search options

18 VRManager Manual
Exporting to FilesTo export search results to a tab-separated text file (.txt), choose File > Export To File from the main menu, or right-click the search results list and choose Export To File.
Changing the PasswordTo change your password: 1. Choose File > Change Password from the main menu. 2. In the dialog box, enter the necessary information in the Old
Password, New Password and Confirm Password fields, and then click OK.
The new password applies at the next log in.
Edit MenuThis section describes the commands on the Edit menu.
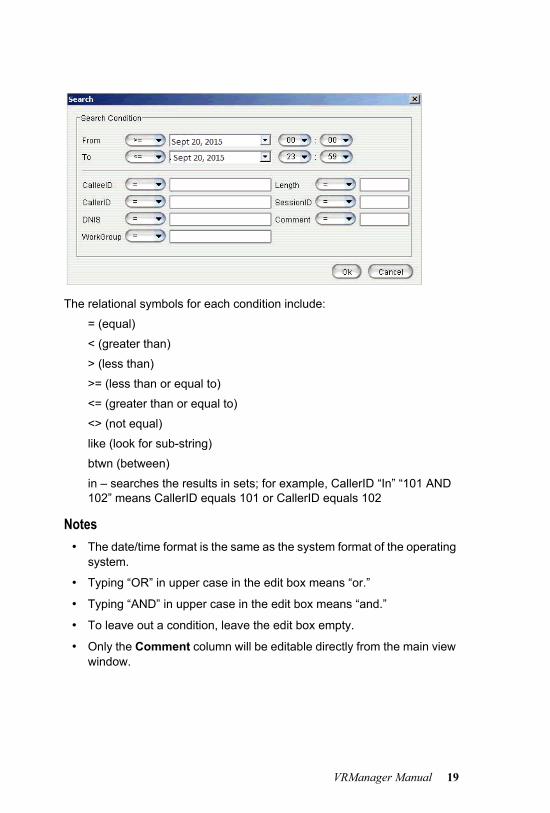
Searching Voice RecordsTo search voice records, choose Edit > Search or click the Search button in the toolbar. You can search based on the following conditions:
VRManager Manual 19
The relational symbols for each condition include:= (equal)< (greater than)> (less than)>= (less than or equal to)<= (greater than or equal to)<> (not equal)like (look for sub-string)btwn (between)in – searches the results in sets; for example, CallerID “In” “101 AND 102” means CallerID equals 101 or CallerID equals 102
Notes
• The date/time format is the same as the system format of the operating system.
• Typing “OR” in upper case in the edit box means “or.”
• Typing “AND” in upper case in the edit box means “and.”
• To leave out a condition, leave the edit box empty.
• Only the Comment column will be editable directly from the main view window.

20 VRManager Manual
Searching for All an Agent’s Voice RecordsIf you query an agent’s voice records and in that query you also specify a workgroup, the query results show only the agent’s voice records related to the workgroup. The results do not show non-workgroup voice records. If you want the query results to display all voice records for that extension, leave the WorkGroup field blank.
Playing Voice RecordsTo play a voice record,Click on a voice record in the main window to highlight it, and click the Play button. You can also right click a record and select Play, or select a record and choose Edit > Play from the menu.To play a session, Click a voice record in the main window to highlight it, then right-click a record and select Play this Session. You can also select a record and choose Edit > Play this Session from the menu. A series of voice records of this session will play continuously
Note: Deleted voice files cannot be played.
Displaying ColumnsYou can select which columns you want displayed in the main view window. These are the column headers you can select from:
• ID
• Callee ID
• Session ID
• Caller ID
• DNIS
• Workgroup
VRManager Manual 21
• Length
• Date
• State – There are three states that a record file can be in:
— Delete – Deleted records cannot be played or saved.— Backup – You must manually put the right backup media in the path
if you back up the record and remove it.— Normal –The file can be played or saved.
• Comment
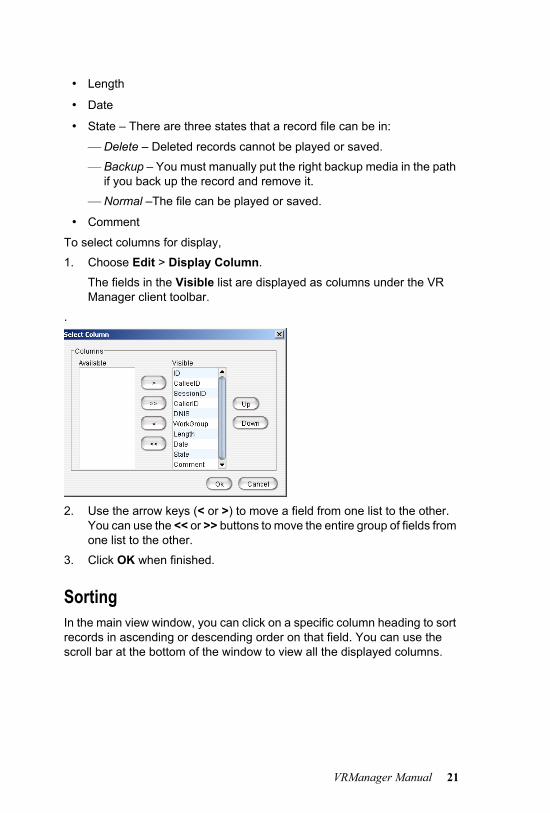
To select columns for display, 1. Choose Edit > Display Column.
The fields in the Visible list are displayed as columns under the VR Manager client toolbar.
.
2. Use the arrow keys (< or >) to move a field from one list to the other. You can use the << or >> buttons to move the entire group of fields from one list to the other.
3. Click OK when finished.
SortingIn the main view window, you can click on a specific column heading to sort records in ascending or descending order on that field. You can use the scroll bar at the bottom of the window to view all the displayed columns.
22 VRManager Manual
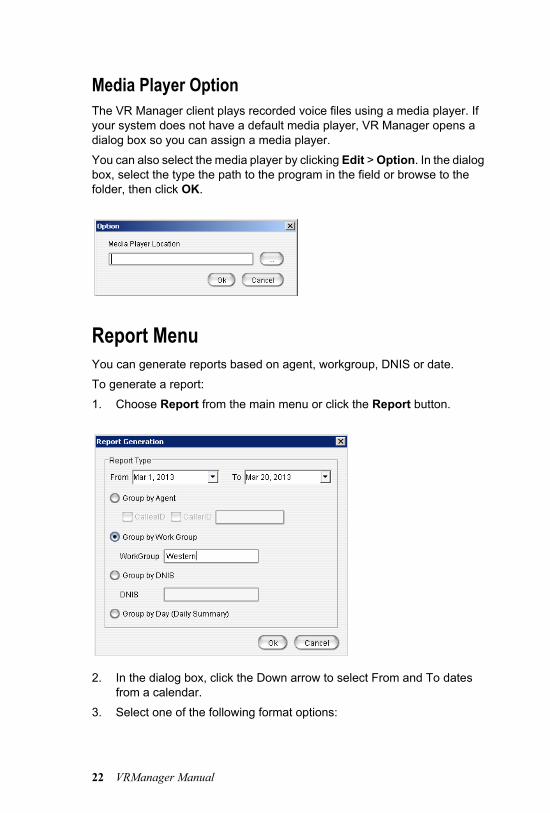
Media Player OptionThe VR Manager client plays recorded voice files using a media player. If your system does not have a default media player, VR Manager opens a dialog box so you can assign a media player. You can also select the media player by clicking Edit > Option. In the dialog box, select the type the path to the program in the field or browse to the folder, then click OK.
Report MenuYou can generate reports based on agent, workgroup, DNIS or date. To generate a report:1. Choose Report from the main menu or click the Report button.
2. In the dialog box, click the Down arrow to select From and To dates from a calendar.
3. Select one of the following format options:

VRManager Manual 23
• Group by Agent – Select Callee ID or Caller ID, or both, and enter the agent’s extension in the field.
• Group by Workgroup – Enter the workgroup name in the Workgroup field.
• Group by DNIS – Enter the DNIS number in the DNIS field.
• Group by Day (Daily Summary) – Formats the report based on date period summary for each day.
4. Click OK.5. VR Manager Client generates a separate report window displaying the
selected report parameters. From there, you can select Print Setup, Preview, Print, or Export (as a tab-separated text file).

24 VRManager Manual
VR Manager User Guide 25
Index
Bbackup 3, 11
location 3, 11
Cchanging
client password 18column display 20
Ddisplaying columns 20
Eexport to file 18
Ffirewalls, running VRManager
behind 3
Iinstalling VRManager 1
Llogin, VRM Client 15
Mmedia player, assigning 22
NNAT and VRManager 3
Ppassword
changing client 18passwords
VRManager 7
playing voice records 20
Rrecords
playing 20searching 18sorting 21
reports, generating 22
Ssaving files 17search symbols 19searching voice records 18sorting records 21storage
directory, setting 7
Ttoolbar 17
Vvoice records
playing 20searching 18
VRM Clientedit menu 18file menu 17generating reports 22login 15
VRManageraccess privileges 3adding servers 13adding users 6centralized recording
directory 14deleting records 9installing 1scheduling backups 9
VRManager Admin 5passwords 7
VRManager Clientusing 15

VR Manager User Guide 26