Embed Size (px)
Citation preview

VPN Tracker for Mac OS X
How-to:
Interoperability with
Novell Border Manager 3.8
Rev. 1.0
Copyright © 2003-2004 equinux USA Inc. All rights reserved.

1. Introduction
2
1. Introduction
This document describes how VPN Tracker can be used to establish a connectionbetween a Macintosh running Mac OS X and Novell Border Manager 3.8 installed on aNovell NetWare server.
The Novell Border Manager server is configured as a router connecting a company LANto the Internet.
This paper is only a supplement to, not a replacement for, the instructions that havebeen included with Novell NetWare / Border Manager. Please be sure to read thoseinstructions and understand them before starting.
All trademarks, product names, company names, logos, screenshots displayed, cited orotherwise indicated on the How-To are the property of their respective owners.
EQUINUX SHALL HAVE ABSOLUTELY NO LIABILITY FOR ANY DIRECT OR INDIRECT,SPECIAL OR OTHER CONSEQUENTIAL DAMAGES IN CONNECTION WITH THE USE OF THEHOW-TO OR ANY CHANGE TO THE ROUTER GENERALLY, INCLUDING WITHOUTLIMITATION, ANY LOST PROFITS, BUSINESS, OR DATA, EVEN IF EQUINUX HAS BEENADVISED OF THE POSSIBILITY OF SUCH DAMAGES.

2. Prerequisites
3
2. Prerequisites
First you have to make sure, that you’ve installed a recent Novell NetWare server, forthis document version 6.5 has been used.
Furthermore you should verify, that you use Novell Border Manager 3.8, since previousversions haven’t been confirmed to interoperate with VPN Tracker.
For the configuration of the Novell Border Manager VPN services, iManager has beenused. So please also make sure, that iManager 2.0 or higher and the VPN snap-ins foriManager are installed.
On the Mac side you need one VPN Tracker Personal license for each Mac connectingto the Novell Border Manager server. VPN Tracker is compatible with Mac OS X 10.2 orhigher.

3. Connecting a VPN Tracker host to a Novell Border Manager server
4
3. Connecting a VPN Tracker host to aNovell Border Manager serverIn this example the Mac running VPN Tracker is directly connected to the Internet via adialup or PPP connection.1
The Novell Border Manager server is configured in NAT mode and has the static WANIP address 169.1.2.3 and the private LAN IP address 192.168.1.1. The Stations in theLAN behind the Novell Border Manager server use 192.168.1.1 as their default gatewayand should have a working Internet connection.
Figure 1: VPN Tracker – Novell Border Manager connection diagram
1 Please note that the connection via a router, which uses Network Address Translation (NAT), only worksif the NAT router supports „IPsec pass-through“. Please contact your router’s manufacturer for details.
mac-vpntrackerdynamic IP
Novell Border ManagerWAN 169.1.2.3
LAN 192.168.1.1
LAN192.168.1.0/24
192.168.1.10
192.168.1.20
192.168.1.30

3. Connecting a VPN Tracker host to a Novell Border Manager server
5
3.1 N o vell Bor der M anager Certificate Cr eation
Please follow the next steps to create the trusted root object, trusted root certificate,server certificates and user certificates. We’ll need these objects later for the VPNClient to Site and VPN Server Configuration.
Please select “Create Trusted Root Containers” under Novell Certificate Server from theleft panel and enter the name and context of the container.
Figure 2: Novell Border Manager - Create Trusted Root Container
Step 1

3. Connecting a VPN Tracker host to a Novell Border Manager server
6
Click on “Create Trusted Root” under Novell Certificate Server and enter an arbitrarycertificate name, select the container you created in step 1 and browse theRootCert.der file (normally located in the pub directory).
Figure 3: Novell Border Manager - Create Trusted Root Certificate
Step 2

3. Connecting a VPN Tracker host to a Novell Border Manager server
7
Select “Create Server Certificate” under Novell Certificate Server and enter the servername and an arbitrary certificate nickname. Make sure that the Creation method is setto “Custom” and click on Next.
Figure 4: Novell Border Manager - Create Server Certificate Wizard
Step 3

3. Connecting a VPN Tracker host to a Novell Border Manager server
8
Check the Organizational Certificate Authority checkbox and click on Next.
Figure 5: Novell Border Manager - Certificate Authority

3. Connecting a VPN Tracker host to a Novell Border Manager server
9
Select “Custom” as Key Type and make sure that all Key Usage checkboxes arechecked.
Figure 6: Novell Border Manager - Key Size and Usage

3. Connecting a VPN Tracker host to a Novell Border Manager server
10
Just click on Next in the following 2 screens.
Figure 7: Novell Border Manager - Certificate Parameters

3. Connecting a VPN Tracker host to a Novell Border Manager server
11
Figure 8: Novell Border Manager - Trusted Root

3. Connecting a VPN Tracker host to a Novell Border Manager server
12
After step 3 your configuration should look like this:
Figure 9: Novell Border Manager – Summary

3. Connecting a VPN Tracker host to a Novell Border Manager server
13
Please create a new Certificate Signing Request (CSR) in the VPN Tracker Certificatesmenu, Tab “Request”.
Figure 10: VPN Tracker – Certificates
Enter your details, then save and export the request in the .pem format.
Figure 11: VPN Tracker - Certificate Request Details
Step 4

3. Connecting a VPN Tracker host to a Novell Border Manager server
14
Import and sign the request you have created in VPN Tracker.
Figure 12: Novell Border Manager - Issue Certificate Wizard
Please refer to step 3 for the settings of the next two screens.
Step 5

3. Connecting a VPN Tracker host to a Novell Border Manager server
15
Save the certificate in binary DER format.
Figure 13: Novell Border Manager - Save Certificate

3. Connecting a VPN Tracker host to a Novell Border Manager server
16
Finally save the certificate to your disk and import it into VPN Tracker.
Figure 14: Novell Border Manager - Download Certificate
Figure 15: VPN Tracker - Import Signed Certificate

3. Connecting a VPN Tracker host to a Novell Border Manager server
17
3.2 N o vell Bor der M anager VPN Client to S ite Configuration
Now you should have all the objects required to configure VPN services. Next we’llneed to setup the VPN Client To Site Configuration, which we’ll later need for the VPNServer Configuration.
Please click on “Default_C2S_Service_yourContext” under “NBM Client To SiteConfiguration”.
Figure 16: Novell Border Manager - Client To Site Service List
Step 1

3. Connecting a VPN Tracker host to a Novell Border Manager server
18
Select the Trusted Root Container we’ve created before and click on apply.
Figure 17: Novell Border Manager - Client to Site General
Step 2

3. Connecting a VPN Tracker host to a Novell Border Manager server
19
Now click on Traffic Rules and change the “Default rule action” to “Encrypt”.
Figure 18: Novell Border Manager - Client to Site Traffic Rule
Step 3

3. Connecting a VPN Tracker host to a Novell Border Manager server
20
Finally click on Authentication Rules and add a new Rule. Enter an arbitrary name forthe rule, check “Allow Certificate Authentication” and “Trust Server CA” underAuthentication Condition and add your Trusted Root to the “Issuer List”.
Figure 19: Novell Border Manager - Client to Site Authentication Rules
Then just click on Apply and Ok to save your settings. We’ve now configured theauthentication method (certificates) and the authentication algorithms. In the next stepwe’ll add these settings to the VPN Server Configuration.
Step 4

3. Connecting a VPN Tracker host to a Novell Border Manager server
21
3.3 N o vell Bor der M anager VPN S erver Configuration
Please click on “NBM VPN Server Configuration” and add a new server. Select thecorrect Server and click on Next.
In the Server Properties screen enter the public IP and Netmask of your Novell BorderManager Server as “Server Address” and an arbitrary Tunnel Address. Please makesure, that the “Tunnel Address” is not in the real LAN subnet.
Also select the “Server Certificate” and the “Trusted Root” we’ve created in section3.1.
Figure 20: Novell Border Manager - VPN Server Configuration
Step 1

3. Connecting a VPN Tracker host to a Novell Border Manager server
22
Please make sure, that “Client To Site” is checked and click on details to select the“Default_C2S_Service.yourContext” VPN Service.
Figure 21: Novell Border Manager - Select Client To Site Service
Finally update and save your VPN Server Configuration. Now all the configuration stepson the Novell Border Manager side are done and we can go over to the VPN Trackerconfiguration.
Step 2
3. Connecting a VPN Tracker host to a Novell Border Manager server
23
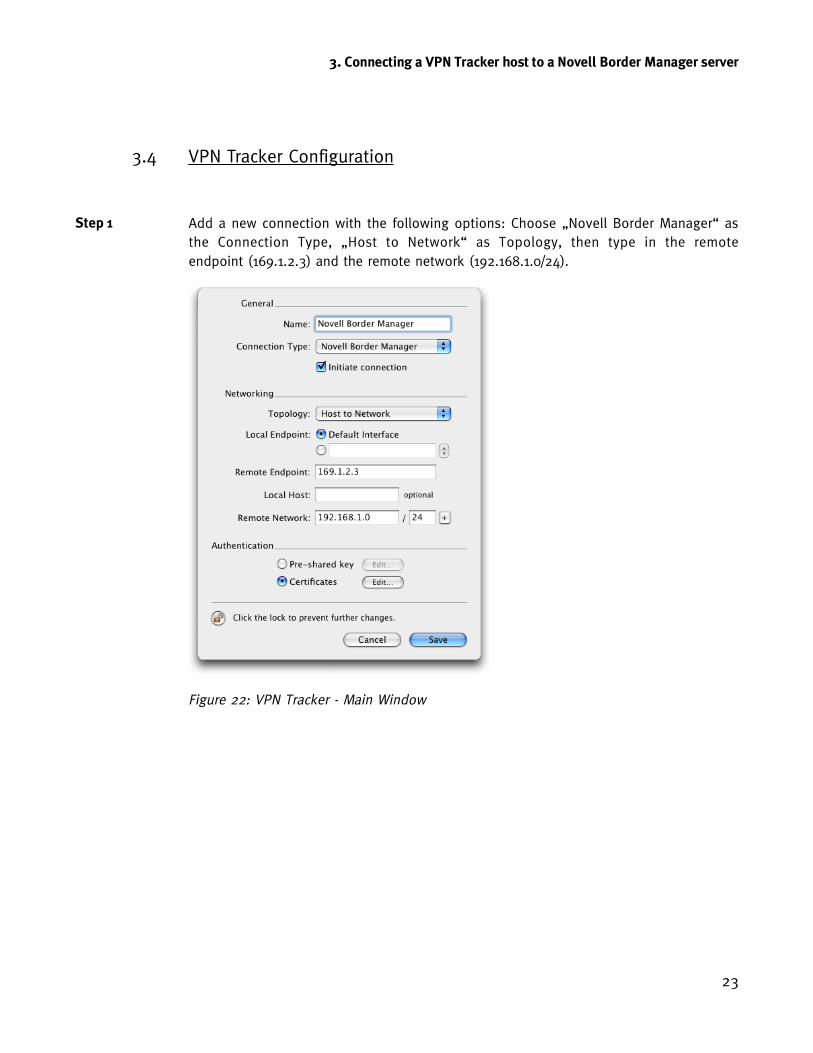
3.4 VPN T racker Configuration
Add a new connection with the following options: Choose „Novell Border Manager“ asthe Connection Type, „Host to Network“ as Topology, then type in the remoteendpoint (169.1.2.3) and the remote network (192.168.1.0/24).
Figure 22: VPN Tracker - Main Window
Step 1

3. Connecting a VPN Tracker host to a Novell Border Manager server
24
Select „Certificates“ as “Authentication” method and click on “Edit...”.
Choose the certificate you’ve created with VPN Tracker and Novell Border Manager as“Own Certificate and verify the remote certificate “with CAs”.
Change the “Local/Remote” Identifier to Own/Remote certificate.
Figure 23: VPN Tracker - Certificate Dialog
Save the connection and Click „Start IPsec“ in the VPN Tracker main window.
You’re done. After 10-20 seconds the red status indicator for the connection shouldchange to green, which means you’re securely connected to the Novell Border ManagerServer. After IPsec has been started, you may quit VPN Tracker. The IPsec service willkeep running.
Now to test your connection simply ping a host in the Novell Border Manager Servernetwork from the dialed-in Mac in the “Terminal” utility:
ping 192.168.1.1
> Debugging
If the status indicator does not change to green please have a look at the log file onboth sides. You can define the amount of information available in the log file in theVPN Tracker preferences.
Step 2
Step 3