Embed Size (px)
Citation preview
VPN Configuration GuideLANCOM®
equinux AG and equinux USA, Inc.
© 2008 equinux USA, Inc. All rights reserved.
Under the copyright laws, this manual may not be copied, in whole or in part, without the written consent of equinux AG or equinux USA, Inc. Your rights to the software are governed by the accompanying software license agreement.
The equinux logo is a trademark of equinux AG and equinux USA, Inc., registered in the U.S. and other countries.
Every effort has been made to ensure that the information in this manual is accurate. equinux is not responsible for printing or clerical errors.
Created using Apple Pages.
www.equinux.com
Apple, the Apple logo, iBook, Mac, Mac OS, MacBook, PowerBook are trademarks of Apple Computer, Inc., registered in the U.S. and other countries.
Finder and Mail are trademarks of Apple Computer, Inc. AppleCare is a service mark of Apple Computer, Inc., registered in the U.S. and other countries.
FileMaker is a trademark of FileMaker, Inc.
equinux shall have absolutely no liability for any direct or indirect, special or other consequential damages in connection with the use of the quick setup guide or any change to the router generally, including without limitation, any lost profits, business, or data, even if equinux has been advised of the possibility of such damages.
2
.....................................................................Introduction 5
.....................................................................Prerequisites 6
............................................................................Scenario 7...........................................................................................................Terminology 8
..........................Task 1 – Configure your VPN Device 9..................................................Step 1 – Access the Configuration Menu 9
......................................................................................Step 2 – Activate VPN 10.........................................................................Step 3 – Add an IKE Identity 11
Step 4 – ......................................................Add Connection Parameters 12.................................................................Step 5 – Add a VPN Connection 13
........................................Step 6a – Retrieve your Intranet Information 14..............................................Step 6b – Add an In-Dialing Address Pool 15
............................................................................Step 7 – Enable Proxy ARP 15
.................................Task 2 – Configure VPN Tracker 16............................................................Step 1 - Create a New Connection 16
........................................................................Step 2 – Select a VPN Device 17.................................................................Step 3 – Configure IP Addresses 18
............................................................Step 4 – Configure Authentication 19...............................................................Step 5 – Configure Identification 20
Task 3 – ............................Test the VPN Connection 21.............................................................................................It‘s time to go out! 21
.......................................................................................Test your connection 21
Setting up a VPN Connection with a Static IP ............................................................................Address 23
Steps 1 - 4: Follow Steps 1- 4 of “Task 1 – Configure Your VPN ...................................................................................................................Device” 23
....................................................................Step 5: Add a VPN Connection 23...........................................Step 6a: Retrieve your Intranet Information 24
..............................................................Required Changes in VPN Tracker 25
............................................................Troubleshooting 26..............................................................VPN Connection Fails to Establish 26
VPN Connection Seems to Be Connected, but no Resources Can Be ...............................................................................................................Accessed 27
..................................Appendix: Terminology Matrix 29
3

4
Introduction
This document describes how VPN Tracker can be used to establish a connection between a Macintosh running Mac OS X and a LANCOM VPN router.
The LANCOM firewall is configured as a router connecting a company LAN to the Internet.
This paper is only a supplement to, not a replacement for, the instructions that have been included with your LANCOM device. Please be sure to read those instructions and understand them before starting.
EQUINUX SHALL HAVE ABSOLUTELY NO LIABILITY FOR ANY DIRECT OR INDIRECT, SPECIAL OR OTHER CONSEQUENTIAL DAMAGES IN CONNECTION WITH THE USE OF THE HOW-TO OR ANY CHANGE TO THE ROUTER GENERALLY, INCLUDING WITHOUT LIMITATION, ANY LOST PROFITS, BUSINESS, OR DATA, EVEN IF EQUINUX HAS BEEN ADVISED OF THE POSSIBILITY OF SUCH DAMAGES.
5
PrerequisitesFirst make sure to use a recent LANCOM firmware version. The latest release for your LANCOM firewall can be obtained from http://www.lancom-systems.com.
For this document, LCOS 6.32.0021 and 7.28.0031 were used.
Please note: VPN Tracker has been tested with the LANCOM 1721 VPN device and the above firmware versions. The instructions should also apply to other LANCOM VPN devices with these these firmware revisions.
You will need one VPN Tracker Personal Edition license for each Mac connecting to the LANCOM device.
We recommend one VPN Tracker Professional Edition for the administrator’s Mac in order to export configuration files to the clients. VPN Tracker is compatible with Mac OS X 10.4 and 10.5.
6
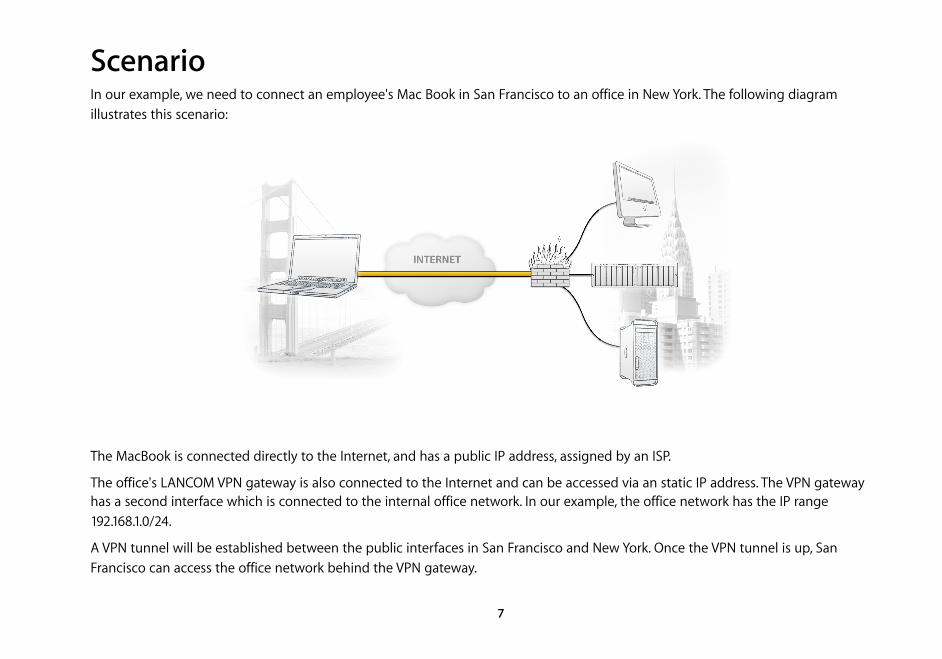
ScenarioIn our example, we need to connect an employee's Mac Book in San Francisco to an office in New York. The following diagram illustrates this scenario:
The MacBook is connected directly to the Internet, and has a public IP address, assigned by an ISP.
The office's LANCOM VPN gateway is also connected to the Internet and can be accessed via an static IP address. The VPN gateway has a second interface which is connected to the internal office network. In our example, the office network has the IP range 192.168.1.0/24.
A VPN tunnel will be established between the public interfaces in San Francisco and New York. Once the VPN tunnel is up, San Francisco can access the office network behind the VPN gateway.
7
Please note that the connection from a MacBook at home to an office network is just one possible scenario. The instructions also apply to connections from a desktop computer or notebook in your office to a VPN gateway at home or at another office. Please adapt the term "office network", which is used throughout this manual, to your scenario.
TerminologyEach VPN connection is established between two peers. In the case of VPN Tracker, one peer is a Mac running VPN Tracker (“client”), the other is (usually) a gateway capable of handling VPN tunnels. Please note that for each peer, the settings on the other peer are considered to be “remote”, while the own settings are called “local”: a “local” setting from VPN Tracker’s perspective, is a “remote” setting from the VPN gateway’s perspective, and vice versa.
A list of terms used by LANCOM, and their corresponding terms in VPN Tracker can be found in Appendix: Terminology Matrix.
8
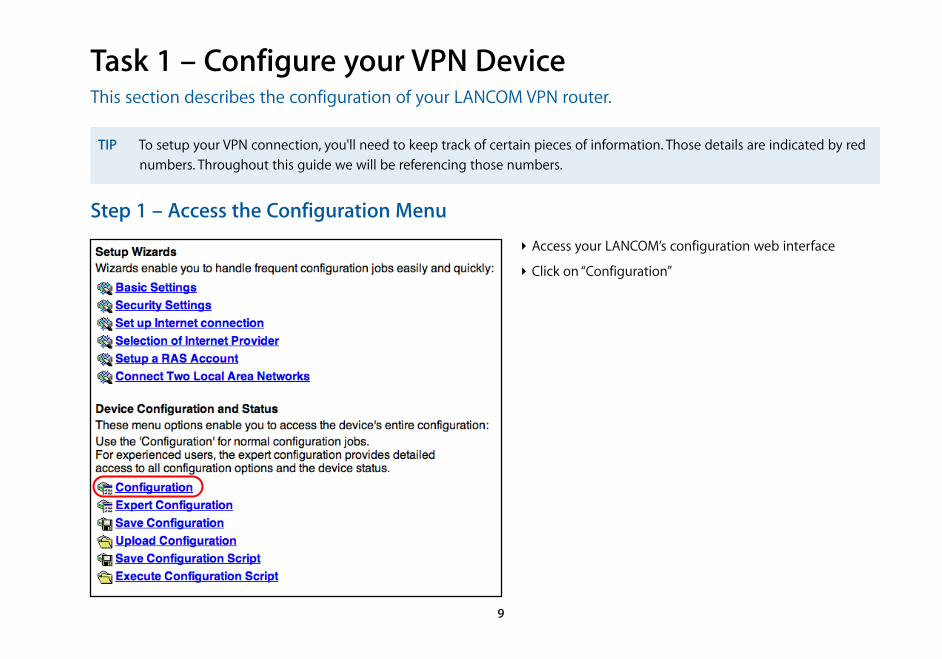
Task 1 – Configure your VPN DeviceThis section describes the configuration of your LANCOM VPN router.
Step 1 – Access the Configuration Menu
TIP To setup your VPN connection, you'll need to keep track of certain pieces of information. Those details are indicated by red numbers. Throughout this guide we will be referencing those numbers.
‣ Access your LANCOM’s configuration web interface
‣ Click on “Configuration”
9
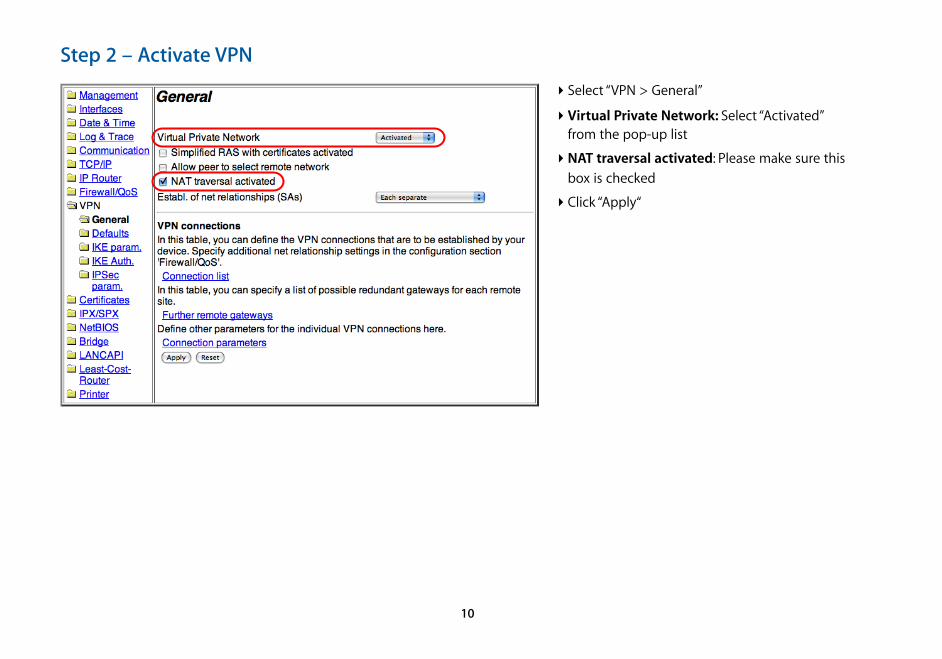
Step 2 – Activate VPN
‣ Select “VPN > General”
‣ Virtual Private Network: Select “Activated” from the pop-up list
‣ NAT traversal activated: Please make sure this box is checked
‣ Click “Apply“
10

Step 3 – Add an IKE Identity
➊
➋
➌
‣ Select “VPN > IKE Auth.“
‣ Click “IKE keys and identities”
‣ Click “Add”
‣ Identification: VPNTRACKER
‣ Enter a pre-shared key. This will be the password for connecting to the VPN
‣ Repeat the pre-shared key
‣ Local identity type: Domain name (FQDN)
‣ Local Identity: Enter an arbitrary identifier (e.g. lancom)
‣ Remote identity type: Domain name (FQDN)
‣ Remote identity: Enter an arbitrary identifier (e.g. vpntracker)
‣ Click “Apply”
TIP Don’t forget to remember (or write down) what you entered for the pre-shared key , the local identity , and the remote identity
1 2
3
11
1
2
3
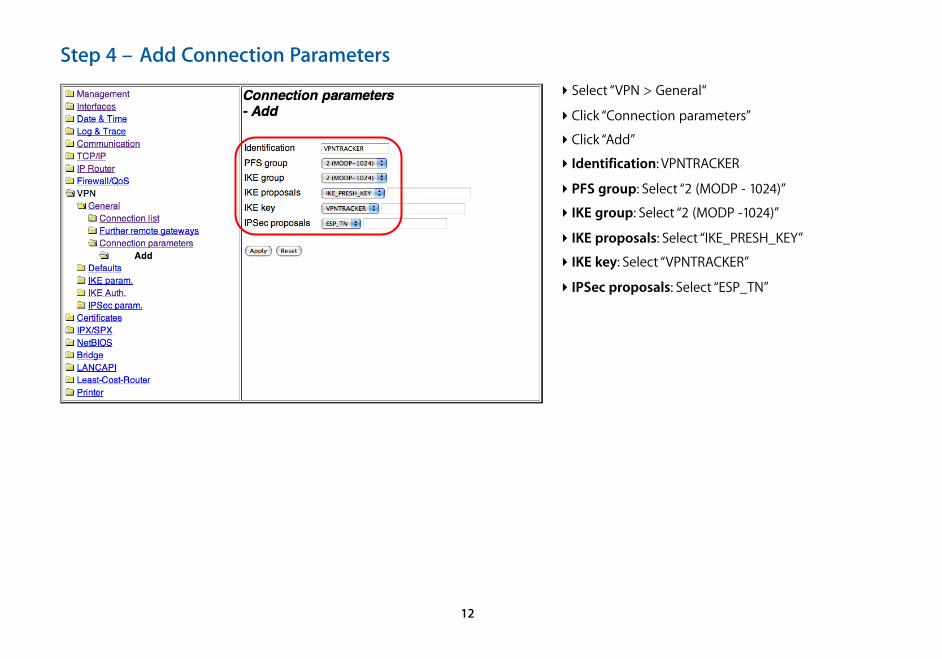
Step 4 – Add Connection Parameters
‣ Select “VPN > General“
‣ Click “Connection parameters”
‣ Click “Add”
‣ Identification: VPNTRACKER
‣ PFS group: Select “2 (MODP - 1024)”
‣ IKE group: Select “2 (MODP -1024)”
‣ IKE proposals: Select “IKE_PRESH_KEY”
‣ IKE key: Select “VPNTRACKER”
‣ IPSec proposals: Select “ESP_TN”
12
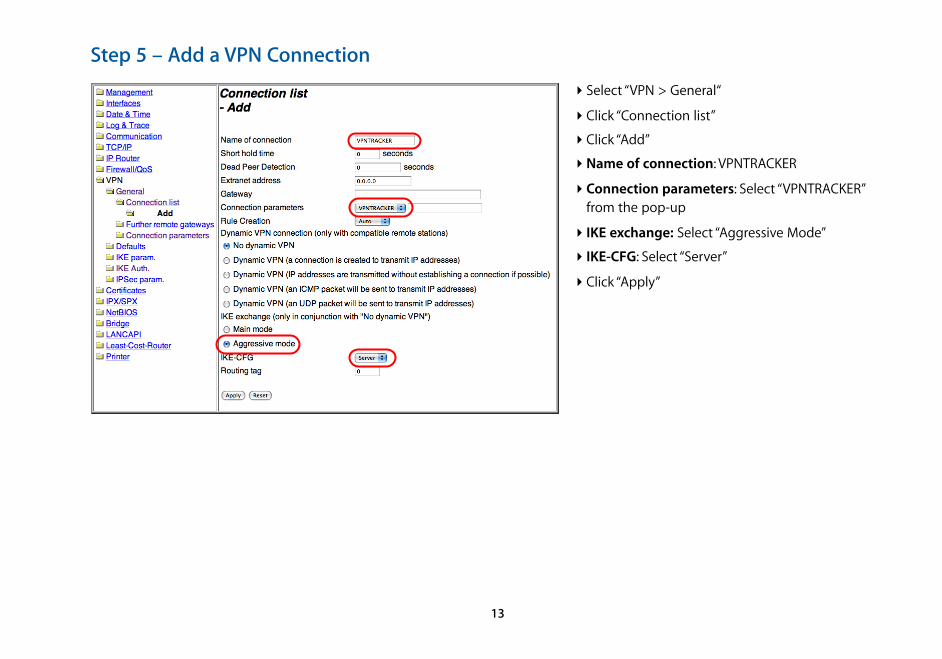
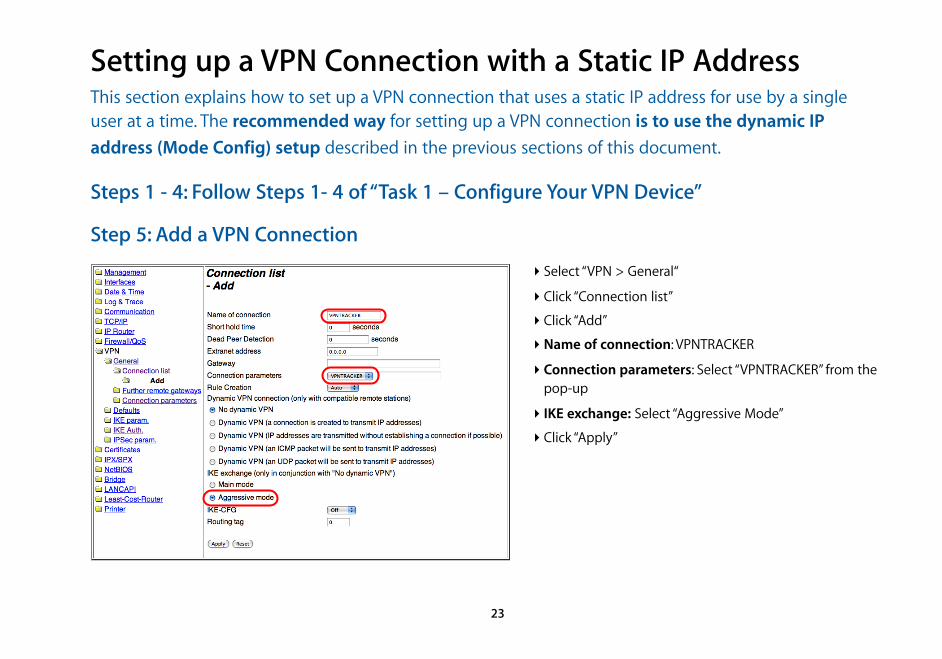
Step 5 – Add a VPN Connection
‣ Select “VPN > General“
‣ Click “Connection list”
‣ Click “Add”
‣ Name of connection: VPNTRACKER
‣ Connection parameters: Select “VPNTRACKER” from the pop-up
‣ IKE exchange: Select “Aggressive Mode”
‣ IKE-CFG: Select “Server”
‣ Click “Apply”
13
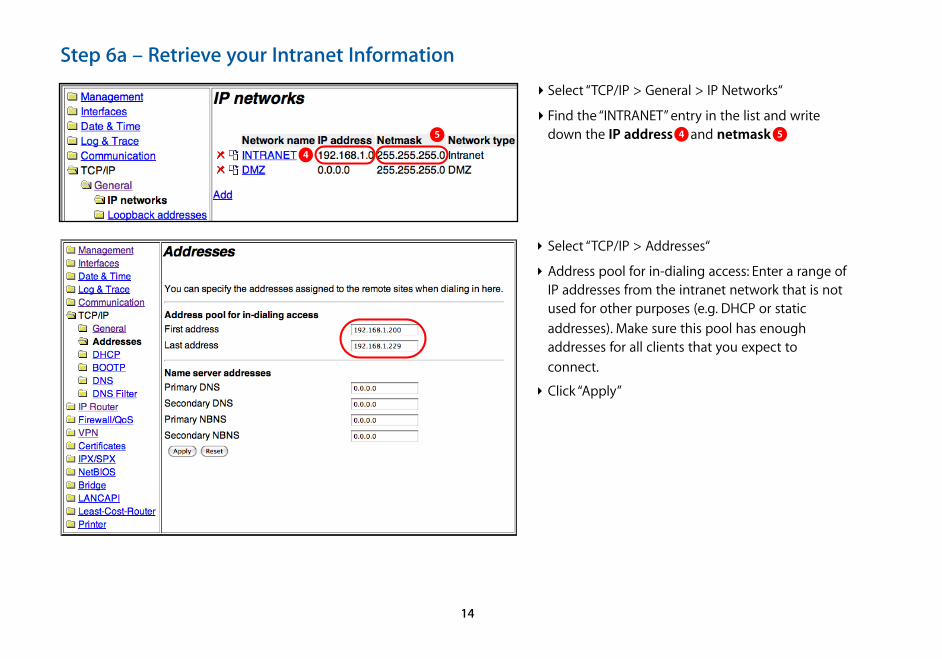
Step 6a – Retrieve your Intranet Information
4
5
‣ Select “TCP/IP > General > IP Networks“
‣ Find the “INTRANET” entry in the list and write down the IP address and netmask
‣ Select “TCP/IP > Addresses“
‣ Address pool for in-dialing access: Enter a range of IP addresses from the intranet network that is not used for other purposes (e.g. DHCP or static addresses). Make sure this pool has enough addresses for all clients that you expect to connect.
‣ Click “Apply”
14
4 5
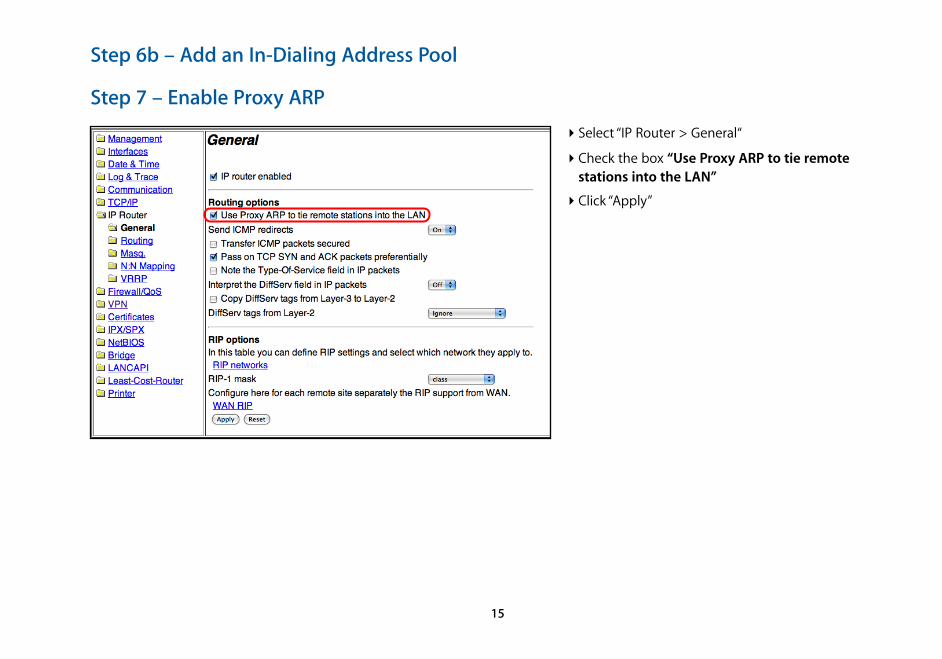
Step 6b – Add an In-Dialing Address Pool
Step 7 – Enable Proxy ARP
‣ Select “IP Router > General“
‣ Check the box “Use Proxy ARP to tie remote stations into the LAN”
‣ Click “Apply”
15
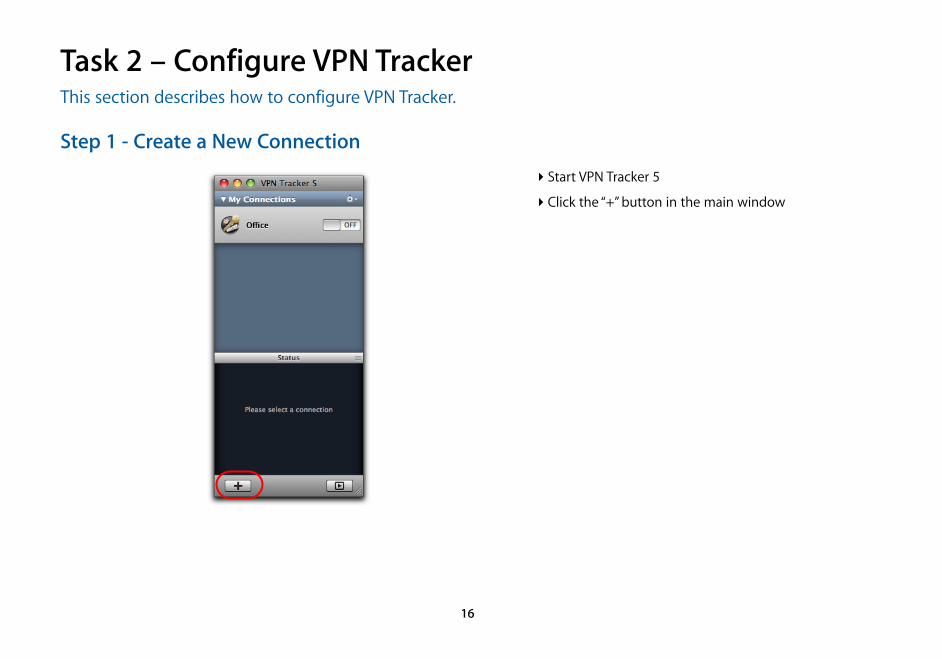
Task 2 – Configure VPN TrackerThis section describes how to configure VPN Tracker.
Step 1 - Create a New Connection
‣ Start VPN Tracker 5
‣ Click the “+” button in the main window
16
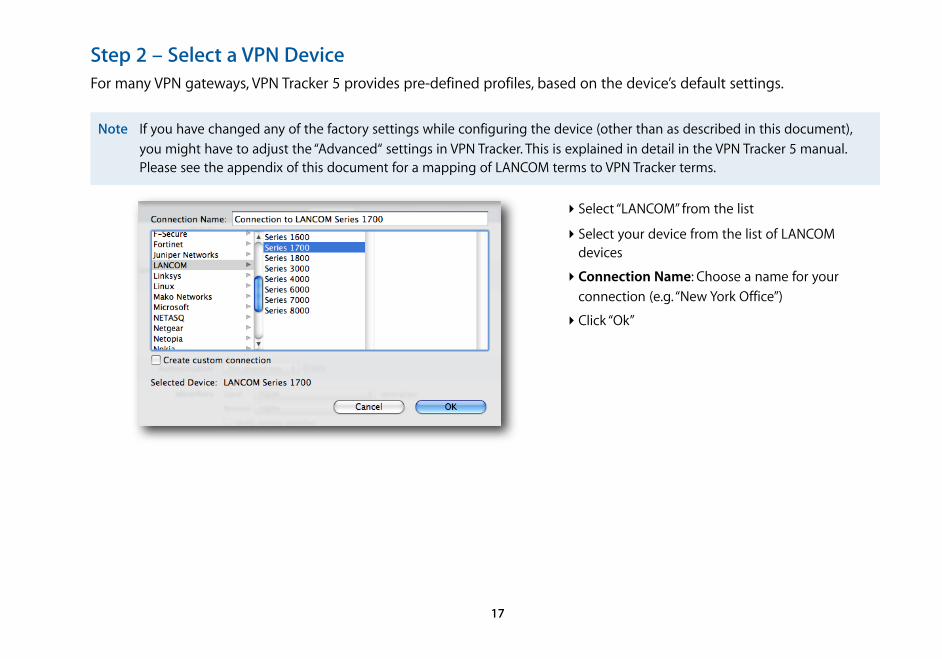
Step 2 – Select a VPN DeviceFor many VPN gateways, VPN Tracker 5 provides pre-defined profiles, based on the device’s default settings.
Note If you have changed any of the factory settings while configuring the device (other than as described in this document), you might have to adjust the “Advanced“ settings in VPN Tracker. This is explained in detail in the VPN Tracker 5 manual. Please see the appendix of this document for a mapping of LANCOM terms to VPN Tracker terms.
‣ Select “LANCOM” from the list
‣ Select your device from the list of LANCOM devices
‣ Connection Name: Choose a name for your connection (e.g. “New York Office”)
‣ Click “Ok”
17
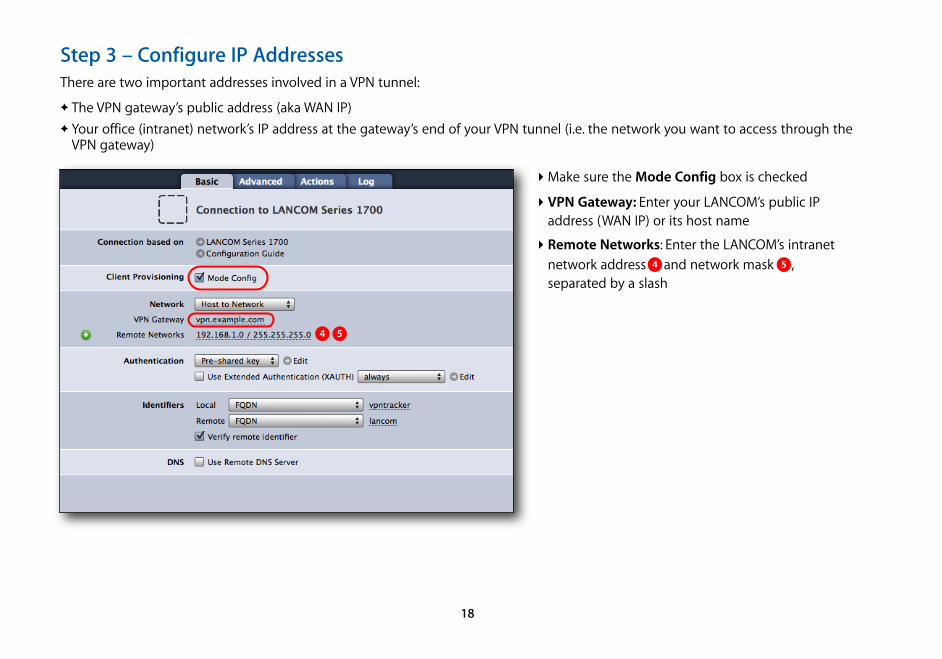
Step 3 – Configure IP AddressesThere are two important addresses involved in a VPN tunnel:
✦ The VPN gateway’s public address (aka WAN IP)✦ Your office (intranet) network’s IP address at the gateway’s end of your VPN tunnel (i.e. the network you want to access through the
VPN gateway)
4 5
‣ Make sure the Mode Config box is checked
‣ VPN Gateway: Enter your LANCOM’s public IP address (WAN IP) or its host name
‣ Remote Networks: Enter the LANCOM’s intranet network address and network mask , separated by a slash
18
4 5
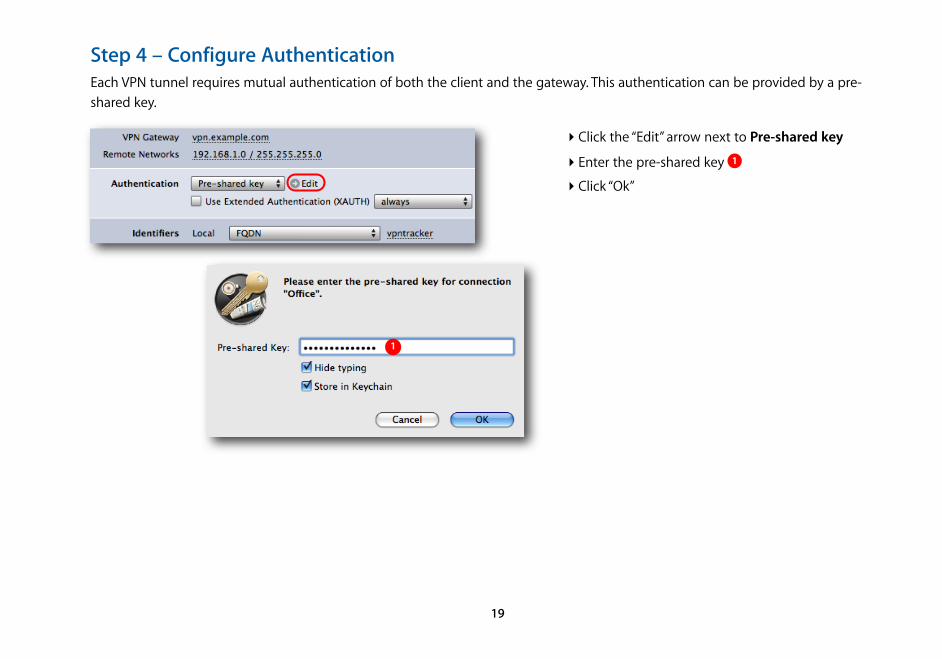
Step 4 – Configure AuthenticationEach VPN tunnel requires mutual authentication of both the client and the gateway. This authentication can be provided by a pre-shared key.
‣ Click the “Edit” arrow next to Pre-shared key
‣ Enter the pre-shared key
‣ Click “Ok”
1
19
1
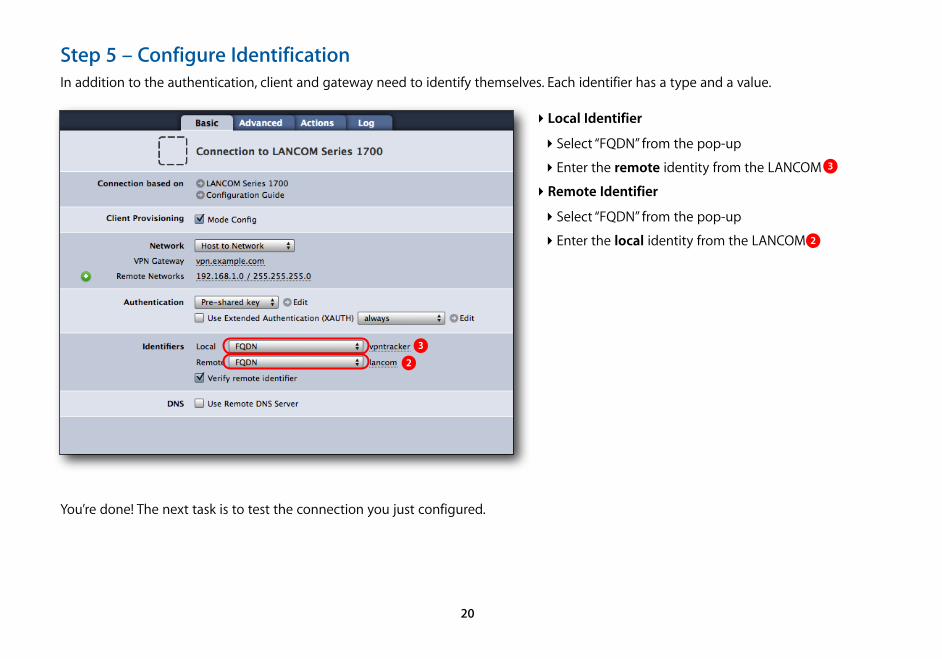
Step 5 – Configure IdentificationIn addition to the authentication, client and gateway need to identify themselves. Each identifier has a type and a value.
You’re done! The next task is to test the connection you just configured.
2
3
‣ Local Identifier
‣ Select “FQDN” from the pop-up
‣ Enter the remote identity from the LANCOM
‣ Remote Identifier
‣ Select “FQDN” from the pop-up
‣ Enter the local identity from the LANCOM
20
2
3
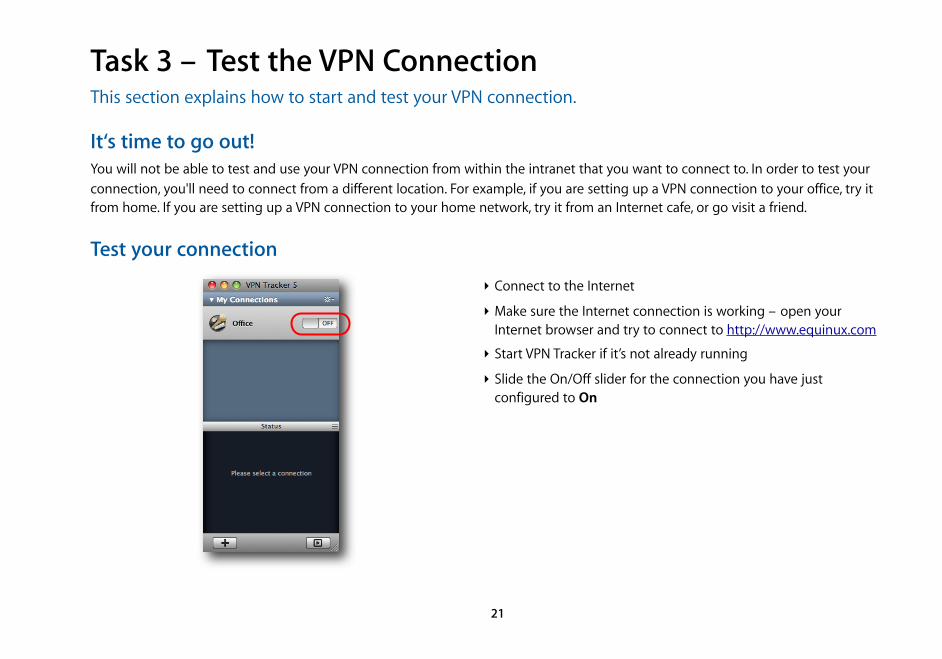
Task 3 – Test the VPN ConnectionThis section explains how to start and test your VPN connection.
It‘s time to go out!You will not be able to test and use your VPN connection from within the intranet that you want to connect to. In order to test your connection, you'll need to connect from a different location. For example, if you are setting up a VPN connection to your office, try it from home. If you are setting up a VPN connection to your home network, try it from an Internet cafe, or go visit a friend.
Test your connection
‣ Connect to the Internet
‣ Make sure the Internet connection is working – open your Internet browser and try to connect to http://www.equinux.com
‣ Start VPN Tracker if it’s not already running
‣ Slide the On/Off slider for the connection you have just configured to On
21
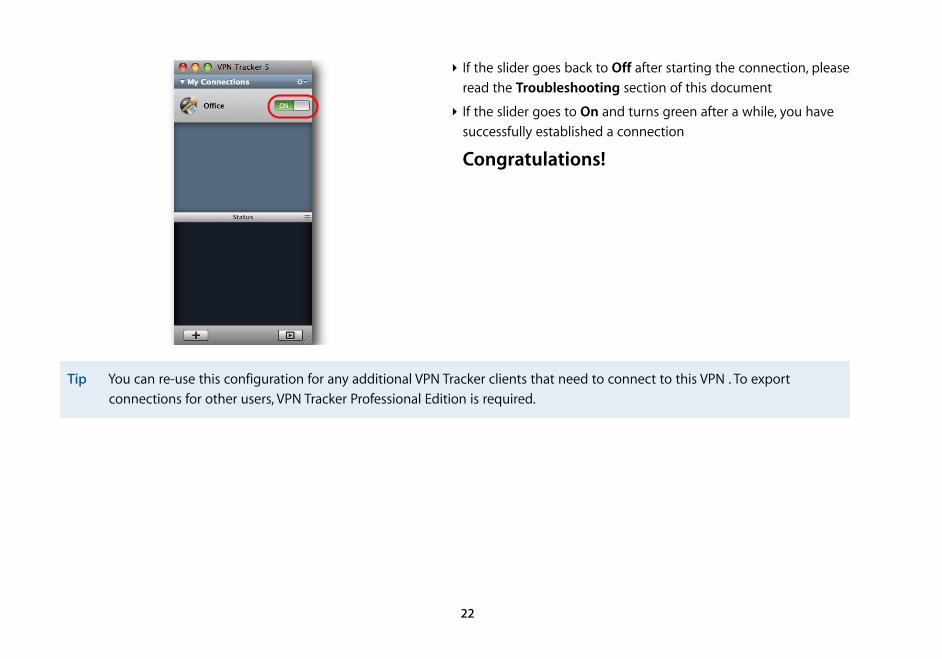
‣ If the slider goes back to Off after starting the connection, please read the Troubleshooting section of this document
‣ If the slider goes to On and turns green after a while, you have successfully established a connection
Congratulations!
Tip You can re-use this configuration for any additional VPN Tracker clients that need to connect to this VPN . To export connections for other users, VPN Tracker Professional Edition is required.
22
Setting up a VPN Connection with a Static IP AddressThis section explains how to set up a VPN connection that uses a static IP address for use by a single user at a time. The recommended way for setting up a VPN connection is to use the dynamic IP address (Mode Config) setup described in the previous sections of this document.
Steps 1 - 4: Follow Steps 1- 4 of “Task 1 – Configure Your VPN Device”
Step 5: Add a VPN Connection
‣ Select “VPN > General“
‣ Click “Connection list”
‣ Click “Add”
‣ Name of connection: VPNTRACKER
‣ Connection parameters: Select “VPNTRACKER” from the pop-up
‣ IKE exchange: Select “Aggressive Mode”
‣ Click “Apply”
23

Step 6a: Retrieve your Intranet Information
Step 6b: Add a Route for the Static IP Address
‣ Select “TCP/IP > General > IP Networks“
‣ Find the “INTRANET” entry in the list and write down the IP address and netmask
6
‣ Select “IP Router > Routing“
‣ Click “Routing Table”
‣ Click “Add”
‣ IP Address: Enter an IP address from any private subnet (i.e. 10.x.y.z, 192.168.x.y, 172.16.x.y) that is not in the LANCOM’s intranet. Here we selected “10.1.2.3”
‣ Netmask: Enter 255.255.255.255
‣ Router: Select “VPNTRACKER” from the pop-up
‣ Click “Apply”
24
6
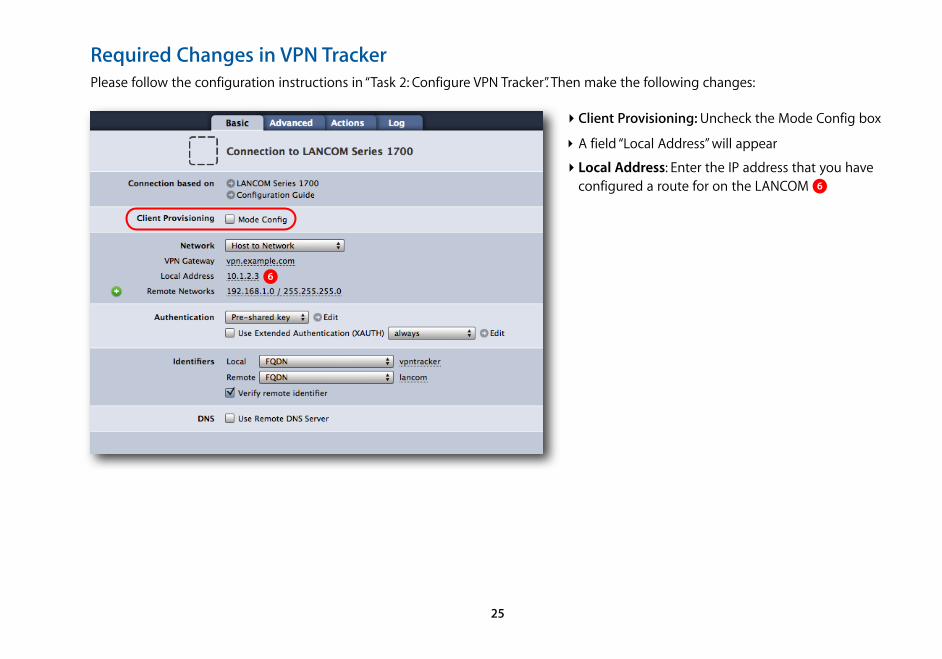
Required Changes in VPN TrackerPlease follow the configuration instructions in “Task 2: Configure VPN Tracker”. Then make the following changes:
6
‣ Client Provisioning: Uncheck the Mode Config box
‣ A field “Local Address” will appear
‣ Local Address: Enter the IP address that you have configured a route for on the LANCOM
25
6
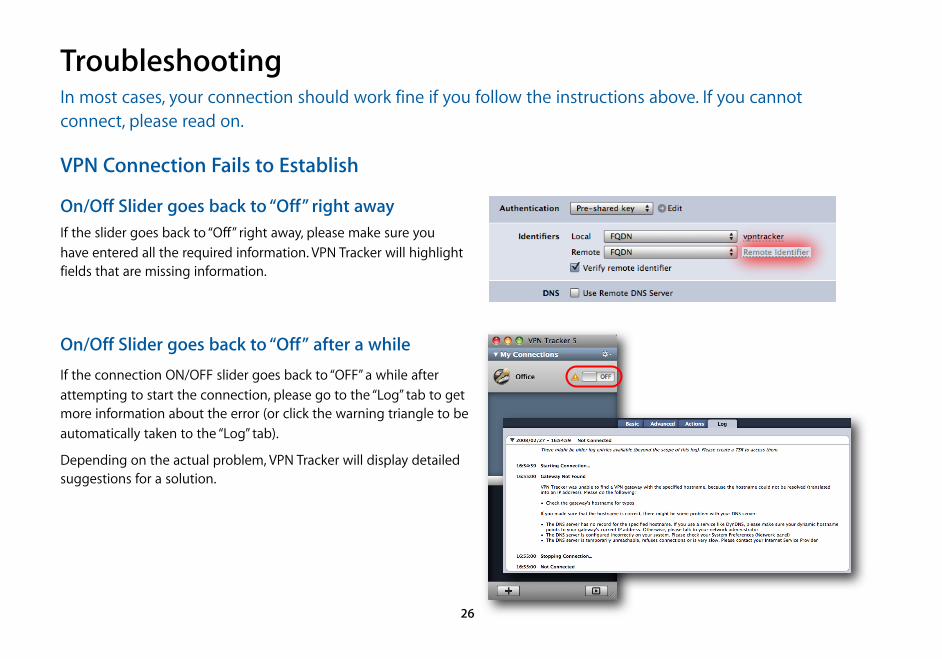
TroubleshootingIn most cases, your connection should work fine if you follow the instructions above. If you cannot connect, please read on.
VPN Connection Fails to Establish
On/Off Slider goes back to “Off” right awayIf the slider goes back to “Off” right away, please make sure you have entered all the required information. VPN Tracker will highlight fields that are missing information.
On/Off Slider goes back to “Off” after a while
If the connection ON/OFF slider goes back to “OFF” a while after attempting to start the connection, please go to the “Log” tab to get more information about the error (or click the warning triangle to be automatically taken to the “Log” tab).
Depending on the actual problem, VPN Tracker will display detailed suggestions for a solution.
26
VPN Connection Seems to Be Connected, but no Resources Can Be Accessed If the connection slider goes to ON and turns green, but you cannot access resources (servers, email, etc.) in the VPN, please check the following points.
Connect by IP address instead of host nameIf you are not connecting to the resource by IP address (e.g. 192.168.1.42), but are using a host name (e.g. server.example.com), please try using the resource’s IP address instead. If the connection works when using the IP address, but not when using a host name, please make sure that your Mac’s DNS server or the “Remote DNS” server that you have configured in VPN Tracker is able to resolve this host name to an IP address.
Check if the IP address is part of the remote networkPlease make sure that the IP address of the resource that you are connecting to is actually contained in the remote network. Also double-check the network mask that you have configured for the remote network in VPN Tracker.
Run the VPN Environment ManagerIn many local network your Mac will be behind a router that performs Network Address Translation (NAT). For a VPN connection to be established through such a router, VPN Tracker can use one of three different methods, but not all of them may be supported by your local router or your VPN gateway. In that case, your VPN connection may seem connected, but no connections to servers or other resources in the VPN are possible. VPN Tracker includes a tool to detect the right method for the local network:
‣ Stop all running VPN connections
‣ Select “Help > VPN Environment Manager”
‣ Click on “Continue”
Tip The network mask (e.g. 255.255.255.0) determines the size of a network. Some examples: The network 192.168.1.0/255.255.255.0 contains all IP addresses starting with 192.168.1.x. The network 192.168.1.0/255.255.255.255 contains only a single IP address, 192.168.1.0.
27
‣ Wait until VPN Tracker has performed the tests
‣ Try to start the connection again
Further Questions?You can find the latest news and compatibility information on our support and FAQ website:
http://www.equinux.com/support
If you need to contact equinux technical supportIf you can’t resolve your issue with the information available on our website or in this guide and would like to contact Technical Support through our website, please be sure to include at least the following information:
‣ The manufacturer and model of the VPN gateway
‣ A Technical Support Report from VPN Tracker (Help > Generate Technical Support Report)
‣ Screenshots of what you have configured on your VPN gateway, in particular all VPN settings
‣ A detailed description of the problem and the troubleshooting steps you have taken
Tip You will only have to run the VPN Environment Manager once for each location that you are using VPN Tracker at.
28
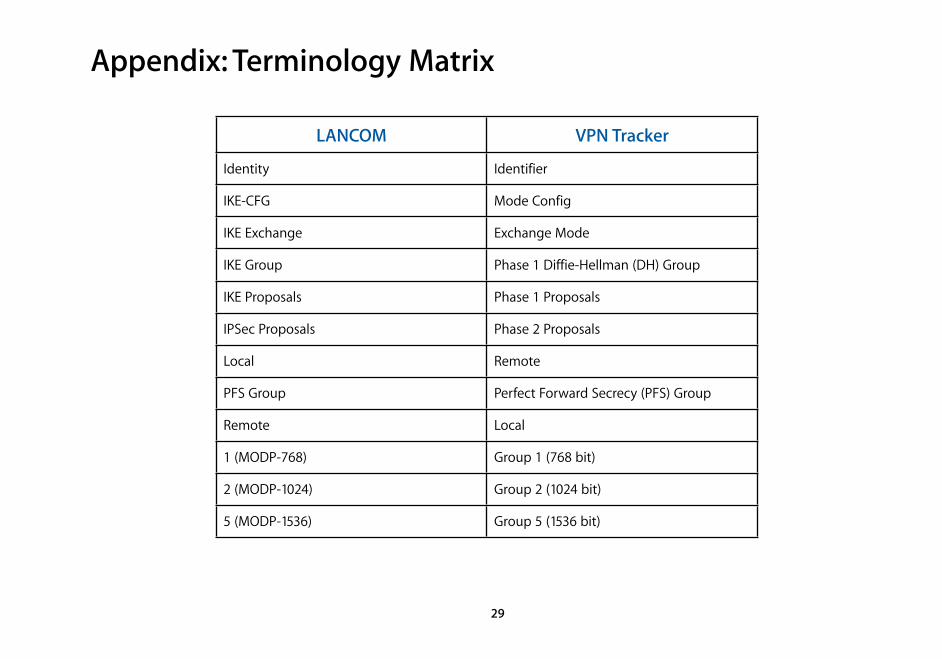
Appendix: Terminology Matrix
LANCOM VPN Tracker
Identity Identifier
IKE-CFG Mode Config
IKE Exchange Exchange Mode
IKE Group Phase 1 Diffie-Hellman (DH) Group
IKE Proposals Phase 1 Proposals
IPSec Proposals Phase 2 Proposals
Local Remote
PFS Group Perfect Forward Secrecy (PFS) Group
Remote Local
1 (MODP-768) Group 1 (768 bit)
2 (MODP-1024) Group 2 (1024 bit)
5 (MODP-1536) Group 5 (1536 bit)
29