Embed Size (px)
Citation preview

VOLUME 20 NO. 9 THE NATION'S LEADING CLINICAL NEWS MAGAZINE FOR DENTISTS SEPTEMBER 2001
AES 'HETICS
Stratdication: Ancient Art Form Applied to Restorative Dentistry By Douglas A.Terry, DDS; Edward A. McLaren, DDS
arquetry, also known as moaragh, derived from intar- sia or inlay, is the ar t and craft
of producing pictures and decorative designs by the skillful use of the grain, figure, and color of thin veneers of wood and other materials. In marquetry, the design is applied to a prepared base material, unlike the related craft of inlay where decorative bandings or designs are let into a solid item for embellishment. It is an ancient tech- nique for decorating the surfaces of fur- niture, as well as a versatile means of creative expression.
The marqueter makes complex pic- tures by carefully cutting different veneers of wood into various shapes. These precisely cut pieces are glued into a solid, stable surface. The finished product or picture is sanded and then polished, leaving a harmonious, inte- grated piece of art. Marquetry is basi- cally veneering executed in inlaid sheets. The art of veneering developed with early civilization, and produced richly grained effects and strength
--- Preaaration Design b
o = ochre
Figure 1. Diagram of preoperative occlusal registrations.
when used on structural parts that must be cut with the grain.
From the ancient techniques of mar- quetry in early civilization to the mod- ern techniques of restorative dentistry in the 21st century, the theories and uses for strength and beauty remain the same. Traditionally, the hybrid compos- ite resin was used for its strength and fracture resistance, whereas the micro-
fill was necessary to attain not only an improved polishability, but to maintain the durability of the polish.l>2 However, i t was soon discovered that this process of stratification provided another advantage, which was a variation in color. It is this variation and distribu- tion of color that creates the three dimensionality and the natural restora- tion.
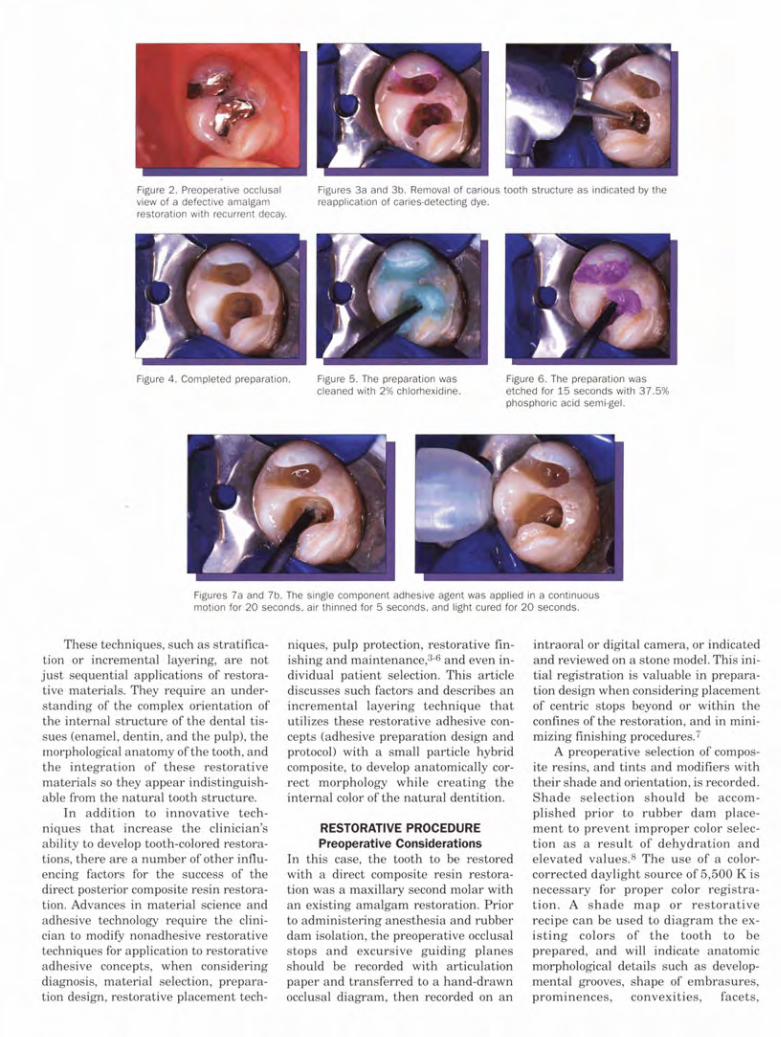
Figure 2. Preoperative occlusal view of a defective amalgam restoration with recurrent decay.
Figures 3a and 3b. Removal of carious tooth structure a s indicated by the reapplication of cariesdetecting dye.
Figure 4. Completed preparation. Figure 5. The preparation was cleaned with 2% chlorhexidine.
Figure 6. The preparation was etched for 15 seconds with 37.5% phosphoric acid semigel.
Figures 7a and 7b. The single component adhesive agent was applied in a continuous motion for 20 seconds, air thinned for 5 seconds, and light cured for 20 seconds.
These techniques, such as stratifica- tion or incremental layering, are not just sequential applications of restora- tive materials. They require an under- standing of the complex orientation of the internal structure of the dental tis- sues (enamel, dentin, and the pulp), the morphological anatomy of the tooth, and the integration of these restorative materials so they appear indistinguish- able from the natural tooth structure.
In addition to innovative tech- niques that increase the clinician's ability to develop tooth-colored restora- tions, there are a number of other influ- encing factors for the success of the direct posterior composite resin restora- tion. Advances in material science and adhesive technology require the clini- cian to modify nonadhesive restorative techniques for application to restorative adhesive concepts, when considering diagnosis, material selection, prepara- tion design, restorative placement tech-
niques, pulp protection, restorative fin- ishing and maintenance,3-6 and even in- dividual patient selection. This article discusses such factors and describes an incremental layering technique that utilizes these restorative adhesive con- cepts (adhesive preparation design and protocol) with a small particle hybrid composite, to develop anatomically cor- rect morphology while creating the internal color of the natural dentition.
RESTORATIVE PROCEDURE Preoperative Considerations
In this case, the tooth to be restored with a direct composite resin restora- tion was a maxillary second molar with an existing amalgam restoration. Prior to administering anesthesia and rubber dam isolation, the preoperative occlusal stops and excursive guiding planes should be recorded with articulation paper and transferred to a hand-drawn occlusal diagram, then recorded on an
intraoral or digital camera, or indicated and reviewed on a stone model. This ini- tial registration is valuable in prepara- tion design when considering placement of centric stops beyond or within the confines of the restoration, and in mini- mizing finishing procedures.7
A preoperative selection of compos- ite resins, and tints and modifiers with their shade and orientation, is recorded. Shade selection should be accom- plished prior to rubber dam place- ment to prevent improper color selec- tion a s a result of dehydration and elevated values.8 The use of a color- corrected daylight source of 5,500 K is necessary for proper color registra- tion. A shade map or restorative recipe can be used to diagram the ex- isting colors of the tooth to be prepared, and will indicate anatomic morphological details such as develop- mental grooves, shape of embrasures, prominences, convexities, facets,

angles, plane areas, or any other char- acteristics that can provide helpful information when reconstructing the tooth surfaces.9 Also, notations of the preoperative occlusal registrations can be useful when developing the preparation design and completing the final restoration. (See Figure 1.)
Isolation and Preparation Design
Once anesthesia was administered, the treatment site was isolated with a rub- ber dam to achieve adequate field con- trol and protect against contamina- tion.loJl Upon removal of the existing amalgam restoration (Figure 21, a caries-disclosing solution (SeeWSable Seek, Ultradent) aided in the detection and identification of the irreversible infected carious tissue, and served as a guide for its removal.lzJ3 The carious dentin was removed with a slow-speed carbide round bur No. 6 (Midwest) and spoon excavators (Figures 3a and 3b).
The occlusal outline was only ex- tended to include carious enamel, pro- vide access to the carious dentin, re- move any residual amalgam staining, and provide access for the application of restorative materials (Figure 4). The healthy tooth structure should be removed only when the occlusal outline requires extension to a point beyond or within the previously indicated func- tional stops. The adhesive preparation design requires maximum preservation of remaining tooth structure, and there is no extension for prevention. The pre- paration is limited to access to the le- sion or defect, because composite re- quires less volume to resist clinical frac- ture than amalgam.14J5 The width of the preparation should be as narrow as possible, because the wear resistance of the restoration is a direct function of dimension.3 Also, increased bucco-lin- gual width of the preparation can tres- pass into the centric holding areas. To allow for a better resin adaptation, all internal line angles should be rounded and cavity walls smooth.16 The occlusal cavosurface margin should not be bev- eled because it increases the width of the preparation and may infringe on the centric holding area, increasing the wear rate of the restoration.3 Beveling should be restricted to the gingival and proximal margins when there is enamel present to increase the potential for bonding. This increases the fracture re- sistance by increasing the bulk of the restoration, increases the bonding sur-
face area, and decreases microleakage by exposing the enamel rods for etch- ing.17
Adhesive Protocol The preparation was completed with a finishing diamond and cleaned with a 2% chlorhexidine solution (Consepsis, Ultradent) (Figure 5) rinsed, and lightly air dried. The "total e t c h technique was used to minimize the potential of microleakage and enhance bond strength to dentin and enamel.18-20 The preparation was etched for 1 5 seconds with 37.5% phosphoric acid (Gel Etchant, KerrlSybron) (Figure 61, rinsed for 5 seconds, and gently air dried for 5 seconds. A single-component adhesive (OptiBond Solo Plus, Kerrl Sybron) was applied with a disposable applicator for 20 seconds with a continuous motion, reapplying every 5 seconds. Any excess was removed with the applicator, and the agent was light cured for 20 seconds (Figures 7a and 7b).
Although a small amount of excess adhesive can be applied over the mar- gins to improve sealing, this excess should be removed during finishing pro- cedures.
Studies have demonstrated that the pulp tissue possesses the inherent abili- ty to repair, heal, and form reparative mineralized bridges under several re- storative materials,4+21 and recent indi- cations have revealkd that the failure of composite restorations may be related to the sealing and adaptation of the tooth-restorative interface. Therefore, bacterial infiltration and microleakage has been attributed as a major factor in the pulpal inflammation and necrosis of exposed vital dentin, regardless of the selection of the restorative material applied to the dentin or the pulp.4,22 However, the use of non-adhesive re- storative materials, such as calcium hydroxide as a protective agent, may generate a gap a t this interface, result- ing in a colonization by bacteria andlor acting as a hydraulic pump, stimulating the flow of tubular fluid inward, and this pressure may be responsible for postoperative sensitivity upon mastica- tion.4.23.24 The hybridization of the exposed dentin with an adhesive system is now considered the most effective way of protecting this pulp-dentin inter- face, and bonding the composite resin to the tooth structure provides resistance to microleakage and retention to the restoration, regardless of the depth of the preparation.4125-28
The Cavity Liner The use of flowable composites as a stress-absorbing lining material be- tween the adhesive system and the restorative composite resin has been suggested for large restorations.29 The combination of flowables and viscous composite ensures a more intimate con- tact with the dentin-bonding agent because of the lower viscosity, and has resulted in enhanced internal adapta- tion.30 Because of low modulus, these composites act as an elastomer and buffer the polymerization shrinkage stress by flow, which theoretically eliminates cuspal deformation or gap formation, with reduced micro- leakage.31 Therefore, if the elastic mod- ulus is low, the composite will stretch to accommodate the inherent modulus of the tooth, and the internal layer may absorb polymerization shrinkage stress of the resin composite by elastic elonga- tion.25J2 Also, these lower viscosity flowables may enhance the wetting capacity30 of the restoration, resulting in a more complete interfacial internal adaptation, and may reduce the fonna- tion of voids, which can contribute to a weakened surface and microleakage.
An A-3 shaded flowable composite (Revolution, Kerrl Sybron) was injected as the syringe tip was slowly removed, and uniformly distributed with a dycal applicator (DentsplyICaulk) (Figures 8a and 8b). This technique reduces the pos- sibility of entrapping bubbles, and en- sures optimal adaptation of the resin material to the adhesive interface. A small increment, 1 to 2 mm in thick- ness, was applied to the pulpal floor of the class I cavity preparation. The incre- ment was light cured for 10 seconds using the boost mode (Optilux 501, SybronIKerr).
The Incremental Layering Technique
Incremental layering has been advocat- ed for use in large composite restora- tions to avoid the limitation of depth of cure, to reduce the effects of polymeriza- tion shrinkage, and to enhance the aes- thetic results from the multi-layering of color.33,34 However, i t is the anatomy of the tooth that should guide the clinician in developing the correct interpretation of form and color. Incremental layering with successive layers of dentin and enamel composite creates high diffusion layers, which allows an optimal light transmission within the restoration,
Figures 8a and 8b. A flowable composite resin is applied as a cavity liner with a syringe applicator and uniformly distributed with a dycal applicator, then light cured for 40 sec- onds.
Figures 9a, 9b, and 9c. Each artificial dentin layer is applied in increments using a lateral condensation technique and light cured for 10 seconds using the boost mode.
Figure 10. A diluted ochre tint was Figure 11. The final artificial enam- placed with an endodontic file into el layer, a clear translucency shad- the final invagination of the body ed T-1 is applied with a curved layer and light cured for 10 sec- instrument. onds in the boost mode.
providing a more realistic depth of color, as well as natural surface and optical characteristics. The polychromatic effect is achieved by stratifying variations in shades and opacities of the restorative composite. Because of the variations in natural teeth, the combinations of dif- ferent composite shades must be applied in relationship to the natural tissue anatomy, and specifically adapted to individual clinical situations. The fol- lowing technique utilizes both the incre- mental layering of composite and the stratification of color to create a natural chromatic integration.35
The cavity preparation was filled incrementally, utilizing an A-2 shaded hybrid composite (Point 4, KerrISybron) from the preoperative shade-mapping diagram. Each increment was gently con- densed with a clean, nonsticlung compos- ite condenser to ensure complete adap-
tation to the underlying resin and tooth structure. Each increment was light cured for 10 seconds using the boost mode (Optilux 501, KerrISybron) (Figures 9a, 9b, and 9c). To reduce the possibility of cuspal flexure, a compos- ite hybrid with a low volumetric poly- merization shrinkage should be se- lected.36 Additionally, this problem may be reduced by a diagonal layering of the hybrid in increments of 1 mm, and feathering the material up the cavity wall in a "V" shape.37~38 Opposing enamel walls should not be contacted by the same increment,39 as this will minimize the wall-to-wall shrinkage and thus reduce intercuspal stress.40 The application of the compos- ite in oblique layers results in fewer contraction gaps a t the margins. Continue to condense and shape the composite resin to correspond to cusp
development and dentin replacement. Once the artificial dentin layer was
developed, a final preocclusal layer was invaginated with an interproximal instrument (Cosmedent) while still soft. It is important to anticipate the final result, not trespass in the final artificial enamel zone, and allow space for the overlying translucent enamel shade. The internal characteristics (creation of pits and fissures, staining of grooves, or the creation of internal color within the restoration) are applied using a No. 08 endodontic file or fine sable brush. An ochre-tinted resin was applied in the previously formed invagination to corre- spond to the preoperative shade dia- gram (Figure 10). If the chroma is too high i t can be diluted with an untinted resin and a small brush, or removed with a clean applicator tip. The tint and the final dentin layer were polymerized
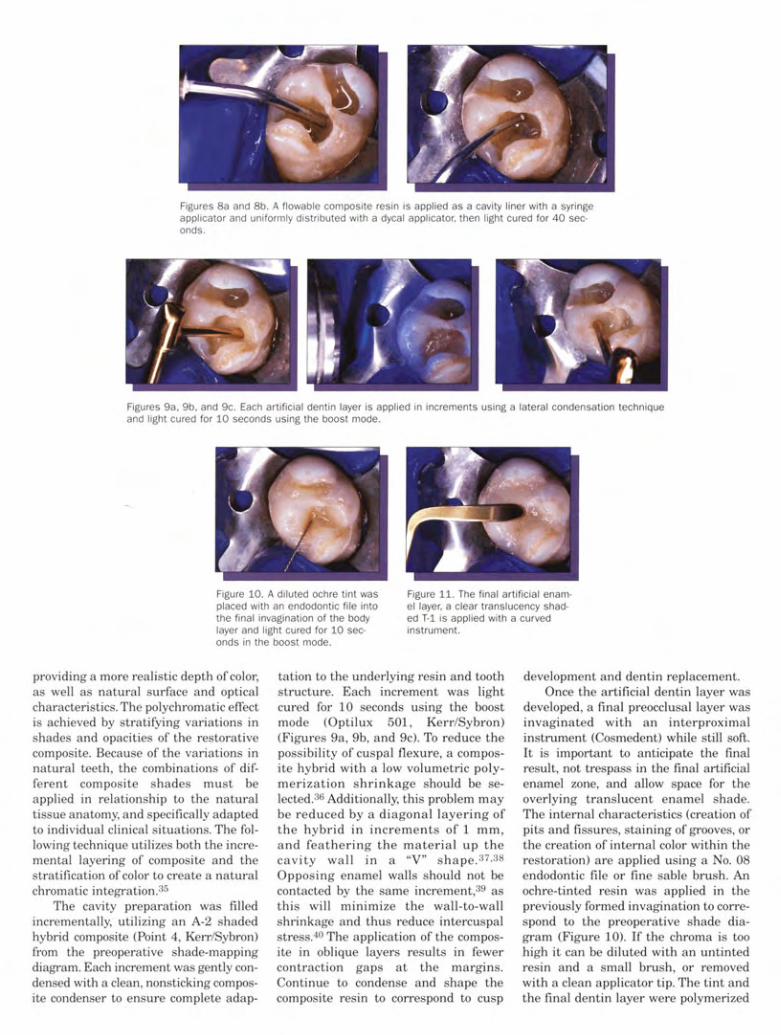
Figure 12. Occlusal equilibration was accomplished with a No.12 and No.30 egg-shaped finishing bur. Figures 13a and 13b. The final polishing was completed
with silicone rubber points and a brush with impregnated bristles.
for 10 seconds in the boost mode (Optilux 501, KerrISybron), or 40 sec- onds for curing lights with lower power output.
The enamel or the artificial enamel layer is the principal determinant of the value of the tooth or the restoration,41 and this can be varied by the thickness of this layer. The enamel is colorless, but through its network of rods acts as a fiber-optic conduit and projects the underlying color found in the dentin. The small particle hybrid (Point 4, Kerr/Sybron) used in developing this restoration has - three translucent shades. The T-1 shaded composite is a clear translucency, T-2 is a yellow translucency, and T-3 is a gray translu- cency. A translucent incisal shaded hybrid composite - 1 Point 4, KerrISybron) was sculpted with a curved metal instrument (Figure 111, and smoothed with a sable brush to the functional and anatomical occlusal mor- phology. Developing the restoration in increments and considering the occlusal morphology and occlusal stops allows the clinician to minimize finishing pro- cedures and results in a restoration with improved physical and mechanical characteristics with less microfracture.
After placing the last layer of com- posite and prior to final cure, an oxygen inhibitor, glycerin (Insure, Cosmedent), or De-Ox (Ultradent) is applied in a thin layer with a brush to the surface of the restoration and light cured for a 2- minute post-cure.
Finishing and Polishing Procedure As discussed previously, a thorough pre- operative occlusal registration and care- ful shaping of the composite resin to those confines prior to curing facilitates the establishment of anatomic morphol- ogy and minimizes the finishing proto- col.7 However, a proper meticulous fin-
ishing protocol may increase the longevity of the restoration.42343 To reproduce the shape, color, and luster of the natural dentition44 while enhancing the aesthetics and longevity of the restoration, the following protocol was implemented.
To replicate the natural anatomical form and texture, the initial contouring was performed with a series of finishing burs. The occlusal refinement is achieved with 12 and 30 fluted egg- shaped finishing burs (BluWhite dia- monds and carbides, Nos. 7406 and 9406, KerrISybron), closely observing the tooth-resin interface and using a dry protocol. The lingual surface was fin- ished with 12 and 30 fluted needle- shaped burs (BluWhite diamonds and carbides, Nos. 7714 and 9714, KerrISybron). After the initial finishing procedure, the margins and surface defects were sealed. All accessible mar- gins were etched with a 37.5% phos- phoric acid semi-gel, rinsed, and dried. A composite surface sealant (Opti- Guard, KerrISybron) was applied and cured to seal any marginal gaps or microscopic porosities that may have formed during the finishing procedures. The rubber dam was removed and the patient was asked to perform closure without force, and then centric, protru- sive, and lateral excursions. Any neces- sary occlusal equilibration was accom- plished with 12 and 30 egg-shaped fin- ishing burs (Figure 12), and the final polish was repeated.
The final polish was initiated with silicone rubber points or cups, which are composed of aluminum oxide particles and silicone that pennit surface defects to be effectively eliminated. The defini- tive polish was accomplished with a brush with impregnated bristles (Jiffy Brushes, Ultradent) (Figures 13a and 13b) a t a low speed and light pressure,
Figure 14. Postoperative occlusal view of the definitive restoration reflects the harmonious integra- tion of anatomical form and inter- nal depth of color.
under water irrigation and air spray. The contact was tested with unwaxed floss to ensure the absence of sealant in the contact zone, and the margins inspected.
The surface quality of the composite is not only influenced by the polishing instruments and polishing pastes, but also by the composition and the filler characteristics of the composite. The newer formulations of composites with smaller particle size, shape, and orien- tation provide a level of polishability that is comparable to porcelain and enamel. Although clinical evidence of polishability with these new small par- ticle hybrids appears promising, the long- term durability of the polish will need to be evaluated in future clinical tri- als.
The postoperative result achieved through the use of direct composite resin reflects the harmonious integration of anatomical form and internal depth of color (Figure 14). Therefore, by under- standing the total morphology of a tooth and using natural teeth as the basis for morphological thinking, the clinician can create restorations with a more natural appearance.45
CONCLUSION This article proposes a thorough and methodical protocol for the incremental application of composite resin in the restoration of posterior teeth. However, the success of free-hand bonding of com- posite resin in posterior teeth is not the result of learning an innovative tech- nique. The process requires an integra- tion of various elements of restorative dentistry. The restorative dentist must have a knowledge of restorative materi- als, color, the internal structures of the tooth, adhesive preparation designs, and protocol. This knowledge must be inte- grated with the proper technique for each

clinical situation, and requires the clini- cal experience and judgment of the oper- ator.
Perhaps, some years ago, a dentist or a scientist watched a marqueter making complex pictures by carefully cutting dif- ferent veneers of wood into various shapes, and gluing these precisely cut pieces into a solid, stable surface. Maybe, watchlng how the finished product was sanded and polished, leaving a hanno- nious, integrated piece of art, gave the dentist an idea of how to use the same technique in the field of dentistry. A good clinician, like a good marqueter, improves hidher art form by becoming knowledge- able of all aspects of hidher profession, learning from the past and utilizing the advances of technology. Possibly the ancient art fonn of marquetry was the basis for the techniques of application in restorative dentistry, or perhaps the sim- ilarity is only a coincidence. +
References 1. Larson TD. Techniques for achieving realistic color dis-
tribution in large composite resin restorations. J Am Dent Assoc. 1986;112:669-672.
2. Bayne SC, Heymann HO, Swifl EJ Jr. Update on den- tal composite restorations. J Am Dent Assoc. 1994;125:687-701.
3. Leinfelder KF. Using composite resin as a posterior restorative materia!. J Am Dent Assoc. 1991;122:65- 70
4. Baratieri LN, Ritter AV, Perdigao J, et al. Direct posteri- or composite resin restorations: Current concepts for the technique. Pract Periodontics Aesthet Dent. 1998;10:875-886.
5. Ferracane JL. Using posterior composites appropriate- ly. J Am Dent Assoc. 1992;123:53-58.
6. Liebenberg WH. Posterior composite resin restorations: operative innovations. Pract Periodonics Aesthet Dent 1996;8:769-778.
7. Liebenberg WH. Successive cusp build-up: an improved placement technique for posterlor direct resin restorations. J Can Dent Assoc. 1996;62:501-507.
8. Fahl N Jr, Denehy GE, Jadtson RD. Protocol for pre- d~ctable restoration of anterior teeth with composite reslns. Pract Periodontks Aesthet Dent. 1995;7:13-21.
9. Baratieri LN, Monteiro S Jr, de Andrada MAC, et al.
Composite resin veneers: a new technique. Quintessence Int. 1992;23:237-243.
10. Croll Tt? Alternative methods for use of the rubber dam. Quintessence Int. 1985;16:387-392.
11. Liebenberg WH. General field isolation and the cemen- tation of indirect restorations: part 1. J Dent Assoc of S Afr. 1994;49:349-353,
12. Hornbrook DS. Optimizing form and function with the direct posterior composite resin: a case report. Pract Periodontics Aesthet Dent. 1996; 8:405-411.
13. Kidd EAM, Joyston-Bechal S, Beighton D. The use of a caries detector dye during cavity preparation: a microbiological assessment. Br Dent J. 1993;174:245- 248.
14. Sturdevant CM, Roberson TM, Heymann HO, et al. The Art and Science of Operative Dentistry 3rd ed. St. Louis, Mo. Mosby-Year Book; 1995.
15. Leinfelder KF. A conservative approach to placing pos- ter~or composite resin restorations. J Am Dent Assoc. 1996;127:743-748.
16. Small BW. Direct posterior composite restorations - state of the art 1998. Gen Dent. 1998;46:26-32.
17. Strassler HE. Esthetic posterior restorations: direct composite resins. J Esthet Dent. 1992;4:216-220.
18. Kanca J Ill. Improving bond strength through acid etching of dentin and bonding to wet dentin surfaces. J Am Dent Assoc. 1992;123:35-43.
19. Nakabayashi N, Nakamura M, Yasuda N. Hybrid layer as a dentin-bonding mechanism. J Esthet Dent. 1991 ;3:133-138.
20. Kanca J Ill. Resin bonding to wet substrate. II. Bonding to enamel. Quintessence Int. 1992;23:625- 627.
21. Cox CF, Bergenholtz G, Heys DR, et al. Pulp capping of dental pulp mechanically exposed to oral microflo- ra: a 1-2 year observation of wound healing in the monkey. J Oral Path011 985; 14:156-168.
22. Bergenholtz G, Cox CF, Loesche WJ, et al. Bacterial leakage around dental restorations: its effect on the dental pulp. J Oral Pathol. 1982;11:439-450.
23. Goracci G, Mori G. Scanning electron microscopic eval- uation of resin-dentin and calcium hydroxide-dentin interface with resin composite restorations. Quint Int. 1996;27:129-135.
24. Brannstrom M. Sensitivity of dentine. Oral S u g Oral Med Oral Pathol. 1966;21:517-526.
25. Van Meerbeek B, Perdigao J, Lambrechts F: et al. The clinical performance of adhesives. J Dent. 1998;26:1- 20.
26. Cox CF, Suzuki S. Re-evaluating pulp protection: calci- um hydroxide liners vs. cohesive hybridization. J Am Dent Assoc. 1994;125:823-831.
27. Cox CF, Keall CL, Keall HJ, et al. Biocompatibility of sur- face-sealed dental materials against exposed pulps. J Prosthet Dent. 1987;57:1-8.
28. Cox CF, Siibay RK, Suzuki S, et al. Biocompatibility of various dental materials: pulp healing with a surface seal. Int J Periodontics Restorative Dent. 1996;16:241- 251.
29. Estafan AM, Estafan D. Microleakage study of flowable composite resin systems. Compendium. 2000;21:705-
708,710,712. 30. Frankenberger R, Kramer N, Pelka M, et al. Internal
adaotation and overhana formation of d~rect class II resi" composite restGations. Clin Oral Invest. 1999;3:208-215.
31. Prager MC. Using flowable composites in direct poste- rior restorations. Dent Today 1997;16:62-68.
32. Lindberg A, van Dijken J W , Horstedt P. Interfacial adaptation of a class II polyacid-modified resin com- positelresin composite laminate restoration in vivo. Acta Wont01 Scand. 2000;58:77-84.
33.Tjan AHL, Glancy JF. Effects of four lubricants used during incremental insertion of two types of visible light- activated composites. J Prosthet Dent. 1988; 60:189- 194.
34. Kovarik RE, Ergle JW. Fracture toughness of posterior composite resins fabricated by incremental layering. J Prosthet Dent. 1993;69:557-560.
35. Vanini L, De Simone F, Tammaro S. Indirect composite restorations in the anterior region: a predictable tech- nique for complex cases. Pract Periodontics Aesthet Dent. 1997;9:795-802.
36. Rees JS, Jacobsen PH. Restoration of posterior teeth with composite resin 1: direct-placement composite. Dent Update. 1996;23:406-410.
37. Eakle WS, Ito RK. Effect of insertion technique on microleakage in mesio-occlusodistal compos~te resin restorations. Quintessence Int. 1990;21:369-374.
38. Duke ES. Direct posterior composites. J Indiana Dent ASSW. 1993;72:35-39.
39. Wieczkowski G Jr, Joynt RB, Klodcowski R, et al. Effects of incremental versus bulk fill technique on resistance to cuspal fracture of teeth restored with pos- terior composites. J Prosthet Dent. 1988; 60:283-287.
40. Hansen EK. Effect of cavity depth and application tech- nique on marginal adaptation of resins in dental cavi- ties. J Dent Res.1986;65:1319-1321.
41. Muia PJ. Esthetic Restorations: Improved Dentist- Laboratory Communication. Carol Stream, Ill: Quintessence Publishing; 1993:86-87.
42. Jefferies SR, Barkmerier WW, Gwinnett AJ.Three com- posite finishing systems: a multisite in vitro evaluation. J Esthet Dent. 1992;4:181-185.
43. Goldstein RE. Finishing of composites and laminates. Dent Clin North Am. 1999;33:305-318.
44. Strasseler HE. Polishing composite resins. J Esthet Dent. 1992;4:177-185.
45.Yamamoto M, Miyoshi Y, Kataoka S. Fundamentals of esthetics: contouring techniques for metal ceramic restorations. Quintessence Dent Technol. 199011991 ;14-81.
Dr. Terry is assistant professor, Department of Restorative Dentistry and Biomaterials, University of Texas Health Science Center at Houston, Tex. He is an adjunct faculty member at the UCLA Center For Esthetic Dentistry. He maintains a private practice limited to aesthetic and restorative dentistry in Houston.
Dr. McLaren is director, UCLA Center for Esthetic Dentistry, and The Center For Esthetic Dental Design at UCLA School of Dentistry. He maintains a pri- vate practice limited to prosthodontics and aesthetic dentistry.