Embed Size (px)
Citation preview
Service No : 000 102 04 2536
EVO-CHR
Hardware Ver: 4
Firmware Ver: 2.0Date: xx-xx
INTERFACE MODULE
Made in CanadaPATENTS PENDING US: 2007-228827-A1
SOUNDSTREAM.COM/SECURITY
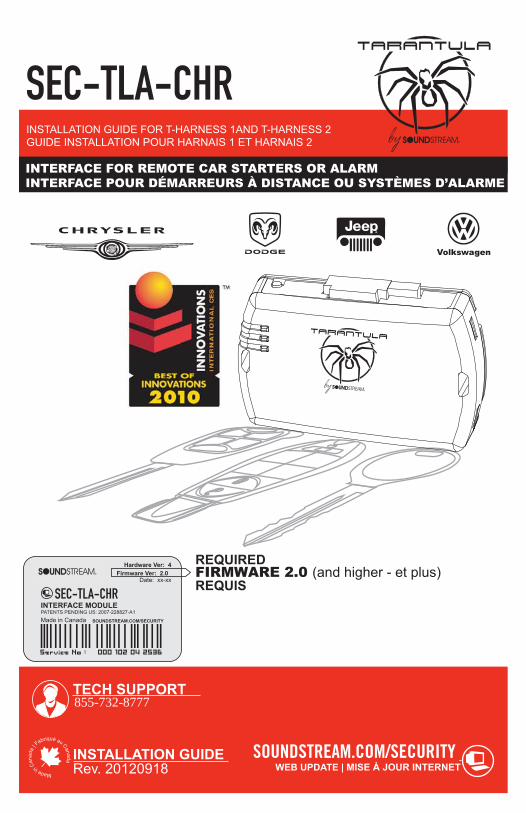
INSTALLATION GUIDERev. 20120918 WEB UPDATE | MISE À JOUR INTERNET
Volkswagen
TECH SUPPORTTél: 514-255-HELP (4357) 1-877-336-7797Fax: 514-255-1367
GUIDE INSTALLATION POUR HARNAIS 1 ET HARNAIS 2
T1
INSTALLATION 1AND T-HARNESSGUIDE FOR T-HARNESS 2
INTERFACE FOR REMOTE CAR STARTERS OR ALARMINTERFACE POUR DÉMARREURS À DISTANCE OU SYSTÈMES D’ALARME
ALLE O CHR T2
FIRMWARE 2.0 (and higher - et plus)REQUIRED
REQUIS
SEC-TLA-CHR
SEC-TLA-CHR
SOUNDSTREAM.COM/SECURITY
855-732-8777
EVO-CHR T1 (THAR-CHR1) Page 2 ALLE O CHR
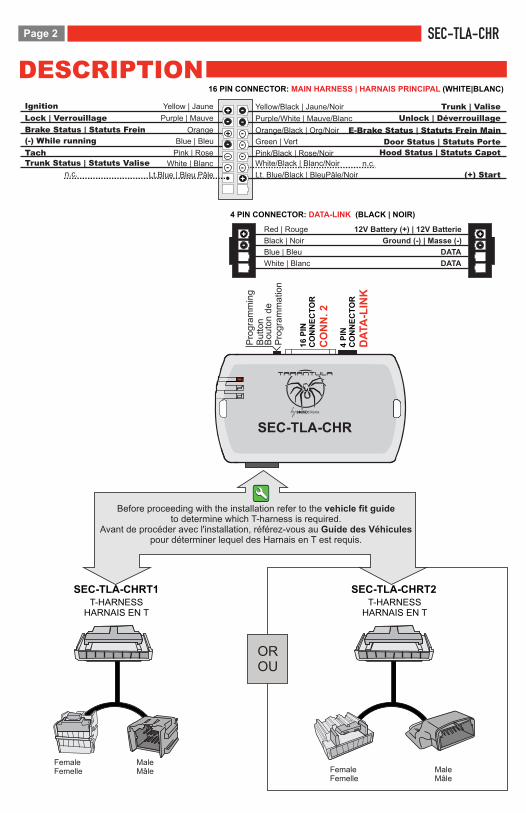
DESCRIPTION
Blue | Bleu
Black | Noir
Red | Rouge
4 PIN CONNECTOR: DATA-LINK (BLACK | NOIR)
White | Blanc
DATA
Ground (-) | Masse (-)
12V Battery (+) | 12V Batterie
DATA
16 PIN CONNECTOR: (WHITE|BLANC) MAIN HARNESS | HARNAIS PRINCIPAL
Pro
gra
mm
ing
Bu
tto
nB
ou
ton
de
Pro
gra
mm
atio
n
Lt.Blue | Bleu Pâle
White | BlancPink | Rose
Blue | Bleu
Orange
Purple | Mauve
Yellow | Jaune
Trunk Status Valise | Statuts
(-) While running
Lock | Verrouillage
Ignition
Brake Status | Statuts Frein
Tach ~
(+) Start
Hood Status Capot | Statuts Door Status Porte | Statuts
E-Brake Status Frein Main | Statuts
Unlock | Déverrouillage
Trunk | Valise
Lt. Blue/Black | BleuPâle/Noir
White/Black | Blanc/NoirPink/Black | Rose/Noir
Green | Vert
Orange/Black | Org/Noir
Purple/White | Mauve/Blanc
Yellow/Black | Jaune/Noir
n.c.n.c.
CO
NN
. 2
16 P
IN
CO
NN
EC
TO
R
DA
TA-L
INK
4 P
IN
CO
NN
EC
TO
R
T-HARNESSHARNAIS EN T
SEC-TLA-CHRT1T-HARNESS
HARNAIS EN T
SEC-TLA-CHRT2
Before proceeding with the installation refer to the vehicle fit guide to determine which T-harness is required.
Avant de procéder avec l'installation, référez-vous au Guide des Véhicules pour déterminer lequel des Harnais en T est requis.
SEC-TLA-CHR
MaleMâle
FemaleFemelle
8
1
MaleMâle
FemaleFemelle
OROU
SEC-TLA-CHR

PT Cruiser
Routan
300-300c
Aspen
Crossfire
Sebring
AvengerCaliber
Charger
Town and Country
Dakota
Durango
Journey
MagnumNitroRAM
Commander
Compass
Grand Cherokee
Liberty
PatriotWrangler
Challenger
A B
Grand Caravan
2004
2005
2006
2007
2008
2009
2010
Unlo
ck
Arm
Dis
arm
Tru
nk/
Hatc
h
Door
Trigger
Slid
ing d
oor*
Lo
ck
Foot B
rakeYEARS | ANNÉES
Hand B
rake
Tru
nk/
Hatc
h T
rigger
Tach
om
ete
r
VEHICLE FUNCTIONALITY (IF EQUIPPED)FONCTIONS S’APPLIQUENT SI LE VÉHICULE EN EST ÉQUIPÉ
Ve
rro
uill
ag
e
D/v
err
ouill
age
Arm
e
Désa
rme
Valis
e/H
ayo
n
Conta
ct p
ort
e
RA
P D
isable
Sta
rt D
ata
Aci
tveR
AP
Port
e c
oulli
ssante
*
Fre
in à
pie
d
Fre
in à
main
Conta
ct V
alis
e/H
ayo
n
Tach
ymetr
e
VEHICLEFIT GUIDE
With
Da
ta-L
ink
Ave
c D
ata
-Lin
k
With
ou
t D
ata
-Lin
kS
an
s D
ata
-Lin
k
2011
E F
C DE FE F
C D
E F
E F
C** D**
D**
E F
E F
E F
E F
E F
C D
C D
C D
C D
C D
C D
C D
C D
C D
Imm
obili
zer
Byp
ass
Conto
urn
e Im
mobili
.
C D
A B
A B
A B
A BA B
A B
A B
A B
A B
C**
Pro
gra
mm
ing
2
122
1
2
2
1
1
2
2
2
2
2
1
1
1
1
1
1
1
1
11
1
1
1
1
11
1
1
1
1
1Déterminez si le démarreur à distance ou système d'alarme est compatible en Data-Link 2-voies.
Determine if the remote-starter or alarm system supports 2-way Data-Link.
VOLKSWAGEN
DODGE
JEEP
CHRYSLER
Page 3
A B & SEC-TLA-CHRT1 C, D, E F & SEC-TLA-CHRT2
*Sliding Door in Data-Link mode only *Porte couilissante en mode Data-Link seulement** See note on the configuration. ** Voir la note dans la configuration.www : Visit SOUNDSTREAM.COM/SECURITY to download an installation guide for this specific vehicle. Visitez le SOUNDSTREAM.COM/SECURITY pour télécharger un guide d'installation spécifique à ce véhicule.
DC 1
CONNECTION
www
www
200
20
12
C D 1
04 05 06 07 08 09 10 11 12
04 05 06 07 08 09 10 11 12
04 05 06 07 08 09 10 11 12
04 05 06 07 08 09 10 11 12
www
Gas
BA 1
EVO-CHR T1 (THAR-CHR1)
OUTPUT | SORTIE INPUT | ENTRÉE
12V
Batt
ery
| 1
2V
Batt
eri
e
Lt.Blue | Bleu Pâle
White | BlancPink | Rose
Blue | Bleu
Orange
Purple | Mauve
Yellow | Jaune
Trunk Status Valise
Ignition
Brake Status Frein
Tach~
Hood Status Capot
Door Status PorteE-Brake Status Frein Main
Lt. Blue/Black | BleuPâle/Noir
White/Black | Blanc/NoirPink/Black | Rose/Noir
Green | Vert
Orange/Black | Orange/Noir
Purple/White | Mauve/Blanc
Yellow/Black | Jaune/Noir
Park
ing L
ight
| Lum
ière
de S
tati
onnem
ent
Remote Starter or AlarmDémarreur ou alarme
n.c.
n.c.
1-way1-way
1-way
1-way
1-way
1-way
1-way
wire-to-wire
Only connect for 1-Way Data-LinkBranchez pour Data-Link 1-voie seulement
Always connectToujours branché
DATA-LINK
DA
TA C
AB
LE
DATAPORT
n.c.
n.c.
n.c.
n.c.
n.c.
DO NOT CONNECT ON THE VEHICLENE PAS BRANCHER SUR LE VÉHICULE
Page 4 ALLE O CHR
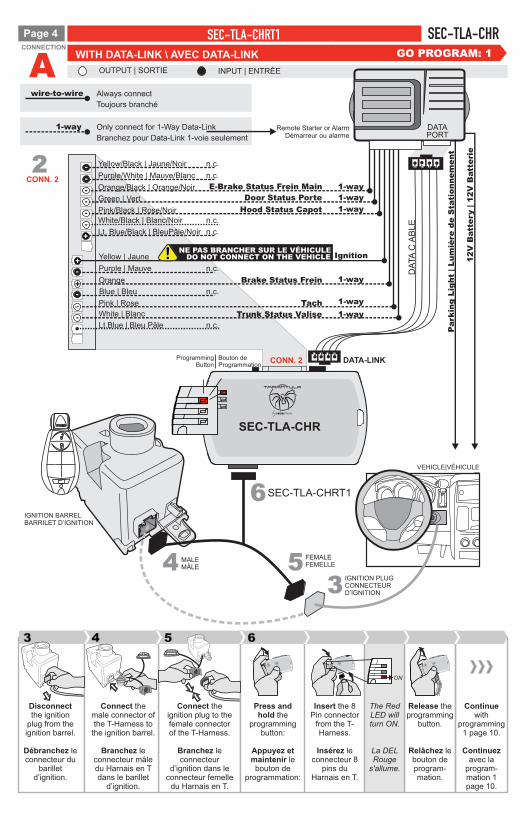
WITH DATA-LINK \ AVEC DATA-LINK
AEVO-CHR T1 (THAR-CHR1)
GO PROGRAM: 1
CONN. 22
CONNECTION
ProgrammingButton
Bouton deProgrammation
CONN. 2
VEHICLE|VÉHICULE
SEC-TLA-CHR
IGNITION BARRELBARRILET D’IGNITION
SEC-TLA-CHRT1
IGNITION PLUGCONNECTEUR D’IGNITION
FEMALEFEMELLE
MALEMÂLE4 5
6
Connect the ignition plug to the female connector of the T-Harness.
Branchez le connecteur
d’ignition dans le connecteur femelle
du Harnais en T.
Press and hold the
programming button:
Appuyez et maintenir le bouton de
programmation:
Insert the 8 Pin connector
from the T-Harness.
Insérez le connecteur 8
pins du Harnais en T.
Release the programming
button.
Relâchez le bouton de program-mation.
The Red LED will turn ON.
La DEL Rouge
s'allume.
ON
3
Connect the male connector of the T-Harness to
the ignition barrel.
Branchez le connecteur mâle du Harnais en T dans le barillet
d’ignition.
Disconnect the ignition
plug from the ignition barrel.
Débranchez le connecteur du
barillet d’ignition.
Continue with
programming 1 page 10.
Continuez avec la
program-mation 1 page 10.
4 5 6
3
SEC-TLA-CHRSEC-TLA-CHRT1
OUTPUT | SORTIE INPUT | ENTRÉE
Lt.Blue | Bleu Pâle
White | BlancPink | Rose
Blue | Bleu
Orange
Purple | Mauve
Yellow | Jaune
Trunk Status Valise
(-) While running
Lock | Verrouille
Ignition
Brake Status Frein
Tach~
(+) Start
Hood Status Capot
Door Status PorteE-Brake Status Frein Main
Unlock | Déverrouille
Trunk | Valise
Lt. Blue/Black | BleuPâle/Noir
White/Black | Blanc/NoirPink/Black | Rose/Noir
Green | Vert
Orange/Black | Org/Noir
Purple/White | Mauve/Blanc
Yellow/Black | Jaune/Noir
Park
ing L
ight
| Lum
ière
de S
tati
onnem
ent
12V
Batt
ery
| 1
2V
Batt
eri
eG
round | M
asse
Remote Starter or AlarmDémarreur ou alarme
n.c.
n.c.
CONN. 2
DO NOT CONNECT ON THE VEHICLENE PAS BRANCHER SUR LE VÉHICULE
2
Page 5
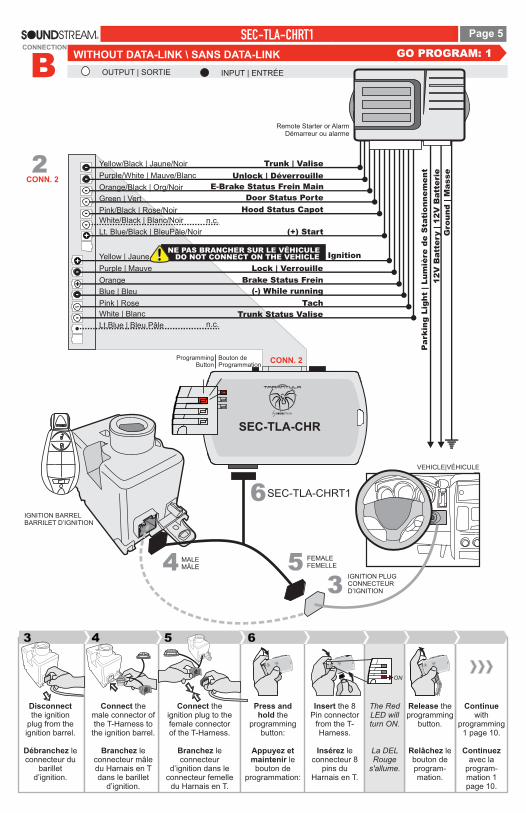
WITHOUT DATA-LINK \ SANS DATA-LINK
EVO-CHR T1 (THAR-CHR1)
GO PROGRAM: 1
BCONNECTION
ProgrammingButton
Bouton deProgrammation
CONN. 2
VEHICLE|VÉHICULE
IGNITION BARRELBARRILET D’IGNITION
SEC-TLA-CHRT1
IGNITION PLUGCONNECTEUR D’IGNITION
FEMALEFEMELLE
MALEMÂLE4 5
6
3
Connect the ignition plug to the female connector of the T-Harness.
Branchez le connecteur
d’ignition dans le connecteur femelle
du Harnais en T.
Press and hold the
programming button:
Appuyez et maintenir le bouton de
programmation:
Insert the 8 Pin connector
from the T-Harness.
Insérez le connecteur 8
pins du Harnais en T.
Release the programming
button.
Relâchez le bouton de program-mation.
The Red LED will turn ON.
La DEL Rouge
s'allume.
ON
3
Connect the male connector of the T-Harness to
the ignition barrel.
Branchez le connecteur mâle du Harnais en T dans le barillet
d’ignition.
Disconnect the ignition
plug from the ignition barrel.
Débranchez le connecteur du
barillet d’ignition.
Continue with
programming 1 page 10.
Continuez avec la
program-mation 1 page 10.
4 5 6
SEC-TLA-CHR
SEC-TLA-CHRT1
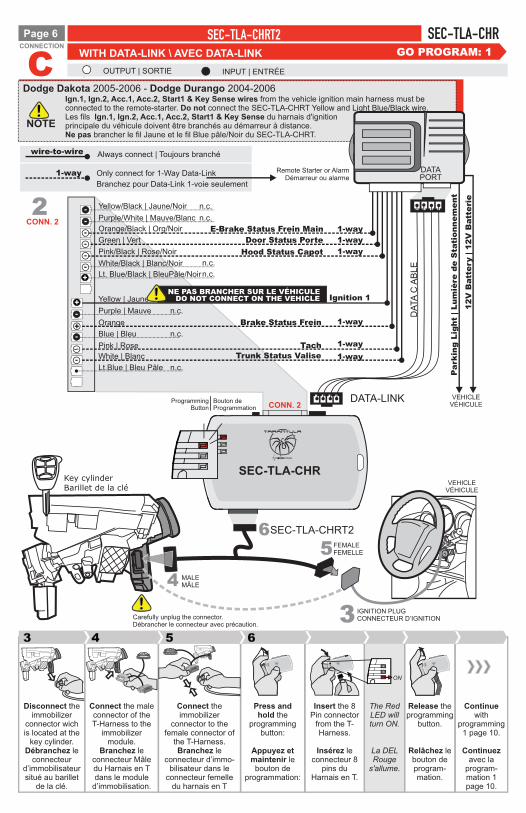
Ign.1, Ign.2, Acc.1, Acc.2, Start1 & Key Sense wires connected to the remote-starter. Do not connect the SEC-TLA-CHRT Yellow and Light Blue/Black wire.Les fils Ign.1, Ign.2, Acc.1, Acc.2, Start1 & Key Sense du harnais d'ignition principale du véhicule doivent être branchés au démarreur à distance. Ne pas brancher le fil Jaune et le fil Blue pâle/Noir du SEC-TLA-CHRT.
from the vehicle ignition main harness must be
NOTE
Dodge Dakota 2005-2006 - Dodge Durango 2004-2006
Connect the immobilizer
connector to the female connector of
the T-Harness.Branchez le
connecteur d’immo-bilisateur dans le
connecteur femelle du harnais en T
Press and hold the
programming button:
Appuyez et maintenir le bouton de
programmation:
Insert the 8 Pin connector
from the T-Harness.
Insérez le connecteur 8
pins du Harnais en T.
Release the programming
button.
Relâchez le bouton de program-mation.
The Red LED will turn ON.
La DEL Rouge
s'allume.
ON
Connect the male connector of the T-Harness to the
immobilizer module.
Branchez le connecteur Mâle du Harnais en T dans le module
d’immobilisation.
Disconnect the immobilizer
connector wich is located at the
key cylinder.Débranchez le
connecteur d’immobilisateur situé au barillet
de la clé.
Continue with
programming 1 page 10.
Continuez avec la
program-mation 1 page 10.
8
11
DATA-LINKProgrammingButton
Bouton deProgrammation CONN. 2
WITH DATA-LINKOUTPUT | SORTIE INPUT | ENTRÉE
ALLE O CHRPage 6
WITH DATA-LINK \ AVEC DATA-LINKC
EVO-CHR T2 (THAR-CHR2)
GO PROGRAM: 1
DA
TA C
AB
LE
12V
Batt
ery
| 1
2V
Batt
eri
e
Lt.Blue | Bleu Pâle
White | BlancPink | Rose
Blue | Bleu
Orange
Purple | Mauve
Yellow | Jaune
Trunk Status Valise
Brake Status Frein
Tach~
Hood Status Capot
Door Status PorteE-Brake Status Frein Main
Lt. Blue/Black | BleuPâle/Noir
White/Black | Blanc/Noir
Pink/Black | Rose/Noir
Green | Vert
Orange/Black | Org/NoirPurple/White | Mauve/Blanc
Yellow/Black | Jaune/Noir
Park
ing L
ight
| Lum
ière
de S
tati
onnem
ent
n.c.
1-way1-way
1-way
1-way
1-way
1-way
VEHICLEVÉHICULE
n.c.
n.c.
n.c.
n.c.
Ignition 1DO NOT CONNECT ON THE VEHICLENE PAS BRANCHER SUR LE VÉHICULE
n.c.
n.c.
Remote Starter or AlarmDémarreur ou alarme
1-way Only connect for 1-Way Data-LinkBranchez pour Data-Link 1-voie seulement
CONN. 22
DATAPORT
wire-to-wire Always connect | Toujours branché
CCONNECTION
4
56
MALEMÂLE
FEMALEFEMELLE
Key cylinderBarillet de la clé
VEHICLEVÉHICULE
3 4 5 6
IGNITION PLUGCONNECTEUR D’IGNITION3
SEC-TLA-CHRT2
Carefully unplug the connector.Débrancher le connecteur avec précaution.
SEC-TLA-CHR
SEC-TLA-CHRSEC-TLA-CHRT2
Page 7
WITHOUT DATA-LINK \ SANS DATA-LINK
SEC-TLA-CHRT2
GO PROGRAM: 1
OUTPUT | SORTIE INPUT | ENTRÉEDCONNECTION
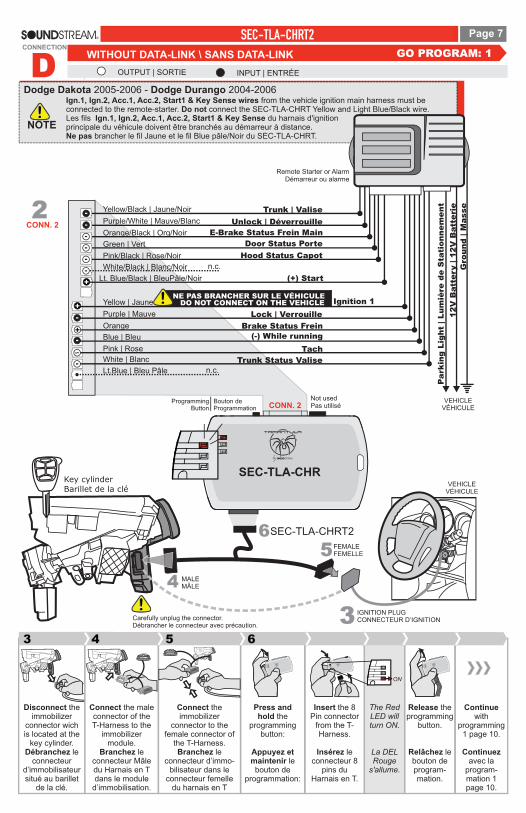
Ign.1, Ign.2, Acc.1, Acc.2, Start1 & Key Sense wires connected to the remote-starter. Do not connect the SEC-TLA-CHRT Yellow and Light Blue/Black wire.Les fils Ign.1, Ign.2, Acc.1, Acc.2, Start1 & Key Sense du harnais d'ignition principale du véhicule doivent être branchés au démarreur à distance. Ne pas brancher le fil Jaune et le fil Blue pâle/Noir du SEC-TLA-CHRT.
from the vehicle ignition main harness must be
NOTE
Dodge Dakota 2005-2006 - Dodge Durango 2004-2006
Trunk Status Valise
(-) While running
Lock | Verrouille
Ignition 1
Brake Status Frein
Tach~
Hood Status Capot
Door Status PorteE-Brake Status Frein Main
Unlock | Déverrouille
Trunk | Valise
Park
ing L
ight
| Lum
ière
de S
tati
onnem
ent
12V
Batt
ery
| 1
2V
Batt
eri
eG
round | M
asse
n.c.
VEHICLEVÉHICULE
Lt.Blue | Bleu Pâle
White | BlancPink | Rose
Blue | Bleu
Orange
Purple | Mauve
Yellow | Jaune
White/Black | Blanc/Noir
Pink/Black | Rose/Noir
Green | Vert
Orange/Black | Org/Noir
Purple/White | Mauve/Blanc
Yellow/Black | Jaune/Noir
DO NOT CONNECT ON THE VEHICLENE PAS BRANCHER SUR LE VÉHICULE
Remote Starter or AlarmDémarreur ou alarme
CONN. 222
ProgrammingButton
Bouton deProgrammation CONN. 2
Not usedPas utilisé
n.c.
(+) StartLt. Blue/Black | BleuPâle/Noir
4
5MALEMÂLE
FEMALEFEMELLE
Key cylinderBarillet de la clé
VEHICLEVÉHICULE
IGNITION PLUGCONNECTEUR D’IGNITION3
Connect the immobilizer
connector to the female connector of
the T-Harness.Branchez le
connecteur d’immo-bilisateur dans le
connecteur femelle du harnais en T
Press and hold the
programming button:
Appuyez et maintenir le bouton de
programmation:
Insert the 8 Pin connector
from the T-Harness.
Insérez le connecteur 8
pins du Harnais en T.
Release the programming
button.
Relâchez le bouton de program-mation.
The Red LED will turn ON.
La DEL Rouge
s'allume.
ON
Connect the male connector of the T-Harness to the
immobilizer module.
Branchez le connecteur Mâle du Harnais en T dans le module
d’immobilisation.
Disconnect the immobilizer
connector wich is located at the
key cylinder.Débranchez le
connecteur d’immobilisateur situé au barillet
de la clé.
Continue with
programming 1 page 10.
Continuez avec la
program-mation 1 page 10.
3 6
6SEC-TLA-CHRT2
Carefully unplug the connector.Débrancher le connecteur avec précaution.
8
1
4 5
SEC-TLA-CHR
SEC-TLA-CHRT2
FEMALEFEMELLE
4
55
Key cylinderBarillet de la clé
VEHICLEVÉHICULE
3 immobilizer connectorconnecteur d’immobilisateur
MALEMÂLE
OUTPUT | SORTIE INPUT | ENTRÉE
ALLE O CHRPage 8
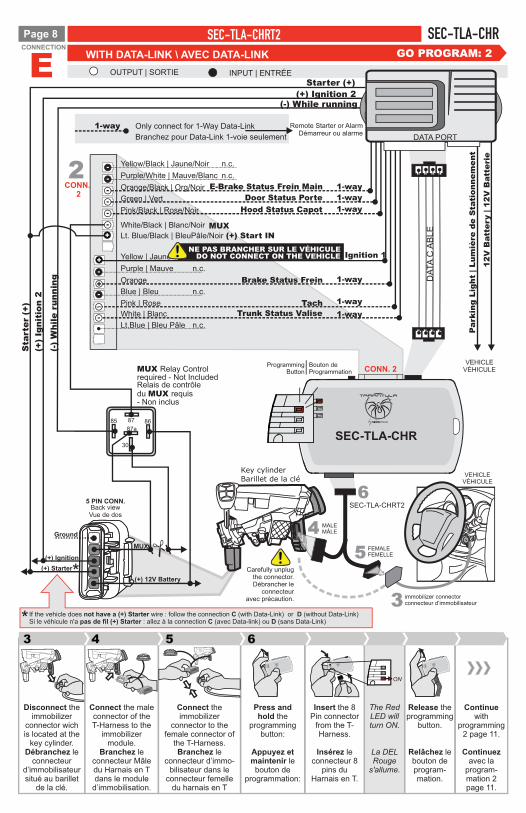
WITH DATA-LINK \ AVEC DATA-LINKE GO PROGRAM: 2
OUTPUT | SORTIE INPUT | ENTRÉE
30
8685 87
87a
(+) 12V Battery
Back viewVue de dos
Ground
(+) Starter
12V
Batt
ery
| 1
2V
Batt
eri
e
Lt.Blue | Bleu Pâle
White | BlancPink | Rose
Blue | Bleu
Orange
Purple | Mauve
Yellow | Jaune
Trunk Status Valise
Brake Status Frein
Tach~
Hood Status Capot
Door Status PorteE-Brake Status Frein Main
Lt. Blue/Black | BleuPâle/NoirWhite/Black | Blanc/Noir
Pink/Black | Rose/Noir
Green | Vert
Orange/Black | Org/Noir
Purple/White | Mauve/Blanc
Yellow/Black | Jaune/Noir
ProgrammingButton
Bouton deProgrammation
Park
ing L
ight
| Lum
ière
de S
tati
onnem
ent
n.c.
1-way1-way
1-way
1-way
1-way
1-way
VEHICLEVÉHICULE
MUX
CONN. 2
DA
TA C
AB
LE
n.c.
n.c.
n.c.
n.c.
Remote Starter or AlarmDémarreur ou alarme
1-way Only connect for 1-Way Data-LinkBranchez pour Data-Link 1-voie seulement
Ignition 1
Starter (+)
(+) Start IN
(-) While running
5 PIN CONN.
(+) Ignition 2
(+) Ignition
DO NOT CONNECT ON THE VEHICLENE PAS BRANCHER SUR LE VÉHICULE
DATA PORT
CONN. 2
2
(-)
While r
unnin
g
(+)
Ignit
ion 2
Sta
rter
(+)
MUX
EVO-CHR T2 (THAR-CHR2)
MUX Relay Controlrequired - Not IncludedRelais de contrôledu MUX requis - Non inclus
ECONNECTION
Connect the immobilizer
connector to the female connector of
the T-Harness.Branchez le
connecteur d’immo-bilisateur dans le
connecteur femelle du harnais en T
Press and hold the
programming button:
Appuyez et maintenir le bouton de
programmation:
Insert the 8 Pin connector
from the T-Harness.
Insérez le connecteur 8
pins du Harnais en T.
Release the programming
button.
Relâchez le bouton de program-mation.
The Red LED will turn ON.
La DEL Rouge
s'allume.
ON
Connect the male connector of the T-Harness to the
immobilizer module.
Branchez le connecteur Mâle du Harnais en T dans le module
d’immobilisation.
Disconnect the immobilizer
connector wich is located at the
key cylinder.Débranchez le
connecteur d’immobilisateur situé au barillet
de la clé.
Continue with
programming 2 page 11.
Continuez avec la
program-mation 2 page 11.
3 6
6SEC-TLA-CHRT2
* Carefully unplug the connector.Débrancher le
connecteur avec précaution.
If the vehicle does not have a Starter wire : follow the connection C (with Data-Link) or D (without Data-Link)Si le véhicule n'a pas de fil (+) Starter : allez à la connection C (avec Data-link) ou D (sans Data-Link)
(+) *
8
1
4 5
SEC-TLA-CHR
SEC-TLA-CHRSEC-TLA-CHRT2
(+) 12V Battery
Back viewVue de dos
Ground
(+) Starter
5 PIN CONN.
(+) Ignition
MUX
Trunk Status Valise
(-) While running
Lock | Verrouille
Ignition 1
Brake Status Frein
Tach~
(+) Start IN
Hood Status Capot
Door Status PorteE-Brake Status Frein Main
Unlock | Déverrouille
Trunk | Valise
n.c.
MUX
Lt.Blue | Bleu Pâle
White | BlancPink | Rose
Blue | Bleu
Orange
Purple | Mauve
Yellow | Jaune
Lt. Blue/Black | BleuPâle/NoirWhite/Black | Blanc/Noir
Pink/Black | Rose/Noir
Green | Vert
Orange/Black | Org/Noir
Purple/White | Mauve/Blanc
Yellow/Black | Jaune/Noir
DO NOT CONNECT ON THE VEHICLENE PAS BRANCHER SUR LE VÉHICULE
Park
ing L
ight
| Lum
ière
de S
tati
onnem
ent
12V
Batt
ery
| 1
2V
Batt
eri
eG
round | M
asse
VEHICLEVÉHICULE
Page 9
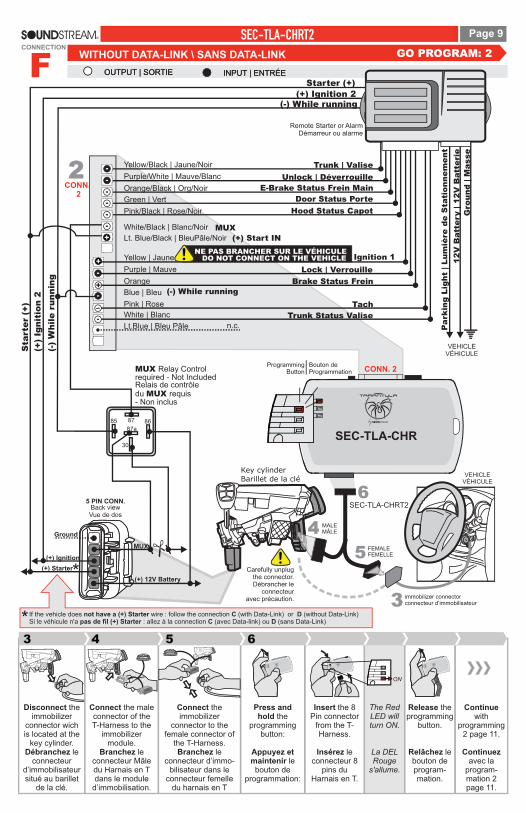
WITHOUT DATA-LINK \ SANS DATA-LINK GO PROGRAM: 2
OUTPUT | SORTIE INPUT | ENTRÉEOUTPUT | SORTIE INPUT | ENTRÉE
30
8685 87
87a
Remote Starter or AlarmDémarreur ou alarme
Starter (+)
(-)
While r
unnin
g
(-) While running(+) Ignition 2
(+)
Ignit
ion 2
Sta
rter
(+)
CONN. 2
22
MUX Relay Controlrequired - Not IncludedRelais de contrôledu MUX requis - Non inclus
EVO-CHR T2 (THAR-CHR2)
FCONNECTION
Connect the immobilizer
connector to the female connector of
the T-Harness.Branchez le
connecteur d’immo-bilisateur dans le
connecteur femelle du harnais en T
Press and hold the
programming button:
Appuyez et maintenir le bouton de
programmation:
Insert the 8 Pin connector
from the T-Harness.
Insérez le connecteur 8
pins du Harnais en T.
Release the programming
button.
Relâchez le bouton de program-mation.
The Red LED will turn ON.
La DEL Rouge
s'allume.
ON
Connect the male connector of the T-Harness to the
immobilizer module.
Branchez le connecteur Mâle du Harnais en T dans le module
d’immobilisation.
Disconnect the immobilizer
connector wich is located at the
key cylinder.Débranchez le
connecteur d’immobilisateur situé au barillet
de la clé.
Continue with
programming 2 page 11.
Continuez avec la
program-mation 2 page 11.
3 6
*
FEMALEFEMELLE
4
5
Key cylinderBarillet de la clé
VEHICLEVÉHICULE
3 immobilizer connectorconnecteur d’immobilisateur
MALEMÂLE
ProgrammingButton
Bouton deProgrammation CONN. 2
6SEC-TLA-CHRT2
Carefully unplug the connector.Débrancher le
connecteur avec précaution.
If the vehicle does not have a Starter wire : follow the connection C (with Data-Link) or D (without Data-Link)Si le véhicule n'a pas de fil (+) Starter : allez à la connection C (avec Data-link) ou D (sans Data-Link)
(+) *
8
1
4 5
SEC-TLA-CHR
SEC-TLA-CHRT2
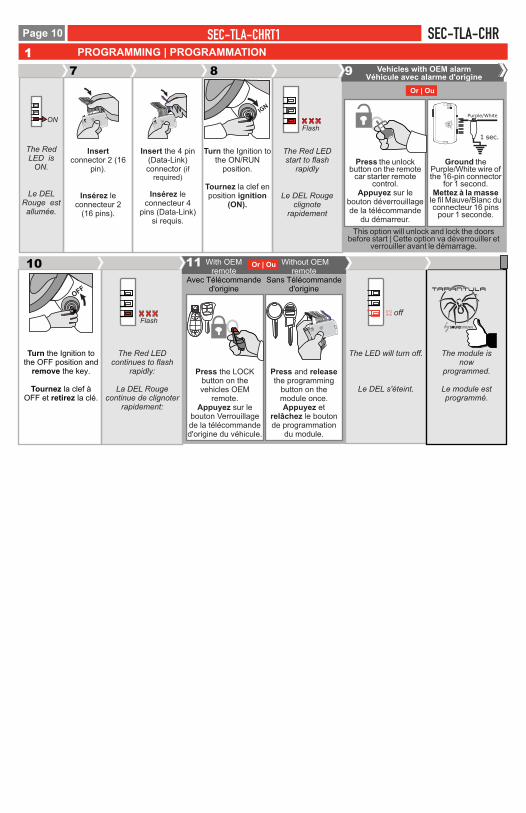
1 PROGRAMMING | PROGRAMMATION
ALLE O CHRPage 10 EVO-CHR T1 (THAR-CHR1)
7 8
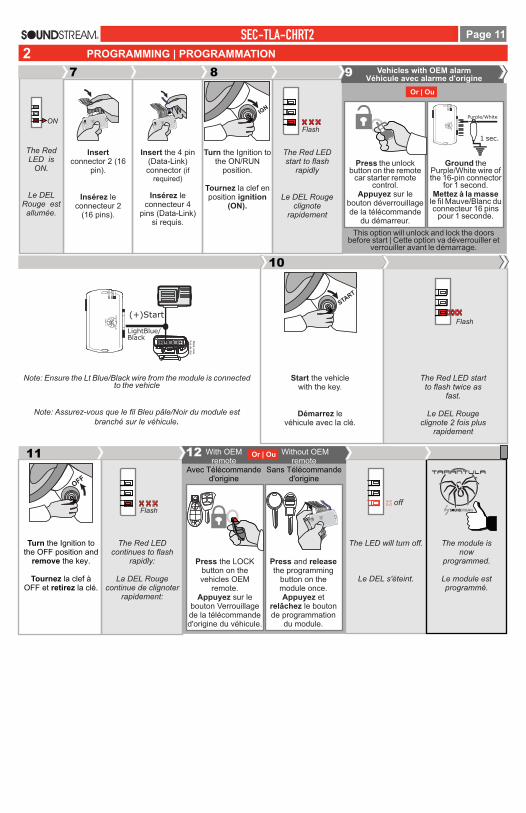
Press the unlock button on the remote
car starter remote control.
Appuyez sur le bouton déverrouillage de la télécommande
du démarreur.
Ground the Purple/White wire of the 16-pin connector
for 1 second. Mettez à la masse
le fil Mauve/Blanc du connecteur 16 pins
pour 1 seconde.
Vehicles with OEM alarmVéhicule avec alarme d'origine
This option will unlock and lock the doors before start | Cette option va déverrouiller et
verrouiller avant le démarrage.
9
Purple/White
1 sec.
Or | Ou
Insert connector 2 (16
pin).
Insérez le connecteur 2
(16 pins).
Insert the 4 pin (Data-Link) connector (if
required)
Insérez le connecteur 4
pins (Data-Link) si requis.
LOC
K
ACC ON
PUSH
ST
AR
T
IGN
Turn the Ignition to the ON/RUN
position.
Tournez la clef en position ignition
(ON).
The Red LED start to flash
rapidly
Le DEL Rouge clignote
rapidement
Flash
The LED will turn off.
Le DEL s'éteint.
Press the LOCK button on the vehicles OEM
remote. Appuyez sur le
bouton Verrouillage de la télécommande d'origine du véhicule.
Press and release the programming
button on the once.
Appuyez et relâchez le bouton de programmation
du module.
module
The module is now
programmed.
Le module est programmé.
The Red LED continues to flash
rapidly:
La DEL Rouge continue de clignoter
rapidement:
LOC
K
ACC ON
PUSH
ST
AR
T
OFF
Turn the Ignition to the OFF position and
remove the key.
Tournez la clef à OFF et retirez la clé.
1110
offFlash
With OEM remote
Avec Télécommande d'origine
Without OEM remote
Sans Télécommande d'origine
Or | Ou
The Red LED is
ON.
Le DEL Rouge est allumée.
ON
SEC-TLA-CHRT1 SEC-TLA-CHR
PROGRAMMING | PROGRAMMATION
Page 11EVO-CHR T2 (THAR-CHR2)
2
LOC
K
ACC ON
PUSH
ST
AR
T
START
Start the vehicle with the key.
Démarrez le véhicule avec la clé.
The Red LED start to flash twice as
fast.
Le DEL Rouge clignote 2 fois plus
rapidement
Note: Ensure the Lt Blue/Black wire from the module is connected to the vehicle
Note: Assurez-vous que le fil Bleu pâle/Noir du module est
branché sur le véhicule.
Back vie
wV
ue d
e d
os
LightBlue/Black
(+)Start
10
Flash
The LED will turn off.
Le DEL s'éteint.
Press the LOCK button on the vehicles OEM
remote. Appuyez sur le
bouton Verrouillage de la télécommande d'origine du véhicule.
Press and release the programming
button on the module once.Appuyez et
relâchez le bouton de programmation
du module.
The module is now
programmed.
Le module est programmé.
The Red LED continues to flash
rapidly:
La DEL Rouge continue de clignoter
rapidement:
LOC
K
ACC ON
PUSH
ST
AR
T
OFF
Turn the Ignition to the OFF position and
remove the key.
Tournez la clef à OFF et retirez la clé.
11
offFlash
With OEM remote
Avec Télécommande d'origine
Without OEM remote
Sans Télécommande d'origine
Or | Ou12
7 8
Press the unlock button on the remote
car starter remote control.
Appuyez sur le bouton déverrouillage de la télécommande
du démarreur.
Ground the Purple/White wire of the 16-pin connector
for 1 second. Mettez à la masse
le fil Mauve/Blanc du connecteur 16 pins
pour 1 seconde.
Vehicles with OEM alarmVéhicule avec alarme d'origine
This option will unlock and lock the doors before start | Cette option va déverrouiller et
verrouiller avant le démarrage.
9
Purple/White
1 sec.
Or | Ou
Insert connector 2 (16
pin).
Insérez le connecteur 2
(16 pins).
Insert the 4 pin (Data-Link) connector (if
required)
Insérez le connecteur 4
pins (Data-Link) si requis.
LOC
K
ACC ON
PUSH
ST
AR
T
IGN
Turn the Ignition to the ON/RUN
position.
Tournez la clef en position ignition
(ON).
The Red LED start to flash
rapidly
Le DEL Rouge clignote
rapidement
Flash
The Red LED is
ON.
Le DEL Rouge est allumée.
ON
SEC-TLA-CHRT2
7 770 350 00 223
TECHNICAL SUPPORTTél: 514-255-HELP (4357) 1-877-336-7797
INSTALLATION GUIDE
WEB UPDATE | MISE À JOUR INTERNET
TECHNICAL SUPPORT / INFORMATION
Neither the manufacturer or distributor of this module is responsible for damages of any kind either indirectly or directly caused by this module, except for the replacement of this module in case of manufacturing defects. This module must be installed by a qualified technician. This instruction guide may change without notice. Visit SOUNDSTREAM.COM/SECURITY to obtain the latest version.
Ni le manufacturier, ni le distributeur ne se considèrent responsables des dommages causés ou ayant pu être causés, indirectement ou directement, par ce module, excepté le remplacement de ce module en cas de défectuosité de fabrication. Ce module doit être installé par un technicien qualifié. Ce guide d'instruction peut faire l’objet de changement sans préavis. Consultez le pour voir la plus récente version.SOUNDSTREAM.COM/SECURITY
INFORMATIONS / SUPPORT TECHNIQUE
ALLE O CHR SEC-TLA-CHR
SOUNDSTREAM.COM/SECURITY
855-732-8777