Embed Size (px)
Citation preview

Producing Preparation Designs in PatientsWho Require Simultaneous, DifferentRestorative ProtocolsLarry Rosenthal, DDSPeter Rinaldi, DMD
Sponsored by Brasseler USA 2 Hours of Continuing Education Credit
from Dental Learning Systems
A Supplement to Contemporary Esthetics and Restorative Practice® An MWC Publication
© 2001. Medical World Business Press, Inc.
Esthetic Technique™
Clinical Case Studies and Technique Review
Vol. 1, No. 3, 2001

Dear Reader:
With the expanded options for esthetic restorations today, practi-tioners have the challenge of choosing rotary instrumentation that willallow them to prepare teeth for the variety of restorations available. Weno longer have a “one size fits all” option when it comes to the type anddesign of finish line margins and amount of tooth reduction for esthet-ically bonded restorations. For example, ceramic veneers require a sig-nificantly different preparation than ceramic crowns. For posteriorrestorations, it is now possible to conserve tooth structure with eithercomposite or ceramic inlays and onlays when only partial-coveragepreparations are needed. The posterior crown has requirements differentfrom anterior crowns.
In this issue of Esthetic Technique, Drs. Rosenthal and Rinaldidescribe a rationale and approach to the preparation of esthetically bond-ed anterior and posterior restorations using The Rosenthal GroupAesthetic Design Kit. This kit offers the clinician a compact, well-orga-nized set of rotary instruments that fulfills the criteria for preparing teethfor all types of esthetically bonded restorations. Instead of spending timesearching for rotary burs and abrasives, one only has to reach for one kitof rotary instruments. As dentistry becomes more complex, having a kitsuch as this makes it easier for everyone.
Dental Learning Systems would like to thank Brasseler USA forsponsoring this teaching series for the dental clinician.
Best regards,
Howard E. Strassler, DMDProfessor and Director of Operative DentistryDepartment of Restorative DentistryDental School, University of MarylandBaltimore, Maryland
The Esthetic Technique™ series is made possible through an educational grant from Brasseler USA,
Inc. To order additional copies call 800-926-7636, x180. D451
Publisher and President, Daniel W. Perkins; Vice President of Sales and Associate Publisher, Anthony Angelini; Senior Managing Editor, Allison W. Walker; Associate ProjectsEditor, Lisa M. Neuman; Projects Director, Eileen R. Henry-Lewis; Copy Editors, Barbara Marino and Susan Costello; Design Director, Jennifer Kmenta; Design Director SpecialProjects, Liz Arendt; Circulation Director, Jackie Hubler; Northeast Regional Sales Manager, Jeffery E. Gordon; West Coast Regional Sales Manager, Michael Gee; Executiveand Advertising Offices, Dental Learning Systems, 241 Forsgate Drive, Jamesburg, NJ 08831-1676, Phone (732) 656-1143, Fax (732) 656-1148.
Postmaster: Send address changes to Contemporary Esthetics and Restorative Practice®, Attn: Data Control, One Broad Avenue, Fairview, NJ 07022-1570. Send correspon-dence regarding subscriptions or address changes to Data Control, One Broad Avenue, Fairview, NJ 07022-1570, or call (800) 603-3512. Periodicals postage paid at Monroe
Township, NJ 08831, and at additional mailing entries.
Contemporary Esthetics and Restorative Practice® (ISSN 1523-2581, USPS 017-212) is published 12 times a year by Medical World Business Press, Inc., 241 Forsgate Drive,Jamesburg, NJ 08831-0505. Copyright © 2001 by Medical World Business Press, Inc./A division of Medical World Communications, Inc. Printed in the USA. All rights reserved.No part of this issue may be reproduced in any form without written permission from the publisher.
Contemporary Esthetics and Restorative Practice® is a registered trademark of Medical World Business Press, Inc. Medical World Communications Corporate Officers:Chairman/CEO, John J. Hennessy; President, Curtis Pickelle; Chief Financial Officer, Steven J. Resnick; Vice President of Business Development, Robert Issler; Vice President ofManufacturing, Frank A. Lake.
BPA International Membership Applied for October 1998.
Dental Learning Systems 241 Forsgate Drive, Jamesburg, NJ 08831-1676 • (800) 926-7636 • Fax (732) 656-1148
Bruce Crispin,DDS, MS
Nasser Barghi,DDS
Lee Culp, CDT
John Kois,DMD, MSD
Gerard Kugel,DMD, MS
Edward A.McLaren, DDS
Larry Rosenthal,DDS
Howard E. Strassler, DMD
Douglas A.Terry, DDS
Thomas F.Trinkner, DDS
ADVISORY BOARD
Dental Learning Systems is an ADA Recognized Provider
Academy of General Dentistry Approved National Sponsor. FAGD/MAGD Credit
7/18/1990 to 12/31/2002
3ESTHETIC TECHNIQUE VOL. 1, NO. 3, 2001
LEARNING OBJECTIVESAfter reading this article, the reader should be able to:
• discuss a specific protocol for preparation design.• understand smile design preparation and material
preparation.• identify new techniques for tooth preparation for dif-
ferent materials.• describe the benefits of the new bur system that sim-
plifies esthetic procedures.
As new materials enter the marketplace, dentalprofessionals are continually supplementingtheir knowledge and skills to enhance the quali-
ty and functionality of the restorations and esthetictreatments they provide. As they incorporate the newergenerations of products into their repertoire, itbecomes necessary to identify the clinical techniquesassociated with placing such materials that will ensureconsistent quality and restorative longevity.1-3
Among the techniques requiring evaluation and, per-haps, modification based on the restorative materialselected, are those involving the preparation of dentition.Full-coverage ceramic restorations require one type oftooth reduction, while minimally invasive procedures,such as indirect inlays or veneers, require tooth prepara-tions that follow different guidelines. As such, cliniciansshould become keenly familiar with the proper protocolassociated with various restorative modalities, as well asthe instrumentation that should be used.4-6
It seems obvious, then, that clinicians are facedwith a challenge when a patient presents for multiplerestorations, each requiring a different preparation proto-col. The challenge, specifically, is to quickly and appro-priately identify those instruments and methods that will
ABSTRACTAs dentists incorporate new materials into
their treatment regimen, they must become
knowledgeable in the armamentarium available
for completing specific esthetic preparation
design techniques, and they must become
skilled in performing such procedures. This
article features a case presentation that high-
lights the clinical protocol associated with
using a recently introduced, functionally organ-
ized tooth preparation kit designed for simplic-
ity and maximum step-by-step consistency.
Producing Preparation Designs inPatients Who Require Simultaneous,Different Restorative ProtocolsLarry Rosenthal, DDS
Peter Rinaldi, DMD
Larry Rosenthal, DDS
Director
Peter Rinaldi, DMD
Clinical Director
Aesthetic Advantage Inc.
The Rosenthal Group
New York, New York
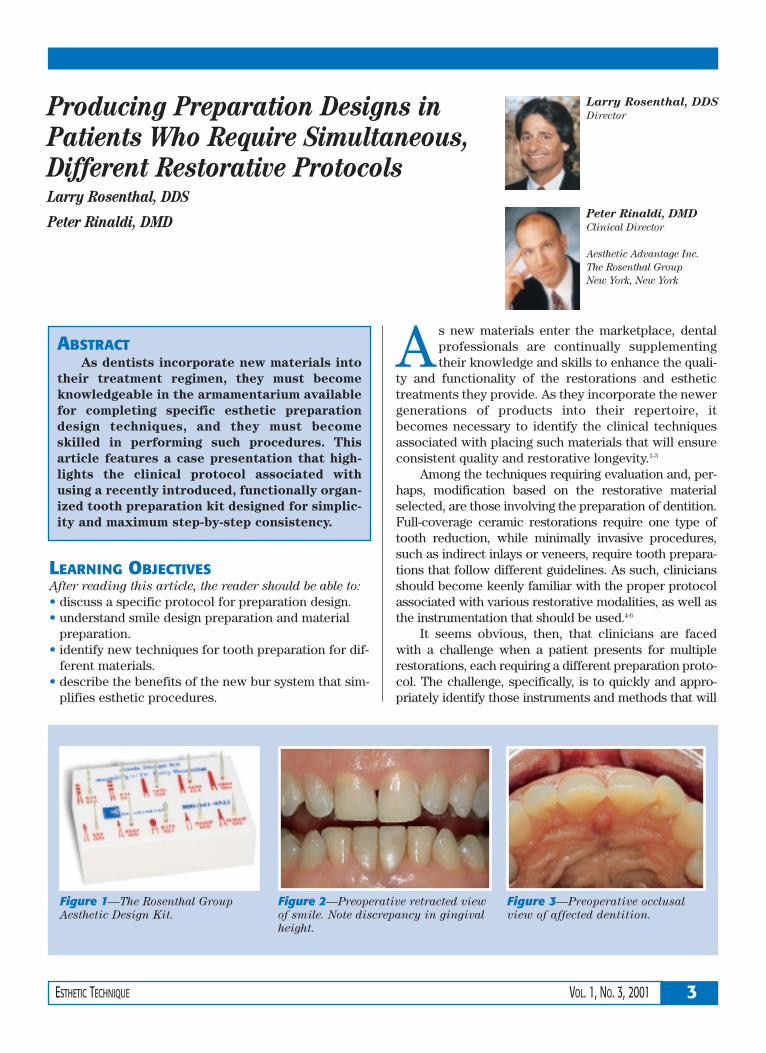
Figure 1—The Rosenthal Group
Aesthetic Design Kit.
Figure 2—Preoperative retracted view
of smile. Note discrepancy in gingival
height.
Figure 3—Preoperative occlusal
view of affected dentition.

4 VOL. 1, NO. 3, 2001 ESTHETIC TECHNIQUE
ensure overall treatment success,patient comfort, and esthetic value.Using a system of rotary instrumentsdeveloped in recognition of clini-cians’ needs will enable dentists tomeet the criteria necessary to con-sistently achieve esthetically excel-lent direct and indirect restorations.
ARMAMENTARIUMA recently introduced system
of preparation armamentarium,The Rosenthal Group AestheticDesign Kita (Figure 1), is simplify-ing the process and enabling den-tists to complete each type of toothreduction in a more step-by-step,yet still clinically sound and appro-priate, manner. Using the uniquedesign elements of specific instru-mentation, clinicians can easilyachieve the desired preparationdesign and subsequent restorativeform and function in a predictablemanner.
The kit fulfills all of the require-ments for preparing esthetic restora-tions. The instruments are grouped
according to preparation design (ie,ceramic inlay/onlay, indirect res-torations, all-ceramic veneers, full-coverage crown restorations, andcomposite provisionals). The kitmostly consists of diamond burs ofvarious grits for inlay/onlay, veneer,and full-coverage crown (both all-ceramic and metal-supported) prep-arations. A recently introduced car-bide bur is also included for grossreduction and shaping of directlyplaced provisional composite res-torations. There are two depth cut-
ters in the kit, one 0.5 mm and one0.7 mm, in addition to several bursfor finishing.
CASE PRESENTATIONA 53-year-old woman present-
ed with concerns regarding herworn dentition (Figures 2 and 3).She also expressed concerns re-garding her tooth color. On exami-nation, it was noted that severalteeth were malpositioned in theanterior region, and decay was pres-ent in the upper left premolar andmolar. Recurrent decay was alsopresent under an existing porce-lain-fused-to-metal (PFM) full-cov-erage crown on tooth No. 4. Fur-thermore, the patient was begin-ning to lose canine guidance,which would require proper recon-struction to regain occlusal pro-tection. It was decided that reha-bilitation would be completed byplacing veneer restorations andreplacing the existing PFM with an all-ceramic restoration. The inter-proximal decay would be removedand replaced with indirect inlayrestorations.
As new materials
enter the market-
place, dental profes-
sionals are continually
supplementing their
knowledge and skills to
enhance the quality and
functionality of the
restorations and
esthetic treatments
they provide.
TABLE 1—THE ROSENTHAL GROUP AESTHETIC DESIGN KIT
Veneer Preparation
#828-026 0.5-mm depth cutter—creates initial depth cutat cervical third forfeldspathic porcelainveneer
#828-030 0.7-mm depth cutter—creates initial depth cutat cervical third forpressed porcelainveneer
#6844-016 Two-grit preparationdiamond defines porce-lain veneer preparationto depth determined bydepth cutter
Crown Preparation
#5847KR-016 Facial reduction andmargins for porcelaincrown (supercoarsegrit)
#6368-023 Occlusal reduction forporcelain crown(coarse grit)
Margin Finishing
#8392-016 Finishing diamondfor cervical margins(fine grit)
#3392EF-016 Finishing diamondfor cervical margins(extrafine grit)
aBrasseler USA®, Savannah, GA 31419; 800-841-4522

5ESTHETIC TECHNIQUE VOL. 1, NO. 3, 2001
CLINICAL PROTOCOLPreliminary impressions were
obtained and used for the creationof the diagnostic wax-ups. Duringthe initial visit, restoration shadeswere discussed, and the patientwas informed that the interimrestorations would serve as a guidetoward her final shade selection.
The preoperative photographswere taken using a Yashica DentalEye III camerab and a Polaroid Macro5c. The instant photographs wereessential for proper communicationwith the laboratory regarding thepreexisting condition of the patient’soral environment. An impressionwas made with a polyvinylsiloxanematerial, such as Honigumd, and biteregistrations were made.
Local anesthetic was adminis-tered, the old crown restoration wasremoved, and the affected teethwere prepared using the armamen-
tarium included in The RosenthalGroup Aesthetic Preparation DesignKit (Table 1). The inlay restorationswere prepared independently.
Smile Design Preparation
To initiate the preparation pro-
tocol, a diamond bur (#6856-029a)was used first to facilitate smiledesign, create arch form, andrealign axial inclinations, in addi-tion to gross reduction (Figures 4and 5). To open gingival embra-sures and allow for proper emer-gence profiles of the plannedveneer restorations—as well as tofacilitate accessibility for cleans-ing—the #132F-008 diamond burwas used (Figure 6).7,8
Veneer Preparation
When the smile design prepara-tion was completed (Figure 7),depth cutters were used. Depend-ing on the material selected for the veneer restorations (pressedceramic or feldspathic porcelain),either a 0.5-mm bur (#828-026) or a0.7-mm bur (#828-030) may be cho-sen (Figures 8 and 9).
Material choice for a restora-tive procedure depends on several
Figure 4—Initial development of
arch form and correction of axial
inclinations.
Figure 5—Alternate view of arch
form development and correction of
axial inclinations.
Figure 6—Enhancement of smile
relation and improved gingival
embrasures.
Figure 7—Completed smile design
preparation, left side.
Figure 8—Depth cuts were made with
either the 0.5-mm or 0.7-mm bur.
Figure 9—Alternate view of depth
cut preparation.
b Kyocera International, Inc, San Diego, CA 92123;858-576-2600
c Polaroid Corporation, Cambridge, MA 02139;781-386-2000
d Zenith Dental/DMG, Englewood, NJ 07631; 800-662-6383
Among the tech-
niques requiring
evaluation and, perhaps,
modification based on
the restorative material
selected, are those
involving the prepara-
tion of dentition.

factors. For example, when prepara-tions are to be kept to a minimum,feldspathic porcelain is the materialof choice, because it inherentlyrequires less bulk of material forstrength. If the stump shade of theprepared tooth is dark (ie, St 5 of theChromoscope shade guide), thenfeldspathic porcelain will block outthe color better than the moretranslucent ingots of a pressedceramic. On the other hand, if agreat deal of tooth structure needsto be removed, as in full-mouthreconstructions or severely crowd-ed dentition, or if there are largeexisting fillings that need to beremoved, waxing and pressing maybe the appropriate technique to use.
A diamond bur (#6844-016) wasused for the initial veneer prepara-tion (Figure 10). A diode laser
(Biolase Twilightf) was used forcontouring the gingival height andzenith over teeth Nos. 8 and 9(Figure 11), and the #6844 bur wasused again to define the margins andfinish the preparations (Figure 12).9
Crown Preparation
After completion of the veneerpreparations, the defective PFMcrown on tooth No. 4 was removedwith a cross-cut fissure carbide bur(#H32-012) (Figure 13), and the
crown preparation was redefinedwith a diamond bur (#5847KR-016).Overall occlusal reduction was alsocompleted with a diamond bur(#6368-023). The final restorationwas an all-ceramic crown. Theauthors try to restore the areabetween the premolars, particular-ly the first premolars, with all-ceramic restorations as often aspossible because this area is con-sidered the anterior part of themouth and nonmetal restorationswill not show dark lines if gingivalrecession occurs.
The inlay/onlay portion of thekit was used to remove the inter-proximal decay on teeth Nos. 13and 14, first using the #H32-012 bur.The inlay/onlay preparations wererefined with two burs (#845KR-45and #845KR-018). An end-cuttingdiamond bur (#10839) was used tosmooth the gingival floor of thepreparation. Final smoothing of theline angles and points was accom-
6 VOL. 1, NO. 3, 2001 ESTHETIC TECHNIQUE
C linicians should
become keenly
familiar with the proper
protocol associated
with various restorative
modalities, as well as
the instrumentation
that should be used.
Figure 10—The #6844 diamond
bur was used for veneer prepara-
tions.
Figure 11—Zenith positions were
corrected with a diode laser.
Figure 12—The veneer prepara-
tions were finalized.
Figure 14—Diamond strips and
sandpaper disks were used to
smooth contact points and angles.
Figure 15—The anterior prepara-
tions are ready for final impres-
sions.
Figure 13—The existing crown
was removed, and the underlying
tooth structure was re-prepared.
e Ivoclar Vivadent, Inc, Amherst, NY 14228; 800-533-6825
f Biolase Technology Inc, San Clemente, CA92673; 888-424-6527

plished with sandpaper disks anddiamond strips (Figure 14).
Temporization
After impression-making (Fig-ures 15 and 16), a matrix—whichwas made over the diagnostic wax-up—was subsequently employedfor the fabrication of the provision-al restorations. After placement,the provisional restorations (Luxa-tempd) were grossly refined using anew carbide bur (#H375-R-016),and the overall shape was devel-oped (Figure 17). The gingivalembrasures were opened up forhealing and ease of cleansing(Figures 18 and 19), and facial andincisal embrasures were createdusing the diamond bur (#8392-016).Sandpaper disks and rubberwheels were used to polish andrecontour the provisional restora-tions after placement (Figure 20).
The preoperative photographs,along with stump shades of the pre-
pared dentition and approved tem-poraries, were forwarded to the lab-oratory and helped the ceramist to
fabricate the final restorations. Thepatient was seen the day after thetemporary restorations were placedto check for proper occlusion and toreview any esthetic considerations.
PLACEMENT OF THE FINALRESTORATIONS
The patient returned to theoffice the following week for
placement of the finished porce-lain veneers. The temporary res-torations were removed by gentlyslicing vertical cuts with the #132diamond bur (Figure 21). This bureasily cut through the compositematerial, yet provided sufficienttactile sense to ensure that theunderlying tooth structure was noteasily marred. A crown separatorwas then applied in a gentletorquing action to “pop” the sec-tioned temporary (Figure 22).Interproximal composite remnantswere removed with floss and a dia-mond strip.
The teeth were then cleanedusing Consepsisg. The veneerswere tried in to verify fit and over-all appearance, after which theywere cleaned, silanated, and inter-nally coated with a bonding agent(OptiBond™ 2 Flh). A rubber dam
7ESTHETIC TECHNIQUE VOL. 1, NO. 3, 2001
Figure 16—The posterior prepara-
tions are ready for final impres-
sions.
Figure 17—The provisional res-
torations were grossly reduced and
shaped.
Figure 18—Gingival margins were
recontoured and blended.
Figure 21—Vertical slices were
made in the provisional restora-
tions to facilitate removal.
Figure 20—Glaze was placed over
the polished provisional restora-
tions.
Figure 19—Development of lingual
contours and adjustment of occlu-
sion.
g Ultradent Products, Inc, South Jordan, UT 84095;800-552-5512
h Kerr® Corporation, Orange, CA 92867; 800-537-7123
C linicians are faced
with a challenge
when a patient presents
for multiple restora-
tions, each requiring a
different preparation
protocol.

was placed, the prepared teethwere etched and washed thorough-ly, and excess water was removedwithout dehydrating. The teethwere collectively adhesively pre-pared (Figure 23), and the restora-tions were placed sequentiallyfrom right to left (Figure 24).
After placement, excess ce-ment was removed with cottonrolls and brushes, and the restora-tions were spot-cured with a 3-mmturbo tip (Demetronh) for 4 sec-onds at the gingival collar (Figure25). All excess hardened lutingagent was then gently removedwith scalers and interproximallywith saws and floss (Figure 26).
Final curing was completedfor 9 seconds for each side on boththe lingual and facial aspects usinga plasma arc curing light (Apollo™
95Ei).
POLISHING AND FINISHINGAfter final curing, the gingival
margins were finished with dia-mond burs (#8392, #392EF, #379F,and #379EF) (Figures 27 and 28).Interproximal smoothing wasaccomplished with diamond stripsand floss. The lingual contours andocclusal adjustment were complet-ed using the Ceramist Porcelain
Polishing Systemj in the frictiongrip style.
CONCLUSIONThe rationale of this systematic
approach toward unique instrumen-tation enables the clinician to con-sistently produce the patient’s antic-ipated esthetic, clinical, and func-tional results (Figures 29 and 30).
The clinical protocol associat-ed with placing multiple restora-tions of different modalities usinga recently introduced, functionallyorganized tooth preparation kithas been greatly simplified intostep-by-step procedures. As aresult, dentists can now quicklyand appropriately identify thoseinstruments and methods that willensure overall treatment success,patient comfort, and esthetic valuewhen preparing teeth in a singlevisit for a variety of restorativealternatives.
8 VOL. 1, NO. 3, 2001 ESTHETIC TECHNIQUE
The challenge is to
quickly and appro-
priately identify those
instruments and meth-
ods that will ensure
overall treatment suc-
cess, patient comfort,
and esthetic value.
Figure 24—The final veneer restora-
tions were seated sequentially.
Figure 23—Occlusal view of com-
pleted preparations demonstrating
corrected arch form. Preparations
were then ready for adhesive.
Figure 22—The provisional res-
torations were gently torqued
using a Brasseler crown separator.
Figure 27—Remaining gross excesscement was removed from the gin-gival margins.
Figure 26—An interproximal saw
was used for initial clean-up.
Figure 25—The restorations were
spot-cured at the gingival margins.
iDental/Medical Diagnostic Systems, Inc,Woodland Hills, CA 91367; 818-595-0226
jSHOFU® Dental Corporation, Menlo Park, CA94025; 800-827-4638

REFERENCES1. Trinkner TF: Treatment and material consid-
erations for veneer restorations. Signature
7(1):2-7, 1998.2. Goldstein RE: Diagnostic dilemma: to bond,
laminate or crown? Int J Periodontics
Restorative Dent 7(5):8-29, 1987.3. Crispin BJ: The full veneer as an alternative
to the full crown. Curr Opin Cosmet Dent
4:6-10, 1997.
4. Shavel HM: The periodontal-restorativeinterface in fixed prosthodontics: toothpreparation, provisionalization, and biologicfinal impressions—part II. Pract Perio-
dontics Aesthet Dent 6(3):49-62, 1994.5. Shillingburg HT Jr., Grace CS: Thickness of
enamel and dentin. J South Calif Dental
Assoc 41(1):33-36, 1973.6. Crispin BJ: Evaluation of enamel thickness
and instrumentation as it relates to porce-lain veneer preparation. J Esthet Dent
5(1):37, 1993.7. Becker CM, Kaldahl WB: Crown contours
that promote access for oral hygiene.Quintessence Int 12(2):233-238, 1981.
8. Kois JC: The restorative-periodontal inter-face: biologic parameters. Periodontol 2000
11:29-38, 1996.9. Trinkner TF, Rosenthal L: Esthetic restora-
tion of anterior dentition with metal-freerestorative material. Compend Contin Educ
Dent 19(12):1248-1255, 1998.
9ESTHETIC TECHNIQUE VOL. 1, NO. 3, 2001
WARNING: Reading an article in Esthetic Technique™ does not necessarily qualify you to integrate new techniques or procedures into your practice. Dental Learning Systemsexpects its readers to rely on their judgment regarding their clinical expertise and recommends further education when necessary before trying to implement any new pro-cedure.
The views and opinions expressed in the article appearing in this publication are those of the author(s) and do not necessarily reflect the views or opinions of the editors, theeditorial board, or the publisher. As a matter of policy, the editors, the editorial board, the publisher, and the university affiliate do not endorse any products, medical tech-niques, or diagnoses, and publication of any material in this journal should not be construed as such an endorsement.
Figure 30—View of the fine detail of
the veneer restorations, demonstrat-
ing lifelike luster and characteriza-
tion.
Figure 29—The final restorations
displayed proper tissue and tooth
esthetics and harmony.
Figure 28—View of occlusal adjust-
ments and finishing.
Dental Learning Systems is an ADA Recognized Provider
Academy of General Dentistry Approved National Sponsor FAGD/MAGD Credit
7/18/1990 to 12/31/2002

10 VOL. 1, NO. 3, 2001 ESTHETIC TECHNIQUE
6. What was subsequently employed for thefabrication of the provisional restorations?a. a matrixb. copper tubec. no provisional was usedd. alginate impression
7. The temporary restorations were removed:a. with a spoon excavator.b. with sticky wax.c. by gently slicing vertical cuts.d. with hydrophilic eugenol solvent.
8. Restorations were spot-cured for 4 seconds at the:a. gingival collar.b. lingual.c. incisal.d. mesial and distal.
9. Final curing was completed for:a. 9 seconds.b. 15 seconds.c. 45 seconds.d. 1 minute.
10. Interproximal smoothing was accomplished with:a. diamond burs.b. carbide burs.c. scalers.d. diamond strips and floss.
1. How many depth cutters are included in thekit?a. oneb. twoc. threed. four
2. What was essential for proper communica-tion with the laboratory regarding the pre-existing condition?a. written descriptionb. full-mouth radiographsc. instant photographsd. final impressions
3. To initiate the preparation protocol, a dia-mond bur was first used to:a. facilitate smile design.b. create arch form.c. accomplish gross reduction.d. all of the above
4. What was used to contour the gingivalheight and zenith over teeth Nos. 8 and 9?a. scalpel bladeb. diode laserc. electrosurgeryd. free gingival graft
5. What type of diamond bur was used tosmooth the gingival floor of the preparation?a. end cuttingb. football shapedc. inverted coned. a hybrid diamond/carbide round bur
CE QUIZDental Learning Systems provides 2 hours of Continuing Education credit for those who wish to document
their continuing education endeavors. Participants are urged to contact their state registry boards for specialCE requirements.
To receive credit, complete the enclosed answer form, and mail with a check for $20, payable to DentalLearning Systems, to Dental Learning Systems CE Dept., 405 Glenn Drive, Suite 4, Sterling, VA 20164-4432.
Program #: D451

11ESTHETIC TECHNIQUE VOL. 1, NO. 3, 2001
Whatever the ultimate restorative goal,removal of nonserviceable or obsoleterestorations is frequently a time-consuming
step in the preparation sequence. Choosing instru-ments designed and adapted for the removal of spe-cific materials facilitates rapid and atraumaticremoval.
The time required to remove amalgam restora-tions can be greatly reduced with the use of the #H32-012 carbide bur. The transverse blade on the tip of thebur allows axial drilling. The pyramidal blade geome-try permits passage of water to reduce heat and mini-mizes the release of mercury vapor. Amalgam isremoved by drilling into the restoration in an axialdirection. Several longitudinal and transverse separa-tion grooves are cut. By dividing the filling into sec-tions, large fragments of the filling detach. This instru-ment provides quick, health-conscious removal of oldamalgam restorations.
The new diamond rotary instrument, #5985-012,is ideally adapted to the specific application ofremoving composite restorations. The innovative tiphas a transverse blade to improve axial drilling capac-ity. This makes it possible to remove large amounts ofcomposite from the first rotation of the instrument.The multiangled lateral surface increases chip space
for quick material reduction and minimal clogging(Figure 1).
For efficient removal of nonfunctioning porcelain-fused-to-metal crowns and bridges, the #5985-012supercoarse diamond is used first to cut through theporcelain. Placing the diamond at the buccal gingivalmargin, cut occlusally until the metal is exposed(Figure 2). Continue cutting over the occlusal surface,exposing the metal substructure. Then place the dia-mond instrument at the lingual gingival margin andcut occlusally until the cuts meet (Figure 3). Whenmetal is exposed from the buccal margin to the lingualmargin, the newly developed #H34L-012 carbide willeasily cut through precious or nonprecious metalswith minimal vibration (Figure 4). The crown-spread-er #EB134 hand instrument is placed in the separationgroove and rotated to spread and release the metalsubstructure from the tooth (Figure 5).
Cutting through the dense, hard substructures ofall-ceramic crowns generates extreme heat, whichmay cause iatrogenic damage to supporting hard andsoft tissue. Use of the 180-µm CRF diamond with copi-ous amounts of water (water syringe in addition tohandpiece spray) will save the clinician valuable chairtime and ensure comfortable treatment when remov-ing all-ceramic crowns.
This information is provided by Brasseler USA.
Removal of Nonserviceable or Obsolete Restorations
PREP STEPS
Figure 2—Sectioning the
porcelain on a porcelain-
fused-to-metal crown.
Figure 3—Sectioning
the porcelain on the lin-
gual gingival margin.
Figure 5—
Spreading
sectioned
crown with
the #EB134
hand
instrument.
Figure 1—Removing
composite with a #5985-
012 diamond rotary
instrument.
Figure 4—
Sectioning
the metal
with the
#H34L-012
carbide.