Embed Size (px)
Citation preview
Table of Contents
1 Welcome to GP02: VOCALISE! ................................................................................. 2
2 About GP02: VOCALISE ........................................................................................... 3
2.1 Key Mappings .................................................................................................. 3
2.1.1 Complex Pads / Elements ........................................................................... 3
2.1.2 Menus...................................................................................................... 3
3 Common Interface Controls ...................................................................................... 4
3.1 Navigation ....................................................................................................... 4
3.2 The Main Page ................................................................................................. 5
3.2.1 Volume Envelopes ..................................................................................... 5
3.2.2 Twist and Punish FX .................................................................................. 6
3.2.3 Master Effects .......................................................................................... 8
3.2.4 Performance Controls ............................................................................... 10
3.3 Trigger FX ..................................................................................................... 11
3.3.1 Main Controls ......................................................................................... 11
3.3.2 Advanced Controls ................................................................................... 13
3.4 Motion .......................................................................................................... 16
3.4.1 Triggering Motion Playback....................................................................... 17
3.4.2 Patterns and the Pattern Chain ................................................................. 17
3.4.3 Master Controls ....................................................................................... 18
3.4.4 Editing Sequences................................................................................... 18
3.4.5 Linking Sequences .................................................................................. 19
3.4.6 Three Channel Motion Controls ................................................................. 20
3.4.7 Presets ................................................................................................... 21
3.5 EQs and Filters .............................................................................................. 22
3.5.1 Sample/Channel EQ ................................................................................. 22
3.5.2 Filters .................................................................................................... 23
3.5.3 Copy, Paste, and Link .............................................................................. 26
3.5.4 Master EQ .............................................................................................. 27
4 The Complex Pads Interface ................................................................................... 28
4.1 Mixer ............................................................................................................ 28
4.2 Pitch ............................................................................................................ 29
5 Menus and Elements ............................................................................................. 30
5.1 Sample Controls............................................................................................. 30
6 Credits ................................................................................................................. 31
2
1 Welcome to GP02: VOCALISE! Thank you for purchasing GP02: VOCALISE!
Fall deeper into GRAVITY with GP02: VOCALISE.
Combining the raw character of the human voice with Heavyocity’s signature sound design capabilities, GP02: VOCALISE is an alluring collection of vocal pads and phrases.
GP02: VOCALISE adds an emotional vocal component to the already-diverse GRAVITY family of instruments. Featuring an esteemed roster of professional vocalists, including Siobhan Magnus of American Idol Season 9, GP02: VOCALISE delivers a sonic sound palette unlike anything else in your cinematic collection.
Vocal Sessions
GP02: VOCALISE features evocative sustained vowels, phrases, and ensembles, meticulously sampled in the sympathetic vibrations of Brick Hill Studios and Heavyocity HQ. Our award-winning sound design team converted this dynamic source material into stylized, cinematic playable pads and phrases.
In our first-ever dedicated vocal instrument, we have presented vocals the way that only Heavyocity can - creating a cinematic vocal experience unlike any other vocal instrument on the market today.
Expert Sound Design
It’s no secret that Heavyocity’s prowess for creating cinematic sound design content is unparallelled in the industry, and GP02: VOCALISE is no exception to that rule. With precision processing and creative synthetic manipulation, these already-vibrant organic sound sources were given new life, and a commanding sonic voice.
3
2 About GP02: VOCALISE The GP02: VOCALISE Library is divided into four main categories:
Pads – playable vocal pads, which are divided into three sub-categories:
◦ Complex – a combination of three elements that are mixed together.
◦ Element Menus – a different pad sound on each key.
◦ Elements – a single pad sound, playable over the keyboard.
Performance Palettes – a combination of sustained vocal sounds that slowly twist and 2 octaves of phrases. These sounds can be manipulated by the modwheel.
Phrase Menus – instruments with a different vocal phrase on each key.
Sustained Vowels – simple sustained vocal sounds.
These instruments make use the following interfaces, which will be referenced throughout the manual:
Complex Pads – pads with three layered sound elements. The interface includes a mixer and per-channel controls for filters, EQ, and even pitch bend options. This interface is used by the Complex Pads, the Performance Palettes, and the Sustained Vowels.
Menus – these are instruments with a different sound on each key.
Elements – instruments with a single sound stretched across a large playable key-range.
The interfaces share many of the same controls and features, but will each have a few unique elements. This manual will document the common shared features before highlighting these differences.
2.1 Key Mappings
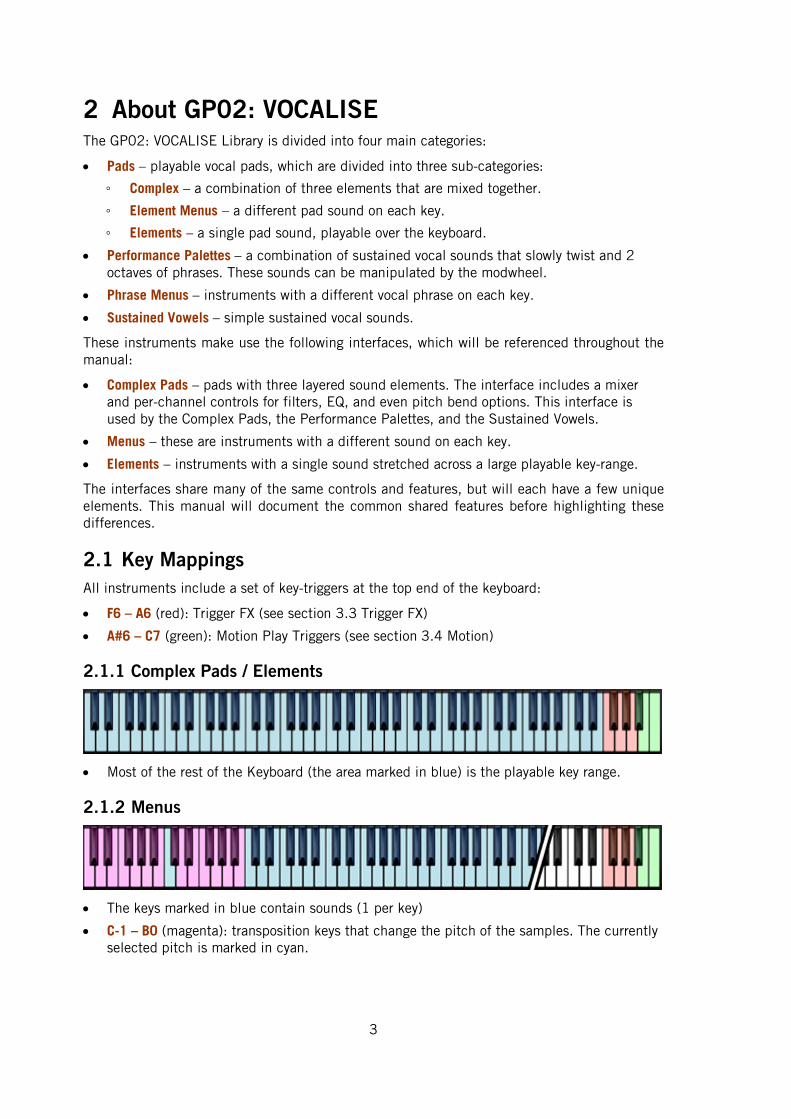
All instruments include a set of key-triggers at the top end of the keyboard:
F6 – A6 (red): Trigger FX (see section 3.3 Trigger FX)
A#6 – C7 (green): Motion Play Triggers (see section 3.4 Motion)
2.1.1 Complex Pads / Elements
Most of the rest of the Keyboard (the area marked in blue) is the playable key range.
2.1.2 Menus
The keys marked in blue contain sounds (1 per key)
C-1 – B0 (magenta): transposition keys that change the pitch of the samples. The currently selected pitch is marked in cyan.

4
3 Common Interface Controls Every instrument in the GP02: VOCALISE library shares a similar interface layout.
1 An Instrument from the GP02: VOCALISE library.
3.1 Navigation
The controls are spread across 4-5 pages, each dealing with different aspects of the instrument. These pages are:
1 MAIN – contains the main controls for the most commonly used parts of the instrument, like the volume envelopes, master effects and mixer.
2 EQ/FILT – contains a collection of equalizer and filter options for the instrument.
3 TFX – gives you access to the parameters of the Trigger Effects.
4 MOTION – contains the controls for the motion sequencer.
The tabs for accessing these pages are located at the bottom of the interface.
► You can navigate through the pages by clicking on their respective tabs.
5
3.2 The Main Page
3.2.1 Volume Envelopes
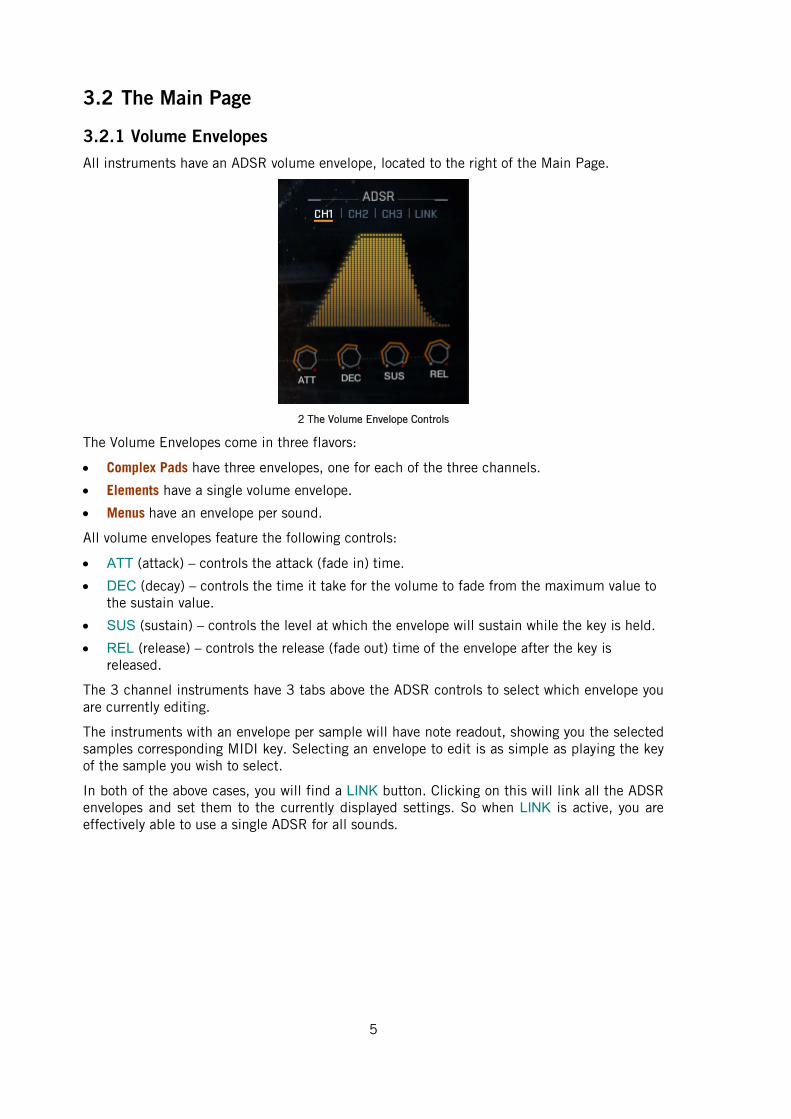
All instruments have an ADSR volume envelope, located to the right of the Main Page.
2 The Volume Envelope Controls
The Volume Envelopes come in three flavors:
Complex Pads have three envelopes, one for each of the three channels.
Elements have a single volume envelope.
Menus have an envelope per sound.
All volume envelopes feature the following controls:
ATT (attack) – controls the attack (fade in) time.
DEC (decay) – controls the time it take for the volume to fade from the maximum value to the sustain value.
SUS (sustain) – controls the level at which the envelope will sustain while the key is held.
REL (release) – controls the release (fade out) time of the envelope after the key is released.
The 3 channel instruments have 3 tabs above the ADSR controls to select which envelope you are currently editing.
The instruments with an envelope per sample will have note readout, showing you the selected samples corresponding MIDI key. Selecting an envelope to edit is as simple as playing the key of the sample you wish to select.
In both of the above cases, you will find a LINK button. Clicking on this will link all the ADSR envelopes and set them to the currently displayed settings. So when LINK is active, you are effectively able to use a single ADSR for all sounds.
6
3.2.2 Twist and Punish FX
All instruments have a central area in the Main Page that is divided into three to four tabs. The exact tabs differ depending on which instrument type you have loaded, but all instruments include the PUNISH and TWIST effects.
► You can navigate to these effects by clicking on the respective tab.
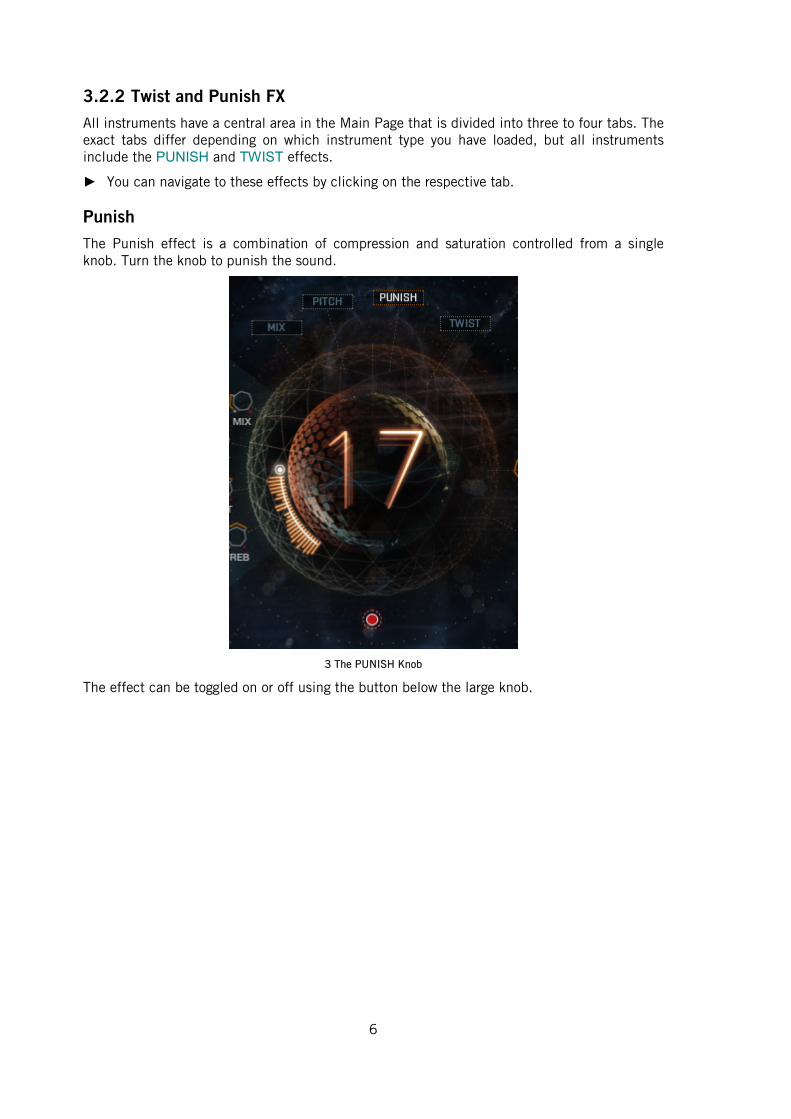
Punish
The Punish effect is a combination of compression and saturation controlled from a single knob. Turn the knob to punish the sound.
3 The PUNISH Knob
The effect can be toggled on or off using the button below the large knob.
7
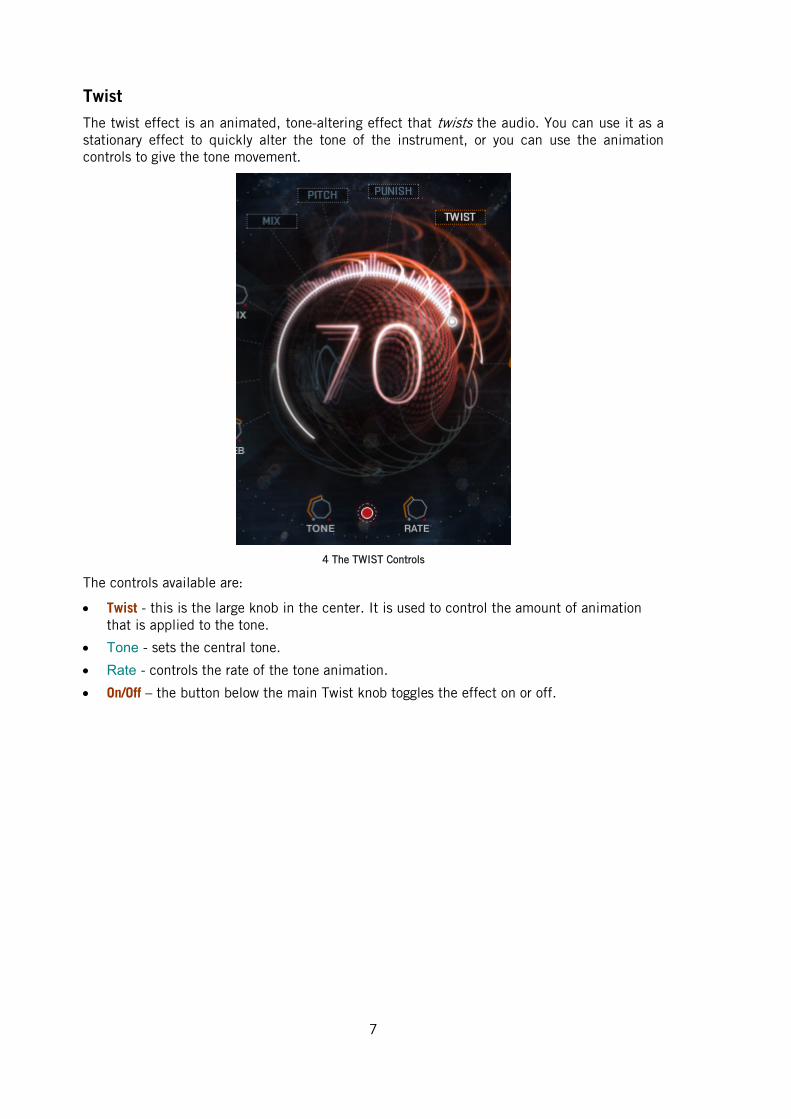
Twist
The twist effect is an animated, tone-altering effect that twists the audio. You can use it as a stationary effect to quickly alter the tone of the instrument, or you can use the animation controls to give the tone movement.
4 The TWIST Controls
The controls available are:
Twist - this is the large knob in the center. It is used to control the amount of animation that is applied to the tone.
Tone - sets the central tone.
Rate - controls the rate of the tone animation.
On/Off – the button below the main Twist knob toggles the effect on or off.
8
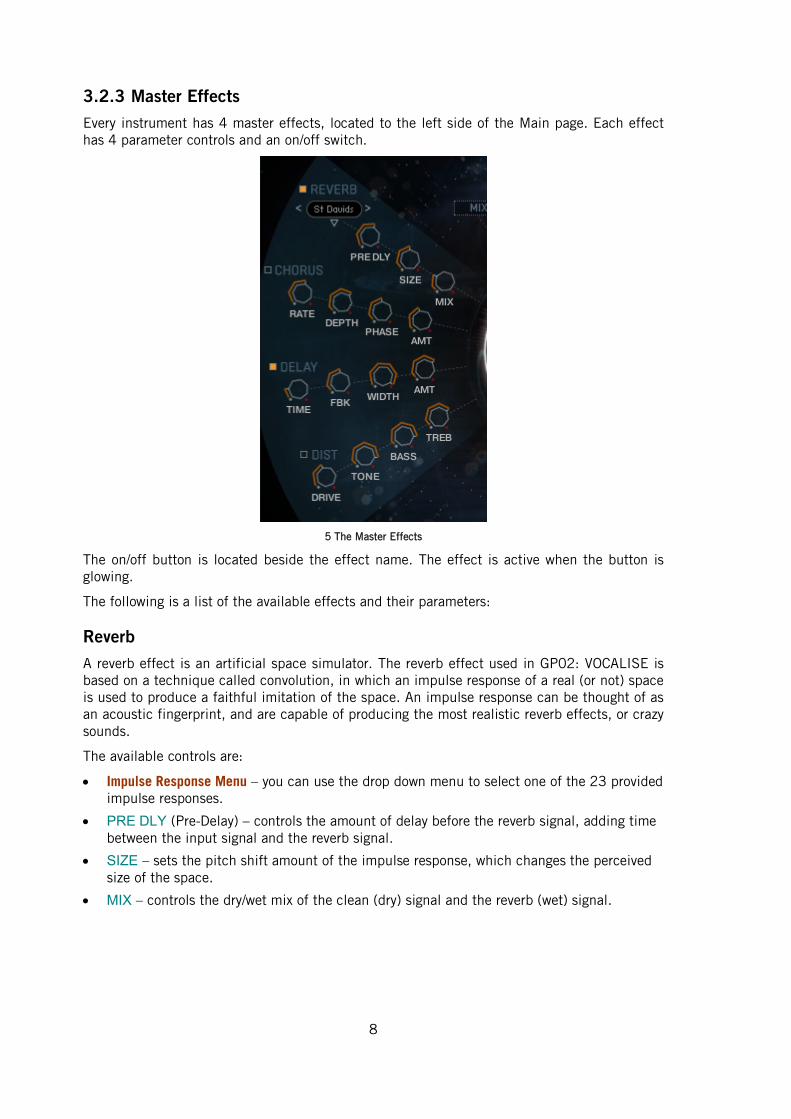
3.2.3 Master Effects
Every instrument has 4 master effects, located to the left side of the Main page. Each effect has 4 parameter controls and an on/off switch.
5 The Master Effects
The on/off button is located beside the effect name. The effect is active when the button is glowing.
The following is a list of the available effects and their parameters:
Reverb
A reverb effect is an artificial space simulator. The reverb effect used in GP02: VOCALISE is based on a technique called convolution, in which an impulse response of a real (or not) space is used to produce a faithful imitation of the space. An impulse response can be thought of as an acoustic fingerprint, and are capable of producing the most realistic reverb effects, or crazy sounds.
The available controls are:
Impulse Response Menu – you can use the drop down menu to select one of the 23 provided impulse responses.
PRE DLY (Pre-Delay) – controls the amount of delay before the reverb signal, adding time between the input signal and the reverb signal.
SIZE – sets the pitch shift amount of the impulse response, which changes the perceived size of the space.
MIX – controls the dry/wet mix of the clean (dry) signal and the reverb (wet) signal.
9
Chorus
The Chorus effect is a modulated delay; it can be used to thicken the sound and give a sense of movement to the instrument timbre.
The available controls are:
RATE – controls the rate of modulation (or movement) in the effect.
DEPTH – controls the intensity of the modulation.
PHASE – adjusts the LFO phase between the left and right channels, effectively working as a stereo width control.
AMT (amount) – controls the output level of the modulated signal.
Delay
A delay effect produces a version of the signal that is delayed in time. When mixed with the original signal, this can produce an echo effect. Additional echoes can be created by feeding the delay output back into the effect input.
The available controls are:
TIME – the time between the original signal and the delayed signal (i.e. the time between echoes).
FBK (feedback) – controls how much of the delayed signal is fed back into the effect's input. In other words, this controls the strength of the repeating echoes.
WIDTH – controls the stereo width of the echoes.
AMT (amount) – controls the output level of the delayed signal.
Distortion
The distortion effect emulates the sound of an overdriven analogue circuit. This makes the sound "heavier" by adding overtones and compressing the dynamics.
The available controls are:
DRIVE – controls the amount the signal is overdriven, i.e. the distortion amount.
TONE – controls the tone of the output. Lowering the value of this control will lower the amount of high frequencies present in the output signal.
BASS – controls the level of the bass frequencies.
TREB (treble) – controls the level of the high (treble) frequencies.
10
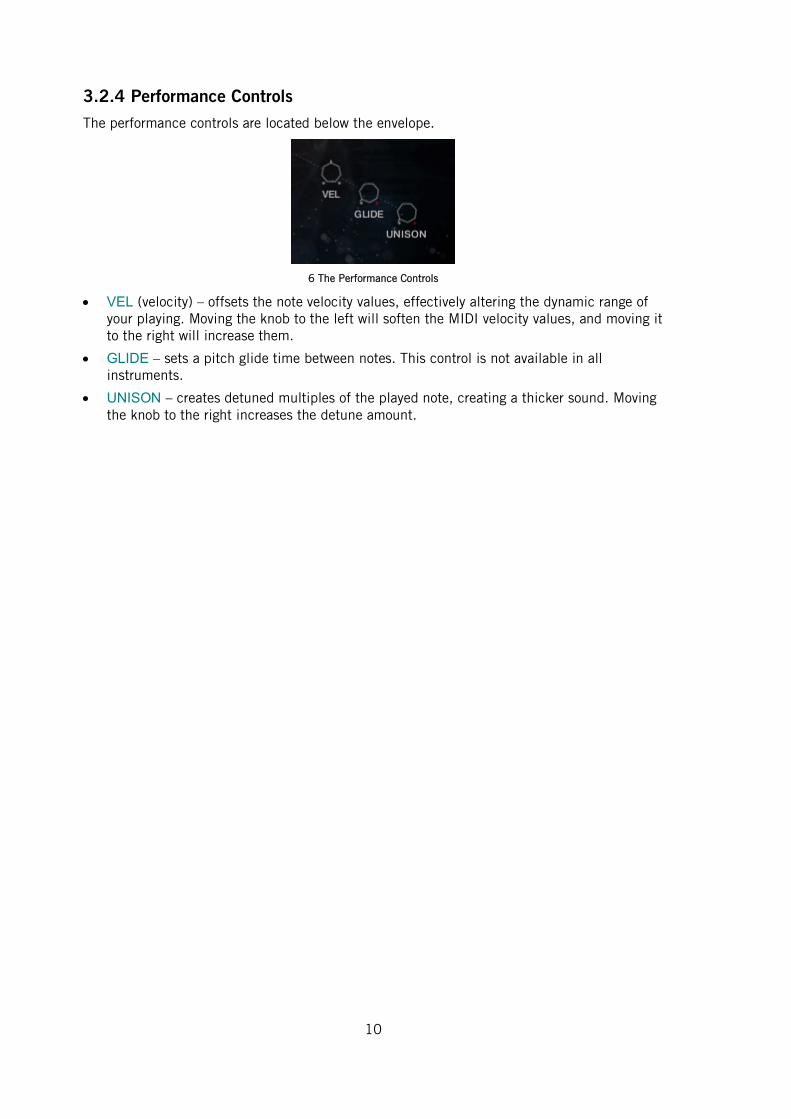
3.2.4 Performance Controls
The performance controls are located below the envelope.
6 The Performance Controls
VEL (velocity) – offsets the note velocity values, effectively altering the dynamic range of your playing. Moving the knob to the left will soften the MIDI velocity values, and moving it to the right will increase them.
GLIDE – sets a pitch glide time between notes. This control is not available in all instruments.
UNISON – creates detuned multiples of the played note, creating a thicker sound. Moving the knob to the right increases the detune amount.
11
3.3 Trigger FX
The Trigger FX are effects that are triggered with MIDI Keys F6-A6. They allow you to temporarily alter or completely mangle a sound quickly and with ease.
There are five Trigger FX available:
1 Distortion (F6) - similar to the distortion in the Master Effects section.
2 LoFi (F#6) - a digital quality reduction effect. The results can range from retro and gritty, to extreme decimation.
3 Filter (G6) - a choice of low pass or high pass filters to alter the timbre of the instrument.
4 Panner (G#6) - modulates the stereo field to move the sound between the left and right channels.
5 Delay (A6) - a delay/echo effect.
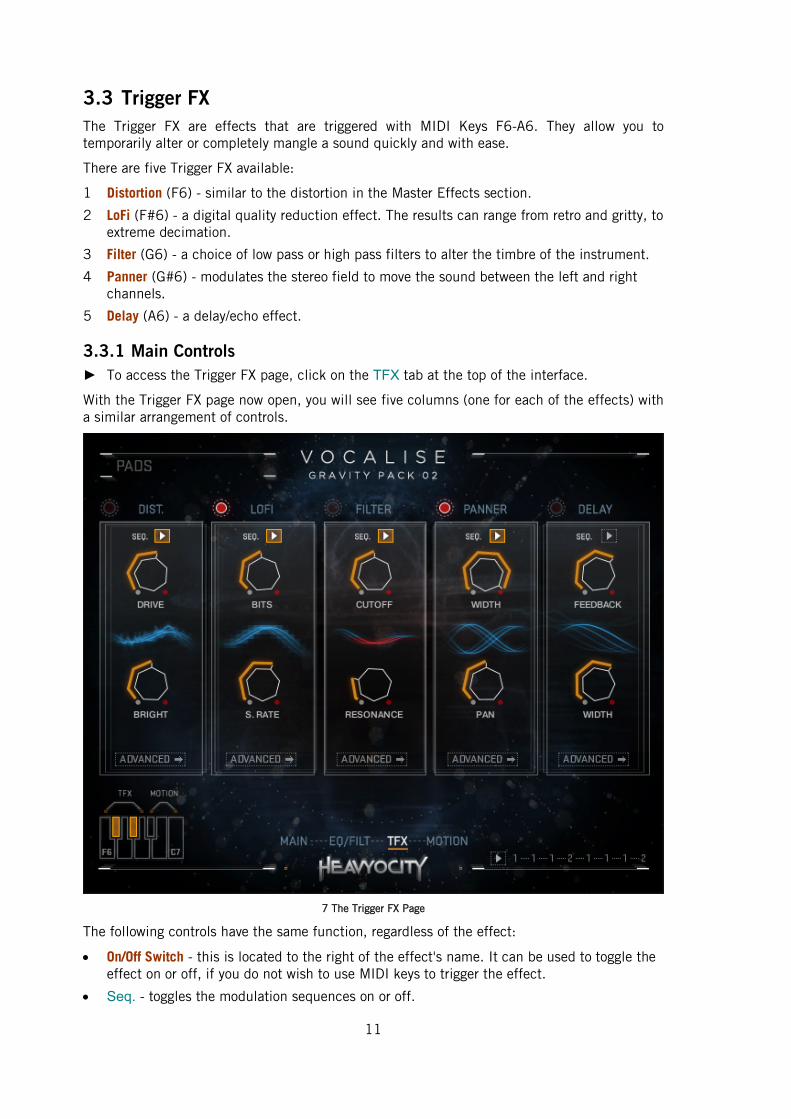
3.3.1 Main Controls
► To access the Trigger FX page, click on the TFX tab at the top of the interface.
With the Trigger FX page now open, you will see five columns (one for each of the effects) with a similar arrangement of controls.
7 The Trigger FX Page
The following controls have the same function, regardless of the effect:
On/Off Switch - this is located to the right of the effect's name. It can be used to toggle the effect on or off, if you do not wish to use MIDI keys to trigger the effect.
Seq. - toggles the modulation sequences on or off.
12
Advanced - opens the advanced controls for the effect.
As well as these controls, all of the effects have two parameters that you can edit. These alter the sound of the effect in some way:
Distortion
◦ Drive - controls the overdrive amount.
◦ Damp - controls a lowpass filter that can be used to soften the harsh overtones produceed by the distortion.
LoFi
◦ Bits - controls the bit-depth of the output. A lower bit-depth means more digital distortion.
◦ S. Rate - controls the sample rate of the output. Lowering the sample rate will produce aliasing - a digital artefact that is usually undesired, but can also be used creatively.
Filter
◦ Cutoff - controls the cutoff frequency of the filter.
◦ Reso. - controls the resonant peak at the cutoff frequency.
Panner
◦ Width - controls the stereo width (how far a sound can be positioned in the panoramic field).
◦ Pan - controls the stereo position of the sound.
Delay
◦ Feedback - controls how much of the delayed signal is fed back into the effect's input. In other words, this controls the strength of the repeating echoes.
◦ Width. - controls the frequency (rate) of the LFO.
13
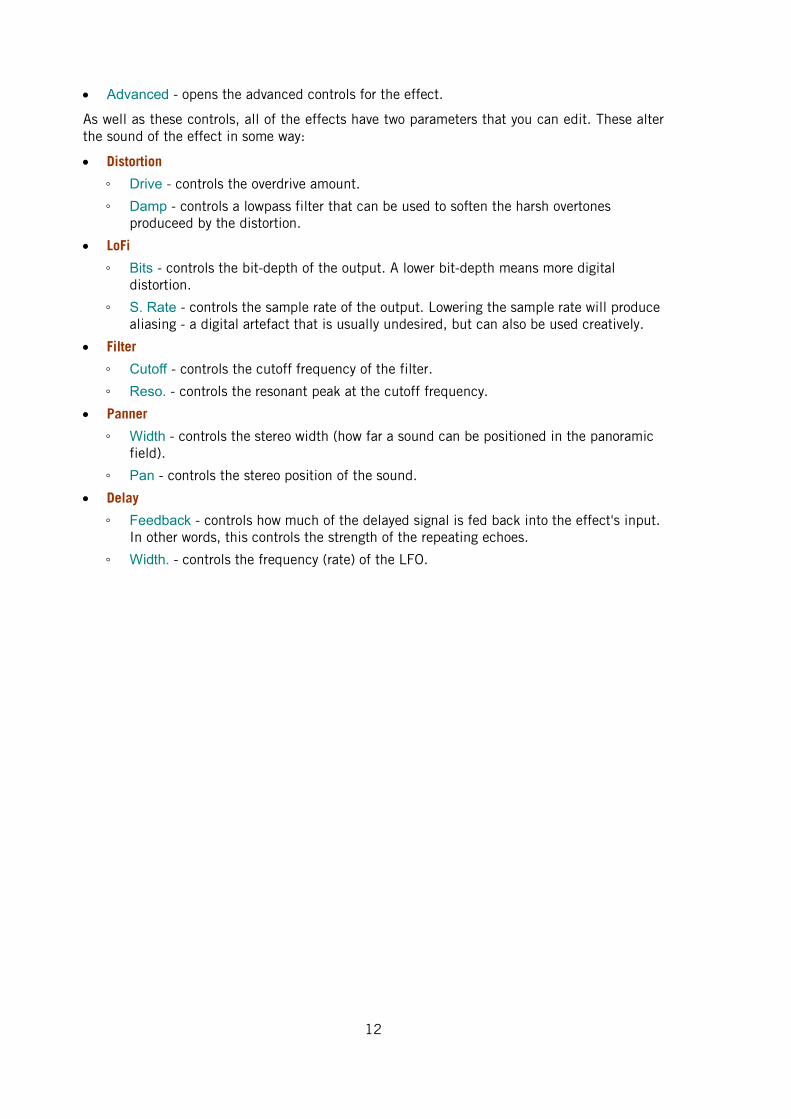
3.3.2 Advanced Controls
Every effect in the Trigger FX has the same advanced control layout.
► The advanced page for a specific effect is accessed by clicking on the ADVANCED button at the bottom of the effect's column.
With the advanced page now open, you will see the effect control column has moved to the far left position, with the advanced controls filling the rest of the page.
8 The Trigger FX Advanced View
You can navigate between effects by using the arrow buttons to the bottom left of the page.
► To return to the main Trigger FX page, click on the BACK button between the navigation arrows to the bottom left.
Step Sequencers
Each of the main parameter controls is linked to a step sequencer.
► You can draw in a sequence by simply clicking and dragging with the mouse.
The master rate for both of the sequences is controlled by the RATE knob located between the two step sequences.
The additional controls are the same for each of the sequences, but control them individually.
RANGE – sets the modulation amount applied from the sequence to the parameter, i.e. the intensity of the modulation.
SMOOTH – sets the smoothing amount between steps. When set all the way to the left, no smoothing will occur, and when set all the way to the right, smoothing will happen constantly so no stepping will be heard.
16/32 – sets the number of steps for the sequence. You can select 16 or 32 steps.
14
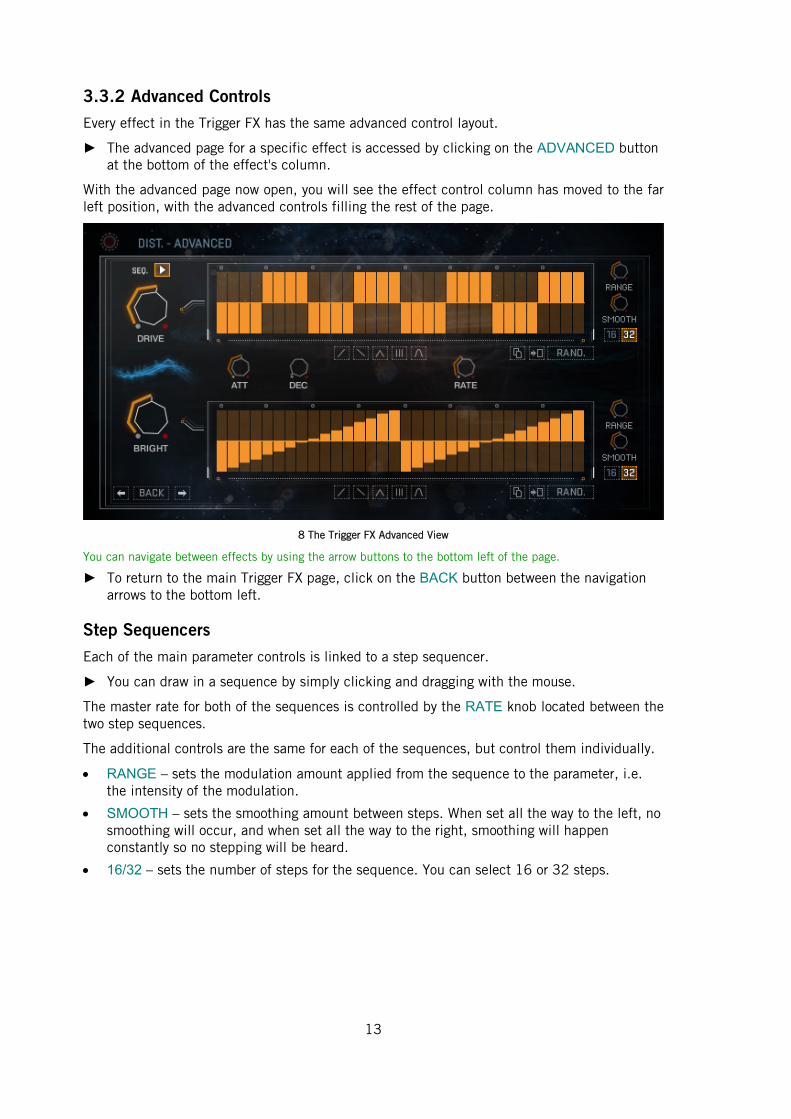
Below each of the sequences is a row of 5 buttons which populate the sequences with preset shapes. These are (from left to right):
Ramp Up
Ramp Down
Triangle
Comb
Sine
1. Clicking on one of these buttons will open a menu, asking you how many cycles of the preset shape you would like in the sequence.
2. Clicking on a number will then load that many cycles into the sequence.
The Comb shape is an exception, as the number specifies the length of each comb column, rather than the number of columns.
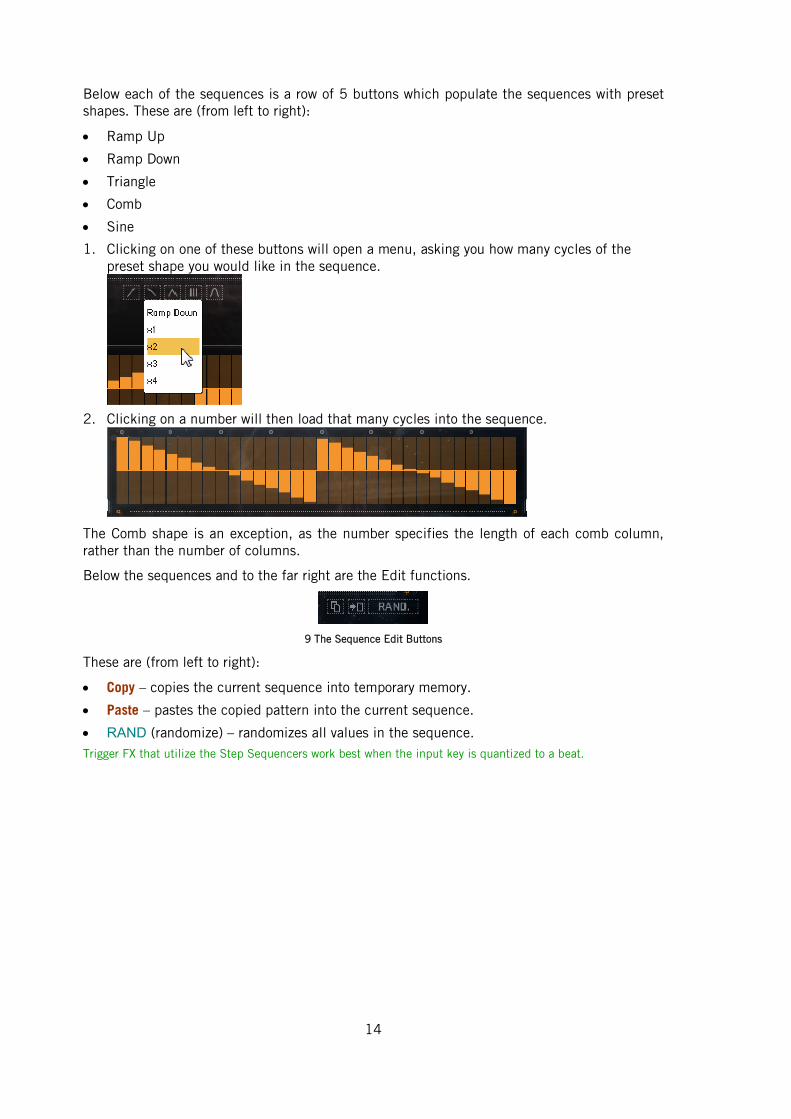
Below the sequences and to the far right are the Edit functions.
9 The Sequence Edit Buttons
These are (from left to right):
Copy – copies the current sequence into temporary memory.
Paste – pastes the copied pattern into the current sequence.
RAND (randomize) – randomizes all values in the sequence.
Trigger FX that utilize the Step Sequencers work best when the input key is quantized to a beat.

15
Effect Envelope
Between the step sequencers you will also find the effect envelope. This is a simple Attack/Decay envelope that sets the fade-in and fade-out times for the effect when it is triggered. The controls are:
ATT (attack) – sets the fade in time for the effect, i.e. the amount of time it takes for the effect to go from neutral to full effect after the effect is triggered.
DEC (decay) – sets the fade out time for the effect, i.e. the amount of time it takes for the effect to go from full to neutral after the effect is deactivated.
Effect Specific Controls
The Filter and Delay effects both have specific controls that are accessed on their Advanced Pages. They are:
Filter: a switch for the filter mode, with options for lowpass (LO) and Highpass (HI) filter types.
Delay: a knob for selecting the delay time.
16
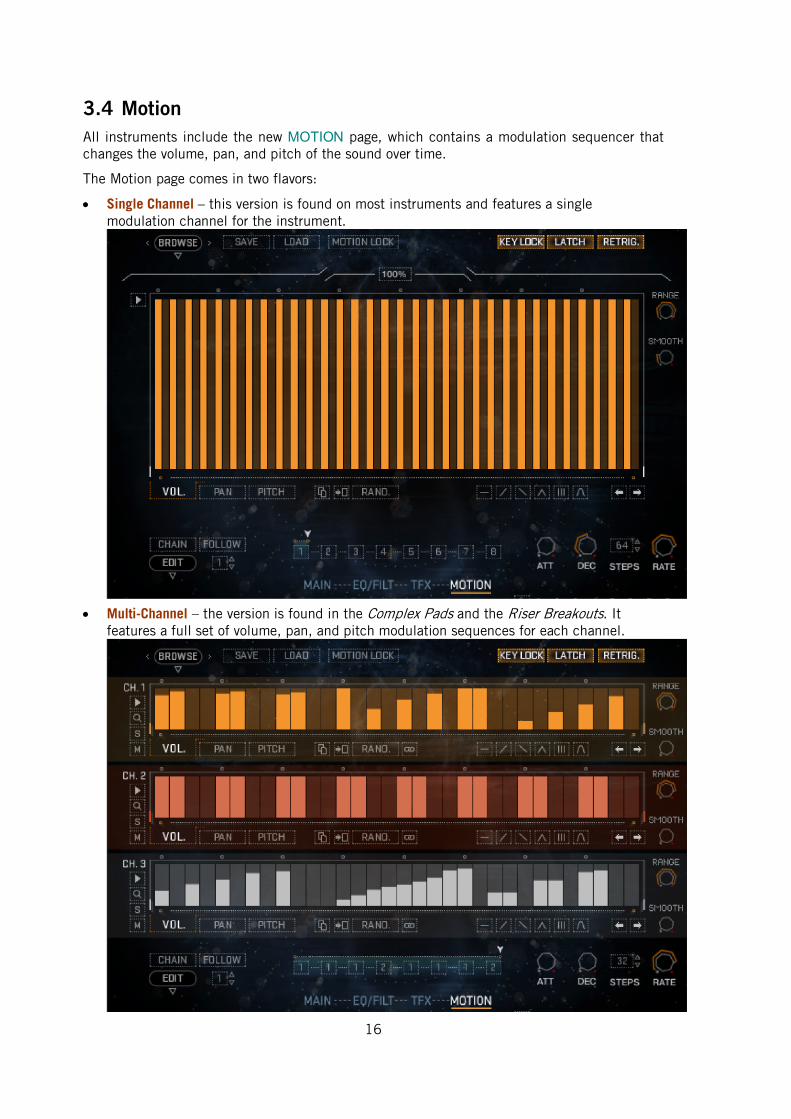
3.4 Motion
All instruments include the new MOTION page, which contains a modulation sequencer that changes the volume, pan, and pitch of the sound over time.
The Motion page comes in two flavors:
Single Channel – this version is found on most instruments and features a single modulation channel for the instrument.
Multi-Channel – the version is found in the Complex Pads and the Riser Breakouts. It features a full set of volume, pan, and pitch modulation sequences for each channel.
17
3.4.1 Triggering Motion Playback
The Motion sequences can be activated and deactivated in three ways:
By using MIDI keys A#6 to C7.
By clicking on the play button to the left of the sequence.
By clicking on the global play button located to the bottom right of all pages.
To the top right of the Motion page are three buttons that influence how the Motion sequencer reacts in incoming MIDI:
KEY LOCK – when active, the three trigger keys (A#6 to C7) are linked together and act as one. This only affects the Multi-Channel version of the Motion Sequencer.
LATCH – when active, the MIDI triggering of the Motion Sequencer only responds to notes pressed. The first press starts the sequence and the second press stops it. When inactive, a note pressed will start the sequence, and the sequence will stop when the key is lifted.
RETRIG. – when active, the sequence will restart from the beginning when a non-legato note is played. Legato (overlapping) notes will not restart the sequence.
3.4.2 Patterns and the Pattern Chain
Each Motion sequence can contain up to 8 different patterns, which can be chained together in any order in the Pattern Chain.
A pattern can be selected to view and edit by clicking and dragging on the numeric value to the bottom left of the Motion Page (beside the EDIT menu).
The Pattern Chain can be toggled on or off by clicking on the CHAIN button:
When the Chain is active, the played pattern will cycle through the patterns defined in the chain.
When the Chain is inactive, the played pattern will be whichever pattern is currently selected for viewing/editing.
The FOLLOW button links the displayed pattern to the chain. So if the Chain is active, and the sequence is running, the displayed pattern will automatically update as a new pattern is reached in the chain.
Editing the Pattern Chain
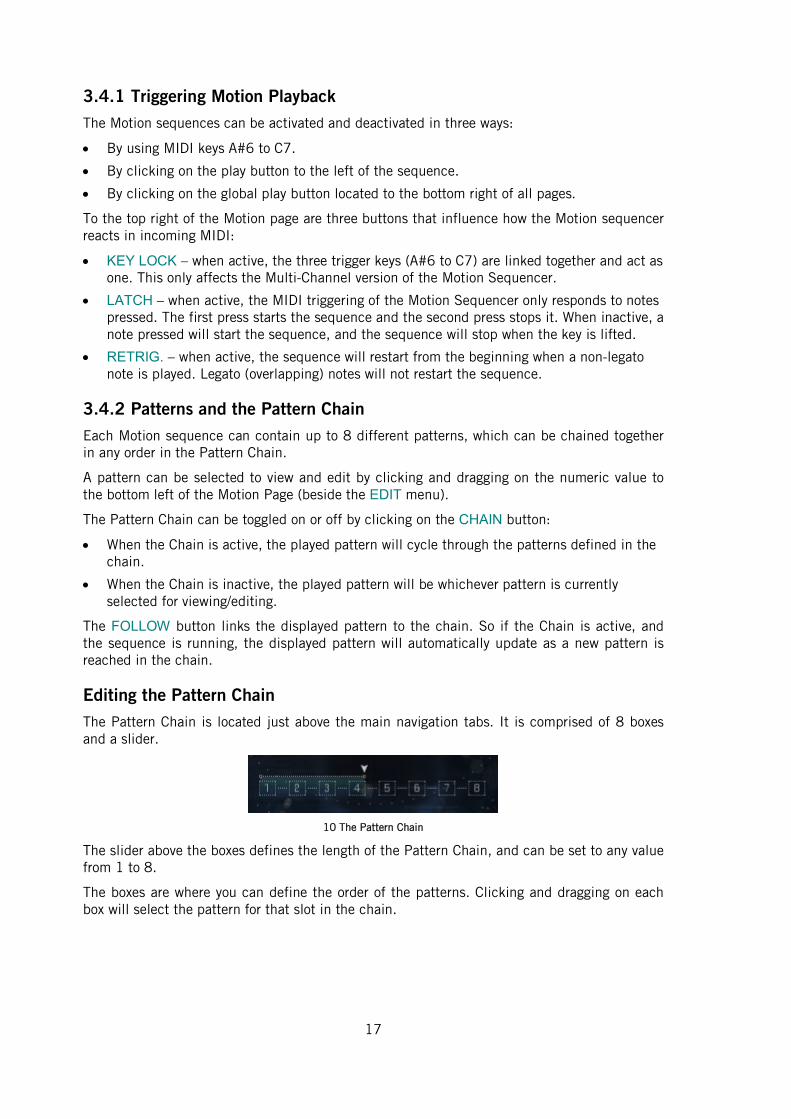
The Pattern Chain is located just above the main navigation tabs. It is comprised of 8 boxes and a slider.
10 The Pattern Chain
The slider above the boxes defines the length of the Pattern Chain, and can be set to any value from 1 to 8.
The boxes are where you can define the order of the patterns. Clicking and dragging on each box will select the pattern for that slot in the chain.
18
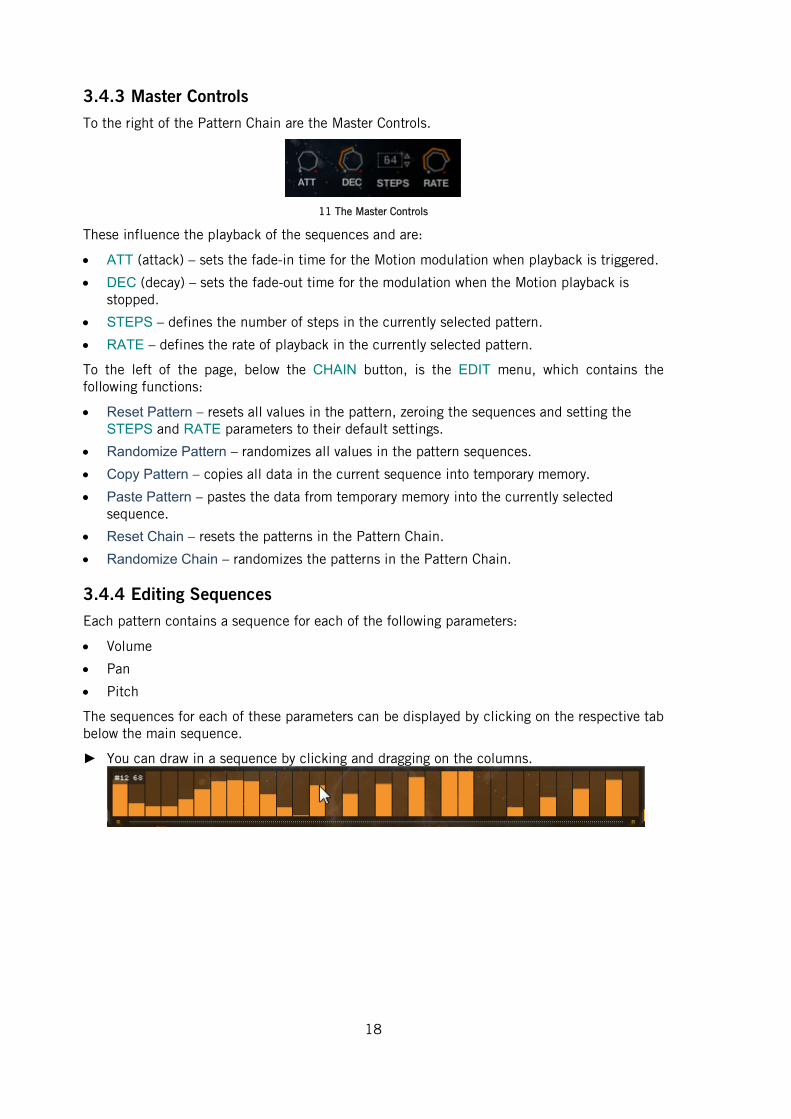
3.4.3 Master Controls
To the right of the Pattern Chain are the Master Controls.
11 The Master Controls
These influence the playback of the sequences and are:
ATT (attack) – sets the fade-in time for the Motion modulation when playback is triggered.
DEC (decay) – sets the fade-out time for the modulation when the Motion playback is stopped.
STEPS – defines the number of steps in the currently selected pattern.
RATE – defines the rate of playback in the currently selected pattern.
To the left of the page, below the CHAIN button, is the EDIT menu, which contains the following functions:
Reset Pattern – resets all values in the pattern, zeroing the sequences and setting the STEPS and RATE parameters to their default settings.
Randomize Pattern – randomizes all values in the pattern sequences.
Copy Pattern – copies all data in the current sequence into temporary memory.
Paste Pattern – pastes the data from temporary memory into the currently selected sequence.
Reset Chain – resets the patterns in the Pattern Chain.
Randomize Chain – randomizes the patterns in the Pattern Chain.
3.4.4 Editing Sequences
Each pattern contains a sequence for each of the following parameters:
Volume
Pan
Pitch
The sequences for each of these parameters can be displayed by clicking on the respective tab below the main sequence.
► You can draw in a sequence by clicking and dragging on the columns.
19
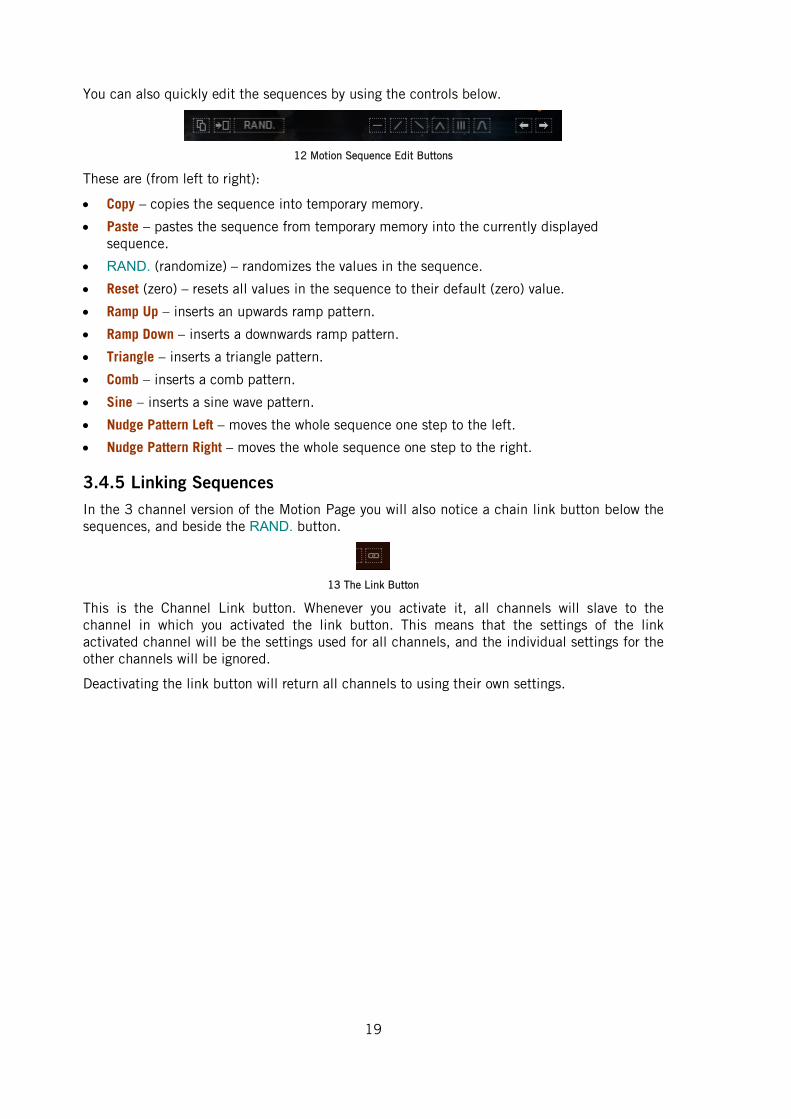
You can also quickly edit the sequences by using the controls below.
12 Motion Sequence Edit Buttons
These are (from left to right):
Copy – copies the sequence into temporary memory.
Paste – pastes the sequence from temporary memory into the currently displayed sequence.
RAND. (randomize) – randomizes the values in the sequence.
Reset (zero) – resets all values in the sequence to their default (zero) value.
Ramp Up – inserts an upwards ramp pattern.
Ramp Down – inserts a downwards ramp pattern.
Triangle – inserts a triangle pattern.
Comb – inserts a comb pattern.
Sine – inserts a sine wave pattern.
Nudge Pattern Left – moves the whole sequence one step to the left.
Nudge Pattern Right – moves the whole sequence one step to the right.
3.4.5 Linking Sequences
In the 3 channel version of the Motion Page you will also notice a chain link button below the sequences, and beside the RAND. button.
13 The Link Button
This is the Channel Link button. Whenever you activate it, all channels will slave to the channel in which you activated the link button. This means that the settings of the link activated channel will be the settings used for all channels, and the individual settings for the other channels will be ignored.
Deactivating the link button will return all channels to using their own settings.
20
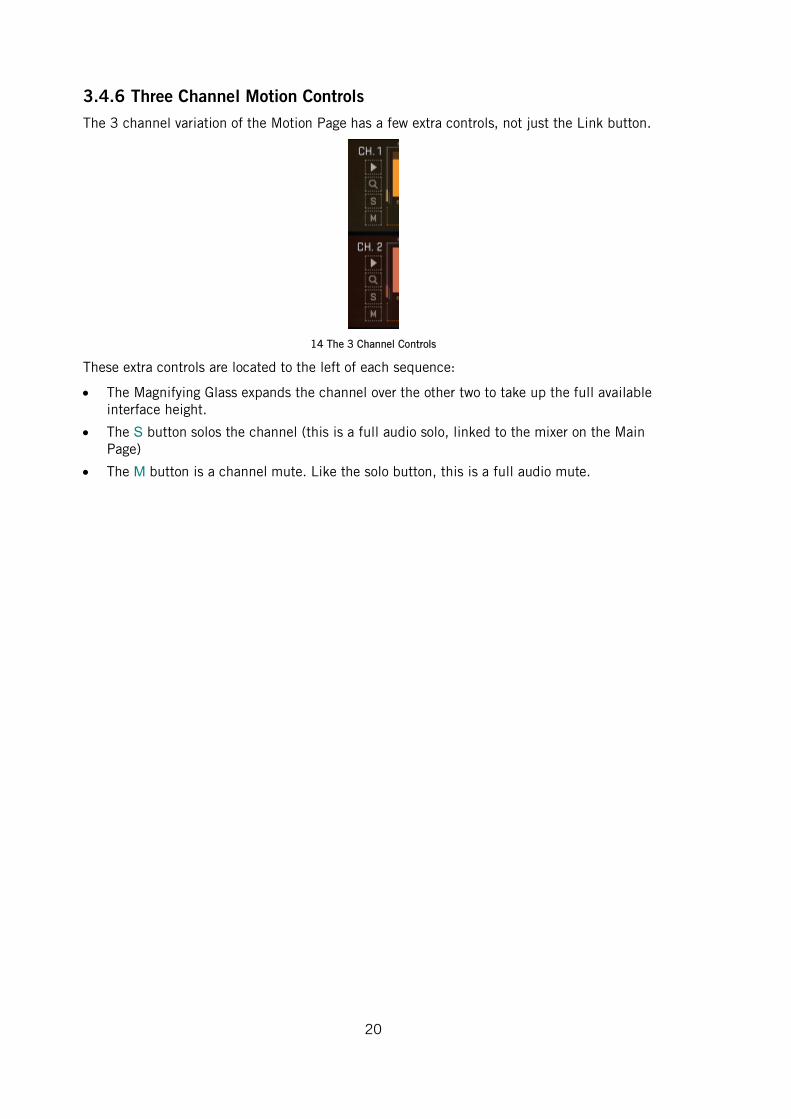
3.4.6 Three Channel Motion Controls
The 3 channel variation of the Motion Page has a few extra controls, not just the Link button.
14 The 3 Channel Controls
These extra controls are located to the left of each sequence:
The Magnifying Glass expands the channel over the other two to take up the full available interface height.
The S button solos the channel (this is a full audio solo, linked to the mixer on the Main Page)
The M button is a channel mute. Like the solo button, this is a full audio mute.
21
3.4.7 Presets
The entire state of the Motion page can be saved and loaded as presets.
To save a preset:
1. Click on the SAVE button.
2. A window will open asking where you want to save the preset. It is suggested you save your presets in the following locations:
◦ …/<GP02: VOCALISE Library Directory>/Presets/Complex/User/ - for 3
channel presets.
◦ …/< GP02: VOCALISE Library Directory>/Presets/Single/User/ - for
single channel presets.
3. When you have located where you wish to save the preset, click the Save button.
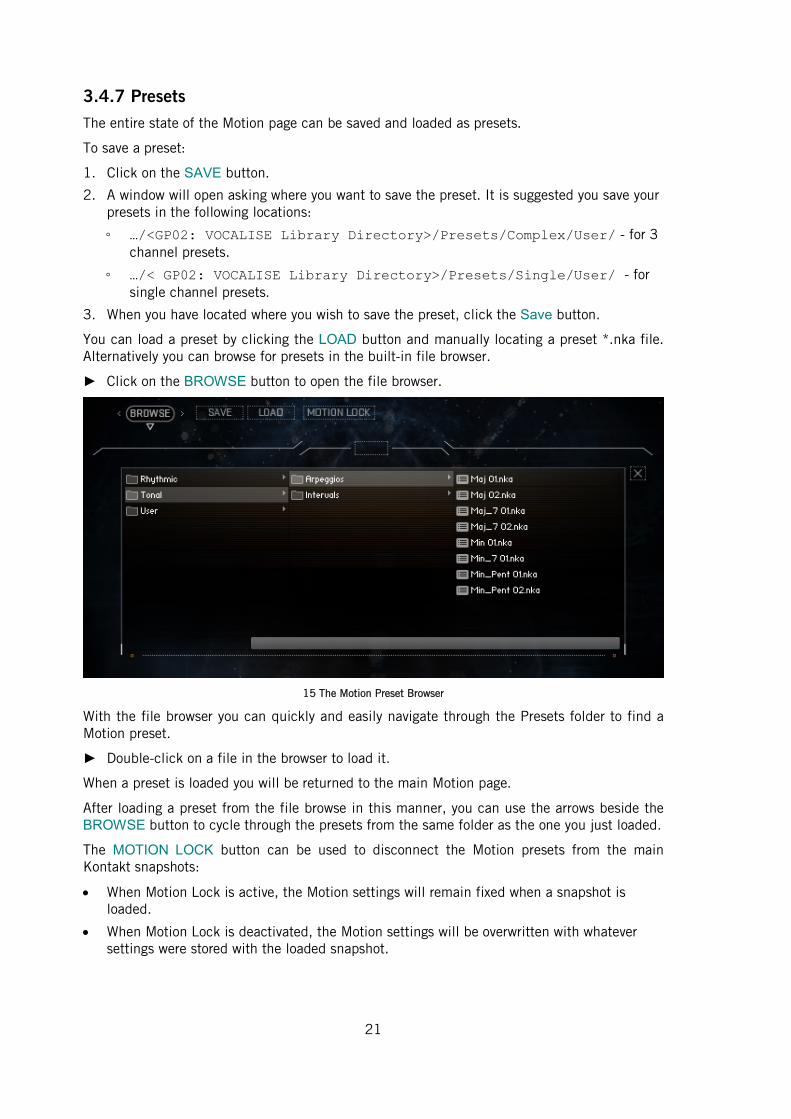
You can load a preset by clicking the LOAD button and manually locating a preset *.nka file. Alternatively you can browse for presets in the built-in file browser.
► Click on the BROWSE button to open the file browser.
15 The Motion Preset Browser
With the file browser you can quickly and easily navigate through the Presets folder to find a Motion preset.
► Double-click on a file in the browser to load it.
When a preset is loaded you will be returned to the main Motion page.
After loading a preset from the file browse in this manner, you can use the arrows beside the BROWSE button to cycle through the presets from the same folder as the one you just loaded.
The MOTION LOCK button can be used to disconnect the Motion presets from the main Kontakt snapshots:
When Motion Lock is active, the Motion settings will remain fixed when a snapshot is loaded.
When Motion Lock is deactivated, the Motion settings will be overwritten with whatever settings were stored with the loaded snapshot.
22
3.5 EQs and Filters
3.5.1 Sample/Channel EQ
An Equalizer (commonly known as an EQ) is an effect designed to control the levels of different parts of a signal’s spectrum. The effect can be used in a subtle manner to compensate for imperfections in recordings, or help fit sounds in a mix; or it can be used in an extreme way to creatively alter the timbre of an instrument.
The exact routing of the EQ differs for each instrument type:
Complex Pads – each channel has its own EQ.
Menus – each sample/key has its own EQ.
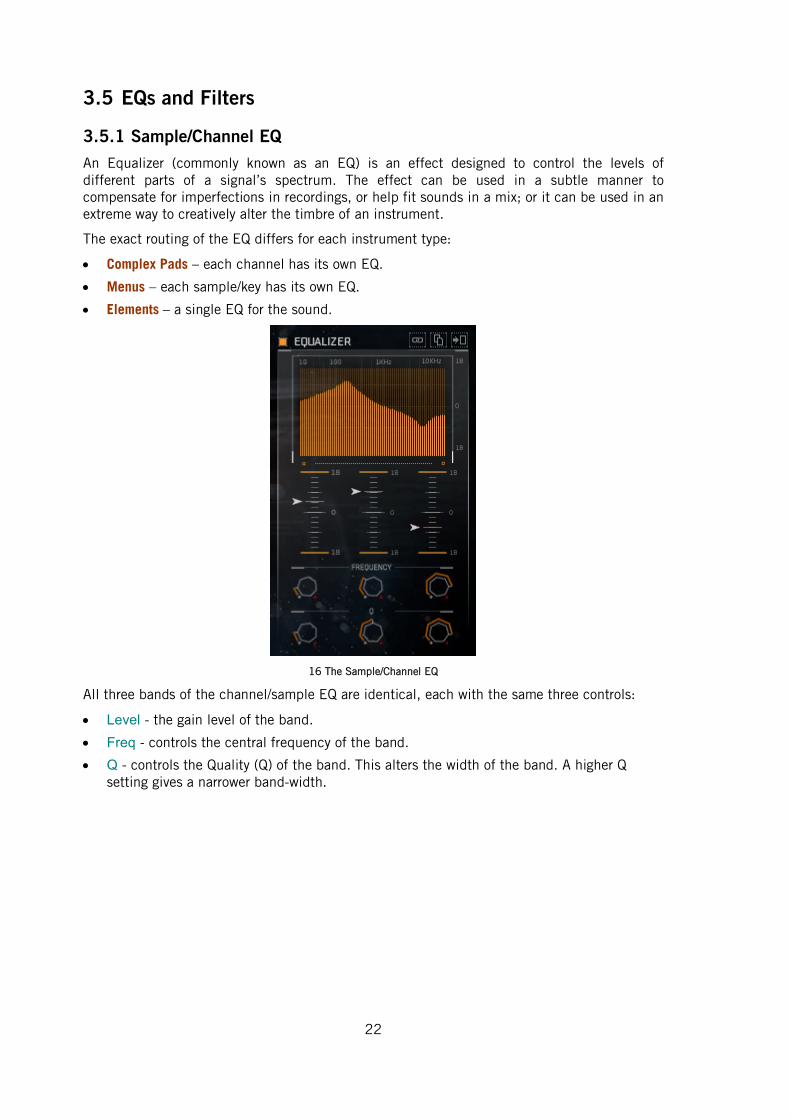
Elements – a single EQ for the sound.
16 The Sample/Channel EQ
All three bands of the channel/sample EQ are identical, each with the same three controls:
Level - the gain level of the band.
Freq - controls the central frequency of the band.
Q - controls the Quality (Q) of the band. This alters the width of the band. A higher Q setting gives a narrower band-width.
23
3.5.2 Filters
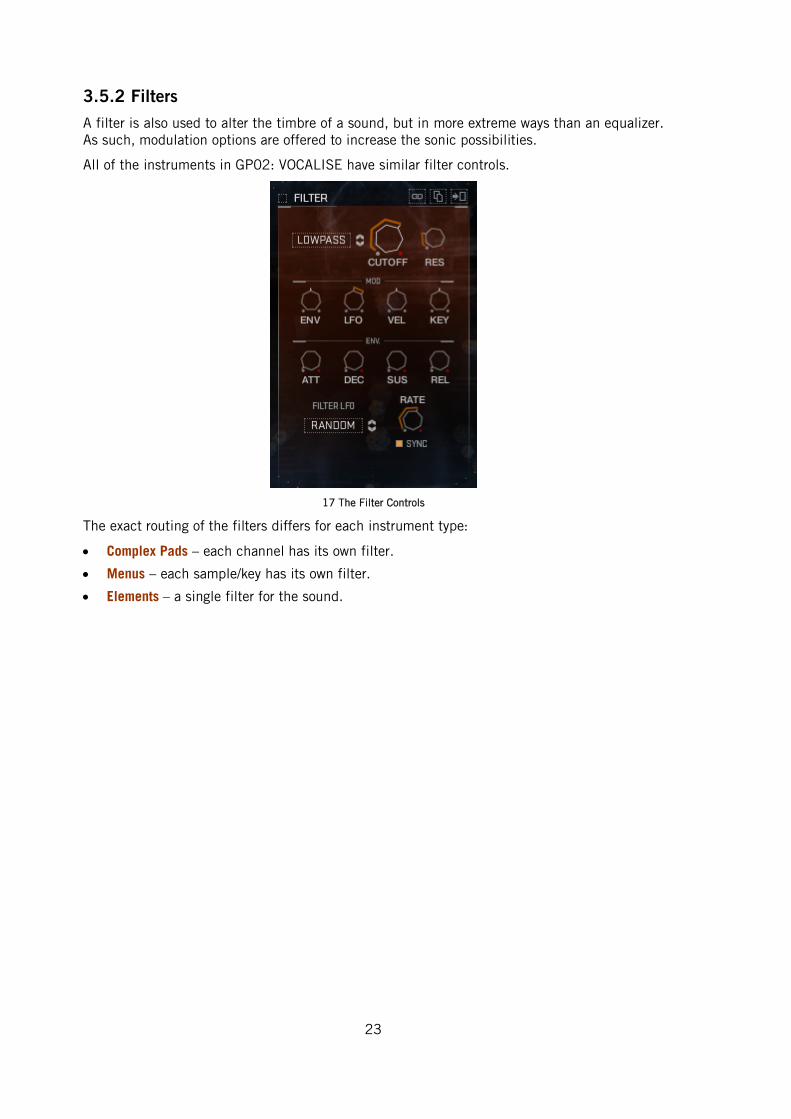
A filter is also used to alter the timbre of a sound, but in more extreme ways than an equalizer. As such, modulation options are offered to increase the sonic possibilities.
All of the instruments in GP02: VOCALISE have similar filter controls.
17 The Filter Controls
The exact routing of the filters differs for each instrument type:
Complex Pads – each channel has its own filter.
Menus – each sample/key has its own filter.
Elements – a single filter for the sound.
24
Main Controls
You can select one of five filter modes by clicking and dragging on the filter type or by clicking on the arrows to the right of the filter type. The filter modes available are:
LOWPASS – a 4-pole Lowpass. This removes all of the frequencies above the cutoff frequency.
BANDPASS – a 4-pole Bandpass. This removes all of the frequencies except for those in a narrow band around the cutoff frequency.
HIGHPASS – a 4-pole Highpass. This removes all of the frequencies below the cutoff frequency.
VOWEL – the vowel filter uses a simple double-peak system to mimic an unspecified vowel sound.
FORMANT – a formant filter. This is a more advanced alternative to the vowel filter and more accurately models the frequency response of the human vocal tract as it forms different vowels.
To the right of the filter mode selector are the main controls:
CUTOFF – controls the cutoff frequency of the filter. This means different things to the different filter modes.
RES – For the LP, HP, and BP filter modes, this controls the resonant peak at the cutoff frequency. For the Vowel and Formant filters, this controls the intensity (or sharpness) of the filter.
Modulation Controls
The section labelled MOD contains 4 controls for settings the modulation amounts:
ENV – sets the amount of modulation applied from the envelope to the filter cutoff.
LFO – sets the amount of modulation applied from the LFO to the filter cutoff.
KEY – sets the MIDI key tracking of the filter cutoff, i.e. how much the cutoff frequency will follow the notes played.
VEL – sets the amount of modulation applied from the MIDI keyboard velocity to the filter cutoff.
All of these controls are bipolar, and thus are neutral (have zero affect) at the middle position, apply the modulation negatively when moved to the left, and apply the modulation positively when moved to the right.
Envelope Controls
The next section, labelled ENV, contains controls that are for the filter envelope:
ATT – controls the attack time (or fade in time) of the envelope.
DEC – controls the decay time of the envelope - the time it takes for the envelope value to reach the sustain level after the attack phase is finished.
SUS – controls the sustain level of the envelope - the level at which the envelope will sustain after the decay phase, and while the MIDI note is held.
REL – controls the release time of the envelope - the time it takes for the envelope value to return to zero after the MIDI note is released.
25
Filter LFO
The lowest area of the Filter section is the FILTER LFO. An LFO is a Low Frequency Oscillator, used to modulate parameters.
The two controls to the right define the rate of the LFO:
RATE – is the main LFO rate control.
SYNC – when this button is active, the LFO rate will sync to the host tempo; when it is inactive, the LFO rate is set freely in hertz.
To the left of this section is the LFO shape selector. There are four shapes to choose from:
SINE
TRIANGLE
SQUARE
RAMP + (upwards ramp)
RAMP - (downwards ramp)
RANDOM
You can select an LFO shape by clicking and dragging on this area, or by clicking on the arrow buttons to the right.
26
3.5.3 Copy, Paste, and Link
For all instruments apart from the Elements, the settings of the EQs and Filters can be copied and pasted.
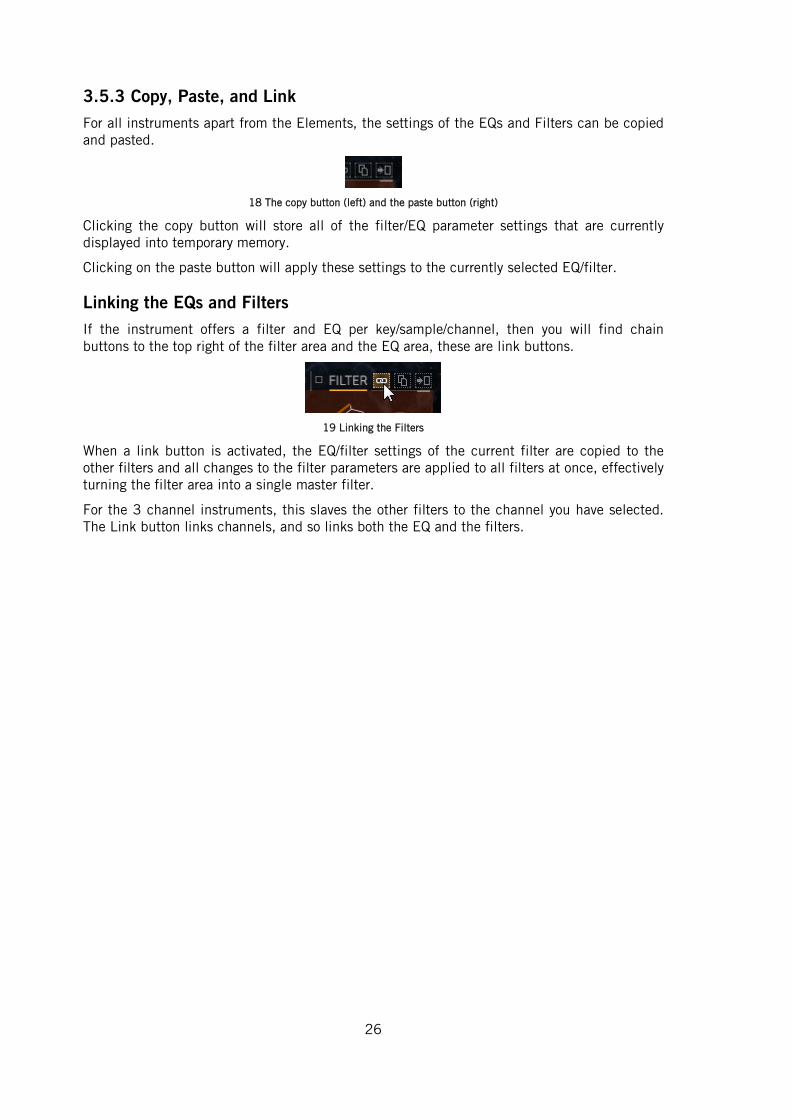
18 The copy button (left) and the paste button (right)
Clicking the copy button will store all of the filter/EQ parameter settings that are currently displayed into temporary memory.
Clicking on the paste button will apply these settings to the currently selected EQ/filter.
Linking the EQs and Filters
If the instrument offers a filter and EQ per key/sample/channel, then you will find chain buttons to the top right of the filter area and the EQ area, these are link buttons.
19 Linking the Filters
When a link button is activated, the EQ/filter settings of the current filter are copied to the other filters and all changes to the filter parameters are applied to all filters at once, effectively turning the filter area into a single master filter.
For the 3 channel instruments, this slaves the other filters to the channel you have selected. The Link button links channels, and so links both the EQ and the filters.
27
3.5.4 Master EQ
Each instrument may have different Channel/Sample EQ options available, but all instruments include a Master EQ. This can be used to fit the instrument in a mix, or as a creative effect for altering the tonality of the instrument.
If the instrument is a 3 channel instrument, the Master EQ is accessed by clicking on the MASTER EQ tab in the EQ/FILT Page. If not, then the Master EQ is located on the left side of the EQ/FILT Page.
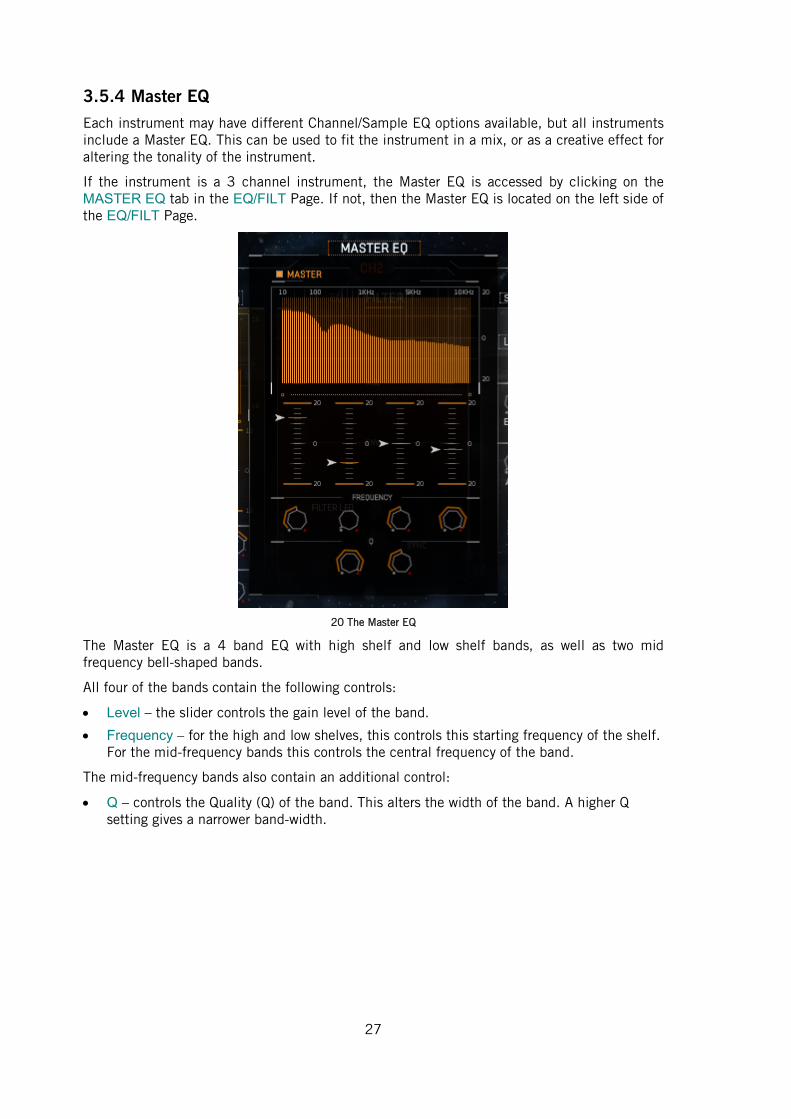
20 The Master EQ
The Master EQ is a 4 band EQ with high shelf and low shelf bands, as well as two mid frequency bell-shaped bands.
All four of the bands contain the following controls:
Level – the slider controls the gain level of the band.
Frequency – for the high and low shelves, this controls this starting frequency of the shelf. For the mid-frequency bands this controls the central frequency of the band.
The mid-frequency bands also contain an additional control:
Q – controls the Quality (Q) of the band. This alters the width of the band. A higher Q setting gives a narrower band-width.

28
4 The Complex Pads Interface The Complex Pad instruments use the 3 channel variations of the Volume Envelopes, the Motion Page, and the EQ/Filter Page.
On the Main Page, the central area has four tabs. The Punish and Twist tabs are already documented in section 3.2.2 Twist and Punish FX. The other two tabs are documented below…
4.1 Mixer ► Clicking on the MIX button opens the Mixer tab.
21 The Mixer Controls
The Complex Pads feature three different sounds. As such, a mixer is provided to allow you to blend these sounds together.
However, this mixer features a special Volume Mod feature, which is an LFO, phase offset between the channels in such a way as to allow undulating between the sounds.
Each channel has the following controls:
Pan – sets the stereo position of the channel.
Volume – sets the volume level of the channel.
MOD (volume mod amount) – controls the amount of volume modulation.
S (solo) – solos the channel, muting the audio of all other channels.
M (mute) – mutes the channel.
Beside each channel are controls for the sample start offset of each channel:
start – sets the sample start offset.
rand (random) – sets the sample start randomization amount.
Below the mixer are controls for the Volume Mod:
VOL MOD RATE – sets the rate of the Volume Mod LFO.
On/Off – the button below the VOL MOD RATE knob toggles the modulation on or off.
29
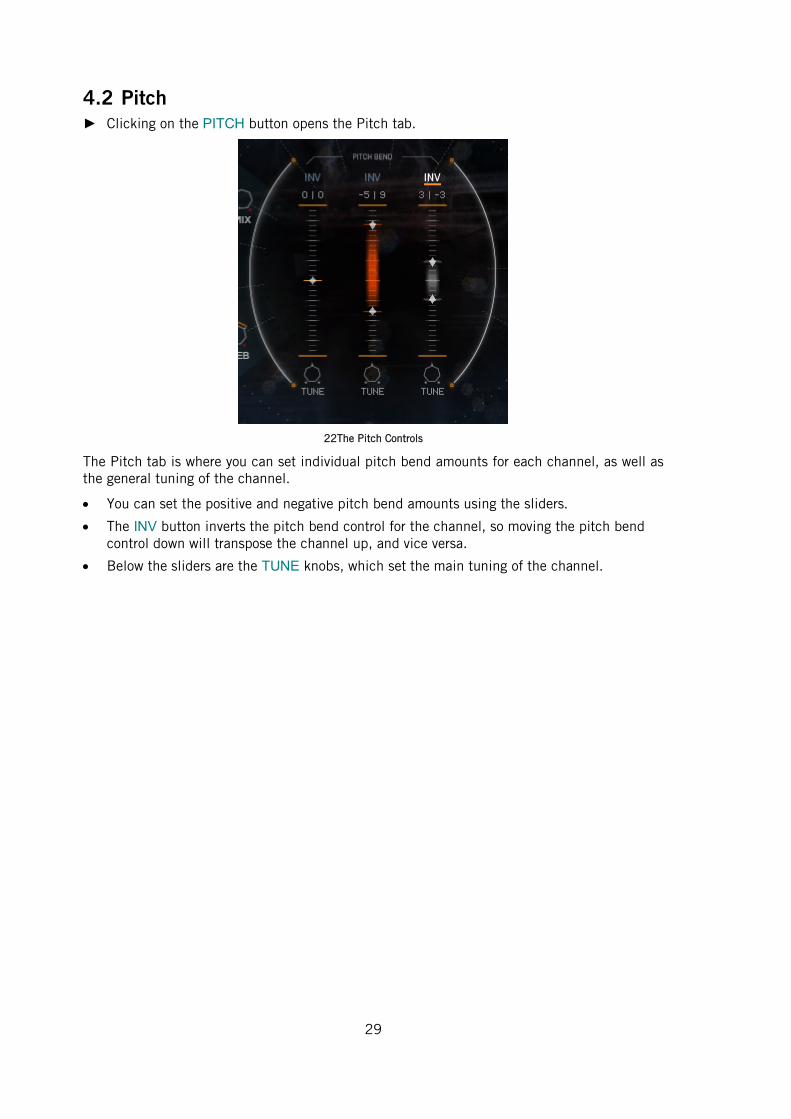
4.2 Pitch ► Clicking on the PITCH button opens the Pitch tab.
22The Pitch Controls
The Pitch tab is where you can set individual pitch bend amounts for each channel, as well as the general tuning of the channel.
You can set the positive and negative pitch bend amounts using the sliders.
The INV button inverts the pitch bend control for the channel, so moving the pitch bend control down will transpose the channel up, and vice versa.
Below the sliders are the TUNE knobs, which set the main tuning of the channel.
30
5 Menus and Elements The Menu and Elements instruments, which share similar layouts, function differently:
Menus – these are a collection of different sounds (one per key)
Elements – these are single samples stretched over the keyboard as a playable instrument.
The Menus offer Volume Envelopes, EQ, and Filters per key. The Elements, being a single sound, have only one of each.
Both instrument types have a single channel version of the Motion Page.
5.1 Sample Controls
The Sample Controls are featured in the Hits, Pads, and Stings.
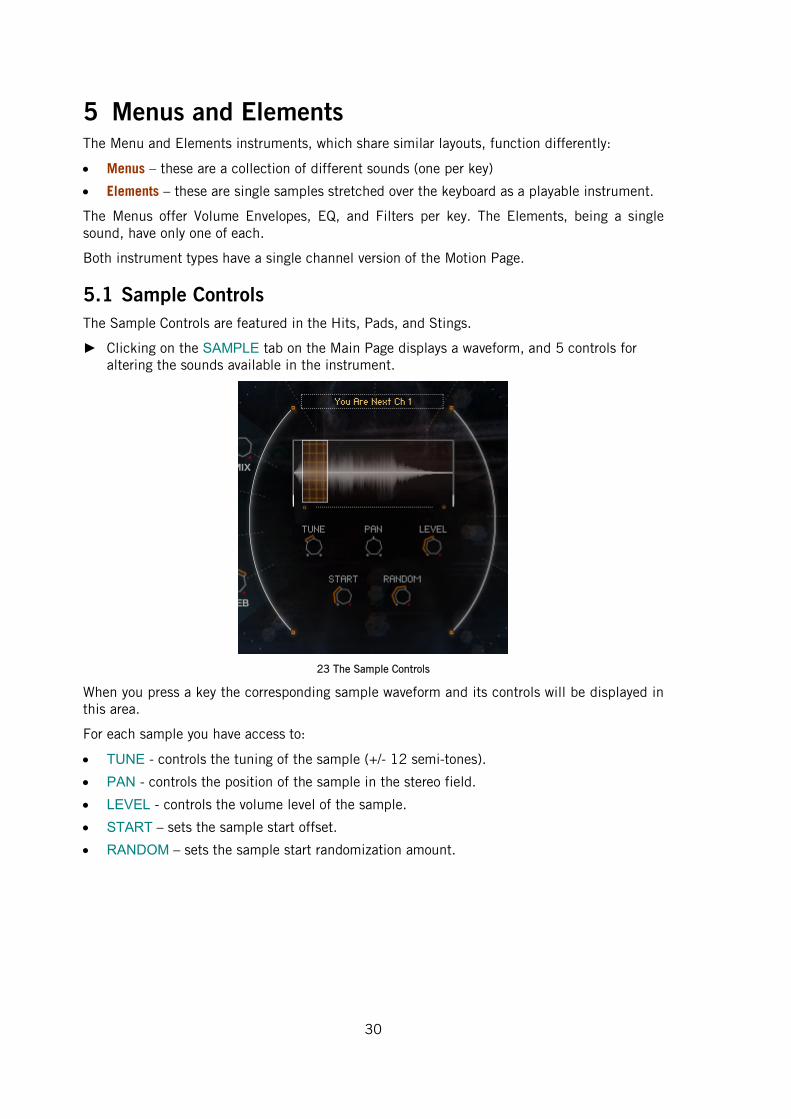
► Clicking on the SAMPLE tab on the Main Page displays a waveform, and 5 controls for altering the sounds available in the instrument.
23 The Sample Controls
When you press a key the corresponding sample waveform and its controls will be displayed in this area.
For each sample you have access to:
TUNE - controls the tuning of the sample (+/- 12 semi-tones).
PAN - controls the position of the sample in the stereo field.
LEVEL - controls the volume level of the sample.
START – sets the sample start offset.
RANDOM – sets the sample start randomization amount.
31
6 Credits Product Concept and Design: Heavyocity Media - Dave Fraser, Ari Winters, Neil Goldberg, George Valavanis
Content Creation: Heavyocity Media - Ari Winters, Neil Goldberg, Dave Fraser, George Valavanis, Ryan Mallen, Luis D’elias, Alejandro Zorrilla
Kontakt Scripting: Adam Hanley
Recording Studios:
◦ Heavyocity Studios - Engineers: Neil Goldberg, Dave Fraser, Ari Winters
◦ Brick Hill Studios - Engineer: Jon Evans
Performers:
◦ Female Group Vocalists - Emily Adams, Alicia Mathewson, Anne Stott, Sharon Topper, Ashley Wade
◦ Female Solo Vocalists - Carla Kihlstedt, Siobhan Magnus, Songyi Jeon, Alison Evans, Nelly Petkova
Editing: Heavyocity Media
Strategic Planning: Evan Goldberg - Garrison Street Partners
Marketing: Heavyocity Media - CJ Aquilino, George Valavanis, Ari Winters
Artwork:
◦ Interface - Perception NYC
◦ Cover Photo – Andrea Willa
Content Licensing:
◦ Reverb Impulse Response Content: www.ImpulseRecord.com - Tom Gauger