Embed Size (px)
Citation preview
VMware® Lab Manager InstallationGuide
VMware Lab Manager 2.4
You can find the most up-to-date technical documentation on our Web site at:
http://www.vmware.com/support/
The VMware Web site also provides the latest product updates.
If you have comments about this documentation, submit your feedback to:
© 2007 VMware, Inc. All rights reserved. Protected by one or more of U.S. Patent Nos. 6,397,242, 6,496,847, 6,704,925, 6,711,672, 6,725,289, 6,735,601, 6,785,886, 6,789,156, 6,795,966, 6,880,022, 6,961,941, 6,961,806 and 6,944,699; patents pending.
VMware, the VMware “boxes” logo and design, Virtual SMP and VMotion are registered trademarks or trademarks of VMware, Inc. in the United States and/or other jurisdictions.
All other marks and names mentioned herein may be trademarks of their respective companies.
VMware, Inc.3145 Porter DrivePalo Alto, CA 94304www.vmware.com
2 VMware, Inc.
VMware® Lab Manager Installation Guide
VMware® Lab Manager Installation GuideRevision: 20070330Item: VL-ENG-Q406-274
VMware, Inc. 3
Contents
Preface 5
1 Introduction to the Lab Manager Installation 9
Lab Manager Components 10High‐Level View of the Installation Process 11
2 Installation Requirements 13General Requirements 14System Requirements: Lab Manager Server and
Managed Server 15Guest Operating System Requirements 17Client User Machine Requirements 18Storage Requirements 19
Media Storage 19Virtual Machine Storage (Datastore) 19
Network Requirements 20Configuring Routing 20Configuring Domains and Permissions 20Configuring Firewall Settings 21Gathering Network Information for Installation 22IP Addresses for Virtual Machines 22Configuring IIS and ASP.NET on a Lab Manager Server 22
Using Lab Manager with VirtualCenterManagement Server 23
3 Installing Lab Manager 25Reviewing the Installation Flow 26Setting Up Managed Server Systems 27
Prerequisites for Managed Server Systems 27Verifying the Setup of the ESX Server System 27Configuring Additional Media Storage (NFS) Prior to Installing the
Managed Server 28
VMware® Lab Manager Installation Guide
4 VMware, Inc.
Installing the Managed Server Agent Software on ESX Server 29Setting Up the Lab Manager Server 31
Prerequisites for Lab Manager Server 31Security Recommendations 31
Installing or Customizing the SSL Certificate 32Modifying Security Policies 34
Configuring Internet Explorer on the Lab Manager Server 34Setting Up a FQDN for the Server 35Installing the Lab Manager Server Software 36
Verifying the ASP.NET Version 37Initializing and Configuring Lab Manager 38Checking the Sample Template and Configuration 40Adding and Synchronizing Lab Manager Server
with NFS Media Storage 41Uninstalling Lab Manager 42
Uninstalling Managed Server Agent Software 42Uninstalling Lab Manager Server 42
Troubleshooting the Installation 45Error 1720: Windows Installer Package 46Microsoft SQL Desktop Engine (MSDE) Installation Fails 46Transfer of Managed Server Agent Software to ESX Server Machine Fails 47Error 1603: Required Services for Installing Lab Manager 47
Index 49
VMware, Inc. 5
This preface provides information about the VMware Lab Manager Installation Guide and links to VMware® technical support and educational resources.
This preface contains the following topics:
“About This Book” on page 5
“Technical Support and Education Resources” on page 6
About This BookThe VMware Lab Manager Installation Guide describes installation and configuration tasks for Lab Manager 2.4.
Intended AudienceThe guide is intended for experienced developers and testers of software applications. This document assumes the user has some familiarity with these topics:
Virtual machine technology
Basic concepts of distributed, multitiered systems
Current development and testing practices
Windows and Linux operating systems
Preface
VMware® Lab Manager Installation Guide
6 VMware, Inc.
Document FeedbackIf you have comments about this documentation, submit your feedback to:
ConventionsTable P‐1 illustrates the typographic conventions used in this manual.
Technical Support and Education ResourcesThe following sections describe the technical support resources available to you.
Self-Service SupportUse the VMware Technology Network (VMTN) for self‐help tools and technical information:
Product information – http://www.vmware.com/products/
Technology information – http://www.vmware.com/vcommunity/technology
Documentation – http://www.vmware.com/support/pubs
VMTN Knowledge Base – http://www.vmware.com/support/kb
Discussion forums – http://www.vmware.com/community
User groups – http://www.vmware.com/vcommunity/usergroups.html
For more information about the VMware Technology Network, go to http://www.vmtn.net.
Table P-1. Conventions in this Manual
Style Elements
Blue (online only) Cross‐references and email addresses
Blue boldface (online only) Links
Black boldface User interface elements such as button names and menu items
Monospace Commands, filenames, directories, and paths
Monospace bold User input
Italic Document titles, glossary terms, and occasional emphasis
< Name > Variable and parameter names
VMware, Inc. 7
Preface
Online and Telephone SupportUse online support to submit technical support requests, view your product and contract information, and register your products. Go to http://www.vmware.com/support.
Customers with appropriate support contracts should use telephone support for the fastest response on priority 1 issues. Go to http://www.vmware.com/support/phone_support.html.
Support OfferingsFind out how VMware support offerings can help meet your business needs. Go to http://www.vmware.com/support/services.
VMware Education ServicesVMware courses offer extensive hands‐on labs, case study examples, and course materials designed to be used as on‐the‐job reference tools. For more information about VMware Education Services, go to http://mylearn1.vmware.com/mgrreg/index.cfm.

VMware® Lab Manager Installation Guide
8 VMware, Inc.
VMware, Inc. 9
1
VMware Lab Manager provides a robust solution to manage virtual machines in the test lab infrastructure. You can capture a complex and running software environment and share it instantly across your organization. See the VMware Lab Manager User’s Guide for a full overview of the product.
This chapter covers these topics:
“Lab Manager Components” on page 10
“High‐Level View of the Installation Process” on page 11
Introduction to the Lab Manager Installation 1
VMware® Lab Manager Installation Guide
10 VMware, Inc.
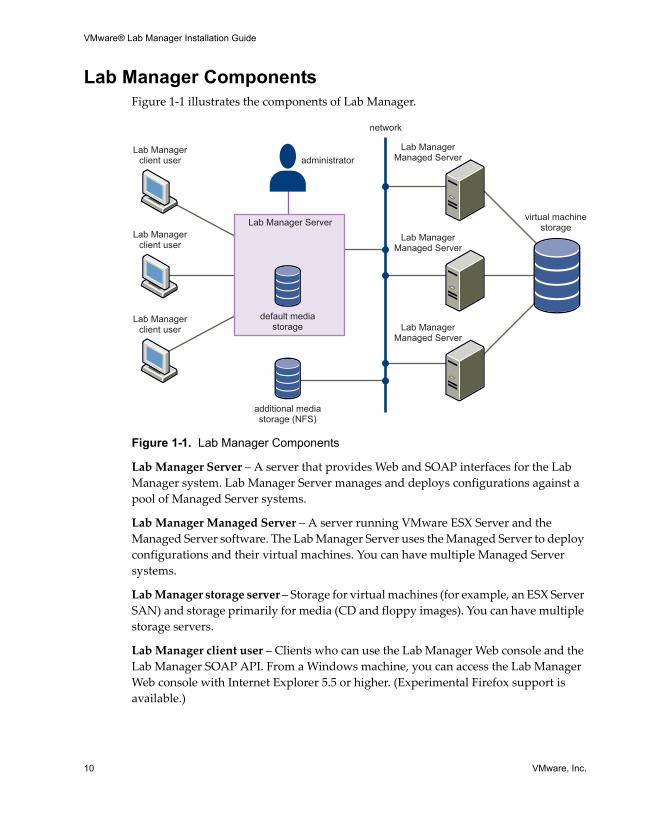
Lab Manager ComponentsFigure 1‐1 illustrates the components of Lab Manager.
Figure 1-1. Lab Manager Components
Lab Manager Server – A server that provides Web and SOAP interfaces for the Lab Manager system. Lab Manager Server manages and deploys configurations against a pool of Managed Server systems.
Lab Manager Managed Server – A server running VMware ESX Server and the Managed Server software. The Lab Manager Server uses the Managed Server to deploy configurations and their virtual machines. You can have multiple Managed Server systems.
Lab Manager storage server – Storage for virtual machines (for example, an ESX Server SAN) and storage primarily for media (CD and floppy images). You can have multiple storage servers.
Lab Manager client user – Clients who can use the Lab Manager Web console and the Lab Manager SOAP API. From a Windows machine, you can access the Lab Manager Web console with Internet Explorer 5.5 or higher. (Experimental Firefox support is available.)
virtual machinestorage
default mediastorage
additional mediastorage (NFS)
Lab ManagerManaged Server
Lab ManagerManaged Server
Lab ManagerManaged Server
Lab Managerclient user
Lab Managerclient user
Lab Managerclient user
Lab Manager Server
administrator
network
VMware, Inc. 11
Chapter 1 Introduction to the Lab Manager Installation
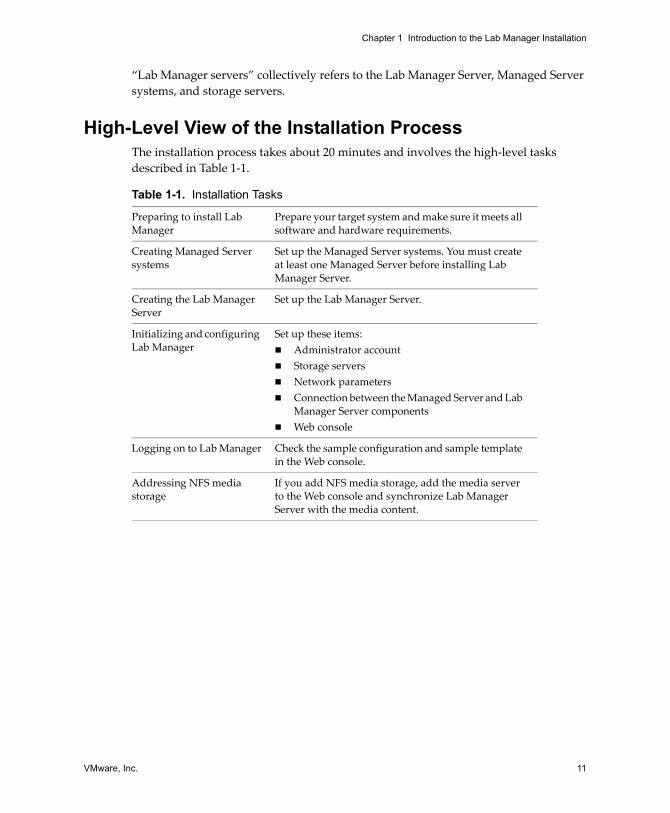
“Lab Manager servers” collectively refers to the Lab Manager Server, Managed Server systems, and storage servers.
High-Level View of the Installation ProcessThe installation process takes about 20 minutes and involves the high‐level tasks described in Table 1‐1.
Table 1-1. Installation Tasks
Preparing to install Lab Manager
Prepare your target system and make sure it meets all software and hardware requirements.
Creating Managed Server systems
Set up the Managed Server systems. You must create at least one Managed Server before installing Lab Manager Server.
Creating the Lab Manager Server
Set up the Lab Manager Server.
Initializing and configuring Lab Manager
Set up these items:Administrator accountStorage serversNetwork parametersConnection between the Managed Server and Lab Manager Server componentsWeb console
Logging on to Lab Manager Check the sample configuration and sample template in the Web console.
Addressing NFS media storage
If you add NFS media storage, add the media server to the Web console and synchronize Lab Manager Server with the media content.

VMware® Lab Manager Installation Guide
12 VMware, Inc.
VMware, Inc. 13
2
This chapter details VMware recommendations and requirements for your Lab Manager components and network.
“General Requirements” on page 14
“System Requirements: Lab Manager Server and Managed Server” on page 15
“Guest Operating System Requirements” on page 17
“Client User Machine Requirements” on page 18
“Storage Requirements” on page 19
“Network Requirements” on page 20
“Using Lab Manager with VirtualCenter Management Server” on page 23
Installation Requirements 2
VMware® Lab Manager Installation Guide
14 VMware, Inc.
General RequirementsReview this general requirement checklist to make sure you have everything you need for the Lab Manager system:
One or more Windows Server 2003 machines with the specifications detailed in “System Requirements: Lab Manager Server and Managed Server” on page 15
Windows Server 2003 CD.
One or more VMware ESX Server 3.0.1 machines with the specifications detailed in “System Requirements: Lab Manager Server and Managed Server” on page 15.
Lab Manager license key to use the Lab Manager license on a single Lab Manager Server. Network errors can occur when different Lab Manager Servers attempt to access the same Managed Server.
Lab Manager VMware-labmanager-agent-esx-2.4.0-<build number>.bin to install the Lab Manager Managed Server software.
VMware-labmanager-server-2.4.0-<build number>.exe to install the Lab Manager Server software.
Networking requirements:
IP address information for virtual machines
A block of unused IP addresses
Gateway
Subnet mask
DNS server
(Optional) Secondary DNS server
For more information, see “Network Requirements” on page 20.
Guest operating system ISO files. A guest operating system resides on a virtual machine. An ISO file is an image of a CD‐ROM.
VMware uses the term “guest OS” to distinguish it from the operating system for the physical server (“host OS”) that the virtual machine runs on.
For more information, see “Guest Operating System Requirements” on page 17.
Guest operating system license keys.
VMware, Inc. 15
Chapter 2 Installation Requirements
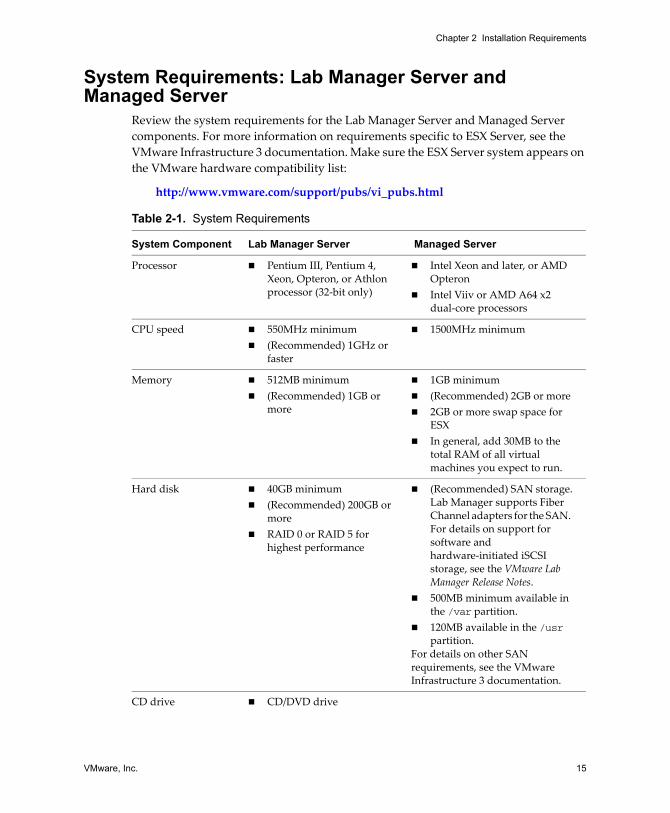
System Requirements: Lab Manager Server andManaged Server
Review the system requirements for the Lab Manager Server and Managed Server components. For more information on requirements specific to ESX Server, see the VMware Infrastructure 3 documentation. Make sure the ESX Server system appears on the VMware hardware compatibility list:
http://www.vmware.com/support/pubs/vi_pubs.html
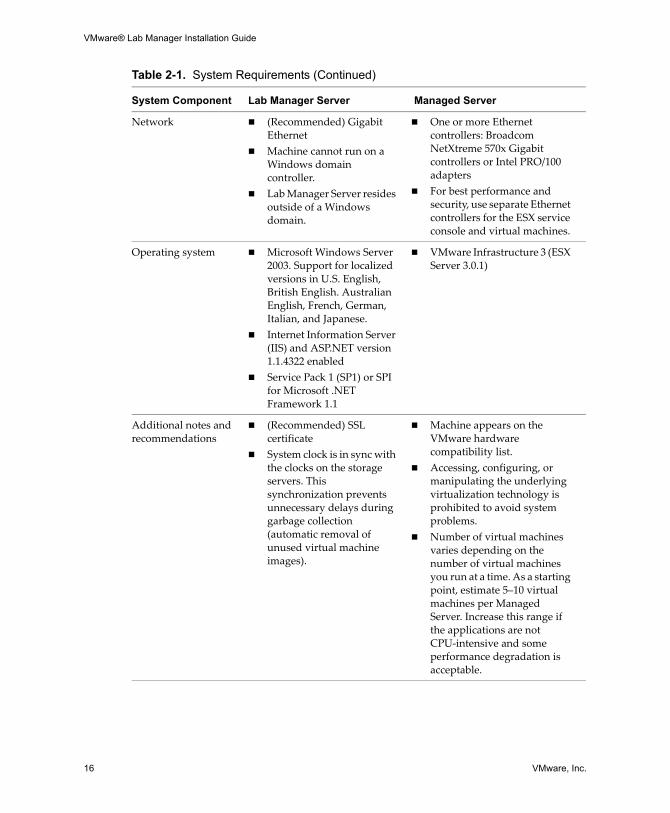
Table 2-1. System Requirements
System Component Lab Manager Server Managed Server
Processor Pentium III, Pentium 4, Xeon, Opteron, or Athlon processor (32‐bit only)
Intel Xeon and later, or AMD OpteronIntel Viiv or AMD A64 x2 dual‐core processors
CPU speed 550MHz minimum(Recommended) 1GHz or faster
1500MHz minimum
Memory 512MB minimum(Recommended) 1GB or more
1GB minimum(Recommended) 2GB or more2GB or more swap space for ESXIn general, add 30MB to the total RAM of all virtual machines you expect to run.
Hard disk 40GB minimum (Recommended) 200GB or moreRAID 0 or RAID 5 for highest performance
(Recommended) SAN storage.Lab Manager supports Fiber Channel adapters for the SAN. For details on support for software and hardware‐initiated iSCSI storage, see the VMware Lab Manager Release Notes.500MB minimum available in the /var partition.120MB available in the /usr partition.
For details on other SAN requirements, see the VMware Infrastructure 3 documentation.
CD drive CD/DVD drive
VMware® Lab Manager Installation Guide
16 VMware, Inc.
Network (Recommended) Gigabit EthernetMachine cannot run on a Windows domain controller.Lab Manager Server resides outside of a Windows domain.
One or more Ethernet controllers: Broadcom NetXtreme 570x Gigabit controllers or Intel PRO/100 adaptersFor best performance and security, use separate Ethernet controllers for the ESX service console and virtual machines.
Operating system Microsoft Windows Server 2003. Support for localized versions in U.S. English, British English. Australian English, French, German, Italian, and Japanese.Internet Information Server (IIS) and ASP.NET version 1.1.4322 enabledService Pack 1 (SP1) or SPI for Microsoft .NET Framework 1.1
VMware Infrastructure 3 (ESX Server 3.0.1)
Additional notes and recommendations
(Recommended) SSL certificateSystem clock is in sync with the clocks on the storage servers. This synchronization prevents unnecessary delays during garbage collection (automatic removal of unused virtual machine images).
Machine appears on the VMware hardware compatibility list.Accessing, configuring, or manipulating the underlying virtualization technology is prohibited to avoid system problems.Number of virtual machines varies depending on the number of virtual machines you run at a time. As a starting point, estimate 5–10 virtual machines per Managed Server. Increase this range if the applications are not CPU‐intensive and some performance degradation is acceptable.
Table 2-1. System Requirements (Continued)
System Component Lab Manager Server Managed Server
VMware, Inc. 17
Chapter 2 Installation Requirements
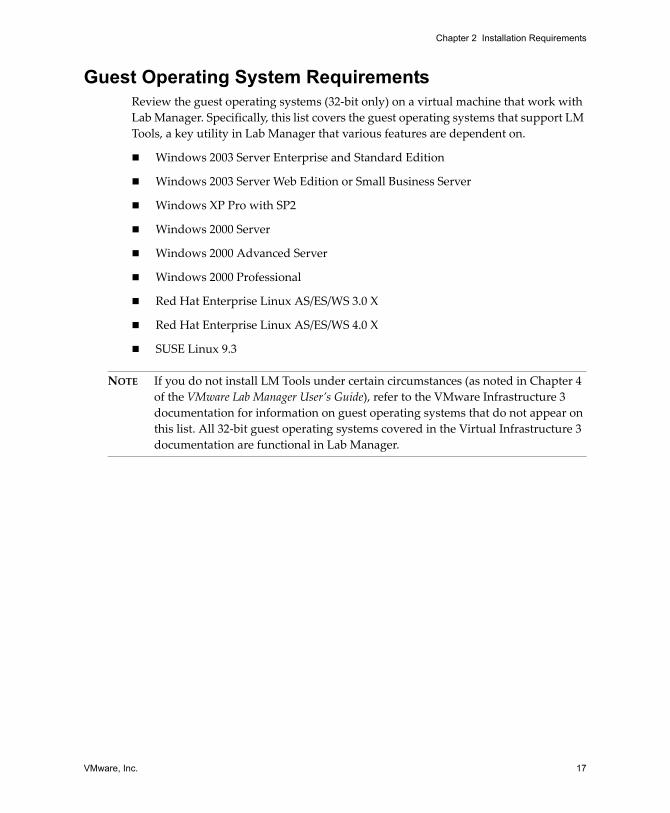
Guest Operating System RequirementsReview the guest operating systems (32‐bit only) on a virtual machine that work with Lab Manager. Specifically, this list covers the guest operating systems that support LM Tools, a key utility in Lab Manager that various features are dependent on.
Windows 2003 Server Enterprise and Standard Edition
Windows 2003 Server Web Edition or Small Business Server
Windows XP Pro with SP2
Windows 2000 Server
Windows 2000 Advanced Server
Windows 2000 Professional
Red Hat Enterprise Linux AS/ES/WS 3.0 X
Red Hat Enterprise Linux AS/ES/WS 4.0 X
SUSE Linux 9.3
NOTE If you do not install LM Tools under certain circumstances (as noted in Chapter 4 of the VMware Lab Manager User’s Guide), refer to the VMware Infrastructure 3 documentation for information on guest operating systems that do not appear on this list. All 32‐bit guest operating systems covered in the Virtual Infrastructure 3 documentation are functional in Lab Manager.
VMware® Lab Manager Installation Guide
18 VMware, Inc.
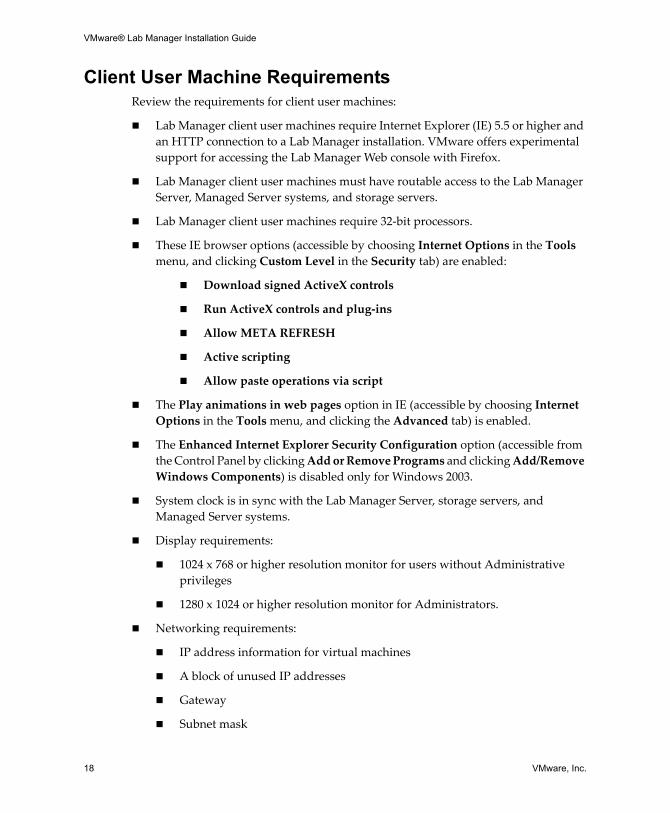
Client User Machine RequirementsReview the requirements for client user machines:
Lab Manager client user machines require Internet Explorer (IE) 5.5 or higher and an HTTP connection to a Lab Manager installation. VMware offers experimental support for accessing the Lab Manager Web console with Firefox.
Lab Manager client user machines must have routable access to the Lab Manager Server, Managed Server systems, and storage servers.
Lab Manager client user machines require 32‐bit processors.
These IE browser options (accessible by choosing Internet Options in the Tools menu, and clicking Custom Level in the Security tab) are enabled:
Download signed ActiveX controls
Run ActiveX controls and plug‐ins
Allow META REFRESH
Active scripting
Allow paste operations via script
The Play animations in web pages option in IE (accessible by choosing Internet Options in the Tools menu, and clicking the Advanced tab) is enabled.
The Enhanced Internet Explorer Security Configuration option (accessible from the Control Panel by clicking Add or Remove Programs and clicking Add/Remove Windows Components) is disabled only for Windows 2003.
System clock is in sync with the Lab Manager Server, storage servers, and Managed Server systems.
Display requirements:
1024 x 768 or higher resolution monitor for users without Administrative privileges
1280 x 1024 or higher resolution monitor for Administrators.
Networking requirements:
IP address information for virtual machines
A block of unused IP addresses
Gateway
Subnet mask
VMware, Inc. 19
Chapter 2 Installation Requirements
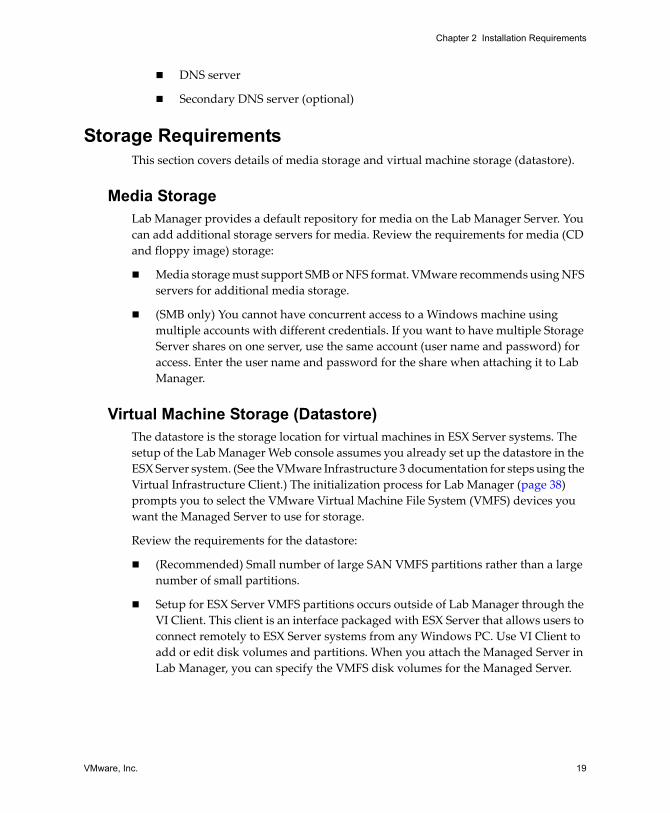
DNS server
Secondary DNS server (optional)
Storage RequirementsThis section covers details of media storage and virtual machine storage (datastore).
Media StorageLab Manager provides a default repository for media on the Lab Manager Server. You can add additional storage servers for media. Review the requirements for media (CD and floppy image) storage:
Media storage must support SMB or NFS format. VMware recommends using NFS servers for additional media storage.
(SMB only) You cannot have concurrent access to a Windows machine using multiple accounts with different credentials. If you want to have multiple Storage Server shares on one server, use the same account (user name and password) for access. Enter the user name and password for the share when attaching it to Lab Manager.
Virtual Machine Storage (Datastore)The datastore is the storage location for virtual machines in ESX Server systems. The setup of the Lab Manager Web console assumes you already set up the datastore in the ESX Server system. (See the VMware Infrastructure 3 documentation for steps using the Virtual Infrastructure Client.) The initialization process for Lab Manager (page 38) prompts you to select the VMware Virtual Machine File System (VMFS) devices you want the Managed Server to use for storage.
Review the requirements for the datastore:
(Recommended) Small number of large SAN VMFS partitions rather than a large number of small partitions.
Setup for ESX Server VMFS partitions occurs outside of Lab Manager through the VI Client. This client is an interface packaged with ESX Server that allows users to connect remotely to ESX Server systems from any Windows PC. Use VI Client to add or edit disk volumes and partitions. When you attach the Managed Server in Lab Manager, you can specify the VMFS disk volumes for the Managed Server.
VMware® Lab Manager Installation Guide
20 VMware, Inc.
Network RequirementsNetwork requirements and recommendations are covered in these sections:
“Configuring Routing” on page 20
“Configuring Domains and Permissions” on page 20
“Configuring Firewall Settings” on page 21
“Gathering Network Information for Installation” on page 22
“IP Addresses for Virtual Machines” on page 22
“Configuring IIS and ASP.NET on a Lab Manager Server” on page 22
Configuring RoutingReview the requirements for network connectivity
Lab Manager client user machines have routable access to Lab Manager servers. If the Lab Manager servers are behind a firewall and not directly accessible, you can use a virtual private network (VPN). Lab Manager is not compatible with network address translation (NAT). See “Configuring Firewall Settings” on page 21 for more information on configuring network ports for routable access.
Lab Manager Server does not need to reside on the same subnet as the Managed Server systems. Lab Manager Server requires a static IP address.
Lab Manager Server and the Managed Server systems need access to the media storage but do not need to reside on the same subnet.
VMware recommends that you isolate the Lab Manager servers on the same physical switch to facilitate network traffic.
Configuring Domains and PermissionsBecause the Lab Manager Server and Managed Server systems must mount shares, these servers require matching DNS and DNS suffix information.
VMware, Inc. 21
Chapter 2 Installation Requirements
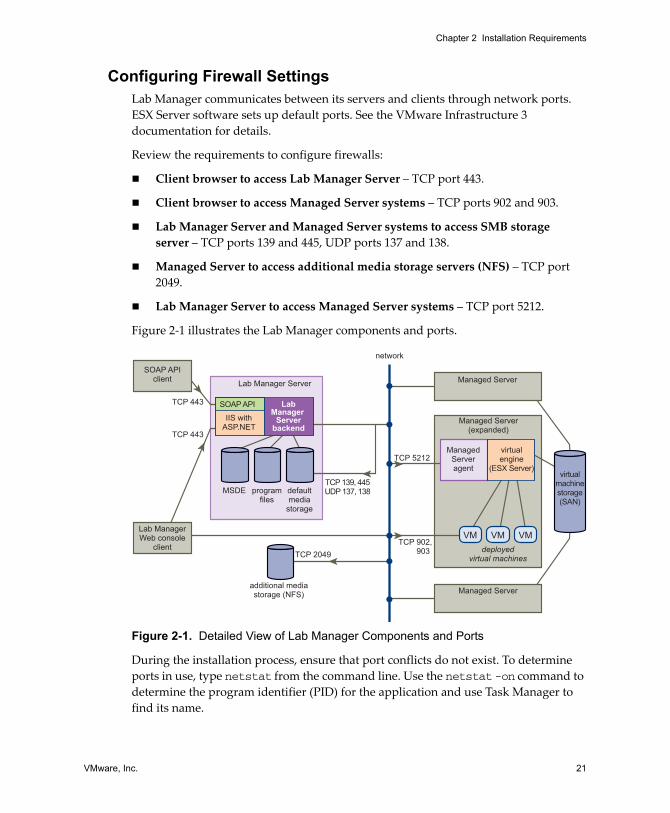
Configuring Firewall SettingsLab Manager communicates between its servers and clients through network ports. ESX Server software sets up default ports. See the VMware Infrastructure 3 documentation for details.
Review the requirements to configure firewalls:
Client browser to access Lab Manager Server – TCP port 443.
Client browser to access Managed Server systems – TCP ports 902 and 903.
Lab Manager Server and Managed Server systems to access SMB storageserver – TCP ports 139 and 445, UDP ports 137 and 138.
Managed Server to access additional media storage servers (NFS) – TCP port 2049.
Lab Manager Server to access Managed Server systems – TCP port 5212.
Figure 2‐1 illustrates the Lab Manager components and ports.
Figure 2-1. Detailed View of Lab Manager Components and Ports
During the installation process, ensure that port conflicts do not exist. To determine ports in use, type netstat from the command line. Use the netstat -on command to determine the program identifier (PID) for the application and use Task Manager to find its name.
virtualmachinestorage(SAN)
MSDE programfiles
defaultmedia
storage
additional mediastorage (NFS)
IIS withASP.NET
SOAP API
deployedvirtual machines
Managed Server(expanded)
Managed Server
Lab ManagerWeb console
client
SOAP APIclient Managed ServerLab Manager Server
LabManager
Serverbackend
network
TCP 5212
TCP 2049TCP 902,
903
TCP 443
TCP 443
TCP 139, 445UDP 137, 138
ManagedServeragent
virtualengine
(ESX Server)
VM VM VM
VMware® Lab Manager Installation Guide
22 VMware, Inc.
Gathering Network Information for InstallationBefore you begin the installation, gather information about your network. This includes the block of IP addresses the Lab Manager System uses for virtual machines, IP addresses for the primary and secondary DNS servers in the network, subnet mask for the network, IP address for the network gateway, and the Lab Manager Server DNS suffix. Consult your network IT Administrator for information.
IP Addresses for Virtual MachinesReserve a range of IP addresses for virtual machines. This range is in addition to the IP addresses required for each Lab Manager Server, storage server, and Managed Server. IP addresses for virtual machines are automatically allocated from the pool of IP addresses you reserve. The number of virtual machines running and requiring IP addresses varies with the number and complexity of configurations deployed at any one time.
For a minimum system, you probably need at least 100 IP addresses. (You can add blocks of addresses at a later time.) For a large installation, VMware recommends allocating 200 or more IP addresses. You need one or two IP addresses for each deployed virtual machine. Base your estimate on current and future needs.
Configuring IIS and ASP.NET on a Lab Manager ServerYou must have IIS and ASP.NET version 1.1.4322 installed and enabled on your Lab Manager Server. (See “System Requirements: Lab Manager Server and Managed Server” on page 15.) Though IIS and ASP.NET come with Windows Server 2003, these programs might not be installed at the same time as Windows Server 2003. You also must have either Service Pack 1 (SP1) or SPI for Microsoft .NET Framework 1.1 installed.
Table 2-2. Essential Network Information
IP and Network Component Example
IP address block for virtual machines 10.6.1.10 — 10.6.1.199
Subnet mask for virtual machines 255.255.255.0
Gateway for virtual machines 10.6.1.1
DNS server 1 10.6.1.200
DNS server 2 (optional) 10.6.1.201
DNS suffix vmware.com
VMware, Inc. 23
Chapter 2 Installation Requirements
To install Internet Information Server (IIS) and ASP.NET
1 Choose Start > Settings > Control Panel > Add or Remove Programs.
2 In the left pane of the Add or Remove Programs dialog box, click the Add/Remove Windows Components icon.
3 In the Windows Components wizard, select the Application Server component.
4 Click Details.
5 Select the ASP.NET and Internet Information Services (IIS) options.
6 Click OK and Next to install the components.
To verify you installed ASP.NET version 1.1.4322
1 Choose Start > Control Panel > Administrative Tools > Internet Information Services (IIS) Manager.
2 On the left pane, expand the entry for the local computer and select Web Service Extensions.
3 Make sure you can see ASP.NET v1.1.4322 with an Allowed status.
If the status is Prohibited, right‐click ASP.NET v1.1.4322 and choose Allow from the menu.
For more information, see the Microsoft Web site:
http://office.microsoft.com/en‐us/assistance/HA100598511033.aspx
Using Lab Manager with VirtualCenterManagement Server
Before you install and use Lab Manager, be aware that you can use VMware VirtualCenter Management Server (VirtualCenter Server) to monitor ESX Server systems managed by Lab Manager. However, all VirtualCenter Server actions that register or deregister Lab Manager virtual machines (including those triggered by VMware HA and VMware VMotion) break Lab Manager.
VMware recommends managing ESX Server systems with Lab Manager or VirtualCenter Server, but not both. For more information on VirtualCenter Server, see the VMware Infrastructure 3 documentation.
NOTE You might need to put the Windows Server 2003 boot disk into the CD or DVD drive of the server.

VMware® Lab Manager Installation Guide
24 VMware, Inc.
VMware, Inc. 25
3
After reviewing the requirements in Chapter 2, install the software for the Lab Manager Managed Server and Lab Manager Server. This chapter covers these topics:
“Reviewing the Installation Flow” on page 26
“Setting Up Managed Server Systems” on page 27
“Setting Up the Lab Manager Server” on page 31
“Verifying the ASP.NET Version” on page 37
“Initializing and Configuring Lab Manager” on page 38
“Checking the Sample Template and Configuration” on page 40
“Adding and Synchronizing Lab Manager Server with NFS Media Storage” on page 41
“Uninstalling Lab Manager” on page 42
Installing Lab Manager 3
VMware® Lab Manager Installation Guide
26 VMware, Inc.
Reviewing the Installation FlowThe installation process involves these high‐level steps:
Step 1 Set up the Managed Server systems.
Install the Lab Manager Managed Server software on at least one ESX Server system. You must have access to the Managed Server agent executable (VMware-labmanager-agent-esx-2.4.0-<build number>.bin). See “Setting Up Managed Server Systems” on page 27.
Step 2 Set up the Lab Manager Server.
After creating at least one Managed Server, create the Lab Manager Server. The Lab Manager Server controls both the back‐end (Managed Server systems) and front‐end (Lab Manager Web console). You must have access to the Lab Manager Server executable (VMware-labmanager-server-2.4.0-<build number>.exe). See “Setting Up the Lab Manager Server” on page 31.
Step 3 Initialize and configure Lab Manager.
After creating at least one Managed Server and the Lab Manager Server, log in to the Lab Manager Web console and perform one‐time initialization tasks. These tasks involve the Administrator account, licensing, connection of the Managed Server to the Lab Manager Server, network parameters, default storage server for media, and product support. See “Initializing and Configuring Lab Manager” on page 38.
VMware, Inc. 27
Chapter 3 Installing Lab Manager
Setting Up Managed Server SystemsInstall the Managed Server software on at least one ESX Server machine before creating the Lab Manager Server. This procedure involves installing the Managed Server agent component on your designated Managed Server. This component allows Lab Manager Server to control and deploy virtual machines on the Managed Server.
This section covers these procedures:
“Prerequisites for Managed Server Systems” on page 27
“Installing the Managed Server Agent Software on ESX Server” on page 29
Prerequisites for Managed Server SystemsIn addition to the installation requirements described in Chapter 2, make sure ESX Server is set up properly for a Lab Manager Managed Server, configure the NFS server if you need additional media storage, and review the information on network fencing.
Verifying the Setup of the ESX Server SystemUse the VI Client packaged with ESX Server to review these prerequisites for your target Managed Server:
At least one VMFS 3 partition is attached to the Managed Server. In the VI Client, navigate to the Storage Management page to add VMFS disk volumes and partitions. During the process of attaching the Managed Server to the Lab Manager Server, specify the partitions for the Managed Server.
ESX Server licensing is enabled to allow Lab Manager to deploy virtual machines. See the VMware Infrastructure 3 documentation for details on enabling the license with the VI Client.
The host name of the ESX Server machine must map to the IP address of the console NIC. See the VMware Infrastructure 3 documentation for details on configuring network parameters for the service console.
At least one virtual switch for virtual machines is attached to an active NIC. For details, see the VMware Infrastructure 3 documentation.
The system clock shows the current date and time. VMware recommends using Network Time Protocol (NTP).
VMware® Lab Manager Installation Guide
28 VMware, Inc.
Configuring Additional Media Storage (NFS) Prior to Installing the Managed ServerBefore installing the Managed Server, configure the NFS server if you plan on having extra media storage besides the default media storage server on the Lab Manager Server.
Configuring an NFS server involves these tasks:
Create a /ISO directory (use capital letters) under the exported share.
For example, if the NFS server is 10.6.1.2:/export/medialib, the user must create the /export/medialib/ISO directory on the NFS server. Lab Manager requires you to populate the /ISO directory with the media files.
Use the VI Client to set up the VMkernel network.
You need an IP address specifically for this process. See the VMware Infrastructure 3 documentation for details on the VI Client.
To set up the VMkernel network
1 In the Configuration tab of the VI Client, click Networking in the Hardware box.
2 Click the Properties link for the switch associated with the appropriate NIC.
3 Click the Add button.
4 Select the VMkernel option.
5 Enter the required network information. Make sure to enter the correct gateway for the VMkernel.
6 Click Finish.
This procedure is required for all Managed Server systems that you need to attach to Lab Manager. After installing the Managed Server systems and Lab Manager Server, see “Adding and Synchronizing Lab Manager Server with NFS Media Storage” on page 41 to ensure Lab Manager recognizes the contents of the NFS server.
VMware, Inc. 29
Chapter 3 Installing Lab Manager
Installing the Managed Server Agent Software on ESX ServerAfter reviewing the prerequisites and background information, install the Managed Server agent software.
To install the Managed Server agent software
1 On the target Managed Server, log in as root.
2 Copy VMware-labmanager-agent-esx-2.4.0-<build number>.bin to the target ESX server computer.
VMware recommends using the scp utility. If you have a choice of transferring the files in binary or ASCII mode, use binary mode.
To verify the integrity of the software, use the md5sum utility on the target ESX Server computer:
> md5sum VMware-labmanager-agent-esx-2.4.0-<build number>.bin
The correct output is noted on the VMware download site.
3 To run the installer, type:
> sh VMware-labmanager-agent-esx-2.4.0-<build number>.bin
This command initiates verifications to ensure the ESX Server machine is in an adequate state for the agent installation.
4 Specify your action based on whether you want NFS media storage.
The following non-fatal error(s) have been found:- No VMKernel Network found. Virtual Machines on this Managed Server will not be able to use CDROM or Floppy media hosted on Lab Manager's NFS Storage Servers. Please use the Virtual Infrastucture Client to to add a VMKernel Network (please see documentation for details). Ignore warnings and proceed with installation (y/n)? y
If you did not set up the VMkernel network described on page 28 and you want to store media on NFS storage, refuse to proceed with the installation.
After setting up the VMkernel network, start the process of installing the Managed Server agent software again.
If you did not set up the VMkernel network described on page 28 and you do not need to store media on NFS storage, agree to proceed with the installation.
5 Type a user name and password.
Enter a username/password that you will use to access this server from Lab Manager:> Username [labmanager]:
VMware® Lab Manager Installation Guide
30 VMware, Inc.
> Password:> Confirm password:
This account enables communication between Lab Manager and the Managed Server and also enables access to the consoles of the hosted virtual machines for the Managed Server. Use the same user name and password when adding a Managed Server to Lab Manager in the Lab Manager console. For more information on adding a Managed Server, see the “Administering and Monitoring Lab Manager” chapter of the VMware Lab Manager User’s Guide.
6 If you configured two or more virtual switches using the VI Client, select a network switch for virtual machines.
VMware, Inc. 31
Chapter 3 Installing Lab Manager
Setting Up the Lab Manager ServerAfter installing the Managed Server systems, set up the Lab Manager Server. The Lab Manager Server provides Web and SOAP interfaces to interact with Lab Manager. Note that Lab Manager Server automatically installs an instance of Microsoft SQL Server Desktop Engine (MSDE) for use with Lab Manager.
This section covers these topics:
“Prerequisites for Lab Manager Server” on page 31
“Security Recommendations” on page 31
“Configuring Internet Explorer on the Lab Manager Server” on page 34
“Installing the Lab Manager Server Software” on page 36
Prerequisites for Lab Manager ServerIn addition to the installation requirements described in Chapter 2, review these prerequisites for the Lab Manager Server.
The target Lab Manager Server must have a NIC with these requirements:
Static IP address
Physically connected NIC (no wireless cards)
You must use a fully qualified domain name (FQDN). Certain features of Lab Manager, such as LiveLink, require an FQDN.
This requirement does not mean that the Lab Manager Server system resides in a domain. See “Setting Up a FQDN for the Server” on page 35.
The system clock shows the current date and time.
Lab Manager Server cannot reside on a machine with Microsoft SQL Server 2005.
Security RecommendationsReview the information on SSL certificates and enabling a high security policy.
NOTE Make sure your target Lab Manager Server does not already contain a Windows share called “VMwareLM.”
VMware® Lab Manager Installation Guide
32 VMware, Inc.
Installing or Customizing the SSL CertificateVMware recommends installing an SSL certificate from a trusted certification authority that validates the server identity. Generate the SSL certificate with the domain name or IP address for accessing Lab Manager.
If you do not install the SSL certificate, VMware automatically generates one but SSL security warnings appear in the browser. For more information, see “Accessing the Lab Manager Console” in the VMware Lab Manager User’s Guide.
You can use OpenSSL to generate a custom SSL certificate with a different name than the one generated by VMware.
To generate a custom SSL certificate using OpenSSL
1 Download and install OpenSSL.
2 Create a file named OpenSSlVMware.cfg in a working directory. Refer to this sample file:
# Conf file that vpx uses to generate SSL certificates.[ req ]default_bits = 1024default_keyfile = rui.keydistinguished_name = req_distinguished_name
#Don't encrypt the keyencrypt_key = noprompt = no
string_mask = nombstr
[ req_distinguished_name ]countryName = USstateOrProvinceName = CAlocalityName = CA0.organizationName = VMware, Inc.organizationalUnitName = VMware, Inc.commonName = machine1emailAddress = [email protected]
3 Store openssl.exe, libeay32.dll, and ssleay32.dll in the working directory.
4 From the working directory, change the commonName entry in OpenSSlVMware.cfg to the machine host name:
openssl req -new -x509 -keyout "OpenSslVMware.key" -out "OpenSslVMware.crt" -days 730 -config "<working directory>\OpenSslVMware.cfg"
VMware, Inc. 33
Chapter 3 Installing Lab Manager
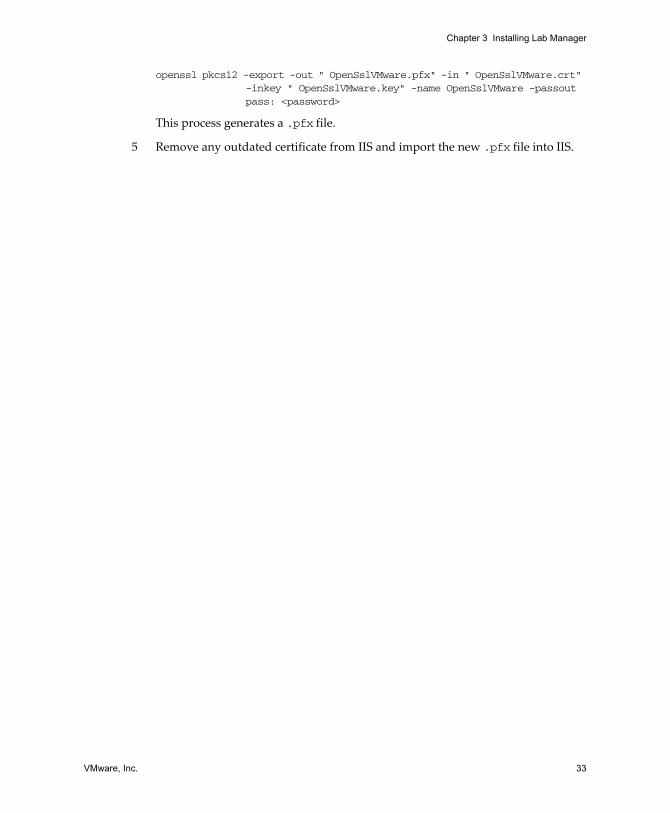
openssl pkcs12 -export -out " OpenSslVMware.pfx" -in " OpenSslVMware.crt" -inkey " OpenSslVMware.key" -name OpenSslVMware -passout pass: <password>
This process generates a .pfx file.
5 Remove any outdated certificate from IIS and import the new .pfx file into IIS.
VMware® Lab Manager Installation Guide
34 VMware, Inc.
Modifying Security PoliciesIf you want to use Lab Manager in a high security environment, you must modify the policy settings.
To modify a high security policy
1 On the desktop of the target Lab Manager Server, choose Start > All Programs > Administrative Tools > Local Security Policy.
2 In the left pane, drill down to Security Options under Local Policies.
3 In the right pane, double‐click Microsoft network server: Digitally sign communications (always).
4 Select Disabled.
5 Click OK.
6 In the right pane, double‐click Microsoft network server: Digitally sign communications (if client agrees).
7 Select Disabled.
8 Click OK.
9 In the right pane, double‐click Network Security: Lan Manager authentication level Properties.
10 Select Send NTLM response only.
11 Click OK.
Configuring Internet Explorer on the Lab Manager ServerAccess Lab Manager from your desktop browser or the Microsoft Windows 2003 server. In either case, remember to adjust the IE browser settings for client operation. See “Client User Machine Requirements” on page 18.
VMware, Inc. 35
Chapter 3 Installing Lab Manager
Setting Up a FQDN for the ServerYou must use a fully qualified domain name (FQDN) to ensure certain Lab Manager features can work. This requirement does not mean that the Lab Manager Server system resides in a domain.
To set up a FQDN for the server
1 On the desktop of the target Lab Manager Server, right‐click My Computer and choose Properties from the menu.
2 On the Computer Name tab, click Change.
3 Click More.
4 Enter the primary DNS suffix of the computer (for example, vmware.com).
VMware® Lab Manager Installation Guide
36 VMware, Inc.
Installing the Lab Manager Server SoftwareLab Manager Server involves a typical or custom installation. Consider a custom installation if you want to put the storage server on a separate disk because of a heavy storage requirements.
To install the Lab Manager Server software
1 On the target Lab Manager Server, launch VMware-labmanager-server-2.4.0-<build number>.exe.
2 Review the Welcome page of the installation wizard.
3 Specify whether you want a Typical or Custom installation. A custom installation enables these actions:
Changing the program files directory.
Changing the data directory (Lab Manager Repository location or \VMwareLM). The Repository directory is the local server for media storage that also holds certain virtual machine images required for Lab Manager Server. These images can have a size in the gigabytes range. After installing the product, you can add more storage servers.
4 Select the IP address for Lab Manager traffic. This page appears only if you have more than one active NIC with static IP addresses.
5 Click Install.
NOTE During the MSDE installation, the actual time to complete this process is longer than the estimated time displayed in a message.
VMware, Inc. 37
Chapter 3 Installing Lab Manager
Verifying the ASP.NET VersionAfter installing the Lab Manager Server, verify that the Lab Manager Web application uses the correct version of ASP.NET.
To verify the ASP.NET version
1 Choose Start > Control Panel > Administrative Tools > Internet Information Services (IIS) Manager.
2 Choose Web Sites > Default Web Site > LabManager.
3 Right‐click LabManager and choose Properties from the menu.
4 In the Virtual Directory tab, click the Configuration button.
5 For the .asax, .ascx, .asmx, and .aspx extensions, look at the executable path for each extension and ensure the version is 1.1.4322.
6 If you had to change the version, open a command‐line prompt and use the iisreset command.
VMware® Lab Manager Installation Guide
38 VMware, Inc.
Initializing and Configuring Lab ManagerAfter installing the Lab Manager Server, initialize and configure the Lab Manager system by accessing it from a Web browser. You can perform this task on the server console or your desktop. The initialization process involves the Administrator account, licensing, storage servers, network parameters for new virtual machines created in Lab Manager, attachment of a Managed Server, and support setup.
Lab Manager sends the customer ID to VMware at the beginning and the end of the initialization wizard.
To initialize and configure Lab Manager
1 From any machine with network access to the Lab Manager Server, launch Internet Explorer and go to http://<Lab Manager Server IP address or name>
You can also launch the same page from the desktop by double‐clicking the VMware Lab Manager icon.
If you receive SSL warnings, see “Accessing the Lab Manager Console” in the VMware Lab Manager User’s Guide.
2 In the Web Initialization wizard, select the location where the installation process is taking place.
3 Accept the license agreement.
4 Browse and select the file with the license key.
The wizard presents information on storage servers, network parameters for virtual machines created in Lab Manager, and Managed Server systems. Note that the default server for media storage (\\<Lab Manager Server IP address>\VMwareLM) resides on the Lab Manager Server hard disk.
5 Specify the details for the network environment:
Specify the IP range and related information.
If you need information on your network, consult your Network IT Administrator. Lab Manager automatically assigns IP addresses reserved for the new virtual machines.
If you have other installations of Lab Manager on your network, you can edit the Installation ID if it conflicts with the ID of another installation.
The Installation ID affects the unique MAC addresses required to deploy virtual machines.
VMware, Inc. 39
Chapter 3 Installing Lab Manager
6 Attach one of the Managed Server systems you created to the Lab Manager Server:
Type a display name and description (optional) for the Managed Server.
If this machine is your Managed Server, default entries appear in the fields.
Type the IP Address for the Managed Server.
If this machine is your Managed Server, its IP address automatically appears in the field.
Type the user name and password of an account with Administrator privileges for the machine you are attaching to the Lab Manager Server.
7 Select the VMFS devices you want this Managed Server to use for storage.
This step assumes you set up your SAN using the VI Client for ESX Server (see “Virtual Machine Storage (Datastore)” on page 19).
Do not select partitions used in production elsewhere. If you are not putting this Managed Server into production right away, you do not have to select any devices.
8 Create the first Lab Manager Administrator account with a user name, password, and email address.
Lab Manager passwords require at least six characters.
9 Choose whether to enable SupportLink, a feature that sends usage data to VMware and improves product support.
If you are outside of the U.S. and enabling SupportLink, you must consent to the possible transfer of data outside of the country where the installation takes place.
10 Before exiting the wizard, review some optional configuration tasks after logging in to the Web console:
Create user accounts.
Configure systems for LDAP authentication.
Lab Manager has a repository of users and can autoimport a list of users from an LDAP server. Lab Manager imports LDAP users as standard users by default without administrative privileges.
Create or import machine templates.
See the VMware Lab Manager User’s Guide for details on various operations.
11 Type the user name and password of the Lab Manager Administrator account you created to log in to the Lab Manager console.
VMware® Lab Manager Installation Guide
40 VMware, Inc.
Checking the Sample Template and ConfigurationAfter logging in to the Lab Manager console, view a sample template and configuration in the Lab Manager console. For details on templates and configurations, see the VMware Lab Manager User’s Guide.
To check the sample template and configuration
1 In the left pane, click Workspace to see the Sample 1 configuration.
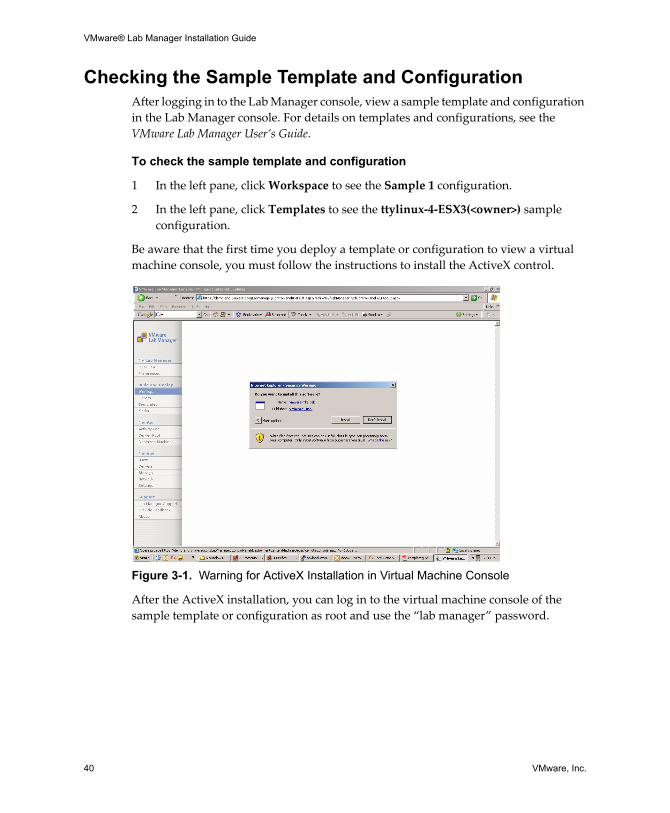
2 In the left pane, click Templates to see the ttylinux‐4‐ESX3(<owner>) sample configuration.
Be aware that the first time you deploy a template or configuration to view a virtual machine console, you must follow the instructions to install the ActiveX control.
Figure 3-1. Warning for ActiveX Installation in Virtual Machine Console
After the ActiveX installation, you can log in to the virtual machine console of the sample template or configuration as root and use the “lab manager” password.
VMware, Inc. 41
Chapter 3 Installing Lab Manager
Adding and Synchronizing Lab Manager Serverwith NFS Media Storage
If you added NFS media storage and created the /ISO folder, as described in “Configuring Additional Media Storage (NFS) Prior to Installing the Managed Server” on page 28, add the media server to the Lab Manager Web console.
To ensure Lab Manager recognizes and syncs up with the contents of the NFS media server, store media files in the /ISO folder. Review these requirements for the CD and floppy files:
CD files must end with .iso.
Floppy files must end with .img, .vfd, and .flp.
To add a media server
1 In the left pane, click Storage.
2 Click the Add Server button.
3 Enter the required information, select NFS Storage, and enter the NFS export path (for example, <host name or IP address:>/export).
4 Create a ISO subdirectory on the NFS server.
If your NFS server is <host name or IP address:>/export, the ISO directory is <host name or IP address:>/export/ISO.
To synchronize Lab Manager Server with NFS media storage
1 In the left pane, click Storage.
2 In the left pane, click Media.
3 Click Synchronize to make Lab Manager recognize the contents of the NFS server.
4 Confirm to synchronize the contents.
NOTE Lab Manager does not provide a way to populate the contents of the NFS server contents as it does for SMB shares. Use your own method of populating the NFS server. If you add new items, use the Synchronize button to ensure Lab Manager recognizes the additional items.
VMware® Lab Manager Installation Guide
42 VMware, Inc.
Uninstalling Lab ManagerUninstalling Lab Manager involves uninstalling the Managed Server agent and the Lab Manager Server software.
Uninstalling Managed Server Agent SoftwareIf required, you can remove the Managed Server agent software.
To uninstall Managed Server Agent software
1 Use the Lab Manager Web console to undeploy all virtual machines that reside on the Managed Server. (In the Templates and Workspace pages, move the pointer over the name of the template or configuration and choose Undeploy from the menu.)
2 Log on as root.
3 ssh to the ESX Server machine and type:
> uninstall-agent.sh
Uninstalling Lab Manager ServerIf required, you can remove the Lab Manager Server software.
To uninstall the Lab Manager Server software
1 If you need to uninstall all of the Lab Manager Server software, use the Lab Manager Web console to undeploy all virtual machines that reside on the Managed Server. (In the Templates and Workspace pages, move the pointer over the name of the template or configuration and choose Undeploy from the menu.)
Skip this step if you need to only uninstall program files.
2 From the Start menu on the desktop, choose Add or Remove Programs in the Control Panel.
3 Select the VMware Lab Manager program and click the Change/Remove button.
4 Specify the extent of the uninstallation:
You can select Remove program files only in the case of a partial uninstallation or an upgrade situation. If you select this option, proceed to Step 7.
You can select Remove everything in the case of a full uninstallation.
5 Confirm to remove all the Lab Manager software.
VMware, Inc. 43
Chapter 3 Installing Lab Manager
6 Agree to reset Lab Manager Services and IIS.
7 Click Finish.

VMware® Lab Manager Installation Guide
44 VMware, Inc.
VMware, Inc. 45
This appendix covers these troubleshooting topics for the Lab Manager installation:
“Error 1720: Windows Installer Package” on page 46
“Microsoft SQL Desktop Engine (MSDE) Installation Fails” on page 46
“Transfer of Managed Server Agent Software to ESX Server Machine Fails” on page 47
“Error 1603: Required Services for Installing Lab Manager” on page 47
Troubleshooting the Installation
VMware® Lab Manager Installation Guide
46 VMware, Inc.
Error 1720: Windows Installer PackageProblem During the installation of Lab Manager Server, you see error 1720:
Error 1720. There is a problem with the Windows Installer package. A script required for the install to complete could not be run
Solution The message indicates a permissions problem in a Visual Basic (VB) script. Make sure you logged in with Administrator privileges. If you already logged in with the correct privileges, contact VMware support. Open the Event Viewer and read the message about the Visual Basic failure.
Microsoft SQL Desktop Engine (MSDE) Installation FailsProblem During the installation of Lab Manager Server, the MSDE installation fails. Subsequent installation attempts also fail, and a reboot has no effect.
Solution In Notepad, open the {WinDir}\temp\VMware\MSDE2Klog.log file and see if these lines (or similar text) appear:
Loading extended custom action library
C:\DOCUME~1\ADMINI~1\LOCALS~1\Temp\{E09B48B5-E141-427A-AB0C-D3605127224A}\sqlcax.dllSOFTWARE\Microsoft\Microsoft SQL Server Setup.{E09B48B5-E141-427A-AB0C-D3605127224A}
Starting custom action InstallSqlRedis
The MSDE installer unsuccessfully tries to install Microsoft Data Access Components (MDAC).
To correct the problem of installing MSDE
1 Open the Task Manager and check that these processes are inactive:
SQLRedis.exe
Helper.exe
MsiExec.exe
Setupre.exe
2 Navigate to {WinDir}\temp\vmware and launch Helper.exe.
3 Return to the Task Manager and wait for Setupre.exe to appear.
4 When the task appears, kill the process.
The MSDE installation can function properly.
VMware, Inc. 47
Troubleshooting the Installation
Transfer of Managed Server Agent Software to ESX Server Machine Fails
Problem If you download the Managed Server software, copy it to the ESX Server machine, and run the tar -xvzf command, this error appears:
tar: This does not look like a tar archivetar: Skipping to next headertar: Archive contains obsolescent base-64 headerstar: Error exit delayed from previous errors running installer
Solution The message indicates possible corruption of the file. Before installing the Managed Server software, transfer the file to the ESX Server machine using FTP in binary mode. For more information on using binary mode and verifying the integrity of the software, see the steps in “Installing the Managed Server Agent Software on ESX Server” on page 29.
Error 1603: Required Services for Installing Lab ManagerProblem During the installation of Lab Manager Server, error 1603 appears.
Solution Make sure the IIS Admin, World Wide Web Publishing, and HTTP SSL services are running.

VMware® Lab Manager Installation Guide
48 VMware, Inc.
VMware, Inc. 49VMware, Inc. 49
Index
AActiveX
installing 40ASP.NET
configuring 22verifying 37
Cclient users
defining 10machine requirements 18
configurationssample in Lab Manager 40
Ddatastore
defining 19
Ffirewall settings 21FQDN
setting up 35
Gguest operating systems
requirements 17
IIIS
configuring 22installation
flow 26
high-level tasks 11requirements 13
Kknowledge base
accessing 6
LLab Manager
components 10installing 25introducing 9uninstalling 42using with VirtualCenter Server 23
Lab Manager Serveradding NFS media storage 41defining 10initializing and configuring 38installing the software 36prerequisites 31setting up 31setting up FQDN 35synchronizing with NFS media
storage 41system requirements 15verifying ASP.NET versions 37
MManaged Server
configuring NFS media storage 28defining 10
VMware® Lab Manager Installation Guide
50 VMware, Inc.
installing the agent software 29prerequisites 27setting up 27system requirements 15
Nnetwork
configuring domains and permissions 20
configuring firewall settings 21configuring routing 20IP addresses for virtual
machines 22requirements 20
Rrequirements
client user machines 18for Lab Manager installation 13general 14guest operating systems 17IIS and ASP.NET 22media storage 19network 20system 15virtual machine storage 19
Ssecurity
recommendations 31storage servers
defining 10requirements 19
Ttechnical support resources 6templates
sample in Lab Manager 40
Uuser groups
accessing 6
Vvirtual machine consoles
installing ActiveX. 40VMkernel network
setting up 28VMware community forums
accessing 6