Embed Size (px)
Citation preview
Getting Started with VMware FusionVMware Fusion for Mac OS X
EN-000371-00
You can find the most up-to-date technical documentation on the VMware Web site at:
http://www.vmware.com/products/fusion/support.html
The VMware Web site also provides the latest product updates.
If you have comments about this documentation, submit your feedback to:
Copyright © 2007–2010 VMware, Inc. All rights reserved. This product is protected by U.S. and international copyright and intellectual property laws. VMware products are covered by one or more patents listed at http://www.vmware.com/go/patents.VMware is a registered trademark or trademark of VMware, Inc. in the United States and/or other jurisdictions. All other marks and names mentioned herein may be trademarks of their respective companies.
VMware, Inc.3401 Hillview Ave.Palo Alto, CA 94304www.vmware.com
VMware, Inc.
2 Getting Started with VMware Fusion
VMware, Inc.
3
Contents
Getting Started with VMware Fusion 5
Introduction 5
What Is a Virtual Machine? 5
What You Can Do with VMware Fusion 6
System Requirements for VMware Fusion 7
Install VMware Fusion 8
Upgrade VMware Fusion 10
Start VMware Fusion 11
Getting Up and Running 11
Create a Windows Virtual Machine with Windows Easy Install 12
Create a Virtual Machine from the Boot Camp Partition 14
Migrating an Existing PC to a Virtual Machine 15
Import an Existing Parallels Desktop or Microsoft Virtual PC 7.0 Virtual Machine 15
Using Mac Keyboards in a Virtual Machine 16
Sending the Ctrl-Alt-Delete Command to a Virtual Machine 17
Quit Your Virtual Machine 17
VMware Fusion Resources 18
Supported Guest Operating Systems 18

4 Getting Started with VMware Fusion
VMware, Inc.
VMware, Inc.
5
Getting Started with VMware Fusion
IntroductionVMware Fusion™ enables you to run your favorite Windows applications and PC-only devices on your Intel-based Mac. Designed from the ground up for the Mac user, VMware Fusion makes it easy to take advantage of the flexibility, security, and portability of virtual machines to run Windows and other x86 operating systems side by side with Mac OS X.
What Is a Virtual Machine?A virtual machine is a software equivalent of a physical computer that, like the physical machine, runs an operating system and applications. In the case of VMware Fusion, a virtual machine is equivalent to a personal computer (PC). A virtual machine is like having a computer running inside another computer, mimicking the actions of different hardware devices commonly found inside a computer, such as a processor, memory, and a hard drive. It is a software file stored on your Mac that contains Windows and all your applications associated with it.
The Mac that you run a virtual machine on is typically referred to as the host. In this context, the virtual machine is referred to as a guest.
6 Getting Started with VMware Fusion
VMware, Inc.
What You Can Do with VMware FusionWith VMware Fusion, Intel-based Mac users have many capabilities.
Run your favorite Windows and Linux applications on any Intel-based Mac, without rebooting – VMware Fusion runs on Mac OS X Snow Leopard and Leopard, and supports over 150 operating systems, including Microsoft Windows 7.
Get the most out of your Mac – With support for 64-bit virtual machines and 8GB of RAM and eight virtual processors per virtual machine in version 3.1, VMware Fusion turns your Mac into a powerhouse.
Run a wide range of sophisticated 3D applications and games – VMware Fusion lets you take advantage of the combination of your Mac’s advanced graphics and Windows 7 new desktop with Aero animations. With DirectX 9.0c Shader Model 3 support and OpenGL 2.1 support for Windows, you can run your favorite Windows games and applications better than ever without having to reboot.
Create virtual machines easily – The VMware Fusion New Virtual Machine Assistant guides you through the process of creating a virtual machine. Windows Easy Install and Linux Easy Install make it easier than ever to install your favorite operating system on your Mac.
Migrate your Windows PC to a virtual machine effortlessly – VMware Fusion lets you use your Mac and take your old Windows PC with you. With the VMware Fusion integrated Migration Assistant, you can convert your physical PC into a virtual machine to run on your Mac in a few steps, and access all of your old PC applications and files.
Graduate from Boot Camp – If you have been running Windows using Boot Camp on your Mac, but want to be able to run Mac OS X and Windows side by side, VMware Fusion can directly access your existing Boot Camp partition. You can even import it into a virtual machine, letting you reclaim your disk space.
Getting Started with VMware Fusion 7
VMware, Inc.
Bring your other virtual machines to VMware Fusion – If you have been using Parallels Desktop or Microsoft Virtual PC for Mac to run Windows on your Mac, VMware Fusion imports your existing virtual machines and provides stability, performance, and ease of use.
Keep Windows safer on your Mac – With advanced safety features like multiple snapshots and AutoProtect, VMware Fusion enables you to keep your virtual machines safe from unexpected harm. VMware Fusion includes a 12-month complimentary subscription to McAfee VirusScan Plus that you can use to keep Windows spyware and viruses away.
System Requirements for VMware Fusion VMware Fusion has the following minimum system requirements:
Any Mac with an Intel processor
1GB of RAM, 2GB recommended
700MB of free disk space for VMware Fusion, and at least 5GB of free disk space for each virtual machine
Mac OS X version 10.5.8 Leopard or later, or 10.6.3 Snow Leopard or later
Operating system installation CD/DVD or disk image for virtual machines. Windows operating systems available separately from Microsoft and your favorite retailers
NOTE You must have enough memory to run Mac OS X, plus the memory required for each guest operating system and for applications on the Mac and in the virtual machine. See your guest operating system and application documentation for their memory requirements.
8 Getting Started with VMware Fusion
VMware, Inc.
Install VMware FusionYou can install VMware Fusion from a CD
To install VMware Fusion
1 Select an installation method.
a If you are installing from a CD, insert it and skip to Step 4.
b If you are installing from a download, first download VMware Fusion from the VMware Web site at http://www.vmware.com/mac/.
Click the Download link and follow the subsequent links for an electronic download distribution.
The VMware Fusion disk image has a full version and a light version. The full version has the VMware Tools suite of utilities for all supported operating systems, and the light version has VMware Tools for Windows and Mac OS X Server only, with additional VMware Tools downloadable on demand.
2 Click the download link, and save the application to your Mac.
The VMware Fusion disk image is saved to your default download directory. For the full version, the filename is VMware-Fusion-x.x.x-xxxxxx.dmg, where x.x.x is the application version and xxxxxx is the build number for the download release. The light version filename is VMware-Fusion-x.x.x-xxxxxx-light.dmg.
3 Double-click VMware-Fusion-x.x.x-xxxxxx.dmg or VMware-Fusion-x.x.x-xxxxxx-light.dmg to mount it.
4 Double-click the Install VMware Fusion icon to start the Installation Assistant, and follow its instructions.
Getting Started with VMware Fusion 9
VMware, Inc.
5 Enter your serial number.
If you do not have a serial number, click Get Serial Number to go to the VMware Web site, where you can purchase a VMware Fusion serial number.
You can continue without entering a serial number, but you cannot power on a virtual machine until you enter a valid serial number. Enter your serial number by selecting VMware Fusion > Buy Now or Enter License.
6 Choose whether to participate in the VMware User Experience Improvement Program. Click Continue to make your choice in the Would you like to participate in our User Experience Improvement Program? dialog.
a (Optional) Click Learn More to read a description of the VMware User Experience Improvement Program.
b Click Yes to participate, or No if you do not want to participate.
After you install VMware Fusion, you can change the participation setting at any time by selecting VMware Fusion > Preferences.
7 Click Install.
10 Getting Started with VMware Fusion
VMware, Inc.
Upgrade VMware FusionIf you are upgrading VMware Fusion, you do not need to uninstall the version installed on your computer. Installation and upgrade does not modify existing virtual machines.
When you upgrade an existing VMware Fusion installation, make sure that all your virtual machines are properly shut down and that VMware Fusion is not running.
To upgrade VMware Fusion
To upgrade the application follow the same steps from “Install VMware Fusion” on page 8.
After upgrading the VMware Fusion, you must upgrade VMware Tools on your virtual machine.
To upgrade VMware Tools
The first time you power on your Windows virtual machine, it offers to install VMware Tools. Approve that, and when the Tools installation is done, restart the virtual machine when prompted.
NOTE Upgrading to VMware Fusion requires a valid 25-character VMware Fusion 3 serial number. If you do not have one, during installation click Get Serial Number on the Serial Number panel, which opens a Web portal where you can purchase an upgrade key.
Getting Started with VMware Fusion 11
VMware, Inc.
Start VMware FusionWhen you start VMware Fusion, the Virtual Machine Library window appears, open to the Home panel. From this panel you can start any of the actions described in “Getting Up and Running.”
To start VMware Fusion
In the Applications folder, double-click VMware Fusion.
For instructions on configuring, running, and closing VMware Fusion, see the VMware Fusion Help.
Getting Up and RunningYou can use one of the following options to get up and running quickly with VMware Fusion:
Create a Windows virtual machine.
Use an existing Boot Camp installation.
Migrate your existing Windows PC.
Import a Parallels Desktop or Microsoft Virtual PC virtual machine.
12 Getting Started with VMware Fusion
VMware, Inc.
Create a Windows Virtual Machine with Windows Easy InstallWhen you create a Windows virtual machine, you can use the VMware Fusion Windows Easy Install feature to automatically install Windows and VMware Tools in your virtual machine. VMware Fusion creates your virtual machine, selects the default Windows installation options, and installs VMware Tools, which loads the drivers required to optimize your virtual machine’s performance. You can also have Windows Easy Install make your Mac home folder and other folders available to this virtual machine, so that you can share files between the virtual machine and your Mac. Alternatively, you can isolate your virtual machine from your Mac and other virtual machines.
Windows Easy Install is available for the following Windows operating systems:
Windows 7, Windows Vista, Windows XP, Windows 2000
Windows Server 2008, Windows Server 2003, Windows 2000 Server
If you are not using one of these Windows operating systems in your virtual machine, or you want to install the operating system manually, see the VMware Fusion Help for details on creating virtual machines.
To create a Windows virtual machine using Windows Easy Install
1 Insert your Windows CD/DVD into your optical drive.
You need a valid Windows product key. Windows CDs that were included with a previous physical computer might be locked to that machine and not work. Check with the PC manufacturer for more information.
2 Select File > New.
The New Virtual Machine Assistant starts.
Getting Started with VMware Fusion 13
VMware, Inc.
3 In the Introduction panel, ensure that Install this operating system is selected, and click Continue.
4 In the Windows Easy Install panel, enter your Display Name or Account Name, Password (optional), and Windows Product Key.
The entry in the Display Name field (Windows XP and earlier) appears in information boxes as the name your Windows software is registered to. It is not the Windows user name. The entry in the Password field is the password for the windows administrator account only. VMware does not provide the Windows Product Key. It is in the packaging for the Windows operating system CD/DVD.
5 In the Integration panel, indicate how the new virtual machine should handle basic file sharing.
More Seamless. VMware Fusion shares your Mac’s documents and applications with Windows. Files on your Mac that Windows supports open in Windows.
More Isolated. VMware Fusion does not share your Mac’s documents and applications with Windows.
6 In the Finish panel, click Finish.
VMware Fusion installs Windows. This process can take up to 45 minutes. After installing Windows, VMware Fusion installs VMware Tools and powers on the virtual machine.
14 Getting Started with VMware Fusion
VMware, Inc.
Create a Virtual Machine from the Boot Camp PartitionBoot Camp is an application from Apple that enables an Intel-based Mac to run Windows operating systems. Boot Camp creates separate Mac and Windows partitions on your hard disk to create a dual-boot environment, so that you can use either Mac OS X or Windows at boot time, but not both. With VMware Fusion, you can use your Windows Boot Camp partition as a virtual machine. This feature gives you the following abilities:
Use your Boot Camp virtual machine and your Mac at the same time without rebooting to switch between them.
Share files easily between your Boot Camp virtual machine and your Mac, through shared folders, and by dragging and dropping files or cutting and pasting text.
To create a virtual machine from the Boot Camp partition
1 From the Virtual Machine Library window, select Boot Camp partition, which is automatically detected, and click the run arrow.
2 Enter your Mac password to access the Boot Camp partition.
You must have administrator privileges to use the Boot Camp as a virtual machine. VMware Fusion creates a virtual machine from your Boot Camp partition and starts Windows.
NOTE If VMware Tools is not installed, and you reactivate Windows in your Boot Camp virtual machine, and subsequently boot your Boot Camp partition natively, you are prompted to reactivate Windows. Reactivating Windows in your native Boot Camp partition results in your Boot Camp virtual machine requiring reactivation the next time you power it on, and so on. Installing VMware Tools solves this problem. If you have VMware Tools installed, you must reactivate Windows only when you first power on your Boot Camp virtual machine.
Getting Started with VMware Fusion 15
VMware, Inc.
3 After Windows boots from your Boot Camp virtual machine, VMware Fusion starts the installation of VMware Tools to enable full virtual machine functionality and optimize performance for your Boot Camp partition when used as a virtual machine. Follow the onscreen instructions and restart your virtual machine when prompted.
4 When the VMware Tools installation is complete, reboot your computer.
The first time you power on your Boot Camp virtual machine after installing VMware Tools, you must reactivate Windows.
Migrating an Existing PC to a Virtual MachineVMware Fusion makes it easy for Windows users to make the switch to a Mac. To migrate from a physical PC to VMware Fusion, use the Migration Assistant, available from the Virtual Machine Library or select File > Migrate Your PC. After you install the VMware Fusion PC Migration Agent on your PC, the Migration Assistant can make a network connection and convert the Windows PC to a VMware Fusion virtual machine.
For details about how to migrate your physical PC to a virtual machine, see the VMware Fusion Help.
Import an Existing Parallels Desktop or Microsoft Virtual PC 7.0 Virtual MachineVMware Fusion makes it easy to import your existing virtual machine to VMware Fusion.
To import an existing virtual machine to your Mac
1 Start VMware Fusion and select File > Import.
2 Select your virtual machine and click Import.
For more information about importing an existing virtual machine, see the VMware Fusion Help.
16 Getting Started with VMware Fusion
VMware, Inc.
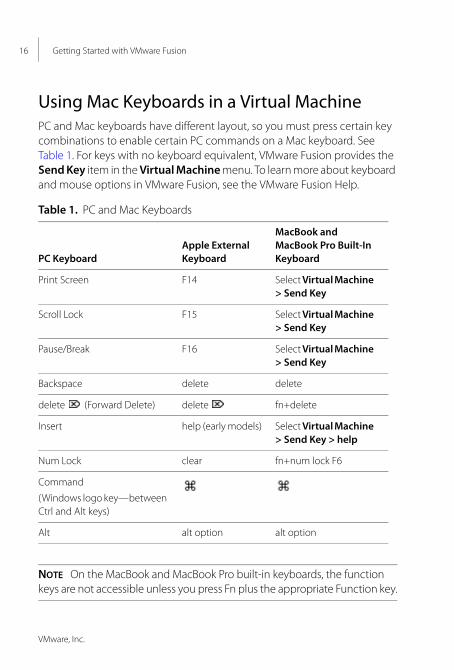
Using Mac Keyboards in a Virtual MachinePC and Mac keyboards have different layout, so you must press certain key combinations to enable certain PC commands on a Mac keyboard. See Table 1. For keys with no keyboard equivalent, VMware Fusion provides the Send Key item in the Virtual Machine menu. To learn more about keyboard and mouse options in VMware Fusion, see the VMware Fusion Help.
Table 1. PC and Mac Keyboards
PC KeyboardApple External Keyboard
MacBook and MacBook Pro Built-In Keyboard
Print Screen F14 Select Virtual Machine > Send Key
Scroll Lock F15 Select Virtual Machine > Send Key
Pause/Break F16 Select Virtual Machine > Send Key
Backspace delete delete
delete (Forward Delete) delete fn+delete
Insert help (early models) Select Virtual Machine > Send Key > help
Num Lock clear fn+num lock F6
Command
(Windows logo key—between Ctrl and Alt keys)
Alt alt option alt option
NOTE On the MacBook and MacBook Pro built-in keyboards, the function keys are not accessible unless you press Fn plus the appropriate Function key.
Getting Started with VMware Fusion 17
VMware, Inc.
Sending the Ctrl-Alt-Delete Command to a Virtual MachineYou can use a VMware Fusion command to send the Ctrl-Alt-Delete keystroke combination to a Windows virtual machine. You can send the command in any of the following ways.
Select Virtual Machine > Send Ctrl-Alt-Del.
If you are using an external PC keyboard, press Ctrl+Alt+Del.
On a full-sized Mac keyboard, press Fwd Del+Ctrl+Option. The Forward Delete key ( ) is below the Help key.
On a Mac laptop keyboard, press Fn+Ctrl+Option+Delete.
Quit Your Virtual MachineYou can quit using a virtual machine by either suspending it or shutting it down. Using the Suspend command instead of Shut Down lets you get back up and running faster.
To quit a virtual machine
Select a method to quit the virtual machine.
Select Virtual Machine > Suspend to save the current state of your virtual machine, including all running applications, so you can return to this state without restarting the operating system in your virtual machine.
Select Virtual Machine > Shut Down to completely shut down the operating system and the virtual machine.
NOTE Boot Camp virtual machines do not support the suspend and snapshot features because you can reboot into Windows using Boot Camp, which would invalidate suspend and snapshots.
18 Getting Started with VMware Fusion
VMware, Inc.
VMware Fusion ResourcesTo learn about available VMware support offerings, registering a product, or creating a technical support request, see the VMware support portal athttp://www.vmware.com/go/fusionsupport.
You can also find information about using VMware Fusion at the following self-help sources:
VMware Fusion has a rich, searchable help system available from the Help menu.
You can find self-paced video tutorials and answers to frequently asked questions through the VMware support portal athttp://www.vmware.com/go/fusionsupport.
VMware recommends joining the VMware Fusion Community at http://www.vmware.com/go/fusionforums. The VMware Fusion Community Forum is where users can exchange information, questions, and comments with each other to get the most out of VMware Fusion.
Supported Guest Operating Systems VMware Fusion supports over 150 guest operating systems, including most versions of Windows, and including Mac OS X Server, Linux, Solaris, and FreeBSD. For guest operating system support and known issues, go to the VMware Web site and click the Support & Downloads tab. Under Support Resources, click the Compatibility Guides link.

![USER'S GUIDE - LOGICIELS GRATUITS · Double-click on the setup file “stela-install-[X.X.X].jar”, where [X.X.X] is the release of STELA. The installation program will ask to fill](https://img.pdfslide.us/doc/110x75/5d4d086788c993aa6c8b9029/users-guide-logiciels-gratuits-double-click-on-the-setup-file-stela-install-xxxjar.jpg)