Embed Size (px)
Citation preview

VMD User Guide
2
Introduction VMD (Visual Molecular Dynamics) is a software package for the 3D visualization, modeling and analysis of molecular systems. It is developed and freely distributed by the Theoretical and Computational Biophysics Group at the University of Illinois at Urbana-Champaign. VMD is a powerful instrument used in real scientific research. Additionally, it is also a highly effective teaching tool. This is an abbreviated guide that covers the download, installation and use of VMD. For a tutorial, see http://www.ks.uiuc.edu/Training/Tutorials/vmd/tutorial-html. Further questions can be sent to Bob Johnson: [email protected]. Download and Installation
1. Go to http://www.ks.uiuc.edu/Research/vmd
2. Click on “Download VMD” on the left side of the screen.
3. Choose the version you wish to download Windows users should select: Windows OpenGL (Microsoft Windows XP/Vista/7 (32-bit) using OpenGL) Mac users should select: MacOS X OpenGL (Intel x86) (Apple MacOS-X (10.4.7 or later) with hardware OpenGL (native bundle)) Users of older Macs1 may have to select: MacOS X OpenGL (PowerPC) (Apple MacOS-X (10.4.7 or later) with hardware OpenGL (native bundle))
4. Register a username and password
5. Download the file
6. Windows users: To install, run the file that was download and follow the installation instructions
7. To run VMD: Windows users: Click on VMD from the Start Menu (located in Programs→University of Illinois→VMD by default) Mac users: Run the .dmg file
1 To determine what type of processor is in your Mac, go to the Finder and choose About this Mac from the Apple Menu

VMD User Guide
3
VMD Input – PDB Files VMD accepts many types of input files. However, among the most common types are PDB (Protein Data Bank) files which have the .pdb file extension. You can find PDB files on the web for many molecules ranging from small organic molecules to large biomolecules like proteins and DNA. Normally, you can simply load these files into VMD without viewing or editing their content. However, to use VMD effectively, it is important to know some of the basics about these files. PDB files contain a list of atoms along with their three-dimensional coordinates. Each atom has an index and a name. Collections of atoms are grouped into residues. Each residue has its own number. Below is a sample PDB file of a single water molecule. There are three atoms: an oxygen named O, a hydrogen named H1 and another hydrogen named H2. These three atoms are grouped into a residue named WAT.
Atom index
Atom name
Residue name
Residue number
x y z
VMD User Guide
4
A sample PDB file for hemoglobin, a more complicated molecule, is shown below. The molecule is divided up into many residues with each residue representing a single amino acid. Orange and blue boxes are drawn around the first two residues – a valine (VAL) and leucine (LEU) amino acid, respectively. Many biological molecular structures are composed of several subunits that are held together by noncovalent (hydrogen bonds, van der Waals forces, etc.) interactions (e.g. double-stranded DNA). Within a PDB file, these subunits are collections of residues grouped into a chain designated by a single letter code in the fifth column.
Residue 1
Residue 2
Chain
VMD User Guide
5
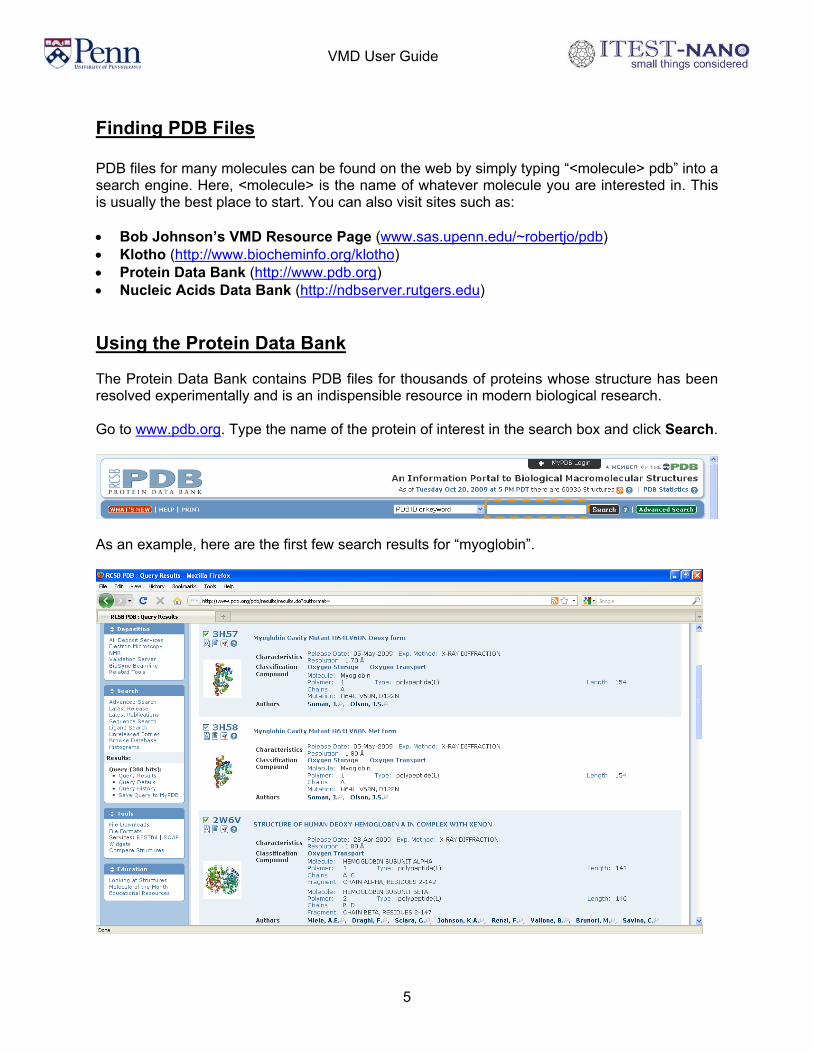
Finding PDB Files PDB files for many molecules can be found on the web by simply typing “<molecule> pdb” into a search engine. Here, <molecule> is the name of whatever molecule you are interested in. This is usually the best place to start. You can also visit sites such as: • Bob Johnson’s VMD Resource Page (www.sas.upenn.edu/~robertjo/pdb) • Klotho (http://www.biocheminfo.org/klotho) • Protein Data Bank (http://www.pdb.org) • Nucleic Acids Data Bank (http://ndbserver.rutgers.edu) Using the Protein Data Bank The Protein Data Bank contains PDB files for thousands of proteins whose structure has been resolved experimentally and is an indispensible resource in modern biological research. Go to www.pdb.org. Type the name of the protein of interest in the search box and click Search.
As an example, here are the first few search results for “myoglobin”.
VMD User Guide
6
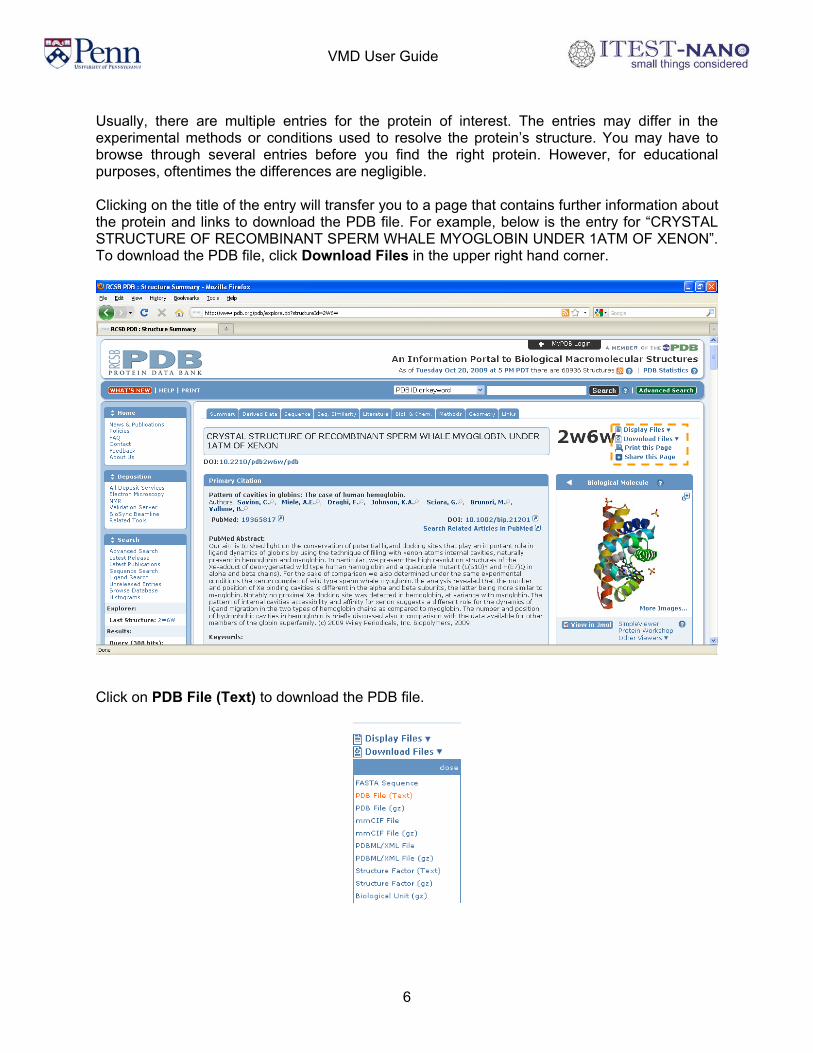
Usually, there are multiple entries for the protein of interest. The entries may differ in the experimental methods or conditions used to resolve the protein’s structure. You may have to browse through several entries before you find the right protein. However, for educational purposes, oftentimes the differences are negligible. Clicking on the title of the entry will transfer you to a page that contains further information about the protein and links to download the PDB file. For example, below is the entry for “CRYSTAL STRUCTURE OF RECOMBINANT SPERM WHALE MYOGLOBIN UNDER 1ATM OF XENON”. To download the PDB file, click Download Files in the upper right hand corner.
Click on PDB File (Text) to download the PDB file.

VMD User Guide
7
Loading a PDB File Run VMD. This will cause three windows to appear on the screen. PDB files can be loaded from the VMD Main window by going to the File menu and clicking on New Molecule. You can then browse for the PDB file. Once you load the file, the three-dimensional molecular structure will appear in the OpenGL window.
Interaction Modes The user can interact with the molecule in a variety of ways. The user can rotate, translate and scale (zoom) the molecule. Each of these interactions modes can be accessed via the Mouse menu in the VMD Main window or using a shortcut key listed below. After the interaction mode has been selected, click on the OpenGL window with the left mouse button and drag the mouse. By default, VMD starts in Rotate Mode.
Mode Shortcut Key Description Rotate r Rotates the molecule
Translate t Translates the molecule Scale s Scales the molecule (zoom) Center c Centers on an atom

VMD User Guide
8
Measuring Structural Features You can place labels that specify the distance between two atoms, the angle formed by three atoms and the dihedral angle formed by four atoms. To do so, select the particular feature you would like to label from the Mouse menu in the VMD Main window or using a shortcut key listed below. Then click on the atoms you would like to measure.
Feature Shortcut Key Description Bond length 2 Distance between two atoms
Angle 3 Angle between three atoms Dihedral Angle 4 Dihedral angle between four atoms
Changing the Drawing Method Atoms and molecules can be visualized with various drawing methods. To change the drawing method, go to Graphics → Representations and then click on the Drawing Method menu.

VMD User Guide
9
Drawing Method Description
Lines Default method HBonds Draws hydrogen bonds
VDW Space filling visualization CPK Ball and stick visualization
Licorice Stick visualization Ribbons/New Ribbons Draws backbone of DNA/protein as a ribbon Cartoon/New Cartoon Draws secondary structure of proteins
Surf Draws a surface around the molecule Beads Draws residues as beads
Changing the Coloring Method You can change the way atoms and molecules are colored. This can be done by going to Graphics → Representations and then clicking on the Coloring Method menu. By default, VMD starts with the Name method that colors atoms as listed below.
Default Coloring Method (Name) Hydrogen White Carbon Cyan Oxygen Red Nitrogen Blue
Phosphorus Brown Sulfur Yellow
Changing the Selected Atoms You can choose to visualize a subset of the atoms in the PDB file by changing the text in the Selected Atoms box in the Graphical Representations window (Graphics → Representations). To determine what selections are available, click on the Selections tab of the Graphical Representations window.
Some Common Atom Selections Atom Selection Description
all Show all atoms protein Show only protein atoms
backbone Displays backbone atoms noh Do not display hydrogen atoms
resname X Displays atoms of residue X name X Display atoms named X resid X Display residue number X
VMD User Guide
10
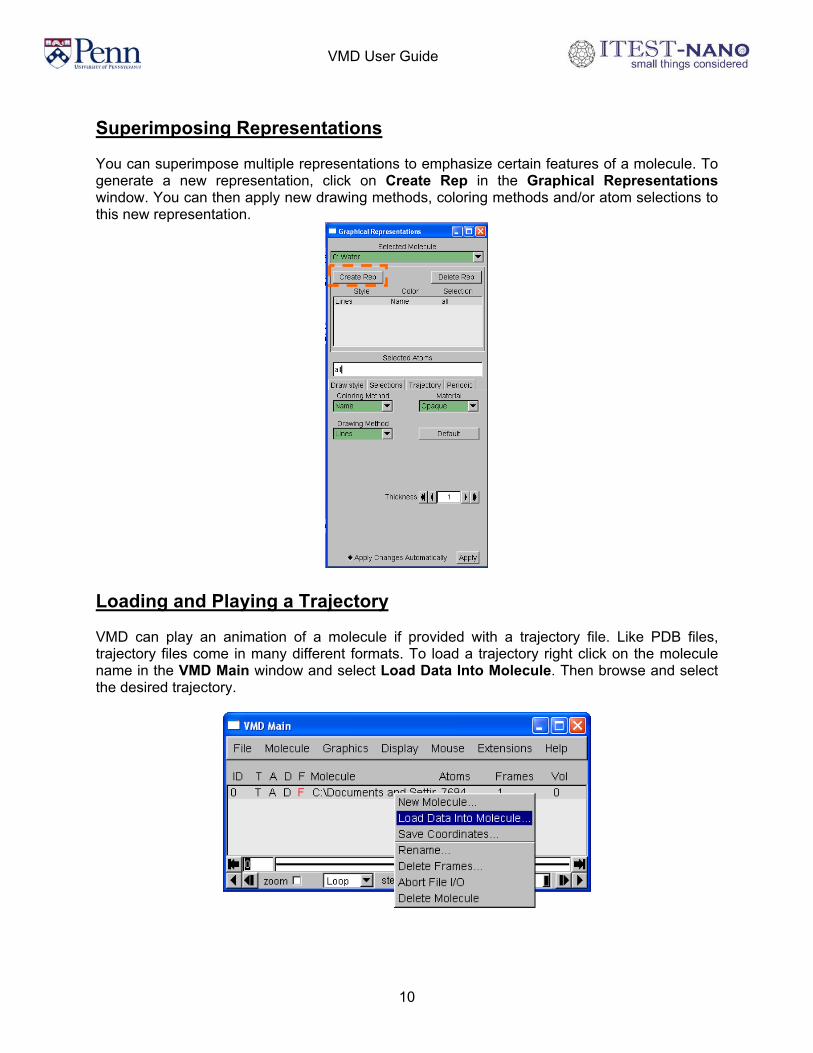
Superimposing Representations You can superimpose multiple representations to emphasize certain features of a molecule. To generate a new representation, click on Create Rep in the Graphical Representations window. You can then apply new drawing methods, coloring methods and/or atom selections to this new representation.
Loading and Playing a Trajectory VMD can play an animation of a molecule if provided with a trajectory file. Like PDB files, trajectory files come in many different formats. To load a trajectory right click on the molecule name in the VMD Main window and select Load Data Into Molecule. Then browse and select the desired trajectory.

VMD User Guide
11
The trajectory can be played using the arrow buttons at the bottom of the VMD Main window. The speed can be adjusted with the slider in the bottom right hand corner.
Saving/Loading a State File After applying your own visualization style to the PDB file, you can save your work in a VMD state file. You can then load the state file at a later time and it will load the PDB file along with the changes that you made. State files have a .vmd file extension. To save a state file, go to File → Save State in the VMD Main window. To load a state file, go to File → Load State.
Saving an Image To save a screenshot of the contents of the OpenGL window in the File menu of the VMD Main window go to: File → Render → Start Rendering Using the default renderer takes a screen shot of the VMD OpenGL window and saves it as an image.

VMD User Guide
12
Saving an Image with Lighting and Shadow Effects You can also save images that include lighting and shadow effects (see figure below of hemoglobin).
First, specify the strength of the lighting by going to Display → Display Settings
VMD User Guide
13
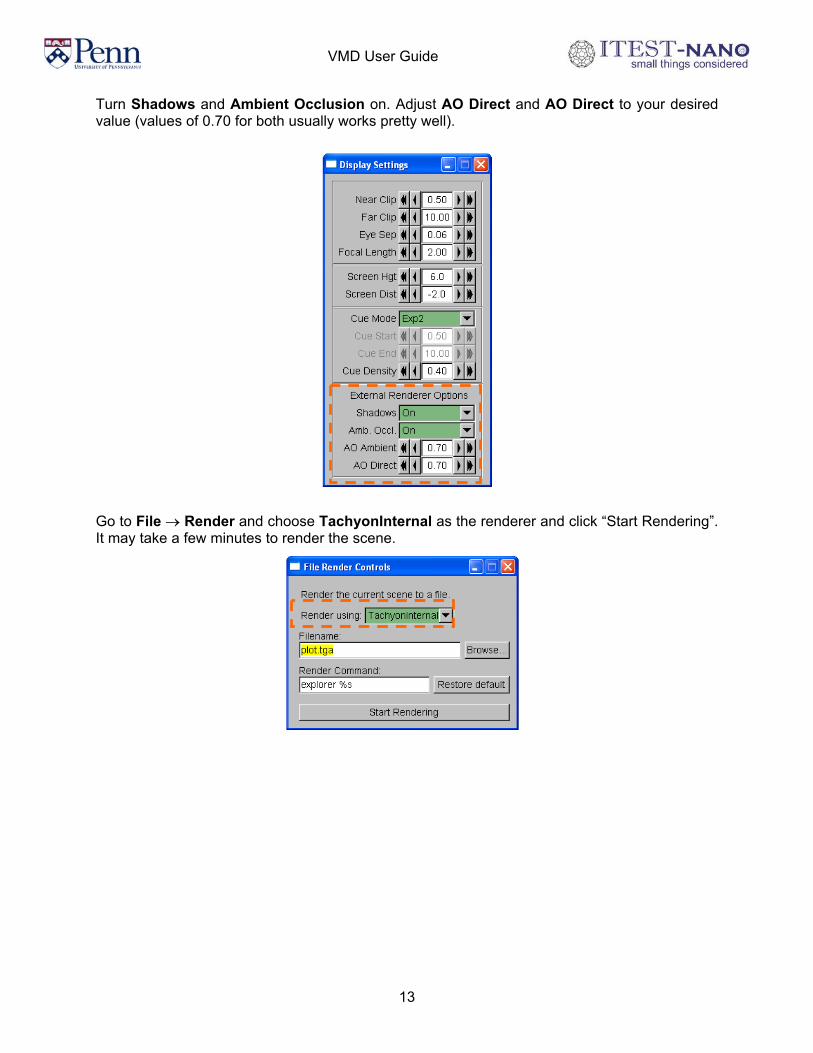
Turn Shadows and Ambient Occlusion on. Adjust AO Direct and AO Direct to your desired value (values of 0.70 for both usually works pretty well).
Go to File → Render and choose TachyonInternal as the renderer and click “Start Rendering”. It may take a few minutes to render the scene.

![Al-Samman, I., Artuso, M., Christiansen, H. , Doufexi, A., & Beach, M. · The network that connects the BBUs with the RRHs is named as fronthaul [2]. BBUs are grouped in a pool in](https://img.pdfslide.us/doc/110x75/5fea11cea2fdf451f47c3e58/al-samman-i-artuso-m-christiansen-h-doufexi-a-beach-m-the-network.jpg)