Embed Size (px)
Citation preview

VistA Blood Establishment Computer Software (VBECS) 2.0.0 Data Center
Installation Guide
October 2014
Department of Veterans Affairs Product Development

This page intentionally left blank.

Revision History Date Revision Description Author
05-09-13 1.0 Initial Version BBM Team
12-02-13 2.0
General: Changed “stood up” to “installed” and “stood up and ready” to “Installed and operational”. Changed all instances of the template name to “VBECS 2.0.0.3” Introduction: Added more information regarding SQL Server roles. Prerequisites section: Added information about space requirements. Moved OVF tool download to here. Sections 1 and 2: Added instructions to verify the template. Adjusted screen captures and instructions for new template naming convention. BBM Team
03-27-14 3.0
Prerequisites section: Added a prerequisite stating which ports have to be open between the primary and disaster recovery site. Deploy App Servers section, Prerequisite: Changed sentence to “A computer account for each App Server must be created in Active Directory.” Deploy SQL Servers section, Prerequisite: Changed sentence to “A computer account for each SQL Server must be created in Active Directory.” Changed template names from hardcoded number to n.n. BBM Team
09-25-14 4.0
General: Changed all instances of “2.0.0.3” to “IPADDRESS Deploy SQL Servers section: Added steps to bring the disks online. Added a section called Create Quorum Shares. BBM Team
10-22-14 5.0 Deploy SQL Servers section: Updated Steps 24 and 26 and Figures 19, 20 and 21 for new drive names. BBM Team

This page intentionally left blank.

Table of Contents
REVISION HISTORY .................................................................................................................................. 3
INTRODUCTION ........................................................................................................................................ 7
PREREQUISITES ......................................................................................................................................... 8
DEPLOY VIRTUAL MACHINES FROM OVF FILES............................................................................ 11
1 Deploy App Servers .................................................................................................................. 11 2 Deploy SQL Servers .................................................................................................................. 12
STAGE ACCOUNTS IN ACTIVE DIRECTORY TO SUPPORT SQL SERVER .................................................. 22 3 Stage the Cluster Account ......................................................................................................... 22 4 Stage the VNN Account ............................................................................................................ 27
QUORUM SHARES ................................................................................................................................... 30 5 Create Quorum Shares (one time task) ...................................................................................... 30
APPENDIX A: ADDING VBECS FTP SITE TO THE TRUSTED SITES IN INTERNET EXPLORER ................. 32

This page intentionally left blank.

Introduction This guide details the installation and configuration that must be done in a data center environment to support the VBECS 2.0.0 environment.
VBECS 2.0.0 has two main components, the Application Server, a.k.a. App Server, and the SQL Server (Figure 1).
• App Server: This is a Windows 2008 Server that is the execution environment for the VBECS application. App Servers are backed up to a disaster recovery location.
• SQL Server: This is a Windows 2008 Server that runs SQL Server 2012 in an Always On cluster consisting of three servers. Each region will have multiple clusters.
o Primary: This server fields all requests. Its data are replicated to the High Availability and Disaster Recovery servers.
o High Availability (HA): This server provides database backup services through synchronous replication. Its data are guaranteed to be consistent with the Primary. It becomes the Primary should the original Primary server fail or become unreachable. Failover to this server is automatic.
o Disaster Recovery (DR): This server resides at a remote site and provides database backup services through asynchronous replication. It becomes the Primary server should both the Primary and HA server fail or become unreachable. Failover to this server is a manual process.

Figure 1: VBECS Architecture
There are two main tasks that the data center must perform to deploy the VBECS environment:
Deploy VBECS Servers from Templates The VBECS team has created virtual machine templates for the App and SQL Servers. These templates are in Open Virtualization Format (OVF) and can be found on the VBECS FTP site.
Perform Active Directory Configuration to Support the SQL Server Cluster Region level personnel with rights in Active Directory (AD) must create and configure accounts to support to the SQL Always On cluster.
Unauthorized access or misuse of this system and/or its data is a federal crime. Use of all data must be in accordance with VA security and privacy policies.
If any problems or questions arise in the course of the installation, file a ticket in Remedy for assistance.
Prerequisites The following tasks must have been completed before beginning this installation:

• Ensure that the firewall is open between the primary and disaster recovery site on the following channels:
o Port 5022; TCP and UDP o Ports 49152 through 65535; TCP and UDP
• The Data Center Worksheets must be filled out and on hand. Please fill out the worksheets and return them to the BBM team.
• The vSphere environment must be installed and operational for VBECS virtual machine deployment.
• Download and install the VMware OVF tool from ftp://IPREDACTED:20001/OVF tool/. • Space must be available for VM deployment. The figure in parentheses is for the DR site:
o Region 1: 20TB (8TB) o Region 2: 20TB (8TB) o Region 3: 30TB (12TB) o Region 4: 20TB (8TB)
Totals: 90TB (primary site), 36TB (DR site)

This page intentionally left blank.

Deploy Virtual Machines from OVF Files The VBECS development team has created virtual machine templates in the form of OVF files for both the App and SQL Servers.
1 Deploy App Servers Prerequisite A computer account for each App Server must be created in Active Directory.
1) The VBECS OVF App server template can be found at ftp://IPREDACTED:20001/App Server 1.0. Import the App Server template (VBECS IPADDRESSpp Server n.n.ovf) into your vSphere environment (n.n is the current version of the template). To access FTP: a) Open Windows Explorer. In the Address field, type ftp://IPREDACTED:20001 and press
Enter. b) On the Log On As dialog, enter your Windows user name and password. If you do not have
access, send an email to the following mail group requesting access: VA OIT VBECS Implementation Support.
Note: NMEA (Non-eMail Enabled Account) accounts cannot be authenticated by the FTP server, so you must access the FTP site using your regular NT account.
See Appendix A: Adding VBECS FTP Site to the Trusted Sites in Internet Explorer if you have difficulty accessing the FTP site.
2) Run the following command where n.n is the current version of the template: ovftool “VBECS
IPADDRESSpp Server n.n.ovf”. Verify that the template name is correct (Figure 2).
Figure 2: Example of Validate App Server Template
3) Deploy an App Server for each location [Worksheet: (App Servers)].

2 Deploy SQL Servers Prerequisite A computer account for each SQL Server must be created in Active Directory.
1) The VBECS OVF SQL server template can be found at ftp://IPREDACTED:20001/SQL Server 1.0. Import the SQL Server template (VBECS IPADDRESSQL Server n.n.ovf) into your vSphere environment.
2) Run the following command where n.n is the current version of the template: ovftool “VBECS IPADDRESSQL Server n.n.ovf”. Verify that the template name is correct (Figure 3).
Figure 3: Example of Validate SQL Server Template
3) Deploy SQL Servers for each system [Worksheet: (SQL Server System 1)], [Worksheet: (SQL
Server System 2)], [Worksheet: (SQL Server System 3)] (Region 3 only) and [Worksheet: (SQL Server Test Systems)]. Note that rows 1-3 cover the SQL Servers. Rows 4 and higher are virtual resources that will be created later.
The next step is to add data drives to the SQL Servers: • Each production SQL Server will have four, 980GB drives. • Each test SQL Server in Regions 1, 2 and 4 will have four, 230GB drives. • Each test SQL Server in Region 3 will have four, 355GB drives.

4) Open the vSphere console and navigate to the VMs and Templates view. Right-click on the VM that will be modified and select Edit Settings (Figure 4).
Figure 4: Edit Settings
5) Click Add (Figure 5).
Figure 5: Example of Virtual Machine Properties

6) Select Hard Disk (Figure 6). Click Next.
Figure 6: Add Hardware
7) Select Create a new virtual disk (Figure 7). Click Next.
Figure 7: Add Hardware

8) For Disk Size, enter the value in [Worksheet: (SQL Server System n, Disk Sizes)]. In Disk Provisioning, select Thick Provision Eager Zeroed (Figure 8). Click Next.
Figure 8: Example of Add Hardware
9) Leave default options. Click Next (Figure 9).
Figure 9: Add Hardware

10) Verify settings are correct (Figure 10). Click Finish.
Figure 10: Example of Add Hardware
11) Repeat Steps 5 through 10 to create three additional disks. 12) Open a command prompt and type diskpart. Press Enter (Figure 11).
Figure 11: Example of Command Prompt
13) Type list disk and press Enter (Figure 12). The four SQL server disks will be listed as Offline.
Figure 12: Example of Command Prompt

14) Execute the following commands (Figure 13). Replace <n> with 1, 2, 3, and 4 as each disk is brought online: a) select disk <n> b) attributes disk clear readonly c) online disk
Figure 13: Example of Bringing Disk Online

15) Execute the list disk command and verify that all disks have a status of Online. 16) Type exit and press Enter to quit the DiskPart utility and then close the command prompt
window. 17) Reboot the server. 18) Login to the server and open Administrative Tools, Computer Management. 19) Select Disk Management. Figure 14 will launch automatically. Click OK.
Figure 14: Initialize Disk
20) Right-click on the word “Unallocated” of Disk 1 and select New Simple Volume (Figure 15).
Figure 15: Example of Computer Management

21) Click Next (Figure 16).
Figure 16: Example of New Simple Volume Wizard
22) Keep defaults. Click Next (Figure 17).
Figure 17: Example of New Simple Volume Wizard

23) Keep defaults. Click Next (Figure 18).
Figure 18: Example of New Simple Volume Wizard
24) Change Volume label field to SQL Data (Figure 19). Click Next.
Figure 19: Example of New Simple Volume Wizard

25) Review the settings (Figure 20). Click Finish.
Figure 20: Example of New Simple Volume Wizard
26) Repeat Steps 20 through 25 using the following settings (Figure 21):
• Disk 2 - Drive letter: F, Volume label: SQL Logs • Disk 3 – Drive letter: G, Volume label: SQL Temp • Disk 4 – Drive letter: H, Volume label: SQL Backup
Figure 21: Example of Configured and Initialized Disks
27) Repeat this section to create and initialize the disks on all SQL Servers.

Stage Accounts in Active Directory to Support SQL Server The cluster and virtual network name (VNN) accounts must be created prior to SQL Server cluster installation. These steps must be executed by someone who has rights in the domain where the accounts will be created.
3 Stage the Cluster Account Prerequisite These instructions must be executed on a workstation or server with Active Directory Users and Computers installed.
1) Click Start, Administrative Tools and open Active Directory Users and Computers. Navigate to the organizational unit (OU) where the accounts will reside. Right-click in the OU and select New, Computer (Figure 22).
Figure 22: Example of Active Directory Users and Computers
2) In the Computer Name field, enter the cluster name [Worksheet: (SQL Server System n, row 4,
Name)]. Click Change (Figure 23). Enter the group: YURDOMAIN\HinesVbecsNMEAAccounts (Figure 24). Click OK in both windows to close.
Figure 23: Example of New Object – Computer
Image Redacted

Figure 24: Example of Select User or Group
3) Right-click on the cluster account you just created and select Disable Account (Figure 25). You
will be prompted with warnings (Figure 26 and Figure 27); click Yes and OK respectively to close.
Figure 25: Example of Active Directory Users and Computers
Figure 26: Example of Active Directory Domain Services Warning
Figure 27: Example of Active Directory Domain Services Warning
Image Redacted

4) Right-click on the OU that contains the cluster account and click Properties (Figure 28).
Figure 28: Example of Active Directory Users and Computers
5) Select the Security tab and then click Advanced (Figure 29).
Figure 29: Example of OU Properties

6) Click Add (Figure 30).
Figure 30: Example of Advanced Security Settings
Image Redacted
7) Make sure you see Computers in the Select this object type field (Figure 31). If not, click Object Types and select Computers. In the Enter the object names to select field, enter the cluster account that you just created. Click OK.
Figure 31: Example of Select Users, Computers...
8) If you receive a warning (Figure 32), click OK.
Figure 32: Windows Security Warning
9) Locate and select the Allow box for Create Computer Objects and Read All Properties (Figure
33). Click OK on all windows to close.
Figure 33: Example of Permission Entry

10) Repeat these instructions for the other cluster accounts [Worksheet: (SQL Server System n, row 4, Name)].

4 Stage the VNN Account These instructions will be repeated for each VNN account that needs to be installed.
1) Navigate to the OU where the VNN account will reside. Right-click in the OU and select New, Computer.
2) In the Computer Name field (Figure 34), enter the name that you will use for the VNN [Worksheet: (SQL Server System n, row 5x, Name)]. In the User or group field, enter the VBECS Admin group: YURDOMAIN\HinesVbecsNMEAAccounts. Click OK.
Figure 34: Example of New Object – Computer
Image Redacted
3) Right-click on the VNN account that you just created and click Properties (Figure 35).
Figure 35: Example of Active Directory Users and Computers
4) Select the Security tab (Figure 36).
Figure 36: Example of Properties

5) Click Add (Figure 37).
Figure 37: Example of Properties
6) Make sure you see Computers in the Select this object type field (Figure 38). If not, click
Object Types and select Computers. In the Enter the object names to select field, enter the cluster name [Worksheet: (SQL Server System n, row 4, Name)]. Click OK.
Figure 38: Example of Select Users, Computers...
7) In the Group or user names pane, make sure that the cluster name is selected (Figure 39). Note
that the appended $ is normal, but may not appear when the account is initially created. In the Permissions for clustername$ pane, select Allow in the Full control permission (this will select all permissions). Click OK and exit the Active Directory Users and Computers tool.
Figure 39: Example of Select Users, Computers...
Image Redacted
8) Repeat this section for the other VNNs [Worksheet: (SQL Server System n, rows 5b, 5c, etc., Name)].

9) Upon completion, send the completed worksheet to the implementation support email group: VA OIT VBECS Implementation Support.

Quorum Shares The quorum shares support the SQL Server clusters.
5 Create Quorum Shares (one time task) Prerequisite These instructions must be executed after the Server_Redacted and Server_Redacted servers are stood up, but before any SQL Servers are installed.
1) Log into Server_Redacted with administrative privileges. 2) Open Windows Explorer and create a folder named Quorum on the D drive. 3) Share the folder with the name Quorum. 4) Repeat these steps on the Server_Redacted server.

This page intentionally left blank.

Appendix A: Adding VBECS FTP Site to the Trusted Sites in Internet Explorer
1) Open Internet Explorer and select Tools, Internet Options (Figure 40).
Figure 40: Example of Internet Explorer Window
2) Select the Security tab (Figure 41).
Figure 41: Example of Internet Explorer Internet Options Security tab

3) Select Trusted sites and click Sites (Figure 42).
Figure 42: Example of Internet Options Trusted Sites
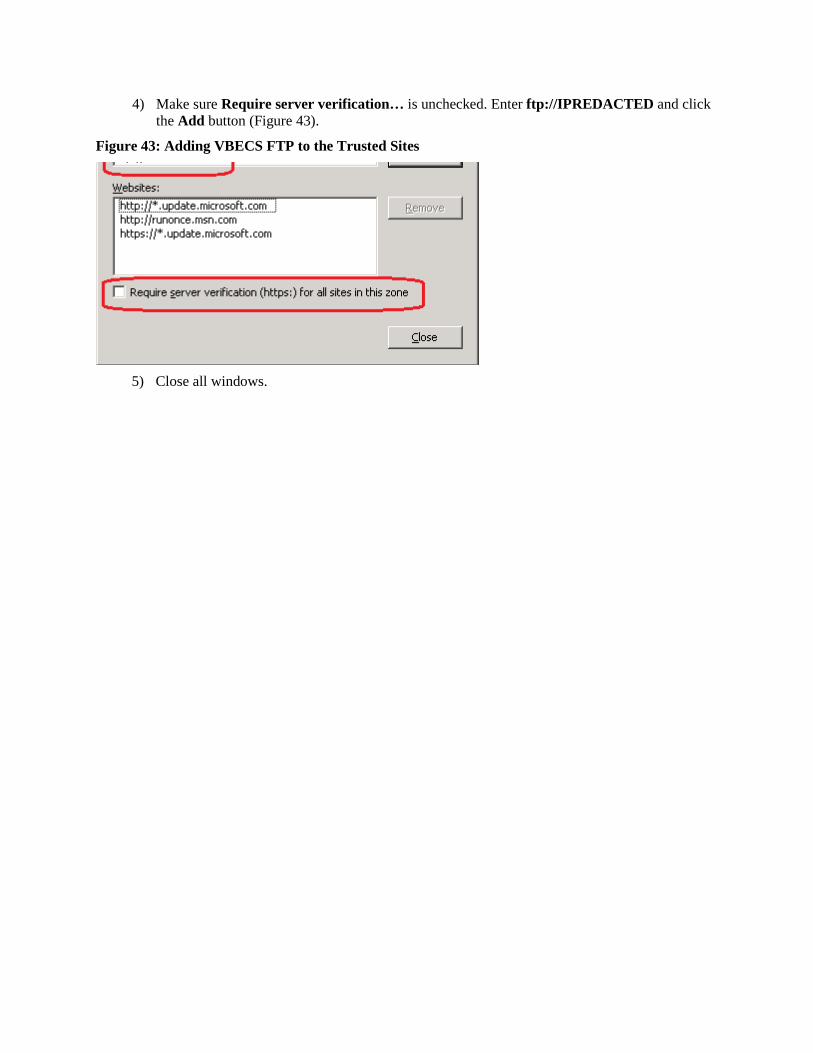
4) Make sure Require server verification… is unchecked. Enter ftp://IPREDACTED and click the Add button (Figure 43).
Figure 43: Adding VBECS FTP to the Trusted Sites
5) Close all windows.

This is the last page of VistA Blood Establishment Computer Software (VBECS) 2.0.0 Data Center Installation Guide.


![Excel FinanceFormulas Vol[1].2.0.0](https://img.pdfslide.us/doc/110x75/577cd7931a28ab9e789f54c8/excel-financeformulas-vol1200.jpg)