Embed Size (px)
Citation preview

Page 1 of 77
December 2001 User Guide for LR*5.2*275
LABORATORY V. 5.2
User Guide For Patch LR*5.2*275
VistA BLOOD BANK SOFTWARE
December 2001
Department of Veterans Affairs VistA System Design and Development

Page 2 of 77
December 2001 User Guide for LR*5.2*275
I. Introduction Patch LR*5.2*275 is being released to address multiple, chronic user problems. An overview of each problem follows: Problem # 1: Once units are selected and associated with an inappropriate specimen/accession, there is currently no intuitive way to un-associate these units. ROUTINE: LRBLPUS2 The routine LRBLPUS2 was modified to update the patient record of units selected for crossmatch when units previously selected on a specimen are reselected on a new specimen for the same patient. Problem # 2: When selecting units for a patient, and multiple specimens are accessioned for the patient, AND a barcode scanner is used to scan the product code barcode for component selection while using the option: Select Units for Patients [LRBLPIC], the system does not display all available accessions and prompt the user to select the correct one. The most recently accessioned specimen is accepted as the default, and all selected units are associated with that specimen, even if it has been cancelled and given a status of Not Performed. ROUTINE: LRBLPUS The routine LRBLPUS was modified to fix this defect that prevented the display of all available specimens when a barcode scanner is used to scan the product code barcode at the prompt Blood component for unit selection. Problem # 3: If: • Units are selected and associated for an accession that is later cancelled,
-AND- • The tech enters results of ND (Not Done) for the ABO and Rh on the previously-selected specimen,
-AND- • The tech performs actual testing on a new specimen, Then: At the time crossmatch results are entered, the system does not evaluate the result of ND as Not Done and allows crossmatch results to be entered on the cancelled specimen, even after issuing a warning that an Antibody Screen has not been performed on the incorrectly-associated specimen. ROUTINE: LRBLPX1 The routine LRBLPX1 was modified to evaluate the results of ND, (Not Done), for ABO and Rh Type entered on the patient specimen/accession selected for crossmatch as No results available, or null. A warning message is displayed to the user and crossmatch results entry is not allowed. The routine LRBLPX1 was modified to repeat the comparison between the ABO/Rh interpretation entered on the current specimen and the ABO/Rh interpretation of the patient's historical record. A warning message with no override is displayed when there is a discrepancy.

Page 3 of 77
December 2001 User Guide for LR*5.2*275
Problem # 4: When using the option Enter crossmatch results [LRBLPX] and the user does not complete the data entry and exits before entering the actual crossmatch interpretation, the BLOOD INVENTORY File (#65) fields XMATCH TECH (#65.02,.05) and DATE/TIME CROSSMATCHED (#65.02,.09) are populated (transparent to the user). When the option Crossmatch: Transfusion Report [LRBLRCT] is later run, it errors with a null subscript error because the report expects actual crossmatch results to be entered when the DATE/TIME CROSSMATCHED field has data. ROUTINE: LRBLPX The routine LRBLPX was modified to only populate the XMATCH TECH and DATE/TIME CROSSMATCHED fields for a unit of blood when the actual crossmatch results are entered. This was causing database integrity problems that caused the Crossmatch: Transfusion Report [LRBLCT] to error with a null subscript error. Problem # 5: The FileMan logic used to search the FUNCTION FIELD File (#61.3) when executing the option Edit Corresponding Antigen/Antibody [LRBLSNO] does not search for all possible matches to input. It is set to stop at the first possible match. In the event that the user intended to input a lower case antibody, and FileMan converts the input to upper case, the option may inadvertently return the upper case antibody. ROUTINE: LRBLS This routine was modified to search for all possible matches when performing a lookup to the FUNCTION FIELD File (#61.3). The routine was also modified to display data input and require the user to confirm the selection prior to prompting for specific data fields to be edited in the Corresponding Antigen/Antibody [LRBLSNO] option. Problem # 6: During patient data entry using the options Enter test data [LRBLPET] and Previous Records [LRBLPER], data entered at the prompts Select SERUM ANTIBODY and Select ANTIBODIES IDENTIFIED: may inadvertently stuff an upper case antibody when in fact the lower case counterpart was input by the user. INPUT TEMPLATES: LRBLSCREEN, LRBLPOLD These two input templates were modified to display data input and require the user to confirm the selections. Note: The six problems cited do involve a software safety critical requirement, but do NOT change the scope of the design safeguard or intended use.

Page 4 of 77
December 2001 User Guide for LR*5.2*275
II. Installation Instructions NOTE # 1 The following patches are required, however, KIDS will not check for their prior installation: LR*5.2*1 LR*5.2*25 LR*5.2*72 LR*5.2*78 LR*5.2*79 LR*5.2*247 NOTE # 2 After a successful install of this patch, KIDS deletes the routine LR275PRE from the system. There will be no checksums to check. Users can remain on the system. Patch installation should take less than 5 minutes. No additional resources are needed as a result of loading this patch. Taskman does not need to be disabled. 1. Use the 'INSTALL/CHECK MESSAGE' option on the PackMan menu. This option will load the KIDS package in this message onto your system. 2. Review your mapped set. If the routines are mapped, they should be removed from the mapped set at this time. 3. From the Kernel installation and Distribution System Menu, select the Installation menu. 4. You may elect to use the following options (when prompted for the INSTALL NAME, enter LR*5.2*275): a. Backup a Transport Global b. Compare Transport Global to Current System c. Verify Checksums in Transport Global 5. Use the Install Package(s) option and select the package (LR*5.2*275). 6. When prompted: "Want KIDS to INHIBIT LOGONs during the install?" respond "NO" 7. When prompted "Want to DISABLE Scheduled Options, Menu Option, and Protocols? YES??", respond "YES". When prompted to select the options you would like to place out of order, enter the option [LRBL] Blood Bank. 8. Enter protocols you wish to mark as 'Out Of Order': <CR> 9. Delay Install (Minutes): (0-60): 0// enter 0 10. If routines were unmapped as part of step 2, they should be returned to the mapped set once the installation has run to completion.

Page 5 of 77
December 2001 User Guide for LR*5.2*275
Note # 3 The File 61.3, Function Field is where the Antibody – Antigen relationships are stored. These relationships should have been configured locally with the initial Blood Bank setup. It has been found, through the testing of this patch that some sites may have not defined these Antibody – Antigen relationships. The following FileMan search procedures should be followed to ensure that the Antibody – Antigen relationships are configured properly at your site. Attention: This association is imperative because the software cannot check for the Antibody Antigen relationship unless defined. If improperly defined, the software will allow units that are not phenotyped for a clinically significant Antigen to be issued and transfused. Step by step instructions to Search File 61.3 FUNCTION FIELD
1. FileMan access is required to do search. 2. The example below provides a minimal set of Antibodies with their Corresponding Antigen/Antibody:
Select VA FileMan Option: Search File Entries OUTPUT FROM WHAT FILE: FUNCTION FIELD// -A- SEARCH FOR FUNCTION FIELD FIELD: IDENTIFIER -A- CONDITION: = EQUALS -A- EQUALS: BLOOD GROUP ANTIBODY -B- SEARCH FOR FUNCTION FIELD FIELD: CORRESPONDING ANTIGEN/ANTIBODY -B- CONDITION: 'NULL -C- SEARCH FOR FUNCTION FIELD FIELD: <CR> IF: AB IDENTIFIER EQUALS "AB" (BLOOD GROUP ANTIBODY) and CORRESPONDING ANTIGEN/ANTIBODY NOT NULL OR: STORE RESULTS OF SEARCH IN TEMPLATE: SORT BY: NAME// START WITH NAME: FIRST// FIRST PRINT FIELD: NAME THEN PRINT FIELD: CORRESPONDING ANTIGEN/ANTIBODY THEN PRINT FIELD: Heading (S/C): FUNCTION FIELD SEARCH Replace DEVICE: ;;300 DecServer Right Margin: 80//

Page 6 of 77
December 2001 User Guide for LR*5.2*275
FUNCTION FIELD SEARCH NOV 16,2001 11:21 PAGE 1 NAME CORRESPONDING ANTIGEN/ANTIBODY ------------------------------------------------------------------------------- ANTI A-1 A-1 ANTI C C ANTI D D ANTI E E ANTI Fy(a) Fy(a) ANTI Fy(b) Fy(b) ANTI Jk(a) Jk(a) ANTI Jk(b) Jk(b) ANTI Js(a) Js(a) ANTI Js(b) Js(b) ANTI K K ANTI S S ANTI c c ANTI e e ANTI k k ANTI s s
3. Your list should have at least the above entries, if not use the option ‘Edit corresponding antigen/ antibody’ [LRBLSNO] to create any missing relationships. Your site may have additional clinically significant antibodies, these can be locally defined.
a. In order for software to perform the checks, the antibodies must be entered in the 'Select ANTIBODIES IDENTIFIED field, in addition to the 'Select SERUM ANTIBODY field during data entry using the option Enter test data [LRBLPET].
b. Select SERUM ANTIBODY is used to collect workload as well as identify antibodies not considered clinically significant. All antibodies are entered in this field.
c. Clinically significant antibodies must be entered again in the Select ANTIBODIES IDENTIFIED field. This step ensures that the patient cumulative record is updated and filed properly.
4. Validate changes using these clinically significant antibodies.

Page 7 of 77
December 2001 User Guide for LR*5.2*275
III. Validation Requirements Installation of this patch requires that a site validation be performed for several blood bank options. As is the case with all patches to the Blood Bank software, it is assumed that a full validation of the software has been previously performed. The validation scenarios that follow are designed to provide guidance to sites for the re-validation of options listed in the description of patch LR*5.2*275. Changes made to the software that involve the reading, interpretation and displaying of information through these options must be validated. GENERAL VALIDATION NOTES All sites must validate the affected options that are used within their facility. Site validation should be undertaken in a mirrored test account if at all possible. This does NOT mean that the test account must be mirrored just prior to validation. For the purposes of validating patches to the Blood Bank software, the site-configurable files that control how the Blood Bank software behaves, such as the FUNCTION FIELD File (#61.3), must be identical to the production account. Validation performed in a mirrored test account does NOT need to be repeated in a production environment. IV. Changes to v5.2 Blood Bank User Manual Examples Routine LRBLS was modified to search for all possible matches when performing a lookup to the FUNCTION FIELD File (#61.3). The routine was also modified to display data input and require the user to confirm the selection prior to prompting for specific data fields to be edited in the Corresponding Antigen/Antibody [LRBLSNO] option. As a result of these modifications, the following four examples taken from the v5.2 Blood Bank User Manual have been changed to reflect the new confirmation prompts. The following Blood Bank Patient Option Enter Test Data example replaces the one found on page 171 of the V 5.2 Blood Bank User Manual: Example 2: Pretransfusion testing for a patient with a positive direct antiglobulin test and a clinically significant serum antibody with workload turned on. The prompts displayed after the patient information below are based on having the first default for the Patient option in the LABORATORY SITE file (#69.9) set to “YES.” This will include the prompts for the Direct Coombs testing. If you do not wish to have these prompts included, use the Edit Blood Bank Site Parameters (S-EF-SP) option in the Supervisor’s Menu to set the default to “NO.” Select Blood bank patient Option: ET Enter test data BLOOD BANK Patient data entry for MAR 5, 1993 ? YES// <RET> (YES)

Page 8 of 77
December 2001 User Guide for LR*5.2*275
Enter TEST COMMENT(s) ? NO// Y (YES) Edit SPECIMEN COMMENT(s) ? NO// <RET> (NO) Select Accession Number: 3 for MAR 5, 1993 WASHINGTON,GEORGE ID: 592-88-8888 ABO: A Rh: POS Specimen: BLOOD Antibody present: ANTI K Test: TRANSFUSION REQUEST ABO: A Rh: POS ABO INTERPRETATION: A A ABO TESTING COMMENT: <RET> RH INTERPRETATION: POS RH TESTING COMMENT: <RET> DIRECT AHG(POLYSPECIFIC): 1 1 1+ TINY CLUMPS, TURBID BACKGROUND ANTI-IgG: 1 1 1+ TINY CLUMPS, TURBID BACKGROUND ANTI-COMPLEMENT: N N NO AGGLUTINATION DIRECT AHG INTERPRETATION: ? CHOOSE FROM: P POSITIVE N NEGATIVE I INVALID, USE EDTA SPECIMEN DIRECT AHG INTERPRETATION: P POSITIVE DIRECT AHG TEST COMMENT: <RET> Select ELUATE ANTIBODY: <RET> ANTIBODY SCREEN INTERPRETATION: P POS Select SERUM ANTIBODY: E 1 E ANTI E 52030 ANTI E 2 Ew ANTI E(w) 52110 ANTI E(w) CHOOSE 1-2: 1 ANTI E SERUM ANTIBODY: ANTI E// <RET> Select SERUM ANTIBODY: <RET> SERUM ANTIBODY: ANTI E SNOMED CODE: 52030 IS THIS CORRECT? YES// Y (YES) !!!!======New Confirmation Prompt Select ANTIBODY SCREEN COMMENT: <RET>

Page 9 of 77
December 2001 User Guide for LR*5.2*275
Enter '?' for list of antibodies identified to date. Select ANTIBODIES IDENTIFIED: ANTI K// ANTI E 1 ANTI E 52030 ANTI E 2 ANTI E(w) 52110 ANTI E(w) CHOOSE 1-2: 1 ANTIBODIES IDENTIFIED COMMENT: <RET> Select ANTIBODIES IDENTIFIED: <RET> ANTIBODIES IDENTIFIED: ANTI E SNOMED CODE: 52030 IS THIS CORRECT? YES// Y (YES) !!!!======New Confirmation Prompt Date/time work completed: NOW// <RET> (MAR 05, 1993@14:24) The following two Blood Bank Patient Option Previous Records examples replace the two found beginning on page 174 of the V 5.2 Blood Bank User Manual: Example 1: Addition of Anti-E in a patient with a previous history of anti-K and anti-C Select Blood bank patient Option: PR Previous records Blood bank patient data from old records Select Patient Name: W8888 WASHINGTON,GEORGE 03-01-00 592888888 SC VETERAN WASHINGTON,GEORGE ID: 592-88-8888 Physician: WELBY,HARRY ABO group: A Rh type: POS AGE: 93 DATE OF BIRTH: MAR 1, 1900 Ward on Adm: 1B Service: ALLERGY Adm Date: NOV 22, 1984 Adm DX: ACUTE DEPRESSION Present Ward: 1B MD: WELBY,HARRY PATIENT LOCATION: 1B// <RET> Antibody present: ANTI C ANTI K Select ANTIBODIES IDENTIFIED: ANTI C// ANTI E 1 E ANTI E 52030 ANTI E

Page 10 of 77
December 2001 User Guide for LR*5.2*275
2 Ew ANTI E(w) 52110 ANTI E(w) CHOOSE 1-2: 1 ANTIBODIES IDENTIFIED COMMENT: <RET> Select ANTIBODIES IDENTIFIED: ANTIBODIES IDENTIFIED: ANTI E SNOMED CODE: 52030 ANTIBODIES IDENTIFIED: ANTI E(w) SNOMED CODE: 52110 IS THIS CORRECT? YES// Y (YES) !!!!======New Confirmation Prompt Select RBC ANTIGENS PRESENT: ? ANSWER WITH RBC ANTIGENS PRESENT(other) YOU MAY ENTER A NEW RBC ANTIGENS PRESENT(other), IF YOU WISH ANSWER WITH FUNCTION FIELD SYNONYM, OR SNOMED CODE, OR IDENTIFIER DO YOU WANT THE ENTIRE FUNCTION FIELD LIST? N (NO) RBC ANTIGENS PRESENT: Jk(a)// <RET> Select RBC ANTIGENS PRESENT: <RET> Select RBC ANTIGENS ABSENT: K// <RET> RBC ANTIGENS ABSENT: K// <RET> Select RBC ANTIGENS ABSENT: <RET> Select HLA ANTIGEN PRESENT: <RET> Select HLA ANTIGENS ABSENT: <RET> BLOOD BANK COMMENTS: 1> TRANSFUSE K negative, C negative blood only 8/12/87 2> Transfuse washed cells only-febrile nonhemolytic reaction 8/20/87 EDIT Option: E Edit line: 1 1) TRANSFUSE K negative, C negative blood only 8/12/87 Replace K negative, C negative With K, C, E negative Replace 8/12/87 With 9/20/87 Replace <RET> 1) Transfuse K, C, E negative blood only. 9/20/87 EDIT Option: <RET> Select TRANSFUSION RECORD TRANSFUSION DATE/TIME: <RET> Example 2: Entry of previous transfusions (before implementation of module) for a patient already entered in the system Select Blood bank patient Option: PR Previous records

Page 11 of 77
December 2001 User Guide for LR*5.2*275
Blood bank patient data from old records Select Patient Name: P0019 PROCESSING,SIMON 08-12-23 300010019 NON-VETERAN (OTHER) PROCESSING,SIMON ID: 300-01-0019 ABO group: B Rh type: NEG AGE: 69 DATE OF BIRTH: AUG 12, 1923 PATIENT LOCATION: ORTHOPEDICS// <RET> Antibody present: ANTI K ANTI Jk(a) Select ANTIBODIES IDENTIFIED: ANTI K// <RET> ANTIBODIES IDENTIFIED: ANTI K// <RET> ANTIBODIES IDENTIFIED COMMENT: <RET> Select ANTIBODIES IDENTIFIED: <RET> ANTIBODIES IDENTIFIED: ANTI K SNOMED CODE: 51810 IS THIS CORRECT? YES// Y (YES) !!!!======New Confirmation Prompt Select RBC ANTIGENS PRESENT: // <RET> RBC ANTIGENS PRESENT: // Select RBC ANTIGENS PRESENT: <RET> Select RBC ANTIGENS ABSENT: <RET> Select HLA ANTIGEN PRESENT: <RET> Select HLA ANTIGENS ABSENT: <RET> BLOOD BANK COMMENTS: 1> <RET> Select TRANSFUSION RECORD TRANSFUSION DATE/TIME: 8-6-87 AUG 6, 1987 TRANSFUSION RECORD COMPONENT: 04060 CPDA-1 RED BLOOD CELLS 04060 PRBC 1 TRANSFUSION RECORD COMPONENT ID: G11111 COMPONENT: CPDA-1 RED BLOOD CELLS// <RET> COMPONENT ID: G11111// <RET> ABO: O O RH: POSITIVE UNITS POOLED: <RET> TRANSFUSION REACTION: NO Select TRANSFUSION COMMENT: <RET> Select CROSSMATCH COMMENT: <RET> Select TRANSFUSION RECORD TRANSFUSION DATE/TIME: 8-6-87 AUG 6, 1987 CPDA-1 RED BLOOD CELLS G11111

Page 12 of 77
December 2001 User Guide for LR*5.2*275
For new entries only. No editing. Select TRANSFUSION RECORD TRANSFUSION DATE/TIME: 8-6-87 AUG 6, 1987 TRANSFUSION RECORD COMPONENT: 04060 CPDA-1 RED BLOOD CELLS 04060 PRBC 1 TRANSFUSION RECORD COMPONENT ID: G22222 COMPONENT: CPDA-1 RED BLOOD CELLS// <RET> COMPONENT ID: G22222// <RET> ABO: O O RH: POSITIVE UNITS POOLED: <RET> TRANSFUSION REACTION: NO Select TRANSFUSION COMMENT: <RET> Select CROSSMATCH COMMENT: <RET> Select TRANSFUSION RECORD TRANSFUSION DATE/TIME: <RET> Select Patient Name: <RET> The following Blood Bank Files Option Edit Corresponding Antigen/Antibody example replaces the one found on page 375 of the V 5.2 Blood Bank User Manual: Example 1: Entry of data for Anti-K Select Edit blood bank files Option: AA Edit Corresponding Antigen/Antibody This option is case sensitive. Enter data using the EXACT case of the ANTIBODY or ANTIGEN. Select ANTIGEN or ANTIBODY: 51810 ANTI K 51810 ANTIBODY: ANTI K CORRESPONDING ANTIGEN: K SNOMED CODE: 51810 IS THIS CORRECT? NO// YES !!!!======New Confirmation Prompt CORRESPONDING ANTIGEN/ANTIBODY: K// <RET> COMPATIBILITY FACTOR: .92 COMMENT: 1>Anti-K is antibody most often occurring after transfusion or pregnancy.

Page 13 of 77
December 2001 User Guide for LR*5.2*275
2>Anti-K may also be found as a naturally occurring IgM antibody. 3>The antibody can cause acute hemolytic transfusion reactions and 4>hemolytic disease of the newborn. Anti-K has been implicated as a 5>cause of delayed hemolytic transfusion reactions. 6><RET> EDIT Option: <RET> Select TITLE OF ARTICLE: <RET> Select ANTIGEN or ANTIBODY: <RET> Select Edit blood bank files Option: <RET>

Page 14 of 77
December 2001 User Guide for LR*5.2*275
LR*5.2*275 TEST CASES

Page 15 of 77
December 2001 User Guide for LR*5.2*275
The following test package is designed to provide the basis for system validation following the installation of patch LR*5.2*275. It is assumed that a full validation of the Blood Bank software has been previously performed. The test cases included in this document have been designed to revalidate menu options that were affected by the coding changes exported with patch LR*5.2*275. Stress testing, which will involve input representing limit, negative and non-valid data entry, should be performed following the guidelines presented in Appendix E of the Blood Bank User Manual. The normal test scenarios may be modified to incorporate the additional data entry with the appropriate adjustment to the indicated “Expected Results”. This document covers the following topics: I. INTRODUCTION II. PROCEDURAL NOTES III. TEST CASE OVERVIEW IV. SETUP V. TEST CASES I. INTRODUCTION The following test scenarios have been created to assist with the validation of the system performance for options affected by the coding changes exported with patch LR*5.2*275. In addition, the individual facilities are required to ensure that existing system functionality has not been adversely effected by the installation of this patch. Site validation should be undertaken in a mirrored test account if at all possible. This does NOT mean that the test account must be mirrored just prior to validation. For the purpose of validating patches to the Blood Bank software, this means a site-configurable file that controls how the Blood Bank software behaves, such as the Blood product File (#66), are identical to the production account. Validation performed in a mirrored account does NOT need to be repeated in a production environment. The attached test cases are designed to exercise the menu options that are affected by the coding changes contained in path LR*5.2*275. These scenarios involve Selecting Units for Patients [LRBLPIC], requesting a Crossmatch: Transfusion Report [LRBLRCT], Edit Corresponding Antigen/Antibody [LRBLSNO], Enter test data [LRBLPET], and Previous records [LRBLPER] although other menu options will be called upon during setup and confirmation of expected results. It is assumed a full validation of the Blood Bank software has been previously performed. The test cases included in this document have been designed to re-validate only those menu options affected by the coding changes associated with the installation of LR*5.2*275. It is the responsibility of the individual site to determine if the scope of the test cases needs to be broadened to include additional functionality based on a risk analysis of the actual procedures and workflow at

Page 16 of 77
December 2001 User Guide for LR*5.2*275
the facility. For additional guidance, please refer to Appendix E of the Blood Bank User manual dated March 2001. By following the specific test case format limit and negative testing may be accomplished by entering unacceptable data in all fields where data input is requested of the user. This allows the facility to utilize the test format provided, with data similar to that presented during initial system validation. The goal should be to adequately stress the application to assure continued acceptable performance at each facility. II. PROCEDURAL NOTES This test package does not provide any materials beyond the actual test cases. When a barcode label is required for scanned input, as required for the test case designated P-RS-US-01, it is assumed that a label is available at the testing facility. When a patient, specimen, or unit is requested during testing, each facility will substitute a local input and modify expected results accordingly. Since the majority of data entry is manual, it is left to the test site to determine how closely they would like their screen output to parallel the screen capture presented in this set of test cases. Expected results are in the form of screen captures. In most cases there is more information displayed than is actually included in the test case. In those cases the intent was to display the system prompt, and only that portion of the screen capture that was deemed necessary for the correct interpretation of the result. The following conventions (underlined) are utilized throughout the test scenarios:
a. Enter “x” at the prompt indicates a manual user response to a system prompt is required. The x must be replaced by the appropriate data. b. Select XY indicates a menu option selection. c. Enter <CR> at the prompt represents a request to select the ENTER key. d. BOLD FACE ENTRY indicates a complete or partial screen capture. e. Italicized display indicates a clarification that may help in interpreting a screen display. f. Scan… indicates data input with the use of a bar code scanner.
III. TEST CASE OVERVIEW Test Case #1 [P-RS-US_01]: The purpose of this test case is to confirm that all available patient specimens are displayed during the Select units for patients process when a barcode scanner is utilized to identify the component type required. Test Case #2 [P-RS-US_02]: The purpose of this test case is to confirm that all available patient specimens are displayed during the Select units for patients process when the component type is identified manually via the keyboard. Test Case #3 [P-RS-US_03]: This test case confirms that a unit, once assigned to a patient specimen, may be reassigned to another specimen for that same patient, with subsequent crossmatch results associated with the correct specimen. Test Case #4 [R-UR-CT_01]: This test scenario will confirm that the Crossmatch: Transfusion Report will run without generating any errors when the Crossmatch result entry process is completed.

Page 17 of 77
December 2001 User Guide for LR*5.2*275
Test Case #5 [R-UR-CT_02}: This test case is a follow-up to R-UR-CT_01. It confirms that the Crossmatch: Transfusion Report will perform correctly when the Crossmatch result entry process is begun, but halted before results are entered. Test Case #6 [P-RS-XM_01]: This test case validates the systems ability to prevent entering crossmatch results for a unit that is associated with a specimen devoid of ABO/Rh test results. Test Case #7 [P-RS-XM_02]: This exercise validates the systems ability to interpret a specimen ABO and Rh result of ND (Not Done) as a null entry, and prevent entry of crossmatch results. Test Case #8 [S-EF-AA_01]: This test case validates the search and display functionality utilized during the ANTIBODY lookup. A message has been added within the menu option to indicate that the search is case sensitive. When an exact match is not found, the system will return a list of choices from which to select the desired antibody or antigen. In addition, the requirement that there is user confirmation following data entry, before accessing the edit function for a specific antibody or antigen. Test Case #9 [P-ET_01]: This test case will validate the requirement that input data is displayed, and the user be given the opportunity to accept or reject the selection. Test Case #10 [P-PR_01]: This test case will validate the requirement that input data is displayed, and the user be given the opportunity to accept or reject the selection, for this menu option [P-PR]. IV. SETUP The accompanying test cases require setup prior to execution. The setup consists of the following:
a. Patient: Each facility will locate or create a patient for use when performing the appropriate test scenario. A single patient is all that is required. The patient appearing in the following test cases is identified as DOE,JOHN. When site specific patient specific information is displayed, it is replaced with X’s, with an accompanying italicized Note:. The patient ABO/Rh for the following test cases is identified as A NEGATIVE. Each facility may substitute for the displayed ABO/Rh, as long as the Expected Results” are modified accordingly.
b. Specimens: Each facility is to receive 5 specimens [P-SL] for the patient to be used during validation testing. These specimens are to be received in the
following order, and handled as indicated: Specimen #1: do not result with the patients ABO/Rh Specimen #2: result with the patients ABO/Rh using menu option [P-ET] Specimen #3: result with the patients ABO/Rh using menu option [P-ET] Specimen #4: result with the patients ABO/Rh using menu option [P-ET] Specimen #5: do not result with the patients ABO/Rh
c. Inventory: Each facility will enter 6 units into inventory. The units which appear in the test cases are defined as follows:

Page 18 of 77
December 2001 User Guide for LR*5.2*275
UNIT # UNIT ID COMPONENT TYPE AB O Rh
1 PMD001 AS-1 RED BLOOD CELLS (04210) A NEGATIVE 2 PMD002 AS-1 RED BLOOD CELLS (04210) A NEGATIVE 3 PMD003 AS-1 RED BLOOD CELLS (04210) A NEGATIVE 4 PMD004 AS-1 RED BLOOD CELLS (04210) A NEGATIVE 5 PMD005 AS-1 RED BLOOD CELLS (04210) A NEGATIVE 6 PMD006 AS-1 RED BLOOD CELLS (04210) A NEGATIVE
Note: The Unit ID, component type, and ABO/Rh designation may be altered at the test site. Adjustments must be made to the “Expected Results” to reflect the actual data assignment.
d. The performance of test Case 8 is dependant on the relationship established between antibodies and antigens in the .04 (CORRESPONDING ANTIGEN/ANTIBODY) field, of the FUNCTION FIELD file. Differences between Expected and Actual results may be due to the current status of these antigen/antibody relationships, and should be investigated by the testing technologist to determine if the variance is acceptable. Justification of any variance must be documented in the comments column of the appropriate test case.

User Guide for LR*5.2*275 December 2001 Test Case # 1 [P-RS-US_01] Page 19 of 77
Test Case # 1 [P-RS-US_01] Date Performed: Technologist: STEP ACTION EXPECTED RESULT OUTCOME COMMENTS
1 Log into the blood bank module D Donor ... I Inventory ... P Blood bank patient ... Q Inquiries ... R Reports ... S Supervisor ... W Ward ... Select Blood bank Option:
2 Select P [Blood bank patient …] CD Change to new division DA Remove an accession DT Blood transfusion results ET Enter test data PR Previous records RS Request/select/xmatch blood components ... SI Special instructions SL Specimen log-in TA Add tests to a given accession. TD Delete test from an accession TL Test worklist WL Accession area worklist Select Blood bank patient Option:
3 Select RS [Request/select/xmatch blood components …]
CR Blood component requests CT Unit CAUTION tag labels US Select units for patients XM Enter crossmatch results Select Request/select/xmatch blood components Option:
User Guide for LR*5.2*275 December 2001 Test Case # 1 [P-RS-US_01] Page 20 of 77
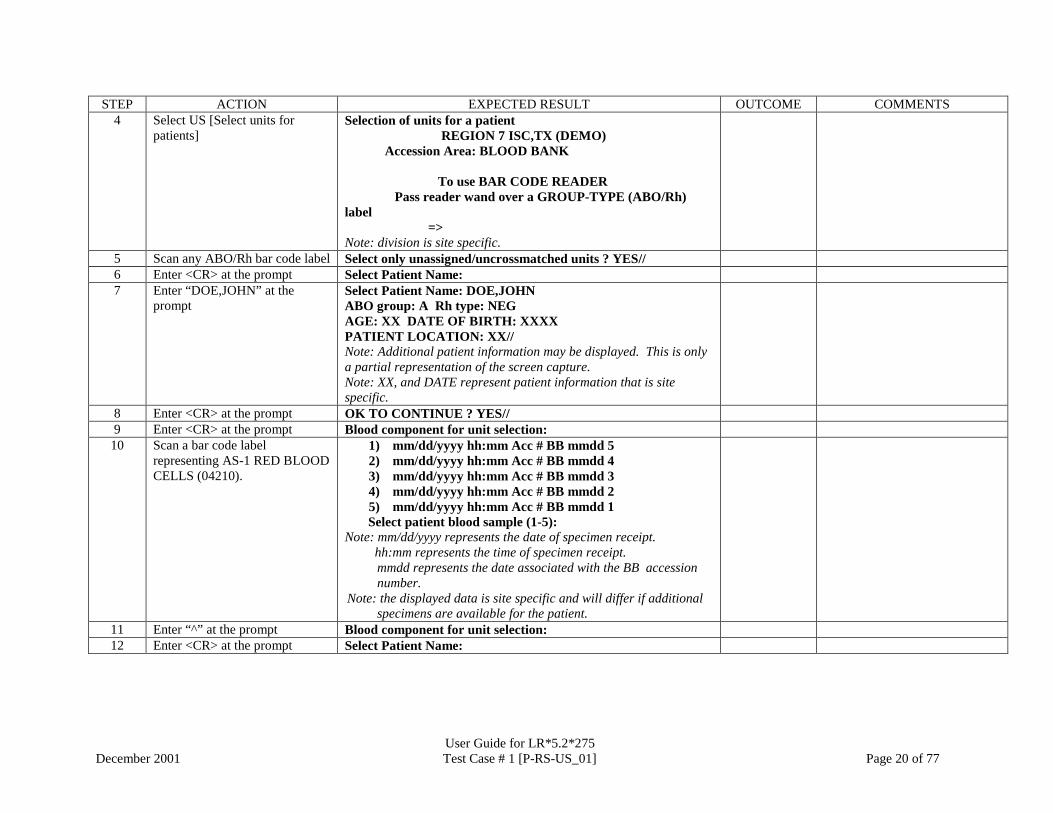
STEP ACTION EXPECTED RESULT OUTCOME COMMENTS 4 Select US [Select units for
patients] Selection of units for a patient REGION 7 ISC,TX (DEMO) Accession Area: BLOOD BANK To use BAR CODE READER Pass reader wand over a GROUP-TYPE (ABO/Rh) label => Note: division is site specific.
5 Scan any ABO/Rh bar code label Select only unassigned/uncrossmatched units ? YES// 6 Enter <CR> at the prompt Select Patient Name: 7 Enter “DOE,JOHN” at the
prompt Select Patient Name: DOE,JOHN ABO group: A Rh type: NEG AGE: XX DATE OF BIRTH: XXXX PATIENT LOCATION: XX// Note: Additional patient information may be displayed. This is only a partial representation of the screen capture. Note: XX, and DATE represent patient information that is site specific.
8 Enter <CR> at the prompt OK TO CONTINUE ? YES// 9 Enter <CR> at the prompt Blood component for unit selection:
10 Scan a bar code label representing AS-1 RED BLOOD CELLS (04210).
1) mm/dd/yyyy hh:mm Acc # BB mmdd 5 2) mm/dd/yyyy hh:mm Acc # BB mmdd 4 3) mm/dd/yyyy hh:mm Acc # BB mmdd 3 4) mm/dd/yyyy hh:mm Acc # BB mmdd 2 5) mm/dd/yyyy hh:mm Acc # BB mmdd 1
Select patient blood sample (1-5): Note: mm/dd/yyyy represents the date of specimen receipt. hh:mm represents the time of specimen receipt.
mmdd represents the date associated with the BB accession number.
Note: the displayed data is site specific and will differ if additional specimens are available for the patient.
11 Enter “^” at the prompt Blood component for unit selection: 12 Enter <CR> at the prompt Select Patient Name:

User Guide for LR*5.2*275 December 2001 Test Case # 1 [P-RS-US_01] Page 21 of 77
STEP ACTION EXPECTED RESULT OUTCOME COMMENTS 13 Enter <CR> at the prompt CR Blood component requests
CT Unit CAUTION tag labels US Select units for patients XM Enter crossmatch results Select Request/select/xmatch blood components Option
14 Enter <CR> at the prompt CD Change to new division DA Remove an accession DT Blood transfusion results ET Enter test data PR Previous records RS Request/select/xmatch blood components ... SI Special instructions SL Specimen log-in TA Add tests to a given accession. TD Delete test from an accession TL Test worklist WL Accession area worklist Select Blood bank patient Option:
15 Enter <CR> at the prompt D Donor ... I Inventory ... P Blood bank patient ... Q Inquiries ... R Reports ... S Supervisor ... W Ward ... Select Blood bank Option:

User Guide for LR*5.2*275 December 2001 Test Case # 2 [P-RS-US_02] Page 22 of 77
Test Case # 2 [P-RS-US_02] Date Performed: Technologist: STEP ACTION EXPECTED RESULT OUTCOME COMMENTS
1 Log into the blood bank module D Donor ... I Inventory ... P Blood bank patient ... Q Inquiries ... R Reports ... S Supervisor ... W Ward ... Select Blood bank Option:
2 Select P [Blood bank patient …] CD Change to new division DA Remove an accession DT Blood transfusion results ET Enter test data PR Previous records RS Request/select/xmatch blood components ... SI Special instructions SL Specimen log-in TA Add tests to a given accession. TD Delete test from an accession TL Test worklist WL Accession area worklist Select Blood bank patient Option:
3 Select RS [Request/select/xmatch blood components …]
CR Blood component requests CT Unit CAUTION tag labels US Select units for patients XM Enter crossmatch results Select Request/select/xmatch blood components Option:

User Guide for LR*5.2*275 December 2001 Test Case # 2 [P-RS-US_02] Page 23 of 77
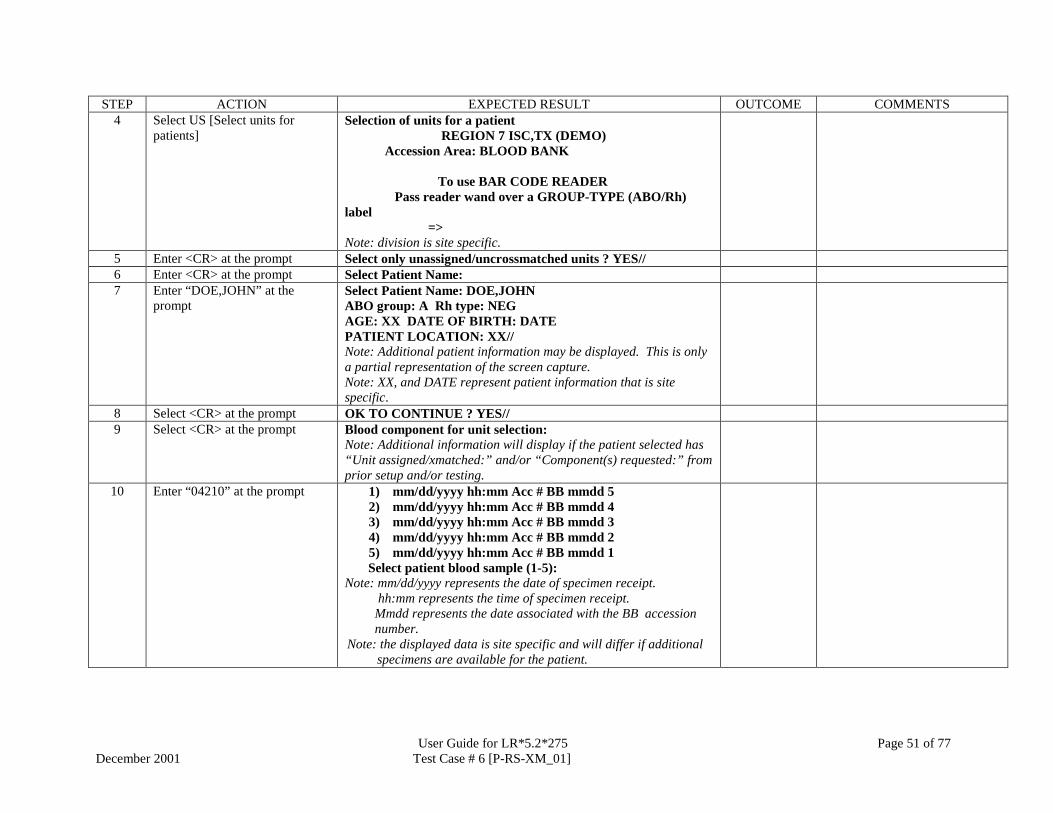
STEP ACTION EXPECTED RESULT OUTCOME COMMENTS 4 Select US [Select units for
patients] Selection of units for a patient REGION 7 ISC,TX (DEMO) Accession Area: BLOOD BANK To use BAR CODE READER Pass reader wand over a GROUP-TYPE (ABO/Rh) label => Note: division is site specific.
5 Enter <CR> at the prompt Select only unassigned/uncrossmatched units ? YES// 6 Enter <CR> at the prompt Select Patient Name: 7 Enter “DOE,JOHN” at the
prompt Select Patient Name: DOE,JOHN ABO group: A Rh type: NEG AGE: XX DATE OF BIRTH: DATE PATIENT LOCATION: XX// Note: Additional patient information may be displayed. This is only a partial representation of the screen capture. Note: XX, and DATE represent patient information that is site specific.
8 Select <CR> at the prompt OK TO CONTINUE ? YES// 9 Select <CR> at the prompt Blood component for unit selection:
10 Enter “04210” at the prompt 1) mm/dd/yyyy hh:mm Acc # BB mmdd 5 2) mm/dd/yyyy hh:mm Acc # BB mmdd 4 3) mm/dd/yyyy hh:mm Acc # BB mmdd 3 4) mm/dd/yyyy hh:mm Acc # BB mmdd 2 5) mm/dd/yyyy hh:mm Acc # BB mmdd 1
Select patient blood sample (1-5): Note: mm/dd/yyyy represents the date of specimen receipt. Hh:mm represents the time of specimen receipt.
mmdd represents the date associated with the BB accession number.
Note: the displayed data is site specific and will differ if additional specimens are available for the patient.
11 Enter “^” at the prompt Blood component for unit selection: 12 Enter <CR> at the prompt Select Patient Name:

User Guide for LR*5.2*275 December 2001 Test Case # 2 [P-RS-US_02] Page 24 of 77
STEP ACTION EXPECTED RESULT OUTCOME COMMENTS 13 Enter <CR> at the prompt CR Blood component requests
CT Unit CAUTION tag labels US Select units for patients XM Enter crossmatch results Select Request/select/xmatch blood components Option
14 Enter <CR> at the prompt CD Change to new division DA Remove an accession DT Blood transfusion results ET Enter test data PR Previous records RS Request/select/xmatch blood components ... SI Special instructions SL Specimen log-in TA Add tests to a given accession. TD Delete test from an accession TL Test worklist WL Accession area worklist Select Blood bank patient Option:
15 Enter <CR> at the prompt D Donor ... I Inventory ... P Blood bank patient ... Q Inquiries ... R Reports ... S Supervisor ... W Ward ... Select Blood bank Option:

User Guide for LR*5.2*275 Page 25 of 77
December 2001 Test Case # 3 [P-RS-US_03]
Test Case # 3 [P-RS-US_03] Date Performed: Technologist: STEP ACTION EXPECTED RESULT OUTCOME COMMENTS
1 Log into the blood bank module D Donor ... I Inventory ... P Blood bank patient ... Q Inquiries ... R Reports ... S Supervisor ... W Ward ... Select Blood bank Option:
2 Select P [Blood bank patient …] CD Change to new division DA Remove an accession DT Blood transfusion results ET Enter test data PR Previous records RS Request/select/xmatch blood components ... SI Special instructions SL Specimen log-in TA Add tests to a given accession. TD Delete test from an accession TL Test worklist WL Accession area worklist Select Blood bank patient Option:
3 Select RS [Request/select/xmatch blood components …]
CR Blood component requests CT Unit CAUTION tag labels US Select units for patients XM Enter crossmatch results Select Request/select/xmatch blood components Option:

User Guide for LR*5.2*275 Page 26 of 77
December 2001 Test Case # 3 [P-RS-US_03]
STEP ACTION EXPECTED RESULT OUTCOME COMMENTS 4 Select US [Select units for
patients] Selection of units for a patient REGION 7 ISC,TX (DEMO) Accession Area: BLOOD BANK To use BAR CODE READER Pass reader wand over a GROUP-TYPE (ABO/Rh) label => Note: division is site specific.
5 Enter <CR> at the prompt Select only unassigned/uncrossmatched units ? YES// 6 Enter <CR> at the prompt Select Patient Name: 7 Enter “DOE,JOHN” at the
prompt Select Patient Name: DOE,JOHN ABO group: A Rh type: NEG AGE: XX DATE OF BIRTH: DATE PATIENT LOCATION: XX// Note: Additional patient information may be displayed. This is only a partial representation of the screen capture. Note: XX, and DATE represent patient information that is site specific.
8 Select <CR> at the prompt OK TO CONTINUE ? YES// 9 Select <CR> at the prompt Blood component for unit selection:
Note: Additional information will display if the patient selected has “Unit assigned/xmatched:” and/or “Component(s) requested:” from prior setup and/or testing.
10 Enter “04210” at the prompt 1) mm/dd/yyyy hh:mm Acc # BB mmdd 5 2) mm/dd/yyyy hh:mm Acc # BB mmdd 4 3) mm/dd/yyyy hh:mm Acc # BB mmdd 3 4) mm/dd/yyyy hh:mm Acc # BB mmdd 2 5) mm/dd/yyyy hh:mm Acc # BB mmdd 1
Select patient blood sample (1-5): Note: mm/dd/yyyy represents the date of specimen receipt. hh:mm represents the time of specimen receipt.
mmdd represents the date associated with the BB accession number.
Note: the displayed data is site specific and will differ if additional specimens are available for the patient.

User Guide for LR*5.2*275 Page 27 of 77
December 2001 Test Case # 3 [P-RS-US_03]
STEP ACTION EXPECTED RESULT OUTCOME COMMENTS 11 Enter “1” at the prompt
Note: the input must reflect the 5th specimen received during setup.
Select UNIT:
12 Enter “??” at the prompt PMD001 A NEG mm/dd/yy PMD002 A NEG mm/dd/yy PMD003 A NEG mm/dd/yy PMD004 A NEG mm/dd/yy PMD005 A NEG mm/dd/yy PMD006 A NEG mm/dd/yy Note: mm/dd/yy represents the expiration date of the unit
13 Enter “PMD001” at the prompt UNIT OK for DOE,JOHN 111-11-1111 ? YES// 14 Enter <CR> at the prompt Select UNIT: 15 Enter <CR> at the prompt Blood component for unit selection: 16 Enter <CR> at the prompt Select Patient Name: 17 Enter <CR> at the prompt CR Blood component requests
CT Unit CAUTION tag labels US Select units for patients XM Enter crossmatch results Select Request/select/xmatch blood components Option:
18 Select US [Select units for patients]
Selection of units for a patient REGION 7 ISC,TX (DEMO) Accession Area: BLOOD BANK To use BAR CODE READER Pass reader wand over a GROUP-TYPE (ABO/Rh) label => Note: division is site specific.
19 Enter <CR> at the prompt Select only unassigned/uncrossmatched units ? YES// 20 Enter <CR> at the prompt Select Patient Name:

User Guide for LR*5.2*275 Page 28 of 77
December 2001 Test Case # 3 [P-RS-US_03]
STEP ACTION EXPECTED RESULT OUTCOME COMMENTS 21 Enter “DOE,JOHN” at the
prompt Select Patient Name: DOE,JOHN ABO group: A Rh type: NEG AGE: XX DATE OF BIRTH: DATE PATIENT LOCATION: XX// Note: Additional patient information may be displayed. This is only a partial representation of the screen capture. Note: XX, and DATE represent patient information that is site specific.
22 Enter <CR> at the prompt OK TO CONTINUE ? YES// (YES) 23 Select <CR> at the prompt Blood component for unit selection:
Note: Additional information will display if the patient selected has “Unit assigned/xmatched:” and/or “Component(s) requested:” from prior setup and/or testing.
24 Enter “04210” at the prompt 1) mm/dd/yyyy hh:mm Acc # BB mmdd 5 2) mm/dd/yyyy hh:mm Acc # BB mmdd 4 3) mm/dd/yyyy hh:mm Acc # BB mmdd 3 4) mm/dd/yyyy hh:mm Acc # BB mmdd 2 5) mm/dd/yyyy hh:mm Acc # BB mmdd 1
Select patient blood sample (1-5): Note: mm/dd/yyyy represents the date of specimen receipt. hh:mm represents the time of specimen receipt.
mmdd represents the date associated with the BB accession number.
Note: the displayed data is site specific and will differ if additional specimens are available for the patient.
25 Enter “2” at the prompt. Note: the input must reflect the 4th specimen received during setup.
Select UNIT:
26 Enter “??” at the prompt PMD001 A NEG mm/dd/yy PMD002 A NEG mm/dd/yy PMD003 A NEG mm/dd/yy PMD004 A NEG mm/dd/yy PMD005 A NEG mm/dd/yy PMD006 A NEG mm/dd/yy Note: mm/dd/yy represents the expiration date of the unit Note: the displayed data is site specific and will differ if additional specimens are available for the patient.

User Guide for LR*5.2*275 Page 29 of 77
December 2001 Test Case # 3 [P-RS-US_03]
STEP ACTION EXPECTED RESULT OUTCOME COMMENTS 27 Enter “PMD001” at the prompt UNIT OK for DOE,JOHN 111-11-1111 ? YES// 28 Enter <CR> at the prompt Select UNIT: 29 Enter <CR> at the prompt Blood component for unit selection: 30 Enter <CR> at the prompt Select Patient Name: 31 Enter <CR> at the prompt CR Blood component requests
CT Unit CAUTION tag labels US Select units for patients XM Enter crossmatch results Select Request/select/xmatch blood components Option:
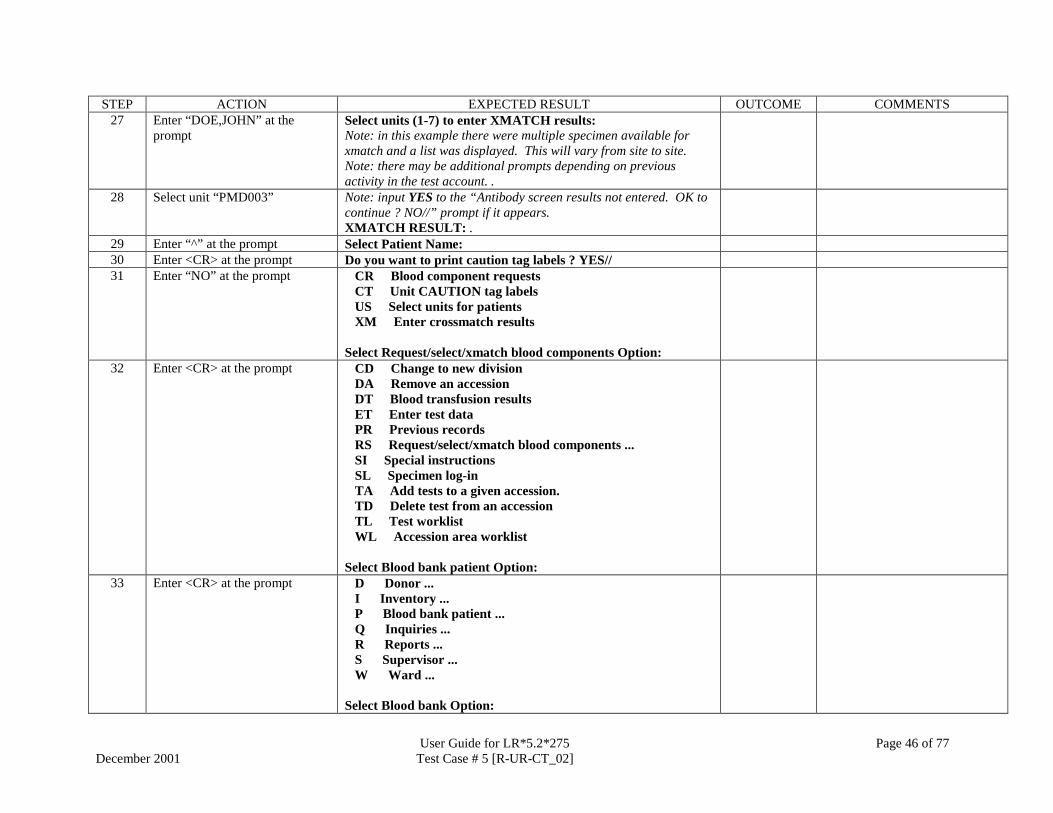
32 Select XM [Enter crossmatch results]
Enter crossmatch results REGION 7 ISC,TX (DEMO) Select Patient Name: Note: division is site specific.
33 Enter “DOE,JOHN” at the prompt
Select units (1-7) to enter XMATCH results: Note: in this example there were multiple units available for xmatch and a list was displayed. This will vary from site to site. Note: input YES to the “Antibody screen results not entered. OK to continue ? NO//” prompt.
34 Select unit “PMD001”
Note: input YES to the “Antibody screen results not entered. OK to continue ? NO//” prompt if it appears. XMATCH RESULT:
35 Enter “COMPATIBLE” at the prompt
Note: this may display a list of valid entries. Select COMPATIBLE. Select CROSSMATCH COMMENT:
36 Enter <CR> at the prompt DATE/TIME UNIT ASSIGNED: DATE @ TIME // Note: DATE and TIME will be site specific.
37 Enter <CR> at the prompt Select Patient Name: 38 Enter <CR> at the prompt Do you want to print caution tag labels ? YES// 39 Enter “NO” at the prompt CR Blood component requests
CT Unit CAUTION tag labels US Select units for patients XM Enter crossmatch results Select Request/select/xmatch blood components Option:

User Guide for LR*5.2*275 Page 30 of 77
December 2001 Test Case # 3 [P-RS-US_03]
STEP ACTION EXPECTED RESULT OUTCOME COMMENTS 40 Enter <CR> at the prompt CD Change to new division
DA Remove an accession DT Blood transfusion results ET Enter test data PR Previous records RS Request/select/xmatch blood components ... SI Special instructions SL Specimen log-in TA Add tests to a given accession. TD Delete test from an accession TL Test worklist WL Accession area worklist Select Blood bank patient Option:
41 Enter <CR> at the prompt D Donor ... I Inventory ... P Blood bank patient ... Q Inquiries ... R Reports ... S Supervisor ... W Ward ... Select Blood bank Option:
42 Select Q [Inquiries ...] DI Single donor demographic information OR Order/test status PA Show list of accessions for a patient PH Patient Medication List PR Patient blood bank record SD Single donor information ST Single unit status SU Single unit information- display UA Units assigned/components requested VD Validation documentation VT Test description information Select Inquiries Option:
43 Select SU [Single unit information- display ]
Select BLOOD INVENTORY UNIT ID:

User Guide for LR*5.2*275 Page 31 of 77
December 2001 Test Case # 3 [P-RS-US_03]
STEP ACTION EXPECTED RESULT OUTCOME COMMENTS 44 Enter “PMD001” at the prompt Note: search the screen display for the entry that indicates the unit
has a crossmatch result of COMPATIBLE associated with the correct(intended) specimen. In this example the correct specimen is associated with steps 24 & 25 of this test case. XMATCH RESULT: COMPATIBLE PATIENT SAMPLE ACC #: BB XXXX 4 Note: XXXX represents specimen date.
45 Enter “^” at the prompt Select BLOOD INVENTORY UNIT ID: 46 Enter <CR> at the prompt DI Single donor demographic information
OR Order/test status PA Show list of accessions for a patient PH Patient Medication List PR Patient blood bank record SD Single donor information ST Single unit status SU Single unit information- display UA Units assigned/components requested VD Validation documentation VT Test description information Select Inquiries Option:
47 Enter <CR> at the prompt D Donor ... I Inventory ... P Blood bank patient ... Q Inquiries ... R Reports ... S Supervisor ... W Ward ... Select Blood bank Option:

User Guide for LR*5.2*275 Page 32 of 77 December 2001 Test Case # 4 [R-UR-CT_01]
Test Case # 4 [R-UR-CT_01] Date Performed: Technologist: STEP ACTION EXPECTED RESULT OUTCOME COMMENTS
1 Log into the blood bank module D Donor ... I Inventory ... P Blood bank patient ... Q Inquiries ... R Reports ... S Supervisor ... W Ward ... Select Blood bank Option:
2 Select R [Reports …] AR Patient antibody report (short list) BR Blood bank tests report ... CT Unit CAUTION tag labels CV CMV Antibody Status Report DR Donor summary reports ... IS Blood inventory status reports ... IT Blood inventory transaction reports ... PL Patient accession list TC Transfusion reaction count TR Transfusion reactions report UP Phenotyped units available UR Blood utilization & summary reports ... VD Print blood bank validation WK Blood bank workload reports ... Select Reports Option:

User Guide for LR*5.2*275 Page 33 of 77 December 2001 Test Case # 4 [R-UR-CT_01]
STEP ACTION EXPECTED RESULT OUTCOME COMMENTS 3 Select UR [Blood utilization &
summary reports ...]
AA Crossmatch/Transfusions by Specialty/Physician AR Autologous disposition report CT Crossmatch:Transfusion report IS Unit issue book entries IT Inappropriate transfusion requests report PT Prolonged transfusion times RS Transfused RBC for treating specialty TH Patient transfusions & hematology results TR Transfusion data report TS Transfusions by treating specialty/physician TX Transfusion follow-up tests Select Blood utilization & summary reports Option:
4 Select CT [Crossmatch:Transfusion report]
Crossmatch:Transfusion Report Start with Date TODAY//
5 Enter <CR> at the prompt Go to Date TODAY// 6 Enter <CR> at the prompt DEVICE: HOME// 7 Enter <CR> at the prompt Note: The report may or may not have data. What is being
confirmed is that there are no issues existing in the system prior to beginning this exercise. If there is an error displayed then this test case cannot proceed. Request assistance. AA Crossmatch/Transfusions by Specialty/Physician AR Autologous disposition report CT Crossmatch:Transfusion report IS Unit issue book entries IT Inappropriate transfusion requests report PT Prolonged transfusion times RS Transfused RBC for treating specialty TH Patient transfusions & hematology results TR Transfusion data report TS Transfusions by treating specialty/physician TX Transfusion follow-up tests Select Blood utilization & summary reports Option:

User Guide for LR*5.2*275 Page 34 of 77 December 2001 Test Case # 4 [R-UR-CT_01]
STEP ACTION EXPECTED RESULT OUTCOME COMMENTS 8 Enter <CR> at the prompt AR Patient antibody report (short list)
BR Blood bank tests report ... CT Unit CAUTION tag labels CV CMV Antibody Status Report DR Donor summary reports ... IS Blood inventory status reports ... IT Blood inventory transaction reports ... PL Patient accession list TC Transfusion reaction count TR Transfusion reactions report UP Phenotyped units available UR Blood utilization & summary reports ... VD Print blood bank validation WK Blood bank workload reports ... Select Reports Option:
9 Enter <CR> at the prompt D Donor ... I Inventory ... P Blood bank patient ... Q Inquiries ... R Reports ... S Supervisor ... W Ward ... Select Blood bank Option:
10 Select P [Blood bank patient …] CD Change to new division DA Remove an accession DT Blood transfusion results ET Enter test data PR Previous records RS Request/select/xmatch blood components ... SI Special instructions SL Specimen log-in TA Add tests to a given accession. TD Delete test from an accession TL Test worklist WL Accession area worklist Select Blood bank patient Option:

User Guide for LR*5.2*275 Page 35 of 77 December 2001 Test Case # 4 [R-UR-CT_01]
STEP ACTION EXPECTED RESULT OUTCOME COMMENTS 11 Select RS
[Request/select/xmatch blood components …]
CR Blood component requests CT Unit CAUTION tag labels US Select units for patients XM Enter crossmatch results Select Request/select/xmatch blood components Option:
12 Select US [Select units for patients]
Selection of units for a patient REGION 7 ISC,TX (DEMO) Accession Area: BLOOD BANK To use BAR CODE READER Pass reader wand over a GROUP-TYPE (ABO/Rh) label => Note: division is site specific.
13 Enter <CR> at the prompt Select only unassigned/uncrossmatched units ? YES// 14 Enter <CR> at the prompt Select Patient Name: 15 Enter “DOE,JOHN” at the
prompt Select Patient Name: DOE,JOHN ABO group: A Rh type: NEG AGE: XX DATE OF BIRTH: DATE PATIENT LOCATION: XX// Note: Additional patient information may be displayed. This is only a partial representation of the screen capture. Note: Patient name, XX, and DATE represent patient information that is site specific.
16 Enter <CR> at the prompt OK TO CONTINUE ? YES// 17 Enter <CR> at the prompt Blood component for unit selection:
Note: Additional information will display if the patient selected has “Unit assigned/xmatched:” and/or “Component(s) requested:” from prior setup and/or testing.

User Guide for LR*5.2*275 Page 36 of 77 December 2001 Test Case # 4 [R-UR-CT_01]
STEP ACTION EXPECTED RESULT OUTCOME COMMENTS 18 Enter “04210” at the prompt 1) mm/dd/yyyy hh:mm Acc # BB mmdd 5
2) mm/dd/yyyy hh:mm Acc # BB mmdd 4 3) mm/dd/yyyy hh:mm Acc # BB mmdd 3 4) mm/dd/yyyy hh:mm Acc # BB mmdd 2 5) mm/dd/yyyy hh:mm Acc # BB mmdd 1
Select patient blood sample (1-5): Note: mm/dd/yyyy represents the date of specimen receipt. hh:mm represents the time of specimen receipt.
mmdd represents the date associated with the BB accession number.
Note: the displayed data is site specific and will differ if additional specimens are available for the patient.
Select patient blood sample (1-5):
19 Enter “2” at the prompt Note: the input must reflect the 4th specimen received during setup.
Select UNIT:
20 Enter “??” at the prompt PMD002 A NEG mm/dd/yy PMD003 A NEG mm/dd/yy PMD004 A NEG mm/dd/yy PMD005 A NEG mm/dd/yy PMD006 A NEG mm/dd/yy Note: mm/dd/yy represents the expiration date of the unit
21 Enter “PMD002” at the prompt UNIT OK for DOE,JOHN 111-11-1111 ? YES// 22 Enter <CR> at the prompt Select UNIT: 23 Enter <CR> at the prompt Blood component for unit selection: 24 Enter <CR> at the prompt Select Patient Name: 25 Enter <CR> at the prompt CR Blood component requests
CT Unit CAUTION tag labels US Select units for patients XM Enter crossmatch results Select Request/select/xmatch blood components Option:
26 Select XM [Enter crossmatch results]
Enter crossmatch results REGION 7 ISC,TX (DEMO) Select Patient Name: Note: division is site specific.

User Guide for LR*5.2*275 Page 37 of 77 December 2001 Test Case # 4 [R-UR-CT_01]
STEP ACTION EXPECTED RESULT OUTCOME COMMENTS 27 Enter “DOE,JOHN” at the
prompt Select units (1-7) to enter XMATCH results: Note: in this example there were multiple specimen available for xmatch and a list was displayed. This will vary from site to site..
28 Select unit “PMD002”
Note: input YES to the “Antibody screen results not entered. OK to continue ? NO//” prompt if it appears. XMATCH RESULT:
29 Enter COMPATIBLE at the prompt
Note: this may display a list of valid entries. Select COMPATIBLE. Select CROSSMATCH COMMENT:
30 Enter <CR> at the prompt DATE/TIME UNIT ASSIGNED: DATE @ TIME // Note: DATE and TIME will be site specific.
31 Enter <CR> at the prompt Select Patient Name: 32 Enter <CR> at the prompt Do you want to print caution tag labels ? YES// 33 Enter “NO” at the prompt CR Blood component requests
CT Unit CAUTION tag labels US Select units for patients XM Enter crossmatch results Select Request/select/xmatch blood components Option:
34 Enter <CR> at the prompt CD Change to new division DA Remove an accession DT Blood transfusion results ET Enter test data PR Previous records RS Request/select/xmatch blood components ... SI Special instructions SL Specimen log-in TA Add tests to a given accession. TD Delete test from an accession TL Test worklist WL Accession area worklist Select Blood bank patient Option:

User Guide for LR*5.2*275 Page 38 of 77 December 2001 Test Case # 4 [R-UR-CT_01]
STEP ACTION EXPECTED RESULT OUTCOME COMMENTS 35 Enter <CR> at the prompt D Donor ...
I Inventory ... P Blood bank patient ... Q Inquiries ... R Reports ... S Supervisor ... W Ward ... Select Blood bank Option:
36 Select R [Reports ...] AR Patient antibody report (short list) BR Blood bank tests report ... CT Unit CAUTION tag labels CV CMV Antibody Status Report DR Donor summary reports ... IS Blood inventory status reports ... IT Blood inventory transaction reports ... PL Patient accession list TC Transfusion reaction count TR Transfusion reactions report UP Phenotyped units available UR Blood utilization & summary reports ... VD Print blood bank validation WK Blood bank workload reports ... Select Reports Option:
37 Select UR [Blood utilization & summary reports ...]
AA Crossmatch/Transfusions by Specialty/Physician AR Autologous disposition report CT Crossmatch:Transfusion report IS Unit issue book entries IT Inappropriate transfusion requests report PT Prolonged transfusion times RS Transfused RBC for treating specialty TH Patient transfusions & hematology results TR Transfusion data report TS Transfusions by treating specialty/physician TX Transfusion follow-up tests Select Blood utilization & summary reports Option:

User Guide for LR*5.2*275 Page 39 of 77 December 2001 Test Case # 4 [R-UR-CT_01]
STEP ACTION EXPECTED RESULT OUTCOME COMMENTS 38 Select CT
[Crossmatch:Transfusion report] Crossmatch:Transfusion Report Start with Date TODAY//
39 Enter <CR> at the prompt Go to Date TODAY// 40 Enter <CR> at the prompt DEVICE: HOME// 41 Enter <CR> at the prompt 1) DOE,JOHN 111-11-1111
DATE @ TIME PMD002 AS-1 C On x-match, not counted Note: The report may contain additional information. It will at least contain the information for the unit resulted in step 28 of this test case. AA Crossmatch/Transfusions by Specialty/Physician AR Autologous disposition report CT Crossmatch:Transfusion report IS Unit issue book entries IT Inappropriate transfusion requests report PT Prolonged transfusion times RS Transfused RBC for treating specialty TH Patient transfusions & hematology results TR Transfusion data report TS Transfusions by treating specialty/physician TX Transfusion follow-up tests Select Blood utilization & summary reports Option:
42 Enter <CR> at the prompt AR Patient antibody report (short list) BR Blood bank tests report ... CT Unit CAUTION tag labels CV CMV Antibody Status Report DR Donor summary reports ... IS Blood inventory status reports ... IT Blood inventory transaction reports ... PL Patient accession list TC Transfusion reaction count TR Transfusion reactions report UP Phenotyped units available UR Blood utilization & summary reports ... VD Print blood bank validation WK Blood bank workload reports ... Select Reports Option:

User Guide for LR*5.2*275 Page 40 of 77 December 2001 Test Case # 4 [R-UR-CT_01]
STEP ACTION EXPECTED RESULT OUTCOME COMMENTS 43 Enter <CR> at the prompt D Donor ...
I Inventory ... P Blood bank patient ... Q Inquiries ... R Reports ... S Supervisor ... W Ward ... Select Blood bank Option:

User Guide for LR*5.2*275 Page 41 of 77
December 2001 Test Case # 5 [R-UR-CT_02]
Test Case # 5 [R-UR-CT_02] Date Performed: Technologist: STEP ACTION EXPECTED RESULT OUTCOME COMMENTS
1 Log into the blood bank module D Donor ... I Inventory ... P Blood bank patient ... Q Inquiries ... R Reports ... S Supervisor ... W Ward ... Select Blood bank Option:
2 Select R [Reports ...]
AR Patient antibody report (short list) BR Blood bank tests report ... CT Unit CAUTION tag labels CV CMV Antibody Status Report DR Donor summary reports ... IS Blood inventory status reports ... IT Blood inventory transaction reports ... PL Patient accession list TC Transfusion reaction count TR Transfusion reactions report UP Phenotyped units available UR Blood utilization & summary reports ... VD Print blood bank validation WK Blood bank workload reports ... Select Reports Option:

User Guide for LR*5.2*275 Page 42 of 77
December 2001 Test Case # 5 [R-UR-CT_02]
STEP ACTION EXPECTED RESULT OUTCOME COMMENTS 3 Select UR [Blood utilization &
summary reports ...] AA Crossmatch/Transfusions by Specialty/Physician AR Autologous disposition report CT Crossmatch:Transfusion report IS Unit issue book entries IT Inappropriate transfusion requests report PT Prolonged transfusion times RS Transfused RBC for treating specialty TH Patient transfusions & hematology results TR Transfusion data report TS Transfusions by treating specialty/physician TX Transfusion follow-up tests Select Blood utilization & summary reports Option:
4 Select CT [Crossmatch:Transfusion report]
Crossmatch:Transfusion Report Start with Date TODAY//
5 Enter <CR> at the prompt Go to Date TODAY// 6 Enter <CR> at the prompt DEVICE: HOME// 7 Enter <CR> at the prompt Note: The report may or may not have data. What is being
confirmed is that there are no issues existing in the system prior to beginning this exercise. If there is an error displayed then this test case cannot proceed. Request assistance. AA Crossmatch/Transfusions by Specialty/Physician AR Autologous disposition report CT Crossmatch:Transfusion report IS Unit issue book entries IT Inappropriate transfusion requests report PT Prolonged transfusion times RS Transfused RBC for treating specialty TH Patient transfusions & hematology results TR Transfusion data report TS Transfusions by treating specialty/physician TX Transfusion follow-up tests Select Blood utilization & summary reports Option:

User Guide for LR*5.2*275 Page 43 of 77
December 2001 Test Case # 5 [R-UR-CT_02]
STEP ACTION EXPECTED RESULT OUTCOME COMMENTS 8 Enter <CR> at the prompt AR Patient antibody report (short list)
BR Blood bank tests report ... CT Unit CAUTION tag labels CV CMV Antibody Status Report DR Donor summary reports ... IS Blood inventory status reports ... IT Blood inventory transaction reports ... PL Patient accession list TC Transfusion reaction count TR Transfusion reactions report UP Phenotyped units available UR Blood utilization & summary reports ... VD Print blood bank validation WK Blood bank workload reports ... Select Reports Option:
9 Enter <CR> at the prompt D Donor ... I Inventory ... P Blood bank patient ... Q Inquiries ... R Reports ... S Supervisor ... W Ward ... Select Blood bank Option:
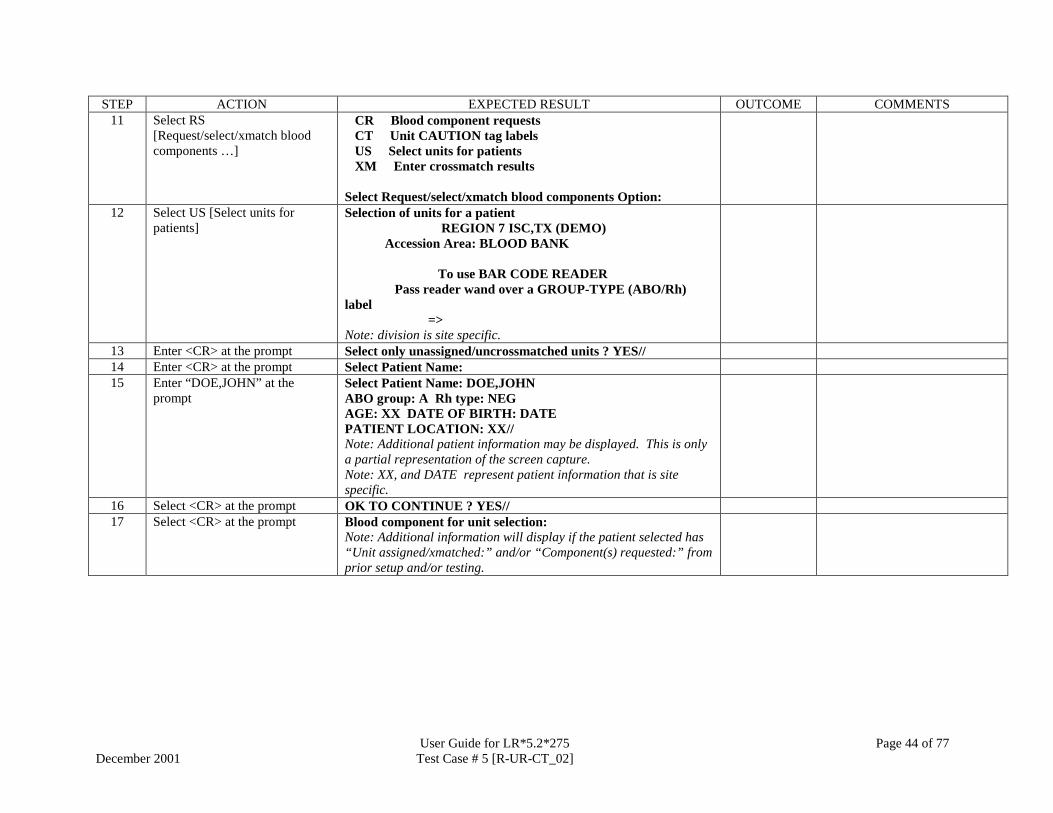
10 Select P [Blood bank patient …] CD Change to new division DA Remove an accession DT Blood transfusion results ET Enter test data PR Previous records RS Request/select/xmatch blood components ... SI Special instructions SL Specimen log-in TA Add tests to a given accession. TD Delete test from an accession TL Test worklist WL Accession area worklist Select Blood bank patient Option:
User Guide for LR*5.2*275 Page 44 of 77
December 2001 Test Case # 5 [R-UR-CT_02]
STEP ACTION EXPECTED RESULT OUTCOME COMMENTS 11 Select RS
[Request/select/xmatch blood components …]
CR Blood component requests CT Unit CAUTION tag labels US Select units for patients XM Enter crossmatch results Select Request/select/xmatch blood components Option:
12 Select US [Select units for patients]
Selection of units for a patient REGION 7 ISC,TX (DEMO) Accession Area: BLOOD BANK To use BAR CODE READER Pass reader wand over a GROUP-TYPE (ABO/Rh) label => Note: division is site specific.
13 Enter <CR> at the prompt Select only unassigned/uncrossmatched units ? YES// 14 Enter <CR> at the prompt Select Patient Name: 15 Enter “DOE,JOHN” at the
prompt Select Patient Name: DOE,JOHN ABO group: A Rh type: NEG AGE: XX DATE OF BIRTH: DATE PATIENT LOCATION: XX// Note: Additional patient information may be displayed. This is only a partial representation of the screen capture. Note: XX, and DATE represent patient information that is site specific.
16 Select <CR> at the prompt OK TO CONTINUE ? YES// 17 Select <CR> at the prompt Blood component for unit selection:
Note: Additional information will display if the patient selected has “Unit assigned/xmatched:” and/or “Component(s) requested:” from prior setup and/or testing.

User Guide for LR*5.2*275 Page 45 of 77
December 2001 Test Case # 5 [R-UR-CT_02]
STEP ACTION EXPECTED RESULT OUTCOME COMMENTS 18 Enter “04210” at the prompt 1) mm/dd/yyyy hh:mm Acc # BB mmdd 5
2) mm/dd/yyyy hh:mm Acc # BB mmdd 4 3) mm/dd/yyyy hh:mm Acc # BB mmdd 3 4) mm/dd/yyyy hh:mm Acc # BB mmdd 2 5) mm/dd/yyyy hh:mm Acc # BB mmdd 1
Select patient blood sample (1-5): Note: mm/dd/yyyy represents the date of specimen receipt. hh:mm represents the time of specimen receipt.
mmdd represents the date associated with the BB accession number.
Note: the displayed data is site specific and will differ if additional specimens are available for the patient.
19 Enter “2” at the prompt Note: the input must reflect the 4th specimen received during setup.
Select UNIT:
20 Enter “??” at the prompt PMD003 A NEG mm/dd/yy PMD004 A NEG mm/dd/yy PMD005 A NEG mm/dd/yy PMD006 A NEG mm/dd/yy Note: mm/dd/yy represents the expiration date of the unit Select UNIT:
21 Enter “PMD003” at the prompt UNIT OK for DOE,JOHN 111-11-1111 ? YES// 22 Enter <CR> at the prompt Select UNIT: 23 Enter <CR> at the prompt Blood component for unit selection: 24 Enter <CR> at the prompt Select Patient Name: 25 Enter <CR> at the prompt CR Blood component requests
CT Unit CAUTION tag labels US Select units for patients XM Enter crossmatch results Select Request/select/xmatch blood components Option:
26 Select XM [Enter crossmatch results]
Enter crossmatch results REGION 7 ISC,TX (DEMO) Select Patient Name: Note: division is site specific.
User Guide for LR*5.2*275 Page 46 of 77
December 2001 Test Case # 5 [R-UR-CT_02]
STEP ACTION EXPECTED RESULT OUTCOME COMMENTS 27 Enter “DOE,JOHN” at the
prompt Select units (1-7) to enter XMATCH results: Note: in this example there were multiple specimen available for xmatch and a list was displayed. This will vary from site to site. Note: there may be additional prompts depending on previous activity in the test account. .
28 Select unit “PMD003” Note: input YES to the “Antibody screen results not entered. OK to continue ? NO//” prompt if it appears. XMATCH RESULT: .
29 Enter “^” at the prompt Select Patient Name: 30 Enter <CR> at the prompt Do you want to print caution tag labels ? YES// 31 Enter “NO” at the prompt CR Blood component requests
CT Unit CAUTION tag labels US Select units for patients XM Enter crossmatch results Select Request/select/xmatch blood components Option:
32 Enter <CR> at the prompt CD Change to new division DA Remove an accession DT Blood transfusion results ET Enter test data PR Previous records RS Request/select/xmatch blood components ... SI Special instructions SL Specimen log-in TA Add tests to a given accession. TD Delete test from an accession TL Test worklist WL Accession area worklist Select Blood bank patient Option:
33 Enter <CR> at the prompt D Donor ... I Inventory ... P Blood bank patient ... Q Inquiries ... R Reports ... S Supervisor ... W Ward ... Select Blood bank Option:

User Guide for LR*5.2*275 Page 47 of 77
December 2001 Test Case # 5 [R-UR-CT_02]
STEP ACTION EXPECTED RESULT OUTCOME COMMENTS 34 Select R [Reports ...]
AR Patient antibody report (short list) BR Blood bank tests report ... CT Unit CAUTION tag labels CV CMV Antibody Status Report DR Donor summary reports ... IS Blood inventory status reports ... IT Blood inventory transaction reports ... PL Patient accession list TC Transfusion reaction count TR Transfusion reactions report UP Phenotyped units available UR Blood utilization & summary reports ... VD Print blood bank validation WK Blood bank workload reports ... Select Reports Option:
35 Select UR [Blood utilization & summary reports ...]
AA Crossmatch/Transfusions by Specialty/Physician AR Autologous disposition report CT Crossmatch:Transfusion report IS Unit issue book entries IT Inappropriate transfusion requests report PT Prolonged transfusion times RS Transfused RBC for treating specialty TH Patient transfusions & hematology results TR Transfusion data report TS Transfusions by treating specialty/physician TX Transfusion follow-up tests Select Blood utilization & summary reports Option:
36 Select CT [Crossmatch:Transfusion report]
Crossmatch:Transfusion Report Start with Date TODAY//
37 Enter <CR> at the prompt Go to Date TODAY// 38 Enter <CR> at the prompt DEVICE: HOME//

User Guide for LR*5.2*275 Page 48 of 77
December 2001 Test Case # 5 [R-UR-CT_02]
STEP ACTION EXPECTED RESULT OUTCOME COMMENTS 39 Enter <CR> at the prompt 1) DOE,JOHN 111-11-1111
DATE @ TIME PMD003 AS-1 C On x-match, not counted Note: The report may contain additional information. It will not contain the unit referenced in step 28 of this test case. '^' TO STOP: Note: if there are no additional pages the screen may include the information displayed in the following step. Proceed from that point.
40 Enter <CR> at the prompt AA Crossmatch/Transfusions by Specialty/Physician AR Autologous disposition report CT Crossmatch:Transfusion report IS Unit issue book entries IT Inappropriate transfusion requests report PT Prolonged transfusion times RS Transfused RBC for treating specialty TH Patient transfusions & hematology results TR Transfusion data report TS Transfusions by treating specialty/physician TX Transfusion follow-up tests Select Blood utilization & summary reports Option:
41 Enter <CR> at the prompt AR Patient antibody report (short list) BR Blood bank tests report ... CT Unit CAUTION tag labels CV CMV Antibody Status Report DR Donor summary reports ... IS Blood inventory status reports ... IT Blood inventory transaction reports ... PL Patient accession list TC Transfusion reaction count TR Transfusion reactions report UP Phenotyped units available UR Blood utilization & summary reports ... VD Print blood bank validation WK Blood bank workload reports ... Select Reports Option:

User Guide for LR*5.2*275 Page 49 of 77
December 2001 Test Case # 5 [R-UR-CT_02]
STEP ACTION EXPECTED RESULT OUTCOME COMMENTS 42 Enter <CR> at the prompt D Donor ...
I Inventory ... P Blood bank patient ... Q Inquiries ... R Reports ... S Supervisor ... W Ward ... Select Blood bank Option:

User Guide for LR*5.2*275 Page 50 of 77
December 2001 Test Case # 6 [P-RS-XM_01]
Test Case # 6 [P-RS-XM_01] Date Performed: Technologist: STEP ACTION EXPECTED RESULT OUTCOME COMMENTS
1 Log into the blood bank module D Donor ... I Inventory ... P Blood bank patient ... Q Inquiries ... R Reports ... S Supervisor ... W Ward ... Select Blood bank Option:
2 Select P [Blood bank patient …] CD Change to new division DA Remove an accession DT Blood transfusion results ET Enter test data PR Previous records RS Request/select/xmatch blood components ... SI Special instructions SL Specimen log-in TA Add tests to a given accession. TD Delete test from an accession TL Test worklist WL Accession area worklist Select Blood bank patient Option:
3 Select RS [Request/select/xmatch blood components …]
CR Blood component requests CT Unit CAUTION tag labels US Select units for patients XM Enter crossmatch results Select Request/select/xmatch blood components Option:
User Guide for LR*5.2*275 Page 51 of 77
December 2001 Test Case # 6 [P-RS-XM_01]
STEP ACTION EXPECTED RESULT OUTCOME COMMENTS 4 Select US [Select units for
patients] Selection of units for a patient REGION 7 ISC,TX (DEMO) Accession Area: BLOOD BANK To use BAR CODE READER Pass reader wand over a GROUP-TYPE (ABO/Rh) label => Note: division is site specific.
5 Enter <CR> at the prompt Select only unassigned/uncrossmatched units ? YES// 6 Enter <CR> at the prompt Select Patient Name: 7 Enter “DOE,JOHN” at the
prompt Select Patient Name: DOE,JOHN ABO group: A Rh type: NEG AGE: XX DATE OF BIRTH: DATE PATIENT LOCATION: XX// Note: Additional patient information may be displayed. This is only a partial representation of the screen capture. Note: XX, and DATE represent patient information that is site specific.
8 Select <CR> at the prompt OK TO CONTINUE ? YES// 9 Select <CR> at the prompt Blood component for unit selection:
Note: Additional information will display if the patient selected has “Unit assigned/xmatched:” and/or “Component(s) requested:” from prior setup and/or testing.
10 Enter “04210” at the prompt 1) mm/dd/yyyy hh:mm Acc # BB mmdd 5 2) mm/dd/yyyy hh:mm Acc # BB mmdd 4 3) mm/dd/yyyy hh:mm Acc # BB mmdd 3 4) mm/dd/yyyy hh:mm Acc # BB mmdd 2 5) mm/dd/yyyy hh:mm Acc # BB mmdd 1
Select patient blood sample (1-5): Note: mm/dd/yyyy represents the date of specimen receipt. hh:mm represents the time of specimen receipt.
Mmdd represents the date associated with the BB accession number.
Note: the displayed data is site specific and will differ if additional specimens are available for the patient.

User Guide for LR*5.2*275 Page 52 of 77
December 2001 Test Case # 6 [P-RS-XM_01]
STEP ACTION EXPECTED RESULT OUTCOME COMMENTS 11 Enter “1” at the prompt
Note: the input must reflect the 5th specimen received during setup.
Select UNIT:
12 Enter “??” at the prompt PMD003 A NEG mm/dd/yy PMD004 A NEG mm/dd/yy PMD005 A NEG mm/dd/yy PMD006 A NEG mm/dd/yy Note: mm/dd/yy represents the expiration date of the unit. Select UNIT:
13 Enter “PMD004” at the prompt UNIT OK for DOE,JOHN 111-11-1111 ? YES// 14 Enter <CR> at the prompt Select UNIT: 15 Enter <CR> at the prompt Blood component for unit selection: 16 Enter <CR> at the prompt Select Patient Name: 17 Enter <CR> at the prompt CR Blood component requests
CT Unit CAUTION tag labels US Select units for patients XM Enter crossmatch results Select Request/select/xmatch blood components Option:
18 Enter XM [Enter crossmatch results]
Enter crossmatch results Select Patient Name:
19 Enter “DOE.JOHN” at the prompt
Select units (1-7) to enter XMATCH results: Note: in this example there were multiple specimen available for xmatch and a list was displayed. This will vary from site to site.
20 Select unit “PMD004” Sorry, must have ABO/Rh results to enter XMATCH results Select Patient Name:
21 Enter “^” at the prompt Do you want to print caution tag labels ? YES// 22 Enter “N” at the prompt CR Blood component requests
CT Unit CAUTION tag labels US Select units for patients XM Enter crossmatch results Select Request/select/xmatch blood components Option:

User Guide for LR*5.2*275 Page 53 of 77
December 2001 Test Case # 6 [P-RS-XM_01]
STEP ACTION EXPECTED RESULT OUTCOME COMMENTS 23 Enter <CR> at the prompt CD Change to new division
DA Remove an accession DT Blood transfusion results ET Enter test data PR Previous records RS Request/select/xmatch blood components ... SI Special instructions SL Specimen log-in TA Add tests to a given accession. TD Delete test from an accession TL Test worklist WL Accession area worklist Select Blood bank patient Option:
24 Enter ET [Enter test data] BLOOD BANK Patient data entry for DATE ? YES// Note: Assumes setup and test case are performed on same day. Adjust as needed.
25 Enter <CR> at the prompt Enter TEST COMMENT(s) ? NO// 26 Enter <CR> at the prompt Edit SPECIMEN COMMENT(s) ? NO// 27 Enter <CR> at the prompt Select Accession Number: 28 Enter “5” at the prompt
Note: the input must reflect the 5th specimen received during setup.
Patient record ABO: A Rh: NEG ABO INTERPRETATION:
29 Enter “A” at the prompt RH INTERPRETATION: 30 Enter “NEG” at the prompt ANTIBODY SCREEN INTERPRETATION: 31 Enter <CR> at the prompt Note: Enter <CR> until the following prompt is displayed.
Select Accession Number:

User Guide for LR*5.2*275 Page 54 of 77
December 2001 Test Case # 6 [P-RS-XM_01]
STEP ACTION EXPECTED RESULT OUTCOME COMMENTS 32 Enter <CR> at the prompt CD Change to new division
DA Remove an accession DT Blood transfusion results ET Enter test data PR Previous records RS Request/select/xmatch blood components ... SI Special instructions SL Specimen log-in TA Add tests to a given accession. TD Delete test from an accession TL Test worklist WL Accession area worklist Select Blood bank patient Option:
33 Select RS [Request/select/xmatch blood components ...]
CR Blood component requests CT Unit CAUTION tag labels US Select units for patients XM Enter crossmatch results Select Request/select/xmatch blood components Option:
34 Select XM [Enter crossmatch results]
Select Patient Name:
35 Enter “DOE,JOHN” at the prompt
Select units (1-7) to enter XMATCH results: Note: in this example there were multiple units available for xmatch and a list was displayed. This will vary from site to site.
36 Select unit “PMD004” Antibody screen results not entered. OK to continue ? NO// Note: this prompt will not appear if screen results have been previously entered.
37 Enter “Y” at the prompt Note: see expected result associated with Step 36 above.
XMATCH RESULT:
38 Enter “COMPATIBLE” at the prompt
Note: if a list displays select COMPATIBLE. Select CROSSMATCH COMMENT:
39 Enter <CR> at the prompt DATE/TIME UNIT ASSIGNED: SEP 7,2001@07:56// Note: date and time is site specific.
40 Enter “N” at the prompt Select Patient Name: 41 Enter “^” at the prompt Do you want to print caution tag labels ? YES//
User Guide for LR*5.2*275 Page 55 of 77
December 2001 Test Case # 6 [P-RS-XM_01]
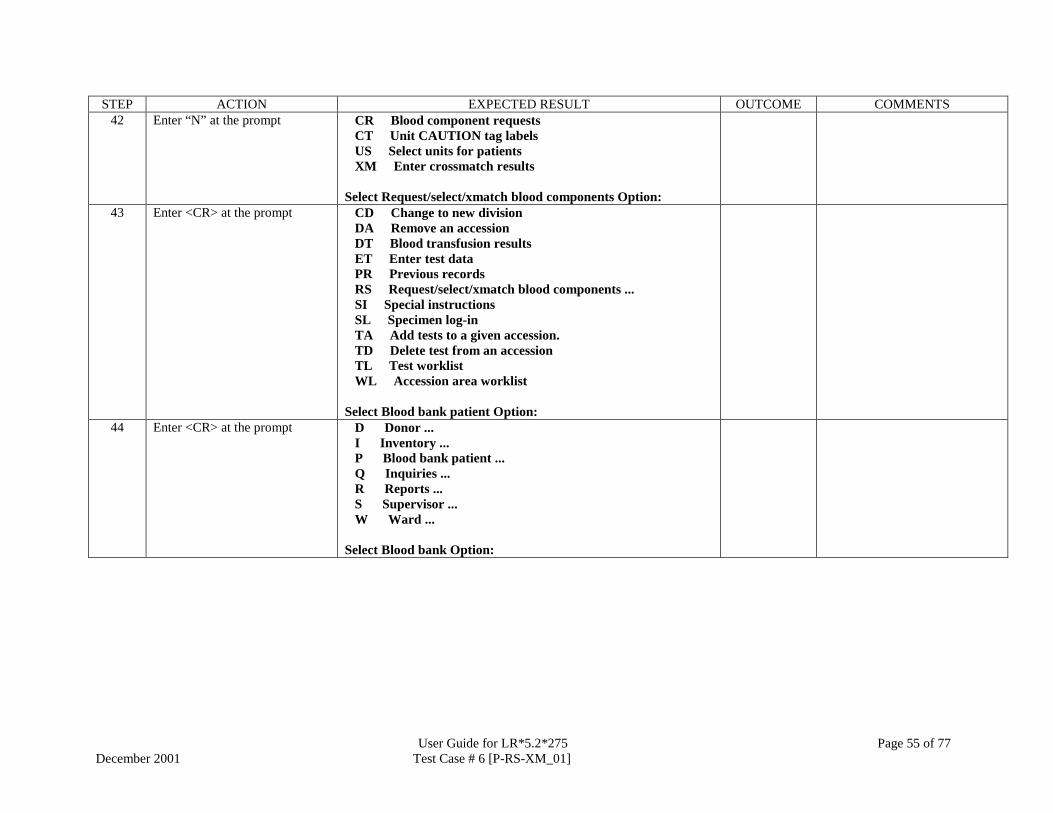
STEP ACTION EXPECTED RESULT OUTCOME COMMENTS 42 Enter “N” at the prompt CR Blood component requests
CT Unit CAUTION tag labels US Select units for patients XM Enter crossmatch results Select Request/select/xmatch blood components Option:
43 Enter <CR> at the prompt CD Change to new division DA Remove an accession DT Blood transfusion results ET Enter test data PR Previous records RS Request/select/xmatch blood components ... SI Special instructions SL Specimen log-in TA Add tests to a given accession. TD Delete test from an accession TL Test worklist WL Accession area worklist Select Blood bank patient Option:
44 Enter <CR> at the prompt D Donor ... I Inventory ... P Blood bank patient ... Q Inquiries ... R Reports ... S Supervisor ... W Ward ... Select Blood bank Option:

User Guide for LR*5.2*275 Page 56 of 77
December 2001 Test Case # 7 [P-RS-XM_02]
Test Case # 7 [P-RS-XM_02] Date Performed: Technologist: STEP ACTION EXPECTED RESULT OUTCOME COMMENTS
1 Log into the blood bank module D Donor ... I Inventory ... P Blood bank patient ... Q Inquiries ... R Reports ... S Supervisor ... W Ward ... Select Blood bank Option:
2 Select P [Blood bank patient …] CD Change to new division DA Remove an accession DT Blood transfusion results ET Enter test data PR Previous records RS Request/select/xmatch blood components ... SI Special instructions SL Specimen log-in TA Add tests to a given accession. TD Delete test from an accession TL Test worklist WL Accession area worklist Select Blood bank patient Option:
3 Select RS [Request/select/xmatch blood components …]
CR Blood component requests CT Unit CAUTION tag labels US Select units for patients XM Enter crossmatch results Select Request/select/xmatch blood components Option:

User Guide for LR*5.2*275 Page 57 of 77
December 2001 Test Case # 7 [P-RS-XM_02]
STEP ACTION EXPECTED RESULT OUTCOME COMMENTS 4 Select US [Select units for
patients] Selection of units for a patient REGION 7 ISC,TX (DEMO) Accession Area: BLOOD BANK To use BAR CODE READER Pass reader wand over a GROUP-TYPE (ABO/Rh) label => Note: division is site specific.
5 Enter <CR> at the prompt Select only unassigned/uncrossmatched units ? YES// 6 Enter <CR> at the prompt Select Patient Name: 7 Enter “DOE,JOHN” at the
prompt Select Patient Name: DOE,JOHN ABO group: A Rh type: NEG AGE: XX DATE OF BIRTH: DATE PATIENT LOCATION: XX// Note: Additional patient information may be displayed. This is only a partial representation of the screen capture. Note: XX, and DATE represent patient information that is site specific.
8 Select <CR> at the prompt OK TO CONTINUE ? YES// 9 Select <CR> at the prompt Blood component for unit selection:
Note: Additional information will display if the patient selected has “Unit assigned/xmatched:” and/or “Component(s) requested:” from prior setup and/or testing.
10 Enter “04210” at the prompt 1) mm/dd/yyyy hh:mm Acc # BB mmdd 5 2) mm/dd/yyyy hh:mm Acc # BB mmdd 4 3) mm/dd/yyyy hh:mm Acc # BB mmdd 3 4) mm/dd/yyyy hh:mm Acc # BB mmdd 2 5) mm/dd/yyyy hh:mm Acc # BB mmdd 1
Select patient blood sample (1-5): Note: mm/dd/yyyy represents the date of specimen receipt. hh:mm represents the time of specimen receipt.
mmdd represents the date associated with the BB accession number.
Note: the displayed data is site specific and will differ if additional specimens are available for the patient.

User Guide for LR*5.2*275 Page 58 of 77
December 2001 Test Case # 7 [P-RS-XM_02]
STEP ACTION EXPECTED RESULT OUTCOME COMMENTS 11 Enter “3” at the prompt
Note: the input must reflect the 3rd specimen received during setup.
Select UNIT:
12 Enter “??” at the prompt PMD003 A NEG mm/dd/yy PMD005 A NEG mm/dd/yy PMD006 A NEG mm/dd/yy Note: mm/dd/yy represents the expiration date of the unit. Select UNIT:
13 Enter “PMD005” at the prompt UNIT OK for DOE,JOHN 111-11-1111 ? YES// 14 Enter <CR> at the prompt Select UNIT: 15 Enter <CR> at the prompt Blood component for unit selection: 16 Enter <CR> at the prompt Select Patient Name: 17 Enter <CR> at the prompt CR Blood component requests
CT Unit CAUTION tag labels US Select units for patients XM Enter crossmatch results Select Request/select/xmatch blood components Option:
18 Enter <CR> at the prompt CD Change to new division DA Remove an accession DT Blood transfusion results ET Enter test data PR Previous records RS Request/select/xmatch blood components ... SI Special instructions SL Specimen log-in TA Add tests to a given accession. TD Delete test from an accession TL Test worklist WL Accession area worklist Select Blood bank patient Option:
19 Enter ET [Enter test data] BLOOD BANK Patient data entry for Sep 07, 2001 ? YES// Note: date and time is site specific. Note: Assumes setup and test case are performed on same day. Adjust as needed.
20 Enter <CR> at the prompt Enter TEST COMMENT(s) ? NO//

User Guide for LR*5.2*275 Page 59 of 77
December 2001 Test Case # 7 [P-RS-XM_02]
STEP ACTION EXPECTED RESULT OUTCOME COMMENTS 21 Enter <CR> at the prompt Edit SPECIMEN COMMENT(s) ? NO// 22 Enter <CR> at the prompt Select Accession Number: 23 Enter “3’ at the prompt
Note: the input must reflect the 3rd specimen received during setup.
ABO INTERPRETATION: A//
24 Enter “ND” at the prompt ND not the ABO group on record Is present testing OK ? NO//
25 Enter “Y” at the prompt ND not the ABO group of present specimen Is present testing OK ? NO//
26 Enter “Y” at the prompt RH INTERPRETATION: NEG// 27 Enter “ND” at the prompt ND not the Rh type on record
Is present testing OK ? NO//
28 Enter “Y” at the prompt ND not the Rh type on present specimen Is present testing OK ? NO//
29 Enter “Y” at the prompt ANTIBODY SCREEN INTERPRETATION: 30 Enter <CR> at the prompt Select ANTIBODIES IDENTIFIED: 31 Enter <CR> at the prompt Select Accession Number: 32 Enter <CR> at the prompt CD Change to new division
DA Remove an accession DT Blood transfusion results ET Enter test data PR Previous records RS Request/select/xmatch blood components ... SI Special instructions SL Specimen log-in TA Add tests to a given accession. TD Delete test from an accession TL Test worklist WL Accession area worklist Select Blood bank patient Option:
33 Select RS [Request/select/xmatch blood components …]
CR Blood component requests CT Unit CAUTION tag labels US Select units for patients XM Enter crossmatch results Select Request/select/xmatch blood components Option:

User Guide for LR*5.2*275 Page 60 of 77
December 2001 Test Case # 7 [P-RS-XM_02]
STEP ACTION EXPECTED RESULT OUTCOME COMMENTS 34 Select XM [Enter crossmatch
results] Select Patient Name:
35 Enter “DOE,JOHN” at the prompt
Select units (1-9) to enter XMATCH results:
36 Select unit “PMD005” Sorry, must have ABO/Rh results to enter XMATCH results Select Patient Name:
37 Enter <CR> at the prompt Do you want to print caution tag labels ? YES// 38 Enter “NO” at the prompt CR Blood component requests
CT Unit CAUTION tag labels US Select units for patients XM Enter crossmatch results Select Request/select/xmatch blood components Option:
39 Enter <CR> at the prompt CD Change to new division DA Remove an accession DT Blood transfusion results ET Enter test data PR Previous records RS Request/select/xmatch blood components ... SI Special instructions SL Specimen log-in TA Add tests to a given accession. TD Delete test from an accession TL Test worklist WL Accession area worklist Select Blood bank patient Option:
40 Enter <CR> at the prompt D Donor ... I Inventory ... P Blood bank patient ... Q Inquiries ... R Reports ... S Supervisor ... W Ward ... Select Blood bank Option:

User Guide for LR*5.2*275 Page 61 of 77 December 2001 Test Case # 8 [S-EF-AA_01]
Test Case # 8 [S-EF-AA_01] The performance of test Case 8 is dependant on the relationship established between antibodies and antigens in the .04 (CORRESPONDING ANTIGEN/ANTIBODY) field, of the FUNCTION FIELD file. Differences between Expected and Actual results may be due to the current status of these antigen/antibody relationships, and should be investigated by the testing technologist to determine if the variance is acceptable. Justification of any variance must be documented in the comments column of this test case.
Date Performed: Technologist: STEP ACTION EXPECTED RESULT OUTCOME COMMENTS
1 Log into the blood bank module D Donor ... I Inventory ... P Blood bank patient ... Q Inquiries ... R Reports ... S Supervisor ... W Ward ... Select Blood bank Option:
2 Select S [Supervisor …] DO Delete entire order or individual tests ED Blood donor edit options ... EF Edit blood bank files ... EI Blood bank inventory edit options ... EP Blood bank patient edit options ... FD Outline for one or more files II Blood bank inventory integrity report LL Edit number of lines in a label SR Summary and deletion reports ... SW Blood bank workload ... Select Supervisor Option:

User Guide for LR*5.2*275 Page 62 of 77 December 2001 Test Case # 8 [S-EF-AA_01]
STEP ACTION EXPECTED RESULT OUTCOME COMMENTS 3 Select EF [Edit blood bank
files…] AA Edit Corresponding Antigen/Antibody BD Edit blood bank descriptions file BP Edit blood product file BU Edit blood bank utility file CR Edit Blood Component Request File LL Edit lab letter file MS Maximum surgical blood order edit SP Edit blood bank site parameters VD Blood bank validation documentation Select Edit blood bank files Option::
4 Select AA [Edit Corresponding Antigen/Antibody]
This option is case sensitive. Enter data using the EXACT case of the ANTIBODY or ANTIGEN. Select ANTIGEN or ANTIBODY:
5 Enter “ANTI E” at the prompt 1. ANTI E 52030 2. ANTI E(w) 52110 CHOOSE 1-2:
6 Enter “^” at the prompt Select ANTIGEN or ANTIBODY: 7 Enter “ANTI E” at the prompt 1. ANTI E 52030
2. ANTI E(w) 52110 CHOOSE 1-2:
8 Enter “1” at the prompt ANTIBODY: ANTI E CORRESPONDING ANTIGEN: E// SNOMED CODE: 52030 IS THIS CORRECT? NO//
9 Enter “YES” at the prompt CORRESPONDING ANTIGEN/ANTIBODY: E// 10 Enter <CR> at the prompt COMPATIBILITY FACTOR:
Note: there may be a value displayed for the COMPATIBILITY FACTOR. Note: enter <CR> until the following is displayed. This option is case sensitive. Enter data using the EXACT case of the ANTIBODY or ANTIGEN. Select ANTIGEN or ANTIBODY:

User Guide for LR*5.2*275 Page 63 of 77 December 2001 Test Case # 8 [S-EF-AA_01]
STEP ACTION EXPECTED RESULT OUTCOME COMMENTS 11 Enter “ANTI e” at the prompt ANTIBODY: ANTI e
CORRESPONDING ANTIGEN: e SNOMED CODE: 52050 IS THIS CORRECT? NO//
12 Enter “^” at the prompt AA Edit Corresponding Antigen/Antibody BD Edit blood bank descriptions file BP Edit blood product file BU Edit blood bank utility file CR Edit Blood Component Request File LL Edit lab letter file MS Maximum surgical blood order edit SP Edit blood bank site parameters VD Blood bank validation documentation Select Edit blood bank files Option::
13 Select AA [Edit Corresponding Antigen/Antibody]
This option is case sensitive. Enter data using the EXACT case of the ANTIBODY or ANTIGEN. Select ANTIGEN or ANTIBODY:
14 Enter “ANti e” at the prompt 1. ANTI E 52030 2. ANTI E(w) 52110 CHOOSE 1-2:
15 Enter “^” at the prompt Select ANTIGEN or ANTIBODY: 16 Enter “ANTI C” at the prompt 1. ANTI C 52020
2. ANTI Ce 52070 3. ANTI Cw 52080 4. ANTI Cx 52090 CHOOSE 1-4:
17 Enter “1” at the prompt ANTIBODY: ANTI C CORRESPONDING ANTIGEN: C SNOMED CODE: 52020 IS THIS CORRECT? NO//
18 Enter <CR> a the prompt Select ANTIGEN or ANTIBODY: 19 Enter “ANTi c” at the prompt 1. ANTI C 52020
2. ANTI Ce 52070 3. ANTI Cw 52080 4. ANTI Cx 52090 CHOOSE 1-4:

User Guide for LR*5.2*275 Page 64 of 77 December 2001 Test Case # 8 [S-EF-AA_01]
STEP ACTION EXPECTED RESULT OUTCOME COMMENTS 20 Enter “^” at the prompt Select ANTIGEN or ANTIBODY: 21 Enter “ANTI c” at the prompt ANTIBODY: ANTI c
CORRESPONDING ANTIGEN: c SNOMED CODE: 52040 IS THIS CORRECT? NO//
22 Enter “YES” at the prompt CORRESPONDING ANTIGEN/ANTIBODY: c// 23 Enter <CR> at the prompt COMPATIBILITY FACTOR:
Note: there may be a value displayed for the COMPATIBILITY FACTOR. Note: enter <CR> until the following is displayed. This option is case sensitive. Enter data using the EXACT case of the ANTIBODY or ANTIGEN. Select ANTIGEN or ANTIBODY:
24 Enter “ANTI S” at the prompt ANTIBODY: ANTI S CORRESPONDING ANTIGEN: S SNOMED CODE: 52310 IS THIS CORRECT? NO//
25 Enter “^” at the prompt AA Edit Corresponding Antigen/Antibody BD Edit blood bank descriptions file BP Edit blood product file BU Edit blood bank utility file CR Edit Blood Component Request File LL Edit lab letter file MS Maximum surgical blood order edit SP Edit blood bank site parameters VD Blood bank validation documentation Select Edit blood bank files Option:
26 Select AA [Edit Corresponding Antigen/Antibody]
This option is case sensitive. Enter data using the EXACT case of the ANTIBODY or ANTIGEN. Select ANTIGEN or ANTIBODY:

User Guide for LR*5.2*275 Page 65 of 77 December 2001 Test Case # 8 [S-EF-AA_01]
STEP ACTION EXPECTED RESULT OUTCOME COMMENTS 27 Enter “ANTI s” at the prompt Select ANTIGEN or ANTIBODY: ANTI s
ANTIBODY: ANTI s CORRESPONDING ANTIGEN: s SNOMED CODE: 52320 IS THIS CORRECT? NO//
28 Enter “^” at the prompt AA Edit Corresponding Antigen/Antibody BD Edit blood bank descriptions file BP Edit blood product file BU Edit blood bank utility file CR Edit Blood Component Request File LL Edit lab letter file MS Maximum surgical blood order edit SP Edit blood bank site parameters VD Blood bank validation documentation Select Edit blood bank files Option:
29 Select AA [Edit Corresponding Antigen/Antibody]
This option is case sensitive. Enter data using the EXACT case of the ANTIBODY or ANTIGEN. Select ANTIGEN or ANTIBODY:
30 Enter “ANti s” at the prompt ANTIBODY: ANTI S CORRESPONDING ANTIGEN: S SNOMED CODE: 52310 IS THIS CORRECT? NO//
31 Enter <CR> at the prompt Select ANTIGEN or ANTIBODY: 32 Enter “ANTI Jk(a)” at the
prompt Select ANTIGEN or ANTIBODY: ANTI Jk(a) 1. ANTI Jk(a) 52410 2. ANTI Jk(a)Jk(b) 52430 CHOOSE 1-2:
33 Enter “1” at the prompt ANTIBODY: ANTI Jk(a) CORRESPONDING ANTIGEN: Jk(a) SNOMED CODE: 52410 IS THIS CORRECT? NO//
34 Enter “YES” at the prompt CORRESPONDING ANTIGEN/ANTIBODY: Jk(a)//

User Guide for LR*5.2*275 Page 66 of 77 December 2001 Test Case # 8 [S-EF-AA_01]
STEP ACTION EXPECTED RESULT OUTCOME COMMENTS 35 Enter <CR> at the prompt COMPATIBILITY FACTOR:
Note: there may be a value displayed for the COMPATIBILITY FACTOR. Note: enter <CR> until the following is displayed. This option is case sensitive. Enter data using the EXACT case of the ANTIBODY or ANTIGEN. Select ANTIGEN or ANTIBODY:
36 Enter “ANTI K” at the prompt 1 ANTI K 51810 2 ANTI Kp(a) 51830 3 ANTI Kp(b) 51840 CHOOSE 1-3: Note: the number of choices may vary from site to site.
37 Enter “1” at the prompt Note: due to site variations, the input may be adjusted to reflect the selection of the K antibody.
ANTIBODY: ANTI K CORRESPONDING ANTIGEN: K SNOMED CODE: 51810 IS THIS CORRECT? NO//
38 Enter “YES” at the prompt CORRESPONDING ANTIGEN/ANTIBODY: ANTI K// 39 Enter <CR> at the prompt COMPATIBILITY FACTOR:
Note: there may be a value displayed for the COMPATIBILITY FACTOR. Note: enter <CR> until the following is displayed. This option is case sensitive. Enter data using the EXACT case of the ANTIBODY or ANTIGEN. Select ANTIGEN or ANTIBODY:
40 Enter “ANTI k” at the prompt ANTIBODY: ANTI k CORRESPONDING ANTIGEN: k SNOMED CODE: 51820 IS THIS CORRECT? NO//
41 Enter <CR> at the prompt Select ANTIGEN or ANTIBODY:
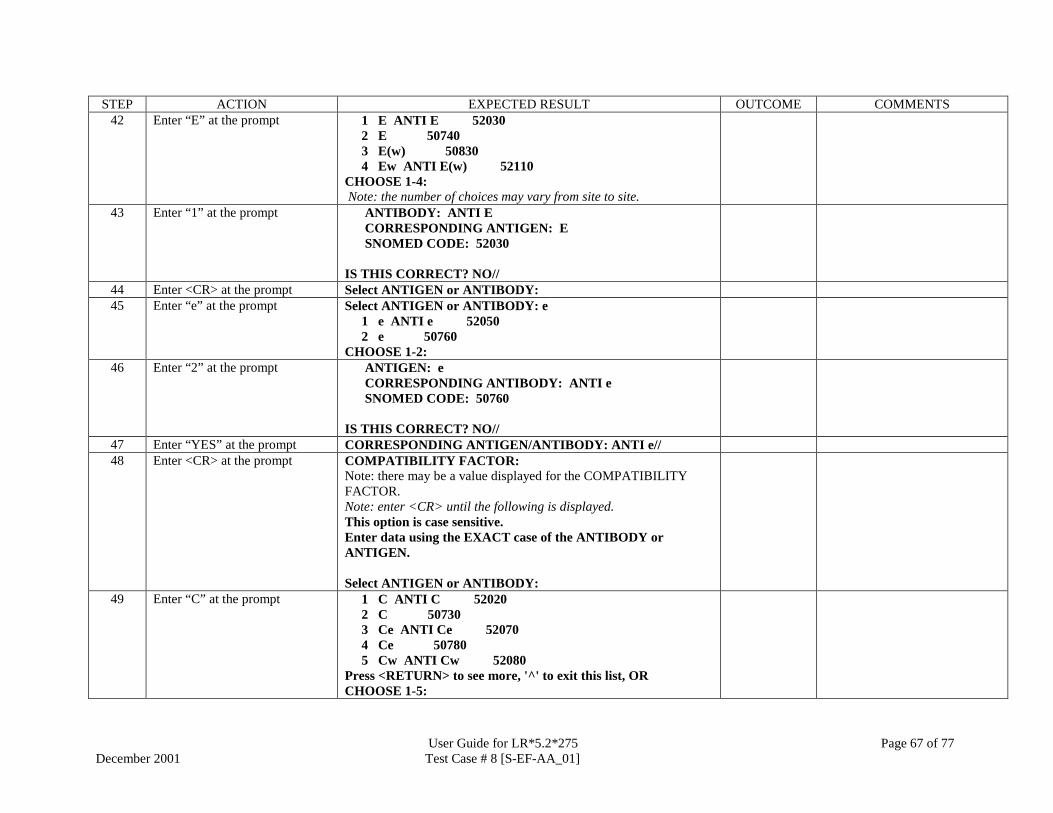
User Guide for LR*5.2*275 Page 67 of 77 December 2001 Test Case # 8 [S-EF-AA_01]
STEP ACTION EXPECTED RESULT OUTCOME COMMENTS 42 Enter “E” at the prompt 1 E ANTI E 52030
2 E 50740 3 E(w) 50830 4 Ew ANTI E(w) 52110 CHOOSE 1-4: Note: the number of choices may vary from site to site.
43 Enter “1” at the prompt ANTIBODY: ANTI E CORRESPONDING ANTIGEN: E SNOMED CODE: 52030 IS THIS CORRECT? NO//
44 Enter <CR> at the prompt Select ANTIGEN or ANTIBODY: 45 Enter “e” at the prompt Select ANTIGEN or ANTIBODY: e
1 e ANTI e 52050 2 e 50760 CHOOSE 1-2:
46 Enter “2” at the prompt ANTIGEN: e CORRESPONDING ANTIBODY: ANTI e SNOMED CODE: 50760 IS THIS CORRECT? NO//
47 Enter “YES” at the prompt CORRESPONDING ANTIGEN/ANTIBODY: ANTI e// 48 Enter <CR> at the prompt COMPATIBILITY FACTOR:
Note: there may be a value displayed for the COMPATIBILITY FACTOR. Note: enter <CR> until the following is displayed. This option is case sensitive. Enter data using the EXACT case of the ANTIBODY or ANTIGEN. Select ANTIGEN or ANTIBODY:
49 Enter “C” at the prompt 1 C ANTI C 52020 2 C 50730 3 Ce ANTI Ce 52070 4 Ce 50780 5 Cw ANTI Cw 52080 Press <RETURN> to see more, '^' to exit this list, OR CHOOSE 1-5:

User Guide for LR*5.2*275 Page 68 of 77 December 2001 Test Case # 8 [S-EF-AA_01]
STEP ACTION EXPECTED RESULT OUTCOME COMMENTS 50 Enter “2” at the prompt ANTIGEN: C
CORRESPONDING ANTIBODY: ANTI C SNOMED CODE: 50730 IS THIS CORRECT? NO//
51 Enter <CR> at the prompt Select ANTIGEN or ANTIBODY: 52 Enter “c” at the prompt 1 c ANTI c 52040
2 c 50750 CHOOSE 1-2:
53 Enter “2” at the prompt ANTIGEN: c CORRESPONDING ANTIBODY: ANTI c SNOMED CODE: 50750 IS THIS CORRECT? NO//
54 Enter <CR> at the prompt Select ANTIGEN or ANTIBODY: 55 Enter “S” at the prompt 1 S ANTI S 52310
2 S 51000 3 SHOCK, HEMORRHAGIC EM 70060 4 SMALL C c 50750 CHOOSE 1-4:
56 Enter “2” at the prompt ANTIGEN: S CORRESPONDING ANTIBODY: ANTI S SNOMED CODE: 51000 IS THIS CORRECT? NO//
57 Enter “YES” at the prompt CORRESPONDING ANTIGEN/ANTIBODY: ANTI S// 58 Enter <CR> at the prompt COMPATIBILITY FACTOR:
Note: there may be a value displayed for the COMPATIBILITY FACTOR. Note: enter <CR> until the following is displayed. This option is case sensitive. Enter data using the EXACT case of the ANTIBODY or ANTIGEN. Select ANTIGEN or ANTIBODY:
59 Enter “s” at the prompt 1 s ANTI s 52320 2 s 51010 CHOOSE 1-2:

User Guide for LR*5.2*275 Page 69 of 77 December 2001 Test Case # 8 [S-EF-AA_01]
STEP ACTION EXPECTED RESULT OUTCOME COMMENTS 60 Enter “2” at the prompt ANTIGEN: s
CORRESPONDING ANTIBODY: ANTI s SNOMED CODE: 51010 IS THIS CORRECT? NO//
61 Enter <CR> at the prompt Select ANTIGEN or ANTIBODY: 62 Enter “K” at the prompt 1 K ANTI K 51810
2 K 50500 3 Kp(a) 50520 4 Kp(b) 50530 5 Kpa ANTI Kp(a) 51830 Press <RETURN> to see more, '^' to exit this list, OR CHOOSE 1-5:
63 Enter “2” at the prompt ANTIGEN: K CORRESPONDING ANTIBODY: ANTI K SNOMED CODE: 50500 IS THIS CORRECT? NO//
64 Enter <CR> at the prompt Select ANTIGEN or ANTIBODY: 65 Enter “k” at the prompt 1 k ANTI k 51820
2 k 50510 CHOOSE 1-2:
66 Enter “2” at the prompt ANTIGEN: k CORRESPONDING ANTIBODY: ANTI k SNOMED CODE: 50510 IS THIS CORRECT? NO//
67 Enter “^” at the prompt AA Edit Corresponding Antigen/Antibody BD Edit blood bank descriptions file BP Edit blood product file BU Edit blood bank utility file CR Edit Blood Component Request File LL Edit lab letter file MS Maximum surgical blood order edit SP Edit blood bank site parameters VD Blood bank validation documentation Select Edit blood bank files Option:

User Guide for LR*5.2*275 Page 70 of 77 December 2001 Test Case # 8 [S-EF-AA_01]
STEP ACTION EXPECTED RESULT OUTCOME COMMENTS 68 Enter <CR> at the prompt DO Delete entire order or individual tests
ED Blood donor edit options ... EF Edit blood bank files ... EI Blood bank inventory edit options ... EP Blood bank patient edit options ... FD Outline for one or more files II Blood bank inventory integrity report LL Edit number of lines in a label SR Summary and deletion reports ... SW Blood bank workload ... Select Supervisor Option:
69 Enter <CR> at the prompt D Donor ... I Inventory ... P Blood bank patient ... Q Inquiries ... R Reports ... S Supervisor ... W Ward ... Select Blood bank Option:

User Guide for LR*5.2*275 Page 71 of 77
December 2001 Test Case #9 [P-ET_01]
Test Case # 9 [P-ET_01] Date Performed: Technologist: STEP ACTION EXPECTED RESULT OUTCOME COMMENTS
1 Log into the blood bank module D Donor ... I Inventory ... P Blood bank patient ... Q Inquiries ... R Reports ... S Supervisor ... W Ward ... Select Blood bank Option:
2 Select P[Blood bank patient …] CD Change to new division DA Remove an accession DT Blood transfusion results ET Enter test data PR Previous records RS Request/select/xmatch blood components ... SI Special instructions SL Specimen log-in TA Add tests to a given accession. TD Delete test from an accession TL Test worklist WL Accession area worklist Select Blood bank patient Option:
3 Select ET [Enter test data] BLOOD BANK Patient data entry for Mmm dd, yyyy ? YES// Note: Mmm dd, yyyy is a placeholder for the current date. Note: displayed date may require adjustment to reflect the actual specimen collection date.
4 Enter <CR> at the prompt Note: adjust if there is no specimen associated with the current date.
Enter TEST COMMENT(s) ? NO//
5 Enter <CR> at the prompt Edit SPECIMEN COMMENT(s) ? NO// 6 Enter <CR> at the prompt Select Accession Number:

User Guide for LR*5.2*275 Page 72 of 77
December 2001 Test Case #9 [P-ET_01]
STEP ACTION EXPECTED RESULT OUTCOME COMMENTS 7 Enter “4” at the prompt
Note: this reflects the 2nd specimen received during set-up, and may be adjusted to conform to site conditions.
Test:TRANSFUSION REQUEST Patient record ABO: A Rh: NEG Note: the ABO and Rh display may be site specific. ABO INTERPRETATION: A//
8 Enter <CR> at the prompt RH INTERPRETATION: NEG// 9 Enter <CR> at the prompt ANTIBODY SCREEN INTERPRETATION:
Note: at some facilities POS may have been entered previously.
10 Enter “POS” at the prompt Note: at some facilities POS may have been entered previously. If that is the case, a <CR> is all that is required.
ANTIBODY SCREEN INTERPRETATION: POS POS Select SERUM ANTIBODY: Note: this prompt may display an entry representing previously entered data. If this is the case use the @ functionality to delete all previous antigen and antibody results before proceeding.
11 Enter “ANti s” at the prompt Select SERUM ANTIBODY: ANti s 52310 ANTI S SERUM ANTIBODY: ANTI S//
12 Enter “@” at the prompt SURE YOU WANT TO DELETE THE ENTIRE SERUM ANTIBODY?
13 Enter “YES” at the prompt Select SERUM ANTIBODY: 14 Enter “ANTI s” a the prompt Select SERUM ANTIBODY: ANTI s 52320 ANTI s
SERUM ANTIBODY: ANTI s//
15 Enter <CR> at the prompt Select SERUM ANTIBODY: 16 Enter <CR> at the prompt SERUM ANTIBODY: ANTI s SNOMED CODE: 52320
IS THIS CORRECT? YES//
17 Enter “NO” at the prompt Select SERUM ANTIBODY: 18 Enter <CR> at the prompt SERUM ANTIBODY: ANTI s SNOMED CODE: 52320
IS THIS CORRECT? YES//
19 Enter “NO” at the prompt Select SERUM ANTIBODY: 20 Enter “ANTI E” at the prompt 1 ANTI E 52030 ANTI E
2 ANTI E(w) 52110 ANTI E(w) CHOOSE 1-2:
21 Enter “1” at the prompt CHOOSE 1-2: 1 ANTI E 52030 ANTI E SERUM ANTIBODY: ANTI E//
22 Enter <CR> at the prompt Select SERUM ANTIBODY:

User Guide for LR*5.2*275 Page 73 of 77
December 2001 Test Case #9 [P-ET_01]
STEP ACTION EXPECTED RESULT OUTCOME COMMENTS 23 Enter <CR> at the prompt SERUM ANTIBODY: ANTI E SNOMED CODE: 52030
SERUM ANTIBODY: ANTI s SNOMED CODE: 52320 IS THIS CORRECT? YES//
24 Enter <CR> at the prompt Select ANTIBODIES IDENTIFIED: 25 Enter <CR> at the prompt Date/time work completed: NOW// 26 Enter <CR> at the prompt Select EXECUTE WKLD CODE: 27 Enter <CR> at the prompt No WKLD CODES selected.
Select Accession Number:
28 Enter “4” at the prompt Note: this reflects the 2nd specimen received during set-up, and may be adjusted to conform to site conditions.
Test:TRANSFUSION REQUEST Patient record ABO: A Rh: NEG Note: the ABO and Rh display may be site specific. ABO INTERPRETATION: A//
29 Enter <CR> at the prompt RH INTERPRETATION: NEG// 30 Enter <CR> at the prompt ANTIBODY SCREEN INTERPRETATION: POS// 31 Enter <CR> at the prompt Select SERUM ANTIBODY: ANTI E// 32 Enter “ANti s” at the prompt. Select SERUM ANTIBODY: ANTI E// ANti s 52310 ANTI S
SERUM ANTIBODY: ANTI S//
33 Enter “@” at the prompt Select SERUM ANTIBODY: ANTI S// @ SURE YOU WANT TO DELETE THE ENTIRE SERUM ANTIBODY?
34 Enter “YES” at the prompt Select SERUM ANTIBODY: 35 Enter “ANTI s” at the prompt Select SERUM ANTIBODY: ANTI s 52320 ANTI s
...OK? Yes//
36 Enter <CR> at the prompt SERUM ANTIBODY: ANTI s// 37 Enter <CR> at the prompt Select SERUM ANTIBODY: 38 Enter <CR> at the prompt SERUM ANTIBODY: ANTI E SNOMED CODE: 52030
SERUM ANTIBODY: ANTI s SNOMED CODE: 52320 IS THIS CORRECT? YES//
39 Enter <CR> at the prompt Select ANTIBODIES IDENTIFIED: 40 Enter <CR> at the prompt Date/time work completed: NOW// 41 Enter <CR> at the prompt Select EXECUTE WKLD CODE: 42 Enter <CR> at the prompt Select Accession Number:

User Guide for LR*5.2*275 Page 74 of 77
December 2001 Test Case #9 [P-ET_01]
STEP ACTION EXPECTED RESULT OUTCOME COMMENTS 43 Enter <CR> at the prompt CD Change to new division
DA Remove an accession DT Blood transfusion results ET Enter test data PR Previous records RS Request/select/xmatch blood components ... SI Special instructions SL Specimen log-in TA Add tests to a given accession. TD Delete test from an accession TL Test worklist WL Accession area worklist Select Blood bank patient Option:
44 Enter <CR> at the prompt D Donor ... I Inventory ... P Blood bank patient ... Q Inquiries ... R Reports ... S Supervisor ... W Ward ... Select Blood bank Option:

User Guide for LR*5.2*275 Page 75 of 77
December 2001 Test Case # 10 [P-PR_01]
Test Case # 10 [P-PR_01] Date Performed: Technologist: STEP ACTION EXPECTED RESULT OUTCOME COMMENTS
1 Log into the blood bank module D Donor ... I Inventory ... P Blood bank patient ... Q Inquiries ... R Reports ... S Supervisor ... W Ward ... Select Blood bank Option:
2 Select P [Blood bank patient …] CD Change to new division DA Remove an accession DT Blood transfusion results ET Enter test data PR Previous records RS Request/select/xmatch blood components ... SI Special instructions SL Specimen log-in TA Add tests to a given accession. TD Delete test from an accession TL Test worklist WL Accession area worklist Select Blood bank patient Option:
3 Select PR [Previous records] Select Patient Name: Note: patient is site specific.
4 Enter “DOE,JOHN” at the prompt
Select Patient Name: DOE,JOHN ABO group: A Rh type: NEG AGE: XX DATE OF BIRTH: DATE PATIENT LOCATION: XX// Note: Additional patient information may be displayed. This is only a partial representation of the screen capture. Note: XX ,and DATE represent patient information that is site specific.

User Guide for LR*5.2*275 Page 76 of 77
December 2001 Test Case # 10 [P-PR_01]
STEP ACTION EXPECTED RESULT OUTCOME COMMENTS 5 Enter <CR> at the prompt Select ANTIBODIES IDENTIFIED:
Note: there may be information displayed if the selected patient has had previously entered data.
6 Enter “ANti s” at the prompt Select ANTIBODIES IDENTIFIED: ANti s 52310 ANTI S Select ANTIBODIES IDENTIFIED:
7 Enter <CR> at the prompt ANTIBODIES IDENTIFIED: ANTI S SNOMED CODE: 52310 IS THIS CORRECT? YES//
8 Enter “NO” at the prompt Select ANTIBODIES IDENTIFIED: 9 Enter “ANTI s” at the prompt Select ANTIBODIES IDENTIFIED: ANTI s 52310 ANTI S
...OK? Yes//
10 Enter <CR> at the prompt ANTIBODIES IDENTIFIED: ANTI S// 11 Enter <CR> at the prompt Select ANTIBODIES IDENTIFIED: 12 Enter <CR> at the prompt ANTIBODIES IDENTIFIED: ANTI S SNOMED CODE:
52310 IS THIS CORRECT? YES//
13 Enter “NO” at the prompt Select ANTIBODIES IDENTIFIED: 14 Enter “ANTI S” at the prompt Select ANTIBODIES IDENTIFIED: ANTI S 52310 ANTI S
...OK? Yes//
15 Enter <CR> at the prompt ANTIBODIES IDENTIFIED: ANTI S// 16 Enter “@” at the prompt SURE YOU WANT TO DELETE THE ENTIRE
ANTIBODIES IDENTIFIED?
17 Enter “YES” at the prompt Select ANTIBODIES IDENTIFIED: 18 Enter “ANTI s” at the prompt Select ANTIBODIES IDENTIFIED: ANTI s 52320 ANTI s 19 Enter “ANTI E” at the prompt Select ANTIBODIES IDENTIFIED: ANTI E
1. ANTI E 52030 ANTI E 2. ANTI E(w) 52110 ANTI E(w) CHOOSE 1-2:
20 Enter “1” at the prompt CHOOSE 1-2: 1 ANTI E 52030 ANTI E Select ANTIBODIES IDENTIFIED:
21 Enter <CR> at the prompt ANTIBODIES IDENTIFIED: ANTI E SNOMED CODE: 52030 ANTIBODIES IDENTIFIED: ANTI s SNOMED CODE: 52320 IS THIS CORRECT? YES//

User Guide for LR*5.2*275 Page 77 of 77
December 2001 Test Case # 10 [P-PR_01]
STEP ACTION EXPECTED RESULT OUTCOME COMMENTS 22 Enter <CR> at the prompt Select RBC ANTIGENS PRESENT: 23 Enter <CR> at the prompt Select RBC ANTIGENS ABSENT: 24 Enter <CR> at the prompt Select HLA ANTIGEN PRESENT: 25 Enter <CR> at the prompt Select HLA ANTIGENS ABSENT: 26 Enter <CR> at the prompt BLOOD BANK COMMENTS:
No existing text Edit? NO//
27 Enter <CR> at the prompt Select TRANSFUSION RECORD TRANSFUSION DATE/TIME:
28 Enter <CR> at the prompt Select Patient Name: 29 Enter <CR> at the prompt CD Change to new division
DA Remove an accession DT Blood transfusion results ET Enter test data PR Previous records RS Request/select/xmatch blood components ... SI Special instructions SL Specimen log-in TA Add tests to a given accession. TD Delete test from an accession TL Test worklist WL Accession area worklist Select Blood bank patient Option:
30 Enter <CR> at the prompt D Donor ... I Inventory ... P Blood bank patient ... Q Inquiries ... R Reports ... S Supervisor ... W Ward ... Select Blood bank Option: