Embed Size (px)
Citation preview
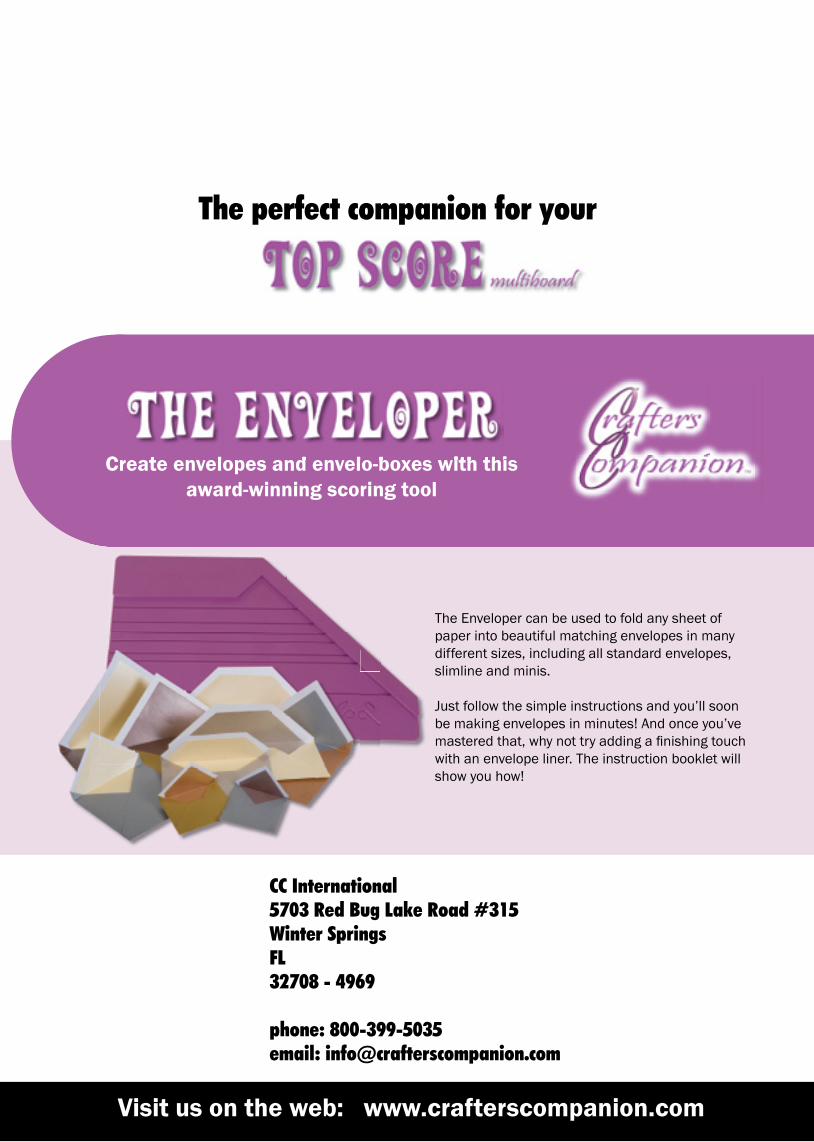
Visit us on the web: www.crafterscompanion.com
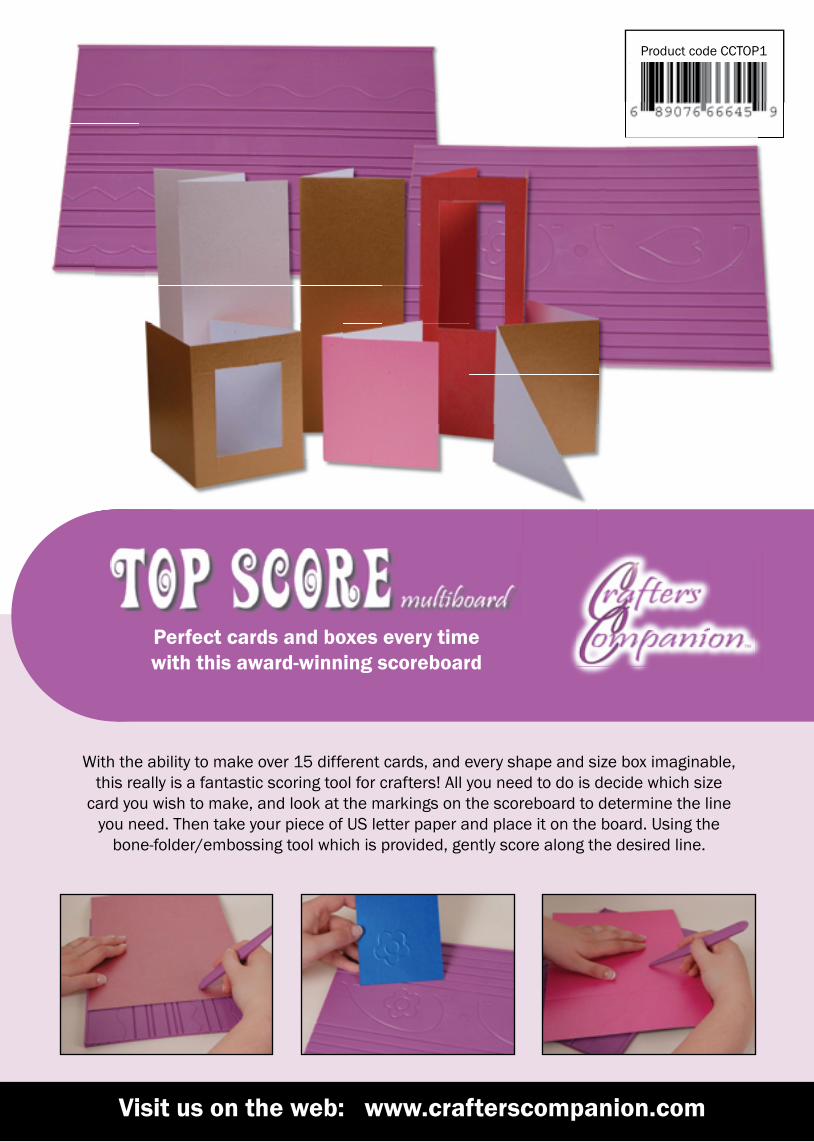
With the ability to make over 15 different cards, and every shape and size box imaginable, this really is a fantastic scoring tool for crafters! All you need to do is decide which size
card you wish to make, and look at the markings on the scoreboard to determine the line you need. Then take your piece of US letter paper and place it on the board. Using the
bone-folder/embossing tool which is provided, gently score along the desired line.
Perfect cards and boxes every timewith this award-winning scoreboard
Product code CCTOP1

Card making Card making
This section of the board is designed to fold all different sizes, styles and shapes of card using both US lettersize and scrapbook size cardstock. Simply place your cardstock onto the board with the shorter edge butted up against the sidebar, and read along the markings to determine which line to score down.
Use the pointed edge of your scoring tool to crease the cardstock into the groove, then lift the card up from the board and fold along your creased line, then place the card back down onto a fl at surface and run the side of the scoring tool down the fold.
Introduction
Use the ‘Half-fold US Letter’ and ‘Half-fold 12”x12” or 8”x8”’ lines to put a single score-line into the centre of your cardstock for a basic-fold card. This is the most common and simplest of card-making folds.
For a small half-fold card, take your sheet of US letter size card and score it in half. Use the mark as a guide to cut the card in half, then place one piece of the card back on the board with the shorter edge against the sidebar and score the ‘Half-fold ½ US Letter’ scoreline to fold this in half.
You can achieve the same technique with 12”x12” cardstock by scoring and cutting it in half, and then using the gatefold 12”x12” scoreline to fold it in half again to make a 3”x6” card.
Basic half-fold
For a tall gatefold card, score down the ‘Gatefold US letter’ line, turn the card 180 degrees and score again on the same line. Crease both scored lines inwards for the outside edges to meet in the centre.
The same technique is used on a ½ US letter size piece of cardstock using the ‘Gatefold ½ US Letter’ scoreline for a small gatefold card.
To make a square gatefold using 12”x12” cardstock, fi rstly score your 12”x12” cardstock and cut along the scored line to make a 12”x6” blank, then use the Gatefold 12”x12” line with the same technique as above.
Gatefold
Card making Card making
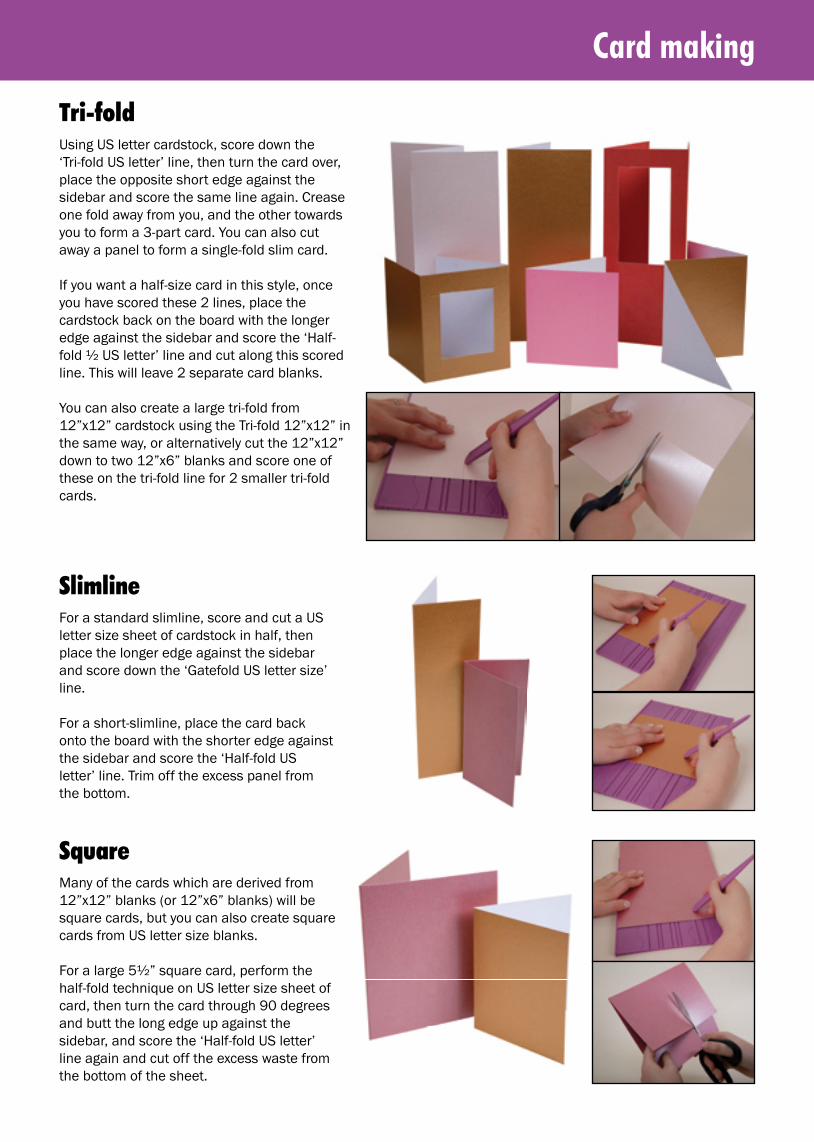
Using US letter cardstock, score down the ‘Tri-fold US letter’ line, then turn the card over, place the opposite short edge against the sidebar and score the same line again. Crease one fold away from you, and the other towards you to form a 3-part card. You can also cut away a panel to form a single-fold slim card.
If you want a half-size card in this style, once you have scored these 2 lines, place the cardstock back on the board with the longer edge against the sidebar and score the ‘Half-fold ½ US letter’ line and cut along this scored line. This will leave 2 separate card blanks.
You can also create a large tri-fold from 12”x12” cardstock using the Tri-fold 12”x12” in the same way, or alternatively cut the 12”x12” down to two 12”x6” blanks and score one of these on the tri-fold line for 2 smaller tri-fold cards.
Tri-fold
For a standard slimline, score and cut a US letter size sheet of cardstock in half, then place the longer edge against the sidebar and score down the ‘Gatefold US letter size’ line.
For a short-slimline, place the card back onto the board with the shorter edge against the sidebar and score the ‘Half-fold US letter’ line. Trim off the excess panel from the bottom.
Slimline
Many of the cards which are derived from 12”x12” blanks (or 12”x6” blanks) will be square cards, but you can also create square cards from US letter size blanks.
For a large 5½” square card, perform the half-fold technique on US letter size sheet of card, then turn the card through 90 degrees and butt the long edge up against the sidebar, and score the ‘Half-fold US letter’ line again and cut off the excess waste from the bottom of the sheet.
Square
Card making
As well as the embossed shapes on the board, you can make any design on the inside of your popout simply by drawing your own. As long as your shape is symmetrical and does not extend past the second scored line on your card, then it will work. You can also make a small popout card in exactly the same way using ½ size US letter cardstock. The two blanks would be Half fold ½ US letter, and a ½ US letter size concertina.
Making a basic box
1. Score two pieces of US lettersize cardstock; one as a plain half-fold and the other as a 4-fold concertina (see previous pages).
2. Take the half-fold piece and place the scored side of the card against one of the popout shapes on the reverse of the board.
3. Butt the crease up against the raised edges. Use the scoring tool’s round edge to trace the shape, starting in the channel to the side.
4. Now cut the inside of the shape. Apply double sided tape in the 2 outer panels at the far edge and on the inside of the crease.
5. Take the half-fold card, butt the shorter edge up against the sidebar, then put the fi rst panel of your 4-fold card above and against the sidebar.
6. Place the other edge of the card against the sidebar and position the fi nal edge of the 4-fold card above it in the same way as previously.
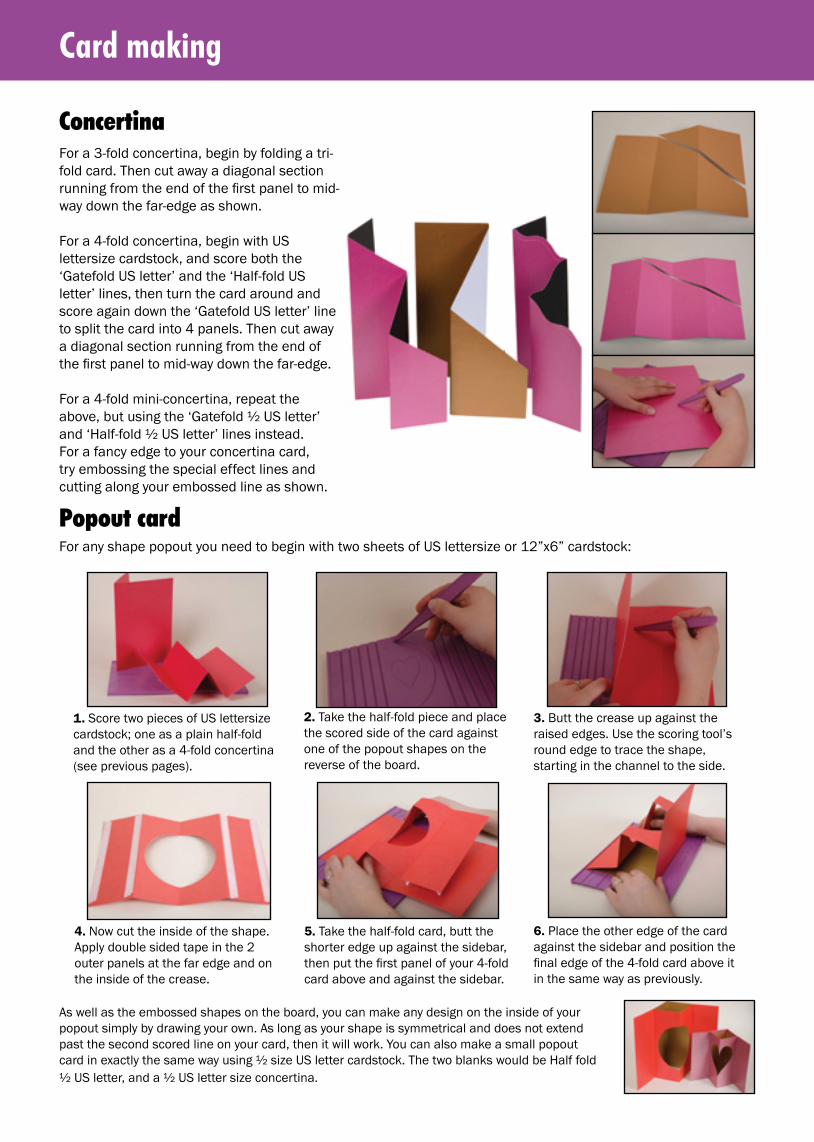
For a 3-fold concertina, begin by folding a tri-fold card. Then cut away a diagonal sectionrunning from the end of the fi rst panel to mid-way down the far-edge as shown.
For a 4-fold concertina, begin with US lettersize cardstock, and score both the ‘Gatefold US letter’ and the ‘Half-fold US letter’ lines, then turn the card around and score again down the ‘Gatefold US letter’ line to split the card into 4 panels. Then cut away a diagonal section running from the end of the fi rst panel to mid-way down the far-edge.
For a 4-fold mini-concertina, repeat the above, but using the ‘Gatefold ½ US letter’ and ‘Half-fold ½ US letter’ lines instead. For a fancy edge to your concertina card, try embossing the special effect lines and cutting along your embossed line as shown.
Concertina
Popout cardFor any shape popout you need to begin with two sheets of US lettersize or 12”x6” cardstock:
Card making Making a basic box
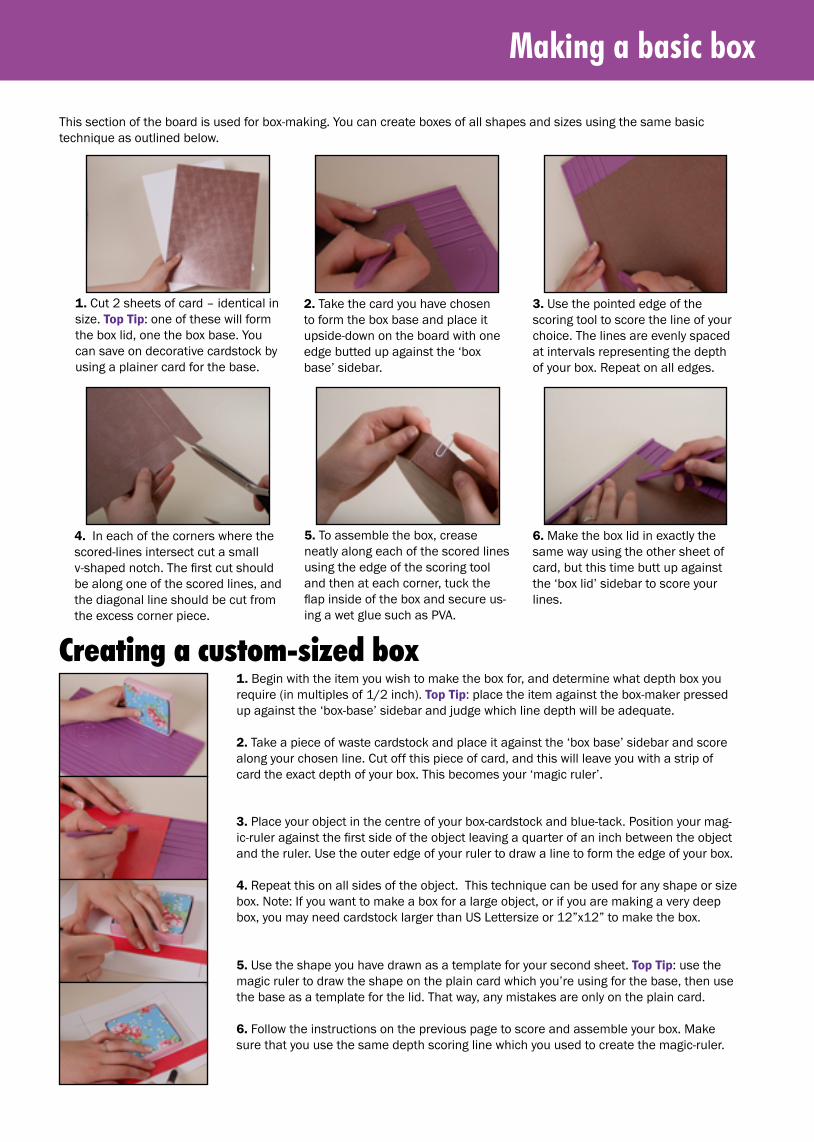
This section of the board is used for box-making. You can create boxes of all shapes and sizes using the same basic technique as outlined below.
1. Cut 2 sheets of card – identical in size. Top Tip: one of these will form the box lid, one the box base. You can save on decorative cardstock by using a plainer card for the base.
2. Take the card you have chosen to form the box base and place it upside-down on the board with one edge butted up against the ‘box base’ sidebar.
3. Use the pointed edge of the scoring tool to score the line of your choice. The lines are evenly spaced at intervals representing the depth of your box. Repeat on all edges.
4. In each of the corners where the scored-lines intersect cut a small v-shaped notch. The first cut should be along one of the scored lines, and the diagonal line should be cut from the excess corner piece.
5. To assemble the box, crease neatly along each of the scored lines using the edge of the scoring tool and then at each corner, tuck the flap inside of the box and secure us-ing a wet glue such as PVA.
6. Make the box lid in exactly the same way using the other sheet of card, but this time butt up against the ‘box lid’ sidebar to score your lines.
Creating a custom-sized box1. Begin with the item you wish to make the box for, and determine what depth box you require (in multiples of 1/2 inch). Top Tip: place the item against the box-maker pressed up against the ‘box-base’ sidebar and judge which line depth will be adequate.
2. Take a piece of waste cardstock and place it against the ‘box base’ sidebar and score along your chosen line. Cut off this piece of card, and this will leave you with a strip of card the exact depth of your box. This becomes your ‘magic ruler’.
3. Place your object in the centre of your box-cardstock and blue-tack. Position your mag-ic-ruler against the first side of the object leaving a quarter of an inch between the object and the ruler. Use the outer edge of your ruler to draw a line to form the edge of your box.
4. Repeat this on all sides of the object. This technique can be used for any shape or size box. Note: If you want to make a box for a large object, or if you are making a very deep box, you may need cardstock larger than US Lettersize or 12”x12” to make the box.
5. Use the shape you have drawn as a template for your second sheet. Top Tip: use the magic ruler to draw the shape on the plain card which you’re using for the base, then use the base as a template for the lid. That way, any mistakes are only on the plain card.
6. Follow the instructions on the previous page to score and assemble your box. Make sure that you use the same depth scoring line which you used to create the magic-ruler.
Shaped boxes
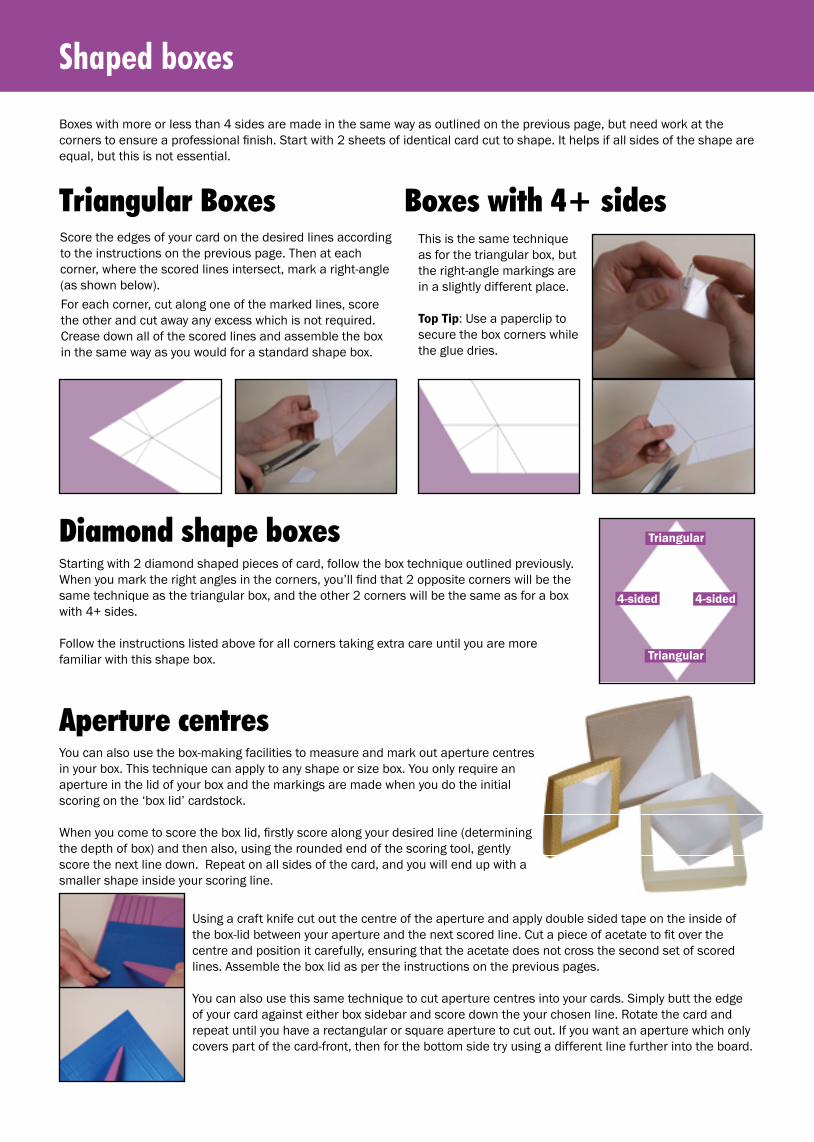
Boxes with more or less than 4 sides are made in the same way as outlined on the previous page, but need work at the corners to ensure a professional fi nish. Start with 2 sheets of identical card cut to shape. It helps if all sides of the shape are equal, but this is not essential.
Wedge boxes and embossing shapes
Aperture centres
Triangular BoxesScore the edges of your card on the desired lines according to the instructions on the previous page. Then at each corner, where the scored lines intersect, mark a right-angle (as shown below). For each corner, cut along one of the marked lines, score the other and cut away any excess which is not required. Crease down all of the scored lines and assemble the box in the same way as you would for a standard shape box.
Boxes with 4+ sides
Diamond shape boxesStarting with 2 diamond shaped pieces of card, follow the box technique outlined previously. When you mark the right angles in the corners, you’ll fi nd that 2 opposite corners will be the same technique as the triangular box, and the other 2 corners will be the same as for a box with 4+ sides.
Follow the instructions listed above for all corners taking extra care until you are more familiar with this shape box.
4-sided4-sided
Triangular
Triangular
This is the same technique as for the triangular box, but the right-angle markings are in a slightly different place.
Top Tip: Use a paperclip to secure the box corners while the glue dries.
You can also use the box-making facilities to measure and mark out aperture centres in your box. This technique can apply to any shape or size box. You only require an aperture in the lid of your box and the markings are made when you do the initial scoring on the ‘box lid’ cardstock.
When you come to score the box lid, fi rstly score along your desired line (determining the depth of box) and then also, using the rounded end of the scoring tool, gently score the next line down. Repeat on all sides of the card, and you will end up with a smaller shape inside your scoring line.
Using a craft knife cut out the centre of the aperture and apply double sided tape on the inside of the box-lid between your aperture and the next scored line. Cut a piece of acetate to fi t over the centre and position it carefully, ensuring that the acetate does not cross the second set of scored lines. Assemble the box lid as per the instructions on the previous pages.
You can also use this same technique to cut aperture centres into your cards. Simply butt the edge of your card against either box sidebar and score down the your chosen line. Rotate the card and repeat until you have a rectangular or square aperture to cut out. If you want an aperture which only covers part of the card-front, then for the bottom side try using a different line further into the board.
Shaped boxes Wedge boxes and embossing shapes
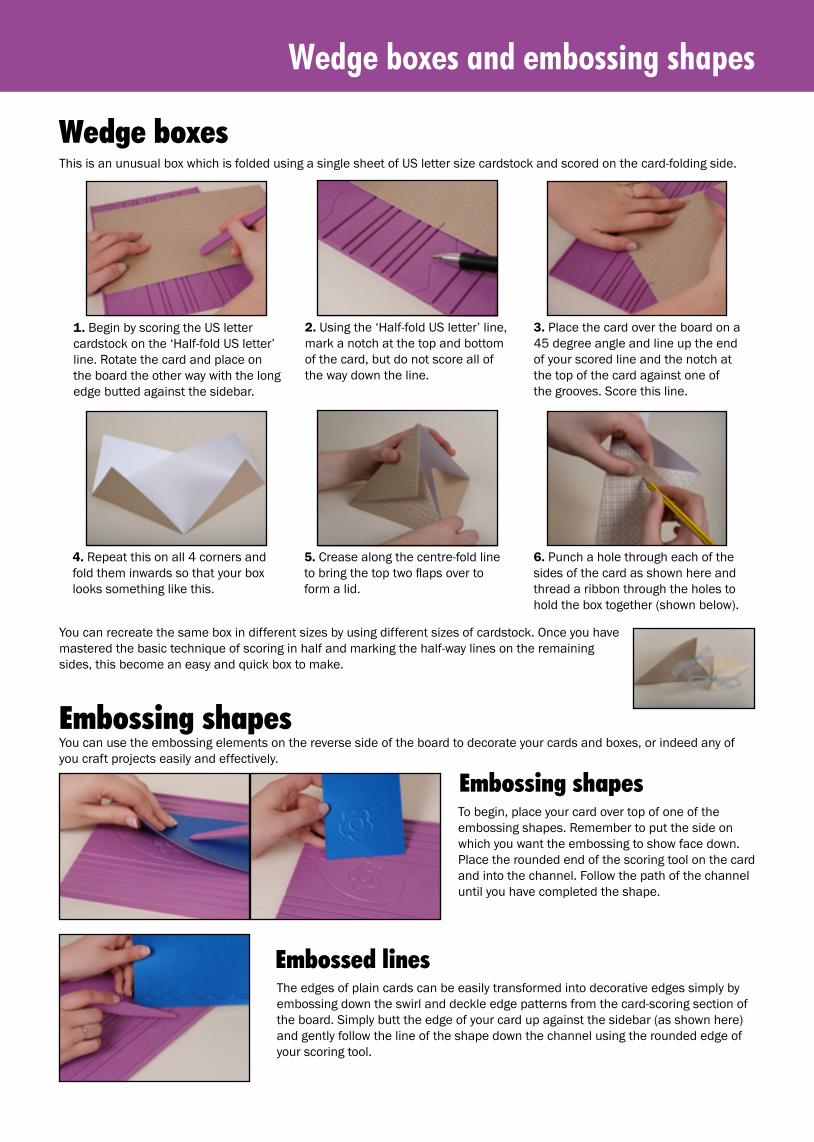
This is an unusual box which is folded using a single sheet of US letter size cardstock and scored on the card-folding side.
1. Begin by scoring the US letter cardstock on the ‘Half-fold US letter’ line. Rotate the card and place on the board the other way with the long edge butted against the sidebar.
2. Using the ‘Half-fold US letter’ line, mark a notch at the top and bottom of the card, but do not score all of the way down the line.
3. Place the card over the board on a 45 degree angle and line up the end of your scored line and the notch at the top of the card against one of the grooves. Score this line.
4. Repeat this on all 4 corners and fold them inwards so that your box looks something like this.
5. Crease along the centre-fold line to bring the top two flaps over to form a lid.
6. Punch a hole through each of the sides of the card as shown here and thread a ribbon through the holes to hold the box together (shown below).
Embossing shapes
You can recreate the same box in different sizes by using different sizes of cardstock. Once you have mastered the basic technique of scoring in half and marking the half-way lines on the remaining sides, this become an easy and quick box to make.
You can use the embossing elements on the reverse side of the board to decorate your cards and boxes, or indeed any of you craft projects easily and effectively.
To begin, place your card over top of one of the embossing shapes. Remember to put the side on which you want the embossing to show face down. Place the rounded end of the scoring tool on the card and into the channel. Follow the path of the channel until you have completed the shape.
Embossing shapes
Embossed linesThe edges of plain cards can be easily transformed into decorative edges simply by embossing down the swirl and deckle edge patterns from the card-scoring section of the board. Simply butt the edge of your card up against the sidebar (as shown here) and gently follow the line of the shape down the channel using the rounded edge of your scoring tool.
Wedge boxes
Visit us on the web: www.crafterscompanion.com
The perfect companion for your
CC International5703 Red Bug Lake Road #315Winter SpringsFL32708 - 4969
phone: 800-399-5035email: [email protected]
The Enveloper can be used to fold any sheet of paper into beautiful matching envelopes in many different sizes, including all standard envelopes, slimline and minis.
Just follow the simple instructions and you’ll soon be making envelopes in minutes! And once you’ve mastered that, why not try adding a fi nishing touch with an envelope liner. The instruction booklet will show you how!
Create envelopes and envelo-boxes with this award-winning scoring tool
Create envelopes and envelo-boxes with this Create envelopes and envelo-boxes with this