Embed Size (px)
Citation preview
Vision Screening Installation and User’s Guide
Technical Support: tel: 310.856.9926 [email protected]
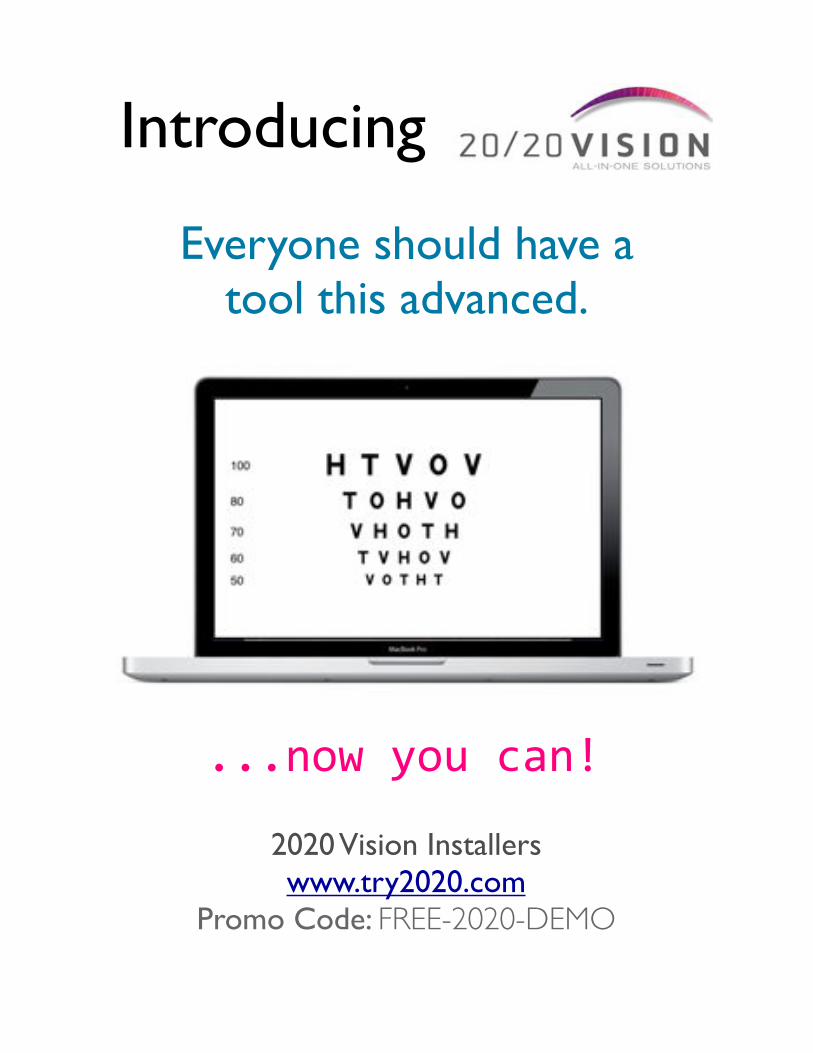
Introducing
Everyone should have a tool this advanced.
2020 Vision Installerswww.try2020.com
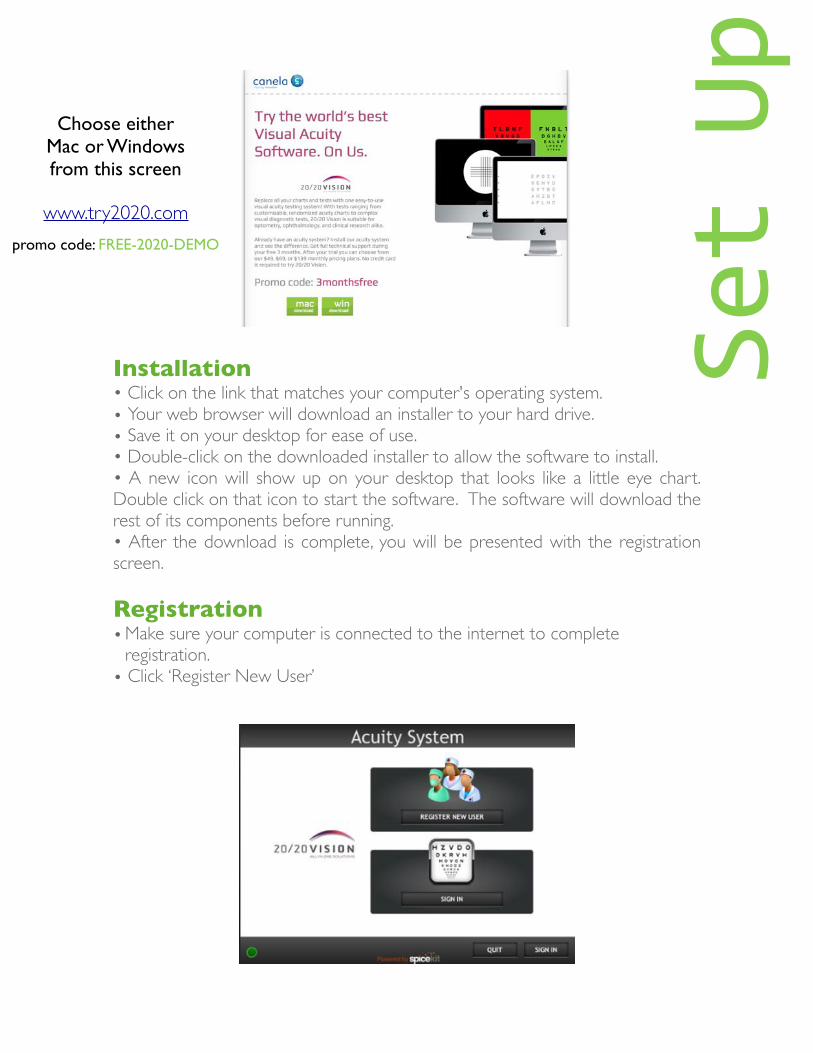
Promo Code: FREE-2020-DEMO
...now%you%can!
Set%
Up
Installation• Click on the link that matches your computer's operating system.• Your web browser will download an installer to your hard drive. • Save it on your desktop for ease of use.• Double-click on the downloaded installer to allow the software to install.• A new icon will show up on your desktop that looks like a little eye chart. Double click on that icon to start the software. The software will download the rest of its components before running.• After the download is complete, you will be presented with the registration screen.
Registration• Make sure your computer is connected to the internet to complete
registration.• Click ‘Register New User’
Choose either Mac or Windows from this screen
www.try2020.compromo code: FREE-2020-DEMO
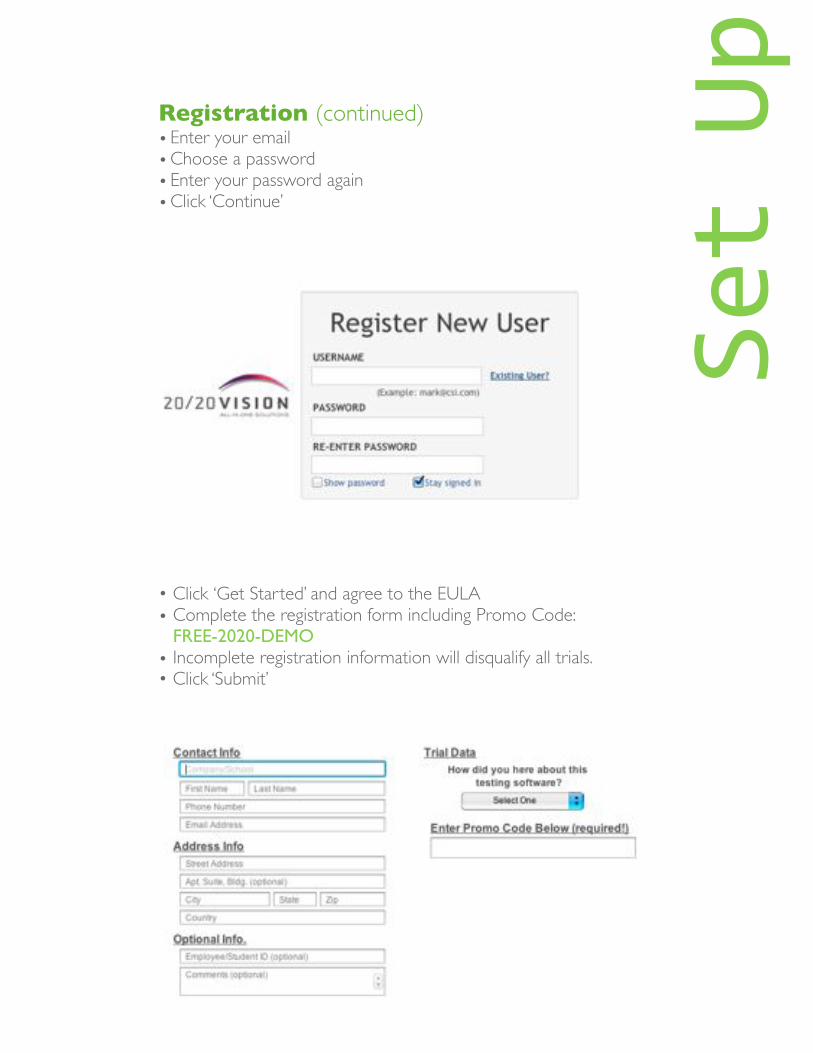
• Click ‘Get Started’ and agree to the EULA• Complete the registration form including Promo Code:
FREE-2020-DEMO • Incomplete registration information will disqualify all trials.• Click ‘Submit’
Registration (continued)• Enter your email• Choose a password• Enter your password again• Click ‘Continue’
Set%
Up
Calibration
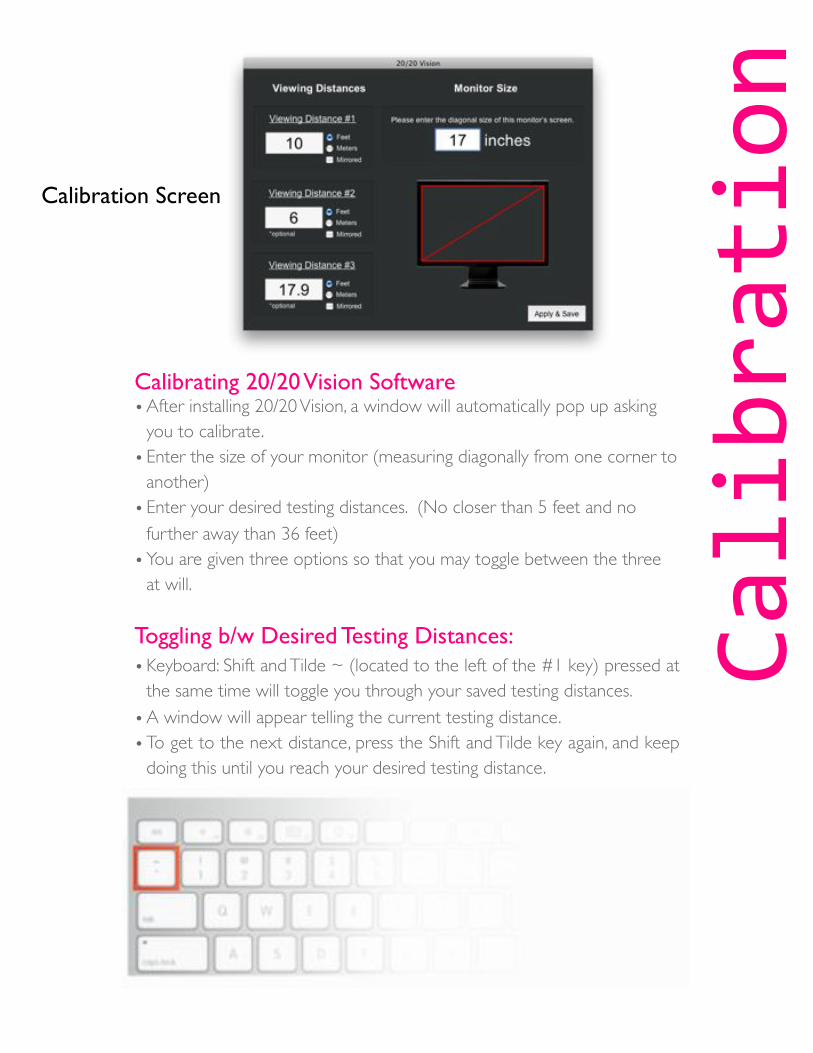
Calibrating 20/20 Vision Software• After installing 20/20 Vision, a window will automatically pop up asking
you to calibrate.• Enter the size of your monitor (measuring diagonally from one corner to
another)• Enter your desired testing distances. (No closer than 5 feet and no
further away than 36 feet)• You are given three options so that you may toggle between the three
at will.
Toggling b/w Desired Testing Distances:• Keyboard: Shift and Tilde ~ (located to the left of the #1 key) pressed at
the same time will toggle you through your saved testing distances.• A window will appear telling the current testing distance.• To get to the next distance, press the Shift and Tilde key again, and keep
doing this until you reach your desired testing distance.
Calibration Screen
Control%Panel
Control Panel
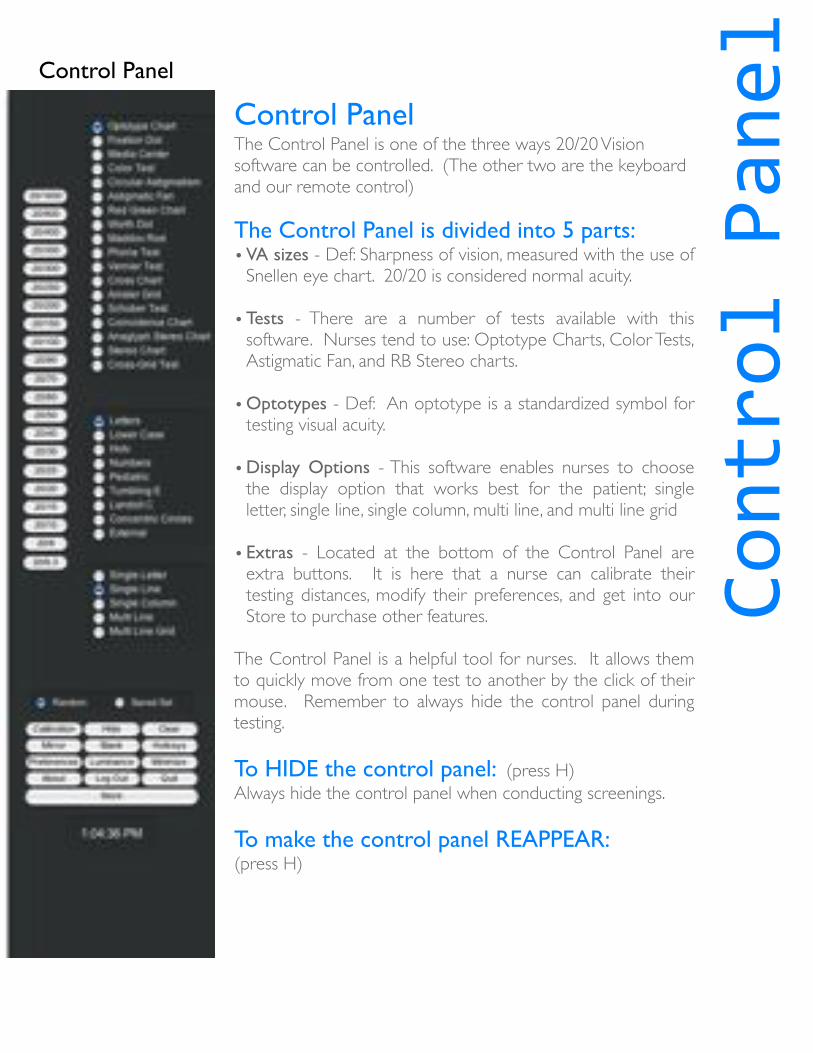
Control PanelThe Control Panel is one of the three ways 20/20 Vision software can be controlled. (The other two are the keyboard and our remote control)
The Control Panel is divided into 5 parts: • VA sizes - Def: Sharpness of vision, measured with the use of
Snellen eye chart. 20/20 is considered normal acuity.
• Tests - There are a number of tests available with this software. Nurses tend to use: Optotype Charts, Color Tests, Astigmatic Fan, and RB Stereo charts.
• Optotypes - Def: An optotype is a standardized symbol for testing visual acuity.
• Display Options - This software enables nurses to choose
the display option that works best for the patient; single letter, single line, single column, multi line, and multi line grid
• Extras - Located at the bottom of the Control Panel are extra buttons. It is here that a nurse can calibrate their testing distances, modify their preferences, and get into our Store to purchase other features.
The Control Panel is a helpful tool for nurses. It allows them to quickly move from one test to another by the click of their mouse. Remember to always hide the control panel during testing.
To HIDE the control panel: (press H)Always hide the control panel when conducting screenings.
To make the control panel REAPPEAR: (press H)
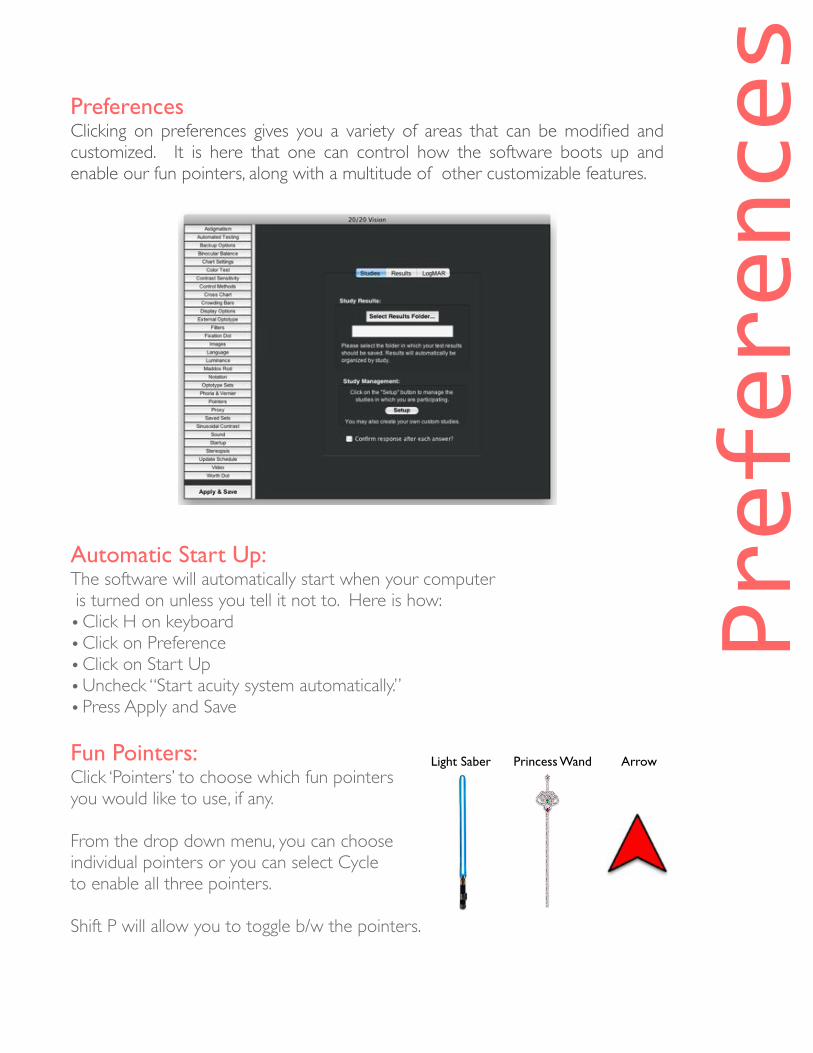
PreferencesClicking on preferences gives you a variety of areas that can be modified and customized. It is here that one can control how the software boots up and enable our fun pointers, along with a multitude of other customizable features.
Automatic Start Up:The software will automatically start when your computer is turned on unless you tell it not to. Here is how:• Click H on keyboard• Click on Preference• Click on Start Up• Uncheck “Start acuity system automatically.”• Press Apply and Save
Fun Pointers:Click ‘Pointers’ to choose which fun pointers you would like to use, if any.
From the drop down menu, you can choose individual pointers or you can select Cycleto enable all three pointers.
Shift P will allow you to toggle b/w the pointers.
Preferences
Light Saber Princess Wand Arrow
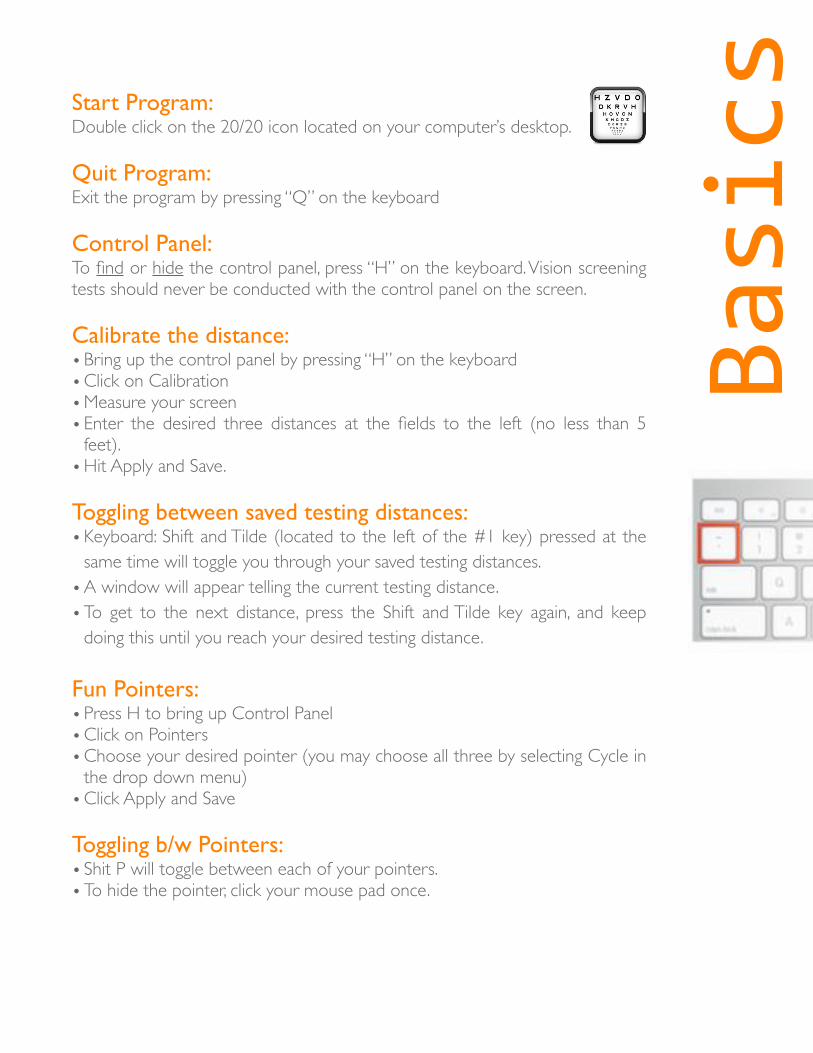
BasicsStart Program:
Double click on the 20/20 icon located on your computer’s desktop.
Quit Program: Exit the program by pressing “Q” on the keyboard
Control Panel: To find or hide the control panel, press “H” on the keyboard. Vision screening tests should never be conducted with the control panel on the screen.
Calibrate the distance: • Bring up the control panel by pressing “H” on the keyboard• Click on Calibration• Measure your screen • Enter the desired three distances at the fields to the left (no less than 5
feet). • Hit Apply and Save.
Toggling between saved testing distances:• Keyboard: Shift and Tilde (located to the left of the #1 key) pressed at the
same time will toggle you through your saved testing distances.• A window will appear telling the current testing distance.• To get to the next distance, press the Shift and Tilde key again, and keep
doing this until you reach your desired testing distance.
Fun Pointers: • Press H to bring up Control Panel• Click on Pointers• Choose your desired pointer (you may choose all three by selecting Cycle in
the drop down menu)• Click Apply and Save
Toggling b/w Pointers:• Shit P will toggle between each of your pointers.• To hide the pointer, click your mouse pad once.
1
2 3 4 5
1 2 3
4 5 6
7 8 9
1 2 34
5
1 2
43
8
5
6
7
9
1 432
5 6 7 8
1211109
1
2
3
4
5
6
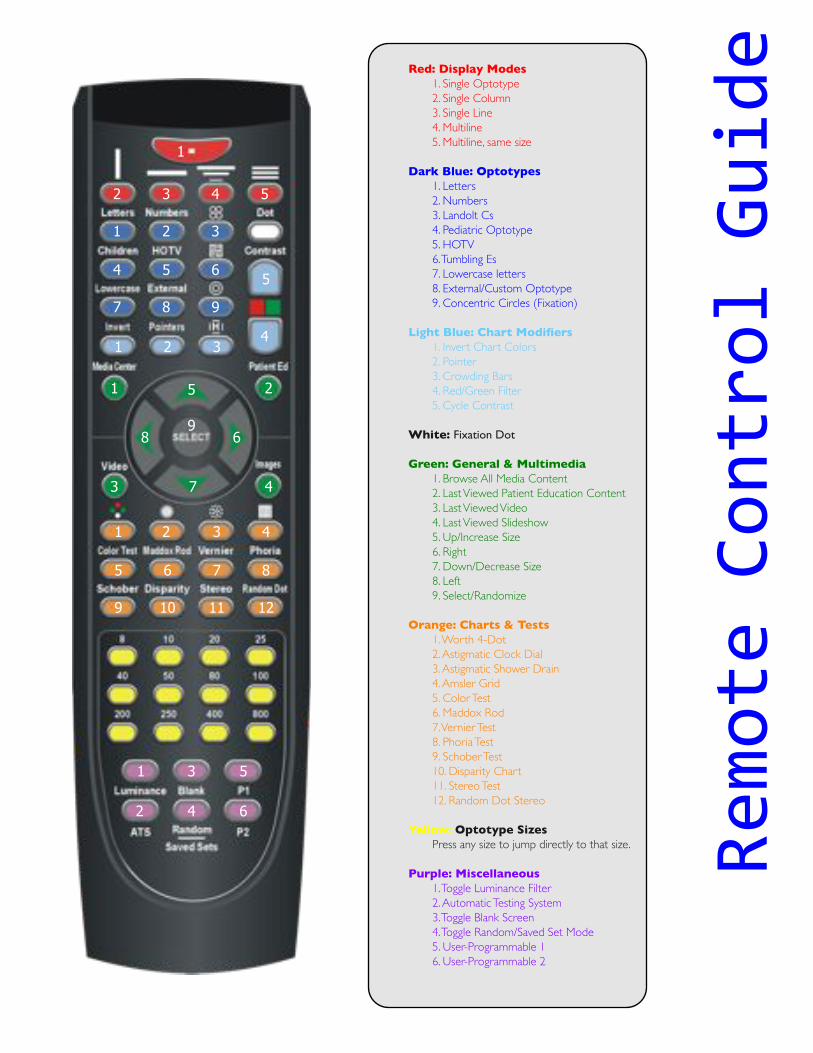
Remote%Control%GuideRed: Display Modes
1. Single Optotype2. Single Column3. Single Line4. Multiline5. Multiline, same size
Dark Blue: Optotypes1. Letters2. Numbers3. Landolt Cs4. Pediatric Optotype5. HOTV6. Tumbling Es7. Lowercase letters8. External/Custom Optotype9. Concentric Circles (Fixation)
Light Blue: Chart Modifiers1. Invert Chart Colors2. Pointer3. Crowding Bars4. Red/Green Filter5. Cycle Contrast
White: Fixation Dot
Green: General & Multimedia1. Browse All Media Content2. Last Viewed Patient Education Content3. Last Viewed Video4. Last Viewed Slideshow5. Up/Increase Size6. Right7. Down/Decrease Size8. Left9. Select/Randomize
Orange: Charts & Tests1. Worth 4-Dot2. Astigmatic Clock Dial3. Astigmatic Shower Drain4. Amsler Grid5. Color Test6. Maddox Rod7. Vernier Test8. Phoria Test9. Schober Test10. Disparity Chart11. Stereo Test12. Random Dot Stereo
Yellow: Optotype SizesPress any size to jump directly to that size.
Purple: Miscellaneous1. Toggle Luminance Filter2. Automatic Testing System3. Toggle Blank Screen4. Toggle Random/Saved Set Mode5. User-Programmable 16. User-Programmable 2

Quick%Keys
Display Options:O = Single CharacterL = One Horizontal LineY = Single Column DescendingShift Y = Single Column Same SizeU = Multi-line Different SizeShift U = Multi-line Same Size
Optotypes: K = Children’s PicturesN = NumbersS = LettersZ = HOTVE = Tumbling E’s
Arrow Keys:Arrow up = increase optotype sizeArrow down = decrease optotype size
Media Center:V = Media CenterShift X = Favorite Slide ShowShift D = Favorite VideoShift E = Favorite Patient Ed Video
Other Helpful Keys:Q = Quit the programH = Hides and shows the control panelB = Blank screenShift P = Pointers on/off/toggleShift ~ = Toggle b/w set viewing distancesV = VideosShift i = Ishihara Color TestA = Astigmatic FanF8 = Amsler GridShift S = Stereo TestShift Z = Invert ScreenM = MirrorShift / = Calibration ScreenShift M = Minimize Program
Notation Sizes:2 = 20/83 = 20/104 = 20/155 = 20/206 = 20/257 = 20/308 = 20/409 = 20/500 = 20/60- = 20/70= = 20/80Shift 1 = 20/100Shift 2 = 20/150Shift 3 = 20/200Shift 4 = 20/250Shift 5 = 20/300Shift 6 = 20/350Shift 7 = 20/400
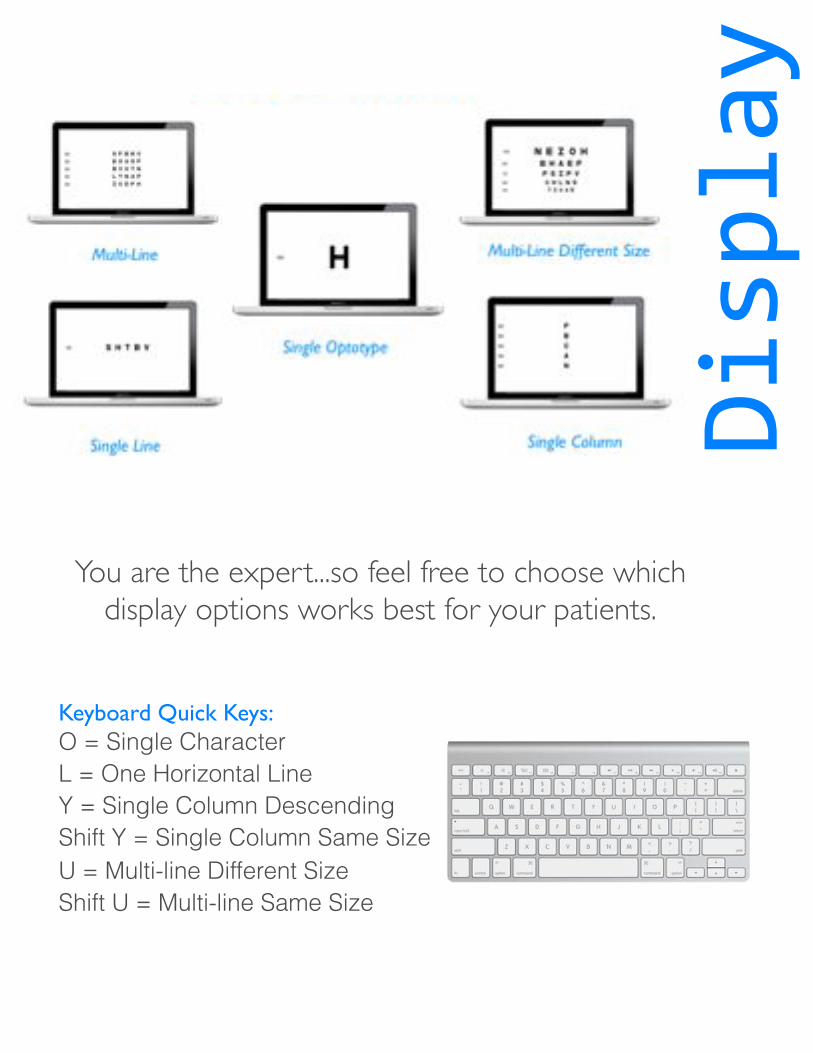
You are the expert...so feel free to choose which display options works best for your patients.
Keyboard Quick Keys:O = Single CharacterL = One Horizontal LineY = Single Column DescendingShift Y = Single Column Same SizeU = Multi-line Different SizeShift U = Multi-line Same Size
Display
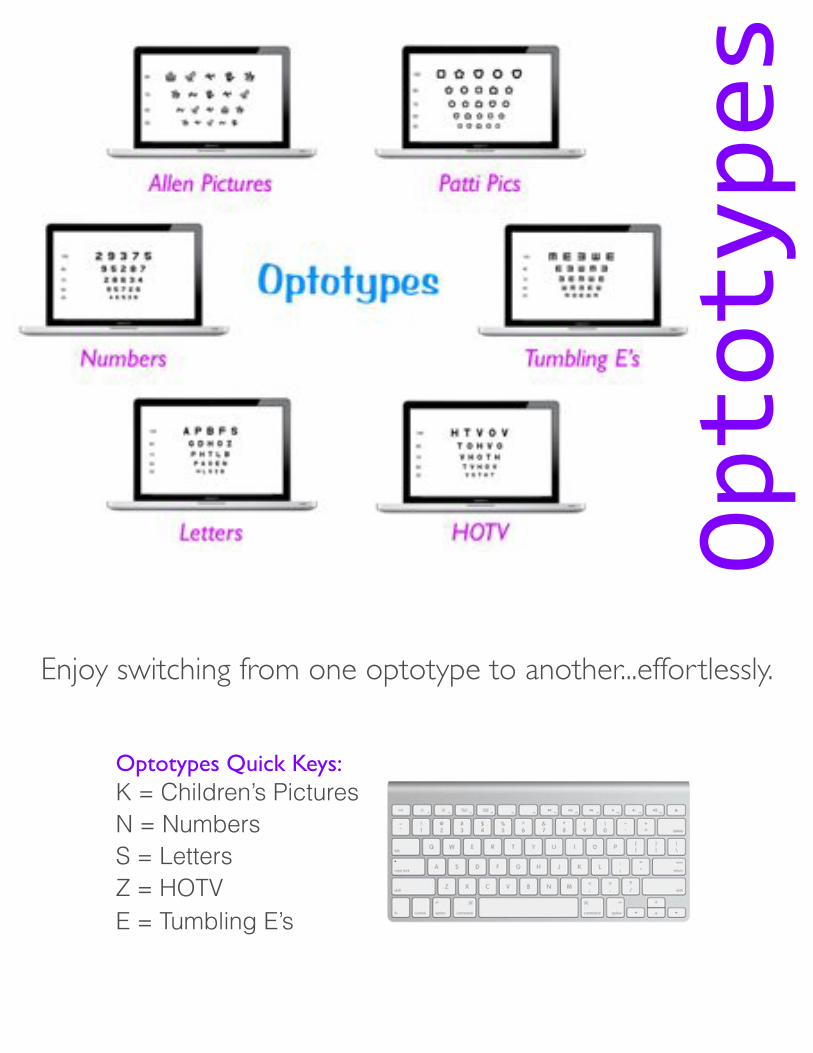
Enjoy switching from one optotype to another...effortlessly.
Optotypes Quick Keys: K = Children’s PicturesN = NumbersS = LettersZ = HOTVE = Tumbling E’s
Optotypes
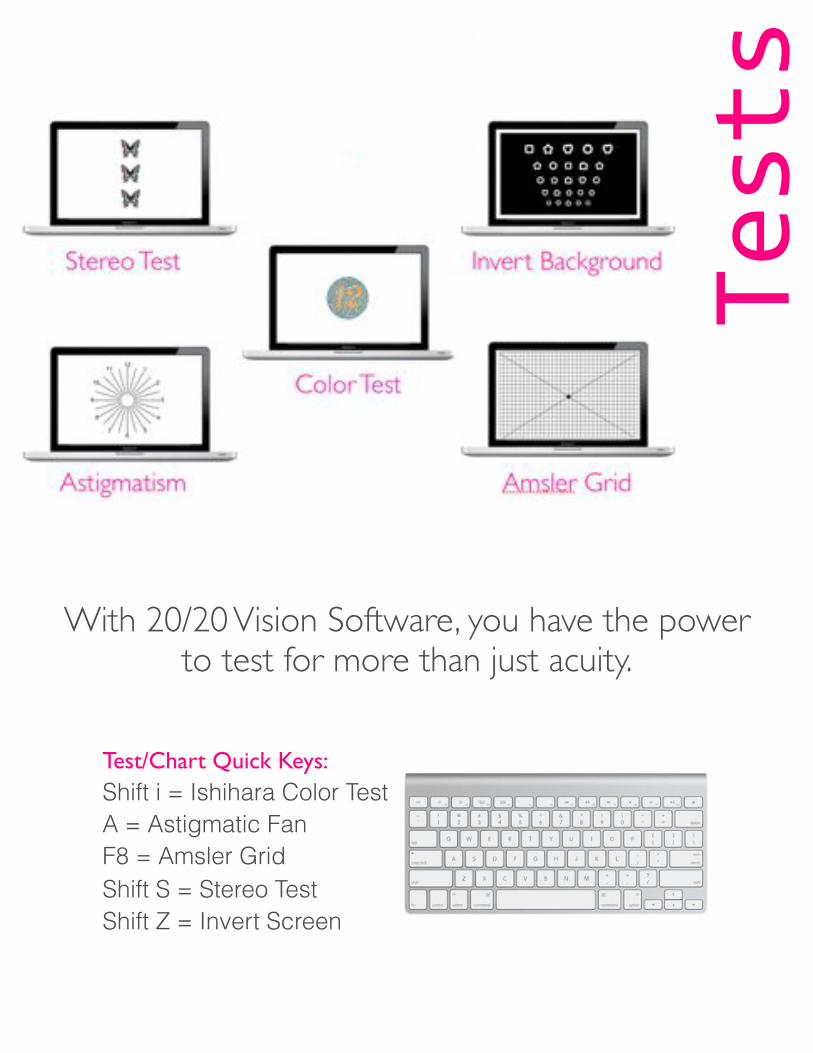
With 20/20 Vision Software, you have the power to test for more than just acuity.
Test/Chart Quick Keys:Shift i = Ishihara Color TestA = Astigmatic FanF8 = Amsler GridShift S = Stereo TestShift Z = Invert Screen
Tests
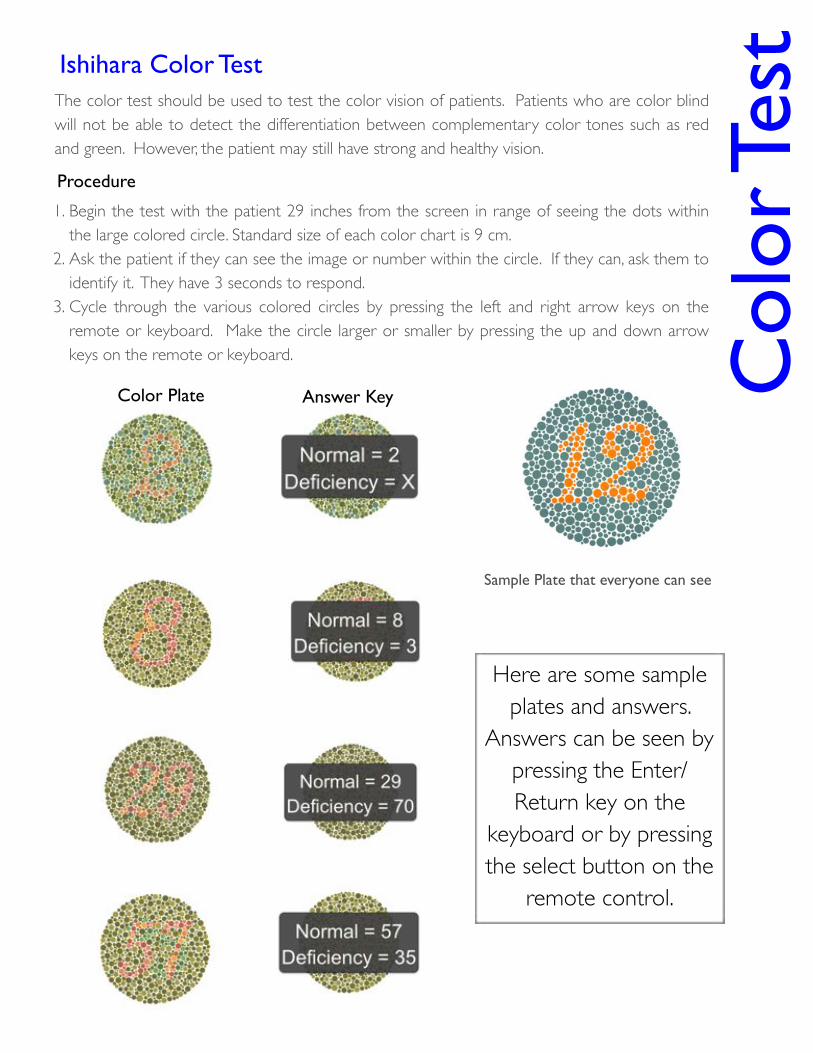
The color test should be used to test the color vision of patients. Patients who are color blind will not be able to detect the differentiation between complementary color tones such as red and green. However, the patient may still have strong and healthy vision.
1. Begin the test with the patient 29 inches from the screen in range of seeing the dots within the large colored circle. Standard size of each color chart is 9 cm.
2. Ask the patient if they can see the image or number within the circle. If they can, ask them to identify it. They have 3 seconds to respond.
3. Cycle through the various colored circles by pressing the left and right arrow keys on the remote or keyboard. Make the circle larger or smaller by pressing the up and down arrow keys on the remote or keyboard.
Color Plate Answer Key
Here are some sample plates and answers.
Answers can be seen by pressing the Enter/Return key on the
keyboard or by pressing the select button on the
remote control.
Procedure
Col
or T
est
Sample Plate that everyone can see
Ishihara Color Test
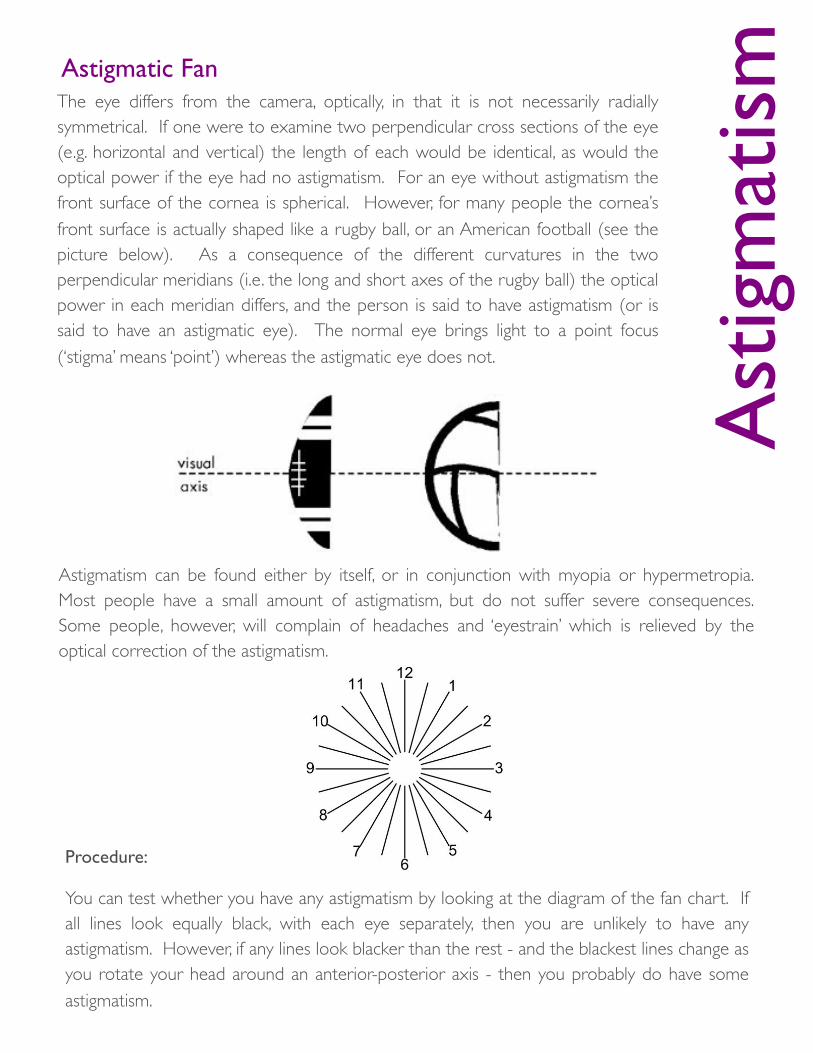
The eye differs from the camera, optically, in that it is not necessarily radially symmetrical. If one were to examine two perpendicular cross sections of the eye (e.g. horizontal and vertical) the length of each would be identical, as would the optical power if the eye had no astigmatism. For an eye without astigmatism the front surface of the cornea is spherical. However, for many people the cornea’s front surface is actually shaped like a rugby ball, or an American football (see the picture below). As a consequence of the different curvatures in the two perpendicular meridians (i.e. the long and short axes of the rugby ball) the optical power in each meridian differs, and the person is said to have astigmatism (or is said to have an astigmatic eye). The normal eye brings light to a point focus (‘stigma’ means ‘point’) whereas the astigmatic eye does not.
Astigmatism can be found either by itself, or in conjunction with myopia or hypermetropia. Most people have a small amount of astigmatism, but do not suffer severe consequences. Some people, however, will complain of headaches and ‘eyestrain’ which is relieved by the optical correction of the astigmatism.
Procedure:
You can test whether you have any astigmatism by looking at the diagram of the fan chart. If all lines look equally black, with each eye separately, then you are unlikely to have any astigmatism. However, if any lines look blacker than the rest - and the blackest lines change as you rotate your head around an anterior-posterior axis - then you probably do have some astigmatism.
Ast
igm
atis
mAstigmatic Fan
Procedure
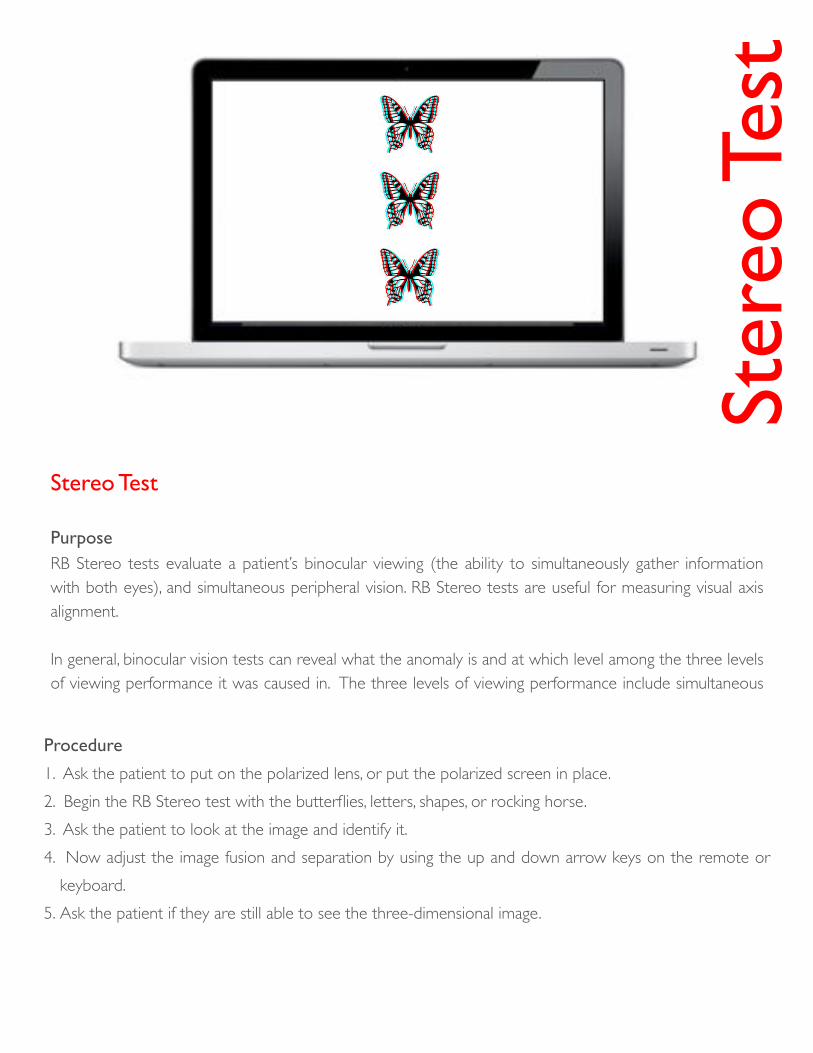
1. Ask the patient to put on the polarized lens, or put the polarized screen in place.2. Begin the RB Stereo test with the butterflies, letters, shapes, or rocking horse.3. Ask the patient to look at the image and identify it.4. Now adjust the image fusion and separation by using the up and down arrow keys on the remote or
keyboard.5. Ask the patient if they are still able to see the three-dimensional image.
Stereo Test
PurposeRB Stereo tests evaluate a patient’s binocular viewing (the ability to simultaneously gather information with both eyes), and simultaneous peripheral vision. RB Stereo tests are useful for measuring visual axis alignment.
In general, binocular vision tests can reveal what the anomaly is and at which level among the three levels of viewing performance it was caused in. The three levels of viewing performance include simultaneous
Ster
eo T
est
TroubleScreen Trouble:
Screen keeps going to sleep or going into screen saver mode. This is a problem that an be easily fixed. It is the computer’s job to protect your screen. It has probably been set to go onto screen saver mode when the computer is not in use. Even though you are doing vision screening and using the the remote control, unless the keyboard or mouse has been touched your computer will go to sleep. To fix this, go to the desktop of your computer and click the Start button (on win computers) at the bottom of your screen. Go to settings. Find screen displays and click on it. go to screen savers. Change the time in the field that designates sleep mode. Hit Apply.
Program does not respond:If the program does not respond, use your mouse to click the cursor inside the “white” area of the screen on the acuity chart. By doing so, you are “telling “ your computer to focus on the acuity software.
My computer has died and I need to transfer 20/20 Software to another computer:No problem! Just start another trial on the new computer. You are free to start as many trials as you’d like. (Note: our software will not allow a user to start more than one trial per computer)
I can’t remember how to...(fill in the blank):Canela Software has a reputation for delivering service with the utmost efficiency and courtesy. Please feel free to contact us at any time and enjoy speaking with a programer who can help you with any question you have about 20/20 Vision Software.
See for yourself...Canela Software is the Clear, Focused Solution to all of your
vision screening needs.
Technical Support: tel: 310.856.9926 [email protected]