Embed Size (px)
Citation preview
Virtual Attack Squadron 128 “Golden Intruders” (C) 2012 Marcel Hendrikse. All rights reserved. For flight simulation purposes only!
SSiimmwwiinnggss..nnll
VViirrttuuaall AAttttaacckk SSqquuaaddrroonn 112288 ““GGoollddeenn IInnttrruuddeerrss””
Course syllabus
Created by Marcel Hendrikse
© Marcel Hendrikse/Simwings.nl 2012. All rights res erved.
Virtual Attack Squadron 128 “Golden Intruders” (C) 2012 Marcel Hendrikse. All rights reserved. For flight simulation purposes only!
DISCLAIMER All material in this document is FFIICCTTIIOONNAALL. None of the procedures and maneuvers have been reviewed or sanctioned by the United States Navy, nor by the U.S. Secretary of the Navy. The contents in this document are intended for recreational flight simulation use only. At no time and under no circumstance whatsoever can anything described in this document be used for real life flight purposes.
Virtual Attack Squadron 128 “Golden Intruders” (C) 2012 Marcel Hendrikse. All rights reserved. For flight simulation purposes only!
Foreword This document describes virtual training missions for the Grumman A-6 Intruder versions as can be used in Flight Simulator FS2004/X. All missions take place from Naval Air Station (NAS) Whidbey Island in Washington State, in the northwestern USA. For resources and scenery, I refer to http://www.simwings.nl/va128. As of 1997, the A-6 has been replaced by the F-18 (Super) Hornet and many former Intruder units have either been disbanded or transitioned to the F-18. The Intruder has vanished from U.S. Navy air wings after a lengthy career that stretches from the air war over Vietnam, Middle East conflicts, the Panama and Granada invasions to the wars in Iraq. Although the A-6 has the reputation of being ‘ugly and old’ (especially for the Top Gun generation that graduated from flight training in the mid 1980s, desperately wanting to fly the F-14), there is no one who will question its effectiveness which it extensively proved throughout its service career. The A-6 is one of my favorite aircraft and I see it as a tribute to the type, its designers and its former pilots to present you with these – hopefully – fun to fly virtual missions.
MMMMMMMMaaaaaaaarrrrrrrrcccccccceeeeeeeellllllll HHHHHHHHeeeeeeeennnnnnnnddddddddrrrrrrrriiiiiiiikkkkkkkksssssssseeeeeeee November 2012
Virtual Attack Squadron 128 “Golden Intruders” (C) 2012 Marcel Hendrikse. All rights reserved. For flight simulation purposes only!
Course overview The course will consist of several parts. The first part (A-stage) will focus on getting to know the Intruder’s flight characteristics and its handling. You will be shown how to take off, land and maneuver the aircraft, how it reacts in stall situations. B-stage will cover airway navigation, aerobatics and low-level flight. During the third part (C-stage) you will learn how to fly carrier operations patterns. Most of this instruction will be a repetition of what is taught at http://vnavcad.simwings.nl/, this time concentrating on carrying out the same maneuvers with the A-6. This is also where you will fly a tanker (KA-6D) for the first time. You get to fly the pattern numerous times in order to get you fairly proficient in making precision landings. D-stage concentrates on your carrier qualification. The knowledge and experience you have built up during B-stage will now be applied to flying around and landing on a carrier. C-stage will carrier-qualify you on the A-6 by means of 10 daytime carrier landings and 4 nighttime ones, both preceded by 1 touch and go. Carrier qualifications will take place at the nearby positioned USS John C. Stennis (CVN-74). Software needed: carr2006.zip . Another important piece of software to have is FSNavigator, as well as FSRecorder, both of them being modules to be incorporated into Flightsimulator.
Stage Training
A1 – A4
Aircraft familiarization Aerobatics (basic)
B1 – B6
Airway navigation Instrument training Low-level flight
C1 – C8 Field Carrier Landing Practice (FCLP)
D1 – D3 Carrier Qualification (CQ) – day/night/instrument
In order to be able to fly these flights, it is highly recommended to have (extensive) prior flightsim experience. I hope you will enjoy these virtual missions. You can always contact me for questions and/or remarks at [email protected] Marcel Hendrikse Simwings.NL

Virtual Attack Squadron 128 “Golden Intruders” (C) 2012 Marcel Hendrikse. All rights reserved. For flight simulation purposes only!
IINNTTEENNTTIIOONNAALLLLYY LLEEFFTT BBLLAANNKK
Virtual Attack Squadron 128 “Golden Intruders” (C) 2012 Marcel Hendrikse. All rights reserved. For flight simulation purposes only!
Stage A: Aircraft familiarization & aerobatics IMPORTANT: The different available Intruder versions on the Internet obviously have different flight characteristics. Payware – as may be expected – is generally somewhat better configured in terms of fuel capacity, aircraft performance and general handling. Other important differences can be found in the quality of the virtual cockpit and in responses to power setting changes when airborne, as well as in the quality of ‘aircraft look’. All values mentioned from here on (speeds, etc.), s hould be applied no matter what you use: freeware o r payware .
A1: Getting to know the aircraft If you fire up the simulator and have selected your preferred Intruder, place it at a parking spot, ma ke sure all systems are down and save the situation. This way, you provide yourself with ‘a clean board’ to start each flight with . Take a look at the outside of the aircraft and move your joystick. Look at the movement of the control surfaces in response to your movements. Drop the hook (tip: see the ‘defined controls’ list below!) and see what it looks like. Open the cockpit roof (SHIFT+E) and look into the cockpit from the outside. Now notice how large the Intruder was. It had to be, in order to carry all the fuel and ordnance it was designed to drop. Fold the wings and take a look at the aircraft from above: notice the reduced area it occupies in this state. Now drop the wings again and lower the flaps in different stages then open the speed brakes at the end of the wingtips. I myself use a Thrustmaster Cougar HOTAS F-16 joystick arrangement to control FS aircraft. Take a look at my controls list to see what I defined to be controlled by button or switch. Note that it is merely a list of which controls; I have deliberately left out which button/switch controls the specific command, as that is depending on one’s personal preferences. Defined controls:
• Engines • Tail hook • Flaps • Gear • Speed brakes • Misc view controls (panning, etc.) • Elevator trim • Aileron trim • ATC Window toggle
Again, this list is subject your personal preferences. Aircraft design One of the things that might seriously get in the way of having fun with an FS aircraft is (little) flaws in the basic design of the .air file. As this is the file that controls the bulk of the aircraft’s characteristics, it is important to have its settings set up to your liking and, at least equally important, in a realistic fashion.
Virtual Attack Squadron 128 “Golden Intruders” (C) 2012 Marcel Hendrikse. All rights reserved. For flight simulation purposes only!
There is an executable called aired.exe . This file will let you adjust all kinds of values. One value I have experienced trouble with, is the “Spoiler drag” parameter. Many designers come up with an .air file that has a far too large value for spoiler drag. As a result, applying the airbrake(s) will result in a mid-air deceleration that can be almost be compared to a full stop. Recommended value: 90. Also take a look at fuel tank capacities. An Intruder can hold fuel in its wings, belly station and wing stations. A fully laden KA-6D tanker aircraft has 10,000 (5 x 2,000) pounds of externally stored fuel and a further 16,000 pounds in its internal tanks (wing + fuselage). Compare the set values in AirEd to adjust things to the right values. I strongly recommended taking a look at the .air file, as realism is one of the elements that (at least for me) is a requirement for having fun with a particular model of Flightsim aircraft. Recommended reading Two books that will give you a load of information on A-6 operations were written by former naval aviator Stephen Coonts. His website can be found at http://www.coonts.com/. His novels Flight of the Intruder and The Intruders present a sharp insight in what it was like to be an A-6 driver in the latter stages of the Vietnam War and directly thereafter. Read them and you will understand a lot of what I explain in this syllabus! Next to that, I can recommend the book Launch The Intruders by Carol Reardon. This book describes the 1972-73 cruises of Attack Squadron 75 “The Sunday Punchers”. And as the A-6 Intruder is an all-time favorite of mine, I have also purchased the NATOPS manual for the type…. A good online resource on the Intruder is the Intruder Association at http://www.intruderassociation.org/
Conclusion You will be flying an aircraft that has gathered fame and throughout its service career accumulated an excellent operational record. The fact that you’re reading this proves that you are prepared to go through the next A-level flights. The three books I mentioned are an excellent theoretical base to use for your Flightsim Intruder flying. Now it’s up to you. Have some good flights!
Virtual Attack Squadron 128 “Golden Intruders” (C) 2012 Marcel Hendrikse. All rights reserved. For flight simulation purposes only!
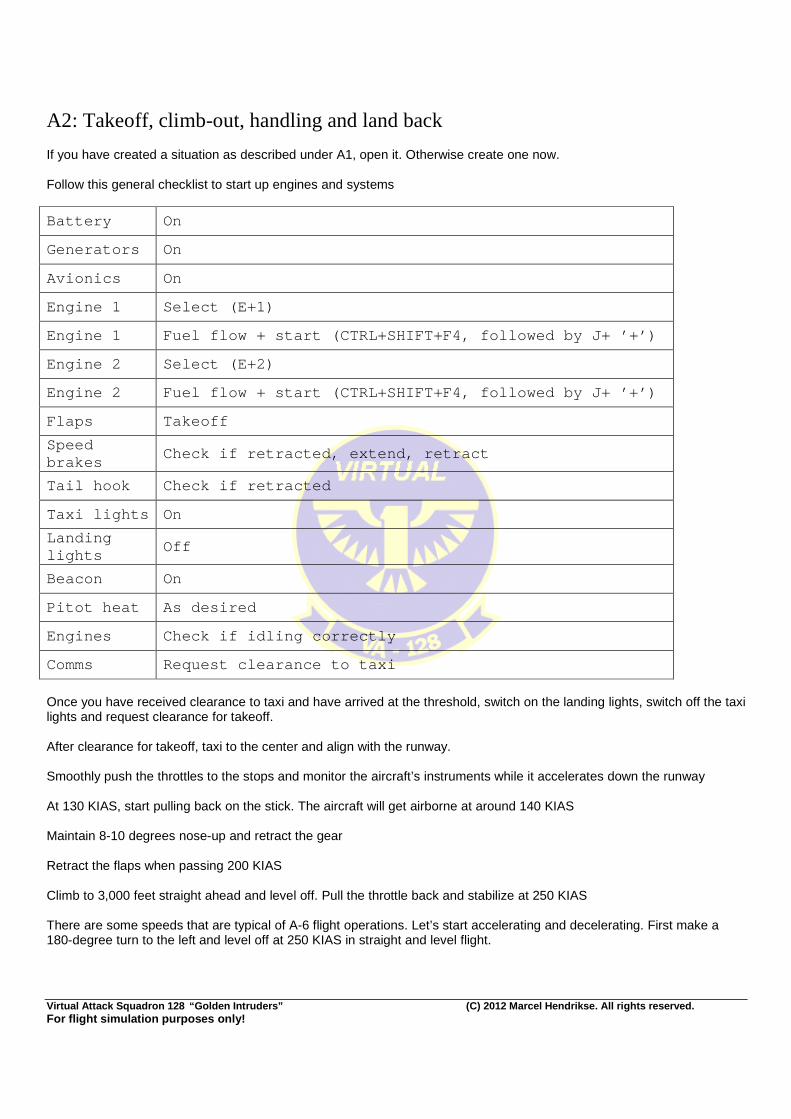
A2: Takeoff, climb-out, handling and land back If you have created a situation as described under A1, open it. Otherwise create one now. Follow this general checklist to start up engines and systems
Battery On
Generators On
Avionics On
Engine 1 Select (E+1)
Engine 1 Fuel flow + start (CTRL+SHIFT+F4, followed by J+ ’+’)
Engine 2 Select (E+2)
Engine 2 Fuel flow + start (CTRL+SHIFT+F4, followed by J+ ’+’)
Flaps Takeoff
Speed brakes
Check if retracted, extend, retract
Tail hook Check if retracted
Taxi lights On
Landing lights
Off
Beacon On
Pitot heat As desired
Engines Check if idling correctly
Comms Request clearance to taxi
Once you have received clearance to taxi and have arrived at the threshold, switch on the landing lights, switch off the taxi lights and request clearance for takeoff. After clearance for takeoff, taxi to the center and align with the runway. Smoothly push the throttles to the stops and monitor the aircraft’s instruments while it accelerates down the runway At 130 KIAS, start pulling back on the stick. The aircraft will get airborne at around 140 KIAS Maintain 8-10 degrees nose-up and retract the gear Retract the flaps when passing 200 KIAS Climb to 3,000 feet straight ahead and level off. Pull the throttle back and stabilize at 250 KIAS There are some speeds that are typical of A-6 flight operations. Let’s start accelerating and decelerating. First make a 180-degree turn to the left and level off at 250 KIAS in straight and level flight.
Virtual Attack Squadron 128 “Golden Intruders” (C) 2012 Marcel Hendrikse. All rights reserved. For flight simulation purposes only!
♠ Accelerate to 360 KIAS. Strive to arrive at that airspeed as opposed to bashing right through it and having to decelerate again ♠ Hold 360 KIAS for about 2 minutes, then decelerate to 250 KIAS. Again, make sure you end your deceleration at 250 KIAS and not below ♠ Hold 250 KIAS for another minute, then increase power and accelerate to 420 KIAS. When at this speed, initiate another 180-degree turn, this time to the right. NOTE: during both 180-degree turns, you should lose/gain no more than 100 feet in altitude! ♠ Holding the power setting as is, start a 2000 feet per minute climb to 10,000 feet, maintaining 420 KIAS. Start leveling off at 9,800 feet ♠ Once in straight and level flight at 10,000 feet, make another right-hand turn, then decelerate to 360 KIAS ♠ Once stable at 360 KIAS, start a 1000 feet per minute descend to 7,000 feet, maintaining 360 KIAS. Start leveling off at 7,100 feet and end up at 7,000 feet, straight and level, 360 KIAS. Decelerate to 250 KIAS. Prepare for horizontal S-tu rns ♠ Start a 30-degree AOB (angle of bank) turn to heading 270. Altitude tolerance is +/- 200 feet, speed tolerance +/- 15 KIAS Once on heading 270 : ♠ Start a 30-degree AOB left-hand turn to heading 090, same altitude and speed tolerance Once on heading 090 : ♠ Start a 30-degree AOB right-hand turn to heading 270, climbing at 1000 fpm to 10,000 feet at 250 KIAS, speed tolerance +/- 10 KIAS Once on heading 270 : ♠ Start a 30-degree AOB left-hand turn to heading 090, descending at 1000 fpm to 7,000 feet at 250 KIAS, speed tolerance +/- 10 KIAS Use GPS to navigate back to NAS Whidbey Island. Within 20 miles, set your comms to Whidbey Tower but don’t contact them yet.
LANDING PROCEDURE Depending on your assigned runway, you will be able fly directly to the base or you will have to circumvent the field first before lining up for landing. We will start with the Navy break, a maneuver that involves over-flying the runway and turning sharply while getting set up for landing You will be landing on the same runway from which you took off (the ‘active’), so make sure you put your aircraft on a course that will take you to NAS Whidbey Island along the runway heading. One way to achieve this is to open FSNavigator and set a waypoint about 5 miles from the active runway. Then set the active runway as the second waypoint and align the vector between the two to parallel the active runway by moving the first waypoint to the proper position. Fly to the 1st waypoint and make sure you are at 800 feet AGL, 250 KIAS when arriving there Fly over the runway. When passing the end of the runway, idle the throttle, apply speed brakes and make a 180-degree LEFT turn with 60 degrees AOB. Lower the gear and flaps
Virtual Attack Squadron 128 “Golden Intruders” (C) 2012 Marcel Hendrikse. All rights reserved. For flight simulation purposes only!
You should now be flying downwind in landing configuration, at about 120 KIAS. Contact tower and request landing clearance. Once clearance is received, make sure you are using the virtual cockpit at 0.50 zoom and pan the view so you can ‘look into the turn’ Start the left-hand turn toward the runway, gently descending, using the view to coordinate your turn. Make sure you have centered the view once you are lined up with the runway and land the aircraft. Speed: 112-118 KIAS. Landing an A-6, like any other aircraft, is something that should be practiced extensively. During the FCLPs (C-stage) you will be carrying out a lot of these landings in order to perfect your technique and be proficient enough to safely land your A-6 on a carrier. ‘Study’-advice : save the flight when you are on the downwind leg, so you can use that to practice landings a few times after this flight has ended After landing, taxi back to the parking and shut down engines and systems
Virtual Attack Squadron 128 “Golden Intruders” (C) 2012 Marcel Hendrikse. All rights reserved. For flight simulation purposes only!
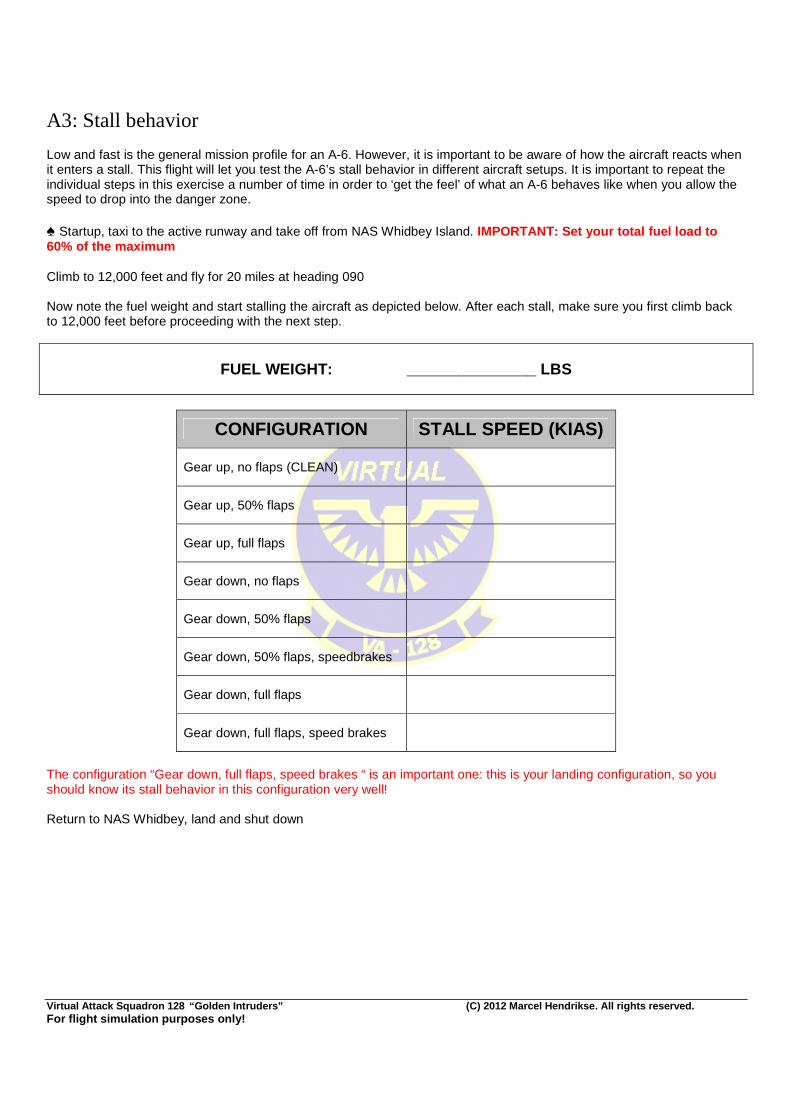
A3: Stall behavior Low and fast is the general mission profile for an A-6. However, it is important to be aware of how the aircraft reacts when it enters a stall. This flight will let you test the A-6’s stall behavior in different aircraft setups. It is important to repeat the individual steps in this exercise a number of time in order to ‘get the feel’ of what an A-6 behaves like when you allow the speed to drop into the danger zone. ♠ Startup, taxi to the active runway and take off from NAS Whidbey Island. IMPORTANT: Set your total fuel load to 60% of the maximum Climb to 12,000 feet and fly for 20 miles at heading 090 Now note the fuel weight and start stalling the aircraft as depicted below. After each stall, make sure you first climb back to 12,000 feet before proceeding with the next step.
FUEL WEIGHT: _______________ LBS
CONFIGURATION STALL SPEED (KIAS)
Gear up, no flaps (CLEAN)
Gear up, 50% flaps
Gear up, full flaps
Gear down, no flaps
Gear down, 50% flaps
Gear down, 50% flaps, speedbrakes
Gear down, full flaps
Gear down, full flaps, speed brakes
The configuration “Gear down, full flaps, speed brakes “ is an important one: this is your landing configuration, so you should know its stall behavior in this configuration very well! Return to NAS Whidbey, land and shut down
Virtual Attack Squadron 128 “Golden Intruders” (C) 2012 Marcel Hendrikse. All rights reserved. For flight simulation purposes only!
A4: Aerobatics (basic) Fuel load: 75% of total Take off from NAS Whidbey, climb to 15,000 feet, level off at 300 KIAS, proceed to heading 270 until 25 miles from the base
Aileron roll: Apply sideways stick deflection until you have rolled 360 degrees. The aircraft will lose altitude! Repeat as often as you like Climb back to 15,000 feet and increase the airspeed to 450 KIAS
Looping: Once you reach 450, execute a looping by pulling back on the stick, holding 4G as long as possible. Come over the top and end up at 15,000 feet, not below !! Repeat as often as you like
Split-S: Decrease airspeed to 200 KIAS, the roll the aircraft upside down and pull 3-4G until in level flight, 180 degrees from your original course. Climb back to 15,000 and repeat as often as you like
Immelmann: Increase airspeed to 450 KIAS and pull up the same way you would when starting a loop. When upside down at the top, roll 180 degrees to the upright position, wings level. Your altitude has increased, your course has reversed. Repeat as often as you like Return to NAS Whidbey, land and shutdown
Virtual Attack Squadron 128 “Golden Intruders” (C) 2012 Marcel Hendrikse. All rights reserved. For flight simulation purposes only!
A5: Single engine flight and no-flap landings Background: Battle damage may force A-6 pilots to land with only one engine still active and/or shot-up hydraulics that prevent flaps from being operated normally. This flight will consist of flying under those circumstances. You will be practicing this in the pattern.
� Takeoff from the active runway, climb straight forward to 1,200 feet and level off with 250 KIAS on the dial. FUEL LOAD: 6,000 pounds MAXIMUM
Portion 1 First, practice landing without flaps. Fly the pattern as if you are going to land, skipping the step of lowering the flaps. Be aware that your landing speed will be higher, somewhere between 120 and 130 KIAS! Make a couple of touch and go’s without flaps and alternate between configurations “no flaps/speed brakes open ” and “no flaps/no speed brakes ”.
Portion 2 After a few touch and go’s (about 5 or 6), climb straight ahead to 1,200 feet again and set the simulator to randomly shut down an engine within 5 minutes . Keep flying upwind for an additional 2 minutes, then turn left 180 degrees and hold that heading until one of the engines fails. Now turn back toward the base and setup for landing:
� Lower landing gear � Lower flaps � Do NOT extend the speedbrakes � Remember to be careful while reducing engine power � Remember to double your power additions when necessary
Of course, the lack of one power source will tend to slew your aircraft left or right. This can easily corrected by rudder.
Virtual Attack Squadron 128 “Golden Intruders” (C) 2012 Marcel Hendrikse. All rights reserved. For flight simulation purposes only!
Stage B: Airway navigation / Instrument flight / Lo w-level flight
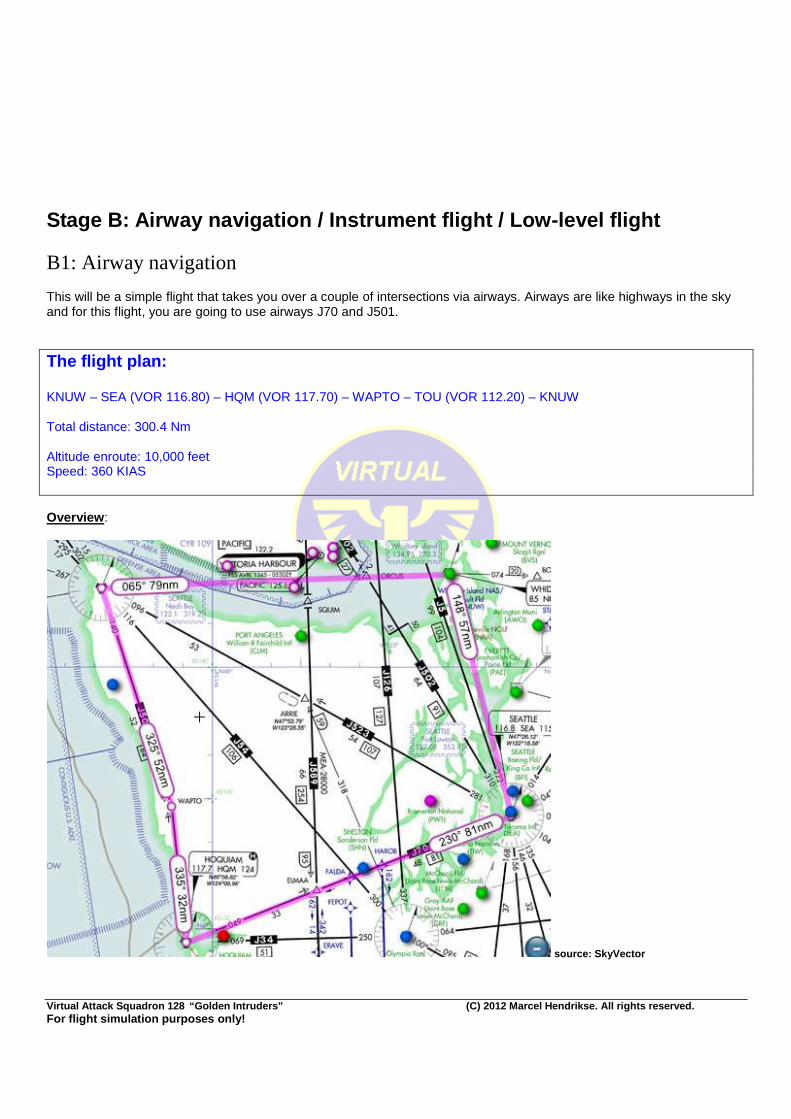
B1: Airway navigation This will be a simple flight that takes you over a couple of intersections via airways. Airways are like highways in the sky and for this flight, you are going to use airways J70 and J501.
The flight plan: KNUW – SEA (VOR 116.80) – HQM (VOR 117.70) – WAPTO – TOU (VOR 112.20) – KNUW Total distance: 300.4 Nm Altitude enroute: 10,000 feet Speed: 360 KIAS Overview :
source: SkyVector
Virtual Attack Squadron 128 “Golden Intruders” (C) 2012 Marcel Hendrikse. All rights reserved. For flight simulation purposes only!
Make sure you carry out this flight with real world weather set and with proper ATC communications. Contact Whidbey tower when you are about 20 miles from the base and request a touch and go on the active. EXTRA CHALLENGE 1 : make the touch and go without flaps . EXTRA CHALLENGE 2 : once airborne, shutdown 1 engine, request clearance for a full stop landing and land
Virtual Attack Squadron 128 “Golden Intruders” (C) 2012 Marcel Hendrikse. All rights reserved. For flight simulation purposes only!
B2: Instrument flight 1
IIMMPPOORRTTAANNTT:: TThhiiss mmoodduullee wwii ll ll NNOOTT ccoonnttaaiinn bbaassiicc IIFFRR iinnssttrruucctt iioonnss!! IIff yyoouu aarree uunnffaammii ll iiaarr wwii tthh ff ll iigghhttssiimm iinnssttrruummeenntt ff ll iigghhtt,, rreeffeerr ttoo tthhee lleessssoonnss aanndd oonnll iinnee ssoouurrcceess ttoo bbuuii lldd uupp aann uunnddeerrssttaannddiinngg ooff tthhee pprr iinncciippllee “Instrument flight 1” is an exercise designed to force you to keep your eyes on the instrument panel. You will be carrying out a number of maneuvers without any outside reference. How fast you are flying, turning, climbing or descending, which direction you are going, your angle of pitch, your angle of bank, all must be derived from the instrument panel. It makes no sense looking out the window: you will just see nothing. Skills gained here should serve you well when landing on an aircraft carrier at night.
� Taxi to the active runway, setup your A-6 for takeoff, get permission for takeoff
� Prior to starting your takeoff run, set visibility to ¼ mile
� Note your heading and maintain that heading while accelerating down the runway
� Rotate and start a climb to 10,000 feet
� Level off, 250 KIAS
� Now proceed to a cardinal heading (0/90/180/270)
� Next, change course by 180 degrees to the RIGHT, holding your altitude. This will require control inputs:
remember to trim up when starting a turn and trim down when rolling back to wings level
� Next, change course by 180 degrees to the LEFT, holding your altitude
� Now climb to 12,000 feet at 2,000 feet per minute. Remember to start leveling off at 11,800 feet. Maintain your
speed of 250 KIAS within 20 KIAS
� Make a 360 degree LEFT turn, 30 degrees angle of bank, maintaining 12,000 feet, 250 KIAS
� Level off after the turn and start a 1000 feet per minute descend to 9,000 feet by means of engine power:
decrease it and adjust to maintain the rate of descend
� Level off at 9,000 feet and 250 KIAS
� Go into the weather menu and set clear weather
� Return to KNUW, practice some touch and goes, then land and shut down the aircraft
Virtual Attack Squadron 128 “Golden Intruders” (C) 2012 Marcel Hendrikse. All rights reserved. For flight simulation purposes only!
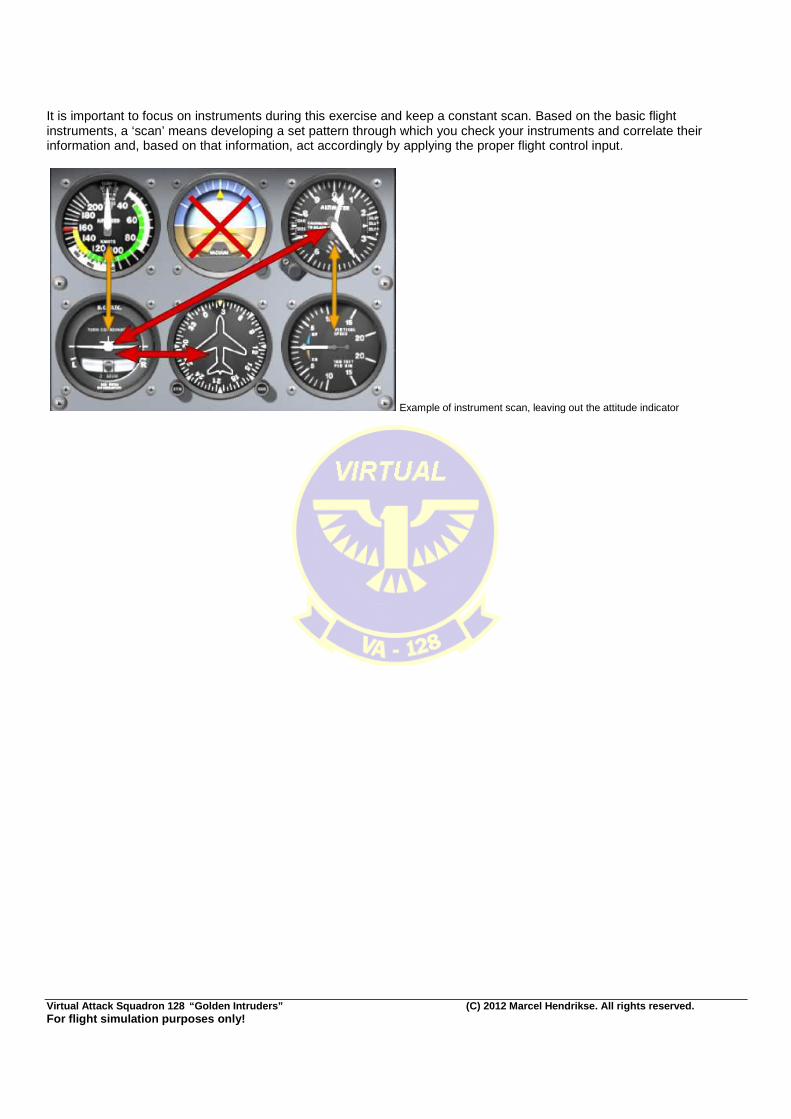
It is important to focus on instruments during this exercise and keep a constant scan. Based on the basic flight instruments, a ‘scan’ means developing a set pattern through which you check your instruments and correlate their information and, based on that information, act accordingly by applying the proper flight control input.
Example of instrument scan, leaving out the attitude indicator

Virtual Attack Squadron 128 “Golden Intruders” (C) 2012 Marcel Hendrikse. All rights reserved. For flight simulation purposes only!
B3: Instrument flight 2 REQUIREMENT: ArrestorCables installed and activated and aircraft carriers installed (see the website f or file names)
Find CVN-74 positioned near Washington State. Airport name will be AC<number>; scroll through the list to select the correct one. Set your aircraft on runway 2L. Fuel load: 6,000 pounds Visibility: 2 miles Look at ArrestorCables for the landing area heading. Frequency for your NAV1 radio: 110.30. Set ADF to 374.0 Parking brake set, flaps in takeoff, press SHIFT+F9 to activate catapult and apply full power You are now ready to launch; before you launch, rea d the following procedure first, so you will know w hat is to be expected . Right after the cat launch, rotate to 8-10 degrees nose up and retract the gear at positive VSI. At 200 KIAS, retract the flaps and climb to 1,200 feet. Hold your speed between 250-300 KIAS. When you reach 1,200 feet, start a 30 degree angle of bank turn to the LEFT, changing your heading by 170 degrees. Watch your DME indicator. Once it indicates the carrier is 7 miles away, slow down to 210 KIAS, apply airbrakes, lower hook, full flaps, lower gear and maintain 120 KIAS. Start a calm turn to the left, back toward the ship. MONITOR YOUR ADF indicator in order to intercept the final approach course toward the landing area. This is a matter of turning steadily, but not too sharp! At one point, the localizer indicator on your Horizontal Situation Indicator (you set it to the correct approach radial, right?) will start moving toward the middle, indicating you are crossing the ILS signal of the landing area. Your turn should ideally end when the localizer indicator arrives in the middle. This is of course a very demanding task. Once you are heading back toward the ship with the localizer needle more or less in the middle, make small heading adjustments. Just a dip of the wing, then back to level, watch the localizer needle and react accordingly. MAINTAIN 1,200 FEET ALL THE WAY IN, UNTIL…... At about 3 miles, the glide scope needle will start falling from the top of the gauge to the center, forming a cross with the localizer needle. Once it is a cross, you are on glide path, on centerline. From there, it is a matter of keeping your speed, lineup and descend at such rates that you see a cross all the way down to the landing deck (112-120 KIAS, 600 fpm descend rate are the good values) Once you are at 2 miles, you could see a faint light. Keep your eyes on the instrument panel and your sca n going!! Only within the last ¾ mile should you use the visual clues to land. Upon hitting the deck, retract the speed brakes and apply full power. If you’ve caught a wire, fast deceleration will come and you can idle the throttles. If deceleration does not occur, you’ll have sufficient power to go around. The go-around procedure involves climbing straight ahead to 1,200 feet, maintaining 250 KIAS, turning left to the downwind leg and allow a 7-mile distance between yourself and the carrier. Then turn left again back to final approach. This flight has given you a small taste of what is to come.
Virtual Attack Squadron 128 “Golden Intruders” (C) 2012 Marcel Hendrikse. All rights reserved. For flight simulation purposes only!
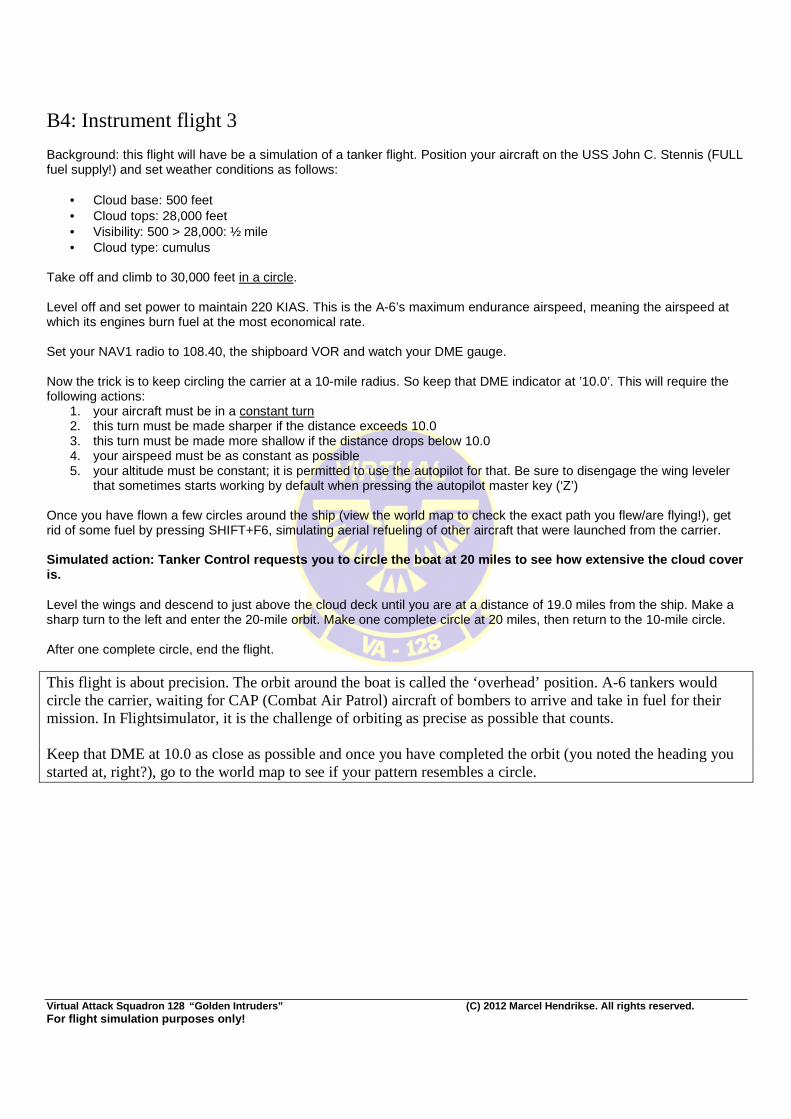
B4: Instrument flight 3 Background: this flight will have be a simulation of a tanker flight. Position your aircraft on the USS John C. Stennis (FULL fuel supply!) and set weather conditions as follows:
• Cloud base: 500 feet • Cloud tops: 28,000 feet • Visibility: 500 > 28,000: ½ mile • Cloud type: cumulus
Take off and climb to 30,000 feet in a circle. Level off and set power to maintain 220 KIAS. This is the A-6’s maximum endurance airspeed, meaning the airspeed at which its engines burn fuel at the most economical rate. Set your NAV1 radio to 108.40, the shipboard VOR and watch your DME gauge. Now the trick is to keep circling the carrier at a 10-mile radius. So keep that DME indicator at ’10.0’. This will require the following actions:
1. your aircraft must be in a constant turn 2. this turn must be made sharper if the distance exceeds 10.0 3. this turn must be made more shallow if the distance drops below 10.0 4. your airspeed must be as constant as possible 5. your altitude must be constant; it is permitted to use the autopilot for that. Be sure to disengage the wing leveler
that sometimes starts working by default when pressing the autopilot master key (‘Z’) Once you have flown a few circles around the ship (view the world map to check the exact path you flew/are flying!), get rid of some fuel by pressing SHIFT+F6, simulating aerial refueling of other aircraft that were launched from the carrier. Simulated action: Tanker Control requests you to ci rcle the boat at 20 miles to see how extensive the cloud cover is. Level the wings and descend to just above the cloud deck until you are at a distance of 19.0 miles from the ship. Make a sharp turn to the left and enter the 20-mile orbit. Make one complete circle at 20 miles, then return to the 10-mile circle. After one complete circle, end the flight.
This flight is about precision. The orbit around the boat is called the ‘overhead’ position. A-6 tankers would circle the carrier, waiting for CAP (Combat Air Patrol) aircraft of bombers to arrive and take in fuel for their mission. In Flightsimulator, it is the challenge of orbiting as precise as possible that counts. Keep that DME at 10.0 as close as possible and once you have completed the orbit (you noted the heading you started at, right?), go to the world map to see if your pattern resembles a circle.
Virtual Attack Squadron 128 “Golden Intruders” (C) 2012 Marcel Hendrikse. All rights reserved. For flight simulation purposes only!
B5: Instrument flight 4 In order to control the flow of aircraft landing back on the carrier in nighttime and reduced visibility, the Navy uses a procedure called “recovery”. This is the general term describing the phenomenon of aircraft returning to their base at sea. Below is a description.
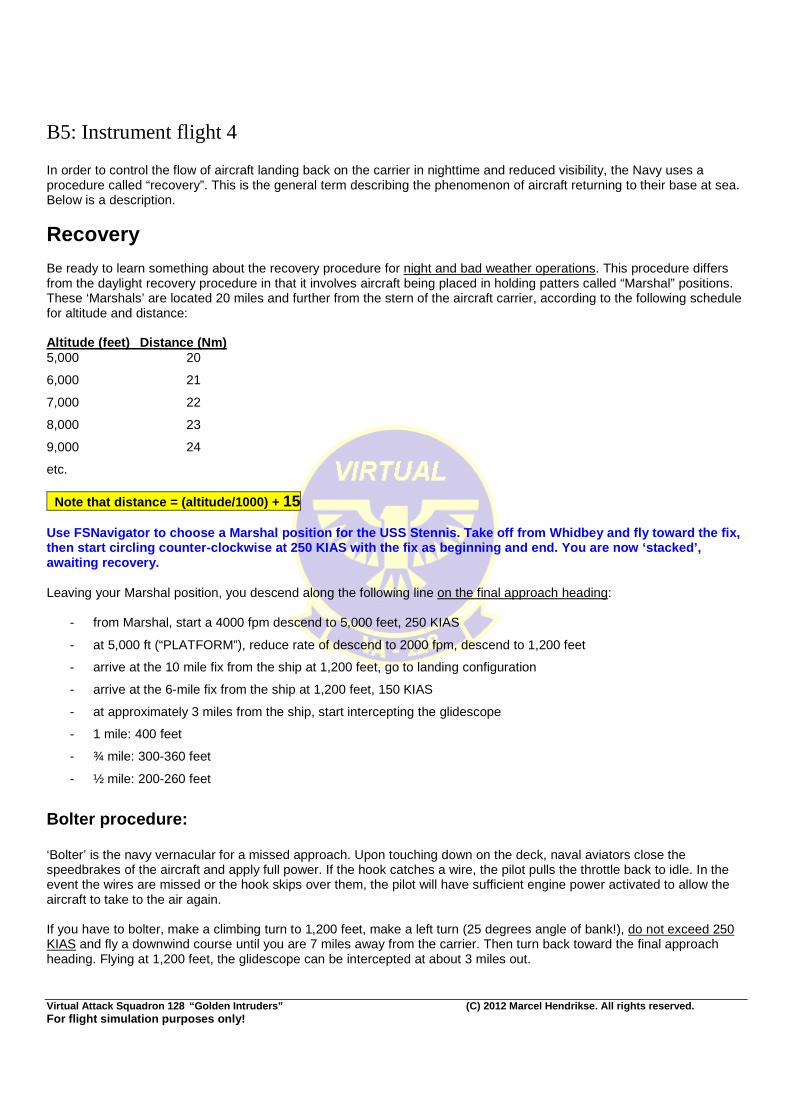
Recovery Be ready to learn something about the recovery procedure for night and bad weather operations. This procedure differs from the daylight recovery procedure in that it involves aircraft being placed in holding patters called “Marshal” positions. These ‘Marshals’ are located 20 miles and further from the stern of the aircraft carrier, according to the following schedule for altitude and distance: Altitude (feet) Distance (Nm) 5,000 20
6,000 21
7,000 22
8,000 23
9,000 24
etc. Note that distance = (altitude/1000) + 15 Use FSNavigator to choose a Marshal position for th e USS Stennis. Take off from Whidbey and fly toward the fix, then start circling counter-clockwise at 250 KIAS w ith the fix as beginning and end. You are now ‘stac ked’, awaiting recovery. Leaving your Marshal position, you descend along the following line on the final approach heading:
- from Marshal, start a 4000 fpm descend to 5,000 feet, 250 KIAS
- at 5,000 ft (“PLATFORM”), reduce rate of descend to 2000 fpm, descend to 1,200 feet
- arrive at the 10 mile fix from the ship at 1,200 feet, go to landing configuration
- arrive at the 6-mile fix from the ship at 1,200 feet, 150 KIAS
- at approximately 3 miles from the ship, start intercepting the glidescope
- 1 mile: 400 feet
- ¾ mile: 300-360 feet
- ½ mile: 200-260 feet
Bolter procedure: ‘Bolter’ is the navy vernacular for a missed approach. Upon touching down on the deck, naval aviators close the speedbrakes of the aircraft and apply full power. If the hook catches a wire, the pilot pulls the throttle back to idle. In the event the wires are missed or the hook skips over them, the pilot will have sufficient engine power activated to allow the aircraft to take to the air again. If you have to bolter, make a climbing turn to 1,200 feet, make a left turn (25 degrees angle of bank!), do not exceed 250 KIAS and fly a downwind course until you are 7 miles away from the carrier. Then turn back toward the final approach heading. Flying at 1,200 feet, the glidescope can be intercepted at about 3 miles out.
Virtual Attack Squadron 128 “Golden Intruders” (C) 2012 Marcel Hendrikse. All rights reserved. For flight simulation purposes only!
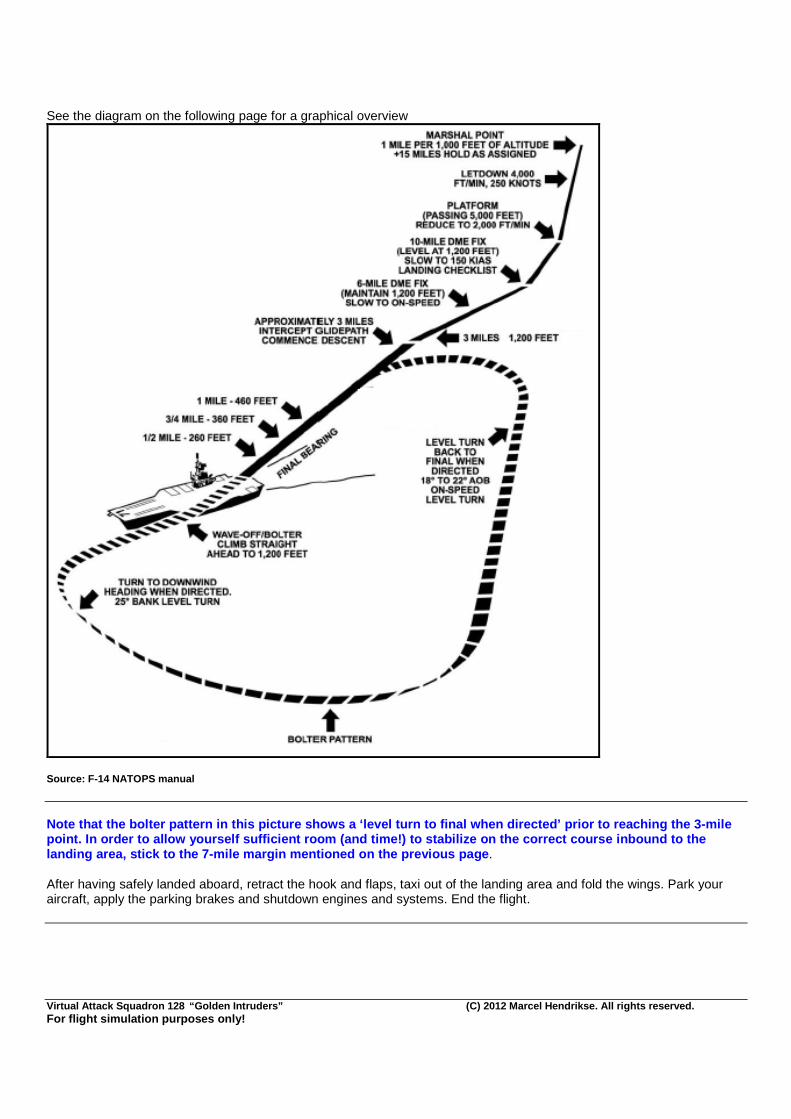
See the diagram on the following page for a graphical overview
Source: F-14 NATOPS manual Note that the bolter pattern in this picture shows a ‘level turn to final when directed ’ prior to reaching the 3-mile point. In order to allow yourself sufficient room ( and time!) to stabilize on the correct course inbou nd to the landing area, stick to the 7-mile margin mentioned on the previous page . After having safely landed aboard, retract the hook and flaps, taxi out of the landing area and fold the wings. Park your aircraft, apply the parking brakes and shutdown engines and systems. End the flight.
Virtual Attack Squadron 128 “Golden Intruders” (C) 2012 Marcel Hendrikse. All rights reserved. For flight simulation purposes only!
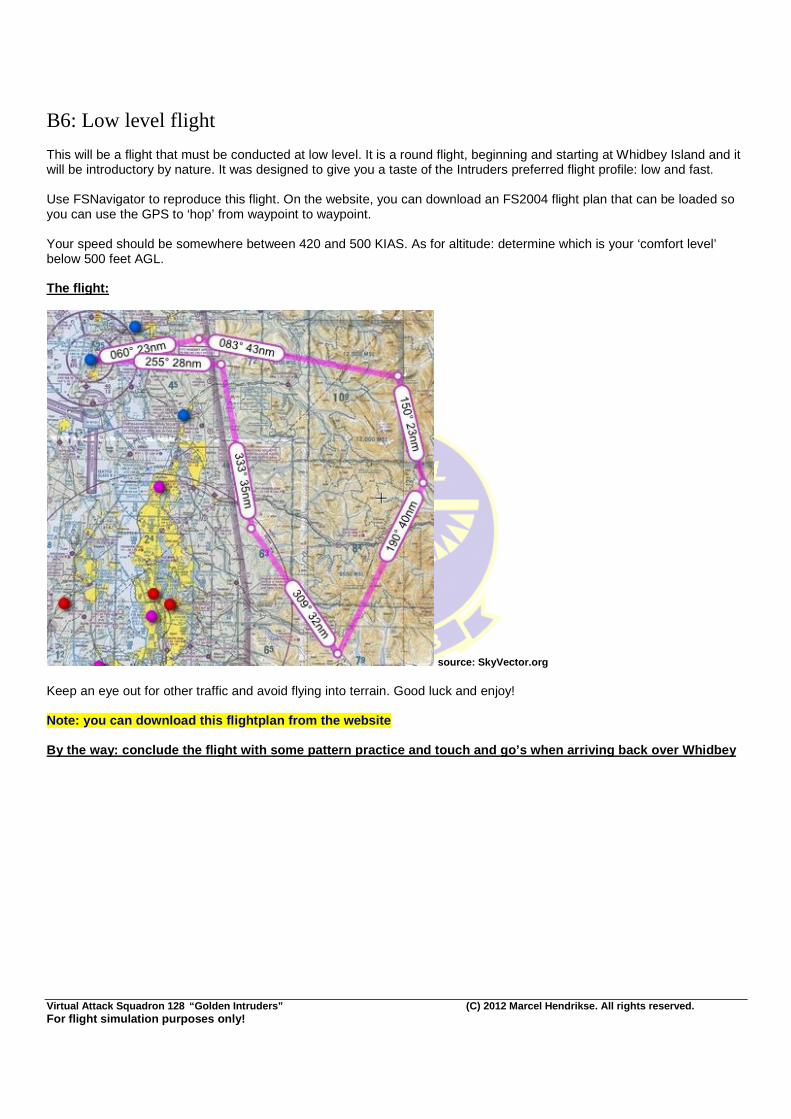
B6: Low level flight This will be a flight that must be conducted at low level. It is a round flight, beginning and starting at Whidbey Island and it will be introductory by nature. It was designed to give you a taste of the Intruders preferred flight profile: low and fast. Use FSNavigator to reproduce this flight. On the website, you can download an FS2004 flight plan that can be loaded so you can use the GPS to ‘hop’ from waypoint to waypoint. Your speed should be somewhere between 420 and 500 KIAS. As for altitude: determine which is your ‘comfort level’ below 500 feet AGL. The flight:
source: SkyVector.org Keep an eye out for other traffic and avoid flying into terrain. Good luck and enjoy! Note: you can download this flightplan from the web site By the way: conclude the flight with some pattern p ractice and touch and go’s when arriving back over Whidbey
Virtual Attack Squadron 128 “Golden Intruders” (C) 2012 Marcel Hendrikse. All rights reserved. For flight simulation purposes only!
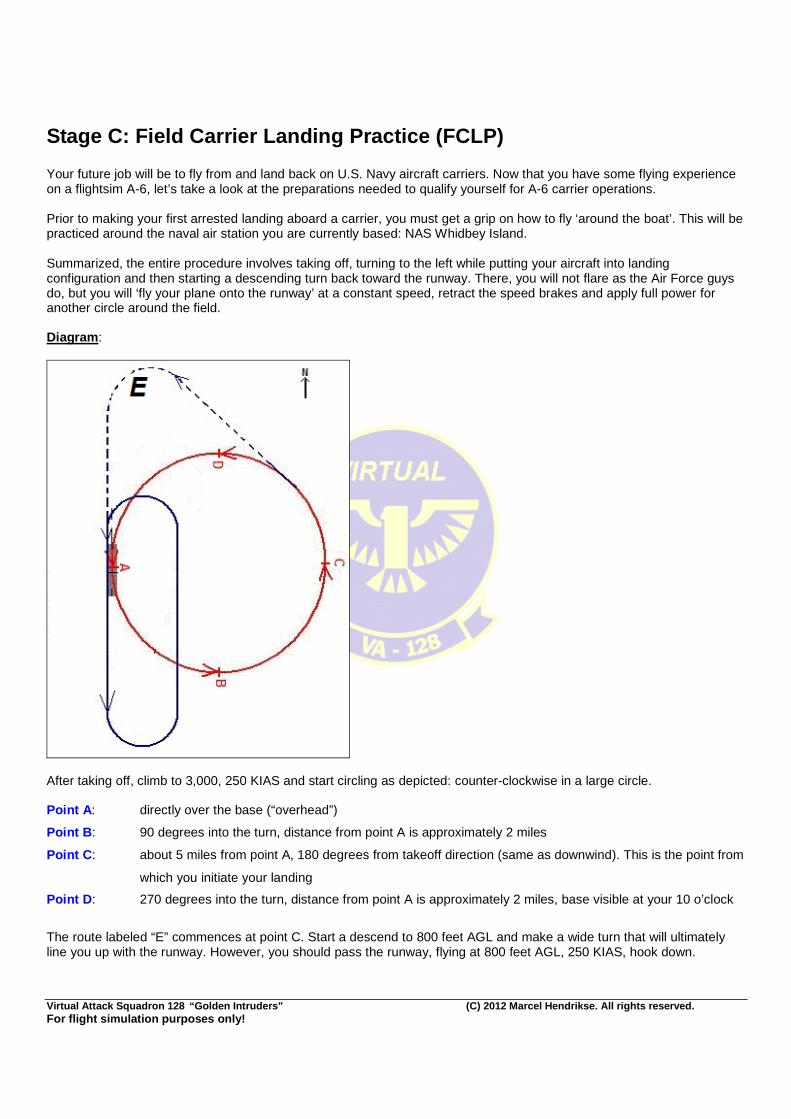
Stage C: Field Carrier Landing Practice (FCLP) Your future job will be to fly from and land back on U.S. Navy aircraft carriers. Now that you have some flying experience on a flightsim A-6, let’s take a look at the preparations needed to qualify yourself for A-6 carrier operations. Prior to making your first arrested landing aboard a carrier, you must get a grip on how to fly ‘around the boat’. This will be practiced around the naval air station you are currently based: NAS Whidbey Island. Summarized, the entire procedure involves taking off, turning to the left while putting your aircraft into landing configuration and then starting a descending turn back toward the runway. There, you will not flare as the Air Force guys do, but you will ‘fly your plane onto the runway’ at a constant speed, retract the speed brakes and apply full power for another circle around the field. Diagram :
After taking off, climb to 3,000, 250 KIAS and start circling as depicted: counter-clockwise in a large circle. Point A : directly over the base (“overhead”)
Point B : 90 degrees into the turn, distance from point A is approximately 2 miles
Point C : about 5 miles from point A, 180 degrees from takeoff direction (same as downwind). This is the point from
which you initiate your landing
Point D : 270 degrees into the turn, distance from point A is approximately 2 miles, base visible at your 10 o’clock
The route labeled “E” commences at point C. Start a descend to 800 feet AGL and make a wide turn that will ultimately line you up with the runway. However, you should pass the runway, flying at 800 feet AGL, 250 KIAS, hook down.
Virtual Attack Squadron 128 “Golden Intruders” (C) 2012 Marcel Hendrikse. All rights reserved. For flight simulation purposes only!
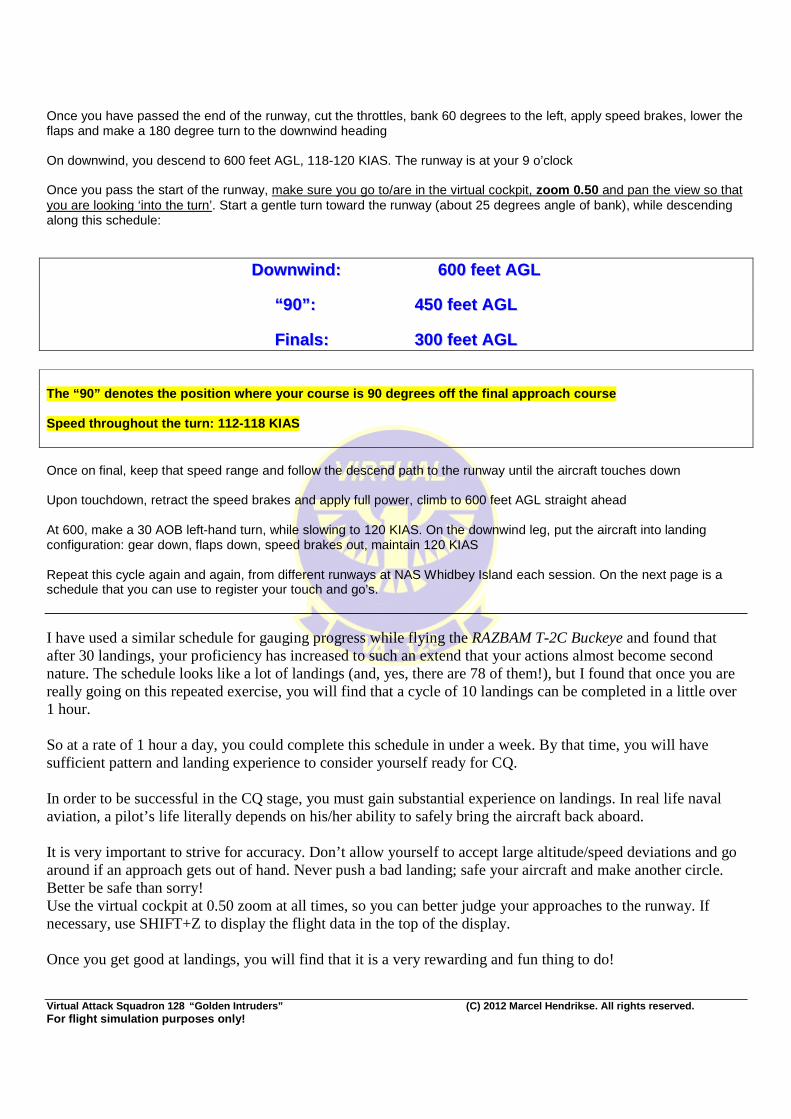
Once you have passed the end of the runway, cut the throttles, bank 60 degrees to the left, apply speed brakes, lower the flaps and make a 180 degree turn to the downwind heading On downwind, you descend to 600 feet AGL, 118-120 KIAS. The runway is at your 9 o’clock Once you pass the start of the runway, make sure you go to/are in the virtual cockpit, zoom 0.50 and pan the view so that you are looking ‘into the turn’. Start a gentle turn toward the runway (about 25 degrees angle of bank), while descending along this schedule:
DDoowwnnwwiinndd:: 660000 ffeeeett AAGGLL
““ 9900”” :: 445500 ffeeeett AAGGLL
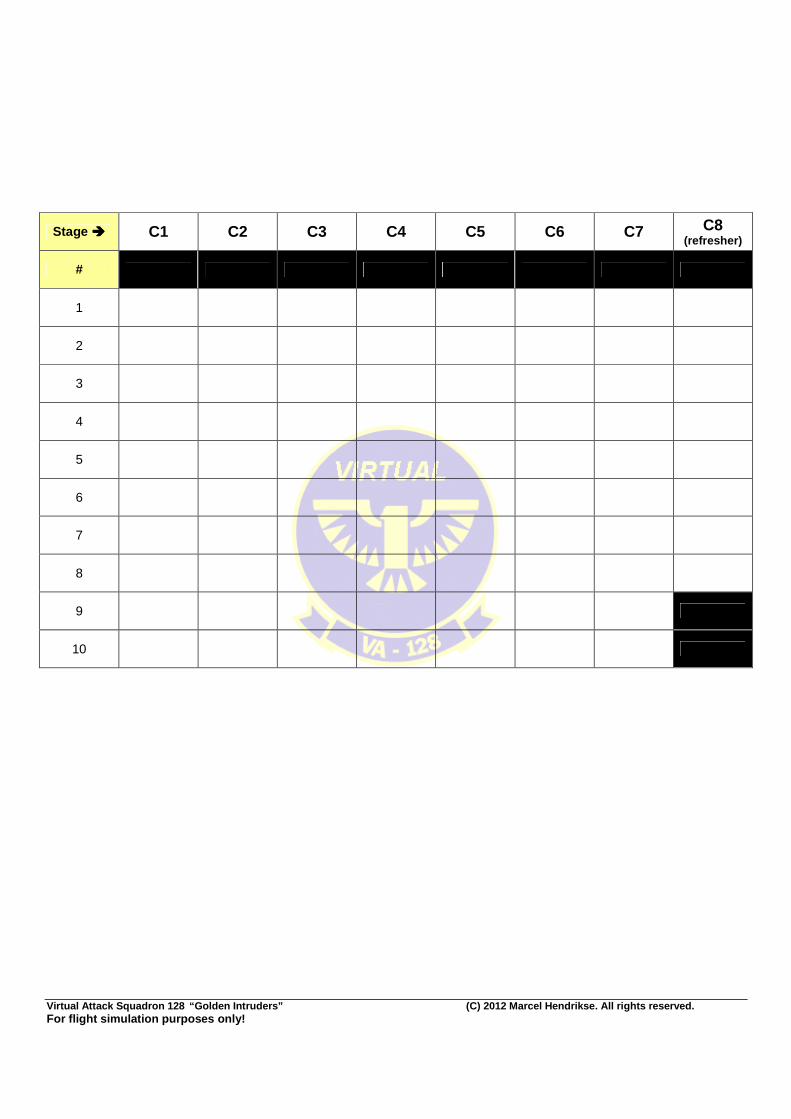
FFiinnaallss:: 330000 ffeeeett AAGGLL The “90” denotes the position where your course is 90 degrees off the final approach course Speed throughout the turn: 112-118 KIAS Once on final, keep that speed range and follow the descend path to the runway until the aircraft touches down Upon touchdown, retract the speed brakes and apply full power, climb to 600 feet AGL straight ahead At 600, make a 30 AOB left-hand turn, while slowing to 120 KIAS. On the downwind leg, put the aircraft into landing configuration: gear down, flaps down, speed brakes out, maintain 120 KIAS Repeat this cycle again and again, from different runways at NAS Whidbey Island each session. On the next page is a schedule that you can use to register your touch and go’s. I have used a similar schedule for gauging progress while flying the RAZBAM T-2C Buckeye and found that after 30 landings, your proficiency has increased to such an extend that your actions almost become second nature. The schedule looks like a lot of landings (and, yes, there are 78 of them!), but I found that once you are really going on this repeated exercise, you will find that a cycle of 10 landings can be completed in a little over 1 hour. So at a rate of 1 hour a day, you could complete this schedule in under a week. By that time, you will have sufficient pattern and landing experience to consider yourself ready for CQ. In order to be successful in the CQ stage, you must gain substantial experience on landings. In real life naval aviation, a pilot’s life literally depends on his/her ability to safely bring the aircraft back aboard. It is very important to strive for accuracy. Don’t allow yourself to accept large altitude/speed deviations and go around if an approach gets out of hand. Never push a bad landing; safe your aircraft and make another circle. Better be safe than sorry! Use the virtual cockpit at 0.50 zoom at all times, so you can better judge your approaches to the runway. If necessary, use SHIFT+Z to display the flight data in the top of the display. Once you get good at landings, you will find that it is a very rewarding and fun thing to do!
Virtual Attack Squadron 128 “Golden Intruders” (C) 2012 Marcel Hendrikse. All rights reserved. For flight simulation purposes only!
Stage ���� C1 C2 C3 C4 C5 C6 C7 C8 (refresher)
#
1
2
3
4
5
6
7
8
9
10
Virtual Attack Squadron 128 “Golden Intruders” (C) 2012 Marcel Hendrikse. All rights reserved. For flight simulation purposes only!
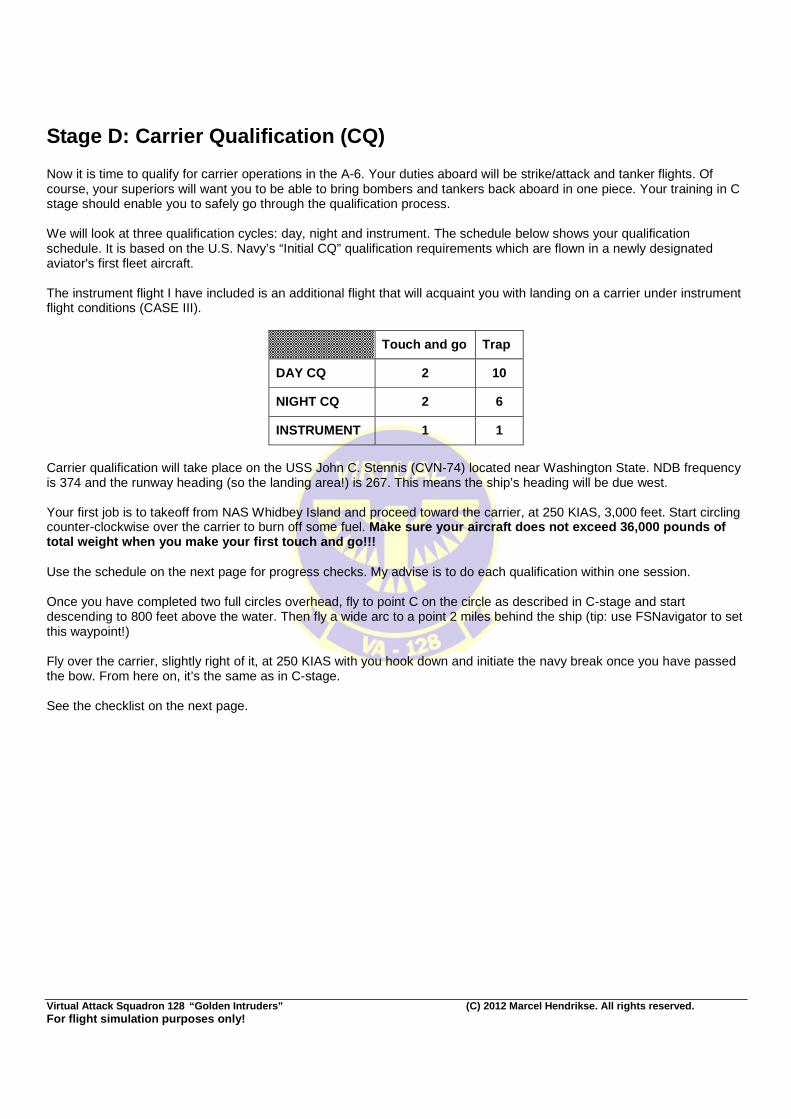
Stage D: Carrier Qualification (CQ) Now it is time to qualify for carrier operations in the A-6. Your duties aboard will be strike/attack and tanker flights. Of course, your superiors will want you to be able to bring bombers and tankers back aboard in one piece. Your training in C stage should enable you to safely go through the qualification process. We will look at three qualification cycles: day, night and instrument. The schedule below shows your qualification schedule. It is based on the U.S. Navy’s “Initial CQ” qualification requirements which are flown in a newly designated aviator's first fleet aircraft. The instrument flight I have included is an additional flight that will acquaint you with landing on a carrier under instrument flight conditions (CASE III).
Touch and go Trap
DAY CQ 2 10
NIGHT CQ 2 6
INSTRUMENT 1 1
Carrier qualification will take place on the USS John C. Stennis (CVN-74) located near Washington State. NDB frequency is 374 and the runway heading (so the landing area!) is 267. This means the ship’s heading will be due west. Your first job is to takeoff from NAS Whidbey Island and proceed toward the carrier, at 250 KIAS, 3,000 feet. Start circling counter-clockwise over the carrier to burn off some fuel. Make sure your aircraft does not exceed 36,000 poun ds of total weight when you make your first touch and go! !! Use the schedule on the next page for progress checks. My advise is to do each qualification within one session. Once you have completed two full circles overhead, fly to point C on the circle as described in C-stage and start descending to 800 feet above the water. Then fly a wide arc to a point 2 miles behind the ship (tip: use FSNavigator to set this waypoint!) Fly over the carrier, slightly right of it, at 250 KIAS with you hook down and initiate the navy break once you have passed the bow. From here on, it’s the same as in C-stage. See the checklist on the next page.
Virtual Attack Squadron 128 “Golden Intruders” (C) 2012 Marcel Hendrikse. All rights reserved. For flight simulation purposes only!
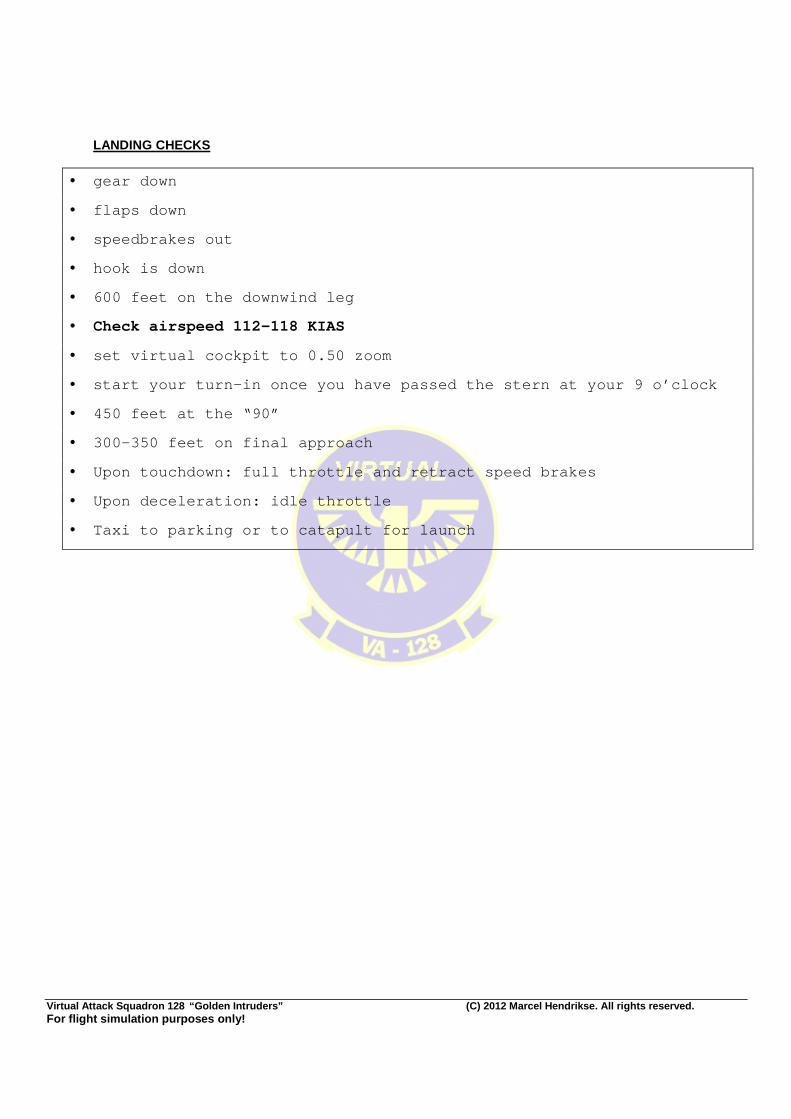
LANDING CHECKS
• gear down
• flaps down
• speedbrakes out
• hook is down
• 600 feet on the downwind leg
• Check airspeed 112-118 KIAS
• set virtual cockpit to 0.50 zoom
• start your turn-in once you have passed the stern a t your 9 o’clock
• 450 feet at the “90”
• 300-350 feet on final approach
• Upon touchdown: full throttle and retract speed bra kes
• Upon deceleration: idle throttle
• Taxi to parking or to catapult for launch
Virtual Attack Squadron 128 “Golden Intruders” (C) 2012 Marcel Hendrikse. All rights reserved. For flight simulation purposes only!
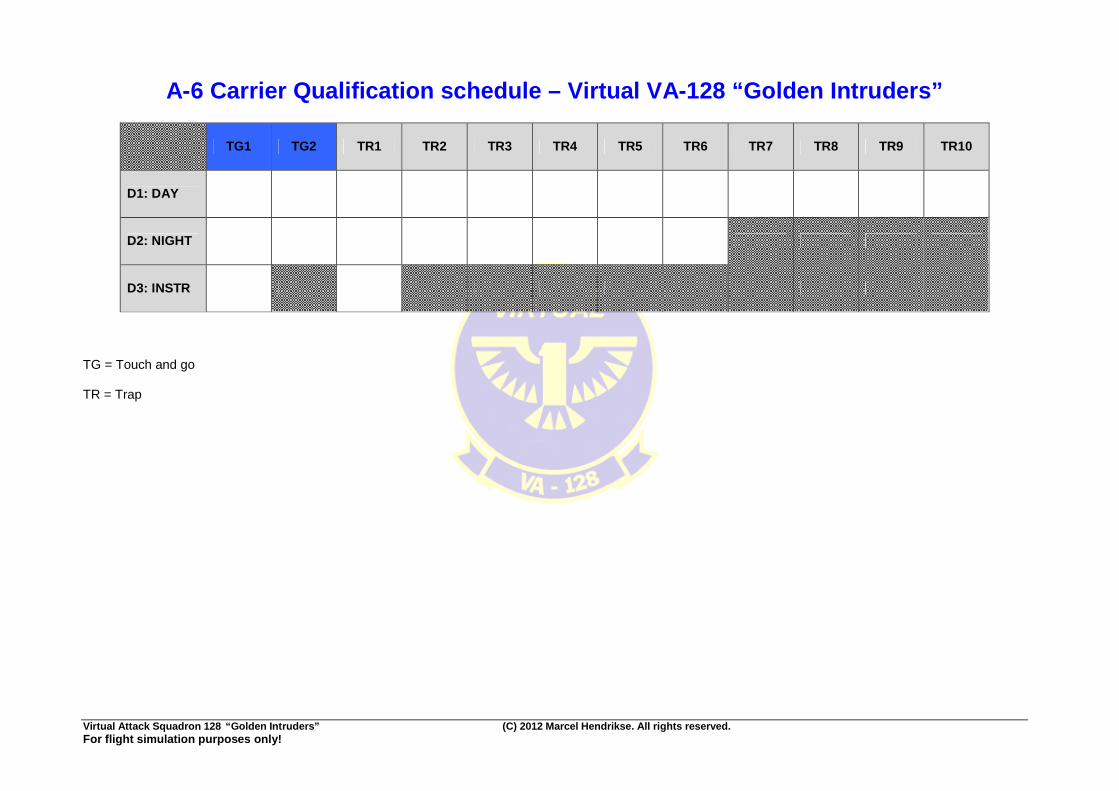
A-6 Carrier Qualification schedule – Virtual VA-128 “Golden Intruders”
TG1 TG2 TR1 TR2 TR3 TR4 TR5 TR6 TR7 TR8 TR9 TR10
D1: DAY
D2: NIGHT
D3: INSTR
TG = Touch and go TR = Trap
Virtual Attack Squadron 128 “Golden Intruders” (C) 2012 Marcel Hendrikse. All rights reserved. For flight simulation purposes only!
What happens next? Not covered in this syllabus, but perhaps it is nice to sketch the outlines as they were in the good old A-6 days: Once you have completed the CQ training, your time in VA-128 has ended. You are now to be transferred to one of the U.S. Navy’s operational A-6 squadrons. There, you will be trained to use your A-6 as a weapons delivery system. Flying from NAS Fallon, Nevada, you will learn how to deploy different types of ordnance. Your squadron is part of an Air Wing. That Air Wing will be part of a Carrier Strike Group and within that group is your ship. This ship will be an aircraft carrier assigned to the Navy’s Pacific or Atlantic Fleet. Once you have boarded that ship, you will have to make 6 day traps and 3 night traps, each proceeded by 1 touch and go . Unless the LSO (Landing Signal Officer) gives a negative advice to the Operations Officer of your squadron as to your performance in carrier operations, your name will appear on the flight schedule. Only then will you have ‘made it to the fleet’. And be able to call yourself a ‘carrier pilot’. Translated to Flight Simulator: Pick a carrier (carr2006.zip for scenery, see the website!) in a foreign area. The mentioned file places various carriers in hotspots like the Persian Gulf, Gulf of Sidra, Central America, Asia….. Choose one. Create a startup situation on that carrier and from there, make the required day and night traps in order to get used to your new base at sea. You can add them to the ones you have already logged during your training. From there on, your ‘tour of duty’ has begun. Best of luck, Lieutenant!