Embed Size (px)
Citation preview
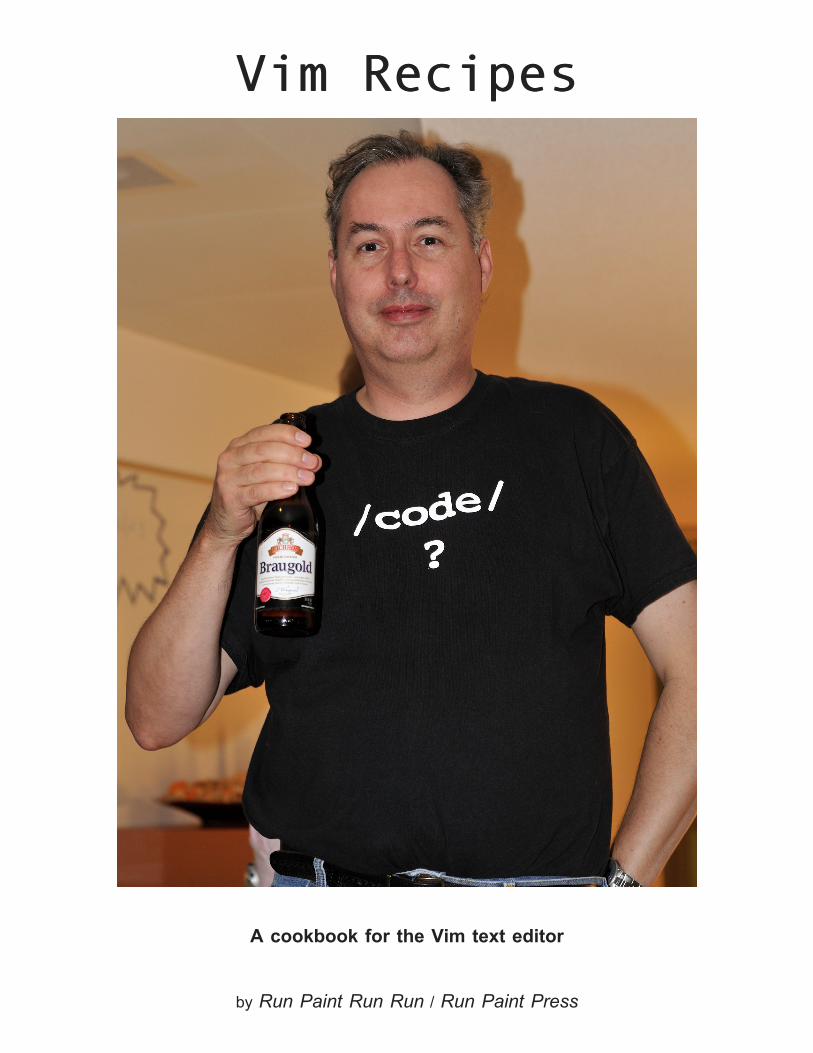
VimVim RecipesRecipes
A cookbook for the Vim text editor
by Run Paint Run Run / Run Paint Press
Vim Recipes
Visit http://vim.runpaint.org/ for latest updates. 1
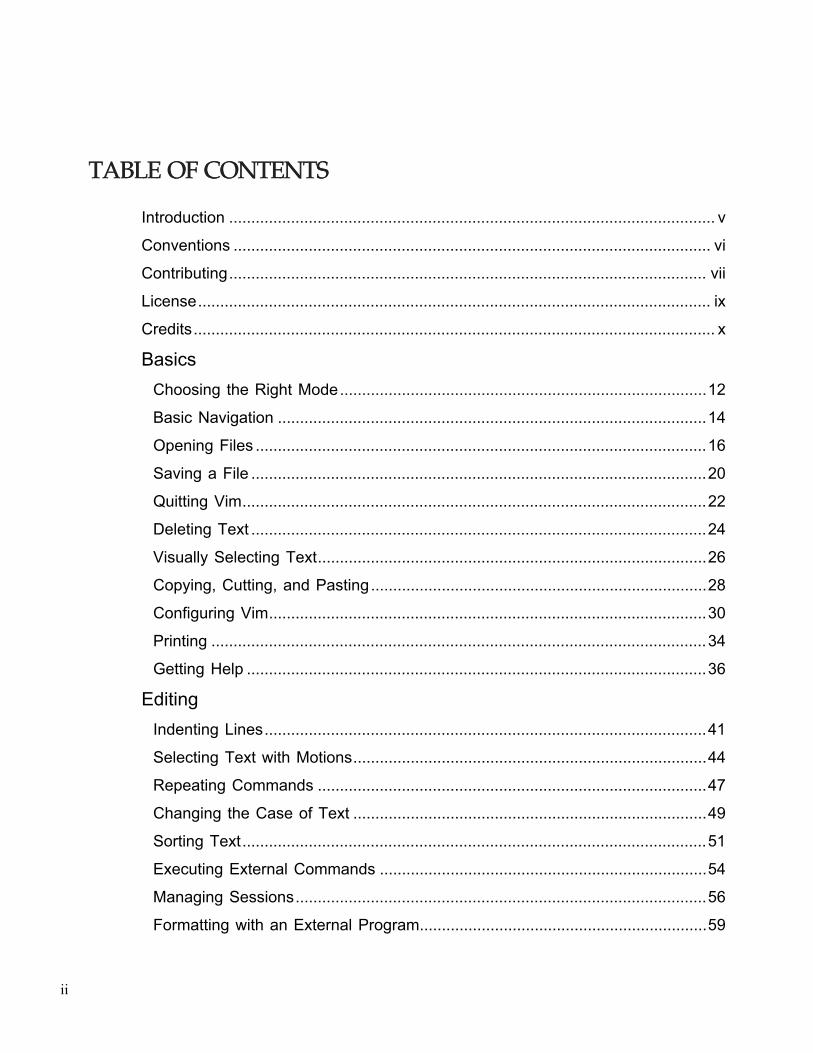
TABLETABLE OFOF CONTENTSCONTENTS
Introduction .............................................................................................................. v
Conventions ............................................................................................................ vi
Contributing............................................................................................................ vii
License.................................................................................................................... ix
Credits...................................................................................................................... x
BasicsChoosing the Right Mode...................................................................................12
Basic Navigation .................................................................................................14
Opening Files ......................................................................................................16
Saving a File .......................................................................................................20
Quitting Vim.........................................................................................................22
Deleting Text .......................................................................................................24
Visually Selecting Text........................................................................................26
Copying, Cutting, and Pasting............................................................................28
Configuring Vim...................................................................................................30
Printing ................................................................................................................34
Getting Help ........................................................................................................36
EditingIndenting Lines....................................................................................................41
Selecting Text with Motions................................................................................44
Repeating Commands ........................................................................................47
Changing the Case of Text ................................................................................49
Sorting Text.........................................................................................................51
Executing External Commands ..........................................................................54
Managing Sessions.............................................................................................56
Formatting with an External Program.................................................................59
ii
Working with Different File Formats ...................................................................61
TypingSpell Checking ....................................................................................................64
Using Templates .................................................................................................66
Undoing Mistakes................................................................................................70
Auto-Completing Text .........................................................................................72
Abbreviating Common Strings ............................................................................75
Inserting Accented or “Foreign” Characters .......................................................77
Opening the File .................................................................................................80
Inserting the Date ...............................................................................................83
Inserting Snippets ...............................................................................................85
NavigationNavigating Text Files ..........................................................................................90
Navigating Source Code.....................................................................................92
Navigating the Viewport......................................................................................94
Navigating Buffers...............................................................................................95
Navigating Tabs ..................................................................................................97
Manually Creating Folds .....................................................................................99
Navigating Folds ...............................................................................................102
Splitting the Screen...........................................................................................104
Navigating Marks ..............................................................................................106
Navigating Tags ................................................................................................108
Bookmarking Lines with Visible Markers (Signs).............................................111
GUIChanging the Font ............................................................................................115
Maximising Screen Space ................................................................................117
Creating Menus and Toolbar Buttons ..............................................................119
SearchingSearching for any Word....................................................................................122
Vim Recipes
Visit http://vim.runpaint.org/ for latest updates. iii
Searching Over Multiple Files ..........................................................................123
Searching and Replacing..................................................................................126
Searching for the Word Beneath the Cursor ...................................................128
Creating Regular Expressions ..........................................................................129
Looking up Documentation for the Keyword Under the Cursor ......................134
DisplayWorking with Long Lines ..................................................................................136
Displaying Line Numbers..................................................................................138
Working with Remote Files...............................................................................140
Changing the Status Line .................................................................................142
Redefining Highlight Groups.............................................................................145
Modifying the Cursor.........................................................................................148
Changing the Window Title ..............................................................................150
ExtendingCreating Keyboard Shortcuts with Key Mappings ...........................................153
Changing the Colour Scheme ..........................................................................155
Creating Command-Line Commands ...............................................................157
Extending Vim with Scripts and Plugins ..........................................................159
Integrating Vim with Git ....................................................................................162
Other Uses of VimBrowsing Directories .........................................................................................167
Using Vim as a File Manager...........................................................................169
Viewing Differences Between Files ..................................................................172
Outlining a Document .......................................................................................174
iv
INTRODUCTIONINTRODUCTION
The Vim text editor is perhaps as famous for its learning curve as it is for its
contributions to productivity. Vim isn't "intuitive" in the way other applications claim to
be—you cannot use it by simply replicating the actions you perform with a word
processor, by clicking on menu items aimlessly until you achieve your desired effect.
But this is by design. The major strength of Vim is that it does things differently to
magnificent effect. It permanently alters the way in which you regard text editors and
software in general. And that is why, in 2009, I am putting the finishing touches to a
free book about a text editor whose ancestry can be traced back to 1976.
This book is written to be consulted when you're looking for a better way to perform a
task. It does not replace Vim's excellent built-in documentation, but complements it by
focussing on tasks rather than commands. It will always be incomplete by virtue of Vim
having more features and extensions than I have years alive, but will hopefully still
serve as an indispensable reference.
In addition to being free, this book is open source. The files from which it is compiled
are freely available, for you to examine and, hopefully, improve. In any case, I would
enjoy hearing any feedback you have. Contact details are in the Contributing section,
and you can e-mail me at the address below.
Happy Viming!
—Run Paint Run Run ([email protected]), 2009, U.K.
Vim Recipes
Visit http://vim.runpaint.org/ for latest updates. v

CONVENTIONSCONVENTIONS
The following typographical conventions are used in this book:
KEYKEY PRESSESPRESSES
<Esc><Esc> - Indicates that the named key should be pressed.
<Ctrl><Ctrl>--pp - Keys joined with a - should be pressed simultaneously. In this example
the <Ctrl><Ctrl> should be held down while the pp key is pressed.
NORMALNORMAL MODEMODE COMMANDSCOMMANDS
gqapgqap - The named characters should be entered in order while in Normal mode.
COMMAND-LINECOMMAND-LINE COMMANDSCOMMANDS
:set spell - The command should be typed in Command-Line mode. (If you're in a
different mode, press <Esc><Esc> before you type the command).
:!command - As above, but command is a variable which should be substituted for its
value.
MONOSPACEDMONOSPACED FONTFONT
A fixed width font is used for filenames, code, and variable names.
vi
CONTRIBUTINGCONTRIBUTING
This book is released under a Creative Commons Attribution-Share Alike 3.0 Unported
License, and its complete text is available in a Git repository. All contributions are
welcomed. Patches are preferred, but if you're not comfortable with Git you can use
the issue tracker as described below.
ISSUEISSUE TRACKERTRACKER
You may report typographical errors, factual mistakes, or unclear passages via the
web-based issues tool at github.com/runpaint/vim-recipes/issues.
E-MAILE-MAIL
You can send patches and bug reports to [email protected].
PATCHESPATCHES
The source for this book is available in a Git repository. If you have Git installed on
your system you may clone the repository using the URL git://github.com/runpaint/vim-
recipes.git. (For an introduction to Git see the Git Community Book).
You'll probably want to do something like this:
$ gitgit cloneclone git://github.com/git://github.com/runpaint/runpaint/vim-recipes.gitvim-recipes.git
Initialized empty Git repository in /tmp/vim-recipes/.git/
remote: Counting objects: 666, done.
remote: Compressing objects: 100% (610/610), done.
Vim Recipes
Visit http://vim.runpaint.org/ for latest updates. vii
remote: Total 666 (delta 350), reused 0 (delta 0)
Receiving objects: 100% (666/666), 407.52 KiB | 35 KiB/s,
done.
Resolving deltas: 100% (350/350), done.
$ cdcd vim-recipesvim-recipes
$ vimvim text/text/04_basics/04_basics/09_configuring_vim.html09_configuring_vim.html
$ gitgit commitcommit -a-a
Then either send me a patch ([email protected]), or post it to the issue tracker.
Alternatively, if you already use GitHub, fork the repository, make your changes, then
send me a pull request.
viii
LICENSELICENSE
This work is licensed under the Creative Commons Attribution-Share Alike 3.0
Unported License. To view a copy of this license, visit http://creativecommons.org/
licenses/by-sa/3.0/ or send a letter to Creative Commons, 171 Second Street, Suite
300, San Francisco, California, 94105, USA.
Vim Recipes
Visit http://vim.runpaint.org/ for latest updates. ix
CREDITSCREDITS
COVERCOVER IMAGEIMAGE
The cover photograph of Bram Moolenaar, the creator of Vim, was taken by Sebastian
Bergmann and kindly released under a Creative Commons Attribution-Share Alike 2.0
Generic License. The original photograph can be viewed at Flickr.
CSSCSS
The Cascading Style Sheets used in the production of the book were derived
significantly from the work of others. Mark Pilgrim's stylesheet from Dive Into Python 3
was the main inspiration. In conjunction, the CSS created by Håkon Wium Lie and Bert
Bos for their book entitled Cascading Style Sheets: Designing for the Web, 3rd Edition,
and graciously made available via A List Apart, was particularly helpful. Lastly, Nando
Vieira's kitabu project offered ideas on how to tie it all together.
CONTRIBUTORSCONTRIBUTORS
The following people have kindly contributed ideas, corrections, and advice: Rizal
Almashoor, Raúl Núñez de Arenas Coronado, Adam Blinkinsop, coderpunk, dm3, Kjetil
Dynnamittt, Ihar Filipau, Michael Houghton, Javier Rojas, and others who I'm bound to
have omitted. Thank you!
x
BASICSBASICS
Vim Recipes
Visit http://vim.runpaint.org/ for latest updates. 11
CHOOSINGCHOOSING THETHE RIGHTRIGHT MODEMODE
PROBLEMPROBLEM
You know that Vim has multiple modes of operation but aren't sure when to use which
one.
SOLUTIONSOLUTION
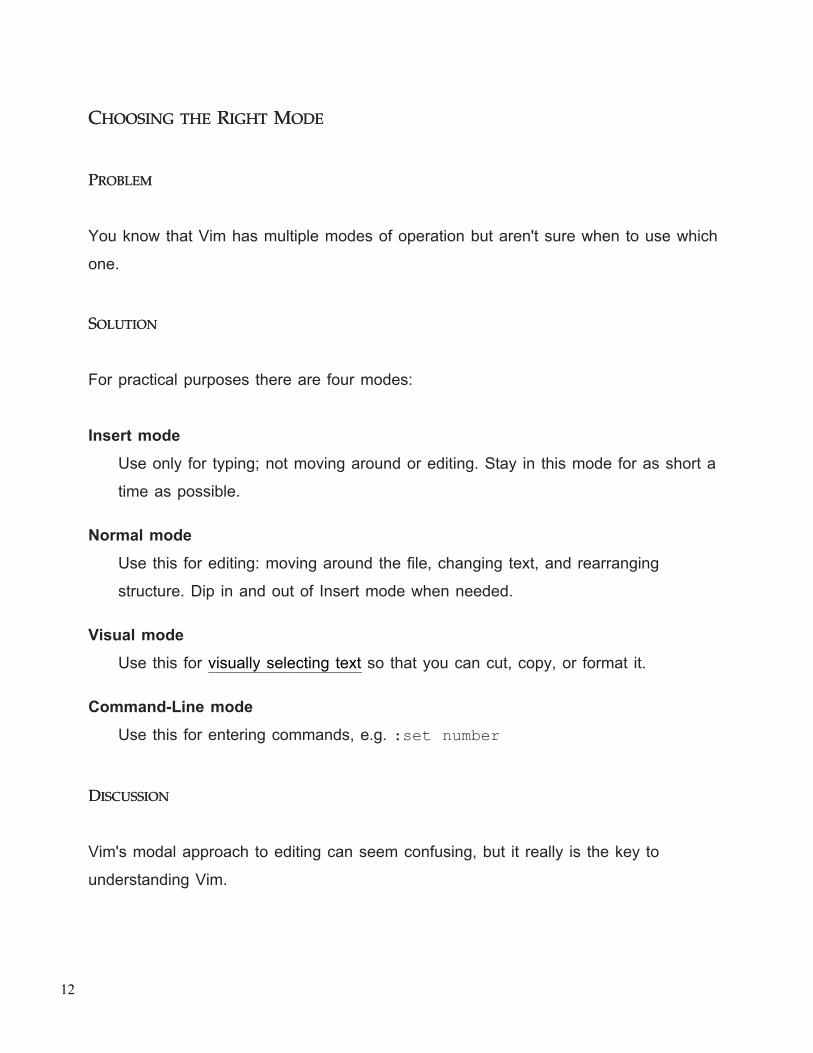
For practical purposes there are four modes:
Insert modeUse only for typing; not moving around or editing. Stay in this mode for as short a
time as possible.
Normal modeUse this for editing: moving around the file, changing text, and rearranging
structure. Dip in and out of Insert mode when needed.
Visual modeUse this for visually selecting text so that you can cut, copy, or format it.
Command-Line modeUse this for entering commands, e.g. :set number
DISCUSSIONDISCUSSION
Vim's modal approach to editing can seem confusing, but it really is the key to
understanding Vim.
12
It's tempting to spend much of your time in Insert mode, and navigate with the arrow
keys. However, this is slow and requires an awful lot of key presses.
Normal mode is the default mode because it makes it so easy to move around the file
to either edit existing text or position the cursor where you want to insert text.
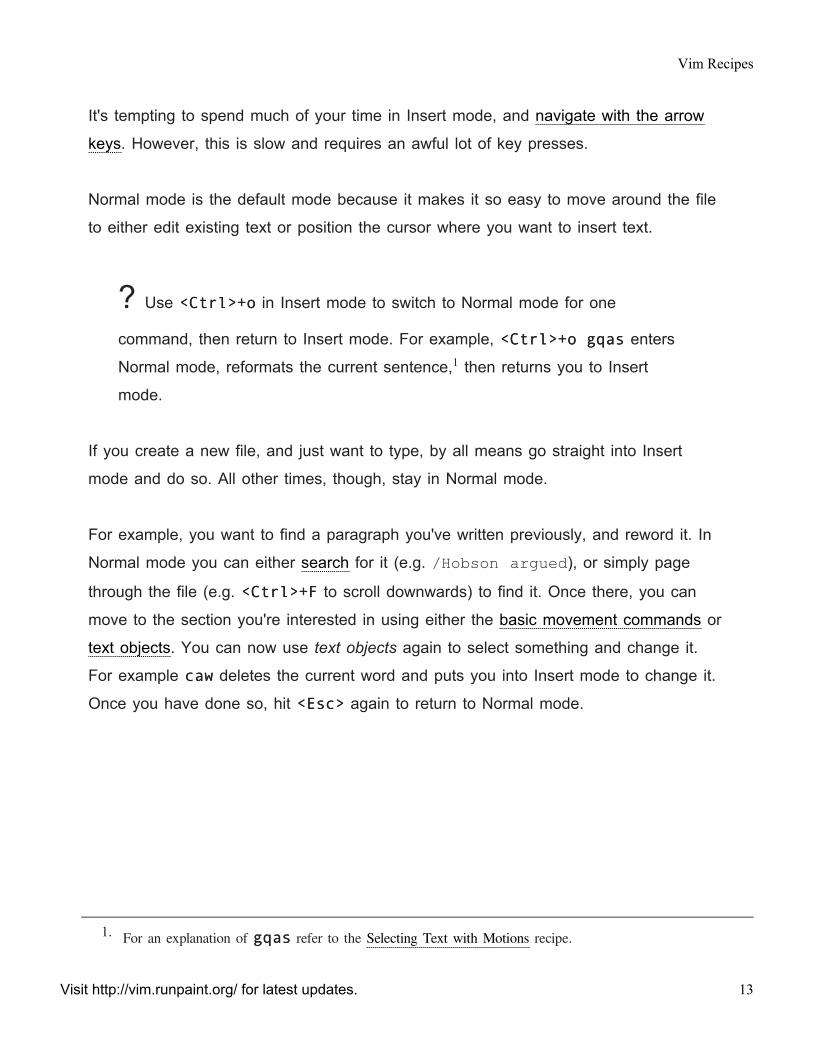
? Use <Ctrl><Ctrl>++oo in Insert mode to switch to Normal mode for one
command, then return to Insert mode. For example, <Ctrl><Ctrl>++oo gqasgqas enters
Normal mode, reformats the current sentence,1 then returns you to Insert
mode.
If you create a new file, and just want to type, by all means go straight into Insert
mode and do so. All other times, though, stay in Normal mode.
For example, you want to find a paragraph you've written previously, and reword it. In
Normal mode you can either search for it (e.g. /Hobson argued), or simply page
through the file (e.g. <Ctrl><Ctrl>++FF to scroll downwards) to find it. Once there, you can
move to the section you're interested in using either the basic movement commands or
text objects. You can now use text objects again to select something and change it.
For example cawcaw deletes the current word and puts you into Insert mode to change it.
Once you have done so, hit <Esc><Esc> again to return to Normal mode.
1. For an explanation of gqasgqas refer to the Selecting Text with Motions recipe.
Vim Recipes
Visit http://vim.runpaint.org/ for latest updates. 13
BASICBASIC NAVIGATIONNAVIGATION
PROBLEMPROBLEM
You want to move around inside a file.
SOLUTIONSOLUTION
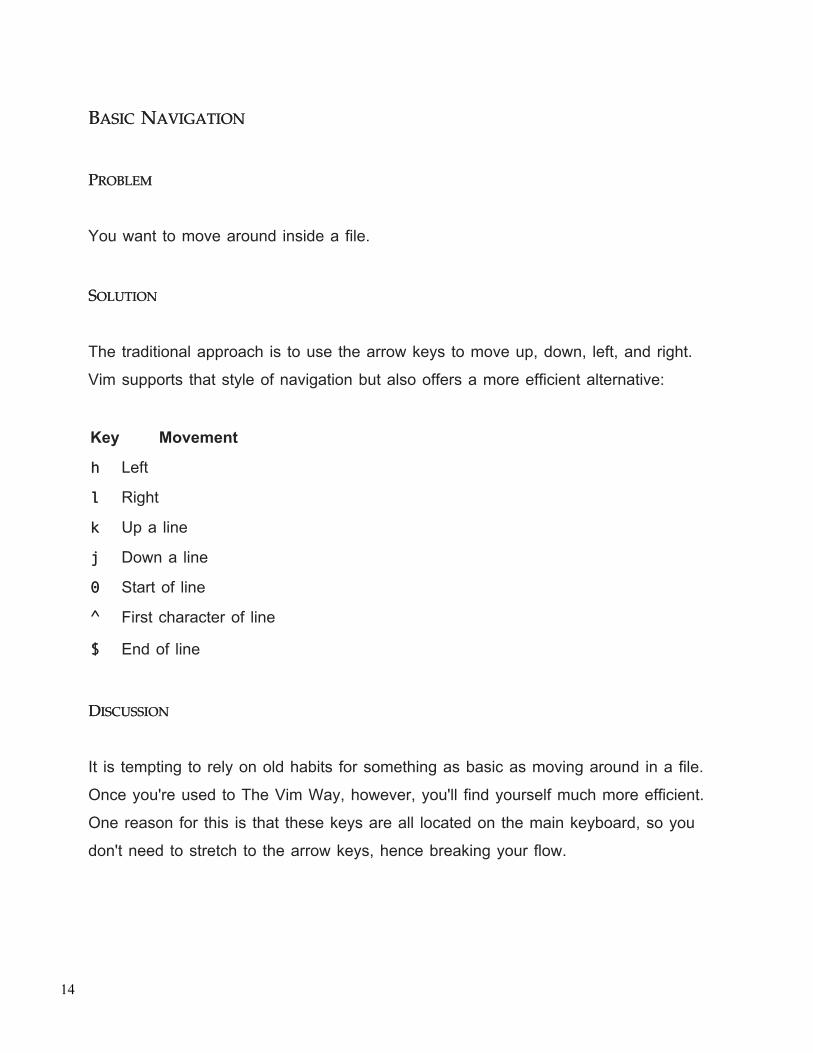
The traditional approach is to use the arrow keys to move up, down, left, and right.
Vim supports that style of navigation but also offers a more efficient alternative:
Key Movement
hh Left
ll Right
kk Up a line
jj Down a line
00 Start of line
^̂ First character of line
$$ End of line
DISCUSSIONDISCUSSION
It is tempting to rely on old habits for something as basic as moving around in a file.
Once you're used to The Vim Way, however, you'll find yourself much more efficient.
One reason for this is that these keys are all located on the main keyboard, so you
don't need to stretch to the arrow keys, hence breaking your flow.
14

Another benefit is that you can prefix these shortcuts with counts (as you can with
many Vim commands) which specify how many times they should be executed. For
instance, 2k2k moves up two lines.
Once you've become used to these keys, take a look at motions and text objects in
Selecting Text with Motions to make the humble combination of hh, ll, kk, and jj more
powerful still.
Vim Recipes
Visit http://vim.runpaint.org/ for latest updates. 15

OPENINGOPENING FILESFILES
PROBLEMPROBLEM
You want to open a file in Vim.
If you want to edit or view an existing file you need to open it first. For example, if your
world-changing novel is saved as novel.txt, you want to open novel.txt in Vim.
SOLUTIONSOLUTION
To open a file from the command line invoke Vim with the filename as an argument.
For example: vim docs/novel.txt (on Windows: vim.exe docs\novel.txt).
To open a file from inside Vim you can use :e file (mnemonic: edit). This closes the
current file and opens a new buffer containing the given file.
? If you use Andy Lester's ack utility you can create a shell script to open
files without having to specify their path. For example, using bash:
#!/bin/sh
vim $(ack -g $@)
Name it vack, then vack shapes.rb will search recursively downwards from
the current directory to find shapes.rb, then open it in Vim.
16
DISCUSSIONDISCUSSION
You may prefix the filename with +linenumber to instruct Vim to jump to the given
line after opening. For example, vim +7 todo.list or :e +100 treatise.txt. If
you omit linenumber, i.e. you prefix the filename with +, Vim will jump to the end of
the file.
Similarly, prefixing the filename with +/pattern positions the cursor at the first
occurrence of the pattern pattern. For example, vim +/^Referencesbtrees.textile instructs Vim to open btrees.textile, find the first line that
starts with References, then position the cursor there.
The :cd directory command lets you change the directory Vim resolves
relative paths to. So if you're working with multiple files in the same directory
tree you can use this command to set your working directory so it's easier to
open files. For example, instead of opening /home/julie/recipes/pasta/cabonara.txt then /home/julie/recipes/pasta/peperonata.txt you
can :cd /home/julie/recipes/pasta then :e carbonara.txt. If you
forget which directory you're in :pwd (print working directory) will tell you.
If you supply multiple filenames, Vim opens them all, one in each buffer. The first file
named is opened in the current buffer. If you provide a line number or pattern to jump
to, this only affects the first named file. Typing :next advances you to the next file in
the list.
When working with multiple files you may prefer to view them in tabs or split windows,
instead of buffers.
Vim Recipes
Visit http://vim.runpaint.org/ for latest updates. 17
Tabs display a single file at a time, but, by default, provide a list of opened tabs across
the top of the screen. You can switch to an open tab by clicking on its name in the
GUI or referring to its number. From within Vim :tabedit file opens the named file
in a new tab. Or, from the command line vim -p files opens each named file in its
own tab.
Split windows display multiple files on screen simultenously. By default the screen is
divided horizontally, putting each file beneath the previous, but you may also split it
vertically so that each file is displayed next to each other. From Vim :split file
splits the screen horizontally between the current file and the named file. :vsplitfile effects a vertical division. These operations can be conducted from the command
line with vim -o files and vim -O files, respectively.
So far we have specified filenames literally by naming each file to open. However, at
other times this is impractical. For example, suppose you want to edit all files whose
names end with .txt, or a file that you can only remember has the word lethargy in
it. In cases such as these we would rather describe a group of files by using wildcards.
If you're opening a file from the command line (i.e. vim resume.tex), your shell
expands any wildcards. Windows is notoriously weak at command-line work, but other
operating systems will probably do the right thing here. For example, using the bash
shell I can open .txt files whose names start with 1, 2, or 3 with vim [123]*.txt.
Vim commands that accept filenames support a similar set of wildcards with one
caveat: some commands only accept a single filename, while others accept a list. The
implication is that if you use wildcards with a command like :edit, which only takes a
single filename, they cannot expand to multiple files. So if your current directory
contained only one .html file, :edit *.html would save you typing and work how
you expect. However, if the directory contained multiple .html files, that same wildcard
18
would imply a list of files, and :edit *.html would complain: E77: Too many
file names.
Instead of using :edit, you can use :next files which happily accepts a list of
files, and opens each one in a new buffer. The :args files command is similar, but
instead of appending the list of files to the current list of open files, it uses them to
replace the current list.
Vim Recipes
Visit http://vim.runpaint.org/ for latest updates. 19
SAVINGSAVING AA FILEFILE
PROBLEMPROBLEM
You want to save the file you've been working on.
After you've made changes to a file you typically want to save them. For example, if
you've written up a turkey recipe to send to your daughter, you'd open Vim, type the
recipe, save it to turkey-recipe.txt, then e-mail turkey-recipe.txt to your
hungry child.
SOLUTIONSOLUTION
The :up[date] command saves the current buffer if it has been modified2. If your file
doesn't have a name yet, you'll need to follow :up with a filename. This is conceptually
similar to most word processors' Save function.
To change the name of an existing file, use :saveas file. If file already exists
and you want to overwrite it, use :saveas! file. This is conceptually the same as most
word processors' Save As function.
DISCUSSIONDISCUSSION
There are a number of situations where it can be useful to have Vim save your file for
you automatically. One is when you're working with files in multiple buffers and cycling
between them. By default, every time you switch to a buffer Vim prompts you to save
the current one first. Another is when you execute an external command on the current
2. The more common command to save a file is :w, however this always saves the file, even if it hasn't beenchanged. :up preserves timestamps and saves needless disk access.
20
file. The command is passed the file's name, so if your buffer contains unsaved
changes, the command won't see them. The solution is to :set autowrite. This
causes files to be automatically saved when you switch buffers and execute external
commands. If you also want files automatically saved when you quit Vim, use :setautowriteall.
? The :autowrite functionality is not related to some word processor's concept
of auto-saving a file periodically in case of a crash. Vim does this
automatically.
You can also "write" a specific portion of a file to a new filename. By prefixing the :upcommand with a line range only the specified lines are written to the named file. For
example, :20,30up 20-30.txt saves lines twenty to thirty of the current buffer to a
file named 20-30.txt. Alternatively, select a portion of a file visually then execute
:up filename and the text you selected will be written to a file named filename.
Vim Recipes
Visit http://vim.runpaint.org/ for latest updates. 21
QUITTINGQUITTING VIMVIM
PROBLEMPROBLEM
You've finished using Vim and now you want to close the program.
SOLUTIONSOLUTION
To save the changes in the current file then quit use :x3. In Normal mode you use ZZZZ.
DISCUSSIONDISCUSSION
The way you quit Vim depends on what you want to quit (the whole program, or just
the current window) and what you want to do with your unsaved changes.
As mentioned above, if you're using a single window either :x or ZZZZ will save any
unsaved changes, and exit Vim.
To exit and discard your changes you use :q! (mnemonic: quit in a possibly
dangerous (exclamatory) manner).
You can also quit on the condition that there are no unsaved changes with :q; if you
do need to save Vim warns you E37: No write since last change (add ! to
override).
If you're using multiple windows the above commands will act upon the current window.
To quit all windows use :qa (mnemonic: quit all). Vim will prompt you to save any
3. The more usual suggestion for saving then quiting is :wq. We use :x here because it only saves the file ifit has been changed, thus preserving its timestamp and saving needless disk access.
22

changes. To quit all windows without saving use :qa! (mnemonic: quit all in a possibly
dangerous manner).
Vim Recipes
Visit http://vim.runpaint.org/ for latest updates. 23
DELETINGDELETING TEXTTEXT
PROBLEMPROBLEM
You wish to remove some text from a file. For example, you've typed a paragraph
which is no longer needed.
SOLUTIONSOLUTION
In Normal mode, move your cursor over the character to banish and hit xx (mnemonic:
expunge). This deletes characters under and after the cursor; to delete characters
before the cursor use XX. This is fine for single characters, but to delete words and
other text objects you can use ddmotionmotion. The difference, then, is that xx deletes
characters, whereas dd deletes text described by a given motion.
If you'd rather nuke entire lines at a time use dddd. So, to delete the current line and the
one following it: 2dd2dd. Use a range prefix to delete the specified lines, e.g. :17,20ddeletes lines seventeen through to twenty.
A compromise is to delete the remainder of a line, which can be achieved with DD. If
your cursor was positioned after compromise in the above sentence, and you then hit
DD, the line would be changed to just A compromise.
If you've selected a block of text visually, you can delete it all with xx.
DISCUSSIONDISCUSSION
Vim doesn't just delete text; it saves it to a register first. If you delete a small amount
of text (less than a line), it's stored in a register named "-. Otherwise, it's stored in "0,
24
whose existing contents are moved to "1, whose existing…right up to "9. This allows
you easy access to previously deleted text inasmuch as you can recall, say, the 3rd
most recently deleted line with "2p"2p. Even more usefully, you can use :registers to
view your recent deletions. The Undoing Mistakes recipe explains how to revert these
deletions.
Vim Recipes
Visit http://vim.runpaint.org/ for latest updates. 25

VISUALLYVISUALLY SELECTINGSELECTING TEXTTEXT
PROBLEMPROBLEM
You want to interactively select some text by drawing a box around it, thus enabling
you to perform a command that affects it. In other words, you want to select a text like
you would in a GUI word processor using either the keyboard or, in Gvim, the mouse.
SOLUTIONSOLUTION
To select text character by character change to Visual mode with v, then move the
cursor as normal using the h,j,k,l keys. For example, to select the current character
and the three that follow hit v, then 3l. To select the current paragraph: v, then ap.
To select text by lines switch to Visual Line mode with V, then move upwards and
downwards with k and j as normal. For example, to select the current line and the 2
following it hit V, then 2j.
To select text in vertical blocks, or 'columns' to the rest of us, you use Visual Block
mode with <Ctrl>-v. For example, if you wanted to select the first two characters of
the current line and the 20 following, you'd position your cursor on the first character of
the first line you're interested in, hit <Ctrl>-v, move one character to the right (l),
then move down 20 lines with 20j.
If you want to switch selection mode mid-selection hit v, V, or <Ctrl>-v, as
appropriate.
26
DISCUSSIONDISCUSSION
As you get used to Vim's movement command, you'll have less of a need for the
various visual modes. Regardless, they can still be convenient when you're making
complex selections or aren't really sure what you're doing. ;-)
Having selected text, o can be used to toggle the cursor between the beginning and
end of the selection.
The point of selecting text is to operate on it. Here are some common actions:
• Copy/cut it.
• Format it, e.g. gqgq.
• Indent/unindent it.
Vim Recipes
Visit http://vim.runpaint.org/ for latest updates. 27
COPYING,COPYING, CUTTING,CUTTING, ANDAND PASTINGPASTING
PROBLEMPROBLEM
You want to duplicate text from one place to another. For example, you may want to
move the paragraph you've just typed above the previous one. Or maybe you want to
copy some text from a web page into Vim.
SOLUTIONSOLUTION
To copy/cut text from Vim you must first select it. You can do so visually, or provide a
motion to the relevant command.
Vim calls copying yanking, so to copy visually selected text use the yy (mnemonic:
yank) command. The syntax yymotionmotion yanks the text defined by motion. For example,
y2wy2w would copy the current and following words. yyyy works on lines instead, so 4yy4yy
would copy the current line and the three following it. (YY is a synonym, thus saving you
that extra keystroke ;-)).
Cutting is much the same, only it uses dd (mnemonic: delete) and dddd, respectively. To
cut the visually selected text, hit dd. To cut the current line, dddd. To cut the current word,
dwdw.
The text is now in one of Vim's registers. To paste the contents of a register into a file,
position your cursor appropriately, then use the pp (mnemonic: paste or put) key in
Normal mode. pp inserts text after the cursor. To insert the text before use PP. As with
many Vim commands, pp and PP can be prefixed with a repetition count, so 2p2p pastes
the clipboard contents twice.
28
To paste text from the system clipboard use ShiftShift++InsIns in Insert mode or "*p"*p in
Normal mode. Conversely, "+y yanks the current selection to the system clipboard.
DISCUSSIONDISCUSSION
The solution above uses the concept of a single clipboard, much like some operating
systems do. Vim can work this way, as you can see, but also supports 'named
registers'. These are, effectively, multiple, independent clipboards. 4 Registers are
named with a " character followed by a single lowercase letter, e.g. "a5.
To yank/delete/put using a named register, simply prefix the command with the register
name. So, to yank the current line to register "b use "byy"byy. To paste it use "bp"bp.
To view the contents of the registers (both user-set and Vim-set), issue the
:registers command.
When pasting text from external applications into a Vim instance Vim may clobber the
text by attempting to be too clever. This happens when it cannot distinguish between
entered text and pasted text. The most common symptom is that the pasted text is
indented bizarrely.
To fix this, consider using :set paste before you paste, then :set nopasteafterwards. Alternatively, use :set pastetoggle=key to map a key to toggle paste
mode. With this setup on Linux, for example, users could paste with
F11F11++ShiftShift--InsIns++F11F11.
4. Registers are actually far more powerful than this; :help registers for details.5. Again, this is a vast simplification.
Vim Recipes
Visit http://vim.runpaint.org/ for latest updates. 29
CONFIGURINGCONFIGURING VIMVIM
PROBLEMPROBLEM
You want your Vim preferences to persist over sessions.
For example, you want Vim to show line numbers all the time. Displaying Line
Numbers explains how, but when you restart Vim you find that your preferences have
been forgotten.
SOLUTIONSOLUTION
Throughout this book I will discuss how to configure Vim options using the :setoption or :set option=value syntax. This works, but only for the current instance
of Vim. If you specify these options in your vimrc file they'll be set permanently.
?? LocationLocation ofof vimrc
The default location of the vimrc file depends on your operating system.
Identify your operating system, then note the corresponding path. All
references in this book to vimrc refer to this path.
Gvim reads vimrc then a gvimrc file located in the same place as vimrc. In
this book vimrc and gvimrc are treated as synonyms.
Unix/Linux$HOME/.vimrc
30
OS/2$HOME/.vimrc or $VIM/.vimrc (or _vimrc)
MS-DOS and Windows$HOME/_vimrc or $VIM/_vimrc
Amigas:.vimrc or $VIM/.vimrc
The vimrc is a simple plain text file. Open the filename specified in the sidebar and
add one option per line using the option=value syntax (the ':' prefix is unnecessary).
Indeed, this is the general principle for adding any Command-Line command in this
book to your vimrc. For example:
" Set the boolean number option to true
set number
" Set the textwidth option to '78'
set textwidth=78
" Set the expandtab option to false
set noexpandtab
A single quotation mark (") introduces comments. They are ignored by Vim, but
particularly useful for remembering what all of your preferences mean.
? Even if you don't want to specify any options in vimrc you should still
create it. On some systems Vim will act like the Vi editor in the absence of this
file, which is unlikely to be what you want.
Vim Recipes
Visit http://vim.runpaint.org/ for latest updates. 31
DISCUSSIONDISCUSSION
The vimrc locations given in the sidebar are used for user preferences; there are also
system wide vimrc files. User preferences take precedence over system preferences.
This means that if you change an option set in the system vimrc, your preferences
will be respected. However, if the system vimrc sets an option differently from the Vim
defaults, and you don't include it in your vimrc, the system preference will be used.
The example vimrc above is very basic. They can also include functions, conditionals,
and anything else Vim's scripting engine supports. For a simple example look at the
usage of :autocmd in the Using Templates recipe.
If your configuration becomes complex you may want to split it over multiple files. You
can instruct Vim to include these files in your configuration by adding a source file
line to vimrc for each config file. See Abbreviating Common Strings for an example.
If you want a different configuration for a specific project you can :set exrc then
include a .vimrc (or vimrc on DOS and MS Windows) in the project's directory. This
takes precedence over your vimrc, and will be used when you edit files in that
directory.
Warning: There's the potential for security problems when using exrc. If a vimrc was
placed in your project directory without you knowing -- as a result of unpacking an
archive, for example -- it could be used to execute arbitrary commands under your user
account. For this reason it's strongly recommended that you use :set secure in
conjunction with exrc. This prevents the directory-specific vimrc files from executing
potentially dangerous commands. The Vim documentation suggests adding setsecure as the last line in your vimrc.
32
?? DebuggingDebugging ConfigurationConfiguration
• Start Vim without loading your vimrc: vim -u NORC. (Use -U for
Gvim).
• Start Vim with a different vimrc: vim -u file.
• Start Vim in verbose mode: vim -V. (Describes each file being
sourced).
• Check the system wide vimrc to see whether its interacting badly with
yours.
Vim Recipes
Visit http://vim.runpaint.org/ for latest updates. 33
PRINTINGPRINTING
PROBLEMPROBLEM
You want to print something from Vim.
SOLUTIONSOLUTION
In GVim there's a Print entry on the File menu, and a printer icon on the toolbar. In
Vim execute :hardcopy.
DISCUSSIONDISCUSSION
:hardcopy converts the current file to Postscript and sends it to the default printer.
You can specify that a different printer is used with :set pdev=printer. For
example, :set pdev=usblp1.
If you have a PDF printer installed6, you can use this technique to print a file to PDF.
For example, assuming your PDF printer is called pdf:
set pdev=pdf
set printoptions=paper:A4,syntax:y,wrap:y
The printoptions line is a comma separated list of values that affect how Vim
formats the document before it sends it to the printer. A list of options is at :helppopt.
6. Linux/Mac users can install the CUPS PDF package to get a PDF printer, e.g. on Debian/Ubuntu: apt-get install cups-pdf.
34
The paper option sets the paper size. It accepts values such as A3, letter, and
legal.
The syntax option determines whether the document is printed with syntax
highlighting. By default it has the value a which means that Vim only uses highlighting
for colour printers. A value of y forces highlighting.
Lines are wrapped when wrap:y, which is the default. If wrap has the value n, long
lines are truncated.
Other useful options are header:0 to stop a header from being printed, number:y to
number lines, duplex:off to print on only one side of the page.
On Linux the lpr utility is used for printing. To use a different program add a stanza
such as the following to your vimrc:
set printexpr=PrintFile(v:fname_in)
function PrintFile(fname)
call system("a2ps " . a:fname)
call delete(a:fname)
return v:shell_error
endfunc
The above example specifies that the GNU Anything to Postscript (a2ps) utility is used
for printing. a2ps can print two pages per physical page and custom headers, for
example; see man a2ps for a complete list of features.
Vim Recipes
Visit http://vim.runpaint.org/ for latest updates. 35
GETTINGGETTING HELPHELP
PROBLEMPROBLEM
You want help with Vim but don't know where to look. Or, you've found help but find
the output of the online help confusing.
SOLUTIONSOLUTION
Look up a topic in the online help with :help topic. Search it with the :helpgreppattern command.
? When requesting help for a subject use <Ctrl><Ctrl>++dd to auto complete what
you've typed. For example, :help :h<Ctrl><Ctrl>++dd shows a list of help topics for
commands starting with :h.
DISCUSSIONDISCUSSION
The :help topic displays documentation for the tag named topic in the Vim
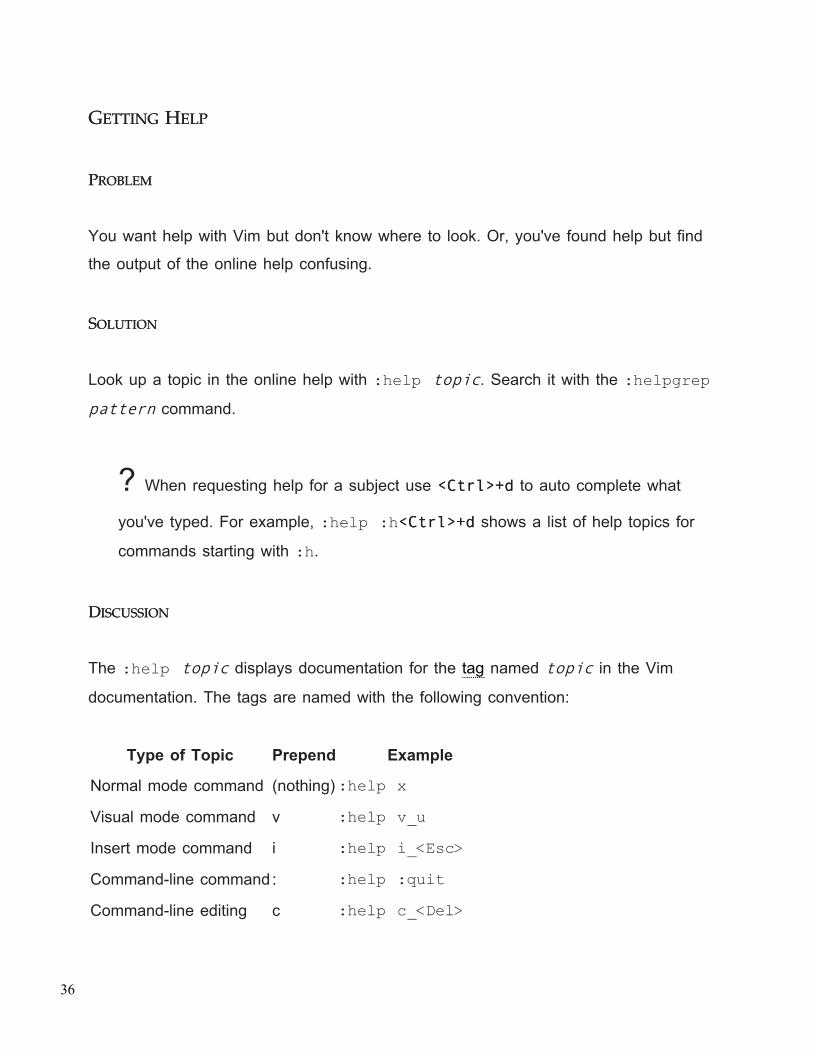
documentation. The tags are named with the following convention:
Type of Topic Prepend Example
Normal mode command (nothing) :help xVisual mode command v :help v_uInsert mode command i :help i_<Esc>Command-line command: :help :quitCommand-line editing c :help c_<Del>
36
Vim command argument - :help -r
Option ' :help 'textwidth'
(The table above is excerpted from the Vim online help).
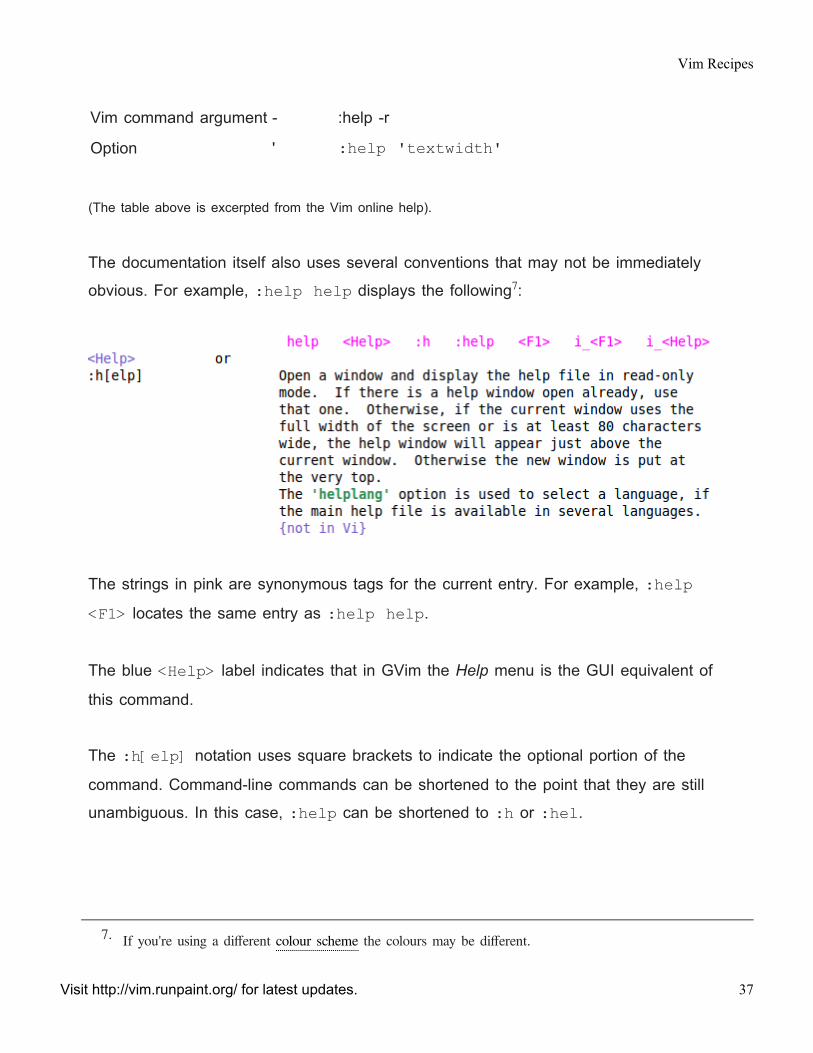
The documentation itself also uses several conventions that may not be immediately
obvious. For example, :help help displays the following7:
The strings in pink are synonymous tags for the current entry. For example, :help<F1> locates the same entry as :help help.
The blue <Help> label indicates that in GVim the Help menu is the GUI equivalent of
this command.
The :h[elp] notation uses square brackets to indicate the optional portion of the
command. Command-line commands can be shortened to the point that they are still
unambiguous. In this case, :help can be shortened to :h or :hel.
7. If you're using a different colour scheme the colours may be different.
Vim Recipes
Visit http://vim.runpaint.org/ for latest updates. 37
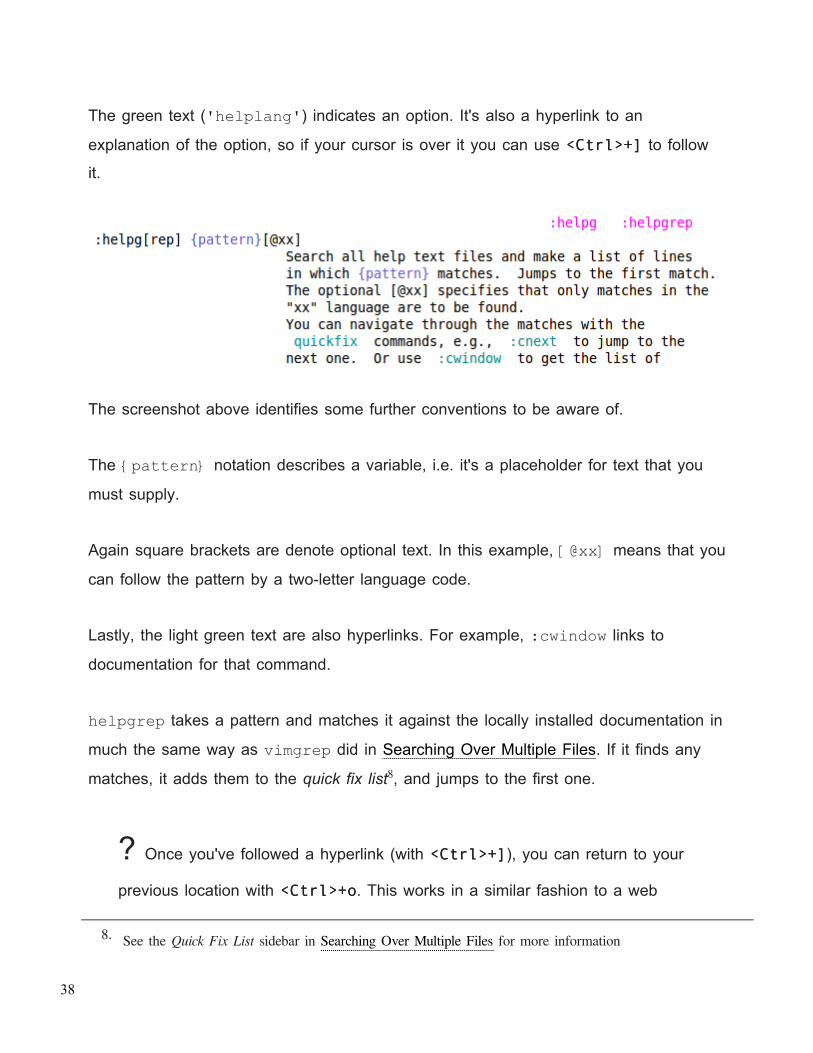
The green text ('helplang') indicates an option. It's also a hyperlink to an
explanation of the option, so if your cursor is over it you can use <Ctrl><Ctrl>++]] to follow
it.
The screenshot above identifies some further conventions to be aware of.
The {pattern} notation describes a variable, i.e. it's a placeholder for text that you
must supply.
Again square brackets are denote optional text. In this example, [@xx] means that you
can follow the pattern by a two-letter language code.
Lastly, the light green text are also hyperlinks. For example, :cwindow links to
documentation for that command.
helpgrep takes a pattern and matches it against the locally installed documentation in
much the same way as vimgrep did in Searching Over Multiple Files. If it finds any
matches, it adds them to the quick fix list8, and jumps to the first one.
? Once you've followed a hyperlink (with <Ctrl><Ctrl>++]]), you can return to your
previous location with <Ctrl><Ctrl>++oo. This works in a similar fashion to a web
8. See the Quick Fix List sidebar in Searching Over Multiple Files for more information
38

browser's Back button, so using this key combination n times will take you to
the place you were at n links previously.
If you've installed a Vim addon, you'll need to run :helptags docs-path before
helpgrep will see its documentation.
Vim Recipes
Visit http://vim.runpaint.org/ for latest updates. 39

EDITINGEDITING
40
INDENTINGINDENTING LINESLINES
PROBLEMPROBLEM
You want to use whitespace (spaces or tabs) to indent lines from the left margin.
For example, you may want to start your paragraphs with an indented first line. Or, if
you're writing program source code, you may want to visually represent the structure of
your program by using indentation to show nesting.
SOLUTIONSOLUTION
To start a line indented, just press the tab key once for each level of indentation.
To indent existing lines, highlight them visually and press >> to indent or << to unindent.
If you're in Insert or Replace mode you can use <Ctrl><Ctrl>--<Shift><Shift>--tt to indent
(mnemonic: tab), and <Ctrl><Ctrl>--<Shift><Shift>--dd to unident (mnemonic: de-tab/indent).
More powerful are motions combined with indent/unident commands. The syntax is
>>motionmotion to indent the text described by motion, and <<motionmotion to unident it. For
example, >ap>ap indents the current paragraph.
DESCRIPTIONDESCRIPTION
For many users, this solution will be sufficient. However, programmers regularly need
more control over indentation because it's so important to their work.
Vim Recipes
Visit http://vim.runpaint.org/ for latest updates. 41
? The :set list command makes literal tabs visible. It displays them as
^I, and uses a similar notation for other non-printable characters. The $symbol is used to show the end of lines.
A contentious issue among programmers involves how the tab key should work. There
are two main schools of thought:
• Literal tabs - Each press of the tab key should insert a literal tab character
(padding with spaces if necessary). To achieve this: :set tabstop=8 (the
default), :set softtabstop=8, :set shiftwidth=8, and :setnoexpandtab. Tabs are now eight columns wide; each indentation level is a
single tab.
• Convert tabs to spaces - Each press of the tab key should insert a certain
number of spaces. The settings you need are :set tabstop=8, :setshiftwidth=4, and :set expandtab. Tabs are now replaced with 4 spaces.
Real tabs are displayed 8 character wide, spaced tabs 4 characters wide.
shiftwidth controls how many spaces are inserted when using the >>>>/<<<< technique
described above, or the automatic indenting used with source code.
softtabstop specifies how many columns Vim uses when TabTab is hit in Insert mode.
If it's less than tabstop, and Vim's not expanding tabs (:set noexpandtab), Vim
indents with tabs, padding with spaces where necessary.
(It can be seen, then, that you'll typically want to make softtabstop and
shiftwidth equal, for reasons of consistency and sanity.)
42
The boolean expandtab option replaces tabs with spaces if true; leaves them alone if
false.
These settings are not retroactive. To make an existing file honour your indentation
preferences use the :retab! command.
SEESEE ALSOALSO
• Tabs versus Spaces: An Eternal Holy War by Jamie Zawinski.
• Secrets of Tabs in Vim by Ted Logan.
Vim Recipes
Visit http://vim.runpaint.org/ for latest updates. 43
SELECTINGSELECTING TEXTTEXT WITHWITH MOTIONSMOTIONS
PROBLEMPROBLEM
You want to define an area of text for a command to operate on without leaving
Normal mode.
For example, you want to delete next two words, or reformat the current paragraph.
SOLUTIONSOLUTION
In Normal and Visual mode operator commands can be followed by motions which
describe what text they should operate on. They can be thought of as a set of
directions the operator should use to select text.
For example, you can delete the character under the cursor with xx. If you wanted to
delete the word fandangle you'd need to press xx nine times: once for each character.
You could simplify the process by prefixing xx with a count: 9x9x. However, that requires
you to know how many characters are in the word, and would be totally impractical if
you wanted to delete multiple words at once. Instead you can use the ddmotionmotion
command which deletes the text selected by motion, as opposed to the character-by-
character approach of xx. The motion for a word is w, so you can delete the word more
easily with dwdw.
The following table shows some common operators which understand motions.
Operator Action Description
cc change Deletes then enters insert mode.
dd delete Deletes.
44
yy yank Copies to a register.
gqgq format Reformats.
>> indent Shifts text left.
<< unindentShifts text right.
Here are some common motions:
Command Moves
countcounthh Left count characters.
countcountll Right count characters.
countcountjj Down count characters.
countcountkk Up count characters.
$$ To end of the line.
countcount$$ To end of the line count-1 lines downward.
00 To the first character of the line.
countcountffcharcharTo the countth occurrence of char to the right.
We can combine operators and motions to select text then operate upon it. Let's look
at some examples:
y10hy10h
Copy the previous 10 characters to a register.
d$d$
Delete from the current character until the end of the line.
c2jc2j
Delete the current line and the one below it, then enter Insert mode.
Vim Recipes
Visit http://vim.runpaint.org/ for latest updates. 45
DISCUSSIONDISCUSSION
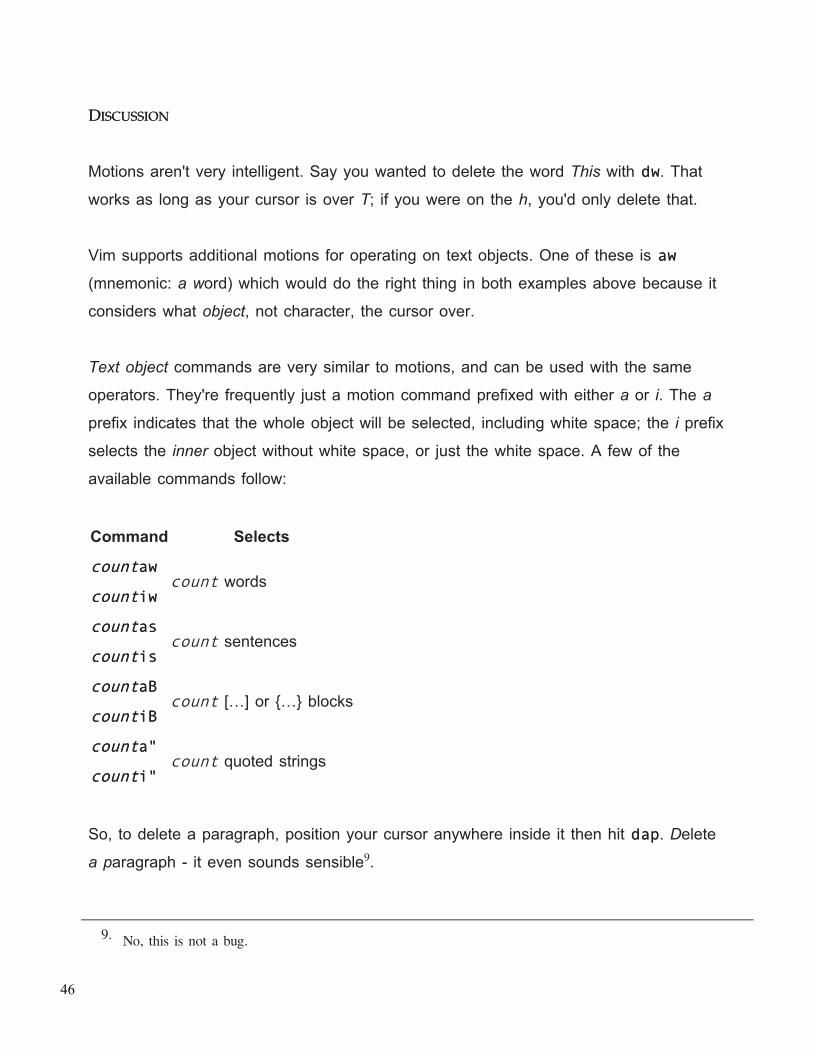
Motions aren't very intelligent. Say you wanted to delete the word This with dwdw. That
works as long as your cursor is over T; if you were on the h, you'd only delete that.
Vim supports additional motions for operating on text objects. One of these is awaw
(mnemonic: a word) which would do the right thing in both examples above because it
considers what object, not character, the cursor over.
Text object commands are very similar to motions, and can be used with the same
operators. They're frequently just a motion command prefixed with either a or i. The a
prefix indicates that the whole object will be selected, including white space; the i prefix
selects the inner object without white space, or just the white space. A few of the
available commands follow:
Command Selects
countcountawaw
countcountiwiwcount words
countcountasas
countcountisiscount sentences
countcountaBaB
countcountiBiBcount […] or {…} blocks
countcounta"a"
countcounti"i"count quoted strings
So, to delete a paragraph, position your cursor anywhere inside it then hit dapdap. Delete
a paragraph - it even sounds sensible9.
9. No, this is not a bug.
46
REPEATINGREPEATING COMMANDSCOMMANDS
PROBLEMPROBLEM
You've entered a command and want to repeat it without re-typing it.
SOLUTIONSOLUTION
The period .. repeats the last command entered in Normal mode. For example, dddd
deletes the current line; dd..dd.. deletes the current line, then deletes the new current
line, then deletes the new current line. In other words, it repeats the command twice.
To repeat a command entered in Command mode hit ::, then ↑↑ to scroll back through
your command history. If you type the first few letters of the command before using ↑↑,
the history will be limited appropriately.
DISCUSSIONDISCUSSION
The period command helps automating repetitive tasks with the fewest keypresses. It
lets you say “do that again”, but in only one character.
If you know you want to execute a command n times, you can prefix it with the integer
n. The above example rewritten in this way is 3dd3dd.
The second approach requires fewer keystrokes so is clearly preferable if you know in
advance how many times you want to repeat a command. However, the period
command lets you make that decision incrementally, after executing the command.
Vim Recipes
Visit http://vim.runpaint.org/ for latest updates. 47

You can combine these approaches by prefixing the period command with an integer to
say “do that n times again”: nn... Be aware that having done this, if you use the period
command again it will repeat your previous repetitions, i.e. commandcommand, followed by nn..,
followed by .. will result in command being executed 2n + 1 times.
The discussion above assumes that the last command needs to be repeated exactly.
Instead, you may wish to execute a different command on the same text. Jump to the
line of the last change with the Normal mode command '., then make that change.
48
CHANGINGCHANGING THETHE CASECASE OFOF TEXTTEXT
PROBLEMPROBLEM
You want to change the case of a character or block of text. For example, you may
want to change bob to Bob.
SOLUTIONSOLUTION
~~
Toggles the case of the current character in Normal mode, or the selection in
Visual mode.
uu
Lowercases highlighted text. (Note: This only works in Visual mode; otherwise uu
will undo your last change).
UU
Uppercases highlighted text. (Note: This only works in Visual mode; otherwise UU
will undo the changes made on the current line).
DISCUSSIONDISCUSSION
As normal, these commands accept motions. For example:
VUVU
Uppercase current line.
guwguw
Lowercases current word.
Vim Recipes
Visit http://vim.runpaint.org/ for latest updates. 49
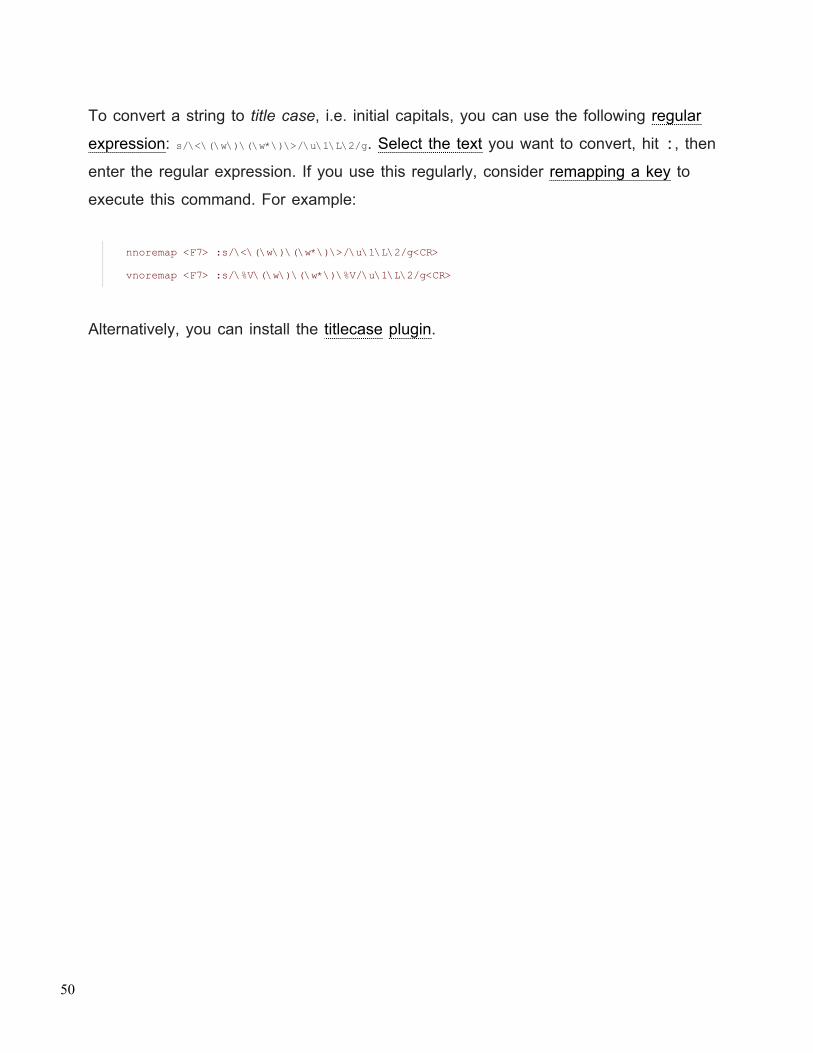
To convert a string to title case, i.e. initial capitals, you can use the following regular
expression: s/\<\(\w\)\(\w*\)\>/\u\1\L\2/g. Select the text you want to convert, hit ::, then
enter the regular expression. If you use this regularly, consider remapping a key to
execute this command. For example:
nnoremap <F7> :s/\<\(\w\)\(\w*\)\>/\u\1\L\2/g<CR>
vnoremap <F7> :s/\%V\(\w\)\(\w*\)\%V/\u\1\L\2/g<CR>
Alternatively, you can install the titlecase plugin.
50
SORTINGSORTING TEXTTEXT
PROBLEMPROBLEM
You want to sort a selection of text or an entire whole file.
For example, if you've made a list of your books with one title per line, you'd like to
organise it alphabetically.
SOLUTIONSOLUTION
Vim version 7 introduced a :sort command. So if you're using v7 or later you can
sort an entire file using :sort.
? You can find your Vim version number with the :version command. The
first line of output contains the version number, e.g. VIM - Vi IMproved
7.2 (2008 Aug 9, compiled Mar 19 2009 15:27:51), which indicates
version 7.2.
If you're using an older version of Vim you'll need an external sort utility. Linux/UNIX
users should already have sort installed. You can sort the entire file by executing
:!%sort, which filters the file through the external sort utility.
To sort part of a file:
1. Select the area you're interested in.
2. Hit :: and Vim will display :'<,'>' which refers to your selection.
Vim Recipes
Visit http://vim.runpaint.org/ for latest updates. 51

3. Type !sort (i.e. execute :'<,'>!sort).
DISCUSSIONDISCUSSION
Both methods above sort lines alphabetically. If you require a different type of sorting
you need to pass options to the command.
If you're using Vim 7+:
:sort!Reverses the sort order, i.e. sorts in descending order: z-a, 100-0.
:sort flagsflags
The sort command can be followed by a series of flags which can be combined in
any order:
nSorts by the first decimal number in the line.
iIgnores case while sorting.
uDeletes duplicate lines (keeps unique lines).
:sort /patternpattern/Ignore text matching pattern when sorting.
For example, the following table describes how the set of data in the Original column is
transformed for the given invocations of :sort.
Original :sort! :sort in:sort i /^./}
52
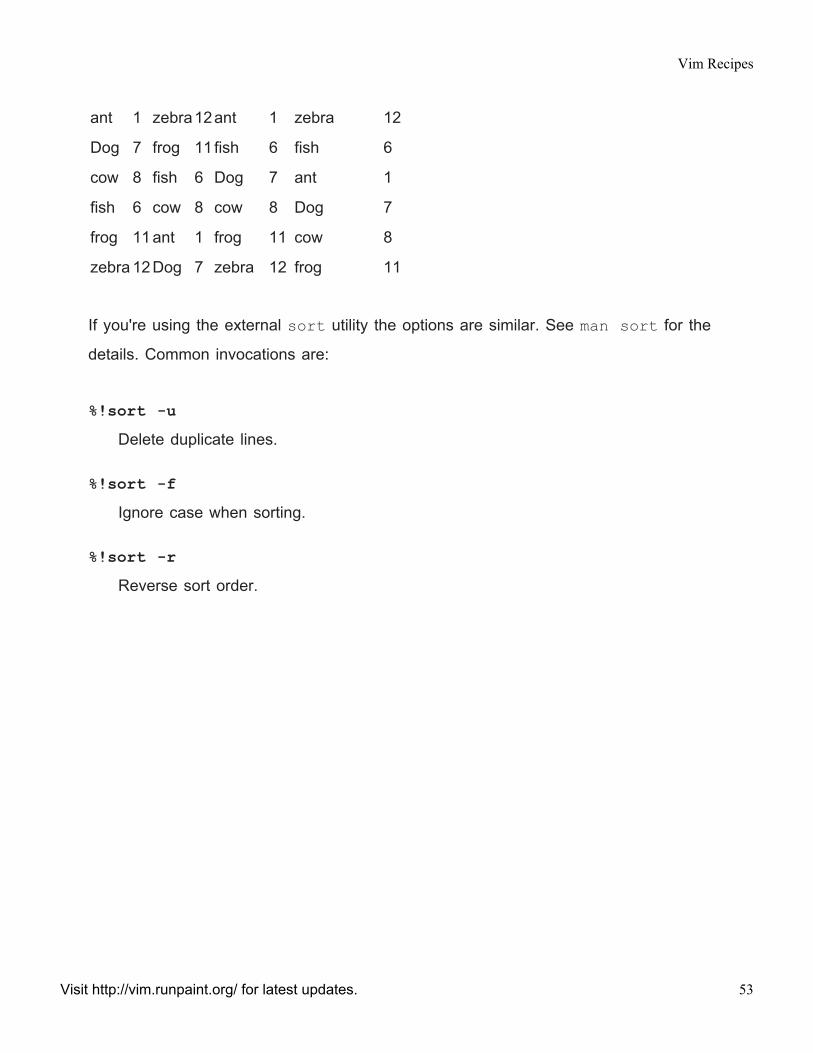
ant 1 zebra12ant 1 zebra 12
Dog 7 frog 11 fish 6 fish 6
cow 8 fish 6 Dog 7 ant 1
fish 6 cow 8 cow 8 Dog 7
frog 11ant 1 frog 11 cow 8
zebra 12Dog 7 zebra 12 frog 11
If you're using the external sort utility the options are similar. See man sort for the
details. Common invocations are:
%!sort -uDelete duplicate lines.
%!sort -fIgnore case when sorting.
%!sort -rReverse sort order.
Vim Recipes
Visit http://vim.runpaint.org/ for latest updates. 53
EXECUTINGEXECUTING EXTERNALEXTERNAL COMMANDSCOMMANDS
PROBLEMPROBLEM
You want to run a program from within Vim, possibly having it operate on the current
file.
For example, you want to view a list of the other files in your project by getting a listing
of the current directory. Or you want to find the word count of the essay you're working
on by passing its filename to the wc utility.
SOLUTIONSOLUTION
Invoke the program using the :!program syntax. For example, to view a directory
listing on a POSIX system: :!ls.
If you need to pass the current filename to the command as an argument, use the %wildcard. For example, executing :!wc % from aristotle-essay.txt executes wcaristotle-essay.txt.
?? FilenameFilename ModifiersModifiers
You can alter the filename represented by % by following the wildcard with a
modifier. For example:
%:pMakes the filename a full path.
54
%:.Makes the filename relative to the current directory.
%:tRemoves any directories before the actual file name. For example
~/work/foo.txt ⇒ foo.txt.
%:eRemoves everything except the filename extension. For example ~/work/foo.txt ⇒ txt.
DISCUSSIONDISCUSSION
The concept is that Vim suspends itself, asks your system to execute the command,
shows you its output, then, once the user presses <Enter><Enter>, returns you to Vim.
If you don't want to see the output of the command, you can execute it like this:
:silent command. (To also hide any error output: :silent! command).
You can use :redir > file if you want to save the output of a command to a file.
You first execute, say, :redir > /tmp/output, then :!command. The output for
command will be saved in the file /tmp/output, and displayed on the screen. (You
can combine :silent command and :redir file to redirect a command's output
to a file without seeing it on screen). To stop output redirection execute :redir END.
You can use :r!command to execute command and read in its output to the current
file. For example, if you're using a POSIX system, you can insert your kernel version
with :r!uname -v.
Vim Recipes
Visit http://vim.runpaint.org/ for latest updates. 55
MANAGINGMANAGING SESSIONSSESSIONS
PROBLEMPROBLEM
Every time you work on a project you need to manually open all of the files it
comprises of, readjust the window size, etc. You'd like Vim to do all this automatically.
SOLUTIONSOLUTION
Use sessions.
To save a session: :mksession. Vim saves the session information as 'Session.vim'
in the working directory; to specify your own filename execute :mksession file
instead. To overwrite an existing session follow the command with an exclamation
mark: :mksession!.
To restore a session invoke Vim with the -S flag from the same directory you saved
Session.vim in: vim -S. If you used a different filename for your session: vim -Sfile. If you're already inside Vim, you can load a session by sourcing the session file,
e.g. :source Session.vim.
DISCUSSIONDISCUSSION
Applications such as Mozilla Firefox use the concept of a global session file which is
overwritten every time you use the program. To make Vim work this way you simply
use a fixed name for the session variable. For example, you could save it to
$VIMHOME/Session.vim. You could add a mapping something like this to your
vimrc.
56
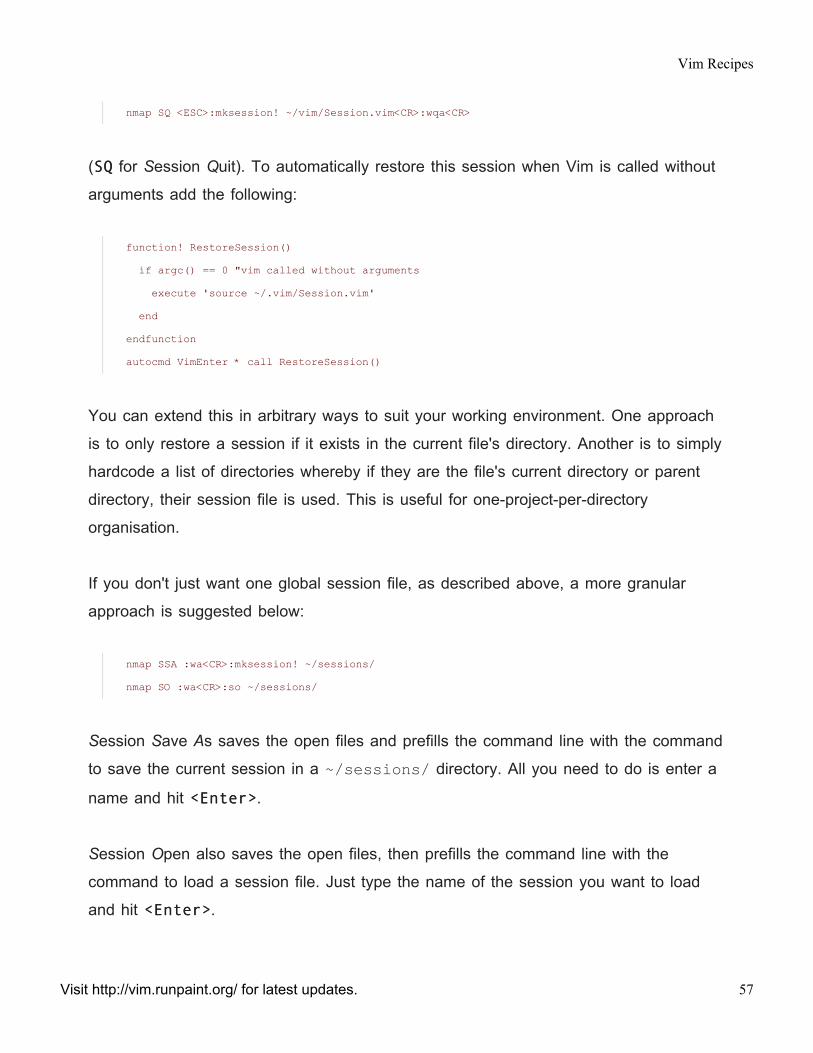
nmap SQ <ESC>:mksession! ~/vim/Session.vim<CR>:wqa<CR>
(SQSQ for Session Quit). To automatically restore this session when Vim is called without
arguments add the following:
function! RestoreSession()
if argc() == 0 "vim called without arguments
execute 'source ~/.vim/Session.vim'
end
endfunction
autocmd VimEnter * call RestoreSession()
You can extend this in arbitrary ways to suit your working environment. One approach
is to only restore a session if it exists in the current file's directory. Another is to simply
hardcode a list of directories whereby if they are the file's current directory or parent
directory, their session file is used. This is useful for one-project-per-directory
organisation.
If you don't just want one global session file, as described above, a more granular
approach is suggested below:
nmap SSA :wa<CR>:mksession! ~/sessions/
nmap SO :wa<CR>:so ~/sessions/
Session Save As saves the open files and prefills the command line with the command
to save the current session in a ~/sessions/ directory. All you need to do is enter a
name and hit <Enter><Enter>.
Session Open also saves the open files, then prefills the command line with the
command to load a session file. Just type the name of the session you want to load
and hit <Enter><Enter>.
Vim Recipes
Visit http://vim.runpaint.org/ for latest updates. 57
You can use <Tab><Tab> completion in both cases. For example, you could save a session
with SSAwork<Enter>SSAwork<Enter>. Later, when you want to restore the session but can't recall its
name, just hit SO<Tab>SO<Tab> to cycle through the saved sessions.
(Both mappings assume the ~/sessions/ directory already exists; create it if it
doesn't).
? Yuri Klubakov's sessionman plugin provides a more polished approach for
session management, subsuming the functionality described above.
58
FORMATTINGFORMATTING WITHWITH ANAN EXTERNALEXTERNAL PROGRAMPROGRAM
PROBLEMPROBLEM
You want to reformat text with a program other than Vim. For example, you want to
use the W3C 's 'tidy' utility to format HTML .
SOLUTIONSOLUTION
Set the equalprg option to the name of the program you want to use, along with any
arguments it should be passed. For example:
:set equalprg=tidy\ -indent\ -q
You can now select the text you want to format, then hit ==. You can reformat the entire
file with 1G=G1G=G.
DISCUSSIONDISCUSSION
The formatter that you use depends on the type of content you are producing. Here
are a couple of suggestions of programs to use for specific file types:
TextText
If you want to format normal text using an external program, par is a popular choice. It
can wrap, align, justify, and quote text in every conceivable way, and many more
aside.
Vim Recipes
Visit http://vim.runpaint.org/ for latest updates. 59
HTML/HTML/XHTMLXHTML
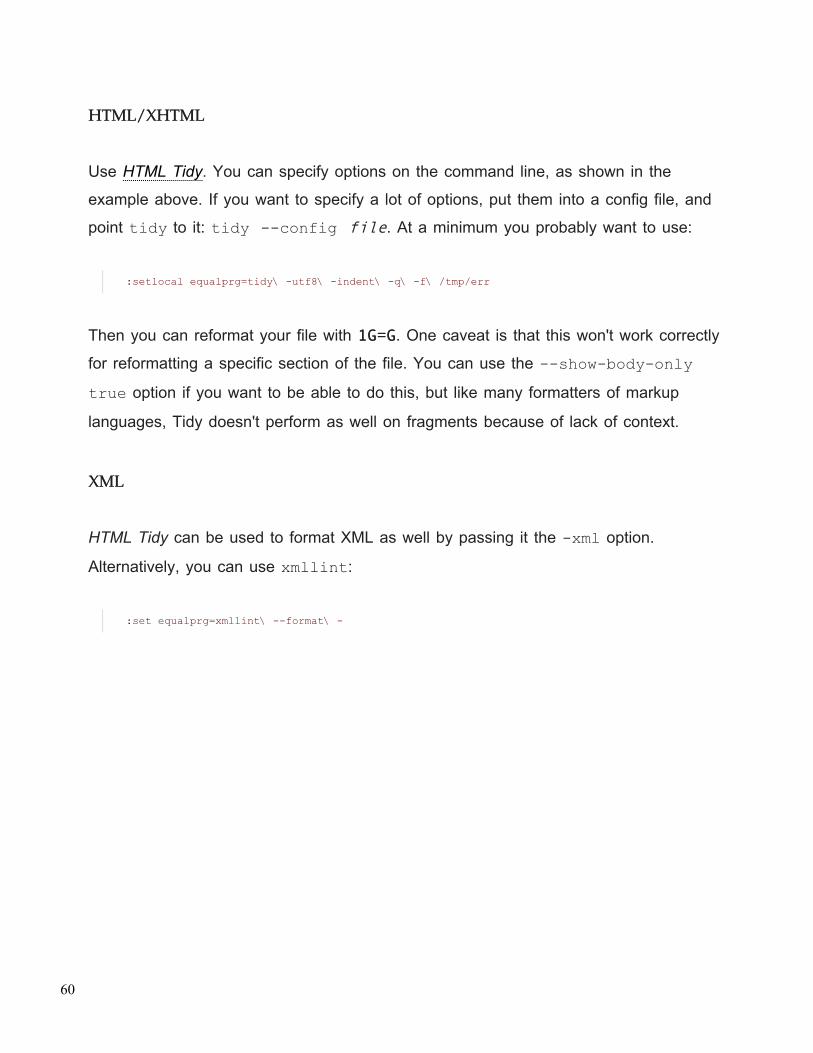
Use HTML Tidy. You can specify options on the command line, as shown in the
example above. If you want to specify a lot of options, put them into a config file, and
point tidy to it: tidy --config file. At a minimum you probably want to use:
:setlocal equalprg=tidy\ -utf8\ -indent\ -q\ -f\ /tmp/err
Then you can reformat your file with 1G=G1G=G. One caveat is that this won't work correctly
for reformatting a specific section of the file. You can use the --show-body-onlytrue option if you want to be able to do this, but like many formatters of markup
languages, Tidy doesn't perform as well on fragments because of lack of context.
XMLXML
HTML Tidy can be used to format XML as well by passing it the -xml option.
Alternatively, you can use xmllint:
:set equalprg=xmllint\ --format\ -
60
WORKINGWORKING WITHWITH DIFFERENTDIFFERENT FILEFILE FORMATSFORMATS
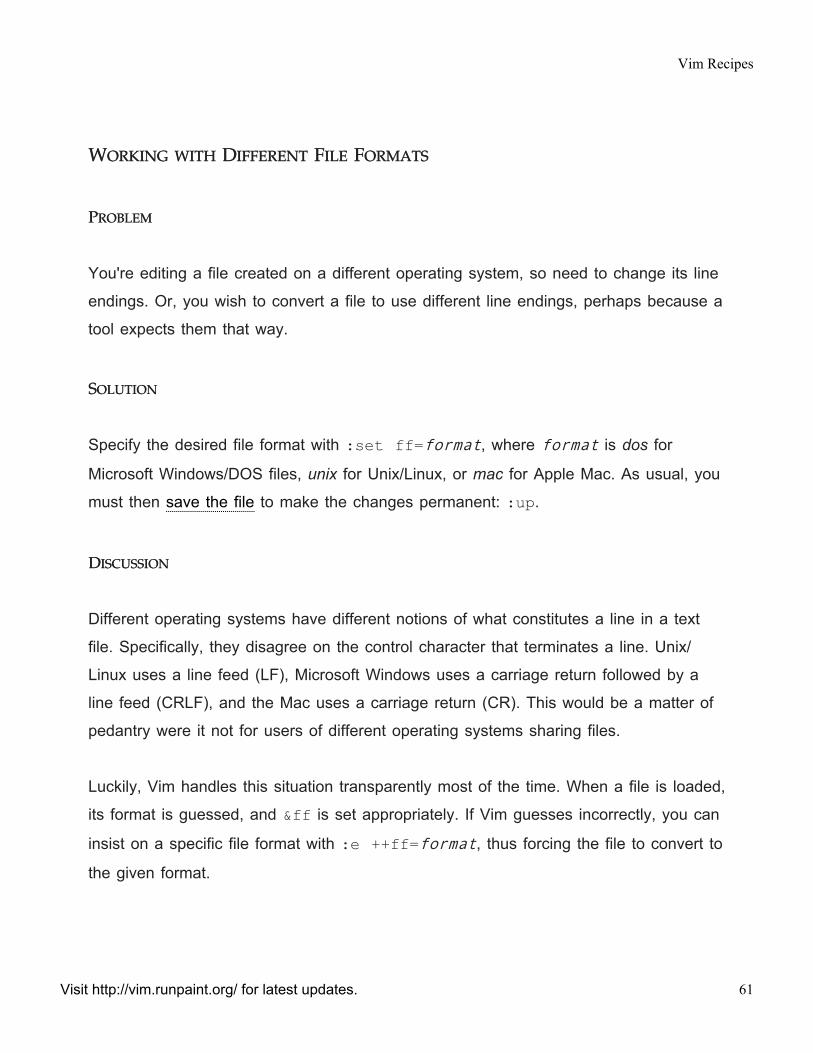
PROBLEMPROBLEM
You're editing a file created on a different operating system, so need to change its line
endings. Or, you wish to convert a file to use different line endings, perhaps because a
tool expects them that way.
SOLUTIONSOLUTION
Specify the desired file format with :set ff=format, where format is dos for
Microsoft Windows/DOS files, unix for Unix/Linux, or mac for Apple Mac. As usual, you
must then save the file to make the changes permanent: :up.
DISCUSSIONDISCUSSION
Different operating systems have different notions of what constitutes a line in a text
file. Specifically, they disagree on the control character that terminates a line. Unix/
Linux uses a line feed (LF), Microsoft Windows uses a carriage return followed by a
line feed (CRLF), and the Mac uses a carriage return (CR). This would be a matter of
pedantry were it not for users of different operating systems sharing files.
Luckily, Vim handles this situation transparently most of the time. When a file is loaded,
its format is guessed, and &ff is set appropriately. If Vim guesses incorrectly, you can
insist on a specific file format with :e ++ff=format, thus forcing the file to convert to
the given format.
Vim Recipes
Visit http://vim.runpaint.org/ for latest updates. 61
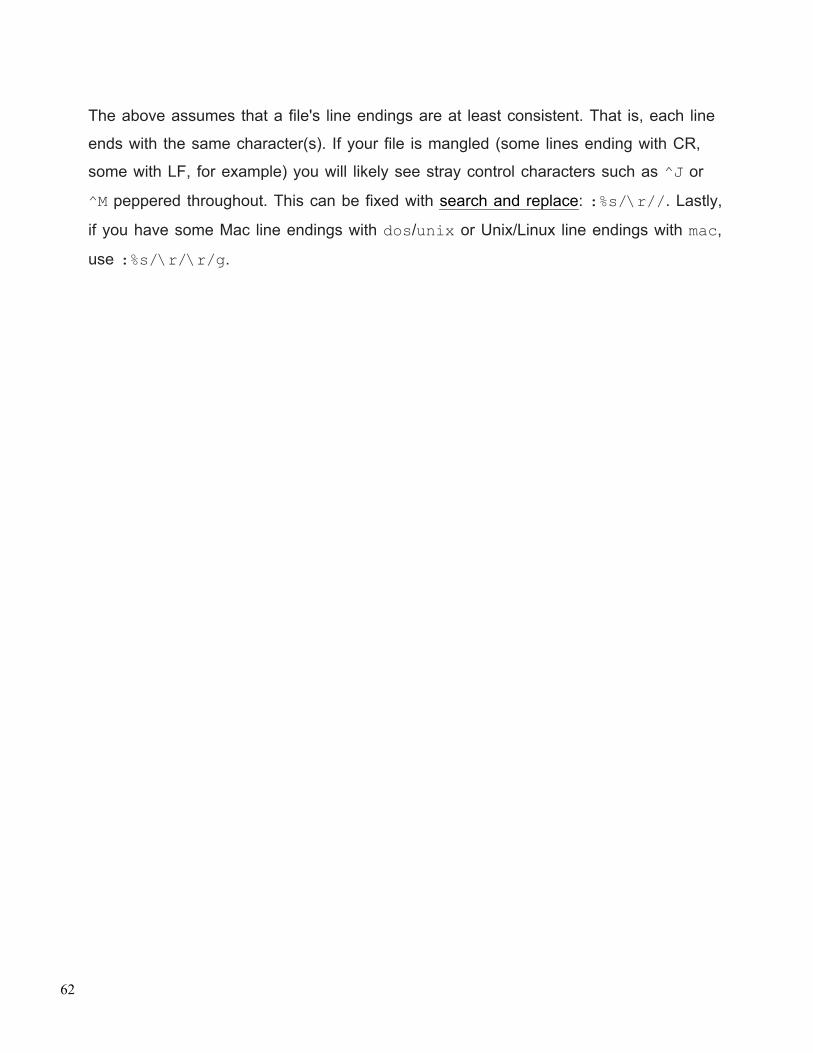
The above assumes that a file's line endings are at least consistent. That is, each line
ends with the same character(s). If your file is mangled (some lines ending with CR,
some with LF, for example) you will likely see stray control characters such as ^J or
^M peppered throughout. This can be fixed with search and replace: :%s/\r//. Lastly,
if you have some Mac line endings with dos/unix or Unix/Linux line endings with mac,
use :%s/\r/\r/g.
62

TYPINGTYPING
Vim Recipes
Visit http://vim.runpaint.org/ for latest updates. 63

SPELLSPELL CHECKINGCHECKING
PROBLEMPROBLEM
You want Vim to highlight misspelled words and suggest alternatives.
SOLUTIONSOLUTION
To enable spell checking you first need to ensure that Vim knows which language
you're typing in. If you execute :echo &spelllang you'll see the language code that
Vim thinks applies. For instance en. To change this use :set spelllang=code. For
example, I use :set spelllang=en_GB.UTF-8.
If you're spell checking in American English, you should already have the dictionary
installed. Otherwise, Vim should prompt you to download it. If you're not and it doesn't,
see the Getting Dictionaries sidebar of Auto-Completing Text.
To highlight spelling errors just execute :set spell. To remove the highlighting:
:set nospell.
DISCUSSIONDISCUSSION
Spelling errors are highlighted in one of four colours depending on the type of error:
• Word is not in the dictionary.
• Word is in the dictionary but not capitalised.
• Word is classed as 'rare'.
• Word is spelled incorrectly for this region. For instance, color in British English.
64
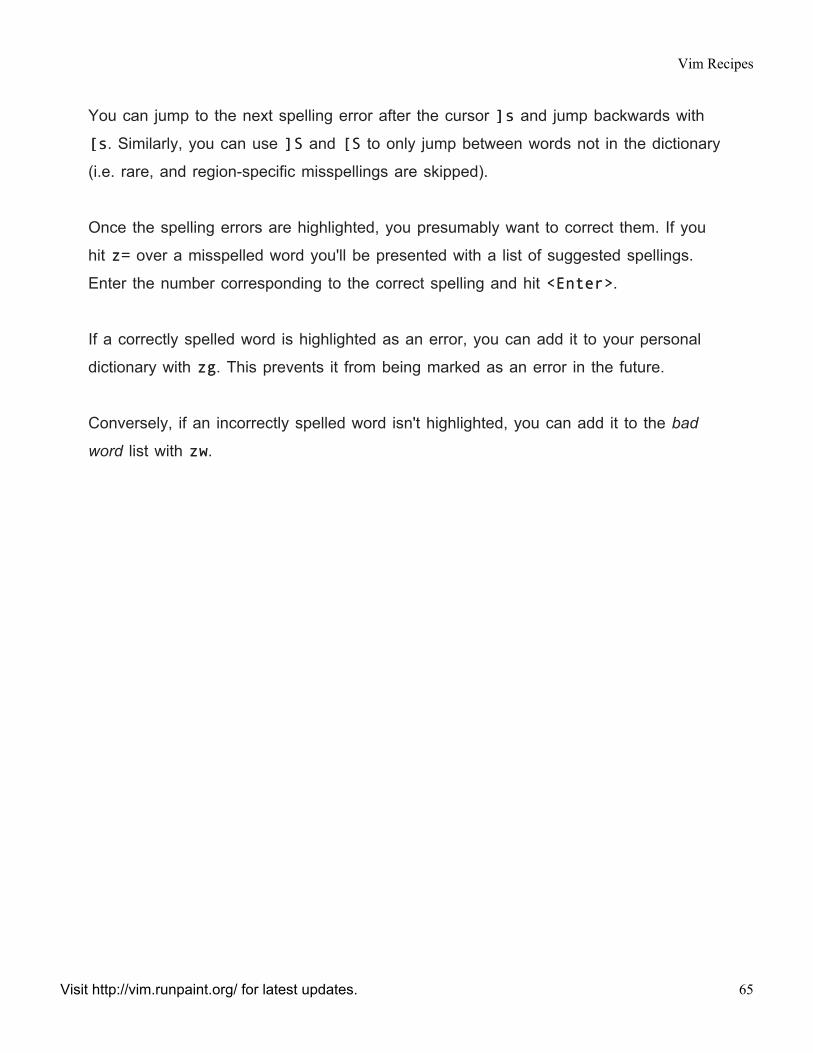
You can jump to the next spelling error after the cursor ]s]s and jump backwards with
[s[s. Similarly, you can use ]S]S and [S[S to only jump between words not in the dictionary
(i.e. rare, and region-specific misspellings are skipped).
Once the spelling errors are highlighted, you presumably want to correct them. If you
hit z=z= over a misspelled word you'll be presented with a list of suggested spellings.
Enter the number corresponding to the correct spelling and hit <Enter><Enter>.
If a correctly spelled word is highlighted as an error, you can add it to your personal
dictionary with zgzg. This prevents it from being marked as an error in the future.
Conversely, if an incorrectly spelled word isn't highlighted, you can add it to the bad
word list with zwzw.
Vim Recipes
Visit http://vim.runpaint.org/ for latest updates. 65
USINGUSING TEMPLATESTEMPLATES
PROBLEMPROBLEM
You create documents containing boilerplate text and would like to avoid typing it.
For instance, you write HTML documents and don't want to type the standard preamble
every time.
SOLUTIONSOLUTION
Use templates and associate them with a file extension. When a new file is created
with an extension for which a template is available, the template contents will be
inserted.
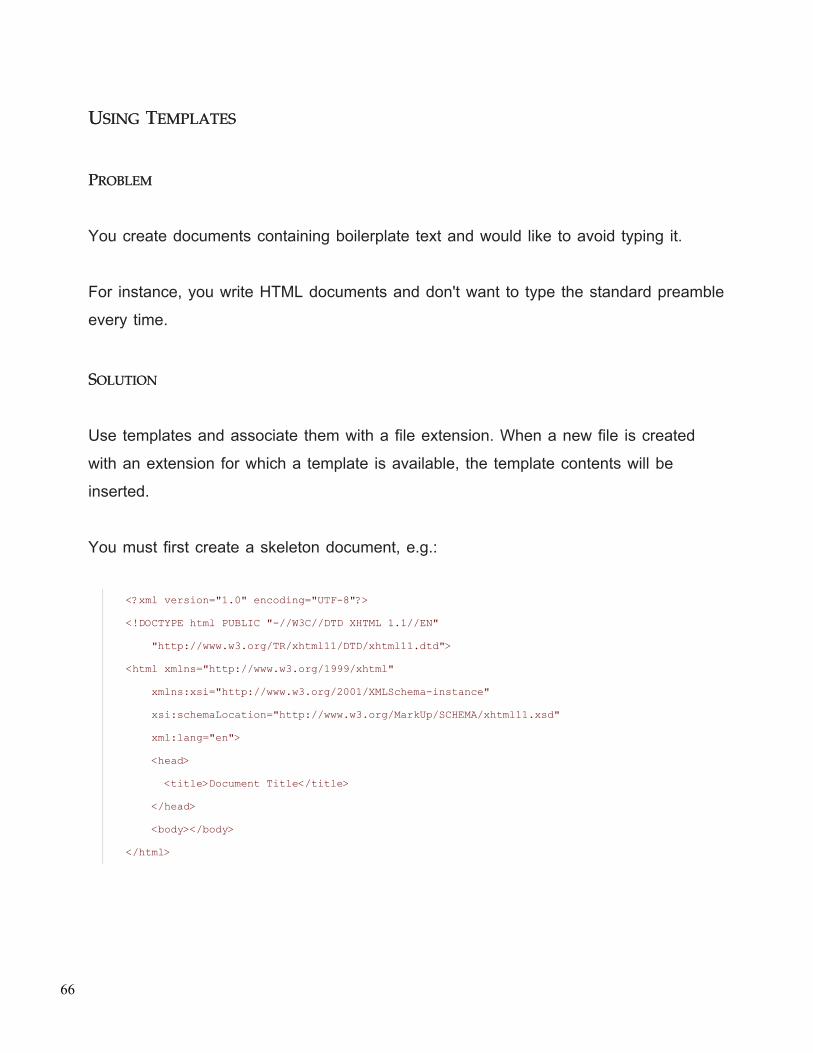
You must first create a skeleton document, e.g.:
<?xml version="1.0" encoding="UTF-8"?>
<!DOCTYPE html PUBLIC "-//W3C//DTD XHTML 1.1//EN"
"http://www.w3.org/TR/xhtml11/DTD/xhtml11.dtd">
<html xmlns="http://www.w3.org/1999/xhtml"
xmlns:xsi="http://www.w3.org/2001/XMLSchema-instance"
xsi:schemaLocation="http://www.w3.org/MarkUp/SCHEMA/xhtml11.xsd"
xml:lang="en">
<head>
<title>Document Title</title>
</head>
<body></body>
</html>
66
Save this document in your Vim directory with the corresponding file extension, e.g.
~/.vim/skel/tmpl.html. (You may also want to make this file read only so you
don't modify it by mistake).
Add the following to your .vimrc:
autocmd! BufNewFile * silent! 0r ~/.vim/skel/tmpl.%:e
Now, every time you open a new file Vim checks ~/.vim/skel/ for a file whose
name starts with tmpl. and ends with the extension of the file you're creating. It then
reads the template file into your new file's buffer.
For example, if you added the template above then invoked Vim with vimpage.html, the XHTML above would be inserted into the page.html file
automatically.
DISCUSSIONDISCUSSION
Once you have created a document from a template you have to insert text at various
predefined positions. For instance, for the XHTML template, you have to change the
contents of <title>…</title>, then start typing between the <body>…</body> tags. Navigating
between these points in the document, which are the same every time you use the
template, is cumbersome.
The traditional solution is to use placeholders. This involves including some notation in
the template file that indicates where your input is required, then providing a method to
jump between them.
Here's the previous template with placeholders added:
Vim Recipes
Visit http://vim.runpaint.org/ for latest updates. 67
<?xml version="1.0" encoding="UTF-8"?>
<!DOCTYPE html PUBLIC "-//W3C//DTD XHTML 1.1//EN"
"http://www.w3.org/TR/xhtml11/DTD/xhtml11.dtd">
<html xmlns="http://www.w3.org/1999/xhtml"
xmlns:xsi="http://www.w3.org/2001/XMLSchema-instance"
xsi:schemaLocation="http://www.w3.org/MarkUp/SCHEMA/xhtml11.xsd"
xml:lang="en">
<head>
<title>%TITLE%</title>
</head>
<body>%BODY%</body>
</html>
The placeholder notation is arbitrary, but let's stick with %VARIABLE% for the sake of
example. Now we need a way to jump between them, and <Ctrl><Ctrl>--pp (menmonic:
placeholder) seems reasonable. While we're at it, we'll define a function
(LoadTemplate()) to replace the autocmd line we added earlier. Add the following to
your vimrc:
function! LoadTemplate()
silent! 0r ~/.vim/skel/tmpl.%:e
" Highlight %VAR% placeholders with the Todo colour group
syn match Todo "%\u\+%" containedIn=ALL
endfunction
autocmd! BufNewFile * call LoadTemplate()
"Jump between %VAR% placeholders in Normal mode with
" <Ctrl-p>
nnoremap <c-p> /%\u.\{-1,}%<cr>c/%/e<cr>
"Jump between %VAR% placeholders in Insert mode with
" <Ctrl-p>
inoremap <c-p> <ESC>/%\u.\{-1,}%<cr>c/%/e<cr>
If we create a new HTML file now this is what we see:
68
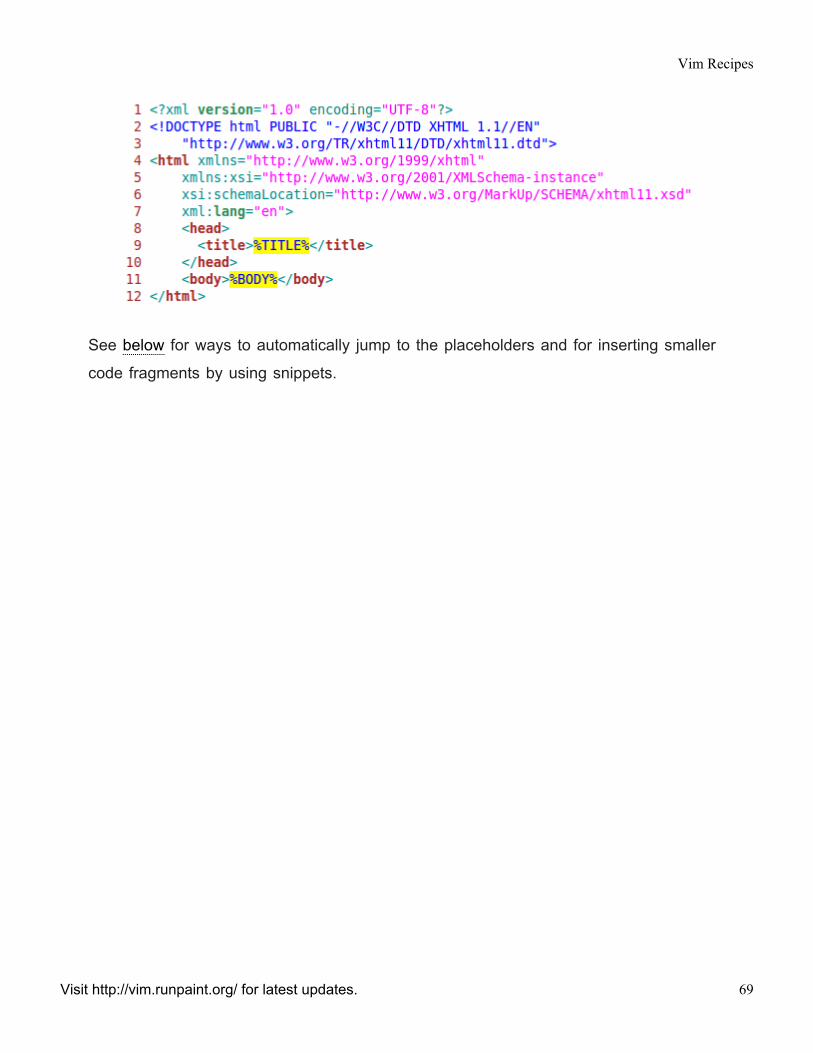
See below for ways to automatically jump to the placeholders and for inserting smaller
code fragments by using snippets.
Vim Recipes
Visit http://vim.runpaint.org/ for latest updates. 69
UNDOINGUNDOING MISTAKESMISTAKES
PROBLEMPROBLEM
You've made a mistake while editing and you'd like to revert it. Or, worse, you've made
a mistake while reverting a mistake, and you'd like to revert that.
For example, you've just deleted the paragraphs containing, subject to peer review, the
cure for cancer. You'd kinda' like to retrieve it, and pretend the whole situation had
never occurred.
SOLUTIONSOLUTION
Use the undo feature. Hit uu in Normal mode or :u in Command mode. You can undo
all recent changes on the current line with UU. To undo multiple times either repeat the
command or prefix it with a digit indicating the number of times. For example, to undo
the previous change and the one before that: uuuu.
To redo a change that was undone use <Ctrl><Ctrl>++RR or :redo.
You can also jump backwards and forwards through your edits by time. To return to
how your file looked 1 hour ago use :earlier 1h, then travel forward 20 minutes
with :later 20m.
DISCUSSIONDISCUSSION
The undo/redo behaviour described above should be familiar to most users as it
mirrors that of many other applications. Vim, however, extends this concept into the
idea of undo branches.
70
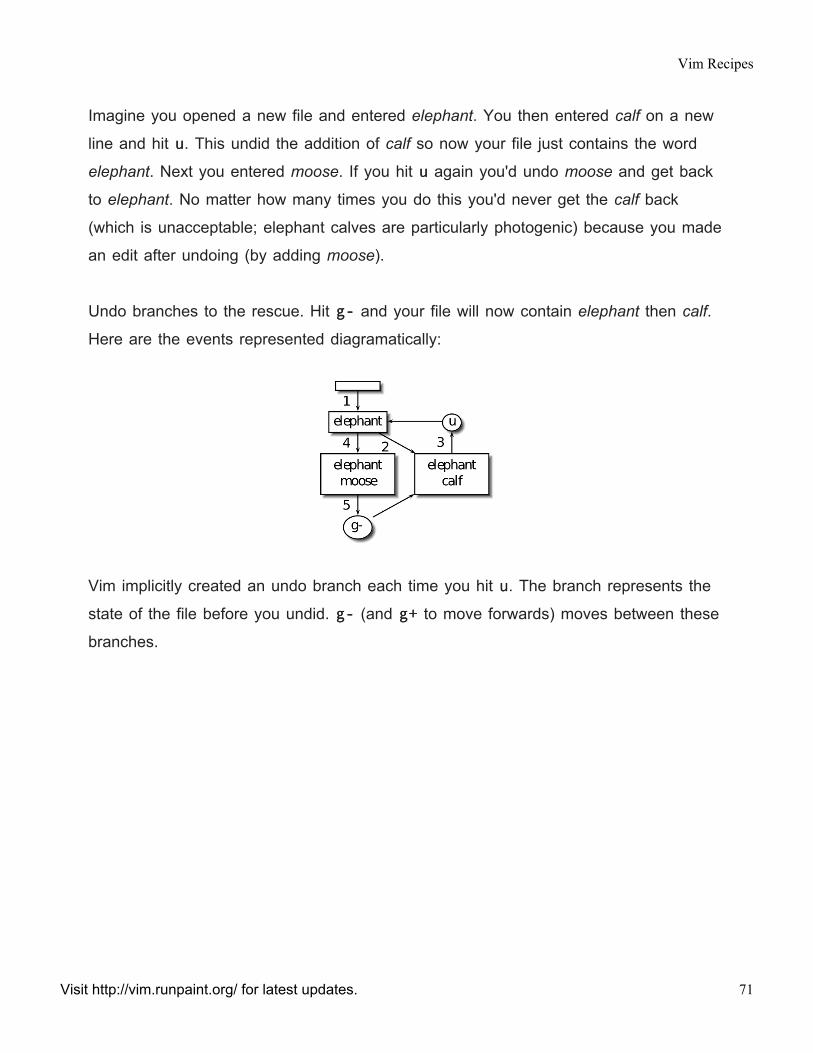
Imagine you opened a new file and entered elephant. You then entered calf on a new
line and hit uu. This undid the addition of calf so now your file just contains the word
elephant. Next you entered moose. If you hit uu again you'd undo moose and get back
to elephant. No matter how many times you do this you'd never get the calf back
(which is unacceptable; elephant calves are particularly photogenic) because you made
an edit after undoing (by adding moose).
Undo branches to the rescue. Hit g-g- and your file will now contain elephant then calf.
Here are the events represented diagramatically:
Vim implicitly created an undo branch each time you hit uu. The branch represents the
state of the file before you undid. g-g- (and g+g+ to move forwards) moves between these
branches.
Vim Recipes
Visit http://vim.runpaint.org/ for latest updates. 71
AUTO-COMPLETINGAUTO-COMPLETING TEXTTEXT
PROBLEMPROBLEM
You want to be able to type the start of a word and then have Vim complete it. For
example, you want to type multip, be offered suggestions for words that start that way,
then pick one.
SOLUTIONSOLUTION
To auto-complete a word Vim needs a list of possible words. An obvious source is the
current file(s). If your file already contains the word multiplicand, then Vim can use it to
auto-complete multip. Simply hit <Ctrl><Ctrl>++nn after the p to complete the word. If multiple
matches are found you'll be presented with a list from which to choose from.
Another source of words is a dictionary. Get one, using the sidebar for reference, then
point Vim to it with :set dictionary=file. Then add the dictionary to list of places
Vim looks for words: :set complete+=k. The 'complete' options controls where
Vim looks for possible matches.
?? GettingGetting DictionariesDictionaries
If you specify your language with :set spelllang=lang-code, e.g. :setspelllang=it for Italian, Vim should automatically download the correct
dictionary for you and set it up. If this doesn't work for you see :help spelland vim/runtime/spell/README.txt.
72
Auto-complete can also be used to lookup synonyms for the current word. Get a
thesaurus file, then instruct Vim to use it with :set thesaurus=file, :setcomplete+=s.
<Ctrl><Ctrl>--xx <Ctrl><Ctrl>--ff searches for the filename that starts with the text before the
cursor. If one is found, it is inserted before the cursor. If multiple filenames are found,
a drop down list is displayed to choose between them.
? Eric Van Dewoestine's SuperTab plugin lets you use the <Tab><Tab> key to
auto-complete text. You select the type of completion that you want using
:SuperTabHelp, then just hit <Tab><Tab> after a word to see a drop-down menu
of completion choices.
DISCUSSIONDISCUSSION
Vim can use pretty much any word source imaginable. Consult :help ins-completion for more details.
Vim version 7 and above supports Omni-Completion, which allows custom functions to
generate possible completions dynamically. Even better, for programmers at least, is
that some popular programming languages already have Omni-Completion functions
which are enabled automatically. These typically allow context-sensitive completion of
method names, objects, and reserved words. For example, using Ruby I can type an
integer, a period, then invoke Omni-Completion to find that Fixnum objects support
methods such as %, *, and +.
Languages that don't have Omni-Complete functions available can use their syntax
highlighting definitions to achieve a similar affect. The Vim documentation suggests
Vim Recipes
Visit http://vim.runpaint.org/ for latest updates. 73
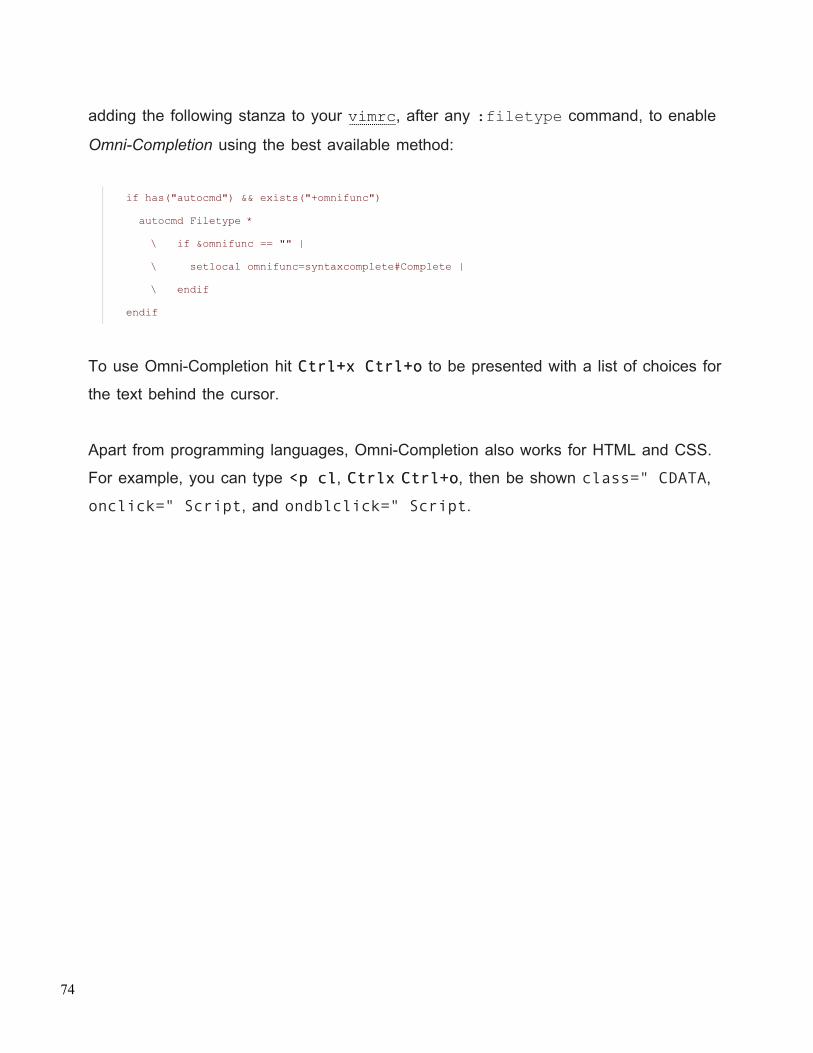
adding the following stanza to your vimrc, after any :filetype command, to enable
Omni-Completion using the best available method:
if has("autocmd") && exists("+omnifunc")
autocmd Filetype *
\ if &omnifunc == "" |
\ setlocal omnifunc=syntaxcomplete#Complete |
\ endif
endif
To use Omni-Completion hit CtrlCtrl++xx CtrlCtrl++oo to be presented with a list of choices for
the text behind the cursor.
Apart from programming languages, Omni-Completion also works for HTML and CSS.
For example, you can type <p<p clcl, CtrlCtrlxx CtrlCtrl++oo, then be shown class=" CDATA,
onclick=" Script, and ondblclick=" Script.
74
ABBREVIATINGABBREVIATING COMMONCOMMON STRINGSSTRINGS
PROBLEMPROBLEM
You regularly have to enter the same text, but don't want to.
For instance, if you use Vim to write e-mail you may often mention the URL of your
website. Instead of typing http://example.com/ every time, which is both annoying
and error prone, you want to enter, say, myUrl and have it replaced with the address.
SOLUTIONSOLUTION
Use Vim's abbreviations feature to map concise abbreviations to frequently entered
text.
To create the aforementioned abbreviation we use the :iabbrev command:
:iabbrev myUrl http://example.com/. To use it, type the name of the
abbreviation (myUrl in this case) and then hit <Space><Space> or <Enter><Enter>. The name of the
abbreviation is replaced with its payload.
The syntax for defining abbreviations is :iabbrev name payload, where name is
the text you want replaced, and payload is what it should be replaced with.
DISCUSSIONDISCUSSION
The abbreviation feature is smart enough not to expand abbreviation names that occur
as part of another word, but its telepathic functionality is suboptimal. Useful
abbreviation names are easy to type, but will not appear in normal text. The convention
Vim Recipes
Visit http://vim.runpaint.org/ for latest updates. 75
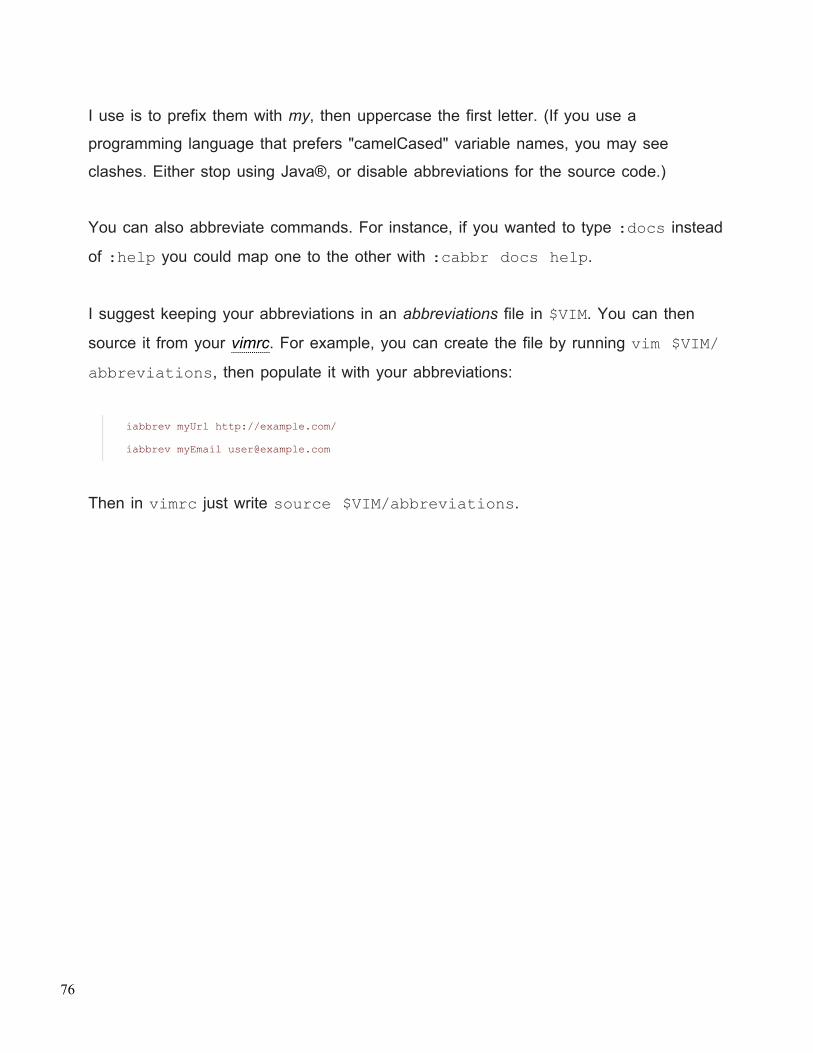
I use is to prefix them with my, then uppercase the first letter. (If you use a
programming language that prefers "camelCased" variable names, you may see
clashes. Either stop using Java®, or disable abbreviations for the source code.)
You can also abbreviate commands. For instance, if you wanted to type :docs instead
of :help you could map one to the other with :cabbr docs help.
I suggest keeping your abbreviations in an abbreviations file in $VIM. You can then
source it from your vimrc. For example, you can create the file by running vim $VIM/abbreviations, then populate it with your abbreviations:
iabbrev myUrl http://example.com/
iabbrev myEmail [email protected]
Then in vimrc just write source $VIM/abbreviations.
76
INSERTINGINSERTING ACCENTEDACCENTED OROR "FOREIGN""FOREIGN" CHARACTERSCHARACTERS
PROBLEMPROBLEM
You want to type characters which don't exist on your keyboard.
For example, you want to type some words in another language, so need to insert
accented characters. Or you want to type a symbol such as ±.
SOLUTIONSOLUTION
If you haven't already, set up Vim to use UTF-8 by following the sidebar. It makes this
process far easier.
?? EnablingEnabling UTF-8UTF-8 SupportSupport
Vim uses the encoding specified by the user's environment. On Linux this is
set with the $LANG variable. To override this use :set encoding=utf-8.
If you're using Vim from a terminal your terminal software must also be
configured to use UTF-8. Instructions for that are outside the scope of this
recipe.
When editing files their current encoding is maintained, so if you opened a file
in ISO-8859-2, your changes would be written in that encoding. To force UTF-8
for all files use :set encoding=utf-8 fileencodings=.
Vim Recipes
Visit http://vim.runpaint.org/ for latest updates. 77
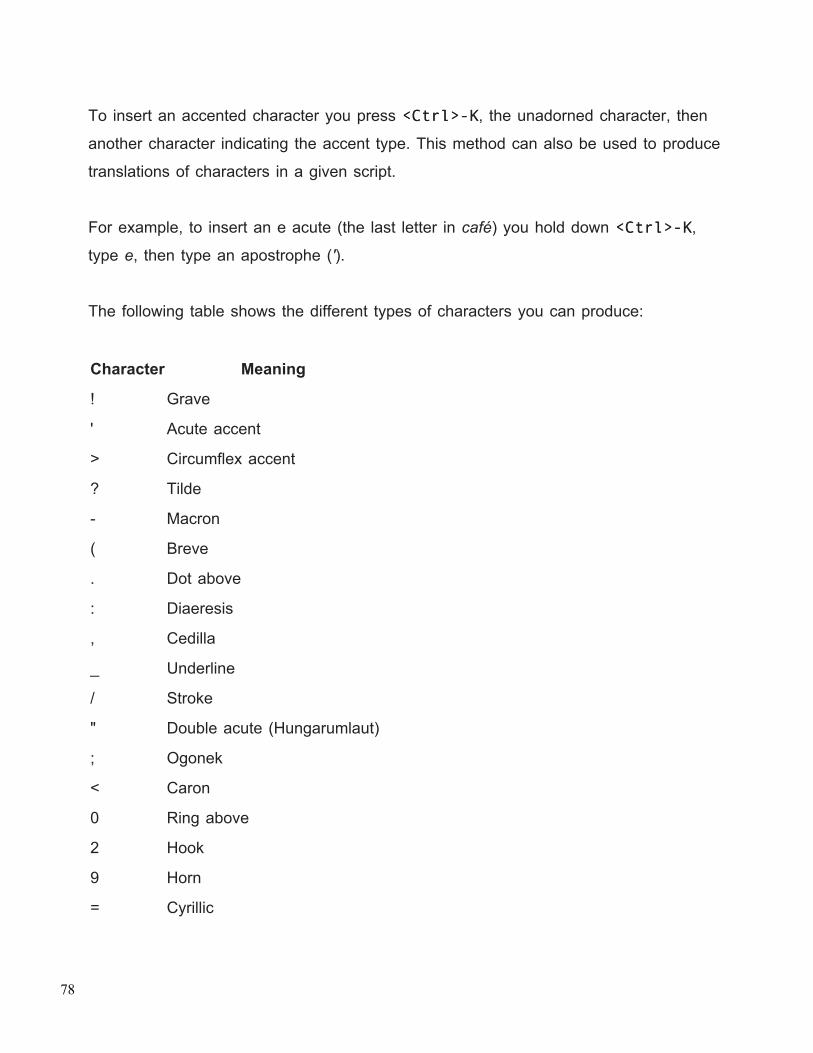
To insert an accented character you press <Ctrl><Ctrl>--KK, the unadorned character, then
another character indicating the accent type. This method can also be used to produce
translations of characters in a given script.
For example, to insert an e acute (the last letter in café) you hold down <Ctrl><Ctrl>--KK,
type e, then type an apostrophe (').
The following table shows the different types of characters you can produce:
Character Meaning
! Grave
' Acute accent
> Circumflex accent
? Tilde
- Macron
( Breve
. Dot above
: Diaeresis
, Cedilla
_ Underline
/ Stroke
" Double acute (Hungarumlaut)
; Ogonek
< Caron
0 Ring above
2 Hook
9 Horn
= Cyrillic
78
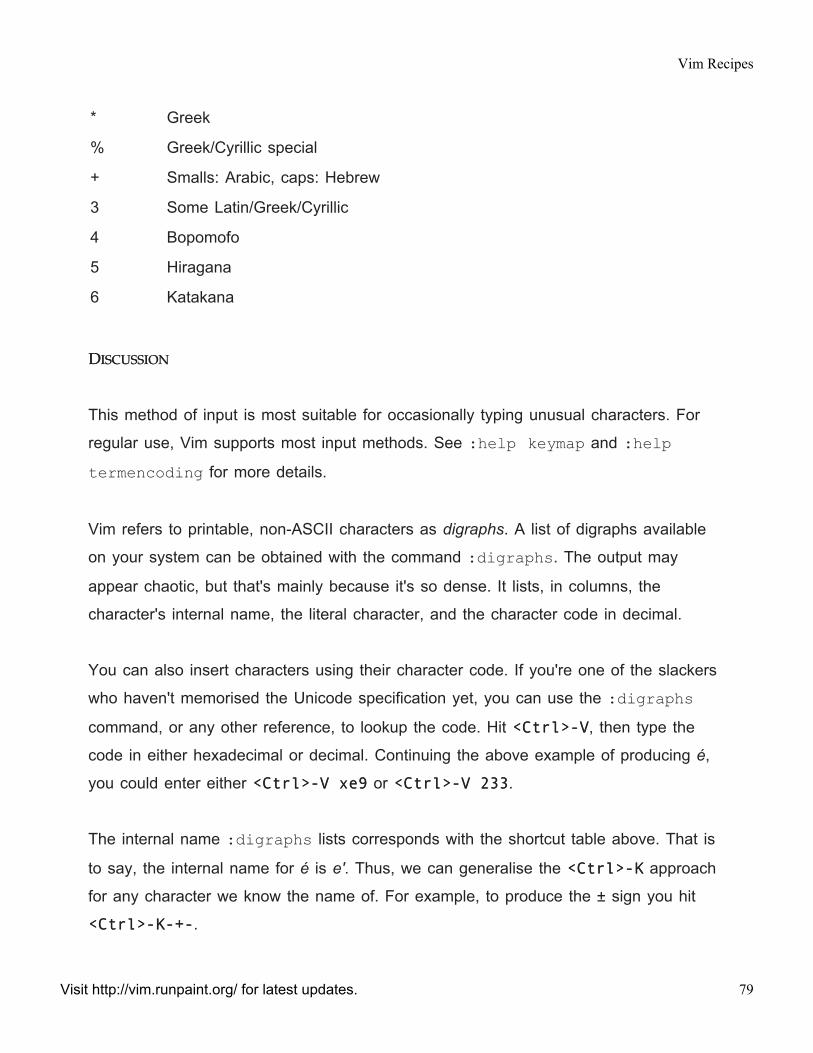
* Greek
% Greek/Cyrillic special
+ Smalls: Arabic, caps: Hebrew
3 Some Latin/Greek/Cyrillic
4 Bopomofo
5 Hiragana
6 Katakana
DISCUSSIONDISCUSSION
This method of input is most suitable for occasionally typing unusual characters. For
regular use, Vim supports most input methods. See :help keymap and :helptermencoding for more details.
Vim refers to printable, non-ASCII characters as digraphs. A list of digraphs available
on your system can be obtained with the command :digraphs. The output may
appear chaotic, but that's mainly because it's so dense. It lists, in columns, the
character's internal name, the literal character, and the character code in decimal.
You can also insert characters using their character code. If you're one of the slackers
who haven't memorised the Unicode specification yet, you can use the :digraphscommand, or any other reference, to lookup the code. Hit <Ctrl><Ctrl>--VV, then type the
code in either hexadecimal or decimal. Continuing the above example of producing é,
you could enter either <Ctrl><Ctrl>--VV xe9xe9 or <Ctrl><Ctrl>--VV 233233.
The internal name :digraphs lists corresponds with the shortcut table above. That is
to say, the internal name for é is e'. Thus, we can generalise the <Ctrl><Ctrl>--KK approach
for any character we know the name of. For example, to produce the ± sign you hit
<Ctrl><Ctrl>--KK--+-+-.
Vim Recipes
Visit http://vim.runpaint.org/ for latest updates. 79
OPENINGOPENING THETHE FILEFILE NAMENAME BENEATHBENEATH THETHE CURSORCURSOR
PROBLEMPROBLEM
You have a file name under your cursor and would like Vim to open it.
For example, program source code often references other files from which it includes
functionality. You want to quickly open such a file.
SOLUTIONSOLUTION
Position your cursor over a file name then hit gfgf (mnemonic: go to file or get file) in
Normal mode. For example, consider a file like the following:
Edit your ~/.vimrc by opening it with Vim, then...
If your cursor was anywhere over ~/.vimrc, gfgf would try to open your Vim
configuration file. (This assumes that you're using Linux where ~ is shorthand for the
user's home directory).
Vim doesn't care if the word under the cursor looks like a filename, so if your cursor
was over the word your, instead, it would try to open a file named your in your path.
Your path is a list of directories in which Vim searches for the named file. To see what
it's currently set to execute :echo &path. The path is a comma-separated list of
directories, some of which have special significance:
.The directory containing the current file.
80
;A path that ends with a semicolon is searched recursively, up the directory
hierarchy. For example /usr/share/doc; means to first search in /usr/share/doc, then /usr/share/, then /usr/, then /.
*A path that ends in an asterisk is searched recursively downwards. For example,
/home/kate/* would search all of user kate's home directory.
I like gf to search recursively downwards from the current directory so I append ./**to my path like so: :set path+=./**.
DISCUSSIONDISCUSSION
This feature has a surprising amount of uses for something so basic. I use it when:
• Log files are referenced in e-mail alerts.
• To open files referenced in my version control system's commit e-mails.
• When outlining10 a project that consists of multiple files. Each level of outline
links to the relevant file.
• To view source code for external modules when writing source code.
Vim also lets you follow URLs in this way, so you can gf on http://example.com/,
to open the HTML in Vim, or sftp://example.com/README to connect to
example.com via SFTP, fetch README, then open it for editing in Vim.
10. The Indentation Folding sidebar in Manually Creating Folds describes one approach to outlining in Vim
Vim Recipes
Visit http://vim.runpaint.org/ for latest updates. 81
By default gf opens the file in the same window. To open it in a new tab use
<Ctrl><Ctrl>ww++gfgf. To make this behaviour the default consider a key remap: :nnoremapgf <C-W>gf.
If your filename is followed by a line number, e.g. foo.txt:10 you can jump to the given
line with gFgF.
If the filename you use gfgf on doesn't exist, Vim complains. I don't use gFgF so I have
remapped it to create the given file: :nnoremap gF :view <cfile><cr>.
82
INSERTINGINSERTING THETHE DATEDATE
PROBLEMPROBLEM
You're typing a document and want to insert the current date.
For example, you're composing a letter and want to include today's date at the top.
SOLUTIONSOLUTION
Use !!date in Normal mode.
DISCUSSIONDISCUSSION
The !!command syntax executes command and replaces the current line with the
output.11. To control where the date is inserted see the following paragraphs.
A similar same effect can be achieved with :r!date. The advantage is that it inserts
the output of date on the next line, rather than replacing the current one.
The solutions above assume that you have a date executable in your PATH, as all
UNIX-based systems should. I understand that Windows users have to use !!date/t.
11. This is in fact an oversimplification. count!!command actually filters count lines through
command and returns the result, but when count is omitted, it has the effect I've described. This is whythe text on the current line is replaced with the date.
Vim Recipes
Visit http://vim.runpaint.org/ for latest updates. 83
Alternatively, you can call Vim's strftime() function, e.g. strftime("%c"). This
will work on all systems which support the strftime system call, which I believe is
the majority. You can map this function to a function key. For example, the following
commands map <F7><F7> to insert a date stamp after the cursor.
:inoremap <F7> <C-R>=strftime("%c")<CR>
:nnoremap <F7> "=strftime("%c")<CR>p
I suggest the use of !!date because it doesn't waste a function key, and, personally, I
find it more memorable. If you intend to insert dates regularly, by all means remap a
key to do so.
84

INSERTINGINSERTING SNIPPETSSNIPPETS
PROBLEMPROBLEM
You repeatedly type the same constructs, so want to expedite the process by typing a
few letters then have Vim produce the boilerplate text.
For example, to enter a HTML <table> you want to type table<Tab><Tab> then have Vim
produce:
<table border=" ">
<tr><th> </th></tr>
<tr><h> </th></tr>
</table>
SOLUTIONSOLUTION
Use Michael Sanders' snipMate plugin, which provides a subset of the snippets feature
of the Textmate. editor.
Follow the installation instructions on the script page, then open a HTML document
with Vim, e.g. vim test.html. Type table<Tab><Tab>. The <table> given above should
be inserted into your document.
In the above example, table is the trigger, the text you type, and the resultant HTML is
the snippet, the text that is inserted after typing trigger<Tab><Tab>.
Vim Recipes
Visit http://vim.runpaint.org/ for latest updates. 85
snipMate is distributed with a collection of snippets for common file types. To see a list
of snippets available for the current buffer execute <Ctrl><Ctrl>--RR <Tab><Tab>. To write your
own see :help snipMate.
? Several snipMate users have made their snippets available on GitHub.com:
• Scala snippets by Tyler Weir.
• Ruby, Ruby on Rails, jQuery, rSpec, etc. snippets by Martin Grenfell
and Travis Jeffery.
• A general collection by Ron Damen.
DISCUSSIONDISCUSSION
The power of snipMate comes from how it lets you navigate the snippet once inserted.
Consider again the <table> example:
<table border="1">
<tr><th>2</th></tr>
<tr><h>3</th></tr>
</table>4
The numbers, e.g. 1, in the above output represent tab stops: the positions where the
nth<Tab><Tab> after the trigger will move the cursor to. So, the user types table<Tab><Tab> to
insert the snippet. His cursor is placed in position 1 so he can enter the border size.
He then hits <Tab><Tab> again to position his cursor in 2 so he can enter the name of the
header for the first row. And so on.
Some constructs require user-entered text to appear multiple times. For instance,
HTML authors may want to enter an <option> element like the following:
86
<option value="placeholder">placeholder</option>
In this example, placeholder is placeholder text that needs to be entered twice.
snipMate lets you enter the text in value="placeholder">, and have it copied into
>placeholder< as you type.
To learn more about snipMate and its features see :help snipMate.
There is also a similar snippet engine called XPTemplate.
?? ComparisonComparison ofof TechniquesTechniques toto Auto-CompleteAuto-Complete TextText
We have discussed various approaches to automatically inserting text in this
chapter, so let us recap12.
Templates can be used to associate a skeleton document with a file extension,
whereby opening a file whose name ends with that extension causes the
skeleton document to be inserted into the buffer. The advantage of this
approach is that it doesn't require the installation of any plugins, but other than
that snipMate can be used to achieve the same effect. For example, SnipMate
has a trigger named docx which inserts the XHTML 1.1 doctype:
<!DOCTYPE html PUBLIC "-//W3C//DTD XHTML 1.1//EN"
"http://www.w3.org/TR/xhtml11/DTD/xhtml11.dtd">
This can trivially be adapted to insert whatever boilerplate HTML you desire.
12. The forthcoming is intentionally opinionated and simplified because a detailed analysis of every possibilityis beyond the scope of this book. That said, if there are any factual errors, please let me know.
Vim Recipes
Visit http://vim.runpaint.org/ for latest updates. 87
Abbreviations can be used to replace a piece of text with another piece of text
after pressing <Tab><Tab>. They differ from snippets in two key respects.
Abbreviations are typically defined globally, whereas snippets are defined for
specific filetypes. For instance, a trigger of for could insert a C for loop when
editing C source code, or a Ruby for loop when editing Ruby code. More
importantly, snippets have the notion of placeholders that can be tabbed
between. In general, snippets can do everything abbreviations can, and more.
Insert-mode auto-completion can auto-complete text based on what has
already been typed or the grammar of the current file type. For instance, you
can auto-complete a variable name that you have declared previously, or a
language keyword. This form of auto-completion augments snipMate: use the
former to complete unique definitions and names in the current file, and those
that it includes; use the latter to complete pre-defined snippets. Where the
two's functionalities overlap, snipMate has a simpler interface (type a trigger,
hit <Tab><Tab>), and is, arguably, easier to configure.
88

NAVIGATIONNAVIGATION
Vim Recipes
Visit http://vim.runpaint.org/ for latest updates. 89
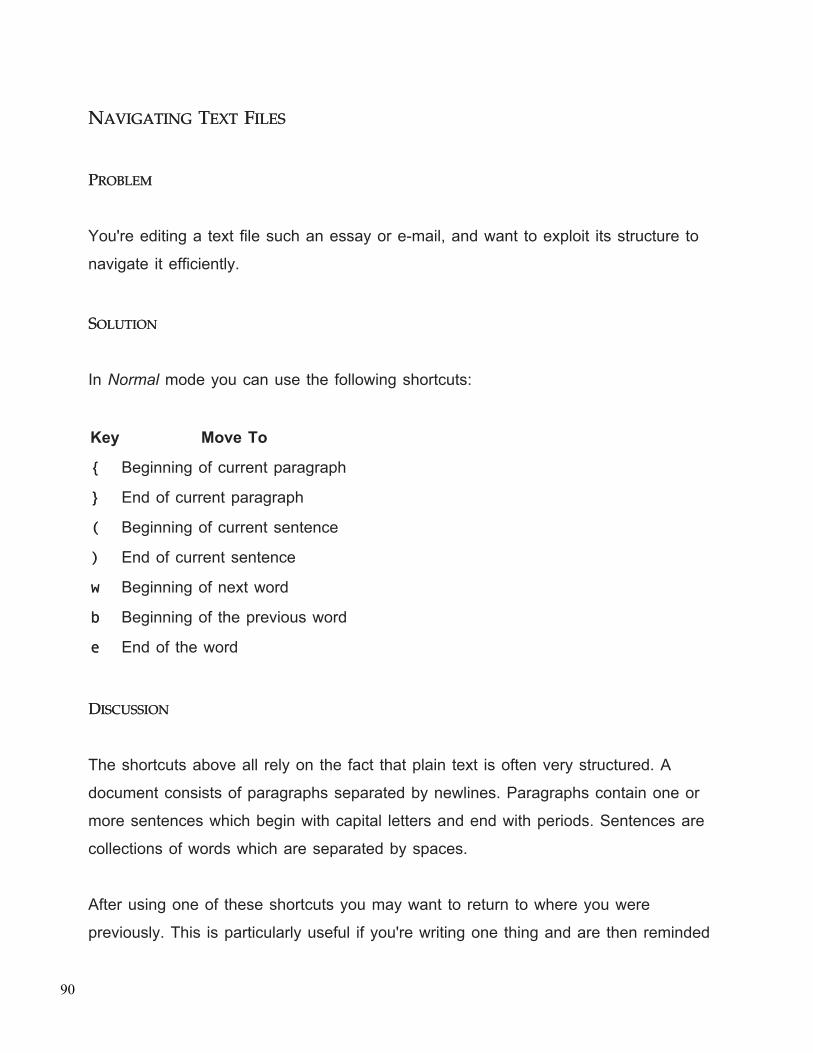
NAVIGATINGNAVIGATING TEXTTEXT FILESFILES
PROBLEMPROBLEM
You're editing a text file such an essay or e-mail, and want to exploit its structure to
navigate it efficiently.
SOLUTIONSOLUTION
In Normal mode you can use the following shortcuts:
Key Move To
{{ Beginning of current paragraph
}} End of current paragraph
(( Beginning of current sentence
)) End of current sentence
ww Beginning of next word
bb Beginning of the previous word
ee End of the word
DISCUSSIONDISCUSSION
The shortcuts above all rely on the fact that plain text is often very structured. A
document consists of paragraphs separated by newlines. Paragraphs contain one or
more sentences which begin with capital letters and end with periods. Sentences are
collections of words which are separated by spaces.
After using one of these shortcuts you may want to return to where you were
previously. This is particularly useful if you're writing one thing and are then reminded
90
that you now have to change another: you use a shortcut to jump to the location of the
change, then want to resume where you left of. You can use the g,g, (mnemonic: go
back to where I paused (commas can be used to represent pauses…)) command.
Each time you execute it you'll be taken back another step. To move in the other
direction (towards more recent changes), use g;g;.
All of these shortcuts can be combined. So, to move to the end of the previous word
you type bebe. You can also prefix them with numbers to indicate how many times they
should be executed: 3b3b moves to the beginning of the 3rd previous word.
Vim Recipes
Visit http://vim.runpaint.org/ for latest updates. 91
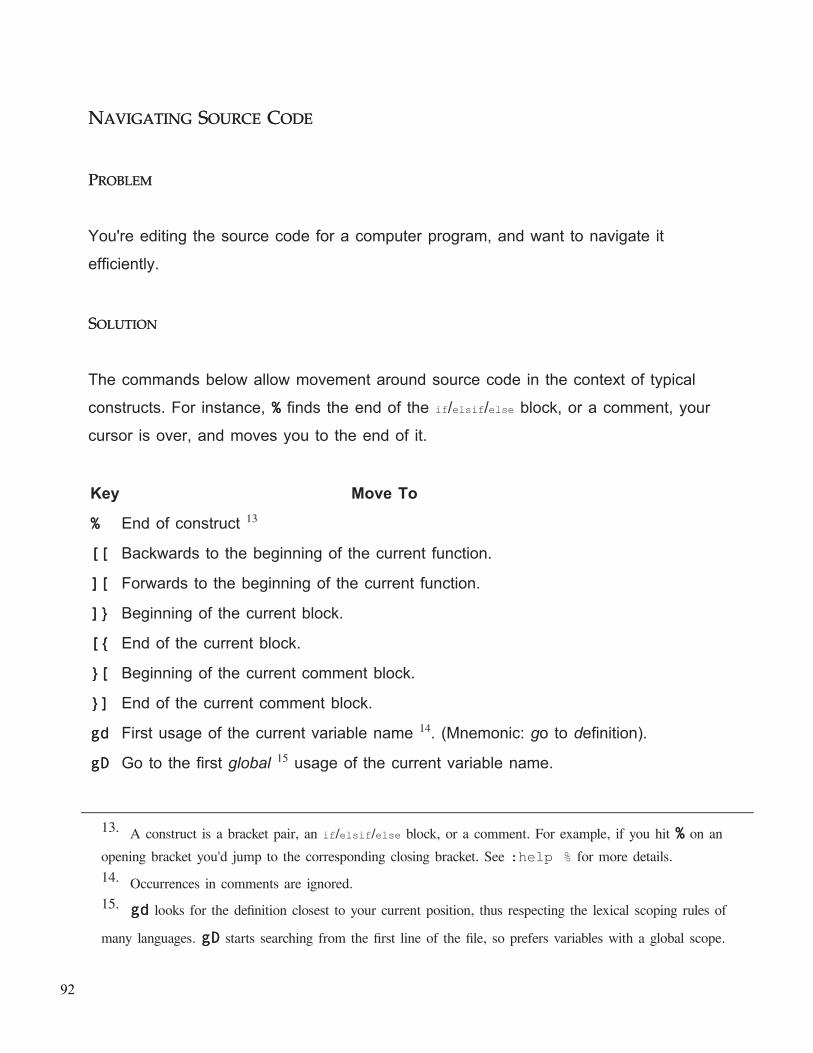
NAVIGATINGNAVIGATING SOURCESOURCE CODECODE
PROBLEMPROBLEM
You're editing the source code for a computer program, and want to navigate it
efficiently.
SOLUTIONSOLUTION
The commands below allow movement around source code in the context of typical
constructs. For instance, %% finds the end of the if/elsif/else block, or a comment, your
cursor is over, and moves you to the end of it.
Key Move To
%% End of construct 13
[[[[ Backwards to the beginning of the current function.
][][ Forwards to the beginning of the current function.
]}]} Beginning of the current block.
[{[{ End of the current block.
}[}[ Beginning of the current comment block.
}]}] End of the current comment block.
gdgd First usage of the current variable name 14. (Mnemonic: go to definition).
gDgD Go to the first global 15 usage of the current variable name.
13. A construct is a bracket pair, an if/elsif/else block, or a comment. For example, if you hit %% on anopening bracket you'd jump to the corresponding closing bracket. See :help % for more details.14. Occurrences in comments are ignored.15. gdgd looks for the definition closest to your current position, thus respecting the lexical scoping rules of
many languages. gDgD starts searching from the first line of the file, so prefers variables with a global scope.
92
DISCUSSIONDISCUSSION
The shortcuts available for text files are supported for source code, too, so review them
if you haven't already.
There's a lot to remember here. Despite my best efforts, I suspect that the descriptions
above are still confusing. To understand these shortcuts you really need to try them
yourself. Open some source code written in your favourite language with Vim, make
sure that syntax highlighting is on (:syntax on), and bounce back and forth between
those braces.
Vim Recipes
Visit http://vim.runpaint.org/ for latest updates. 93
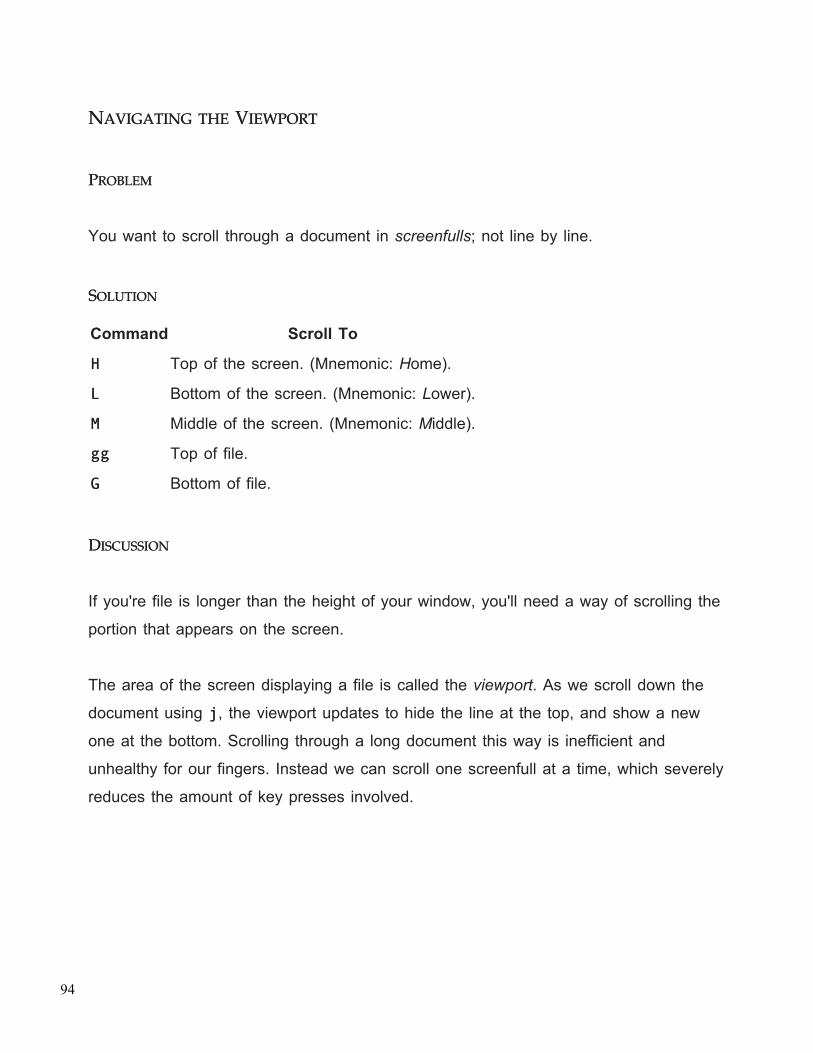
NAVIGATINGNAVIGATING THETHE VIEWPORTVIEWPORT
PROBLEMPROBLEM
You want to scroll through a document in screenfulls; not line by line.
SOLUTIONSOLUTION
Command Scroll To
HH Top of the screen. (Mnemonic: Home).
LL Bottom of the screen. (Mnemonic: Lower).
MM Middle of the screen. (Mnemonic: Middle).
gggg Top of file.
GG Bottom of file.
DISCUSSIONDISCUSSION
If you're file is longer than the height of your window, you'll need a way of scrolling the
portion that appears on the screen.
The area of the screen displaying a file is called the viewport. As we scroll down the
document using jj, the viewport updates to hide the line at the top, and show a new
one at the bottom. Scrolling through a long document this way is inefficient and
unhealthy for our fingers. Instead we can scroll one screenfull at a time, which severely
reduces the amount of key presses involved.
94
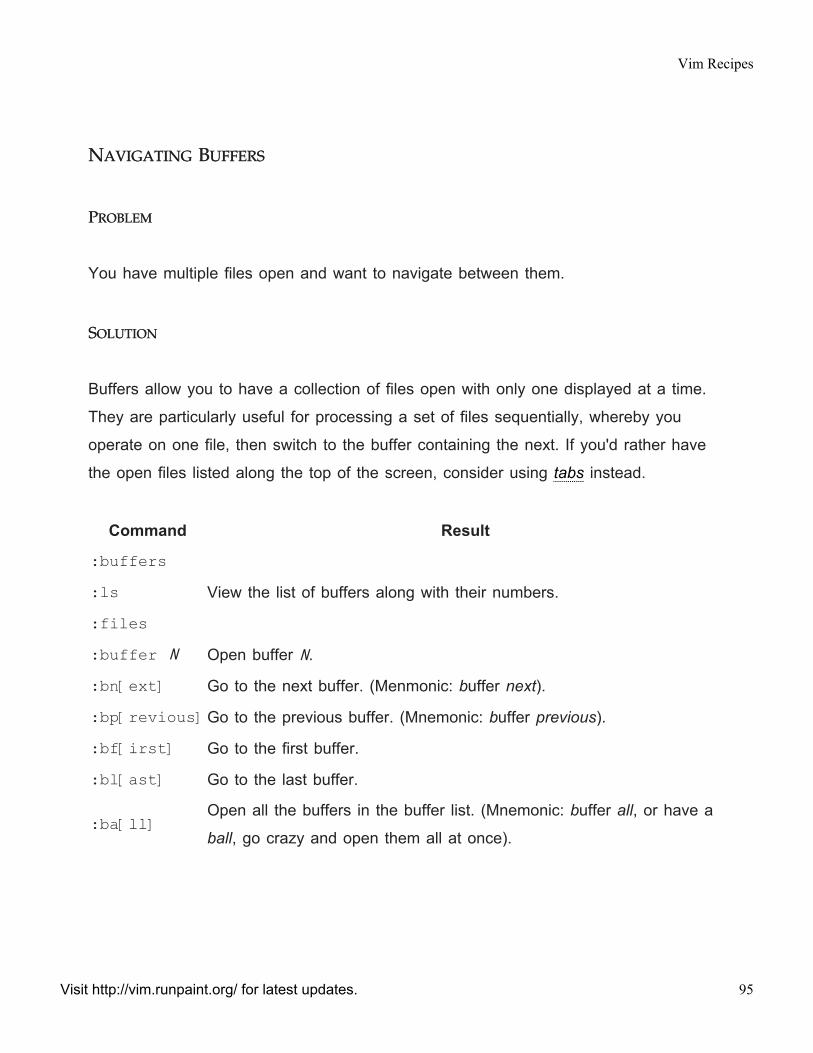
NAVIGATINGNAVIGATING BUFFERSBUFFERS
PROBLEMPROBLEM
You have multiple files open and want to navigate between them.
SOLUTIONSOLUTION
Buffers allow you to have a collection of files open with only one displayed at a time.
They are particularly useful for processing a set of files sequentially, whereby you
operate on one file, then switch to the buffer containing the next. If you'd rather have
the open files listed along the top of the screen, consider using tabs instead.
Command Result
:buffers:ls:files
View the list of buffers along with their numbers.
:buffer N Open buffer N.
:bn[ext] Go to the next buffer. (Menmonic: buffer next).
:bp[revious]Go to the previous buffer. (Mnemonic: buffer previous).
:bf[irst] Go to the first buffer.
:bl[ast] Go to the last buffer.
:ba[ll] Open all the buffers in the buffer list. (Mnemonic: buffer all, or have a
ball, go crazy and open them all at once).
Vim Recipes
Visit http://vim.runpaint.org/ for latest updates. 95

DISCUSSIONDISCUSSION
To quickly navigate between buffers its common to map :bnext and/or :bprev to a
key. For example map <F6> :bn<CR> lets you hit <F6><F6> to cycle through the open
buffers.
You can also switch buffers very quickly by using :buffer (and its shortcut :b). It
supports (partial) file matching thus if you have first.txt and second.txt loaded you can
use :b fir (or even just :b f) to switch to first.txt.
96
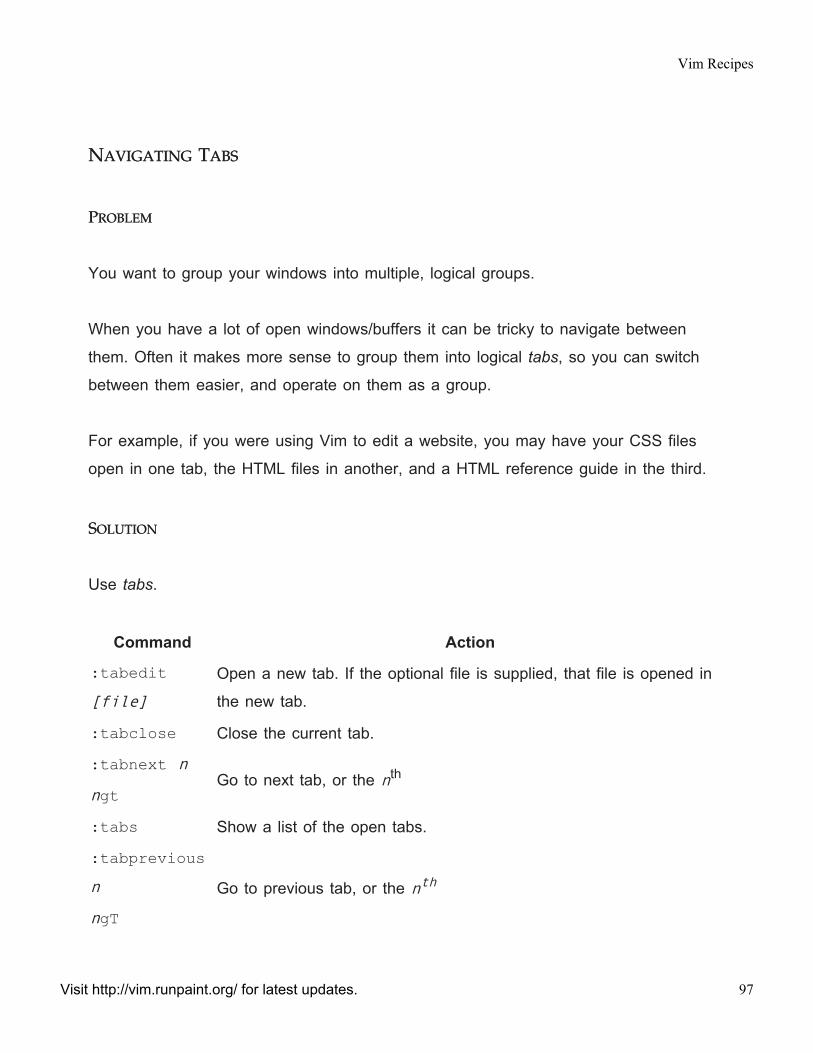
NAVIGATINGNAVIGATING TABSTABS
PROBLEMPROBLEM
You want to group your windows into multiple, logical groups.
When you have a lot of open windows/buffers it can be tricky to navigate between
them. Often it makes more sense to group them into logical tabs, so you can switch
between them easier, and operate on them as a group.
For example, if you were using Vim to edit a website, you may have your CSS files
open in one tab, the HTML files in another, and a HTML reference guide in the third.
SOLUTIONSOLUTION
Use tabs.
Command Action
:tabedit[file]
Open a new tab. If the optional file is supplied, that file is opened in
the new tab.
:tabclose Close the current tab.
:tabnext n
ngtGo to next tab, or the nth
:tabs Show a list of the open tabs.
:tabpreviousn
ngTGo to previous tab, or the nth
Vim Recipes
Visit http://vim.runpaint.org/ for latest updates. 97
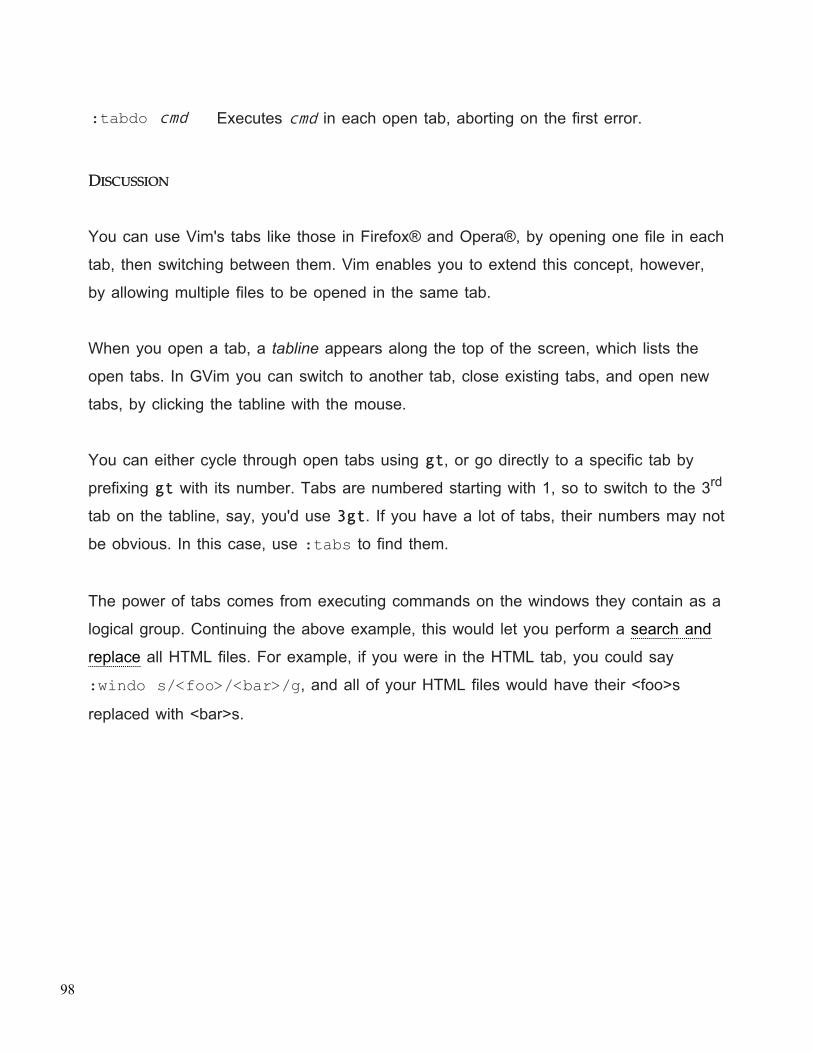
:tabdo cmd Executes cmd in each open tab, aborting on the first error.
DISCUSSIONDISCUSSION
You can use Vim's tabs like those in Firefox® and Opera®, by opening one file in each
tab, then switching between them. Vim enables you to extend this concept, however,
by allowing multiple files to be opened in the same tab.
When you open a tab, a tabline appears along the top of the screen, which lists the
open tabs. In GVim you can switch to another tab, close existing tabs, and open new
tabs, by clicking the tabline with the mouse.
You can either cycle through open tabs using gtgt, or go directly to a specific tab by
prefixing gtgt with its number. Tabs are numbered starting with 1, so to switch to the 3rd
tab on the tabline, say, you'd use 3gt3gt. If you have a lot of tabs, their numbers may not
be obvious. In this case, use :tabs to find them.
The power of tabs comes from executing commands on the windows they contain as a
logical group. Continuing the above example, this would let you perform a search and
replace all HTML files. For example, if you were in the HTML tab, you could say
:windo s/<foo>/<bar>/g, and all of your HTML files would have their <foo>s
replaced with <bar>s.
98
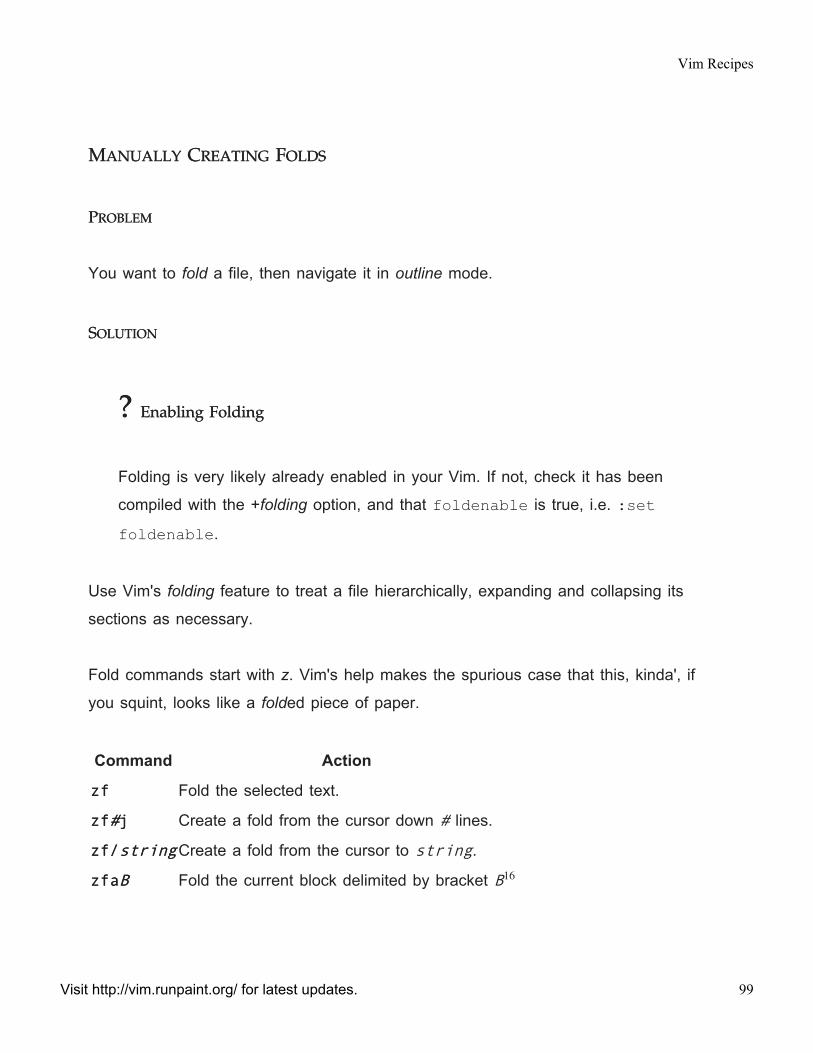
MANUALLYMANUALLY CREATINGCREATING FOLDSFOLDS
PROBLEMPROBLEM
You want to fold a file, then navigate it in outline mode.
SOLUTIONSOLUTION
?? EnablingEnabling FoldingFolding
Folding is very likely already enabled in your Vim. If not, check it has been
compiled with the +folding option, and that foldenable is true, i.e. :setfoldenable.
Use Vim's folding feature to treat a file hierarchically, expanding and collapsing its
sections as necessary.
Fold commands start with z. Vim's help makes the spurious case that this, kinda', if
you squint, looks like a folded piece of paper.
Command Action
zfzf Fold the selected text.
zfzf##jj Create a fold from the cursor down # lines.
zf/zf/stringstringCreate a fold from the cursor to string.
zfazfaBB Fold the current block delimited by bracket B16
Vim Recipes
Visit http://vim.runpaint.org/ for latest updates. 99

For instance, zf4jzf4j creates a fold from the current line to the forth line down. Or, if
you've selected text in Visual mode, then zfzf will fold the selection.
DISCUSSIONDISCUSSION
How you use folds will depend very much on the type of file you are editing. They are
particularly useful for long papers or essays, for instance, where you fold each section
so as to navigate the document hierarchically. When editing program source code they
can be used with function/method/class declarations.
This recipe is entitled Manually Creating Folds, because there are other approaches to
folding which are automatic. A particularly useful method, indentation folding, is
described below. In addition, most programming languages support syntax folding. Try
it out by opening some source code in Vim then executing :setfoldmethod=syntax.
?? IndentationIndentation FoldingFolding
If you're working with structured, indented text you may prefer to use
indentation folding.
Enable it with :set foldmethod=indent. Folds are now automatically
created for each level of indented text. (To indent simply start a line with a
<Tab><Tab>17 So, for example, zMzM folds all indented text.
16. B can be any of ()[]{}<>. This feature understands nested blocks, too, so will usually do the rightthing.17. Each shiftwidth of indent corresponds to one fold. See the Indenting Lines recipe for details.
100

To expand, collapse, and otherwise navigate folds see Navigating Folds.
Vim Recipes
Visit http://vim.runpaint.org/ for latest updates. 101
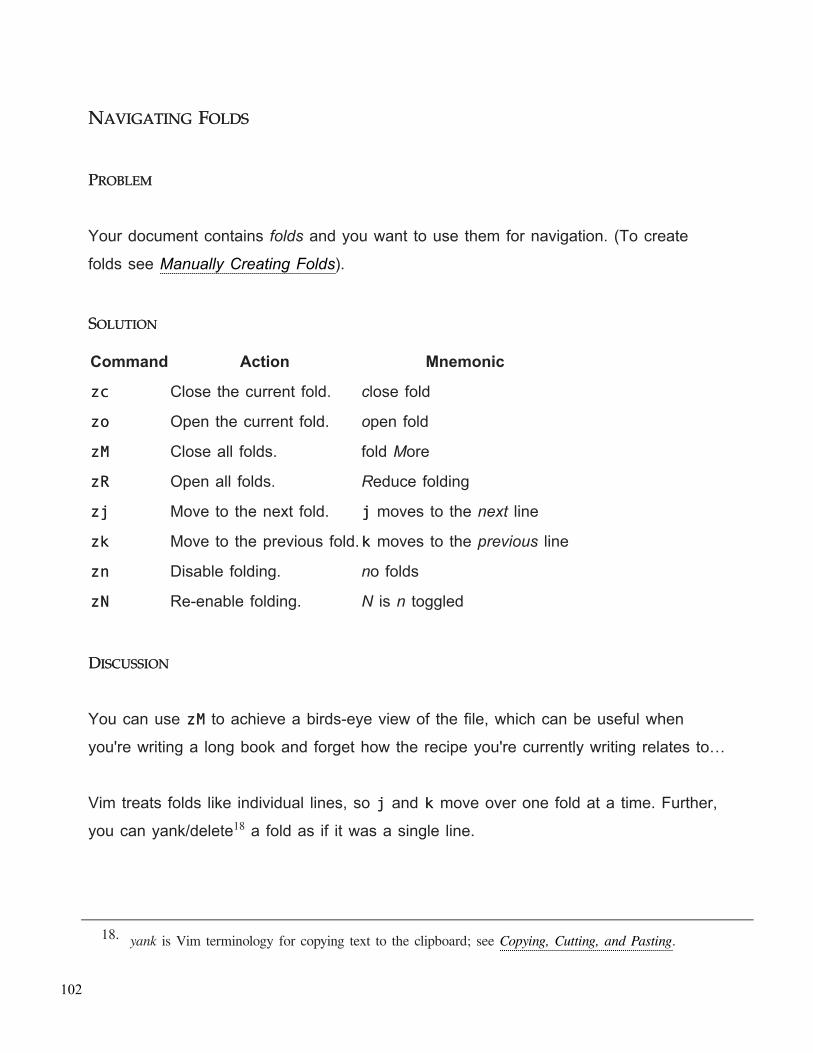
NAVIGATINGNAVIGATING FOLDSFOLDS
PROBLEMPROBLEM
Your document contains folds and you want to use them for navigation. (To create
folds see Manually Creating Folds).
SOLUTIONSOLUTION
Command Action Mnemonic
zczc Close the current fold. close fold
zozo Open the current fold. open fold
zMzM Close all folds. fold More
zRzR Open all folds. Reduce folding
zjzj Move to the next fold. jj moves to the next line
zkzk Move to the previous fold.kk moves to the previous line
znzn Disable folding. no folds
zNzN Re-enable folding. N is n toggled
DISCUSSIONDISCUSSION
You can use zMzM to achieve a birds-eye view of the file, which can be useful when
you're writing a long book and forget how the recipe you're currently writing relates to…
Vim treats folds like individual lines, so jj and kk move over one fold at a time. Further,
you can yank/delete18 a fold as if it was a single line.
18. yank is Vim terminology for copying text to the clipboard; see Copying, Cutting, and Pasting.
102
By default, folds are forgotten when you edit another file. To save them use :mkview.
Then, to restore them, use :loadview:loadview.
The :set foldcolumn=W command, where W is a integer width less than 13,
displays a column along the left-hand side of the screen with information about the
folds in the current file. It indicates whether the corresponding line is an open or closed
fold (with - or +, respectively).
Vim Recipes
Visit http://vim.runpaint.org/ for latest updates. 103
SPLITTINGSPLITTING THETHE SCREENSCREEN
PROBLEMPROBLEM
You want to view multiple files at one time. Or, you want to view different positions in
the same file at the same time.
For example, if you were editing source code in an unfamiliar programming language,
you may want to have the documentation and source visible at the same time. Or, if
you wanted to move text between multiple files, you could view the source and target
file together.
SOLUTIONSOLUTION
Use Vim's split screen feature to divide the screen into multiple panes, each of which
can display a file.
Command Action
:split file Splits the window horizontally.
:vsplit fileSplits the window vertically.
(If file is specified, that file is shown in the upper/left, as appropriate, pane; if not,
both panes show the current file).
To move between windows you use <Ctrl><Ctrl>--ww (mnemonic: control window). To move
in a specific direction, add the relevant movement key. So, to move upwards:
<Ctrl><Ctrl>--ww++kk.
To close the active window use :q, just as you would to close a window normally.
104
You can reduce/enlarge the size of the current window with <Ctrl><Ctrl>--ww++-- and
<Ctrl><Ctrl>--ww++++, respectively. To specify the size of a window when you open it, prefix
the :split command with the desired height/width in lines. For example, to show
README in a window of 5 lines high: :5 :split README.
DISCUSSIONDISCUSSION
The default behaviour of both :split and :vsplit is to show the current file twice.
This is more useful than it may first sound.
When working with long documents it means that you can view the top and bottom of
the file simultaneously. If you use folding you can use one window to display an outline
of a document while editing a specific section in another. For example, when I'm
working on reports I use :30 :vsplit to view the first and second level headings
along the left of the screen, while editing the report in the main window.
By default the windows will scroll independently of each other. If you :setscrollbind before you split the screen the windows scroll together.
Vim Recipes
Visit http://vim.runpaint.org/ for latest updates. 105
NAVIGATINGNAVIGATING MARKSMARKS
PROBLEMPROBLEM
You want to bookmark specific points in a file so you can easily jump to them from
elsewhere.
SOLUTIONSOLUTION
Use Vim's marks feature. A mark is a character in the range a-zA-Z0-9. It's
represented in the examples below as M.
Command Action
mmMM Mark the current position as M.
''MM Jump to the first character of the line containing M.
`̀MM Jump to the position of mark M.
DISCUSSIONDISCUSSION
Marks 0-9 are mainly for Vim's internal use, so ignore them. Marks a-z are only
available in the current file, and are deleted when it is closed. Marks A-Z are available
across multiple files. If your .viminfo file is available, as it usually will be, they persist
across sessions.
Marks have a multitude of uses. I use them often when I have a section of a file that I
need to keep referring to: I mark that section with mama, jump to it with 'a'a, then return to
where I was previously with ````. I use them almost implicitly when formatting and
filtering text to define the text that I want to edit.
106

The :marks command shows a list of marks you have set, which is useful for the kind
of person who fully embraced the idea of marking anything and everything but was
unable to remember the significance of all 52 marks he used.
Vim Recipes
Visit http://vim.runpaint.org/ for latest updates. 107
NAVIGATINGNAVIGATING TAGSTAGS
PROBLEMPROBLEM
You're working on a project where you need to jump between occurrences of
significant keywords, which are possibly spread across multiple files.
For example, you're writing source code and want to be able to type a function name
then quickly jump to where it was initially defined so you understand how it should be
used. Then you want to return to where you were.
SOLUTIONSOLUTION
Use tags. Tags are similar to index entries in a book: significant terms are linked to the
key places that they occur.
We will use a program called Exuberant Ctags to generate the tag list because it is
compatible with all popular programming languages: C, assembler, ASP, Bourne/Korn/Z
shell, C++, COBOL, Eiffel, Fortran, Java, Lisp, Lua, Pascal, Perl, PHP, Python, REXX,
Ruby, S-Lang, Scheme, Tcl, Verilog, Vim and YACC.
After you have installed Ctags you can generate a tag list for the current directory (and
its sub-directories) with ctags -R. To only consider files in the current directory use
ctags *. This will generate a tag list for source code in most common languages.
You can now open a source file from that directory and use the :tag tag command
to jump to the definition of the tag. To look up the tag under the cursor use <Ctrl><Ctrl>++]].
You can also auto-complete tag names by starting to type one then using <Tab><Tab> to
108
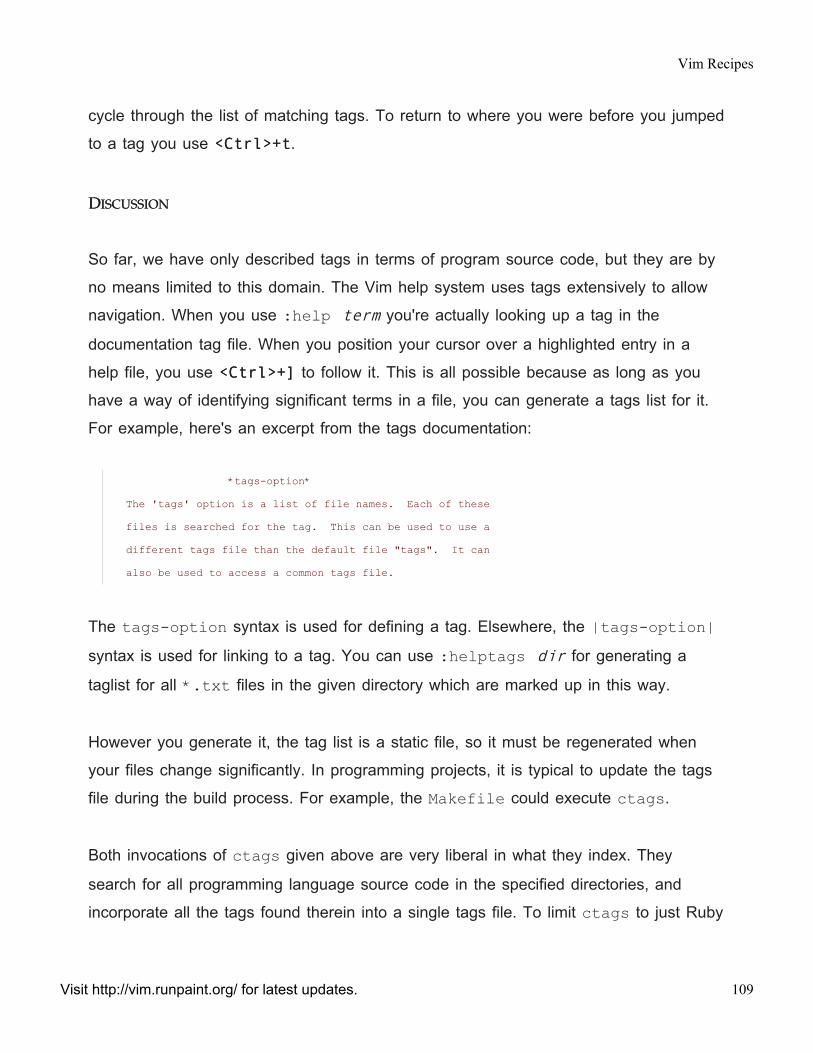
cycle through the list of matching tags. To return to where you were before you jumped
to a tag you use <Ctrl><Ctrl>++tt.
DISCUSSIONDISCUSSION
So far, we have only described tags in terms of program source code, but they are by
no means limited to this domain. The Vim help system uses tags extensively to allow
navigation. When you use :help term you're actually looking up a tag in the
documentation tag file. When you position your cursor over a highlighted entry in a
help file, you use <Ctrl><Ctrl>++]] to follow it. This is all possible because as long as you
have a way of identifying significant terms in a file, you can generate a tags list for it.
For example, here's an excerpt from the tags documentation:
*tags-option*
The 'tags' option is a list of file names. Each of these
files is searched for the tag. This can be used to use a
different tags file than the default file "tags". It can
also be used to access a common tags file.
The tags-option syntax is used for defining a tag. Elsewhere, the |tags-option|syntax is used for linking to a tag. You can use :helptags dir for generating a
taglist for all *.txt files in the given directory which are marked up in this way.
However you generate it, the tag list is a static file, so it must be regenerated when
your files change significantly. In programming projects, it is typical to update the tags
file during the build process. For example, the Makefile could execute ctags.
Both invocations of ctags given above are very liberal in what they index. They
search for all programming language source code in the specified directories, and
incorporate all the tags found therein into a single tags file. To limit ctags to just Ruby
Vim Recipes
Visit http://vim.runpaint.org/ for latest updates. 109
source code, for example, you can use ctags *.rb. For more control over what files
ctags considers, consult its documentation. On Linux: man ctags.
Once you have generated the tags file Vim needs to be able to find it. By default it
looks for a file named tags in the current directory, but for projects which span
multiple directories this is not always suitable. You can specify the location of the tags
file using :set tags=file. Specify multiple tag files by separating the paths with
commas. Instruct Vim to search for a tags file recursively with :set tags=./tags;/.
Using <Ctrl><Ctrl>++]] to jump to a new tag takes you to a new buffer to show the results. If
you'd rather see them in a new window use <Ctrl><Ctrl>++WW++]], or :stag tag.
If you get dizzy after all this jumping around you can reacquaint yourself with where
you've been by using the :tags command. This shows you which tags you've jumped
to, and where you jumped to them from.
110
BOOKMARKINGBOOKMARKING LINESLINES WITHWITH VISIBLEVISIBLE MARKERSMARKERS ((SIGNSSIGNS))
PROBLEMPROBLEM
You want to assign visible marks to the margins of certain lines.
For example, you're using Vim as an IDE and want breakpoints to be clearly marked.
Or, you want to label lines in need of editing with a question mark icon.
SOLUTIONSOLUTION
Vim allows you to define a sign and then associate it with one or more lines of a file. It
is displayed in the right-hand margin as a two-character string in the terminal, and an
icon in Gvim.
Before you use a sign you must define it. For example:
:sign define fixme text=!! linehl=Todo texthl=Error icon=/path/to/todo.xpm
Let's break this down. We name the sign fixme, which is how we'll refer to it later. We
specify that in the terminal the sign should be displayed as !!, and that in the GUI the
icon stored at /path/to/todo.xpm should be used instead. The linehl argument
defines the highlight group used for the entire line the sign is attached to; texthl defines
the highlight group for the sign itself.
Now the sign is defined, presumably in vimrc, you can use it in any file. To attach the
sign to a specific line you use:
Vim Recipes
Visit http://vim.runpaint.org/ for latest updates. 111
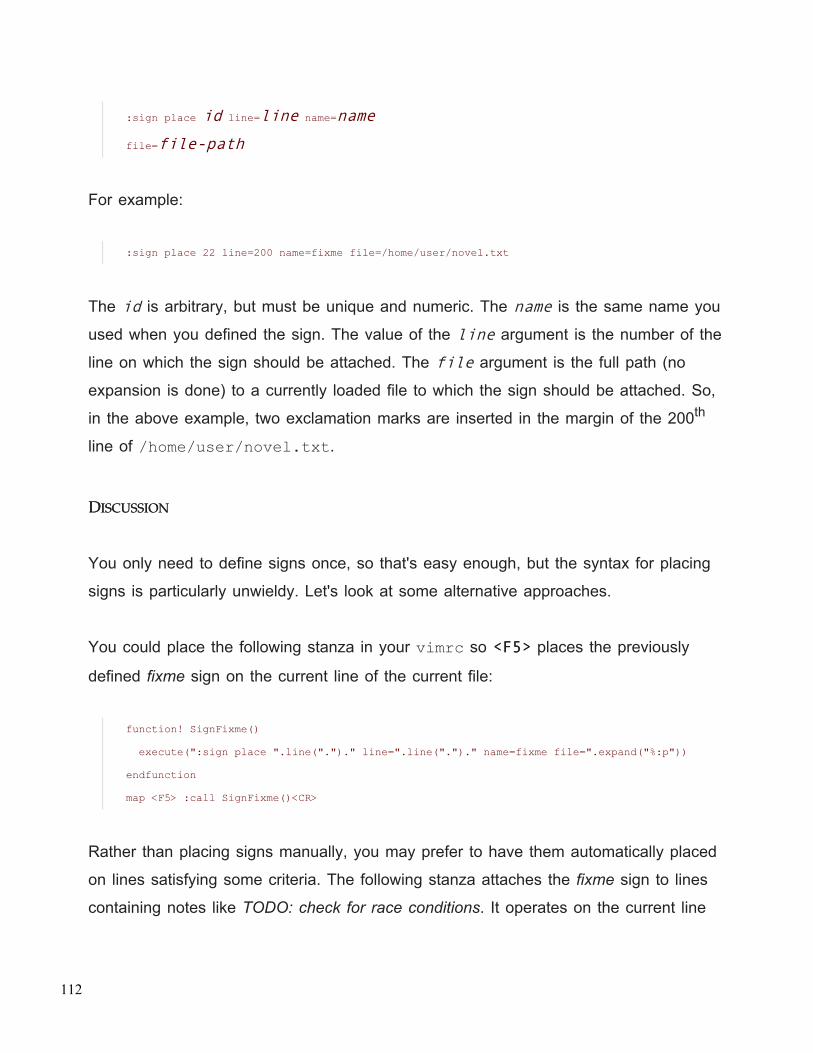
:sign place id line=line name=name
file=file-path
For example:
:sign place 22 line=200 name=fixme file=/home/user/novel.txt
The id is arbitrary, but must be unique and numeric. The name is the same name you
used when you defined the sign. The value of the line argument is the number of the
line on which the sign should be attached. The file argument is the full path (no
expansion is done) to a currently loaded file to which the sign should be attached. So,
in the above example, two exclamation marks are inserted in the margin of the 200th
line of /home/user/novel.txt.
DISCUSSIONDISCUSSION
You only need to define signs once, so that's easy enough, but the syntax for placing
signs is particularly unwieldy. Let's look at some alternative approaches.
You could place the following stanza in your vimrc so <F5><F5> places the previously
defined fixme sign on the current line of the current file:
function! SignFixme()
execute(":sign place ".line(".")." line=".line(".")." name=fixme file=".expand("%:p"))
endfunction
map <F5> :call SignFixme()<CR>
Rather than placing signs manually, you may prefer to have them automatically placed
on lines satisfying some criteria. The following stanza attaches the fixme sign to lines
containing notes like TODO: check for race conditions. It operates on the current line
112
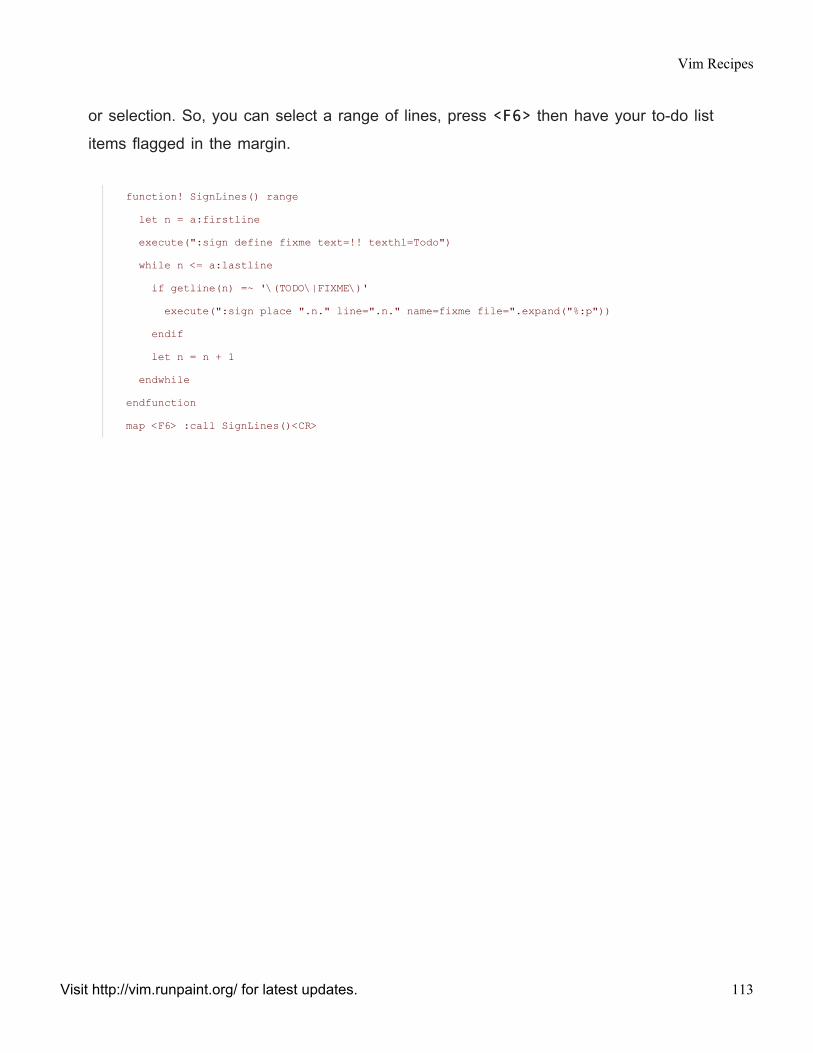
or selection. So, you can select a range of lines, press <F6><F6> then have your to-do list
items flagged in the margin.
function! SignLines() range
let n = a:firstline
execute(":sign define fixme text=!! texthl=Todo")
while n <= a:lastline
if getline(n) =~ '\(TODO\|FIXME\)'
execute(":sign place ".n." line=".n." name=fixme file=".expand("%:p"))
endif
let n = n + 1
endwhile
endfunction
map <F6> :call SignLines()<CR>
Vim Recipes
Visit http://vim.runpaint.org/ for latest updates. 113

GUIGUI (GVIM)(GVIM)
114
CHANGINGCHANGING THETHE FONTFONT
PROBLEMPROBLEM
You want to display the text in a different font.
For example, the current font isn't particularly readable, or is too large.
SOLUTIONSOLUTION
Standard Vim uses the font from the terminal it is run under. Gvim, however, gives you
full control over the font face and size.
The command :set guifont font-name changes the current font to font-name.
The font name can be followed by a size. There are, unfortunately, some platform-
specific differences at this point…
?? SpecifyingSpecifying guifont inin anan Operating-System-SpecificOperating-System-Specific MannerManner
LinuxLinux
• The font name and size are space separated.
• Spaces and commas need to be backslash escaped.
For example: :set guifont=Andale\ Mono\ 11.
Vim Recipes
Visit http://vim.runpaint.org/ for latest updates. 115
MacMac
• The font name and size are colon separated.
• The size is prefixed with a h.
• Spaces and commas need to be backslash escaped.
For example: :set guifont=Monaco:h11.
WindowsWindows
• The font name and size are colon separated.
• The size is prefixed with a h.
• Spaces in font names can be replaced with underscores (_).
For example: :set guifont=Andale_Mono:h11.
DISCUSSIONDISCUSSION
To change the font you need to know its name. On most operating systems you can
request a GUI font chooser with the command :set guifont=*. Linux users can
also use the xlsfonts utility to see a list of available fonts.
If the font you've specified can not be found, Vim complains. To avoid this you can
specify multiple fonts in order of preference with a comma separated list. The first valid
font is loaded. For example: :set guifont=Screen15,\ 7x13. This approach is
particularly useful if you use your Vim configuration on multiple computers, or if you
simply want it to be portable.
116
MAXIMISINGMAXIMISING SCREENSCREEN SPACESPACE
PROBLEMPROBLEM
The toolbar, menubar, and other GUI artifacts take up too much of your screen; you
want to hide them.
SOLUTIONSOLUTION
Modify the guioptions variable. Gvim decides which elements of the GUI to display
based on the value of guioptions. This is a series of letters, each of which refer to
some specfic element. Some examples follow:
• m - Display a menu bar.
• T - Display a toolbar.
• r - Always display the right-hand scrollbar.
• R - Display the right-hand scrollbar if the window is split vertically.
• l - Always display left-hand scrollbar.
• L - Display the left-hand scrollbar if the window is split vertically.
• b - Display the horizontal scrollbar.
So, to hide the menu bar, toolbar, and scrollbars you could use :set guioptions-=mTrlb. To display a hidden element use += instead, e.g. :set guioptions+=T.
Vim Recipes
Visit http://vim.runpaint.org/ for latest updates. 117
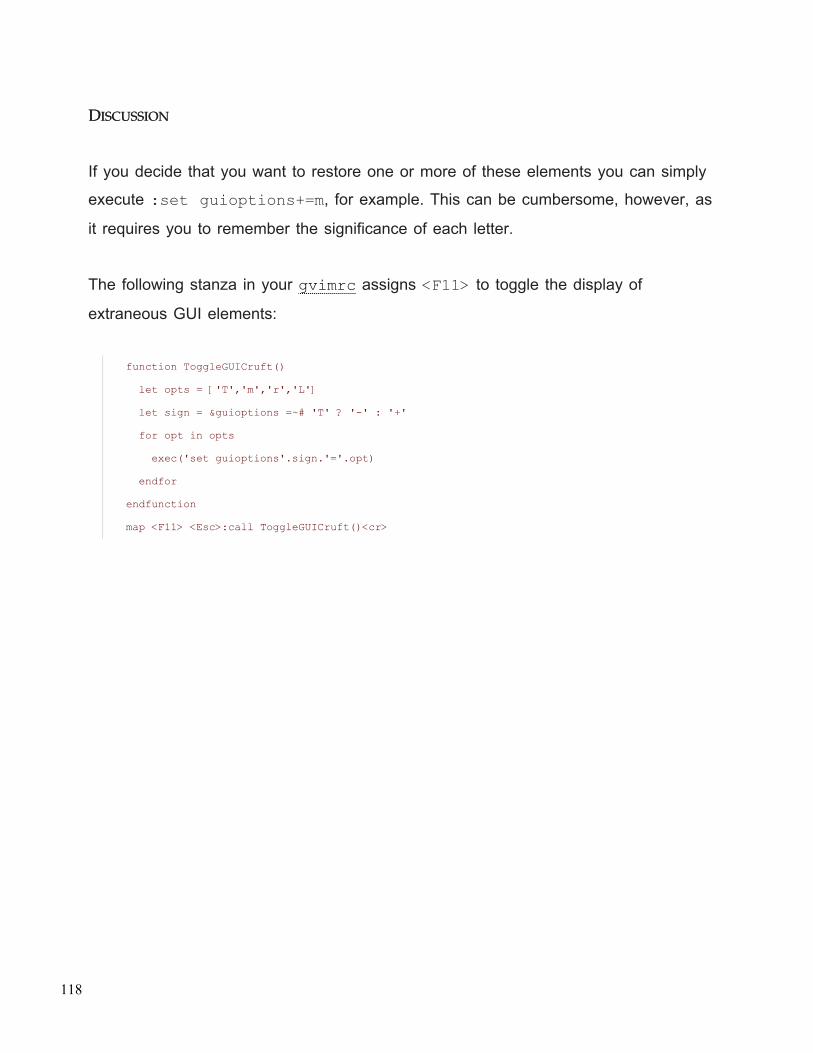
DISCUSSIONDISCUSSION
If you decide that you want to restore one or more of these elements you can simply
execute :set guioptions+=m, for example. This can be cumbersome, however, as
it requires you to remember the significance of each letter.
The following stanza in your gvimrc assigns <F11> to toggle the display of
extraneous GUI elements:
function ToggleGUICruft()
let opts = ['T','m','r','L']
let sign = &guioptions =~# 'T' ? '-' : '+'
for opt in opts
exec('set guioptions'.sign.'='.opt)
endfor
endfunction
map <F11> <Esc>:call ToggleGUICruft()<cr>
118
CREATINGCREATING MENUSMENUS ANDAND TOOLBARTOOLBAR BUTTONSBUTTONS
PROBLEMPROBLEM
You want to add your own commands to Gvim's menus, or toolbar, for quick access.
For example, you've written a function that automatically writes bestselling novels for
you, but you're not willing to use it if you have to type its name every time; you want to
invoke it by selecting a menu option.
SOLUTIONSOLUTION
Use :set amenu menu command to map a menu item to a command. This is the
GUI equivalent of :map.
For example, :amenu Help.Op&ions :help options<cr> adds a new item called
Options to the Help menu, which invokes :help options. The ampersand (&)
signifies that the character it prefixes can be used as a keyboard shortcut, so in this
case <Alt><Alt>++hh++tt selects this command.
DISCUSSIONDISCUSSION
You're not restricted to adding items to existing menus; you can create a new top-level
menu simply by specifying a name not currently in use. For example:
:amenu <silent>&Vim.vim\.org :!xdg-open http://www.vim.org/<cr>
Vim Recipes
Visit http://vim.runpaint.org/ for latest updates. 119
will create a new top-level menu called Vim with the shortcut key VV. It will contain one
entry named vim.org (we escape the . because otherwise it would create a vim entry
which in turn contain an org item). When invoked it will open the Vim website on
systems adhering to the Free Desktop Specification. The <silent> prefix prevents the
command from being echoed on the command-line.
If you want to add a dashed separator line between menu items use a menu item
named -SEP- and an empty command, e.g. :amenu Help.-SEP- :.
To control where a top-level menu appears relative to its neighbours you need to prefix
amenu with a numeric priority: the lower the number the further right the menu's
position. For example, :5amenu First.first :echo 'first'<cr> creates a top-
level menu named First that appears before all of the others.
The same approach can be used to position menu items. For example, :amenu9999.1 Help.first :echo 'first'<cr> adds a first item to the Help menu,
which appears before the other items.
You can also use :amenu to add a new toolbar icon:
:amenu icon=image-path Toolbar.item-name
command
For example:
:amenu icon=options.png ToolBar.OptionsHelp :help<cr>
If the image-path consists only of a filename, as above, Vim prepends
$VIMRUNTIME/bitmaps/ to it.
120

SEARCHINGSEARCHING
Vim Recipes
Visit http://vim.runpaint.org/ for latest updates. 121
SEARCHINGSEARCHING FORFOR ANYANY WORDWORD
PROBLEMPROBLEM
You want to search the current file for an arbitrary word.
SOLUTIONSOLUTION
Use /word to search forward in the file; ?word to search backward.
DISCUSSIONDISCUSSION
You can use incremental (find-as-you-type) search by using the :set incsearchoption. Having done so, your cursor will move to the first match as you enter your
query. This enables you to receive feedback on the effectiveness of your query. Once
satisfied with your query, press <Enter><Enter> to run it. If you were interested more in the
erratic cursor movement than searching, pressing <Esc><Esc> will cancel the search and
return to where you began.
You're not limited to finding literal strings; word can also be a regular expression. For
example /^[A-Z] searches for lines beginning with capital letters.
To repeat your search use //// or ????.
After finding the first match using either of the above methods, you can press the nn
(mnemonic: next match) key to jump to the next match. To jump to the previous match,
use NN.
122
SEARCHINGSEARCHING OVEROVER MULTIPLEMULTIPLE FILESFILES
PROBLEMPROBLEM
You want to search for a particular term in a collection of files. For example, you want
to find the files in your project that mention Mr J. Random.
SOLUTIONSOLUTION
Use the :vimgrep command: :vimgrep /pattern/ [flags] file0 file1
fileN.
DISCUSSIONDISCUSSION
In its simplest form, vimgrep takes a word to search for, and a list of files in which to
do so. So, to search for grapes in shopping-list.txt you'd run :vimgrep/grapes/ shopping-list.txt.
You can name as many files as you like, but you'll probably want to use shell globbing,
see the sidebar for details, instead to specify groups of files. Searching for grapes in all
*.txt files could be accomplished with: :vimgrep /grapes/ *.txt.
?? GlobbingGlobbing
A number of Vim commands support filename globbing. This is a way of
selecting a group of files by specifying a pattern matching their names. For
Vim Recipes
Visit http://vim.runpaint.org/ for latest updates. 123
example, *.txt refers to all files in the current directory whose names end in
.txt. The * is a wildcard and means anything.
** recursively matches directories below the current one, so **/*.txtsearches recursively downwards from the current directory for filenames ending
in .txt.
If your operating system supports additional globbing patterns, you can use
these as well.
You're not restricted to searching on simple words, however. You can use any of Vim's
regular expressions between the forward slashes. Searching /tmp/bar.txt and
~/foo.tex for lines starting with numbers: :vimgrep /^[0-9]/ /tmp/bar.txt~/foo.tex.
vimgrep jumps to the first match it finds. To jump to the next match use :cn:cn; use
:cN:cN for the previous.
? If you use :grep instead of :vimgrep an external grep-like utility is used
to perform the search. The program used is the value of &grepprg. A good
choice is Andy Lester's ack which can be used with set grepprg=ack and
set grepformat=%f:%l:%m.
The jj flag inhibits the jumpiness (Ritalin for Vim); simply saving the search results to
the quickfix list (see sidebar for details) and leaving your cursor where it was.
124
The gg flag controls how lines matching the pattern multiple times are handled. If not
present (by default), only the first match of a line is shown; otherwise, every
occurrence of the pattern is regarded as a separate match.
The flags can be combined in either order.
?? QuickQuick FixFix ListList
The quick fix list mentioned above is a Vim concept for creating a temporary
index of positions in a file. vimgrep stores its results (a file name, a position
within that file, and the matched text) in the quick fix list.
To view the quick fix list (i.e. the results of the last search) use :cl[ist].
The results are numbered, so you can jump to a specific one with :ccnumber.
For more information see :help quickfix.
Vim Recipes
Visit http://vim.runpaint.org/ for latest updates. 125
SEARCHINGSEARCHING ANDAND REPLACINGREPLACING
PROBLEMPROBLEM
You want to replace all occurrences of one string with another.
For example, imagine you were using Vim to write a novel wherein there was a
protaganist named Curtis. You decide to change his name to Excalibur to give him
more panache. You want Vim to make these changes with the least possible effort.
SOLUTIONSOLUTION
Execute :%s/target/replacement/g to replace all occurrences of target with
replacement. For example: :%s/Curtis/Excalibur/g.
DESCRIPTIONDESCRIPTION
The solution above replaces Curtis with Excalibur. The g flag at the end causes this
operation to be performed globally, i.e. multiple times on each line, if necessary.
The % prefix indicates that the replacement should occur over the entire file. Had you
previously visually selected text to which you want to constrain the search/replace
operation omit the %, e.g. :s/Curtis/Excalibur/g. Or, prefix the command with a
range to contstrain it that way, e.g. 2,20s/Curtis/Excalibur/g performs the
operation over lines two to twenty.
The search string (Curtis in this example) doesn't have to be a literal string; it can be
any Vim regular expression. The details of Vim's regular expressions are explained in
126
the Creating Regular Expressions recipe, so I won't go into them here. Two tips,
though:
• Search for words - If you provide a literal string to replace, as above, Vim even
replaces occurrences that form parts of other words. For example :%s/and/or/g would change supply and demand into supply or demor. To avoid this,
surround the string with word boundary anchors (\<, \>). Thus, the above
command could be rewritten as :%s/\<and\>/or/g.
• Search case insensitively - If you want linux to match Linux, linux, and LiNuX
you need to either add the i flag to the end of the replacement command, or,
use :set ignorecase to enable this behaviour for all searches.
Vim Recipes
Visit http://vim.runpaint.org/ for latest updates. 127
SEARCHINGSEARCHING FORFOR THETHE WORDWORD BENEATHBENEATH THETHE CURSORCURSOR
PROBLEMPROBLEM
You want to search the current document for the word underneath your cursor. You'd
rather not type it in again.
SOLUTIONSOLUTION
In Normal mode, place your cursor on or just in front of the word you wish to find, then
press ** (mnemonic: star search). This will jump to the next occurrence of the word in
the current file. Alternatively, pressing ## will find the previous occurrence.
DISCUSSIONDISCUSSION
After finding the first match using either of the above methods, you can press the nn
(mnemonic: next match) key to jump to the next match. To jump to the previous match,
use NN.
To search for words containing the current word, press g*g* or g#g#, as appropriate. For
instance, if the current word is back, g*g* will jump to hunchback.
128
CREATINGCREATING REGULARREGULAR EXPRESSIONSEXPRESSIONS
PROBLEMPROBLEM
You want to use a Vim regular expression, but don't know how they work.
For example, you want to search a document for a word that begins with a vowel.
SOLUTIONSOLUTION
Vim allows you to use regular expressions (regexps) in many areas. The Searching for
Any Word recipe, for example, explains how to search a file for a regexp.
A regexp is a pattern that describes a string. We will use the /pattern/ notation for
describing patterns, and the "string" notation to represent the text the pattern is
being tested against.
The simplest form of pattern is a literal string, which matches that exact string. For
example, /cow/ matches "cow", "Don't have a cow", and "cower".
The period (.) has special significance in a regexp. It matches any single character.
So, /.ow/ also matches "cow", but also "sow", and "tow".
You can use character ranges to indicate that any one of the specified characters are
acceptable. For example /[cs]ow/ would match "cow", "sow", and "undersow".
If your range consists of alphabetically or numerically consecutive characters you can
specify the start character and end character separated by a hyphen. For example, to
Vim Recipes
Visit http://vim.runpaint.org/ for latest updates. 129
match "b", "c", "d", "e", or "f", you can use /[b-f]/. Or, an integer between 1
and 5: /[1-5]/.
You can invert character ranges so they match any character not specified. For
example, /[^cs]ow/ matches any character that isn't a "c" or an "s" followed by
"ow", i.e. "acknowledge", "I said "ow"!", and "bellow".
Another useful concept of regexps is repetition. If you wanted to match strings
containing consecutive "o"s followed by an ""i", like "cooing" and "tattooist",
you could use /ooi/. If you wanted to abstract this pattern, however, to match one or
more "o"}s followed by an "i", you'd have a problem.
The solution is to suffix the part of the pattern that can be repeated with a
metacharacter which specifies the type of repetition. A metacharacter is simply a
character that has special significance in a regular expression. For example, the "+"metacharacter requires that what precedes it19 occurs either one or more times. For
example, /o\+i/, matches one or more "o"s followed by an "i": "abattoir",
"cooing", and "oii".
The "*" metacharacter represents any number of occurrences of the preceding
character, so /o*i/ matches "zucchini", "boating", and "zooimg". This time the
"o" is made optional. (Given that it starts the pattern it's actually unnecessary; /i/ will
match everything that it matches).
A more useful example is /[a-c]t*o\+i/ which matches either "a", "b", or "c"followed by any number of "t"s, followed by at least one "o", followed by an "i".
The following words satisfy the pattern: ""tattooing", "coins", and "limboing".
19. In fact, it requires that the atom that precedes it occurs one or more times, but this recipe is already toocomplex. If you want this level of detail see :help pattern or a regular expression book.
130
It may not be intuitive that "tattooing" would match, so let's walk through it: The
"a" satisfies /[a-c]/, the following two "t"s match /t*/, the following two "o"s
match /o\+/, then the "i" matches /i/.
A key concept to grasp here is that a string matches a regexp as long as a contiguous
portion of it matches. In the example above the regexp looks at the first character of
"tattooing" and tries applying the pattern to it. This fails because "t" is not a
member of the character class [a-c]. So it moves on to the next letter and starts
again, this time it matches up to "i", as explained above, and because the pattern
has now been exhausted, the rest of the string is ignored.
You can make a portion of the regexp optional (i.e. insisting that it matches 0 or 1
times) with \=. You can generalise this with the \{min,max\} notation which matches
at least min times, but no more than max times. For example, /[^a-c][a-c]\{2,4\}/ matches "yachts" ("yac"), and "blabbed" ("labb"), but doesn't
match "cabbage".
Like character ranges, alternation allows you to specify a list of alternatives that can
match at a given point. Whereas character ranges specify sets of characters,
alternation is used for sets of strings. For example, /\(ing|ed\)/ matches the string
"ing" or the string "ed", e.g. "simpered", and "attacking". If you used a
character range here, e.g. /[inged]/, the pattern would match any string that
contained an "i", an "n", a "g", an "e", or a "d". i.e. it would match all the strings
the alternation approach does, but also many, many more.
All the patterns so far have been allowed to match at any point in the string. That is to
say, before Vim gives up on a match it will try applying the pattern at every point in the
text. You can change this behaviour by using anchors: ^ matches the start of a line,
while $ matches the end. So, /^\s\=\uo/ matches a line that begins with optional
Vim Recipes
Visit http://vim.runpaint.org/ for latest updates. 131
white space, which is followed by an uppercase letter, which is followed by an "o".
The following strings will all match: " Popes are religious", "Roman", and
"Soviet Union".
You can combine the two anchors to require that the whole line matches the pattern.
For example, /\^uo\(v|ma\).\+[rnt]\$/ will match "November" and "Soviet",
but will reject "Soviet Union" or "During November".
DISCUSSIONDISCUSSION
The features described above are common to most regexp implementations. Vim offers
some extensions, though, that users familiar with other regexp implementations may
not be aware of.
By default regexps are case sensitive. That is to say /cow/ will not match "Cow". You
can make all patterns ignore case with :set ignorecase. To change the case
sensitivity for a particular pattern surround the relevant portions with \c (to ignore case
from this point on) and/or \C to respect case from this point on. For example,
/\ccow/ matches "cow", "coW", and "Cow". However, /\cco\Cw/ matches "COw"and "cow", but not "COW". The \c makes the "co" case insensitive, then the \Cmakes the "w" case sensitive.
Some characters in a regexp have a special significance and don't match themselves
literally in the string. For example, /^foo/ matches a line starting with "foo"; it
doesn't match "^foo". To match a special character you need to precede it with a
backslash, For example \^ matches "^", \$ matches "$", \. matches ".", etc.
Of particular note in Vim is \n, which matches a newline character, \r which matches
a carriage return character. and \t which matches a <Tab><Tab>.
132
Vim supports backreferences which allow you to refer to part of a match later in the
same match. For example, /\([a-z]\)\1/ matches a lowercase letter followed by
the same character that just matched. This would match "zoom", and "seeing". The
parenthesised portion of the pattern is a group, and the backreference (\n) refers to
the nth group. So, /\([a-z]\)\([a-z]\)\2\1/ matches two lowercase letters,
followed by the second one again, then the first one again. This matches strings like
"abba".
Vim Recipes
Visit http://vim.runpaint.org/ for latest updates. 133
LOOKINGLOOKING UPUP DOCUMENTATIONDOCUMENTATION FORFOR THETHE KEYWORDKEYWORD UNDERUNDER THETHE CURSORCURSOR
PROBLEMPROBLEM
You want to invoke an external command to lookup documentation for the keyword
underneath the cursor. For example, Linux users may like to read the manual for the
named command with the man utility.
SOLUTIONSOLUTION
Use :set keywordprg=program, then hit KK while hovering over the word.
DISCUSSIONDISCUSSION
This recipe calls the command specified with :set keywordprg, passing the current
word20 as an argument. Thus, if keywordprg = man, then hovering over the word ls
and hitting KK would display the documentation for Linux's ls command.
When used with man, Vim translates a count for the KK command into a section number.
So 7K7K over glob invokes man 7 glob to display section 7 of the glob documentation.
The Ruby programming language has a utility called ri that displays documentation
about the given Ruby method. The Perl programming language has a similar command
called perldoc. By setting keywordprg appropriately, you can make context-sensitive
documentation lookup trivial.
20. word is used in the sense of a string that looks like a word to Vim; it is not necessarily a valid word inyour language.
134

DISPLAYDISPLAY
Vim Recipes
Visit http://vim.runpaint.org/ for latest updates. 135
WORKINGWORKING WITHWITH LONGLONG LINESLINES
PROBLEMPROBLEM
Your file contains lines which are too long to fit on the screen. You find it hard to edit
and view.
SOLUTIONSOLUTION
The :set wrap command, which should be on by default, changes how long lines are
displayed. Once they reach the right margin they are broken, and continued on the line
below. (To disable this behaviour: :set nowrap).
wrap only changes the way the lines are displayed, however; the file will not be
changed. It inserts soft line breaks.
This means that a file containing two particularly long lines may be represented by Vim
as having 5 lines, for example, after wrapping. If you try to navigate this file using the
basic movement commands jj would move between the two logical lines, rather than
the screen lines. The solution is to prefix the movement commands with gg, so gjgj
moves down one screen line.
If using wrap, you can specify what point the line should be broken by executing :setlinebreak. This uses the value of breakat to decide where to break the line. To
change the characters used modify breakat.
You can use :set textwidth=width to enforce a maximum line length, after which
the text is broken with a "hard" line break. Vim breaks at white space, so lines may be
shorter than width. To reformat existing text according to this preference either select
136
them visually and hit gqgq or, in Normal mode, you can reformat the current paragraph
with gqapgqap.
DISCUSSIONDISCUSSION
In general, you'll be better off using hard line breaks with textwidth. This removes the
need to differentiate between logical lines and screen lines, and means that the file will
display reasonably in any editor, even if it doesn't wrap long lines.
Traditionally, text file lines are kept under 80 characters. This is mainly a holdover from
the days of terminals whose displays were limited in this way, but is still customary in
many programming languages and e-mail. To enforce this restriction just :settextwidth=80.
There's another way to insert hard line breaks without specifying a maximum line
length. It is called wrapmargin and wraps lines relative to the width of the terminal
window. For example, :set wrapmargin=4 means that when a line is more than four
characters away from the right-hand margin, it is broken. This approach is more flexible
than textwidth, but has the disadvantage of producing files which will display poorly
on smaller displays or when the screen is split between multiple files. Especially if
you're sharing the files you produce with others, I suggest the use of textwidthinstead.
? textwidth takes precedence over wrapmargin. For wrapmargin to take
effect textwidth must be zero, as it is by default.
Vim Recipes
Visit http://vim.runpaint.org/ for latest updates. 137
DISPLAYINGDISPLAYING LINELINE NUMBERSNUMBERS
PROBLEMPROBLEM
You want to see each line's number alongside it. For example, if you’re writing a
program, error messages frequently reference line numbers.
SOLUTIONSOLUTION
Use :set number to enable line numbering. If you're using a small monitor, you may
want to disable them: :set nonumber.
DISCUSSIONDISCUSSION
Even if you're not programming, line numbers can still be useful. For example, if you’re
collaborating on a file with other people, they may mention specific lines, which you
can then jump to with :number. If you’re wrapping long lines, the line number can be
used to differentiate the beginning of the line from the point at which it has been
wrapped.
By default the number column is at least 4 characters wide, regardless of how many
lines the file has. To change this minimum width use :set numberwidth=width.
The line numbers are only displayed when you’re viewing the file with Vim; the actual
file isn't modified. If you'd like it to be, and you have the cat command on your
system, you can execute :%!cat -n %. This filters the entire file through cat and
prepends the number to each line.
138

Lastly, if you'd like to see the line numbers when you print the file without permanently
changing its contents: :set printoptions=number:y.
Vim Recipes
Visit http://vim.runpaint.org/ for latest updates. 139
WORKINGWORKING WITHWITH REMOTEREMOTE FILESFILES
PROBLEMPROBLEM
You want to edit/view a file that is stored on another computer.
For example, you might want to change a file on your website from your home
computer. Or, you want to change the message of the day file on a server you
administer.
SOLUTIONSOLUTION
To invoke Vim with a remote file use its URL as the argument to vim. For example:
vim sftp://[email protected]/file.txt.
To work with remote files from within Vim, just use their URLs in place of a filename
with normal editing commands.
So, to to open a remote file for editing use :e URL. For example: :eftp://[email protected]/README.
To save to a remote file use :w URL. For example: :wscp://[email protected]/etc/motd.
DISCUSSIONDISCUSSION
Vim supports the following protocols: SCP , SFTP , RCP , HTTP (read-only), WEBDAV ,
rsync (read-only), and fetch (read-only). However, it relies on external programs to do
so. On Linux, most of these programs are available by default; on Windows, for
140
example, only FTP is normally available. See :help netrw-externapp for more
information.
If the protocol requires authentication, you can supply the username as part of the
URL, and then be prompted for the password interactively. This gets boring fast,
however.
If you're editing files via SSH or SCP consider setting up passwordless logins. The
principle is explained in Password-less logins with OpenSSH for Debian Linux, but it is
much for the same for other operating systems.
If you're using FTP on Linux, you can store your credentials in ~/.netrc'. The file is
formatted as follows:
machine {host name 1}
login {username}
password {password}
machine {host name 2}
...
It should be made read-only for your user: chmod 600 ~/.netrc . Now you can use
URLs like ftp://example.org/README, and it will find your username and password
automatically.
? FTP is an insecure protocol, so please don't use it unless you must. SSH/
SFTP/SCP are all superior alternatives.
Vim Recipes
Visit http://vim.runpaint.org/ for latest updates. 141
CHANGINGCHANGING THETHE STATUSSTATUS LINELINE
PROBLEMPROBLEM
You don't like the way the status line looks or would prefer if it displayed different types
of information.
For example, you work with files created on different operating systems, so you'd like
the file format (e.g. unix, MS-Windows, or mac) to be displayed along the bottom of the
screen.
SOLUTIONSOLUTION
Use the :set statusline command along with a format string. The format string is
the text you want displayed interspersed with variable names corresponding to the
types of information you want included.
? By default Vim hides the status line. To show it: :set laststatus=2.
For example, to display the file format you could use :set statusline=%{&ff}.
You can surround this with arbitrary text, for example: :set statusline=format:\%{&ff}.
Here are some common variables the status line can display:
Name Description
b Value of byte under cursor.
c Column number.
142
l Line number.
r Displays [RO] if file is read only.
t File name (as opposed to file path)
y File content type, e.g. [ruby] or [latex].
\&ff File format, e.g. unix, mac, dos.
Variable names are prefixed with a percentage sign (%). Spaces, bars (|), and other
special characters need to be backslash escaped.
Here's a longer example:
:set statusline=%t\ %y\ format:\ %{&ff};\ [%c,%l]
Sample output: .vimrc [vim] format: unix [2,3].
DISCUSSIONDISCUSSION
You may have noted that the syntax for displaying the file format was different from the
other variables. The %{} syntax evaluates the expression contained within the braces
and displays the result.
For example, to display the name of the current colour scheme: %{g:colors_name}(example output: morning). Or the current language: %{v:lang} (example output:
en_GB.UTF-8). Here we are simply displaying the value of Vim internal variables. (See
:let for a list).
The reason %{&ff} works is because ff is the Vim option for getting/setting the file
format, and the & prefix is used for referring to options. The value of any option can be
displayed in this way.
Vim Recipes
Visit http://vim.runpaint.org/ for latest updates. 143
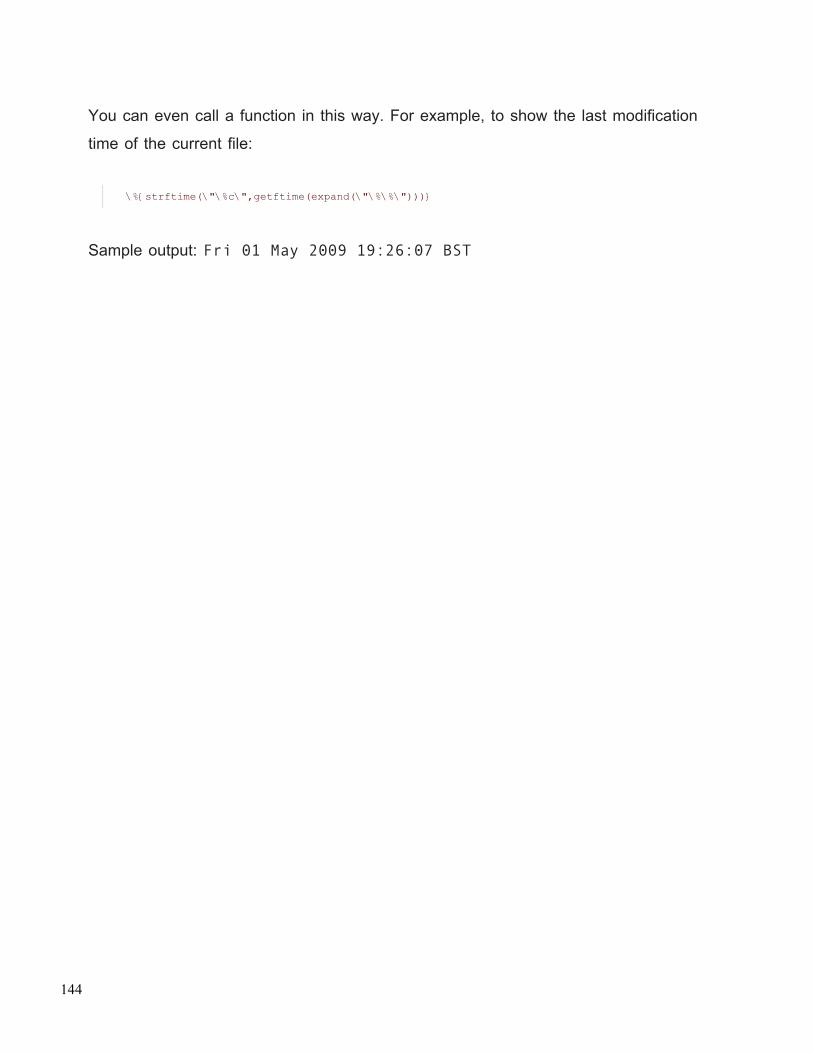
You can even call a function in this way. For example, to show the last modification
time of the current file:
\%{strftime(\"\%c\",getftime(expand(\"\%\%\")))}
Sample output: Fri 01 May 2009 19:26:07 BST
144
REDEFININGREDEFINING HIGHLIGHTHIGHLIGHT GROUPSGROUPS
PROBLEMPROBLEM
You want to change the colours of specific elements of the display. For example, you
want text to be white on a black background.
SOLUTIONSOLUTION
Use the :highight group definition command.
A highlight group (group) is an element of the display whose colours can be
customised. Some of the default highlight groups are:
CursorCharacter under the cursor.
ErrorMsgCommand line error messages.
NormalNormal text.
VisualText selected under Visual mode.
The definition is a list of key-value pairs. For example, the following sets the
terminal foreground colour to black and the terminal background colour to yellow:
:highlight Normal ctermfg=black ctermbg=yellow
Vim Recipes
Visit http://vim.runpaint.org/ for latest updates. 145
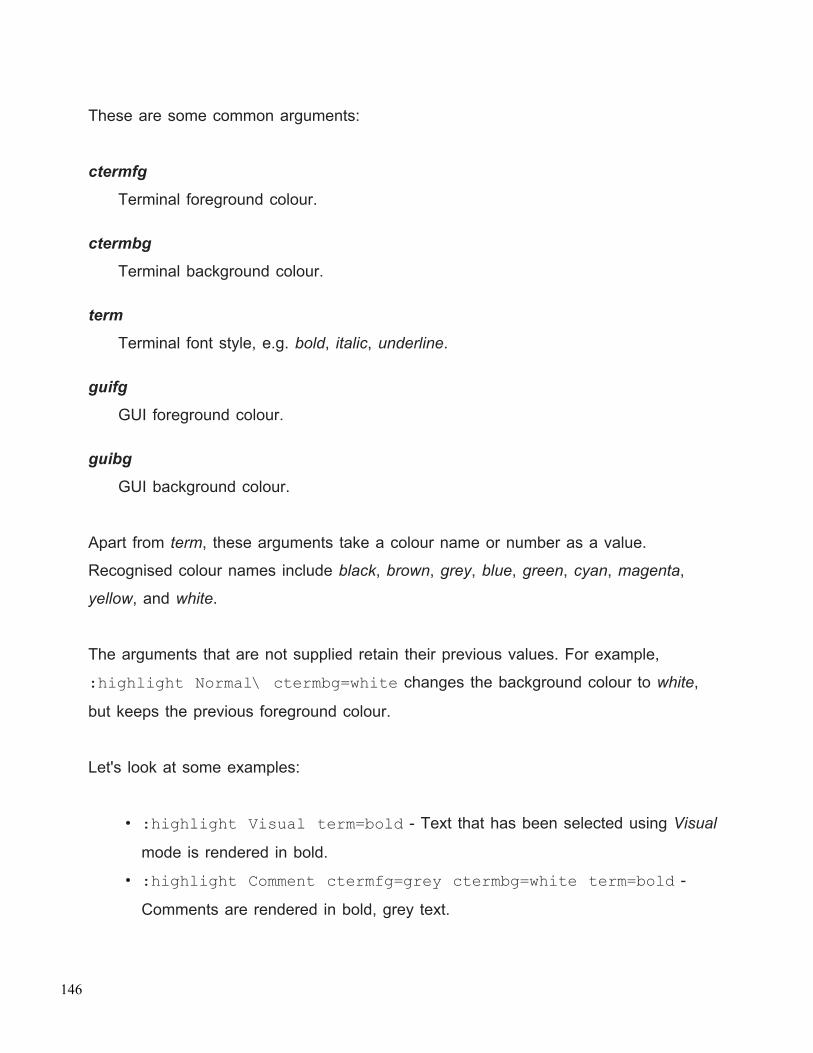
These are some common arguments:
ctermfgTerminal foreground colour.
ctermbgTerminal background colour.
termTerminal font style, e.g. bold, italic, underline.
guifgGUI foreground colour.
guibgGUI background colour.
Apart from term, these arguments take a colour name or number as a value.
Recognised colour names include black, brown, grey, blue, green, cyan, magenta,
yellow, and white.
The arguments that are not supplied retain their previous values. For example,
:highlight Normal\ ctermbg=white changes the background colour to white,
but keeps the previous foreground colour.
Let's look at some examples:
• :highlight Visual term=bold - Text that has been selected using Visual
mode is rendered in bold.
• :highlight Comment ctermfg=grey ctermbg=white term=bold -
Comments are rendered in bold, grey text.
146
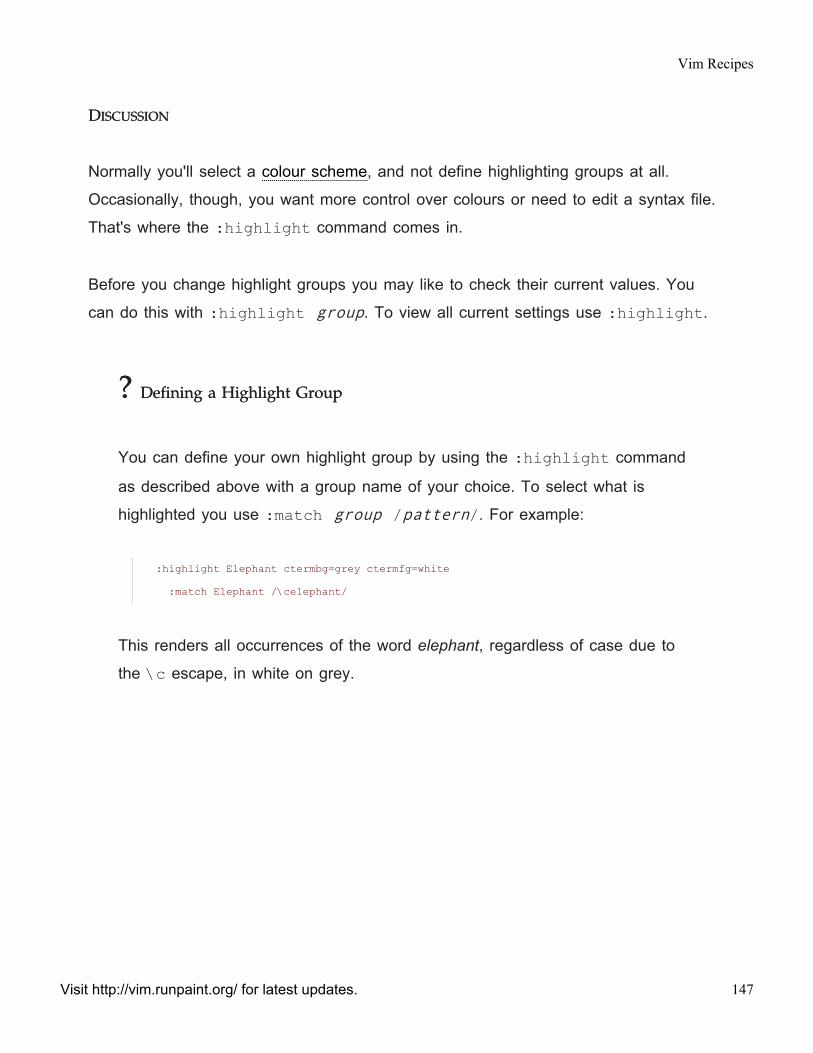
DISCUSSIONDISCUSSION
Normally you'll select a colour scheme, and not define highlighting groups at all.
Occasionally, though, you want more control over colours or need to edit a syntax file.
That's where the :highlight command comes in.
Before you change highlight groups you may like to check their current values. You
can do this with :highlight group. To view all current settings use :highlight.
?? DefiningDefining aa HighlightHighlight GroupGroup
You can define your own highlight group by using the :highlight command
as described above with a group name of your choice. To select what is
highlighted you use :match group /pattern/. For example:
:highlight Elephant ctermbg=grey ctermfg=white
:match Elephant /\celephant/
This renders all occurrences of the word elephant, regardless of case due to
the \c escape, in white on grey.
Vim Recipes
Visit http://vim.runpaint.org/ for latest updates. 147
MODIFYINGMODIFYING THETHE CURSORCURSOR
PROBLEMPROBLEM
You want to make the cursor easier to see.
For example, you're using visually “busy” syntax highlighting, and sometimes lose the
cursor. Or, you're working with columnar data, and need the entire column that the
cursor is over to be highlighted.
SOLUTIONSOLUTION
To change the cursor colour in Gvim redefine the Cursor highlighting group21.
Another approach is to highlight the line the cursor is on. You do this by executing
:set cursorline. Again, to change the colours modify the CursorLine highlighting
group.
Similarly, you can highlight the current column the cursor is in with :setcursorcolumn. The highlight group is, predictably, called CursorColumn.
If you want your terminal to resemble a sniper's sights, you can combine both line and
column highlighting to create a cross-hair effect, as shown below.
21. The Creating Highlight Groups recipe explains how to redefine highlight groups, but in standard Vim theterminal defines the cursor colour.
148
DISCUSSIONDISCUSSION
Gvim allows you to customise every conceivable aspect of the cursor display with the
command :set guicursor. This allows you to change the cursor's appearance
based on the mode (i.e. one colour for Insert mode, another for Normal), its height,
and control whether it blinks… This is achieved by providing a format string as the
value for guioptions. Here are some examples:
• n-c-v:ver50-ncvCursor - In Normal, Command, and Insert mode set the
cursor to a vertical bar 50% of the current character's width. Highlight it with the
ncvCursor group.
• i:block-iCursor-blinkon0,v:block-vCursor - In Insert mode use a
non-blinking block cursor highlighted with the iCursor highlighting group. In
Visual mode also use a block cursor, but highlight it with vCursor.
The above examples should be adaptable for your uses. For the gritty detail of the
supported syntax look at :help guicursor.
Vim Recipes
Visit http://vim.runpaint.org/ for latest updates. 149
CHANGINGCHANGING THETHE WINDOWWINDOW TITLETITLE
PROBLEMPROBLEM
You want to change the title of a Vim window to make it more descriptive.
SOLUTIONSOLUTION
Assign a value to the titlestring option, and set the title option. For example:
:set title titlestring=My\ Title
DISCUSSIONDISCUSSION
When working with multiple instances of Vim, it can be difficult to remember what task
each window corresponds to. You can avoid this problem by customising each
window's title. The window title can also function similarly to the status line, reminding
the user about an important aspect of the current file.
The default window title contains the current filename, followed by a character
indicating the state of this file, followed by the name of its directory22. The state
character is one of the following:
-File can't be modified
+File has been modified
22. To be precise, the directory name is followed by a hyphen then the value of &v:servername, if set,otherwise just VIM.
150
=File is read-only
=+File is read-only and has been modified
This is already quite a descriptive title, but we can customise it further using a format
string, as described in the Changing the Status Line recipe. The Vim documentation
(:help titlestring) gives the following example:
:auto BufEnter * let &titlestring = hostname() . "/" .
expand("%:p")
Here the window title is reset when the user enters a new buffer. It contains the
hostname, a forward slash, then the full path of the current file23.
Another example is to display the value of an environment variable in the window title
along with the filename. For instance, Ruby on Rails developers could prefix the
filename with the value of RAILS_ENV, which indicates whether the application is in
development, production, staging, or testing mode:
let &titlestring=expand($RAILS_ENV) . ": " .
expand("%:t")
One last trick is to embed the value of an external command in the window title using
the %{system('command')} syntax. This could be used to display the name of the
current branch, if using a version control system, or indicate whether the project's unit
tests are passing or failing.
23. For an explanation of the %:p syntax see the Filename Modifiers section of the Executing ExternalCommands recipe.
Vim Recipes
Visit http://vim.runpaint.org/ for latest updates. 151

EXTENDINGEXTENDING
152
CREATINGCREATING KEYBOARDKEYBOARD SHORTCUTSSHORTCUTS WITHWITH KEYKEY MAPPINGSMAPPINGS
PROBLEMPROBLEM
You'd like to execute a command, or series thereof, with a keyboard shortcut rather
than continually type it in. Or, you'd like to change an existing keyboard shortcut so
that it does something more useful.
For example, you use the <Space><Space> key to page down in other applications, and you'd
like to do the same in Vim. Or, you regularly reformat paragraphs with gqapgqap, but would
prefer to simply hit QQ.
SOLUTIONSOLUTION
Use key mappings. A map is simply a key combination followed by another key
combination. When you enter the first key combination Vim acts as if you entered the
second.
For example, to remap <Space><Space> to <PageDown><PageDown> you execute :map <Space><PageDown>. The map command creates a mapping for Normal, Visual, and Operator
Pending mode; i.e. if you press <Space><Space> in Insert mode this mapping, thankfully, has
no effect.
Mapping QQ to gqapgqap is similarly straight forward: :nmap Q gqap. Unlike map, :nmaponly takes effect in Normal mode. We used nmap here because this mapping doesn't
make sense in other modes: in Insert mode we want QQ to insert a literal Q, and in
Visual mode we want to reformat the selected text rather than the current paragraph.
The Visual mode mapping is :vmap Q gq.
Vim Recipes
Visit http://vim.runpaint.org/ for latest updates. 153
The other main types of mapping commands are:
:imapInsert mode only.
:cmapCommand-line only.
:mapNormal, Visual, and Operator-pending.
DISCUSSIONDISCUSSION
Keyboard mapping is yet another way to save valuable keystrokes. If you find yourself
executing a command repeatedly create a mapping. It's also useful for creating more
sensible aliases for existing keyboard shortcuts that you can never quite remember.
It's generally recommended to map the function keys (<F1><F1>-<F12><F12>), as well as their
shifted counterparts (e.g. <Shift><Shift>--<F3><F3>) because they're not used by Vim24. As long
as you use a combination that doesn't interfere with the commands you do use, you're
free to use whatever you want, though.
Before you create a mapping you might like to check what, if anything, it's currently
being used for. You can do this by executing :help key, e.g. :help <F1> will show
that Vim maps it to :help. If you want to see the user-defined mappings (whether set
by you or a plugin) call the :map command with no arguments. This works will the
mode-specific map commands outlined above, too, so :imap will show Insert mode
mappings.
24. <F1><F1> is used for :help but pretty useless given that you'd normally use :help topic.
154
CHANGINGCHANGING THETHE COLOURCOLOUR SCHEMESCHEME
PROBLEMPROBLEM
You don't like the colours Vim uses; you want to change them.
For example, you've found a colour scheme you like better, so want to instruct Vim to
use it. Or, you find that the current colour scheme makes text hard to read so want to
find a more suitable one.
SOLUTIONSOLUTION
To browse existing colour schemes enter :colourscheme, then hit <Tab><Tab> to cycle
through the installed schemes. If you find one that you like hit <Enter><Enter> to apply it.
DISCUSSIONDISCUSSION
A colour scheme is a set of rules controlling how different elements of the interface
appear. Vim is distributed with a selection of colour schemes, but you can also
download new ones, as explained in the sidebar.
? The Vim Color Scheme Test is a a gallery of colour schemes along with
their names. Browse through it to select a theme you like, then follow the
instructions below to install it.
Vim Recipes
Visit http://vim.runpaint.org/ for latest updates. 155
?? InstallingInstalling ColourColour SchemesSchemes
1. Browse the available colour schemes at Vim.org and download any that
you like.
2. Create a $VIM/colors, e.g. mkdir -p ~/.vim/colors on POSIX
systems.
3. Copy the .vim file you downloaded in step one to the colorsdirectory you just created.
4. Open vim then execute :colorscheme name, where name is that of
the file you downloaded without the .vim extension.
5. If you want to use this colour scheme permanently add colorschemename to your vimrc; otherwise repeat these steps with a different
colour scheme.
Before you change your color scheme you may like to make a note of what you're
using at the moment. You can find the name of the current scheme with :echog:colors_name.
To change a specific aspect of a colour scheme you can redefine a highlight group.
156
CREATINGCREATING COMMAND-LINECOMMAND-LINE COMMANDSCOMMANDS
PROBLEMPROBLEM
You want to create your own :command command.
SOLUTIONSOLUTION
Use the :command command like so::command name command, where name is the
command you're creating and command the command name should execute. (name
must start with an initial capital)
For example, :command Ls !ls -all % lets you use :Ls to view the long listing
for the current file on POSIX systems, thus showing the permissions, owner, group,
etc.
DISCUSSIONDISCUSSION
The command can be anything you could enter at the : prompt.
You can modify how the command is defined by supplying :command with a list of
arguments with the syntax :command arg1, arg2, … ,argN name command.
These are not to be confused with arguments passed to the command, itself, however.
To create a command that accepts arguments you use the syntax :command -nargs=spec name command, where spec is:
Vim Recipes
Visit http://vim.runpaint.org/ for latest updates. 157
1One argument.
*Any number of arguments.
?Zero or one arguments.
+One or more arguments.
You reference the arguments in command with the <args> placeholder. The <q-
args> quotes special characters in the argument. For example, you could use
:command -nargs=1 Ci !cd %:h && git commit %:t -m <q-args> to
quickly change to the directory containing the current file (%:h is the current pathname
with the last component removed) and commit the current file (%:t is the last
component of the current pathname) to a Git repository by typing :Ci message,
without worrying about using quotation marks and the like25.
To create a command that accepts a count you use the -count=default argument,
then reference the count in command as <count>.
To create a command that accepts a range you use the -range=spec argument. If
you don't supply a spec (i.e. -range), the range defaults to the current line. A spec of
% means that the range defaults to the whole file. You can reference the range in the
command with the placeholders <line1> and <line2> which denote the first and last
line of the given range, respectively.
25. For more robust integration with Git see the Integrating Vim with Git recipe
158
EXTENDINGEXTENDING VIMVIM WITHWITH SCRIPTSSCRIPTS ANDAND PLUGINSPLUGINS
PROBLEMPROBLEM
You want to add functionality to Vim, preferably without having to write it yourself.
SOLUTIONSOLUTION
Browse Vim Scripts to find a script that meets your needs. Its 'type' should be utility or
ftplugin. Download the latest version to your computer. If the plugin comes with its own
installation instructions, use those; otherwise, read on.
If the file you've downloaded has a name ending with .vim you usually just need to
save it in the right directory and then its ready to use. For scripts labelled utility, also
known as global plugins, this directory is $VIMHOME/plugin; for those labeled
ftplugin, also known as filetype plugins, the last component of this path is ftplugin
instead. If this directory does not already exist you need to create it. The sidebar lists
the locations of the plugin directories on various operating systems.
If the file is compressed (ending with .zip or .tar.gz), try uncompressing it in the
parent directory of the applicable plugin directory. For example, on Linux this is
~/.vim/.
Now you should just be able to start Vim and have the plugin work.
?? PluginPlugin DirectoryDirectory LocationLocation
Note: For filetype plugins, the last portion of these paths is ftplugin; not plugin.
Vim Recipes
Visit http://vim.runpaint.org/ for latest updates. 159
Unix~/.vim/plugin
PC and OS/2$HOME/vimfiles/plugin or $VIM/vimfiles/plugin
Amigas:vimfiles/plugin
Macintosh$VIM:vimfiles:plugin
Mac OS X~/.vim/plugin
RISC-OSChoices:vimfiles.plugin
PluginPlugin TypesTypes
Plugins can be either global or filetype-specific. Global plugins are loaded for every file
you open; filetype-specific plugins are only loaded for certain filetypes.
DISCUSSIONDISCUSSION
As complicated as the above instructions may sound, it's generally trivial to install a
plugin. For example, on Linux to install the potwiki plugin:
$ mkdirmkdir -p-p ~/.vim/~/.vim/pluginplugin
$ wgetwget
160
http://www.vim.org/http://www.vim.org/scripts/scripts/download_script.php?src_id=9316download_script.php?src_id=9316 -O-O
~/.vim/~/.vim/plugin/plugin/potwiki.vimpotwiki.vim
(If your plugin directory already exists, the first command is superfluous.)
Vim 7 added support for a new plugin installation method called vimball. Vimballs make
plugin installation and configuration easier, and are a slight improvement over the
previous methods. They're not in wide use yet, but if you find a plugin distributed in
this way (they have a *.vba extension), try following the steps below:
1. Download the *.vba file.
2. Open it with Vim, e.g. vim something.vba.
3. Use :VimballList to verify its contents.
4. Install it by sourcing: :source %.
Vim Recipes
Visit http://vim.runpaint.org/ for latest updates. 161
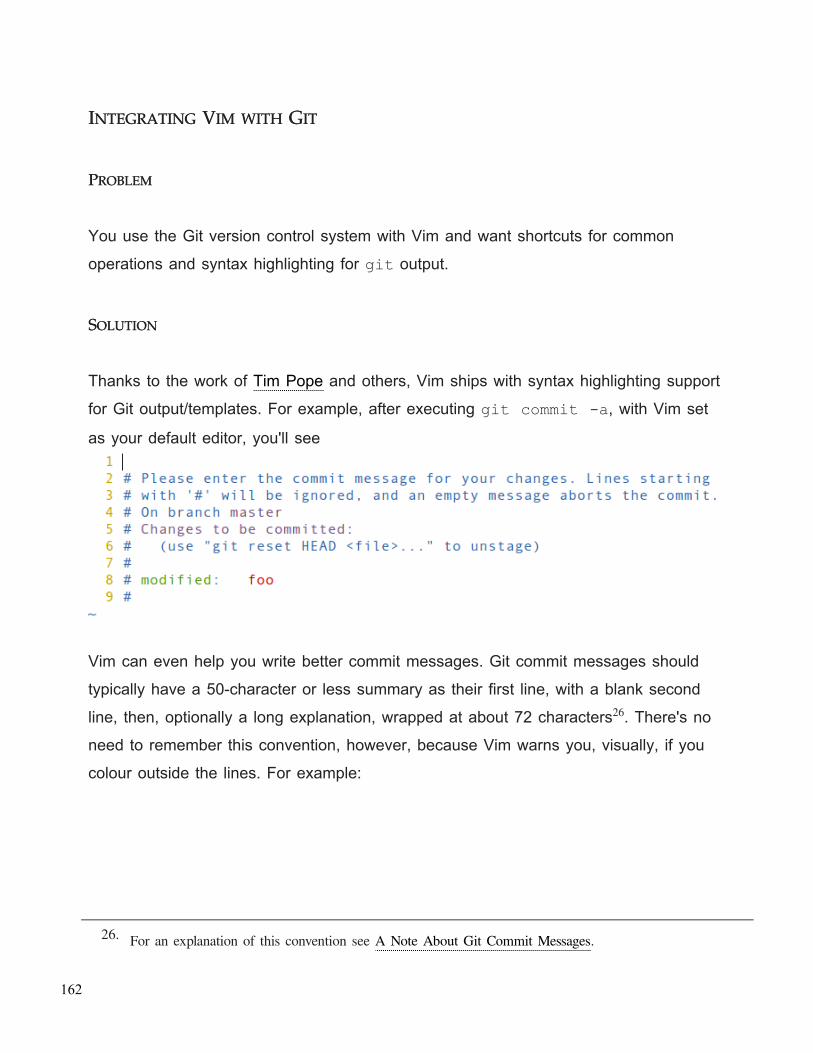
INTEGRATINGINTEGRATING VIMVIM WITHWITH GITGIT
PROBLEMPROBLEM
You use the Git version control system with Vim and want shortcuts for common
operations and syntax highlighting for git output.
SOLUTIONSOLUTION
Thanks to the work of Tim Pope and others, Vim ships with syntax highlighting support
for Git output/templates. For example, after executing git commit -a, with Vim set
as your default editor, you'll see
Vim can even help you write better commit messages. Git commit messages should
typically have a 50-character or less summary as their first line, with a blank second
line, then, optionally a long explanation, wrapped at about 72 characters26. There's no
need to remember this convention, however, because Vim warns you, visually, if you
colour outside the lines. For example:
26. For an explanation of this convention see A Note About Git Commit Messages.
162
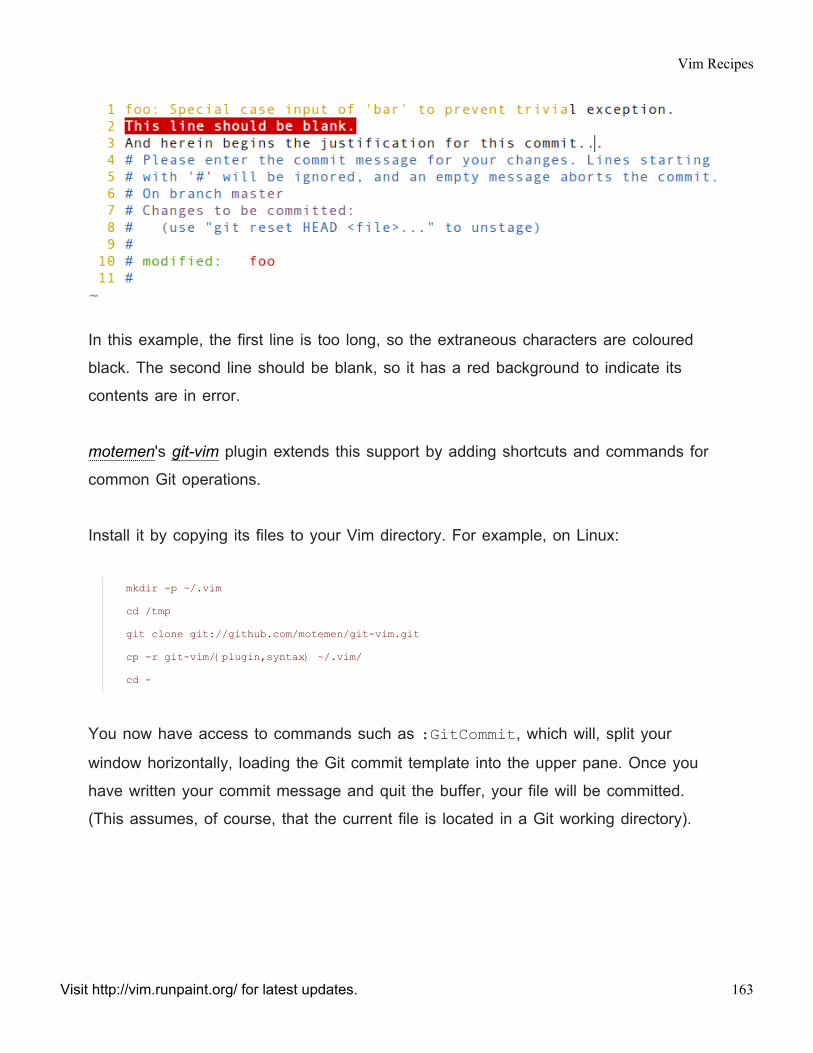
In this example, the first line is too long, so the extraneous characters are coloured
black. The second line should be blank, so it has a red background to indicate its
contents are in error.
motemen's git-vim plugin extends this support by adding shortcuts and commands for
common Git operations.
Install it by copying its files to your Vim directory. For example, on Linux:
mkdir -p ~/.vim
cd /tmp
git clone git://github.com/motemen/git-vim.git
cp -r git-vim/{plugin,syntax} ~/.vim/
cd -
You now have access to commands such as :GitCommit, which will, split your
window horizontally, loading the Git commit template into the upper pane. Once you
have written your commit message and quit the buffer, your file will be committed.
(This assumes, of course, that the current file is located in a Git working directory).
Vim Recipes
Visit http://vim.runpaint.org/ for latest updates. 163
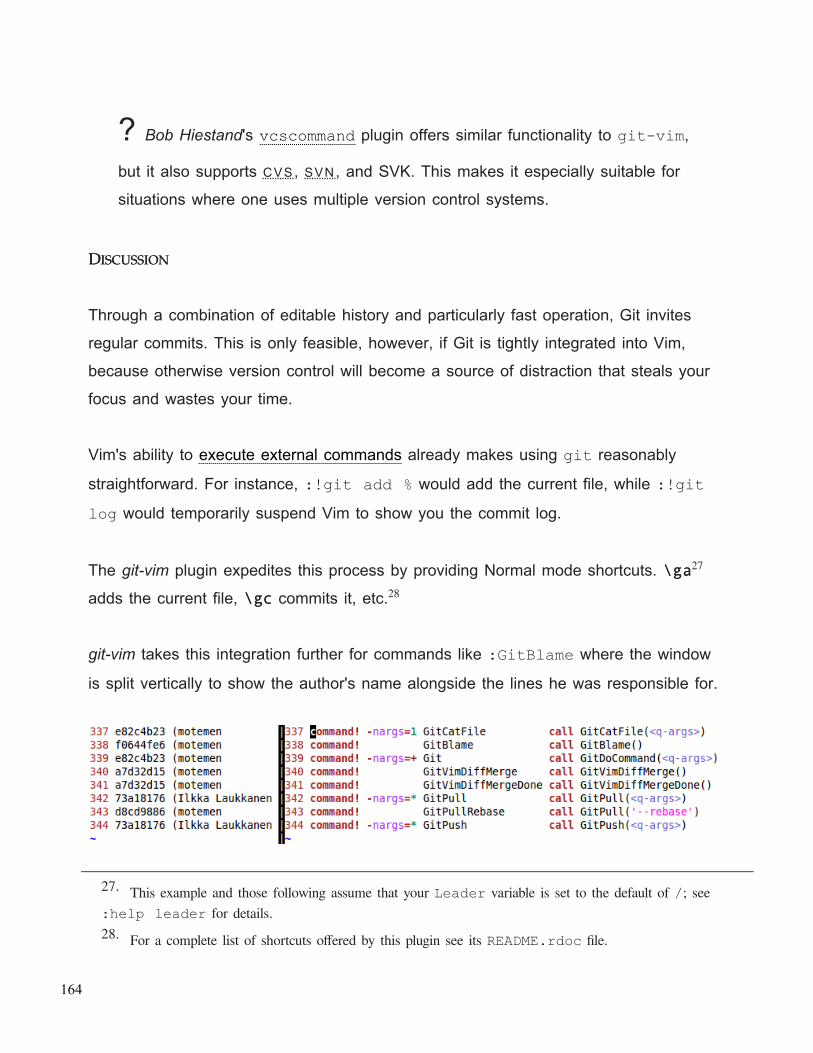
? Bob Hiestand's vcscommand plugin offers similar functionality to git-vim,
but it also supports CVS , SVN , and SVK. This makes it especially suitable for
situations where one uses multiple version control systems.
DISCUSSIONDISCUSSION
Through a combination of editable history and particularly fast operation, Git invites
regular commits. This is only feasible, however, if Git is tightly integrated into Vim,
because otherwise version control will become a source of distraction that steals your
focus and wastes your time.
Vim's ability to execute external commands already makes using git reasonably
straightforward. For instance, :!git add % would add the current file, while :!gitlog would temporarily suspend Vim to show you the commit log.
The git-vim plugin expedites this process by providing Normal mode shortcuts. \ga\ga27
adds the current file, \gc\gc commits it, etc.28
git-vim takes this integration further for commands like :GitBlame where the window
is split vertically to show the author's name alongside the lines he was responsible for.
27. This example and those following assume that your Leader variable is set to the default of /; see:help leader for details.28. For a complete list of shortcuts offered by this plugin see its README.rdoc file.
164
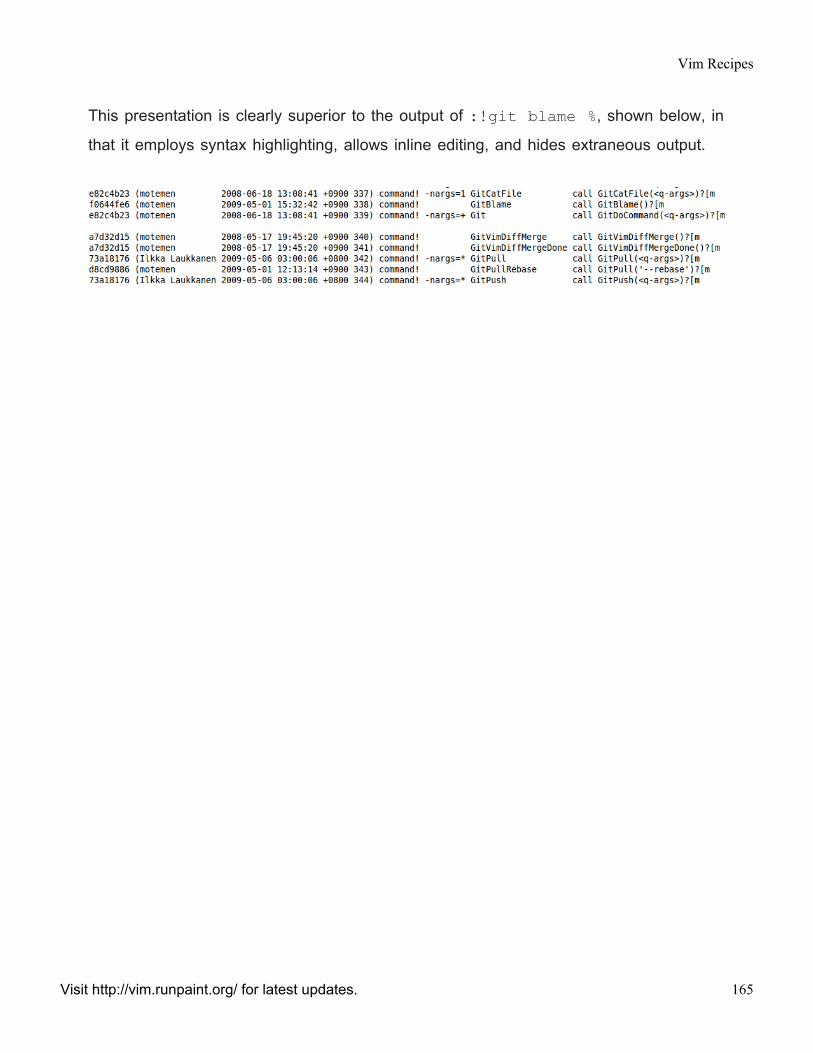
This presentation is clearly superior to the output of :!git blame %, shown below, in
that it employs syntax highlighting, allows inline editing, and hides extraneous output.
Vim Recipes
Visit http://vim.runpaint.org/ for latest updates. 165
OTHEROTHER USESUSES OFOF VIMVIM
166
BROWSINGBROWSING DIRECTORIESDIRECTORIES
PROBLEMPROBLEM
You want to see the contents of a directory, perhaps so as to select a file to edit. For
instance, if working on a project comprising multiple files you want to see a list of the
files in a separate window.
SOLUTIONSOLUTION
Invoke Vim with a directory name as an argument, e.g. vim ~/projects/flying-pigs/. From within Vim use the :Ex (mnemonic: Explore) command. By default it
shows the contents of the current file's directory, but you can provide a directory name
if you wish. For example: :Ex ~/projects/flying-pigs. The directory is shown in
a split screen if the current file has been modified.
To force a directory listing in a split pane, so you can view a file and its directory listing
at once, use :Sex29. Similarly, :Vex to browse in a vertical split, and :Tex to browse
in a new tab.
DISCUSSIONDISCUSSION
By default Vim lists every file contained in a directory. To get a more ls-style listing
you can specify a hiding list with :let g:netrw_listhide='\^\..*'. (This is a
comma-separated list of regular expressions). When you're browsing a directory files
starting with a period will now be hidden. 30 If you hit aa once you'll invert the hiding list
29. No, that's not a joke; the concept is synonymous with Vim
Vim Recipes
Visit http://vim.runpaint.org/ for latest updates. 167
(showing only hidden files). If you hit aa again you'll remove the hiding list, showing
everything.
To change how directory entries are sorted you can modify the
g:netrw_sort_sequence variable. By default its value is, deep breath:
[\/]$,\.h$,\.c$,\.cpp$,*,\.o$,\.obj$,\.info$,\.swp$,\.bak$,\~$
The order of the patterns is the order of the sort. For instance, the first pattern
matches directories, so they're shown first. The next pattern matches file names ending
with *.h (C header files), so they're shown next. And so on. The * pattern matches
everything not matched by the other patterns. You can change this pattern on-the-fly by
hitting SS while viewing a directory listing.
You can change into a directory by selecting it and hitting EnterEnter. The same thing
works for files. If you'd rather open a file in a new buffer use pp. PP will open the file in a
split screen.
If you want to operate on the files you see read Using Vim as a File Manager.
30. By Unix/Linux convention filenames which begin with a period are designated hidden. By default filebrowsers and other utilities ignore these files unless explicitly commanded not to.
168
USINGUSING VIMVIM ASAS AA FILEFILE MANAGERMANAGER
PROBLEMPROBLEM
You want to use Vim to manage your file system in a similar way to Nautilus, Midnight
Commander, or Windows Explorer.
For example, you want to rename files matching a certain pattern. Or you want to
compress the contents of a directory.
SOLUTIONSOLUTION
Browsing Directories explains the basics of working with directories in Vim, so read it
first.
?? MarkingMarking FilesFiles
To operate on files you must first mark them (this does not have any relation
to the marks feature).
• Mark the file under the cursor: mfmf (mnemonic: mark file).
• Unmark the marked file under the cursor: mfmf.
• Mark files matching a Vim regular expression: mrmr (mnemonic: mark
with regular expression). You're then prompted for a pattern.
• Unmark all files: mumu (mnemonic: marks undo).
• Visually mark files: <Shift><Shift>--vv, then jj and kk to change the selection
area.
Vim Recipes
Visit http://vim.runpaint.org/ for latest updates. 169
You can operate on a single file or a group of them. In the latter case, you need to
select files by marking them, as explained in the sidebar. You can now perform various
operations on these files such as:
• Deletion: hit DD. You're prompted for each file you've selected. Answering aa
deletes them all without asking you any more.
• Renaming: hit RR. For each file you're prompted for its new name.
• Copying/Moving: Hit mtmt (mnemonic: mark target) in the target directory.
Change to the directory containing the source files, select them, then hit mcmc
(mnemonic: marked copy) to copy or mmmm (mnemonic: marked move) to move.
• Diff: To diff up to three marked files, use mdmd (mnemonic: marked diff).
• Printing: hit mpmp to print marked files (mnemonic: mark print).
• Execute shell command: hit mxmx (mnemonic: marked execute). (See the
discussion for examples).
• Compress/Decompress: hit mzmz (mnemonic: marked gzip). (Other compression
utilities can be used instead of gzip, but the Vim command remains the same).
• Open in horizontal split: hit oo (mnemonic: open).
DISCUSSIONDISCUSSION
Vim can be used as a pretty well-featured file manager. In fact, given that it can be
scripted, key mapped, and configured in concert with Vim, as well as seamlessly
operate on remote directories, it is arguably better.
Perhaps the most interesting command is mxmx. This allows you to pass the list of
marked files to an external command. You're prompted for a command line, in which
you can use the % wildcard. Vim then loops through the selected files and calls the
command for each one, substituting % for the filename.
170
For example, using a POSIX-compatible system, select three files (foo.txt, bar.txt,
and glark) with mfmf. Hit mxmx and enter cat %>>foo-bar-glark. Vim will now
execute:
cat foo.txt >>foo-bar-glark
cat bar.txt >>foo-bar-glark
cat glark >>foo-bar-glark
foo-bar-glark will now contain the contents of each file in turn.
The mzmz command also bears further discussion. It toggles the state of the selected files
between compressed and decompressed.
If a file is uncompressed, Vim attempts to compress it. By default it uses gzip, but
you can change this by modifying the g:netrw_compress variable. For example, to
use Bzip2: :let g:netrw_compress=bzip2.
For decompression Vim uses an extension-to-program mapping:
• .tar - tar -xf• .gz - gunzip• .bz2 - bunzip2• .zip - unzip
For example, if a filename ends with .zip Vim decompresses it by calling unzipzip-file. To add support for another format use :letg:netrw_decompress[ext] = prog.
Vim Recipes
Visit http://vim.runpaint.org/ for latest updates. 171
VIEWINGVIEWING DIFFERENCESDIFFERENCES BETWEENBETWEEN FILESFILES
PROBLEMPROBLEM
You have multiple versions of a file and want to see how they differ.
For example, if you're working on a document with somebody else, you want to see
the differences between their version and yours.
SOLUTIONSOLUTION
Vim calls this feature diff, as per UNIX convention. You diff a file.
To diff from the command line invoke Vim as vimdiff, e.g. vimdiff -o file1
file2. To diff from within Vim use :diffsplit file.
The screen is split horizontally, and each file is shown in its own window. The
differences between them are highlighted. Lines that exist in one buffer but not in By
default, a line that exists in one file but not in another is coloured blue; the line in the
other buffer that should have held this line is coloured green, and is called a 'filler' line.
When a line exists in both buffers it is coloured purple. If characters inside the line
differ they are highlighted in red. Identical lines have no highlighting. Identical runs of
lines are folded.
To split the screen vertically use vimdif file1 file2 or :vert diffsplitfile1 file2.
172
DISCUSSIONDISCUSSION
Diffs are traditionally used in programming to compare an old and new version of
source code to see what has changed. As suggested above, though, they're invaluable
when collaborating on a file with somebody else. For example, you write a file named
grant-proposal.txt, then e-mail it to somebody else for input. They make their
changes and e-mail it back. You now have two files: grant-proposal.txt and
grant-proposal.changes.txt. You use vimdiff grant-proposal.txtgrant-proposal.changes.txt to see your collaborator's suggestions.
It's important to note, though, that diff only works with plain text files. It won't work
correctly if you use proprietary, binary formats such as Microsoft Word's .doc. As a
general rule, if Vim can view a file it can diff it.
The windows diff feature splits your screen so each pane scrolls in concert with one
other. This means that if you scroll to line 20 in the bottom pane, the top pane will
automatically scroll to that point, too. This makes comparing long files easier, but you
can disable it with :set noscrollbind.
You can jump between the changes with [c[c to go to the previous change, and ]c]c for
the next.
Vim Recipes
Visit http://vim.runpaint.org/ for latest updates. 173
OUTLININGOUTLINING AA DOCUMENTDOCUMENT
PROBLEMPROBLEM
You want to create an outline view of a document such that its structure can be treated
as a hierarchy, the levels of which can be expanded or collapsed.
For example, if you were writing an essay you may begin by creating an outline.
Initially that would consist of the main section headings. You may then decide to
subdivide those headings further, or add explanatory text that explains the heading's
scope. As you continue this iterative process, you can focus on a particular level by
expanding that level of the hierarchy. This process enables long or complex documents
to be planned and organised in a logical fashion.
SOLUTIONSOLUTION
Use the Vim Outliner plugin.
Vim Outliner satisfies all of the objectives above. It's completely integrated with Vim, so
your existing Vim knowledge still applies, and there's little to learn.
Download the plugin from VimOutliner.org, then follow the installation instructions. (The
Extending Vim with Scripts and Plugins recipe may be helpful here).
? Debian/Ubuntu users can install Vim Outliner via their package manager.
The installation process is slightly convoluted, however, so instructions follow:
174
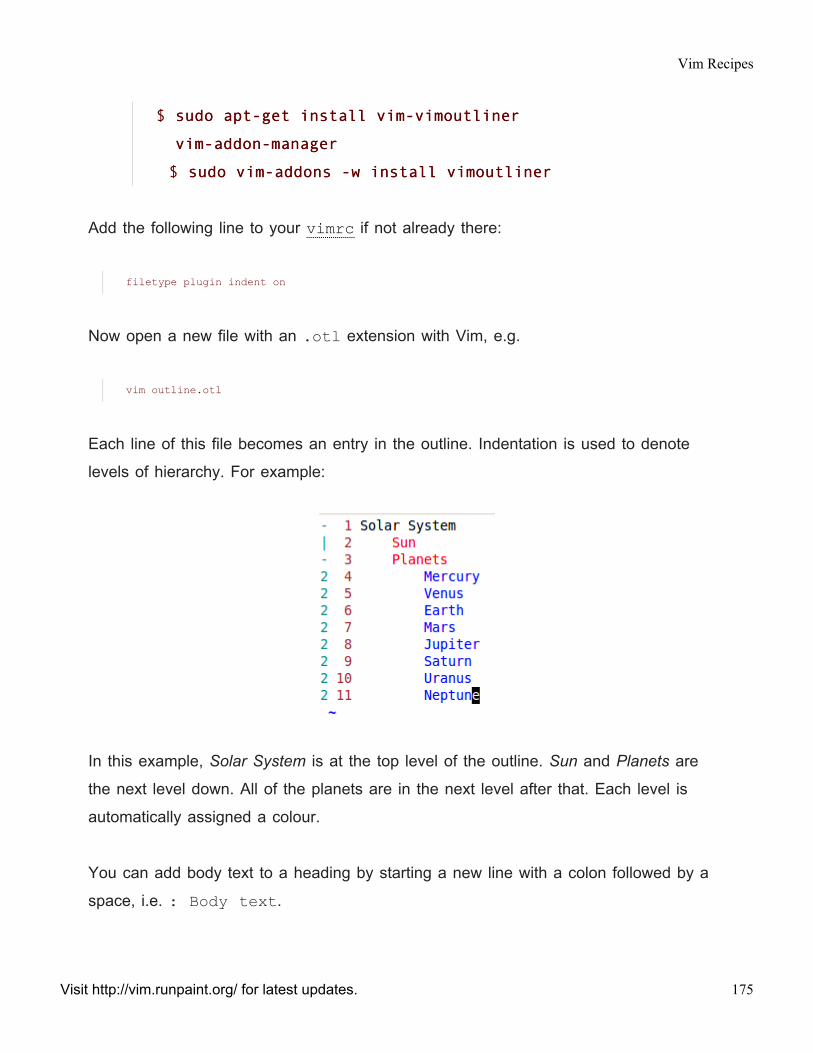
$ sudosudo apt-getapt-get installinstall vim-vimoutlinervim-vimoutliner
vim-addon-managervim-addon-manager
$ sudosudo vim-addonsvim-addons -w-w installinstall vimoutlinervimoutliner
Add the following line to your vimrc if not already there:
filetype plugin indent on
Now open a new file with an .otl extension with Vim, e.g.
vim outline.otl
Each line of this file becomes an entry in the outline. Indentation is used to denote
levels of hierarchy. For example:
In this example, Solar System is at the top level of the outline. Sun and Planets are
the next level down. All of the planets are in the next level after that. Each level is
automatically assigned a colour.
You can add body text to a heading by starting a new line with a colon followed by a
space, i.e. : Body text.
Vim Recipes
Visit http://vim.runpaint.org/ for latest updates. 175
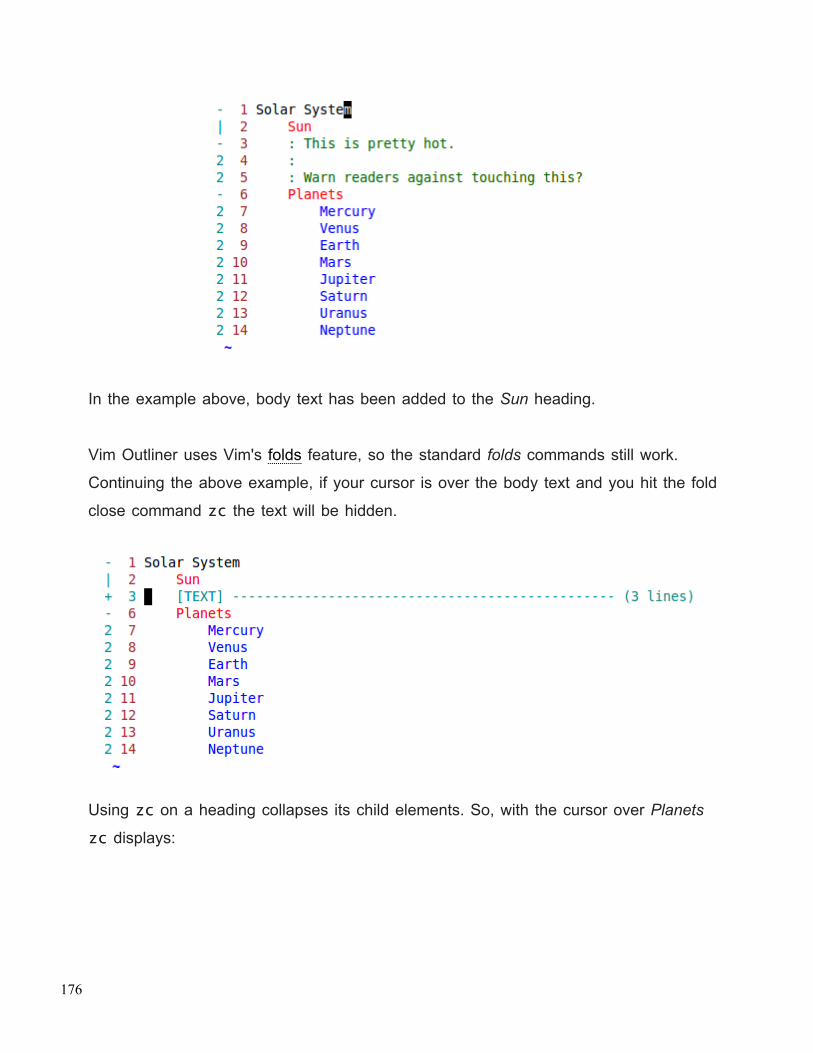
In the example above, body text has been added to the Sun heading.
Vim Outliner uses Vim's folds feature, so the standard folds commands still work.
Continuing the above example, if your cursor is over the body text and you hit the fold
close command zczc the text will be hidden.
Using zczc on a heading collapses its child elements. So, with the cursor over Planets
zczc displays:
176
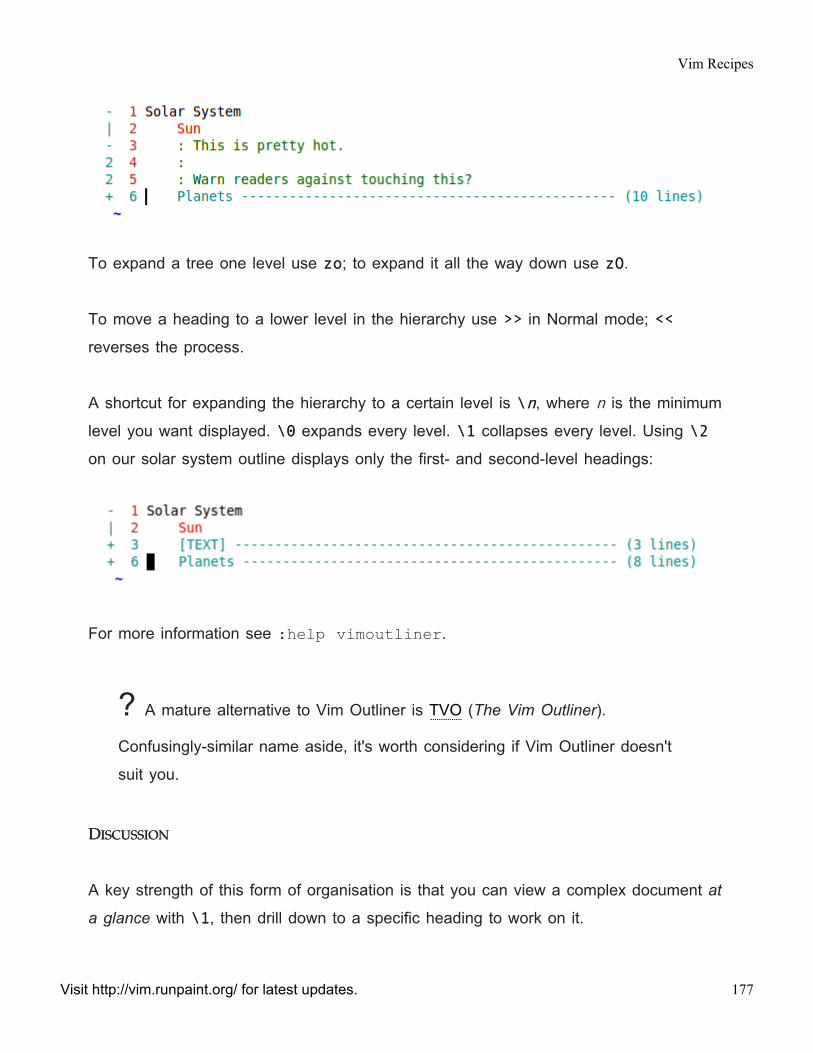
To expand a tree one level use zozo; to expand it all the way down use zOzO.
To move a heading to a lower level in the hierarchy use >>>> in Normal mode; <<<<
reverses the process.
A shortcut for expanding the hierarchy to a certain level is \\nn, where n is the minimum
level you want displayed. \0\0 expands every level. \1\1 collapses every level. Using \2\2
on our solar system outline displays only the first- and second-level headings:
For more information see :help vimoutliner.
? A mature alternative to Vim Outliner is TVO (The Vim Outliner).
Confusingly-similar name aside, it's worth considering if Vim Outliner doesn't
suit you.
DISCUSSIONDISCUSSION
A key strength of this form of organisation is that you can view a complex document at
a glance with \1\1, then drill down to a specific heading to work on it.
Vim Recipes
Visit http://vim.runpaint.org/ for latest updates. 177
I use one for my todo/ideas list by putting every item on a line of its own, then, as
patterns emerge, grouping items under headings. For instance, I may add a heading
for Book on HTML. Some time later I think of some chapters, so add them as
subheadings to Book on HTML. When I want to start writing notes for a chapter I add
body text to a heading, and start typing.
Vim Outliner comes with various scripts to convert outlines into other file formats. For
instance, there is a script named otl2html which can be used to convert a .otl file
into a .html. This lets you create semantically-correct webpages without writing
HTML. There's also otl2docbook and otl2pdb, which target DocBook and
AddressDB Palm, respectively. For more tools like this, see VimOutliner.org.
178