Embed Size (px)
Citation preview
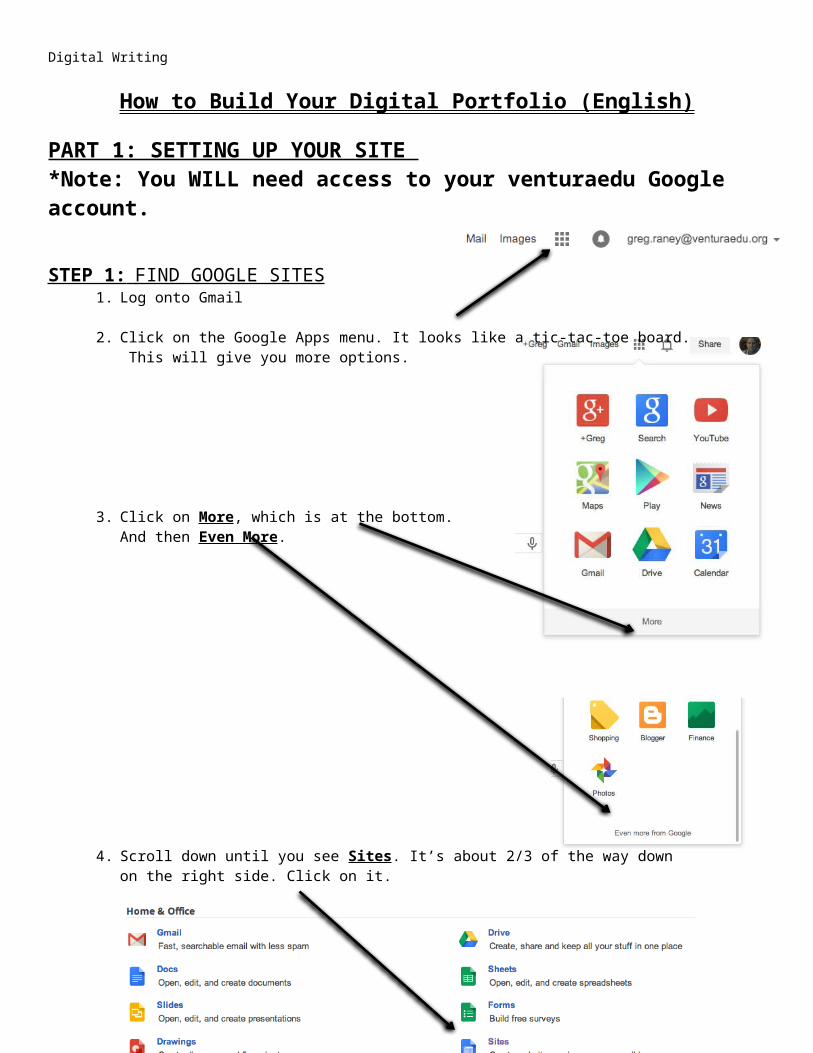
Digital Writing
How to Build Your Digital Portfolio (English)
PART 1: SETTING UP YOUR SITE *Note: You WILL need access to your venturaedu Google account.
STEP 1: FIND GOOGLE SITES 1. Log onto Gmail
2. Click on the Google Apps menu. It looks like a tic-tac-toe board. This will give you more options.
3. Click on More, which is at the bottom.And then Even More.
4. Scroll down until you see Sites. It’s about 2/3 of the way down on the right side. Click on it.

STEP 2: CREATING YOUR SITE 1. Once in Google Sites, click on the red Create button on the left side.
a. Choose the Blank Template for now…
b. Name your website. To name your site put the number of your period, followed by your first or last name, and then the phrase “Writing Portfolio,” “Digital Portfolio,” etc.
Example: 3 Johnson’s Writing Portfolio
Note: DO NOT USE YOUR FIRST AND LAST NAMES.
If your URL is not available, you can change it. Keep your title the same.
c. You MAY be asked to complete a security verification code.
d. Click on Create.i. After you click Create, you should be redirected to the home page of your site.
e. Important: Once you create your site, change the privacy settings. Click on the Share button in the upper-right corner.
i. Find the “Who has access” section. Click on Change.
ii. Change Visibility options to “Anyone at Ventura (USD) with link”
iii. Change Access to Can Viewiii. Click Save.

iv. Return to your Home Page byclicking on the name of yoursite, located on the left side indark black letters.
STEP 3: ADDING PAGES 1. Click on the New Page icon to add the following pages:
a. Dear Readerb. Englishc. Social Studiesd. Sciencee. Mathf. Electives
2. After you title the page, click Create. Important: Keep “Location” at “Top Level”
3. After you save each new page, you can continue by clickingon the New Page icon again (see #1 above). You can create all of your pages.
4. Next, create some sub-pages for your English section. Click on the New Page icon again and create pages for each of the following. This time, change the “Location” to “Under English”:
a. Argumentativeb. Literary Analysisc. Personal Narratived. Poetrye. Process Writing
STEP 4: CHANGING YOUR SITE LAYOUT 1. Turn off your Sidebar and make a Horizontal Navigation Bar by completing the following steps:
a. Click Settings (Gear) and choose Edit Site Layout
b. Turn off your Sidebar: Unselect this by clicking on the Sidebar button. Then select the Horizontal navigation
c. Click Close to save the changes. d. Note: Not all of the pages you just created UNSELECT!

may appear!
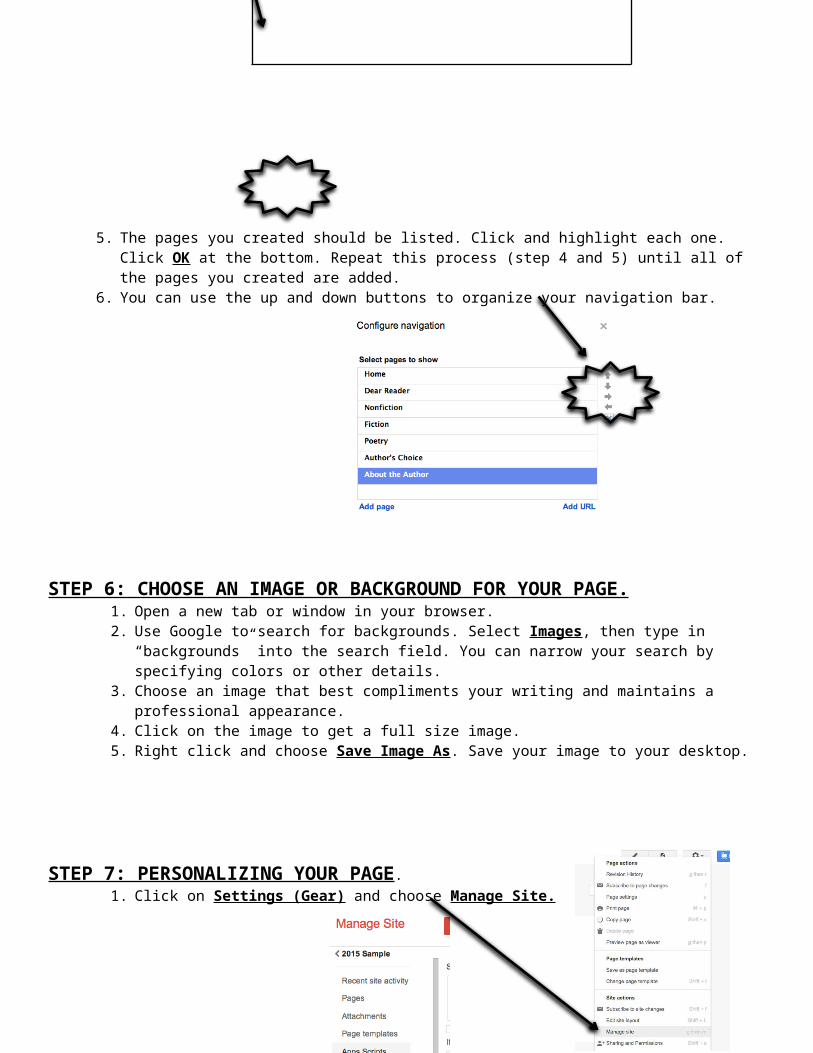
STEP 5: BUILDING YOUR HORIZONTAL NAVIGATION BAR 1. Now you need to add the pages you’ve already named to your new horizontal navigation bar.2. Click on Settings (Gear), find and click on Edit site layout.3. Hover the cursor next to the Home button. The horizontal navigation bar will become blue – CLICK ON IT!
4. Click on Add Page.
5. The pages you created should be listed. Click and highlight each one. Click OK at the bottom. Repeat this process (step 4 and 5) until all of the pages you created are added.
6. You can use the up and down buttons to organize your navigation bar.
STEP 6: CHOOSE AN IMAGE OR BACKGROUND FOR YOUR PAGE.1. Open a new tab or window in your browser.2. Use Google to search for backgrounds. Select Images, then type in “backgrounds” into the search field.
You can narrow your search by specifying colors or other details.
SELECT!!
3. Choose an image that best compliments your writing and maintains a professional appearance.4. Click on the image to get a full size image.5. Right click and choose Save Image As. Save your image to your desktop.
STEP 7: PERSONALIZING YOUR PAGE.1. Click on Settings (Gear) and choose Manage Site.
2. Choose Themes, Colors and Fonts.
3. This menu allows you to personalize your site with fonts, colors, and images. Experiment! It saves automatically, but it can all be changed! To insert a background image, you first need to find something BIG (Google image search a keyword + background), save it to your Z drive OR your Google Drive with a filename you can find, and then click this button to upload it.
STEP 8: SHARING YOUR SITE: There are a number of ways to share your site with others. For the sake of safety and privacy, the following procedure is recommended.
1. Log onto your site and click on the Share.
2. Under the heading “Who has access” it should say “Anyone at VUSD who has link can view.” If it DOES
NOT, click on Change… and proceed to #3. If it DOES, skip #3 and proceed to #4.

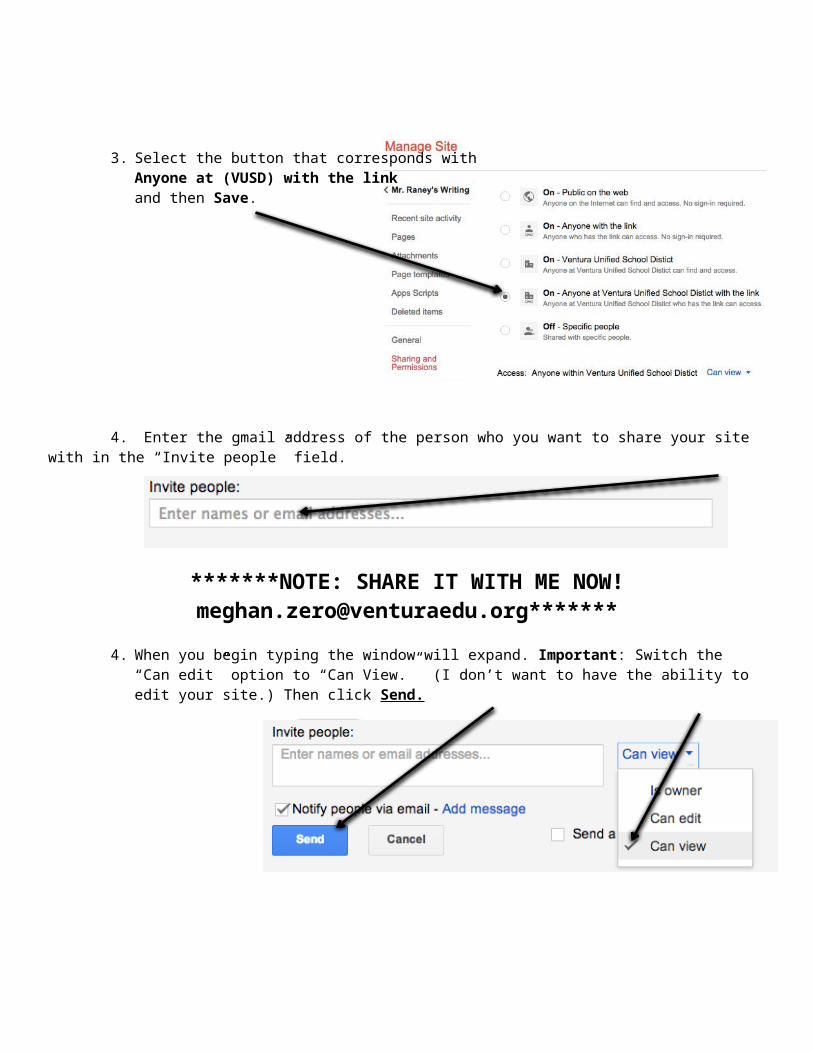
3. Select the button that corresponds withAnyone at (VUSD) with the link and then Save.
4. Enter the gmail address of the person who you want to share your site with in the “Invite people” field.
*******NOTE: SHARE IT WITH ME NOW! [email protected]*******
4. When you begin typing the window will expand. Important: Switch the “Can edit” option to “Can View.” (I don’t want to have the ability to edit your site.) Then click Send.
PART 2: INSERTING DOCUMENTS
STEP 1: WHAT DO YOU INCLUDE IN THE PORTFOLIO?1. You should only include material that has been submitted for a grade or commentary. You want to have
your best material published. Do not post any first drafts, UNLESS your purpose is to demonstrate your first draft.
2. Options for uploading material: You may upload material to your site in one of two ways.Option1: Directly editing the site page.
- Go to the page of your site you wish to edit. Click the pencil.- From here you may type directly into the field.
Option 2: Create a Google Doc then continue with the following steps.
STEP 2: PREPARE FOR PUBLICATION1. Reread each document carefully; pay attention to teacher comments and suggestions. Make sure all
issues are resolved and errors are fixed.2. Change Sharing setting on each document.
a. Press Shareb. Change privacy setting to Anyone with the link and Can Viewc. IMPORTANT: Take your last name off all of your documents.
3. Notes: a. When you revise or make changes to a document, it should automatically change the same
document on your website.b. Your website settings are set to private. You should only share this website with your teacher for
now. Later, you may share it with parents, guardians, and your classmates.
STEP 3: INSERTING DOCUMENTS ON GOOGLE SITE1. From your site, click the page where you want to upload your document (e.g. Personal Narrative page
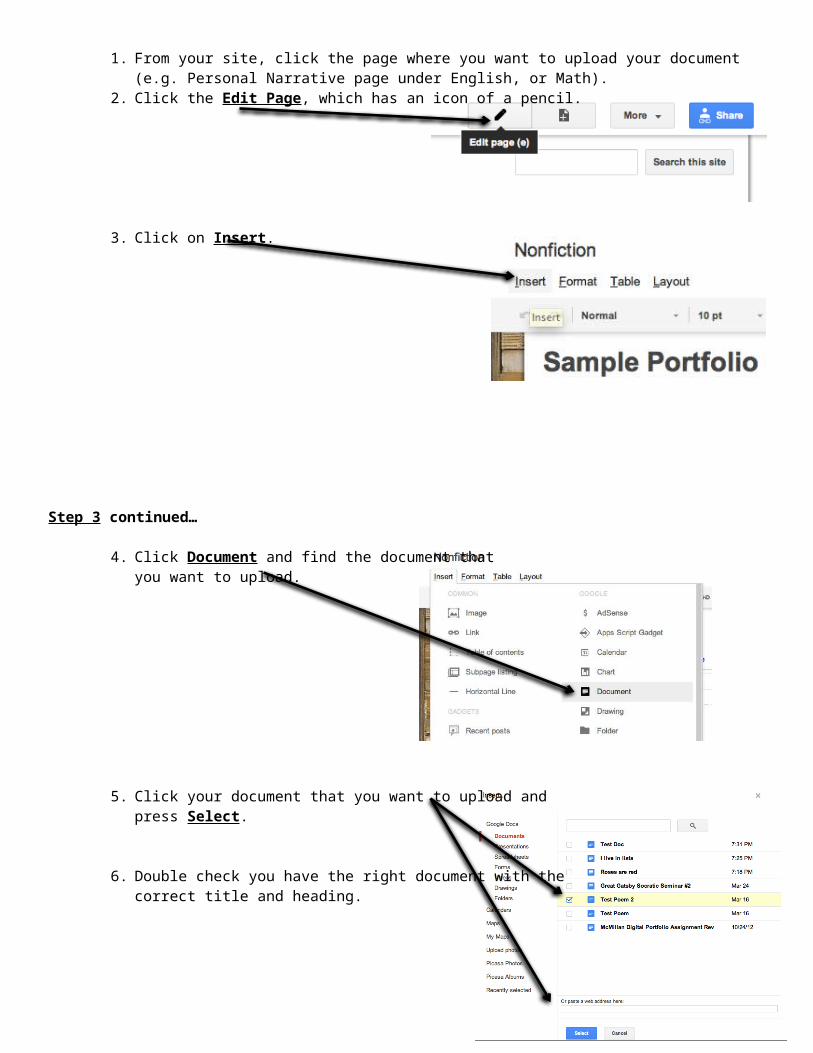
under English, or Math).2. Click the Edit Page, which has an icon of a pencil.
3. Click on Insert.

Step 3 continued…
4. Click Document and find the document that you want to upload.
5. Click your document that you want to upload and press Select.
6. Double check you have the right document with the correct title and heading.
7. Click Save; once it gives you the preview, click Save again (in the blue box at top).
Step 4: Including your reflection for each piece.There are two ways to include your reflection.Option 1:1. Go to the page that has the document you wish to write your reflection for2. Click the Edit Page (pencil icon) at the top of the page.3. Insert the cursor in a blank area next to your document. Type your reflection directly onto your page.4. Once it is typed, click on the document to bring up a small formatting menu.
a. You can use this to rearrange the alignment or the text wrapping.
Option 2:1. Create a new document in Google Docs. Write your reflection.2. Go to the page in your Google Site you wish to insert your reflection.3. Make sure you share it with your intended audience (your teacher, in this case.)4. Follow the steps in Step 3 above for Inserting Documents in Google Sites.

Adapted from the work of Amy McMillan, Teacher at Goleta Valley Junior High. Updated 10/13/15