Embed Size (px)
Citation preview
Multimedia System Design – COMP240 – Week 5-6-7 LAB
Development of flash banner design
Flash is software that helps us to create animations with a high level of Interactivity and with low
file size. It also includes greatly expanded capabilities for creating extra-ordinary animations with
actions packed scripts.
The main reason why Flash becomes so popular is that, it uses Vector Graphics technology. Due
to this technology, it won't get pixilated even when the picture is zoomed to highest level.
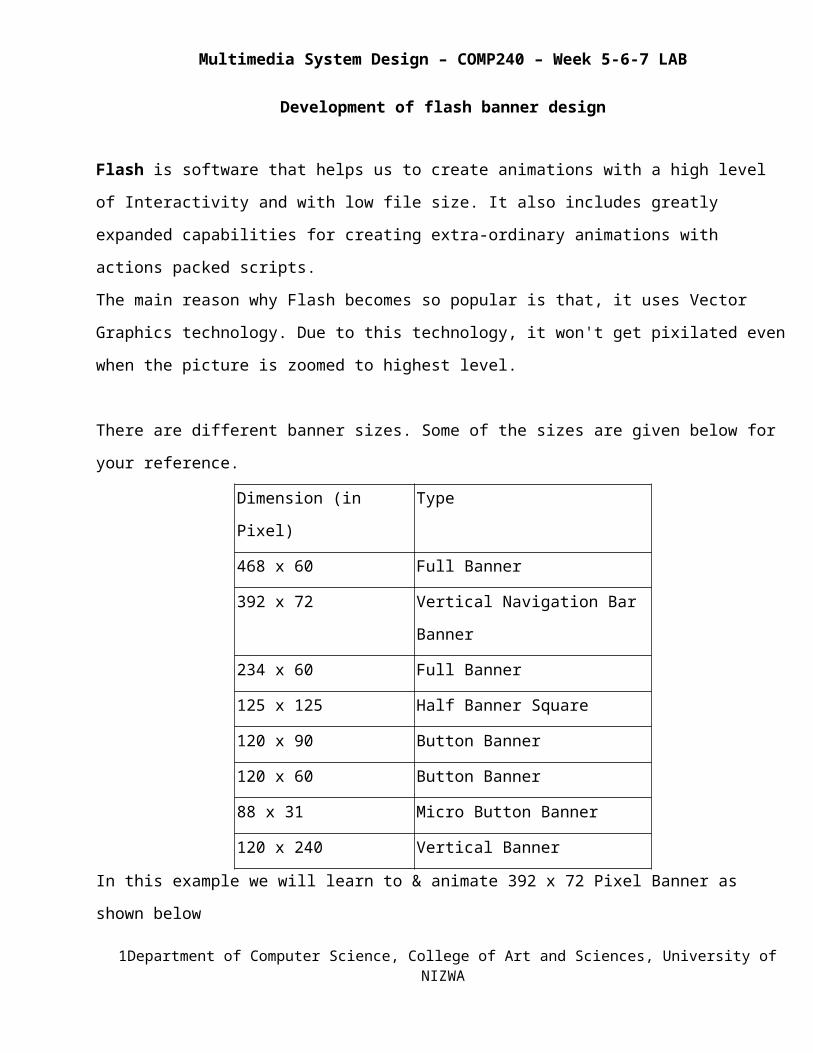
There are different banner sizes. Some of the sizes are given below for your reference.
Dimension (in Pixel) Type
468 x 60 Full Banner
392 x 72 Vertical Navigation Bar Banner
234 x 60 Full Banner
125 x 125 Half Banner Square
120 x 90 Button Banner
120 x 60 Button Banner
88 x 31 Micro Button Banner
120 x 240 Vertical Banner
In this example we will learn to & animate 392 x 72 Pixel Banner as shown below
1. Create a new movie with dimensions of 392 px X 72 px and fps = 24 with white as background
color.
2. Save this file as 'banner.fla'.
1 Department of Computer Science, College of Art and Sciences, University of NIZWA

Multimedia System Design – COMP240 – Week 5-6-7 LAB
1. Rename 'Layer 1' as 'Blue Bg'
2. On the layer named as 'Blue Bg', draw a rectangle with the 'Rectangle Tool' , width = 392
px, height = 72 px, color value of the fill = #184171
3. Select the outline of the rectangular object and delete it.
4. Select the rectangular object, choose Window > Info and in the Info panel, keeping top-left
Registration point selected, set x position = 0 and y position = 0.
5. Select the rectangular object, convert it into a Movie Clip (choose Insert> Convert to Symbol)
with the center Registration point selected and name it as 'dark blue bg'
2 Department of Computer Science, College of Art and Sciences, University of NIZWA

Multimedia System Design – COMP240 – Week 5-6-7 LAB
1. Insert a new layer (Choose Insert > Layer) above the layer named as 'Blue Bg'
2. Rename the layer as 'Green Object'
3. With the help of 'Pen Tool' draw the outline of the curved object as shown in the image
given below.
4. Use the 'Paint Bucket Tool' to apply Solid Fill in the green object outline with color values as
#71D345
5. Select the outline of the curved object and delete it.
6. Select the curved object, choose Window > Info and in the Info panel, keeping top-left
Registration point selected, set x position = 101 and y position = 0.
7. Select the curved object, convert it into a Movie Clip (choose Insert> Convert to Symbol) with
the center Registration point selected and name it as 'green curve'
3 Department of Computer Science, College of Art and Sciences, University of NIZWA

Multimedia System Design – COMP240 – Week 5-6-7 LAB
1. Insert a new layer (Choose Insert > Layer) above the layer named as 'Green Object'
2. Rename the layer as 'Yellow Object'
3. With the help of 'Pen Tool' draw the outline as shown in the image given below.
4. Use the 'Paint Bucket Tool' to apply Solid Fill in the yellow object outline with color values
as #FFCC00
5. Select the outline of the rectangular curved object and delete it.
6. Select the rectangular curved object, choose Window > Info and in the Info panel, keeping top-
left Registration point selected, set x position = 0and y position = 0.
7. Select the rectangular curved object, convert it into a Movie Clip (choose Insert> Convert to
Symbol) with the center Registration point selected and name it as 'yellow bg'
4 Department of Computer Science, College of Art and Sciences, University of NIZWA

Multimedia System Design – COMP240 – Week 5-6-7 LAB
8. Select the layer named as 'Yellow Object' and drag it below the layer named as 'Green Object'.
1. Select keyframe 1 of layer named as 'Green Object' and 'Yellow Object', drag them on frame
20.
2. Select frame 11 on layer named as 'Blue Bg'
3. Choose Insert > Keyframe
4. Select the 'dark blue bg' Movie Clip at frame 1 on layer named as 'Blue Bg'
5. Choose Window > Properties
6. In the Properties panel, set Color Style = Alpha and Alpha Amount = 50%.
7. Choose Window > Info
8. In the Info panel, keeping center Registration point selected, set Width = 392 px and Height = 1
px.
5 Department of Computer Science, College of Art and Sciences, University of NIZWA

Multimedia System Design – COMP240 – Week 5-6-7 LAB
9. Select the 'dark blue bg' Movie Clip at frame 11 on layer named as 'Blue Bg'
10. Choose Window > Properties
11. In the Properties panel, set Color Style = Alpha and Alpha Amount = 50%.
12. Select frame 5 on layer named as 'Blue Bg'
13. Choose Window > Properties
14. In the Properties panel, set Tween = Motion and Ease = 100.
15. Select layer named as 'Blue Bg'
16. Choose Edit > Copy Frames
17. Insert a new layer (Choose Insert > Layer) above the layer named as 'Blue Bg'
18. Select the newly added layer and Choose Edit > Paste Frames
6 Department of Computer Science, College of Art and Sciences, University of NIZWA

Multimedia System Design – COMP240 – Week 5-6-7 LAB
19. Automatically it will take the layer name as 'Blue Bg', rename it as 'Blue Bg 1'
20. Select all the frames form 1 to 11 of layer named as 'Blue Bg 1' and drag them 2 frames
further.
21. Similarly, insert a new layer (Choose Insert > Layer) above the layer named as 'Blue Bg 1'
22. Select the newly added layer, Choose Edit > Paste Frames and rename it as 'Blue Bg 2'
23. Select all the frames form 1 to 11 of layer named as 'Blue Bg 2' and drag them 4 frames
further.
24. Select the 'dark blue bg' Movie Clip at frame 15 on layer named as 'Blue Bg 2'
25. Choose Window > Properties
26. In the Properties panel, set Color Style = None.
1. Select keyframe 20 of layer named as 'Green Object' and drag it at frame 5.
2. Select frame 12 on layer named as 'Green Object'
3. Choose Insert > Keyframe
4. Select frame 8 on layer named as 'Green Object'
5. Choose Window > Properties
6. In the Properties panel, set Tween = Motion and Ease = 100.
7. Select frame 5 on layer named as 'Green Object'
8. Choose Window > Transform
9. In the Transform panel keep Constrain = on, set Width = 200% and Height = 200%.
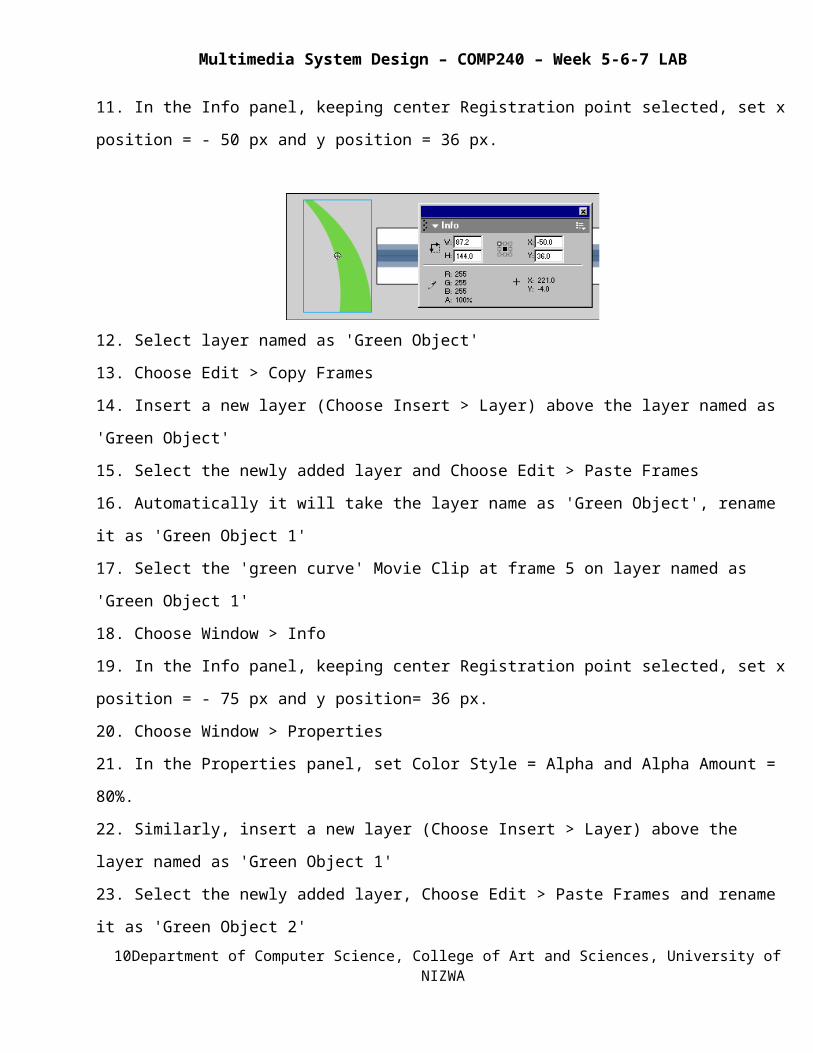
10. Choose Window > Info
11. In the Info panel, keeping center Registration point selected, set x position = - 50 px and y
position = 36 px.
7 Department of Computer Science, College of Art and Sciences, University of NIZWA

Multimedia System Design – COMP240 – Week 5-6-7 LAB
12. Select layer named as 'Green Object'
13. Choose Edit > Copy Frames
14. Insert a new layer (Choose Insert > Layer) above the layer named as 'Green Object'
15. Select the newly added layer and Choose Edit > Paste Frames
16. Automatically it will take the layer name as 'Green Object', rename it as 'Green Object 1'
17. Select the 'green curve' Movie Clip at frame 5 on layer named as 'Green Object 1'
18. Choose Window > Info
19. In the Info panel, keeping center Registration point selected, set x position = - 75 px and y
position= 36 px.
20. Choose Window > Properties
21. In the Properties panel, set Color Style = Alpha and Alpha Amount = 80%.
22. Similarly, insert a new layer (Choose Insert > Layer) above the layer named as 'Green Object
1'
23. Select the newly added layer, Choose Edit > Paste Frames and rename it as 'Green Object 2'
24. Select the 'green curve' Movie Clip at frame 5 on layer named as 'Green Object 2'
25. Choose Window > Info
26. In the Info panel, keeping center Registration point selected, set x position = - 100 px and y
position= 36 px.
27. Choose Window > Properties
28. In the Properties panel, set Color Style = Alpha and Alpha Amount = 50%.
29. After following all the steps given above, it will look as shown in the image given below,
8 Department of Computer Science, College of Art and Sciences, University of NIZWA

Multimedia System Design – COMP240 – Week 5-6-7 LAB
1. Select keyframe 20 of layer named as 'Yellow Object' and drag it at frame 5.
2. Select frame 12 on layer named as 'Yellow Object'
3. Choose Insert > Keyframe
4. Select frame 8 on layer named as 'Yellow Object'
5. Choose Window > Properties
6. In the Properties panel, set Tween = Motion and Ease = 100.
7 . Select frame 5 on layer named as 'Yellow Object'
8. Choose Window > Info
9. In the Info panel, keeping center Registration point selected, set x position = - 100 px and y
position= 36.3 px.
9 Department of Computer Science, College of Art and Sciences, University of NIZWA
Multimedia System Design – COMP240 – Week 5-6-7 LAB
1. Insert a new layer (Choose Insert > Layer) above the layer named as 'Yellow Object'
2. Rename the layer as 'Lines'
3. Insert a Blank Keyframe (Choose Insert > Blank Keyframe) at frame 13 of the layer named as
'Lines'
4. At frame 13 with the help of 'Line Tool' draw 9 lines at equal distance from each other, with
color values as #F0C000 as shown in the image given below.
5. Select frame 13 on the layer named as 'Lines', convert it into a Movie Clip (choose Insert>
Convert to Symbol) with the center Registration point selected and name it as 'lines'
6. Select frame 20 on layer named as 'Lines'
7. Choose Insert > Keyframe
8. Select the 'lines' Movie Clip at frame 13 on layer named as 'Lines'
9. Choose Window > Properties
10. In the Properties panel, set Color Style = Alpha and Alpha Amount = 0%.
12. Select frame 15 on layer named as 'Lines'
13. Choose Window > Properties
14. In the Properties panel, set Tween = Motion and Ease = 100.
15. Select frame 35 on all the layer and choose Insert > Frame as shown in the image given
below,
10 Department of Computer Science, College of Art and Sciences, University of NIZWA

Multimedia System Design – COMP240 – Week 5-6-7 LAB
. In the Properties panel, set Tween = Motion and Ease = 100.
To animate the word Digital Design which is a part of Punch Line 1, follow the steps given below.
1. Insert a new layer (Choose Insert > Layer) above the layer named as action'
2. Rename the layer as Digital Design
3. Insert a Blank Keyframe (Choose Insert > Blank Keyframe) at frame 10 of the layer named as
Digital Design
4. At frame 10 of layer named as Digital Design, type the following text Digital Design with the
Text Tool and in the Properties panel apply the following text settings : Text Type = Static
Text, Font = Arial, Font Size = 25, Text (fill) Color = #FFFFFF, Text Style = Bold and Text Align =
Align Left.
5. Select the text Digital Design with the Arrow tool, convert it into a Movie Clip (choose Insert>
Convert to Symbol) with the center Registration point selected and name it as Digital Design
6. Choose Window > Info
7. In the Info panel, keeping top-left Registration point selected, set x position = 250 px and y
position= - 25 px.
11 Department of Computer Science, College of Art and Sciences, University of NIZWA

Multimedia System Design – COMP240 – Week 5-6-7 LAB
8. Select frame 16 on layer named as Digital Design
9. Choose Insert > Keyframe
10. Select the Digital Design Movie Clip at frame 16 on layer named as Digital Design
11. Choose Window > Info
12. In the Info panel, keeping top-left Registration point selected, set x position = 250 px and y
position= 15 px.
13. Select frame 12 on layer named as Digital Design
14. Choose Window > Properties
15. In the Properties panel, set Tween = Motion and Ease = 100.
16. Select layer named as Digital Design
17. Choose Edit > Copy Frames
18. Insert a new layer (Choose Insert > Layer) above the layer named as Digital Design
19. Select the newly added layer and Choose Edit > Paste Frames
12 Department of Computer Science, College of Art and Sciences, University of NIZWA

Multimedia System Design – COMP240 – Week 5-6-7 LAB
20. Automatically it will take the layer name as Digital Design, rename it as Digital Design 1
21. Select all the frames form 10 to 16 of layer named as Digital Design 1
and drag them 1 frames further.
22. Select the Digital Design Movie Clip at frame 11 on layer named as Digital Design 1
23. Choose Window > Properties
24. In the Properties panel, set Color Style = Alpha and Alpha Amount = 50%.
25. Similarly, insert a new layer (choose Insert > Layer) above the layer named as Digital Design 1
26. Select the newly added layer, Choose Edit > Paste Frames and rename it as Digital Design 2
27. Select all the frames form 10 to 16 of layer named as Digital Design 2 and drag them 2 frames
further.
28. Select the Digital Design Movie Clip at frame 12 on layer named as Digital Design 2
29. Choose Window > Properties
30. In the Properties panel, set Color Style = Alpha and Alpha Amount = 20%.
31: Insert new layer at the top of the digital design layer.
31 file import the image sky.jpg in new layer & name the layer as Sky Image.
32. In Info panel, keeping top-left Registration point selected, set x position = 0 px and y position=
0 px. and change the W : 150, H= 72
13 Department of Computer Science, College of Art and Sciences, University of NIZWA

Multimedia System Design – COMP240 – Week 5-6-7 LAB
33. Convert to Symbol -into Graphics name Sky image
34: Insert new layer at the top of the Sky image layer.
35 file import the image digital chip image.jpg in new layer & name the layer as digital chip image.
36. In Info panel, keeping top-left Registration point selected, set x position = 0 px and y position=
0 px. and change the W : 392, H= 72
37. Convert to Symbol -into Graphics name digital chip image
Save file
Make file - publish setting with swf & html
File publish.
14 Department of Computer Science, College of Art and Sciences, University of NIZWA
![Accelerating I/O Forwarding in IBM Blue Gene/P Systems › uploads › cels › papers › P1745.pdfphysics [16]. Current leadership-class machines such as the IBM Blue Gene/P (BG/P)](https://img.pdfslide.us/doc/110x75/5f02f7087e708231d406e25c/accelerating-io-forwarding-in-ibm-blue-genep-systems-a-uploads-a-cels-a.jpg)