Embed Size (px)
Citation preview

INTERMEDIATE
View B: Square
View B: Square
SABRINA CAPE
www.portlandfashioninstitute.com
ONE SIZE
INTERMEDIATE SEWING
#6351
YOUR CLASSROOM IN A BOOK
View A: Circle
SABRINA CAPE #6351
In this pattern, you will learn: Types of knit fabric Types of stitches to use on knits. How to prepare your fabric. How to put buttonholes & buttons into knits How to complete a project that you will be happy to wear!
After this pattern, try: Intermediate Sewing: Pants & Jeans, Casual Jacket, Perfect Shirt Intermediate Knits: Sweaters, knit tops, knit dresses Intermediate Mens: Pants & Slacks, Dress Shirts Activewear: Raglan Hoodie, Yoga & Sweatpants, Sports Bra/Middie Advanced: Lingerie, Dresses, Tailored Jacket, Couture Jacket
This is an Intermediate pattern. To use this pattern, you should know how to thread a sewing machine and a serger and have sewn some garments. If not, look for our Learn to Sew or Apparel Construction series of patterns. Need to practice your knit stitches? Look for our Sewing Knits 1: Knit Top patterns.
Portland Sewing (c) 2014 page 2
Look for this symbol throughout the pattern for helpful TIPS from Portland Fashion Institute -- all aimed to make your sewing easier and give you a professional finish.
View A: Circle

KNOW BEFORE YOU BUY 1 TYPES OF
KNITSPONTE. A stable double knit fabric made of a blend of rayon and polyester fibers. It has a super smooth hand, low luster sheen and a full-bodied drape in prints or solids with less than 15% stretch crossgrain. It is used for structured knit apparel such as skirts, dresses, pants and jackets. Some ponte has spandex for a 40% stretch across grain and 25% vertical stretch. Don’t confuse Ponte with Ponti or Ponte de Roma which is 100% polyester. SUGGESTION: USE NON-SPANDEX RAYON PONTE FOR THIS PROJECT. DOUBLE-FACED IS GREAT. JERSEY. Single knit. Flat vertical ribs on right side; dominant horizontal courses on wrong side. Little lengthwise stretch. Used for skinny t-shirts, lingerie. DOUBLE KNITS. Firm, stable knits that are medium to heavy weight. Little to moderate stretch. Used for jackets, suits, pants, dresses. SOME DOUBLE KNITS ARE SUITABLE FOR THIS PROJECT. INTERLOCKS. Fine rib on both sides. Light to medium weight. Moderate crosswise stretch. Watch out for runs! Used for heavier t-shirts, sportswear, sleepwear.
SWEATSHIRT FLEECE. Flat vertical ribs on right side; soft, brushed surface on wrong side. Stable with little stretch. Used for sweatshirts, sweatpants, hoodies. FLEECE IS SUITABLE FOR THIS PROJECT. SWEATER KNITS. Smooth and lightweight to lofty and bulky. Stable without much stretch. Can be sold by yard or as sweaterbodies with built in ribbing. Have a nap and may run. Used as sweaters or coats. RIBBINGS. Prominent vertical ribs on both sides. Have significant stretch. Used to finish openings or edges of this project (View A). 4-WAY STRETCH. Includes lycra spandex. Stretches lengthwise and crosswise. May be blended with nylon, cotton, polyester. Used for swimwear and activewear. KNIT TERRY. Includes French and stretch terry. Small loops on right side; smooth vertical ribs on wrong side. May shift with right sides together because of nap. Used for robes.
Portland Sewing (c) 2014 page 3
STRETCH NEEDLES. 11/75. Has rounded tip and deep scarf to prevent skipped stitches. Use on sewing machines, sergers or coverstitch machines.
STRETCH TWIN NEEDLES. Use 2.5 mm for sewing seams. Use 4.0 mm for sewing hems. Mimics look of industrial coverstitch used on professional garments. Use only on sewing machines.
STRAIGHT STITCH. SL=3. Gently stretch fabric as you sew.
KNOW BEFORE YOU SEW 2 TOOLS & TIPS FOR SEWING
KNITS
THREE-STEP ZIGZAG. SL=3.0; SW=3.0. A quick overlock stitch on your sewing machine.ZIGZAG. SL=1.5; SW=1.5 Trim away excess fabric or stitch SA with a wide zigzag (SW=3-4).SEED STITCH. A special stitch on your machine. Looks like a lightning bolt. Stitch seam with this. Then stitch SA with a wide zigzag.TWIN NEEDLE. SL=3. 2.5 or 4.0 mm stretch needle that uses two spools of thread. Bobbin zigzags.CHAINSTITCH. Uses a coverstitch machine with one looper and one needle. Loops stretch. Looks like a straight stitch. Most common knit stitch in apparel industry. COVERSTITCH. Two chainstitches in parallel.OVERLOCK. Use a serger machine set for 4-thread overlock to trim and stitch your SA.
NEEDLES
Portland Sewing (c)2014 4
Use a stretch stitch on knits. A stretch stitch is any stitch that travels right to left, such as a zigzag stitch.
STITCHES FOR KNITS

61
4 5
7
15
814
1310 9
15
16
182 & 3
3
17
11
12
Portland Sewing (c)2014 5
Portland Sewing (c) 2014 page 6
GENERAL TOOLS 1. TAPE MEASURE: Choose one that is 60” x ⅝” -- same width as a typical home sewing seam allowance. 2. PINS: Choose 1⅜” glass head pins. Steel tips stay sharp while shanks don’t bend. Heads don’t melt should you iron them. 3. PIN CUSHION: Tomato pin cushions are most common. Attached strawberry has emery for sharpening your hand needles. Magnetic pin cushions pick up spilled pins. Throw pins at them and magnet will grab them. 4. SEAM GAUGE: 6” long, black and metallic aluminum with a blue or red slider. Metal is marked with inches on one side and metric on other. Slider moves for quick measuring on small pieces widths such as hems. 5. CHALK PENCIL: Or refillable chalk marker. Transfers information within pattern, such as dots, to fabric. Chalk shows best on dark fabrics. 6. BLUE WATER-SOLUBLE MARKER: Transfers information within pattern, such as dots, to fabric. Use on light colored fabrics. Avoid purple or pink air-erasable markers. Their marks quickly disappear.
7. POINT TURNER: Has a flat side and a point. Use to square out corners on such things as pockets. Never poke corners directly. Never use scissors to turn your corners. 8. SEAM RIPPER: For “unsewing”. Choose one with a good handle and fine tip. Pluck a few bobbin threads with tip and you can pull out whole bobbin thread to remove a seam. Rip a seam with red ball into fabric to keep from slashing fabric by mistake. 1. WASHAWAY BASTING TAPE: ¼”-wide double-sided tape. Holds seams in place until stitched. Goes away with first wash. 2. SEAM SEALANT: To keep threads from raveling. Dries clear. 3. FUSIBLE WEB: ¼”-wide. Fuses seams in place permanently. CUTTING TOOLS 12. DRESSMAKER SHEARS: Invest in a pair of 8” stainless steel fabric cutting shears. Use them for fabric alone. Sharpen them each year. You’ll have effortless cutting for life. 13. PAPER SCISSORS: Use regular scissors for cutting pattern paper. 14. NIPPERS: Use small scissors or nippers to cut threads as you sew. We put ours on a retractable leash then clip leash to our neckline so nippers never get lost. Blunt scissors won’t poke holes in your clothes. 15. ROTARY CUTTER AND (16) MAT: To get a clean cut on fabric, use a rotary cutter rather than scissors. mat protects your table and keeps rotary blade from getting dull. Use weights to hold fabric.
PRESSING TOOLS 17.PRESSING HAM: A tightly stuffed pillow, shaped like a ham. It’s used to press curved areas. This allows a garment to better fit body contours. A ham is cotton on one side, wool on other. Use cotton side for cotton or cotton blend fabrics.
18. CLAPPER: A piece of hardwood, sometimes with a point press on top, used to push steam into a seam and flatten it. Use it every time you press.
STEAM IRON: Choose an iron with easy to adjust temperature and a shot of steam. Look for one with many steam holes and a large water tank. Use distilled water unless your area has naturally soft water. NOTE: Test iron a piece of artificial leather before ironing garment. Never iron right side of velveteen or corduroy. Instead, place fabric face down on a terry cloth towel and press from wrong side.
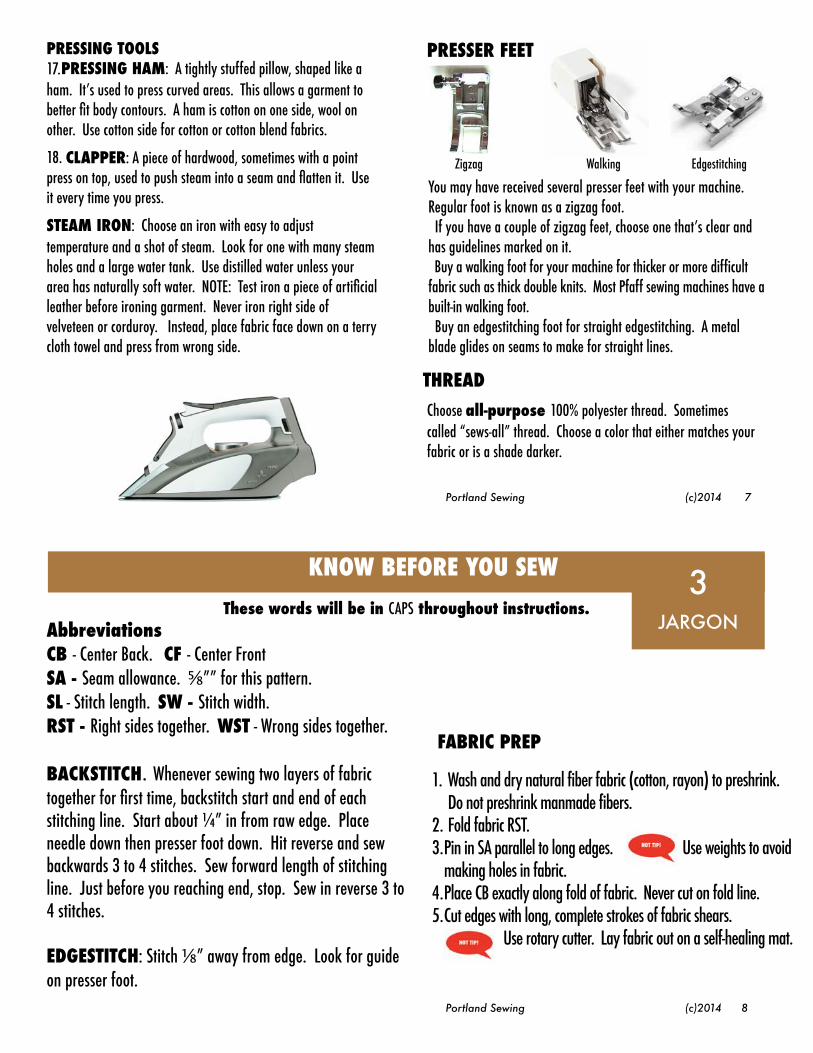
You may have received several presser feet with your machine. Regular foot is known as a zigzag foot. If you have a couple of zigzag feet, choose one that’s clear and has guidelines marked on it. Buy a walking foot for your machine for thicker or more difficult fabric such as thick double knits. Most Pfaff sewing machines have a built-in walking foot. Buy an edgestitching foot for straight edgestitching. A metal blade glides on seams to make for straight lines.
Zigzag Walking
Choose all-purpose 100% polyester thread. Sometimes called “sews-all” thread. Choose a color that either matches your fabric or is a shade darker.
THREAD
PRESSER FEET
Edgestitching
Portland Sewing (c)2014 7
1. Wash and dry natural fiber fabric (cotton, rayon) to preshrink. Do not preshrink manmade fibers.
2. Fold fabric RST. 3.Pin in SA parallel to long edges. Use weights to avoid
making holes in fabric. 4.Place CB exactly along fold of fabric. Never cut on fold line. 5.Cut edges with long, complete strokes of fabric shears.
Use rotary cutter. Lay fabric out on a self-healing mat.
Pin in SA parallel to long edges.
Use rotary cutter. Lay fabric out on a self-healing mat.
KNOW BEFORE YOU SEW 3 JARGON
These words will be in CAPS throughout instructions.Abbreviations CB - Center Back. CF - Center Front SA - Seam allowance. ⅝”” for this pattern. SL - Stitch length. SW - Stitch width. RST - Right sides together. WST - Wrong sides together.
BACKSTITCH. Whenever sewing two layers of fabric together for first time, backstitch start and end of each stitching line. Start about ¼” in from raw edge. Place needle down then presser foot down. Hit reverse and sew backwards 3 to 4 stitches. Sew forward length of stitching line. Just before you reaching end, stop. Sew in reverse 3 to 4 stitches.
EDGESTITCH: Stitch ⅛” away from edge. Look for guide on presser foot. Portland Sewing (c)2014 8
FABRIC PREP
YOU’RE READY TO CUT 4
LAYOUTFABRIC LAYOUT
Wrong side of fabric Right side of fabric
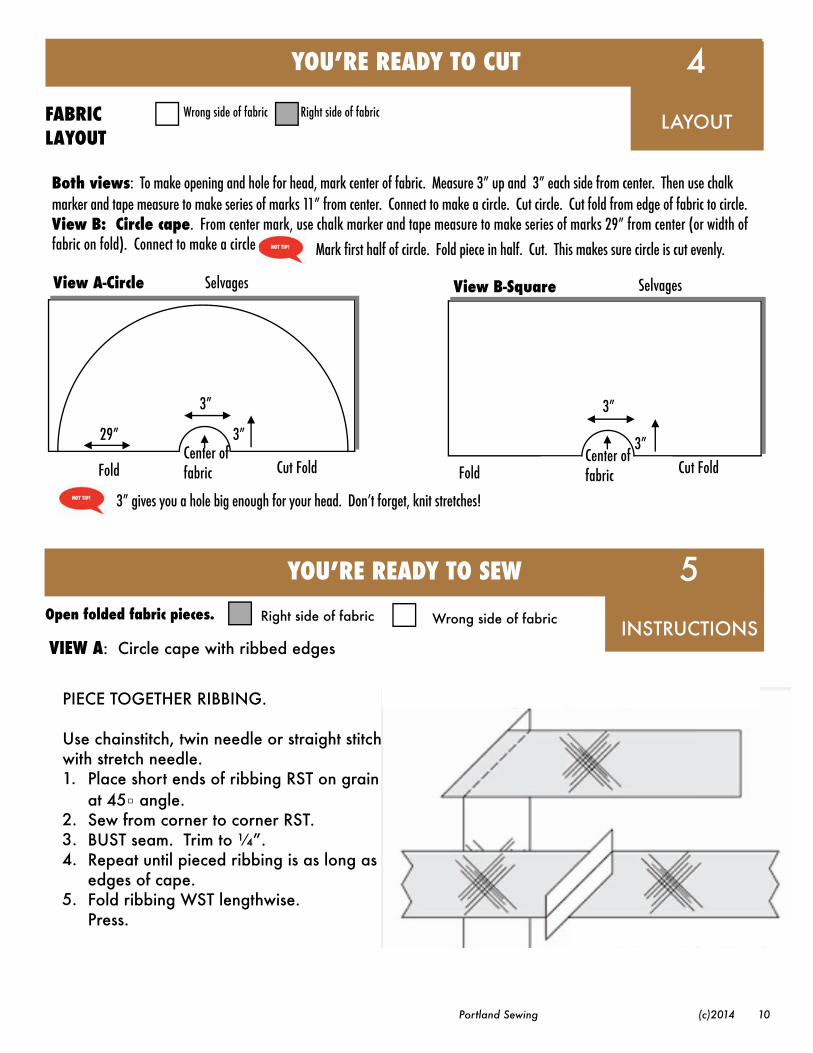
Both views: To make opening and hole for head, mark center of fabric. Measure 3” up and 3” each side from center. Then use chalk marker and tape measure to make series of marks 11” from center. Connect to make a circle. Cut circle. Cut fold from edge of fabric to circle. View B: Circle cape. From center mark, use chalk marker and tape measure to make series of marks 29” from center (or width of fabric on fold). Connect to make a circle.
Selvages
Fold Cut Fold3”
3”
View B-Square
Center of fabric
Selvages
3”
3”
Fold Cut Fold
View A-Circle
Center of fabric
29”
Portland Sewing (c)2014 10
YOU’RE READY TO SEW 5
INSTRUCTIONSOpen folded fabric pieces. Right side of fabric Wrong side of fabric
VIEW A: Circle cape with ribbed edges
fabric on fold). Connect to make a circle.
3” gives you a hole big enough for your head. Don’t forget, knit stretches!
Mark first half of circle. Fold piece in half. Cut. This makes sure circle is cut evenly.
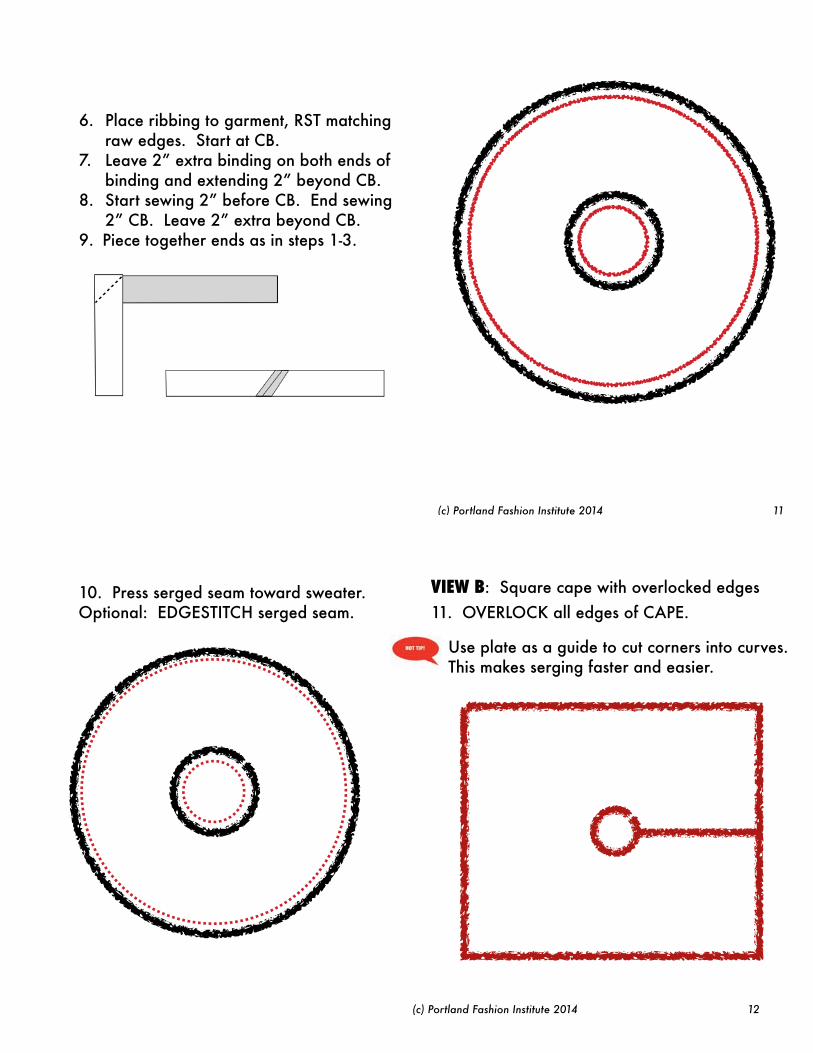
PIECE TOGETHER RIBBING.
Use chainstitch, twin needle or straight stitch with stretch needle. 1. Place short ends of ribbing RST on grain
at 45▫︎ angle. 2. Sew from corner to corner RST. 3. BUST seam. Trim to ¼”. 4. Repeat until pieced ribbing is as long as
edges of cape. 5. Fold ribbing WST lengthwise.
Press.
(c) Portland Fashion Institute 2014 11
11. OVERLOCK all edges of CAPE.VIEW B: Square cape with overlocked edges
(c) Portland Fashion Institute 2014 12
10. Press serged seam toward sweater. Optional: EDGESTITCH serged seam.
Use plate as a guide to cut corners into curves. This makes serging faster and easier.
6. Place ribbing to garment, RST matching raw edges. Start at CB.
7. Leave 2” extra binding on both ends of binding and extending 2” beyond CB.
8. Start sewing 2” before CB. End sewing 2” CB. Leave 2” extra beyond CB.
9. Piece together ends as in steps 1-3.
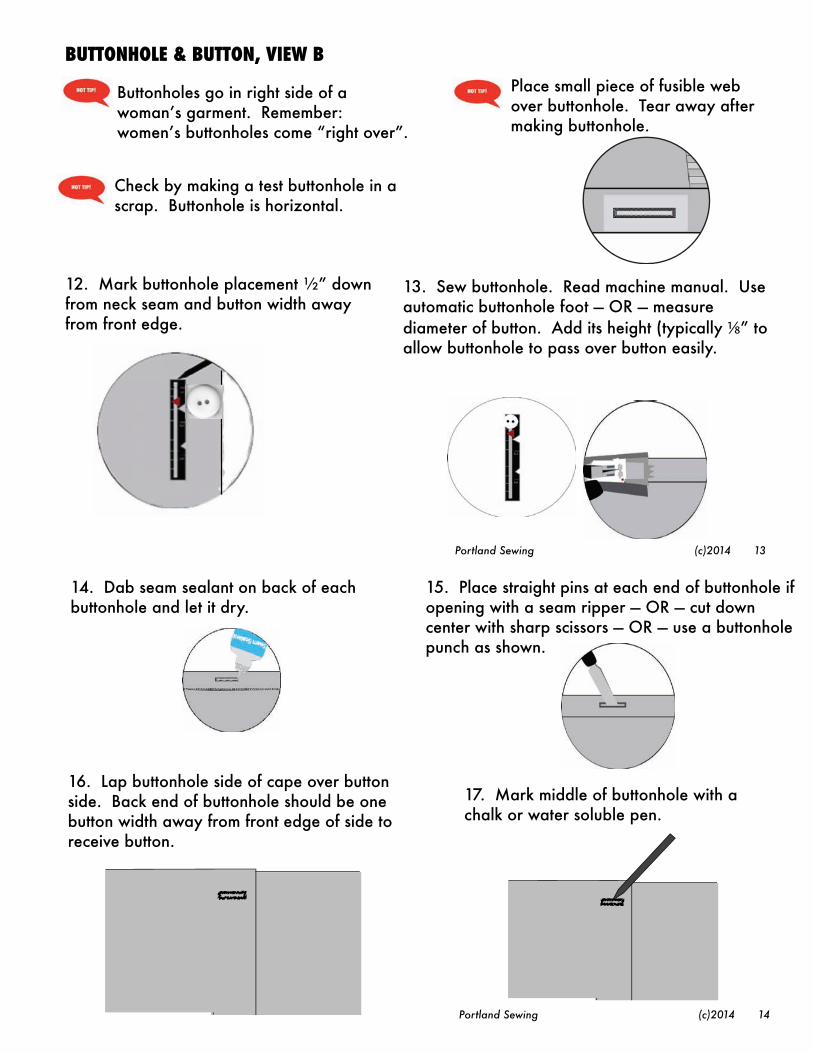
Buttonholes go in right side of a woman’s garment. Remember: women’s buttonholes come “right over”.
Place small piece of fusible web over buttonhole. Tear away after making buttonhole.
BUTTONHOLE & BUTTON, VIEW B
Check by making a test buttonhole in a scrap. Buttonhole is horizontal.
12. Mark buttonhole placement ½” down from neck seam and button width away from front edge.
13. Sew buttonhole. Read machine manual. Use automatic buttonhole foot — OR — measure diameter of button. Add its height (typically ⅛” to allow buttonhole to pass over button easily.
14. Dab seam sealant on back of each buttonhole and let it dry.
15. Place straight pins at each end of buttonhole if opening with a seam ripper — OR — cut down center with sharp scissors — OR — use a buttonhole punch as shown.
16. Lap buttonhole side of cape over button side. Back end of buttonhole should be one button width away from front edge of side to receive button.
17. Mark middle of buttonhole with a chalk or water soluble pen.
Portland Sewing (c)2014 14
Portland Sewing (c)2014 13

SABRINA CAPEMISSES CAPE: Loose-fitting knit cape can be a circle (View A) or a square (View B). View A has optional ribbed edges. View B has overlocked edges.
SUGGESTED FABRICS: Cape - Stable or moderate stretch knits only: Ponte, Doubleknits, Sweatshirt, French Terry. Rib - Cotton or cotton-poly blend.
NOTIONS: 1 spools of thread, 4 cones serger thread or 3 cones + 1 of decorative thread to put in serger’s upper looper, scrap of stabilizer or stitch witchery, One 1” sew-through buttons.
WHAT YOU WILL NEED AT HOME: Sewing machine with straight stitch, serger, scissors (shears and thread snips), iron (with steam), tape measure, sewing machine needles stretch size 75/11, seam gauge, seam ripper, seam sealant. Optional: rotary cutter, self-healing mat and fabric weights (tuna cans work well), buttonhole cutter.
INTERMEDIATE SEWINGONE SIZE FITS ALL #6351
Portland Fashion Institute started business in 2002 as Portland Sewing with a beginning sewing class for four students. The business has grown to add classes in intermediate and advanced sewing, and apparel business. Our goal is to help you become industry-proficient in clothing design, patternmaking, construction, manufacturing and production. All of our teachers work in the apparel industry. At Portland Fashion Institute:
We are apparel people teaching apparel people
(c) Portland Fashion Institute 2014 15
YARDAGE TO BUY One size fits all Both Views
Cape: 1⅔ yards 58”/60”-wide fabric
Optional ribbed edges for View A:- ¾ yards 58”/60”-wide rib. Cut rib
into 4 pieces each 4” wide. - 1 yard 44”/45”-wide rib. Cut rib
into 6 pieces each 4” wide. - 1¼ yard 36”-wide rib. Cut rib into
7 pieces each 4” wide.
18. For sew-through button, take off presser foot. Drop feed dogs. Place button on garment. Set “ankle” on button. Choose zigzag SW 3. Turn machine hand wheel to make sure needle goes through buttonholes. Adjust width as needed.
19. Place a pin on top of button to create a thread “shank”. Zigzag six times. Finish with three straight stitches in one of holes to secure stitch. Dab seam sealant on back of button stitch and let dry.


![MySewingMall.com [Sewing Machine Parts & Sewing Jargons]](https://img.pdfslide.us/doc/110x75/587a415b1a28ab00148b4837/mysewingmallcom-sewing-machine-parts-sewing-jargons.jpg)