Embed Size (px)
Citation preview
Manual de instruccionesAntes de poner en funcionamiento la unidad, lea detenidamente este manual y el manual de referencia rápida incluido y consérvelos para referencias futuras.
VPL-HW65
4-580-042-23 (1)
Video Projector
Contenido
Ubicación de los controlesLado frontal/derecho ......................... 4Parte posterior/inferior ....................... 5Mando a distancia .............................. 6
Conexiones y preparativosInstalación de la unidad ..................... 7Ajuste de posición de la imagen ........ 8Conexión a un equipo de vídeo u
ordenador ..................................... 12
ProyecciónProyección de la imagen .................. 14
Apagado de la alimentación ....... 14Visualización de imágenes de vídeo en
3D ................................................. 15Uso de las gafas 3D ................... 15
Selección de una relación de aspecto según la señal de vídeo ................. 17
Selección del modo de visualización de la imagen ...................................... 19
Uso de los menúsFuncionamiento mediante los
menús ........................................... 20Menú Imagen ................................... 22Menú Pantalla .................................. 28Menú Configuración ........................ 30Menú Función .................................. 31
Elementos bloqueados por Bloqueo ajustes ..................................... 33
Menú Instalación ............................. 34Menú Información ........................... 37
Acerca de la memoria preestablecida ......................... 37
Uso de funciones de redVisualización de la ventana de control
de la unidad en un navegador web ................................................38
Funcionamiento de la ventana de control ...........................................39
Cambio de página .......................39Configuración de la limitación de
acceso ......................................39Confirmación de la información
relacionada con la unidad ........40
Gestión de erroresSolución de problemas .....................41Indicadores de advertencia ...............44Listas de mensajes ............................45
OtrosActualización del software ...............46Acerca de x.v.Color ..........................46Acerca de la función 3D simulado ...46Sustitución de la lámpara y del filtro de
aire y limpieza de los orificios de ventilación (entrada) .....................47
Limpieza del filtro de aire ................51Colocación de la tapa del objetivo ...51Limpieza ..........................................52Especificaciones ...............................53
Señales predefinidas ...................54Señales de entrada y elementos
ajustables/de configuración .....56Señales 3D compatibles .............57Señales 3D y elementos ajustables/
configurable ............................57Modo de aspecto .........................59Motionflow .................................60
2
Condiciones de almacenamiento de elementos ajustables/configurable ............................ 61
Distancia de proyección y rango de desplazamiento del objetivo ......... 63
Dimensiones .................................... 65AVISOS Y LICENCIAS
DEL SOFTWARE UTILIZADO EN ESTE PRODUCTO ...................... 68
Índice ............................................... 84
3
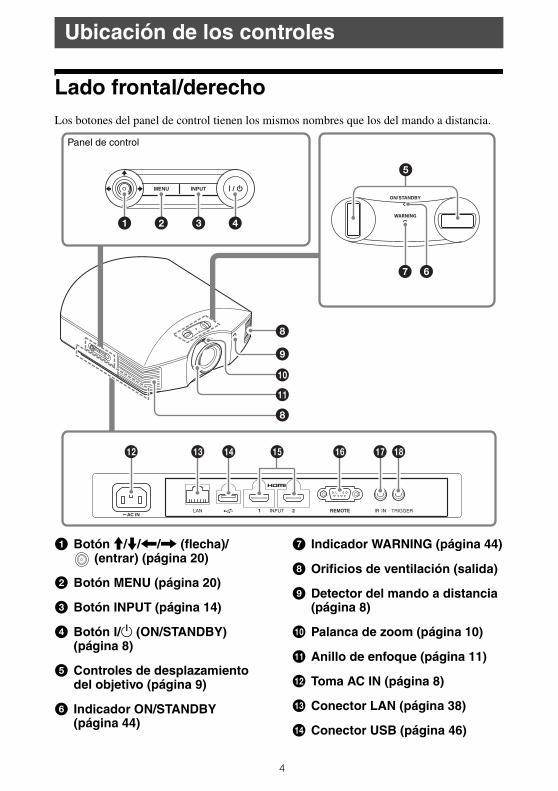
Lado frontal/derechoLos botones del panel de control tienen los mismos nombres que los del mando a distancia.
a Botón M/m/</, (flecha)/(entrar) (página 20)
b Botón MENU (página 20)
c Botón INPUT (página 14)
d Botón ?/1 (ON/STANDBY) (página 8)
e Controles de desplazamiento del objetivo (página 9)
f Indicador ON/STANDBY (página 44)
g Indicador WARNING (página 44)
h Orificios de ventilación (salida)
i Detector del mando a distancia (página 8)
j Palanca de zoom (página 10)
k Anillo de enfoque (página 11)
l Toma AC IN (página 8)
m Conector LAN (página 38)
n Conector USB (página 46)
Ubicación de los controles
Panel de control
4
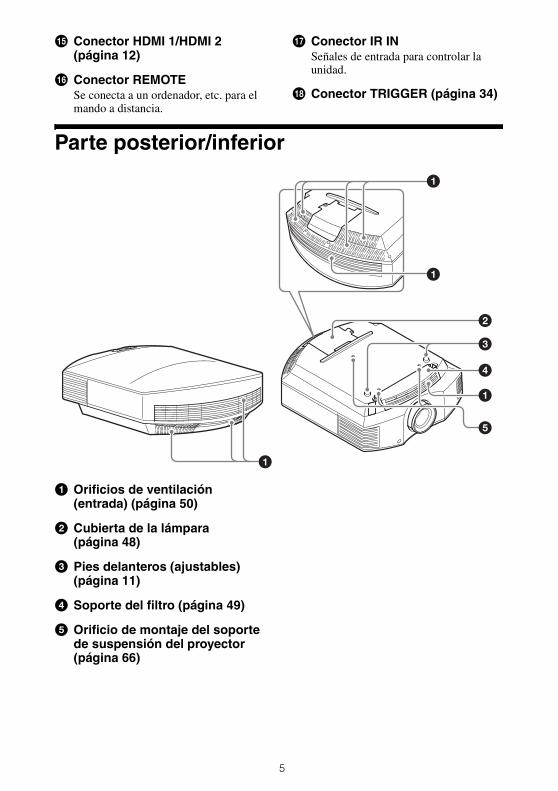
o Conector HDMI 1/HDMI 2 (página 12)
p Conector REMOTESe conecta a un ordenador, etc. para el mando a distancia.
q Conector IR IN Señales de entrada para controlar la unidad.
r Conector TRIGGER (página 34)
Parte posterior/inferior
a Orificios de ventilación (entrada) (página 50)
b Cubierta de la lámpara (página 48)
c Pies delanteros (ajustables) (página 11)
d Soporte del filtro (página 49)
e Orificio de montaje del soporte de suspensión del proyector (página 66)
5
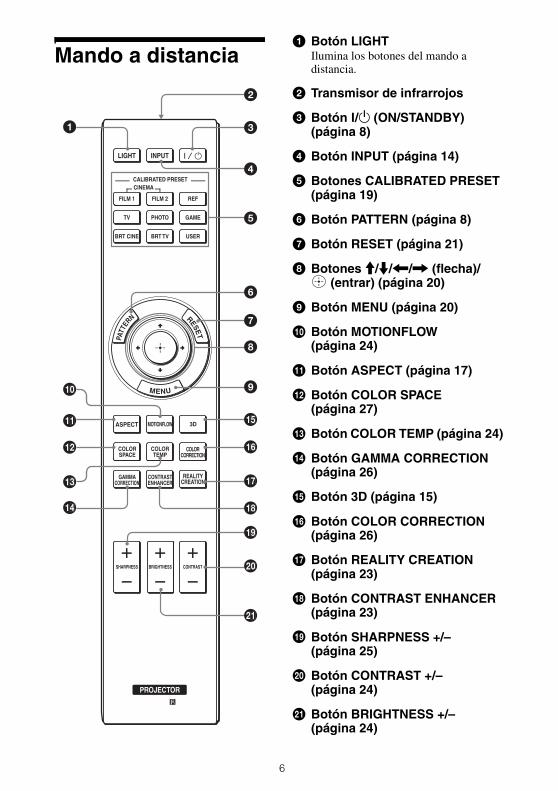
Mando a distanciaa Botón LIGHT
Ilumina los botones del mando a distancia.
b Transmisor de infrarrojos
c Botón ?/1 (ON/STANDBY) (página 8)
d Botón INPUT (página 14)
e Botones CALIBRATED PRESET (página 19)
f Botón PATTERN (página 8)
g Botón RESET (página 21)
h Botones M/m/</, (flecha)/(entrar) (página 20)
i Botón MENU (página 20)
j Botón MOTIONFLOW (página 24)
k Botón ASPECT (página 17)
l Botón COLOR SPACE (página 27)
m Botón COLOR TEMP (página 24)
n Botón GAMMA CORRECTION (página 26)
o Botón 3D (página 15)
p Botón COLOR CORRECTION (página 26)
q Botón REALITY CREATION (página 23)
r Botón CONTRAST ENHANCER (página 23)
s Botón SHARPNESS +/– (página 25)
t Botón CONTRAST +/– (página 24)
u Botón BRIGHTNESS +/– (página 24)
6
En esta sección se describe cómo instalar la unidad y la pantalla, cómo conectar el equipo desde el que desea proyectar la imagen, etc.
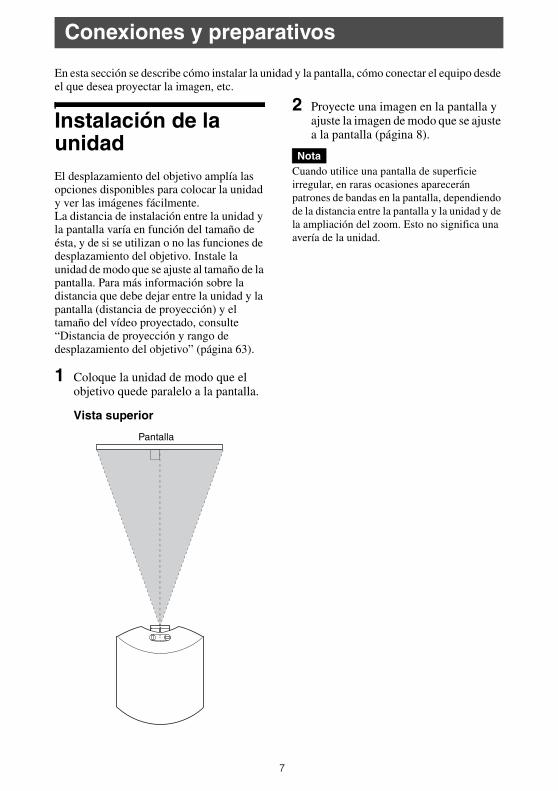
Instalación de la unidadEl desplazamiento del objetivo amplía las opciones disponibles para colocar la unidad y ver las imágenes fácilmente.La distancia de instalación entre la unidad y la pantalla varía en función del tamaño de ésta, y de si se utilizan o no las funciones de desplazamiento del objetivo. Instale la unidad de modo que se ajuste al tamaño de la pantalla. Para más información sobre la distancia que debe dejar entre la unidad y la pantalla (distancia de proyección) y el tamaño del vídeo proyectado, consulte “Distancia de proyección y rango de desplazamiento del objetivo” (página 63).
1 Coloque la unidad de modo que el objetivo quede paralelo a la pantalla.
Vista superior
2 Proyecte una imagen en la pantalla y ajuste la imagen de modo que se ajuste a la pantalla (página 8).
Cuando utilice una pantalla de superficie irregular, en raras ocasiones aparecerán patrones de bandas en la pantalla, dependiendo de la distancia entre la pantalla y la unidad y de la ampliación del zoom. Esto no significa una avería de la unidad.
Conexiones y preparativos
Pantalla
Nota
7
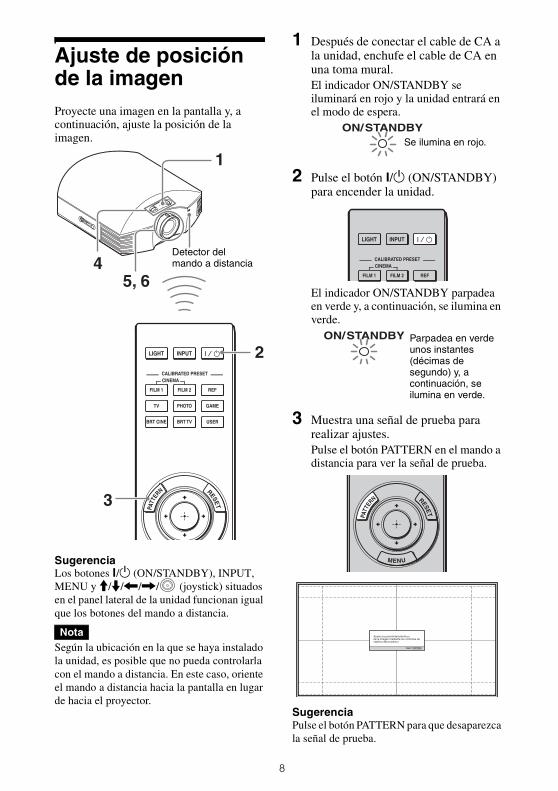
Ajuste de posición de la imagenProyecte una imagen en la pantalla y, a continuación, ajuste la posición de la imagen.
SugerenciaLos botones ?/1 (ON/STANDBY), INPUT, MENU y M/m/</,/ (joystick) situados en el panel lateral de la unidad funcionan igual que los botones del mando a distancia.
Según la ubicación en la que se haya instalado la unidad, es posible que no pueda controlarla con el mando a distancia. En este caso, oriente el mando a distancia hacia la pantalla en lugar de hacia el proyector.
1 Después de conectar el cable de CA a la unidad, enchufe el cable de CA en una toma mural.El indicador ON/STANDBY se iluminará en rojo y la unidad entrará en el modo de espera.
2 Pulse el botón ?/1 (ON/STANDBY) para encender la unidad.
El indicador ON/STANDBY parpadea en verde y, a continuación, se ilumina en verde.
3 Muestra una señal de prueba para realizar ajustes.Pulse el botón PATTERN en el mando a distancia para ver la señal de prueba.
SugerenciaPulse el botón PATTERN para que desaparezca la señal de prueba.
Nota
Detector del mando a distancia
Se ilumina en rojo.
Parpadea en verde unos instantes (décimas de segundo) y, a continuación, se ilumina en verde.
8

4 Mueva ambos controles de desplazamiento del objetivo para ajustar la posición de la imagen.
Para ajustar la posición horizontal
Gire el control de desplazamiento del objetivo hacia la derecha o hacia la izquierda.La imagen proyectada en la pantalla se mueve a la derecha o a la izquierda, como máximo, un 25% de la anchura de la pantalla desde el centro del objetivo.
Vista superior
Para ajustar la posición vertical
Para ajustar la posición horizontal
25% 25%Anchura de 1 pantalla
: posición de la imagen cuando se mueve al máximo a la izquierda
: posición de la imagen cuando se mueve al máximo a la derecha
9
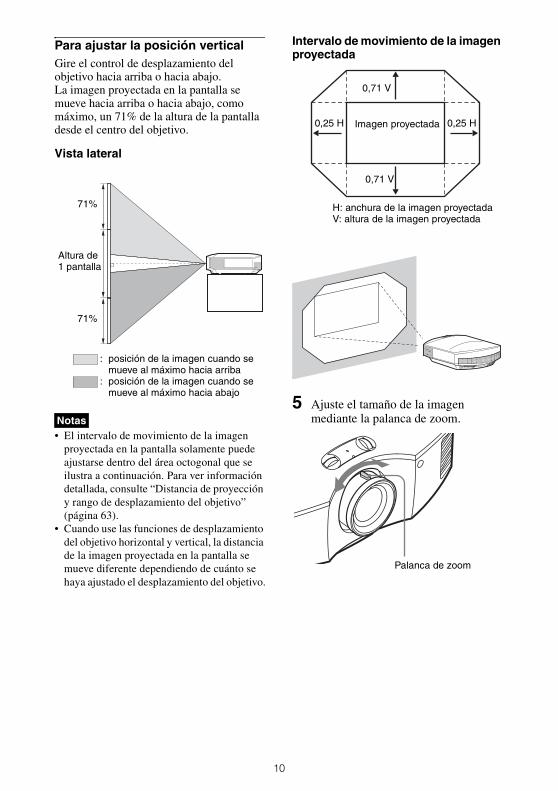
Para ajustar la posición verticalGire el control de desplazamiento del objetivo hacia arriba o hacia abajo.La imagen proyectada en la pantalla se mueve hacia arriba o hacia abajo, como máximo, un 71% de la altura de la pantalla desde el centro del objetivo.
Vista lateral
• El intervalo de movimiento de la imagen proyectada en la pantalla solamente puede ajustarse dentro del área octogonal que se ilustra a continuación. Para ver información detallada, consulte “Distancia de proyección y rango de desplazamiento del objetivo” (página 63).
• Cuando use las funciones de desplazamiento del objetivo horizontal y vertical, la distancia de la imagen proyectada en la pantalla se mueve diferente dependiendo de cuánto se haya ajustado el desplazamiento del objetivo.
Intervalo de movimiento de la imagen proyectada
5 Ajuste el tamaño de la imagen mediante la palanca de zoom.Notas
71%
71%
Altura de 1 pantalla
: posición de la imagen cuando se mueve al máximo hacia arriba
: posición de la imagen cuando se mueve al máximo hacia abajo
0,71 V
0,25 H
H: anchura de la imagen proyectadaV: altura de la imagen proyectada
0,25 H
0,71 V
Imagen proyectada
Palanca de zoom
10
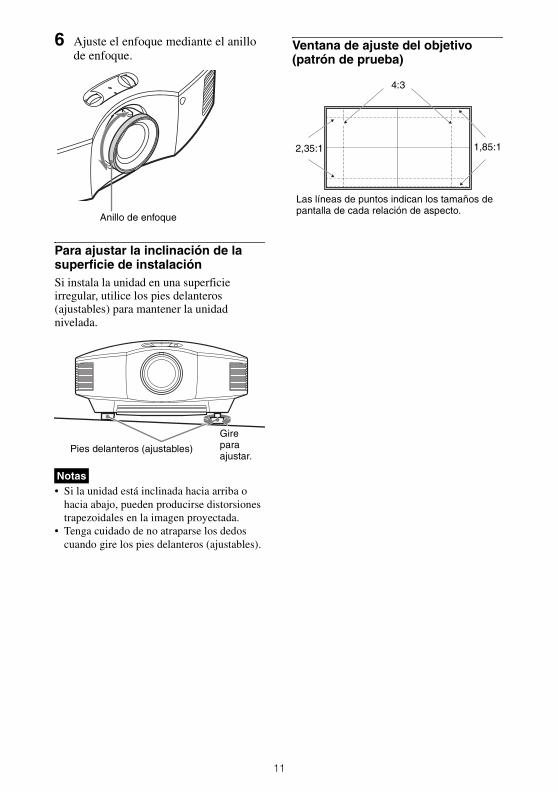
6 Ajuste el enfoque mediante el anillo de enfoque.
Para ajustar la inclinación de la superficie de instalaciónSi instala la unidad en una superficie irregular, utilice los pies delanteros (ajustables) para mantener la unidad nivelada.
• Si la unidad está inclinada hacia arriba o hacia abajo, pueden producirse distorsiones trapezoidales en la imagen proyectada.
• Tenga cuidado de no atraparse los dedos cuando gire los pies delanteros (ajustables).
Ventana de ajuste del objetivo (patrón de prueba)
Notas
Anillo de enfoque
Pies delanteros (ajustables)
Gire para ajustar.
4:3
2,35:1 1,85:1
Las líneas de puntos indican los tamaños de pantalla de cada relación de aspecto.
11
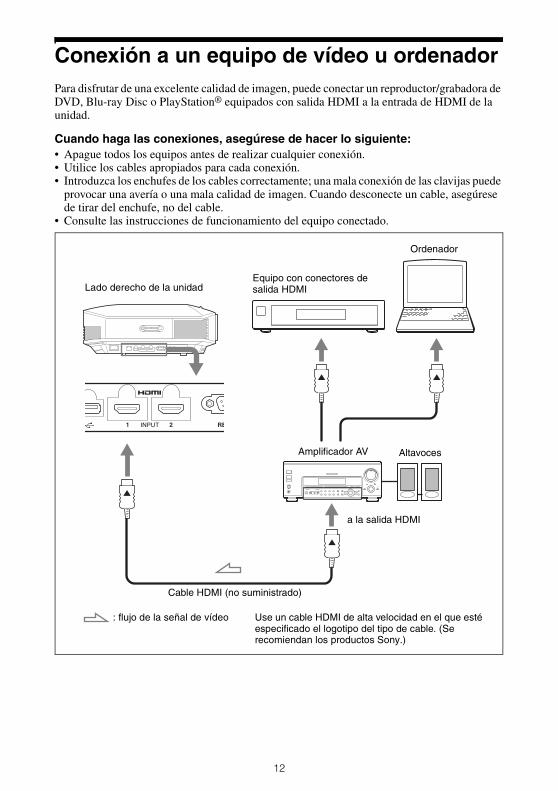
Conexión a un equipo de vídeo u ordenadorPara disfrutar de una excelente calidad de imagen, puede conectar un reproductor/grabadora de DVD, Blu-ray Disc o PlayStation® equipados con salida HDMI a la entrada de HDMI de la unidad.
Cuando haga las conexiones, asegúrese de hacer lo siguiente:• Apague todos los equipos antes de realizar cualquier conexión.• Utilice los cables apropiados para cada conexión.• Introduzca los enchufes de los cables correctamente; una mala conexión de las clavijas puede
provocar una avería o una mala calidad de imagen. Cuando desconecte un cable, asegúrese de tirar del enchufe, no del cable.
• Consulte las instrucciones de funcionamiento del equipo conectado.
Lado derecho de la unidad
Amplificador AV Altavoces
Equipo con conectores de salida HDMI
Ordenador
a la salida HDMI
Cable HDMI (no suministrado)
: flujo de la señal de vídeo Use un cable HDMI de alta velocidad en el que esté especificado el logotipo del tipo de cable. (Se recomiendan los productos Sony.)
12

• Utilice un cable HDMI de alta velocidad. Con un cable HDMI estándar, es posible que las imágenes 1080p, DeepColor y los vídeos 3D no se visualicen correctamente.
• Cuando conecte un cable HDMI a la unidad, asegúrese de que la marca V de la parte superior de la entrada HDMI de la unidad y la marca v del conector del cable se encuentren en la misma posición.
• Si la imagen del equipo conectado a la unidad con un cable HDMI no es correcta, compruebe la configuración del equipo conectado.
• Si configura un ordenador, como por ejemplo un portátil, para que envíe la señal tanto a la pantalla del mismo como a este equipo, es posible que la imagen del equipo no se vea correctamente. Ajuste el ordenador para que envíe la señal solamente al monitor externo. Para obtener información detallada, consulte el manual de instrucciones suministrado con el ordenador. Para la configuración del ordenador, consulte con el fabricante del ordenador.
Notas
13
En esta sección se describe cómo utilizar la unidad para ver la imagen procedente del equipo conectado. También describe cómo ajustar la calidad de imagen que se desee.
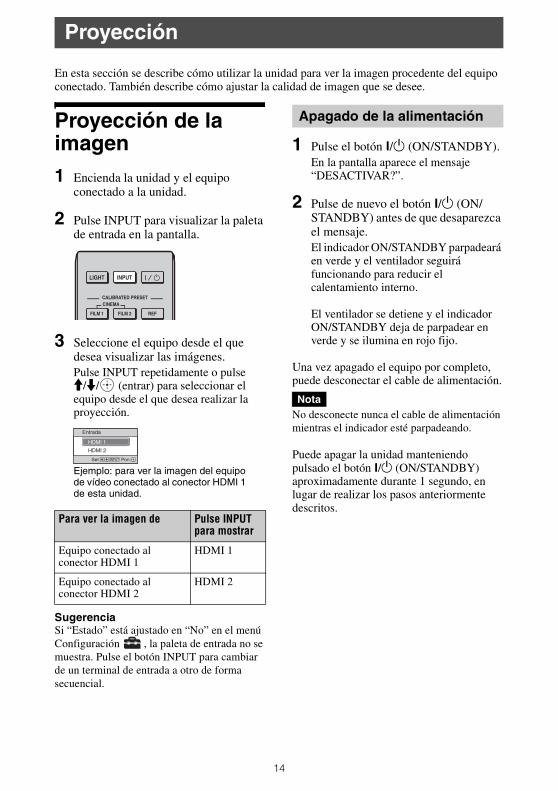
Proyección de la imagen1 Encienda la unidad y el equipo
conectado a la unidad.
2 Pulse INPUT para visualizar la paleta de entrada en la pantalla.
3 Seleccione el equipo desde el que desea visualizar las imágenes.Pulse INPUT repetidamente o pulse M/m/ (entrar) para seleccionar el equipo desde el que desea realizar la proyección.
SugerenciaSi “Estado” está ajustado en “No” en el menú Configuración , la paleta de entrada no se muestra. Pulse el botón INPUT para cambiar de un terminal de entrada a otro de forma secuencial.
1 Pulse el botón ?/1 (ON/STANDBY).En la pantalla aparece el mensaje “DESACTIVAR?”.
2 Pulse de nuevo el botón ?/1 (ON/STANDBY) antes de que desaparezca el mensaje.El indicador ON/STANDBY parpadeará en verde y el ventilador seguirá funcionando para reducir el calentamiento interno.
El ventilador se detiene y el indicador ON/STANDBY deja de parpadear en verde y se ilumina en rojo fijo.
Una vez apagado el equipo por completo, puede desconectar el cable de alimentación.
No desconecte nunca el cable de alimentación mientras el indicador esté parpadeando.
Puede apagar la unidad manteniendo pulsado el botón ?/1 (ON/STANDBY) aproximadamente durante 1 segundo, en lugar de realizar los pasos anteriormente descritos.
Proyección
Para ver la imagen de Pulse INPUT para mostrar
Equipo conectado al conector HDMI 1
HDMI 1
Equipo conectado al conector HDMI 2
HDMI 2
Ejemplo: para ver la imagen del equipo de vídeo conectado al conector HDMI 1 de esta unidad.
Apagado de la alimentación
Nota
14
Visualización de imágenes de vídeo en 3DPuede disfrutar de impactantes imágenes de vídeo en 3D, como las de los juegos en 3D y los discos Blu-ray en 3D, utilizando las gafas 3D activas opcionales (TDG-BT500A).
1 Active el equipo HDMI para la compatibilidad 3D conectado a la unidad y reproduzca el contenido en 3D.Para obtener información sobre cómo reproducir contenido 3D, consulte las instrucciones del equipo conectado.
2 Encienda la unidad y proyecte la imagen de vídeo en 3D a la pantalla.Para obtener información sobre cómo proyectar las imágenes, consulte “Proyección de la imagen” (página 14).
3 Encienda las gafas 3D y, a continuación, póngaselas de modo que se sienta cómodo con ellas.Para obtener información sobre cómo utilizar las gafas 3D, consulte “Uso de las gafas 3D” (página 15).
Consejos• El ajuste predeterminado de fábrica de “Sel.
pantalla 2D-3D” es “Automático” para permitir la proyección de imágenes de vídeo en 3D cuando la unidad detecta señales 3D.
• Para convertir imágenes de vídeo en 3D a imágenes en 2D, ajuste “Sel. pantalla 2D-3D” en “2D” (página 31).
• En función del tipo de señal, tal vez no sea posible mostrar imágenes de vídeo en 3D. Ajuste “Sel. pantalla 2D-3D” en “3D” y “Formato 3D” en “Lado a lado” o “Encima-debajo” para adaptarlo al formato del contenido en 3D que desea ver (página 31).
• Utilice las gafas 3D dentro del alcance de comunicación (página 15).
• Se ha demostrado que cada persona puede ver imágenes de vídeo en 3D de forma distinta.
• Cuando la temperatura del entorno de uso es baja, es posible que el efecto de 3D disminuya.
Ajuste de las funciones 3DEs posible ajustar las funciones 3D pulsando el botón 3D del mando a distancia o desde “Ajustes 3D” en el menú Función . Para ver información detallada, consulte “Ajustes 3D” (página 31).
1 Encienda las gafas 3D y regístrelas en la unidad.Para ver información detallada sobre cómo registrar las gafas 3D, consulte el manual de instrucciones suministrado con las gafas 3D.
2 Póngase las gafas 3D.
3 Gire la cara hacia la pantalla.
Precauciones de utilizaciónEs posible que no funcionen correctamente si:• La posición de visualización está
demasiado lejos del proyector • Hay otros dispositivos de comunicación,
tales como una red LAN inalámbrica (IEEE802.11 b/g/n) o un microondas con un ancho de banda de 2,4 GHz, cerca de la unidad
Alcance de comunicación de las gafas 3DLa siguiente figura indica el intervalo de comunicación de las gafas 3D. Si intenta ver imágenes de vídeo en 3D desde una distancia superior a la indicada en el alcance de comunicación o si instala la unidad más allá de los límites del alcance de comunicación, las gafas 3D no podrán procesar las imágenes correctamente. Además, la distancia varía en función del entorno de la habitación y el entorno de instalación de la unidad.
Notas
Uso de las gafas 3D
15
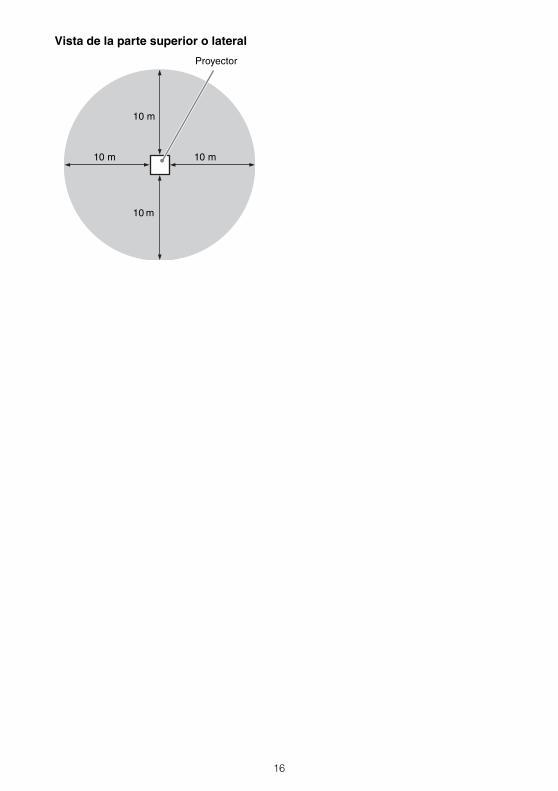
Vista de la parte superior o lateral
Proyector
10 m 10 m
10 m
10 m
16
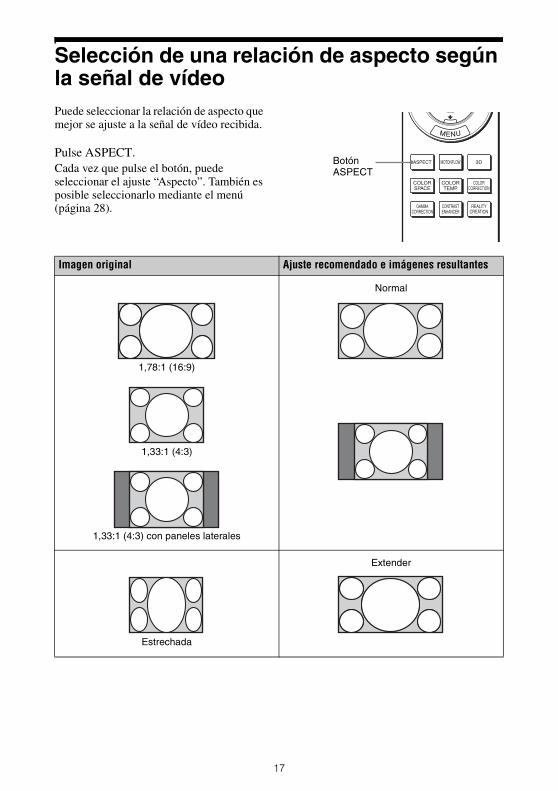
Selección de una relación de aspecto según la señal de vídeoPuede seleccionar la relación de aspecto que mejor se ajuste a la señal de vídeo recibida.
Pulse ASPECT.Cada vez que pulse el botón, puede seleccionar el ajuste “Aspecto”. También es posible seleccionarlo mediante el menú (página 28).
Botón ASPECT
Imagen original Ajuste recomendado e imágenes resultantes
1,78:1 (16:9)
1,33:1 (4:3)
1,33:1 (4:3) con paneles laterales
Normal
Estrechada
Extender
17
Los modos de aspecto seleccionables dependen de la señal de entrada (página 59).
Notas sobre el cambio del ajuste “Aspecto”• Seleccione el modo de aspecto teniendo en
cuenta que al cambiar la relación de aspecto de la imagen original proporcionará una apariencia diferente a la de la imagen original.
• Tenga en cuenta que, si se utiliza la unidad de forma comercial o para la exhibición pública, la modificación de la imagen original mediante el cambio del modo de aspecto puede constituir una infracción de los derechos de los autores o de los productores, que gozan de protección legal.
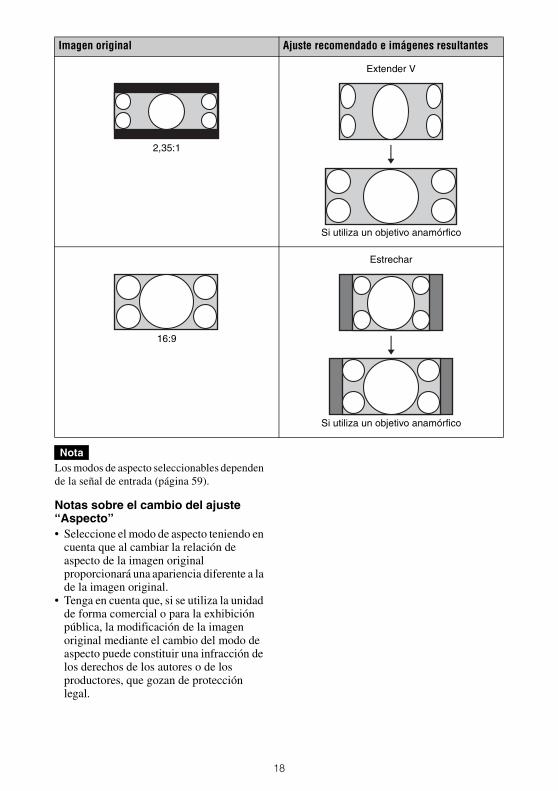
Imagen original Ajuste recomendado e imágenes resultantes
2,35:1
Extender V
Si utiliza un objetivo anamórfico
16:9
Estrechar
Si utiliza un objetivo anamórfico
Nota
18
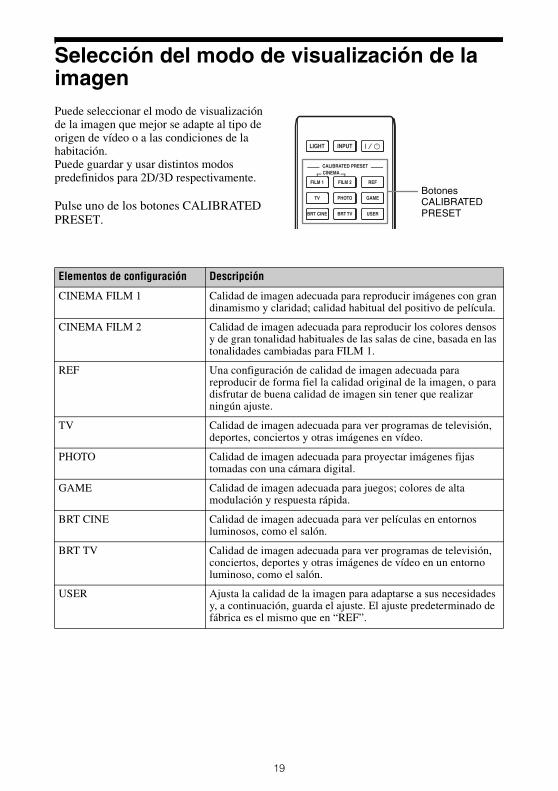
Selección del modo de visualización de la imagenPuede seleccionar el modo de visualización de la imagen que mejor se adapte al tipo de origen de vídeo o a las condiciones de la habitación.Puede guardar y usar distintos modos predefinidos para 2D/3D respectivamente.
Pulse uno de los botones CALIBRATED PRESET.
Botones CALIBRATED PRESET
Elementos de configuración Descripción
CINEMA FILM 1 Calidad de imagen adecuada para reproducir imágenes con gran dinamismo y claridad; calidad habitual del positivo de película.
CINEMA FILM 2 Calidad de imagen adecuada para reproducir los colores densos y de gran tonalidad habituales de las salas de cine, basada en las tonalidades cambiadas para FILM 1.
REF Una configuración de calidad de imagen adecuada para reproducir de forma fiel la calidad original de la imagen, o para disfrutar de buena calidad de imagen sin tener que realizar ningún ajuste.
TV Calidad de imagen adecuada para ver programas de televisión, deportes, conciertos y otras imágenes en vídeo.
PHOTO Calidad de imagen adecuada para proyectar imágenes fijas tomadas con una cámara digital.
GAME Calidad de imagen adecuada para juegos; colores de alta modulación y respuesta rápida.
BRT CINE Calidad de imagen adecuada para ver películas en entornos luminosos, como el salón.
BRT TV Calidad de imagen adecuada para ver programas de televisión, conciertos, deportes y otras imágenes de vídeo en un entorno luminoso, como el salón.
USER Ajusta la calidad de la imagen para adaptarse a sus necesidades y, a continuación, guarda el ajuste. El ajuste predeterminado de fábrica es el mismo que en “REF”.
19
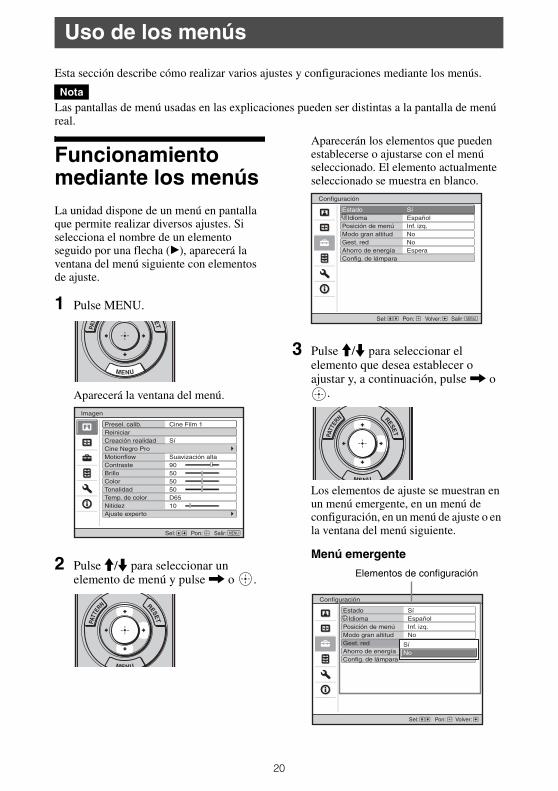
Esta sección describe cómo realizar varios ajustes y configuraciones mediante los menús.
Las pantallas de menú usadas en las explicaciones pueden ser distintas a la pantalla de menú real.
Funcionamiento mediante los menús La unidad dispone de un menú en pantalla que permite realizar diversos ajustes. Si selecciona el nombre de un elemento seguido por una flecha (B), aparecerá la ventana del menú siguiente con elementos de ajuste.
1 Pulse MENU.
Aparecerá la ventana del menú.
2 Pulse M/m para seleccionar un elemento de menú y pulse , o .
Aparecerán los elementos que pueden establecerse o ajustarse con el menú seleccionado. El elemento actualmente seleccionado se muestra en blanco.
3 Pulse M/m para seleccionar el elemento que desea establecer o ajustar y, a continuación, pulse , o
.
Los elementos de ajuste se muestran en un menú emergente, en un menú de configuración, en un menú de ajuste o en la ventana del menú siguiente.
Menú emergente
Uso de los menús
Nota
Elementos de configuración
20
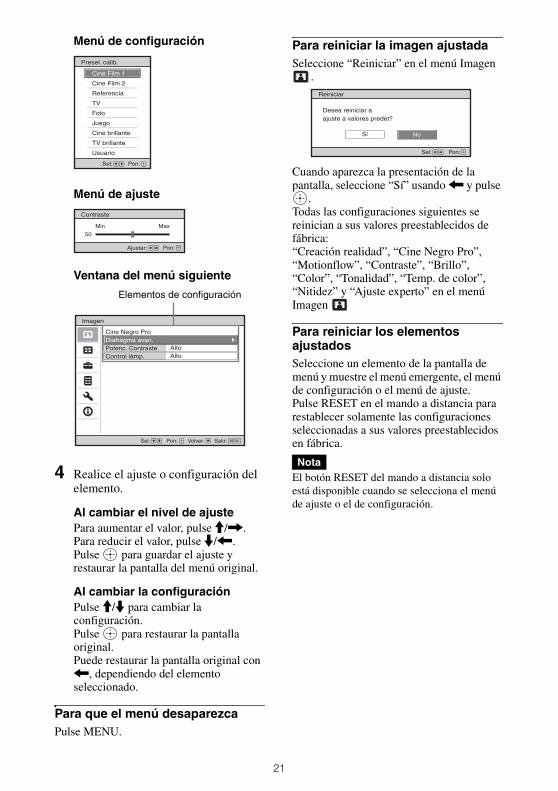
Menú de configuración
Menú de ajuste
Ventana del menú siguiente
4 Realice el ajuste o configuración del elemento.
Al cambiar el nivel de ajustePara aumentar el valor, pulse M/,.Para reducir el valor, pulse m/<.Pulse para guardar el ajuste y restaurar la pantalla del menú original.
Al cambiar la configuraciónPulse M/m para cambiar la configuración.Pulse para restaurar la pantalla original.Puede restaurar la pantalla original con <, dependiendo del elemento seleccionado.
Para que el menú desaparezcaPulse MENU.
Para reiniciar la imagen ajustadaSeleccione “Reiniciar” en el menú Imagen
.
Cuando aparezca la presentación de la pantalla, seleccione “Sí” usando < y pulse
.Todas las configuraciones siguientes se reinician a sus valores preestablecidos de fábrica:“Creación realidad”, “Cine Negro Pro”, “Motionflow”, “Contraste”, “Brillo”, “Color”, “Tonalidad”, “Temp. de color”, “Nitidez” y “Ajuste experto” en el menú Imagen
Para reiniciar los elementos ajustadosSeleccione un elemento de la pantalla de menú y muestre el menú emergente, el menú de configuración o el menú de ajuste.Pulse RESET en el mando a distancia para restablecer solamente las configuraciones seleccionadas a sus valores preestablecidos en fábrica.
El botón RESET del mando a distancia solo está disponible cuando se selecciona el menú de ajuste o el de configuración.
Elementos de configuración
Nota
Reiniciar
Desea reiniciar aajuste a valores predet?
Sel: Pon:
Sí No
21
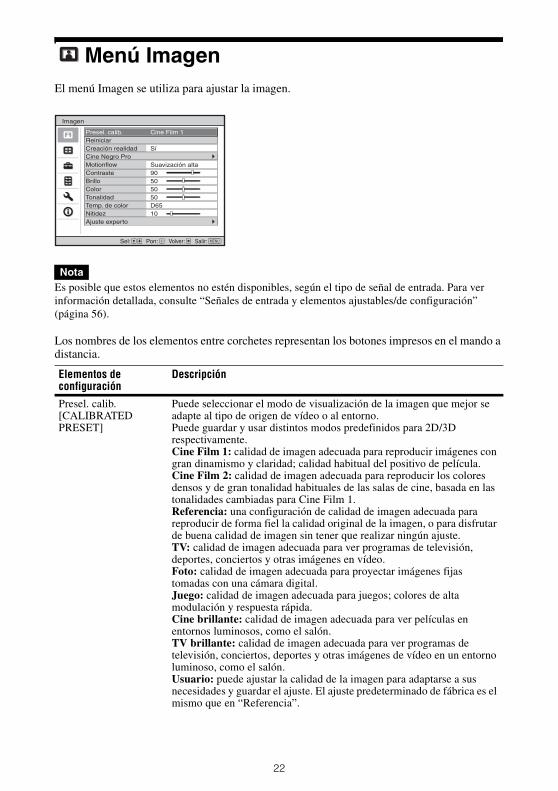
Menú ImagenEl menú Imagen se utiliza para ajustar la imagen.
Es posible que estos elementos no estén disponibles, según el tipo de señal de entrada. Para ver información detallada, consulte “Señales de entrada y elementos ajustables/de configuración” (página 56).
Los nombres de los elementos entre corchetes representan los botones impresos en el mando a distancia.
Nota
Elementos de configuración
Descripción
Presel. calib. [CALIBRATED PRESET]
Puede seleccionar el modo de visualización de la imagen que mejor se adapte al tipo de origen de vídeo o al entorno.Puede guardar y usar distintos modos predefinidos para 2D/3D respectivamente.Cine Film 1: calidad de imagen adecuada para reproducir imágenes con gran dinamismo y claridad; calidad habitual del positivo de película.Cine Film 2: calidad de imagen adecuada para reproducir los colores densos y de gran tonalidad habituales de las salas de cine, basada en las tonalidades cambiadas para Cine Film 1.Referencia: una configuración de calidad de imagen adecuada para reproducir de forma fiel la calidad original de la imagen, o para disfrutar de buena calidad de imagen sin tener que realizar ningún ajuste.TV: calidad de imagen adecuada para ver programas de televisión, deportes, conciertos y otras imágenes en vídeo.Foto: calidad de imagen adecuada para proyectar imágenes fijas tomadas con una cámara digital.Juego: calidad de imagen adecuada para juegos; colores de alta modulación y respuesta rápida.Cine brillante: calidad de imagen adecuada para ver películas en entornos luminosos, como el salón.TV brillante: calidad de imagen adecuada para ver programas de televisión, conciertos, deportes y otras imágenes de vídeo en un entorno luminoso, como el salón.Usuario: puede ajustar la calidad de la imagen para adaptarse a sus necesidades y guardar el ajuste. El ajuste predeterminado de fábrica es el mismo que en “Referencia”.
22
SugerenciaCualquier ajuste realizado en la configuración de calidad de imagen se guarda para cada entrada.
Reiniciar Restablece todos los ajustes del modo Presel. calib. seleccionado a los valores predeterminados (página 21).
SugerenciaEl restablecimiento no afecta a los ajustes guardados en las opciones de “Temp. de color”.
Creación realidad [REALITY CREATION]
Ajusta el procesamiento del detalle y del ruido de las imágenes. (Función de superresolución)Sí: ajusta la configuración de “Creación realidad”.
Resolución: si se aumenta este valor, la textura y el detalle de la imagen se hacen más nítidos.Filtración ruido: si se aumenta este valor, el ruido (dureza de la imagen) se hace menos evidente.Test: On/Off: cambia “Sí” y “No” a una determinada frecuencia para comprobar el efecto de “Creación realidad”.
SugerenciaLa posición de pantalla de estado durante la prueba funciona de forma conjunta con el ajuste “Posición de menú” (página 30).
No: no se aplica la función “Creación realidad”.
Cine Negro Pro
Diafragma avan. Control dinámico: ajusta el intervalo de movimiento del diafragma (apertura).
Completo: optimiza automáticamente el diafragma (apertura) y el procesamiento de señales según el nivel de brillo de la fuente de entrada. Esto produce como resultado una imagen luminosa y con gran contraste.Limitado: ofrece un movimiento más lento del diafragma (apertura) y menos brillo que “Completo”, lo que permite que la imagen se visualice correctamente en entornos oscuros.No: no se aplica la función “Control dinámico”.
Brillo: cuanto mayor sea el ajuste, mayor será el brillo de la imagen. Si el ajuste es menor, la imagen será más oscura.
SugerenciaTras ajustar la opción “Brillo”, establezca la opción “Control dinámico” en función del brillo de la habitación y la imagen.
Potenc. Contraste [CONTRAST ENHANCER]
Corrige automáticamente el nivel de las partes brillantes y oscuras para optimizar el contraste en función de una escena.Aumenta la nitidez de la imagen y aporta dinamismo a la imagen.Alto/Medio/Bajo: puede ajustar el potenciador del contraste.No: no se aplica la función Potenc. Contraste.
Control lámp. Cambia la salida de la lámpara.Alto: aumenta el brillo y proyecta imágenes más brillantes.Bajo: reduce el brillo y realza el negro mediante la minimización del brillo.
SugerenciaSi ajusta la opción en “Bajo” el ruido del ventilador se reduce y también el consumo de energía, por lo que la lámpara dura más.
Elementos de configuración
Descripción
23
Motionflow [MOTIONFLOW]
Impulso: reproduce la calidad de la imagen original. Ofrece una imagen de cine, que puede centellear. Combinación: reduce el desenfoque de movimiento a la vez que conserva el brillo para contenido de imágenes a alta velocidad. Suavización alta: ofrece un movimiento de la imagen más suave; especialmente efectivo para el contenido de películas. Suavización baja: ofrece un movimiento de la imagen más suave para uso estándar. True Cinema: las imágenes, tales como una película creada en 24 fotogramas por segundo, se reproducen a la frecuencia de imagen original. No: no se aplica la función “Motionflow”.
Consejos• Seleccione “No” si las opciones seleccionadas “Suavización alta”,
“Suavización baja”, “Impulso”, “Combinación” o “True Cinema” originan una imagen distorsionada.
• En función del contenido de la imagen, es posible que no visualice el efecto, aunque haya cambiado los ajustes.
Contraste [CONTRAST]
Ajusta el contraste.Los valores más altos indican un mayor contraste en las imágenes, mientras que los valores más bajos indican un contraste menor.Puede hacer ajustes pulsando CONTRAST +/– en el mando a distancia.
Brillo[BRIGHTNESS]
Ajusta el brillo de la imagen.Cuanto mayor sea el ajuste, mayor será el brillo de la imagen. Si el ajuste es menor, la imagen será más oscura.Puede hacer ajustes pulsando BRIGHTNESS +/– en el mando a distancia.
Color Ajusta la densidad de color.Cuanto mayor sea el ajuste, mayor será la intensidad. Si el ajuste es menor, la intensidad será menor.
Tonalidad Ajusta el tono del color.Cuanto mayor sea el ajuste, la imagen adquirirá un tono más verdoso. Cuanto menor sea el ajuste, la imagen adquirirá un tono más rojo.
Temp. de color[COLOR TEMP]
Ajusta la temperatura del color.D93: equivalente a 9.300 K de temperatura de color, normalmente usado en TV. El color blanco adquiere un tono azulado.D75: equivalente a 7.500 K de temperatura de color, usado como iluminador estándar auxiliar. Aporta un tono neutro entre “D93” y “D65”.D65: equivalente a 6.500 K de temperatura color, usado como iluminador estándar. El color blanco adquiere un tono rojizo.D55: equivalente a 5.500 K de temperatura de color, usado como iluminador estándar auxiliar. El color blanco adquiere un tono incluso más rojizo.Personal 1 a 5: le permite ajustar, establecer y almacenar la temperatura de color favorita.La configuración predeterminada de fábrica es la siguiente.
Personal 1: igual que la configuración de temperatura de color “D93”.Personal 2: igual que la configuración de temperatura de color “D75”.Personal 3: igual que la configuración de temperatura de color “D65”.Personal 4: igual que la configuración de temperatura de color “D55”.Personal 5: configuración que da prioridad al brillo.
Elementos de configuración
Descripción
24
SugerenciaPuede asignar la temperatura de color que prefiera a cada opción.
Nitidez[SHARPNESS]
Define el contorno de la imagen, o reduce el ruido.Cuanto mayor sea el ajuste, mayor será la nitidez de la imagen. Si el ajuste es menor, la imagen aparecerá con mayor suavidad, reduciéndose así el ruido.Puede hacer ajustes pulsando SHARPNESS +/– en el mando a distancia.
Ajuste experto
NR (Reducción de ruido)
Reduce las irregularidades o el ruido de la imagen.Automático: detecta automáticamente el nivel de ruido para reducir las irregularidades o el ruido de la imagen.Alto/Medio/Bajo: seleccione un ajuste en función de las irregularidades o el ruido de la fuente de la señal de entrada.No: no se aplica la función NR (reducción de ruido).
SugerenciaEl nivel de ruido no puede detectarse con precisión con la opción “Automático” en función de la fuente de la señal de entrada. Si la imagen es inaceptable con la opción “Automático”, seleccione un ajuste de entre las opciones “Alto”, “Medio”, “Bajo” o “No”.
MPEG NR (Reducción de ruido MPEG)
Reduce el ruido de bloque y el ruido de mosquito, en particular en las señales digitales.Automático: detecta automáticamente el nivel de ruido para reducir el ruido de bloque y el ruido de mosquito de la imagen.Alto/Medio/Bajo: seleccione un ajuste en función del ruido de bloque y el ruido de mosquito de la fuente de la señal de entrada.No: no se aplica la función MPEG NR (reducción de ruido MPEG).
SugerenciaEl nivel de ruido no puede detectarse con precisión con la opción “Automático” en función de la fuente de la señal de entrada. Si la imagen es inaceptable con la opción “Automático”, seleccione un ajuste de entre las opciones “Alto”, “Medio”, “Bajo” o “No”.
Gradación suave Suaviza la gradación de las partes planas de las imágenes.Alto/Medio/Bajo: puede ajustar el efecto de gradación suave.No: no se aplica la función Gradación suave.
Modo Film Configure la reproducción de acuerdo con la fuente de película que haya seleccionado.Automático: adecuado para reproducir el movimiento original de la imagen. Normalmente se ajusta en “Automático”.No: reproduce la imagen en formato progresivo sin detectar automáticamente las señales de vídeo.
Elementos de configuración
Descripción
25
Corr. Gamma[GAMMA CORRECTION]
Ajusta las características de respuesta del tono de la imagen.Seleccione el tono favorito entre 10 opciones.1.8: Brillante Produce una imagen más brillante en general.2.02.12.22.42.6: Oscura Produce una imagen más oscura en general.Gamma 7: simula la curva de gamma de la película.Gamma 8: aumenta la nitidez de las imágenes. Seleccione esta opción cuando visualice las imágenes en un entorno luminoso, como por ejemplo, el salón.Gamma 9: produce una imagen más brillante que la opción Gamma 8.Gamma 10: aumenta la nitidez de las imágenes. Seleccione esta opción cuando visualice los programas de TV, etc., en un entorno luminoso, como por ejemplo, el salón.No: no se aplica la función “Corr. Gamma”.
Corr. color[COLOR CORRECTION]
Sí: ajusta la Tonalidad, Saturación o Brillo de los colores seleccionados.Repita los pasos 1 y 2 descritos a continuación para especificar el color objetivo.1 Pulse M/m para seleccionar la opción “Selección color” y, a
continuación, pulse </, para seleccionar el color que desea ajustar entre las opciones “Rojo”, “Amarillo”, “Verde”, “Cian”, “Azul” y “Magenta”.
2 Pulse M/m para seleccionar las opciones “Tonalidad”, “Saturación” o “Brillo” y, a continuación, ajuste estas opciones para adaptarlas a sus necesidades con </, a la vez que visualiza la imagen proyectada.
No: no se aplica el efecto “Corr. color”.
Reforzar blanco Realza los blancos más vívidos.Alto/Bajo: puede ajustar el efecto “Reforzar blanco”.No: no se aplica el efecto “Reforzar blanco”.
x.v.Color Establezca este elemento cuando conecte la unidad a equipos compatibles con x.v.Color y reproduzca señales de vídeo x.v.Color.Sí: puede reproducir señales de vídeo x.v.Color.No: no se aplica la función “x.v.Color”.Para obtener información detallada sobre x.v.Color, consulte “Acerca de x.v.Color” (página 46).
SugerenciaSi ajusta x.v.Color en “Sí” desactivará el ajuste de gamma.
Elementos de configuración
Descripción
26
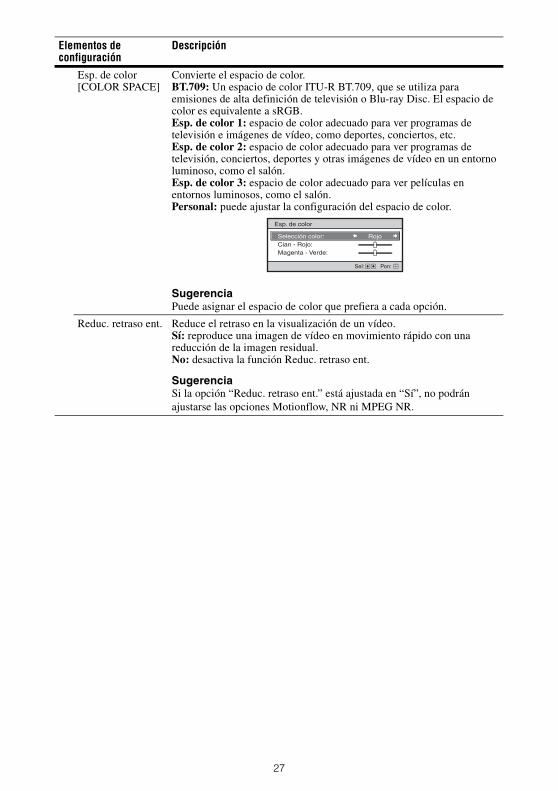
Esp. de color[COLOR SPACE]
Convierte el espacio de color.BT.709: Un espacio de color ITU-R BT.709, que se utiliza para emisiones de alta definición de televisión o Blu-ray Disc. El espacio de color es equivalente a sRGB.Esp. de color 1: espacio de color adecuado para ver programas de televisión e imágenes de vídeo, como deportes, conciertos, etc.Esp. de color 2: espacio de color adecuado para ver programas de televisión, conciertos, deportes y otras imágenes de vídeo en un entorno luminoso, como el salón.Esp. de color 3: espacio de color adecuado para ver películas en entornos luminosos, como el salón.Personal: puede ajustar la configuración del espacio de color.
SugerenciaPuede asignar el espacio de color que prefiera a cada opción.
Reduc. retraso ent. Reduce el retraso en la visualización de un vídeo.Sí: reproduce una imagen de vídeo en movimiento rápido con una reducción de la imagen residual.No: desactiva la función Reduc. retraso ent.
SugerenciaSi la opción “Reduc. retraso ent.” está ajustada en “Sí”, no podrán ajustarse las opciones Motionflow, NR ni MPEG NR.
Elementos de configuración
Descripción
27
Menú PantallaPuede definir el tamaño de la imagen, el modo de aspecto, etc.
Es posible que estos elementos no estén disponibles, según el tipo de señal de entrada. Para ver información detallada, consulte “Señales de entrada y elementos ajustables/de configuración” (página 56).
Los nombres de los elementos entre corchetes representan los botones impresos en el mando a distancia.
Nota
Elementos de configuración
Descripción
Aspecto[ASPECT]
Puede establecer la relación de aspecto de las imágenes que se mostrarán para la señal de entrada actual (página 17). Solo puede establecer la función cuando se reciba la señal de un vídeo.Normal: la entrada de vídeo se visualiza con su relación de aspecto original. La imagen se amplía para rellenar la pantalla. Este modo está indicado para ver vídeo con relación de aspecto 1,78:1 (16:9) y 1,33:1 (4:3).Extender V: es el modo idóneo para uso de pantallas 2,35:1 para ver vídeo 2,35:1 con objetivos anamórficos disponibles en tiendas.Si selecciona “Extender V” en “Selección disparador” en el menú Instalación , se emitirá una señal de 12 V desde el conector TRIGGER (página 34).Estrechar: con este ajuste, el vídeo 1,78:1 (16:9) y 1,33:1 (4:3) se visualizará con la relación de aspecto correcta si se utiliza un objetivo anamórfico disponible en tiendas.Extender: visualiza vídeo estrechado a una relación de aspecto 1,33:1 (4:3) como 1,78:1 (16:9).
Consejos• Los modos de aspecto seleccionables dependen de la señal de entrada
(página 59).• No se puede seleccionar el aspecto para una señal de entrada de un
ordenador (páginas 54, 55, 59).
28
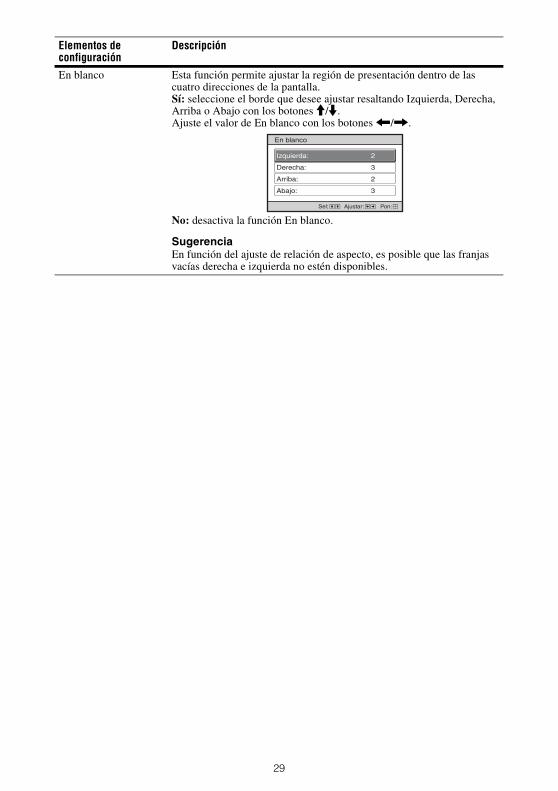
En blanco Esta función permite ajustar la región de presentación dentro de las cuatro direcciones de la pantalla.Sí: seleccione el borde que desee ajustar resaltando Izquierda, Derecha, Arriba o Abajo con los botones M/m.Ajuste el valor de En blanco con los botones </,.
No: desactiva la función En blanco.
SugerenciaEn función del ajuste de relación de aspecto, es posible que las franjas vacías derecha e izquierda no estén disponibles.
Elementos de configuración
Descripción
29
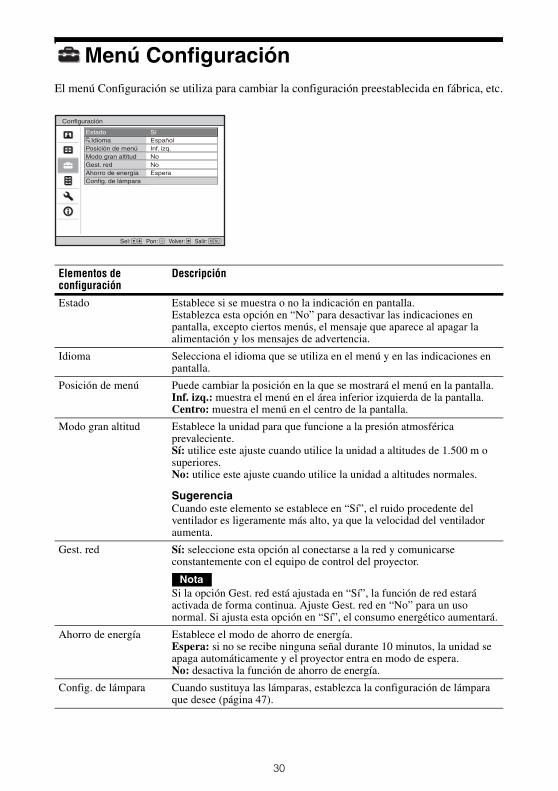
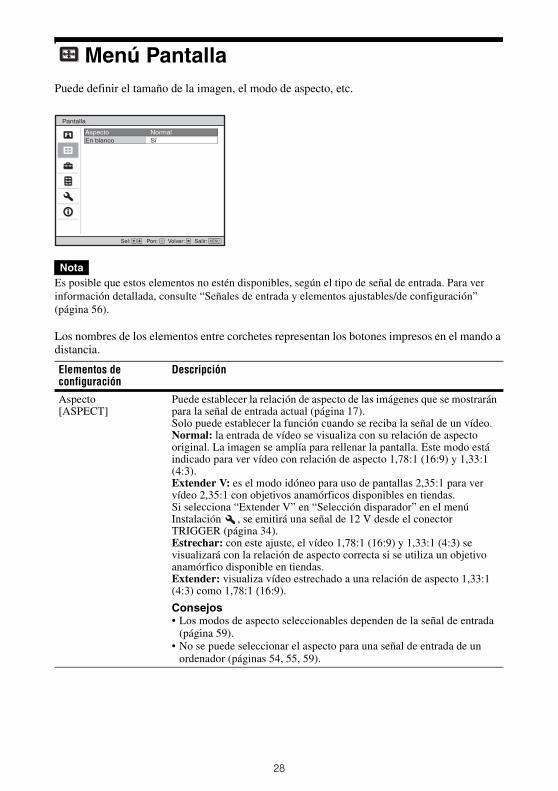
Menú ConfiguraciónEl menú Configuración se utiliza para cambiar la configuración preestablecida en fábrica, etc.
Elementos de configuración
Descripción
Estado Establece si se muestra o no la indicación en pantalla.Establezca esta opción en “No” para desactivar las indicaciones en pantalla, excepto ciertos menús, el mensaje que aparece al apagar la alimentación y los mensajes de advertencia.
Idioma Selecciona el idioma que se utiliza en el menú y en las indicaciones en pantalla.
Posición de menú Puede cambiar la posición en la que se mostrará el menú en la pantalla.Inf. izq.: muestra el menú en el área inferior izquierda de la pantalla.Centro: muestra el menú en el centro de la pantalla.
Modo gran altitud Establece la unidad para que funcione a la presión atmosférica prevaleciente.Sí: utilice este ajuste cuando utilice la unidad a altitudes de 1.500 m o superiores.No: utilice este ajuste cuando utilice la unidad a altitudes normales.
SugerenciaCuando este elemento se establece en “Sí”, el ruido procedente del ventilador es ligeramente más alto, ya que la velocidad del ventilador aumenta.
Gest. red Sí: seleccione esta opción al conectarse a la red y comunicarse constantemente con el equipo de control del proyector.
Si la opción Gest. red está ajustada en “Sí”, la función de red estará activada de forma continua. Ajuste Gest. red en “No” para un uso normal. Si ajusta esta opción en “Sí”, el consumo energético aumentará.
Ahorro de energía Establece el modo de ahorro de energía.Espera: si no se recibe ninguna señal durante 10 minutos, la unidad se apaga automáticamente y el proyector entra en modo de espera.No: desactiva la función de ahorro de energía.
Config. de lámpara Cuando sustituya las lámparas, establezca la configuración de lámpara que desee (página 47).
Nota
30
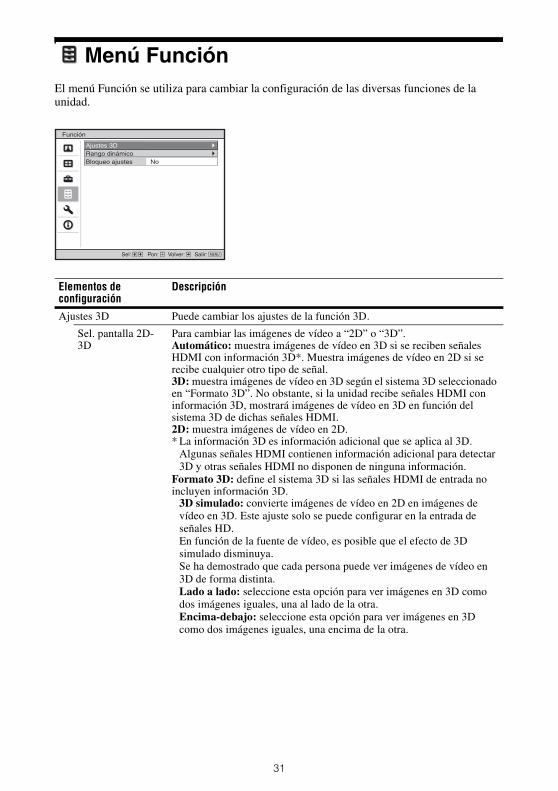
Menú FunciónEl menú Función se utiliza para cambiar la configuración de las diversas funciones de la unidad.
Elementos de configuración
Descripción
Ajustes 3D Puede cambiar los ajustes de la función 3D.
Sel. pantalla 2D-3D
Para cambiar las imágenes de vídeo a “2D” o “3D”.Automático: muestra imágenes de vídeo en 3D si se reciben señales HDMI con información 3D*. Muestra imágenes de vídeo en 2D si se recibe cualquier otro tipo de señal.3D: muestra imágenes de vídeo en 3D según el sistema 3D seleccionado en “Formato 3D”. No obstante, si la unidad recibe señales HDMI con información 3D, mostrará imágenes de vídeo en 3D en función del sistema 3D de dichas señales HDMI.2D: muestra imágenes de vídeo en 2D.* La información 3D es información adicional que se aplica al 3D.
Algunas señales HDMI contienen información adicional para detectar 3D y otras señales HDMI no disponen de ninguna información.
Formato 3D: define el sistema 3D si las señales HDMI de entrada no incluyen información 3D.
3D simulado: convierte imágenes de vídeo en 2D en imágenes de vídeo en 3D. Este ajuste solo se puede configurar en la entrada de señales HD.En función de la fuente de vídeo, es posible que el efecto de 3D simulado disminuya.Se ha demostrado que cada persona puede ver imágenes de vídeo en 3D de forma distinta.Lado a lado: seleccione esta opción para ver imágenes en 3D como dos imágenes iguales, una al lado de la otra.Encima-debajo: seleccione esta opción para ver imágenes en 3D como dos imágenes iguales, una encima de la otra.
31

Sugerencias• “Sel. pantalla 2D-3D” no puede ajustarse en “3D” para algunas fuentes
de vídeo. Para obtener información sobre las señales 3D disponibles, consulte “Señales 3D compatibles” (página 57).
• La función 3D simulado puede tener un efecto limitado en función del tamaño de la pantalla (se recomiendan pantallas de entre 100 y 120 pulg.) y del origen de vídeo.
• La pantalla del menú aparece con un halo al visualizar imágenes de vídeo en 3D y se ve mejor con las gafas 3D.
Brillo gafas 3D Sirve para ajustar el brillo de la imagen cuando se ven imágenes de vídeo en 3D. Puede seleccionar que el brillo sea “Alto”, “Medio” o “Bajo”.
Ajuste prof. 3D Sirve para ajustar la profundidad de las imágenes de vídeo en 3D en la pantalla. Este ajuste se puede llevar a cabo solo si se selecciona un Formato 3D distinto de “3D simulado”.
Se recomienda ajustar “Ajuste prof. 3D” en “0”. Es posible que se haga más difícil percibir las imágenes de vídeo en 3D en función del “Ajuste prof. 3D”.
Efecto 3D simulado
Sirve para ajustar el efecto 3D cuando se convierte contenido en 2D en imágenes de vídeo en 3D. Se puede seleccionar el efecto entre “Alto”, “Medio” y “Bajo”.
SugerenciaSe ha demostrado que cada persona puede ver las imágenes de vídeo en 3D convertidas por la función 3D simulado de forma distinta.
Rango dinámico Ajusta el nivel de entrada de vídeo en los conectores HDMI 1 y HDMI 2.Automático: ajusta el nivel de entrada de vídeo automáticamente.Limitado: el nivel de entrada de vídeo se ajusta para señales de 16-235.Completo: el nivel de entrada de vídeo se ajusta para señales de 0-255.
Si el ajuste de salida de vídeo del dispositivo HDMI conectado no se establece correctamente, las partes brillantes y oscuras del vídeo pueden aparecer demasiado brillantes o demasiado oscuras.
Bloqueo ajustes Bloquea la configuración de los elementos de menú para evitar el error de funcionamiento (página 33).No: cancela el Bloqueo ajustes.Nivel A: los elementos del Grupo 1 (se muestran a continuación) no se muestran en el menú ni están disponibles.Nivel B: los elementos del Grupo 1 y Grupo 2 (se muestran a continuación) no se muestran en los menús ni están disponibles.
Elementos de configuración
Descripción
Profundidad
NormalFrente Profundidad
Nota
32
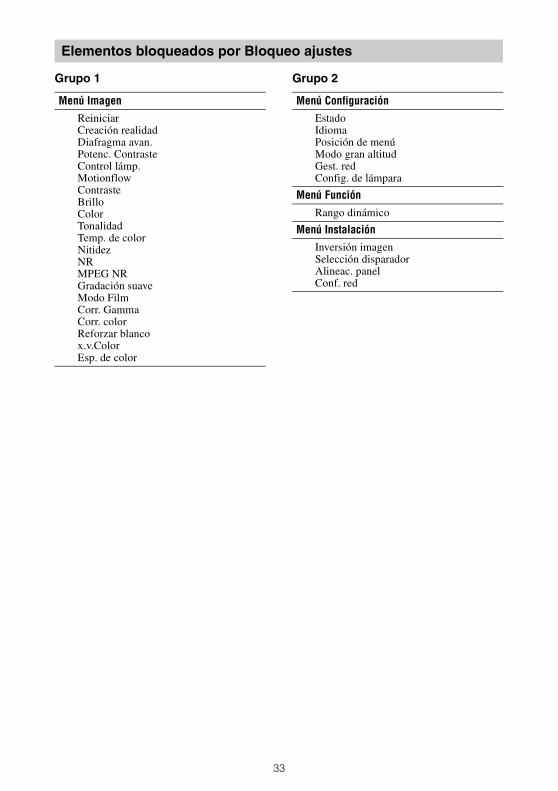
Grupo 1 Grupo 2
Elementos bloqueados por Bloqueo ajustes
Menú ImagenReiniciarCreación realidadDiafragma avan.Potenc. ContrasteControl lámp.MotionflowContrasteBrilloColorTonalidadTemp. de colorNitidezNRMPEG NRGradación suaveModo FilmCorr. GammaCorr. colorReforzar blancox.v.ColorEsp. de color
Menú ConfiguraciónEstadoIdiomaPosición de menúModo gran altitudGest. redConfig. de lámpara
Menú Función
Rango dinámico
Menú InstalaciónInversión imagenSelección disparadorAlineac. panelConf. red
33
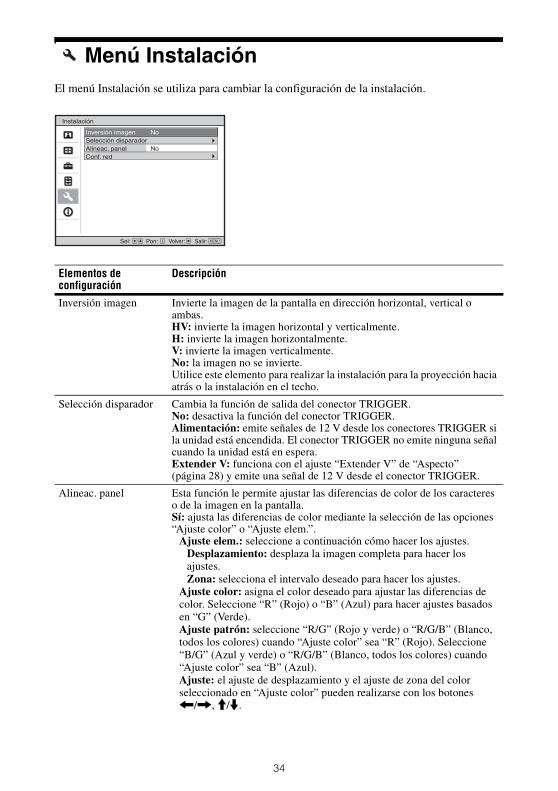
Menú InstalaciónEl menú Instalación se utiliza para cambiar la configuración de la instalación.
Elementos de configuración
Descripción
Inversión imagen Invierte la imagen de la pantalla en dirección horizontal, vertical o ambas.HV: invierte la imagen horizontal y verticalmente.H: invierte la imagen horizontalmente. V: invierte la imagen verticalmente.No: la imagen no se invierte.Utilice este elemento para realizar la instalación para la proyección hacia atrás o la instalación en el techo.
Selección disparador Cambia la función de salida del conector TRIGGER.No: desactiva la función del conector TRIGGER.Alimentación: emite señales de 12 V desde los conectores TRIGGER si la unidad está encendida. El conector TRIGGER no emite ninguna señal cuando la unidad está en espera.Extender V: funciona con el ajuste “Extender V” de “Aspecto” (página 28) y emite una señal de 12 V desde el conector TRIGGER.
Alineac. panel Esta función le permite ajustar las diferencias de color de los caracteres o de la imagen en la pantalla.Sí: ajusta las diferencias de color mediante la selección de las opciones “Ajuste color” o “Ajuste elem.”.
Ajuste elem.: seleccione a continuación cómo hacer los ajustes.Desplazamiento: desplaza la imagen completa para hacer los ajustes.Zona: selecciona el intervalo deseado para hacer los ajustes.
Ajuste color: asigna el color deseado para ajustar las diferencias de color. Seleccione “R” (Rojo) o “B” (Azul) para hacer ajustes basados en “G” (Verde).Ajuste patrón: seleccione “R/G” (Rojo y verde) o “R/G/B” (Blanco, todos los colores) cuando “Ajuste color” sea “R” (Rojo). Seleccione “B/G” (Azul y verde) o “R/G/B” (Blanco, todos los colores) cuando “Ajuste color” sea “B” (Azul).Ajuste: el ajuste de desplazamiento y el ajuste de zona del color seleccionado en “Ajuste color” pueden realizarse con los botones </,, M/m.
34
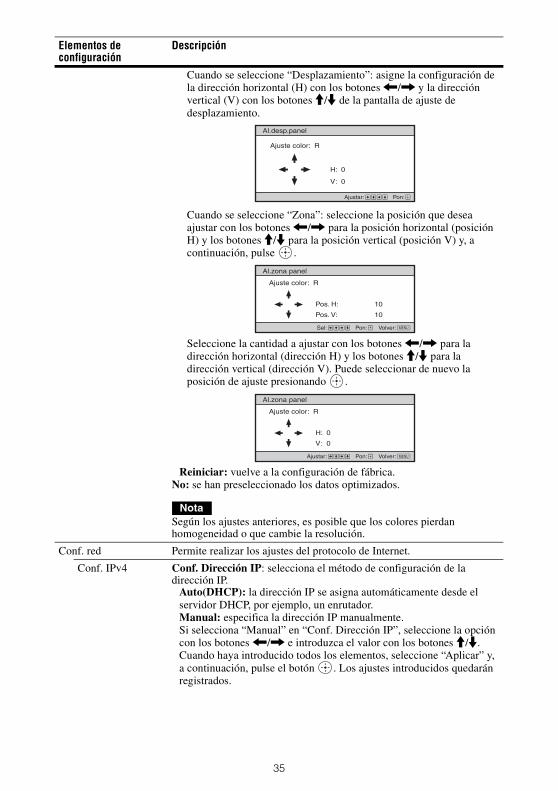
Cuando se seleccione “Desplazamiento”: asigne la configuración de la dirección horizontal (H) con los botones </, y la dirección vertical (V) con los botones M/m de la pantalla de ajuste de desplazamiento.
Cuando se seleccione “Zona”: seleccione la posición que desea ajustar con los botones </, para la posición horizontal (posición H) y los botones M/m para la posición vertical (posición V) y, a continuación, pulse .
Seleccione la cantidad a ajustar con los botones </, para la dirección horizontal (dirección H) y los botones M/m para la dirección vertical (dirección V). Puede seleccionar de nuevo la posición de ajuste presionando .
Reiniciar: vuelve a la configuración de fábrica.No: se han preseleccionado los datos optimizados.
Según los ajustes anteriores, es posible que los colores pierdan homogeneidad o que cambie la resolución.
Conf. red Permite realizar los ajustes del protocolo de Internet.
Conf. IPv4 Conf. Dirección IP: selecciona el método de configuración de la dirección IP.
Auto(DHCP): la dirección IP se asigna automáticamente desde el servidor DHCP, por ejemplo, un enrutador.Manual: especifica la dirección IP manualmente.Si selecciona “Manual” en “Conf. Dirección IP”, seleccione la opción con los botones </, e introduzca el valor con los botones M/m. Cuando haya introducido todos los elementos, seleccione “Aplicar” y, a continuación, pulse el botón . Los ajustes introducidos quedarán registrados.
Elementos de configuración
Descripción
Nota
35
Dirección IP: ajusta la dirección IP de la unidad.Máscara subred: ajusta la máscara de subred de la unidad.Gateway pred.: ajusta la puerta de enlace predeterminada de la unidad.Dirección MAC: muestra la dirección MAC de la unidad. No se puede modificar.Aplicar: activa la dirección IP configurada manualmente.
Información IPv6 Muestra la información de IPv6.Si configura la dirección IP de IPv6, configúrela en un navegador web (página 38).
Elementos de configuración
Descripción
36

Menú InformaciónEl menú Información muestra el nombre de modelo, el número de serie, el tipo de señal de entrada, la versión de software y las horas de uso acumuladas de la lámpara.
No es posible ajustar ni modificar las indicaciones de la lista anterior.
Esta unidad dispone de datos de imagen predeterminados para ajustar correctamente los datos preestablecidos para señales de entrada en función de la señales mostradas en “Señales predefinidas” (página 54) (la memoria preestablecida). Al introducirse una señal predefinida, la unidad detecta automáticamente el tipo de señal y recupera los datos correspondientes a la misma de la memoria preestablecida con el fin de ajustarla y obtener una imagen óptima. El tipo de señal se muestra en el menú Información .
Según la señal de entrada del ordenador, es posible que ciertas partes de la pantalla no se visualicen correctamente o estén ocultas.
Elementos Descripción
Nombre de modelo Muestra el nombre del modelo
Nº de Serie Muestra el número de serie.
Tipo de señal Muestra el tipo de señal de entrada. Si se reciben señales de entrada con información 3D, se muestra el tipo de las señales de entrada y el formato 3D.
Versión software Muestra la versión de software.
Contador lámpara Indica cuánto tiempo ha estado encendida la lámpara (uso total).
Nota
Acerca de la memoria preestablecida
Nota
Nombre de modelo
Nº de Serie
Versión software
Tipo de señal
37
La conexión a la red le permite utilizar las siguientes funciones:• Comprobación del estado actual de la
unidad a través de un navegador web.• Realización de la configuración de red
para la unidad.• Admite supervisión de la red y
protocolo de control (SDAP [Advertisement], SDCP [PJ Talk], DDDP [AMX], Crestron RoomView, Control4).
• Al conectar este proyector a una red, póngase en contacto con la persona que haya configurado la red. La red debe estar protegida.
• Al utilizar este proyector conectado a la red, acceda a la ventana de control desde un navegador web y modifique la limitación de acceso de los valores predeterminados de fábrica (página 40). Se recomienda cambiar la contraseña periódicamente.
• Cuando haya terminado con la configuración desde el navegador web, ciérrelo para salir de la sesión.
• Las pantallas de menú que se utilizan en la siguiente explicación pueden variar en función del modelo que utilice.
• Los navegadores web admitidos son Internet Explorer 8/9/10/11.
• Únicamente se admite el inglés como idioma.
• Si el navegador de su ordenador está establecido en [Usar servidor proxy] cuando accede a la unidad desde su ordenador, haga clic en la marca de verificación para establecer el acceso sin utilizar un servidor proxy.
• AMX DDDP no es compatible con IPv6.• Estas funciones de red están disponibles
cuando la unidad está encendida.
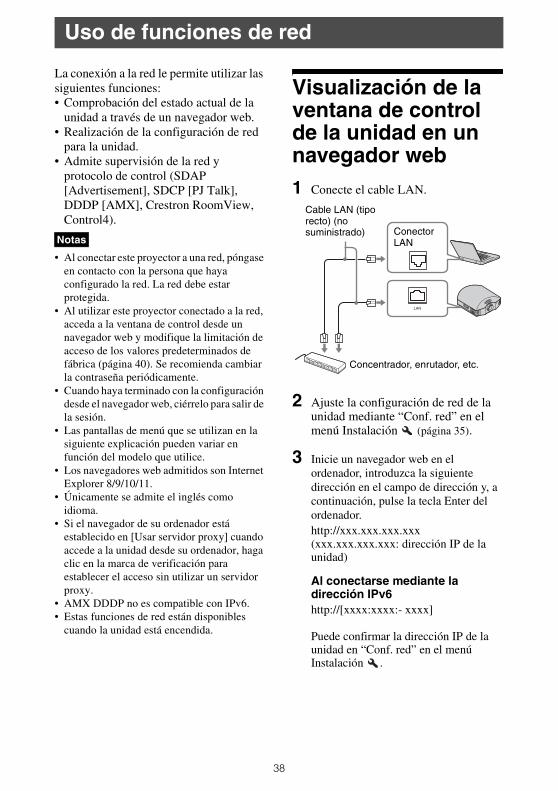
Visualización de la ventana de control de la unidad en un navegador web1 Conecte el cable LAN.
2 Ajuste la configuración de red de la unidad mediante “Conf. red” en el menú Instalación (página 35).
3 Inicie un navegador web en el ordenador, introduzca la siguiente dirección en el campo de dirección y, a continuación, pulse la tecla Enter del ordenador.http://xxx.xxx.xxx.xxx(xxx.xxx.xxx.xxx: dirección IP de la unidad)
Al conectarse mediante la dirección IPv6http://[xxxx:xxxx:- xxxx]
Puede confirmar la dirección IP de la unidad en “Conf. red” en el menú Instalación .
Uso de funciones de red
NotasConector LAN
Cable LAN (tipo recto) (no suministrado)
Concentrador, enrutador, etc.
38
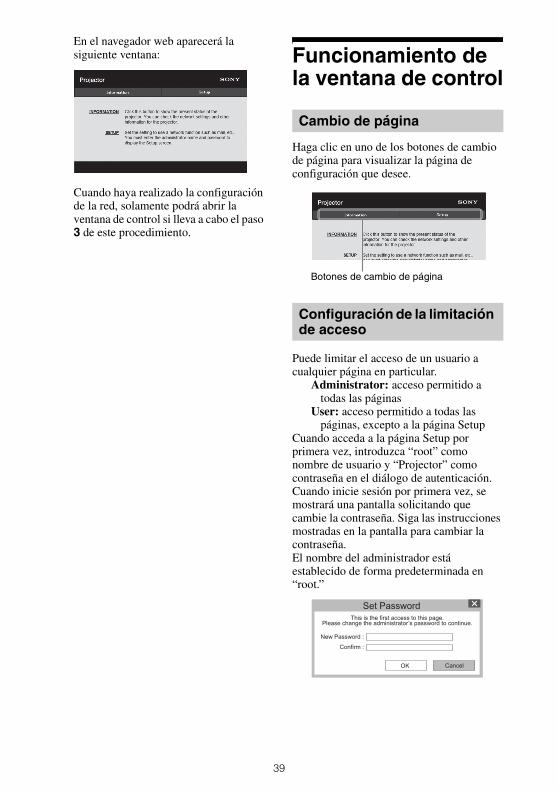
En el navegador web aparecerá la siguiente ventana:
Cuando haya realizado la configuración de la red, solamente podrá abrir la ventana de control si lleva a cabo el paso 3 de este procedimiento.
Funcionamiento de la ventana de control
Haga clic en uno de los botones de cambio de página para visualizar la página de configuración que desee.
Puede limitar el acceso de un usuario a cualquier página en particular.
Administrator: acceso permitido a todas las páginas
User: acceso permitido a todas las páginas, excepto a la página Setup
Cuando acceda a la página Setup por primera vez, introduzca “root” como nombre de usuario y “Projector” como contraseña en el diálogo de autenticación.Cuando inicie sesión por primera vez, se mostrará una pantalla solicitando que cambie la contraseña. Siga las instrucciones mostradas en la pantalla para cambiar la contraseña.El nombre del administrador está establecido de forma predeterminada en “root.”
Cambio de página
Configuración de la limitación de acceso
Botones de cambio de página
39
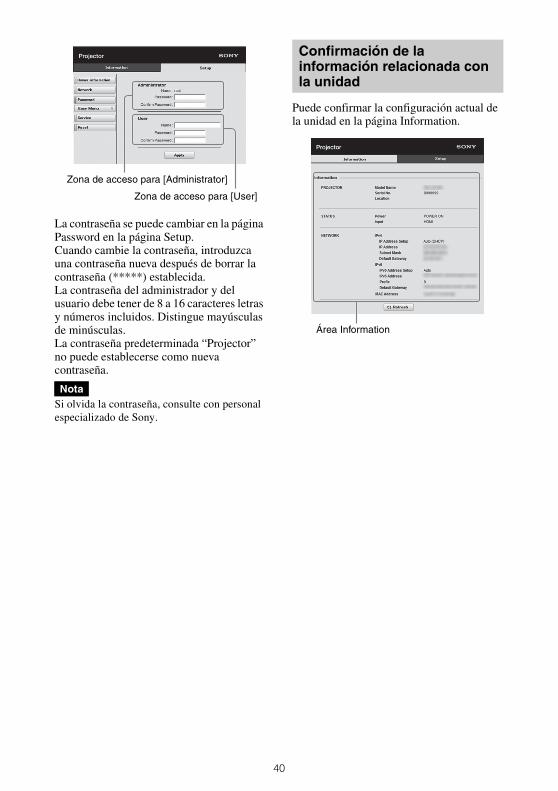
La contraseña se puede cambiar en la página Password en la página Setup.Cuando cambie la contraseña, introduzca una contraseña nueva después de borrar la contraseña (*****) establecida.La contraseña del administrador y del usuario debe tener de 8 a 16 caracteres letras y números incluidos. Distingue mayúsculas de minúsculas.La contraseña predeterminada “Projector” no puede establecerse como nueva contraseña.
Si olvida la contraseña, consulte con personal especializado de Sony.
Puede confirmar la configuración actual de la unidad en la página Information.
Nota
Zona de acceso para [Administrator]
Zona de acceso para [User]
Confirmación de la información relacionada con la unidad
Área Information
40

Solución de problemasSi la unidad parece no funcionar correctamente, intente diagnosticar y corregir el problema utilizando las siguientes instrucciones. Si el problema no se soluciona, consulte con personal especializado de Sony.
Alimentación
Imagen
Gestión de errores
Síntoma Causa y solución PáginaLa alimentación no se activa.
Es posible que la alimentación no se active si la apaga con el botón ?/1 (ON/STANDBY) y la vuelve a encender en un corto periodo de tiempo. Después de 1 minuto, encienda la alimentación.
–
Cierre firmemente la cubierta de la lámpara y, a continuación, apriete los tornillos.
49
Cierre el soporte del filtro con firmeza. 49
Compruebe los indicadores de advertencia. 44
La unidad se apaga de repente.
Compruebe que “Ahorro de energía” en el menú Configuración está ajustado en “Espera”.
30
Ajuste “Ahorro de energía” en “No”. 30
Síntoma Causa y solución PáginaSin imagen. Compruebe que el cable de conexión está bien conectado al
equipo externo.12
Seleccione correctamente la fuente de entrada mediante el botón INPUT.
14
Compruebe que la señal del ordenador está ajustada para emitirse en un monitor externo.Si la señal del portátil, etc., se emite en su pantalla y en un monitor externo, es posible que la imagen del monitor externo no se visualice correctamente. Ajuste el ordenador para que envíe la señal solamente a un monitor externo.
–
La imagen tiene sombras. Las imágenes de vídeo se están procesando en 3D. Vea las imágenes de vídeo en 3D con las gafas 3D y ajuste la opción “Sel. pantalla 2D-3D” en “2D”.
15, 31
El área brillante u oscura del vídeo se visualiza demasiado brillante o demasiado oscura.
Este síntoma puede producirse cuando se introduce un nivel de señal diferente a la del estándar HDMI. Cambie el nivel de salida del equipo conectado o cambie la opción Rango dinámico en el menú Función de la unidad.
32
La imagen es demasiado oscura.
Ajuste correctamente “Contraste” o “Brillo” en el menú Imagen .
24
La imagen no es nítida. Ajuste el foco. 11
Se ha acumulado condensación en el objetivo. Deje la unidad encendida durante unas 2 horas.
–
41
Indicación en pantalla
Mando a distancia
El color de los caracteres o de la imagen no es el adecuado.
Seleccione el registro de color que desee en “Alineac. panel” en el menú Instalación .
34
La imagen permanece en la pantalla. (retención de imagen)
Cuando se muestren imágenes muy contrastadas sin movimiento durante un periodo largo de tiempo, es posible que haya cierta retención de imagen en la pantalla. Esto solamente ocurre temporalmente. Si se apaga la alimentación durante unos momentos se eliminará la imagen retenida.
–
Síntoma Causa y solución PáginaLa indicación en pantalla no aparece.
Establezca “Estado” del menú Configuración en “Sí”. 30
Compruebe si el indicador ON/STANDBY se ilumina en verde. El indicador ON/STANDBY parpadea en color verde cuando la unidad se inicia. Espere hasta que deje de parpadear y la luz verde sea fija.
8
El nombre del modelo no desaparece de la pantalla.
El modo de presentación de la unidad puede establecerse en el momento de la compra. Consulte con el distribuidor local o con personal cualificado de Sony.
–
Síntoma Causa y solución PáginaEl mando a distancia no funciona.
Es posible que las pilas estén agotadas. Sustitúyalas por unas nuevas.
–
Introduzca las pilas con las polaridades correctas. –
Si hay una lámpara fluorescente cerca del detector del mando a distancia, es posible que la unidad funcione de forma incorrecta o inadvertida.
–
Confirme la posición del detector del mando a distancia en la unidad.
4
Síntoma Causa y solución Página
42

Imágenes de vídeo en 3D
Otros
Síntoma Causa y solución Página
La imagen de vídeo no parece una imagen de vídeo en 3D.
Compruebe si las gafas 3D están encendidas. 15
Asegúrese de que la batería de las gafas 3D no esté agotada o esté suficientemente cargada.
–
Establezca “Sel. pantalla 2D-3D” en “Automático” o “3D”. 31
Verifique si las señales de entrada son señales 3D compatibles.
57
Es posible que las señales 3D no se emitan en función de las especificaciones del selector AV/amplificador AV/equipo externo conectados. Si la señal 3D no se emite, confirme las especificaciones o ajustes del selector AV/amplificador AV/equipo externo.
–
Si la posición de visionado está demasiado lejos de la unidad, es posible que las gafas 3D no muestren las imágenes correctamente.
15
El tamaño de la pantalla no es el adecuado. Ajuste la ampliación del zoom a un nivel bajo o vea las imágenes lo más alejado posible de la pantalla.
63
Para obtener información detallada, consulte la sección “Precauciones de utilización” de “Uso de las gafas 3D”.
15
Síntoma Causa y solución PáginaEl ventilador hace ruido. Compruebe la configuración de “Modo gran altitud” en el
menú Configuración .30
Asegúrese de que la temperatura de la habitación no sea demasiado alta.
–
Compruebe los requisitos de instalación de la unidad.La velocidad del ventilador aumenta para mantener la fiabilidad de los componentes del proyector cuando la temperatura de la habitación es superior a lo normal. El ruido del ventilador se hace ligeramente más fuerte. La temperatura normal aproximada es de 25°C.
–
No es posible ajustar el desplazamiento del objetivo.
El desplazamiento del objetivo no se puede ajustar más allá del intervalo de movimiento. Ajuste el desplazamiento del objetivo dentro del intervalo de movimiento.
10, 63
43
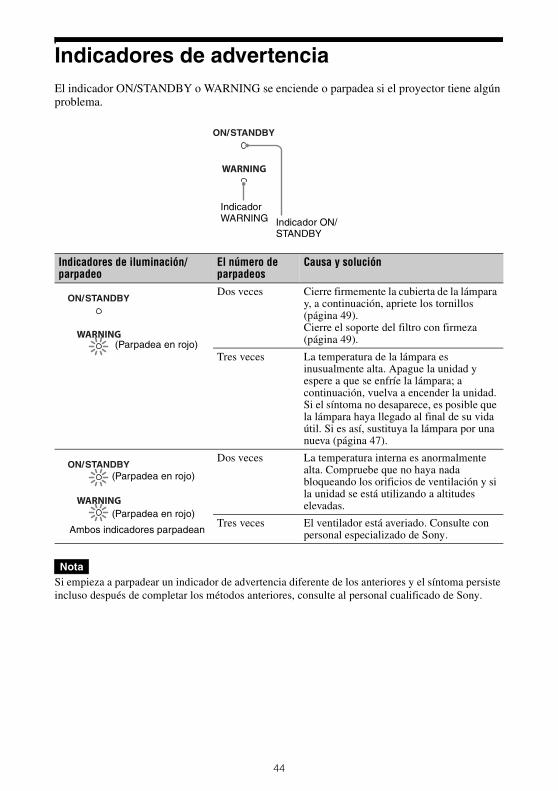
Indicadores de advertenciaEl indicador ON/STANDBY o WARNING se enciende o parpadea si el proyector tiene algún problema.
Si empieza a parpadear un indicador de advertencia diferente de los anteriores y el síntoma persiste incluso después de completar los métodos anteriores, consulte al personal cualificado de Sony.
Indicadores de iluminación/parpadeo
El número de parpadeos
Causa y solución
Dos veces Cierre firmemente la cubierta de la lámpara y, a continuación, apriete los tornillos (página 49).Cierre el soporte del filtro con firmeza (página 49).
Tres veces La temperatura de la lámpara es inusualmente alta. Apague la unidad y espere a que se enfríe la lámpara; a continuación, vuelva a encender la unidad.Si el síntoma no desaparece, es posible que la lámpara haya llegado al final de su vida útil. Si es así, sustituya la lámpara por una nueva (página 47).
Dos veces La temperatura interna es anormalmente alta. Compruebe que no haya nada bloqueando los orificios de ventilación y si la unidad se está utilizando a altitudes elevadas.
Tres veces El ventilador está averiado. Consulte con personal especializado de Sony.
Nota
Indicador ON/STANDBY
Indicador WARNING
(Parpadea en rojo)
(Parpadea en rojo)
(Parpadea en rojo)
Ambos indicadores parpadean
44
Listas de mensajesMensajes de advertencia
Mensajes de precaución
Síntoma Causa y solución PáginaTemperatura alta! Apag. 1min.
Desactive la alimentación. –
Compruebe que nada bloquee los orificios de ventilación. 4, 5
Frecuencia fuera de rango!
Frecuencia fuera de rango. Introduzca una señal que se encuentre dentro del margen aceptable de frecuencias de la unidad.
54
Por favor, cambie la lámpara/filtro.
Es necesario sustituir la lámpara. Sustituya la lámpara.Cambie el filtro de aire también. Vuelva a limpiar también los orificios de ventilación (entrada).Si aparece de nuevo este mensaje después de sustituir la lámpara y el filtro, el proceso de sustitución de la lámpara no se ha completado. Compruebe el proceso de sustitución de la lámpara.
Para borrar este mensaje, pulse una vez cualquier botón del mando a distancia o del panel de control de la unidad.
47
Por favor limpie el filtro. Es hora de cambiar el filtro de aire. Limpie el filtro de aire.
Para borrar este mensaje, pulse una vez cualquier botón del mando a distancia o del panel de control de la unidad.
51
Por favor limpie el filtro. Terminó? Sí No
Es hora de cambiar el filtro de aire. Limpie el filtro de aire.Si ha limpiado el filtro de aire, seleccione “Sí”. Si no ha limpiado el filtro de aire, seleccione “No”.
51
Temperatura del proyector elevada. El modo gran altitud debe estar “Sí” si se usa el proyector a gran altitud.
Compruebe que nada bloquee los orificios de ventilación. 4, 5
Cuando utilice la unidad en zonas de altitud elevada, establezca “Modo gran altitud” en “Sí”.
Cuando la temperatura dentro de la unidad continúe siendo alta, el “Modo gran altitud” cambia a “Sí” durante 1 minuto y la velocidad del ventilador aumenta.
30
Ajustado modo Ahorro energía. El proyector pasará a espera en 1m.
“Ahorro de energía” está ajustado en “Espera”.
Si no se recibe ninguna señal, la unidad se apaga tras 1 minuto y el proyector entra en modo de espera.
30
Síntoma Causa y solución Página
No hay señal de entrada en la entrada seleccionada. Compruebe las conexiones.
12
No aplicable! Pulse el botón adecuado.La operación que activa el botón está prohibida actualmente.
–
Bloque ajustes act. “Bloqueo ajustes” está ajustado en “Nivel A” o “Nivel B”. 32
Nota
Nota
Nota
Nota
x
45
Actualización del softwarePuede descargar archivos para actualizar el software de la unidad. Copie los archivos descargados en su memoria USB, introduzca la memoria USB en el correspondiente terminal USB y, a continuación, realice la actualización.Para utilizar las funciones actualizadas, introduzca un dispositivo de memoria USB en el PC conectado a Internet.Descargue los archivos actualizados desde el siguiente sitio web de Sony:http://www.pro.sony.eu/En el sitio web también se explica cómo instalar la actualización.
No es posible utilizar algunas memorias USB. Para obtener más información, consulte el sitio web indicado arriba.
Acerca de x.v.Color• “x.v.Color” es un nombre promocional
que se da a los productos que tienen la capacidad de representar un espacio de color amplio basado en las especificaciones xvYCC, y es una marca comercial de Sony Corporation.
• xvYCC es un estándar internacional de especificaciones técnicas del espacio de color de gama extendida para las señales de vídeo. La gama de color xvYCC es más amplia que la de sRGB, que se utiliza con el sistema de televisión actual.
Acerca de la función 3D simulado• Utilice la función 3D simulado teniendo
en cuenta que la imagen se verá de manera diferente a las imágenes originales, ya que esta función convierte las imágenes de vídeo.
• Tenga en cuenta que si se utiliza la unidad de forma comercial o para la exhibición pública, la visualización de imágenes de vídeo en 2D como imágenes de vídeo en 3D mediante la conversión a 3D simulado puede constituir una infracción de los derechos de los autores o de los productores, que gozan de protección legal.
Otros
Nota
46
Sustitución de la lámpara y del filtro de aire y limpieza de los orificios de ventilación (entrada)Herramientas que necesita para empezar:• Lámpara de proyector LMP-H210
(opcional)• Destornillador Phillips estándar• Paño (como protección contra arañazos)
La lámpara que se utiliza como fuente de luz tiene una determinada vida útil. Cuando la luz de la lámpara pierde intensidad, el balance de color de la imagen se vuelve extraño, o aparece el mensaje “Por favor, cambie la lámpara/filtro.”, es posible que la lámpara esté agotada. Sustituya inmediatamente la lámpara por una nueva.Utilice una lámpara de proyector LMP-H210 como lámpara de sustitución.El filtro de aire está incluido en la lámpara de proyector LMP-H210. Cuando reemplace la lámpara será también el momento de reemplazar el filtro del aire.Siempre que reemplace la lámpara, asegúrese de reemplazar el filtro del aire por uno nuevo. Limpie también los orificios de ventilación (entrada).
SugerenciaLa vida útil de la lámpara utilizada como fuente de luz cambia en función del entorno de instalación o las condiciones de uso. Puede utilizar la lámpara durante más tiempo si evita apagarla hasta que transcurran unos minutos después de encenderla.
Precaución• La lámpara continúa estando caliente
después de haber apagado la unidad con el botón ?/1 (ON/STANDBY). Si toca la lámpara, puede quemarse los dedos. Antes de sustituir la lámpara, espere al menos 1 hora hasta que se enfríe.
• No toque la superficie de la lámpara. Si la toca, limpie las huellas con un paño suave.
• Ponga especial cuidado al reemplazar la lámpara cuando la unidad esté instalada en el techo.
• Al retirar la unidad de la lámpara, asegúrese de que se encuentra en posición horizontal y tire hacia arriba. No incline la unidad de la lámpara. Si tira hacia fuera de la unidad de la lámpara mientras se encuentra inclinada y la lámpara se rompe, los fragmentos pueden dispersarse y provocar lesiones.
• Cuando retire el filtro del aire, tenga cuidado para evitar que caiga polvo en el proyector.
• La sustitución del filtro del aire es crucial para mantener el buen rendimiento del proyector y para evitar que se averíe. Cuando aparezca un mensaje de advertencia para reemplazar el filtro del aire, reemplace inmediatamente el filtro del aire.
• Asegúrese de utilizar la lámpara de proyector LMP-H210 para la sustitución. Si utiliza otras lámparas que no sean la LMP-H210, la unidad podría averiarse.
• No olvide apagar la unidad y desenchufar el cable de alimentación antes de sustituir la lámpara; a continuación, compruebe que el indicador ON/STANDBY está apagado.
1 Apague el proyector y desenchufe el cable de alimentación de CA.
Notas
47
2 Cuando coloque el proyector sobre una superficie plana tal como una mesa de escritorio, etc., coloque un paño para evitar rayar la superficie. Invierta el proyector como se muestra y, a continuación, colóquelo sobre el paño.
• Cuando la lámpara se daña, los fragmentos pueden dispersarse si no se invierte el proyector. Esto puede provocar lesiones.
• Asegúrese de que el proyector se encuentre en una superficie estable.
3 Afloje el tornillo de la cubierta de la lámpara con un destornillador Philips y, a continuación, abra la cubierta de la lámpara.
4 Afloje los 3 tornillos de la unidad de la lámpara con el destornillador Phillips. Levante el asa y, a continuación, tire de la lámpara para extraerla.
Notas
48
5 Sujete el asa de la nueva lámpara, empújela hacia dentro hasta el fondo y, a continuación, apriete los 3 tornillos.
Tenga cuidado de no tocar el bloque óptico del interior de la unidad.
6 Cierre la cubierta de la lámpara y, a continuación, apriete los tornillos.
7 Quite el soporte del filtro.
8 Extraiga el filtro de aire.
9 Coloque el nuevo filtro de aire de forma que encaje en las lengüetas (10 posiciones) del soporte del filtro.
Coloque el filtro de aire alineándolo con la forma del soporte del filtro.Además, no toque el ventilador después de retirar el filtro del aire, que se encuentra a cierta profundidad en el interior del proyector.
10 Instale el soporte del filtro.
El proyector no se encenderá si el soporte del filtro no está bien cerrado.
Nota
Nota
Nota
Lengüetas
49
11Limpie el polvo de los orificios de ventilación (entrada) con un paño suave.
12Vuelva a colocar el proyector en su posición original.
13Encienda la unidad y, a continuación, seleccione el elemento de configuración de la lámpara en el menú Configuración .Se mostrará la pantalla de menú siguiente.
SugerenciaSi “Bloqueo ajustes” está establecido en “Nivel B”, establezca “No” una vez (página 32).
14Seleccione “Sí”.
PrecauciónPara evitar descargas eléctricas o incendios, no introduzca las manos en el compartimento de sustitución de la lámpara, ni permita que se introduzcan líquidos ni ningún otro objeto.
• La unidad no se encenderá si la lámpara no está bien instalada.
• La unidad no se encenderá si la cubierta de la lámpara no está bien cerrada.
• Para borrar un mensaje que aparezca en la pantalla, pulse una vez cualquier botón del mando a distancia o del panel de control de la unidad.
Orificios de ventilación (entrada)
Notas
NotaEsta lámpara contiene mercurio. Las reglas para desechar tubos fluorescentes usados dependen de dónde viva. Siga la normativa de desecho de residuos de su zona.
50
Limpieza del filtro de aireCuando aparezca en la pantalla “Por favor limpie el filtro.” debe limpiar el filtro de aire.El filtro de aire debe limpiarse cada 1.500 horas. Este valor varía en función del entorno y de cómo se utilice el proyector. La cifra de 1.500 horas es aproximada.Después de lavar el filtro de aire con una solución detergente suave, déjelo secar a la sombra.
• Cuando limpie el filtro de aire, asegúrese de no dañarlo.Para ver información detallada sobre cómo instalar y retirar el filtro de aire, consulte los pasos del 7 al 10 de “Sustitución de la lámpara y del filtro de aire y limpieza de los orificios de ventilación (entrada)” (página 49).
• Cuando retire el filtro del aire, tenga cuidado para evitar que caiga polvo en el proyector.
• La limpieza del filtro del aire es crucial para mantener el buen rendimiento del proyector y para evitar que se averíe. Cuando aparezca un mensaje de advertencia para limpiar el filtro del aire, reemplace inmediatamente el filtro del aire.
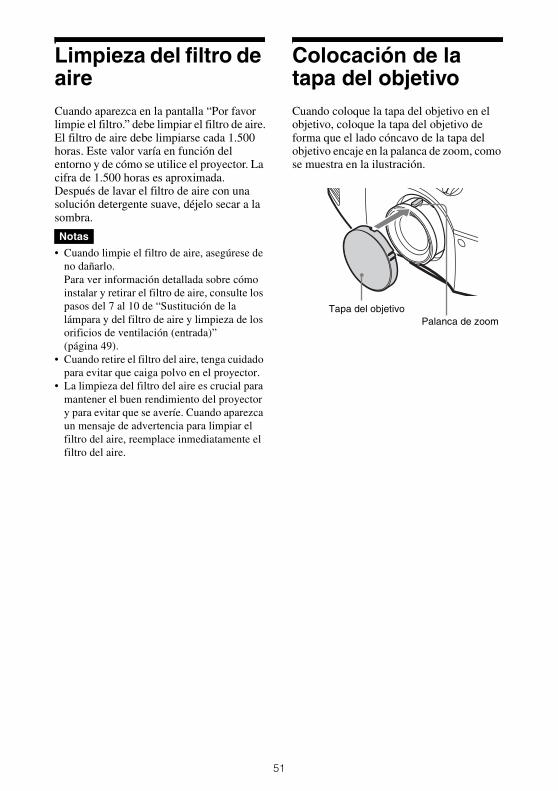
Colocación de la tapa del objetivoCuando coloque la tapa del objetivo en el objetivo, coloque la tapa del objetivo de forma que el lado cóncavo de la tapa del objetivo encaje en la palanca de zoom, como se muestra en la ilustración.
Notas
Tapa del objetivoPalanca de zoom
51

LimpiezaLimpieza del objetivoLa superficie del objetivo se ha tratado de manera especial para reducir el reflejo de la luz.Puesto que un mantenimiento incorrecto puede afectar al rendimiento del proyector, tenga cuidado con las siguientes indicaciones:• Frote el objetivo suavemente con un paño
suave como un paño de limpieza o un paño de limpieza de cristales.
• Se pueden eliminar las manchas persistentes con un paño suave como un paño de limpieza o un paño de limpieza de cristales ligeramente humedecido con agua.
• Nunca use disolventes como el alcohol, benceno, aguarrás o ácido, limpiadores alcalinos o abrasivos ni paños de limpieza con productos químicos, puesto que pueden dañar la superficie del objetivo.
Limpieza de la carcasa• Para eliminar el polvo de la carcasa,
frótelo suavemente con un paño suave. Si el polvo es persistente, frote con un paño suave ligeramente humedecido con una solución diluida de detergente suave.
• No utilice nunca ningún tipo de estropajo abrasivo, ni limpiadores alcalinos o ácidos, polvos abrasivos ni disolventes volátiles tales como alcohol, benceno, aguarrás o insecticida.
• Limpie la unidad con un paño limpio. Si realiza la limpieza con un paño sucio, podría arañar la unidad.
• Si utiliza tales materiales o mantiene un contacto prolongado con materiales de goma o vinilo puede provocar daños en la superficie de la pantalla y en el material de la carcasa.
52
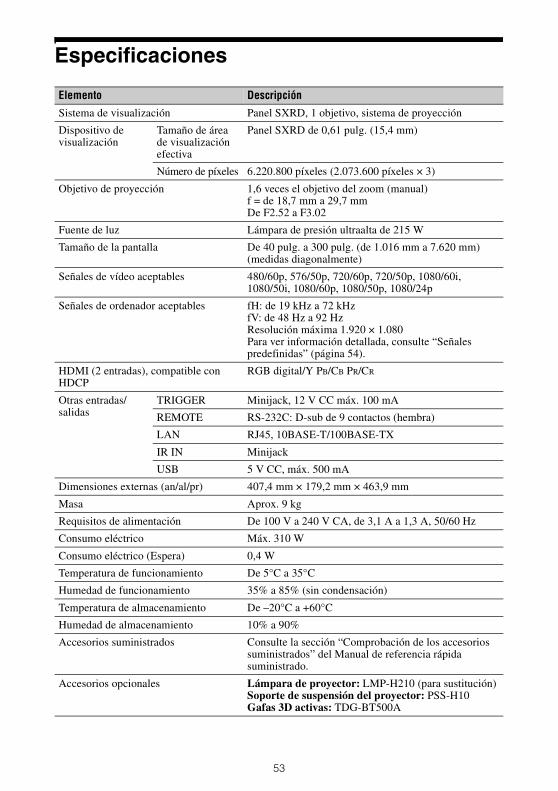
Especificaciones
Elemento Descripción
Sistema de visualización Panel SXRD, 1 objetivo, sistema de proyección
Dispositivo de visualización
Tamaño de área de visualización efectiva
Panel SXRD de 0,61 pulg. (15,4 mm)
Número de píxeles 6.220.800 píxeles (2.073.600 píxeles × 3)
Objetivo de proyección 1,6 veces el objetivo del zoom (manual)f = de 18,7 mm a 29,7 mmDe F2.52 a F3.02
Fuente de luz Lámpara de presión ultraalta de 215 W
Tamaño de la pantalla De 40 pulg. a 300 pulg. (de 1.016 mm a 7.620 mm) (medidas diagonalmente)
Señales de vídeo aceptables 480/60p, 576/50p, 720/60p, 720/50p, 1080/60i, 1080/50i, 1080/60p, 1080/50p, 1080/24p
Señales de ordenador aceptables fH: de 19 kHz a 72 kHzfV: de 48 Hz a 92 HzResolución máxima 1.920 × 1.080 Para ver información detallada, consulte “Señales predefinidas” (página 54).
HDMI (2 entradas), compatible con HDCP
RGB digital/Y PB/CB PR/CR
Otras entradas/salidas
TRIGGER Minijack, 12 V CC máx. 100 mA
REMOTE RS-232C: D-sub de 9 contactos (hembra)
LAN RJ45, 10BASE-T/100BASE-TX
IR IN Minijack
USB 5 V CC, máx. 500 mA
Dimensiones externas (an/al/pr) 407,4 mm × 179,2 mm × 463,9 mm
Masa Aprox. 9 kg
Requisitos de alimentación De 100 V a 240 V CA, de 3,1 A a 1,3 A, 50/60 Hz
Consumo eléctrico Máx. 310 W
Consumo eléctrico (Espera) 0,4 W
Temperatura de funcionamiento De 5°C a 35°C
Humedad de funcionamiento 35% a 85% (sin condensación)
Temperatura de almacenamiento De –20°C a +60°C
Humedad de almacenamiento 10% a 90%
Accesorios suministrados Consulte la sección “Comprobación de los accesorios suministrados” del Manual de referencia rápida suministrado.
Accesorios opcionales Lámpara de proyector: LMP-H210 (para sustitución)Soporte de suspensión del proyector: PSS-H10Gafas 3D activas: TDG-BT500A
53
• Los valores de masa y dimensiones son aproximados.• No todos los accesorios opcionales están disponibles en todos los países o zonas. Verifíquelo con
su distribuidor local autorizado de Sony.• La información sobre los accesorios de este manual será vigente a partir de septiembre de 2015.
El diseño y las especificaciones de esta unidad, así como sus accesorios opcionales, pueden variar sin previo aviso.
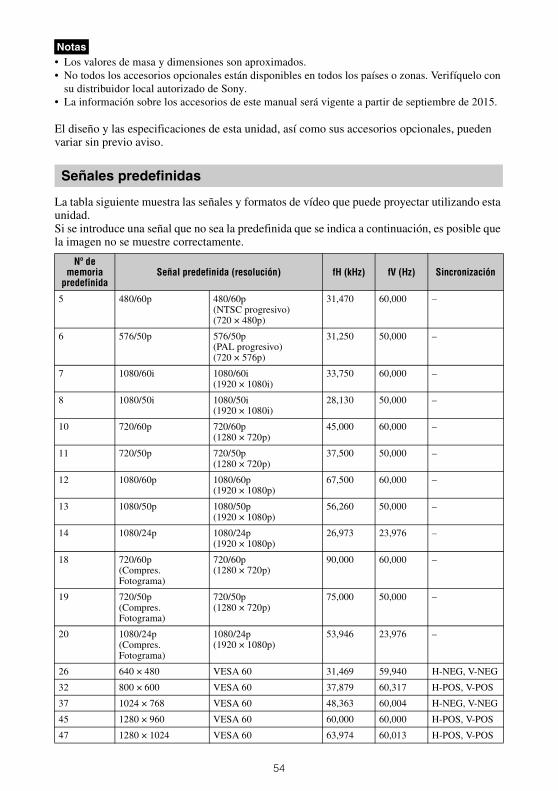
La tabla siguiente muestra las señales y formatos de vídeo que puede proyectar utilizando esta unidad.Si se introduce una señal que no sea la predefinida que se indica a continuación, es posible que la imagen no se muestre correctamente.
Notas
Señales predefinidas
Nº de memoria
predefinidaSeñal predefinida (resolución) fH (kHz) fV (Hz) Sincronización
5 480/60p 480/60p(NTSC progresivo)(720 × 480p)
31,470 60,000 –
6 576/50p 576/50p(PAL progresivo)(720 × 576p)
31,250 50,000 –
7 1080/60i 1080/60i(1920 × 1080i)
33,750 60,000 –
8 1080/50i 1080/50i(1920 × 1080i)
28,130 50,000 –
10 720/60p 720/60p(1280 × 720p)
45,000 60,000 –
11 720/50p 720/50p(1280 × 720p)
37,500 50,000 –
12 1080/60p 1080/60p(1920 × 1080p)
67,500 60,000 –
13 1080/50p 1080/50p(1920 × 1080p)
56,260 50,000 –
14 1080/24p 1080/24p(1920 × 1080p)
26,973 23,976 –
18 720/60p(Compres. Fotograma)
720/60p(1280 × 720p)
90,000 60,000 –
19 720/50p(Compres. Fotograma)
720/50p(1280 × 720p)
75,000 50,000 –
20 1080/24p(Compres. Fotograma)
1080/24p(1920 × 1080p)
53,946 23,976 –
26 640 × 480 VESA 60 31,469 59,940 H-NEG, V-NEG
32 800 × 600 VESA 60 37,879 60,317 H-POS, V-POS
37 1024 × 768 VESA 60 48,363 60,004 H-NEG, V-NEG
45 1280 × 960 VESA 60 60,000 60,000 H-POS, V-POS
47 1280 × 1024 VESA 60 63,974 60,013 H-POS, V-POS
54
Números de memoria preestablecidos para cada señal de entrada
Señal digital
* Algunas señales digitales entrantes desde ordenadores pueden mostrarse como el número de memoria preconfigurado de la señal de componentes o de vídeo GBR.
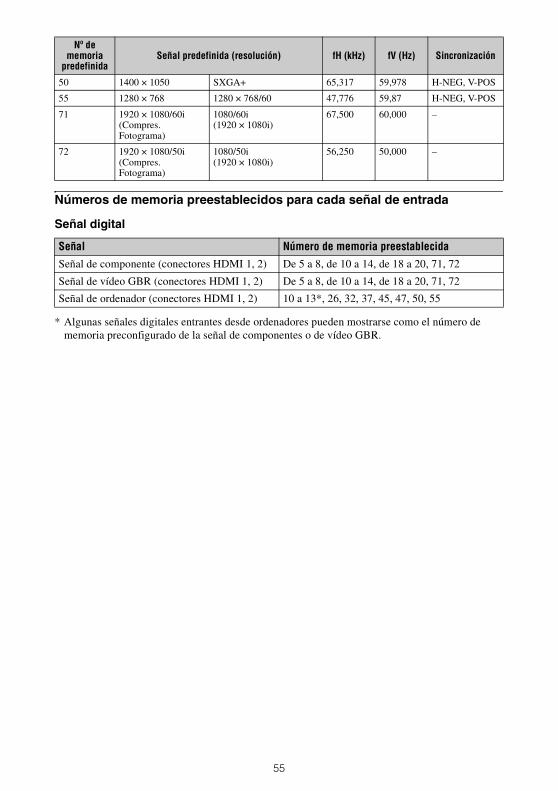
50 1400 × 1050 SXGA+ 65,317 59,978 H-NEG, V-POS
55 1280 × 768 1280 × 768/60 47,776 59,87 H-NEG, V-POS
71 1920 × 1080/60i(Compres. Fotograma)
1080/60i (1920 × 1080i)
67,500 60,000 –
72 1920 × 1080/50i(Compres. Fotograma)
1080/50i (1920 × 1080i)
56,250 50,000 –
Señal Número de memoria preestablecidaSeñal de componente (conectores HDMI 1, 2) De 5 a 8, de 10 a 14, de 18 a 20, 71, 72
Señal de vídeo GBR (conectores HDMI 1, 2) De 5 a 8, de 10 a 14, de 18 a 20, 71, 72
Señal de ordenador (conectores HDMI 1, 2) 10 a 13*, 26, 32, 37, 45, 47, 50, 55
Nº de memoria
predefinidaSeñal predefinida (resolución) fH (kHz) fV (Hz) Sincronización
55
Los elementos de menú disponibles para el ajuste varían en función de la señal de entrada. Se indican en las tablas siguientes. Los elementos que no pueden ajustarse no aparecen en el menú.
Menú Imagen
z: Ajustable/puede establecerse–: No ajustable/no puede establecerse*1: Para obtener más información, consulte las tablas de “Motionflow” (página 60).*2: Este ajuste se puede llevar a cabo solo si “x.v.Color” está ajustado en “No”.
Señales de entrada y elementos ajustables/de configuración
ElementoSeñal de entrada
Señal de componente Señal GBR de vídeo Señal Ordenador
Creación realidad z z –
Diafragma avan. z z z
Potenc. Contraste z z –
Control lámp. z z z
Motionflow*1z (sin incluir el
número de memoria preestablecido 19)
z (sin incluir el número de memoria preestablecido 19)
–
Contraste z z z
Brillo z z z
Color z z –
Tonalidad z z –
Temp. de color z z z
Nitidez z z –
NR z z –
MPEG NR z z z
Gradación suave z z –
Modo Film z (sin incluir el número de memoria preestablecido 14)
z (sin incluir el número de memoria preestablecido 14)
–
Corr. Gamma*2z z z
Corr. color z z z
Reforzar blanco z z z
x.v.Color z – –
Esp. de color z z z
56
Menú Pantalla
z: Ajustable/puede establecerse–: No ajustable/no puede establecerse*1: Si la señal de entrada procede de un ordenador, el ajuste no se puede hacer cuando la relación de
aspecto es 16:9 o mayor (fijado en “Normal”).
Cuando conecte un cable, como por ejemplo, un cable HDMI, etc., compruebe el tipo de señal en el menú Información (página 37) y “Señal digital” (página 55), y los elementos ajustables/que puedan establecerse.
Esta unidad acepta los siguientes tipos de señales 3D.
*: formato 3D obligatorio de los estándares HDMI.
Algunas opciones de los menús no siempre están disponibles para su configuración: depende de las señales 3D.Las opciones que no se pueden ajustar no se visualizan en el menú. En las siguientes tablas incluimos dichas opciones.
ElementoSeñal de entrada
Señal de componente
Señal GBR de vídeo Señal Ordenador
Aspecto z z z*1
Nota
Señales 3D compatibles
Resolución Formato de señal 3D720/60p, 720/50p Formato lado a lado
Formato encima-debajo*
Compres. Fotograma*
1080/60i, 1080/50i Formato lado a lado
Compres. Fotograma
1080/24p Formato lado a lado
Formato encima-debajo*
Compres. Fotograma*
1080/60p, 1080/50p Formato lado a lado
Formato encima-debajo
Señales 3D y elementos ajustables/configurable
ElementoSeñales 3D
720/60p, 720/50p
1080/60i, 1080/50i
1080/24p 1080/60p, 1080/50p
Creación realidad z z z z
Diafragma avan. – – – –
Control lámp. z z z z
Motionflow*1z z z z
57
z: Ajustable/puede establecerse–: No ajustable/no puede establecerse*1: El elemento no está disponible para Compres. Fotograma/Encima-debajo en 720/60p, o Encima-
debajo en 1080/60p.*2: Para obtener más información, consulte las tablas de “Modo de aspecto” (página 59).
Si la unidad está configurada para convertir imágenes de vídeo en 2D en imágenes de vídeo en 3D, algunas opciones de los menús no siempre están disponibles para su configuración: depende de los ajustes de “Formato 3D” del menú Función . Las opciones que no se pueden ajustar no se visualizan en el menú. En la siguiente tabla incluimos dichas opciones.
z: Ajustable/puede establecerse–: No ajustable/no puede establecerse*1: El elemento no está disponible para Encima-debajo en 720/60p, o Encima-debajo en 1080/60p.*2: El elemento no está disponible para 720/60p, ni para Encima-debajo en 1080/60p.*3: Para obtener más información, consulte las tablas de “Modo de aspecto” (página 59).
NR – – – –
MPEG NR – – – –
Gradación suave – – – –
Modo Film – z – –
x.v.Color z z z z
Aspecto*2z z z z
ElementoSeñales 3D
Encima-debajo Lado a lado 3D simulado
Creación realidad z z z
Diafragma avan. – – –
Control lámp. z z z
Motionflow*1z z z
NR – – z
MPEG NR – – z
Gradación suave – – z
Modo Film*2 – z z
x.v.Color z z z
Aspecto*3z z z
ElementoSeñales 3D
720/60p, 720/50p
1080/60i, 1080/50i
1080/24p 1080/60p, 1080/50p
58
Los elementos que se pueden seleccionar varían en función del tipo de señal de entrada o de formato 3D.Para obtener más información, consulte las siguientes tablas. Los elementos que no pueden seleccionarse no aparecen en el menú.
2D
*1: No se visualiza en el menú si está fijado en Normal.
3D
Modo de aspecto
Señales aceptables 1920 × 10801280 × 720
720 × 480720 × 576 Otros
Número de memoria predefinida (página 54) 7, 8, de 10 a 14 5, 6 26, 32, 37, 45, 47, 50, 55
Normal z z z*1
Extender V z z –
Estrechar z z –
Extender – z –
Señales aceptables 1920 × 1080, 1280 × 720
Formato 3D Lado a lado Encima-debajo Compres. Fotograma 3D simulado
Número de memoria predefinida (página 54) 7, 8, de 10 a 14 De 10 a 14 De 18 a 20, 71, 72 7, 8, de 10 a 14
Normal z z z z
Extender V z z z z
Estrechar z z z z
Extender – – – –
59
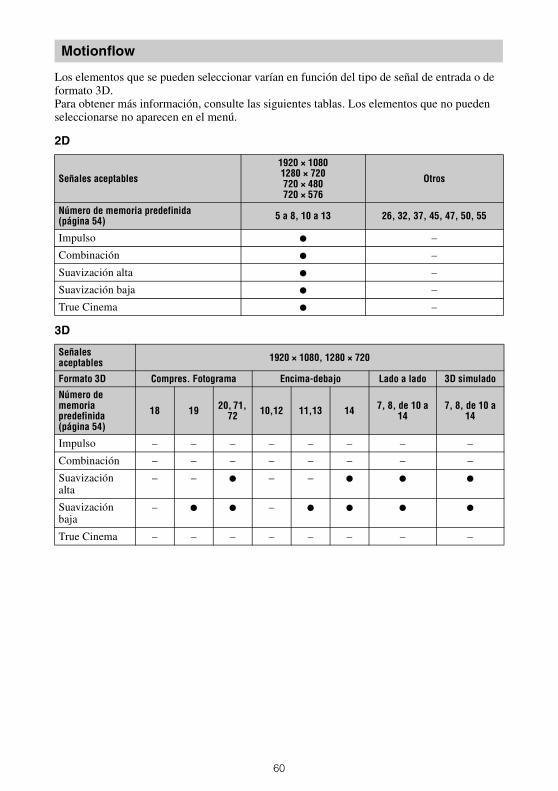
Los elementos que se pueden seleccionar varían en función del tipo de señal de entrada o de formato 3D.Para obtener más información, consulte las siguientes tablas. Los elementos que no pueden seleccionarse no aparecen en el menú.
2D
3D
Motionflow
Señales aceptables
1920 × 10801280 × 720720 × 480720 × 576
Otros
Número de memoria predefinida (página 54) 5 a 8, 10 a 13 26, 32, 37, 45, 47, 50, 55
Impulso z –
Combinación z –
Suavización alta z –
Suavización baja z –
True Cinema z –
Señales aceptables 1920 × 1080, 1280 × 720
Formato 3D Compres. Fotograma Encima-debajo Lado a lado 3D simulado
Número de memoria predefinida (página 54)
18 19 20, 71, 72 10,12 11,13 14 7, 8, de 10 a
147, 8, de 10 a
14
Impulso – – – – – – – –
Combinación – – – – – – – –
Suavización alta
– – z – – z z z
Suavización baja
– z z – z z z z
True Cinema – – – – – – – –
60
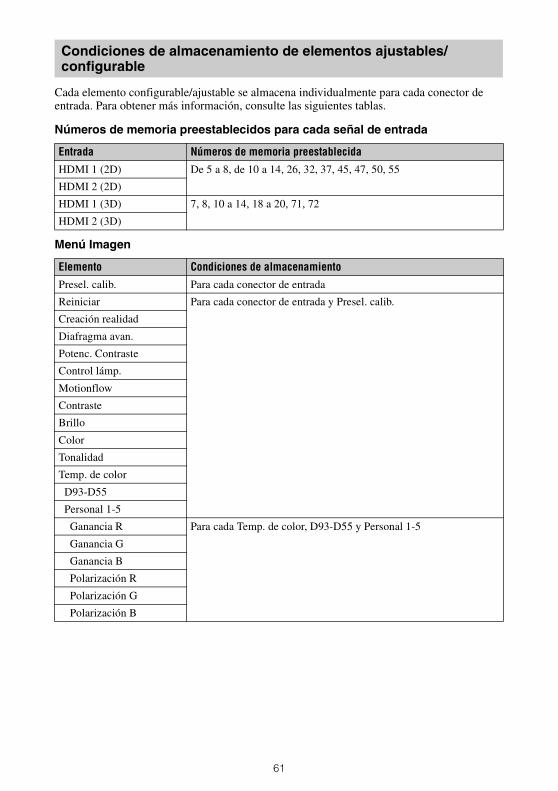
Cada elemento configurable/ajustable se almacena individualmente para cada conector de entrada. Para obtener más información, consulte las siguientes tablas.
Números de memoria preestablecidos para cada señal de entrada
Menú Imagen
Condiciones de almacenamiento de elementos ajustables/configurable
Entrada Números de memoria preestablecida
HDMI 1 (2D) De 5 a 8, de 10 a 14, 26, 32, 37, 45, 47, 50, 55
HDMI 2 (2D)
HDMI 1 (3D) 7, 8, 10 a 14, 18 a 20, 71, 72
HDMI 2 (3D)
Elemento Condiciones de almacenamiento
Presel. calib. Para cada conector de entrada
Reiniciar Para cada conector de entrada y Presel. calib.
Creación realidad
Diafragma avan.
Potenc. Contraste
Control lámp.
Motionflow
Contraste
Brillo
Color
Tonalidad
Temp. de color
D93-D55
Personal 1-5
Ganancia R Para cada Temp. de color, D93-D55 y Personal 1-5
Ganancia G
Ganancia B
Polarización R
Polarización G
Polarización B
61

Nitidez Para cada conector de entrada y Presel. calib.
NR
MPEG NR
Gradación suave
Modo Film
Corr. Gamma
Corr. color
Reforzar blanco
x.v.Color
Esp. de color
Elemento Condiciones de almacenamiento
62
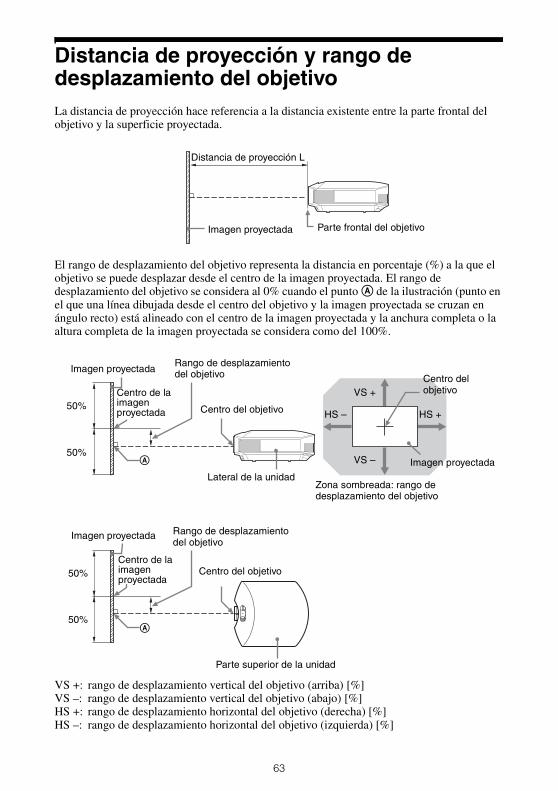
Distancia de proyección y rango de desplazamiento del objetivoLa distancia de proyección hace referencia a la distancia existente entre la parte frontal del objetivo y la superficie proyectada.
El rango de desplazamiento del objetivo representa la distancia en porcentaje (%) a la que el objetivo se puede desplazar desde el centro de la imagen proyectada. El rango de desplazamiento del objetivo se considera al 0% cuando el punto A de la ilustración (punto en el que una línea dibujada desde el centro del objetivo y la imagen proyectada se cruzan en ángulo recto) está alineado con el centro de la imagen proyectada y la anchura completa o la altura completa de la imagen proyectada se considera como del 100%.
VS +: rango de desplazamiento vertical del objetivo (arriba) [%]VS –: rango de desplazamiento vertical del objetivo (abajo) [%]HS +: rango de desplazamiento horizontal del objetivo (derecha) [%]HS –: rango de desplazamiento horizontal del objetivo (izquierda) [%]
Distancia de proyección L
Imagen proyectada Parte frontal del objetivo
Rango de desplazamiento del objetivoImagen proyectada
Centro del objetivo50%
50%
Centro de la imagen proyectada
Lateral de la unidad
A
Centro del objetivo
Imagen proyectada
VS +
VS –
HS – HS +
Zona sombreada: rango de desplazamiento del objetivo
Rango de desplazamiento del objetivo
Imagen proyectada
Centro del objetivo50%
50%
Centro de la imagen proyectada
Parte superior de la unidad
A
63

Cuando se proyecta en formato 1,78:1 (16:9)
Distancia de proyecciónUnidad: m
Fórmula de la distancia de proyecciónD: Tamaño de imagen proyectada (Diagonal) Unidad: m
Rango de desplazamiento del objetivo
Tamaño de imagen proyectadaDistancia de proyección L
Diagonal Anchura × Altura
80" (2,03 m) 1,77 × 1,00 2,40 – 3,83
100" (2,54 m) 2,21 × 1,25 3,00 – 4,79
120" (3,05 m) 2,66 × 1,49 3,61 – 5,76
150" (3,81 m) 3,32 × 1,87 4,52 – 7,20
200" (5,08 m) 4,43 × 2,49 6,04 – 9,61
Distancia de proyección L (longitud mínima) Distancia de proyección L (longitud máxima)L = 0,030349 × D – 0,0354 L = 0,048191 × D – 0,0212
1,78
1Área de visualización de vídeo
Área de proyección
71%
71%
25% 25% VS + = VS – = 71 – 2,840 × (HS + o HS –) [%]HS + = HS – = 25 – 0,352 × (VS + o VS –) [%]
64
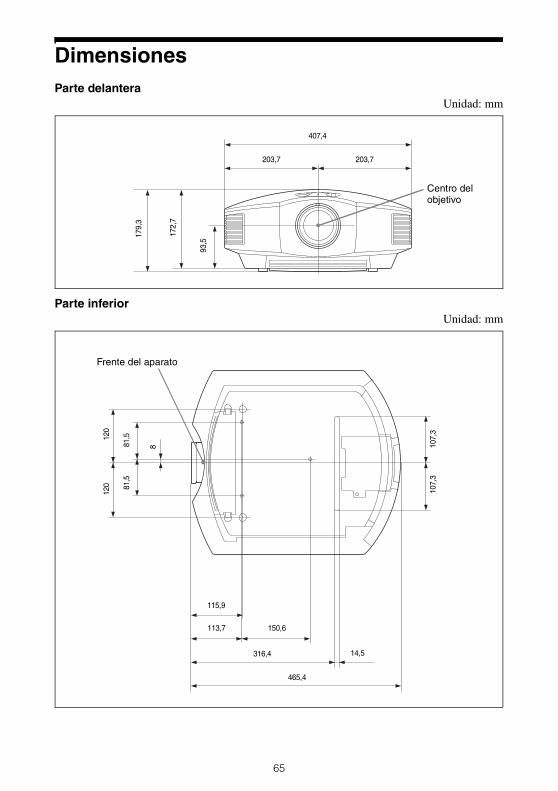
DimensionesParte delantera
Unidad: mm
Parte inferiorUnidad: mm
407,4
Centro del objetivo
203,7 203,7
179,
3
172,
7
93,5
465,4
Frente del aparato
113,7 150,6
120
81,5
120
14,5
107,
3
115,9
81,5
107,
3
316,4
8
65
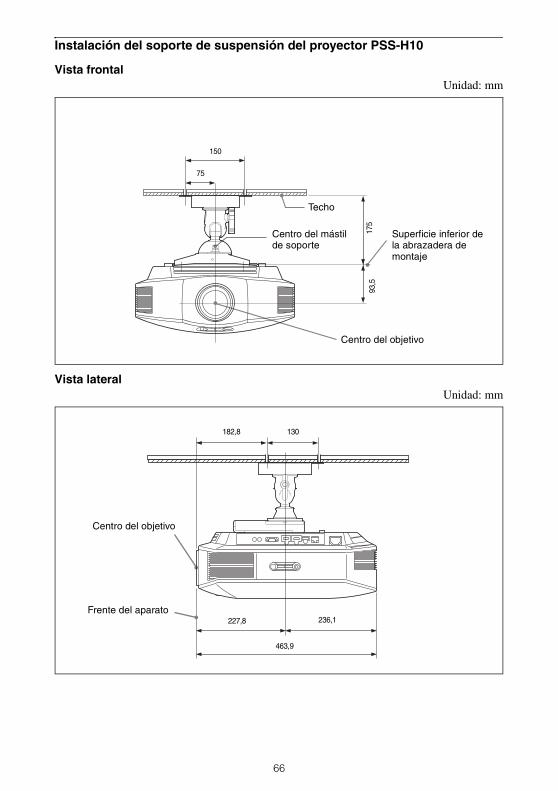
Instalación del soporte de suspensión del proyector PSS-H10
Vista frontalUnidad: mm
Vista lateralUnidad: mm
Superficie inferior de la abrazadera de montaje
Techo
Centro del mástil de soporte
Centro del objetivo
150
75
175
93,5
Frente del aparato
182,8 130
227,8
463,9
236,1
Centro del objetivo
66
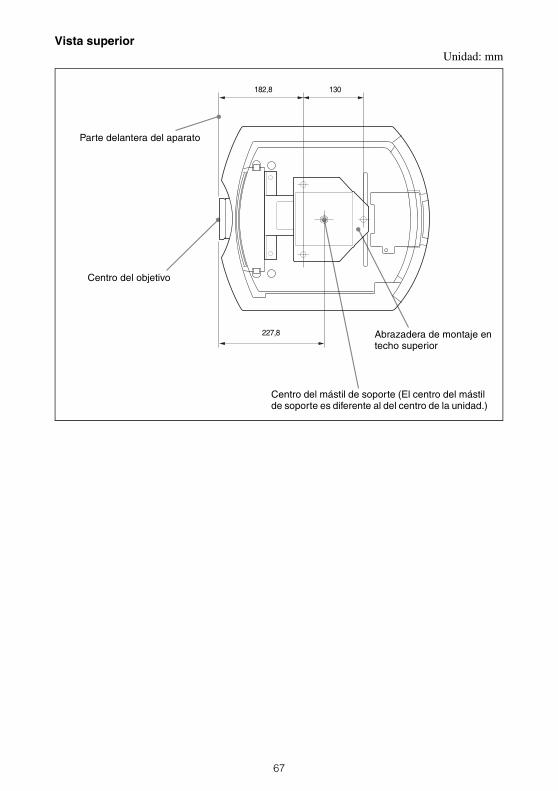
Vista superiorUnidad: mm
Centro del objetivo
227,8
182,8 130
Abrazadera de montaje en techo superior
Centro del mástil de soporte (El centro del mástil de soporte es diferente al del centro de la unidad.)
Parte delantera del aparato
67
AVISOS Y LICENCIASDEL SOFTWARE UTILIZADO EN ESTE PRODUCTOGPL/LGPL LICENSED SOFTWARE
The following GPL executables and LGPL libraries are used in this product and are subject to the GPL/LGPL License Agreements included as part of this documentation:
Package list:
linux-kernelalsa-libbusyboxcryptodirectfbdosfstoolse2fsprogsexceptionmonitorfusegdiskglibglibciptableslibmicrohttpdlibnuma (in numactl)procpspump-autoipXZ utilsSource code for these executables and libraries, as well as other executables and libraries, can be obtained using the following link:http://oss.sony.net/Products/Linux/===============================
GNU GENERAL PUBLIC LICENSEVersion 2, June 1991
Copyright (C) 1989, 1991 Free Software Foundation, Inc., 51 Franklin Street, Fifth Floor, Boston, MA 02110-1301, USA. Everyone is permitted to copy and distribute verbatim copies of this license document, but changing it is not allowed.
Preamble
The licenses for most software are designed to take away your freedom to share and change it. By contrast, the GNU General Public License is intended to guarantee your freedom to share and change free software--to make sure the software is free for all its users. This General Public License applies to most of
the Free Software Foundation’s software and to any other program whose authors commit to using it. (Some other Free Software Foundation software is covered by the GNU Library General Public License instead.) You can apply it to your programs, too.When we speak of free software, we are referring to freedom, not price. Our General Public Licenses are designed to make sure that you have the freedom to distribute copies of free software (and charge for this service if you wish), that you receive source code or can get it if you want it, that you can change the software or use pieces of it in new free programs; and that you know you can do these things.To protect your rights, we need to make restrictions that forbid anyone to deny you these rights or to ask you to surrender the rights. These restrictions translate to certain responsibilities for you if you distribute copies of the software, or if you modify it.For example, if you distribute copies of such a program, whether gratis or for a fee, you must give the recipients all the rights that you have. You must make sure that they, too, receive or can get the source code. And you must show them these terms so they know their rights.We protect your rights with two steps: (1) copyright the software, and (2) offer you this license which gives you legal permission to copy, distribute and/or modify the software.Also, for each author’s protection and ours, we want to make certain that everyone understands that there is no warranty for this free software. If the software is modified by someone else and passed on, we want its recipients to know that what they have is not the original, so that any problems introduced by others will not reflect on the original authors’ reputations.Finally, any free program is threatened constantly by software patents. We wish to avoid the danger that redistributors of a free program will individually obtain patent licenses, in effect making the program proprietary. To prevent this, we have made it clear that any patent must be licensed for everyone’s free use or not licensed at all.The precise terms and conditions for copying, distribution and modification follow.
GNU GENERAL PUBLIC LICENSE TERMS AND CONDITIONS FOR COPYING, DISTRIBUTION AND MODIFICATION
0. This License applies to any program or other work which contains a notice placed by the copyright holder saying it may be distributed under the terms of this General Public License. The “Program”, below, refers to any such program or work, and a “work based on the Program” means either the Program or any derivative work under copyright law: that is to say, a work containing the Program or a portion of it, either verbatim or with modifications and/or translated into another language. (Hereinafter,
68
translation is included without limitation in the term “modification”.) Each licensee is addressed as “you”.Activities other than copying, distribution and modification are not covered by this License; they are outside its scope. The act of running the Program is not restricted, and the output from the Program is covered only if its contents constitute a work based on the Program (independent of having been made by running the Program). Whether that is true depends on what the Program does.1. You may copy and distribute verbatim copies of the Program’s source code as you receive it, in any medium, provided that you conspicuously and appropriately publish on each copy an appropriate copyright notice and disclaimer of warranty; keep intact all the notices that refer to this License and to the absence of any warranty; and give any other recipients of the Program a copy of this License along with the Program.You may charge a fee for the physical act of transferring a copy, and you may at your option offer warranty protection in exchange for a fee.2. You may modify your copy or copies of the Program or any portion of it, thus forming a work based on the Program, and copy and distribute such modifications or work under the terms of Section 1 above, provided that you also meet all of these conditions:a) You must cause the modified files to carry prominent notices stating that you changed the files and the date of any change.b) You must cause any work that you distribute or publish, that in whole or in part contains or is derived from the Program or any part thereof, to be licensed as a whole at no charge to all third parties under the terms of this License.c) If the modified program normally reads commands interactively when run, you must cause it, when started running for such interactive use in the most ordinary way, to print or display an announcement including an appropriate copyright notice and a notice that there is no warranty (or else, saying that you provide a warranty) and that users may redistribute the program under these conditions, and telling the user how to view a copy of this License. (Exception: if the Program itself is interactive but does not normally print such an announcement, your work based on the Program is not required to print an announcement.)These requirements apply to the modified work as a whole. If identifiable sections of that work are not derived from the Program, and can be reasonably considered independent and separate works in themselves, then this License, and its terms, do not apply to those sections when you distribute them as separate works. But when you distribute the same sections as part of a whole which is a work based on the Program, the distribution of the whole must be on the terms of this License, whose permissions for other
licensees extend to the entire whole, and thus to each and every part regardless of who wrote it.Thus, it is not the intent of this section to claim rights or contest your rights to work written entirely by you; rather, the intent is to exercise the right to control the distribution of derivative or collective works based on the Program.In addition, mere aggregation of another work not based on the Program with the Program (or with a work based on the Program) on a volume of a storage or distribution medium does not bring the other work under the scope of this License.3. You may copy and distribute the Program (or a work based on it, under Section 2) in object code or executable form under the terms of Sections 1 and 2 above provided that you also do one of the following:a) Accompany it with the complete corresponding machine-readable source code, which must be distributed under the terms of Sections 1 and 2 above on a medium customarily used for software interchange; or,b) Accompany it with a written offer, valid for at least three years, to give any third party, for a charge no more than your cost of physically performing source distribution, a complete machine-readable copy of the corresponding source code, to be distributed under the terms of Sections 1 and 2 above on a medium customarily used for software interchange; or,c) Accompany it with the information you received as to the offer to distribute corresponding source code. (This alternative is allowed only for noncommercial distribution and only if you received the program in object code or executable form with such an offer, in accord with Subsection b above.)The source code for a work means the preferred form of the work for making modifications to it. For an executable work, complete source code means all the source code for all modules it contains, plus any associated interface definition files, plus the scripts used to control compilation and installation of the executable. However, as a special exception, the source code distributed need not include anything that is normally distributed (in either source or binary form) with the major components (compiler, kernel, and so on) of the operating system on which the executableruns, unless that component itself accompanies the executable.If distribution of executable or object code is made by offering access to copy from a designated place, then offering equivalent access to copy the source code from the same place counts as distribution of the source code, even though third parties are not compelled to copy the source along with the object code.4. You may not copy, modify, sublicense, or distribute the Program except as expressly provided under this License. Any attempt otherwise to copy, modify, sublicense or distribute the Program is void, and will
69
automatically terminate your rights under this License.However, parties who have received copies, or rights, from you under this License will not have their licenses terminated so long as such parties remain in full compliance.5. You are not required to accept this License, since you have not signed it. However, nothing else grants you permission to modify or distribute the Program or its derivative works. These actions are prohibited by law if you do not accept this License. Therefore, by modifying or distributing the Program (or any work based on the Program), you indicate your acceptance of this License to do so, and all its terms and conditions for copying, distributing or modifying the Program or works based on it.6. Each time you redistribute the Program (or any work based on the Program), the recipient automatically receives a license from the original licensor to copy, distribute or modify the Program subject to these terms and conditions. You may not impose any further restrictions on the recipients’ exercise of the rights granted herein. You are not responsible for enforcing compliance by third parties to this License.7. If, as a consequence of a court judgment or allegation of patent infringement or for any other reason (not limited to patent issues), conditions are imposed on you (whether by court order, agreement or otherwise) that contradict the conditions of this License, they do not excuse you from the conditions of this License. If you cannot distribute so as to satisfy simultaneously your obligations under this License and any other pertinent obligations, then as a consequence you may not distribute the Program at all. For example, if a patent license would not permit royalty-free redistribution of the Program by all those who receive copies directly or indirectly through you, then the only way you could satisfy both it and this License would be to refrain entirely from distribution of the Program.If any portion of this section is held invalid or unenforceable under any particular circumstance, the balance of the section is intended to apply and the section as a whole is intended to apply in other circumstances. It is not the purpose of this section to induce you to infringe any patents or other property right claims or to contest validity of any such claims; this section has the sole purpose of protecting the integrity of the free software distribution system, which is implemented by public license practices. Many people have made generous contributions to the wide range of software distributed through that system in reliance on consistent application of that system; it is up to the author/donor to decide if he or she is willing to distribute software through any other system and a licensee cannot impose that choice.
This section is intended to make thoroughly clear what is believed to be a consequence of the rest of this License.8. If the distribution and/or use of the Program is restricted in certain countries either by patents or by copyrighted interfaces, the original copyright holder who places the Program under this License may add an explicit geographical distribution limitation excluding those countries, so that distribution is permitted only in or among countries not thus excluded. In such case, this License incorporates the limitation as if written in the body of this License.9. The Free Software Foundation may publish revised and/or new versions of the General Public License from time to time. Such new versions will be similar in spirit to the present version, but may differ in detail to address new problems or concerns.Each version is given a distinguishing version number.If the Program specifies a version number of this License which applies to it and “any later version”, you have the option of following the terms and conditions either of that version or of any later version published by the Free Software Foundation. If the Program does not specify a version number of this License, you may choose any version ever published by the Free Software Foundation.10. If you wish to incorporate parts of the Program into other free programs whose distribution conditions are different, write to the author to ask for permission. For software which is copyrighted by the Free Software Foundation, write to the Free Software Foundation; we sometimes make exceptions for this. Our decision will be guided by the two goals of preserving the free status of all derivatives of our free software and of promoting the sharing and reuse of software generally.
NO WARRANTY
BECAUSE THE PROGRAM IS LICENSED FREE OF CHARGE, THERE IS NO WARRANTY FOR THE PROGRAM, TO THE EXTENT PERMITTED BY APPLICABLE LAW. EXCEPT WHEN OTHERWISE STATED IN WRITING THE COPYRIGHT HOLDERS AND/OR OTHER PARTIES PROVIDE THE PROGRAM “AS IS” WITHOUT WARRANTY OF ANY KIND, EITHER EXPRESSED OR IMPLIED, INCLUDING, BUT NOT LIMITED TO, THE IMPLIED WARRANTIES OF MERCHANTABILITY AND FITNESS FOR A PARTICULAR PURPOSE. THE ENTIRE RISK AS TO THE QUALITY AND PERFORMANCE OF THE PROGRAM IS WITH YOU.SHOULD THE PROGRAM PROVE DEFECTIVE, YOU ASSUME THE COST OF ALL NECESSARY SERVICING, REPAIR OR CORRECTION.IN NO EVENT UNLESS REQUIRED BY APPLICABLE LAW OR AGREED TO IN WRITING WILL ANY COPYRIGHT HOLDER,
70
OR ANY OTHER PARTY WHO MAY MODIFY AND/OR REDISTRIBUTE THE PROGRAM AS PERMITTED ABOVE, BE LIABLE TO YOU FOR DAMAGES, INCLUDING ANY GENERAL, SPECIAL, INCIDENTAL OR CONSEQUENTIAL DAMAGES ARISING OUT OF THE USE OR INABILITY TO USE THE PROGRAM (INCLUDING BUT NOT LIMITED TO LOSS OF DATA OR DATA BEING RENDERED INACCURATE OR LOSSES SUSTAINED BY YOU OR THIRD PARTIES OR A FAILURE OF THE PROGRAM TO OPERATE WITH ANY OTHER PROGRAMS), EVEN IF SUCH HOLDER OR OTHER PARTY HAS BEEN ADVISED OF THE POSSIBILITY OF SUCH DAMAGES.
END OF TERMS AND CONDITIONSHow to Apply These Terms to Your New Programs
If you develop a new program, and you want it to be of the greatest possible use to the public, the best way to achieve this is to make it free software which everyone can redistribute and change under these terms.To do so, attach the following notices to the program. It is safest to attach them to the start of each source file to most effectively convey the exclusion of warranty; and each file should have at least the “copyright” line and a pointer to where the full notice is found.<one line to give the program’s name and a brief idea of what it does.> Copyright (C) <year> <name of author>This program is free software; you can redistribute it and/or modify it under the terms of the GNU General Public License as published by the Free Software Foundation; either version 2 of the License, or (at your option) any later version.This program is distributed in the hope that it will be useful, but WITHOUT ANY WARRANTY; without even the implied warranty of MERCHANTABILITY or FITNESS FOR A PARTICULAR PURPOSE. See the GNU General Public License for more details.You should have received a copy of the GNU General Public License along with this program; if not, write to the Free Software Foundation, Inc., 51 Franklin Street, Fifth Floor, Boston, MA 02110-1301, USA.Also add information on how to contact you by electronic and paper mail.If the program is interactive, make it output a short notice like this when it starts in an interactive mode:Gnomovision version 69, Copyright (C) year name of author Gnomovision comes with ABSOLUTELY NO WARRANTY; for details type ‘show w’.This is free software, and you are welcome to redistribute it under certain conditions; type ‘show c’ for details.The hypothetical commands ‘show w’ and ‘show c’ should show the appropriate parts of the General
Public License. Of course, the commands you use may be called something other than ‘show w’ and ‘show c’; they could even be mouse-clicks or menu items--whatever suits your program.You should also get your employer (if you work as a programmer) or your school, if any, to sign a “copyright disclaimer” for the program, if necessary. Here is a sample; alter the names:Yoyodyne, Inc., hereby disclaims all copyright interest in the program ‘Gnomovision’ (which makes passes at compilers) written by James Hacker.<signature of Ty Coon>, 1 April 1989Ty Coon, President of ViceThis General Public License does not permit incorporating your program into proprietary programs.If your program is a subroutine library, you may consider it more useful to permit linking proprietary applications with the library. If this is what you want to do, use the GNU Library General Public License instead of this License.===============================
GNU LESSER GENERAL PUBLIC LICENSEVersion 2.1, February 1999
Copyright (C) 1991, 1999 Free Software Foundation, Inc. 51 Franklin Street, Fifth Floor, Boston, MA 02110-1301, USA. Everyone is permitted to copy and distribute verbatim copies of this license document, but changing it is not allowed.[This is the first released version of the Lesser GPL. It also counts as the successor of the GNU Library Public License, version 2, hence the version number 2.1.]
Preamble
The licenses for most software are designed to take away your freedom to share and change it. By contrast, the GNU General Public Licenses are intended to guarantee your freedom to share and change free software-to make sure the software is free for all its users.This license, the Lesser General Public License, applies to some specially designated software packagestypically libraries--of the Free Software Foundation and other authors who decide to use it. You can use it too, but we suggest you first think carefully about whether this license or the ordinary General Public License is the better strategy to use in any particular case, based on the explanations below.When we speak of free software, we are referring to freedom of use, not price. Our General Public Licenses are designed to make sure that you have the freedom to distribute copies of free software (and charge for this service if you wish); that you receive source code or can get it if you want it; that you can change the software and use pieces of it in new free
71
programs; and that you are informed that you can do these things.To protect your rights, we need to make restrictions that forbid distributors to deny you these rights or to ask you to surrender these rights. These restrictions translate to certain responsibilities for you if you distribute copies of the library or if you modify it.For example, if you distribute copies of the library, whether gratis or for a fee, you must give the recipients all the rights that we gave you. You must make sure that they, too, receive or can get the source code. If you link other code with the library, you must provide complete object files to the recipients, so that they can relink them with the library after making changes to the library and recompiling it. And you must show them these terms so they know their rights.We protect your rights with a two-step method: (1) we copyright the library, and (2) we offer you this license, which gives you legal permission to copy, distribute and/or modify the library.To protect each distributor, we want to make it very clear that there is no warranty for the free library. Also, if the library is modified by someone else and passed on, the recipients should know that what they have is not the original version, so that the original author’s reputation will not be affected by problems that might be introduced by others.Finally, software patents pose a constant threat to the existence of any free program. We wish to make sure that a company cannot effectively restrict the users of a free program by obtaining a restrictive license from a patent holder. Therefore, we insist that any patent license obtained for a version of the library must be consistent with the full freedom of use specified in this license.Most GNU software, including some libraries, is covered by the ordinary GNU General Public License. This license, the GNU Lesser General Public License, applies to certain designated libraries, and is quite different from the ordinary General Public License. We use this license for certain libraries in order to permit linking those libraries into non-free programs.When a program is linked with a library, whether statically or using a shared library, the combination of the two is legally speaking a combined work, a derivative of the original library. The ordinary General Public License therefore permits such linking only if the entire combination fits its criteria of freedom. The Lesser General Public License permits more lax criteria for linking other code with the library.We call this license the “Lesser” General Public License because it does Less to protect the user’s freedom than the ordinary General Public License. It also provides other free software developers Less of an advantage over competing non-free programs. These disadvantages are the reason we use the ordinary General Public License for many libraries.
However, the Lesser license provides advantages in certain special circumstances.For example, on rare occasions, there may be a special need to encourage the widest possible use of a certain library, so that it becomes a de-facto standard. To achieve this, non-free programs must be allowed to use the library. A more frequent case is that a free library does the same job as widely used non-free libraries. In this case, there is little to gain by limiting the free library to free software only, so we use the Lesser General Public License.In other cases, permission to use a particular library in non-free programs enables a greater number of people to use a large body of free software. For example, permission to use the GNU C Library in non-free programs enables many more people to use the whole GNU operating system, as well as its variant, the GNU/Linux operating system.Although the Lesser General Public License is Less protective of the users’ freedom, it does ensure that the user of a program that is linked with the Library has the freedom and the wherewithal to run that program using a modified version of the Library.The precise terms and conditions for copying, distribution and modification follow. Pay close attention to the difference between a “work based on the library” and a “work that uses the library”. The former contains code derived from the library, whereas the latter must be combined with the library in order to run.
GNU LESSER GENERAL PUBLIC LICENSE TERMS AND CONDITIONS FOR COPYING, DISTRIBUTION AND MODIFICATION
0. This License Agreement applies to any software library or other program which contains a notice placed by the copyright holder or other authorized party saying it may be distributed under the terms of this Lesser General Public License (also called “this License”). Each licensee is addressed as “you”.A “library” means a collection of software functions and/or data prepared so as to be conveniently linked with application programs (which use some of those functions and data) to form executables.The “Library”, below, refers to any such software library or work which has been distributed under these terms.A “work based on the Library” means either the Library or any derivative work under copyright law: that is to say, a work containing the Library or a portion of it, either verbatim or with modifications and/or translated straightforwardly into another language. (Hereinafter, translation is included without limitation in the term “modification”.)“Source code” for a work means the preferred form of the work for making modifications to it. For a library, complete source code means all the source code for all modules it contains, plus any associated interface
72
definition files, plus the scripts used to control compilation and installation of the library.Activities other than copying, distribution and modification are not covered by this License; they are outside its scope. The act of running a program using the Library is not restricted, and output from such a program is covered only if its contents constitute a work based on the Library (independent of the use of the Library in a tool for writing it). Whether that is true depends on what the Library does and what the program that uses the Library does.1. You may copy and distribute verbatim copies of the Library’s complete source code as you receive it, in any medium, provided that you conspicuously and appropriately publish on each copy an appropriate copyright notice and disclaimer of warranty; keep intact all the notices that refer to this License and to the absence of any warranty; and distribute a copy of this License along with the Library.You may charge a fee for the physical act of transferring a copy, and you may at your option offer warranty protection in exchange for a fee.2. You may modify your copy or copies of the Library or any portion of it, thus forming a work based on the Library, and copy and distribute such modifications or work under the terms of Section 1 above, provided that you also meet all of these conditions:a) The modified work must itself be a software library.b) You must cause the files modified to carry prominent notices stating that you changed the files and the date of any change.c) You must cause the whole of the work to be licensed at no charge to all third parties under the terms of this License.d) If a facility in the modified Library refers to a function or a table of data to be supplied by an application program that uses the facility, other than as an argument passed when the facility is invoked, then you must make a good faith effort to ensure that, in the event an application does not supply such function or table, the facility still operates, and performs whatever part of its purpose remains meaningful.(For example, a function in a library to compute square roots has a purpose that is entirely well-defined independent of the application. Therefore, Subsection 2d requires that any application-supplied function or table used by this function must be optional: if the application does not supply it, the square root function must still compute square roots.)These requirements apply to the modified work as a whole. If identifiable sections of that work are not derived from the Library, and can be reasonably considered independent and separate works in themselves, then this License, and its terms, do not apply to those sections when you distribute them as separate works. But when you distribute the same sections as part of a whole which is a work based on
the Library, the distribution of the whole must be on the terms of this License, whose permissions for other licensees extend to the entire whole, and thus to each and every part regardless of who wrote it.Thus, it is not the intent of this section to claim rights or contest your rights to work written entirely by you; rather, the intent is to exercise the right to control the distribution of derivative or collective works based on the Library.In addition, mere aggregation of another work not based on the Library with the Library (or with a work based on the Library) on a volume of a storage or distribution medium does not bring the other work under the scope of this License.3. You may opt to apply the terms of the ordinary GNU General Public License instead of this License to a given copy of the Library. To do this, you must alter all the notices that refer to this License, so that they refer to the ordinary GNU General Public License, version 2, instead of to this License. (If a newer version than version 2 of the ordinary GNU General Public License has appeared, then you can specify that version instead if you wish.) Do not make any other change in these notices.Once this change is made in a given copy, it is irreversible for that copy, so the ordinary GNU General Public License applies to all subsequent copies and derivative works made from that copy. This option is useful when you wish to copy part of the code of the Library into a program that is not a library.4. You may copy and distribute the Library (or a portion or derivative of it, under Section 2) in object code or executable form under the terms of Sections 1 and 2 above provided that you accompany it with the complete corresponding machine-readable source code, which must be distributed under the terms of Sections 1 and 2 above on a medium customarily used for software interchange.If distribution of object code is made by offering access to copy from a designated place, then offering equivalent access to copy the source code from the same place satisfies the requirement to distribute the source code, even though third parties are not compelled to copy the source along with the object code.5. A program that contains no derivative of any portion of the Library, but is designed to work with the Library by being compiled or linked with it, is called a “work that uses the Library”. Such a work, in isolation, is not a derivative work of the Library, and therefore falls outside the scope of this License.However, linking a “work that uses the Library” with the Library creates an executable that is a derivative of the Library (because it contains portions of the Library), rather than a “work that uses the library”. The executable is therefore covered by this License. Section 6 states terms for distribution of such executables.
73
When a “work that uses the Library” uses material from a header file that is part of the Library, the object code for the work may be a derivative work of the Library even though the source code is not. Whether this is true is especially significant if the work can be linked without the Library, or if the work is itself a library. The threshold for this to be true is not precisely defined by law.If such an object file uses only numerical parameters, data structure layouts and accessors, and small macros and small inline functions (ten lines or less in length), then the use of the object file is unrestricted, regardless of whether it is legally a derivative work. (Executables containing this object code plus portions of the Library will still fall under Section 6.)Otherwise, if the work is a derivative of the Library, you may distribute the object code for the work under the terms of Section 6. Any executables containing that work also fall under Section 6, whether or not they are linked directly with the Library itself.6. As an exception to the Sections above, you may also combine or link a “work that uses the Library” with the Library to produce a work containing portions of the Library, and distribute that work under terms of your choice, provided that the terms permit modification of the work for the customer’s own use and reverse engineering for debugging such modifications.You must give prominent notice with each copy of the work that the Library is used in it and that the Library and its use are covered by this License. You must supply a copy of this License. If the work during execution displays copyright notices, you must include the copyright notice for the Library among them, as well as a reference directing the user to the copy of this License. Also, you must do one of these things:a) Accompany the work with the complete corresponding machine-readable source code for the Library including whatever changes were used in the work (which must be distributed under Sections 1 and 2 above); and, if the work is an executable linked with the Library, with the complete machine-readable “work that uses the Library”, as object code and/or source code, so that the user can modify the Library and then relink to produce a modified executable containing the modified Library. (It is understood that the user who changes the contents of definitions files in the Library will not necessarily be able to recompile the application to use the modified definitions.)b) Use a suitable shared library mechanism for linking with the Library. A suitable mechanism is one that (1) uses at run time a copy of the library already present on the user’s computer system, rather than copying library functions into the executable, and (2) will operate properly with a modified version of the library, if the user installs one, as long as the modified
version is interface-compatible with the version that the work was made with.c) Accompany the work with a written offer, valid for at least three years, to give the same user the materials specified in Subsection 6a, above, for a charge no more than the cost of performing this distribution.d) If distribution of the work is made by offering access to copy from a designated place, offer equivalent access to copy the above specified materials from the same place.e) Verify that the user has already received a copy of these materials or that you have already sent this user a copy.For an executable, the required form of the “work that uses the Library” must include any data and utility programs needed for reproducing the executable from it. However, as a special exception, the materials to be distributed need not include anything that is normally distributed (in either source or binary form) with the major components (compiler, kernel, and so on) of the operating system on which the executable runs, unless that component itself accompanies the executable.It may happen that this requirement contradicts the license restrictions of other proprietary libraries that do not normally accompany the operating system. Such a contradiction means you cannot use both them and the Library together in an executable that you distribute.7. You may place library facilities that are a work based on the Library side-by-side in a single library together with other library facilities not covered by this License, and distribute such a combined library, provided that the separate distribution of the work based on the Library and of the other library facilities is otherwise permitted, and provided that you do these two things:a) Accompany the combined library with a copy of the same work based on the Library, uncombined with any other library facilities. This must be distributed under the terms of the Sections above.b) Give prominent notice with the combined library of the fact that part of it is a work based on the Library, and explaining where to find the accompanying uncombined form of the same work.8. You may not copy, modify, sublicense, link with, or distribute the Library except as expressly provided under this License. Any attempt otherwise to copy, modify, sublicense, link with, or distribute the Library is void, and will automatically terminate your rights under this License. However, parties who have received copies, or rights, from you under this License will not have their licenses terminated so long as such parties remain in full compliance.9. You are not required to accept this License, since you have not signed it. However, nothing else grants you permission to modify or distribute the Library or its derivative works. These actions are prohibited by law if you do not accept this License. Therefore, by
74
modifying or distributing the Library (or any work based on the Library), you indicate your acceptance of this License to do so, and all its terms and conditions for copying, distributing or modifying the Library or works based on it.10. Each time you redistribute the Library (or any work based on the Library), the recipient automatically receives a license from the original licensor to copy, distribute, link with or modify the Library subject to these terms and conditions. You may not impose any further restrictions on the recipients’ exercise of the rights granted herein. You are not responsible for enforcing compliance by third parties with this License.11. If, as a consequence of a court judgment or allegation of patent infringement or for any other reason (not limited to patent issues), conditions are imposed on you (whether by court order, agreement or otherwise) that contradict the conditions of this License, they do not excuse you from the conditions of this License. If you cannot distribute so as to satisfy simultaneously your obligations under this License and any other pertinent obligations, then as a consequence you may not distribute the Library at all. For example, if a patent license would not permit royalty-free redistribution of the Library by all those who receive copies directly or indirectly through you, then the only way you could satisfy both it and this License would be to refrain entirely from distribution of the Library.If any portion of this section is held invalid or unenforceable under any particular circumstance, the balance of the section is intended to apply, and the section as a whole is intended to apply in other circumstances.It is not the purpose of this section to induce you to infringe any patents or other property right claims or to contest validity of any such claims; this section has the sole purpose of protecting the integrity of the free software distribution system which is implemented by public license practices. Many people have made generous contributions to the wide range of software distributed through that system in reliance on consistent application of that system; it is up to the author/donor to decide if he or she is willing to distribute software through any other system and a licensee cannot impose that choice.This section is intended to make thoroughly clear what is believed to be a consequence of the rest of this License.12. If the distribution and/or use of the Library is restricted in certain countries either by patents or by copyrighted interfaces, the original copyright holder who places the Library under this License may add an explicit geographical distribution limitation excluding those countries, so that distribution is permitted only in or among countries not thus excluded. In such case, this License incorporates the limitation as if written in the body of this License.
13. The Free Software Foundation may publish revised and/or new versions of the Lesser General Public License from time to time. Such new versions will be similar in spirit to the present version, but may differ in detail to address new problems or concerns.Each version is given a distinguishing version number.If the Library specifies a version number of this License which applies to it and “any later version”, you have the option of following the terms and conditions either of that version or of any later version published by the Free Software Foundation. If the Library does not specify a license version number, you may choose any version ever published by the Free Software Foundation.14. If you wish to incorporate parts of the Library into other free programs whose distribution conditions are incompatible with these, write to the author to ask for permission. For software which is copyrighted by the Free Software Foundation, write to the Free Software Foundation; we sometimes make exceptions for this. Our decision will be guided by the two goals of preserving the free status of all derivatives of our free software and of promoting the sharing and reuse of software generally.
NO WARRANTY
15. BECAUSE THE LIBRARY IS LICENSED FREE OF CHARGE, THERE IS NO WARRANTY FOR THE LIBRARY, TO THE EXTENT PERMITTED BY APPLICABLE LAW.EXCEPT WHEN OTHERWISE STATED IN WRITING THE COPYRIGHT HOLDERS AND/OR OTHER PARTIES PROVIDE THE LIBRARY “AS IS” WITHOUT WARRANTY OF ANY KIND, EITHER EXPRESSED OR IMPLIED, INCLUDING, BUT NOT LIMITED TO, THE IMPLIED WARRANTIES OF MERCHANTABILITY AND FITNESS FOR A PARTICULAR PURPOSE. THE ENTIRE RISK AS TO THE QUALITY AND PERFORMANCE OF THE LIBRARY IS WITH YOU. SHOULD THE LIBRARY PROVE DEFECTIVE, YOU ASSUME THE COST OF ALL NECESSARY SERVICING, REPAIR OR CORRECTION.16. IN NO EVENT UNLESS REQUIRED BY APPLICABLE LAW OR AGREED TO IN WRITING WILL ANY COPYRIGHT HOLDER, OR ANY OTHER PARTY WHO MAY MODIFY AND/OR REDISTRIBUTE THE LIBRARY AS PERMITTED ABOVE, BE LIABLE TO YOU FOR DAMAGES, INCLUDING ANY GENERAL, SPECIAL, INCIDENTAL OR CONSEQUENTIAL DAMAGES ARISING OUT OF THE USE OR INABILITY TO USE THE LIBRARY (INCLUDING BUT NOT LIMITED TO LOSS OF DATA OR DATA BEING RENDERED INACCURATE OR LOSSES SUSTAINED BY YOU OR THIRD PARTIES OR A FAILURE OF THE
75
LIBRARY TO OPERATE WITH ANY OTHER SOFTWARE), EVEN IF SUCH HOLDER OR OTHER PARTY HAS BEEN ADVISED OF THE POSSIBILITY OF SUCH DAMAGES.
END OF TERMS AND CONDITIONSHow to Apply These Terms to Your New Libraries
If you develop a new library, and you want it to be of the greatest possible use to the public, we recommend making it free software that everyone can redistribute and change. You can do so by permitting redistribution under these terms (or, alternatively, under the terms of the ordinary General Public License).To apply these terms, attach the following notices to the library. It is safest to attach them to the start of each source file to most effectively convey the exclusion of warranty; and each file should have at least the “copyright” line and a pointer to where the full notice is found.<one line to give the library’s name and a brief idea of what it does.>Copyright (C) <year> <name of author>This library is free software; you can redistribute it and/or modify it under the terms of the GNU Lesser General Public license as published by the Free Software Foundation; either version 2.1 of the License, or (at your option) any later version.This library is distributed in the hope that it will be useful, but WITHOUT ANY WARRANTY; without even the implied warranty of MERCHANTABILITY or FITNESS FOR A PARTICULAR PURPOSE. See the GNU Lesser General Public License for more details.You should have received a copy of the GNU Lesser General Public License along with this library; if not, write to the Free Software Foundation, Inc., 51 Franklin Street, Fifth Floor, Boston, MA 02110-1301, USA.Also add information on how to contact you by electronic and paper mail.You should also get your employer (if you work as a programmer) or your school, if any, to sign a “copyright disclaimer” for the library, if necessary. Here is a sample; alter the names:Yoyodyne, Inc., hereby disclaims all copyright interest in the library ‘Frob’ (a library for tweaking knobs) written by James Random Hacker.<signature of Ty Coon>, 1 April 1990Ty Coon, President of Vice===============================
Notification of BSD
Redistribution and use in source and binary forms, with or without modification, are permitted provided that the following conditions are met:
1. Redistributions of source code must retain the above copyright notice, this list of conditions and the following disclaimer.2. Redistributions in binary form must reproduce the above copyright notice, this list of conditions and the following disclaimer in the documentation and/or other materials provided with the distribution.3. All advertising materials mentioning features or use of this software must display the following acknowledgement:4. Neither the name of the following developers nor the names of its contributors may be used to endorse or promote products derived from this software without specific prior written permission.THIS SOFTWARE IS PROVIDED BY THE REGENTS AND CONTRIBUTORS “AS IS” AND ANY EXPRESS OR IMPLIED WARRANTIES, INCLUDING, BUT NOT LIMITED TO, THE IMPLIED WARRANTIES OF MERCHANTABILITY AND FITNESS FOR A PARTICULAR PURPOSE ARE DISCLAIMED. IN NO EVENT SHALL THE REGENTS OR CONTRIBUTORS BE LIABLE FOR ANY DIRECT, INDIRECT, INCIDENTAL, SPECIAL, EXEMPLARY, OR CONSEQUENTIAL DAMAGES (INCLUDING, BUT NOT LIMITED TO, PROCUREMENT OF SUBSTITUTE GOODS OR SERVICES; LOSS OF USE, DATA, OR PROFITS; OR BUSINESS INTERRUPTION) HOWEVER CAUSED AND ON ANY THEORY OF LIABILITY, WHETHER IN CONTRACT, STRICT LIABILITY, OR TORT (INCLUDING NEGLIGENCE OR OTHERWISE) ARISING IN ANY WAY OUT OF THE USE OF THIS SOFTWARE, EVEN IF ADVISED OF THE POSSIBILITY OF SUCH DAMAGE.The following notices are required to satisfy the license terms of the software that we have mentioned in this document:This product includes software developed by the NetBSD Foundation, Inc. and its contributors.This product includes software developed by the University of California, Berkeley and its contributors.This product includes software developed for the NetBSD Project. See http://www.NetBSD.org/ for information about NetBSD.This product includes software developed by Christos Zoulas.This product includes software developed by Niels Provos.This product includes software developed by the University of California, Lawrence Berkeley Laboratory.This product includes software developed by WIDE Project and its contributors.This product includes software developed by Brian Aker.
76
This product includes software developed by Danga Interactive, Inc.===============================
INDEPENDENT JPEG GROUP SOFTWARE
This software is based in part on the work of the Independent JPEG Group.===============================
SOFTWARE DEVELOPED BY THE OPENSSL PROJECT FOR USE IN THE SSL TOOLKIT
LICENSE ISSUES===============================The OpenSSL toolkit stays under a dual license, i.e. both the conditions of the OpenSSL License and the original SSLeay license apply to the toolkit. See below for the actual license texts. Actually both licenses are BSD-style Open Source licenses. In case of any license issues related to OpenSSL please contact [email protected].
OpenSSL License--------------------------------------------===============================Copyright (c) 1998-2011 The OpenSSL Project. All rights reserved.Redistribution and use in source and binary forms, with or without modification, are permitted provided that the following conditions are met:1. Redistributions of source code must retain the above copyright notice, this list of conditions and the following disclaimer.2. Redistributions in binary form must reproduce the above copyright notice, this list of conditions and the following disclaimer in the documentation and/or other materials provided with the distribution.3. All advertising materials mentioning features or use of this software must display the following acknowledgment: “This product includes software developed by the OpenSSL Project for use in the OpenSSL Toolkit. (http://www.openssl.org/)”4. The names “OpenSSL Toolkit” and “OpenSSL Project” must not be used to endorse or promote products derived from this software without prior written permission. For written permission, please contact [email protected]. Products derived from this software may not be called “OpenSSL” nor may “OpenSSL” appear in their names without prior written permission of the OpenSSL Project.6. Redistributions of any form whatsoever must retain the following acknowledgment: “This product includes software developed by the OpenSSL Project for use in the OpenSSL Toolkit (http://www.openssl.org/)”
THIS SOFTWARE IS PROVIDED BY THE OpenSSL PROJECT “AS IS” AND ANY EXPRESSED OR IMPLIED WARRANTIES, INCLUDING, BUT NOT LIMITED TO, THE IMPLIED WARRANTIES OF MERCHANTABILITY AND FITNESS FOR A PARTICULAR PURPOSE ARE DISCLAIMED. IN NO EVENT SHALL THE OpenSSL PROJECT OR ITS CONTRIBUTORS BE LIABLE FOR ANY DIRECT, INDIRECT, INCIDENTAL, SPECIAL, EXEMPLARY, OR CONSEQUENTIAL DAMAGES (INCLUDING, BUT NOT LIMITED TO, PROCUREMENT OF SUBSTITUTE GOODS OR SERVICES; LOSS OF USE, DATA, OR PROFITS; OR BUSINESS INTERRUPTION) HOWEVER CAUSED AND ON ANY THEORY OF LIABILITY, WHETHER IN CONTRACT, STRICT LIABILITY, OR TORT (INCLUDING NEGLIGENCE OR OTHERWISE) ARISING IN ANY WAY OUT OF THE USE OF THIS SOFTWARE, EVEN IF ADVISED OF THE POSSIBILITY OF SUCH DAMAGE.===============================This product includes cryptographic software written by Eric Young ([email protected]). This product includes software written by Tim Hudson ([email protected]).
Original SSLeay License--------------------------------------------Copyright (C) 1995-1998 Eric Young ([email protected])All rights reserved.This package is an SSL implementation written by Eric Young ([email protected]).The implementation was written so as to conform with Netscapes SSL.This library is free for commercial and non-commercial use as long as the following conditions are aheared to. The following conditions apply to all code found in this distribution, be it the RC4, RSA, lhash, DES, etc., code; not just the SSL code. The SSL documentation included with this distribution is covered by the same copyright terms except that the holder is Tim Hudson ([email protected]).Copyright remains Eric Young’s, and as such any Copyright notices in the code are not to be removed.If this package is used in a product, Eric Young should be given attribution as the author of the parts of the library used.This can be in the form of a textual message at program startup or in documentation (online or textual) provided with the package. Redistribution and use in source and binary forms, with or without modification, are permitted provided that the following conditions are met:1. Redistributions of source code must retain the copyright notice, this list of conditions and the following disclaimer.
77

2. Redistributions in binary form must reproduce the above copyright notice, this list of conditions and the following disclaimer in the documentation and/or other materials provided with the distribution.3. All advertising materials mentioning features or use of this software must display the following acknowledgement: “This product includes cryptographic software written by Eric Young ([email protected])” The word ’cryptographic’ can be left out if the rouines from the library being used are not cryptographic related :-).4. If you include any Windows specific code (or a derivative thereof) from the apps directory (application code) you must include an acknowledgement: “This product includes software written by Tim Hudson ([email protected])” THIS SOFTWARE IS PROVIDED BY ERIC YOUNG “AS IS” AND ANY EXPRESS OR IMPLIED WARRANTIES, INCLUDING, BUT NOT LIMITED TO, THE IMPLIED WARRANTIES OF MERCHANTABILITY AND FITNESS FOR A PARTICULAR PURPOSE ARE DISCLAIMED. IN NO EVENT SHALL THE AUTHOR OR CONTRIBUTORS BE LIABLE FOR ANY DIRECT, INDIRECT, INCIDENTAL, SPECIAL, EXEMPLARY, OR CONSEQUENTIAL DAMAGES (INCLUDING, BUT NOT LIMITED TO, PROCUREMENT OF SUBSTITUTE GOODS OR SERVICES; LOSS OF USE, DATA, OR PROFITS; OR BUSINESS INTERRUPTION) HOWEVER CAUSED AND ON ANY THEORY OF LIABILITY, WHETHER IN CONTRACT, STRICT LIABILITY, OR TORT (INCLUDING NEGLIGENCE OR OTHERWISE) ARISING IN ANY WAY OUT OF THE USE OF THIS SOFTWARE, EVEN IF ADVISED OF THE POSSIBILITY OF SUCH DAMAGE. The licence and distribution terms for any publically available version or derivative of this code cannot be changed. i.e. this code cannot simply be copied and put under another distribution licence [including the GNU Public Licence.]===============================
FREETYPE/FREETYPE2 SOFTWARE
The software is based in part of the work of the FreeType Team.===============================
Notification of MIT
EXPATCopyright (c) 1998, 1999, 2000 Thai Open Source Software Center Ltd and Clark CooperCopyright (c) 2001, 2002, 2003, 2004, 2005, 2006 Expat maintainers.JSONcpp Copyright (c) 2007-2010 Baptiste Lepilleuryaml-cpp Copyright (c) 2008 Jesse Beder.
cJSON Copyright (c) 2009 Dave GambleGIFLIB Copyright (c) 1997 Eric S. RaymondPyYAML Copyright (c) 2006 Kirill SimonovParson Copyright (c) 2012 - 2014 Krzysztof GabisPermission is hereby granted, free of charge, to any person obtaining a copy of this software and associated documentation files (the “Software”), to deal in the Software without restriction, including without limitation the rights to use, copy, modify, merge, publish, distribute, sublicense, and/or sell copies of the Software, and to permit persons to whom the Software is furnished to do so, subject to the following conditions:The above copyright notice and this permission notice shall be included in all copies or substantial portions of the Software.THE SOFTWARE IS PROVIDED “AS IS”, WITHOUT WARRANTY OF ANY KIND, EXPRESS OR IMPLIED, INCLUDING BUT NOT LIMITED TO THE WARRANTIES OF MERCHANTABILITY, FITNESS FOR A PARTICULAR PURPOSE AND NONINFRINGEMENT. IN NO EVENT SHALL THE AUTHORS OR COPYRIGHT HOLDERS BE LIABLE FOR ANY CLAIM, DAMAGES OR OTHER LIABILITY, WHETHER IN AN ACTION OF CONTRACT, TORT OR OTHERWISE, ARISING FROM, OUT OF OR IN CONNECTION WITH THE SOFTWARE OR THE USE OR OTHER DEALINGS IN THE SOFTWARE.===============================
CURL SOFTWARE
COPYRIGHT AND PERMISSION NOTICE. Copyright (c)1996 - 2012, Daniel Stenberg, <[email protected]>.All rights reserved.Permission to use, copy, modify, and distribute this software for any purpose with or without fee is hereby granted, provided that the above copyright notice and this permission notice appear in all copies.THE SOFTWARE IS PROVIDED “AS IS”, WITHOUT WARRANTY OF ANY KIND, EXPRESS OR IMPLIED, INCLUDING BUT NOT LIMITED TO THE WARRANTIES OF MERCHANTABILITY, FITNESS FOR A PARTICULAR PURPOSE AND NONINFRINGEMENT OF THIRD PARTY RIGHTS. IN NO EVENT SHALL THE AUTHORS OR COPYRIGHT HOLDERS BE LIABLE FOR ANY CLAIM, DAMAGES OR OTHER LIABILITY, WHETHER IN AN ACTION OF CONTRACT, TORT OR OTHERWISE, ARISING FROM, OUT OF OR IN CONNECTION WITH THE SOFTWARE OR THE USE OR OTHER DEALINGS IN THE SOFTWARE. Except as contained in this notice, the name of a copyright holder shall not be used in advertising or otherwise to promote the sale, use or
78
other dealings in this Software without prior written authorization of the copyright holder.===============================
klibc and jemalloc
All of the documentation and software included in the 4.4BSD and 4.4BSD-Lite Releases is copyrighted by The Regents of the University of California.Copyright 1979, 1980, 1983, 1986, 1988, 1989, 1991, 1992, 1993, 1994 The Regents of the University of California.All rights reserved.Redistribution and use in source and binary forms, with or without modification, are permitted provided that the following conditions are met:Redistributions of source code must retain the above copyright notice, this list of conditions and the following disclaimer.Redistributions in binary form must reproduce the above copyright notice, this list of conditions and the following disclaimer in the documentation and/or other materials provided with the distribution.All advertising materials mentioning features or use of this software must display the following acknowledgement:This product includes software developed by the University of California, Berkeley and its contributors.Neither the name of the University nor the names of its contributors may be used to endorse or promote products derived from this software without specific prior written permission.THIS SOFTWARE IS PROVIDED BY THE REGENTS AND CONTRIBUTORS “AS IS’’ AND ANY EXPRESS OR IMPLIED WARRANTIES, INCLUDING, BUT NOT LIMITED TO, THE IMPLIED WARRANTIES OF MERCHANTABILITY AND FITNESS FOR A PARTICULAR PURPOSE ARE DISCLAIMED. IN NO EVENT SHALL THE REGENTS OR CONTRIBUTORS BE LIABLE FOR ANY DIRECT, INDIRECT, INCIDENTAL, SPECIAL, EXEMPLARY, OR CONSEQUENTIAL DAMAGES (INCLUDING, BUT NOT LIMITED TO, PROCUREMENT OF SUBSTITUTE GOODS OR SERVICES; LOSS OF USE, DATA, OR PROFITS; OR BUSINESS INTERRUPTION) HOWEVER CAUSED AND ON ANY THEORY OF LIABILITY, WHETHER IN CONTRACT, STRICT LIABILITY, OR TORT (INCLUDING NEGLIGENCE OR OTHERWISE) ARISING IN ANY WAY OUT OF THE USE OF THIS SOFTWARE, EVEN IF ADVISED OF THE POSSIBILITY OF SUCH DAMAGE.The Institute of Electrical and Electronics Engineers and the American National Standards Committee X3, on Information Processing Systems have given us permission to reprint portions of their documentation.
In the following statement, the phrase “this text’’ refersto portions of the system documentation.Portions of this text are reprinted and reproduced in electronic form in the second BSD Networking Software Release, from IEEE Std 1003.1-1988, IEEE Standard Portable Operating System Interface for Computer Environments (POSIX), copyright C 1988 by the Institute of Electrical and Electronics Engineers, Inc. In the event of any discrepancy between these versions and the original IEEE Standard, the original IEEE Standard is the referee document.In the following statement, the phrase “This material’’ refers to portions of the system documentation.This material is reproduced with permission from American National Standards Committee X3, on Information Processing Systems. Computer and Business Equipment Manufacturers Association (CBEMA), 311 First St., NW, Suite 500, Washington, DC20001-2178. The developmental work of Programming Language C was completed by the X3J11 Technical Committee.The views and conclusions contained in the software and documentation are those of the authors and should not be interpreted as representing official policies, either expressed or implied, of the Regents of the University of California.===============================
Big5 Font(DynaComware)
The DynaFont used on the screen display are solely develop by DynaComware.===============================
icu(libic)
ICU License - ICU 1.8.1 and laterCOPYRIGHT AND PERMISSION NOTICECopyright (c) 1995-2012 International Business Machines Corporation and othersAll rights reserved.Permission is hereby granted, free of charge, to any person obtaining a copy of this software and associated documentation files (the “Software”), to deal in the Software without restriction, including without limitation the rights to use, copy, modify, merge, publish, distribute, and/or sell copies of the Software, and to permit persons to whom the Software is furnished to do so, provided that the above copyright notice(s) and this permission notice appear in all copies of the Software and that both the above copyright notice(s) and this permission notice appear in supporting documentation.THE SOFTWARE IS PROVIDED “AS IS”, WITHOUT WARRANTY OF ANY KIND, EXPRESS OR IMPLIED, INCLUDING BUT NOT
79
LIMITED TO THE WARRANTIES OF MERCHANTABILITY, FITNESS FOR A PARTICULAR PURPOSE AND NONINFRINGEMENT OF THIRD PARTY RIGHTS. IN NO EVENT SHALL THE COPYRIGHT HOLDER OR HOLDERS INCLUDED IN THIS NOTICE BE LIABLE FOR ANY CLAIM, OR ANY SPECIAL INDIRECT OR CONSEQUENTIAL DAMAGES, OR ANY DAMAGES WHATSOEVER RESULTING FROM LOSS OF USE, DATA OR PROFITS, WHETHER IN AN ACTION OF CONTRACT, NEGLIGENCE OR OTHER TORTIOUS ACTION, ARISING OUT OF OR IN CONNECTION WITH THE USE OR PERFORMANCE OF THIS SOFTWARE.Except as contained in this notice, the name of a copyright holder shall not be used in advertising or otherwise to promote the sale, use or other dealings in this Software without prior written authorization of the copyright holder.--------------------------------------------All trademarks and registered trademarks mentioned herein are the property of their respective owners.===============================
dhcpd
Copyright (c) 2004-2011 by Internet SystemsConsortium, Inc. (“ISC”)Copyright (c) 1995-2003 by Internet Software ConsortiumPermission to use, copy, modify, and distribute this software for any purpose with or without fee is hereby granted, provided that the above copyright notice and this permission notice appear in all copies.THE SOFTWARE IS PROVIDED “AS IS” AND ISC DISCLAIMS ALL WARRANTIES WITH REGARD TO THIS SOFTWARE INCLUDING ALL IMPLIED WARRANTIES OF MERCHANTABILITY AND FITNESS. IN NO EVENT SHALL ISC BE LIABLE FOR ANY SPECIAL, DIRECT, INDIRECT, OR CONSEQUENTIAL DAMAGES OR ANY DAMAGES WHATSOEVER RESULTING FROM LOSS OF USE, DATA OR PROFITS, WHETHER IN AN ACTION OF CONTRACT, NEGLIGENCE OR OTHER TORTIOUS ACTION, ARISING OUT OF OR IN CONNECTION WITH THE USE OR PERFORMANCE OF THIS SOFTWARE.Internet Systems Consortium, Inc.950 Charter StreetRedwood City, CA [email protected]://www.isc.org/===============================
libevent
Libevent is available for use under the following license, commonly known as the 3-clause (or “modified”) BSD license:==============Copyright (c) 2000-2007 Niels Provos <[email protected]>Copyright (c) 2007-2010 Niels Provos and Nick MathewsonRedistribution and use in source and binary forms, with or without modification, are permitted provided that the following conditions are met:1. Redistributions of source code must retain the above copyright notice, this list of conditions and the following disclaimer.2. Redistributions in binary form must reproduce the above copyright notice, this list of conditions and the following disclaimer in the documentation and/or other materials provided with the distribution.3. The name of the author may not be used to endorse or promote products derived from this software without specific prior written permission.THIS SOFTWARE IS PROVIDED BY THE AUTHOR “AS IS” AND ANY EXPRESS OR IMPLIED WARRANTIES, INCLUDING, BUT NOT LIMITED TO, THE IMPLIED WARRANTIES OF MERCHANTABILITY AND FITNESS FOR A PARTICULAR PURPOSE ARE DISCLAIMED.IN NO EVENT SHALL THE AUTHOR BE LIABLE FOR ANY DIRECT, INDIRECT, INCIDENTAL, SPECIAL, EXEMPLARY, OR CONSEQUENTIAL DAMAGES (INCLUDING, BUT NOT LIMITED TO, PROCUREMENT OF SUBSTITUTE GOODS OR SERVICES; LOSS OF USE, DATA, OR PROFITS; OR BUSINESS INTERRUPTION) HOWEVER CAUSED AND ON ANY THEORY OF LIABILITY, WHETHER IN CONTRACT, STRICT LIABILITY, OR TORT (INCLUDING NEGLIGENCE OR OTHERWISE) ARISING IN ANY WAY OUT OF THE USE OF THIS SOFTWARE, EVEN IF ADVISED OF THE POSSIBILITY OF SUCH DAMAGE.==============Portions of Libevent are based on works by others, also made available by them under the three-clause BSD license above. The copyright notices are available in the corresponding source files; the license is as above.Here’s a list:log.c:Copyright (c) 2000 Dug Song <[email protected]>Copyright (c) 1993 The Regents of the University of California.strlcpy.c:Copyright (c) 1998 Todd C. Miller <[email protected]>win32select.c:
80
Copyright (c) 2003 Michael A. Davis <[email protected]>evport.c:Copyright (c) 2007 Sun Microsystemsht-internal.h:Copyright (c) 2002 Christopher Clarkminheap-internal.h:Copyright (c) 2006 Maxim Yegorushkin <[email protected]>==============The arc4module is available under the following, sometimes called the “OpenBSD” license:Copyright (c) 1996, David Mazieres <[email protected]>Copyright (c) 2008, Damien Miller <[email protected]>Permission to use, copy, modify, and distribute this software for any purpose with or without fee is hereby granted, provided that the above copyright notice and this permission notice appear in all copies.THE SOFTWARE IS PROVIDED “AS IS” AND THE AUTHOR DISCLAIMS ALL WARRANTIES WITH REGARD TO THIS SOFTWARE INCLUDING ALL IMPLIED WARRANTIES OF MERCHANTABILITY AND FITNESS. IN NO EVENT SHALL THE AUTHOR BE LIABLE FOR ANY SPECIAL, DIRECT, INDIRECT, OR CONSEQUENTIAL DAMAGES OR ANY DAMAGES WHATSOEVER RESULTING FROM LOSS OF USE, DATA OR PROFITS, WHETHER IN AN ACTION OF CONTRACT, NEGLIGENCE OR OTHER TORTIOUS ACTION, ARISING OUT OF OR IN CONNECTION WITH THE USE OR PERFORMANCE OF THIS SOFTWARE.===============================
boost
Boost Software License - Version 1.0 - August 17th, 2003Permission is hereby granted, free of charge, to any person or organization obtaining a copy of the software and accompanying documentation covered by this license (the “Software”) to use, reproduce, display, distribute, execute, and transmit the Software, and to prepare derivative works of the Software, and to permit third-parties to whom the Software is furnished to do so, all subject to the following:The copyright notices in the Software and this entire statement, including the above license grant, this restriction and the following disclaimer, must be included in all copies of the Software, in whole or in part, and all derivative works of the Software, unless such copies or derivative works are solely in the form of machine-executable object code generated by a source language processor.THE SOFTWARE IS PROVIDED “AS IS”, WITHOUT WARRANTY OF ANY KIND, EXPRESS OR IMPLIED, INCLUDING BUT NOT
LIMITED TO THE WARRANTIES OF MERCHANTABILITY, FITNESS FOR A PARTICULAR PURPOSE, TITLE AND NON-INFRINGEMENT. IN NO EVENT SHALL THE COPYRIGHT HOLDERS OR ANYONE DISTRIBUTING THE SOFTWARE BE LIABLE FOR ANY DAMAGES OR OTHER LIABILITY, WHETHER IN CONTRACT, TORT OR OTHERWISE, ARISING FROM, OUT OF OR IN CONNECTION WITH THE SOFTWARE OR THE USE OR OTHER DEALINGS IN THE SOFTWARE.===============================
ppp
Copyrights:***********All of the code can be freely used and redistributed. The individual source files each have their own copyright and permission notice.Pppd, pppstats and pppdump are under BSD-style notices. Some of the pppd plugins are GPL’d. Chat is public domain.===============================
ntp
Copyright (c) University of Delaware 1992-2012.Permission to use, copy, modify, and distribute this software and its documentation for any purpose with or without fee is hereby granted, provided that the above copyright notice appears in all copies and that both the copyright notice and this permission notice appear in supporting documentation, and that the name University of Delaware not be used in advertising or publicity pertaining to distribution of the software without specific, written prior permission. The University of Delaware makes no representations about the suitability this software for any purpose. It is provided “as is” without express or implied warranty.===============================
libcap
Unless otherwise *explicitly* stated, the following text describes the licensed conditions under which the contents of this libcap release may be used and distributed:Redistribution and use in source and binary forms of libcap, with or without modification, are permitted provided that the following conditions are met:1. Redistributions of source code must retain any existing copyright notice, and this entire permission notice in its entirety, including the disclaimer of warranties.2. Redistributions in binary form must reproduce all prior and current copyright notices, this list of conditions, and the following disclaimer in the
81
documentation and/or other materials provided with the distribution.3. The name of any author may not be used to endorse or promote products derived from this software without their specific prior written permission.ALTERNATIVELY, this product may be distributed under the terms of the GNU General Public License, in which case the provisions of the GNU GPL are required INSTEAD OF the above restrictions. (This clause is necessary due to a potential conflict between the GNU GPL and the restrictions contained in a BSD-style copyright.)THIS SOFTWARE IS PROVIDED “AS IS’’ AND ANY EXPRESS OR IMPLIED WARRANTIES, INCLUDING, BUT NOT LIMITED TO, THE IMPLIED WARRANTIES OF MERCHANTABILITY AND FITNESS FOR A PARTICULAR PURPOSE ARE DISCLAIMED. IN NO EVENT SHALL THE AUTHOR(S) BE LIABLE FOR ANY DIRECT, INDIRECT, INCIDENTAL, SPECIAL, EXEMPLARY, OR CONSEQUENTIAL DAMAGES (INCLUDING, BUT NOT LIMITED TO, PROCUREMENT OF SUBSTITUTE GOODS OR SERVICES; LOSS OF USE, DATA, OR PROFITS; OR BUSINESS INTERRUPTION) HOWEVER CAUSED AND ON ANY THEORY OF LIABILITY, WHETHER IN CONTRACT, STRICT LIABILITY, OR TORT (INCLUDING NEGLIGENCE OR OTHERWISE) ARISING IN ANY WAY OUT OF THE USE OF THIS SOFTWARE, EVEN IF ADVISED OF THE POSSIBILITY OF SUCH DAMAGE.===============================
Python®
Python® is a registered trademark of the Python Software Foundation.===============================
lighttpd
Copyright (c) 2004, Jan Kneschke, incremental All rights reserved.Redistribution and use in source and binary forms, with or without modification, are permitted provided that the following conditions are met:– Redistributions of source code must retain the
above copyright notice, this list of conditions and the following disclaimer.
– Redistributions in binary form must reproduce the above copyright notice, this list of conditions and the following disclaimer in the documentation and/or other materials provided with the distribution.
– Neither the name of the ‘incremental’ nor the names of its contributors may be used to endorse or promote products derived from this software without specific prior written permission.
THIS SOFTWARE IS PROVIDED BY THE COPYRIGHT HOLDERS AND CONTRIBUTORS
“AS IS” AND ANY EXPRESS OR IMPLIED WARRANTIES, INCLUDING, BUT NOT LIMITED TO, THE IMPLIED WARRANTIES OF MERCHANTABILITY AND FITNESS FOR A PARTICULAR PURPOSE ARE DISCLAIMED. IN NO EVENT SHALL THE COPYRIGHT OWNER OR CONTRIBUTORS BE LIABLE FOR ANY DIRECT, INDIRECT, INCIDENTAL, SPECIAL, EXEMPLARY, OR CONSEQUENTIAL DAMAGES (INCLUDING, BUT NOT LIMITED TO, PROCUREMENT OF SUBSTITUTE GOODS OR SERVICES; LOSS OF USE, DATA, OR PROFITS; OR BUSINESS INTERRUPTION) HOWEVER CAUSED AND ON ANY THEORY OF LIABILITY, WHETHER IN CONTRACT, STRICT LIABILITY, OR TORT (INCLUDING NEGLIGENCE OR OTHERWISE) ARISING IN ANY WAY OUT OF THE USE OF THIS SOFTWARE, EVEN IF ADVISED OF THE POSSIBILITY OF SUCH DAMAGE.===============================
pcre
PCRE LICENCE------------PCRE is a library of functions to support regular expressions whose syntax and semantics are as close as possible to those of the Perl 5 language.Release 8 of PCRE is distributed under the terms of the “BSD” licence, as specified below. The documentation for PCRE, supplied in the “doc” directory, is distributed under the same terms as the software itself.The basic library functions are written in C and are freestanding. Also included in the distribution is a set of C++ wrapper functions.
THE BASIC LIBRARY FUNCTIONS---------------------------Written by: Philip HazelEmail local part: ph10Email domain: cam.ac.ukUniversity of Cambridge Computing Service, Cambridge, England.Copyright (c) 1997-2010 University of Cambridge All rights reserved.
THE C++ WRAPPER FUNCTIONS-------------------------Contributed by: Google Inc.Copyright (c) 2007-2010, Google Inc. All rights reserved.
THE “BSD” LICENCE-----------------Redistribution and use in source and binary forms, with or without modification, are permitted provided that the following conditions are met:
82
* Redistributions of source code must retain the above copyright notice, this list of conditions and the following disclaimer.
* Redistributions in binary form must reproduce the above copyright notice, this list of conditions and the following disclaimer in the documentation and/or other materials provided with the distribution.
* Neither the name of the University of Cambridge nor the name of Google Inc. nor the names of their contributors may be used to endorse or promote products derived from this software without specific prior written permission.
THIS SOFTWARE IS PROVIDED BY THE COPYRIGHT HOLDERS AND CONTRIBUTORS “AS IS” AND ANY EXPRESS OR IMPLIED WARRANTIES, INCLUDING, BUT NOT LIMITED TO, THE IMPLIED WARRANTIES OF MERCHANTABILITY AND FITNESS FOR A PARTICULAR PURPOSE ARE DISCLAIMED. IN NO EVENT SHALL THE COPYRIGHT OWNER OR CONTRIBUTORS BE LIABLE FOR ANY DIRECT, INDIRECT, INCIDENTAL, SPECIAL, EXEMPLARY, OR CONSEQUENTIAL DAMAGES (INCLUDING, BUT NOT LIMITED TO, PROCUREMENT OF SUBSTITUTE GOODS OR SERVICES; LOSS OF USE, DATA, OR PROFITS; OR BUSINESS INTERRUPTION) HOWEVER CAUSED AND ON ANY THEORY OF LIABILITY, WHETHER IN CONTRACT, STRICT LIABILITY, OR TORT (INCLUDING NEGLIGENCE OR OTHERWISE) ARISING IN ANY WAY OUT OF THE USE OF THIS SOFTWARE, EVEN IF ADVISED OF THE POSSIBILITY OF SUCH DAMAGE.End ===============================
RSA Data Security’s MD5 License
Copyright (C) 1991-2, RSA Data Security, Inc. Created 1991. All rights reserved.
License to copy and use this software is granted provided that it is identified as the “RSA Data Security, Inc. MD5 Message-Digest Algorithm” in all material mentioning or referencing this software or this function.
License is also granted to make and use derivative works provided that such works are identified as “derived from the RSA Data Security, Inc. MD5 Message-Digest Algorithm” in all material mentioning or referencing the derived work.
RSA Data Security, Inc. makes no representations concerning either the merchantability of this software or the suitability of this software for any particular purpose. It is provided “as is” without express or implied warranty of any kind.
These notices must be retained in any copies of any part of this documentation and/or software.
83
ÍndiceAActualización del software ..................... 46Ahorro de energía ................................... 30Ajuste de posición de la imagen ............... 8Ajuste experto ......................................... 25Ajustes 3D
Ajuste prof. 3D ................................... 32Brillo gafas 3D .................................... 32Efecto 3D simulado ............................ 32Formato 3D ......................................... 31Sel. pantalla 2D-3D (Seleccionar) ...... 31
Alineac. panel ......................................... 34Apagado .................................................. 14Aspecto
Estrechar ....................................... 18, 28Extender ........................................ 17, 28Extender V .................................... 18, 28Normal .......................................... 17, 28
BBloqueo ajustes ....................................... 32Brillo ....................................................... 24
CCine Negro Pro ....................................... 23Color ....................................................... 24Conector LAN .................................... 4, 38Conexión a un equipo de vídeo u
ordenador ........................................ 12Conf. red ................................................. 35Config. de lámpara .................................. 30Contador lámpara ................................... 37Contraste ................................................. 24Control lámp. .......................................... 23Corr. color ............................................... 26Corr. Gamma .......................................... 26Creación realidad .................................... 23
DDetector del mando a distancia ................. 4Dimensiones ........................................... 65Distancia de proyección .......................... 64Distancia de proyección y rango de
desplazamiento del objetivo ........................................... 63
EEn blanco .................................................29Encendido ..................................................8Esp. de color ............................................27Especificaciones ......................................53Estado ......................................................30
GGafas 3D
Alcance de comunicación de las gafas 3D ................................................15
Uso de las gafas 3D .............................15Gest. red ..................................................30Gradación suave ......................................25
IIdioma .....................................................30Indicadores de aviso ................................44Inversión imagen .....................................34
LLimpieza ..................................................52
MMando a distancia .....................................6Mensajes
Advertencia .........................................45Precaución ...........................................45
MenúConfiguración ......................................30Función ................................................31Funcionamiento ...................................20Imagen .................................................22Información .........................................37Instalación ...........................................34Pantalla ................................................28
Modo Film ...............................................25Modo gran altitud ....................................30Modo predefinido
BRT CINE ...........................................19BRT TV ...............................................19CINEMA FILM 1 ................................19CINEMA FILM 2 ................................19GAME .................................................19PHOTO ................................................19REF ......................................................19TV ........................................................19USER ...................................................19
Motionflow ..............................................24
84
MPEG NR (Reducción de ruido MPEG) ............................................ 25
NNitidez .................................................... 25NR (Reducción de ruido) ........................ 25Número de memoria preestablecida ....... 37
PPosición de menú .................................... 30Potenc. Contraste .................................... 23Presel. calib.
Cine brillante ....................................... 22Cine Film 1 ......................................... 22Cine Film 2 ......................................... 22Foto ..................................................... 22Juego ................................................... 22Referencia ........................................... 22TV ....................................................... 22TV brillante ......................................... 22Usuario ................................................ 22
Proyección de la imagen ......................... 14
RRango dinámico ...................................... 32Reduc. retraso ent. .................................. 27Reforzar blanco ....................................... 26Reiniciar .................................................. 23Restablecimiento de los elementos ......... 21
SSelección disparador ............................... 34Señales 3D compatibles .......................... 57Señales de entrada y elementos ajustables/
de ajuste ........................................... 56Señales predefinidas ............................... 54Solución de problemas ............................ 41Sustitución de la lámpara ........................ 47
TTemp. de color (Temperatura) ................ 24Tipo de señal ........................................... 37Tonalidad ................................................ 24
UUbicación de los controles
Lado frontal/derecho ............................. 4Parte posterior/inferior .......................... 5
VVentana de ajuste del objetivo .................11Versión software ......................................37Vídeo en 3D ............................................15
Xx.v.Color ............................................26, 46
Información sobre marcas comerciales• “PlayStation” es una marca registrada de
Sony Computer Entertainment Inc.• Los términos HDMI y HDMI High-
Definition Multimedia Interface, así como el logotipo de HDMI son marcas comerciales o marcas comerciales registradas de HDMI Licensing LLC en los Estados Unidos y otros países.
• “Blu-ray” y “Blu-ray Disc” son marcas comerciales de Blu-ray Disc Association.
........................................................................Este proyector es compatible con los estándares HDMI DeepColor, x.v.Color, LipSync, señal 3D y señal de entrada de ordenador. También es compatible con HDCP.
85

© 2015 Sony Corporation