Embed Size (px)
Citation preview

Version 7 Editor’s Manual

Page 2Umbraco editor’s manual
Contents1. Introduction ........................................................................................................................ 3
2. Getting started with Umbraco ......................................................................................2.1 Logging In and Out..........................................................................................................2.2 Umbraco Interface ........................................................................................................ 2.2.1 Initial View ...................................................................................................... 2.2.2 Various Screen Sizes ...................................................................................2.3 Creating, Saving and Publishing Content ................................................................. 2.3.1 Creating a New Page ................................................................................... 2.3.2 Various Saving and Publishing Options .................................................. 2.3.3 Unpublishing .................................................................................................2.4 Finding Content...............................................................................................................2.5 Editing Existing Content................................................................................................ 2.5.1 Content Within the Tree View...................................................................... 2.5.2 List View Pages .............................................................................................2.6 Ordering Pages ...............................................................................................................2.7 Moving a Page ................................................................................................................2.8 Copying a Page ..............................................................................................................2.9 Deleting and Restoring Pages ..................................................................................... 2.9.1 Deleting a Page .............................................................................................. 2.9.2 Restoring a Deleted Page from the Recycle Bin ...................................... 2.9.3 Emptying the Recycle Bin ............................................................................
3. Working with Content .......................................................................................................3.1 Rich Text Editor ............................................................................................................... 3.1.1 Editor Buttons ................................................................................................ 3.1.2 Paragraph Break/Line Break ....................................................................... 3.1.3 Shortcut Keys ................................................................................................ 3.1.4 Text Formatting ............................................................................................. 3.1.5 Show/Hide HTML Code ............................................................................... 3.1.6 Links ................................................................................................................ 3.1.7 Working with Images ................................................................................... 3.1.8 Macros ............................................................................................................ 3.1.9 Tables ..............................................................................................................
4. Version Management .....................................................................................................4.1 Comparing Versions ......................................................................................................4.1 Rollback to a Previous Versions ..................................................................................
5. Media Management .........................................................................................................5.1 Working with Folders.......................................................................................................5.2 Working with Images and Files ....................................................................................5.3 Cropping Images .............................................................................................................
6. Tips & Tricks ......................................................................................................................6.1 Tips when Working with Folders...................................................................................6.2 Audit Trail ..........................................................................................................................6.3 Changing Document Types ...........................................................................................6.4 Notifications ....................................................................................................................6.5 Preview Pane Responsive View ....................................................................................6.6 Session Timeout ..............................................................................................................
4455677891010101113141415151515
1616161617171818222325
262627
28283133
34343435363737

Page 3Umbraco editor’s manual
Welcome to Umbraco! Umbraco is an information platform that allows you to quickly and easily publish information onto a website without the need for any prior knowledge of web page editing. It is designed to be simple to use yet powerful and flexible enough to enable users full control of their website content.
No special skills are required in order to create, publish and manage web pages and related content with Umbraco. Any prior web page editing experience you may have will of course prove useful in terms of understanding what you want your website to do. Anything you can do using HTML can also be done in Umbraco – the functionality is not reduced just because Umbraco is easy to use.
The Umbraco platform can be utilised for all types of websites – from public websites to intranets and extranets, whether password protected or not. It can even be used to manage multiple websites from a single Umbraco instance. Regardless of the type, authorisation to edit them can be given to anybody you choose and as editing is done via a web browser, it can be done at any time and in any place.
Umbraco is designed to be intuitive and straight-forward so the aim of this manual is to explain each step in simple terms and get you editing your website with ease.
Happy editing!
1 Introduction

Page 4Umbraco editor’s manual
2. Getting started with Umbraco2.1 Logging In and Out
Logging in
To access Umbraco you simply need to open your web browser and enter your website domain name followed immediately by /umbraco/ (for example: http://www.company.com/umbraco/). You will be presented with the login form into which you need to enter your username or email address and the password provided by your system administrator.
Please note the address at which you access Umbraco may vary so check with your system administrator.
Logging Out
To logout of the admin panel click the admin profile picture in the top left of the screen which will reveal a slide out menu. Then simply click the logout button in the top right of the menu.
Login Screen
Logout menu
Admin profile picture Logout button
Page 5Umbraco editor’s manual
2.2 Umbraco Interface
2.2.1 Initial View
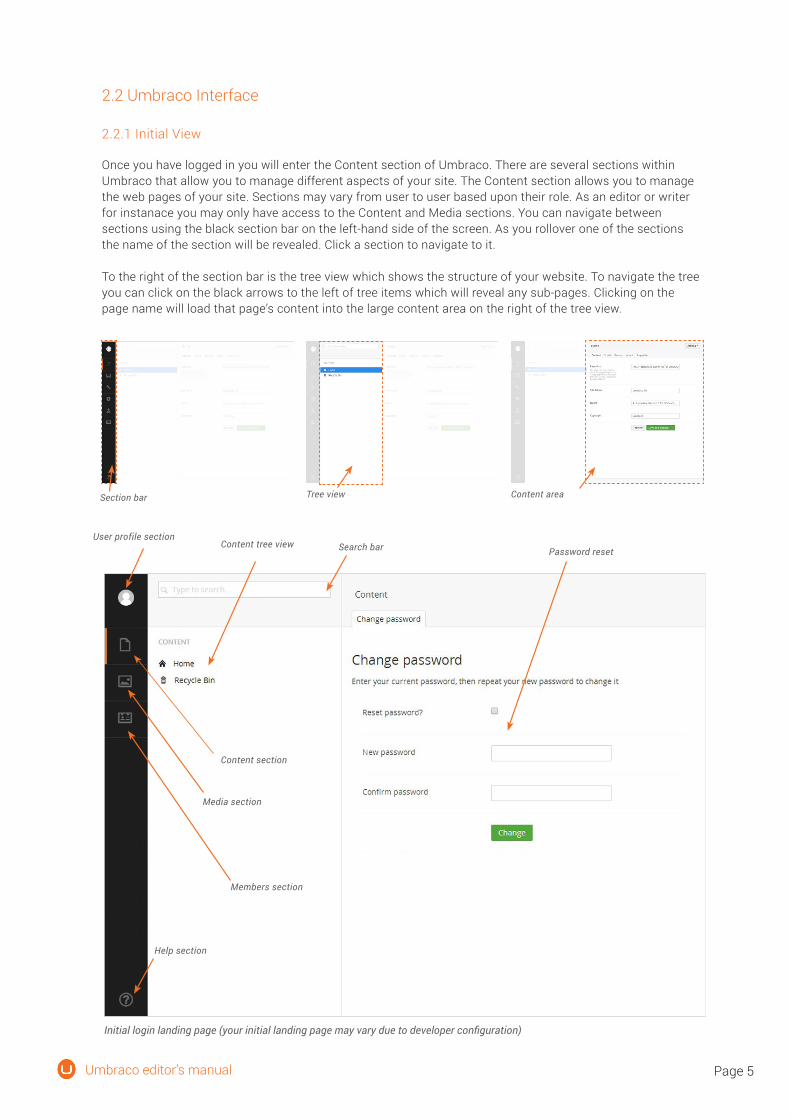
Once you have logged in you will enter the Content section of Umbraco. There are several sections within Umbraco that allow you to manage different aspects of your site. The Content section allows you to manage the web pages of your site. Sections may vary from user to user based upon their role. As an editor or writer for instanace you may only have access to the Content and Media sections. You can navigate between sections using the black section bar on the left-hand side of the screen. As you rollover one of the sections the name of the section will be revealed. Click a section to navigate to it.
To the right of the section bar is the tree view which shows the structure of your website. To navigate the tree you can click on the black arrows to the left of tree items which will reveal any sub-pages. Clicking on the page name will load that page’s content into the large content area on the right of the tree view.
Section bar Tree view Content area
Initial login landing page (your initial landing page may vary due to developer configuration)
User profile section
Content section
Search bar
Media section
Help section
Members section
Content tree viewPassword reset

Page 6Umbraco editor’s manual
2.2.2 Behaviour at Smaller Screen Sizes
By default, on a desktop with a large screen size, the tree view is always visible giving you quick access to select and navigate website content. On smaller devices such as laptops and tablets, the tree view will be closed and only opens after you click on one of the navigation icons in the section bar on the left of the screen.
After selecting an item within the tree view on a smaller device, it will automatically close to save screen space. If you wish to close the tree view without selecting a page, you can move your mouse out of the tree view, or alternatively on a touch device you can swipe left over the tree view. Below are examples of how the interface will look on a tablet.
Dashboard on a device with a smaller screen size
Slide out menu on a device with a smaller screen size

Page 7Umbraco editor’s manual
2.3 Creating, Saving and Publishing Content
2.3.1 Creating a New Page
Firstly you will need to select the parent page for your new page. This could be the home page or any of the sub-pages of the site. If the parent page allows sub-pages underneath it, the following process can be followed:
1. Hover over the name of the parent page and then click on the options icon (•••) to reveal the types of pages you can create.
2. Click on the type of page you wish to create which will then load the new page into the content area on the right-hand side.
3. Enter a name for the page in the text field at the top of the content area. See sections 2.3.2 and 2.5 for more information on saving and editing the new page.
Page creation slide out menu

Page 8Umbraco editor’s manual
2.3.2 Various Saving and Publishing Options
There are four different options you have for saving and publishing pages. Each have their own benefits for different occasions depending on whether you’re still in the process of editing the page or have completed and wish to publish your changes.
SaveThe Save option (found by clicking the arrow on the Save and publish button) is used for saving the page without publishing the changes to the live site. This is especially useful if you are working on changes over a period of time as you can save frequently to prevent losing any data or if you wish to save the current state and return to edit the page at a later date. Using the Preview button will show you how the page will look once published.
Save and PublishThe Save and publish button is ideal for when you want to publish a previously saved page to the live website, or to just publish a page without previewing it. This will save and publish the page to your live website.
PublishClicking the actions menu in the top right of the page or right clicking on the name of the page you wish to publish from the context menu will reveal the slide out menu. On this menu you will see an option to Publish. You can now choose to Publish all sub-pages excluding any with unpublished changes. You can also select to include all unpublished sub-pages pages too. This is especially useful if you have many pages you wish to publish at the same time.
New blank page

Page 9Umbraco editor’s manual
Scheduled PublishingScheduled publishing is ideal when you need a page to go live at a specific date and time when it is not convenient to do so manually. To schedule publishing you need to navigate to the Properties tab and click on the Calendar icon within the Publish at field which will then open up a Calendar. Select the date and then click the Clock icon at the bottom of the calendar to select the time you wish for the page to be published. After you have done this, click anywhere outside of the date and time picker pop-up to close it. Now all you need to do is save your changes by clicking the arrow on the Save and publish button and click Save. Umbraco will automatically publish the page at the date the time you chose.
2.3.3 Unpublishing
Along with the various options for saving and publishing, you also have the ability to unpublish a page. This is useful if you no longer wish for the page to be publicly visible but do not want to delete it.
Manually Unpublish1. Find the page you wish to unpublish and click on the name to select it.2. Click the arrow on the Save and publish button which is found within the content area.3. Select Unpublish.
Scheduled UnpublishingScheduled unpublish is ideal when you require a page to be removed from the website at a specific date and time, but are unable to do so manually, for example at the end of a promotion. To schedule the unpublishing of a page you need to navigate to the Properties tab for the desired page and click on the Calendar icon within the Unpublish at field which will then open up a calendar. Select the date and then click the Clock icon at the bottom of the calendar to select the time you wish for the page to be unpublished. After you have done this, click anywhere outside of the date and time picker pop-up to close it. Now all you need to do is save your changes by clicking the Save and publish button.
Scheduled publishing option in page properties tab

Page 10Umbraco editor’s manual
2.5 Editing Existing Content
2.5.1 Content Within the Tree View
When you want to edit content on an existing page you can follow this process:
1. Find and select the page you want to edit.2. Edit the pages content within the content area. Each different type of page will have different content
fields for you to populate such as simple text boxes, content and date pickers and rich text editors. See section 3 for more information on working with content.
3. Click the arrow on the Save and publish button to reveal more options. Now you can click Save in the popup menu.
4. Click the Preview button to preview how the page will look once published to the live website.5. If you are happy with the changes you can now click Save and publish which will make the changes live.
The Umbraco content tree view allows you to navigate web pages through a logical site hierarchy. You can find a page by navigating through the tree itself if you know where the page is stored. Alternatively a quicker approach might be to perform a search across the entire content tree view. Using the search bar you can enter a search term and Umbraco will search for pages containing the term anywhere in the page name or page content.
Selecting and editing a pageusing the content tree view
1. Select the page you want to edit
2. Edit content4. Preview the changes
5. Click save & publish
3. Click arrow and select
the save option
2.4 Finding Content
Search bar above the tree view

Page 11Umbraco editor’s manual
2.5.2 List View Pages
Some of the pages in your website may use a list view style which shows child pages in a table format rather than the standard tree view.
The first screenshot below shows ten child items below the News page in the tree view. If the website were to have tens or even hundreds more news pages, the tree view would become very large and unmanageable.
Parent page with child pages underneath
Expanded save button options
Saves page but doesn’t publish on website
Removes page from website but doesn’t delete from Umbraco
Saves and publishes page to website

Page 12Umbraco editor’s manual
Parent page with list view activated
Click here to edit page
Click here to reveal
more list items
Click here to sort pages by
selected column
Click here to search for pages
The second screenshot below shows how the list view works. You will notice there are now no child pages for the News section within the tree view but pages are instead listed within a table on the right hand side.
The table will show a maximum of ten child pages at any one time. Pagination controls allow you to navigate to additional pages should you have more than ten. In the top right of the table there is a search facility which enables you search for specific pages. This enables you to quicly and easily locate pages without having to use the pagination. You can click the column titles to sort the list items. For example clicking the name column title will sort the list items alphbetically.

Page 13Umbraco editor’s manual
2.6 Ordering Pages
The pages in Umbraco are sorted in the tree structure according to a predefined sort order. It is most common for the page that has been created most recently to be placed at the bottom of the tree structure, however, you can easily change the sort order of the pages in a section of the website by using the sort function.
1. Select the parent page of the sub-pages you wish to sort2. Right click the page click on the actions button in the top right-hand corner. Click Sort from the context
menu. 3. Click and drag the pages into the required order. Alternatively, click on the Name or Creation Date
column header to sort the items automatically by Name or Creation Date. Clicking on a column header again reverses the sort order.
4. Click Save.
1. Select parent page 2. Right click the page then click sort from the context 3. Drag pages into the required order
4. Click save

Page 14Umbraco editor’s manual
2.7 Moving a Page
2.8 Copying a Page
Pages can easily be moved between areas of the website by moving them in the tree view. Not all pages will be able to be moved below other pages depending on your specific set up. If you are unsure or need clarification, seek advice from your system administrator. To move a page:
1. Right click the page you want to move to reveal the context menu. Or alternatively you can click the Actions button in the top right right-hand corner.
2. Click on Move and select the parent page you would like to move this page under.3. Click on the Move button to confirm the move and then you will see a confirmation message.4. Click OK to dismiss the confirmation message
If you want to re-use a page or structure you have created previously you can copy the page and its sub-pages to a different place within the site structure. When you copy a page all of its sub-pages will also be copied. You can define whether links should be automatically updated, or keep the linkage with the original pages.
1. You can either select the page you want to copy and click the Actions button in the top right, or alternatively you can right click the page title in the menu which will slide out the context menu.
2. Select Copy from the Actions menu. 3. Select the parent page which you want to copy the page. 4. Select whether to Relate copied items to the original page.*5. Click Move.
* When you select ‘Relate copied items to the original page’ every change you make to the copied page will also be made to the original. So if you want the original and duplicated pages to be separate then do not select the ‘Relate copied items to the original page’ tick box.
Slide out menu for moving a page

Page 15Umbraco editor’s manual
2.9 Deleting and Restoring Pages
2.9.1 Deleting a Page
If you have pages that you no longer want on the website you are able to delete them. Upon deletion, the page is moved to the Recycle Bin as a safety net just in case you change your mind and wish to restore the page.
1. Find the page you wish to delete in the website tree view.2. Right click on the page name in the tree view or click the actions link in the top right when on the
selected page.3. Click Delete.4. Click OK to confirm you wish to delete the page or click Cancel if you do not.
2.9.2 Restoring a Deleted Page from the Recycle Bin
The Recycle Bin is a separate tree list which can be found at the bottom of the content tree view. Clicking the arrow to the left of the Recycle Bin icon will reveal any pages that have been deleted from the website. Restoring these pages follows the same process as moving a page between sections.
1. Click on the (•••) icon for the page you wish to restore from the Recycle Bin to reveal the Actions menu.2. Click on Move and select the page you wish to nest the page under.3. Click on the Move button to confirm the move and then you will see a confirmation message.4. Click OK to confirm.5. You will now need to go to the page and republish it by clicking the Save and publish button in order for
it to be visible on the website.
2.9.3 Emptying the Recycle Bin
If you are confident you no longer require any content within the Recycle Bin you can permanently delete it. You can delete pages one by one or as a whole. Please note that after deleting pages from the Recycle Bin you will not be able to retrieve any data associated with that page.
Emptying the Recycle Bin
1. Click on the (•••) icon for the Recycle Bin in the website tree structure to reveal the Actions menu.2. Click Empty Recycle Bin.3. Click OK to confirm you wish to empty the Recycle Bin or click Cancel if you do not.
Deleting Individual Items
1. Click on the (•••) icon of the page within the Recycle Bin you wish to permanently delete.2. Click Delete.3. Click OK to confirm you wish to permanently delete the page or click Cancel if you do not.
Empty recycle bin option

Page 16Umbraco editor’s manual
3. Working with Content
3.1 Rich Text Editor
The Umbraco Rich Text Editor is the field where you, as the editor, can be creative. You select how much you want to do yourself. You can work on text content, format the text, or simply leave it the way it is. If you want to do more, you can insert images, create tables or create links to other pages or documents.
The functionality varies depending on how the editor is set up. Here we describe the default editor with all options enabled. Contact your system administrator for details regarding your editor.
3.1.1 Editor Buttons
Below are all the default editor buttons available. Your system administrator is able to determine which buttons are displayed in different templates. You could therefore have access to more or fewer buttons than those shown here.
The rich text editor toolbar
3.1.2 Paragraph Break/Line Break
The editor is like any other word processing program. You write the text, and the text wraps around when the line reaches the end. When you press ENTER in the editor, you get a paragraph break, which means there is space between the paragraphs. If you do not want a space, you have to make a line break instead. You do this by pressing SHIFT+ENTER.

Page 17Umbraco editor’s manual
3.1.3 Shortcut Keys
To make your work easier, there are shortcut keys for certain editor functions. Shortcut keys let you use the keyboard to carry out certain commands.
Ctrl + A Select all
Ctrl + B Bold
Ctrl + C Copy
Ctrl + I Italic
Ctrl + U Underline
Ctrl + V Paste
Ctrl + X Cut
Ctrl + Y Redo
Ctrl + Z Undo
3.1.4 Text Formatting
You do not normally need to spend much time formatting text because Umbraco takes care of a lot of the formatting for you. When the default formatting is not enough however, there are a number of options for controlling the formatting of text.
Formatting Buttons
The most basic and probably the most familiar way to control formatting are via the formatting buttons. These work much the same as those found in most word processing applications such as Microsoft Word. With these you can apply simple formatting such as Bold, Italic and underline as well as altering text alignment and creating bulleted and numbered lists.
Regardless of the formatting being applied, the process for applying a format using the formatting buttons is always the same.
1. Select the text you want to apply the formatting to. 2. Click the appropriate format button to apply the formatting you wish to add.
Formats
Another way of applying formatting is via the Formats drop-down list. The Formats drop-down list provides a set of predefined styles that can be applied to text whilst maintaining a consistent look and feel through the site. These styles often incorporate more advanced formatting functionality which can be applied to provide a different look for certain elements such as links, headings and sub heading. For example you can use a format style to change a link into a call to action button. Whilst the styles available on your site may differ, the process for applying styles is always the same.
1. Select the text you want to apply the style to. 2. Select the style to apply from the Format drop-down list.
ActionShortcut

Page 18Umbraco editor’s manual
Copying Content from Other Programs
It is important to note that when you pre-write content to later be copied into a rich text editor you may encounter style issues on your website. When pasting content, the original text styles will be preserved which can lead to different font faces, sizes and colours from what is expected when the website is viewed. To prevent this from happening it is advisable that you paste the content into a markdown editor first such as notepad, then copy and paste it from there into your rich text editor.
Remove Formatting
If you have formatted a paragraph or selection using the formatting buttons, you can remove a formatting rule by selecting the text, and clicking the relevant formatting button to remove that formatting rule. You may also have a remove format button in your toolbar. If you do not have this button please speak to your system administrator.
Remove format button
3.1.5 Show/Hide HTML Code
If you are proficient in the use of HTML you can switch to HTML mode and create your page by writing HTML code. You can also check the code and make minor adjustments here to get the page exactly as you want it. Certain elements such as scripts will not be allowed and will be filtered out of code pasted into the rich text editor.
3.1.6 Links
The Insert Link button is used to create links to internal and external pages and media files email links and anchors. The process for inserting a hyperlink differs depending on the type of hyperlink you wish to create.

Page 19Umbraco editor’s manual
Link to a Page on Another Website
1. Select the text that will form the hyperlink. 2. Click the Insert Link button which will reveal the link properties slide out menu. 3. In the URL field, enter the URL of the web page you wish to link to. 4. In the Title field, enter the text that will be shown as a pointer to the link. This is important information
for everyone reading the website with different accessibility aids. 5. In the Target field, select the target window/frame then select how the should be opened. There are
three different ways the link can be opened:6. i. Open link in a new tab in the same browser window.7. ii. Open link in a new separate browser window.8. iii. Open the link in the same browser tab as the user would be viewing your site.9. Click Select. Your text will now contain the link as requested.
Link to a Page in Umbraco
1. Select the text that will form the hyperlink. 2. Click the Insert Link button which will reveal the link properties slide out menu. 3. Select a page from the Content tab to link to. This will then populate the link to document automatically. 4. In the Page Title field, enter the text that will be shown as a pointer to the link. This is important
information for everyone reading the website with different accessibility aids, (by default the name of the selected page will automatically be entered for your convenience).
5. In the Target field, select the target window/frame the link should be opened in. 6. Click Select.
Link to internal page in the insert/edit link menu
Link to external page in the insert/edit link menu
Page 20Umbraco editor’s manual
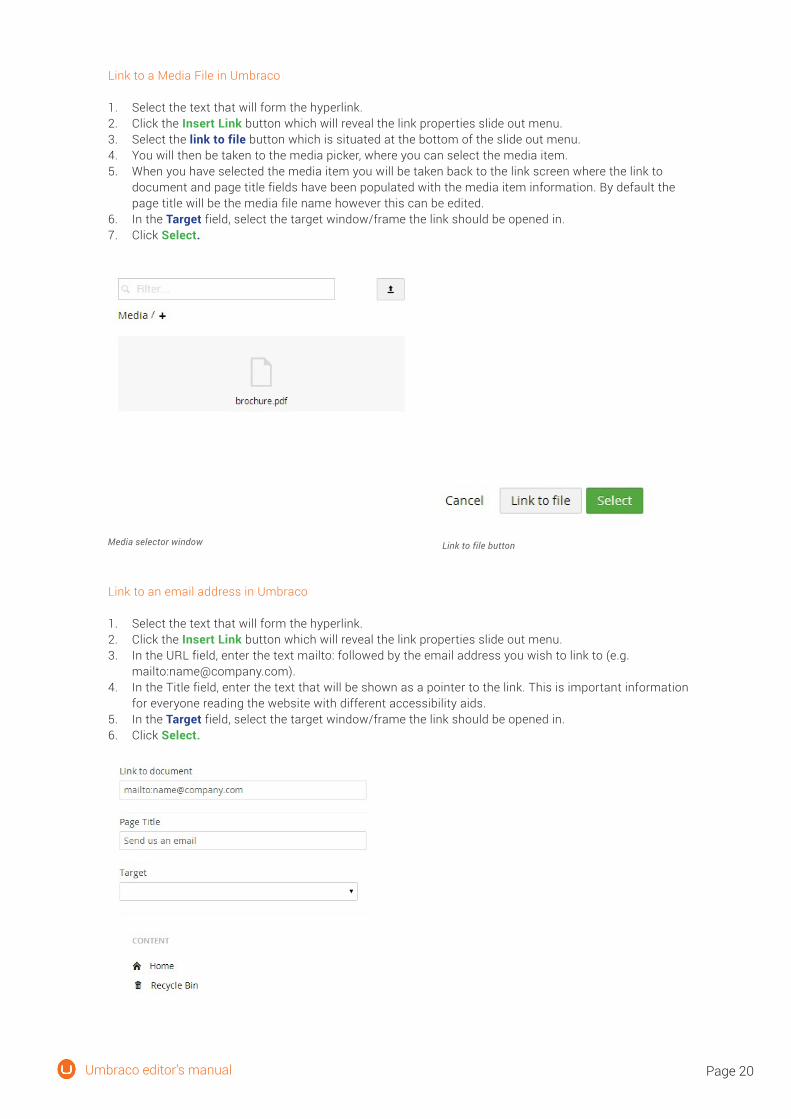
Link to a Media File in Umbraco
1. Select the text that will form the hyperlink. 2. Click the Insert Link button which will reveal the link properties slide out menu. 3. Select the link to file button which is situated at the bottom of the slide out menu. 4. You will then be taken to the media picker, where you can select the media item.5. When you have selected the media item you will be taken back to the link screen where the link to
document and page title fields have been populated with the media item information. By default the page title will be the media file name however this can be edited.
6. In the Target field, select the target window/frame the link should be opened in. 7. Click Select.
Link to an email address in Umbraco
1. Select the text that will form the hyperlink. 2. Click the Insert Link button which will reveal the link properties slide out menu. 3. In the URL field, enter the text mailto: followed by the email address you wish to link to (e.g.
mailto:[email protected]).4. In the Title field, enter the text that will be shown as a pointer to the link. This is important information
for everyone reading the website with different accessibility aids. 5. In the Target field, select the target window/frame the link should be opened in. 6. Click Select.
Link to email address in the insert/edit link menu
Media selector window Link to file button

Page 21Umbraco editor’s manual
Link to an Anchor on the Same Page
An anchor allows you to create internal page links that enable users to navigate within a page. There are two parts to setting up an anchor; the anchor itself and the link to the anchor.
Creating an anchor
1. Focus the editor cursor where you wish to create the anchor.2. Click the Anchor button which will then launch the Anchor creation dialog.3. In the name field enter your anchor name. You should avoid special characters and do not use spaces.4. Click OK to finish.5. You will see a small anchor icon where you previously had the editor cursor.
To delete the anchor, simply select it and then press your delete key.
Linking to an anchor
1. Highlight the content which you wish to add the anchor link to.2. Click the Insert link button which will reveal the link properties slide out menu. 3. Add a hash symbol followed by the name of your anchor into the link to document field.4. Click Select.
Creating anchor dialog box
Anchor button
Linking to anchor in the insert/edit link menu

Page 22Umbraco editor’s manual
Create a Link from an Image
You can make images into clickable links in Umbraco.
1. Insert an image into the editor (see Working with Images for more details).2. Select the image that will form the hyperlink.3. From here, follow the same instructions as for inserting a normal hyperlink, starting at step 2.
Removing a link
1. To remove a link you first need to select it in the editor. For text links simply click the cursor anywhere within the link text. For an image just click the image itself.
2. Click the Remove Link button which remove the hyperlink. If the remove link button is not in your richtext editor toolbar you will instead need to click the Insert/Edit Link button again and manually remove the link from the link to document text field.
3.1.7 Working with Images
To display images on a page they must be uploaded to your Umbraco media library. Many organisations set up a media library containing images that editors can use on their pages. Others allow their editors free use of their own images. The procedure for uploading an image varies slightly depending on which method your organisation has adopted, so check with your system administrator what is applicable in your organisation.
Inserting an Image from the Media Library
1. Place the cursor in the editor where you want to insert your image. 2. Click the Media Picker button from the toolbar to open the media selector menu.3. Select the folder which the image is in. 4. Click the thumbnail of your chosen image to open the image properties menu.5. In the Title field, enter a name/description for the image (by default the name of the file will be
automatically entered for your convenience). It is important to add descriptive titles to images as these as used to assist visually impaired users.
6. Click Insert to add the image.
Media picker slide out menu
Media picker button
Unlink button

Page 23Umbraco editor’s manual
Inserting an Image from your Computer
You can upload images directly from the rich text editor on the page you are editing. These images will be stored in the Umbraco media library. Therefore care should be taken to ensure that the image is placed in the correct location within the library. If you click the plus icon underneath the search bar in the media picker slide out menu you can create folders in the media library.
1. Place the cursor in the editor where you want to insert your image. 2. Click the Media Picker button from the toolbar to open the media selector.3. Click the Upload button which is located in the top right-hand corner of the menu.4. Select the chosen image from the pop-up window.5. In the Title field, enter a name/description for the image. (By default the name of the file will be
automatically entered for your convenience). 6. Click Insert to add the image.
Deleting an Image from the Page
If you want to delete an image from the page, simply select the image and press Delete button on your keyboard. The image disappears from the page, but is not deleted from the Umbraco media library.
3.1.8 Macros
In Umbraco, macros are small building blocks of functionality that can be dropped into an editor. Each macro encompasses a piece of functionality and provides a simple interface to be able to modify the macro to your requirements. A macro can be anything from a contact form to an embeddable media player. The advantage of macros is that it gives editors the ability to add complex elements to the page in a simple manner.
The macros available to you differ from system to system so please see your system administrator to find out which macros are available to you and what they do. The process for adding and updating a macro is always the same.
Adding a Macro to the Page
1. Place the cursor in the editor where you want to insert your macro. 2. Click the Insert Macro button from the toolbar to open the macro properties dialog box. 3. Select a macro to insert from the Choose a macro drop-down list. 4. Configure the macro as required. 5. Click Select to insert the macro. 6. The macro is displayed in the editor with a yellow dotted border.
Upload button to insert media from your computer
Media picker button Macro selection drop-down

Page 24Umbraco editor’s manual
Editing macros
You can edit values you have inputted into a macro after it has been added to the rich text editor.
1. Highlight the macro in the rich text editor.2. Click the macro button in the toolbar.3. This will bring out the configuration slide out menu where you can edit any values previously added.
Removing macros
To remove a macro you simply highlight the macro in the rich text editor and hit the delete or backspace button on your keyboard.
A macro in the rich text editor

Page 25Umbraco editor’s manual
3.1.9 Tables
Tables are used to format information in a grid based structure. When you insert a table, you select how many rows and columns the table should comprise of, as well as fill in a number of additional optional formatting properties. These values can be altered later, so it is not important to know exactly what your table will look like when you create it.
Creating a table in the rich text editor
Editing an existing table in the rich text editor
Table properties pop-up window
Editing an Existing Table
To edit the table after you have already created it, you need to click on it so you have a small square box in each of the four corners. Then you need to click on the Table button in the rich text editor in order to reveal the options.
Clicking Table Properties gives you several options for modifying the table’s appearance, however the developer of the website may have already created table styles for you so you may not need to adjust these settings. There are various other options available for modifying cells, rows and columns such as height, alignment, merge, insert and delete.

Page 26Umbraco editor’s manual
4. Version Management
Umbraco allows you to work with multiple versions of the same page. All previously saved pages are stored in a version history list. This means that you never lose changes to a page because all old versions of the page are saved to the history. You then have the opportunity to access and re-publish older versions if necessary.
4.1 Comparing Versions
To compare a page on the site with its previous versions:
1. Right-click on the page title in the menu or click the Actions button.2. Select the Rollback option.3. In the Rollback dialogue box, select a version from the Rollback To drop-down list.4. When you select a version from the drop-down list, you are presented with a comparison of the current
page with the version you selected. Red, struck-out text is text that will not appear in the selected version and green means text that will be added, should you choose to rollback to that version of the page.
5. If you check the HTML radio button, you will be shown the selected version of the page as HTML. Check the Diff checkbox to see the differences between the versions as a list of fields.
Rollback option in context menu
‘Rollback to’ drop-down menu in slide out menu
Page 27Umbraco editor’s manual
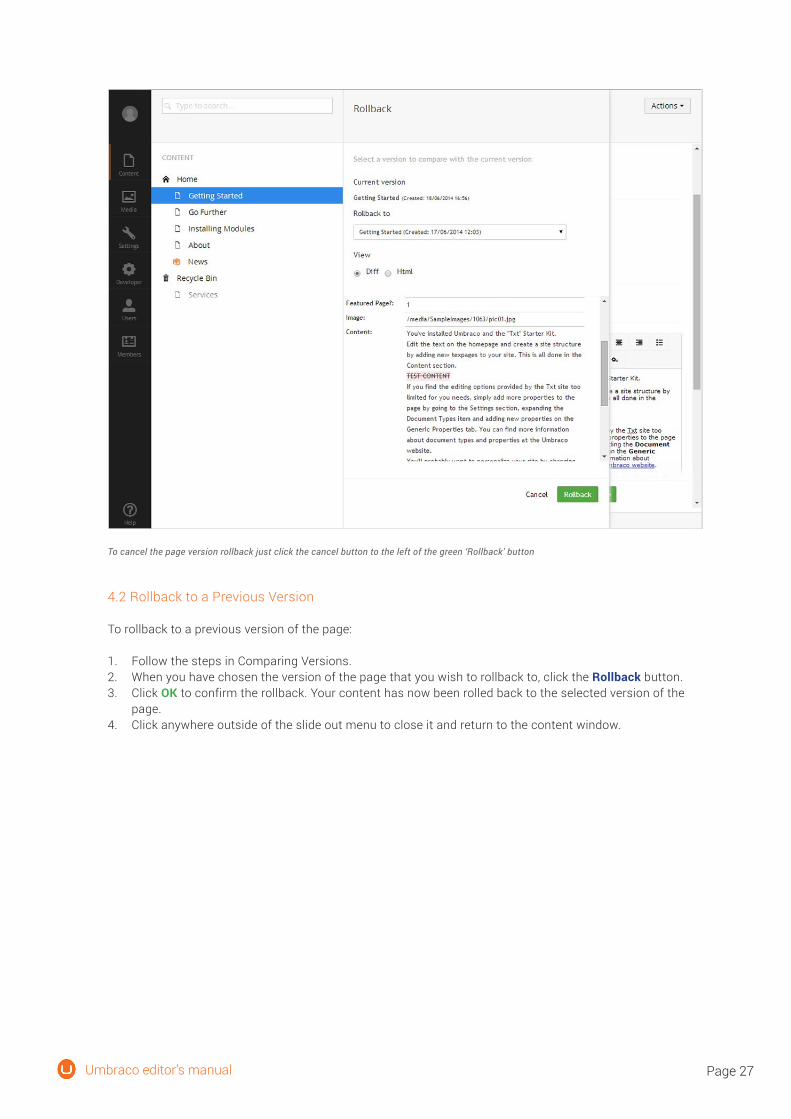
4.2 Rollback to a Previous Version
To rollback to a previous version of the page:
1. Follow the steps in Comparing Versions. 2. When you have chosen the version of the page that you wish to rollback to, click the Rollback button. 3. Click OK to confirm the rollback. Your content has now been rolled back to the selected version of the
page. 4. Click anywhere outside of the slide out menu to close it and return to the content window.
To cancel the page version rollback just click the cancel button to the left of the green ‘Rollback’ button

Page 28Umbraco editor’s manual
5. Media Management
All media within your site first needs to be loaded into the Media section. The Media section is basically a media library for the site. Within the Media section you can create folders and files in a similar manner to that of your desktop computer.
5.1 Working with Folders
Folders can be used to help organise the Media section and to keep similar items in a logical structure. It is highly recommended to ensure you use folders to organise your media. When your media library starts to grow folders become essential in locating media quickly and easily.
Creating a Folder
1. Select the folder to which you would like the new folder to be a sub-folder of (if you want to create a folder at the root of the media section then just hover over the media title).
2. Click on the options icon (•••) and click choose the folder from the context menu.3. Enter a name for your folder and click Save to create the folder.
Folders are purely for sorting within the media section. They will not be part of the image URL nor will they create a folder on the server with the given name.
Slide out menu used to create media or folder

Page 29Umbraco editor’s manual
Editing a Folder
If you wish to edit an existing folder you can follow this process:
1. Click the folder you wish to edit from the media tree view.2. You can then click the title at the top of the page which then gives the ability to edit the title.3. Click Save to make the change.
Deleting a Folder
If you wish to tidy up the Media section of your site, you can easily delete existing folders. Once you have deleted a folder, it is sent to the Recycle Bin. If you change your mind, you can restore the deleted folder from the Recycle Bin.
1. Select the folder you want to delete. 2. Right click the folder, and click Delete from the context menu. 3. Click OK to confirm deletion of the page, or click Cancel to cancel deletion.
Note that the contents of the folder are also moved to the Recycle Bin. You can restore items from the Recycle Bin in the same way as you can in the Content section.
Restoring a Folder from the Recycle Bin
The Recycle Bin is a separate tree structure within the Media panel and you can recognise it by the recycling symbol to the left. If you click the triangle in front of the Recycle Bin, you will see its contents. To restore a folder, move the item to the part of the tree where you want the item to be. Read more about how to do this in the section entitled Moving a Folder.

Page 30Umbraco editor’s manual
Moving a Folder
You can easily move folders within the Media section using the Move function.
1. Select the folder you want to move. 2. Right click the folder and click Move from the context menu. 3. Select the parent folder you want to move the folder below.
Moving an image into a different folder
Sorting the Contents of a Folder
Media items in Umbraco are sorted in the tree view according to a predefined sort order. It is common for the item that has been created most recently to be placed at the bottom of the tree structure. You can easily change the sort order of the items in a folder by using the sort function.
1. Select the folder to sort. 2. Right click the folder, and click Sort from the context menu. 3. Drag the folders, images and files into the required order. Alternatively, click on the Name or Creation
Date column header to sort the items automatically by Name or Creation Date. Clicking on a column header again reverses the sort order.
4. Click Save.

Page 31Umbraco editor’s manual
5.2 Working with Images and Files
Uploading an Image or File
1. Select the folder where you would like to create your new image or file. 2. Right click the folder or click the Actions button in the top right-hand corner. Click Create from the
context menu and click Image. Alternatively you can select the Click to upload button above the assets in the folder or drag the file from your computer and drop it onto the upload area.
3. Select the image.4. You can click the image to view its properties and rename.
Media creation section
Image upload button
Drag image here to upload
Click to create an image

Page 32Umbraco editor’s manual
Deleting an Image or File
If you wish to tidy up the Media section of your site, you can easily delete existing media items. Once you have deleted an image, it is sent to the Recycle Bin. If you change your mind, you can restore the deleted image from the Recycle Bin.
1. Select the image you want to delete. 2. Right click the image, and click Delete from the context menu. 3. Click OK to confirm deletion of the image, or click Cancel to cancel deletion.
Restoring an Image or File from the Recycle Bin
The Recycle Bin is a separate tree structure within the Media section and you can recognise it by the recycling symbol to the left. If you click the triangle in front of the Recycle Bin you will see its contents. To restore an image or file, move the item to the part of the tree where you want the item.
Moving an Image or File
You can easily move media between folders within the Media section using the Move function.
1. Select the image you want to move. 2. Right click the image and click Move from the context menu. 3. Select the parent folder you want to move the image to. 4. Click Move.
Slide out menu for moving media
Select parent folder
Click to move

Page 33Umbraco editor’s manual
5.3 Cropping images
If your system administrator has set up cropping for your images you will see a similar interface within your Media section to the one depicted in the screenshot below. The blue circle in the middle of the image is the default focal point. The focal point defines the primary area or focus of the image which will be the center point of any image re-sizing. You can move the focal point by clicking and dragging it to the desired part of the image. Below the image you may see specific crops of the image depending on your setup. In the example below you can see we have set up three crops.
If you are not happy with one of the crops below the image you can manually alter it. After clicking on one of the crops, you will see an enlarged version of the crop, giving you the ability to drag the image around and zoom in or out until you have the desired result. If you wish to reset the crop to the default you can click Reset below the image. Once you are happy with your changes you can click the X in the top right corner of the image to close the crop editor. You can now edit other crops using the method above. After you have finished editing the crops you can click the Save button.
Crop & focal point selector menu when uploading new image
Zoom crop tool
Preset crops for your image
Focal point picker for image