Embed Size (px)
Citation preview
OPC Quick Client Users Guide
Version 4.70.95 (OPC 1.0 - 3.0 Interfaces)
Page 2 of 78
Table of Contents
INTRODUCTION 5
Overview 5
Intended Audience 6
OPC Quick Client as a Testing Tool 6
LAUNCHING OPC QUICK CLIENT 7
Launch Directly from TOPServer 7
Manual Launch of the Quick Client 8
SAVING AND LOADING AN OPC QUICK CLIENT CONFIGURATION 9
Saving a Configuration 9
Loading a Configuration 11
QUICK CLIENT CONNECTIVITY 13
Initial Connection to a Server 13
Disconnecting from the Server 15
Basic Connectivity Troubleshooting 16
GROUPS 17
What is a Group? 17
Adding a Group 17
Choosing an OPC Group Interface 23
Page 3 of 78
Removing a Group 24
Changing Group Properties 26
ITEMS 28
What is an Item? 28
Adding Items to a Group 28 Browsing 33
Removing Items from a Group 38
Viewing the Properties of an Item 40
SUBSCRIPTIONS 44
Overview 44
Group Level Subscriptions 44 Enabling Subscriptions – Group Level 44 Disabling Subscriptions – Group Level 46
Tag Level Subscriptions 46 Enabling Subscriptions – Tag Level 46 Disabling Subscriptions – Tag Level 47
Auto-Enabling Tag Subscriptions 48
READING AND WRITING 50
One-Shot Reading & Writing 50 Synchronous vs. Asynchronous 53 Synchronous Device Read vs. Synchronous Cache Reads 54 Reading an Item or Items 55 Synchronous Cache Reads 56 Synchronous Device Reads 58
Page 4 of 78
Asynchronous 2.0 Read 60 Writing to an Item or Items 61 Synchronous Writes 62 Asynchronous 2.0 Writes 66 OPC 1.0 or OPC 2.0 Interface and Asynchronous Communications 73
LOOKING UP ERROR CODES 74
READING THE EVENT LOG 75
SUMMARY 78
Contact Us 78
Page 5 of 78
Introduction
Overview
The purpose of this manual is to provide a resource guide for users of the OPC Quick Client, referred to
throughout this document as the Quick Client. Any reference to “server” is a reference to an OPC Server
rather than a server operating system. This guide will provide directions on how to accomplish basic
configuration tasks and will answer general questions involving the routine use of Quick Client. While this
guide will not answer all questions, it is intended to provide the reader with the knowledge to get their Quick
Client up and reading data. The document makes the assumptions that: 1) You have a valid OPC
connection and 2) Your OPC server has been configured properly.
By using this guide, it should be possible to configure your Quick Client to communicate with your OPC
server of choice. For the purposes of this guide, we will be demonstrating this communication by
connecting to a TOP Server OPC Server, which is a product of Software Toolbox, Inc. TOP Server is a
robust, feature-rich OPC server providing a simulation driver for testing purposes and has an integrated
interface to the OPC Quick Client (see Launch Directly from TOPServer). You can download the free demo
of TOP Server at http://www.toolboxopc.com/Features/Demo/demo.html. You can also download the Quick
Client as a standalone application, free of charge, at
ftp://ftp.softwaretoolbox.com/demodnld/OPCClientSetup.zip.
For demonstration purposes, this guide shows connections to TOP Server for which a tag database has
been generated in TOP Server. As such, we are using static tag addressing for the purpose of this guide.
If we were defining tags/items solely within the Quick Client using the native tag addresses configured in
the device and ultimately connecting to the device through the OPC server, we would be defining tags
dynamically.1
Note: When discussing tags and groups, the terms active/inactive will be used interchangeably
with enabled/disabled.
1 Please refer to your OPC Server’s manual for more information as to whether or not dynamic tags are
supported, and if so, what the valid syntax is for them.
Page 6 of 78
Intended Audience
This guide is intended for those who are new users of the OPC Quick Client or for those Quick Client users
seeking a basic resource to augment their current knowledge of Quick Client usage. The guide is by no
means an all-inclusive resource to the usage of Quick Client, but will address those issues and tasks that
the majority of users will find the most useful.
This guide does make several assumptions about the user. It is assumed that the users of this guide have
at least some understanding of the basic principles and uses of OPC. It is also assumed that users of this
guide are going to connect the Quick Client to an OPC server, in our case the TOP Server running the
SimDemo.opf simulation setup.
First-time users will find this guide to be especially helpful because it approaches each step of the
configuration process in a methodical way. As such, following this guide page by page should allow you to
configure your Quick Client most successfully.
OPC Quick Client as a Testing Tool
The OPC Quick Client allows you to perform operations on an OPC server at the Server, Group and Item
level. This allows a user to test out the functionality of an OPC server prior to configuring the HMI programs2 that will ultimately interface with the OPC server. The OPC Quick Client also allows the user to
create a project and run a list of tests. This makes the OPC Quick Client an invaluable tool for testing
server configurations and getting the server to device communications running properly. That way, any
troubleshooting necessary when configuring the HMI software can be narrowed to the HMI and not the
OPC server. This can save time by narrowing the number of possible problem zones to be considered.
2 Human Machine Interface Examples: WonderWare, RSLinx, Iconics, GE Cimplicity
Page 7 of 78
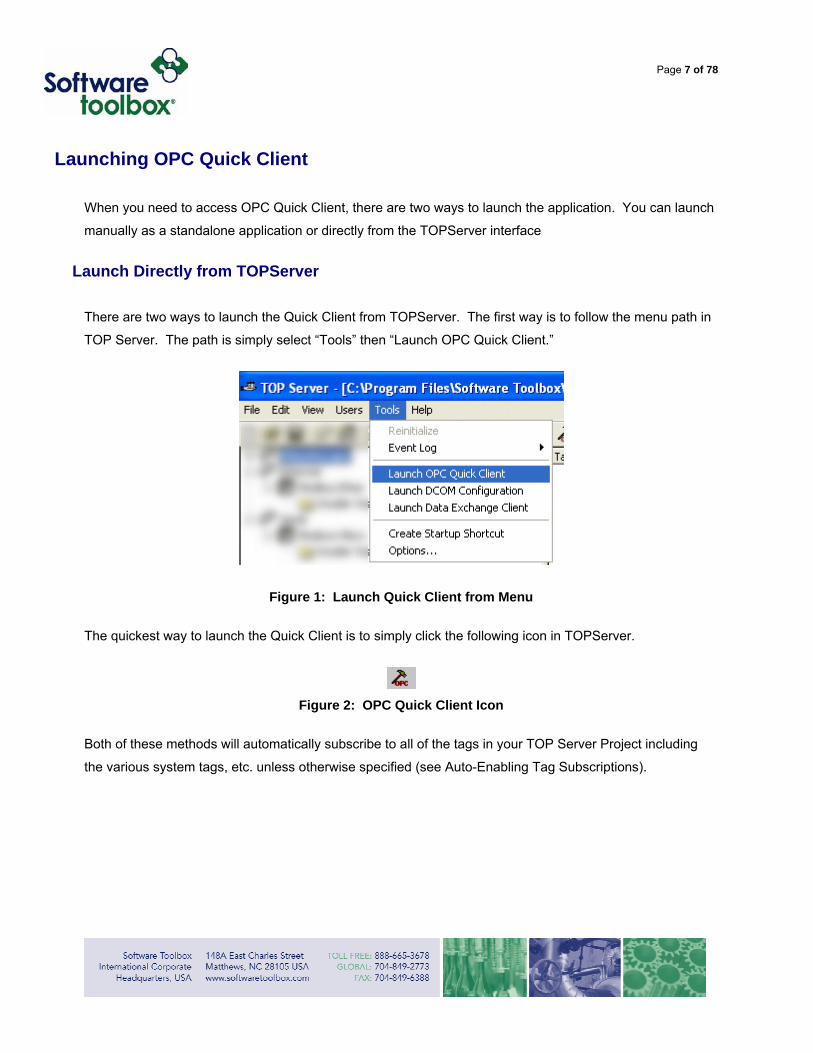
Launching OPC Quick Client
When you need to access OPC Quick Client, there are two ways to launch the application. You can launch
manually as a standalone application or directly from the TOPServer interface
Launch Directly from TOPServer
There are two ways to launch the Quick Client from TOPServer. The first way is to follow the menu path in
TOP Server. The path is simply select “Tools” then “Launch OPC Quick Client.”
Figure 1: Launch Quick Client from Menu
The quickest way to launch the Quick Client is to simply click the following icon in TOPServer.
Figure 2: OPC Quick Client Icon
Both of these methods will automatically subscribe to all of the tags in your TOP Server Project including
the various system tags, etc. unless otherwise specified (see Auto-Enabling Tag Subscriptions).
Page 8 of 78
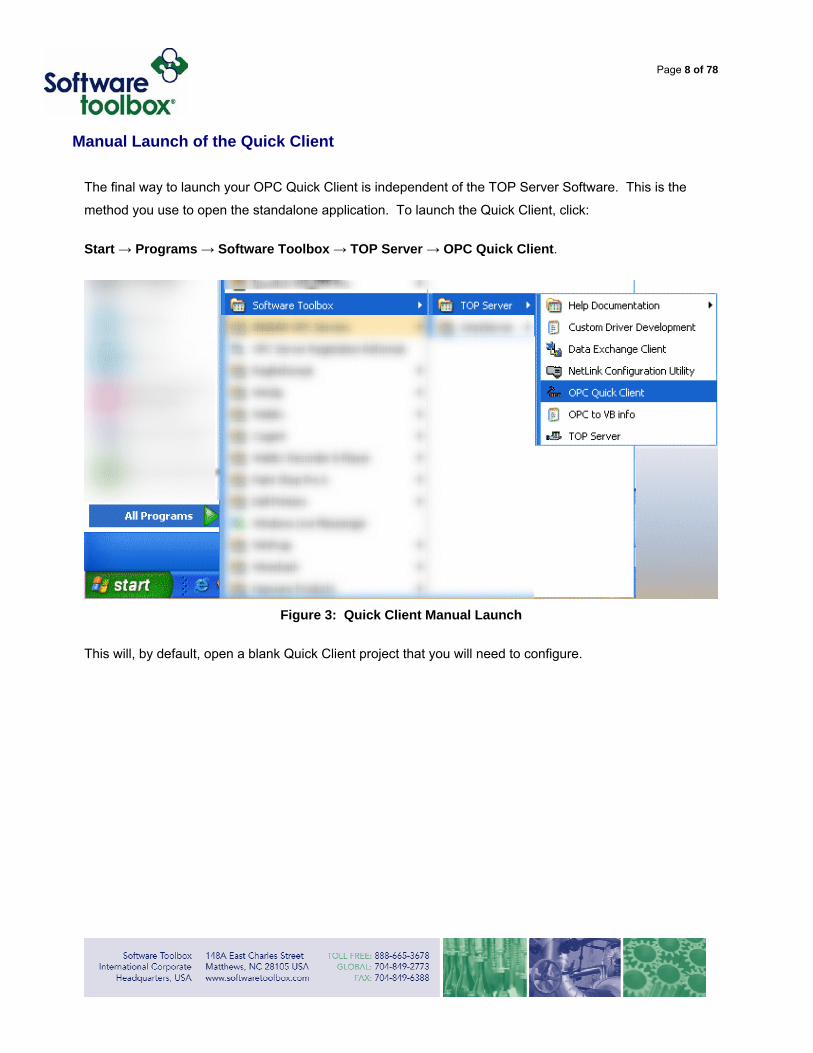
Manual Launch of the Quick Client
The final way to launch your OPC Quick Client is independent of the TOP Server Software. This is the
method you use to open the standalone application. To launch the Quick Client, click:
Start → Programs → Software Toolbox → TOP Server → OPC Quick Client.
Figure 3: Quick Client Manual Launch
This will, by default, open a blank Quick Client project that you will need to configure.
Page 9 of 78
Saving and Loading an OPC Quick Client Configuration
Saving a Configuration
Once a configuration of Initial Connection to a Servers, Adding a Groups and Adding Items to a Group
has been created, either by auto-population from TOPServer or by manually creation, it can be saved for
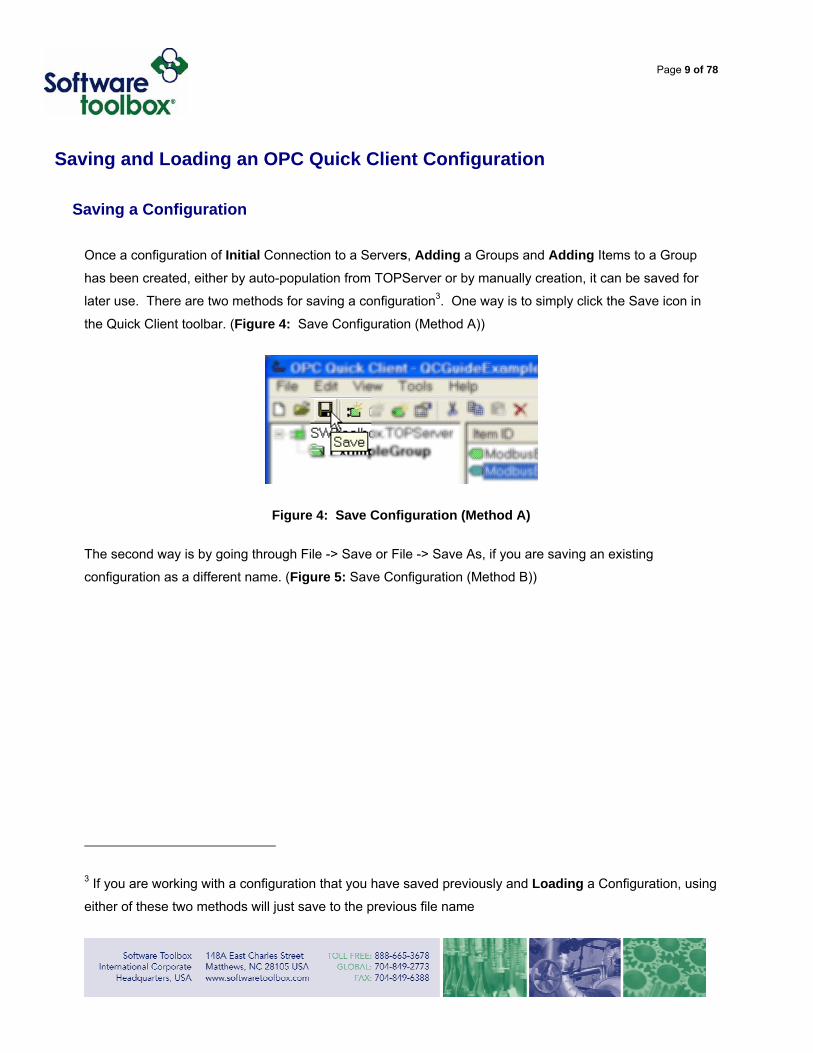
later use. There are two methods for saving a configuration3. One way is to simply click the Save icon in
the Quick Client toolbar. (Figure 4: Save Configuration (Method A))
Figure 4: Save Configuration (Method A)
The second way is by going through File -> Save or File -> Save As, if you are saving an existing
configuration as a different name. (Figure 5: Save Configuration (Method B))
3 If you are working with a configuration that you have saved previously and Loading a Configuration, using
either of these two methods will just save to the previous file name
Page 10 of 78
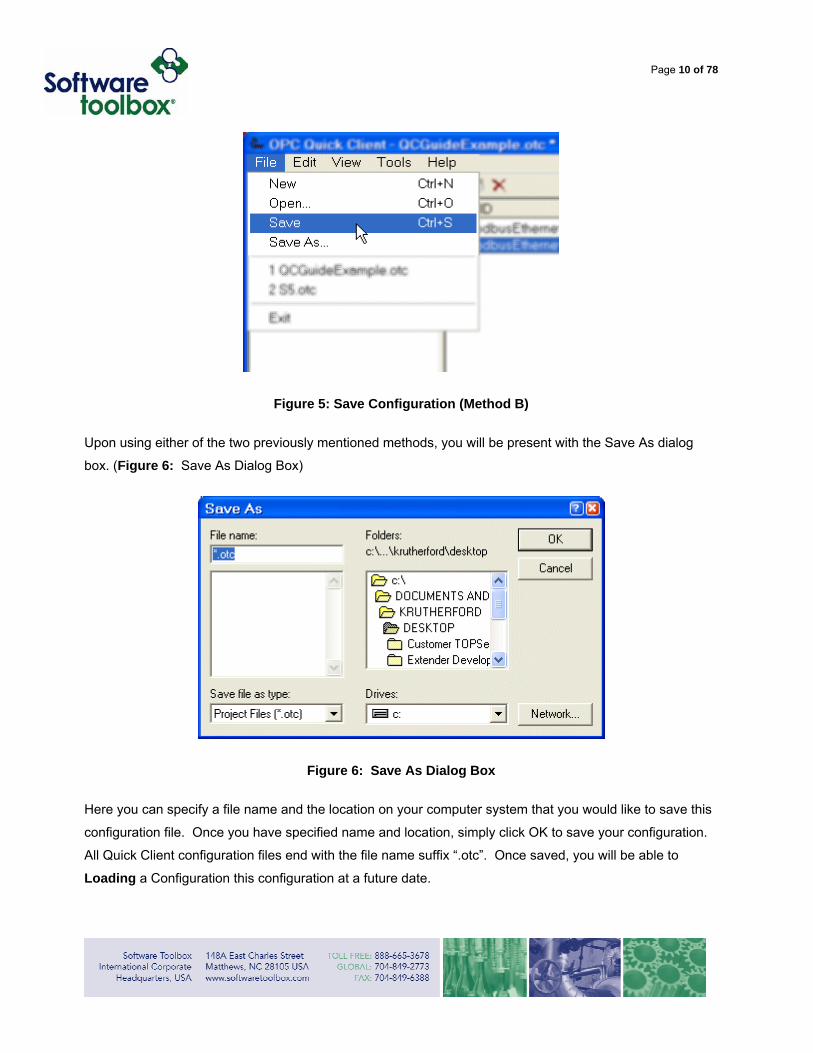
Figure 5: Save Configuration (Method B)
Upon using either of the two previously mentioned methods, you will be present with the Save As dialog
box. (Figure 6: Save As Dialog Box)
Figure 6: Save As Dialog Box
Here you can specify a file name and the location on your computer system that you would like to save this
configuration file. Once you have specified name and location, simply click OK to save your configuration.
All Quick Client configuration files end with the file name suffix “.otc”. Once saved, you will be able to
Loading a Configuration this configuration at a future date.

Page 11 of 78
Loading a Configuration
There are two ways to load a previously saved Quick Client configuration. One way is by clicking the Open
File icon in the Quick Client toolbar. (Figure 7: Load Configuration (Method A))
Figure 7: Load Configuration (Method A)
The second way to load a configuration is to go through File -> Open on the Quick Client menu. (Figure 8: Load Configuration (Method B))
Figure 8: Load Configuration (Method B)
Page 12 of 78
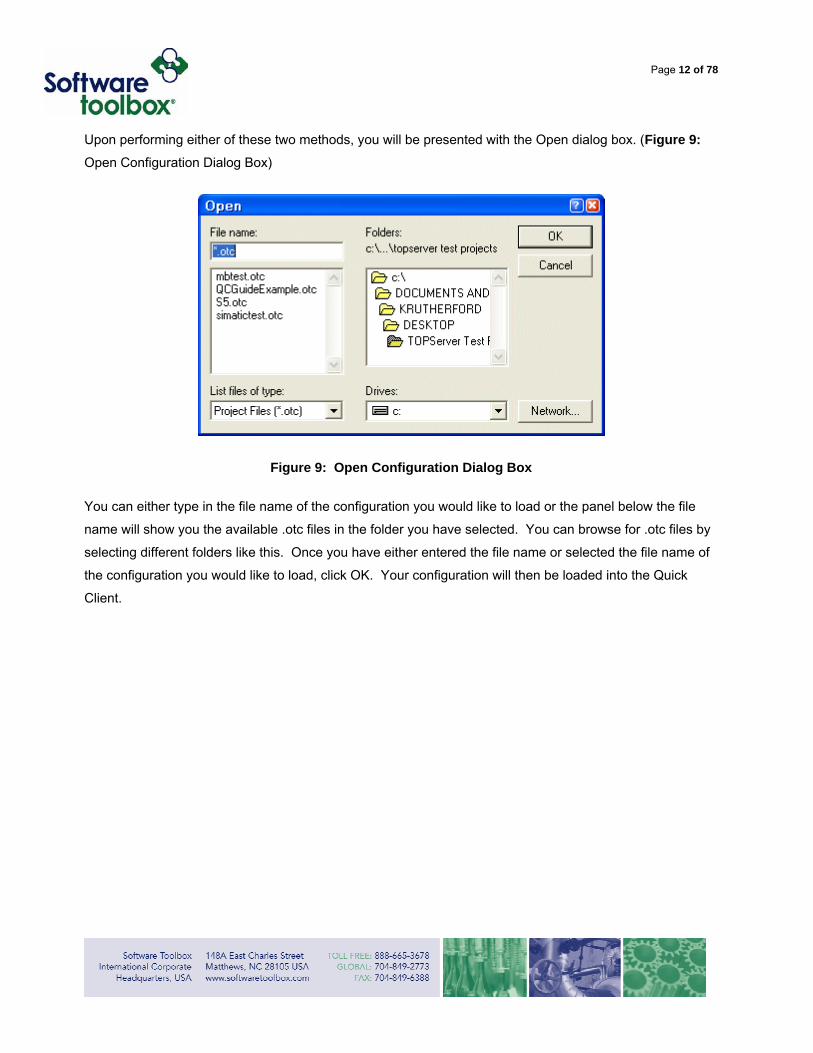
Upon performing either of these two methods, you will be presented with the Open dialog box. (Figure 9: Open Configuration Dialog Box)
Figure 9: Open Configuration Dialog Box
You can either type in the file name of the configuration you would like to load or the panel below the file
name will show you the available .otc files in the folder you have selected. You can browse for .otc files by
selecting different folders like this. Once you have either entered the file name or selected the file name of
the configuration you would like to load, click OK. Your configuration will then be loaded into the Quick
Client.
Page 13 of 78
Quick Client Connectivity
This section will guide you through the basics of the connection between client and server. Here we will
discuss connecting to a server, disconnecting, reconnecting and some basic troubleshooting.
Initial Connection to a Server
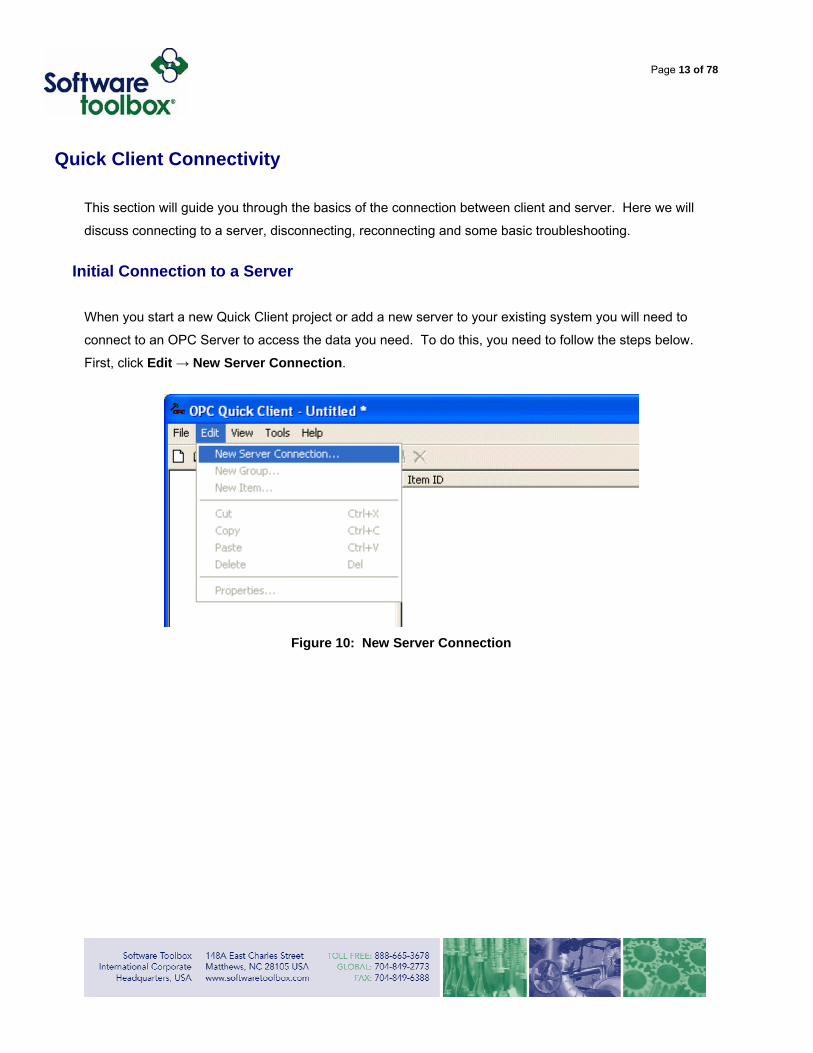
When you start a new Quick Client project or add a new server to your existing system you will need to
connect to an OPC Server to access the data you need. To do this, you need to follow the steps below.
First, click Edit → New Server Connection.
Figure 10: New Server Connection
Page 14 of 78
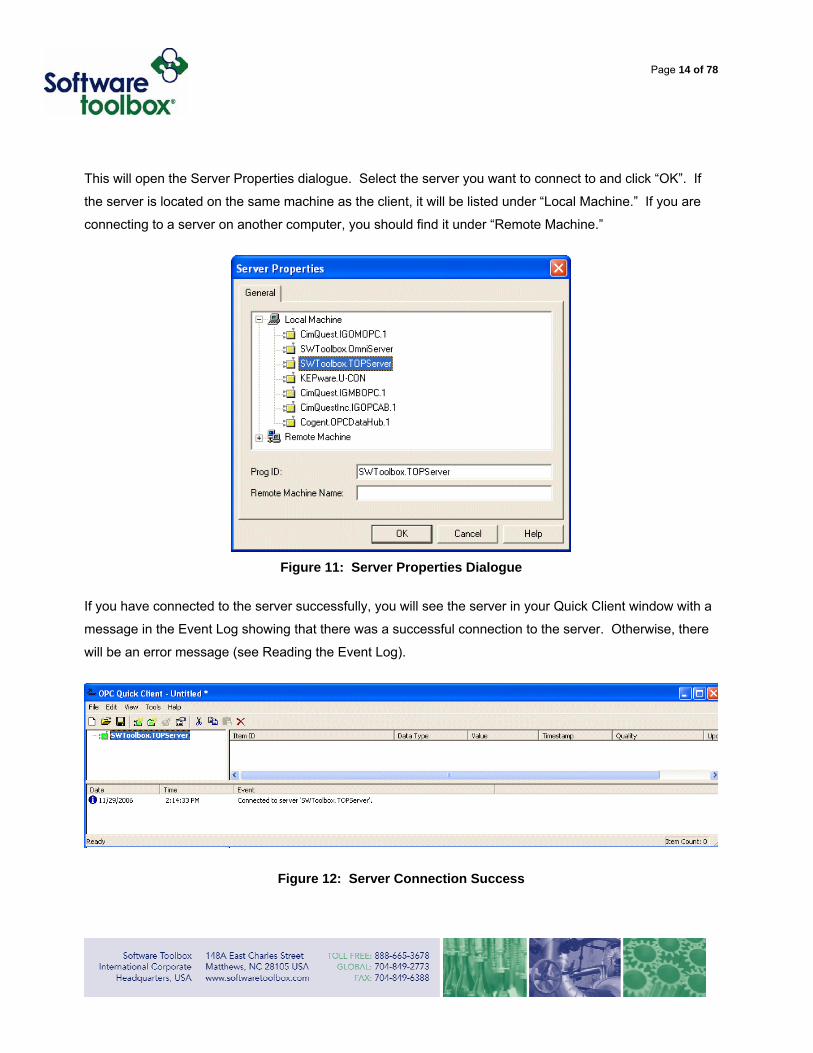
This will open the Server Properties dialogue. Select the server you want to connect to and click “OK”. If
the server is located on the same machine as the client, it will be listed under “Local Machine.” If you are
connecting to a server on another computer, you should find it under “Remote Machine.”
Figure 11: Server Properties Dialogue
If you have connected to the server successfully, you will see the server in your Quick Client window with a
message in the Event Log showing that there was a successful connection to the server. Otherwise, there
will be an error message (see Reading the Event Log).
Figure 12: Server Connection Success
Page 15 of 78
Disconnecting from the Server
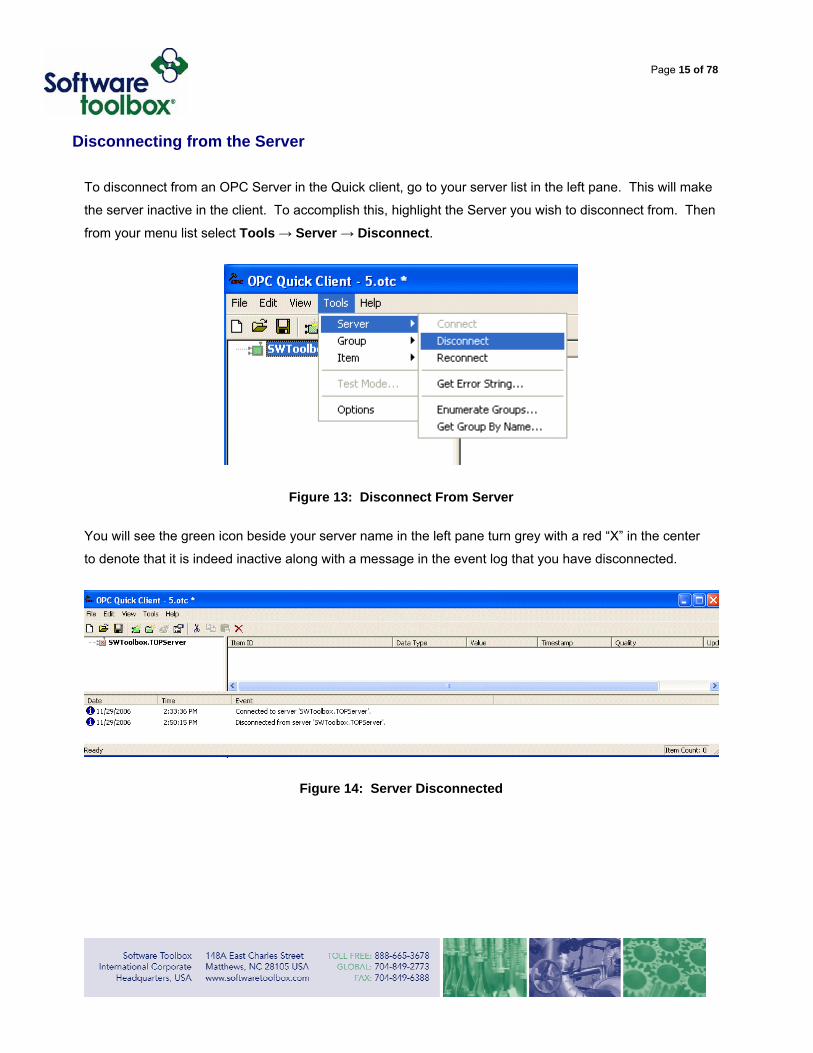
To disconnect from an OPC Server in the Quick client, go to your server list in the left pane. This will make
the server inactive in the client. To accomplish this, highlight the Server you wish to disconnect from. Then
from your menu list select Tools → Server → Disconnect.
Figure 13: Disconnect From Server
You will see the green icon beside your server name in the left pane turn grey with a red “X” in the center
to denote that it is indeed inactive along with a message in the event log that you have disconnected.
Figure 14: Server Disconnected
Page 16 of 78
Basic Connectivity Troubleshooting
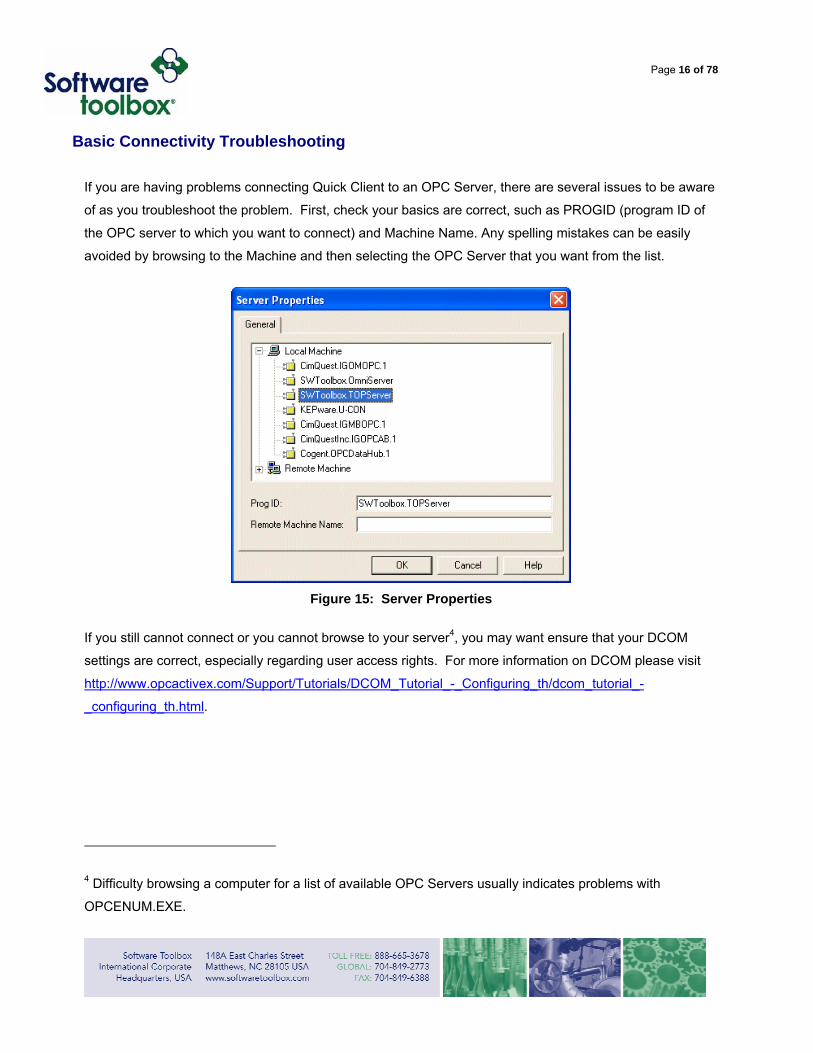
If you are having problems connecting Quick Client to an OPC Server, there are several issues to be aware
of as you troubleshoot the problem. First, check your basics are correct, such as PROGID (program ID of
the OPC server to which you want to connect) and Machine Name. Any spelling mistakes can be easily
avoided by browsing to the Machine and then selecting the OPC Server that you want from the list.
Figure 15: Server Properties
If you still cannot connect or you cannot browse to your server4, you may want ensure that your DCOM
settings are correct, especially regarding user access rights. For more information on DCOM please visit
http://www.opcactivex.com/Support/Tutorials/DCOM_Tutorial_-_Configuring_th/dcom_tutorial_-
_configuring_th.html.
4 Difficulty browsing a computer for a list of available OPC Servers usually indicates problems with
OPCENUM.EXE.
Page 17 of 78
Groups
What is a Group?
A Group (see also Group Level Subscriptions) is used to organize a collection of items, also referred to as
Tags, with a common set of properties. The group also specifies the following properties: group name,
update rate, time bias, percent dead band, language ID, active state, and the type of data connection that
should be made to the server.
Adding a Group
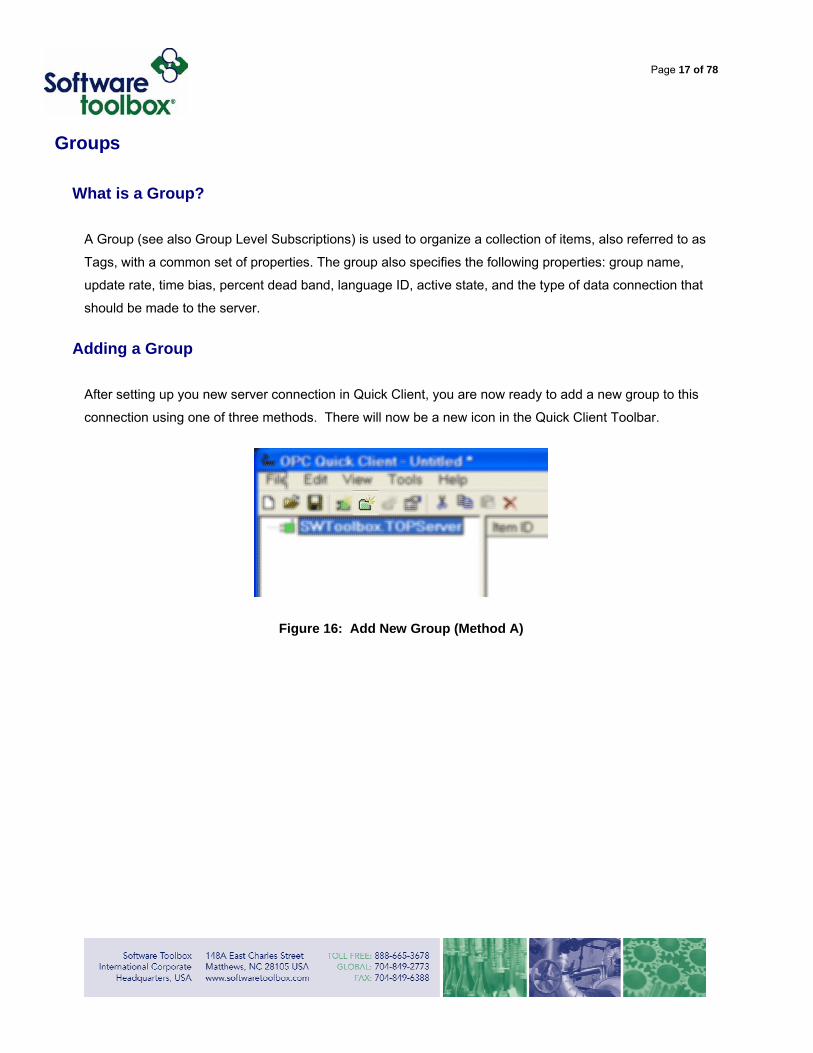
After setting up you new server connection in Quick Client, you are now ready to add a new group to this
connection using one of three methods. There will now be a new icon in the Quick Client Toolbar.
Figure 16: Add New Group (Method A)
Page 18 of 78
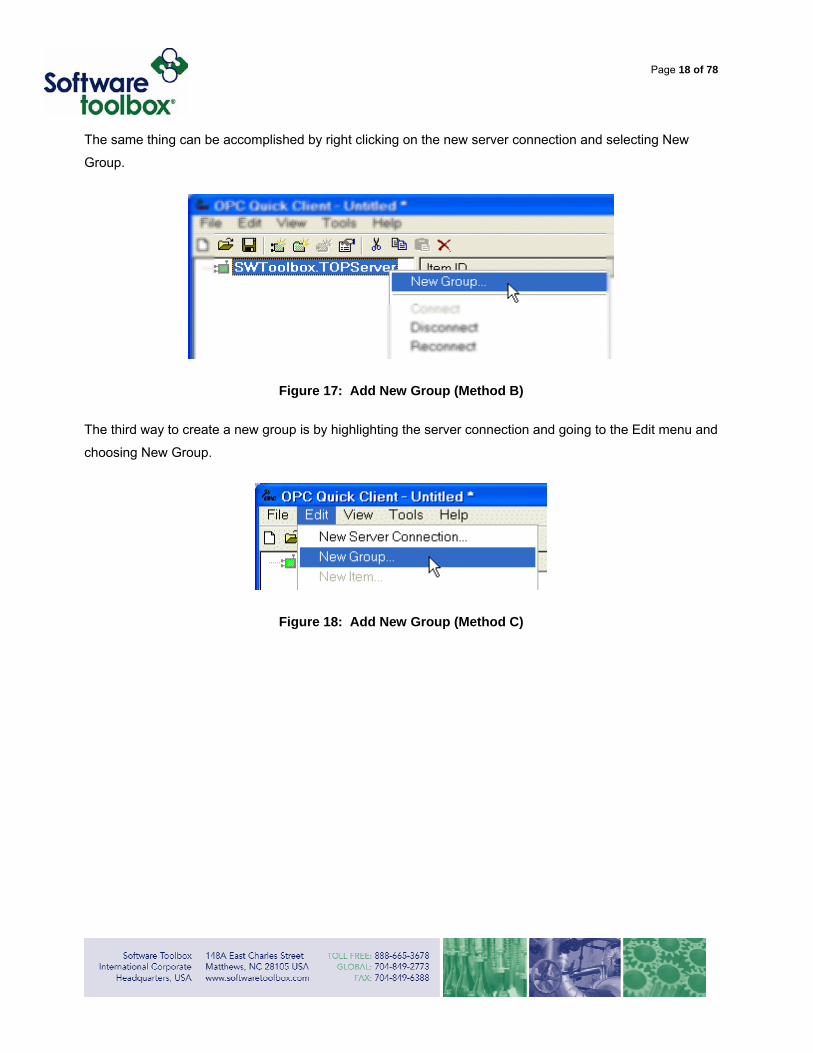
The same thing can be accomplished by right clicking on the new server connection and selecting New
Group.
Figure 17: Add New Group (Method B)
The third way to create a new group is by highlighting the server connection and going to the Edit menu and
choosing New Group.
Figure 18: Add New Group (Method C)
Page 19 of 78
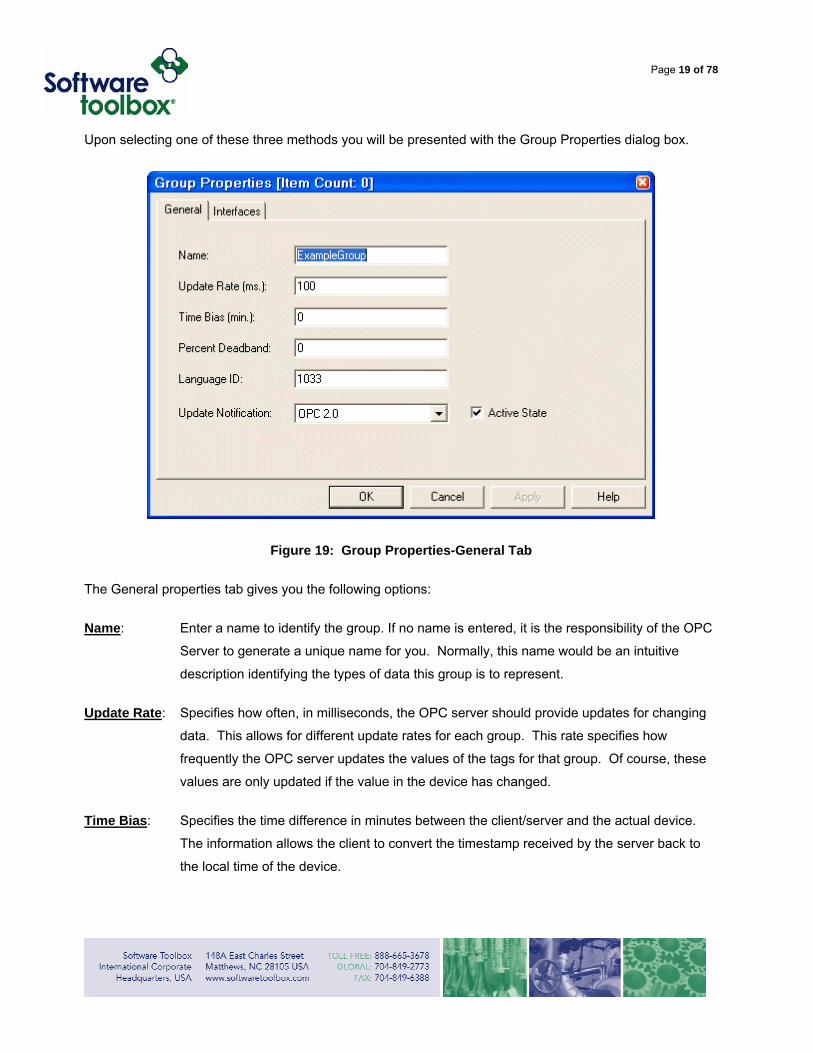
Upon selecting one of these three methods you will be presented with the Group Properties dialog box.
Figure 19: Group Properties-General Tab
The General properties tab gives you the following options:
Name: Enter a name to identify the group. If no name is entered, it is the responsibility of the OPC
Server to generate a unique name for you. Normally, this name would be an intuitive
description identifying the types of data this group is to represent.
Update Rate: Specifies how often, in milliseconds, the OPC server should provide updates for changing
data. This allows for different update rates for each group. This rate specifies how
frequently the OPC server updates the values of the tags for that group. Of course, these
values are only updated if the value in the device has changed.
Time Bias: Specifies the time difference in minutes between the client/server and the actual device.
The information allows the client to convert the timestamp received by the server back to
the local time of the device.
Page 20 of 78
Percent Deadband: Measured in the engineering units programmed into the device, this specifies the
percent change in data required to notify the client of a data change. This avoids
notifying the client when minimal changes are occurring and only substantial
changes are desired.
For example: If you had a holding tank for hot fudge with temperature sensors
connected to your PLC that are gauged to read temperatures of a range from 50
degrees Celsius to 150 degrees Celsius. Your OPC server is attached to the PLC
and is reading tags from that PLC for the temperature readings from those sensors.
The temperature in the holding tank fluctuates by fractions of degrees in Celsius, but
you only want to be aware of changes in temperature greater than five degrees
Celsius. Since this setting is a percentage of engineering units and five degrees out
of the range of 100 degrees is five percent, you would set your Deadband to 5.0.
Language ID: Specifies the language to be used by the server when returning values as text for
operations on this group.
Update Notification: Specifies the interface to use when receiving data change notifications, or initiating
asynchronous requests. Valid selections are OPC 1.0 (No Timestamp), OPC 1.0
(With Timestamp), OPC 2.0 and OPC 3.0. Data Access 2.0 & 3.0 servers
automatically supply timestamps with all data transactions.
Active State: Specifies the active state of the group (see Enabling Subscriptions – Group Level).
When the group is active, the client will subscribe to the addressed tags for each
active item at the specified update rate. When the group is inactive, the items
within the group are inactive and do not receive value updates unless requested by
a one-shot read or write.

Page 21 of 78
You can also select the Interfaces tab, which will present you with the following dialog box.
Figure 20: Group Properties-Interfaces
While the interface options displayed in this dialog box are not editable, they do indicate which group
interfaces are required by the server and which interfaces are supported or not. These interfaces provide
item groups with data management and read/write functionalities.
IOPCGroupStateMgt Allows the client to manage the overall state of the group. Primarily this
allows changes to the update rate and active state of the group.
IOPCPublicGroupStateMgt This optional interface is used to convert a private group to a public group.
IOPCItemMgt Allows a client to add, remove and control the behavior of items is a group.
IOPCSyncIO This interface governs the behavior of synchronous reads and writes for both
active and inactive items within groups based on the active state of both the
group and the item.

Page 22 of 78
IOPCAsyncIO This interface governs the behavior of asynchronous reads and writes for
both active and inactive items within groups based on the active state of both
the group and the item.
IDataObject This interface is implemented on the group rather than on individual items
and allows for the connection between the items in the Quick Client and the
tags in the OPC server.
IOPCAsyncIO2 (2.0 only) This interface is intended to replace IOPCAsyncIO and is used to control a
connection established with IConnectionPoint 5rather than IDataObject 6because they are a much cleaner way to return data.
IConnectionPointContainer (2.0 only) Find a particular connection point between the OPC Server and the
Client.
Once you have adjusted these settings according to your needs, clicking OK will add this new group to your
server connection.
5 IConnectionPoint is an OPC Interface
6 IDataObject is an OPC Interface
Page 23 of 78
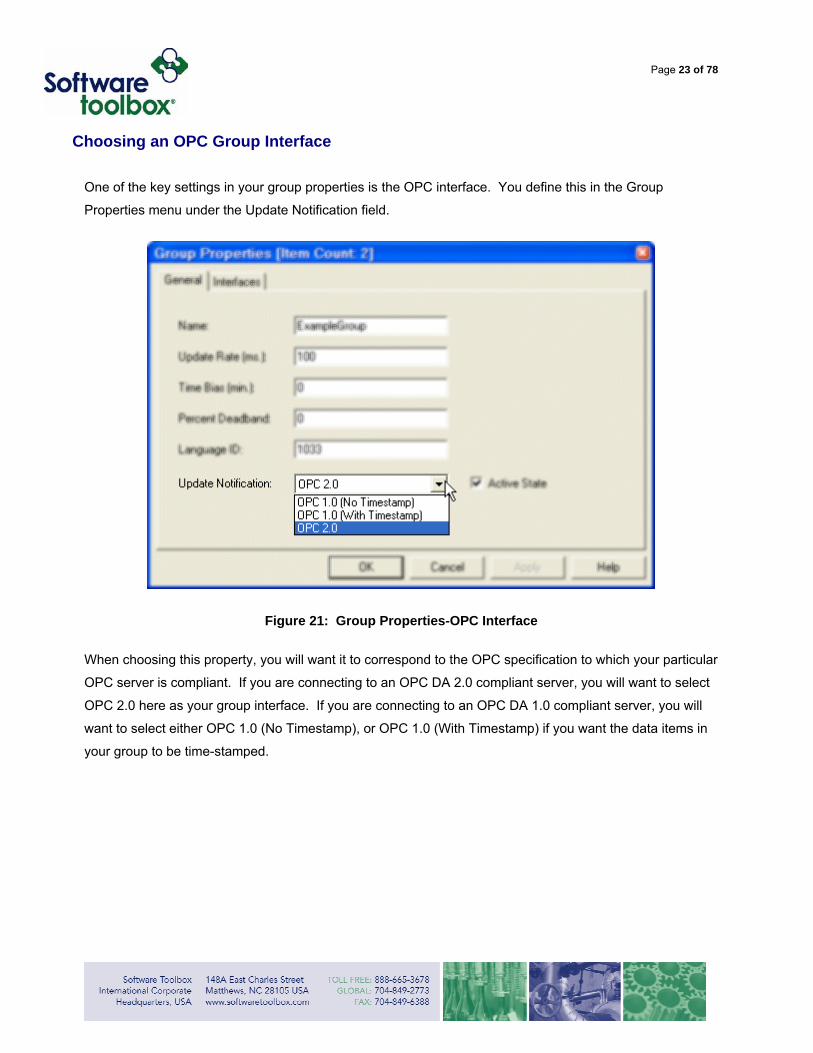
Choosing an OPC Group Interface
One of the key settings in your group properties is the OPC interface. You define this in the Group
Properties menu under the Update Notification field.
Figure 21: Group Properties-OPC Interface
When choosing this property, you will want it to correspond to the OPC specification to which your particular
OPC server is compliant. If you are connecting to an OPC DA 2.0 compliant server, you will want to select
OPC 2.0 here as your group interface. If you are connecting to an OPC DA 1.0 compliant server, you will
want to select either OPC 1.0 (No Timestamp), or OPC 1.0 (With Timestamp) if you want the data items in
your group to be time-stamped.
Page 24 of 78
Removing a Group
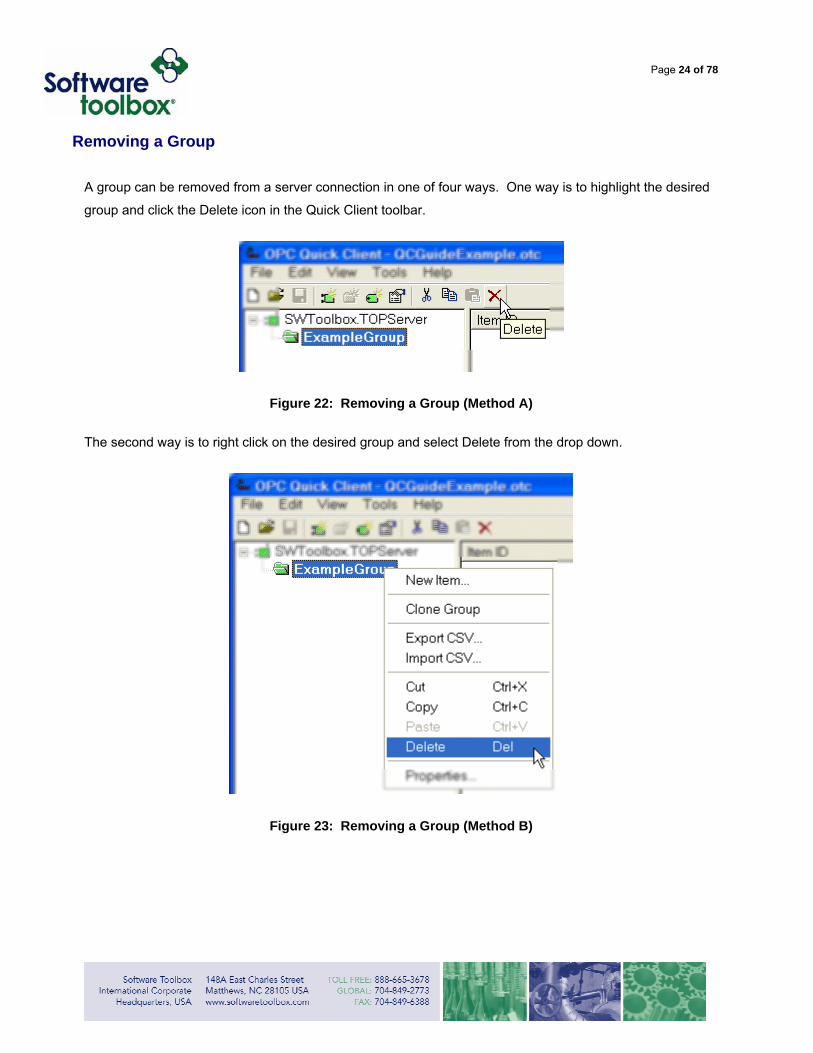
A group can be removed from a server connection in one of four ways. One way is to highlight the desired
group and click the Delete icon in the Quick Client toolbar.
Figure 22: Removing a Group (Method A)
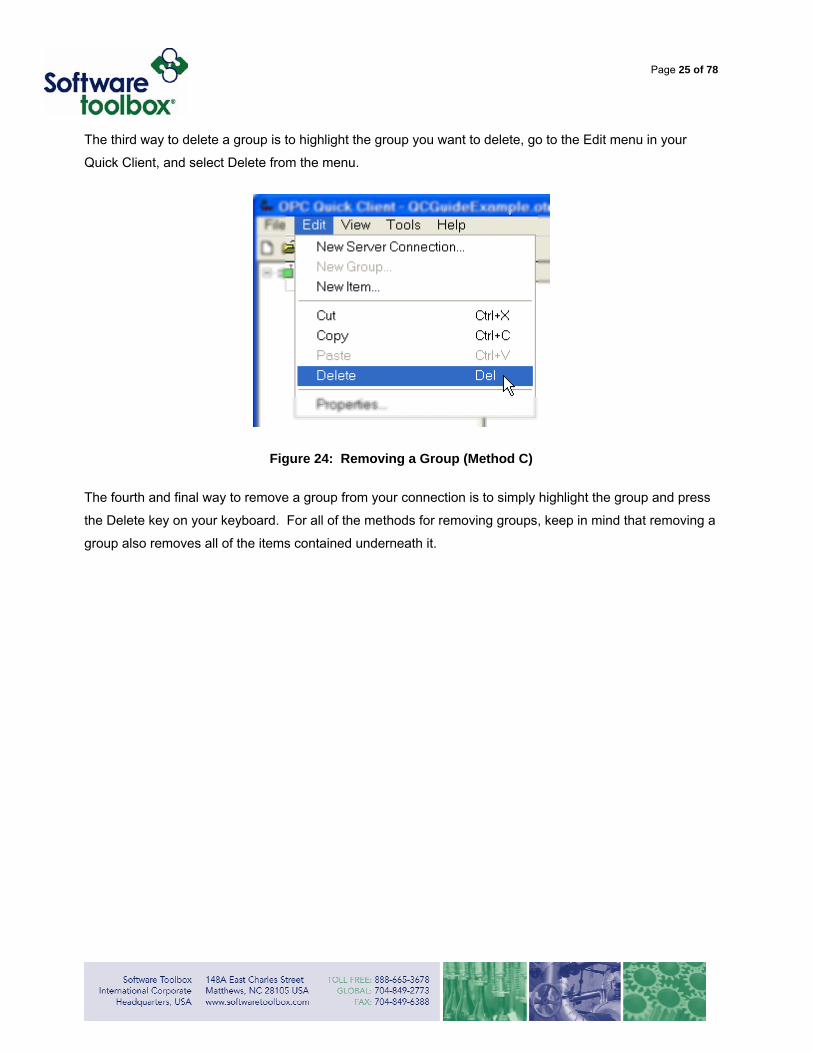
The second way is to right click on the desired group and select Delete from the drop down.
Figure 23: Removing a Group (Method B)
Page 25 of 78
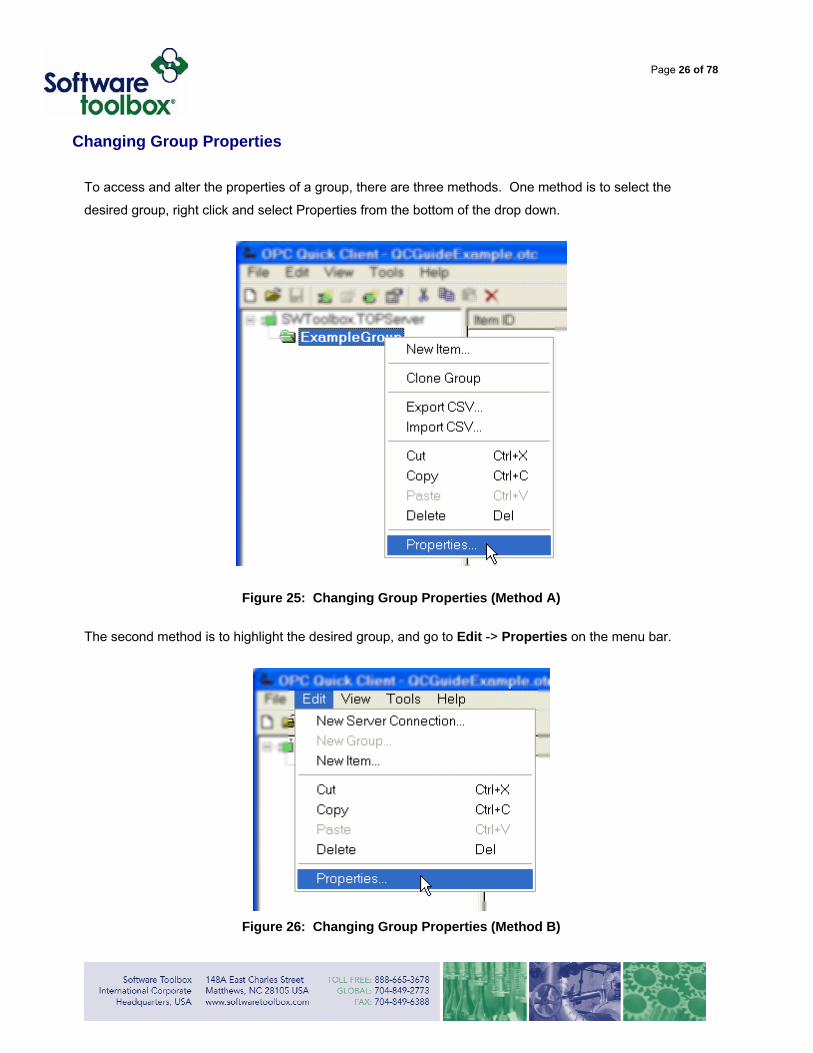
The third way to delete a group is to highlight the group you want to delete, go to the Edit menu in your
Quick Client, and select Delete from the menu.
Figure 24: Removing a Group (Method C)
The fourth and final way to remove a group from your connection is to simply highlight the group and press
the Delete key on your keyboard. For all of the methods for removing groups, keep in mind that removing a
group also removes all of the items contained underneath it.
Page 26 of 78
Changing Group Properties
To access and alter the properties of a group, there are three methods. One method is to select the
desired group, right click and select Properties from the bottom of the drop down.
Figure 25: Changing Group Properties (Method A)
The second method is to highlight the desired group, and go to Edit -> Properties on the menu bar.
Figure 26: Changing Group Properties (Method B)
Page 27 of 78
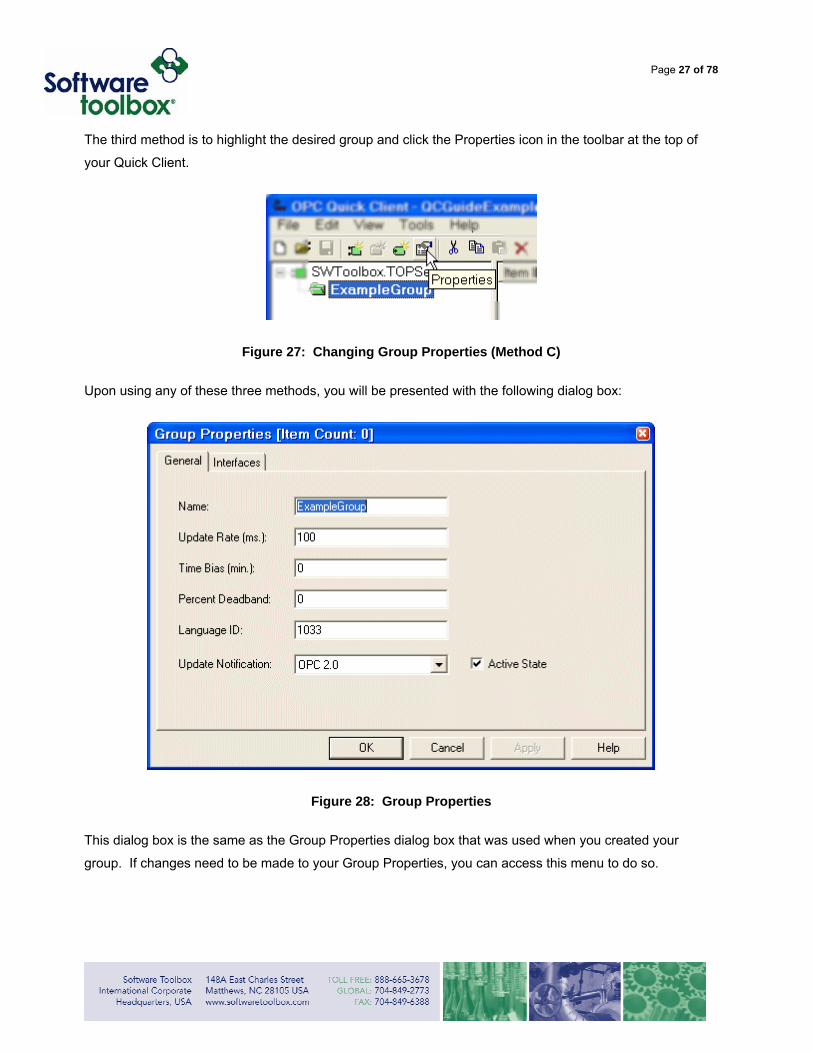
The third method is to highlight the desired group and click the Properties icon in the toolbar at the top of
your Quick Client.
Figure 27: Changing Group Properties (Method C)
Upon using any of these three methods, you will be presented with the following dialog box:
Figure 28: Group Properties
This dialog box is the same as the Group Properties dialog box that was used when you created your
group. If changes need to be made to your Group Properties, you can access this menu to do so.
Page 28 of 78
Items
What is an Item?
An item (also known as a Tag) (See also Tag Level Subscriptions) represents data that may be accessed
via an OPC server. An item specifies the following properties: Item ID, Access Path, Requested Data Type,
and Active State. These items, once created, reference specific memory addresses in the actual physical
memory of the device you are connecting to.
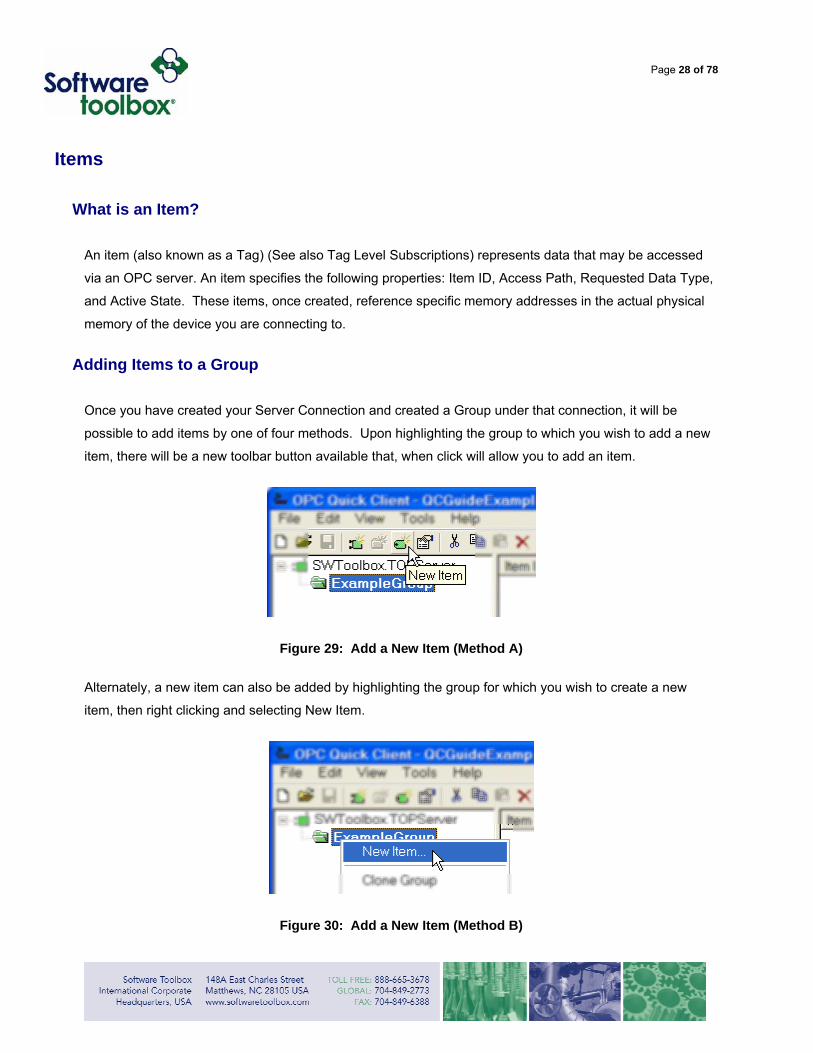
Adding Items to a Group
Once you have created your Server Connection and created a Group under that connection, it will be
possible to add items by one of four methods. Upon highlighting the group to which you wish to add a new
item, there will be a new toolbar button available that, when click will allow you to add an item.
Figure 29: Add a New Item (Method A)
Alternately, a new item can also be added by highlighting the group for which you wish to create a new
item, then right clicking and selecting New Item.
Figure 30: Add a New Item (Method B)
Page 29 of 78
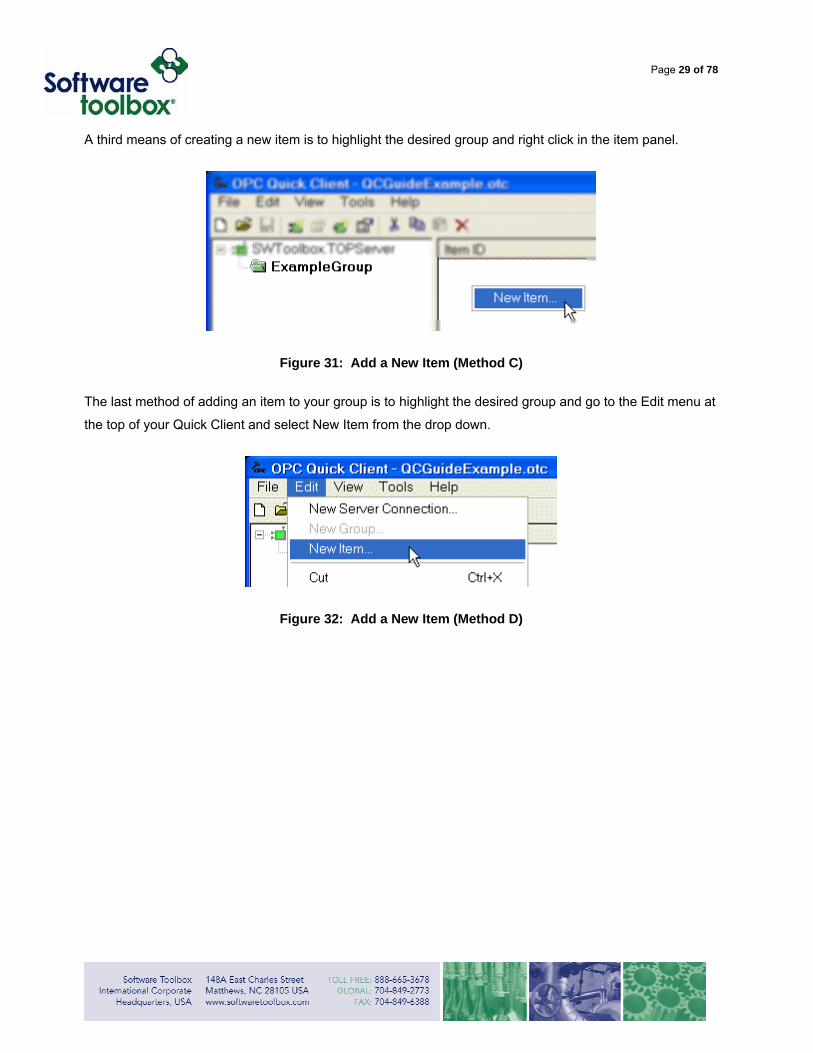
A third means of creating a new item is to highlight the desired group and right click in the item panel.
Figure 31: Add a New Item (Method C)
The last method of adding an item to your group is to highlight the desired group and go to the Edit menu at
the top of your Quick Client and select New Item from the drop down.
Figure 32: Add a New Item (Method D)
Page 30 of 78
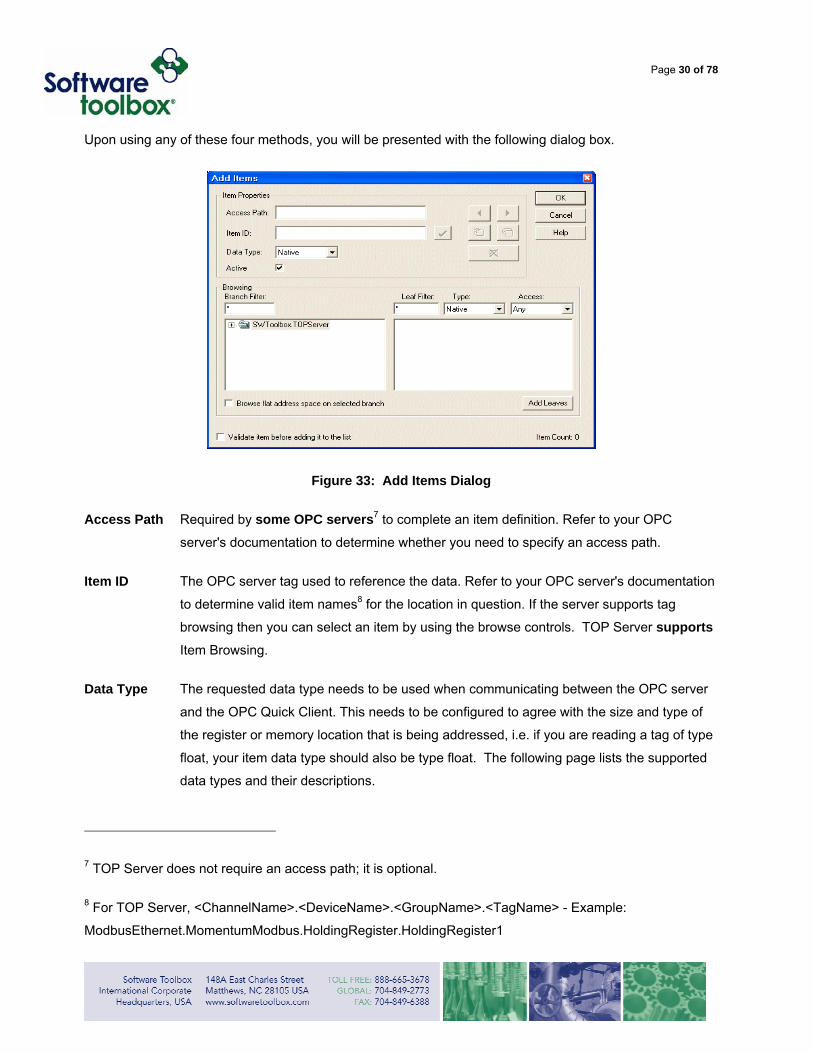
Upon using any of these four methods, you will be presented with the following dialog box.
Figure 33: Add Items Dialog
Access Path Required by some OPC servers7 to complete an item definition. Refer to your OPC
server's documentation to determine whether you need to specify an access path.
Item ID The OPC server tag used to reference the data. Refer to your OPC server's documentation
to determine valid item names8 for the location in question. If the server supports tag
browsing then you can select an item by using the browse controls. TOP Server supports
Item Browsing.
Data Type The requested data type needs to be used when communicating between the OPC server
and the OPC Quick Client. This needs to be configured to agree with the size and type of
the register or memory location that is being addressed, i.e. if you are reading a tag of type
float, your item data type should also be type float. The following page lists the supported
data types and their descriptions.
7 TOP Server does not require an access path; it is optional.
8 For TOP Server, <ChannelName>.<DeviceName>.<GroupName>.<TagName> - Example:
ModbusEthernet.MomentumModbus.HoldingRegister.HoldingRegister1
Page 31 of 78
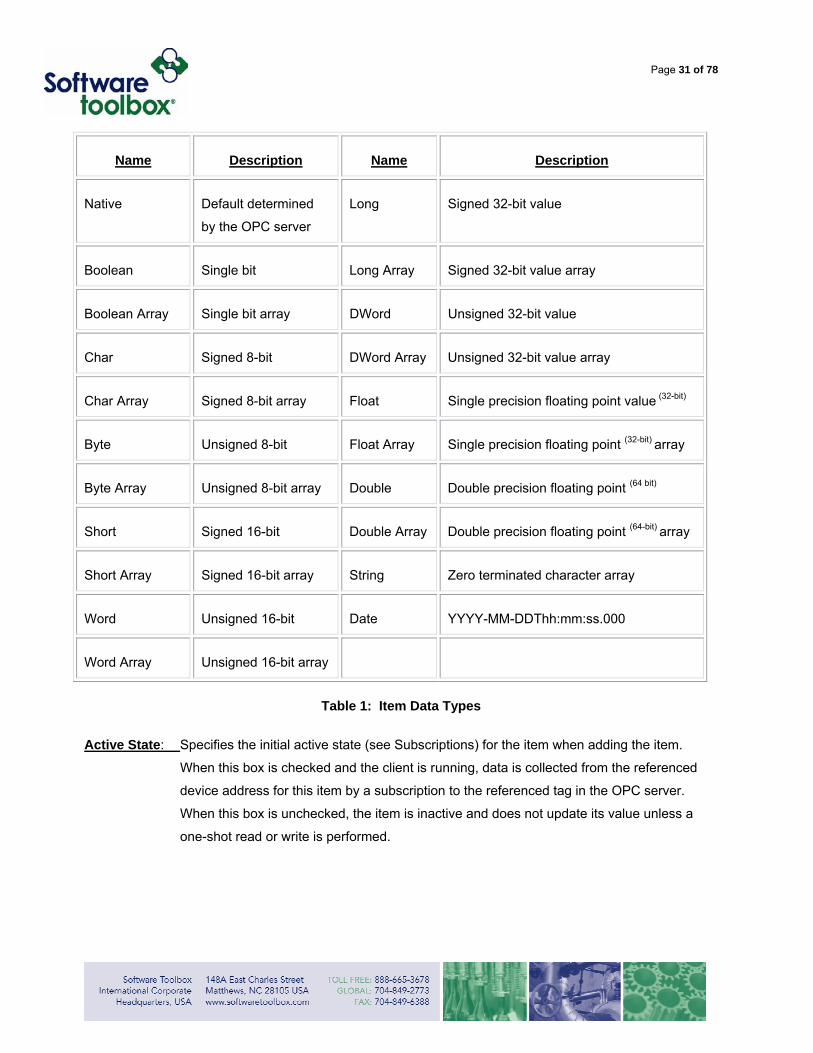
Name Description Name Description
Native Default determined
by the OPC server
Long Signed 32-bit value
Boolean Single bit Long Array Signed 32-bit value array
Boolean Array Single bit array DWord Unsigned 32-bit value
Char Signed 8-bit DWord Array Unsigned 32-bit value array
Char Array Signed 8-bit array Float Single precision floating point value (32-bit)
Byte Unsigned 8-bit Float Array Single precision floating point (32-bit) array
Byte Array Unsigned 8-bit array Double Double precision floating point (64 bit)
Short Signed 16-bit Double Array Double precision floating point (64-bit) array
Short Array Signed 16-bit array String Zero terminated character array
Word Unsigned 16-bit Date YYYY-MM-DDThh:mm:ss.000
Word Array Unsigned 16-bit array
Table 1: Item Data Types
Active State: Specifies the initial active state (see Subscriptions) for the item when adding the item.
When this box is checked and the client is running, data is collected from the referenced
device address for this item by a subscription to the referenced tag in the OPC server.
When this box is unchecked, the item is inactive and does not update its value unless a
one-shot read or write is performed.
Page 32 of 78
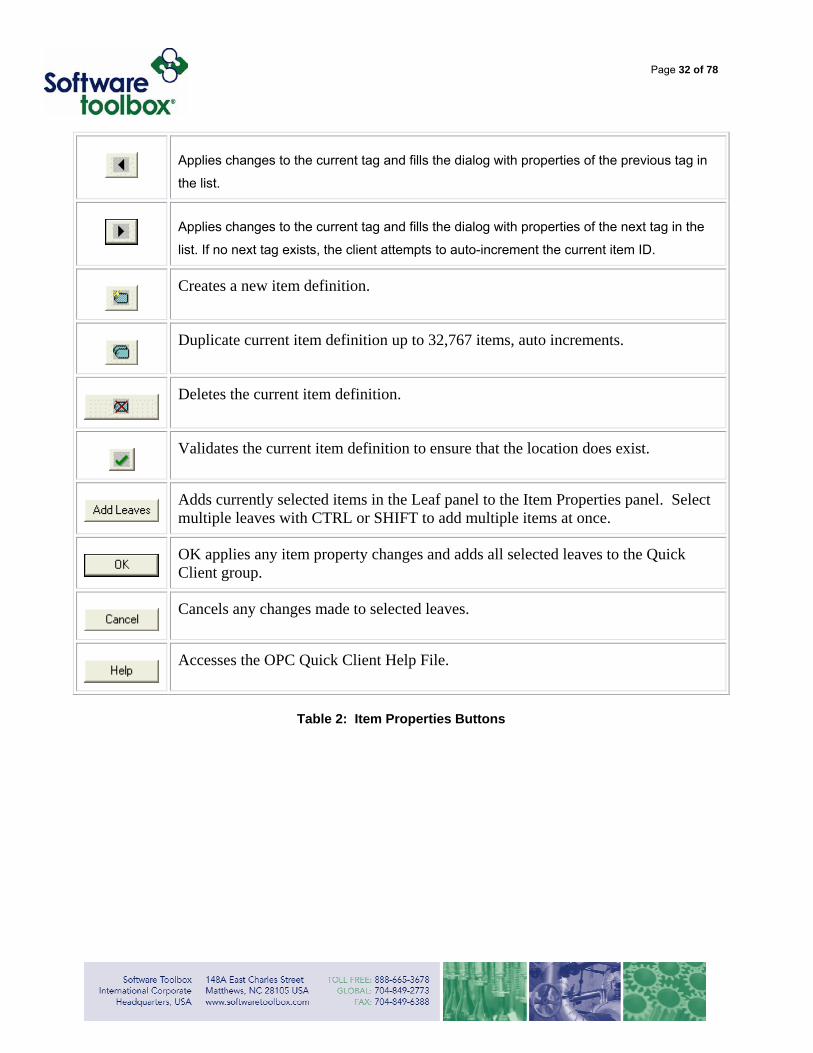
Applies changes to the current tag and fills the dialog with properties of the previous tag in
the list.
Applies changes to the current tag and fills the dialog with properties of the next tag in the
list. If no next tag exists, the client attempts to auto-increment the current item ID.
Creates a new item definition.
Duplicate current item definition up to 32,767 items, auto increments.
Deletes the current item definition.
Validates the current item definition to ensure that the location does exist.
Adds currently selected items in the Leaf panel to the Item Properties panel. Select multiple leaves with CTRL or SHIFT to add multiple items at once.
OK applies any item property changes and adds all selected leaves to the Quick Client group.
Cancels any changes made to selected leaves.
Accesses the OPC Quick Client Help File.
Table 2: Item Properties Buttons
Page 33 of 78
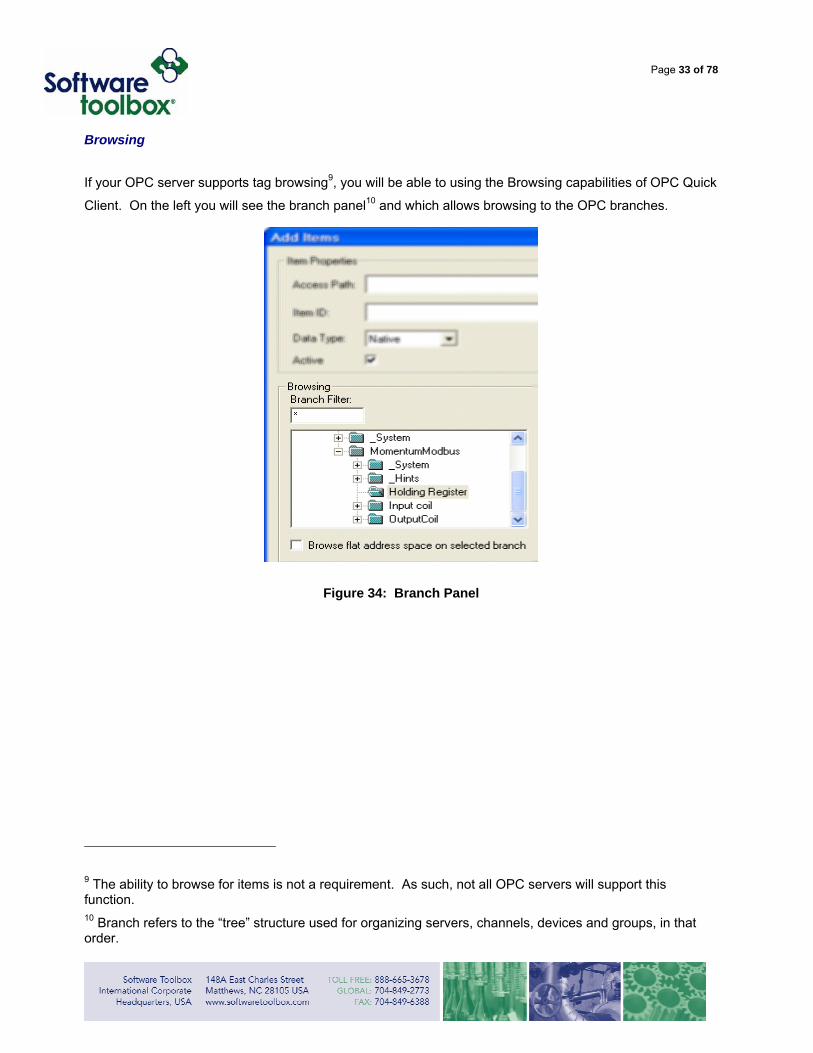
Browsing
If your OPC server supports tag browsing9, you will be able to using the Browsing capabilities of OPC Quick
Client. On the left you will see the branch panel10 and which allows browsing to the OPC branches.
Figure 34: Branch Panel
9 The ability to browse for items is not a requirement. As such, not all OPC servers will support this function. 10 Branch refers to the “tree” structure used for organizing servers, channels, devices and groups, in that order.
Page 34 of 78
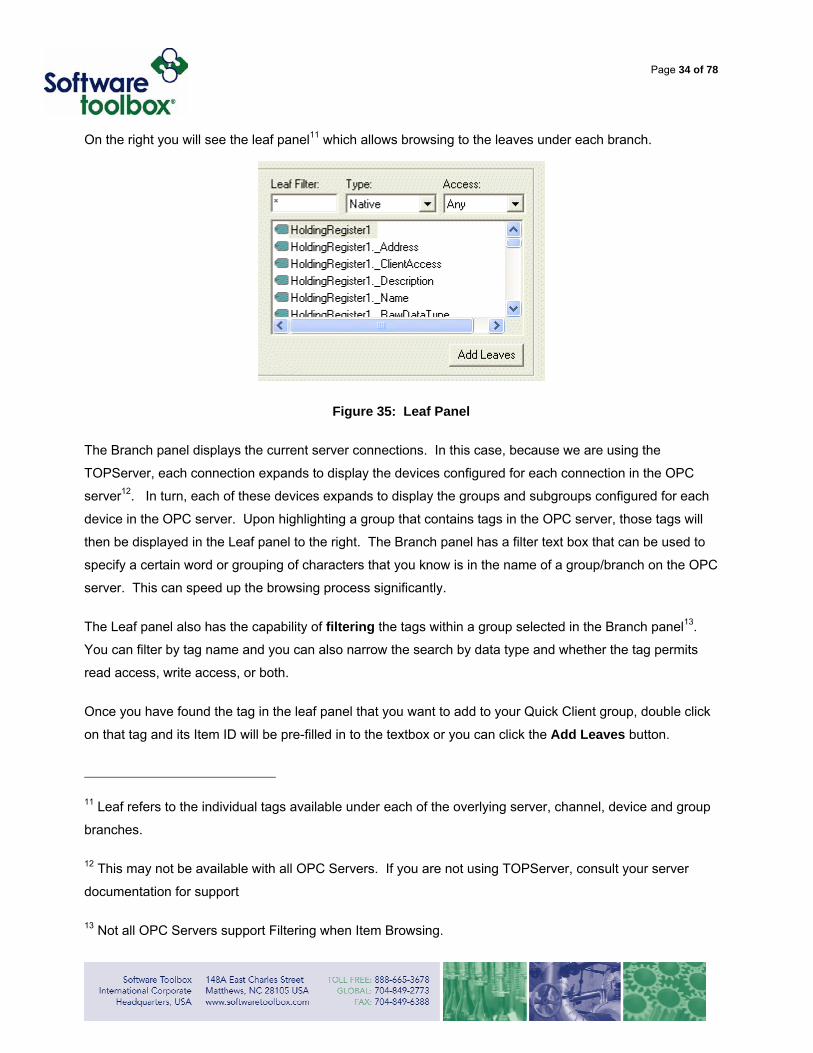
On the right you will see the leaf panel11 which allows browsing to the leaves under each branch.
Figure 35: Leaf Panel
The Branch panel displays the current server connections. In this case, because we are using the
TOPServer, each connection expands to display the devices configured for each connection in the OPC
server12. In turn, each of these devices expands to display the groups and subgroups configured for each
device in the OPC server. Upon highlighting a group that contains tags in the OPC server, those tags will
then be displayed in the Leaf panel to the right. The Branch panel has a filter text box that can be used to
specify a certain word or grouping of characters that you know is in the name of a group/branch on the OPC
server. This can speed up the browsing process significantly.
The Leaf panel also has the capability of filtering the tags within a group selected in the Branch panel13.
You can filter by tag name and you can also narrow the search by data type and whether the tag permits
read access, write access, or both.
Once you have found the tag in the leaf panel that you want to add to your Quick Client group, double click
on that tag and its Item ID will be pre-filled in to the textbox or you can click the Add Leaves button.
11 Leaf refers to the individual tags available under each of the overlying server, channel, device and group
branches.
12 This may not be available with all OPC Servers. If you are not using TOPServer, consult your server
documentation for support
13 Not all OPC Servers support Filtering when Item Browsing.
Page 35 of 78
Items will not be visible in the Quick Client until you click OK. If this is the only item you want to add at this
time, click OK. If there are multiple items in the leaf panel that you want to add, you can simply repeat
either of the above methods, using CTRL or SHIFT until you have added all of the leaves you want to add
to the selected group.
You can cycle back through the leaves you have added to the Item Properties panel using the previous
button and the next button. If you have made changes to the properties of a leaf, cycling through the tags
will apply those changes prior to displaying the next tag in the cycle. When you are finished, clicking the
OK button will add all of these items to your group.
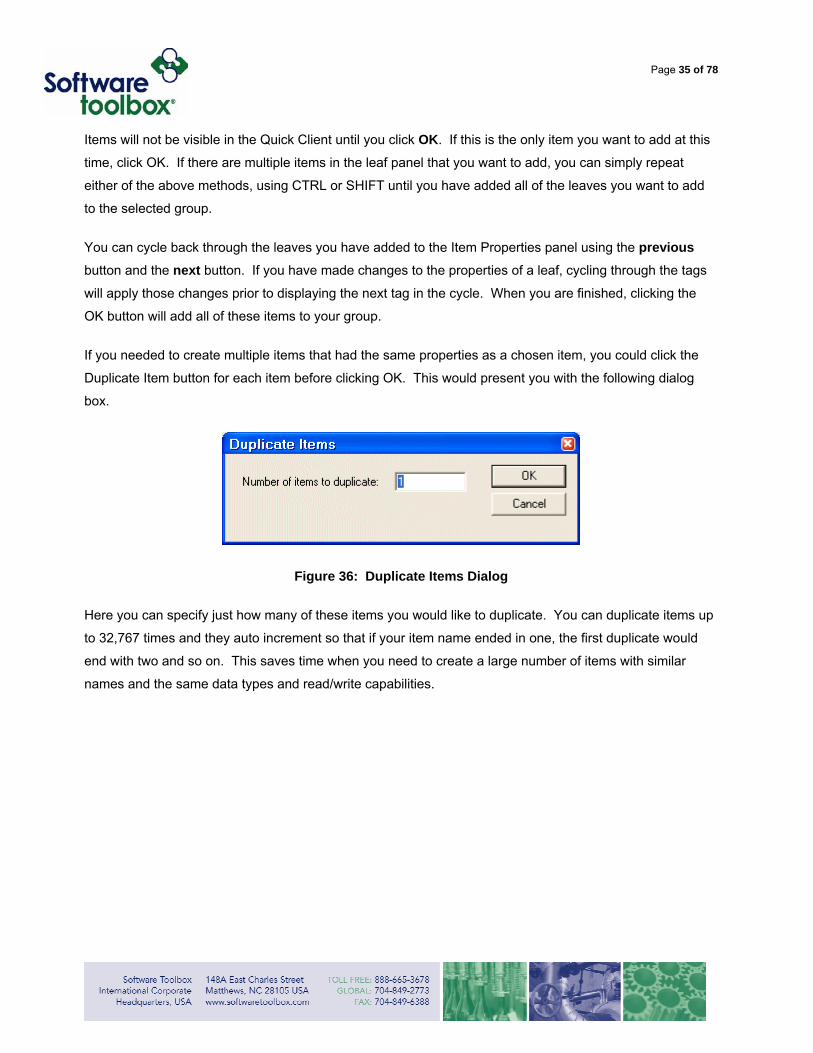
If you needed to create multiple items that had the same properties as a chosen item, you could click the
Duplicate Item button for each item before clicking OK. This would present you with the following dialog
box.
Figure 36: Duplicate Items Dialog
Here you can specify just how many of these items you would like to duplicate. You can duplicate items up
to 32,767 times and they auto increment so that if your item name ended in one, the first duplicate would
end with two and so on. This saves time when you need to create a large number of items with similar
names and the same data types and read/write capabilities.
Page 36 of 78
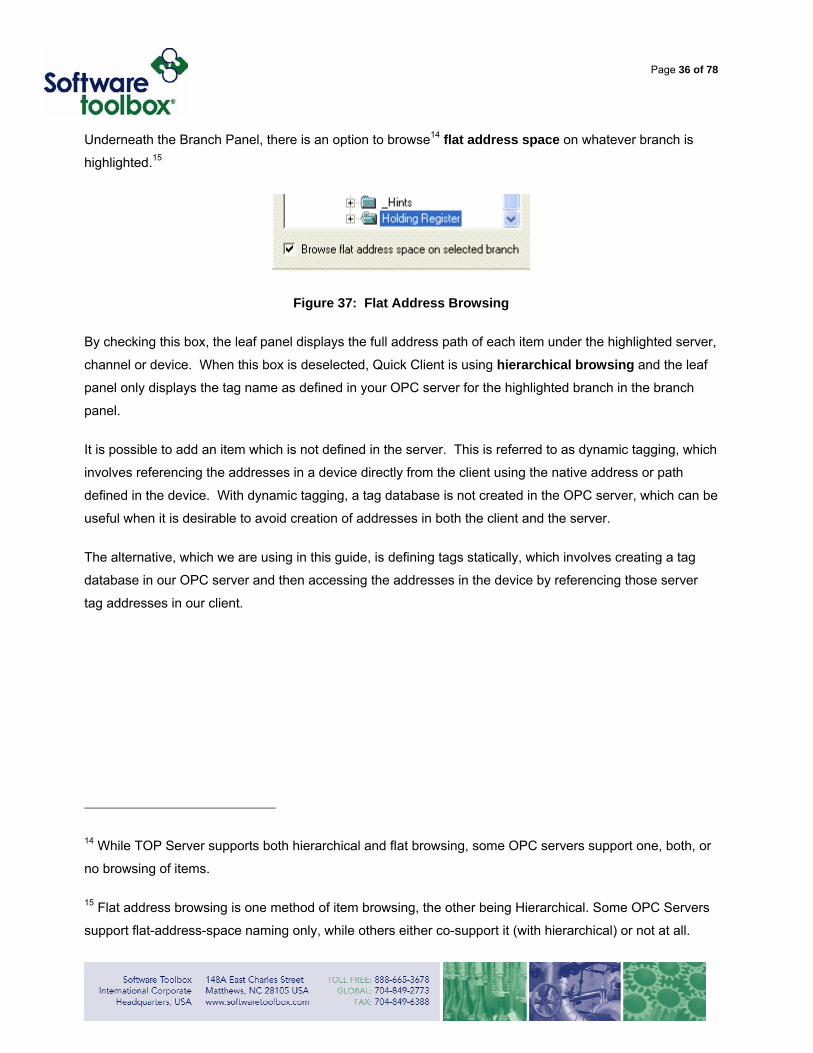
Underneath the Branch Panel, there is an option to browse14 flat address space on whatever branch is
highlighted.15
Figure 37: Flat Address Browsing
By checking this box, the leaf panel displays the full address path of each item under the highlighted server,
channel or device. When this box is deselected, Quick Client is using hierarchical browsing and the leaf
panel only displays the tag name as defined in your OPC server for the highlighted branch in the branch
panel.
It is possible to add an item which is not defined in the server. This is referred to as dynamic tagging, which
involves referencing the addresses in a device directly from the client using the native address or path
defined in the device. With dynamic tagging, a tag database is not created in the OPC server, which can be
useful when it is desirable to avoid creation of addresses in both the client and the server.
The alternative, which we are using in this guide, is defining tags statically, which involves creating a tag
database in our OPC server and then accessing the addresses in the device by referencing those server
tag addresses in our client.
14 While TOP Server supports both hierarchical and flat browsing, some OPC servers support one, both, or
no browsing of items.
15 Flat address browsing is one method of item browsing, the other being Hierarchical. Some OPC Servers
support flat-address-space naming only, while others either co-support it (with hierarchical) or not at all.
Page 37 of 78
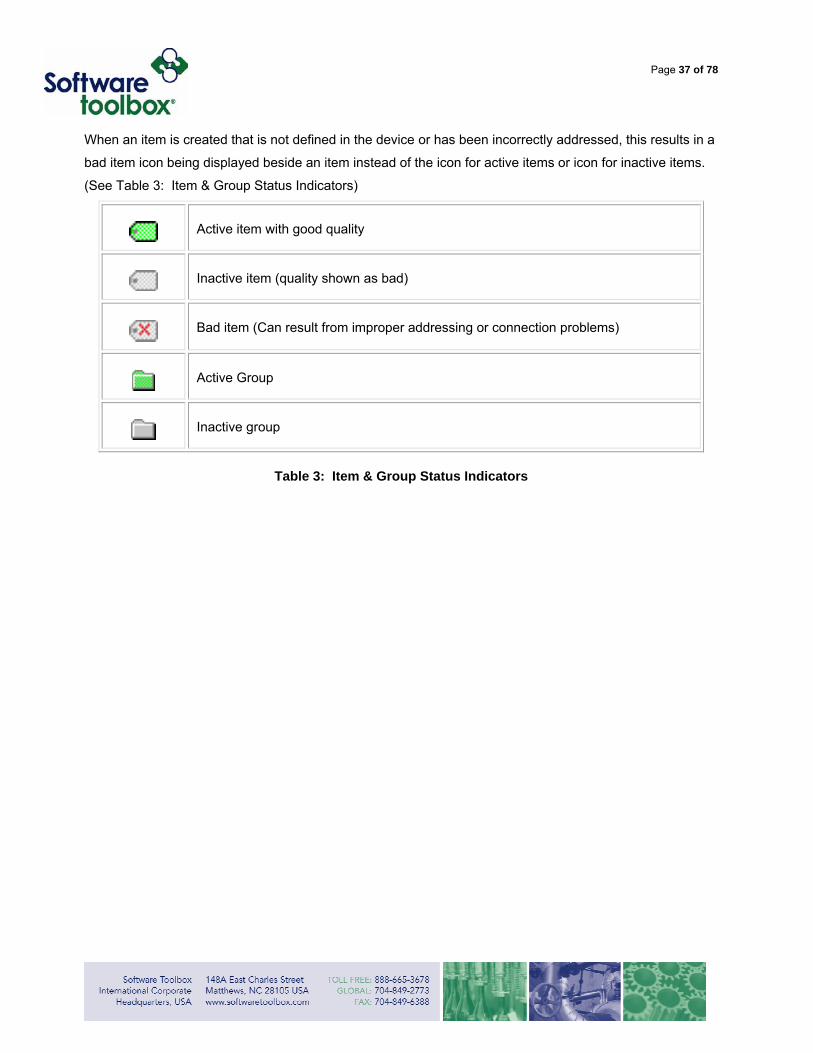
When an item is created that is not defined in the device or has been incorrectly addressed, this results in a
bad item icon being displayed beside an item instead of the icon for active items or icon for inactive items.
(See Table 3: Item & Group Status Indicators)
Active item with good quality
Inactive item (quality shown as bad)
Bad item (Can result from improper addressing or connection problems)
Active Group
Inactive group
Table 3: Item & Group Status Indicators
Page 38 of 78
Removing Items from a Group
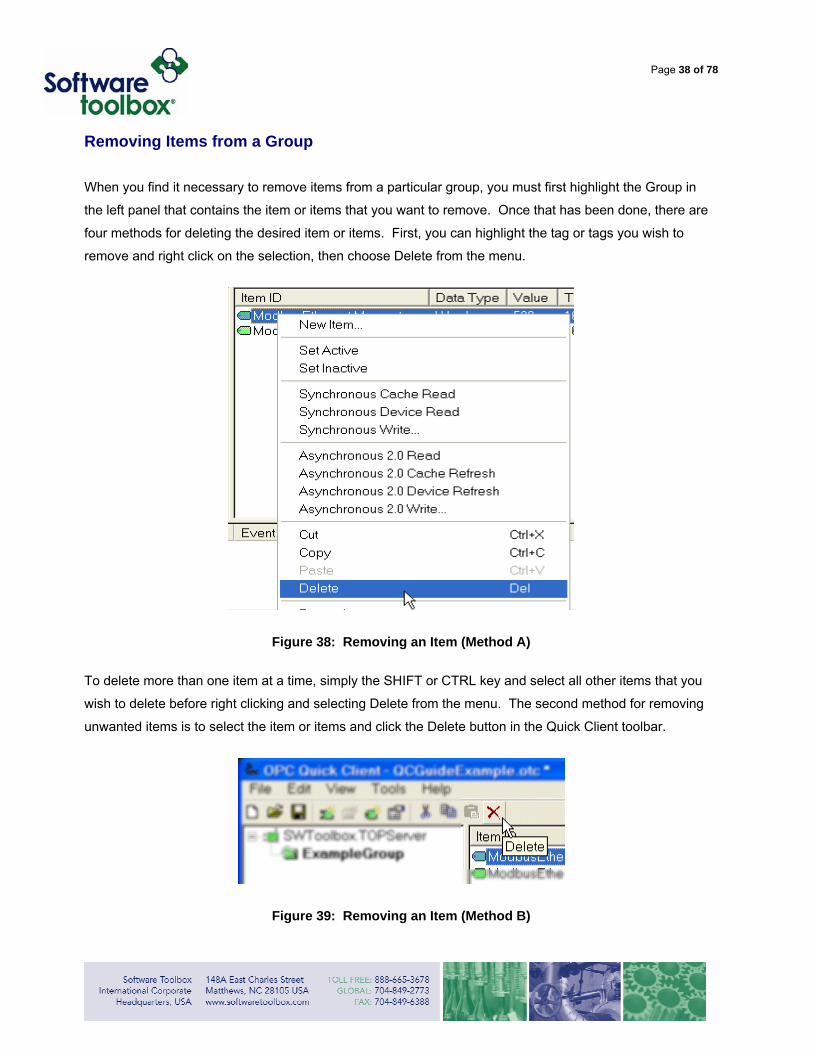
When you find it necessary to remove items from a particular group, you must first highlight the Group in
the left panel that contains the item or items that you want to remove. Once that has been done, there are
four methods for deleting the desired item or items. First, you can highlight the tag or tags you wish to
remove and right click on the selection, then choose Delete from the menu.
Figure 38: Removing an Item (Method A)
To delete more than one item at a time, simply the SHIFT or CTRL key and select all other items that you
wish to delete before right clicking and selecting Delete from the menu. The second method for removing
unwanted items is to select the item or items and click the Delete button in the Quick Client toolbar.
Figure 39: Removing an Item (Method B)
Page 39 of 78
As with the other method, to delete multiple items, hold the CTRL button and select the items desired for
deletion before clicking the Delete button.
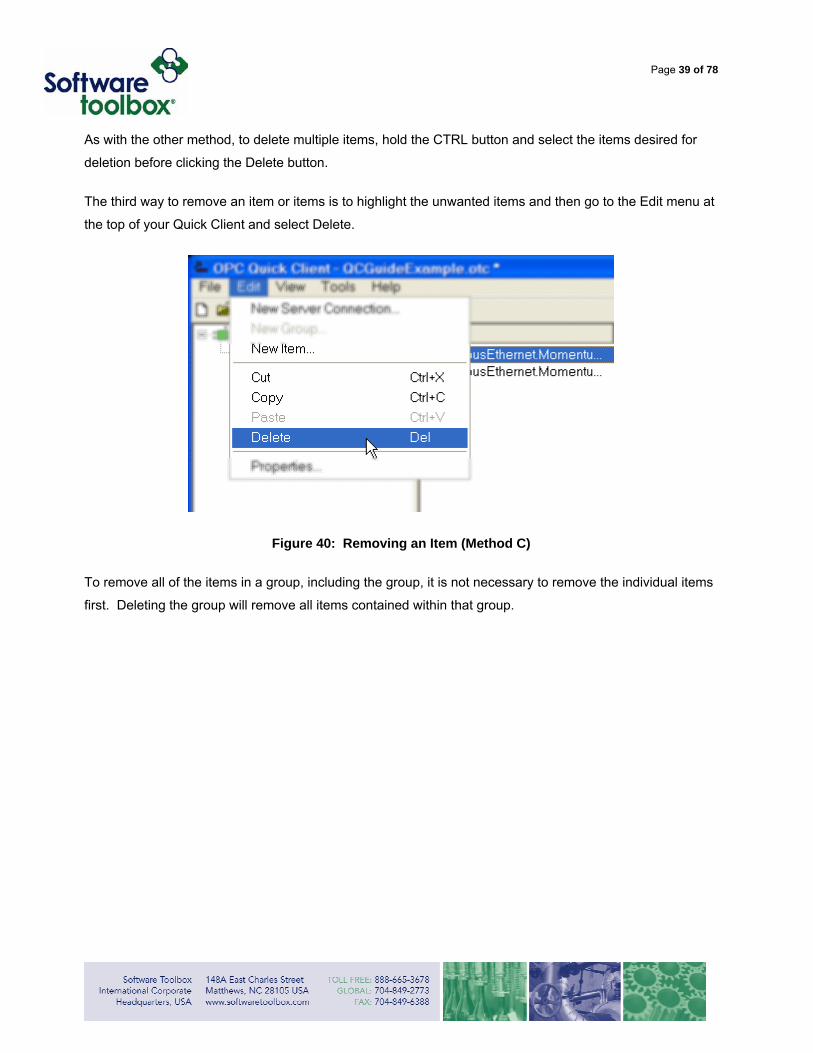
The third way to remove an item or items is to highlight the unwanted items and then go to the Edit menu at
the top of your Quick Client and select Delete.
Figure 40: Removing an Item (Method C)
To remove all of the items in a group, including the group, it is not necessary to remove the individual items
first. Deleting the group will remove all items contained within that group.
Page 40 of 78
Viewing the Properties of an Item
There are three methods for viewing the properties of your created items within a group. After highlighting
the item you desire to view, you can right click on the item and choose Properties from the menu
Figure 41: Viewing Item Properties (Method A)
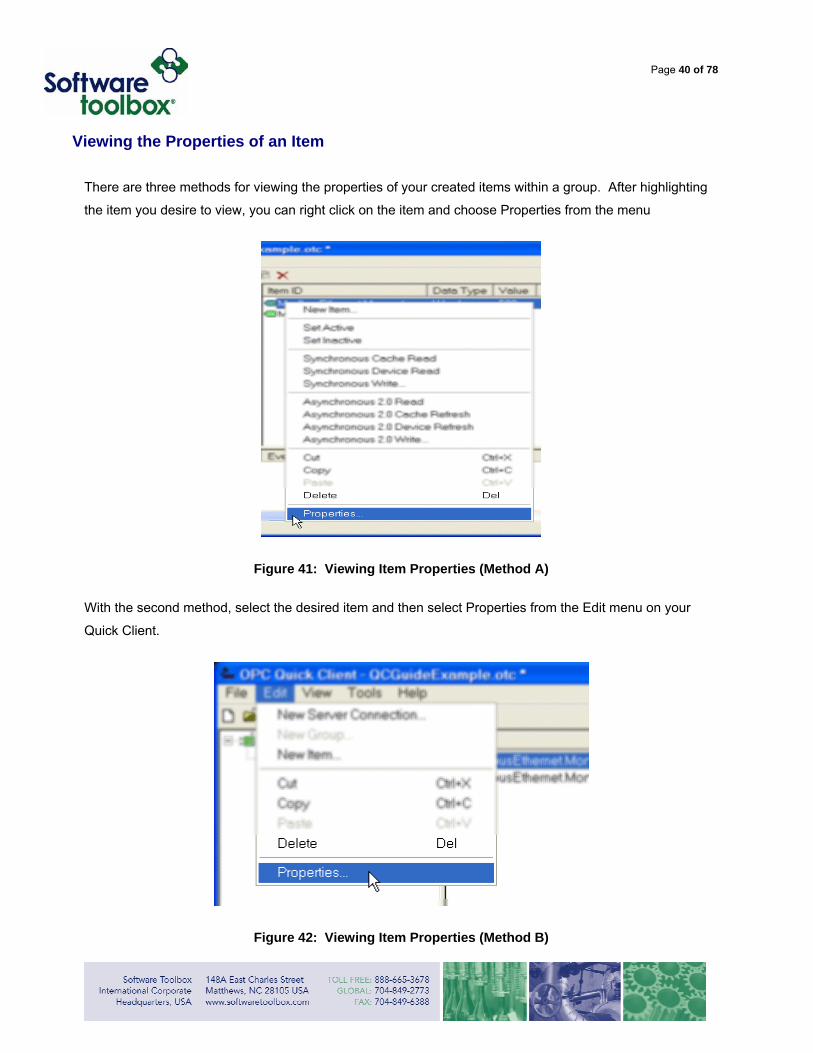
With the second method, select the desired item and then select Properties from the Edit menu on your
Quick Client.
Figure 42: Viewing Item Properties (Method B)
Page 41 of 78
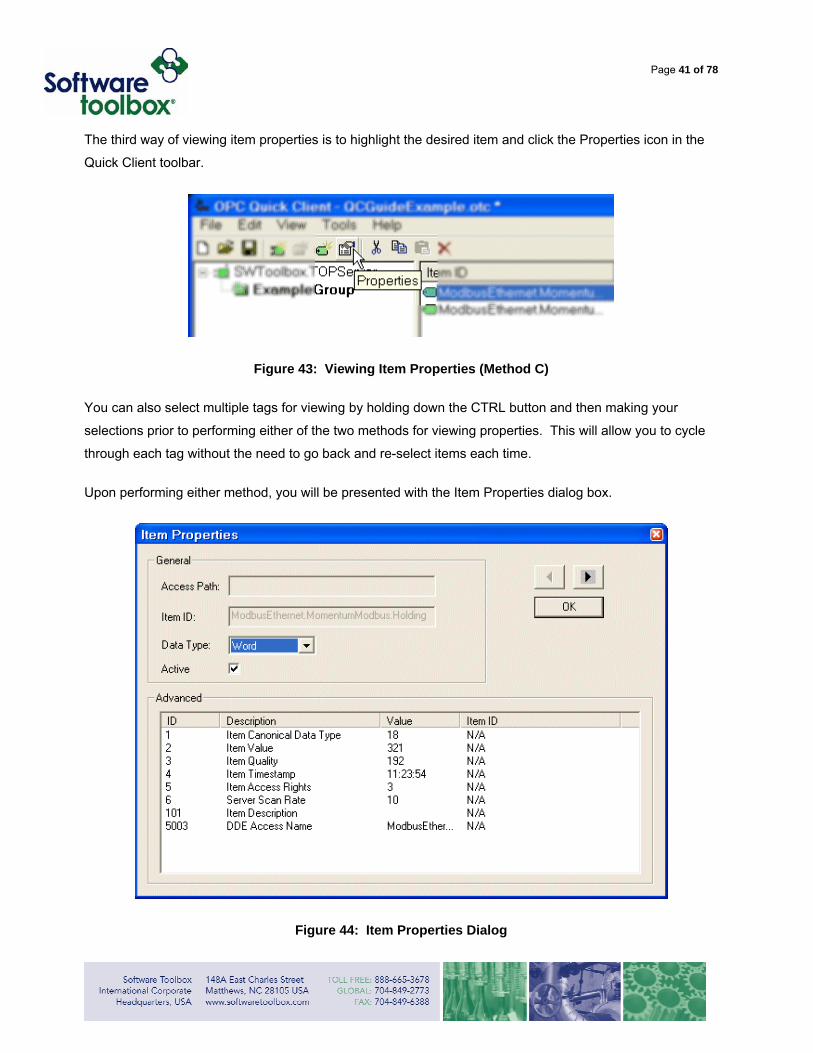
The third way of viewing item properties is to highlight the desired item and click the Properties icon in the
Quick Client toolbar.
Figure 43: Viewing Item Properties (Method C)
You can also select multiple tags for viewing by holding down the CTRL button and then making your
selections prior to performing either of the two methods for viewing properties. This will allow you to cycle
through each tag without the need to go back and re-select items each time.
Upon performing either method, you will be presented with the Item Properties dialog box.
Figure 44: Item Properties Dialog

Page 42 of 78
The only two properties you will actually be able to alter are the data type and the Active State (see
Enabling Subscriptions – Tag Level) of each item. The other details are purely informational. If you have
selected multiple items, clicking the following buttons will cycle forward and backward through the item
properties for each item.
and
For a description of these buttons, please refer to Table 2: Item Properties Buttons

Page 43 of 78
The Advanced panel displays certain statistical information about each item in addition to qualitative data.
Below is a listing and description of these pieces of information.
Item Canonical Data Type This value references a particular data type to which your item is set, i.e.
word, float, short, etc.
Item Value This value is the actual value read from the address in the device.
Item Quality This value will show as zero when the item is not reading data properly.
Item Timestamp This shows the time of the last item transaction.
Item Access Rights
This value shows the Read/Write setting of the item, which is:
Read Only=1
Write Only=2
Read/Write=3
Server Scan Rate This value references the scan rate or how frequently the device will be
polled for this item’s data.
Item Description If your tag in the OPC server has been given a description, this field will
display that description.
DDE Access Name This field displays the full access path name that this item references to
actually read the address in the device.
Table 4: Item Properties Advanced Panel Information
Page 44 of 78
Subscriptions
Here we will discuss Subscriptions to server items. We will cover what a subscription is, how to enable and
disable subscriptions both at the group level and item level as well as auto-subscribing to tags.
Overview
A subscription is a type of read (see Reading and Writing) used by the client. When clients "subscribe" to
tags within an OPC Server, the client is essentially telling the server to "poll these tags on my behalf every
xx msec, but ONLY notify me when their values change". This allows the client to continue processing other
things while the OPC Server is busy polling the device. When the server detects value changes it will push
those values to all clients subscribed to those items, the clients simply process ValueChanged events as-
and-when they occur (invoked by the OPC Server).
How does this differ from a client that simply reads a value every xx msec, using something like a VB
Timer? The answer is quite substantial and potentially dangerous especially when multiple clients are doing
this. This highly important topic is described in the following article which we strongly encourage you to
read:
http://docs.softwaretoolbox.com/Documents/OPC%20Data%20Control/Development/Synchronous%20Rea
ds%20vs%20Subscription%20Reads%20IMPORTANT%20Explanation.
Group Level Subscriptions
Enabling Subscriptions – Group Level
This feature allows you to enable subscriptions to all tags in a tag group at one time. When you add a
group (see Adding a Group) that is active with active tags and your client is connected to the server, you
have subscribed to all tags in that group.
Page 45 of 78
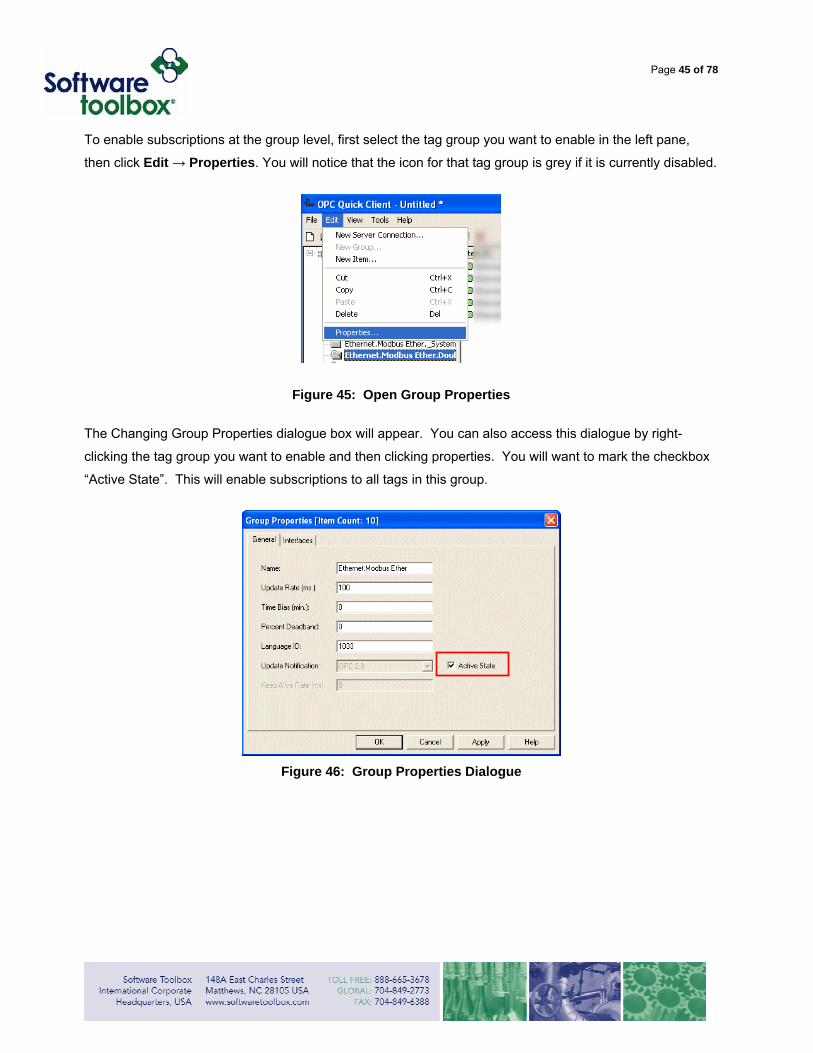
To enable subscriptions at the group level, first select the tag group you want to enable in the left pane,
then click Edit → Properties. You will notice that the icon for that tag group is grey if it is currently disabled.
Figure 45: Open Group Properties
The Changing Group Properties dialogue box will appear. You can also access this dialogue by right-
clicking the tag group you want to enable and then clicking properties. You will want to mark the checkbox
“Active State”. This will enable subscriptions to all tags in this group.
Figure 46: Group Properties Dialogue
Page 46 of 78
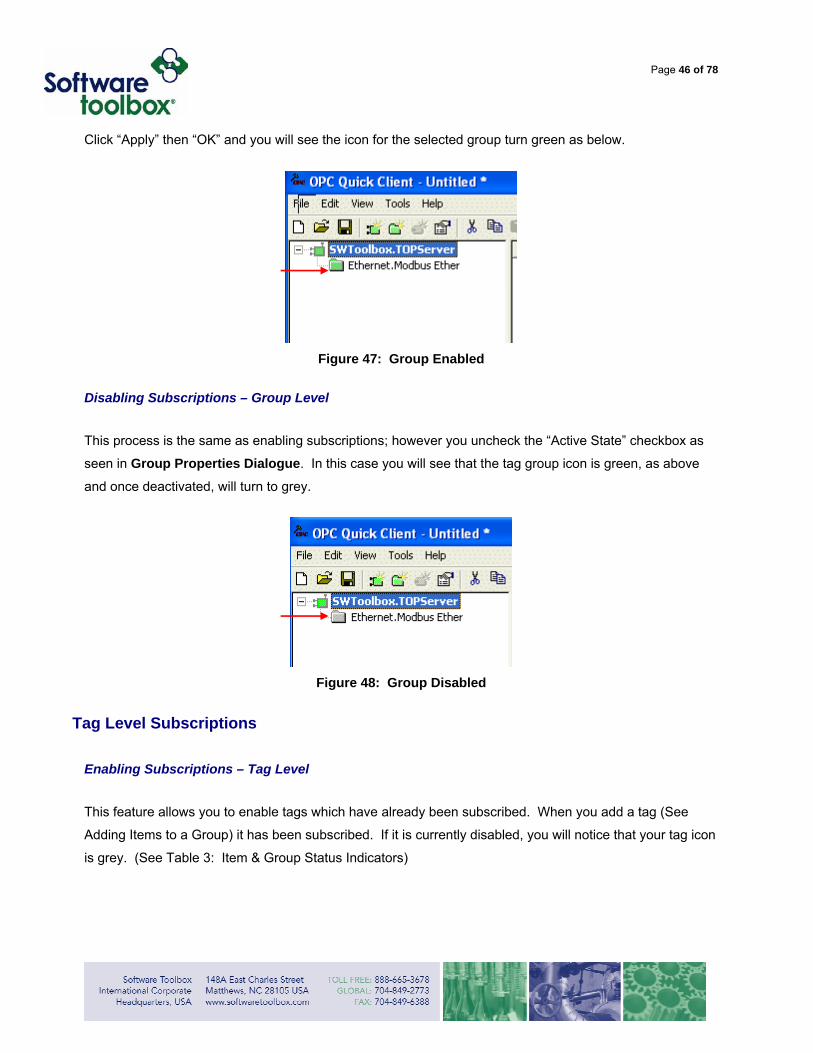
Click “Apply” then “OK” and you will see the icon for the selected group turn green as below.
Figure 47: Group Enabled
Disabling Subscriptions – Group Level
This process is the same as enabling subscriptions; however you uncheck the “Active State” checkbox as
seen in Group Properties Dialogue. In this case you will see that the tag group icon is green, as above
and once deactivated, will turn to grey.
Figure 48: Group Disabled
Tag Level Subscriptions
Enabling Subscriptions – Tag Level
This feature allows you to enable tags which have already been subscribed. When you add a tag (See
Adding Items to a Group) it has been subscribed. If it is currently disabled, you will notice that your tag icon
is grey. (See Table 3: Item & Group Status Indicators)

Page 47 of 78
To enable a single tag subscription, select your tag group16 where the tag resides, in the left pane and the
tag to enable in the right pane. Then click Tools→ Item→ Set Active.
Figure 49: Activate Item
At this point, you will see your tag icon turn from grey to green, indicating that it is enabled.
Figure 50: Item Activated
Disabling Subscriptions – Tag Level
This process is the same as enabling subscriptions at the tag level; however you click “Set InActive” instead
of Set Active checkbox. In this case you will see that the tag group icon is green, as above and once
disabled, will turn to grey.
16 Tags can be in the OPC Groups (otherwise known as OPC Server branches). The relationship between
items (Tags) and branches (groups) is outside the scope of this document.
Page 48 of 78
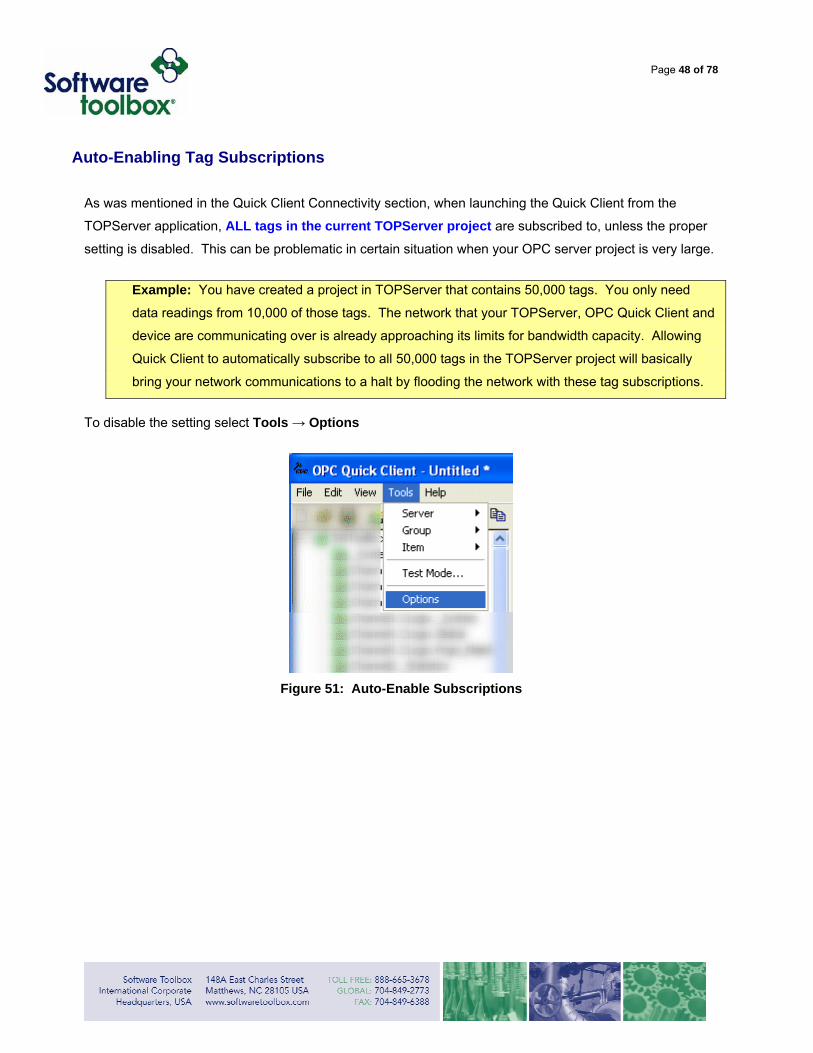
Auto-Enabling Tag Subscriptions
As was mentioned in the Quick Client Connectivity section, when launching the Quick Client from the
TOPServer application, ALL tags in the current TOPServer project are subscribed to, unless the proper
setting is disabled. This can be problematic in certain situation when your OPC server project is very large.
Example: You have created a project in TOPServer that contains 50,000 tags. You only need
data readings from 10,000 of those tags. The network that your TOPServer, OPC Quick Client and
device are communicating over is already approaching its limits for bandwidth capacity. Allowing
Quick Client to automatically subscribe to all 50,000 tags in the TOPServer project will basically
bring your network communications to a halt by flooding the network with these tag subscriptions.
To disable the setting select Tools → Options
Figure 51: Auto-Enable Subscriptions
Page 49 of 78
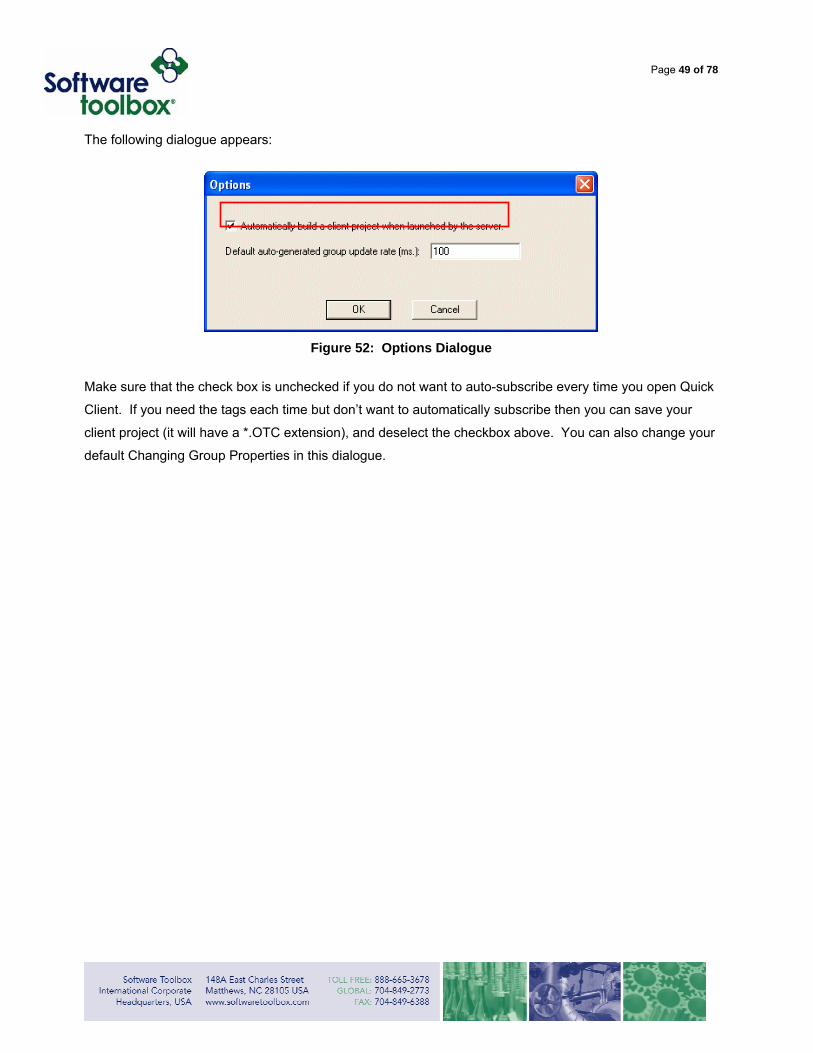
The following dialogue appears:
Figure 52: Options Dialogue
Make sure that the check box is unchecked if you do not want to auto-subscribe every time you open Quick
Client. If you need the tags each time but don’t want to automatically subscribe then you can save your
client project (it will have a *.OTC extension), and deselect the checkbox above. You can also change your
default Changing Group Properties in this dialogue.
Page 50 of 78
Reading and Writing
One-Shot Reading & Writing
A one-shot read or write request refers to making a single transaction request for a single item to the
device. This differs from the normal tag Overview taking place. Instead of having the server poll the
device and update the client on-changed values, one shot transactions are manually performed for specific
items and are updated whether the value has changed or not. If you needed a specific value for a specific
tag, at any given moment you could perform a one-shot read of that item independent from the subscription
to the tag.
Example: You have your TOP Server connected to a programmable logic controller (PLC) that is
connected to a temperature sensor. You have a tag referencing the address in your PLC that is
storing the temperatures being read by that sensor. You have an item in your OPC Quick Client
that is subscribing to the value for that temperature sensor tag in your TOP Server. This value is
being updated every 60 seconds, based on your group update rate. Your supervisor has just asked
what the current temperature of the sensor. Performing a one-shot device read for that sensor item
will allow you to get an update of the temperature value right now, without having to wait 60
seconds.
A one-shot transaction is also useful when viewing the channel diagnostics in your OPC server and being
able to view a specific packet for a specific request. Being able to view the packet for a transaction allows
you to determine if your server is sending data to the device and receiving responses back from the device.
It is also possible to look at the packet itself sometimes17 and determine if the read or write that you
performed is the same data that actually was transmitted to the device. In normal subscription transactions,
17 The Modbus protocol, for example, is fairly easy to dissect for viewing the function, addressing and other
information contained within a transmit and receive packet when compared with other protocols such as
Allen-Bradley proprietary protocols.
Page 51 of 78
the reads and writes are normally taking place far too quickly to be able to differentiate which transaction
corresponds to which packet in the diagnostics window18.
Note: For more information on using channel diagnostics in your TOP Server, you can view the
document found at:
http://docs.softwaretoolbox.com/Product_Names/showdocuments.asp?folder=%2E%2E%2FDocum
ents%2FTOPServer%2FTroubleshooting
For information regarding diagnostics with other OPC servers, please refer to your server documentation.
For the purpose of demonstrating one-shot transactions for diagnostics, all of the reads and writes outlined
below, both synchronous and asynchronous, will occur with all items in all groups inactive (see Disabling
Subscriptions – Group Level), which means there will be no item Tag Level Subscriptions in your Quick
Client. The active state of an item during one-shot reads for diagnostic purposes is important because of
the behavior of an active item.
Active State items are reading tags from the OPC server on a Subscriptions basis according to the group
update rate. This means that the item’s value is updated from the server at that rate every time the value
changes in the device. When trying to perform diagnostic readings, this displays data transfer activity for
each transmission (TX) from the Quick Client to the server and receipt (RX) from the device, which can
make it hard to differentiate between normal subscriptions and the one-shot transactions you are trying to
isolate.
18 This will not be the case if the group update rate is set to a sufficiently high time interval. Subscriptions
that are updating every 100 milliseconds are going to be hard to isolate, but subscriptions that are updating
every 30 seconds would be slower in the diagnostics window and much more viewable.
Page 52 of 78
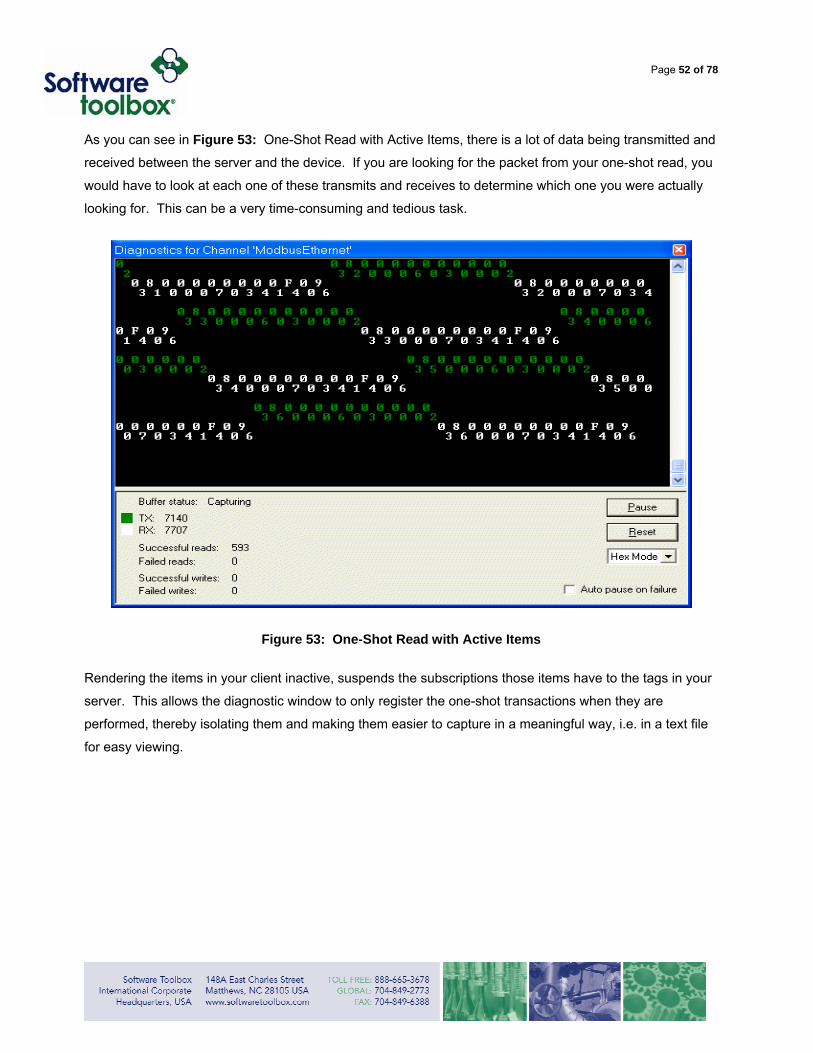
As you can see in Figure 53: One-Shot Read with Active Items, there is a lot of data being transmitted and
received between the server and the device. If you are looking for the packet from your one-shot read, you
would have to look at each one of these transmits and receives to determine which one you were actually
looking for. This can be a very time-consuming and tedious task.
Figure 53: One-Shot Read with Active Items
Rendering the items in your client inactive, suspends the subscriptions those items have to the tags in your
server. This allows the diagnostic window to only register the one-shot transactions when they are
performed, thereby isolating them and making them easier to capture in a meaningful way, i.e. in a text file
for easy viewing.
Page 53 of 78
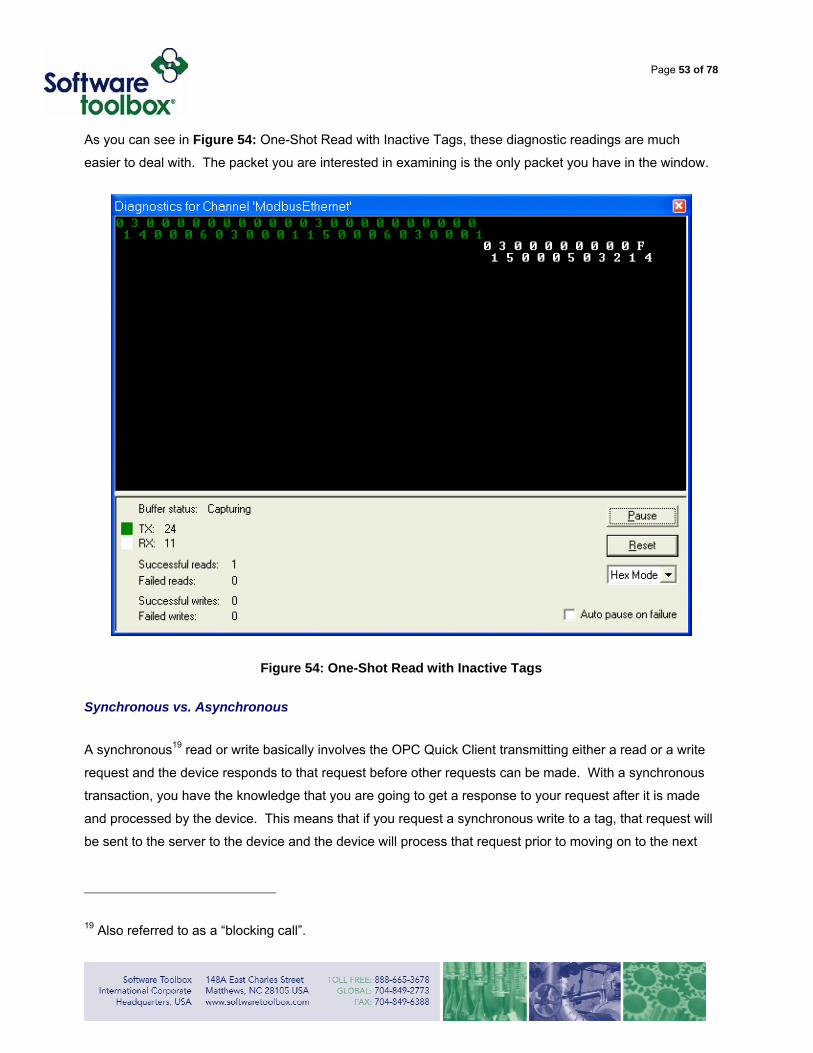
As you can see in Figure 54: One-Shot Read with Inactive Tags, these diagnostic readings are much
easier to deal with. The packet you are interested in examining is the only packet you have in the window.
Figure 54: One-Shot Read with Inactive Tags
Synchronous vs. Asynchronous
A synchronous19 read or write basically involves the OPC Quick Client transmitting either a read or a write
request and the device responds to that request before other requests can be made. With a synchronous
transaction, you have the knowledge that you are going to get a response to your request after it is made
and processed by the device. This means that if you request a synchronous write to a tag, that request will
be sent to the server to the device and the device will process that request prior to moving on to the next
19 Also referred to as a “blocking call”.
Page 54 of 78
step in it’s processing cycle. This also means that your client, in this case the OPC Quick Client, will wait
for this synchronous write to occur before making other requests.
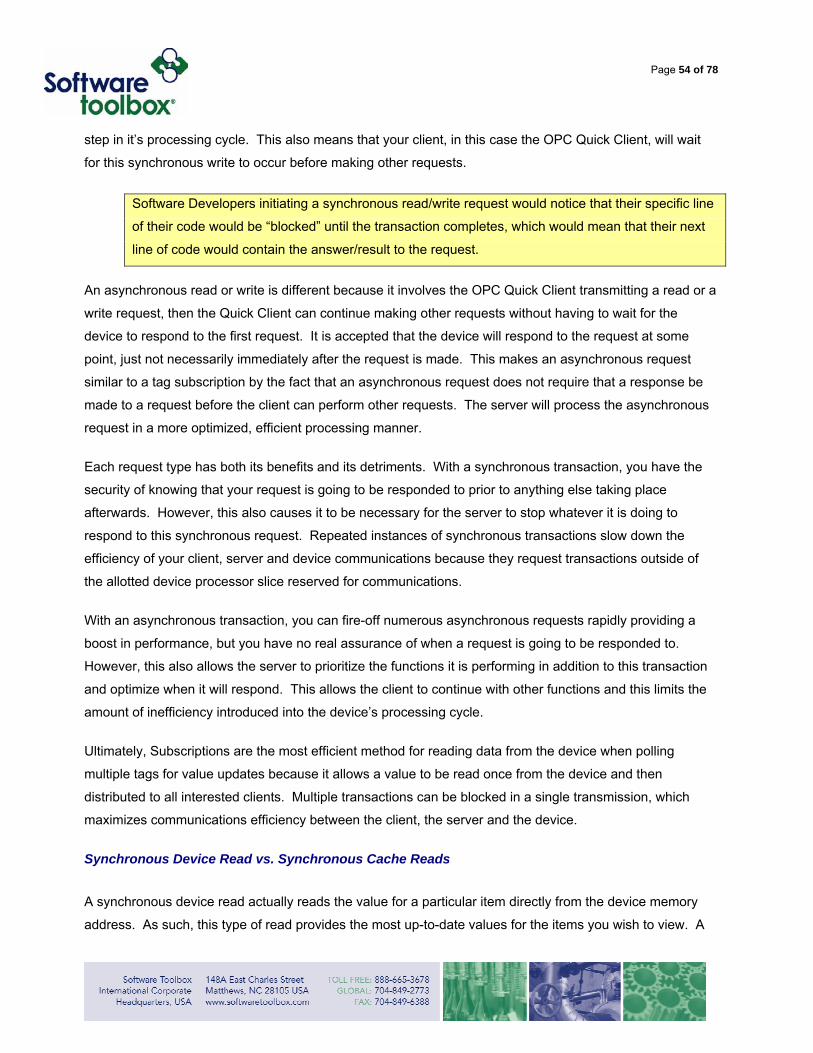
Software Developers initiating a synchronous read/write request would notice that their specific line
of their code would be “blocked” until the transaction completes, which would mean that their next
line of code would contain the answer/result to the request.
An asynchronous read or write is different because it involves the OPC Quick Client transmitting a read or a
write request, then the Quick Client can continue making other requests without having to wait for the
device to respond to the first request. It is accepted that the device will respond to the request at some
point, just not necessarily immediately after the request is made. This makes an asynchronous request
similar to a tag subscription by the fact that an asynchronous request does not require that a response be
made to a request before the client can perform other requests. The server will process the asynchronous
request in a more optimized, efficient processing manner.
Each request type has both its benefits and its detriments. With a synchronous transaction, you have the
security of knowing that your request is going to be responded to prior to anything else taking place
afterwards. However, this also causes it to be necessary for the server to stop whatever it is doing to
respond to this synchronous request. Repeated instances of synchronous transactions slow down the
efficiency of your client, server and device communications because they request transactions outside of
the allotted device processor slice reserved for communications.
With an asynchronous transaction, you can fire-off numerous asynchronous requests rapidly providing a
boost in performance, but you have no real assurance of when a request is going to be responded to.
However, this also allows the server to prioritize the functions it is performing in addition to this transaction
and optimize when it will respond. This allows the client to continue with other functions and this limits the
amount of inefficiency introduced into the device’s processing cycle.
Ultimately, Subscriptions are the most efficient method for reading data from the device when polling
multiple tags for value updates because it allows a value to be read once from the device and then
distributed to all interested clients. Multiple transactions can be blocked in a single transmission, which
maximizes communications efficiency between the client, the server and the device.
Synchronous Device Read vs. Synchronous Cache Reads
A synchronous device read actually reads the value for a particular item directly from the device memory
address. As such, this type of read provides the most up-to-date values for the items you wish to view. A
Page 55 of 78
synchronous cache read simply pulls the last value that was read from the device and stored in the OPC
server’s cache for a particular item. The scan rate for tags in the server determines how often the tag you
are reading is updated from the device. Whether your read from the cache is up-to-date or not depends on
how long it has been since the device was polled last by the server. If tag scan rates in the server are set
to a long interval, cache reads will not be as likely to be current values as when the tag scan rates are set to
short intervals.
Reading an Item or Items
With the OPC Quick Client, there are three item read options. You can perform:
• Synchronous Cache Reads – updates the value for an item from the OPC server cache.
• Synchronous vs. Asynchronous Device Reads – updates the value for an item from the device.
• Asynchronous Reads (Device Read)20 – updates the value for an item from the device.
20 Asynchronous Cache Read is not an option because a cache read is better performed by a synchronous
request since the data is readily available in the OPC Servers memory, consequently no trip to the device is
needed.
Page 56 of 78
Synchronous Cache Reads
Performing a synchronous cache read on a desired item or items can be accomplished in one of two ways.
Firstly, highlight the item you want to read from, right click on the item, and select Synchronous Cache
Read from the menu.
Figure 55: Synchronous Cache Read A
The second way this can be accomplished is to highlight the desired item, go to Tools -> Item, and select
Synchronous Cache Read from the menu.
Figure 56: Synchronous Cache Read B
Doing either of the two methods above will result in the timestamp for your item updating and the value of
the item will update from the cache. (Note: The value will not change if the cache has not updated since
the last read.)
Page 57 of 78
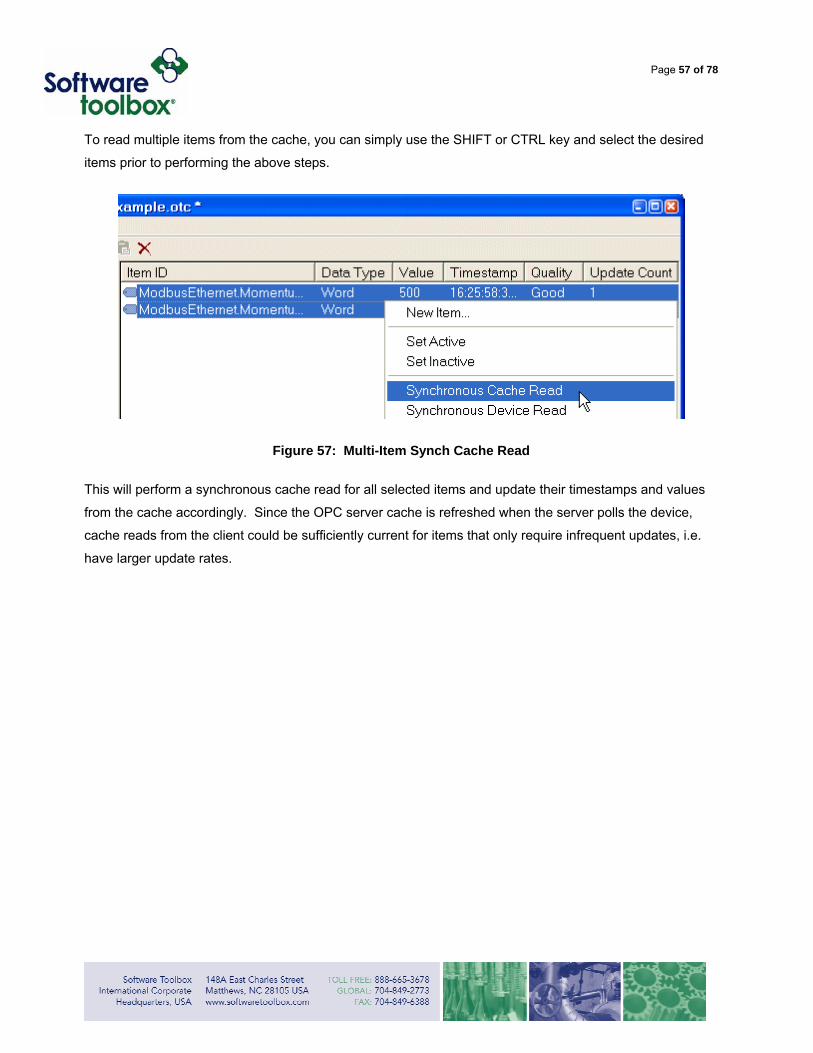
To read multiple items from the cache, you can simply use the SHIFT or CTRL key and select the desired
items prior to performing the above steps.
Figure 57: Multi-Item Synch Cache Read
This will perform a synchronous cache read for all selected items and update their timestamps and values
from the cache accordingly. Since the OPC server cache is refreshed when the server polls the device,
cache reads from the client could be sufficiently current for items that only require infrequent updates, i.e.
have larger update rates.
Page 58 of 78
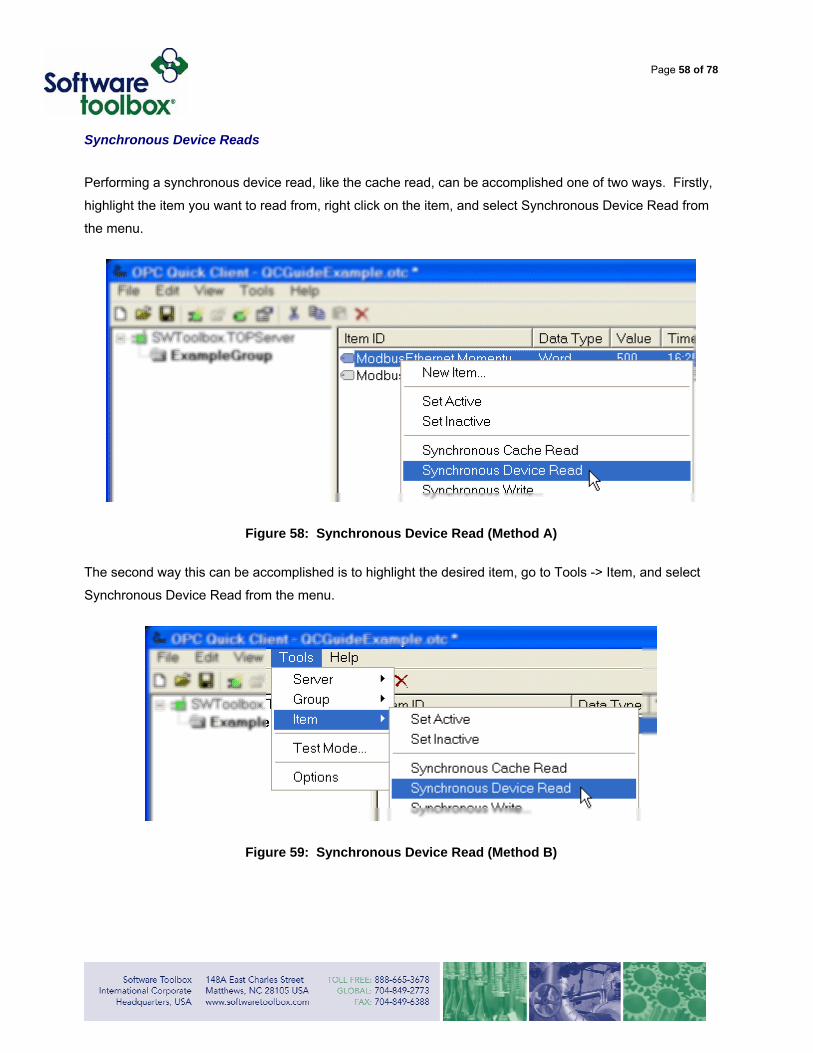
Synchronous Device Reads
Performing a synchronous device read, like the cache read, can be accomplished one of two ways. Firstly,
highlight the item you want to read from, right click on the item, and select Synchronous Device Read from
the menu.
Figure 58: Synchronous Device Read (Method A)
The second way this can be accomplished is to highlight the desired item, go to Tools -> Item, and select
Synchronous Device Read from the menu.
Figure 59: Synchronous Device Read (Method B)
Page 59 of 78
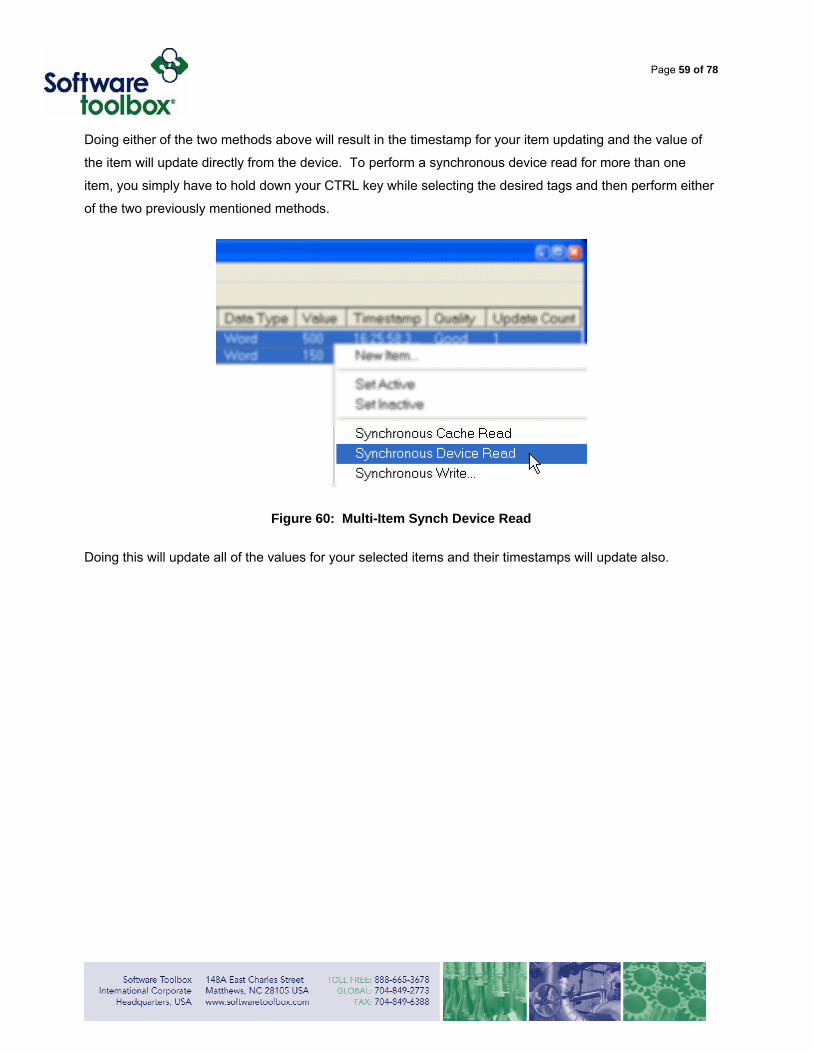
Doing either of the two methods above will result in the timestamp for your item updating and the value of
the item will update directly from the device. To perform a synchronous device read for more than one
item, you simply have to hold down your CTRL key while selecting the desired tags and then perform either
of the two previously mentioned methods.
Figure 60: Multi-Item Synch Device Read
Doing this will update all of the values for your selected items and their timestamps will update also.
Page 60 of 78
Asynchronous 2.0 Read
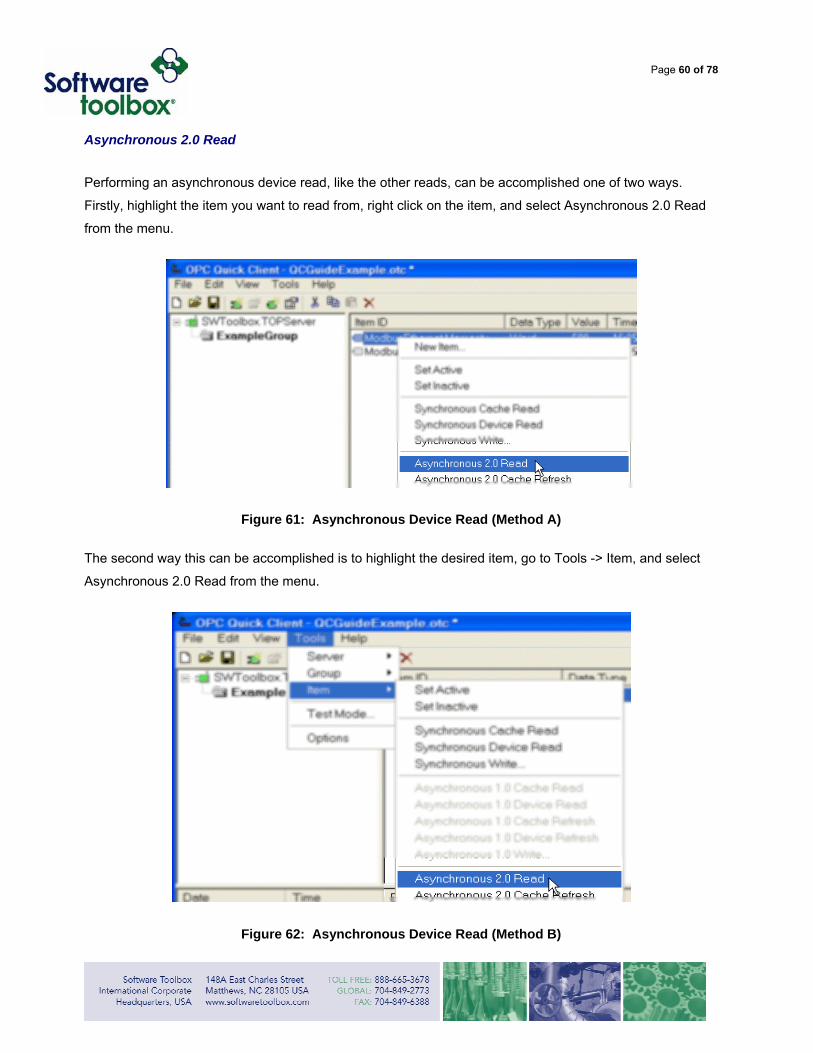
Performing an asynchronous device read, like the other reads, can be accomplished one of two ways.
Firstly, highlight the item you want to read from, right click on the item, and select Asynchronous 2.0 Read
from the menu.
Figure 61: Asynchronous Device Read (Method A)
The second way this can be accomplished is to highlight the desired item, go to Tools -> Item, and select
Asynchronous 2.0 Read from the menu.
Figure 62: Asynchronous Device Read (Method B)
Page 61 of 78
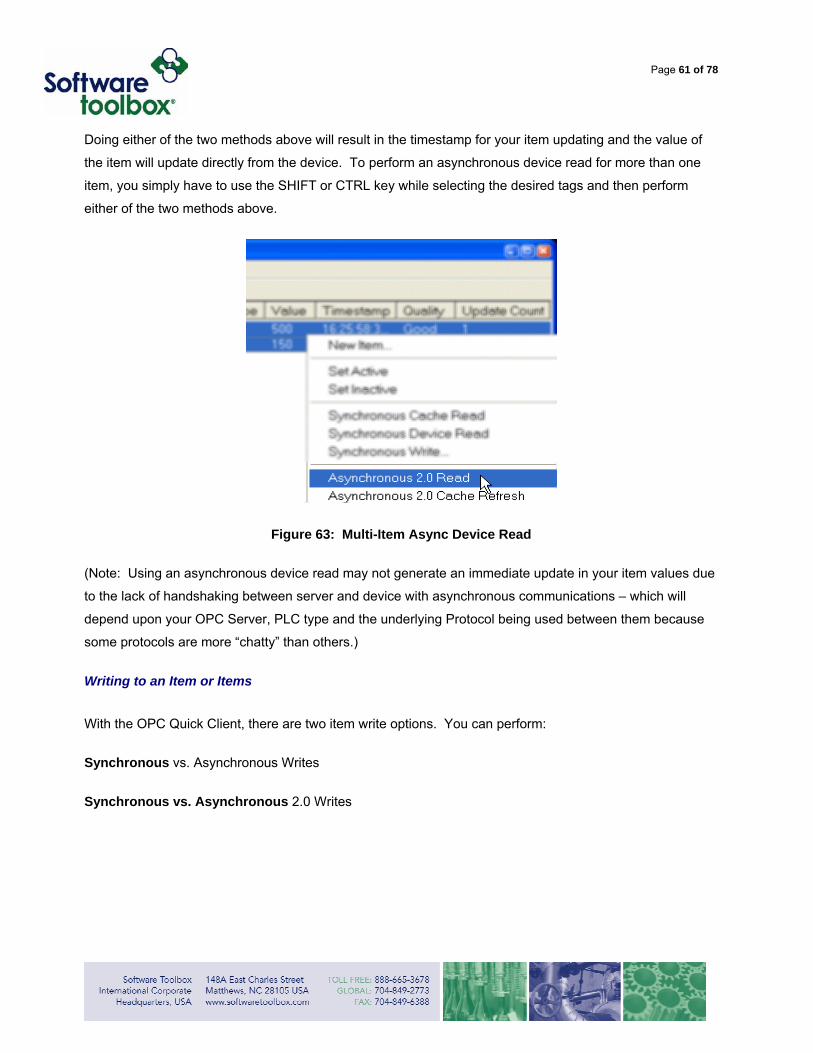
Doing either of the two methods above will result in the timestamp for your item updating and the value of
the item will update directly from the device. To perform an asynchronous device read for more than one
item, you simply have to use the SHIFT or CTRL key while selecting the desired tags and then perform
either of the two methods above.
Figure 63: Multi-Item Async Device Read
(Note: Using an asynchronous device read may not generate an immediate update in your item values due
to the lack of handshaking between server and device with asynchronous communications – which will
depend upon your OPC Server, PLC type and the underlying Protocol being used between them because
some protocols are more “chatty” than others.)
Writing to an Item or Items
With the OPC Quick Client, there are two item write options. You can perform:
Synchronous vs. Asynchronous Writes
Synchronous vs. Asynchronous 2.0 Writes
Page 62 of 78
Synchronous Writes
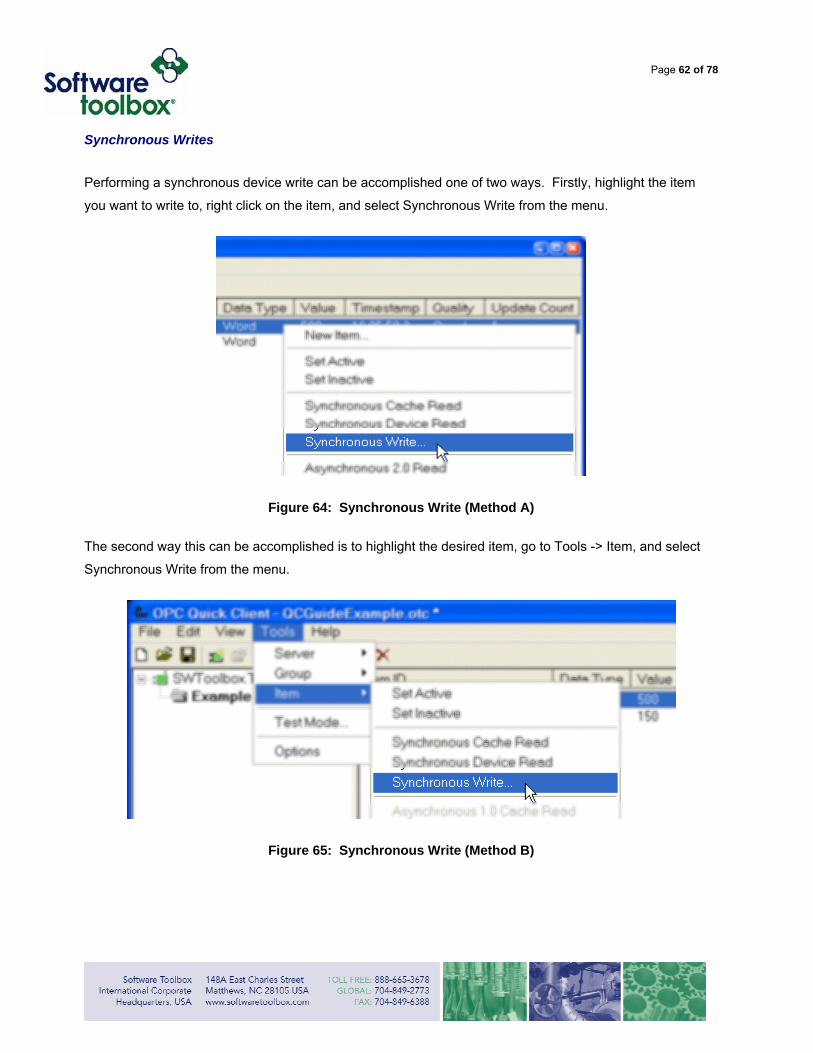
Performing a synchronous device write can be accomplished one of two ways. Firstly, highlight the item
you want to write to, right click on the item, and select Synchronous Write from the menu.
Figure 64: Synchronous Write (Method A)
The second way this can be accomplished is to highlight the desired item, go to Tools -> Item, and select
Synchronous Write from the menu.
Figure 65: Synchronous Write (Method B)
Page 63 of 78
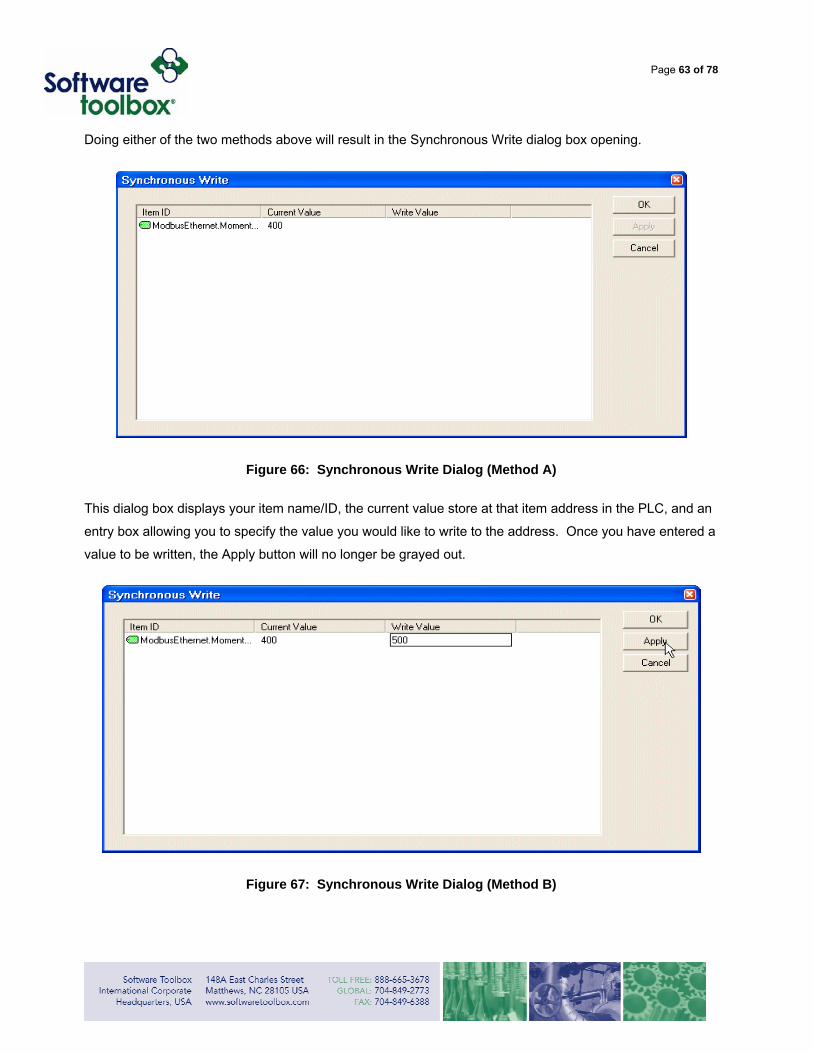
Doing either of the two methods above will result in the Synchronous Write dialog box opening.
Figure 66: Synchronous Write Dialog (Method A)
This dialog box displays your item name/ID, the current value store at that item address in the PLC, and an
entry box allowing you to specify the value you would like to write to the address. Once you have entered a
value to be written, the Apply button will no longer be grayed out.
Figure 67: Synchronous Write Dialog (Method B)
Page 64 of 78
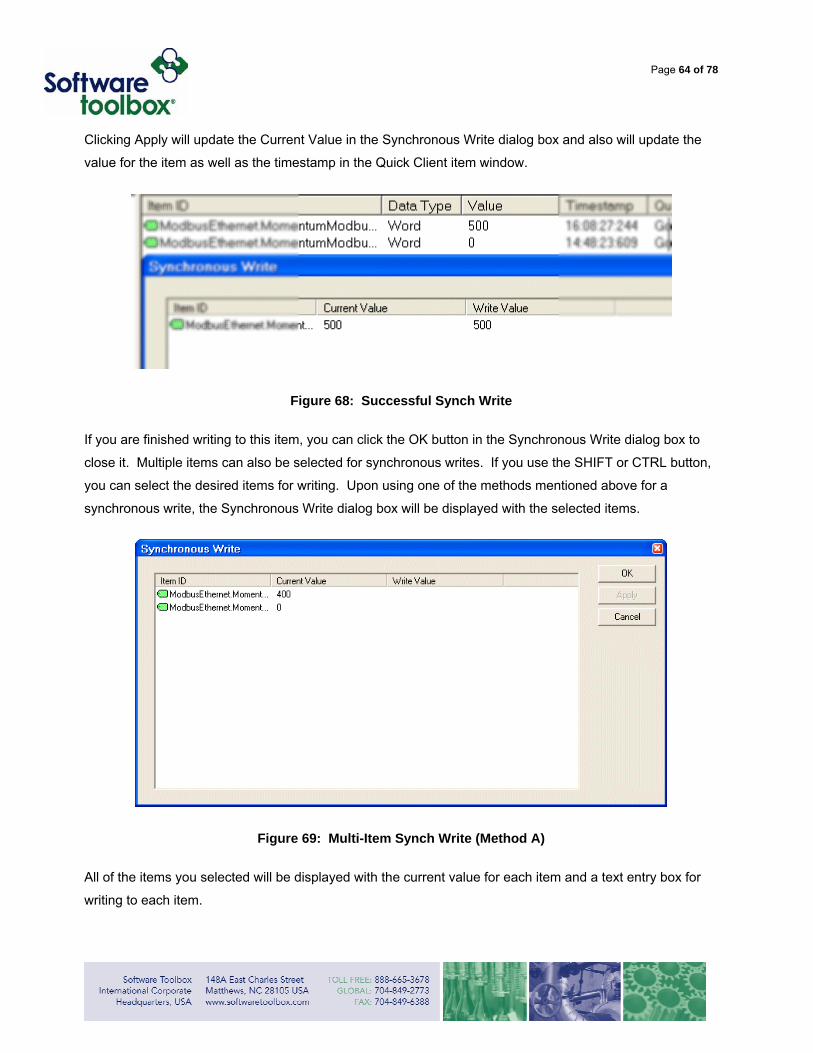
Clicking Apply will update the Current Value in the Synchronous Write dialog box and also will update the
value for the item as well as the timestamp in the Quick Client item window.
Figure 68: Successful Synch Write
If you are finished writing to this item, you can click the OK button in the Synchronous Write dialog box to
close it. Multiple items can also be selected for synchronous writes. If you use the SHIFT or CTRL button,
you can select the desired items for writing. Upon using one of the methods mentioned above for a
synchronous write, the Synchronous Write dialog box will be displayed with the selected items.
Figure 69: Multi-Item Synch Write (Method A)
All of the items you selected will be displayed with the current value for each item and a text entry box for
writing to each item.
Page 65 of 78
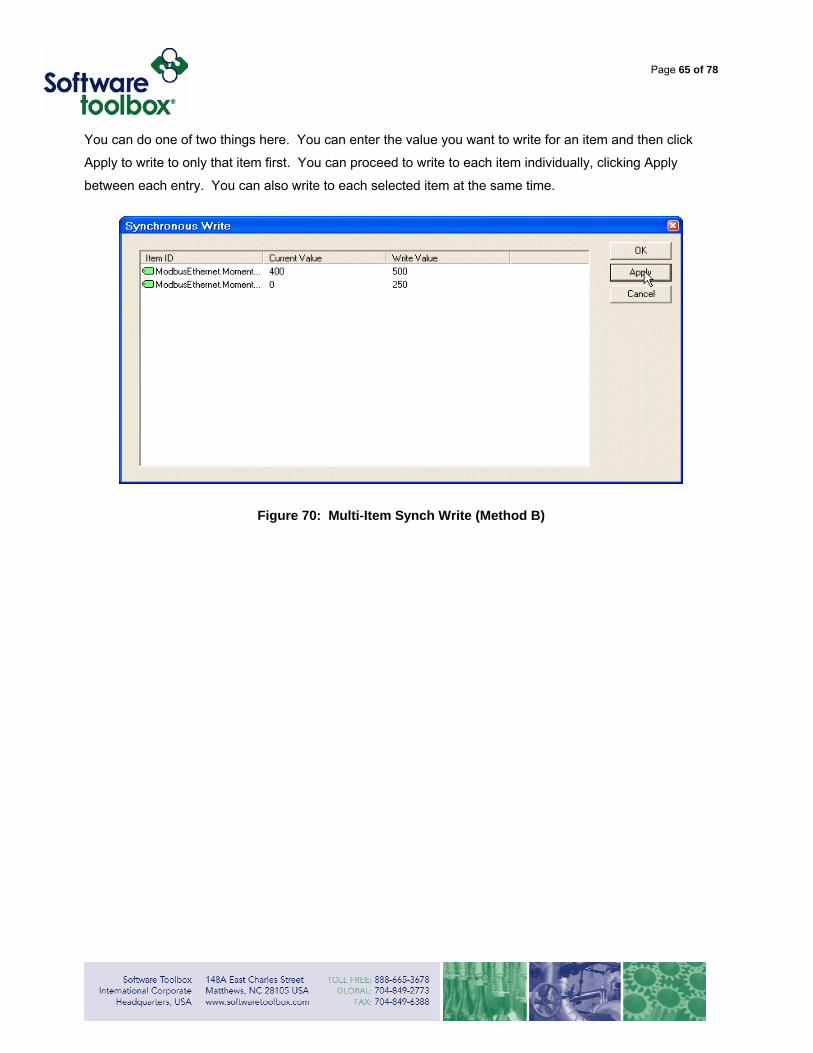
You can do one of two things here. You can enter the value you want to write for an item and then click
Apply to write to only that item first. You can proceed to write to each item individually, clicking Apply
between each entry. You can also write to each selected item at the same time.
Figure 70: Multi-Item Synch Write (Method B)
Page 66 of 78
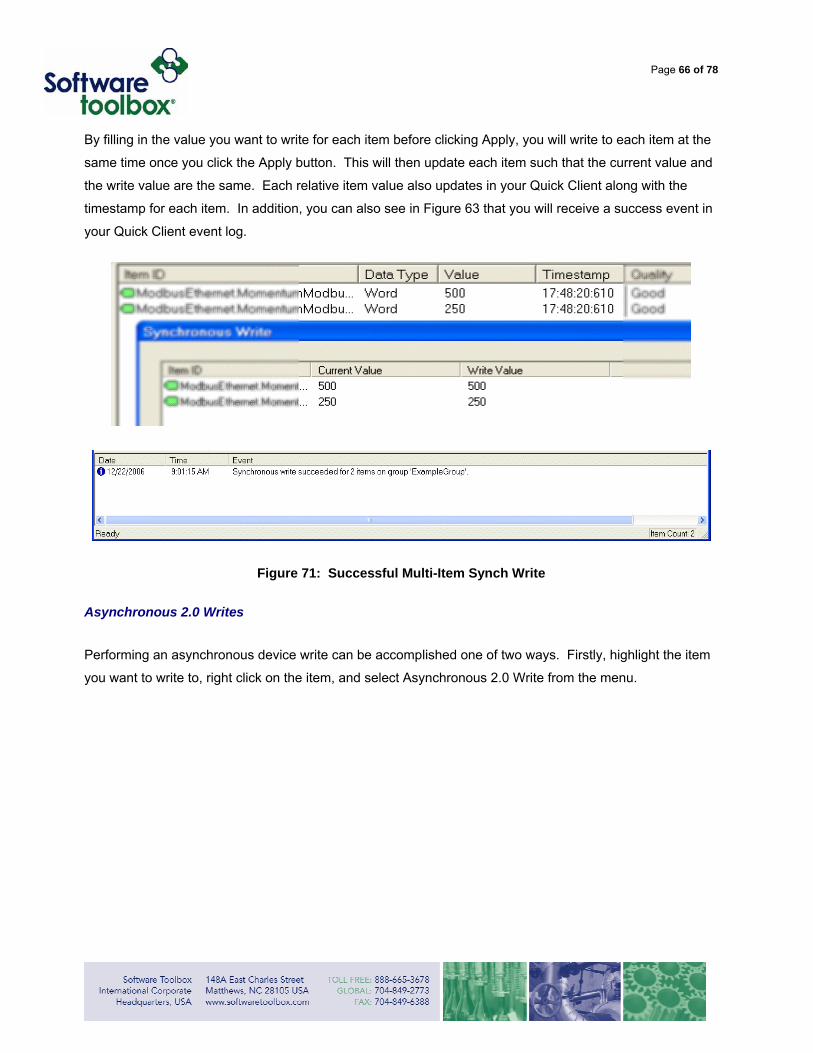
By filling in the value you want to write for each item before clicking Apply, you will write to each item at the
same time once you click the Apply button. This will then update each item such that the current value and
the write value are the same. Each relative item value also updates in your Quick Client along with the
timestamp for each item. In addition, you can also see in Figure 63 that you will receive a success event in
your Quick Client event log.
Figure 71: Successful Multi-Item Synch Write
Asynchronous 2.0 Writes
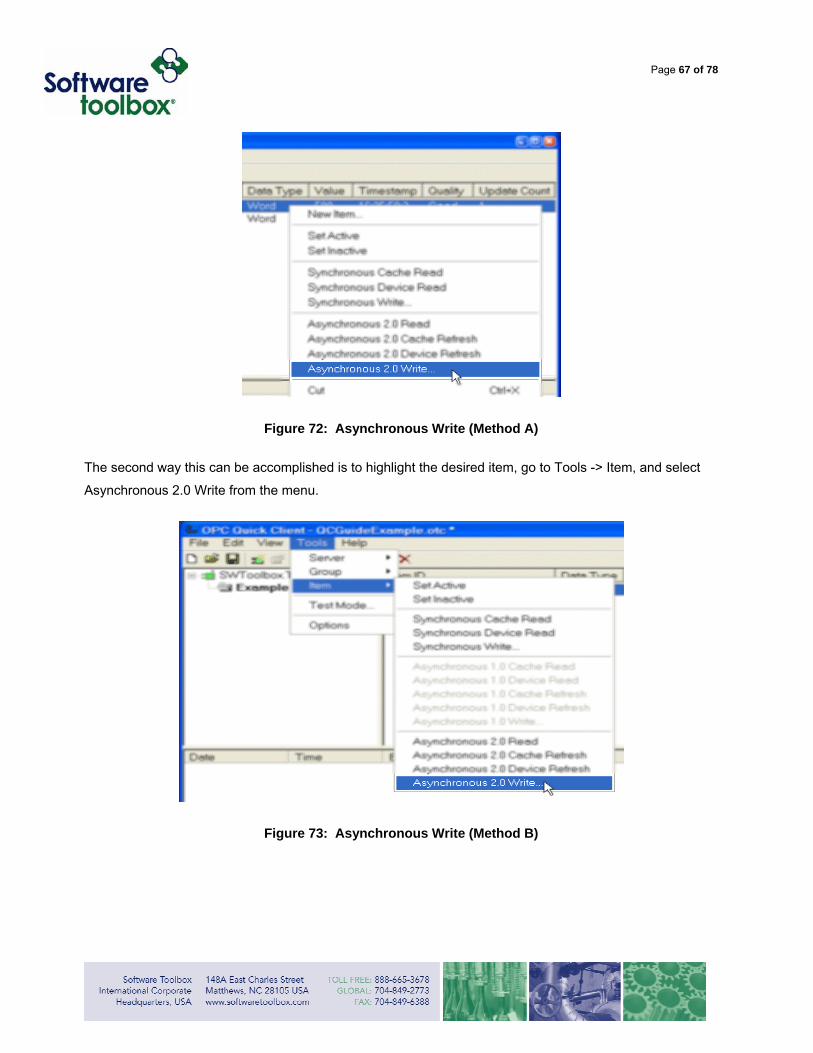
Performing an asynchronous device write can be accomplished one of two ways. Firstly, highlight the item
you want to write to, right click on the item, and select Asynchronous 2.0 Write from the menu.
Page 67 of 78
Figure 72: Asynchronous Write (Method A)
The second way this can be accomplished is to highlight the desired item, go to Tools -> Item, and select
Asynchronous 2.0 Write from the menu.
Figure 73: Asynchronous Write (Method B)
Page 68 of 78
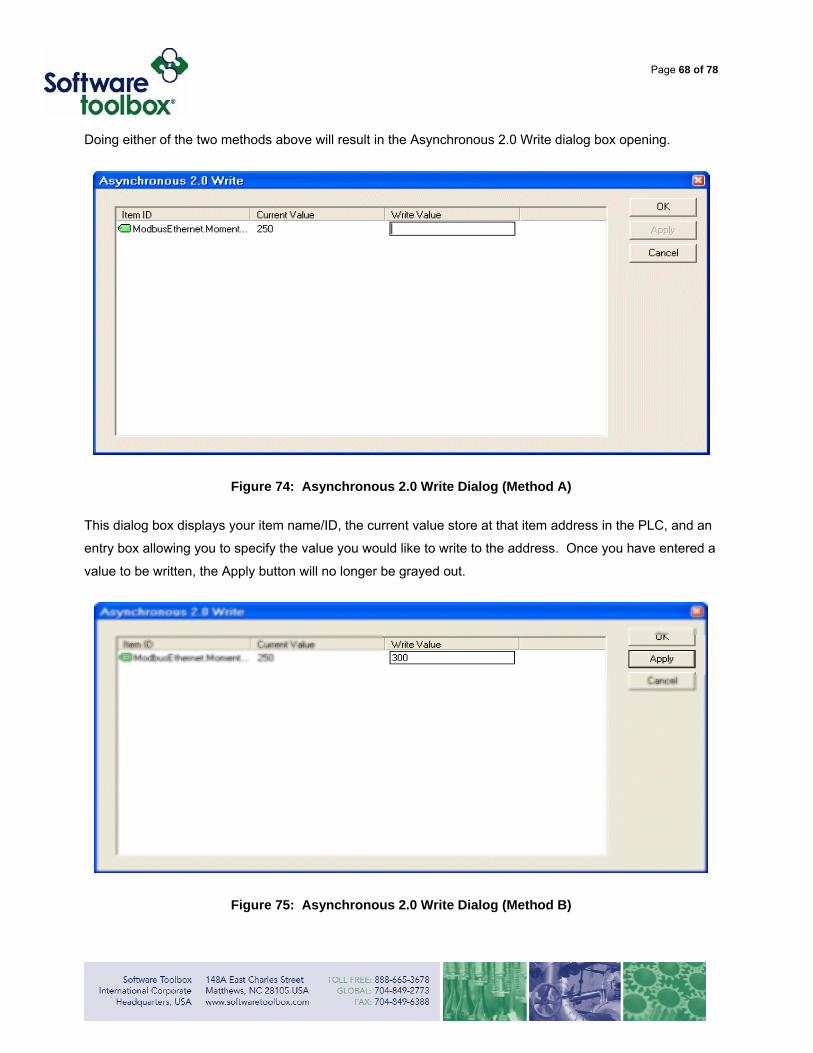
Doing either of the two methods above will result in the Asynchronous 2.0 Write dialog box opening.
Figure 74: Asynchronous 2.0 Write Dialog (Method A)
This dialog box displays your item name/ID, the current value store at that item address in the PLC, and an
entry box allowing you to specify the value you would like to write to the address. Once you have entered a
value to be written, the Apply button will no longer be grayed out.
Figure 75: Asynchronous 2.0 Write Dialog (Method B)
Page 69 of 78
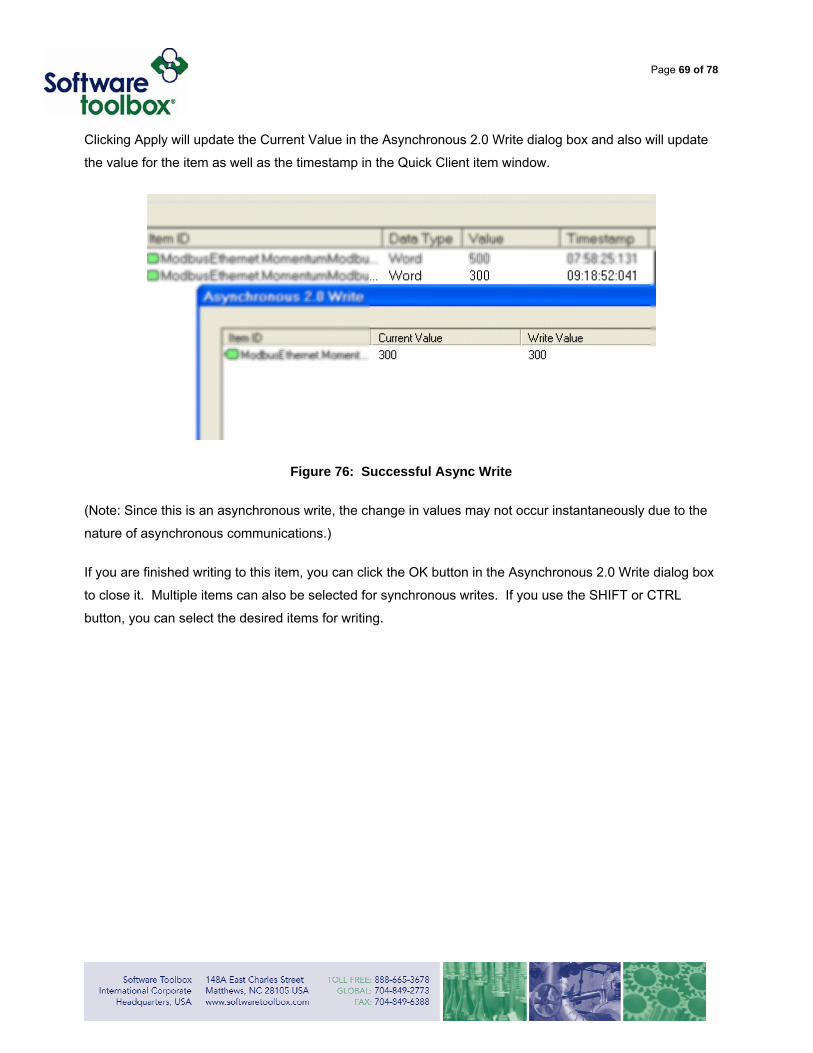
Clicking Apply will update the Current Value in the Asynchronous 2.0 Write dialog box and also will update
the value for the item as well as the timestamp in the Quick Client item window.
Figure 76: Successful Async Write
(Note: Since this is an asynchronous write, the change in values may not occur instantaneously due to the
nature of asynchronous communications.)
If you are finished writing to this item, you can click the OK button in the Asynchronous 2.0 Write dialog box
to close it. Multiple items can also be selected for synchronous writes. If you use the SHIFT or CTRL
button, you can select the desired items for writing.
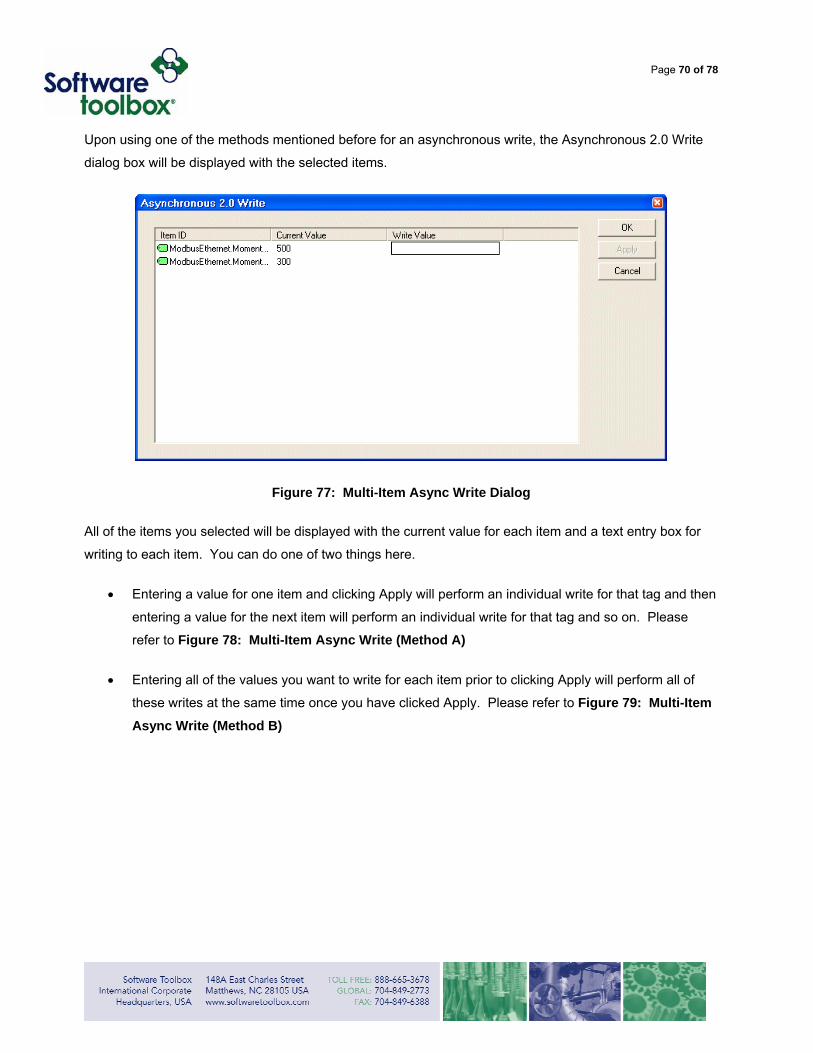
Page 70 of 78
Upon using one of the methods mentioned before for an asynchronous write, the Asynchronous 2.0 Write
dialog box will be displayed with the selected items.
Figure 77: Multi-Item Async Write Dialog
All of the items you selected will be displayed with the current value for each item and a text entry box for
writing to each item. You can do one of two things here.
• Entering a value for one item and clicking Apply will perform an individual write for that tag and then
entering a value for the next item will perform an individual write for that tag and so on. Please
refer to Figure 78: Multi-Item Async Write (Method A)
• Entering all of the values you want to write for each item prior to clicking Apply will perform all of
these writes at the same time once you have clicked Apply. Please refer to Figure 79: Multi-Item Async Write (Method B)
Page 71 of 78
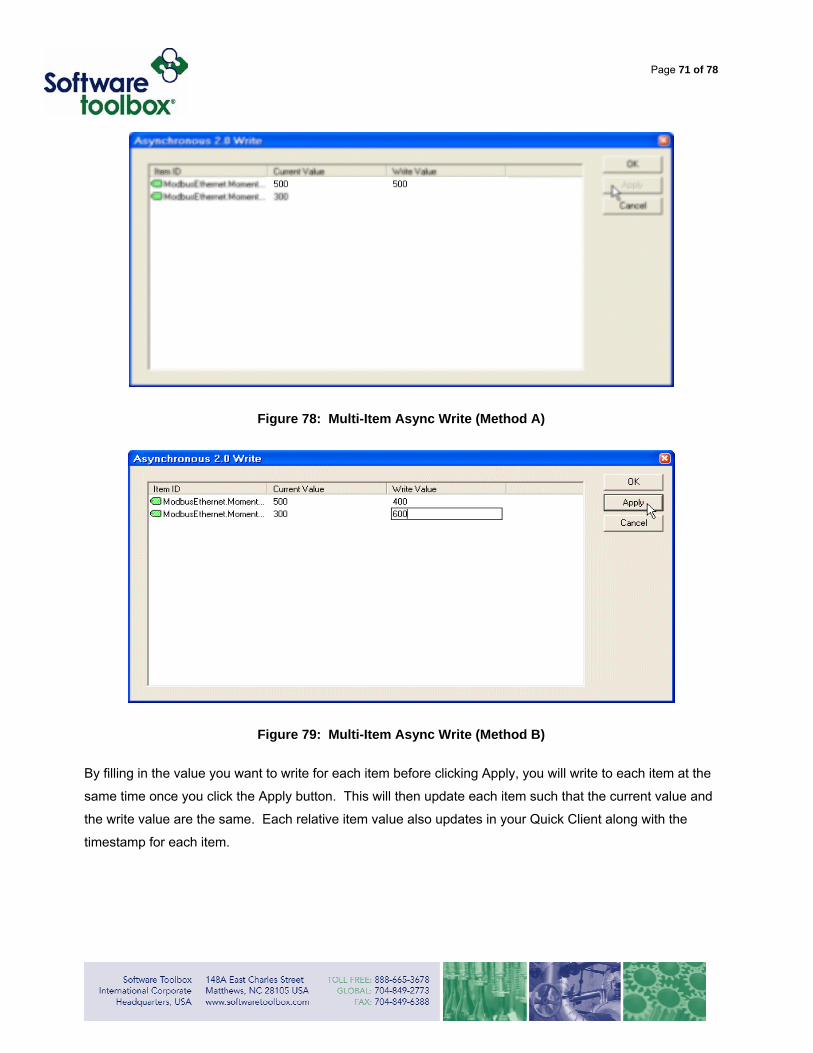
Figure 78: Multi-Item Async Write (Method A)
Figure 79: Multi-Item Async Write (Method B)
By filling in the value you want to write for each item before clicking Apply, you will write to each item at the
same time once you click the Apply button. This will then update each item such that the current value and
the write value are the same. Each relative item value also updates in your Quick Client along with the
timestamp for each item.
Page 72 of 78
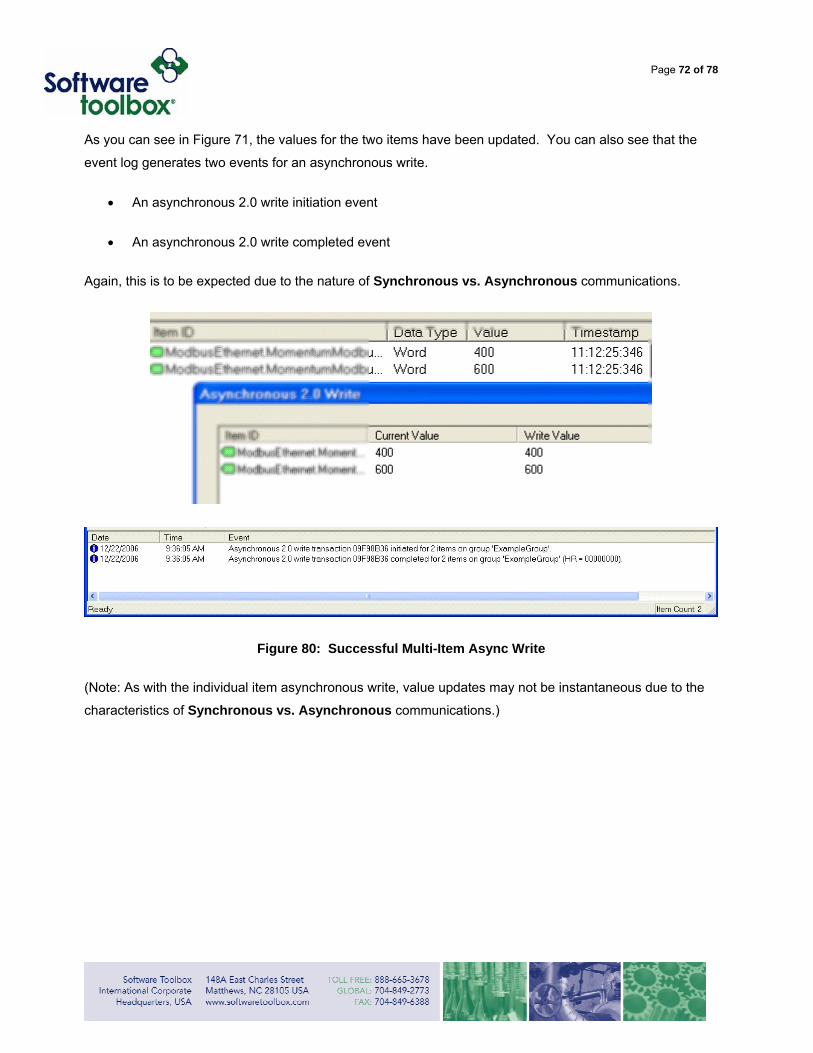
As you can see in Figure 71, the values for the two items have been updated. You can also see that the
event log generates two events for an asynchronous write.
• An asynchronous 2.0 write initiation event
• An asynchronous 2.0 write completed event
Again, this is to be expected due to the nature of Synchronous vs. Asynchronous communications.
Figure 80: Successful Multi-Item Async Write
(Note: As with the individual item asynchronous write, value updates may not be instantaneous due to the
characteristics of Synchronous vs. Asynchronous communications.)
Page 73 of 78
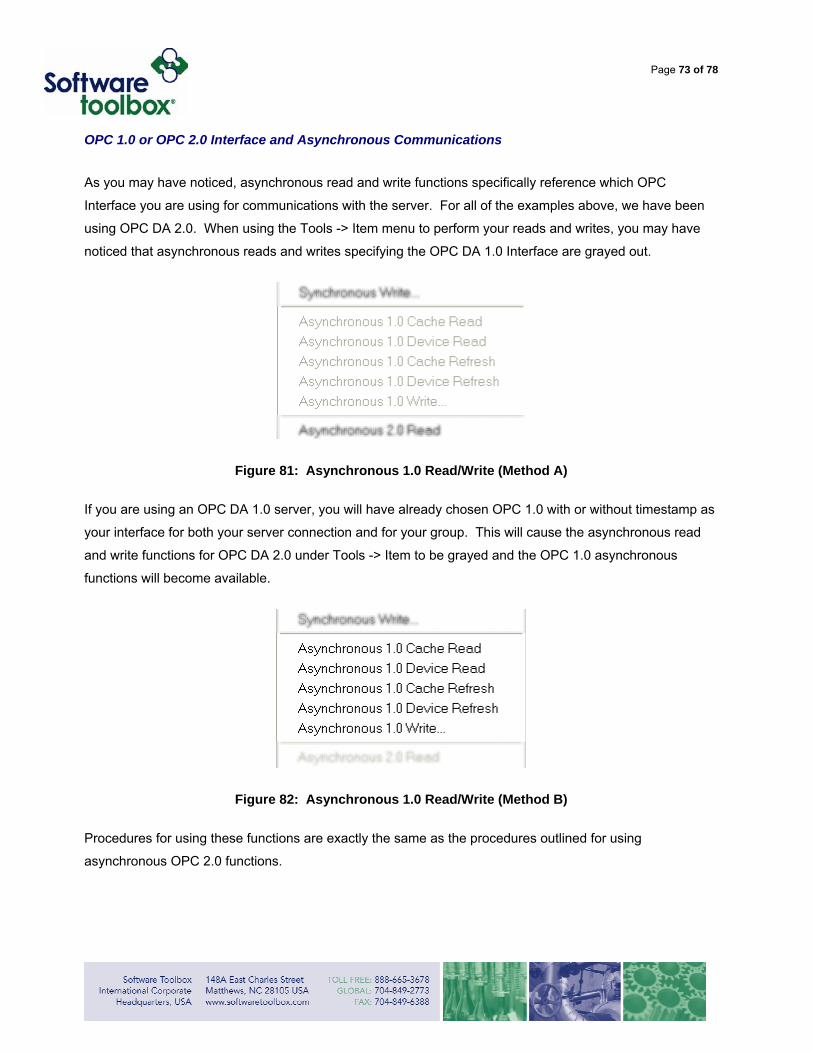
OPC 1.0 or OPC 2.0 Interface and Asynchronous Communications
As you may have noticed, asynchronous read and write functions specifically reference which OPC
Interface you are using for communications with the server. For all of the examples above, we have been
using OPC DA 2.0. When using the Tools -> Item menu to perform your reads and writes, you may have
noticed that asynchronous reads and writes specifying the OPC DA 1.0 Interface are grayed out.
Figure 81: Asynchronous 1.0 Read/Write (Method A)
If you are using an OPC DA 1.0 server, you will have already chosen OPC 1.0 with or without timestamp as
your interface for both your server connection and for your group. This will cause the asynchronous read
and write functions for OPC DA 2.0 under Tools -> Item to be grayed and the OPC 1.0 asynchronous
functions will become available.
Figure 82: Asynchronous 1.0 Read/Write (Method B)
Procedures for using these functions are exactly the same as the procedures outlined for using
asynchronous OPC 2.0 functions.
Page 74 of 78
Looking Up Error Codes
OPC Quick Client allows you to obtain an error description for any valid error codes which the server can
translate. An OPC server should be able to translate any OPC error code, as well as Win32 errors.
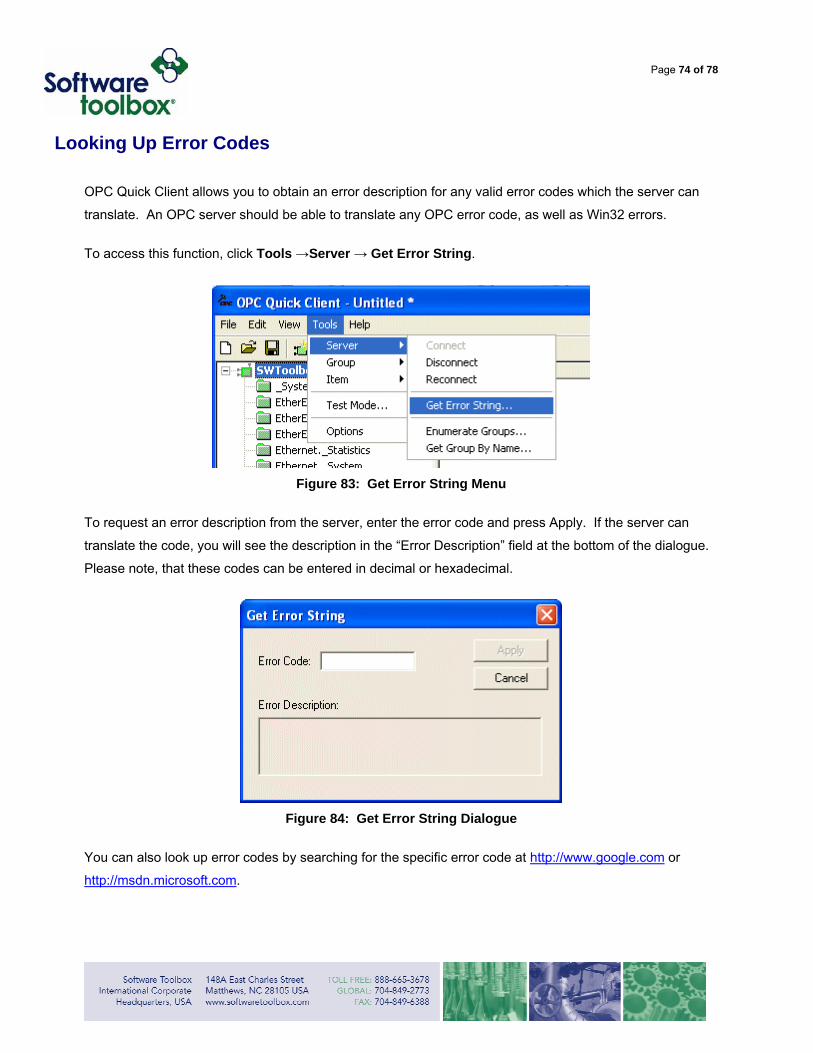
To access this function, click Tools →Server → Get Error String.
Figure 83: Get Error String Menu
To request an error description from the server, enter the error code and press Apply. If the server can
translate the code, you will see the description in the “Error Description” field at the bottom of the dialogue.
Please note, that these codes can be entered in decimal or hexadecimal.
Figure 84: Get Error String Dialogue
You can also look up error codes by searching for the specific error code at http://www.google.com or
http://msdn.microsoft.com.
Page 75 of 78
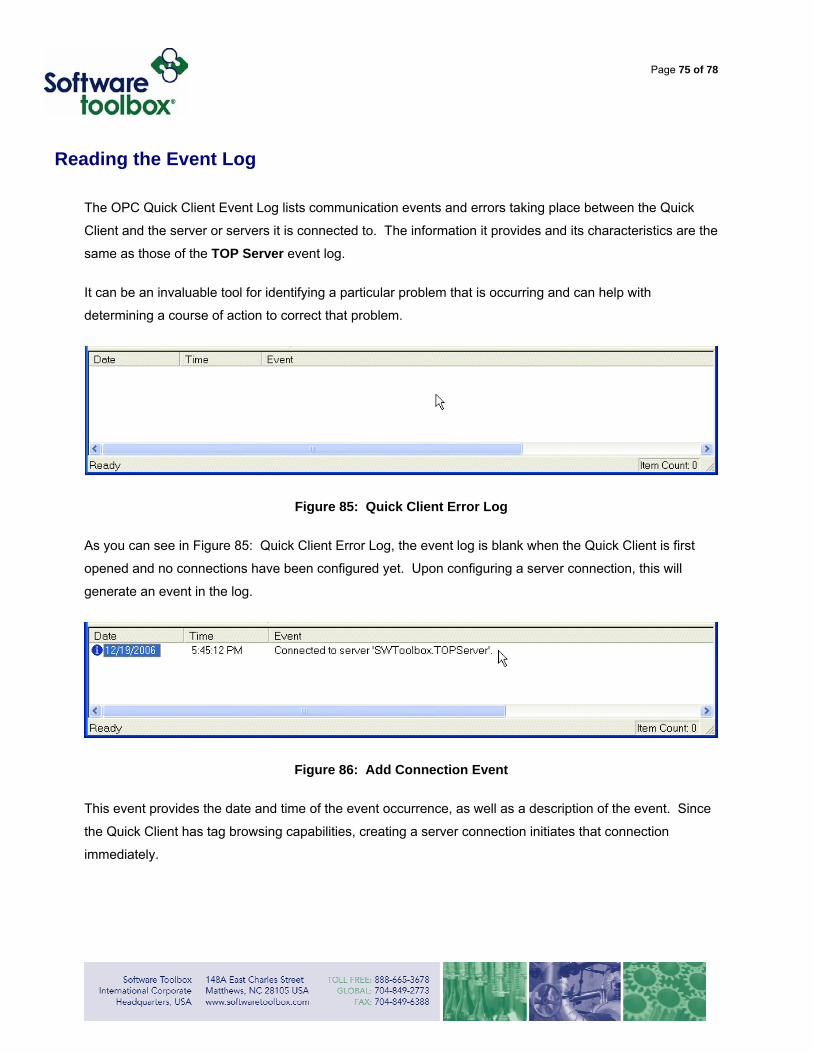
Reading the Event Log
The OPC Quick Client Event Log lists communication events and errors taking place between the Quick
Client and the server or servers it is connected to. The information it provides and its characteristics are the
same as those of the TOP Server event log.
It can be an invaluable tool for identifying a particular problem that is occurring and can help with
determining a course of action to correct that problem.
Figure 85: Quick Client Error Log
As you can see in Figure 85: Quick Client Error Log, the event log is blank when the Quick Client is first
opened and no connections have been configured yet. Upon configuring a server connection, this will
generate an event in the log.
Figure 86: Add Connection Event
This event provides the date and time of the event occurrence, as well as a description of the event. Since
the Quick Client has tag browsing capabilities, creating a server connection initiates that connection
immediately.
Page 76 of 78
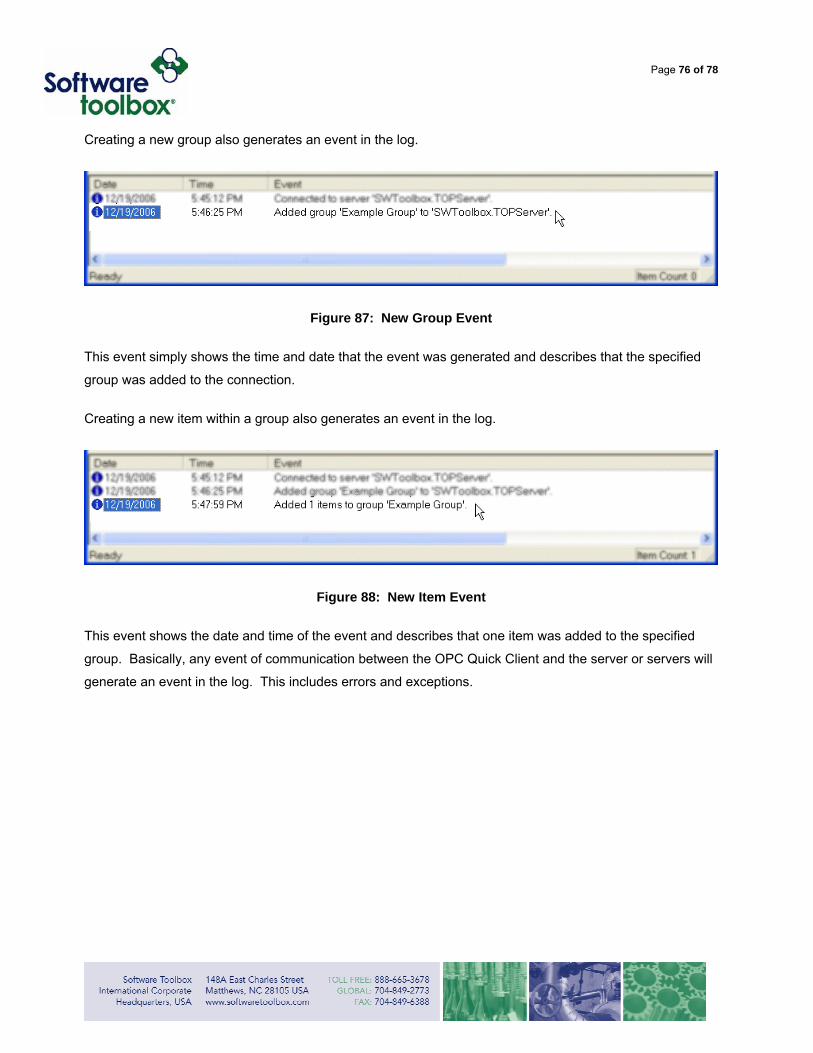
Creating a new group also generates an event in the log.
Figure 87: New Group Event
This event simply shows the time and date that the event was generated and describes that the specified
group was added to the connection.
Creating a new item within a group also generates an event in the log.
Figure 88: New Item Event
This event shows the date and time of the event and describes that one item was added to the specified
group. Basically, any event of communication between the OPC Quick Client and the server or servers will
generate an event in the log. This includes errors and exceptions.
Page 77 of 78
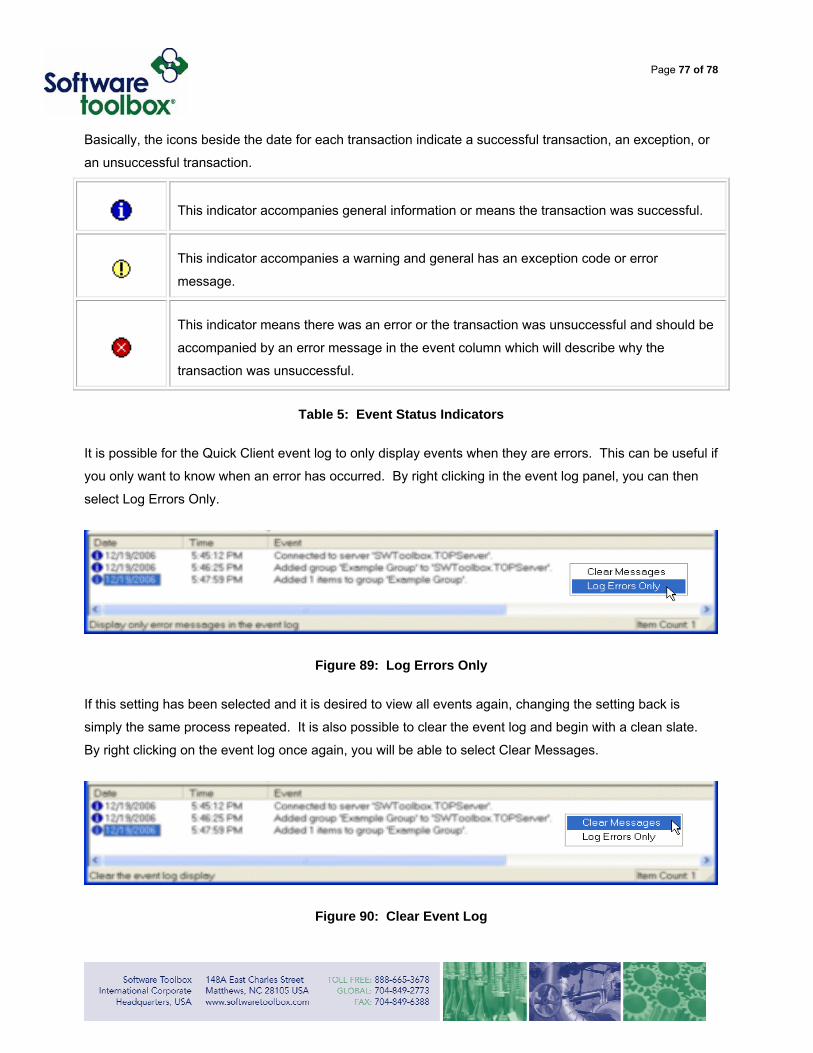
Basically, the icons beside the date for each transaction indicate a successful transaction, an exception, or
an unsuccessful transaction.
This indicator accompanies general information or means the transaction was successful.
This indicator accompanies a warning and general has an exception code or error
message.
This indicator means there was an error or the transaction was unsuccessful and should be
accompanied by an error message in the event column which will describe why the
transaction was unsuccessful.
Table 5: Event Status Indicators
It is possible for the Quick Client event log to only display events when they are errors. This can be useful if
you only want to know when an error has occurred. By right clicking in the event log panel, you can then
select Log Errors Only.
Figure 89: Log Errors Only
If this setting has been selected and it is desired to view all events again, changing the setting back is
simply the same process repeated. It is also possible to clear the event log and begin with a clean slate.
By right clicking on the event log once again, you will be able to select Clear Messages.
Figure 90: Clear Event Log
Page 78 of 78
Summary
This document has been provided to assist the end-user in the basic configuration and use of OPC Quick
Client to read data from an OPC Server, specifically, TOP Server. From this guide, we hope that you have
gained a better understanding of the Quick Client and in the process, some insight into OPC itself. While
the document is not an exhaustive reference on the Quick Client, it has been designed to cover the items
that are seen by the vast majority of users. If you have further questions or need assistance our
experienced staff is more than happy to help. We can be contacted in the methods outlined below.
Contact Us
If you have any questions, or seek further information and help:
Online Support http://support.softwaretoolbox.com/
Email Support [email protected]
Phone Support +1 (704) 849-2773
Fax +1 (704) 849-6388
Mailing Address
Software Toolbox, Inc. 148 A East Charles Street, Matthews, NC, 28105. USA.