Embed Size (px)
Citation preview

1 | P a g e
Utility Billing Software (Updated November 2021)

2 | P a g e

3 | P a g e
Table of Contents
Getting Started ............................................................................................................................................. 5
General Software Navigation ....................................................................................................................... 7
Building/Maintaining Services ..................................................................................................................... 9
Building/Maintaining Rates ....................................................................................................................... 14
Building/Maintaining Surcharges/Taxes ................................................................................................... 14
Bill Groups .................................................................................................................................................. 16
Schedules ................................................................................................................................................... 17
Building/Maintaining Accounts ................................................................................................................ 18
Account Screen/Account Screen Tabs ....................................................................................................... 20
Getting Started/Maintaining Features ..................................................................................................... 30
Setup Options ............................................................................................................................................. 30
Penalty Collections ..................................................................................................................................... 30
Choose Forms ............................................................................................................................................. 32
System Procedures ..................................................................................................................................... 33
Backup/Restore .......................................................................................................................................... 33
Fund Accounting (FA) Transfer .................................................................................................................. 33
History Management ................................................................................................................................. 33
End of Year (EOY) Processes ...................................................................................................................... 34
Deposit Interest .......................................................................................................................................... 36
Budget Billing .............................................................................................................................................. 37
Account Procedures ................................................................................................................................... 38
Attaching Services, Rates, Surcharges/Taxes ............................................................................................ 39
Mass Change ............................................................................................................................................... 40
Service/Surcharge Adjustments ................................................................................................................ 41
Budget/UR (Credit) Adjustments ............................................................................................................... 41
Prepare Check ............................................................................................................................................. 42
Amended Bill .............................................................................................................................................. 43
Bill History .................................................................................................................................................. 43
Final Billing ................................................................................................................................................. 44
Unpost Receipt ........................................................................................................................................... 45

4 | P a g e
Account Features/Tools ............................................................................................................................. 46
Account Templates .................................................................................................................................... 46
Account Screen Receipt Entry .................................................................................................................... 46
Declining Balance ....................................................................................................................................... 47
Special Bill Printing ..................................................................................................................................... 48
Frequently Asked Questions (FAQ) ............................................................................................................ 50
Add-On Modules ........................................................................................................................................ 56
Enhancements ............................................................................................................................................ 57

5 | P a g e
GETTING STARTED
Software Installation
• Only install to the local drive of PCs where the application is run.
• Have a minimum of 500MB free disk space available to install.
• Close all programs before installing Banyon Data Software
• Insert the Banyon Data CD in the CD-ROM drive or the flash drive in the USB port.
• Installation should start automatically, if it does not: Click on Start button; type in the text box
“D:\setup” and press enter. If using Windows 10, you can locate using File Explorer.
• Follow the instructions on the screen to complete the installation.
Sharing Data
When Banyon Data application is run for the first time, it will prompt you for the location of the Shared
Folder (see below)
Where data is stored and shared
Note: Allow one station to complete the initial start-up
before allowing other stations to use the application.
USING THE SOFTWARE
There is an icon (shortcut) for each installed application. Click on the icon and the software will prompt
you to enter a security password.
Two passwords are available as default: “master” and “banyon”
The “master” password is used to setup a new user or change an existing password. You can also assign
“User Rights” to passwords to allow Full Access (default) or Read Only access for those that will be
looking at the data, but not allowed to make changes.
The “banyon” password is used to access the application software as a default.
Creating New Passwords
• At the password entry screen enter “master” and press the
Enter key.
• The Password Setup screen will appear on your screen. Under
the User ID column, click on the next open field and type in
the desired User Name, then enter a password for that user.
Using the drop down list, select the rights level for this user.
• To change the “master” password, click on the password field
on the Master line and enter the new password. NOTE: If you
change your “master” password, please keep a record of it so
Banyon Data can have access to password setup if needed.

6 | P a g e
While in the Password Setup screen, you can also Setup User Rights by clicking the button in the bottom
left corner of the window. This only needs to be done if you do not want to have a certain user access
portions of the software.
Where it says Name of Accessing Right, type in a
name for the level of access you wish to create;
we used “Limited Access” for example. Once the
Rights name is created, scroll through the options
and check the boxes to either have No Access or
Read Only Access.
Close the screen by clicking on the X. Now this
User Right is available in the drop down list of the
Password Setup screen.
Once you have finished entering all the users, click on the Return to Password Entry button. This will
bring you back to the Enter Password prompt.

7 | P a g e
GENERAL SOFTWARE NAVIGATION
(Using the Ribbons)
Banyon Data Utility Billing software uses five (5) main ribbons for navigation. These areas are found in
the upper left corner of your screen and include: File, Account, Tools, View and Help.
File Menu
The File menu opens to the “Data Connection”
option; from here you can view/change your data
location by clicking on the existing location. This will
give you a window to browse for the location.
You can also change your entity information by
clicking the Change Entity Info link. Note: You will
be required to call Banyon support for an
authorized password to change your entity name.
The “About” option gives you general information about Banyon Data including a Suggestion Box, Links
to our website and to Check for Software Updates, as well as a link to our Products page for information
about other products available from Banyon Data.
Account Menu
This menu is designed specifically for the Utility Billing software application and contains many of the
common tools and procedures that are necessary for processing your utility bills.
An in-depth look at each item/segment will be found throughout this manual.
Tools Menu
The Tools menu gives some basic functionality items as well as more in-depth tools used by Banyon
Support staff for troubleshooting.
The Maintenance section of the
Tools tab gives you general system
information and functions. It is
suggested to always call Banyon
Support before selecting an item from this menu if you are unsure what it does.
The Add-on Modules option allows Banyon Support staff to turn on additional modules that your
organization may have purchased.

8 | P a g e
View Menu
The View menu allows you to re-open the Account
Screen, access Report Writer and create a generic Work
Order.
You can also use this menu to Lookup accounts with a
Meter ID or Meter Serial Number or by Social Security
Number.
Help Menu
The Help menu provides access to system related support tools. Banyon Support Staff can view and
control your program by offering Glance sessions to provide superior support and training options.
There is also an option to send your data to Banyon for further review or fixes and an option to receive it
back. You can also return to Password Entry to log different users in and out of the program.

9 | P a g e
BUILDING/MAINTAINING YOUR DATABASE SERVICES
SERVICES
If you are in initial setup, click on the Services button. Service 1 will be added automatically. If you have
completed initial setup and you would like to change an existing service or add a new service, you would
click Setup and then select Services from your Account ribbon at the top of your screen.
ADDING A NEW SERVICE
To add a new service, click on the Add button at the top of the Service Screen window. You will be asked
to enter a new service number, you can accept the number the computer generates or you can enter
your own number and then click the OK button. This creates your new service. If you change your mind
about adding a new service, click the Cancel button.
You will receive a reminder to schedule the service, click the OK button. (Refer to the Schedules section
on page 17 for help scheduling the service.)
Enter a Service Name (Ex: “Water”, “Sewer”, etc.) The service name is what will be displayed on your bill
form; keep this in mind when naming the services.
Choose a Service Type.
SERVICE TYPES
This section will provide an overview of the most commonly used service types. Those types are: Non-
Metered Not Based on Another Service (Flat Fee), Metered, Based On, Transient and Deposit Services.
Non-Metered Not Based on Another Service (Flat Fee)
10 | P a g e
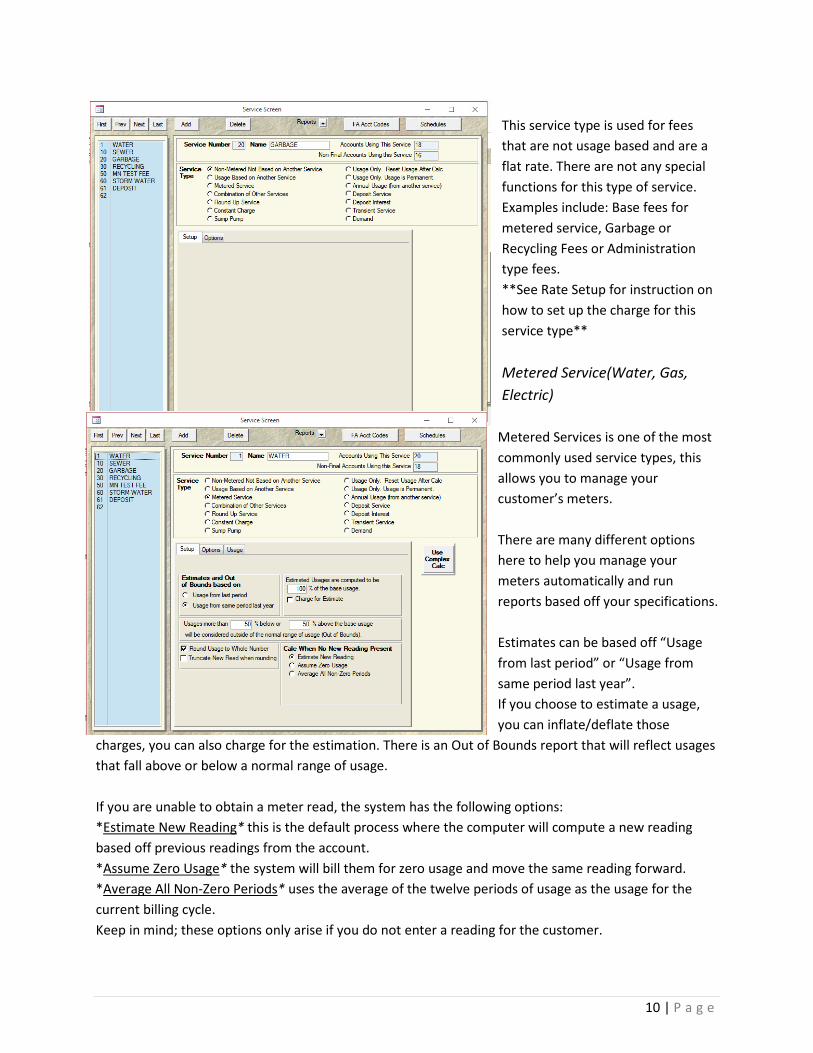
This service type is used for fees
that are not usage based and are a
flat rate. There are not any special
functions for this type of service.
Examples include: Base fees for
metered service, Garbage or
Recycling Fees or Administration
type fees.
**See Rate Setup for instruction on
how to set up the charge for this
service type**
Metered Service(Water, Gas,
Electric)
Metered Services is one of the most
commonly used service types, this
allows you to manage your
customer’s meters.
There are many different options
here to help you manage your
meters automatically and run
reports based off your specifications.
Estimates can be based off “Usage
from last period” or “Usage from
same period last year”.
If you choose to estimate a usage,
you can inflate/deflate those
charges, you can also charge for the estimation. There is an Out of Bounds report that will reflect usages
that fall above or below a normal range of usage.
If you are unable to obtain a meter read, the system has the following options:
*Estimate New Reading* this is the default process where the computer will compute a new reading
based off previous readings from the account.
*Assume Zero Usage* the system will bill them for zero usage and move the same reading forward.
*Average All Non-Zero Periods* uses the average of the twelve periods of usage as the usage for the
current billing cycle.
Keep in mind; these options only arise if you do not enter a reading for the customer.

11 | P a g e
Transient Service (One-Time Charges)
Transient Services are charges attached
to a customer’s account that are
generally billed just once.
(Example: Disconnect/Reconnect Fees,
NSF, Administration Fees)
*Enter the Amount to Charge, if the
amount is dependent on the situation,
you may leave the Amount field at $0.00
– when you attach the service to a
customer’s account, the system will ask
you how much you’d like to charge.
*If applicable, you may also attach a tax
(surcharge).
Deposit Service
Deposit Service can be attached on a customer’s account and held until refund period or held and used
towards final bill upon customer move out.
12 | P a g e
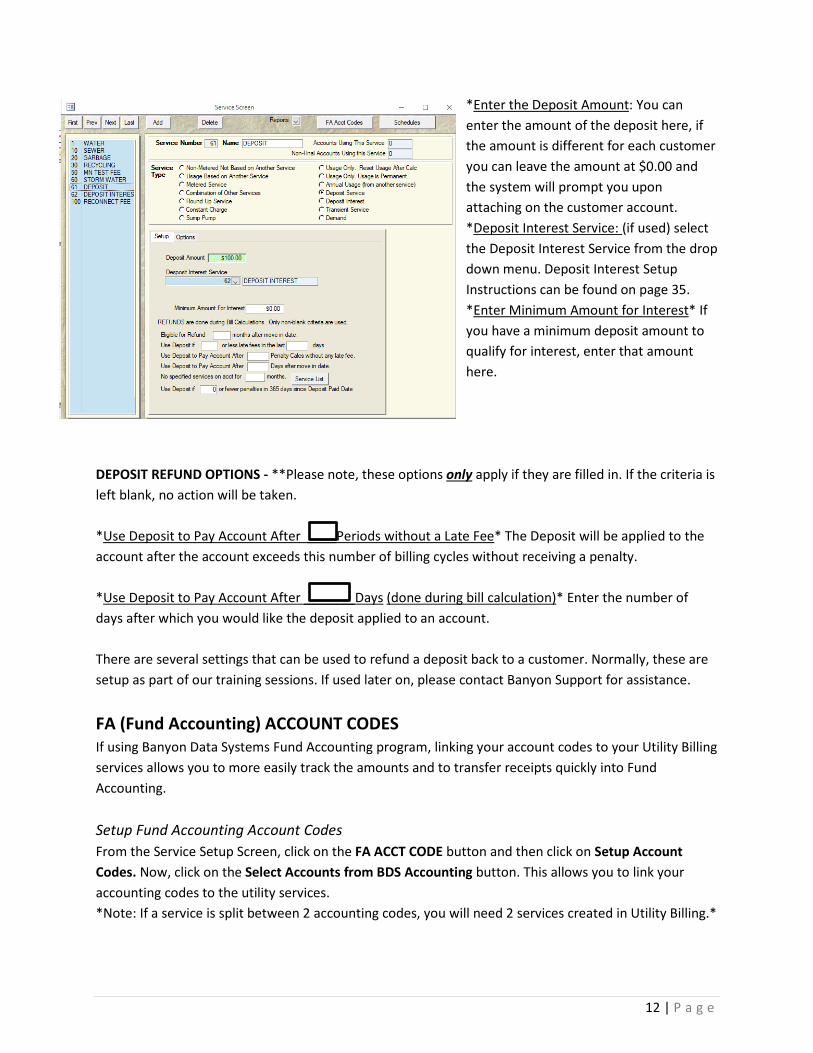
*Enter the Deposit Amount: You can
enter the amount of the deposit here, if
the amount is different for each customer
you can leave the amount at $0.00 and
the system will prompt you upon
attaching on the customer account.
*Deposit Interest Service: (if used) select
the Deposit Interest Service from the drop
down menu. Deposit Interest Setup
Instructions can be found on page 35.
*Enter Minimum Amount for Interest* If
you have a minimum deposit amount to
qualify for interest, enter that amount
here.
DEPOSIT REFUND OPTIONS - **Please note, these options only apply if they are filled in. If the criteria is
left blank, no action will be taken.
*Use Deposit to Pay Account After ____Periods without a Late Fee* The Deposit will be applied to the
account after the account exceeds this number of billing cycles without receiving a penalty.
*Use Deposit to Pay Account After _______Days (done during bill calculation)* Enter the number of
days after which you would like the deposit applied to an account.
There are several settings that can be used to refund a deposit back to a customer. Normally, these are
setup as part of our training sessions. If used later on, please contact Banyon Support for assistance.
FA (Fund Accounting) ACCOUNT CODES
If using Banyon Data Systems Fund Accounting program, linking your account codes to your Utility Billing
services allows you to more easily track the amounts and to transfer receipts quickly into Fund
Accounting.
Setup Fund Accounting Account Codes
From the Service Setup Screen, click on the FA ACCT CODE button and then click on Setup Account
Codes. Now, click on the Select Accounts from BDS Accounting button. This allows you to link your
accounting codes to the utility services.
*Note: If a service is split between 2 accounting codes, you will need 2 services created in Utility Billing.*

13 | P a g e
You can choose from General Ledger,
Expenditure and Revenue.
Once you have the codes selected,
click the button that says Click to start
loading selected items.
Close the Load Account Reference
window. Also, close the Account
Reference Table window.
This brings you back to the Service Fund Accounting Account Codes window.
From here, you will select the account codes you just loaded.
Use the drop down arrows to select the accounts.
The setup below is for CASH BASIS accounting practices, this is a one-step method. You receive money
and transfer it into Fund Accounting; Revenue is credited, Cash is debited.
If you are Accounts Receivable, please see separate setup below.
*Example: Notice that we have the WATER
service selected.
On the Receipt line, we will choose the REV
radio button and select the corresponding
REV code. In this example, it is 601-37100.
On the next line, you choose the proper cash
account code, in this case it is 601-10100.
The 3rd and 4th line down refers to the
Receipt Pen (amounts applied towards late
fees) – you may or may not have a separate
account code for this. Choose the proper
code and then select the cash account code.
The setup below is for ACCOUNTS RECEIVABLE accounting method, this is a two-step process. First, you
calculate bills for your customers. The billing amounts are then transferred to Fund Accounting; Revenue
is credited, Accounts Receivable is debited.
The 2nd step is to transfer payment (receipt) amounts to Fund Accounting; Cash is debited, Accounts
Receivable is credited.

14 | P a g e
**Please understand that Banyon support staff cannot tell you what accounting method or account
codes to use. If you are unsure, please direct those questions to your accountant or auditor.**
BUILDING/MAINTAINING RATES
If you are in initial setup, click on the Rates button. Rate 99 (No Charge) is added automatically. If you
have completed initial setup and you would like to change an existing rate or add a new rate, you would
click Setup and then select Rates from your Account ribbon at the top of your screen.
ADDING A NEW RATE
To add a new rate, click on the Add button at the top of the Rate Screen window. You will be asked to
enter a new rate number, you can accept the number the computer generates or you can enter your
own number and then click the OK button. This creates your new rate. If you change your mind about
adding a new rate, click the Cancel button.
When adding a Rate Name, make sure that it makes sense to you. The customers do not see the rate
names, only the service names.

15 | P a g e
This is an example of a Flat Rate – this
would most commonly be attached to a
non-metered service, such as Garbage.
Enter the amount you wish to charge in
the Base Charge field.
Check the box if you would like to charge
this times the units (multi-family housing,
extra garbage, etc)
Check the box if you wish to Pro-Rate the
Base Charge.
This example shows what a Tiered Rate
setup could look like. Tiered rates are
used on metered services, where cost is
dependent on amount used.
Enter the “To” units and the “Amount per
Unit”. Make sure you know how many
digits you will use for your usage amounts.
Please call Banyon support if you have
questions regarding Tiered Rate setup.
On tiered rates, you can use the “Test
Usage” feature in the bottom right corner
of the Rate Setup screen.
Enter the amount of usage that you’d like
to test and press your Enter key on your
keyboard.
This will display the Rate Test screen.
Using the options on the right side, you
can change your test criteria based on units or pro-rating as well.

16 | P a g e
If the rate looks correct, you can click on the Exit button to go back to the Rate Setup screen.
BUILDING/MAINTAINING SURCHARGES/TAXES
If you are in initial setup, click on the Surcharges/Taxes button. If you have completed initial setup and
you would like to change an existing surcharge/tax or add a new one, you would click Setup and then
select Surcharges/Taxes from your Account ribbon at the top of your screen.
To add a new surcharge/tax, click on the
Add button at the top of the Surcharge
Screen window. You will be asked to enter a
new surcharge number, you can accept the
number the computer generates or you can
enter your own number and then click the
OK button. This creates your new
surcharge. If you change your mind about
adding a new rate, click the Cancel button.
Enter the Surcharge Name, this will be the
name that is displayed on the customer bill.
Surcharge Percent: This is the percent to be charged.
Surcharge Amount: This is a flat amount to be charged on a service. Leave this as $0.00 if not used.
If you have customer’s that are a “Percent Tax Exempt” we have an easy feature that does the figuring
for you. For setup instructions, please see page.
If you use Banyon Fund Accounting, click on the FA Account Codes button to attach the accounting
codes. See page 10 for setup information.
BILLING GROUPS
If you are in initial setup, click on the Bill Groups button. If you have completed initial setup and you
would like to change an existing surcharge/tax or add a new one, you would click Setup and then select
Billing Groups from your Account ribbon at the top of your screen.
If you bill RESIDENTIAL and COMMERCIAL customers at different times (i.e. Residential bills monthly,
commercial bills quarterly) or you bill METER BOOKS at different times, then you will want to set up
separate billing groups. You would then attach custom schedules to each group respectively.
**Bill Schedules are explained on page 15

17 | P a g e
Please note: Having more than a few Billing Groups is very inconvenient for you. Making sure that the
default values on this screen are updated to your entity’s preference will save time and eliminate errors
in the future. If you have questions or need assistance, please call Banyon support.
To add a new Billing Group, click on
the Add button at the top of the Bill
Group window. You will be asked to
enter a new Billing Group number,
you can accept the number the
computer generates or you can enter
your own number and then click the
OK button. This creates your new
Billing Group. If you change your
mind about adding a new group, click
the Cancel button.
Enter the Bill Group name.
At this time, you will also want to update the Current Period; this should match the month of the bills
you will calculate next.
Attach the Fund Accounting account code that you will use for customer overpayments. This will be
used as a “holding account”. When a customer overpays, the amount will go into the UR Account Code,
when you process bills, the money is moved from the UR Account Code into Revenue codes it was
applied towards. When this happens, a Receipt Distribution report will display and you will also have a
transfer item to send to Fund Accounting.
If you plan to Pro-Rate your bills, based on when a customer moves in or out of a property, make sure
that you enter the Default Pro-Rate Days. If you bill monthly, the default should be set at 30; alternately,
if you bill quarterly, you should set the days at 90.
If you would like the system to assign your account numbers, put a check mark in the box. If you want to
enter your own account numbers, leave the box unchecked. Also, change the Default Next Account
number to the next number in your series. If you would like to put a gap in between the account
numbers, enter the amount you’d like for the gap.
Choose which Billing Schedule the group will use, schedules tell the program when to bill specific
services for the group. You can view the schedule by clicking on the View Schedule button.
BILLING SCHEDULES
To create, view or edit a Billing Schedule, you would click Setup and then select Billing Groups from your

18 | P a g e
Account ribbon at the top of your screen. You can also access by clicking the Schedules button on the
Billing Group, Service or Surcharge setup screens.
*Setup the Billing Period information
carefully as it is the table used for keeping
history and is also used by Services that
depend on usage from particular Billing
Periods. Current Bill Period is selected in
Billing Group Set Up*
To schedule a service, enter an ‘X’ into each
Billing Period box.
If you bill monthly, click on the service name,
this will fill in all 12 Billing Periods with an ‘X’.
This will save you time when scheduling
multiple services.
You can also enter a number in a Billing Period box, if you wish to have that period look to a different
Billing Period for usage purposes. The number will correspond to the Billing Period number you would
like to base the usage from, during calculation, the system will ignore current usage amount and replace
it with the usage from the period specified.
RECEIPT DISTRIBUTION PRIORITIES
Priorities range from 0 to 9, charges are paid in ascending priority order. All charges with a priority of 0
are paid first, then 1, 2, etc until all amounts are distributed. This only affects payments that are less
than the total amount due.
BUILDING/MAINTAINING YOUR DATABASE ACCOUNTS If you are in initial setup, click on the Accounts button. If you have completed initial setup and you
would like to add a new account, you would click Add at the top of the Account Screen window.
19 | P a g e
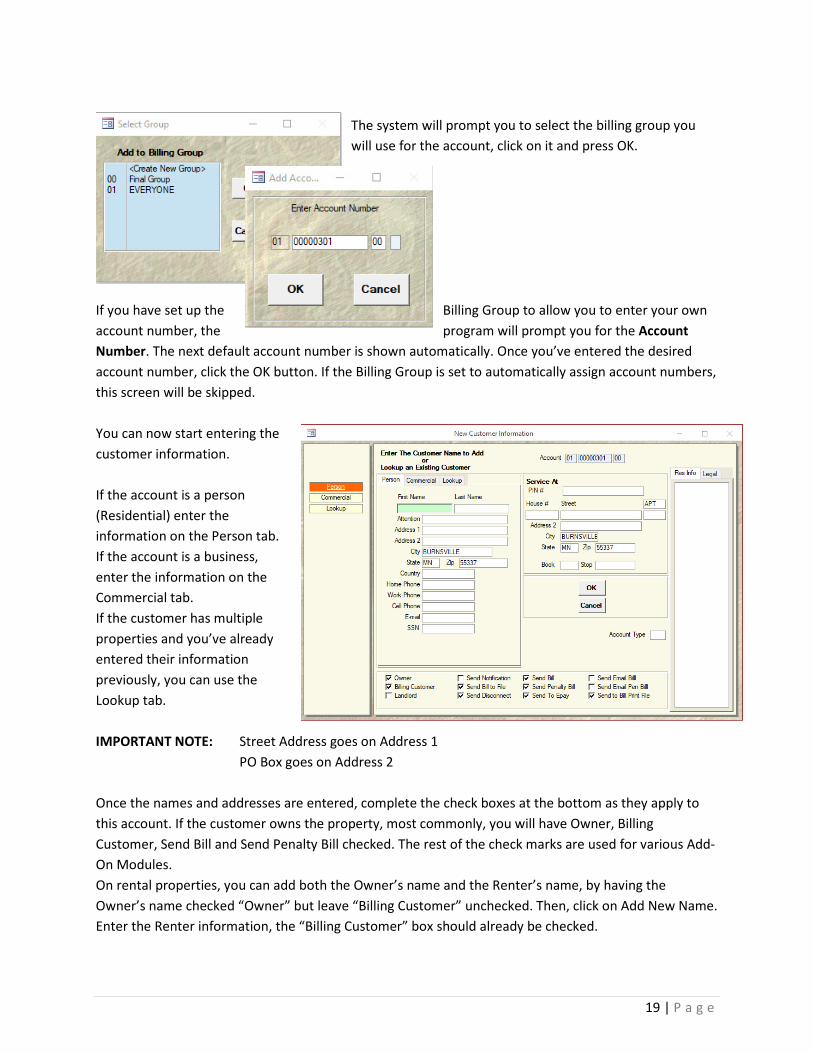
The system will prompt you to select the billing group you
will use for the account, click on it and press OK.
If you have set up the Billing Group to allow you to enter your own
account number, the program will prompt you for the Account
Number. The next default account number is shown automatically. Once you’ve entered the desired
account number, click the OK button. If the Billing Group is set to automatically assign account numbers,
this screen will be skipped.
You can now start entering the
customer information.
If the account is a person
(Residential) enter the
information on the Person tab.
If the account is a business,
enter the information on the
Commercial tab.
If the customer has multiple
properties and you’ve already
entered their information
previously, you can use the
Lookup tab.
IMPORTANT NOTE: Street Address goes on Address 1
PO Box goes on Address 2
Once the names and addresses are entered, complete the check boxes at the bottom as they apply to
this account. If the customer owns the property, most commonly, you will have Owner, Billing
Customer, Send Bill and Send Penalty Bill checked. The rest of the check marks are used for various Add-
On Modules.
On rental properties, you can add both the Owner’s name and the Renter’s name, by having the
Owner’s name checked “Owner” but leave “Billing Customer” unchecked. Then, click on Add New Name.
Enter the Renter information, the “Billing Customer” box should already be checked.

20 | P a g e
Lastly, you will want to enter an “Account Type” – The most common types are C=Commercial,
R=Residential, P=Public, etc. However, you may choose any code that you would like to distinguish your
account types.
Once you are finished entering the information, click the OK button. The program will automatically
bring you back to selecting a Bill Group. You can continue entering accounts, if you do not need to enter
more, click the EXIT button.
*IMPORTANT NOTE: You may want to use Account Templates to save time and reduce potential set up
discrepancies. Account Template Set up can be found on page 46.
Once you have created an
account, the Utility Billing
program will automatically
display the account screen the
next time you open the program.
The Utility Billing Account Screen
is where you will find all
information pertaining to your
customers, each customer will
have a screen like this.
ACCOUNT SCREEN/ACCOUNT SCREEN TABS

21 | P a g e
The top of the Account Screen serves as a Lookup to switch through your accounts. You can select the
sorting order of the accounts by clicking on the drop-down arrow next to Sort by. The options include:
Account Number (most common), Service Address, Billing Name, Owner Name, Book/Stop, PIN # (Parcel
ID), Postal Zip Code or by Social Security Number.
If you know the account number, you can click on the Lookup button and enter the account number you
wish to view. Alternately, you can look up Accounts by clicking the drop-down arrow next to Service
Address, Billing Name, Owner Name, Book/Stop or PIN #. Once you have clicked the drop-down arrow,
type in the first few characters of the name, address etc. and then select the account you’d like to view.
Once you have selected the desired account, all information displayed on the Account Screen pertains to
the customer selected.
On the right side of the screen, you will see Balance, Credits, Account Status, Account Type and Units.
The balance displayed is the current amount the customer owes, if there is an amount in the Credits
field, the customer has a negative (credit) balance. For quick transactions, you can click on the balance
and immediately add a payment. For instructions, please see page 46.
Account Statuses further help you manage your accounts and assist in the calculation process. The
following account statuses are available in Utility Billing:
Active: Active customers are subject to all billing and penalty processes. This would be the correct status
for the majority of your accounts.
Inactive: Inactive customers are dormant, they do not get a bill calculated or printed. This is normally
used for vacant homes where no bill is necessary.
New: This status is selected by the program, it is used on either a brand new property or on an existing
property that has a new owner. Once you process the customer’s first bill, their status will automatically
move to Active status.
Final: This is used when a customer moves out, the account will be moved to the Final Billing Group.
(Explanation for final bill processing can be found on page 44).
Final Calc: The program will change an account to this status during the calculation of your Final Billing
Group, this is when the final charges to the account are processed.
Final Calc Print: The program will change an account to this once you have printed your final bills. This is
the last status a customer will have once they have moved out.
Deleted: This is a background status that cannot be selected by users.

22 | P a g e
Turned Off: Most commonly, this is used in conjunction with a meter device on customers that you have
Turned Off due to non-payment. The system will not produce any charges for the customer unless the
meter device detects usage. For further explanation, please contact Banyon support.
Auto-Activate: This status is used for a customer that you have entered into the program, but you do
not want to process a bill for them yet. The system will skip the account and Activate them for the next
cycle.
Curb-Off Active: This status acts like the Active status for processing purposes. It has a different name
for reporting purposes. This can be used where a customer has their meter Turned Off, but you still wish
to process a bill for them.
ACCOUNT SCREEN – BILLING & OWNER TAB
The billing tab and
the owner tab
contain the same
information, except
in an owner/renter
situation. For
instructions on how
to set up rental
properties, please
see page18.
The billing and owner tab store general information about your customer such as name, billing address
and phone numbers.
BILLING & OWNER TAB – HELPFUL TOOLS
Print Label: Creates address labels for the customer displayed.
You can choose the number of labels you’d like to print and
select the position that you want your label to print on the
sheet. Labels are also compatible with Dymo label printers.
Print Envelope: Creates an envelope template with the
customer name and billing address to your desired printer. This
will only work for standard #10 envelopes. Please check your
printer setup to see how your printer handles envelope
printing.
View Map: This will open your web browser and display Google
Maps for the address displayed.
ACCOUNT SCREEN – PROPERTY TAB

23 | P a g e
The Property tab
displays information
regarding the
physical address;
this should be the
address that the
service is at.
PROPERTY TAB – HELPFUL TOOLS
View Map: This will open your web browser and display Google Maps for the address displayed.
Area Fields 1-4: These fields can be used for a closer definition of the property for reporting purposes.
ACCOUNT SCREEN – NAMES TAB
This tab shows all the customer names associated with the account, for more detail click on the name.
The Customer Link to Account screen will appear.
You can make changes or add new information,
add comments or change billing criteria using the
check boxes at the top of the screen.
If you wish to add another customer name to the
account, click on the Add New button. If you wish
to remove a customer from the account, click the
Delete button. This will delete the customer from
the current account, but not any other account
they may be associated with.
NAMES TAB – HELPFUL TOOLS
Use Print Date Range: You can enter seasonal
addresses, scheduled by month and day. This
works great for customers that leave town for an
extended period of time and would like to receive their bill. For setup instructions, see page48.
ACCOUNT SCREEN – AGING TAB

24 | P a g e
The aging tab gives
you a basic look at
the account’s aged
balances.
You can see the
Last Payment
Amount and Date,
as well as the last
time the customer
received a penalty
charge.
AGING TAB – HELPFUL TOOLS
Payoff Amount: This is the Account Balance minus the amount of Deposit service, plus the amount of
any pending Transient services.
Receipt(s) Not Posted: If a payment has been entered in a batch, but not posted, the Aging screen will
display the Unposted Amount and the Batch name. This lets the user know if they have already entered
a payment for the customer displayed.
Late In Period: The program will place check marks in the Billing Period boxes where the customer did
not send in a payment. This gives you a quick overview of whether a customer pays on time or not.
Pen Calc without a Penalty: This field corresponds with a Deposit Service refund criteria and tabulates
how many penalty calculations you have done where they DID NOT receive late charges. Once the
customer reaches the desired number, their Deposit would refund automatically during the next billing
calculation. Setup instructions for Deposit Refund can be found on page 11.
ACCOUNT SCREEN – MISC TAB

25 | P a g e
The Misc Tab allows
for customized
information entry and
useful tools to help
you manage your
accounts.
Exempt from Penalty for _ Periods: This enables you to exempt the account from receiving penalties for
the set number for billing cycles. Whereas Always Exempt from Penalty would never penalize an
account.
Exempt for Estimate Fee: If you charge for meter reading estimates, this allows you to exempt the
account from those charges.
Creation Date: The date the account was created by a user, if the account was created during a data
conversion, no creation date will apply.
Last Move In Date: The last time a customer moved into the property. The program sets this date
automatically when a new customer moves into an Inactive property.
Move Out Date: This is the date the account was final billed by default but can be changed during the
final billing process.
Date Billed: The date the account was last billed, it is automatically generated by the program.
Units: Number of billable units for the account. This is normally used for multi-family housing.
Current Level: How many times the account has been charged a penalty since the account was last paid
in full.
Total Level: The total number of times the account has been charged a penalty.
Turn-Offs: The number of times the account has been “turned off” (how many times the Turned Off
status has been selected as the Account Status).
Current Period: This is the current billing period for the billing group of this account. *Remember: the
current period is the period you will be calculating next.
Optional Codes A-D: Reporting fields, can be used for any information you want to report on.
Summary Code: Allows you to summarize, by code, several related bills on a combined statement. This
is ideal for owners of multiple properties. For set up instructions, see page 48.
Bill Message: An accounts personal bill message. This message will override any other bill message that
would normally display. You can retain the message for a set number of billing periods or make the
message permanent.
Cash Only: Checking this box will add a “Cash Only” pop-up reminder when you are entering a payment
for the customer.
ACCOUNT SCREEN – SERVICE TAB

26 | P a g e
The Service Tab displays
the Services that are being
used or could be used on
the account. This screen
also displays Service and
Penalty Balances.
On the right side of the screen, you have the option to display All, Used Only or Unused Only services. If
you choose All, you will see a list of all services that have been created. If you select Used Only, you will
see a list of only the services that are attached to the account. Unused Only will display the services that
are not currently attached to the account.
For more detail about a service,
click on the Service Name, this will
open the Account Service Screen.
This screen allows you change
rates, add surcharges and make
adjustments.
ACCOUNT SERVICE SCREEN –
HELPFUL TOOLS
Delete: If you wish to remove a
service from an account, you can
press the Delete key. If the service
has a balance, you will not be able to delete until the balance is paid or adjusted off.
Late In Period: The program will place check marks in the Billing Period boxes where the customer did
not pay off the service amount.
ACCOUNT SCREEN – METER TAB

27 | P a g e
The Meter tab displays
the meter records that
are attached to the
account. A quick display
of the Current Reading,
New Reading and Usage
are shown.
For more detail, click the Service Name. This will open the Account Meter Screen.
The Account Meter Screen retains information
pertaining to the meter, the meter device and usage
history for the Account. This screen is broken down
by tabs across the middle of the screen, Info, Misc,
Device, Replacement and Work Orders.
The top of the screen shows you the most recent
readings for the account. The New Reading field
shows the reading that will be calculated on the next
billing calculation. Once you have finished the bill
calculation, the New Reading moves to the Current
Reading field and last month’s read moves to the
Previous Reading field.
The screen defaults to the INFO tab, the information you enter here usually enables Banyon Utility
Billing to communicate with your Meter Device system. The information required depends on the Meter
Device system you are using. Banyon support staff has limited knowledge on the specifics of meter
devices, but will work with you and your meter device representative to get the information in the
correct fields.

28 | P a g e
The MISC tab contains extra information about the meter that could
be helpful to you or the Meter Reader. Some devices allow the
Notes field to be transferred to the meter device.
The Date Installed and the Maintenance Dates are managed by you
and are not auto populated by the program.
Estimates Since Last Actual Reading: This is the number of times
the meter has been estimated since the last actual read was
entered.
The DEVICE tab contains information regarding the Meter Device, these
numbers are used for the transfer file. Some devices will not use these
fields.
The REPLACEMENT tab features an easy way to replace a
meter. It allows you to easily combine usage from the old
meter to any usage on the new meter.
Important items to keep in mind when replacing a
meter:
The New Reading field HAS to be blank before you enter the
final meter reading on the Replacement tab.
On this screen you will enter the Old Meter Final Reading.
The program will display a message letting you know the meter has been replaced. Now, you can enter
the new serial number and meter ID over the old meter’s information.
If the meter installed is not brand new, you will enter the New Meter Initial Reading into that field.
NOTE: After the meter is replaced it is common to see a very large number as the current reading, this is
intentional to calculate the correct usage amount.
*For further instruction and demonstration please go to https://banyon.com/video-helps

29 | P a g e
WORK ORDERS tab allows you to create, edit and view Work Orders.
To use this option, you must first turn the option on using Setup
Options. Use Work Orders can be found under the Options tab.
The Work Orders are saved as: General, Final Read, Meter Check,
Meter Inventory, or Dual.
The General Work Order has the option of choosing Work Order 1 or
Work Order 2; choose the one that best fits your needs.
Final Read: includes information pertinent to a Final Reading.
Meter Check: this can be used to double check a meter read for
various reasons
Meter Inventory: This is a Work Order that communicates with Banyon Inventory program, used for
keeping track of meter inventory.
Dual: If there is more than one metered service that you wish to create a Work Order for.
Create a New Work Order: Select the category and then click the Add button. This will display the Work
Order to your screen, fill out the information you’d like and then click Print. Your work order will save
under the category you selected.
Edit Existing Work Order: Click on the Work Order you wish to edit, enter the changes and then click the
Update button.
METER TRACKING OPTION
**Do not use this feature unless you understand what it
does. Due to the unique nature of this feature, Banyon Data
recommends calling our support staff prior to using.**
Meter Tracking can be found at the bottom right corner of
the Account Meter Screen.
It is important to assign the Meter Track number PRIOR to
clicking on View/Edit Meter Info button.
This feature allows you to assign a unique number to the
specific meter to retain basic information on the meter for
future reference if a meter is replaced. Customized reports
can be created in the Meter category of Report Writer.
ACCOUNT SCREEN – SURCHARGE TAB

30 | P a g e
The Surcharge Tab
displays the
Surcharges/Taxes that
are being used on the
account. This screen
also displays Surcharge
and Penalty Balances.
For more detail about a
Surcharge, click on the
Name, this will open the
Account Surcharge Screen.
This screen allows you make adjustments.
ACCOUNT SCREEN – MEMO TAB
The Memo tab allows you to store, lookup key
words and print notes entered about the
account. You can set system messages to Auto-
Add to the top of the memo, or default to the
bottom. Select Setup and then Setup Options,
under the Options tab, you can check the box
“Auto Add to the Top of Memo
ACCOUNT SCREEN – TRANS TAB
The Transactions tab
displays transactions
that have occurred on
the account; Receipts,
Penalties and
Adjustments are shown.
You can choose
between Current or All
transactions, you can
also choose the
Transaction types you wish to display or print.
ACCOUNT SCREEN – PRO-RATE TAB

31 | P a g e
The Pro-Rate tab allows you to alter the number of
days you wish to bill a customer. This is most
commonly used when you are Final Billing a
customer.
To change the number of days to bill, enter the
number of days into the Days to Bill field.
The Days in Period information is found under Setup in the Billing Group section under Default Pro-Rate
Days. Typically, 30 days is Monthly; 60 days is Bi-Monthly; and 90 days is Quarterly.
ACCOUNT SCREEN – METER HISTORY TAB
The surcharge tab
displays a quick glance at
the meter’s usage history.
The usage amounts
update with each billing
cycle and overwrite the
previous year’s usage.
If you’d like more
information, click on the
Service Name.
The Account Meter History screen displays a printable graph of
the meter’s usage history.
GETTING STARTED/MAINTAINING FEATURES The Utility Billing program offers several automated and pre-set options to make maintaining and
running your database processes easy and streamlined. These options are normally set up during a
training session, but you are free to make changes as you wish.
These items can be found by clicking Setup from the Account ribbon at the top of your screen.
*IMPORTANT: Most of the features are highly technical and can drastically impact the operations of the
Utility Billing program. Please do not change the options if you do not fully understand. Call Banyon
support and our staff will explain how the change will affect your processes.*

32 | P a g e
SETUP OPTIONS
Setup Options is broken down into different tabs,
this information is “global”, meaning the options
affect all the accounts and not just one.
General: General information, such as Default City,
State and Zip, and attaching an Entity Logo if you
wish.
Bill Calc: This tab contains information that pertains
to calculating the bills.
Receipts: Set up information about receipt
(payment) entry. Also contains bank setup for
Deposit Slip (Add-On Module).
Certify: Set up information for Certification (Add-on
Module) Certification is a feature that sends unpaid utility balances to property taxes.
Acct Descripts: Used to set Account Description values.
Meters: Options to set specific Meter Description values.
Prop Descripts: Used to set specific Property Descriptions (commonly used with Banyon Property
Management program)
Features: Options to turn less common features of the program on or off.
Budgets: Used to set criteria for Budget Billing. For instructions on setting up Budget Billing, see page37.
Options: Set up screen for many useful tools and features.
FA Xfer: Contains the data location for Banyon Fund Accounting and allows you to set the criteria for
sending information to Fund Accounting.
Irregular: Options to turn on/off Special Programming done for specific customers.
Discounts: Setup options for Discount (Add-On Module)
Deposit: Gives the ability to use the Deposit Service and choose whether or not you’d like to use the
Deposit amount against the customer’s final bill.
Email: Set up options for Email Bills (Add-On Module)
PENALTY COLLECTIONS

33 | P a g e
To create a new Penalty
Collection, click on Add New at
the top of the screen.
Enter a name for the Penalty
Collection; this is the name that
will display on the customer’s bill.
You can set up as many Penalty
Collections as you need,
depending on the situation.
Set your Minimum Account
Balance, Prior Amount, or
Delinquency Level to apply the
penalty.
If the penalty is a FLAT amount,
enter the amount in the Penalty
Amount field.
Each collection has its own set of criteria to select. To set up or change Penalty criteria, click on the
Setup Penalties button.
Highlight the Billing Groups that you would like to penalize, then
click the ‘>’ button. If you would like to move all of the Billing
Groups, click the ‘>>’ button. Then click on the Services tab.
On the Service tab, highlight
the services you wish to
penalize and then click the
arrow button to move them
over. Then, click on the
Surcharge tab.
If you penalize your surcharges/taxes, highlight them and use the arrows to
move them to the right side of the screen. Finally, click on the Charge Detail
tab.

34 | P a g e
The Charge Detail tab sets the criteria for the penalty. You
will need to set up each service by selecting it from the list
on the left side of the screen.
Enter the Penalty Percent and then choose what you are
penalizing
Current + Past Due: this will apply the penalty percent to
the entire balance on the account.
Current Only: the penalty percent will apply to the
current (most recent) amounts applied to the account
Past Due Only: the penalty will only apply to prior unpaid
balances, the current billed amount will not be penalized.
Penalize Penalty Balances: Check this box if you wish to
apply penalties on prior penalty amounts.
*If your penalty is a flat amount, you still need to select the services that are subject to penalty and set
the appropriate criteria on the Charge Detail tab. The amount will be split between the applicable
services.*
CHOOSE FORMS
The Choose Forms option in the Setup menu allows you to choose what type of billing form and penalty
form will be used. Select the form you like in the Bill Form and Penalty Form (if used) columns.
Bill Form & Penalty Form options include: (most common)
Full Bills: Printed on regular copy paper, there
are many different layouts to choose from.
Pre-Printed Full Bills: Ordered from a printing
company, items such as logo, city information
and design aspects are pre-printed onto light
card stock. For layout specifications, please
contact us and our support or sales staff can
assist you.
Post Card Bills: Options include 2x or 4x per
page. *NOTE: 4x per page have printer
specifications that not all printers meet,
please contact us for assistance before
choosing this type of form.
The Special Forms column is a list of reports to add to the Reports drop down menu on the Account
Screen. This gives you quick access to the most commonly used reports. You will also turn on any
applicable EOY (End of Year) Reports.

35 | P a g e
SYSTEM PROCEDURES
BACKUP/RESTORE
Backups are CRITICAL; storing
copies of your data can protect
you against loss or damage.
Reconstructing work can be time
consuming and sometimes,
impossible. It is important to
CREATE NEW BACKUPS AND
DELETE OLD ONES. Banyon Data
Systems does not recommend
“Overwriting” backups, although
the option is there if you choose to use it.
Create a backup: Click to create a new backup. You can add
up to 3 backup locations using the Setup tab on the
Backup/Restore Screen.
Enter Name of Backup: You may use a combination of
letters, numbers, spaces and/or dashes, special characters
are not allowed. The name must be unique to avoid
overwriting a previous backup.
*Common Backup names include the date and a short description of what you were doing before the
backup. (i.e. 01 01 20 beforeposting, 01-01-20 b4post, Jan 1 20 posting batch.)
FUND ACCOUNTING (FA) TRANSFER
The Fund Accounting Transfer option is used
to transfer receipt amounts (Cash Basis) and/or
billed amounts (Accounts Receivable) .
Receipts Tab
Batches that have not been transferred to
Fund Accounting will be displayed under the
Current Info option. If you need to re-transfer
a batch, select Re-Transfer to display a list of
previously transferred batches.
If you need to un-post a receipt that has been
previously sent to Fund Accounting, select UnPosted Re-Transfer to display a list of un-posted entries.
This will send the negative entries to Fund Accounting.

36 | P a g e
Receivables Tab
Billed amounts that have not been
transferred to Fund Accounting will be
displayed under the Current Info tab, you
also have the same option to Re-Transfer if
you need.
The Receivables tab is also broken down
into Billing, Penalties, Adjustments,
Certified and Deposit Int. You must transfer
all applicable batches to Fund Accounting.
Adjustments will transfer over with the
Billing information if not managed
separately. Repair Partially Transferred
Batch: After selecting batch, this button will clear the entries transferred, reset and restart the transfer.
This is meant to correct an issue where the transfer is interrupted.
HISTORY MANAGEMENT
On the Account Ribbon, select History Management, then select from the option menu and follow the
instructions below. Banyon Data Systems cannot tell you how many years you need to keep on file,
please ask your accountant or auditor for recommendations.
Please note: History Management can only be completed in single-user status, please make sure
everyone else has exited the program. This process can take some time depending on how many
customers or how much history you have.
*Bill History & Tran History Management
Bill History Management removes Bill History items out
of the current database. Tran History Management
(Transaction) removes items found under the Trans tab
on the customer account screen.
Select the year(s) to be managed.
Export Selected Year(s) to History – Recommended
This option will remove the information from the
current database and put it into a history file.
Delete Selected Year(s) – Not Recommended unless
instructed by City accountant/auditor
This option will completely remove the information from the database.
**Warning: Once the information is deleted, it is gone. There is no way to retrieve that information, be
absolutely sure you want to remove it.

37 | P a g e
Manage Already Exported History – To bring historical data back into current database.
Select the year(s) you wish to manage
Import selected year(s) from History will import the selected year(s) back into the current database.
Delete selected year(s) from History will remove the information from the history file.
Again, be absolutely sure you want to delete the information.
Audit Hist Management
This option is used to remove receipt audit history from the current database. These records are found
under Receipt Audit on the customer account screen. This is the breakdown of each receipt total,
showing what was paid towards each individual charge.
Enter the “Start with” date and the “Stop After” date.
We suggest using the same date range as the history items
from Bill & Transaction History. (Example: You exported years
2004-2012 in bill history and transaction history; you would
enter the date range of 01/01/2004-12/31/2012). This ensures
that the information in your current data and historical data
cover the same years.*
Export the Selected records to History will remove the
information from the current database and put it into a history
file.
Delete the Selected records will remove the information
permanently.
**Warning: Once the information is deleted, it is gone. There is no way to retrieve that information, be
absolutely sure you want to remove it.
Work Order Management
Enter the beginning date of the work orders you want to remove. There is no export option, this simply
removes all work orders older than the date entered.
IMPORTANT: Once you have finished exporting history, in order to actually shrink the database, you will
need to compact the data. This is done under the Tools menu at the top left corner of your screen. Once
you have verified that everyone is still out of the program, click the Compact and Repair button.
END OF YEAR (EOY) PROCESSES/REPORTS
Utility Billing does not require any End of Year procedure in order to process bills in the New Year; we do
suggest various reports and an End of Year of backup.
END OF YEAR BACKUP – should be named as “End of Year 20XX” or some other designation. We also
suggest storing this on an external drive or a server drive that is also separately backed up.
SUGGESTED END OF YEAR REPORTS – these reports should be generated on the last business day of the
year.

38 | P a g e
*Account Balances
*Delinquency
*EOY Reports – EOY Charges, EOY Receipts by Charge, EOY Taxes – these reports can be found under
the Reports drop down menu on the Account Screen. For instructions on how to add reports to this
menu, see page 31.
DEPOSIT INTEREST
To set up a Deposit Interest service, click on
Setup in the Account ribbon at the top of the
screen. Don’t forget to schedule the Billing
Period(s) you wish to calculate the interest.
Deposit Interest Rate: Enter the percentage
Refund Options:
Use Interest to Pay Account After ____
Billing Periods without a Late Fee
Or
Use Interest to Pay Account After____ Days
Compound Interest: (Interest on Interest)
Check the box for compound interest.
Select the Interest Type:
Flat Interest: Use this option if you run interest calculation once a year.
Daily Interest: Formula used – (interest rate/100)/365 = interest rate per day
Interest rate per day * # of days * deposit amount
CALCULATING DEPOSIT INTEREST
Click on Deposit Interest in the Calculations section of the Account ribbon at the top of your screen.
Select the Billing Group(s) that you wish to calculate. The system
will calculate the Interest based on the criteria previously set up. It
will then prompt you to run a Deposit Interest report, this will need
to be created out of Report Writer. If you need assistance, contact
Banyon Support Staff.
Once the deposit interest calculation has been completed, you will
see the Deposit Interest amount on the customer’s account. From the service tab on the customer’s
account, click on the Deposit Interest Service. The screen will display the Deposit Interest Amount
calculated and the Last Interest Date.

39 | P a g e
BUDGET BILLING
Budget billing provides a uniform billing amount year round. Using Budgets is optional and you will need
to select your budget criteria in order to use this feature. Utility Billing allows you to Budget by Service
or Budget by Account. Typically, only metered services are budgeted, you shouldn’t need to budget non-
metered services since those are generally billed the same amount each billing cycle.
SETTING UP THE BUDGET SPECIFICATIONS
Click on Setup from the Account ribbon at
the top of the screen and select Setup
Options.
Click on the Budgets tab. Check the box Use
Budgets.
Select the type:
Budget by Account: This will budget the
entire bill. Accounts are not subject to
penalty/late fees when this is selected.
Budget by Service: This option allows you to
budget specific services.
Other Budget Options:
Budget Percent: This is used when you have
the program determine budget amounts for
you. The program averages the previous
year’s billed amounts and multiplies them by the percentage. This allows you to set budgets lower or
higher than the previous twelve months of bills.
Roll Budget: Allows you to roll over any unpaid amounts from the previous year’s budget and include in
the current year’s budget amount. (i.e. A customer has an unpaid budget balance of $100.00 at the
anniversary of their budget, the system will divide the unpaid balance by the number of billing periods in
your cycle. The amount will be added into the new budget.
Auto Recalc Budget: This will automatically recalculate the budget amount at the anniversary date of
the budget. The new budget amount will be based on the average of the previous twelve months of bills
and factors in the Budget Percent. IMPORTANT: Do not check this box without history data for budget
available. If the box is checked with no history, the values calculated will be $0.00.
No Budget Recon Period: This option tells the program to budget continuously without any
reconciliation period. This is useful if you wish to manage all the budget amounts manually.

40 | P a g e
SETTING UP THE BUDGET CUSTOMERS
Select the Account that you wish to budget. Check
the box next to Budgeted (if budgeting by Service) or
Budget Each Period (if budgeting by Account)
Click on the Misc tab to set the
Beginning and Ending Budget
Periods.
BUDGET
BY SERVICE
Click on the Service tab, then click on the service that you
wish to budget. Complete the budget set up described below
for all services to be budgeted.
If you would like to MANUALLY SET the budget amount,
check the Budgeted box and enter the Budget Amount, this
is the amount you would like to charge each billing cycle.
To have the budget AUTOMATICALLY SET BY THE SYSTEM, check the Budgeted box and the Budget Set
by System box.
When the Budget Calculation process is performed, it will set the Budget Amount for any account with a
Beginning Period
equal to the Billing Group’s current Billing Period.
BUDGET BY ACCOUNT
If you would like to MANUALLY SET the budget
amount, check the Budget Each Period box and enter
the Amount, this is the amount you would like to
charge each billing cycle.
To have the budget AUTOMATICALLY SET BY THE
SYSTEM, check the Budget Each Period box. When
the Budget Calculation process is performed, it will
set the Budget Amount for any account with a
Beginning Period equal to the Billing Group’s current
Billing Period.
41 | P a g e
*BUDGET CALCULATIONS ARE DONE FROM THE ACCOUNT RIBBON AT THE TOP OF THE SCREEN.*
ACCOUNT PROCEDURES
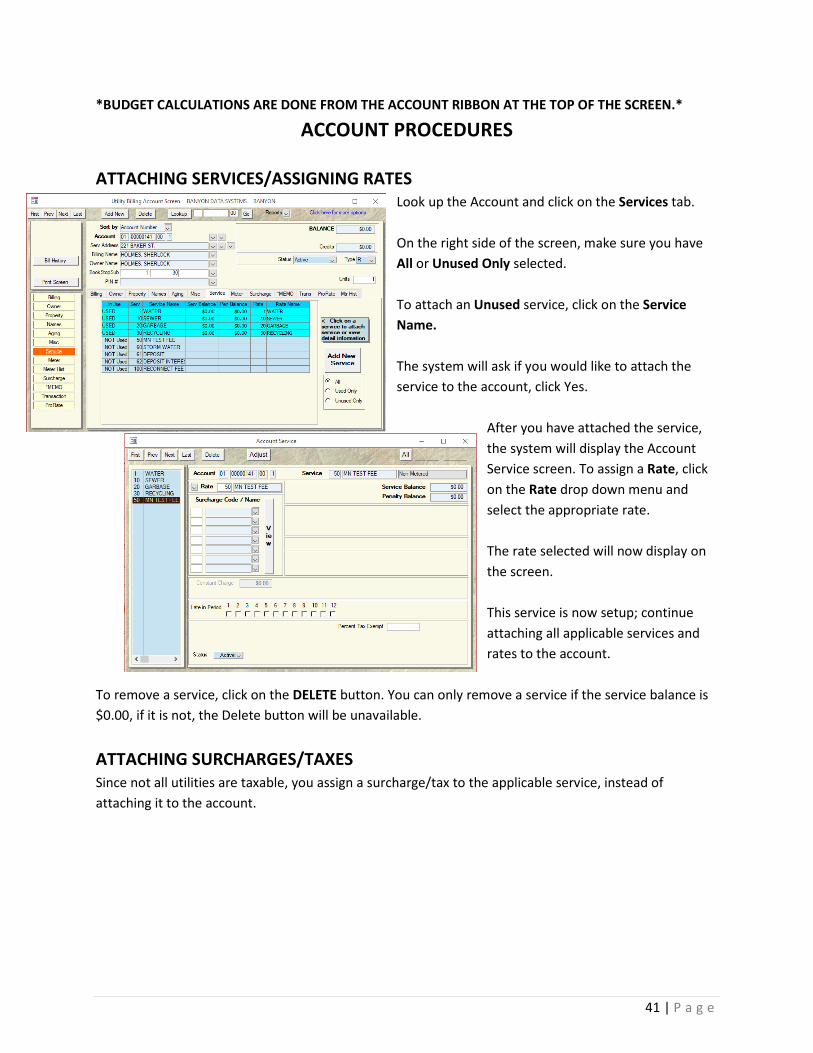
ATTACHING SERVICES/ASSIGNING RATES
Look up the Account and click on the Services tab.
On the right side of the screen, make sure you have
All or Unused Only selected.
To attach an Unused service, click on the Service
Name.
The system will ask if you would like to attach the
service to the account, click Yes.
After you have attached the service,
the system will display the Account
Service screen. To assign a Rate, click
on the Rate drop down menu and
select the appropriate rate.
The rate selected will now display on
the screen.
This service is now setup; continue
attaching all applicable services and
rates to the account.
To remove a service, click on the DELETE button. You can only remove a service if the service balance is
$0.00, if it is not, the Delete button will be unavailable.
ATTACHING SURCHARGES/TAXES
Since not all utilities are taxable, you assign a surcharge/tax to the applicable service, instead of
attaching it to the account.

42 | P a g e
Select the taxable service from the Service tab on the Account
Screen.
Under the Surcharge Code/Name drop down menus, select the
Surcharge/Tax that you would like to attach.
Continue using the drop down menus until all applicable taxes are
attached.
To view the surcharges/taxes that have been attached, click on
the Surcharge tab on the customer Account screen.
Click on the Surcharge/Tax name to view the Account Surcharge
screen. This screen displays balance information and allows you
to make adjustments to the Surcharge balance.
To remove a Surcharge from an account, you must first remove
the surcharge from the service. Click on the Service tab and
select the Service that you wish to remove the Surcharge/Tax from, highlight the Surcharge number and
press the Delete key on your keyboard. Next, click on the Surcharge tab and select the Surcharge/Tax
name you want to remove. Then click the Delete button at the top of the Account Surcharge screen.
MASS CHANGE
This process allows you to easily attach a SERVICE or a SURCHARGE to all of the accounts, or all of the
accounts in a specific bill group.
MAKE SURE YOU BACKUP BEFORE STARTING THE MASS CHANGE PROCEDURE
From the Account ribbon at the top of your screen, click on
Other UB Tools and select Mass Change.
Select whether you want to Mass Add a SERVICE or Mass Add
a SURCHARGE.
The system will ask if you have backed up, the backup prior to the Mass Change procedure is very
important. If you have not backed up, please exit the process and return after a new backup has been
created.
Step 1: Select Billing Group(s), keep in mind that all accounts within the group will have the service
attached. Click on the Next button.
Step 2: Select the Service that you are attaching to the accounts. You may only select one service at a
time, if you have multiple services to mass add, you will need to do this process for each service.

43 | P a g e
Step 3: Select the Rate that corresponds with the service.
Step 4: (Optional) If the service added is taxable, you can attach the Surcharge/Tax. If no tax is
applicable, you may skip this step by clicking on the Next or Skip button.
Step 5: (Optional) This step will only add the Service from Step 2 if the customer has a different specific
service, you can select that service here. If you would like the service added to all the accounts, click the
Next or Skip button.
Step 6: Click the Start Adding button; this will perform the Mass Change procedure. The service, rate
and surcharge (if applicable) are now attached to the accounts in the Billing Group(s) specified.
SERVICE/PENALTY BALANCE ADJUSTMENTS
After a bill has been calculated, sometimes changes need to be made to either add or take away dollars
owed. You can achieve this by making a service adjustment on the customer’s account.
To make a service adjustment, look up the customer’s
account that you wish to change. Click on the Service tab
and select the service you’d like to adjust by clicking on it.
Click on the Adjust button at the top of the Account
Service screen.
In the Adjust What column, select either Service Balance or Penalty
Balance.
Enter the Amount that you would like to adjust. A positive amount will
add to the service balance, a negative amount will decrease the service
balance.
Adjustment Comment: Not required, but recommended.
Once you have entered all the information, click the Apply button.

44 | P a g e
CREDIT(UR)/BUDGET ADJUSTMENTS
UR or “Undistributed Receipts” is a credit on the
customer account, usually from an overpayment or
a deposit refund. Most of the time, this amount is
left on the account to be used against future charges
during the next billing calculation.
If you need to refund this amount to the customer,
you will need to do a UR Adjustment. This is done
with the Budget/UR Adjust button found on the left
side of the Account ribbon.
In the Adjust What column, select Undistributed Receipts.
Enter the Amount you would like to adjust. A positive amount will add to the
credit, a negative amount will decrease the credit.
Adjustment Comment: Not required, but recommended.
Click the Apply button.
PREPARE CHECK
PLEASE NOTE: Only customers using Banyon Fund Accounting are able to utilize the Prepare Check
feature.
If you want to create a check to refund the entire amount of the
credit, you can use the Prepare Check tool, found in the Transfers
menu on the Account ribbon.
If you do not already have a batch created, click on Create New
Batch
The system will display a box asking you to Accept FA Batch Name or Enter
New Name.
Click the Okay button.
Next, you will be asked to enter Batch
Name for Transfer.
Click the Okay button.

45 | P a g e
Click the TRANSFER to (Batch Name) button.
The system will display a message asking you if you’re sure you’d like to
refund the credit amount by creating a check in Banyon Fund
Accounting. To proceed, click Yes. If you aren’t sure or wish to cancel,
click No.
Once the transfer is complete, you will finish the process in Fund
Accounting.
The customer account will no longer display a credit in Utility Billing.
No additional adjustments will need to be made.
AMENDED BILL
After making monetary adjustments to a customer account, you may wish to print them an amended bill
to reflect the change. From the Account ribbon at the top of the screen, select Current Bill.
The top portion of the screen will display your bill as it
was originally calculated. Adjustments are listed below.
To print the Amended Bill, click the Print button at the
top of the window.
The system will display a full page bill showing
the original bill, changes made and the new
account balance.

46 | P a g e
BILL HISTORY
You can access a customer’s bill history records by clicking on the Bill History button on top portion of
the Account Screen or from the Account ribbon at the top of the screen.
Bill History records are listed from
most recent to oldest, if you would
like to isolate a certain period, click
on the item from the list. To select
more than one, highlight them with
your mouse or use Ctrl+Click to select
the periods you wish to display.
To print the history, click on the
Reports drop down menu. Account
History will print the Billing Period(s)
selected.
FINAL BILLING
Banyon Utility Billing has a quick and streamlined process to produce a final bill for a customer that is
moving and to enter the new resident’s information. When a customer is final billed, their information is
moved from their original Bill Group to the “00 – Final” Bill Group. This is done so that you are able to
calculate and print the final bill without affecting your other Bill Groups. It also changes the status of the
vacated property to “Inactive” until the new resident moves in and resumes billing. DO NOT CREATE A
NEW ACCOUNT.
*NOTE: Attach Transient (one-time) services AFTER the account has moved to the Final Bill Group. All
other charges, readings and other information should be entered BEFORE final billing.
1. Select the account that you wish to final bill.
2. Select the Meter tab and click on the metered service(s). Enter the final read into the New
Reading field and close the Account Meter Screen.
3. On the top portion of the Account Screen, click on the Status drop down menu and select FINAL.
The system will prompt you to continue with the Final Billing process. *Once a final bill has been
created it cannot easily be undone, make sure you are ready to final before proceeding.* If you
are sure, click Yes.

47 | P a g e
4. The Pro Rate Info screen will display on your screen. In the Days to Bill field, enter the amount
of days you will bill for and then enter the Move Out Date. Click the OK button.
5. The system will display a message indicating that the final bill has been created. If you are
unfamiliar with the process and this message, please read before continuing.
6. If you have the new resident’s information, you may enter that now. If you do not have this
information, the account will sit Inactive until a new resident moves in.
7. When you are ready to add the new customer information, click on the Add New Name button
at the bottom right corner of the Names tab. A prompt will display asking if you’d like to
reactivate the account, click Yes. If you select No, the system will leave the account in the
Inactive status and you will manually change it to Active when you are ready.
*The next steps are dependent on when you would like to calculate the final bill. You can choose to
calculate your final bills as they happen or calculate them with your normal billing cycle.
8. Create a new backup.
9. Click Bill Calc from the Account ribbon at the top of the screen and select ONLY your Final Bill
Group.
10. Print a Bill Register for the Final Bill Group and verify that the amounts calculated are correct. If
they are not correct, go to the final account and click Current Bill from the Account Ribbon to
make changes to the amounts calculated or the meter reading.
11. Once the information is correct, select Bill Forms from the Reports drop down menu on the
Account Screen. Change your date information and any billing messages. Select your Final Bill
Group and click Generate Report.
UNPOST RECEIPT
If a payment is returned for insufficient funds or is applied to the wrong account, you will need to
unpost the receipt.
This process is easiest when done from the customer Account Screen. Click on UB Tools from the
Account ribbon at the top of the screen and select Unpost Receipt.

48 | P a g e
The system will display a box asking you to select the receipt to unpost. Typically, the
first amount shown is the correct entry. If it is not the first entry, keep clicking No
until the correct entry is displayed, then click Yes.
Once the correct entry is chosen, you can enter
your Reason for Unposting and then click the
UnPost button.
After the payment is Unposted, you will see the updated
balance on the customer Account Screen. You may need to
attach transient fees or adjust penalty amounts onto the account
as necessary. If the payment was applied to the wrong
account, you will need to apply it to the correct account by
creating a Receipt Batch for that entry.
NOTE: If you use Banyon Fund Accounting, there are
additional steps to transfer the unposted amount.
Select Transfers from the Account Ribbon at the top of
the screen, then click on FA Transfer. On the right side
of the screen, select Unposted ReTransfer. Select the
item you unposted from the list and click the Transfer
button, this will send your negative entry to Banyon
Fund Accounting.
ACCOUNT FEATURES & TOOLS
ACCOUNT TEMPLATES
A template can be created for your accounts to simplify the process of adding a new account. The
templates are created by duplicating the service, rate and surcharges from a previously set up account.
Templates are usually created for Residential and Commercial accounts, but they are also commonly
used to differentiate between meter size and rate variances.
To Create an Account Template: You must select an account that has the services, rates and surcharges
that you wish to duplicate. *If you do not have an account set up yet, you will first need to set up one
account with the services, rates and surcharges and then you can build your template off that.
From the Account ribbon at the top of the screen, click on Other UB Tools and select Create Account
Template.

49 | P a g e
Enter the Name of the New Template and click OK.
NOTE: Once a template has been created it cannot be viewed or altered.
If you need to add or remove something from a template, you will first
delete the existing template and create a new one.
When you create an account, there will be an additional display window asking if you’d like to “Add
using a Template”. A list of available templates will be shown, select the appropriate template for the
customer you are adding. This will attach the corresponding services, rates and surcharges without you
having to manually attach them.
ACCOUNT SCREEN RECEIPT ENTRY
This feature allows you to quickly add a customer payment to a new or existing Receipt Batch right from
the customer Account Screen.
You will need to turn this feature on before you are able to use it. From the Account ribbon at the top of
the screen, click on Setup and select Setup Options. Click on the Features tab and check the box for
Allow Account Screen Receipt.
To use the feature, select the account that is making the
payment. Click on the Balance in the upper right corner of the
Account Screen.
The system will prompt you to Create a Batch or display batches
that have been
created but not yet posted. The batch name will default
to the date and include “AS”, indicating the batch originated from the Account Screen.
Once an Account Screen Batch has been created, you can continue entering payments into that batch or
create a new batch.
DECLINING BALANCE
This feature allows you to apply a small amount to an outstanding service balance each billing cycle, the
outstanding amount decreases until the amount is paid off.
This is useful when a customer falls behind on their payments and arrangements are made to pay off the
balance with a set amount each month.

50 | P a g e
You will need to turn this feature on before you are able to use it. From the Account ribbon at the top of
the screen, click on Setup and select Setup Options. Click on the Options tab and check the box for Use
Declining Balances.
Select the account and click on the Service tab. Select the service that you
would like to apply the Declining Balance and click the Adjust button.
First you will adjust out the amount that you would like to start the
Declining Balance from, enter a comment and click the Apply button.
To enter the Declining
Balance, click the Adjust button
again, in the Adjust What
column, choose Declining
Balance. A message will
display reminding you to not use this tool for beginning
balances, click OK.
Enter the amount of the declining balance and an adjustment
comment and click the Apply button.
The system will remind you to set the Amount Each Period;
this is the amount that the customer will be billed towards
the Declining Balance each billing cycle.
Enter this amount in the Amount Each Period field.
The declining balance is now set up; the next Billing Register
will show that the balance for the service includes the
amount specified + current charges. On the Service Screen,
you will also see that the Declining Balance amount has been
reduced. It will continue to reduce until the declining balance amount is paid in full.
BILL PRINTING – SPECIAL OPTIONS
PRINT BY DATE RANGE
If a customer would like to receive their bill at a different residence during a portion of the year, you can
set up the account to send the bill to different locations using a date range.

51 | P a g e
Select the Account and click on the Names tab. The
name listed, has the current mailing address, to set
up a secondary mailing address, you will need to
enter the customer information again. Click on Add
New Name, enter the customer’s name and the
mailing address of the second residence. Click OK.
You will now have two lines on the Names tab with
your customer’s name.
Click on one of the names to open the Customer Link to
Account screen.
Check the box Use Print Date Range, use the drop down
menu to choose the months/days to send to the address
listed below.
Close this window.
Click on the other name and fill out the Print Date Range
information for the other address.
SUMMARY BILLS
Owners with multiple rental properties may want to receive a summary bill for those properties; you can
set up a Summary Code for each owner that is requesting a summarized bill and attach that code to
each property they own.
To add the summary bill to your Reports menu on the Account Screen, click on Setup from the Account
ribbon at the top of the screen and select Choose Forms. Under the Special Forms column, if Full Bills
Summary says “No”, click on it to change to “Yes”. If you would like to display a list of properties
included in the summary, turn on Full Bills Summary 2.

52 | P a g e
Select an account that you would like
included on the summary bill and click on
the Misc tab.
Fill in the Summary Code for the Owner,
the program does not auto generate
summary codes, summary codes can be
numbers 1-9999. All properties for the
owner should have the same summary
code. Use a different code for a different owner.
Once you have entered the summary codes on the customer accounts, you can generate the bill.
From a customer Account Screen, click on the Reports drop
down menu and select Full Bills Summary 2. Select the Bill
Group(s) in the upper left corner and click Generate Report.
This will generate a one page for each owner that you have
set up to receive a summary bill.
FREQUENTLY ASKED QUESTIONS
Where do you input the FA Acct Code for Undistributed Receipts?
On the Account ribbon at the top of your screen, select Set-Up and then Bill Groups. Click on “R”
or “G” and type in account code (including the dash) or select from the drop down menu.
Repeat for each bill group that you have.
I want the Bill History for one account.

53 | P a g e
Look up the account and click on Bill History from the Account ribbon at the top of the screen.
To select multiple periods, hold the Ctrl key down and click on the periods wanted. Next, click on
the Reports drop down arrow and select “Account History”.
Receipts are not transferring to Fund Accounting.
Select Set up from the Account ribbon at the top of your screen, then click on Set up Options.
Click on the FA Xfer tab and make sure the path name to Fund Accounting is typed in at the
bottom, where it says “Location of Fund Accounting” Click on the binoculars to locate the
bdsfundd.mdb file in the BDSWIN folder where the data is stored.
HOW TO UN-DO A FINAL BILL
• First and most importantly, create a new backup.
• Next, pull up the account that was created after you finaled the customer (the inactive account)
and delete it.
• Now pull up the final account that you wish to re-activate.
• In the upper right corner of your Account ribbon, choose Other UB Tools and select Account
Move.
• Here you will change the bill group number back to the original bill group the customer came
from and also change the last field back to 00
I created a new service but no one was billed for it.
Check to make sure the service was scheduled. Select Setup from the Account ribbon at the top
of the screen and then click on Schedules. Make sure there is an “X” in the period(s) that you
want the service billed. Also, there might be more than one schedule, so be sure to check each
schedule from the menu on the left side of the screen.
How do I make an adjustment to an account?
Look up the account and click on the Service tab, click on the service that you want to adjust.
Next, click on the “Adjust” button at the top of the screen. You can adjust either the service
balance or the penalty balance. To adjust a Surcharge, you will need to click on the Surcharge
tab on the Account Screen. Entering -$5.00 will credit the account $5.00.
How do I add the new person to an account once the old person was final billed?
Click on the Names tab, then click on the “Add New Name” button and fill in their customer
information. A pop up message will appear asking if you would like to activate the account,
choose Yes or No. Remember, active accounts WILL get bills.
How do I remove a penalty from an account?
Look up the account and right click, choose Tools and then select Remove Penalty.

54 | P a g e
How do I unpost a receipt on an account?
Look up the account, right click and choose Tools, then Unpost Receipt. Choose yes (if it is
correct entry to unpost) and then on the next screen, enter your reason for unposting and click
Unpost. If you use, Banyon Fund Accounting, you will need to transfer the unposted entry; in FA
Transfer select Unposted Retransfer on the right side of the screen, choose which entry you
want to send and click transfer.
How do I reprint a bill register or bill register summary from a previous period?
Look up any account in the bill group you want the register for, then right click and select Bill
History. Highlight the period that you want and click on the drop down Reports and select bill
register or bill register summary. If you want a different bill group, look up an account in that bill
group and follow the same steps.
My transient service already says used and has a balance, how do I add another dollar amount for the
next billing period?
Click on the transient service and then click the Adjust button. In the “Adjust What” column,
click on Trans Amount and enter a positive amount to increase the charge.
How do I bill one service and not another?
Look up the account and then click on the service tab. Click on the service you do not want to
bill and in the Rate drop down field put in the No Charge rate. This is usually ‘99’, unless your
city has changed it.
How does the transient service work, do I have to delete the service off the account once I bill for it?
No, the system will put the service back to ‘Not Used’ once it has a zero balance.
When can I delete final bills?
We suggest that you keep final bills for at least one year (or until your auditor is finished with
that year), some reports require account info to work correctly.
How do I change an account number?
On the Account ribbon, click on Other UB Tools and select Account Move. Enter a new account
number.
What does UR stand for?
UR stands for Undistributed Receipts; these are over payments/credits on the account(s).
A late fee that I created as a transient service is still there, why?
The fee will continue to show up until the full balance on the account is paid.
I made an adjustment to an account, why won’t it print?
The adjustment will not print until you calculate again. You can also do an amended bill; on the
Account ribbon, click on Current Bill and click the Print button.

55 | P a g e
What do I do with an NSF check?
You can unpost the receipt. To do this, look up the account and click on UB Tools on the Account
ribbon and select Unpost Receipt. Verify the correct amount to unpost, type in your reason for
unposting and click Unpost.
My final bill keeps adding penalty charges, how do I stop this?
If you do not want your final bills to get penalties; on the Account ribbon click on Setup and
choose Penalty Collections. Click on the Setup Penalties button; on the Groups Tab click on your
final group and use the left arrow button to move them to Groups NOT selected from penalty.
If you want to still charge penalties to your final group as a whole and only want to exempt one
customer, select the final account, click on the Misc. Tab and check Exempt from Penalty.
How do I indicate on the bill that it has been “Direct Paid”?
On the account screen, click on the Report down arrow and select Bill Forms. Click on the Bill
Messages Tab and type your message into the Direct Pay Message field.
My printer jammed while I was printing bills, how do I restart from where it jammed?
Many laser printers recognize jams and will reprint the page that was jammed after you fix the
jam. This will only work if you have not turned your printer off.
The easiest way to start over and reprint forms is to display the entire run of bills on the screen,
click on the printer icon, then click on the Pages Tab and select the pages which you would like
to start and end with.
How do I swap out a meter?
Look up the account, click on the Meter Tab. Click on the metered service that you want to swap
out and then click on the Replacement Tab. In the “Old Meter Final Reading” field, enter the
meter reading taken from the meter when it was pulled out. Next, enter the Final Read Date in
the field provided.
Typically at this point you would see a very large number in the “Current Reading” field, this is to
trick the computer into thinking the meter would need to use the usage from the old meter to
roll over to zero. Now, when you put the first reading from the new meter into the “New
Reading” field, the service will use the combined usage amounts from the old meter and the
new meter and bill the correct amount.
If the new meter does not have a new reading of “0”, please enter the initial read into the New
Meter Initial Read field. Your customer will not be charged for any initial usage.
How do I adjust credit balances on accounts?
First, you must have the Enable Account Budget/UR Adjustments turned on. To do this, click on
Setup, located on the Account ribbon at the top of your screen, then select Setup Options. Next,
choose the Options Tab and check the box that reads “Enable Account Budget/UR Adjustments”,
you will now be able to adjust credit amounts off of accounts.

56 | P a g e
To make the adjustment, click for more options on the account screen and select Budget/UR
Adjustments. In the Adjust What menu, make sure that Undistributed Receipts is selected and
enter in the amount you want to adjust. A NEGATIVE AMOUNT REDUCES THE CREDIT; A POSTIVE
AMOUNT INCREASES THE CREDIT. Do not forget to give an adjustment comment for reference.
When do I run an Account Balances Report?
You should always run an Account Balances report at the end of the year. You may also run one
at the end of every month or when requested. You can also run this report by service balance, if
you’d like.
How many backups should I have?
There is no right or wrong number of backups to keep on hand, our rule of thumb is to backup
your data any time you’ve done more work than you want to re-do. You should have a standard
policy for backing up data for all of your Banyon Data applications. Five backups that you rotate
by date or day are recommended. If you backup to a tape or CD from a server and your data is
located on the server you are safer. If you backup to your computer’s hard drive, you should
consider a CD backup or USB backup every week or so.
We also strongly recommend a backup be done for end of year and stored as the end of the
year backup. (Example: WINUB2013EOY)
No bill is printing for an account, what do I do?
Look up the account and click on the Names tab, click on the person’s name that should be
receiving a bill. Look to see if the checkbox marked “Send UB Bill” is checked.
Click on Edit Current Bill on the Account ribbon, do they have a bill?
Click on the Reports drop down arrow and select Bill Forms. On the Ranges tab, does the
account have a balance more than the minimum to print?
No Late Notice is printing for an account, why?
Look up the account and click on the Names tab, click on the person’s name that should be
receiving the late notice. Look to see if the checkbox marked “Send Pen Bill” is checked.
Click on the Reports drop down arrow and choose Penalty Forms. On the Ranges tab, does the
account have a balance and delinquency level higher than the minimum to print?
An account is not transferring to the meter device, why?
On the Account ribbon, click on Other UB Tools and select Meter Transfer Status.
Why are the usage and current charges high on a customer’s account?
The new meter reading was probably less than the old meter reading resulting in a rollover.
Figure out what is wrong with the meter reading and fix it by clicking on Edit Current Bill on the
Account ribbon. You can also restore your backup, fix the meter reading and recalculate.
57 | P a g e
Another reason could be the Usage Multiplier was changed, lookup the account and click on the
Meter tab. Click on the service and check the Usage Multiplier on the Info tab. Normally, the
usage multiplier is 1.
The “Amount Due After” on the bill is the same as the amount due or is an incorrect dollar amount.
The account may be exempt from penalties, the penalties have not been set up, or they are set
up incorrectly. Only the first penalty collection is used when determining pay after amounts.
BILLS DID NOT CALCULATE CORRECTLY – Ask yourself the following questions, these are the most
common reasons a bill would not calculate correctly and these will be the first questions asked when you
call support.
Are the correct rates attached to the services? Are the rates set up correctly? Are the services
scheduled? Was the bill pro-rated? Does the “Units” field show a number other than a 1? Does the
“Service Units” field show a number other than 1? Is there a usage multiplier on the meter screen? Was
the bill edited? Do any of the services use a complex calculation?
PENALTIES DID NOT CALCULATE CORRECTLY
On the Account ribbon, click on Setup and select Penalty Collections; check that the information
is correct. Next, click on the Setup Penalties button. Check the tabs to make sure the Billing
Groups, Services and Surcharges are in the proper columns. Click on the Charge Details tab and
make sure the information for each charge is set up correctly.
FINAL BILL PLACEHOLDER BILLS
There are two different methods that people use to calculate final bills.
The first method is to calculate final bills at the same time you calculate your regular bills. Typically this
is once a month, bi-monthly, or quarterly. If this method is used then no placeholder bills will be
generated.
The second method used is to calculate final bills whenever a customer is moving out and not at the
same time you calculate your other billing group(s). This allows the customer to get their final bill right
away, rather than having to wait for the billing cycle.
With the second method, the final billing group may have bill calculations done several times during the
billing cycle. The first time a final billed account is calculated an actual final bill is generated and can be
printed and mailed to the customer. Subsequent times the final billing group is calculated a place holder
bill is generated.
There are several different reasons the place holder bill is generated. First, some municipalities print all
their final bills when they print billing registers. They want to see every account in the final billing group
listed so they can see accurate totals of the amount due for the final billing group.
Second, this placeholder is used for balancing purposes, certain reports (Bill Register Summary, System
Balancing, etc.) will show the “Previous Balance” and “Totals” so that billing cycles can be accurately
compared and that the totals for those fields will reflect the actual amounts for the accounts.

58 | P a g e
Third, when receipts are paid or adjustments and penalties are put onto final billed accounts, these need
to be included on the bills so those amounts are included in the totals.
Internet Bill Paying for Final Bills Requiring a Unique Account Number
In order for internet bill paying to work best, the account number should never change. A new feature
has been implemented which should solve the final bill account number changing. For customers who
do not have the Internet Bill Paying module activated, nothing will change.
For customers who are using Internet Bill Paying, installing this update will automatically activate two
features.
1) Automatically increment the resident number on the inactive accounts during the final billing
process. This feature was previously available and might already be on.
2) This option is new. This option prints the Old Full Account Number on final bills instead of the
actual, final bill account number. This is necessary because the account number the customer
sees on their bill is the one they use to access their account in Internet Bill Paying. This has been
a point of confusion for users and other potential issues.
When an account is final billed, the account number is copied to the Old Full Account Number field on
the Aging tab. This field is only visible on Final Bills. The inactive account’s resident number is increased
by one, which keeps the account numbers unique.
When looking up an account on the Account screen by account number either the actual final bill
account number can be used (as it has been in the past), or the old account number can be used. Both
will locate the final bill.
Similarly, when entering receipts, accounts can be looked up by both the actual final bill account
number or the old account number.
Internet Bill Paying, of course, will pass the Old Full Account Number for final bills instead of the actual
final billed account number to the file sent to the IBP vendor. When a file is imported from the IBP
vendor, it will have the same account number and the program will import the payment to the final
billed account by matching up the account number with the Old Full Account Number.
Creating new accounts will not allow users to create an account with the same account number as any
Old Full Account Number for any final bill.
Moving accounts will not allow users to move an account to an account number currently in use or any
Old Full Account Number, unless a user is moving a final bill. In that case the New Account Number on
the Account Move screen will be automatically defaulted to the Old Full Account Number, anticipating

59 | P a g e
that the user wants to return the final to the regular group. If such is the case, the Old Full Account
Number will be removed from the account and the account will be moved back.
Accounts which have already been final billed and do not have an Old Full Account Number will be
processed exactly as they always have been before, although users can enter a valid Old Full Account
Number if they wish to make the accounts work the new way. Old Full Account Numbers must be in
valid account number format, i.e. twelve numeric characters.
Bill Printing and Penalty Bill Printing
Bills and Penalty Bills for finals will show the Old Full Account Number (when present) on the bills rather
than the actual final (00) account number.
“Bill Info to File” for finals will use the Old Full Account Number (when present) instead of the actual
final (00) account number. This file is frequently uploaded to IBP vendors.
Email bills also use the Old Full Account Number (when present) instead of the actual final (00) account
number.
The Old Full Account Number field is available in the Accounts category of Report Writer.
Meter Reading Entry screen does not do lookups by Old Full Account Number. Meter readings for final
bills would not normally be entered this way, and if they were, it would be prior to final billing the
account.
ADD-ON MODULES The Utility Billing program has many add-on modules that make your billing and receipting process more
efficient, less time consuming and better streamlined. We’ve put together a list of the most commonly
purchased modules with a short description of their capabilities.

60 | P a g e
• Meter Device: Allows the Utility Billing program to send and receive customer meter reads from
an automatic meter reader (AMR).
• Direct Payment: This module enables you to process ACH payments, taking the money on a
specified date out of their bank accounts.
• Certification: This allows you to send unpaid utility balances to the county to be assessed on
property taxes.
• Tier Report: Allows you to print a report showing total usage and charges by rate tier. You can
run this report based off current or historical information. Helpful for rate increase/decrease
studies.
• Disconnect Notices: Gives the ability to print a disconnection notice for delinquent customers.
Typically requires a special form as well.
• Receipt Bar Codes: Prints a bar code on the Return portion of the bill, allows you to scan the
bar code for faster receipt entry.
• Email Bills: Send your utility bills out via email, you can use your own email server or Gmail
account.
• Internet Bill Pay: Creates a transfer file for billing records and online payments. Depending on
the provider chosen, your customers can view their bill and pay their balance online.
• Deposit Slip: Allows you to print a deposit slip for a receipt batch.
For more information, contact Chris Olson @ 800-229-1130 or send an email to
ENHANCEMENTS
(Revised 01/03/2020)

61 | P a g e
1. Added feature to check if final bill(s) on an active account during receipt entry - printed
instructions
2. Ability to move billing history on final bills and increment the resident number also.
3. Added decimal places to Ontario Electric discount percentage
4. Expanded Entity Name field on Penalty Full Bill and Pen Full Bills showing No Aging for those very
long names
5. Updated Online Payment Profiles and Partner list
6. Added ability to change the size of the Report Writer logo used to display on reports
7. Added Rebuild Batches in Other Tools menu - Check and Fix Problems page. Removes zero balance
batches
8. Added full list of Meter Device Interface Profiles for use as add-on modules with Utility Billing
application
9. End of Year or Anytime of Year Charges sorted by date
10. Added option to transfer to meter device system the customer account number with "-" (dashes)
between number sets
11. Added ability to the receivables transfer of finals bills from different billing periods to Banyon
Fund Accounting
12. Improved the FA Transfer look up procedure to improve access times to batch table entries
13. Added to PSN bill pay file transfer City, State, Zip default fields
14. UB Lite (Basic vs. Advanced) versions available as part of regular download update
15. Added checks for downloading Internet payment files for importation into UB
16. Landlord Added for multiple accounts in Accounts Collection in Report Writer
17. Added Pay Assistance as part of the Test/Preview Bill on the Meter Screen
18. Added Point/Pay Internet Pay module profile
19. Changed EOY Receipt reports date formatting to remove the time stamp (not date) from sorting
filter
20. Added supplemental report to show EOY receipt detail listing by service to confirm Receipt
Summaries
21. Improve GovPay auto-transfer of online payment batches with multiple files
22. New icon shortcut on desktop added as shown above
23. Add retention of PopUp Message for Account
24. Added Mueller MI.net AMR Interface Profile (Upgrade Module)
25. Improve History Management to convert to new versions of software
26. GovPayNet added as profile for internet bill pay option
27. Improvements to Meter Swap-out routine (importing)
28. Added Report for municipal electric service reporting (date range filtering)
29. Added budget account pay amount total for Full Bills Summary Form 3
30. Added ability to unpost receipts to reverse of payments in Certification module
31. Expanded the transaction comment field for customer adjustments
32. PSN Features Added for Internet Bill Pay transfers
33. Payment Entry Bar Codes added to PrintTech penalty form
34. Changes as requested to the InfoSend Bill form
35. Added no rate charges to the Billing Register Summary by Rate Report
36. Added AMR Meter Transfer Profile for Sensus Vflex (Upgrade Module)