Embed Size (px)
Citation preview
Version 1.1
Introduction - Connexion with Repetier-Host 2
Introduction
Authors:
eMotion Tech – http://www.Reprap-France.com Loïc Déchaseaux [email protected] Antony Soury [email protected] Hugo Flye [email protected] Thomas Batigne [email protected]
Photographic credits :
Pictures and 3D representations made by eMotion Tech http://www.emotion-tech.com
Picture director: Antony Soury
Sources :
http://reprap.org/wiki/RepRap
http://www.repetier.com/
License :
µdelta: CC BY-NC-SA 4.0
This document: CC BY-NC-SA 4.0
http://creativecommons.org/licenses/by-nc-sa/4.0/
Update:
Last update : 25/06/2014
Links:
Reprap community: http://reprap.org/wiki/RepRap
Repetier-Host: http://www.repetier.com/
3D models database: http://www.thingiverse.com/
- Connexion with Repetier-Host 3
Introduction ........................................................................................................................................................ 2
Installation: Windows ......................................................................................................................................... 4
Installation: Linux ............................................................................................................................................. 11
Calibration ........................................................................................................................................................ 15
Connexion with Repetier-Host ............................................................................................................ 16
First machine test ................................................................................................................................ 19
eMotion Tech Plugin ............................................................................................................................ 21
Update ................................................................................................................................................. 22
Plane setting ........................................................................................................................................ 23
Printing ............................................................................................................................................................. 27
Filament positioning ............................................................................................................................ 28
Printing with Repetier-Host ................................................................................................................. 31
Annexes ............................................................................................................................................................ 35
Annex 1: Heat control setting (optional) ................................................................................................. 36
Annex 2: Offline update ............................................................................................................................ 38
Annex 3: Save and load G-Codes .............................................................................................................. 39
Annex 4: Manual control .......................................................................................................................... 40
- Connexion with Repetier-Host 4
Installation: Windows
- Connexion with Repetier-Host 5
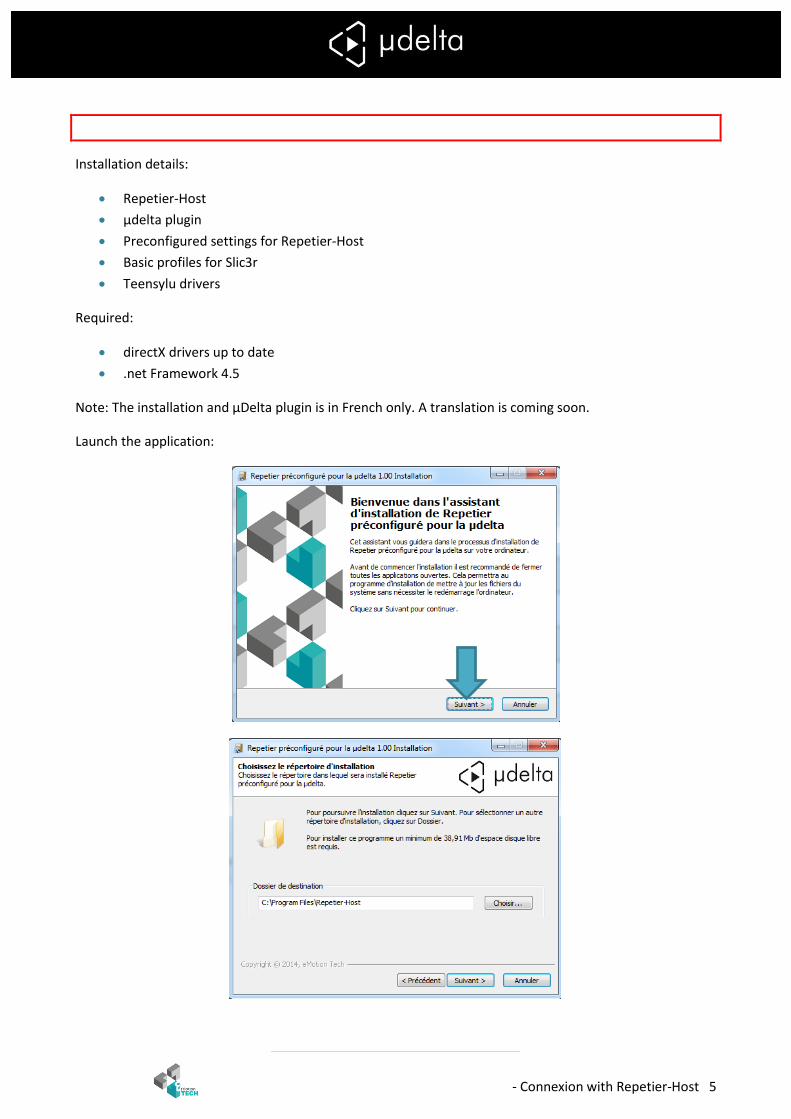
The following chapter concerns windows users only
Installation details:
Repetier-Host
µdelta plugin
Preconfigured settings for Repetier-Host
Basic profiles for Slic3r
Teensylu drivers
Required:
directX drivers up to date
.net Framework 4.5
Note: The installation and µDelta plugin is in French only. A translation is coming soon.
Launch the application:
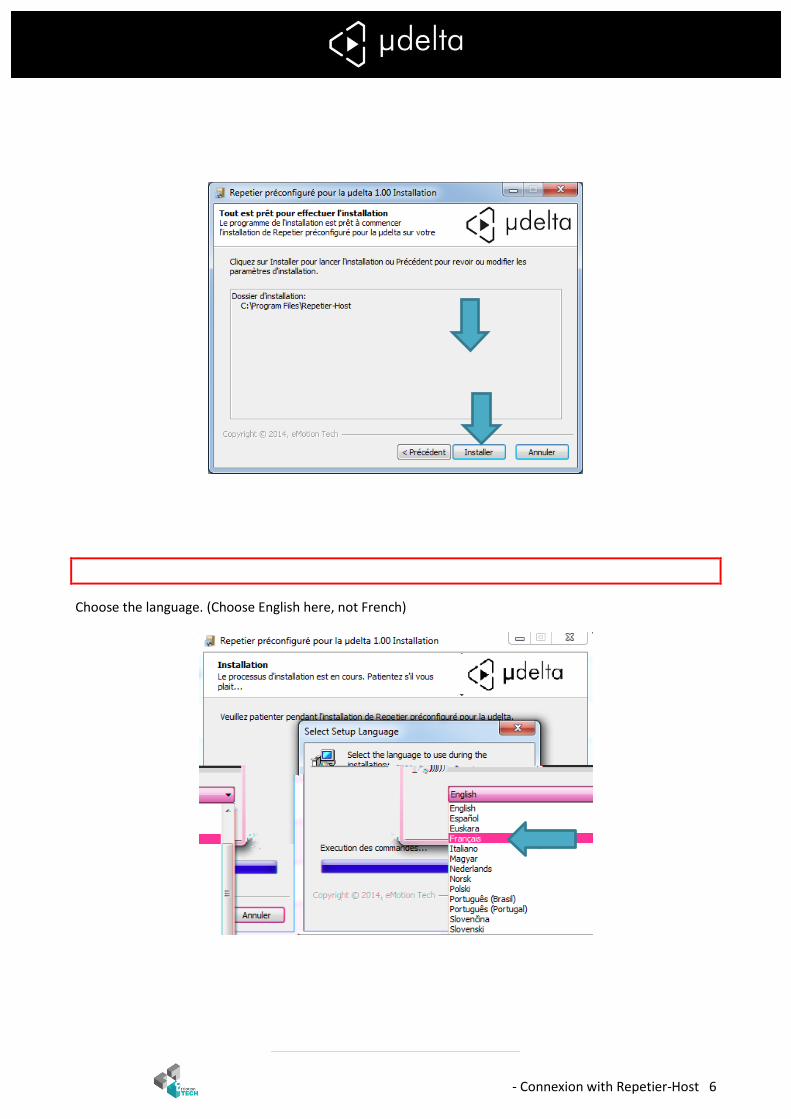
- Connexion with Repetier-Host 6
Do not quit the new Repetier-Host window. If you do, you have to launch the installer again.
Choose the language. (Choose English here, not French)
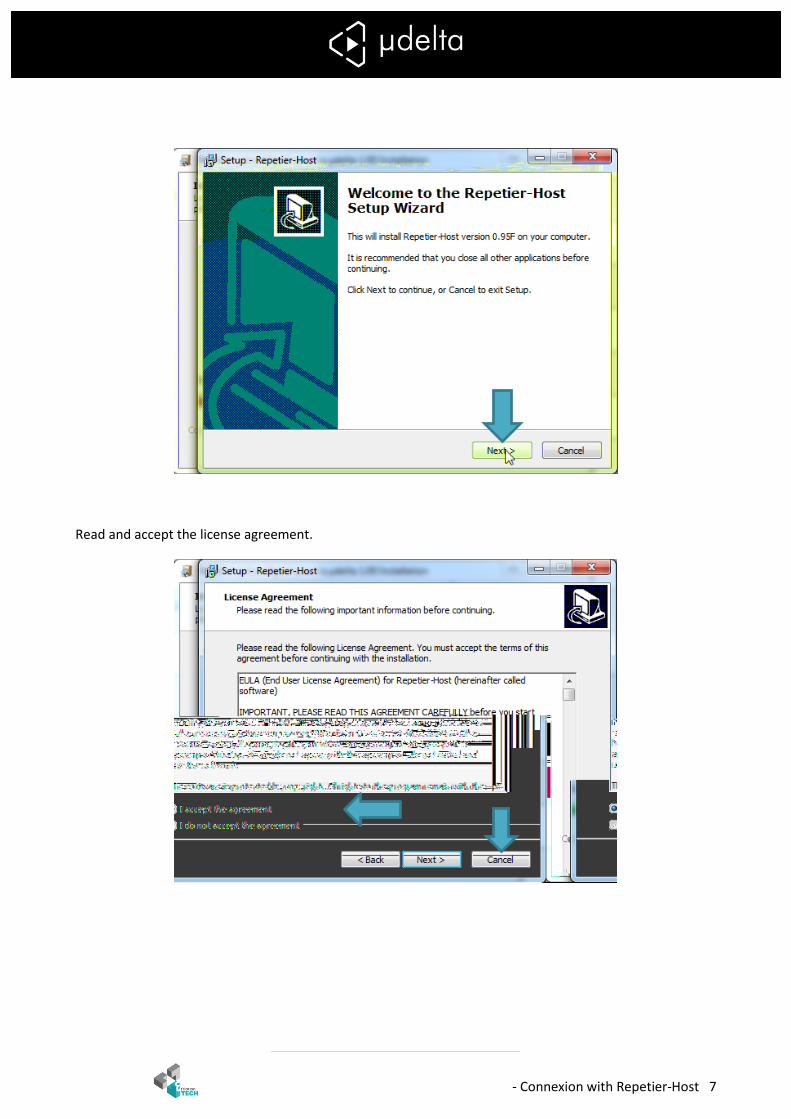
- Connexion with Repetier-Host 7
Read and accept the license agreement.
- Connexion with Repetier-Host 8
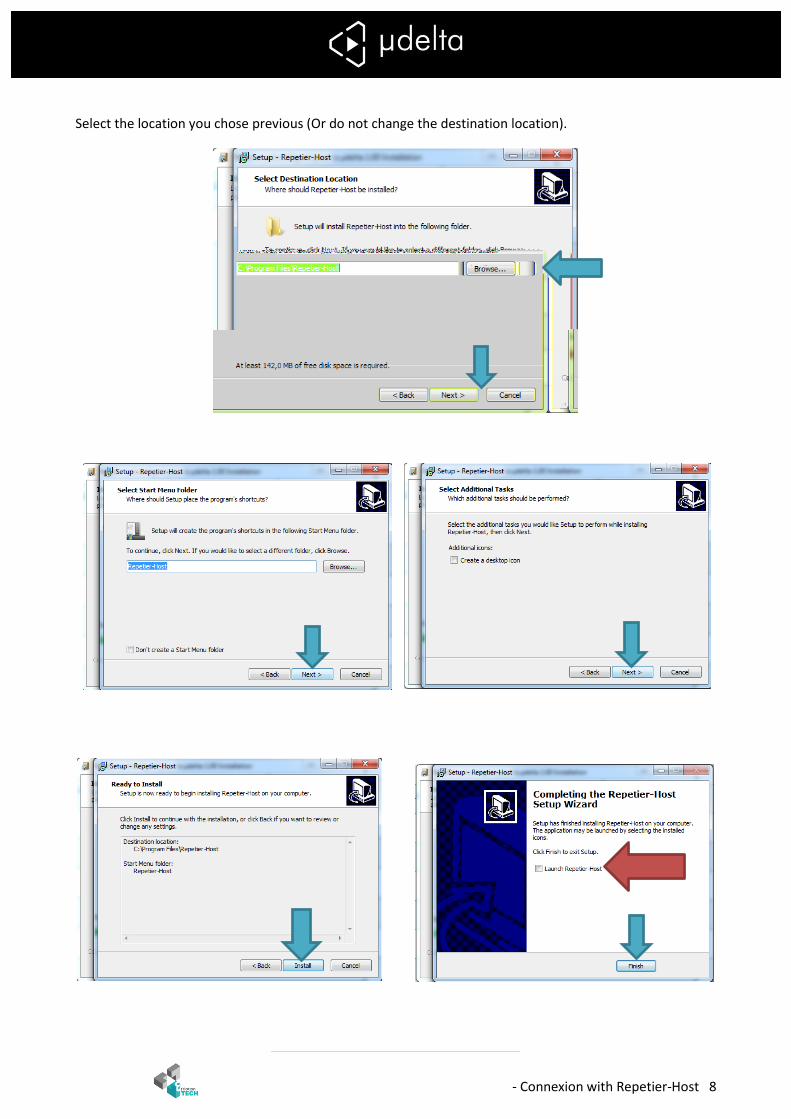
Select the location you chose previous (Or do not change the destination location).
Untick “Launch Repetier-Host”
- Connexion with Repetier-Host 9
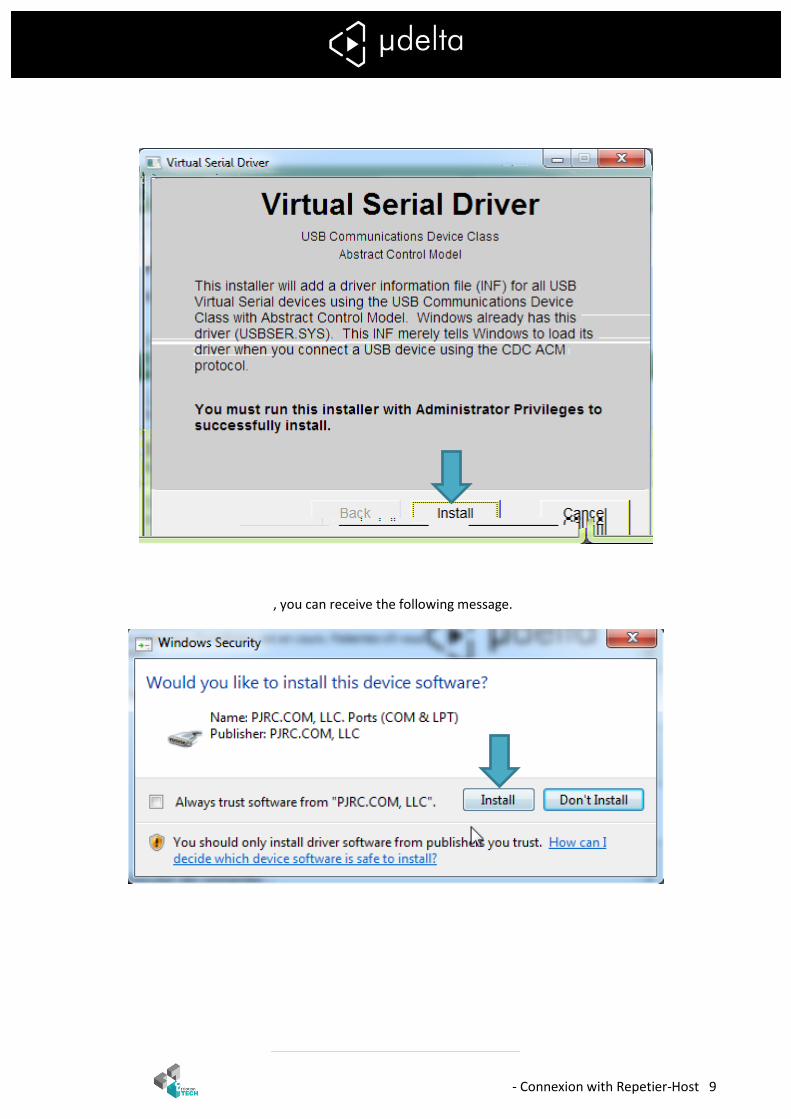
According your windows version, you can receive the following message.
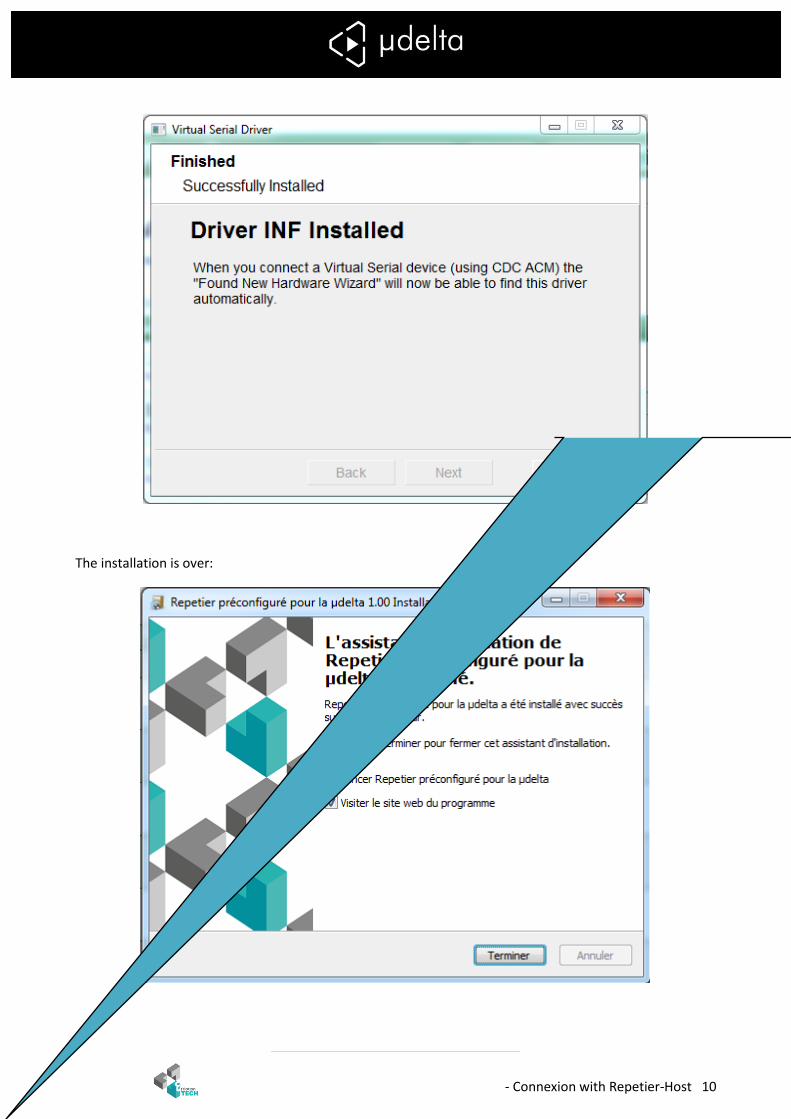
- Connexion with Repetier-Host 10
The installation is over:
- Connexion with Repetier-Host 11
Installation: Linux
- Connexion with Repetier-Host 12
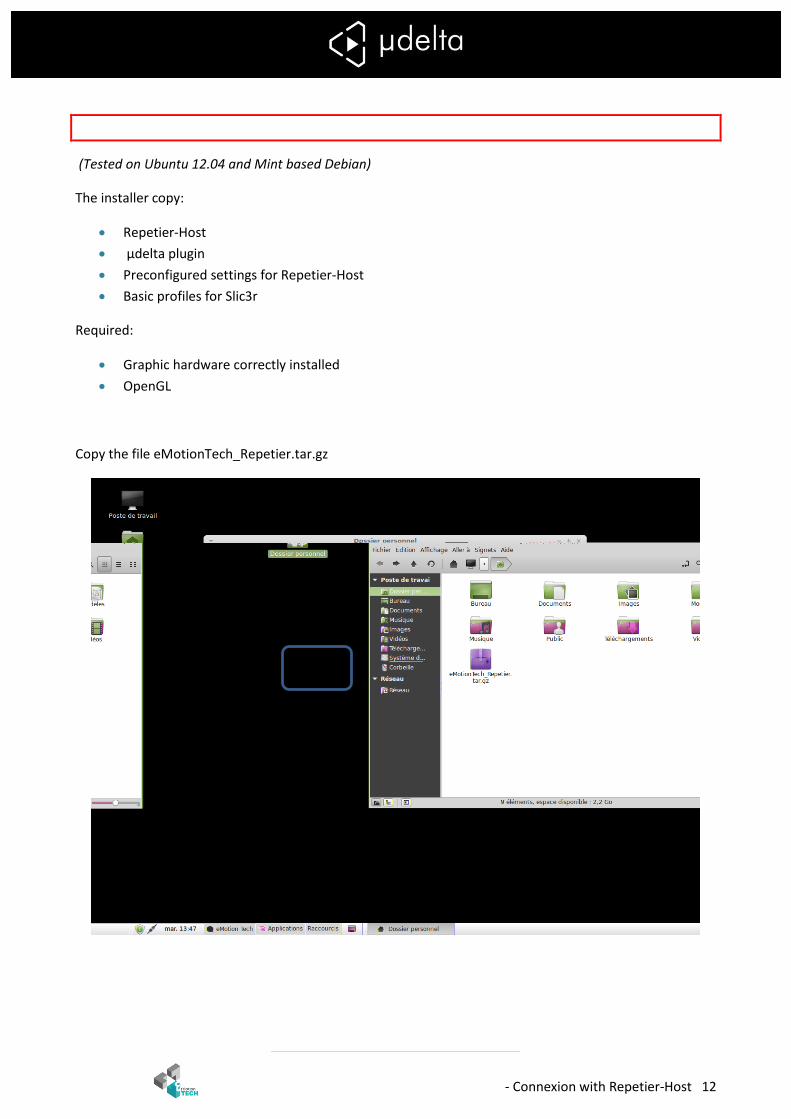
The following chapter concerns Linux users only
(Tested on Ubuntu 12.04 and Mint based Debian)
The installer copy:
Repetier-Host
µdelta plugin
Preconfigured settings for Repetier-Host
Basic profiles for Slic3r
Required:
Graphic hardware correctly installed
OpenGL
Copy the file eMotionTech_Repetier.tar.gz
- Connexion with Repetier-Host 13
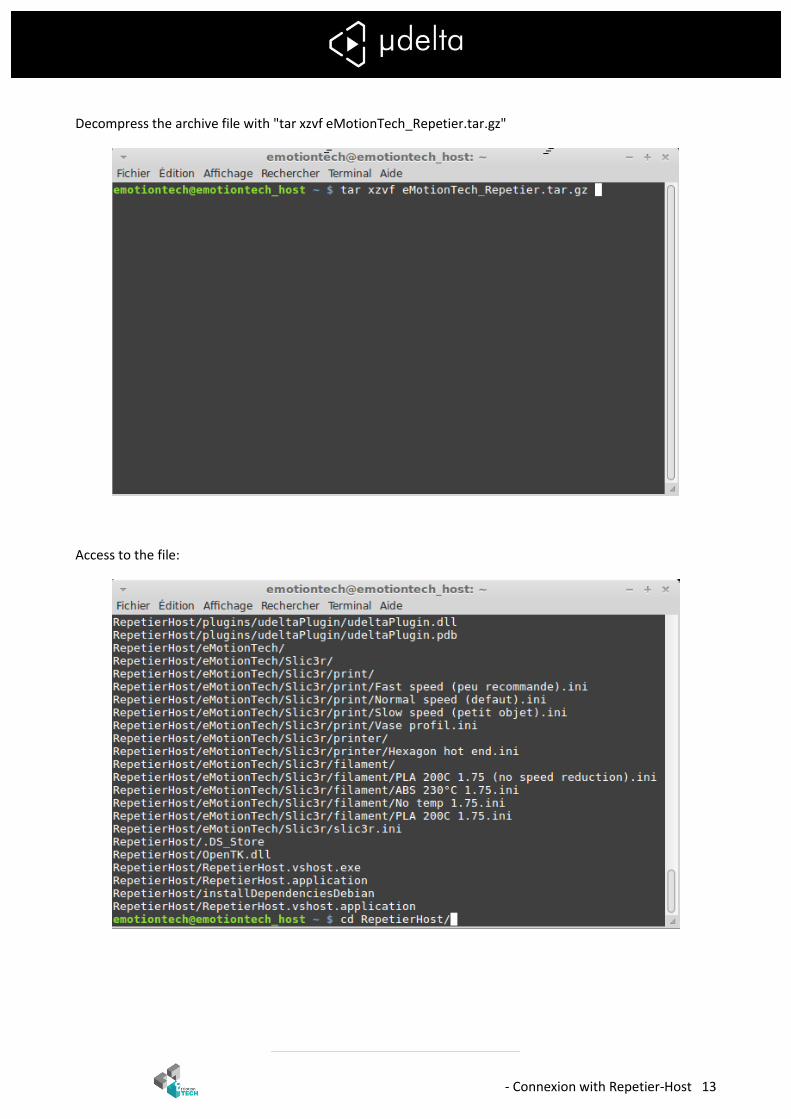
Decompress the archive file with "tar xzvf eMotionTech_Repetier.tar.gz"
Access to the file:
- Connexion with Repetier-Host 14
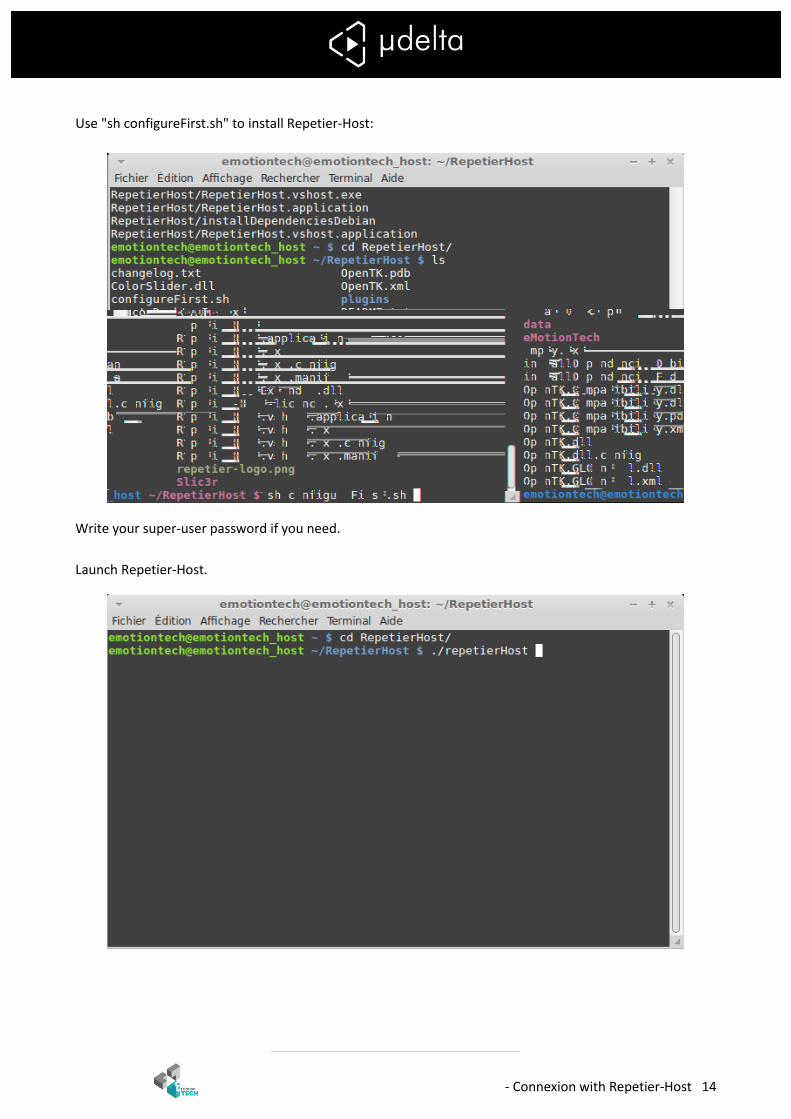
Use "sh configureFirst.sh" to install Repetier-Host:
Write your super-user password if you need.
Launch Repetier-Host.

- Connexion with Repetier-Host 15
Calibration
- Connexion with Repetier-Host 16
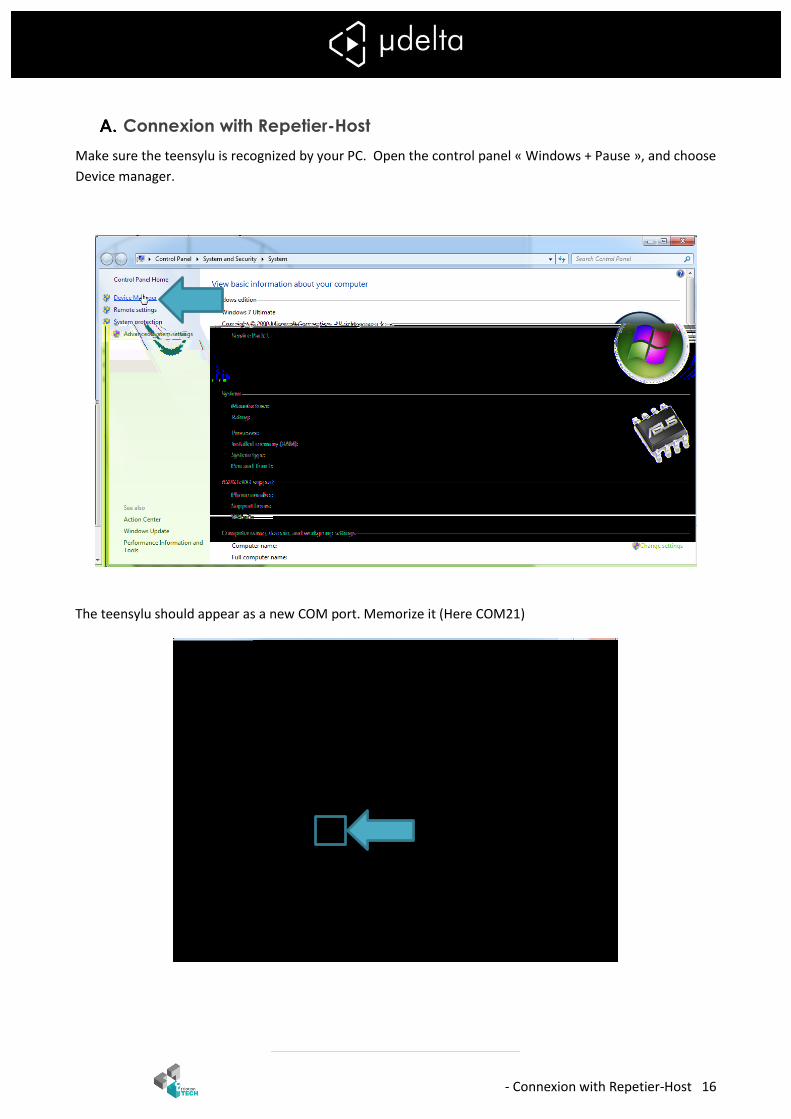
Connexion with Repetier-Host
Make sure the teensylu is recognized by your PC. Open the control panel « Windows + Pause », and choose
Device manager.
The teensylu should appear as a new COM port. Memorize it (Here COM21)
- Connexion with Repetier-Host 17
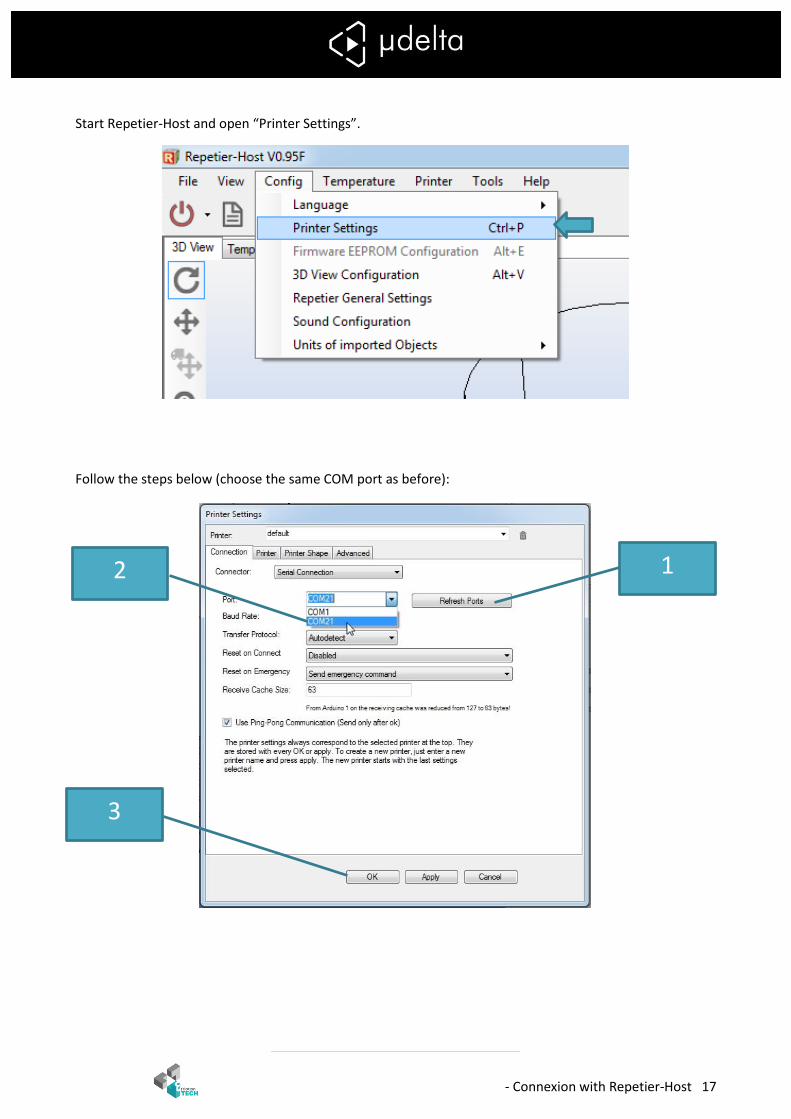
Start Repetier-Host and open “Printer Settings”.
Follow the steps below (choose the same COM port as before):
1 2
1
3
1
- Connexion with Repetier-Host 18
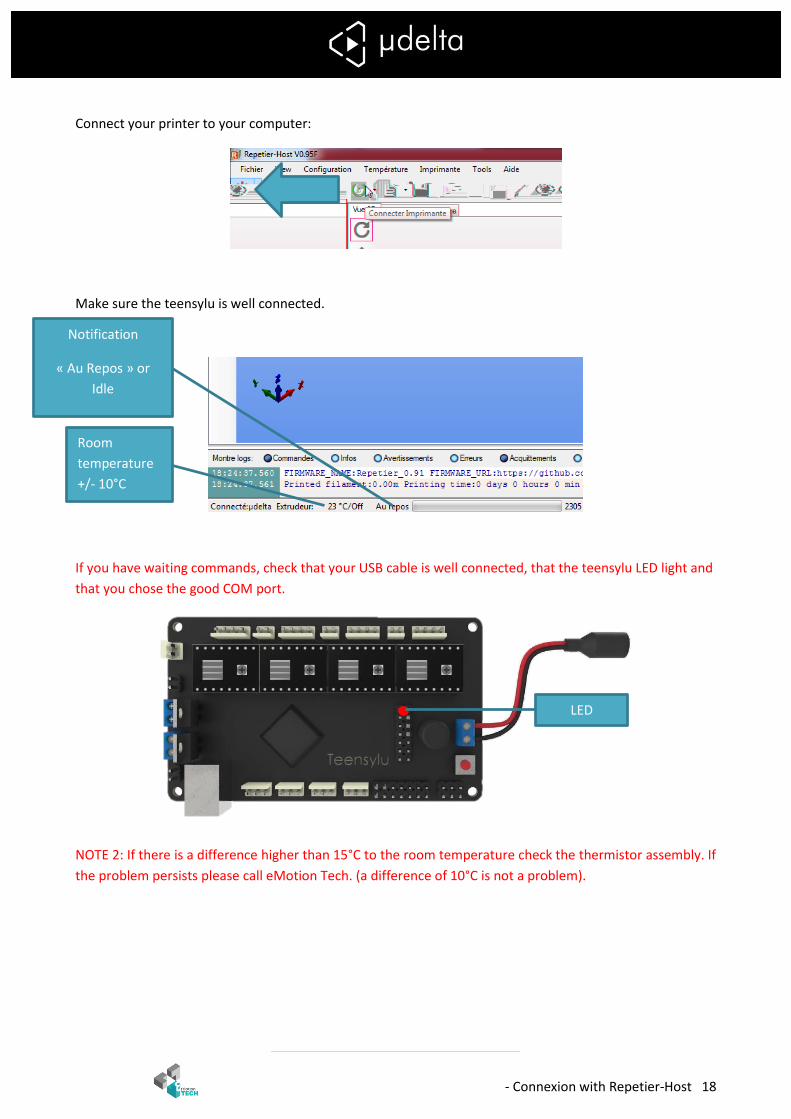
Connect your printer to your computer:
Make sure the teensylu is well connected.
If you have waiting commands, check that your USB cable is well connected, that the teensylu LED light and
that you chose the good COM port.
NOTE 2: If there is a difference higher than 15°C to the room temperature check the thermistor assembly. If
the problem persists please call eMotion Tech. (a difference of 10°C is not a problem).
Room
temperature
+/- 10°C
Notification
« Au Repos » or
Idle
LED
- First machine test 19
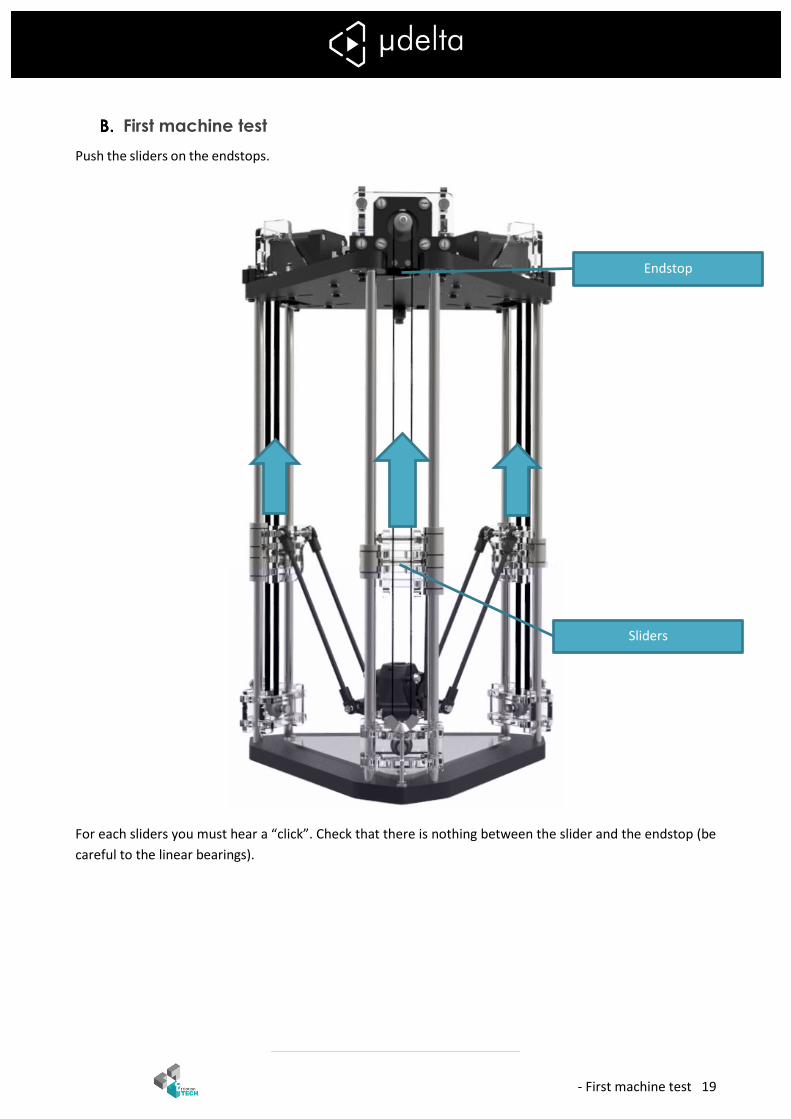
First machine test
Push the sliders on the endstops. If the motor are blocked use the turn motor off command (see next page).
For each sliders you must hear a “click”. Check that there is nothing between the slider and the endstop (be
careful to the linear bearings).
Endstop
Sliders
- First machine test 20
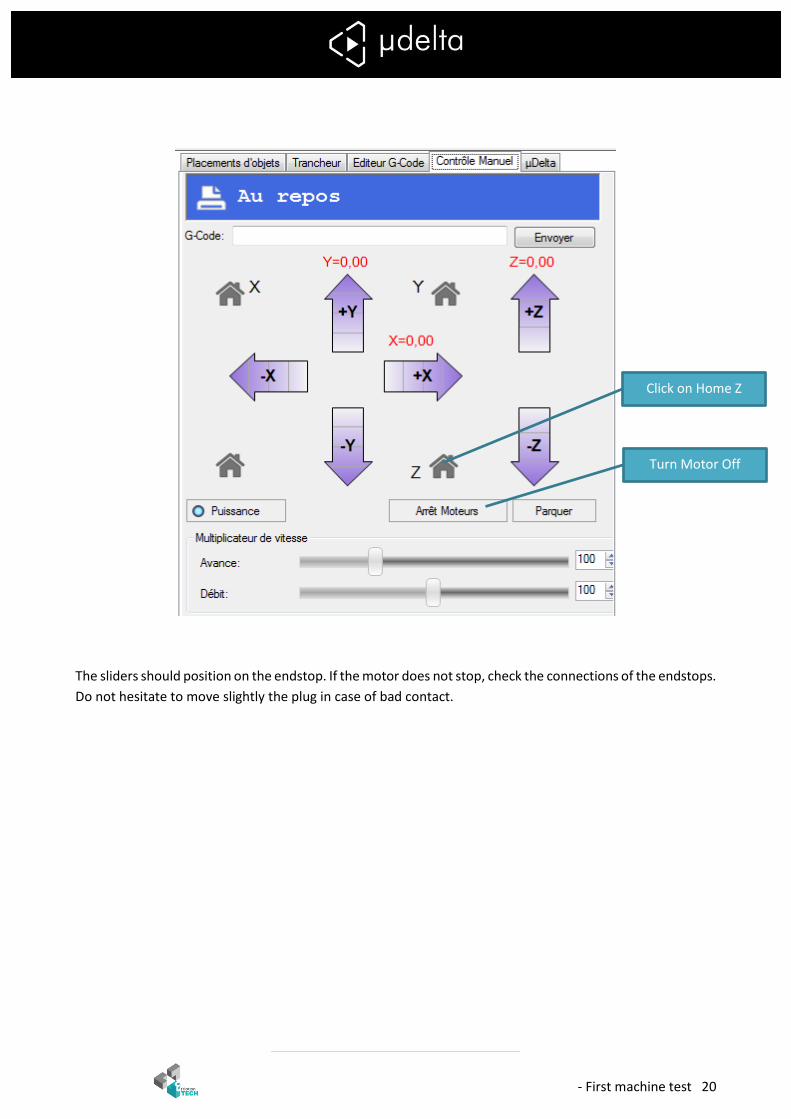
For the next step, if you hear a vibration and that the motor is forcing unplug the power supply.
The sliders should position on the endstop. If the motor does not stop, check the connections of the endstops.
Do not hesitate to move slightly the plug in case of bad contact.
Click on Home Z
Turn Motor Off
- eMotion Tech Plugin 21
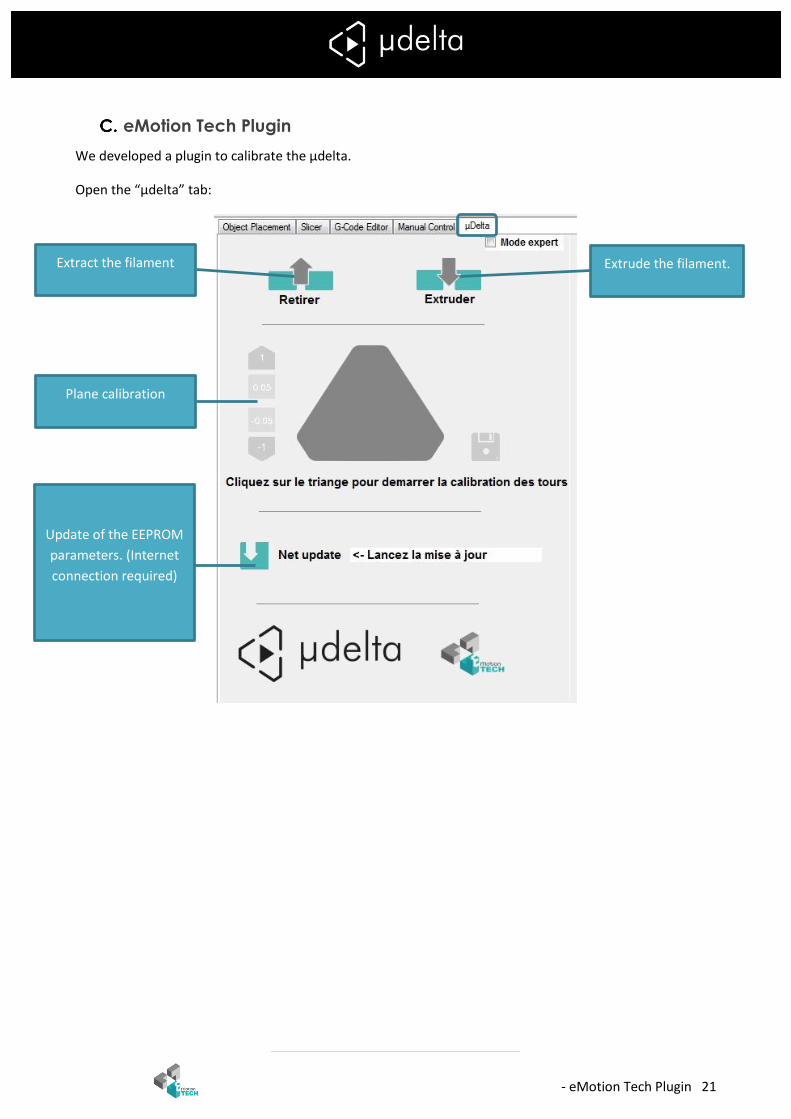
eMotion Tech Plugin
We developed a plugin to calibrate the µdelta.
Open the “µdelta” tab:
Extract the filament Extrude the filament.
Plane calibration
Update of the EEPROM
parameters. (Internet
connection required)
- Update 22
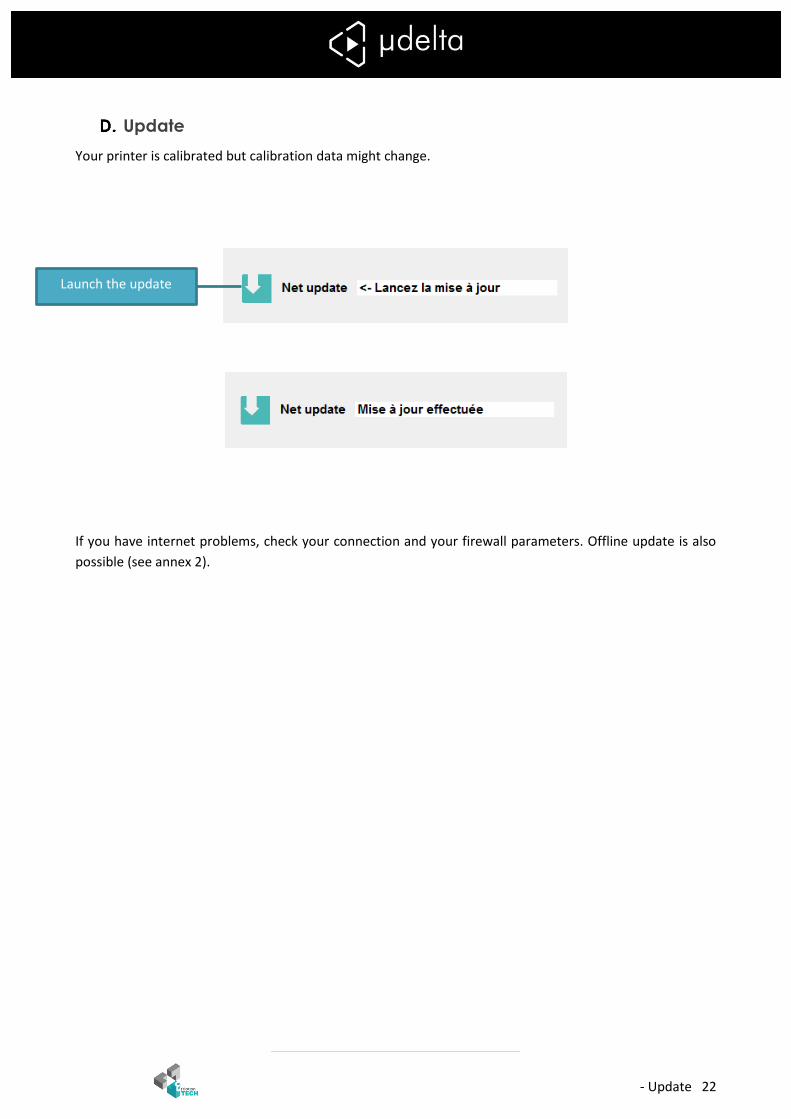
Update
Your printer is calibrated but calibration data might change.
This update is strongly recommended.
If you have internet problems, check your connection and your firewall parameters. Offline update is also
possible (see annex 2).
Launch the update

- Plane setting 23
Plane setting
If you have already used the printer make sure the nozzle is clean. If there is dry plastic on the nozzle heat
the extruder to 130°C to clean the nozzle.
The printer will initialize and block each slider against the endstops.
The printer will go to the first calibration location.
Click to start
calibration
The first button
position the extruder
to the first
calibration point. (Cancel calibration)
- Plane setting 24
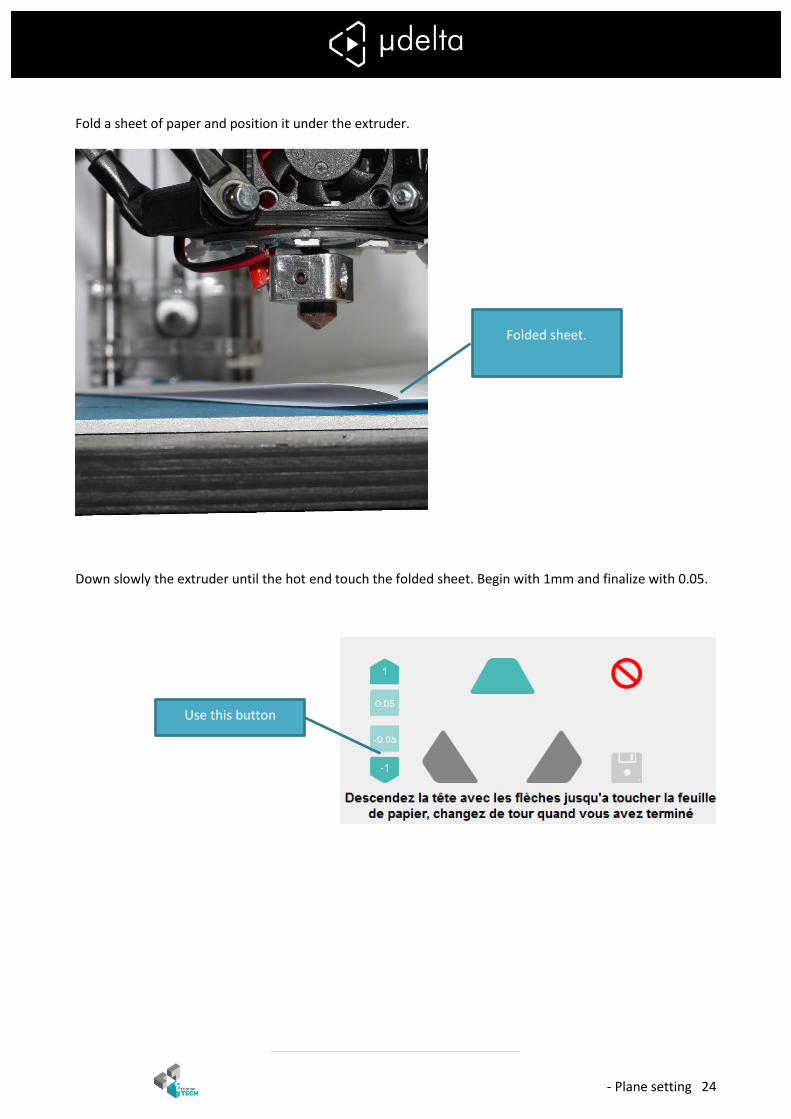
Fold a sheet of paper and position it under the extruder.
Down slowly the extruder until the hot end touch the folded sheet. Begin with 1mm and finalize with 0.05.
Be careful: Do not get too low, you can disrupt the calibration. In that case you will have to start again.
Use this button
Folded sheet.
- Plane setting 25
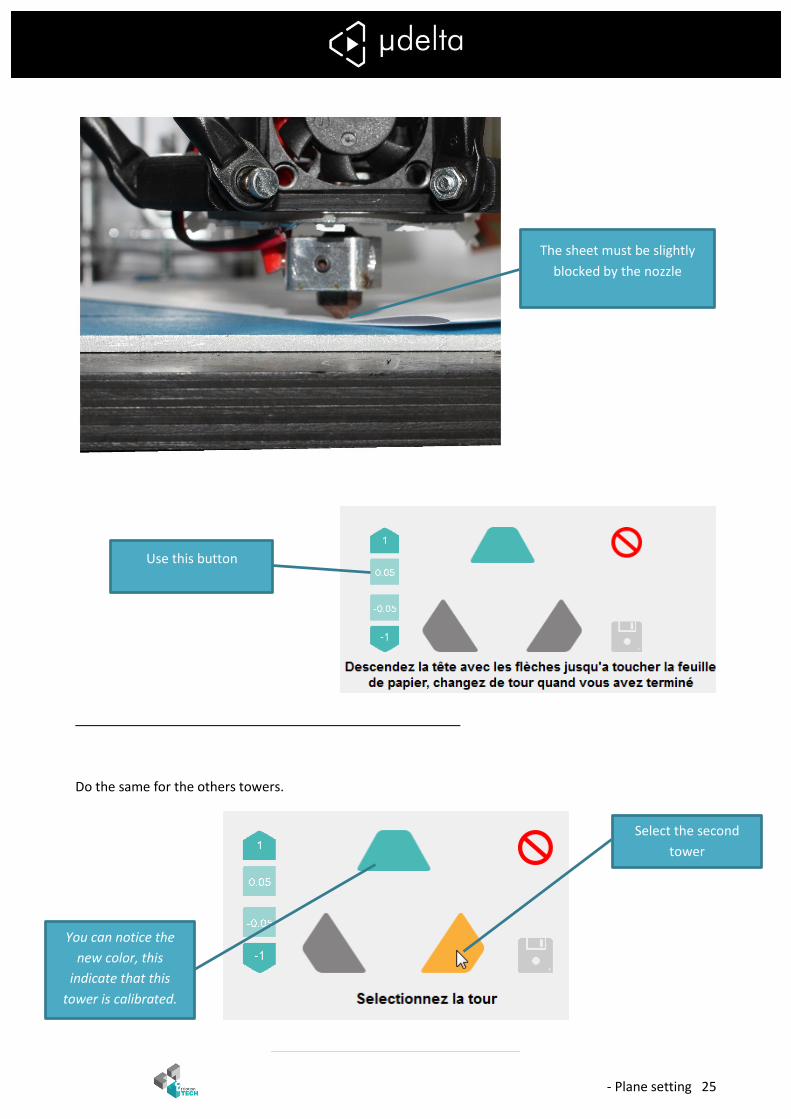
Now the sheet is blocked go 0.05mm up.
If the sheet can slide, the calibration of the tower is completed.
Do the same for the others towers.
Select the second
tower
You can notice the
new color, this
indicate that this
tower is calibrated.
The sheet must be slightly
blocked by the nozzle
Use this button
- Plane setting 26
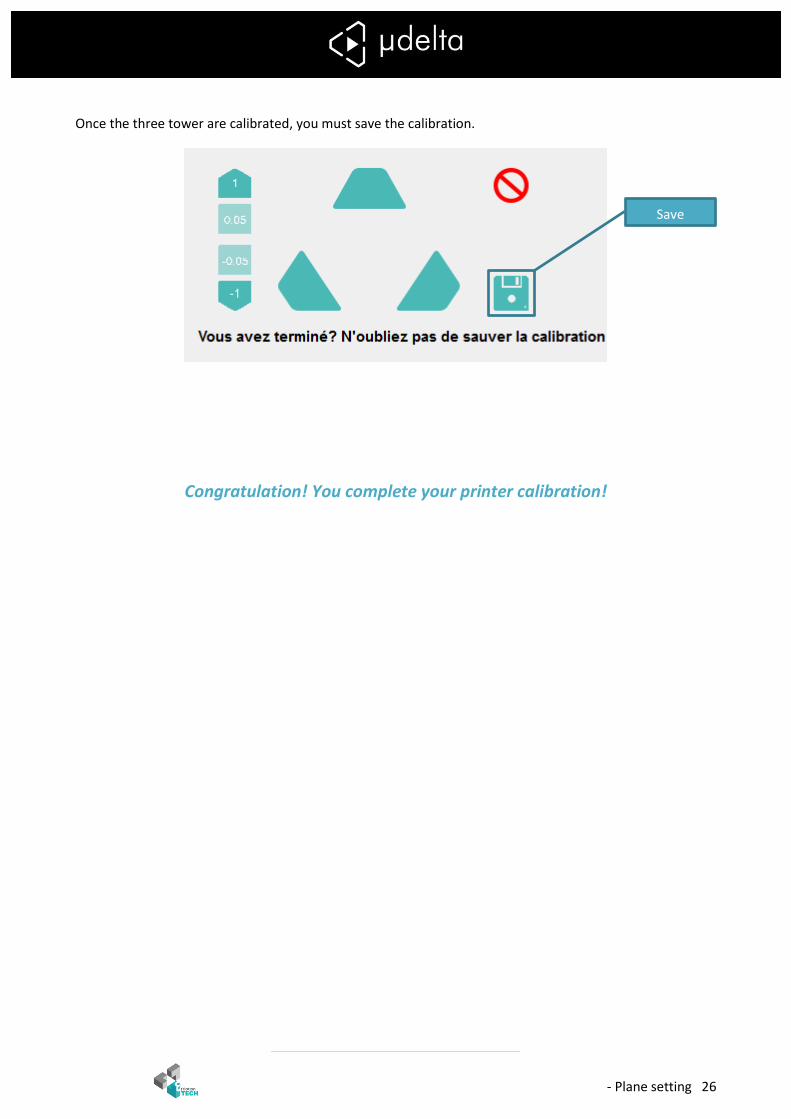
Once the three tower are calibrated, you must save the calibration.
Congratulation! You complete your printer calibration!
Save

- Plane setting 27
Printing
- Filament positioning 28
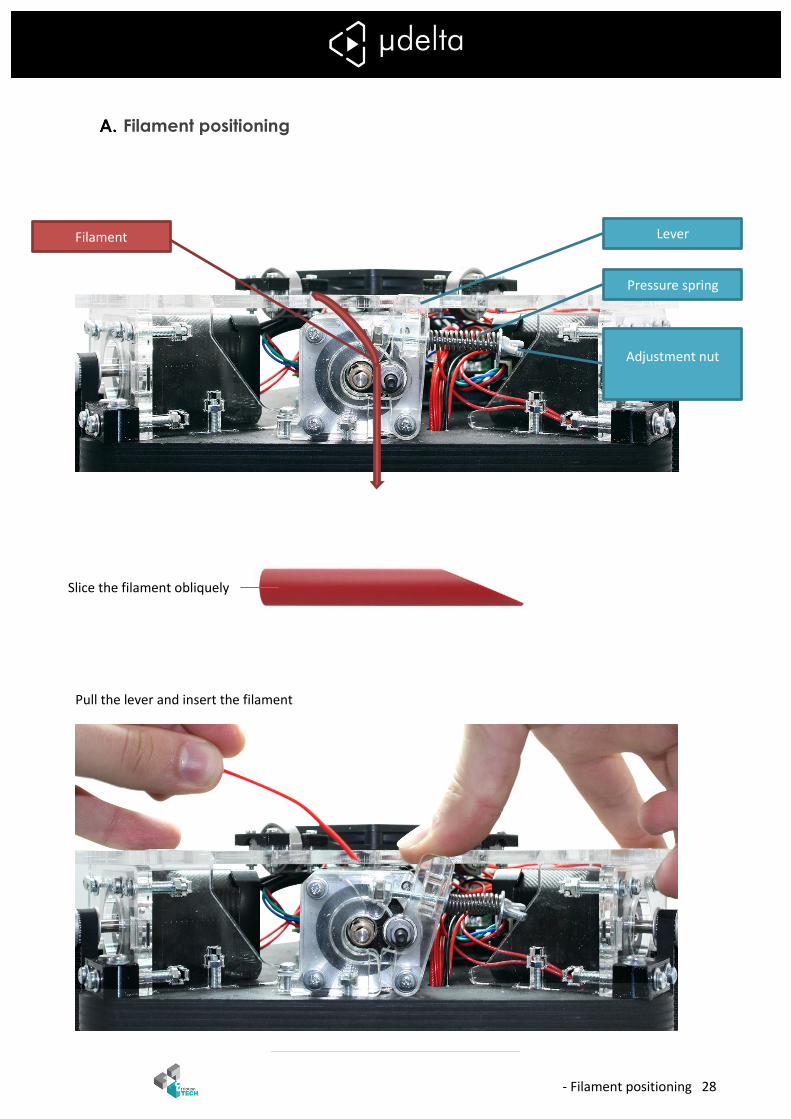
Filament positioning
Pull the lever and insert the filament
Lever
Pressure spring
Adjustment nut
Filament
Slice the filament obliquely
- Filament positioning 29
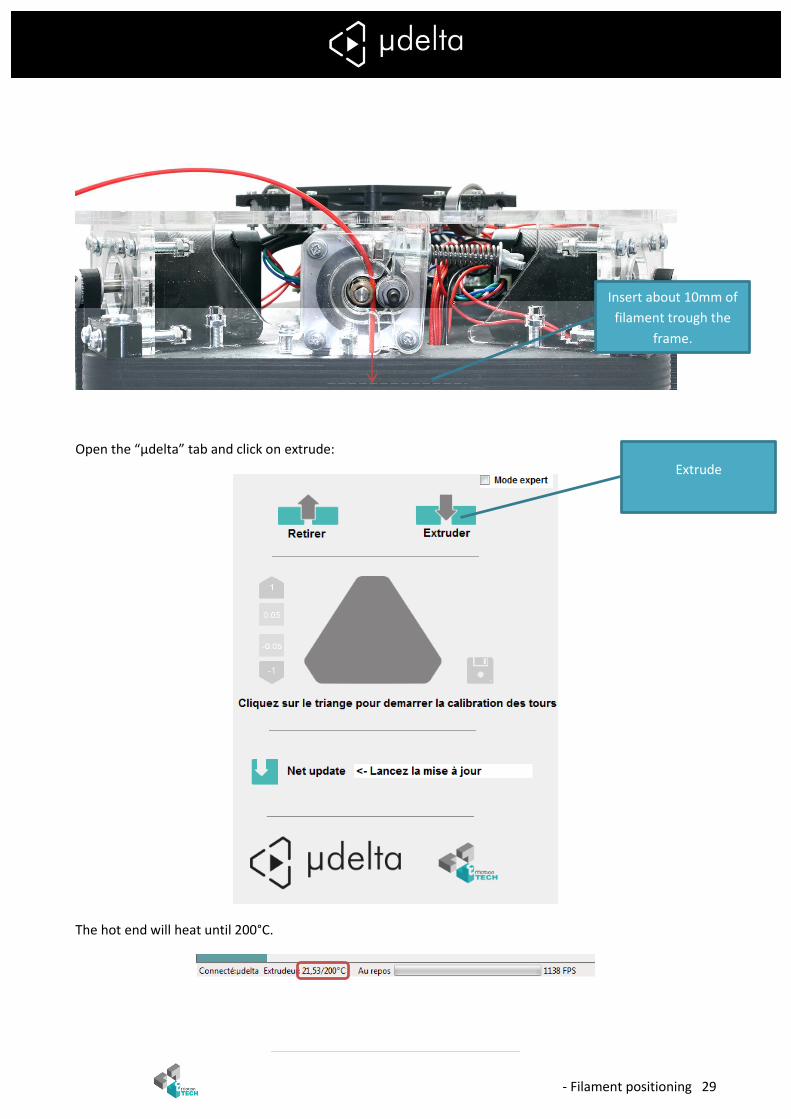
Open the “µdelta” tab and click on extrude:
The hot end will heat until 200°C.
Insert about 10mm of
filament trough the
frame.
Extrude
- Filament positioning 30
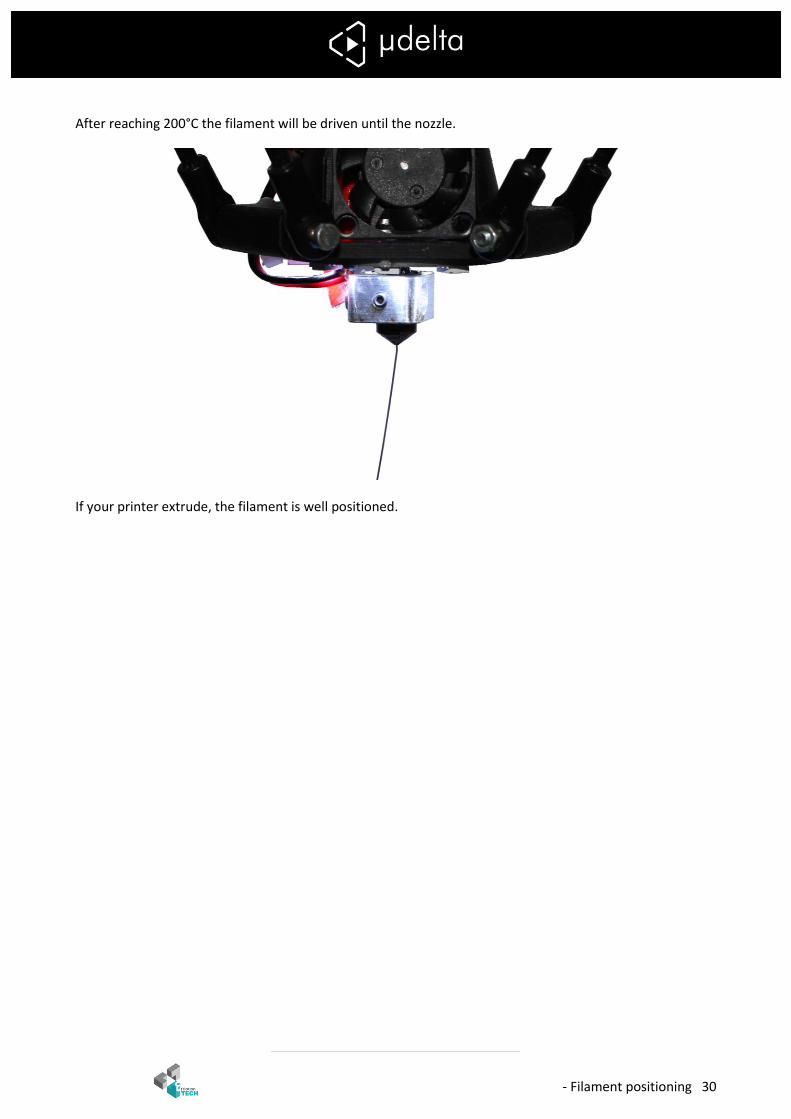
After reaching 200°C the filament will be driven until the nozzle.
If your printer extrude, the filament is well positioned.
- Printing with Repetier-Host 31
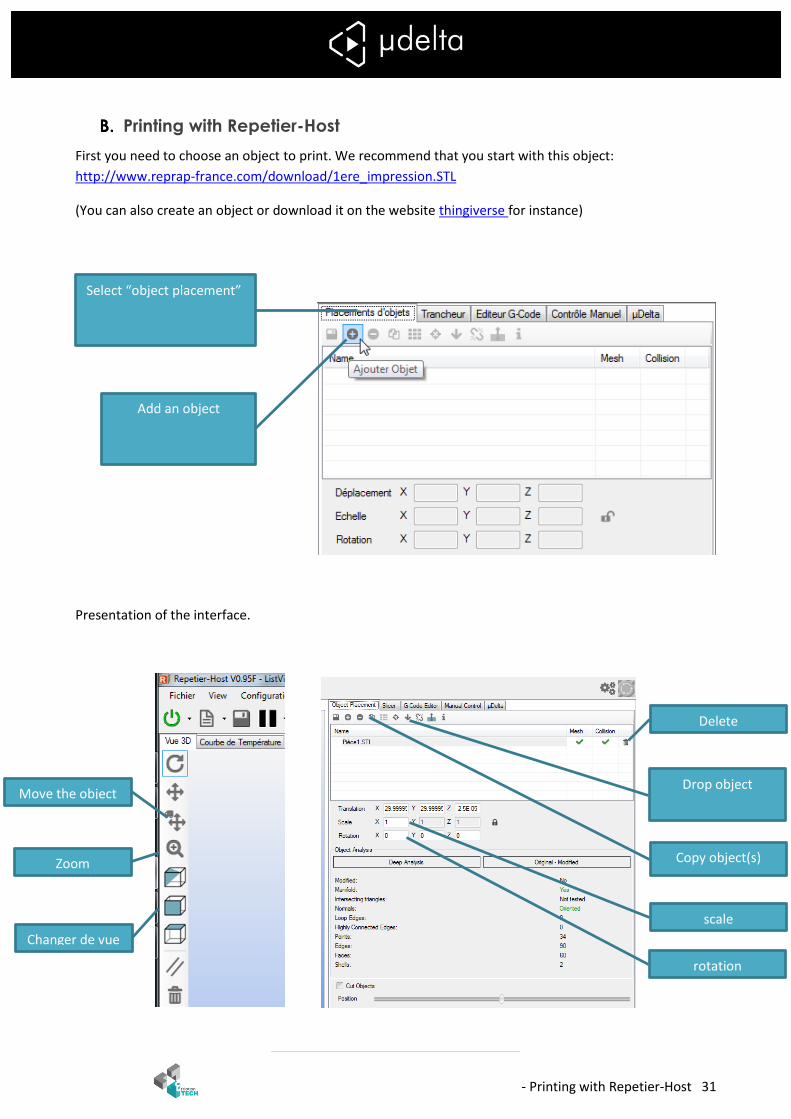
Printing with Repetier-Host
First you need to choose an object to print. We recommend that you start with this object:
http://www.reprap-france.com/download/1ere_impression.STL
(You can also create an object or download it on the website thingiverse for instance)
Presentation of the interface.
Changer de vue
Move the object
Zoom
scale
Add an object
Select “object placement”
rotation
Delete
Copy object(s)
Drop object
- Printing with Repetier-Host 32
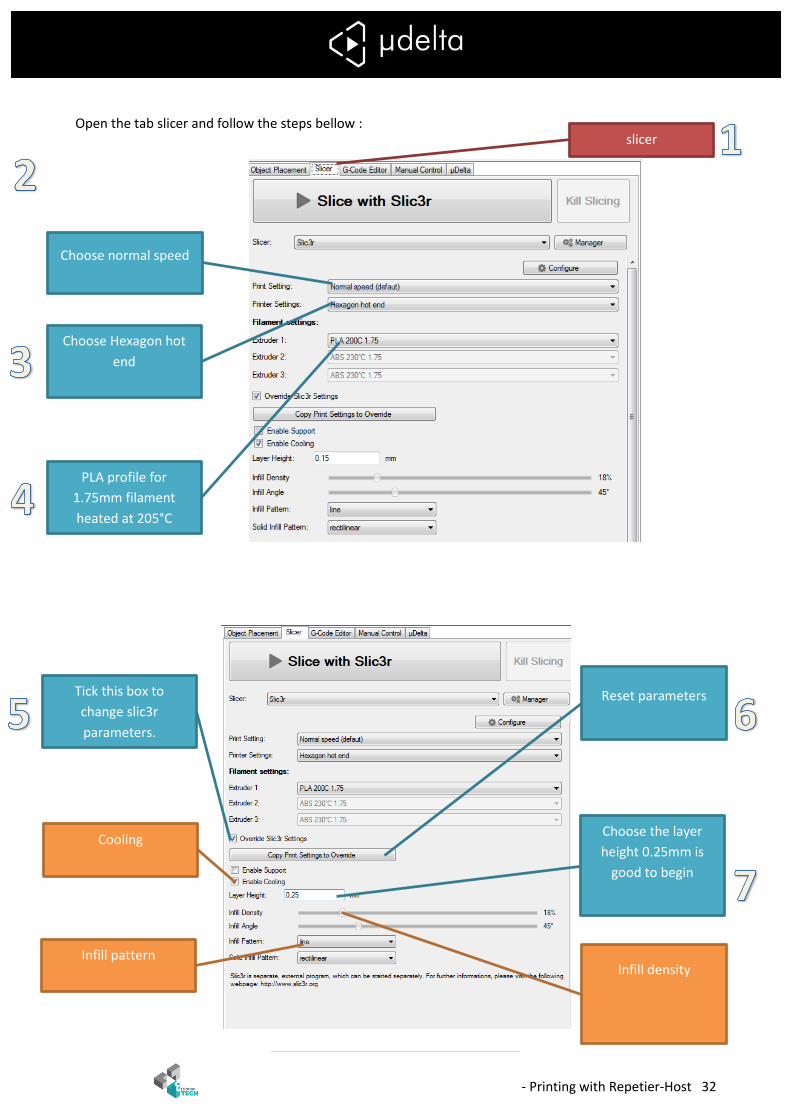
Open the tab slicer and follow the steps bellow :
Tick this box to
change slic3r
parameters.
Reset parameters
Choose the layer
height 0.25mm is
good to begin
Infill density
Cooling
Infill pattern
Choose normal speed
slicer
Choose Hexagon hot
end
PLA profile for
1.75mm filament
heated at 205°C
- Printing with Repetier-Host 33
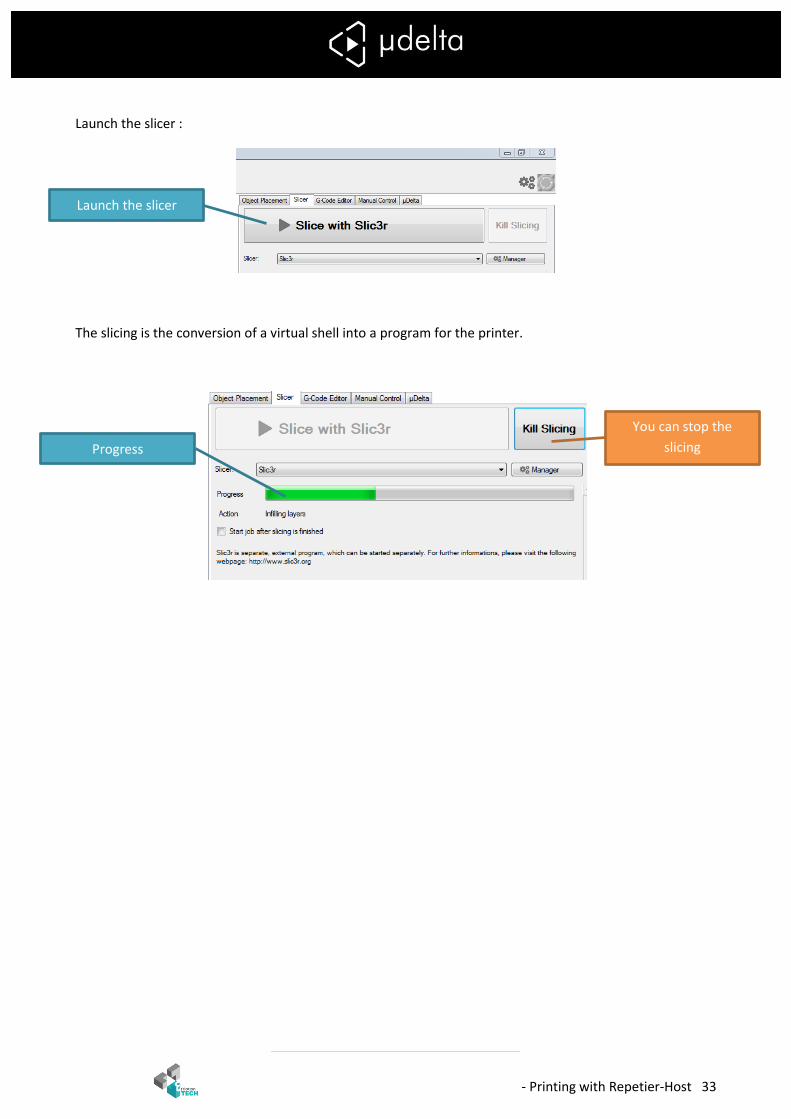
Launch the slicer :
The slicing is the conversion of a virtual shell into a program for the printer.
Launch the slicer
You can stop the
slicing
Progress
- Printing with Repetier-Host 34
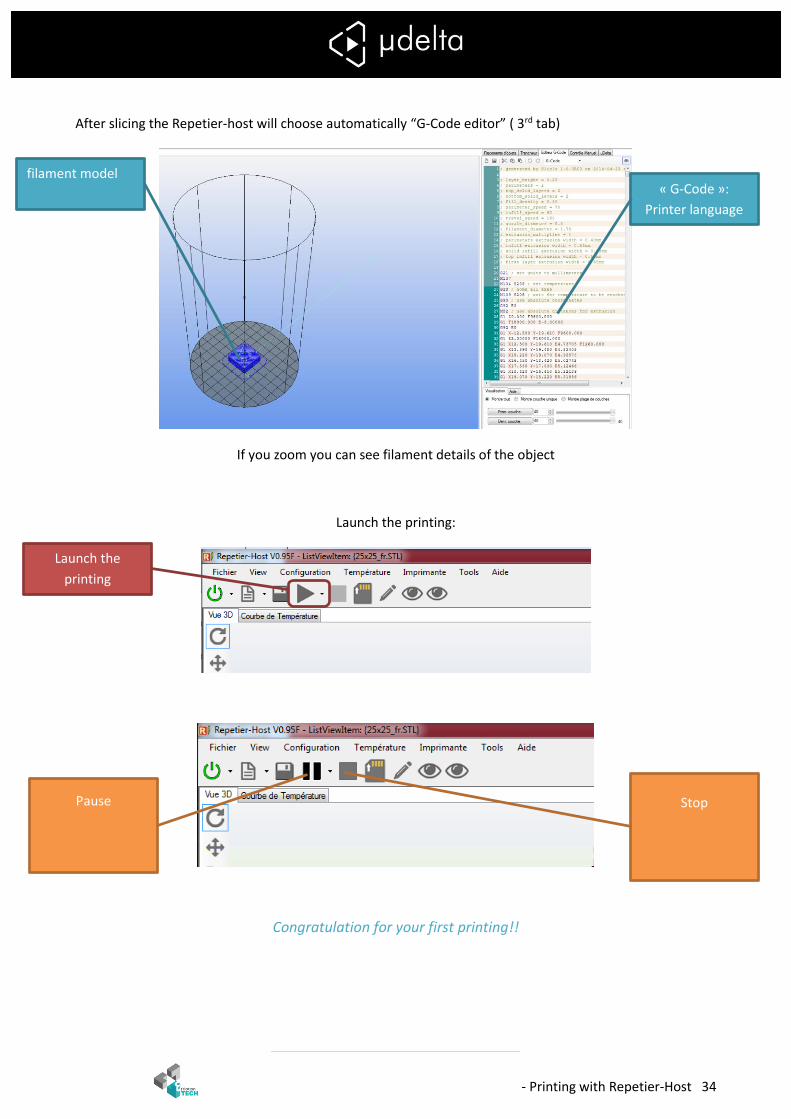
After slicing the Repetier-host will choose automatically “G-Code editor” ( 3rd tab)
If you zoom you can see filament details of the object
Launch the printing:
Congratulation for your first printing!!
filament model
Launch the
printing
« G-Code »:
Printer language
Stop
Pause

Annexes - 35
Annexes
- Annex 1: Heat control setting (optional) 36
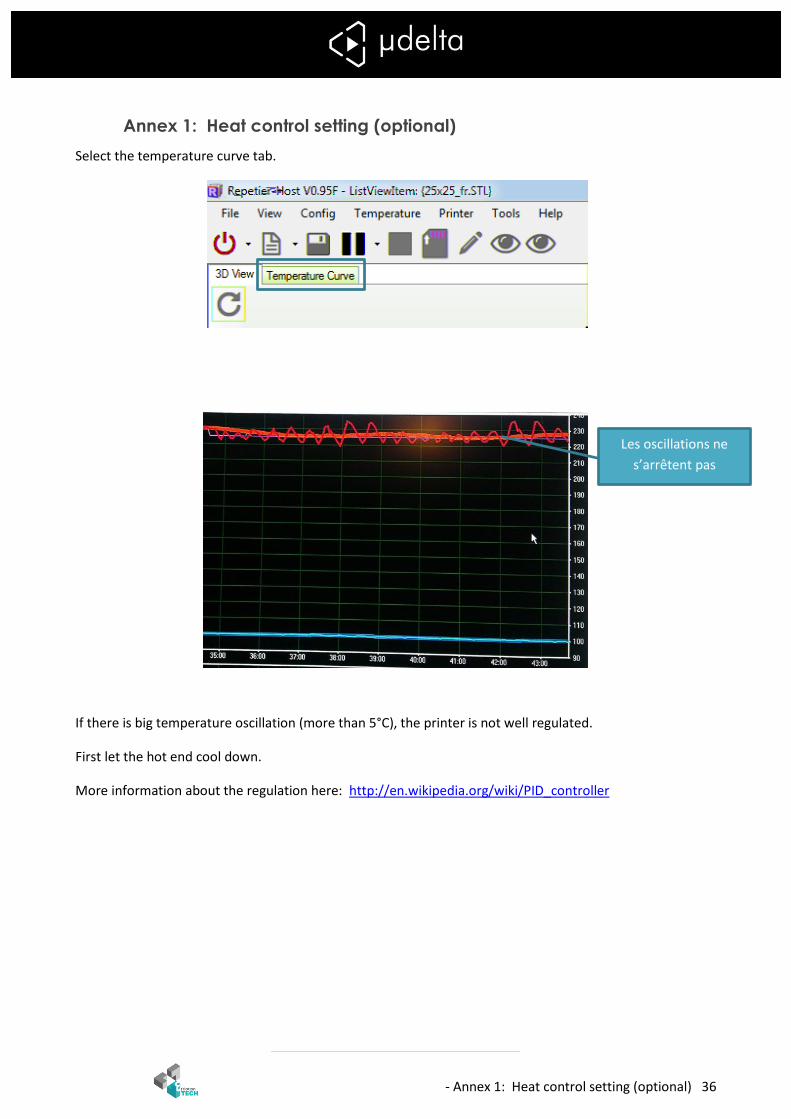
Annex 1: Heat control setting (optional)
Select the temperature curve tab.
If there is big temperature oscillation (more than 5°C), the printer is not well regulated.
First let the hot end cool down.
More information about the regulation here: http://en.wikipedia.org/wiki/PID_controller
Les oscillations ne
s’arrêtent pas
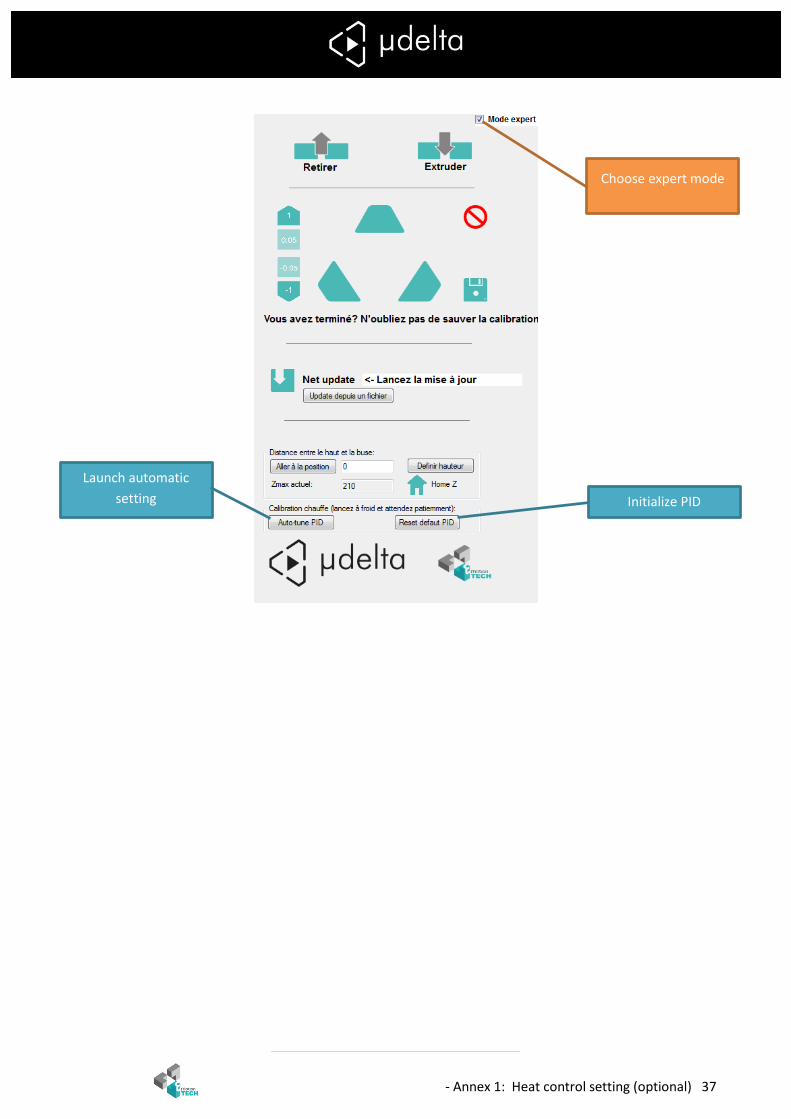
- Annex 1: Heat control setting (optional) 37
Initialize PID
Launch automatic
setting
Choose expert mode
- Annex 2: Offline update 38
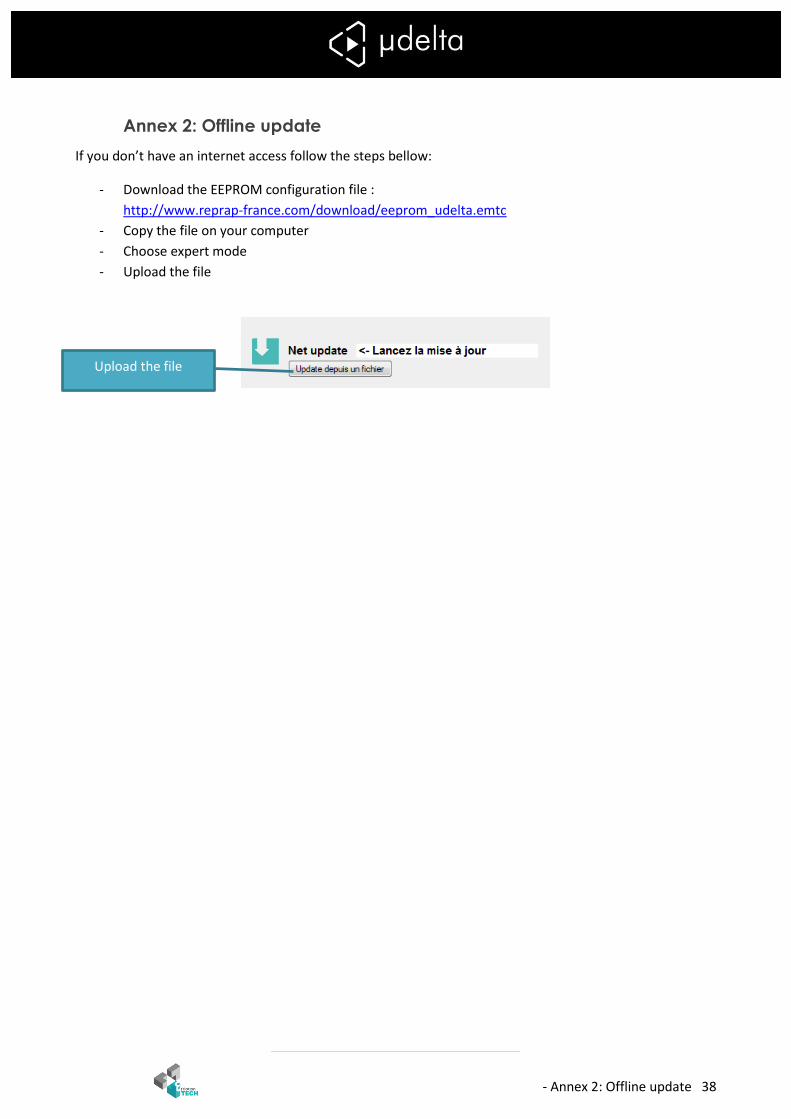
Annex 2: Offline update
If you don’t have an internet access follow the steps bellow:
- Download the EEPROM configuration file :
http://www.reprap-france.com/download/eeprom_udelta.emtc
- Copy the file on your computer
- Choose expert mode
- Upload the file
Upload the file
- Annex 3: Save and load G-Codes 39
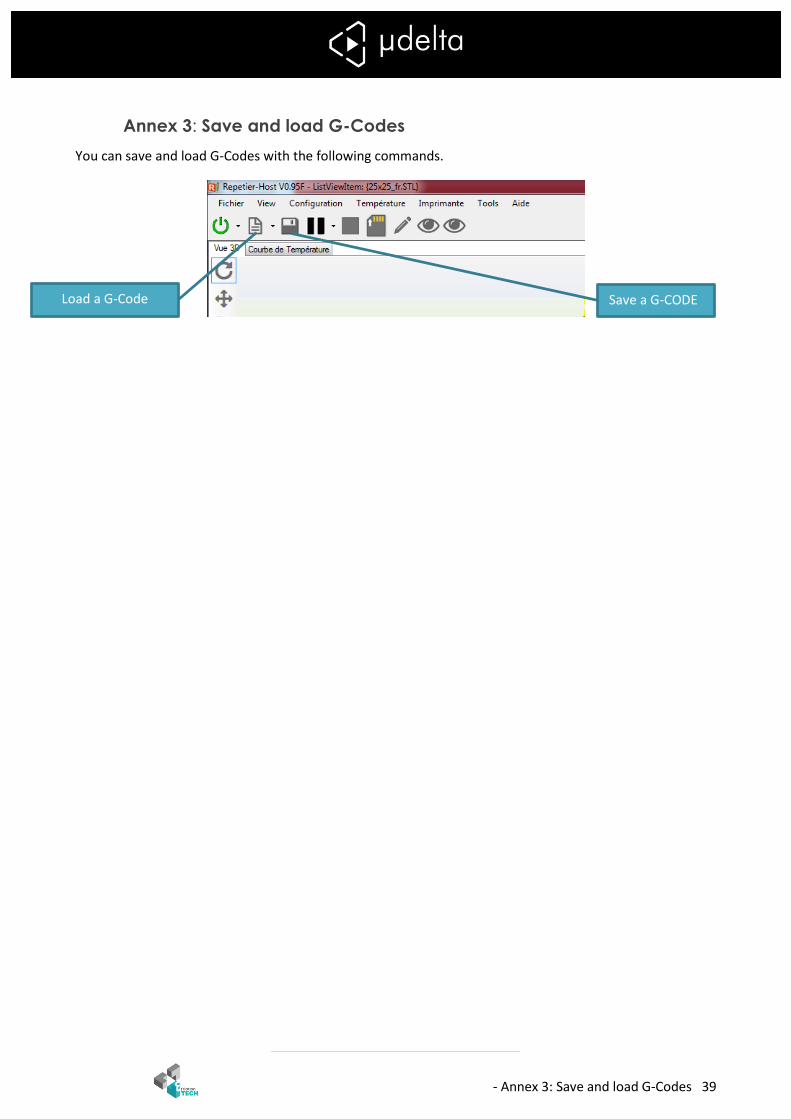
Annex 3: Save and load G-Codes
You can save and load G-Codes with the following commands.
Save a G-CODE
Load a G-Code
- Annex 4: Manual control 40
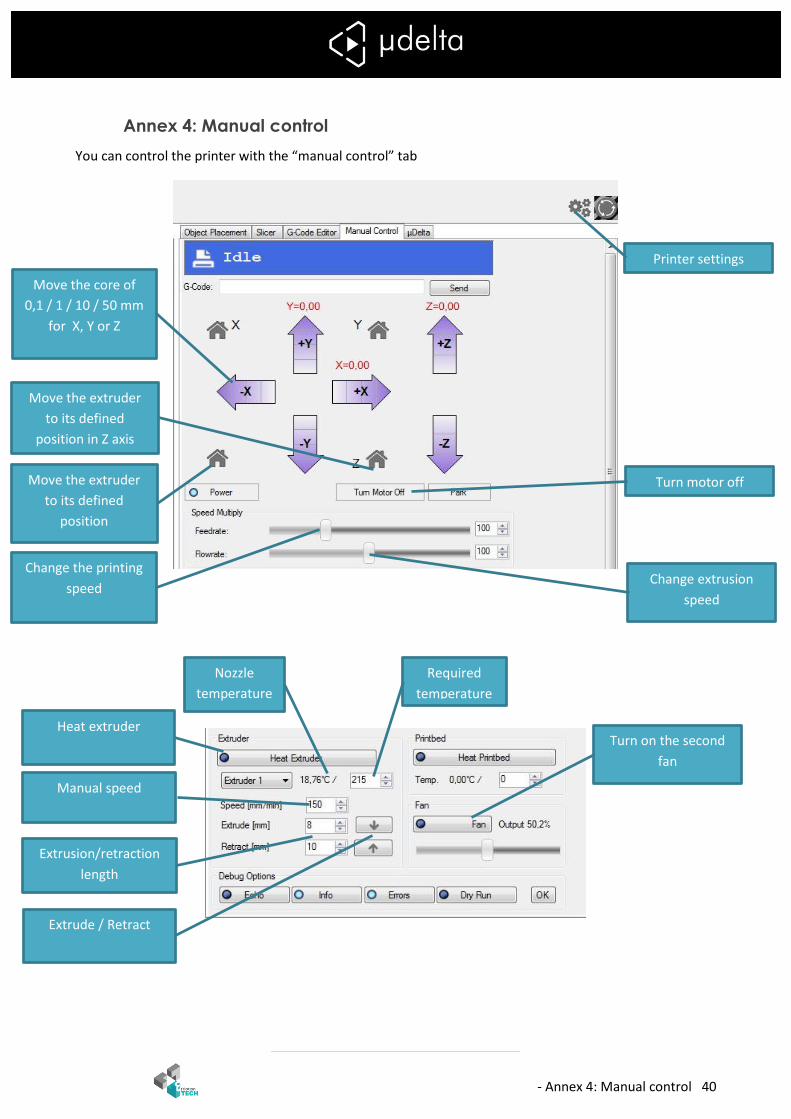
Annex 4: Manual control
You can control the printer with the “manual control” tab
Move the extruder
to its defined
position in Z axis
Printer settings
Turn motor off
Move the extruder
to its defined
position
Move the core of
0,1 / 1 / 10 / 50 mm
for X, Y or Z
Change extrusion
speed
Change the printing
speed
Heat extruder
Turn on the second
fan
Manual speed
Extrusion/retraction
length
Extrude / Retract
Nozzle
temperature
Required
temperature