Embed Size (px)
Citation preview
CBR Software California Bearing Ratio (CBR) Test Report Software
Version: 0.9.12 Release Date: May 6, 2005
User Manual
Version 1.0
Durham Geo Slope Indicator 2175 West Park Court Stone Mountain, GA 30087 USA
Phone: 800-837-0864 or +1.770.465.7557
Fax: 770.465.7447e-mail: [email protected]
www.DurhamGeo.com

I N T R O D U C T I O N
CBR Software Manual 2
T A B L E O F C O N T E N T S
QUICK OVERVIEW AND USER TIPS .................................................................................... 3 INTRODUCTION...................................................................................................................... 3 SOFTWARE INSTALLATION ................................................................................................. 4
TO INSTALL ............................................................................................................................. 4 OPERATION............................................................................................................................ 5
1. TO RUN THE SOFTWARE ...................................................................................................... 5 2. PROJECT SELECTION........................................................................................................... 7 3. SAMPLE SELECTION............................................................................................................. 8 4. MAIN MENU CONTENT........................................................................................................ 10
1. Project .......................................................................................................................... 11 2. Sample ......................................................................................................................... 14 3. Lab Data....................................................................................................................... 16 4. Reset ............................................................................................................................ 19 5. Exit ............................................................................................................................... 20 Calculations...................................................................................................................... 29
DATA BASE .......................................................................................................................... 31 LIMITED WARRANTY.......................................................................................................... 33
I N T R O D U C T I O N
Chapter
1
INTRODUCTION This computer program determines California Bearing Ratio (CBR) values using the methodology described in ASTM D 1883-99 specifications. The program creates a report of the results as described in Section 10 of the ASTM specifications. In addition, a separate graph showing all of the test results is created. These documents can be printed for record purposes and reporting requirements. All values input by the user are stored in an ACCESS database, which is created automatically by the program. Input data values are automatically stored in the database. Values can be retrieved from the database using a simple user interface. The user can specify whether the database will be automatically updated or not, using a menu option. The program requires the user to create a Project before any data can be input. The Project Number, Sample Number, and a valid lab data file are required. All other values are Optional; the program will store and report all data input by the user. In general, the program will use all valid data input by the user. After the required data have been entered and a lab data file selected using the standard Windows dialog box, the results may be viewed in a report or graph. A summary of the calculation results may also be displayed. The lab data file contains formatted displacement and load values. It is typically created using WinSAS as a part of the laboratory testing procedure. The data file may contain a maximum of 600 records, where each record contains observations of displacement and load values for each time period. The program will also determine if the values contained in the lab data file conform to the ASTM specifications. Required penetrations are verified. If they do not conform to the specifications, the user will be advised of the exception. In addition, the program will validate each record before it is used in the calculations. If a record is found to be invalid, a dialog box will inform the user of the discrepancy, along with the record number. CBR values are also determined for each one-tenth (0.1) inch of penetration. The report will use the correct value, based on ASTM specifications. A summary of the moisture data is included in the report. If initial and soaked moisture data are input, the appropriate values will be used to calculate the corresponding dry unit weights.
CBR Software Manual 3

O P E R A T I O N
CBR Software Manual 4
Chapter
2
SOFTWARE INSTALLATION
To Install: RUN Setup.exe from the START/RUN Menu, or 'double click' on the Setup.exe program in Windows Explorer. Follow instructions to install software in the desired folder/location.
The CBR lab data file is a text file containing formatted displacement and load values for a test. The amount of space located in the database for the lab data file name is 80 characters. Therefore, the lab file path and name must be less than 80 characters in length. Because of this limitation, the CBR program should be installed in a folder near the root directory. For example, the full path for the default path of “C:\Program Files\CBR\ProjectFiles\” is 35 characters in length. So then, the maximum file name length can be 45 characters. The person who installs the CBR program should consider this limitation.
This computer application program was developed to be installed on a stand-alone computer. The END-USER LICENSE AGREEMENT allows the customer to install and use the software on not more than five (5) computers, or on a storage device, such as a network server, used only to install or run the SOFTWARE PRODUCT on your other computers over an internal network.
A discussion of the databases used in this software application is included in Chapter 4.
O P E R A T I O N
CBR Software Manual 5
Chapter
3 OPERATION
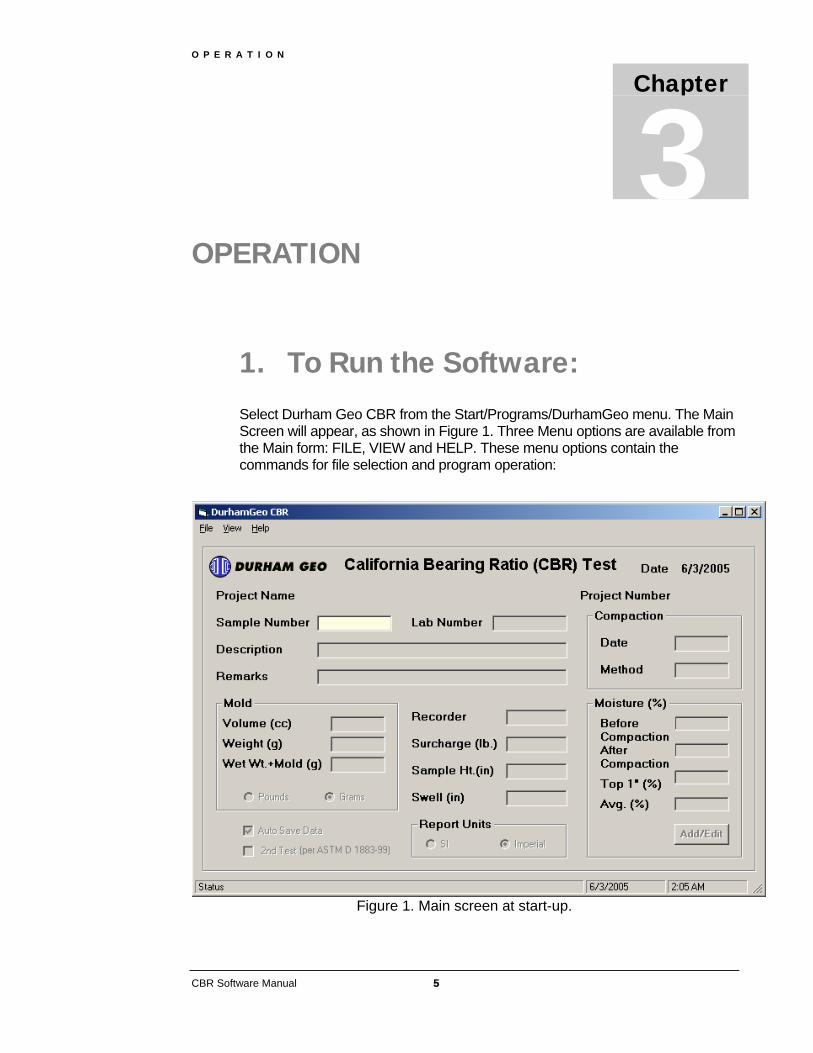
1. To Run the Software: Select Durham Geo CBR from the Start/Programs/DurhamGeo menu. The Main Screen will appear, as shown in Figure 1. Three Menu options are available from the Main form: FILE, VIEW and HELP. These menu options contain the commands for file selection and program operation:
Figure 1. Main screen at start-up.

O P E R A T I O N
CBR Software Manual 6
When the Main Page appears, all fields are disabled. Because the input data is stored in a database, which is referenced by the Project Number and Sample Number, the program requires that these must be specified so that data can be written to the database. After a Project has been selected, the data entry fields on the Main Form will be enabled and the user can begin the data entry process.
If the “Auto Save Data” checkbox on the Main Form is checked, the data will be saved when a new sample number is entered, and before displaying results. If the “Auto Save Data” checkbox on the Main Form is not checked, the data will be saved only when the user selects the (File-Sample-Save) option on the Main Menu.

O P E R A T I O N
CBR Software Manual 7
2. Project Selection
To select a project, use the Main Menu located at the top of the Main Form (Figure 8). Click on the “File” option and a “pull-down” menu will appear with “Project”, “Sample”, “Lab Data”, “Reset” and “Exit” shown as options. Move the cursor over the “Project” option and a submenu will appear listing “Open”, “Close” and “New”. Click on “Open” (File-Project-Open) and a new window will open to show previously created project data (Figure 9).
If the user opens a project, then later selects the File-Project-Open menu option, the program will ask the user to confirm that they wish to open a new project using a message box (Figure2).
Figure 2. New project selection message box.
If the user selects "Yes", all memory variables will be reset to default values, and the “Open Project” Dialog box will be displayed. Current memory variables will not be stored to the database.
If the user selects "No", the message box will close and operations may continue uninterrupted.
If the user attempts to “View” the Report, Graph or Calculations before a project has been opened, an error message will appear, as shown in Figure 3. A project is created using the Main Menu (File-Project-New), described later in this chapter.
Figure 3. Project selection error message.
O P E R A T I O N
CBR Software Manual 8
3. Sample Selection
The user must also specify which Sample Number is to be for indexing data in the database. To input this data, click on the “Sample Number” data field. The yellow background color indicates that this is required input. When the user clicks on another data entry field the program will check to see if the Sample Number has been previously used in the database, and will do one of the following:
1. If the sample number is the same as the sample number currently in use, no action is taken. If the Sample Number data field is zero-length, no action is taken.
2. When the user selects another data field and (1) the Sample Number is found to exist in the database and (2) the Sample description is blank (zero-length), it is presumed that the user wishes to retrieve data previously entered into the database. In this instance, all memory variables will be reset to default values (typically -9999), then all data found in the database will be loaded into the appropriate memory variable. If the lab data file name stored in the database exists, the program will attempt to read the data, as though it had been selected using the File-Sample-Open option found in the Main Menu. No message will be displayed, and all previously entered data values will be displayed in the appropriate data field. This option allows the user to quickly-retrieve data when the sample number is known.
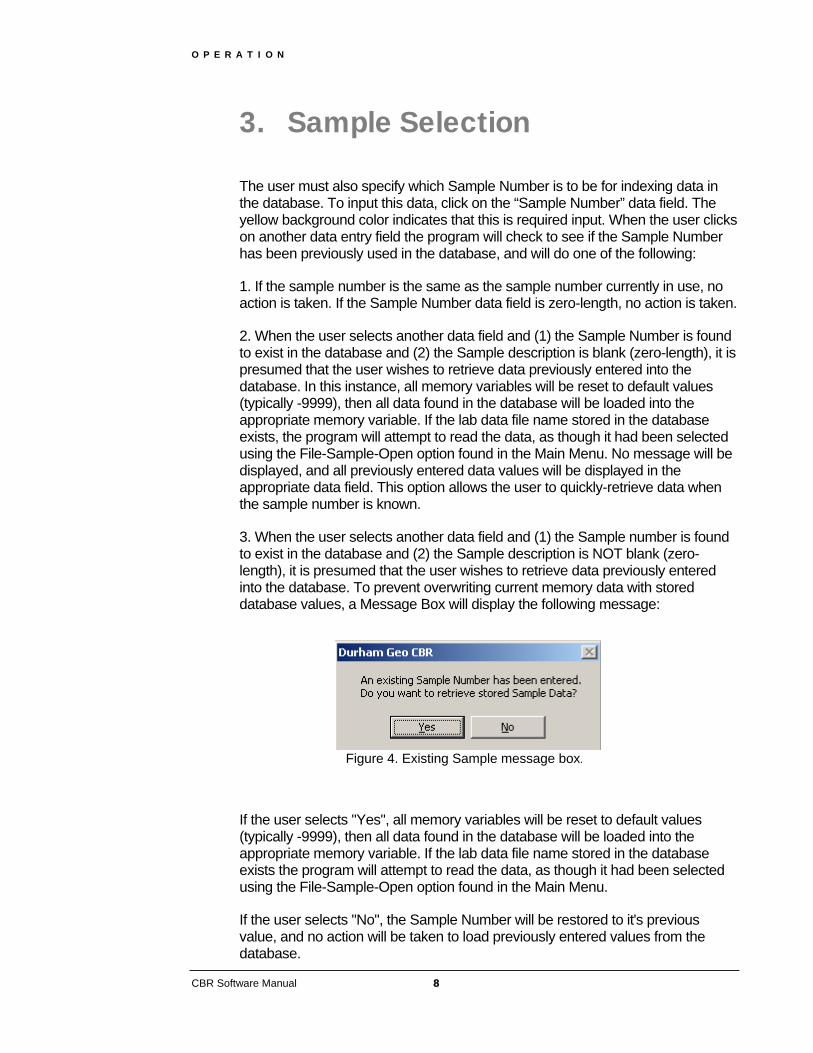
3. When the user selects another data field and (1) the Sample number is found to exist in the database and (2) the Sample description is NOT blank (zero-length), it is presumed that the user wishes to retrieve data previously entered into the database. To prevent overwriting current memory data with stored database values, a Message Box will display the following message:
Figure 4. Existing Sample message box.
If the user selects "Yes", all memory variables will be reset to default values (typically -9999), then all data found in the database will be loaded into the appropriate memory variable. If the lab data file name stored in the database exists the program will attempt to read the data, as though it had been selected using the File-Sample-Open option found in the Main Menu.
If the user selects "No", the Sample Number will be restored to it's previous value, and no action will be taken to load previously entered values from the database.
O P E R A T I O N
CBR Software Manual 9
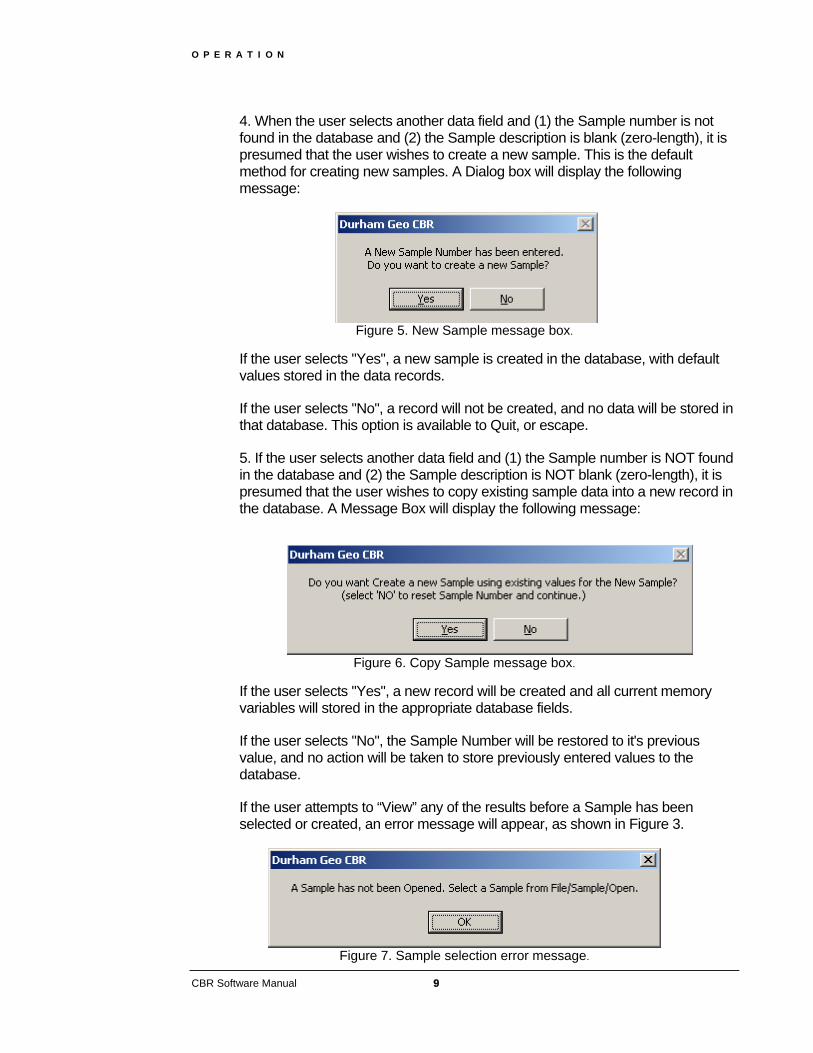
4. When the user selects another data field and (1) the Sample number is not found in the database and (2) the Sample description is blank (zero-length), it is presumed that the user wishes to create a new sample. This is the default method for creating new samples. A Dialog box will display the following message:
Figure 5. New Sample message box.
If the user selects "Yes", a new sample is created in the database, with default values stored in the data records.
If the user selects "No", a record will not be created, and no data will be stored in that database. This option is available to Quit, or escape.
5. If the user selects another data field and (1) the Sample number is NOT found in the database and (2) the Sample description is NOT blank (zero-length), it is presumed that the user wishes to copy existing sample data into a new record in the database. A Message Box will display the following message:
Figure 6. Copy Sample message box.
If the user selects "Yes", a new record will be created and all current memory variables will stored in the appropriate database fields.
If the user selects "No", the Sample Number will be restored to it's previous value, and no action will be taken to store previously entered values to the database.
If the user attempts to “View” any of the results before a Sample has been selected or created, an error message will appear, as shown in Figure 3.
Figure 7. Sample selection error message.

O P E R A T I O N
CBR Software Manual 10
4. Main Menu Contents
Three Menu options are available from the Main form: FILE, VIEW and HELP. These menu options contain the commands for file selection and program operation:
Figure 8. Main Menu.
For example, to select a project, the user must
1. Click on the “File” option to cause a “pull-down” menu to appear with “Project”, “Sample”, “Lab Data”, “Reset” and “Exit” listed as options.
2. Move the cursor over the “File” option and a submenu will appear listing “Open”, “Close” and “New”.
3. Click on “Open” and a new window will open to show previously created project data (Figure 9).
O P E R A T I O N
CBR Software Manual 11
A brief description of each Main Menu option is presented below.
FILE
1. Project
A. Open
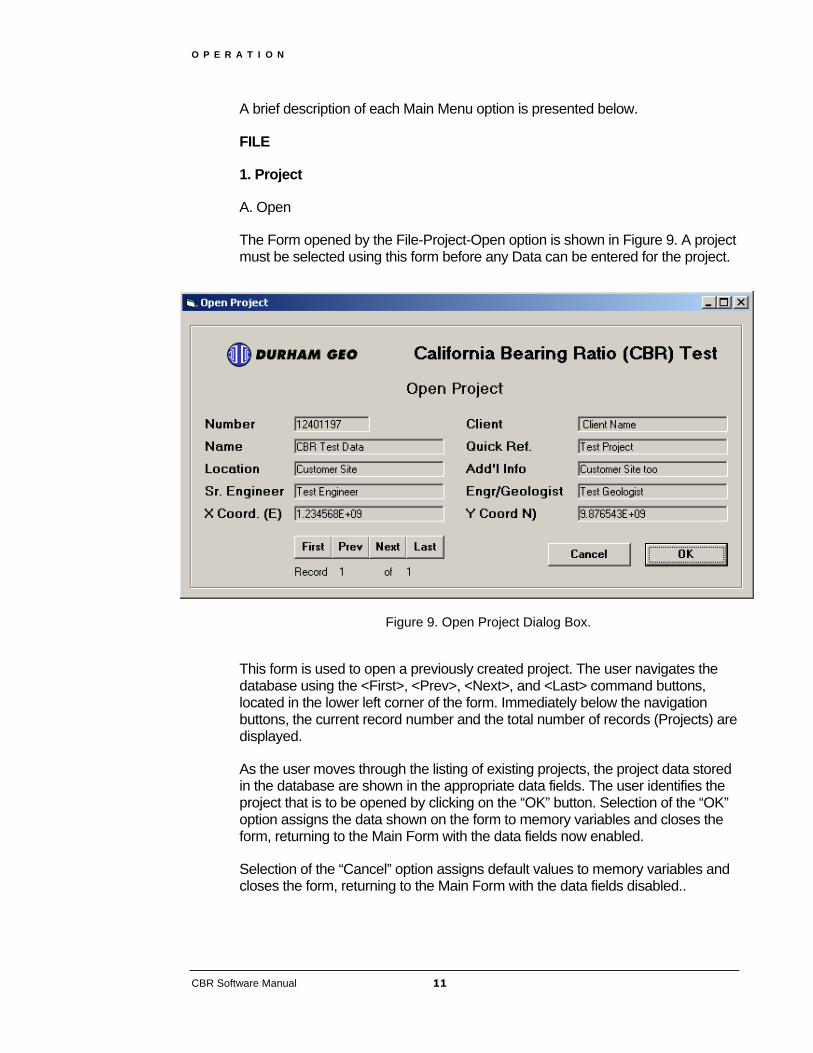
The Form opened by the File-Project-Open option is shown in Figure 9. A project must be selected using this form before any Data can be entered for the project.
Figure 9. Open Project Dialog Box.
This form is used to open a previously created project. The user navigates the database using the <First>, <Prev>, <Next>, and <Last> command buttons, located in the lower left corner of the form. Immediately below the navigation buttons, the current record number and the total number of records (Projects) are displayed.
As the user moves through the listing of existing projects, the project data stored in the database are shown in the appropriate data fields. The user identifies the project that is to be opened by clicking on the “OK” button. Selection of the “OK” option assigns the data shown on the form to memory variables and closes the form, returning to the Main Form with the data fields now enabled.
Selection of the “Cancel” option assigns default values to memory variables and closes the form, returning to the Main Form with the data fields disabled..

O P E R A T I O N
CBR Software Manual 12
B. Close
Selection of the File-Project-Close option will cause the message box shown in Figure 10 to be displayed.
Figure 10. Create Project Dialog Box.
If the user selects "Yes", all memory variables will be reset to default values. The user will be returned to the Main Form with all data fields disabled.
If the user selects "No", the message box will close and operations may continue uninterrupted.
C. New
Selecting the File-Project-New option will open a new form, see Figure 11. This form is used to create New Projects.
The user enters new project data in the appropriate data fields. The Project Name, Project Number, Client name and the Project Location are required values. Additional information for a second location descriptor, and a “short name” may also be entered to help identify the project. Data fields are also provided for the names of the Senior Engineer and Geologist. Numerical coordinates may be entered to locate the project.
A summary of variable properties is shown in Table 1.
The program will not allow overwriting of project data. If the user enters a Project Number that already exists in the database, a message box will be displayed advising the user of this. The New Project form will close, returning to the Main Form with the data fields disabled.
When the user completes input of the project data, selection of the “OK” option will cause the project databases to be created, and the data values input by the user stored in the appropriate database tables.
Selection of the “Cancel” option assigns default values to memory variables and returns to the Main Form with the data fields disabled.

O P E R A T I O N
CBR Software Manual 13
Figure 11. Create Project Dialog Box.

O P E R A T I O N
CBR Software Manual 14
2. Sample
A. Open
The Form opened by the File-Sample-Open option is shown in Figure 12. A
sample may be selected using this form, or by entering a sample number on the Main Form, as described in an earlier section of this document.
Figure12. Open/Load Sample Dialog Box.
This form is used to retrieve previously entered sample data. The user navigates the database using the <First>, <Prev>, <Next>, and <Last> command buttons, located in the lower left corner of the form. Immediately below the navigation buttons, the current record number and the total number of records (Samples) are displayed.
As the user moves through the listing of existing samples, the sample data stored in the database are shown in the appropriate data fields. The user identifies the sample data that is to be loaded by clicking on the “OK” button. Selection of the “OK” option retrieves all sample data from the database and loads the values to memory variables. The form then closes, returning the user to the Main Form.
Selection of the “Cancel” option assigns default values to memory variables and closes the form, returning the user to the Main Form.
O P E R A T I O N
CBR Software Manual 15
B. Save
Selecting the File-Sample-Save option will save all current menory variables to the dtabase. If the update is sucessfully completed, a message box will advise the user of this. If the update fails, a message box will display an error message stating " Error saving sample to database.
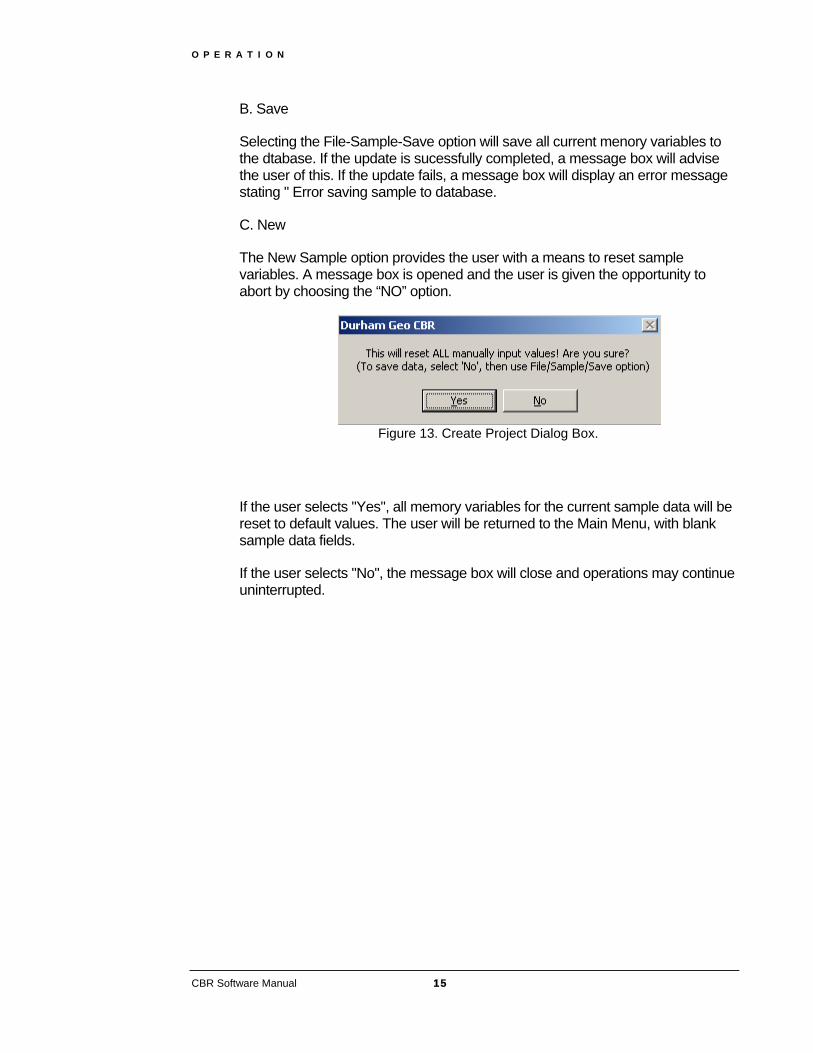
C. New
The New Sample option provides the user with a means to reset sample variables. A message box is opened and the user is given the opportunity to abort by choosing the “NO” option.
Figure 13. Create Project Dialog Box.
If the user selects "Yes", all memory variables for the current sample data will be reset to default values. The user will be returned to the Main Menu, with blank sample data fields.
If the user selects "No", the message box will close and operations may continue uninterrupted.
O P E R A T I O N
CBR Software Manual 16
3. Lab Data
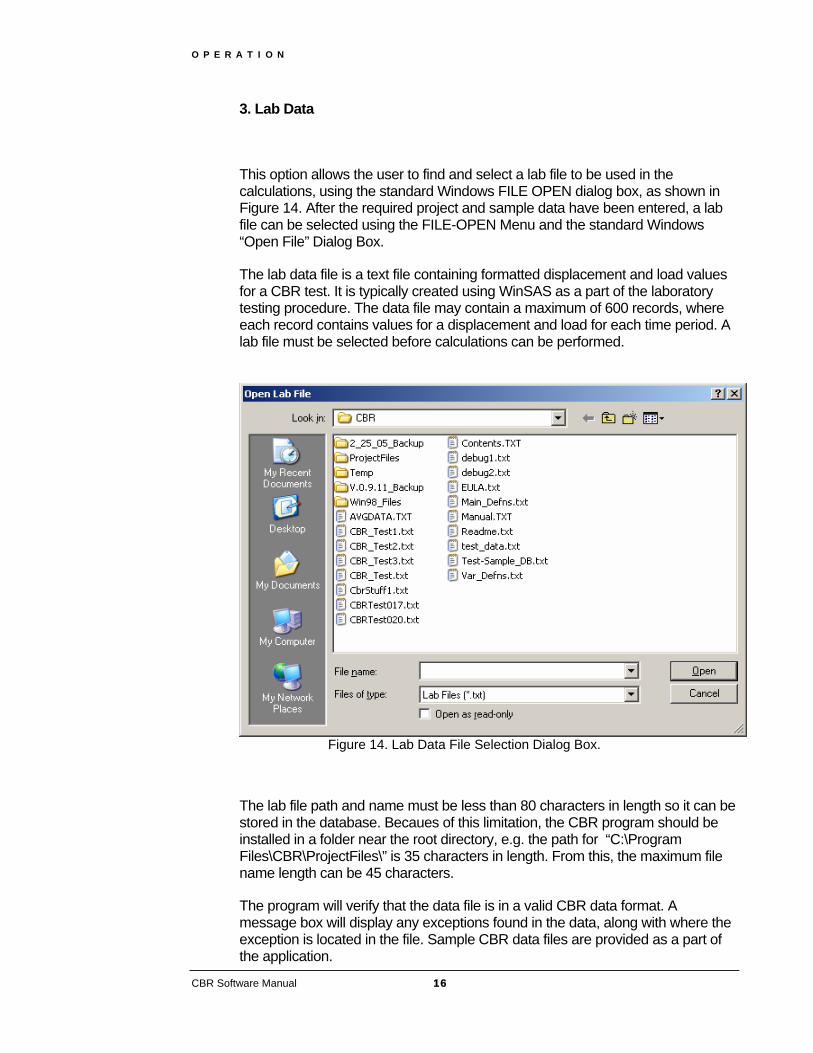
This option allows the user to find and select a lab file to be used in the calculations, using the standard Windows FILE OPEN dialog box, as shown in Figure 14. After the required project and sample data have been entered, a lab file can be selected using the FILE-OPEN Menu and the standard Windows “Open File” Dialog Box.
The lab data file is a text file containing formatted displacement and load values for a CBR test. It is typically created using WinSAS as a part of the laboratory testing procedure. The data file may contain a maximum of 600 records, where each record contains values for a displacement and load for each time period. A lab file must be selected before calculations can be performed.
Figure 14. Lab Data File Selection Dialog Box.
The lab file path and name must be less than 80 characters in length so it can be stored in the database. Becaues of this limitation, the CBR program should be installed in a folder near the root directory, e.g. the path for “C:\Program Files\CBR\ProjectFiles\” is 35 characters in length. From this, the maximum file name length can be 45 characters.
The program will verify that the data file is in a valid CBR data format. A message box will display any exceptions found in the data, along with where the exception is located in the file. Sample CBR data files are provided as a part of the application.

O P E R A T I O N
CBR Software Manual 17
The program will also verify that minimum penetration depth and required observation intervals in the test data file conform to ASTM D 1883-99 specifications. A message box will display any exceptions found in the data, along with an option to abort the lab data input operation. An example of an error message is shown in Figure 15.
Figure 15. Create Project Dialog Box.
After the user selects a valid CBR data file a new form is opened to display the data, as shown in Figure 16.
Figure 16. Lab Data Dialog Box.
O P E R A T I O N
CBR Software Manual 18
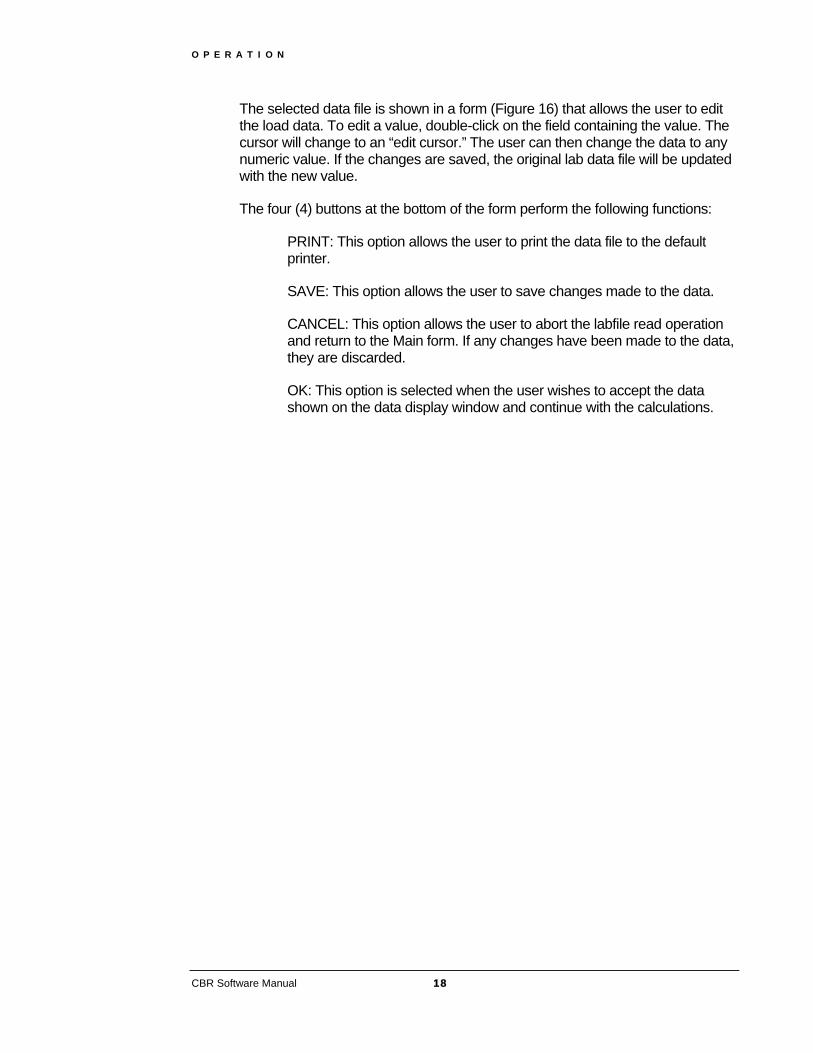
The selected data file is shown in a form (Figure 16) that allows the user to edit the load data. To edit a value, double-click on the field containing the value. The cursor will change to an “edit cursor.” The user can then change the data to any numeric value. If the changes are saved, the original lab data file will be updated with the new value.
The four (4) buttons at the bottom of the form perform the following functions:
PRINT: This option allows the user to print the data file to the default printer.
SAVE: This option allows the user to save changes made to the data.
CANCEL: This option allows the user to abort the labfile read operation and return to the Main form. If any changes have been made to the data, they are discarded.
OK: This option is selected when the user wishes to accept the data shown on the data display window and continue with the calculations.
O P E R A T I O N
CBR Software Manual 19
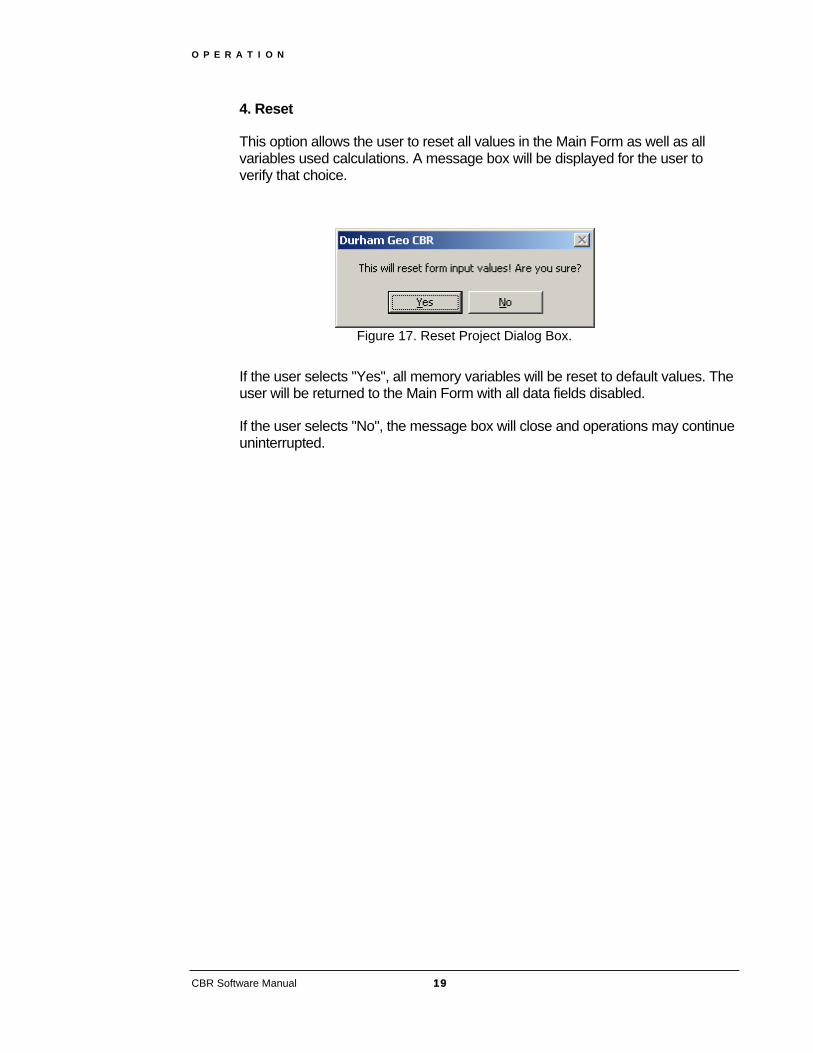
4. Reset
This option allows the user to reset all values in the Main Form as well as all variables used calculations. A message box will be displayed for the user to verify that choice.
Figure 17. Reset Project Dialog Box.
If the user selects "Yes", all memory variables will be reset to default values. The user will be returned to the Main Form with all data fields disabled.
If the user selects "No", the message box will close and operations may continue uninterrupted.
O P E R A T I O N
CBR Software Manual 20
5. Exit
This option allows the user to Exit the program.
VIEW
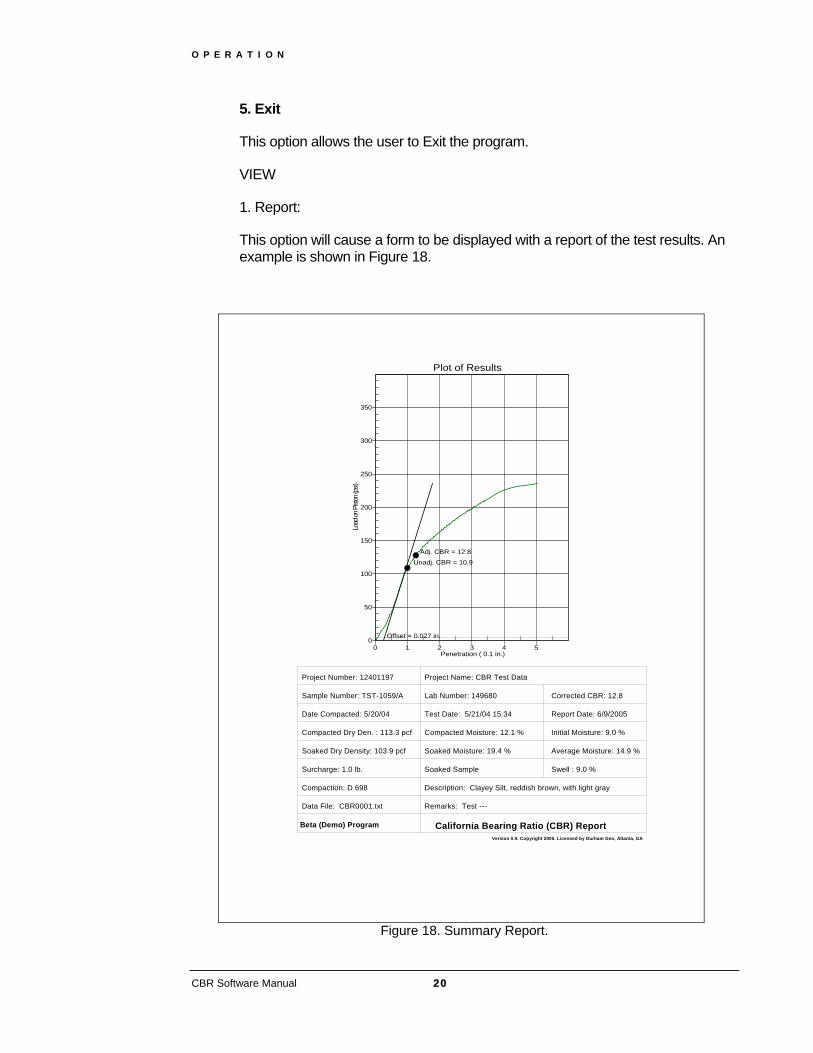
1. Report:
This option will cause a form to be displayed with a report of the test results. An example is shown in Figure 18.
Offset = 0.027 in.
Unadj. CBR = 10.9 Adj. CBR = 12.8
0
50
100
150
200
250
300
350
0 1 2 3 4 5
Plot of Results L
oad
on P
iston
(psi)
Penetration ( 0.1 in.)
Project Number: 12401197 Project Name: CBR Test Data
Sample Number: TST-1059/A Lab Number: 149680 Corrected CBR: 12.8
Date Compacted: 5/20/04 Test Date: 5/21/04 15:34 Report Date: 6/9/2005
Compacted Dry Den. : 113.3 pcf Compacted Moisture: 12.1 % Initial Moisture: 9.0 %
Soaked Dry Density: 103.9 pcf Soaked Moisture: 19.4 % Average Moisture: 14.9 %
Surcharge: 1.0 lb. Soaked Sample Swell : 9.0 %
Compaction: D 698 Description: Clayey Silt, reddish brown, with light gray
Data File: CBR0001.txt Remarks: Test ---
Beta (Demo) Program California Bearing Ratio (CBR) ReportVersion 0.9. Copyright 2005. Licensed by Durham Geo, Atlanta, GA
Figure 18. Summary Report.
O P E R A T I O N
CBR Software Manual 21
Four Menu options on the form allow the user to change the page or printer setup, print the results or exit the Form. The operations are the same as for the form that displays the graphic results, described in the next section.
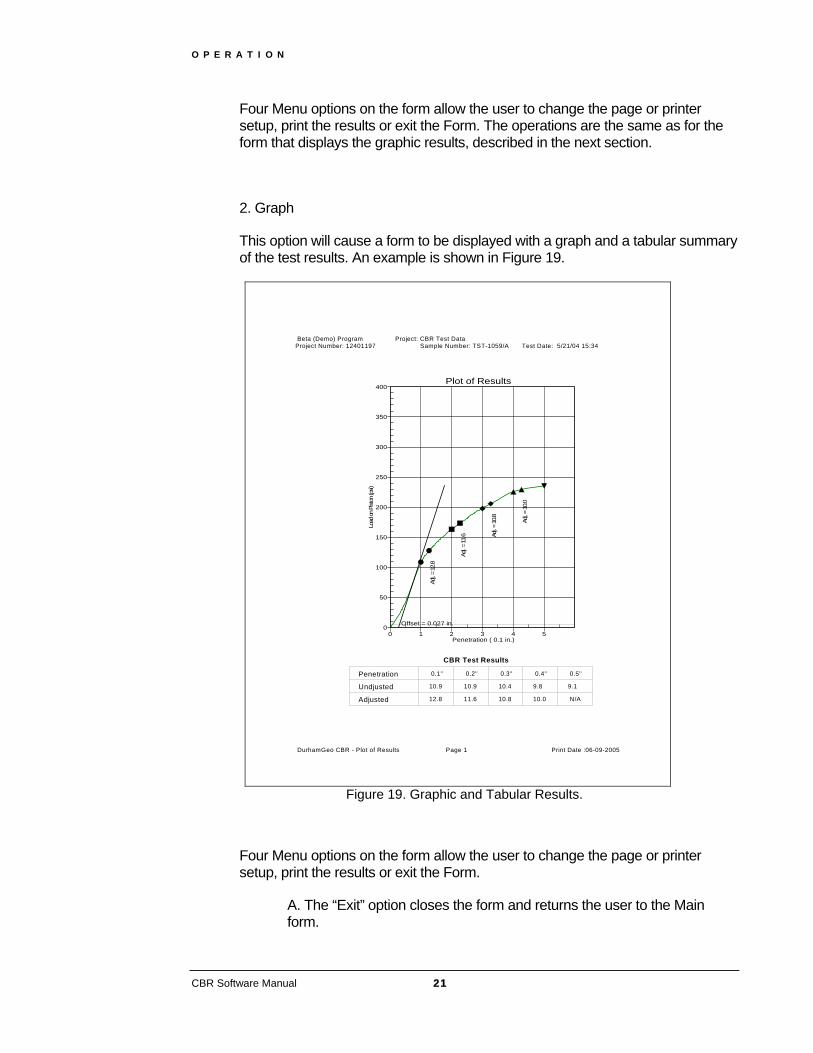
2. Graph
This option will cause a form to be displayed with a graph and a tabular summary of the test results. An example is shown in Figure 19.
Offset = 0.027 in.
Adj.
= 1
2.8
Adj.
= 1
1.6 Adj.
= 1
0.8
Adj.
= 1
0.0
0
50
100
150
200
250
300
350
400
0 1 2 3 4 5
Plot of Results L
oad
on P
iston
(psi)
Penetration ( 0.1 in.)
Beta (Demo) Program Project: CBR Test DataProject Number: 12401197 Sample Number: TST-1059/A Test Date: 5/21/04 15:34
Penetration
Undjusted
Adjusted
CBR Test Results
0.1'' 0.2'' 0.3'' 0.4'' 0.5''
10.9 10.9 10.4 9.8 9.1
12.8 11.6 10.8 10.0 N/A
DurhamGeo CBR - Plot of Results Page 1 Print Date :06-09-2005
Figure 19. Graphic and Tabular Results.
Four Menu options on the form allow the user to change the page or printer setup, print the results or exit the Form.
A. The “Exit” option closes the form and returns the user to the Main form.

O P E R A T I O N
CBR Software Manual 22
B. The “Page Setup“ option will display the standard Windows Page Setup Dialog box to allow the user to change parameters for viewing the page.
C. The “Print Setup“option will display the standard Windows Print Setup Dialog box to allow the user to change parameters for the default printer.
D. The “Print“ option will print the screen to the default printer.
Four Menu options described for the graphic test results are the same as for the form that displays the report results, described in the previous section.
3. Results
This option allows the user to display the results of calculations for the Bearing Ratio values. A message box will be displayed with the summary of the results, along with the value to be reported, according to the ASTM specifications.
Figure 20. Summary of Results
4. Status Bar
This option allows the user to turn the status bar display located at he bottom of the Main form on or off.
HELP
1. Load Test Data
This option is included to allow the user an easy way to see how the program works and to provide a default data set to verify that the program is working correctly. Selecting this option will load a default data set into the appropriate memory variables and update the Main Form. The Summary Report, the Graphic Results and Tabular Summary of the test results, and the Results of calculations may be viewed.

O P E R A T I O N
CBR Software Manual 23
2. About:
This option allows the user to identify the version and license information for the program. An option to display System Information is also available.
Figure 21. About Durham Geo CBR Program.
Selecting the “System Info” option will display the System Information dialog box.
Figure 22. System Information
O P E R A T I O N
CBR Software Manual 24
Data Entry
The Project Name and Project Number shown on the Main Form are selected using the procedures described earlier, rather than directly input by the user. The values shown will be used for all database operations. As previously discussed, a Project number and Sample Number must be specified by the user before data entry functions are enabled.
Most of the data field labels are self-explanatory. Except for the Sample Number, all values are optional. If a value is entered, it will be used in the calculations, if possible, and included on the Summary Report, as appropriate. A summary of variable properties is shown in Table 1.
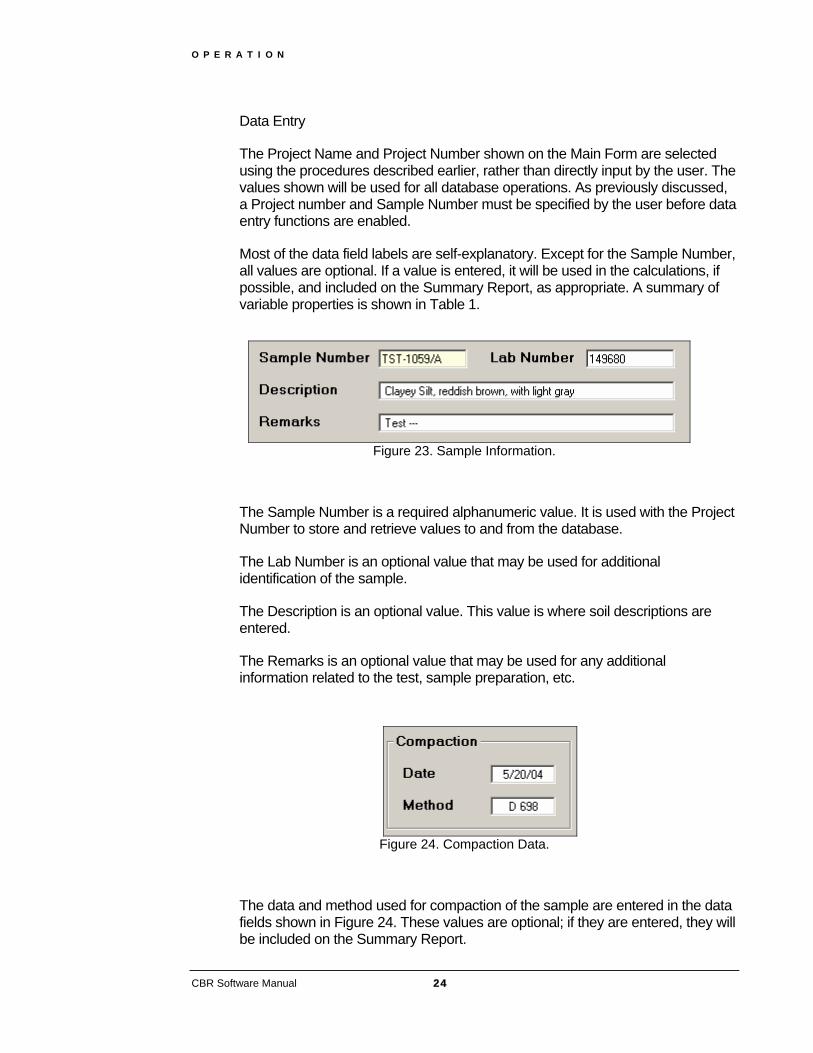
Figure 23. Sample Information.
The Sample Number is a required alphanumeric value. It is used with the Project Number to store and retrieve values to and from the database.
The Lab Number is an optional value that may be used for additional identification of the sample.
The Description is an optional value. This value is where soil descriptions are entered.
The Remarks is an optional value that may be used for any additional information related to the test, sample preparation, etc.
Figure 24. Compaction Data.
The data and method used for compaction of the sample are entered in the data fields shown in Figure 24. These values are optional; if they are entered, they will be included on the Summary Report.
O P E R A T I O N
CBR Software Manual 25
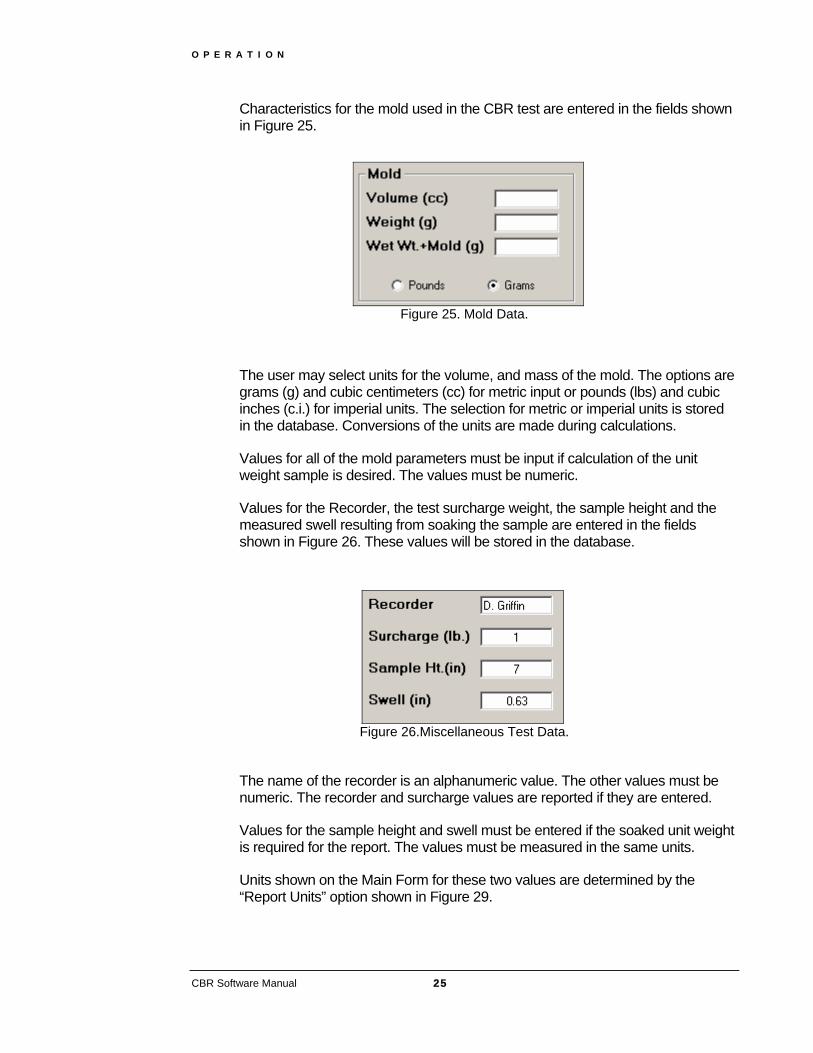
Characteristics for the mold used in the CBR test are entered in the fields shown in Figure 25.
Figure 25. Mold Data.
The user may select units for the volume, and mass of the mold. The options are grams (g) and cubic centimeters (cc) for metric input or pounds (lbs) and cubic inches (c.i.) for imperial units. The selection for metric or imperial units is stored in the database. Conversions of the units are made during calculations.
Values for all of the mold parameters must be input if calculation of the unit weight sample is desired. The values must be numeric.
Values for the Recorder, the test surcharge weight, the sample height and the measured swell resulting from soaking the sample are entered in the fields shown in Figure 26. These values will be stored in the database.
Figure 26.Miscellaneous Test Data.
The name of the recorder is an alphanumeric value. The other values must be numeric. The recorder and surcharge values are reported if they are entered.
Values for the sample height and swell must be entered if the soaked unit weight is required for the report. The values must be measured in the same units.
Units shown on the Main Form for these two values are determined by the “Report Units” option shown in Figure 29.
O P E R A T I O N
CBR Software Manual 26
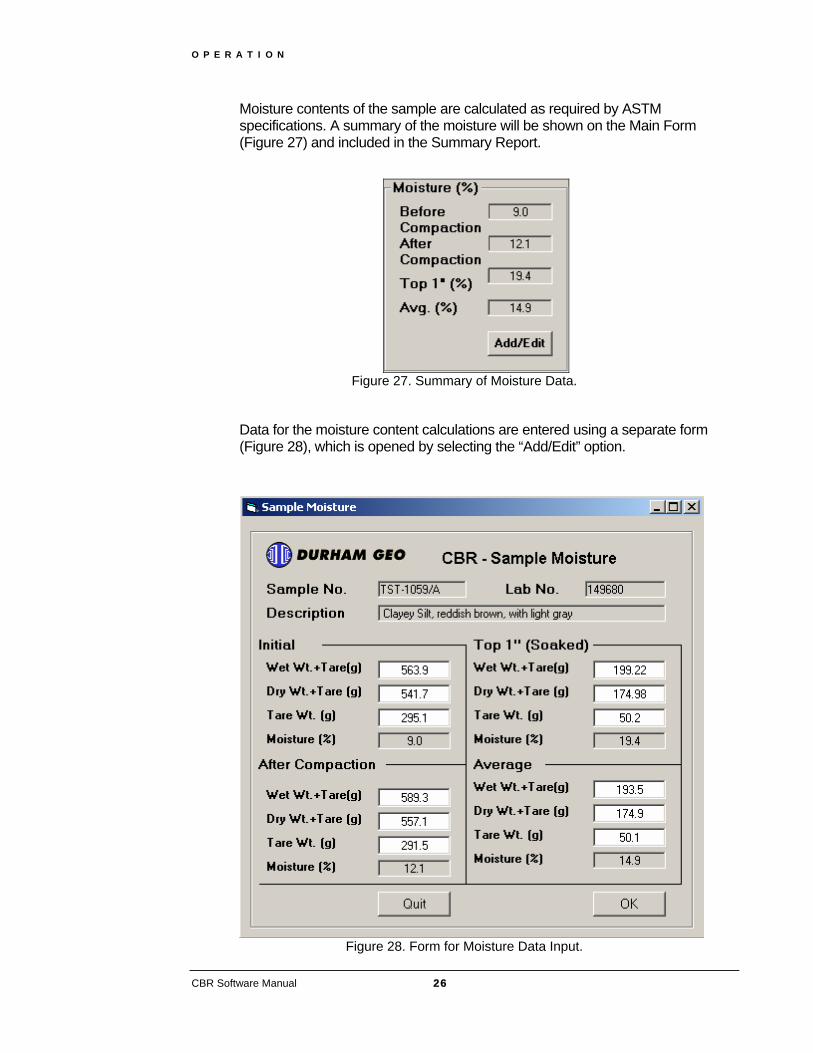
Moisture contents of the sample are calculated as required by ASTM specifications. A summary of the moisture will be shown on the Main Form (Figure 27) and included in the Summary Report.
Figure 27. Summary of Moisture Data.
Data for the moisture content calculations are entered using a separate form (Figure 28), which is opened by selecting the “Add/Edit” option.
Figure 28. Form for Moisture Data Input.

O P E R A T I O N
CBR Software Manual 27
Moisture content for “Initial“, “After Compaction“, “Top 1” (soaked) “, and “Average“ may be calculated as a part of the testing and reporting procedures. All values entered must be in the units of grams (g).
Values for the “Initial” and “Average“ moisture may be for any values the user chooses. Presumably, "Initial" is for any test before compaction, and "Average" is for whatever combination(s) the user wishes to include. If they are entered, the values will be stored in the database, with the calculated results reported.
Values for “Top 1” (soaked)” are used for calculations of the soaked dry unit weight. A discussion of the methodology used in calculations in presented in the following section.
Miscellaneous options for the CBR test are shown in Figure 29
Figure 29.Main Form with Data Input.
Auto Save is a feature that will automatically update the database before any calculations are performed by the program. This is to prevent data loss if the system should encounter an error or otherwise become unstable. The Auto Save value is not stored in the database. It is set to “On” (Checked) each time the program is started. The user must turn this option “Off” (Unchecked) if they wish to temporarily disable this feature.
The “2nd Test” option should be selected if the current test is a retest of a sample, as required by ASTM, when the CBR value calculated for 0.2” of penetration exceeds the penetration at 0.1”. This will allow the correct value to be shown on the Summary Report.
Units for the Summary Report are determined by the “Report Units” option. This option also determines which units will be shown for the sample height and swell values entered for the test.

O P E R A T I O N
CBR Software Manual 28
Table 1. Summary of Variables. Variable Required Type Max. Characters
Project Number Yes Alphanumeric 15 Project Name Yes Alphanumeric 40 Client Yes Alphanumeric 40 Location 1 Yes Alphanumeric 40 Location 2 No Alphanumeric 40 Short Name No Alphanumeric 20 Sr.Engineer No Alphanumeric 30 Engr/Geologist No Alphanumeric 30 X Coordinate No Numeric * Y Coordinate No Numeric * Sample Number Yes Alphanumeric 10 Lab Number No Alphanumeric 10 Lab File Name (N/A, Auto) Alphanumeric 80 Recorder No Alphanumeric 15 Sample Description No Alphanumeric 45 Remarks No Alphanumeric 45 SoakSurcharge No Numeric * SwellInc No Numeric * SampleHt No Numeric * Mold Vol No Numeric * Mold Wt No Numeric * Mold WetWt No Numeric * MetricInput ** Boolean ** SecondTest ** Boolean ** DateCompacted No Alphanumeric 10 CompactMethod No Alphanumeric 10 MetricOutput ** Boolean ** Soaked (N/A, Auto) Boolean ** Before C WetTare No Numeric * Before C DryTare No Numeric * Before C Tare No Numeric * After C WetTare No Numeric * After C DryTare No Numeric * After C Tare No Numeric * Top WetTare No Numeric * Top DryTare No Numeric * Top Tare No Numeric * Avg WetTare No Numeric * Avg DryTare No Numeric * Avg Tare No Numeric *
* Numeric Values are stores as single precision numbers. ** Boolean Values are stored as True/False.

O P E R A T I O N
CBR Software Manual 29
Calculations
A brief overview of relevant calculations is presented below.
1. CBR Values
The CBR value is calculated using the lab data, according to ASTM specifications.
The maximum slope of the Load v. Penetration data is calculated using linear regression. The regression uses each data point, along with five (5) data points to either side. The maximum slope and the point where the maximum slope occurred are used to determine the X-intercept, which is the offset. This offest is added to each penetration value (0.1” – 0.5”) to determine the adjusted value, if appropriate.
The data set is then searched to find a matching value for the standard incremental penetration. If a penetration is found to be the same as the Incremental penetration, the load for that value is used for calculation of the Unadjusted Bearing Ratio. If a penetration is not found in the data set, the closest values (higher and lower) are used to interpolate an appropriate load value.
Once the load value has been determined for the penetration, it is divided by the area of the piston and by the appropriate standard load to produce the unadjusted CBR value. The offset is then added to the standard penetration (e.g. 0.1” + offset), and the process described above is repeated to calculate the Adjusted Bearing Ratio.
Each incremental penetration is calculated in turn, with the results stored in memory values. The results are presented in a table on the graphic report.
In the event that the data was not collected for the required 0.5” penetration, the program will advise the user of this. If the data collection stops before 0.2” of penetration, the standard load will be interpolated, as required by the ASTM specifications.
2. Moisture and Density Values
A. Valid Mold data MUST be entered, i.e. (Mold Wt. + Wet Wt. of Soil),
Mold Wt. & Mold Vol.
(Values are converted using double precision, if req'd.)
B. Wet wt. of soil (WetWt) is determined.
WetWt = (Mold Wt. + Wet Wt. of Soil) - Mold Wt.
NOTE: IF VALID MOLD DATA ARE NOT ENTERED, NO DENSITY CALCULATIONS ARE PERFORMED

O P E R A T I O N
CBR Software Manual 30
-- FOR "AFTER COMPACTION" Density
A. If "After Compaction" moisture (After_C_Wc, %) was calculated, Mass of solids (Ms) is calculated using formula:
Ms = WetWt / (1 + (After_C_Wc / 100))
B. Dry density "After Compaction" (Gamma_C) determined by:
Gamma_C = Ms / Mold Vol.
C. If "After Compaction" moisture (After_C_Wc, %)was NOT calculated, Gamma_C is set to default value (NOT reported).
-- FOR "AFTER SOAKING" Density
Dry density "After Soaking" (Gamma_S) determined by:
A. If Top 1" moisture (Top_Wc) was calculated:
1. If Swell data were entered and Swell(%) was calculated, then mold volume is corrected:
MoldVol_S = Mold Vol. * (1 + (Swell / 100))
2. If Swell data were not entered no correction is made.
(MoldVol_S = Mold Vol.)
B. If Mass of solids (Ms) was calculated for "After Compaction" (Ms "After Compaction" is the same as Ms "After Soaking")
Dry density "After Soaking" (Gamma_S) = Ms / MoldVol_S
[Done, Step C is NOT required.]
C. If Mass of solids (Ms) was NOT calculated for "After Compaction," Mold data is assumed to be for "After Soaking," i.e. Mold Wt., etc. are for values determined after the test has been completed.
1. If "After Soaking" (Top 1") moisture (Top_Wc, %) was calculated, Mass of solids (Ms) is calculated using formula:
Ms = WetWt / (1 + (Top_Wc / 100))
2. Dry density "After Soaking" (Gamma_S) determined by:
Gamma_S = Ms / Mold Vol.
D. If "After Soaking" moisture (Top_Wc, %) was NOT calculated, Gamma_S is set to default value (NOT reported).

Chapter
4 D A T A B A S E
DATA BASE
The Durham Geo California Bearing Ratio (CBR) Test Report Software uses a Microsoft Access database to store data input by users. The databases created by the program are compatible with Access 2000. While the databases can be directly manipulated using the Access database program, it is not recommended. Because some of the data required by the CBR program may become corrupted by direct manipulation of the data tables, such operations may render the database useless.
This overview is included to assist system administrators in understanding how the databases work so they can maintain the system and provide for a more efficient operation of the CBR software product.
The CBR software is delivered with the capability to create and maintain all databases required for proper operation. The software may be installed in any location on a hard drive. The directory selected for installation will be called the application directory in this discussion. The software should be installed in a first or second level directory, if possible. e.g. C:\Program Files\CBR (Refer to Chapter 2 for additional information)
When the CBR software is started for the first time, a database will be created in the application directory. This file (Projects.mdb) will be used to store relevant project data as each project is created. The project data listed in the Open Project Dialog Box (Figure 9) ie retrieved from the Projects.mdb file. If this file becomes corrupted, all previously entered project data may be inaccessible. Therefore, this file is password protected.
The Projects.mdb contains one table, named Job_Data. The schema for the Job_Data table provides for the following fields:
Project_Number Project_Name Client Location1 Location2 Short_Name Sr_Engineer Engr_Geol X_cor Y_cor Project_Path
D A T A B A S E
CBR Software Manual 32
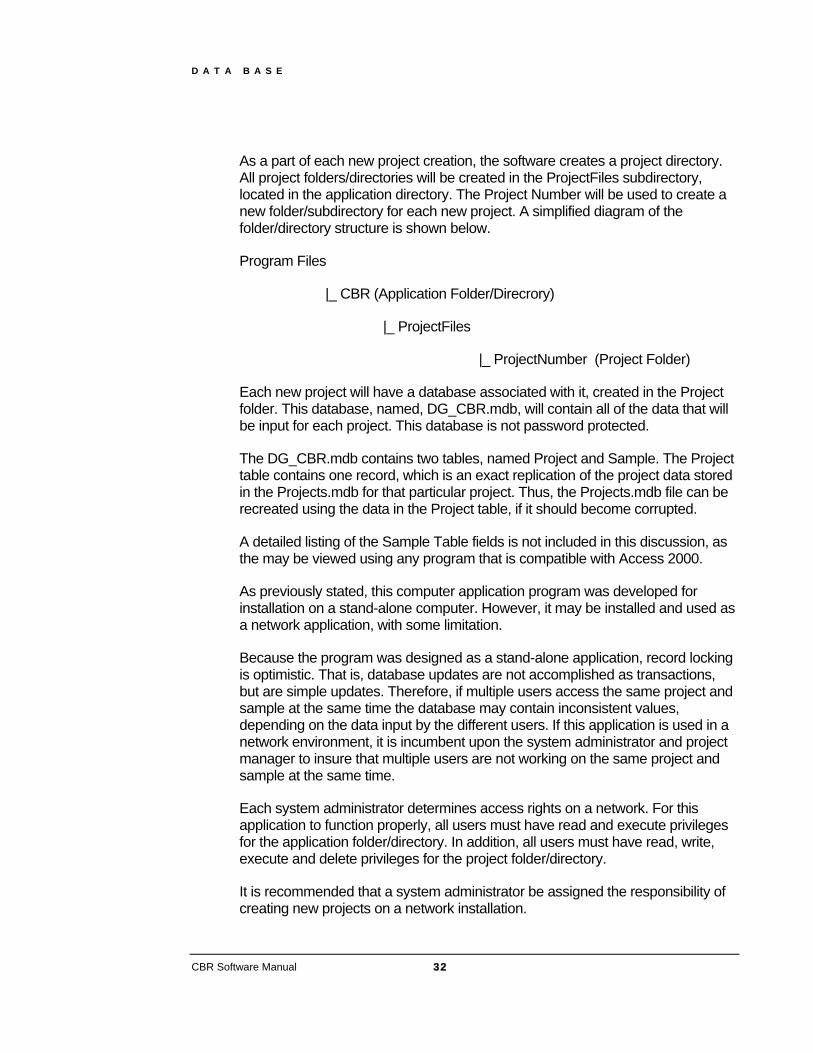
As a part of each new project creation, the software creates a project directory. All project folders/directories will be created in the ProjectFiles subdirectory, located in the application directory. The Project Number will be used to create a new folder/subdirectory for each new project. A simplified diagram of the folder/directory structure is shown below.
Program Files
|_ CBR (Application Folder/Direcrory)
|_ ProjectFiles
|_ ProjectNumber (Project Folder)
Each new project will have a database associated with it, created in the Project folder. This database, named, DG_CBR.mdb, will contain all of the data that will be input for each project. This database is not password protected.
The DG_CBR.mdb contains two tables, named Project and Sample. The Project table contains one record, which is an exact replication of the project data stored in the Projects.mdb for that particular project. Thus, the Projects.mdb file can be recreated using the data in the Project table, if it should become corrupted.
A detailed listing of the Sample Table fields is not included in this discussion, as the may be viewed using any program that is compatible with Access 2000.
As previously stated, this computer application program was developed for installation on a stand-alone computer. However, it may be installed and used as a network application, with some limitation.
Because the program was designed as a stand-alone application, record locking is optimistic. That is, database updates are not accomplished as transactions, but are simple updates. Therefore, if multiple users access the same project and sample at the same time the database may contain inconsistent values, depending on the data input by the different users. If this application is used in a network environment, it is incumbent upon the system administrator and project manager to insure that multiple users are not working on the same project and sample at the same time.
Each system administrator determines access rights on a network. For this application to function properly, all users must have read and execute privileges for the application folder/directory. In addition, all users must have read, write, execute and delete privileges for the project folder/directory.
It is recommended that a system administrator be assigned the responsibility of creating new projects on a network installation.
L I M I T E D W A R R A N T Y
C
LIMITED WARRANTY
hapter
5 DURHAM GEO SLOPE INDICATOR (herein after “DGSI”) warrants that (a) the SOFTWARE PRODUCT will, for a period of ninety (90) days from the date of your receipt, perform substantially in accordance with written materials accompanying it, and (b) any Support Services shall be substantially as described in applicable written materials provided to you by DGSI, and (c) DGSI support engineers will make reasonable efforts to solve any problems with the SOFTWARE PRODUCT. DGSI and its suppliers' entire liability and your exclusive remedy shall be, at DGSI's option, either (a) return of the price paid by you for the SOFTWARE PRODUCT (not to exceed the suggested retail price) if any, or (b) repair or replacement of the component(s) of the SOFTWARE PRODUCT that do(es) not meet DGSI's Limited Warranty and which is returned to DGSI with a copy of your purchase receipt. This Limited Warranty is void if failure of the SOFTWARE PRODUCT has resulted from accident, abuse, or misapplication. Any replacement SOFTWARE PRODUCT will be warranted for the remainder, of the original warranty period or thirty (30) days, whichever is longer. DGSI AND ITS AFFILIATED COMPANIES DISCLAIM ALL OTHER WARRANTIES AND CONDITIONS, EITHER EXPRESS OR IMPLIED, INCLUDING, BUT NOT LIMITED TO, IMPLIED WARRANTIES OF ERCHANTABILITY OR FITNESS FOR A PARTICULAR PURPOSE WITH REGARD TO THE SOFTWARE PRODUCT AND THE PROVISION OF OR FAILURE TO PROVIDE SUPPORT SERVICES. IN NO EVENT SHALL DGSI OR ITS AFFILIATED COMPANIES BE LIABLE FOR ANY SPECIAL, INCIDENTAL, INDIRECT, OR CONSEQUENTIAL DAMAGES WHATSOEVER ARISING OUT OF THE USE OF OR INABILITY TO USE THE SOFTWARE PRODUCT OR THE PROVISION OF OR FAILURE TO PROVIDE SUPPORT SERVICES, EVEN IF DGSI OR ITS AFFILIATED COMPANIES HAVE BEEN ADVISED OF THE POSSIBILITY OF SUCH DAMAGES. DGSI OR ITS AFFILIATED COMPANIES ENTIRE LIABILITY UNDER ANY PROVISION OF THIS EULA SHALL BE LIMITED TO THE GREATER OF THE AMOUNT ACTUALLY PAID BY YOU FOR THE SOFTWARE PRODUCT OR ONE HUNDRED UNITED STATES DOLLARS (U.S. $100.00).
call 1-800-837-0864 (toll free) or +1 (770) 465-7557
e-mail [email protected]
CBR Software Manual 33