Embed Size (px)
Citation preview
VERSANT® kPCR Molecular SystemApplication Guide Addendum
Running Dynamic Assay Protocols Using the VERSANT kPCR Molecular System
SMN: 10814065 Rev. C
© 2013–2016 Siemens Healthcare Diagnostics Inc. All rights reserved.
05/2016
Siemens Healthcare HeadquartersSiemens Healthcare GmbHHenkestr. 12791052 ErlangenGermanyPhone: +49 9131 84-0siemens.com/healthcare
Siemens Healthcare Diagnostics Ltd. Sir William Siemens Sq.Frimley, Camberley, UK GU16 8QD
Siemens Healthcare Diagnostics Inc.511 Benedict AvenueTarrytown, NY 10591-5097 USAwww.siemens.com/diagnostics
Made in USA
Copyrights
No part of this work covered by the copyrights herein may be reproduced or copied in any form or by any means (graphic, electronic, or mechanical; including photocopying, recording, typing, or information storage and retrieval systems) without the written permission of the publisher.
Limitations and conditions
Software screen illustrations within this manual are representational only and may not exactly match the software. Software screen illustrations are intended to identify the location of software screen elements and components. The actual image might not be translated into all native languages.
The information in this guide was correct at the time of printing. However, Siemens continues to improve products and reserves the right to change specifications, equipment, and maintenance procedures at any time without notice. Because variance cannot be precluded entirely, we cannot guarantee full consistency. The information in this publication is reviewed regularly and necessary corrections are included in subsequent editions.
Siemens Healthcare Diagnostics has validated the provided instructions, reagents, instrument, software and customizable features for this system to optimize product performance and meet product specifications. User defined modifications are not supported by Siemens as they may affect performance of the system and test results. It is the responsibility of the user to validate any modifications made to these instructions, instruments, reagents or software provided by Siemens.
If the system is used in a manner differently than specified by Siemens Healthcare Diagnostics, the protection provided by the equipment may be impaired. See warning and hazard statements in this guide.
Trademarks
VERSANT is a trademark of Siemens Healthcare Diagnostics Inc.
Regulatory information
For In Vitro Diagnostic Use.
Contents
Introduction . . . . . . . . . . . . . . . . . . . . . . . . . . . . . . . . . . . . . . . . . . . . . . . 5
Intended use . . . . . . . . . . . . . . . . . . . . . . . . . . . . . . . . . . . . . . . . . . . . . . . . . . . . . . . . . . . . . . . . . . . . .6
About this addendum . . . . . . . . . . . . . . . . . . . . . . . . . . . . . . . . . . . . . . . . . . . . . . . . . . . . . . . . . . . . . .7
About Dynamic Assay Protocols . . . . . . . . . . . . . . . . . . . . . . . . . . . . . . . . . . . . . . . . . . . . . . . . . . . . . .8
Preparing to run Dynamic assays . . . . . . . . . . . . . . . . . . . . . . . . . . . . . .9
Preparing the AD Module . . . . . . . . . . . . . . . . . . . . . . . . . . . . . . . . . . . . . . . . . . . . . . . . . . . . . . . . . .10
Preparing the SP Module . . . . . . . . . . . . . . . . . . . . . . . . . . . . . . . . . . . . . . . . . . . . . . . . . . . . . . . . . .10
Preparing and loading the Sample Preparation Reagents . . . . . . . . . . . . . . . . . . . . . . . . . . . . . . . . .11
Preparing the samples . . . . . . . . . . . . . . . . . . . . . . . . . . . . . . . . . . . . . . . . . . . . . . . . . . . . . . . . . . . .11
Preparing assay reagents . . . . . . . . . . . . . . . . . . . . . . . . . . . . . . . . . . . . . . . . . . . . . . . . . . . . . . . . . .13
Preparing the Control Carrier . . . . . . . . . . . . . . . . . . . . . . . . . . . . . . . . . . . . . . . . . . . . . . . . . . . . . . .14
Running Dynamic Assay Protocols . . . . . . . . . . . . . . . . . . . . . . . . . . . .17
Starting a run . . . . . . . . . . . . . . . . . . . . . . . . . . . . . . . . . . . . . . . . . . . . . . . . . . . . . . . . . . . . . . . . . . .18
Configuring a Dynamic Assay run . . . . . . . . . . . . . . . . . . . . . . . . . . . . . . . . . . . . . . . . . . . . . . . . . . .19
Adding additional samples to one or more assays . . . . . . . . . . . . . . . . . . . . . . . . . . . . . . . . . . . . . .22
Loading samples . . . . . . . . . . . . . . . . . . . . . . . . . . . . . . . . . . . . . . . . . . . . . . . . . . . . . . . . . . . . . . . . .25
Using the Worklist Editor . . . . . . . . . . . . . . . . . . . . . . . . . . . . . . . . . . . . . . . . . . . . . . . . . . . . . . . . . .26
Loading the consumables . . . . . . . . . . . . . . . . . . . . . . . . . . . . . . . . . . . . . . . . . . . . . . . . . . . . . . . . .28
Loading the Control (No SP) carrier . . . . . . . . . . . . . . . . . . . . . . . . . . . . . . . . . . . . . . . . . . . . . . . . . .32
Completing the SP Module run . . . . . . . . . . . . . . . . . . . . . . . . . . . . . . . . . . . . . . . . . . . . . . . . . . . . .33
Configuring the AD Module for Dynamic Assay Protocols . . . . . . . . . . . . . . . . . . . . . . . . . . . . . . . . .34
Loading the PCR plate . . . . . . . . . . . . . . . . . . . . . . . . . . . . . . . . . . . . . . . . . . . . . . . . . . . . . . . . . . . . .35
Importing the plate map . . . . . . . . . . . . . . . . . . . . . . . . . . . . . . . . . . . . . . . . . . . . . . . . . . . . . . . . . .35
Identifying and marking wells with Sample Preparation errors . . . . . . . . . . . . . . . . . . . . . . . . . . . .37
About removing invalid test results from the LIS . . . . . . . . . . . . . . . . . . . . . . . . . . . . . . . . . . . . . . . .40
Starting a run on the AD Module . . . . . . . . . . . . . . . . . . . . . . . . . . . . . . . . . . . . . . . . . . . . . . . . . . . .40
Completing the AD Module run . . . . . . . . . . . . . . . . . . . . . . . . . . . . . . . . . . . . . . . . . . . . . . . . . . . . .41
VERSANT kPCR Assays - Application Guide Addendum 10814065 Rev. C

Contents4
Reference information . . . . . . . . . . . . . . . . . . . . . . . . . . . . . . . . . . . . . .43
Dynamic Assay Protocol specifications . . . . . . . . . . . . . . . . . . . . . . . . . . . . . . . . . . . . . . . . . . . . . . .44
Resolving conflicts with Siemens protocols . . . . . . . . . . . . . . . . . . . . . . . . . . . . . . . . . . . . . . . . . . . .48
10814065 Rev. C VERSANT kPCR Assays - Application Guide Addendum
1Introduction
This section includes the following topics:
• Intended use (page 6)
• About this addendum (page 7)
• About Dynamic Assay Protocols (page 8)
VERSANT kPCR Assays - Application Guide Addendum 10814065 Rev. C
Introduction6
Intended use
The VERSANT kPCR Molecular System is for in vitro diagnostic use.
The VERSANT kPCR Molecular System is a semi-automated system combining an automated sample preparation system for extraction of nucleic acids from a variety of clinical sample types using magnetic bead extraction technology, and separately an automated amplification and detection system for nucleic acids using kPCR (real time) technology, with both system modules linked by software. For information on the types of clinical samples validated for use with the VERSANT Sample Preparation Reagents, refer to the appropriate Sample Preparation Product Insert.
The VERSANT kPCR system is intended to be used by laboratory professionals trained in laboratory techniques and on the use of the system. The VERSANT kPCR system is intended to be used with both Siemens IVD assays using the ‘Closed System’ protocols, customer validated LDA (Laboratory Developed Assay) methods using the non-IVD protocols and now Dynamic Assay Protocols which are intended for customer use to automate third-party companies assays.
10814065 Rev. C VERSANT kPCR Assays - Application Guide Addendum
Introduction 7
About this addendum
This Addendum provides information about running Dynamic Assay Protocols using the VERSANT® kPCR Molecular System. This document is an addendum to the VERSANT kPCR Molecular System Application Guide for kPCR Assays and only includes new or updated information.
Before using the VERSANT kPCR Molecular System:
• Review the current Application Guide.
• Review the VERSANT® Sample Preparation 1.0 or 1.2 Reagents Package Insert to determine which materials are required but not provided.
• Note that Sterile Sarstedt 2-mL skirted micro tubes (item number 72.694.005) are required for the Master Mix and Controls.
When running Dynamic Assay Protocols, use the procedures in this Addendum instead of the procedures in the “Running VERSANT Assay Protocols” section of the VERSANT kPCR Molecular System Application Guide for kPCR Assays.
Text and symbol conventions
For a list of the text and symbol conventions and descriptions of the symbols used in this addendum, see the VERSANT kPCR Molecular System Application Guide for kPCR Assays.
Special terminology
For a description of the special terminology used in this addendum and the specific actions that you need to take when you see the terminology, see the VERSANT kPCR Molecular System Application Guide for kPCR Assays.
Warnings and cautions
The VERSANT kPCR Molecular System is intended for use by laboratory professionals trained in laboratory techniques and on the use of the system. This addendum only includes warnings and cautions specific to running Dynamic Assay Protocols.
Before you begin using the VERSANT kPCR Molecular System to prepare samples (SP Module), run, and analyze samples (AD Module), review all of the cautions and warnings associated with running or maintaining the system. See “Warnings and Cautions” in the VERSANT kPCR Molecular System Application Guide for kPCR Assays for all safety information.
WARNING
Failure to accurately follow all instructions that are provided by the assay manufacturer can lead to incorrect patient results. Prior to beginning a Dynamic Protocol, carefully review all manufacturer’s instructions for the specific assay. Before loading the control carrier(s) on the SP module and starting a run, confirm that all assay reagents (calibrators, controls, master mix, etc.) are correctly positioned on the control carrier(s).
VERSANT kPCR Assays - Application Guide Addendum 10814065 Rev. C
Introduction8
On-System labeling
The labels affixed to the Sample Preparation module provide important safety indicators and information. All operators should review the location and meaning of these labels. See “On-System Labeling” in the VERSANT kPCR Molecular System Application Guide for kPCR Assays for detailed information about the location and content of these labels.
About Dynamic Assay Protocols
Dynamic Assay Protocols allow you to combine multiple assays in a single PCR plate.
Terminology
Controls refers to both calibrators and reaction controls throughout this addendum.
Capabilities
The following capabilities are available for 1 to 6 assays in a single run:
• Load controls at the start or end point of the extraction process and dispense into the PCR plate.
• Dispense an internal control to all samples and controls extracted through the SP process.
• Extract one Universal Negative Control and dispense the eluate into the PCR plate for amplification with all kPCR master mixes in a run.
• Dispense master mix to the PCR plate at the end of a sample preparation run.
• Deliver each sample eluate into multiple assays on a PCR plate.
10814065 Rev. C VERSANT kPCR Assays - Application Guide Addendum
2Preparing to run Dynamic assays
This section includes the following topics:
• Preparing the AD Module (page 10)
• Preparing the SP Module (page 10)
• Preparing and loading the Sample Preparation Reagents (page 11)
• Preparing the samples (page 11)
• Preparing assay reagents (page 13)
• Preparing the Control Carrier (page 14)
VERSANT kPCR Assays - Application Guide Addendum 10814065 Rev. C
Preparing to run Dynamic assays10
Preparing the AD Module
Follow the instructions in the “Preparing and Running the AD Module” section of the VERSANT kPCR Application Guide For VERSANT kPCR Assays for information about turning on the AD module, launching the AD software, and turning on the halogen lamp.
In order to run a kPCR experiment that is based on a Dynamic Assay Protocol, you should configure the protocol before the run on the SP Module completes.
See Configuring the AD Module for Dynamic Assay Protocols (page 34) for more information.
Required module warm up time
The AD Module lamp requires 20 minutes to warm up. Turn on the AD Module and halogen lamp when you turn on the SP Module or at least 20 minutes prior to a run.
Preparing the SP Module
Review the VERSANT kPCR Molecular System Application Guide for kPCR Assays for instructions on turning on the SP module, maintenance and cleaning.
Loading carriers on the Auto Load Deck
See the VERSANT kPCR Molecular System Application Guide for kPCR Assays for information on correct placement of carriers on the autoload tray.
Preparing and loading the plate carrier
See the VERSANT kPCR Molecular System Application Guide for kPCR Assays for information on preparing and loading the plate carrier.
Preparing and loading the tip carriers
See the VERSANT kPCR Molecular System Application Guide for kPCR Assays for information on loading the tip carriers.
The number of tip trays required for a specific number of samples is calculated and displayed on the Control Carrier Loading window. See Loading the consumables (page 28) for more information.
10814065 Rev. C VERSANT kPCR Assays - Application Guide Addendum
Preparing to run Dynamic assays 11
About Reagent Inventory Tracking
For Dynamic Assay Protocols, reagent inventory volume is not monitored; however, volume verification is monitored.
Preparing and loading the Sample Preparation Reagents
See the appropriate VERSANT Sample Preparation 1.0 or 1.2 Reagents product insert for instructions on preparing the VERSANT Sample Preparation Reagents
See Dynamic Assay Protocol specifications (page 44) to determine which VERSANT Sample Preparation Reagents (1.0 or 1.2) should be used with Dynamic Assay Protocols.
Information about pretreatment (if any) of clinical specimen types is located in the VERSANT Sample Preparation 1.0 or 1.2 Reagents product insert.
After you prepare the Sample Preparation Reagents, see the VERSANT kPCR Molecular System Application Guide for kPCR Assays for instructions about loading Sample Preparation Reagents onto the autoload tray.
The system confirms adequate volume is present when the SP reagents are loaded on the deck.
Preparing the samples
See "Preparing and Loading the Samples” in the VERSANT kPCR Molecular System Application Guide for kPCR Assays for instructions on the following topics:
• Preparing the samples.
• Sample tube size requirements for the VERSANT SP Module.
• Barcode information.
Note that each sample in a run must have a unique barcode number.
• Loading the samples in the sample carrier rack.
• Loading the sample carrier rack on the Autoload deck.
VERSANT kPCR Assays - Application Guide Addendum 10814065 Rev. C
Preparing to run Dynamic assays12
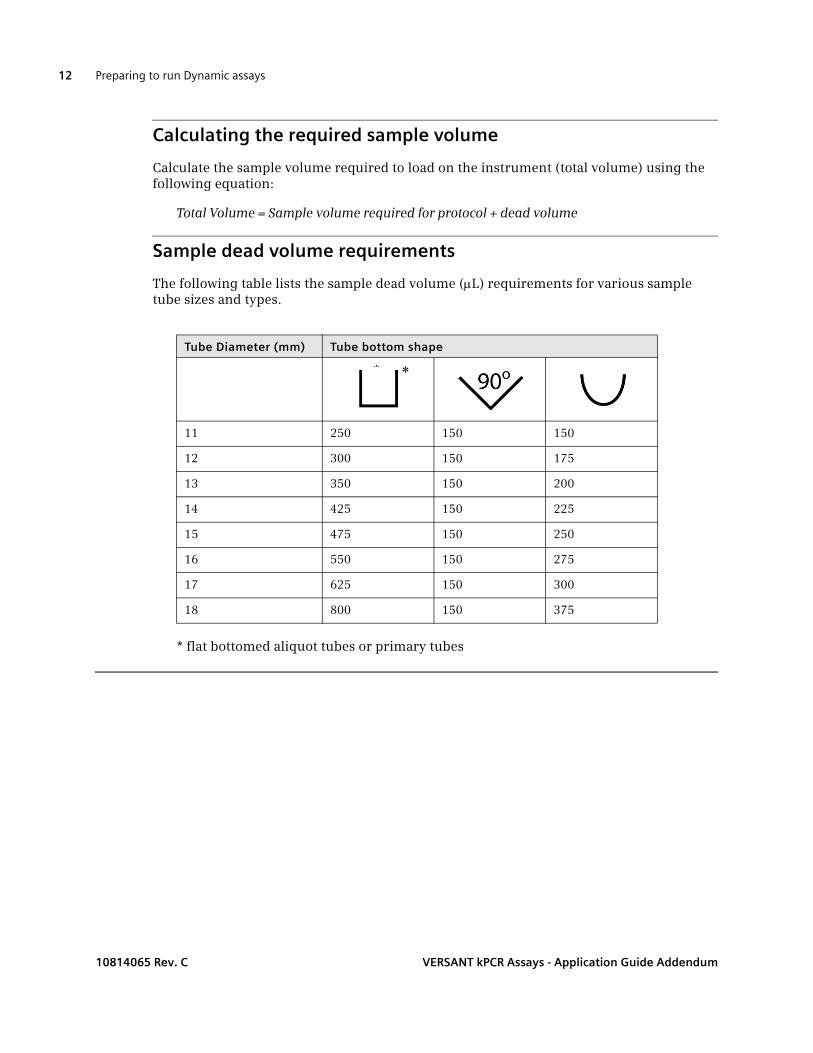
Calculating the required sample volume
Calculate the sample volume required to load on the instrument (total volume) using the following equation:
Total Volume = Sample volume required for protocol + dead volume
Sample dead volume requirements
The following table lists the sample dead volume (L) requirements for various sample tube sizes and types.
* flat bottomed aliquot tubes or primary tubes
Tube Diameter (mm) Tube bottom shape
11 250 150 150
12 300 150 175
13 350 150 200
14 425 150 225
15 475 150 250
16 550 150 275
17 625 150 300
18 800 150 375
* *
10814065 Rev. C VERSANT kPCR Assays - Application Guide Addendum
Preparing to run Dynamic assays 13
Preparing assay reagents
See the assay-specific product insert for instructions on preparing the amplification assay reagents.
Required tubes
Use only sterile Sarstedt 2-mL skirted micro tubes (item number 72.694.005). Barcodes for Master Mix and Controls are optional and not read by the system.
About controls
Dynamic Assay Protocols allow you to load controls both at the start (SP) and end (No SP) of the sample preparation process. Review the assay-specific product inserts to determine which controls are to be extracted (SP) and which controls and reagents will be loaded after extraction is complete (No SP).
• The combined total (SP) and (No SP) controls can not exceed 5 for each assay.
• The maximum number of controls that need to be extracted can not exceed 5 for each assay.
• The maximum number of (No SP) controls available for each assay is 4.
Note that one slot on (No SP) AR rack is reserved for the assay mastermix.
See Using the Worklist Editor (page 26) for more information about the PCR plate map.
About the Universal Negative Control
The Dynamic Assay Protocol allows a Universal Negative Control to be extracted and amplified with all assays in a single run. If you select the Universal Negative Control, there will only be 4 (SP) controls available for each assay.
If the Universal Negative Control is used:
• The combined total (SP), (No SP), and Universal Negative Control available for each assay is 6.
• The maximum number of (SP) controls available for each assay is 4.
• The maximum number of (No SP) controls available for each assay is 4.
See Using the Worklist Editor (page 26) for more information about the PCR plate map.
About the Internal Control
Dynamic Assay Protocols allow an Internal Control (IC) to be added to all controls and samples extracted on the SP Instrument. The IC has to be manually added to any controls that do not go through the sample preparation process.
VERSANT kPCR Assays - Application Guide Addendum 10814065 Rev. C
Preparing to run Dynamic assays14
Preparing the Control Carrier
The control carrier is loaded at the start and end of the sample preparation process. The reagents loaded on the control carrier at the start of the sample preparation process include:
• Controls processed through sample preparation
• IC (optional)
• Universal Negative Control (optional)
• PK
Before you begin
Review the instructions provided with the kPCR assay to determine which controls will be loaded on the control carrier and extracted on the SP module. The assay reagents loaded on the control carrier after the extraction process is completed on the SP module are not loaded at this point.
Preparing the control carrier
To prepare the control carrier:
Insert adapters in all positions on the control carrier where 2 mL tubes will be used according to the following guidelines:
• Position 1 of the control carrier is at the end of the carrier that is closest to the carrier barcode.
• Positions 1 through 5 of the control carrier are used for Assay 1 reagents.
• Each adjacent 5 positions of the control carrier are used for a unique assay. If you are using a Universal Negative Control, position 5 for each assay must remain empty.
Loading the control carrier - start of the SP process
To load the control carrier:
1 In the reagents preparation area, uncap the assay reagents that will be extracted on the SP module.
2 Place each reagent in an adapter on the control carrier.
WARNING
If less than 5 reagents are required for an assay, leave the unused positions on the carrier open. Do not load reagents from a different assay into any of the 5 positions of the control carrier assigned to another assay as they will be incorrectly distributed.
10814065 Rev. C VERSANT kPCR Assays - Application Guide Addendum
Preparing to run Dynamic assays 15
3 If a Universal Negative Control is being used, load it in position 30 of the control carrier.
4 If an Internal Control is being used, load it in position 31 of the control carrier.
5 Load the PK into position 32 (no 2 mL adapter is required).
6 On the SP Module, load the control carrier in track position 19 on the autoload tray. Ensure that the barcode on the control carrier is facing to the right.
See Loading the Control (No SP) carrier (page 32) for more information.
Preparing the Control Carrier - end of SP process
Prepare the Control Reagents (No SP) according the instructions in Preparing the Control Carrier (page 14) with the following exceptions:
• The reagents loaded on the control carrier at the end of the sample preparation process are the Master Mix and Controls (No SP).
When making the master mix, make sure all master mix components are:
– Thawed completely.
– Mixed by pipetting or gentle vortexing (avoid creating bubbles).
– Centrifuged briefly before use.
• Master Mix is loaded into position 1 on the Control Carrier.
• Controls are loaded into positions 2-5.
• Each adjacent 5 positions of the control carrier are used for a unique assay.
See Loading the consumables (page 28) for more information.
VERSANT kPCR Assays - Application Guide Addendum 10814065 Rev. C

This page intentionally left blank
3Running Dynamic Assay Protocols
This section includes the following topics:
• Starting a run (page 18)
• Configuring a Dynamic Assay run (page 19)
• Loading samples (page 25)
• Using the Worklist Editor (page 26)
• Loading the consumables (page 28)
• Loading the Control (No SP) carrier (page 32)
• Completing the SP Module run (page 33)
• Configuring the AD Module for Dynamic Assay Protocols (page 34)
• Loading the PCR plate (page 35)
• Importing the plate map (page 35)
• Identifying and marking wells with Sample Preparation errors (page 37)
• About removing invalid test results from the LIS (page 40)
• Starting a run on the AD Module (page 40)
• Completing the AD Module run (page 41)
VERSANT kPCR Assays - Application Guide Addendum 10814065 Rev. C
Running Dynamic Assay Protocols18
Starting a run
To start a run:
1 Click the Protocol tab in the main screen.
2 Click the appropriate protocol.
See Dynamic Assay Protocol specifications (page 44) for information on the available Dynamic Assay Protocols.
3 Click Run Protocol.
The SP Module verifies that it is able to initialize the iSWAP, the waste sensors, and the heater/shaker. If the system is unable to complete the initialization, an error window displays.
See the VERSANT kPCR Molecular System Application Guide for kPCR Assays for more information about these errors.
4 After the system completes the initialization, you are prompted to empty the solid waste container.
See the VERSANT kPCR Molecular System Application Guide for kPCR Assays for instructions on emptying and reinstalling the solid waste container.
5 When the solid waste container is reinstalled correctly, the Install the Solid Waste Container window closes and the Dynamic Assay Run Setup window displays.
10814065 Rev. C VERSANT kPCR Assays - Application Guide Addendum
Running Dynamic Assay Protocols 19
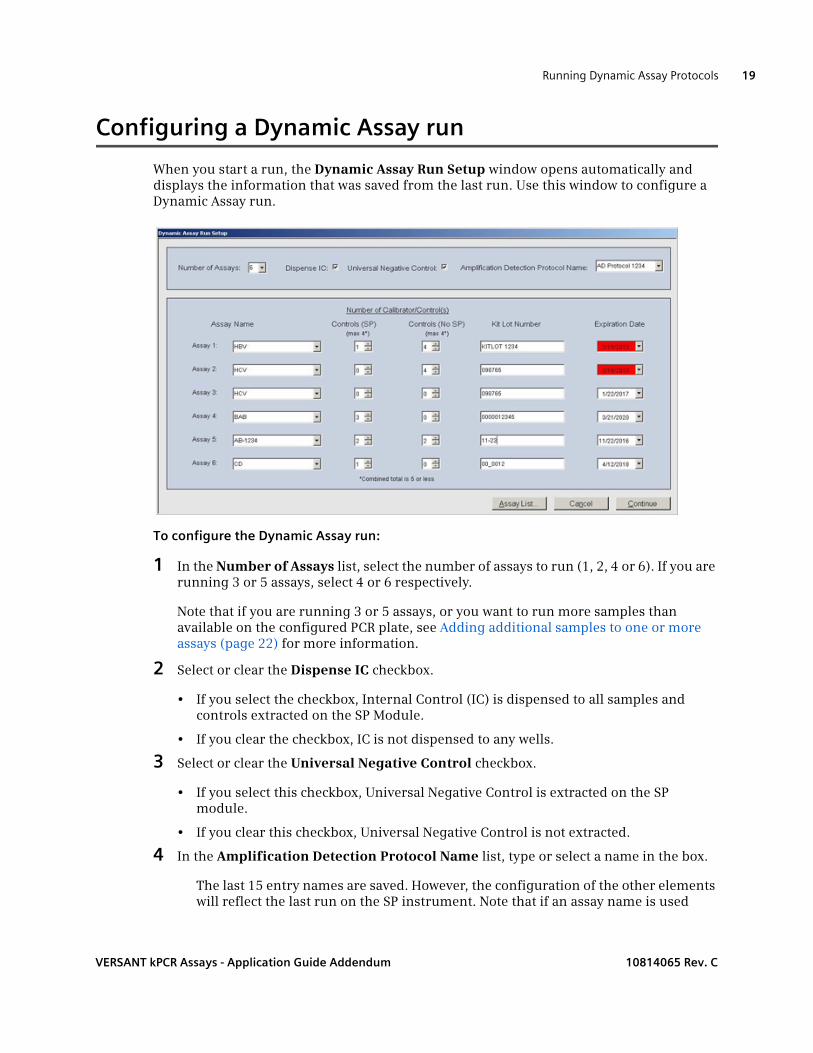
Configuring a Dynamic Assay run
When you start a run, the Dynamic Assay Run Setup window opens automatically and displays the information that was saved from the last run. Use this window to configure a Dynamic Assay run.
To configure the Dynamic Assay run:
1 In the Number of Assays list, select the number of assays to run (1, 2, 4 or 6). If you are running 3 or 5 assays, select 4 or 6 respectively.
Note that if you are running 3 or 5 assays, or you want to run more samples than available on the configured PCR plate, see Adding additional samples to one or more assays (page 22) for more information.
2 Select or clear the Dispense IC checkbox.
• If you select the checkbox, Internal Control (IC) is dispensed to all samples and controls extracted on the SP Module.
• If you clear the checkbox, IC is not dispensed to any wells.
3 Select or clear the Universal Negative Control checkbox.
• If you select this checkbox, Universal Negative Control is extracted on the SP module.
• If you clear this checkbox, Universal Negative Control is not extracted.
4 In the Amplification Detection Protocol Name list, type or select a name in the box.
The last 15 entry names are saved. However, the configuration of the other elements will reflect the last run on the SP instrument. Note that if an assay name is used
VERSANT kPCR Assays - Application Guide Addendum 10814065 Rev. C
Running Dynamic Assay Protocols20
more than once in a run, only one set of information is saved for that assay name. Always review and verify all entries in the Dynamic Assay Setup window.
kPCR Protocol name guidelines:
• A maximum of 20 characters with no spaces.
• If more than 20 characters are required, ensure that a space occurs within the first 20 characters.
• Does not contain the following special characters: \ / : * ? "" < > |.
5 Under Assay, type or select an assay name next to each numbered assay.
If you select a stored Assay name, the Controls, Kit Lot Number, and Expiration Date fields populate with the stored assay information, and the Dispense IC and Universal Negative Control fields display values from the last saved run.
Assay name guidelines:
A valid name must contain 2 to 20 characters consisting of ASCII character codes 32 to 126. This character set includes most of the keyboard characters including uppercase and lowercase letters (Aa-Zz), numerals (0-9), punctuation marks, special characters, common symbols, and a single space.
To review or delete a stored assay, click the Assay List tab in the Dynamic Assay Run Setup window, and then see Reviewing and managing stored assays (page 21) for more information about editing information for a stored assay.
6 Under Number of Calibrator/Control(s), specify the number of controls for each assay.
a. Under Controls (SP), select the number of controls that will be extracted on the SP for each assay.
b. Under Controls (No SP), select the number of controls that will be added directly to the PCR plate after the sample extraction process is complete.
CAUTION
The Amplification Detection Protocol Name on the SP module must match the kPCR protocol name saved on the AD Module to link the Dynamic Assay Protocol information to the AD.
See Configuring the AD Module for Dynamic Assay Protocols (page 34) for more information on the kPCR protocol name.
CAUTION
If you are using the LIS, the assay name must match the dye channel name entered in the AD Module set up. See step 4 in Configuring the AD Module for Dynamic Assay Protocols (page 34) for more information.
10814065 Rev. C VERSANT kPCR Assays - Application Guide Addendum
Running Dynamic Assay Protocols 21
See About controls (page 13) for more information.
7 (Optional) Under Kit Lot Number, type the kit lot number.
8 Under Expiration Date, select the expiration date for the lot.
Expired reagents are highlighted in red on the Dynamic Assay Run Setup window and the VERSANT kPCR Sample Preparation Run Report. The system does not enforce the expiration of the kit lot.
9 Complete one of the following actions as needed:
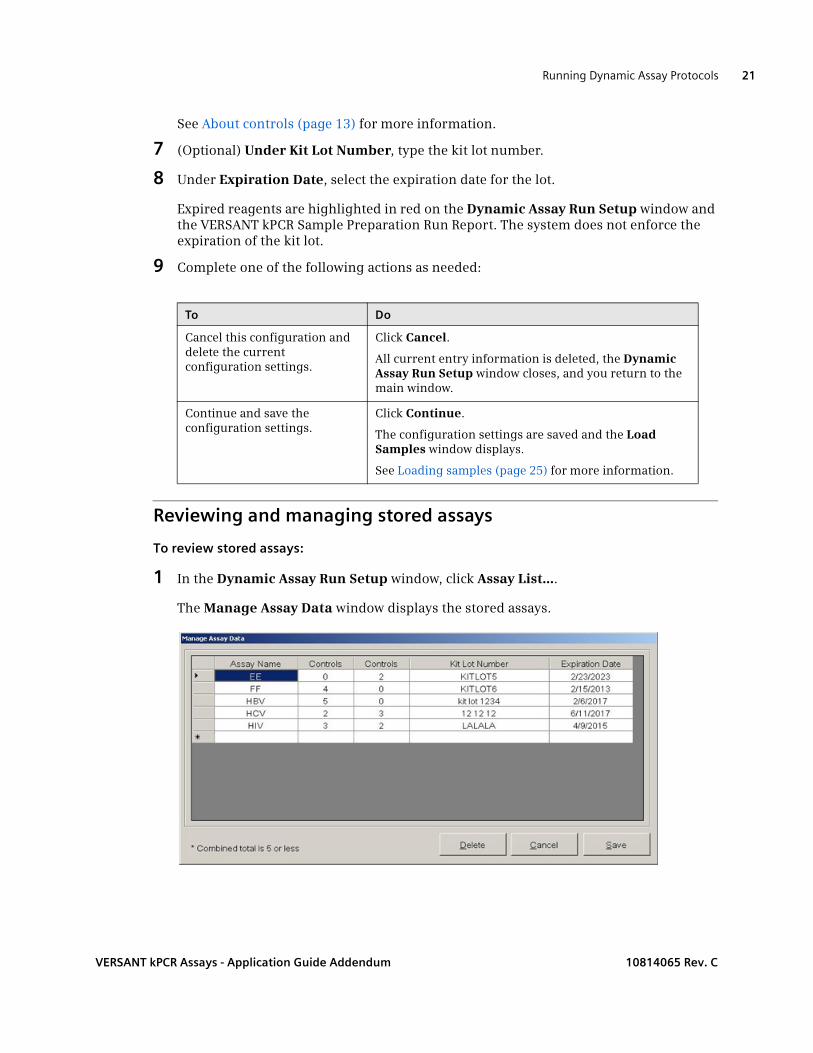
Reviewing and managing stored assays
To review stored assays:
1 In the Dynamic Assay Run Setup window, click Assay List....
The Manage Assay Data window displays the stored assays.
To Do
Cancel this configuration and delete the current configuration settings.
Click Cancel.
All current entry information is deleted, the Dynamic Assay Run Setup window closes, and you return to the main window.
Continue and save the configuration settings.
Click Continue.
The configuration settings are saved and the Load Samples window displays.
See Loading samples (page 25) for more information.
VERSANT kPCR Assays - Application Guide Addendum 10814065 Rev. C
Running Dynamic Assay Protocols22
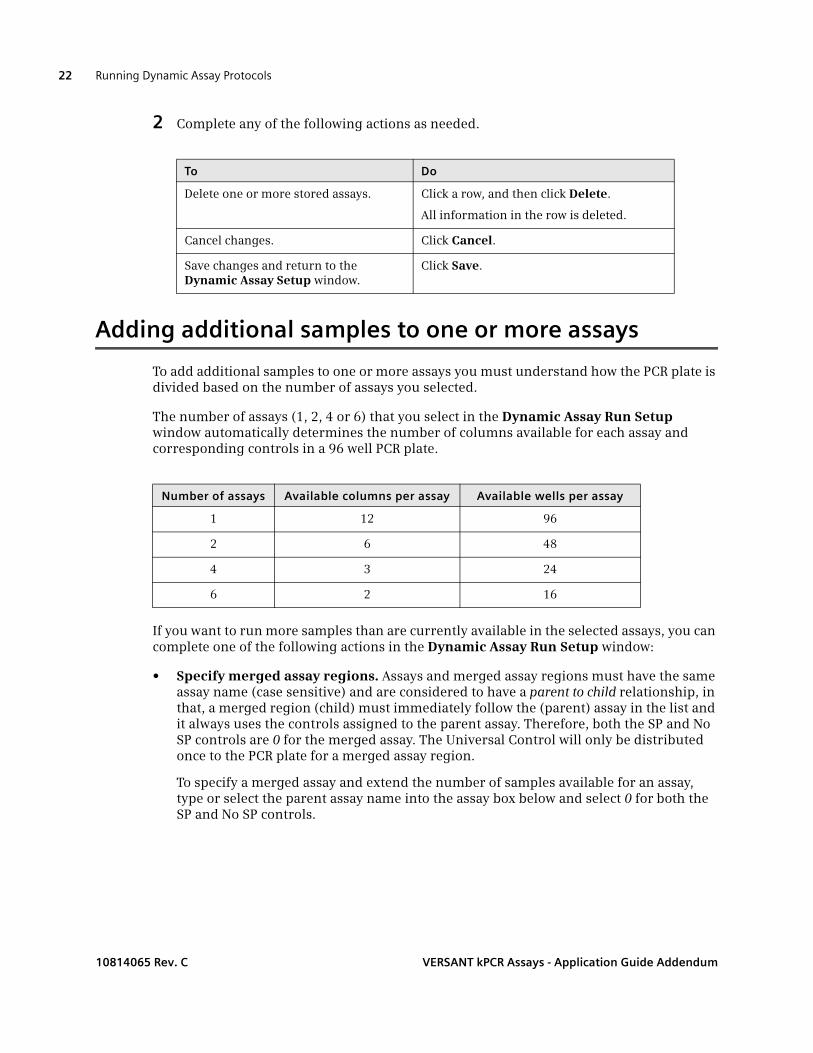
2 Complete any of the following actions as needed.
Adding additional samples to one or more assays
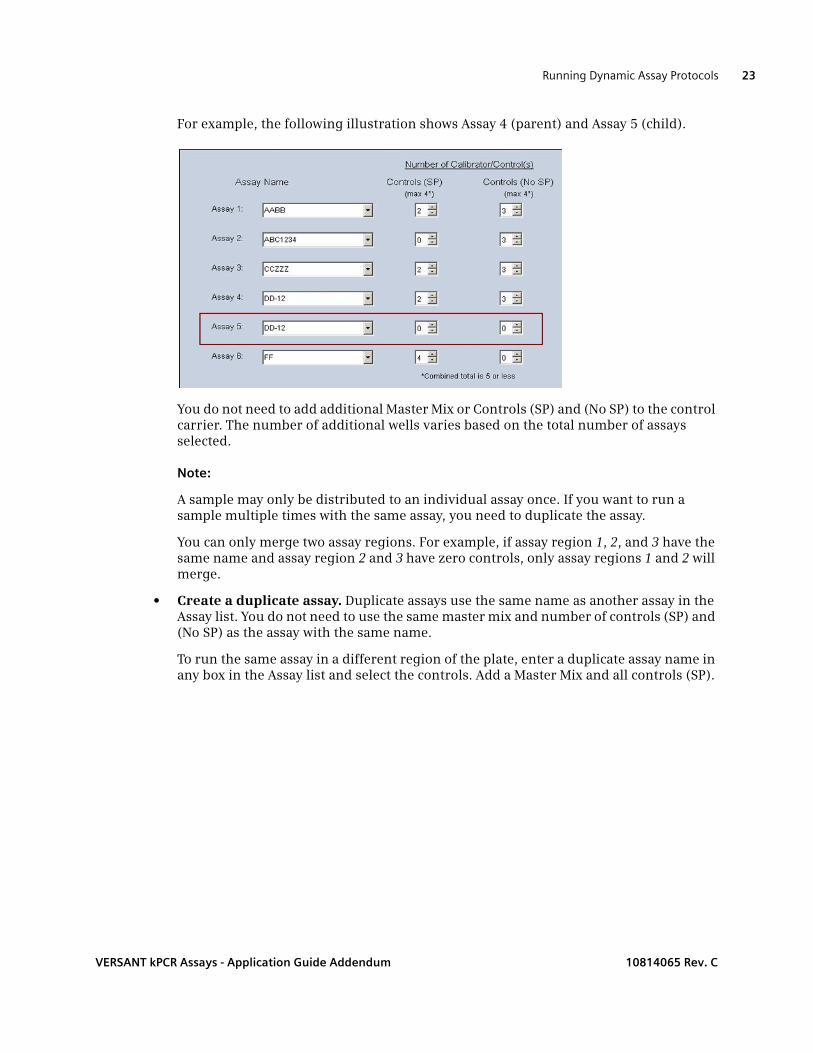
To add additional samples to one or more assays you must understand how the PCR plate is divided based on the number of assays you selected.
The number of assays (1, 2, 4 or 6) that you select in the Dynamic Assay Run Setup window automatically determines the number of columns available for each assay and corresponding controls in a 96 well PCR plate.
If you want to run more samples than are currently available in the selected assays, you can complete one of the following actions in the Dynamic Assay Run Setup window:
• Specify merged assay regions. Assays and merged assay regions must have the same assay name (case sensitive) and are considered to have a parent to child relationship, in that, a merged region (child) must immediately follow the (parent) assay in the list and it always uses the controls assigned to the parent assay. Therefore, both the SP and No SP controls are 0 for the merged assay. The Universal Control will only be distributed once to the PCR plate for a merged assay region.
To specify a merged assay and extend the number of samples available for an assay, type or select the parent assay name into the assay box below and select 0 for both the SP and No SP controls.
To Do
Delete one or more stored assays. Click a row, and then click Delete.
All information in the row is deleted.
Cancel changes. Click Cancel.
Save changes and return to the Dynamic Assay Setup window.
Click Save.
Number of assays Available columns per assay Available wells per assay
1 12 96
2 6 48
4 3 24
6 2 16
10814065 Rev. C VERSANT kPCR Assays - Application Guide Addendum
Running Dynamic Assay Protocols 23
For example, the following illustration shows Assay 4 (parent) and Assay 5 (child).
You do not need to add additional Master Mix or Controls (SP) and (No SP) to the control carrier. The number of additional wells varies based on the total number of assays selected.
Note:
A sample may only be distributed to an individual assay once. If you want to run a sample multiple times with the same assay, you need to duplicate the assay.
You can only merge two assay regions. For example, if assay region 1, 2, and 3 have the same name and assay region 2 and 3 have zero controls, only assay regions 1 and 2 will merge.
• Create a duplicate assay. Duplicate assays use the same name as another assay in the Assay list. You do not need to use the same master mix and number of controls (SP) and (No SP) as the assay with the same name.
To run the same assay in a different region of the plate, enter a duplicate assay name in any box in the Assay list and select the controls. Add a Master Mix and all controls (SP).
VERSANT kPCR Assays - Application Guide Addendum 10814065 Rev. C

Running Dynamic Assay Protocols24
and (No SP) to the control carrier. The number of additional wells available varies based on the total number of assays selected.
Run options for merged or duplicate assays
When you run 3 assays, the number of columns and wells available will be the same as with 4 assays. When you run 5 assays, the number of columns and wells available will be the same as with 6 assays.
To run 3 assays:
In the Dynamic Assay Run Setup window, in the Number of Assays list, select 4.
• Merge or duplicate an assay to add more samples to assay 1, 2 or 3.
or
• Merge an assay but do not select any additional samples.
To run 5 assays:
In the Dynamic Assay Run Setup window, in the Number of Assays list, select 6.
• Merge or duplicate an assay to add more samples to assay 1, 2 , 3, 4 or 5.
or
• Merge an assay but do not select any additional samples.
10814065 Rev. C VERSANT kPCR Assays - Application Guide Addendum

Running Dynamic Assay Protocols 25
Loading samples
When you click Continue in the Dynamic Assay Run Setup window to save a Dynamic Assay Run configuration, the Load Samples window displays.
See Configuring a Dynamic Assay run (page 19) for more information.
Before you load samples
Ensure all caps are removed from the samples.
Procedure
To load samples:
1 Ensure that the barcode on each of the samples is visible through the opening of the sample carrier. The barcode of each of the samples is read as the carriers are loaded.
2 Ensure that you have loaded all of the sample carriers on the autoload tray.
3 Click Load Samples.
The system begins loading the sample carriers from the autoload tray onto the deck and reads all carrier IDs, sample barcodes and sample slot locations for sample tubes contained on the sample carrier.
If errors occur, see the VERSANT kPCR Molecular System Application Guide for kPCR Assays for more information about manually entering barcodes or troubleshooting the error.
When all of the sample carriers are loaded, the Loading Samples Confirmation window displays, indicating the number of samples and carriers loaded.
4 If the information in the Loading Sample Confirmation window correctly indicates the number of samples and sample carriers you loaded, click Yes.
The Work List Editor displays and shows the PCR Plate Map and the Work List.
VERSANT kPCR Assays - Application Guide Addendum 10814065 Rev. C
Running Dynamic Assay Protocols26
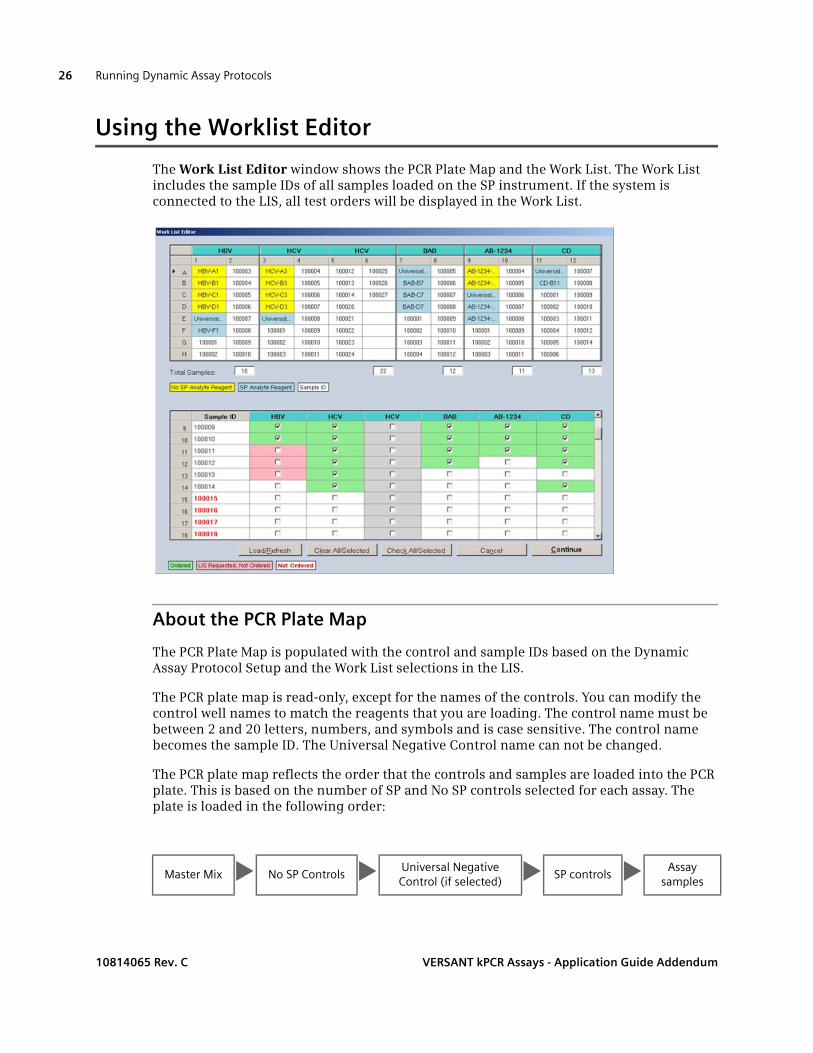
Using the Worklist Editor
The Work List Editor window shows the PCR Plate Map and the Work List. The Work List includes the sample IDs of all samples loaded on the SP instrument. If the system is connected to the LIS, all test orders will be displayed in the Work List.
About the PCR Plate Map
The PCR Plate Map is populated with the control and sample IDs based on the Dynamic Assay Protocol Setup and the Work List selections in the LIS.
The PCR plate map is read-only, except for the names of the controls. You can modify the control well names to match the reagents that you are loading. The control name must be between 2 and 20 letters, numbers, and symbols and is case sensitive. The control name becomes the sample ID. The Universal Negative Control name can not be changed.
The PCR plate map reflects the order that the controls and samples are loaded into the PCR plate. This is based on the number of SP and No SP controls selected for each assay. The plate is loaded in the following order:
Master Mix No SP Controls Universal Negative Control (if selected) SP controls Assay
samples
10814065 Rev. C VERSANT kPCR Assays - Application Guide Addendum
Running Dynamic Assay Protocols 27
About the work list
The first column of the work list contains the sample IDs for all samples loaded on the system starting with position 1 of the sample rack loaded in track position 23 on the deck. The adjacent column headers include the assay names that were defined in the Dynamic Assay Run Setup window.
Test order information from the LIS:
• If a sample ID is associated with an assay in the test order from the LIS then the assay cell is checked other wise it is unchecked.
• If a sample ID from the LIS cannot be accommodated on the PCR Plate due to a lack of available wells for an assay, each associated check box for that sample will be disabled and highlighted red.
• A sample ID with no assays selected will be in highlighted in red.
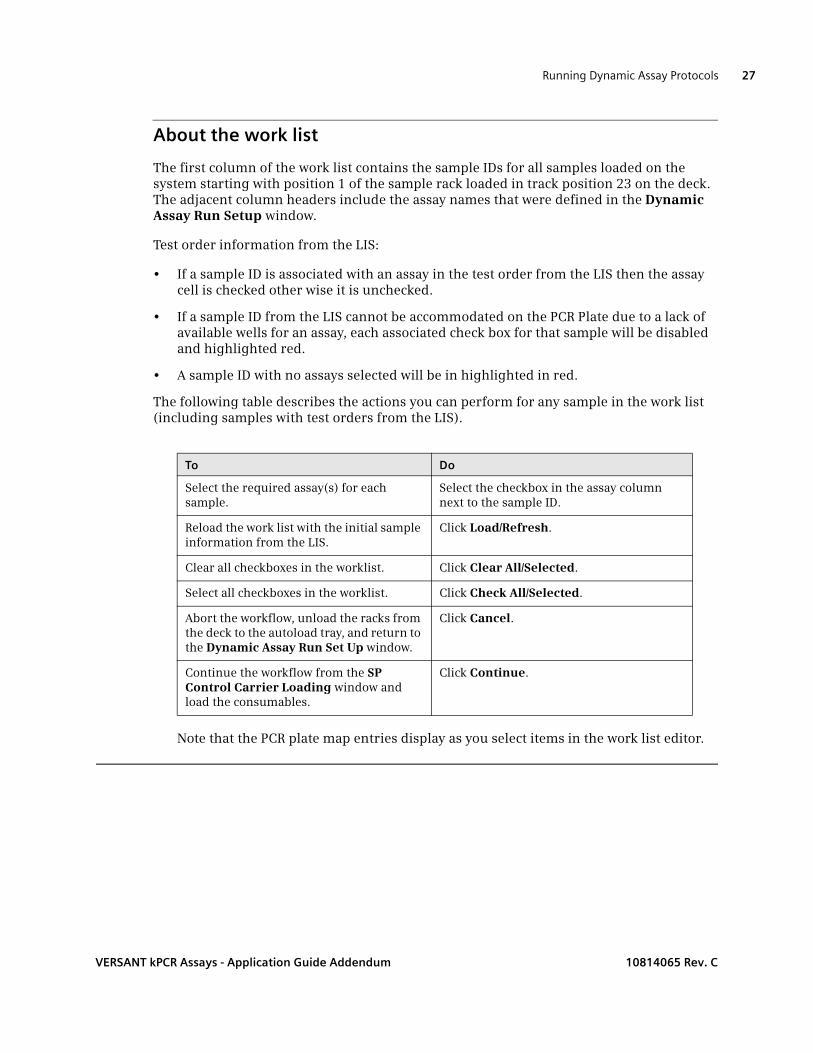
The following table describes the actions you can perform for any sample in the work list (including samples with test orders from the LIS).
Note that the PCR plate map entries display as you select items in the work list editor.
To Do
Select the required assay(s) for each sample.
Select the checkbox in the assay column next to the sample ID.
Reload the work list with the initial sample information from the LIS.
Click Load/Refresh.
Clear all checkboxes in the worklist. Click Clear All/Selected.
Select all checkboxes in the worklist. Click Check All/Selected.
Abort the workflow, unload the racks from the deck to the autoload tray, and return to the Dynamic Assay Run Set Up window.
Click Cancel.
Continue the workflow from the SP Control Carrier Loading window and load the consumables.
Click Continue.
VERSANT kPCR Assays - Application Guide Addendum 10814065 Rev. C
Running Dynamic Assay Protocols28
Loading the consumables
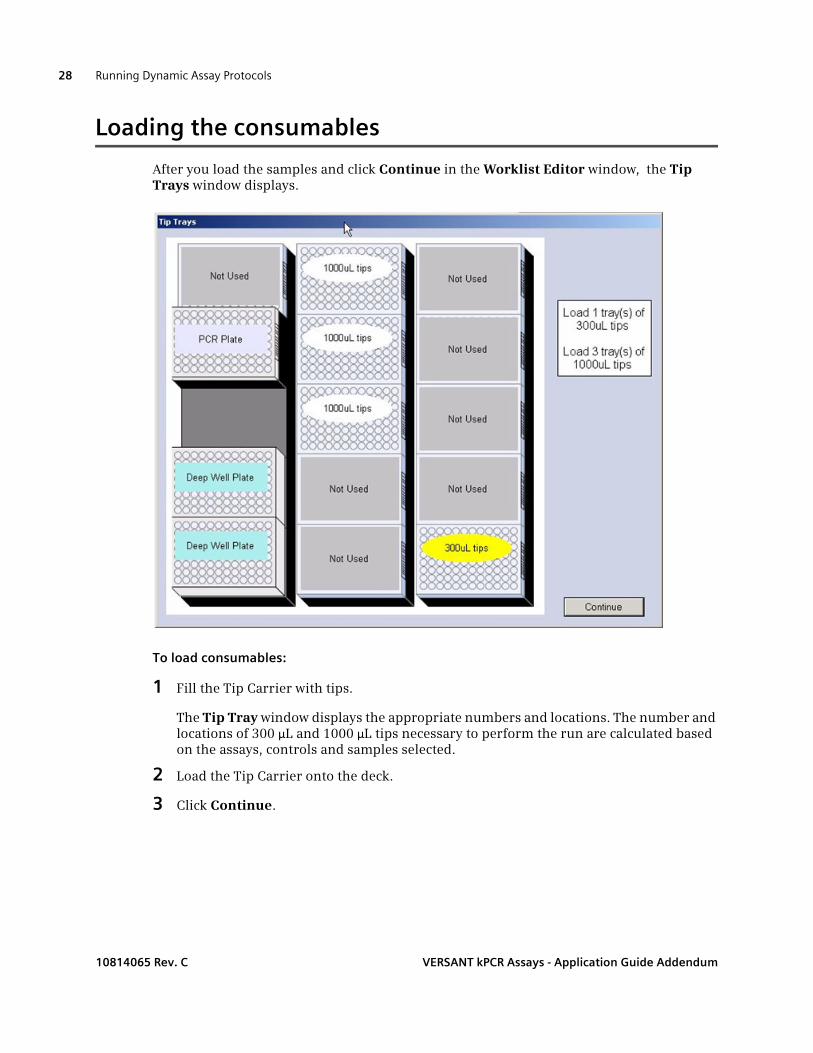
After you load the samples and click Continue in the Worklist Editor window, the Tip Trays window displays.
To load consumables:
1 Fill the Tip Carrier with tips.
The Tip Tray window displays the appropriate numbers and locations. The number and locations of 300 µL and 1000 µL tips necessary to perform the run are calculated based on the assays, controls and samples selected.
2 Load the Tip Carrier onto the deck.
3 Click Continue.
10814065 Rev. C VERSANT kPCR Assays - Application Guide Addendum

Running Dynamic Assay Protocols 29
The SP Analyte Reagent Carrier Loading window displays.
4 Click Print to print a copy of the SP/No SP Analyte Reagent Carrier Map Report.
5 Ensure that caps are removed from all tubes and troughs and click Load Consumables.
The system performs the following activities:
• Checks that the consumable carriers (Tip Carrier, Plate Carrier, Control Carrier, and Sample Preparation carriers) are available on the autoload tray.
• Loads the Tip Carrier.
• Loads the Sample Preparation Reagents Carrier and confirms adequate volume is present.
VERSANT kPCR Assays - Application Guide Addendum 10814065 Rev. C
Running Dynamic Assay Protocols30
• Loads the Control Carrier.
• Confirms adequate volume is present in the Controls and IC.
• Confirms adequate volume is present for PK.
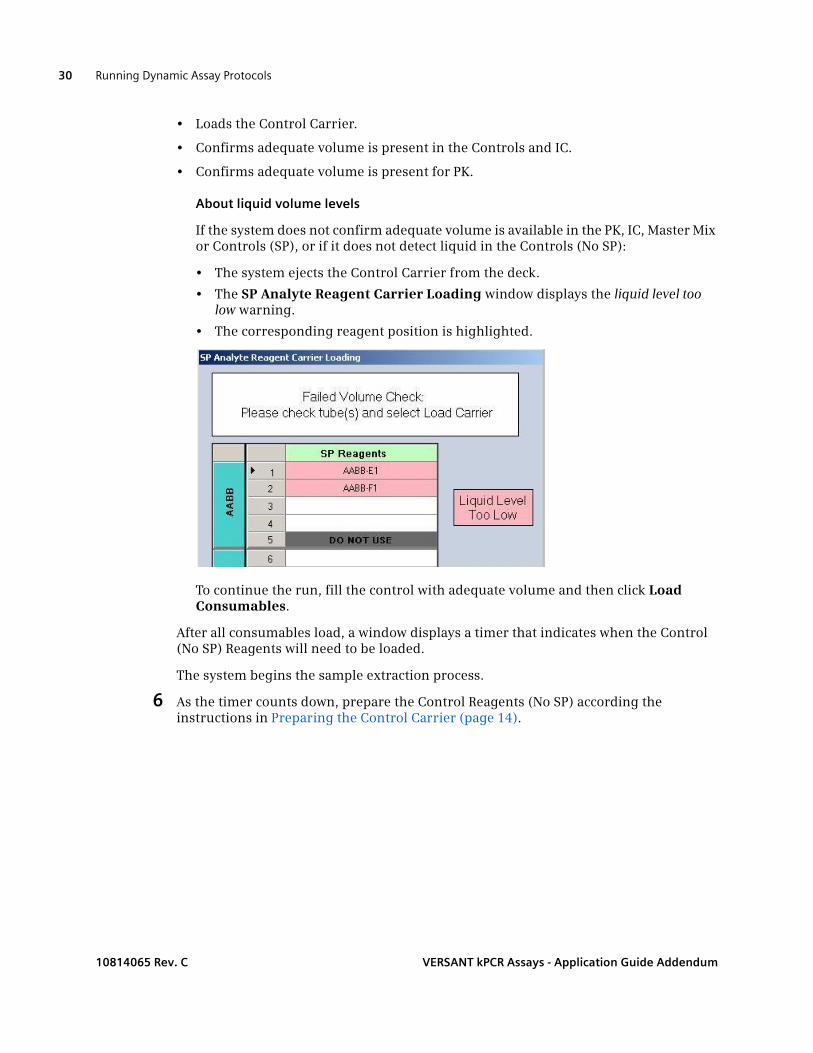
About liquid volume levels
If the system does not confirm adequate volume is available in the PK, IC, Master Mix or Controls (SP), or if it does not detect liquid in the Controls (No SP):
• The system ejects the Control Carrier from the deck.
• The SP Analyte Reagent Carrier Loading window displays the liquid level too low warning.
• The corresponding reagent position is highlighted.
To continue the run, fill the control with adequate volume and then click Load Consumables.
After all consumables load, a window displays a timer that indicates when the Control (No SP) Reagents will need to be loaded.
The system begins the sample extraction process.
6 As the timer counts down, prepare the Control Reagents (No SP) according the instructions in Preparing the Control Carrier (page 14).
10814065 Rev. C VERSANT kPCR Assays - Application Guide Addendum
Running Dynamic Assay Protocols 31
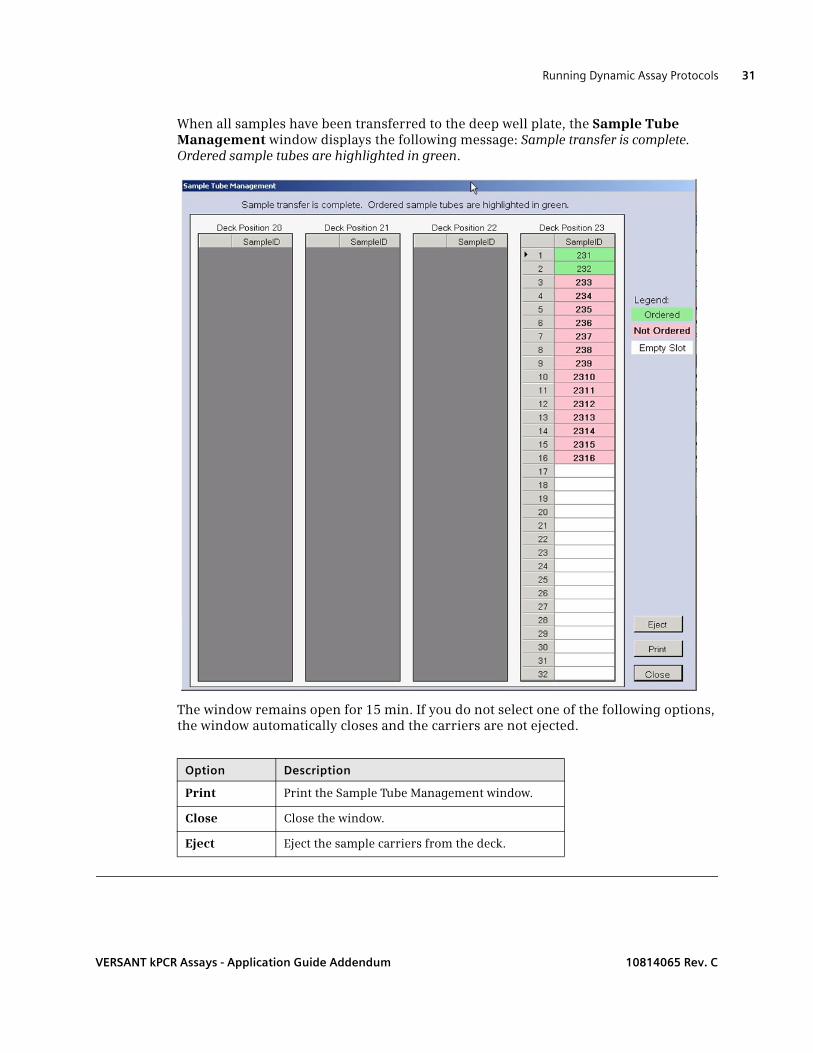
When all samples have been transferred to the deep well plate, the Sample Tube Management window displays the following message: Sample transfer is complete. Ordered sample tubes are highlighted in green.
The window remains open for 15 min. If you do not select one of the following options, the window automatically closes and the carriers are not ejected.
Option Description
Print Print the Sample Tube Management window.
Close Close the window.
Eject Eject the sample carriers from the deck.
VERSANT kPCR Assays - Application Guide Addendum 10814065 Rev. C
Running Dynamic Assay Protocols32
Loading the Control (No SP) carrier
The system audibly and visually prompts you to load the Controls (No SP) Control carrier.
To load the Controls (No SP) and the mastermix on the Control carrier:
1 Click Eject Carrier to eject the Control carrier from the instrument.
2 Remove the Control carrier from the autoload tray, remove the reagents from the carrier, and replace them with the mastermix and Controls (No SP) reagents.
3 Click Load Consumables.
The system performs the following actions:
• Loads the Control carrier.
• Confirms adequate liquid is present in both the Master Mix and in the Controls.
See About liquid volume levels (page 30) for more information.
WARNING
When you see the system prompt, immediately replace the Controls (SP) reagents in the Control carrier with the Controls (No SP) and the mastermix reagents.
10814065 Rev. C VERSANT kPCR Assays - Application Guide Addendum
Running Dynamic Assay Protocols 33
Completing the SP Module run
When a sample preparation run completes, the SP Software audibly beeps and displays the Run Complete window.
• If the Run Complete dialog box indicates that sample preparation errors occurred during the run, note the error message and complete the run. See the run report to determine where the sample preparation errors occurred.
• If the Run Complete dialog box indicates that a plate map file could not be generated, you cannot complete the run. See “SP Module Troubleshooting” in the VERSANT kPCR Molecular System Application Guide for kPCR Assays for more information about possible errors and solutions.
• When the Run Complete dialog box displays without errors, complete the run.
To complete the run:
1 Verify that the autoload tray is clear and perform one of the following actions:
• Click Eject Carriers to end the run without viewing the run report file. The system closes the Run Complete dialog box, unloads all carriers, and ends the run.
• Click Print Preview to preview the run report file and check results before ending the run. The system closes the Run Complete window, displays the Sample Preparation Run Report, unloads all carriers, and ends the run.
• Click Finalize Run to eject carriers, finish the run, and return to the VERSANT kPCR main screen.
2 After the run completes, immediately remove the PCR plates from the SP Module, immediately cap the sample wells, and start the run on the AD Module.
See “Capping the Sample Wells” in the VERSANT kPCR Molecular System Application Guide for kPCR Assays for information about capping the sample wells.
3 Clean the SP Module.
See “Maintenance” in the VERSANT kPCR Molecular System Application Guide for kPCR Assays.
VERSANT kPCR Assays - Application Guide Addendum 10814065 Rev. C
Running Dynamic Assay Protocols34
Configuring the AD Module for Dynamic Assay Protocols
Dynamic Assay protocols can be configured in the AD Module for use with kPCR experiments.
To run a kPCR experiment based on a Dynamic Assay protocol, complete the following steps to configure the AD:
1 At the AD Module, create a new kPCR experiment:
a. Select File > New.
b. In the New Run Options window, select kPCR.
c. Click OK.
2 Set the well types for all wells.
See the “Plate Setup Quick Protocol” topic (Contents > Quick Protocols > Plate Setup Quick Protocol ) in the AD Module Online Help.
3 Select the dyes for which data should be collected for each kPCR assay.
See the AD Module Online Help for more information.
4 Configure the dye filter set for each assay by defining the following properties for up to five dye filters (Filter 1 - Filter 5).
• Dye. Select a dye from predefined dye names (for example, FAM, ROX, CY5, HEX), or manually enter new dyes (for example, CO590 (California Orange) and Q670 (Quasar 670)). See the “Optics Configuration - Dyes & Filters” topic in the AD Module Online Help for more information about adding new dyes.
• Dye Type. Select passive reference dye.
• Dye Channel Name. Name the channel to associate the result from a particular dye with a specific channel. To name the channel, right-click a selected region, and then select Well Information > Channel > assay name.
Notes:
• The Dye channel name must match the assay name entered in the Dynamic Assay Run Setup window. See Configuring a Dynamic Assay run, step 5 for information on naming the assay.
• Running a Dynamic Assay Protocol, which defines a Dye Channel Name and a new dye, can interfere with subsequent running of a Siemens protocol. See Resolving conflicts with Siemens protocols (page 49) for more information about resolving these conflicts.
• Color. Define the displaying color for each dye.
5 Set up the Thermal Profile.
See the Thermal Profile Set-up topic in the AD Module Online Help for more information.
10814065 Rev. C VERSANT kPCR Assays - Application Guide Addendum
Running Dynamic Assay Protocols 35
Note that Analysis Settings to set acceptance criteria for calibrator curve(s) and controls is not available with Dynamic Assay Protocols.
6 Save the kPCR experiment with the desired protocol name. The kPCR protocol name must match the name entered in the Dynamic Assay Run Setup window and must conform to the LIS naming rules.
kPCR Protocol name guidelines:
• The system does not allow the use of a Siemens kPCR Assay Name. If you type in a Siemens kPCR assay name the system displays the following error message: Siemens IVD Amplification/Detection Protocol names cannot be linked to dynamic protocols.
• The Amplification Detection Protocol name must be between 1 and 20 characters with no spaces and cannot contain the following special characters: \ / : * ? "" < > |.
• If the experiment name requires more than 20 characters, ensure that a space occurs within the first 20 characters.
Loading the PCR plate
To load the PCR plate:
Transport the capped PCR plate to the AD Module.
See "Loading the PCR Plate" in the VERSANT kPCR Molecular System Application Guide for kPCR Assays for instruction about loading the PCR plate into the AD Module.
Importing the plate map
During sample preparation on the SP Module, the system generates a plate map that indicates the position of all the samples along with their corresponding sample IDs. When you start a run on the AD Module, you must first import the plate map from the SP Module.
To import the plate map:
1 Open VERSANT software.
2 Select File > Import Plate Map.
WARNING
If you are using a Non-Siemens AD module you must manually transfer patient ID information from the VERSANT SP run report. To prevent incorrect patient results due to a mismatched patient ID, always confirm that the correct patient ID is entered in the well name.
VERSANT kPCR Assays - Application Guide Addendum 10814065 Rev. C
Running Dynamic Assay Protocols36
3 Click the run id. The run id is the barcode number on the PCR plate.
• The plate map for the PCR plate imports into the VERSANT kPCR Molecular System AD Software.
• The parameters for the run import from the SP Module.
4 Click Add to continue the run, or scan the barcode on the PCR plate with a barcode reader to import the plate map.
The plate map automatically displays. Based on the plate map created on the SP Module, the system automatically sets the Sample IDs for all of the wells.
The Sample IDs for all of the wells appear on the Full Screen Plate button. You can view the complete Sample ID for a well by clicking the individual well and then clicking Well Information.
• The system identifies each well as Unknown.
• If applicable, the system indicates any errors that occurred during sample preparation on the SP Module.
You can view this information in the Plate setup comments field. See Identifying and marking wells with Sample Preparation errors (page 37) for more information.
Entering assay kit information
For Dynamic Assay Protocols, after importing a plate map into the AD Module, use the Assay Kit Information feature to enter assay reagent information. Otherwise, the system assumes that the assay reagent kit lot information is the same as the sample preparation reagent kit lot information (such as Kit Lot Number and Expiration Date).
Defining calibrators and controls
After importing the plate map file, you can define the well positions for the Controls and Calibrators (including the assigned concentration).
See the AD Module Online Help for more information about defining well positions.
WARNING
Do not change the operating system settings that were configured by the Siemens service representative. This can change the character set available for Sample IDs and result in the use of invalid characters.
Do not edit the Sample IDs associated with the imported plate map file. The Sample ID used for the SP Module run must remain the same for the AD Module run. The Sample ID on Printed Reports may be truncated and LIS errors may occur if the Sample ID is revised.
10814065 Rev. C VERSANT kPCR Assays - Application Guide Addendum
Running Dynamic Assay Protocols 37
Identifying and marking wells with Sample Preparation errors
Wells with sample preparation errors must be reviewed and clearly marked indicating a Not in Use status along with a Sample Preparation Error comment before they are sent to the LIS.
After completing each SP Module run, perform the following steps immediately after importing the plate map, and prior to starting a run on the AD Module.
To indentify and mark wells with Sample Preparation errors:
1 In the AD Module main system window, click Setup.
2 Click Plate Setup.
WARNING
Do not allow the system to process wells with sample preparation errors. When you run Dynamic Assays, wells with sample preparation errors might generate invalid results. These results must never be reported as valid results. Using invalid results may lead to an improper clinical diagnosis of the patient.
If invalid test results have been sent to your LIS, see your LIS administrator for the procedure for removing invalid results from the LIS and then see About removing invalid test results from the LIS (page 40) for information.
VERSANT kPCR Assays - Application Guide Addendum 10814065 Rev. C
Running Dynamic Assay Protocols38
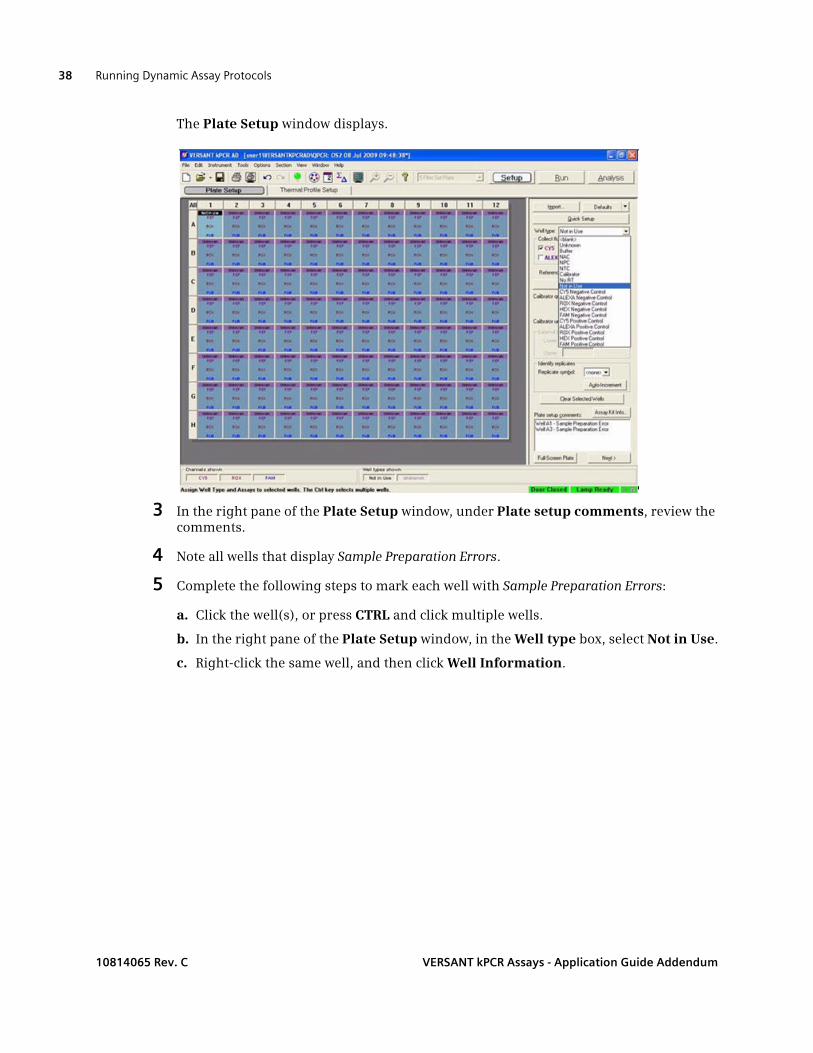
The Plate Setup window displays.
3 In the right pane of the Plate Setup window, under Plate setup comments, review the comments.
4 Note all wells that display Sample Preparation Errors.
5 Complete the following steps to mark each well with Sample Preparation Errors:
a. Click the well(s), or press CTRL and click multiple wells.
b. In the right pane of the Plate Setup window, in the Well type box, select Not in Use.
c. Right-click the same well, and then click Well Information.
10814065 Rev. C VERSANT kPCR Assays - Application Guide Addendum
Running Dynamic Assay Protocols 39
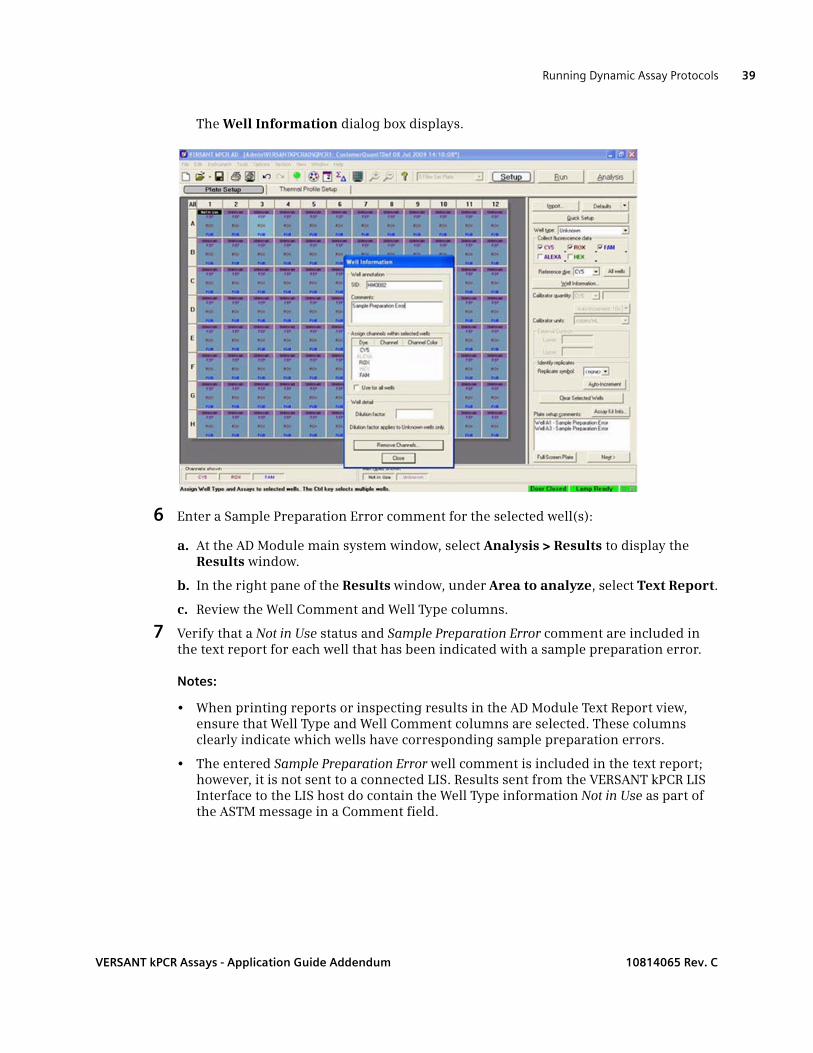
The Well Information dialog box displays.
6 Enter a Sample Preparation Error comment for the selected well(s):
a. At the AD Module main system window, select Analysis > Results to display the Results window.
b. In the right pane of the Results window, under Area to analyze, select Text Report.
c. Review the Well Comment and Well Type columns.
7 Verify that a Not in Use status and Sample Preparation Error comment are included in the text report for each well that has been indicated with a sample preparation error.
Notes:
• When printing reports or inspecting results in the AD Module Text Report view, ensure that Well Type and Well Comment columns are selected. These columns clearly indicate which wells have corresponding sample preparation errors.
• The entered Sample Preparation Error well comment is included in the text report; however, it is not sent to a connected LIS. Results sent from the VERSANT kPCR LIS Interface to the LIS host do contain the Well Type information Not in Use as part of the ASTM message in a Comment field.
VERSANT kPCR Assays - Application Guide Addendum 10814065 Rev. C

Running Dynamic Assay Protocols40
About removing invalid test results from the LIS
If results are being exported to the VERSANT kPCR LIS Interface, you must ensure that results for any samples with sample preparation errors are not reported as valid results.
To prevent errors from being reported as valid results, you can remove specific test results using the VERSANT kPCR LIS Interface software.
See "Managing Test Results" in the VERSANT kPCR Molecular System Application Guide for kPCR Assays for more information.
Starting a run on the AD Module
See "Starting the Run" in the VERSANT kPCR Molecular System Application Guide for kPCR Assays for information about starting the run.
WARNING
Before starting a new run on the AD Module, select File > Save As, and enter a name for the run. Type a new name.
The name cannot match the name of any existing Dynamic Assay Protocols. Saving the run with the name of an existing protocol will corrupt that Amplification/Detection protocol template.
10814065 Rev. C VERSANT kPCR Assays - Application Guide Addendum
Running Dynamic Assay Protocols 41
Completing the AD Module run
This topic describes the tasks you can perform to complete the run.
Reviewing the results
You can review the results versus the Sample Preparation Run Report to detect any results that were not cleared/not selected from data gathering due to sample preparation errors.
To review the results:
1 Click Analysis on the toolbar.
The Analysis pane displays.
2 In the Analysis pane, click Results.
3 Under Area to Analyze, click Text Report to view the results.
4 After you review the results, you can select File > Close to close the protocol.
Next steps:
See “Removing the PCR Plate” and “Printing Reports” in the VERSANT kPCR Molecular System Application Guide for kPCR Assays for information about these steps.
Exporting data to the LIS
If your system is connected to an LIS, you can export your kPCR protocol data directly to the LIS.
See “Exporting the Data to the LIS” in the VERSANT kPCR Molecular System Application Guide for kPCR Assays.
WARNING
Analysis term settings that are entered manually on the AD module are not saved. The user must manually enter selected analysis term settings each time an analysis result is generated. Analysis term settings revert back to the manufacturer’s default settings after each analysis is generated. To prevent reporting incorrect patient results, confirm that the appropriate analysis term settings were used.
VERSANT kPCR Assays - Application Guide Addendum 10814065 Rev. C

This page intentionally left blank
4Reference information
This section includes the following topics:
• Dynamic Assay Protocol specifications (page 44)
• Resolving conflicts with Siemens protocols (page 49)
VERSANT kPCR Assays - Application Guide Addendum 10814065 Rev. C
Reference information44
Dynamic Assay Protocol specifications
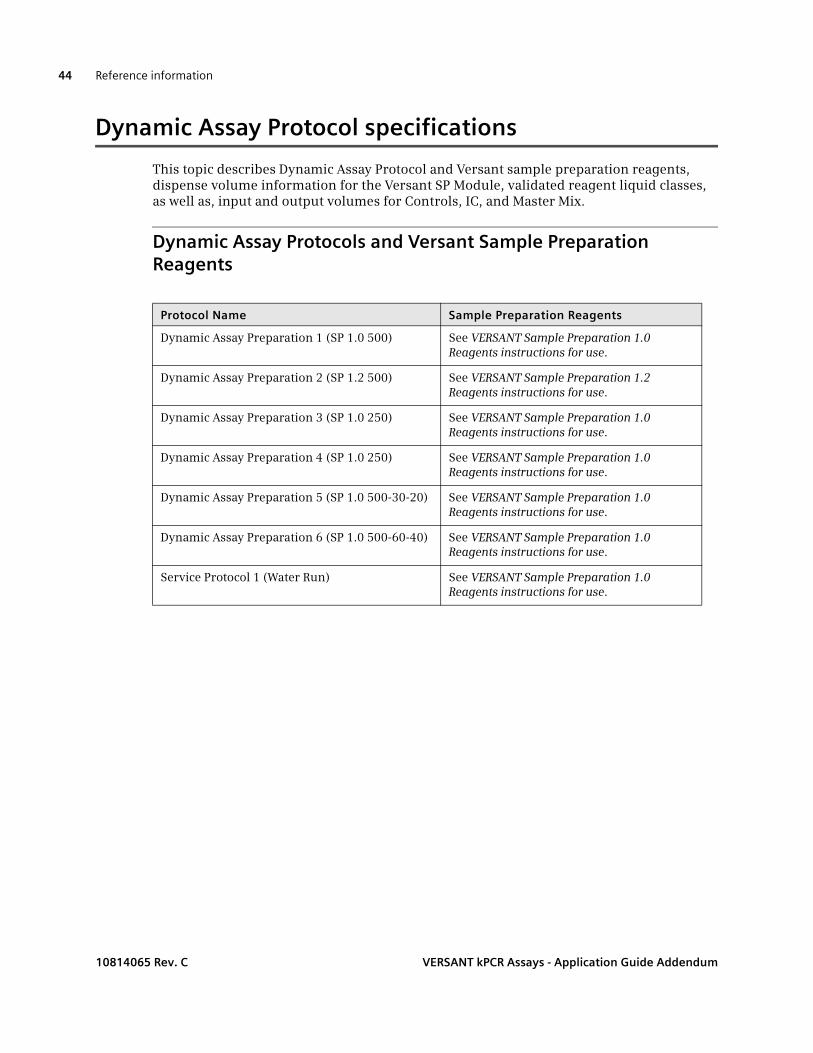
This topic describes Dynamic Assay Protocol and Versant sample preparation reagents, dispense volume information for the Versant SP Module, validated reagent liquid classes, as well as, input and output volumes for Controls, IC, and Master Mix.
Dynamic Assay Protocols and Versant Sample Preparation Reagents
Protocol Name Sample Preparation Reagents
Dynamic Assay Preparation 1 (SP 1.0 500) See VERSANT Sample Preparation 1.0 Reagents instructions for use.
Dynamic Assay Preparation 2 (SP 1.2 500) See VERSANT Sample Preparation 1.2 Reagents instructions for use.
Dynamic Assay Preparation 3 (SP 1.0 250) See VERSANT Sample Preparation 1.0 Reagents instructions for use.
Dynamic Assay Preparation 4 (SP 1.0 250) See VERSANT Sample Preparation 1.0 Reagents instructions for use.
Dynamic Assay Preparation 5 (SP 1.0 500-30-20) See VERSANT Sample Preparation 1.0 Reagents instructions for use.
Dynamic Assay Preparation 6 (SP 1.0 500-60-40) See VERSANT Sample Preparation 1.0 Reagents instructions for use.
Service Protocol 1 (Water Run) See VERSANT Sample Preparation 1.0 Reagents instructions for use.
10814065 Rev. C VERSANT kPCR Assays - Application Guide Addendum
Reference information 45
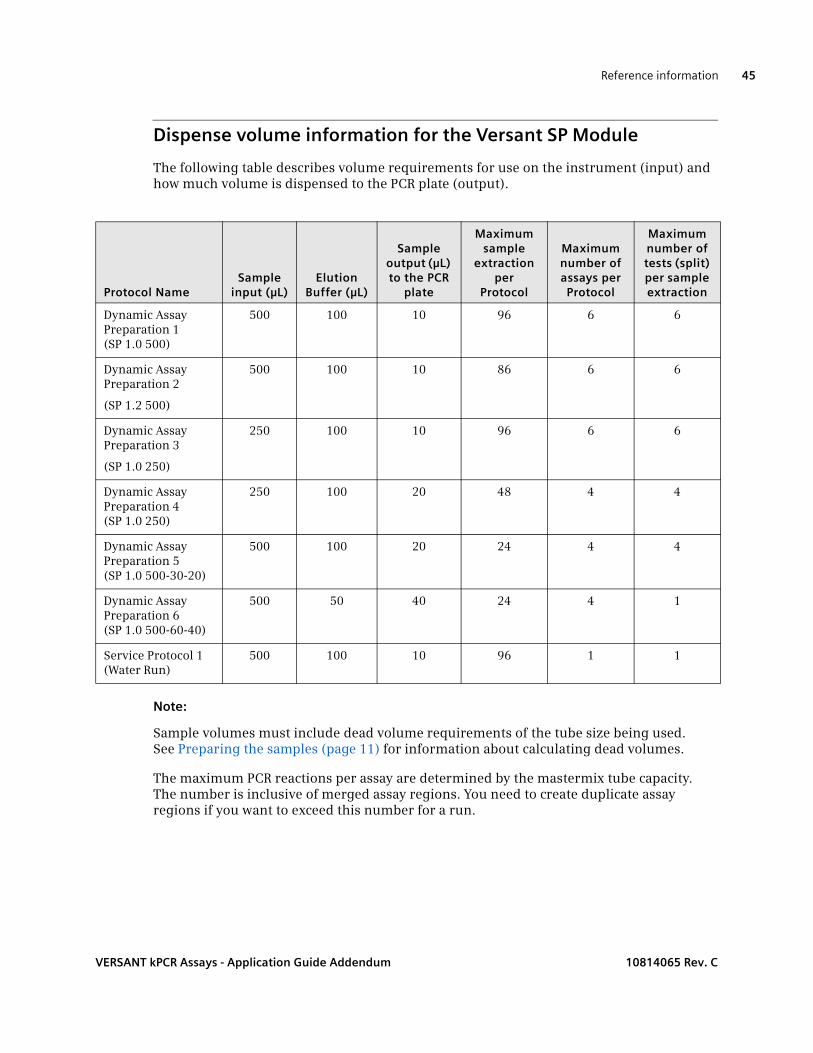
Dispense volume information for the Versant SP Module
The following table describes volume requirements for use on the instrument (input) and how much volume is dispensed to the PCR plate (output).
Note:
Sample volumes must include dead volume requirements of the tube size being used. See Preparing the samples (page 11) for information about calculating dead volumes.
The maximum PCR reactions per assay are determined by the mastermix tube capacity. The number is inclusive of merged assay regions. You need to create duplicate assay regions if you want to exceed this number for a run.
Protocol NameSample
input (μL)Elution
Buffer (μL)
Sample output (μL) to the PCR
plate
Maximum sample
extraction per
Protocol
Maximum number of assays per Protocol
Maximum number of tests (split) per sample extraction
Dynamic Assay Preparation 1 (SP 1.0 500)
500 100 10 96 6 6
Dynamic Assay Preparation 2
(SP 1.2 500)
500 100 10 86 6 6
Dynamic Assay Preparation 3
(SP 1.0 250)
250 100 10 96 6 6
Dynamic Assay Preparation 4 (SP 1.0 250)
250 100 20 48 4 4
Dynamic Assay Preparation 5 (SP 1.0 500-30-20)
500 100 20 24 4 4
Dynamic Assay Preparation 6 (SP 1.0 500-60-40)
500 50 40 24 4 1
Service Protocol 1 (Water Run)
500 100 10 96 1 1
VERSANT kPCR Assays - Application Guide Addendum 10814065 Rev. C
Reference information46
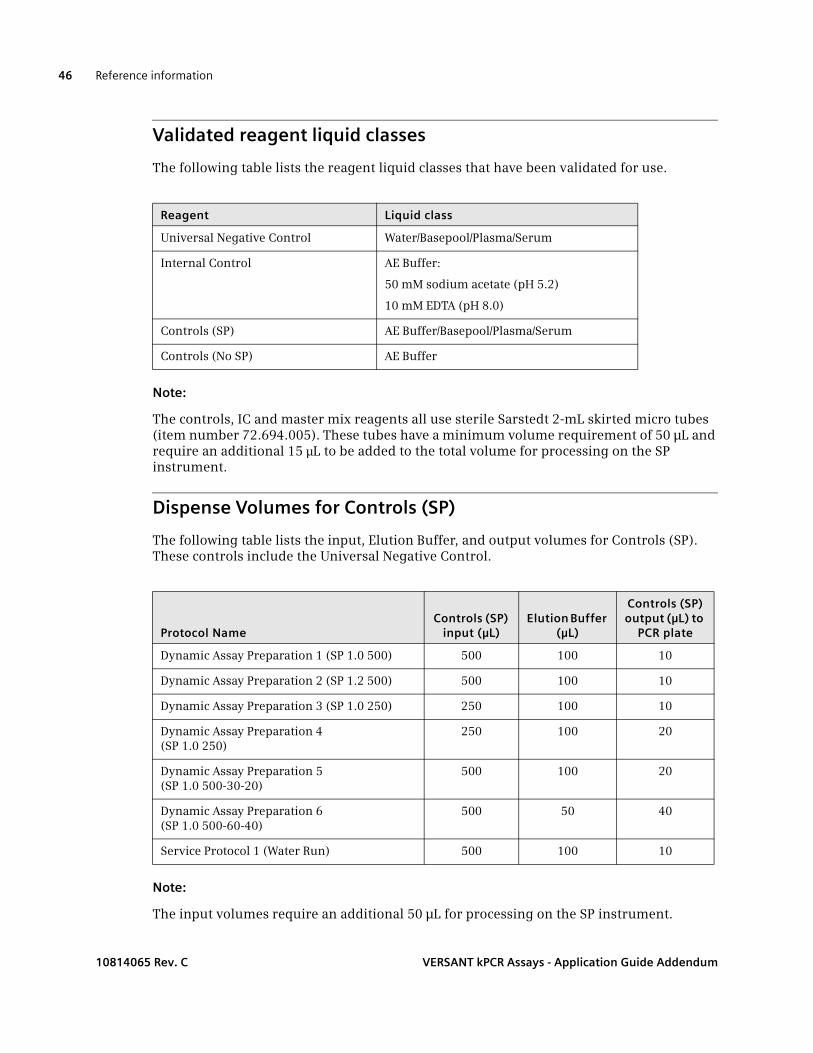
Validated reagent liquid classes
The following table lists the reagent liquid classes that have been validated for use.
Note:
The controls, IC and master mix reagents all use sterile Sarstedt 2-mL skirted micro tubes (item number 72.694.005). These tubes have a minimum volume requirement of 50 μL and require an additional 15 μL to be added to the total volume for processing on the SP instrument.
Dispense Volumes for Controls (SP)
The following table lists the input, Elution Buffer, and output volumes for Controls (SP). These controls include the Universal Negative Control.
Note:
The input volumes require an additional 50 μL for processing on the SP instrument.
Reagent Liquid class
Universal Negative Control Water/Basepool/Plasma/Serum
Internal Control AE Buffer:
50 mM sodium acetate (pH 5.2)
10 mM EDTA (pH 8.0)
Controls (SP) AE Buffer/Basepool/Plasma/Serum
Controls (No SP) AE Buffer
Protocol NameControls (SP)
input (μL)Elution Buffer
(μL)
Controls (SP) output (μL) to
PCR plate
Dynamic Assay Preparation 1 (SP 1.0 500) 500 100 10
Dynamic Assay Preparation 2 (SP 1.2 500) 500 100 10
Dynamic Assay Preparation 3 (SP 1.0 250) 250 100 10
Dynamic Assay Preparation 4 (SP 1.0 250)
250 100 20
Dynamic Assay Preparation 5 (SP 1.0 500-30-20)
500 100 20
Dynamic Assay Preparation 6 (SP 1.0 500-60-40)
500 50 40
Service Protocol 1 (Water Run) 500 100 10
10814065 Rev. C VERSANT kPCR Assays - Application Guide Addendum
Reference information 47
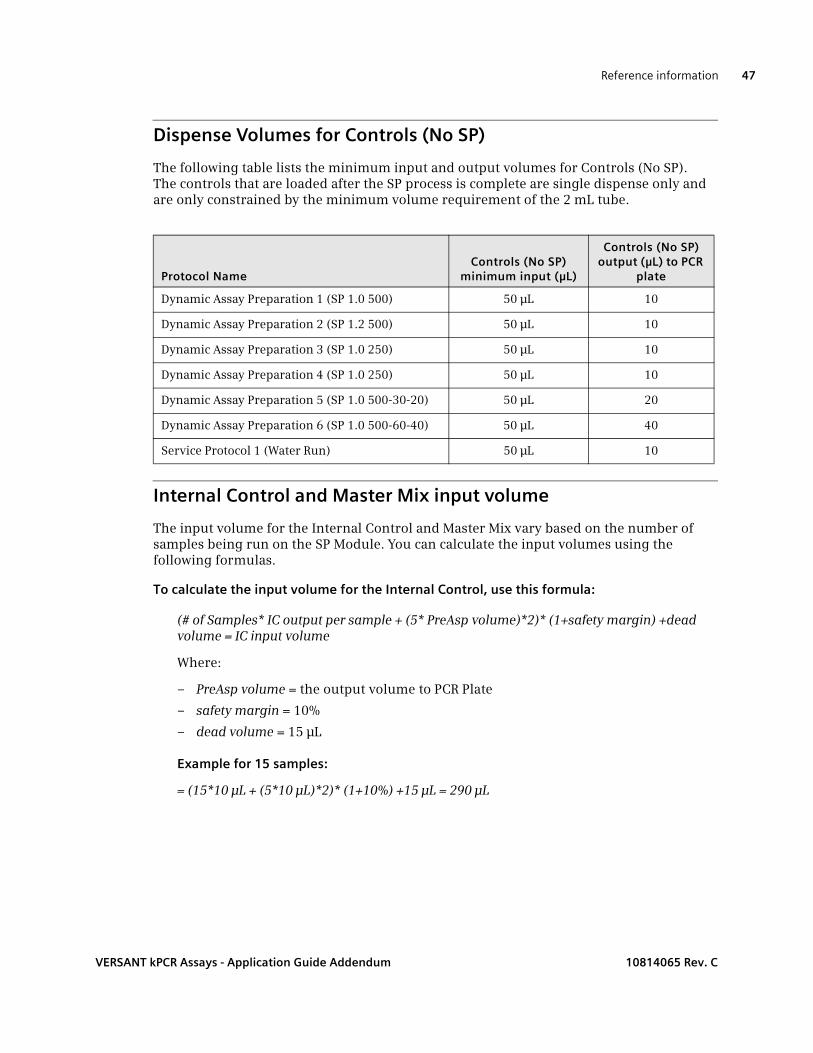
Dispense Volumes for Controls (No SP)
The following table lists the minimum input and output volumes for Controls (No SP). The controls that are loaded after the SP process is complete are single dispense only and are only constrained by the minimum volume requirement of the 2 mL tube.
10
Internal Control and Master Mix input volume
The input volume for the Internal Control and Master Mix vary based on the number of samples being run on the SP Module. You can calculate the input volumes using the following formulas.
To calculate the input volume for the Internal Control, use this formula:
(# of Samples* IC output per sample + (5* PreAsp volume)*2)* (1+safety margin) +dead volume = IC input volume
Where:
– PreAsp volume = the output volume to PCR Plate
– safety margin = 10%
– dead volume = 15 μL
Example for 15 samples:
= (15*10 µL + (5*10 µL)*2)* (1+10%) +15 µL = 290 µL
Protocol NameControls (No SP)
minimum input (μL)
Controls (No SP) output (μL) to PCR
plate
Dynamic Assay Preparation 1 (SP 1.0 500) 50 μL 10
Dynamic Assay Preparation 2 (SP 1.2 500) 50 μL 10
Dynamic Assay Preparation 3 (SP 1.0 250) 50 μL 10
Dynamic Assay Preparation 4 (SP 1.0 250) 50 μL 10
Dynamic Assay Preparation 5 (SP 1.0 500-30-20) 50 μL 20
Dynamic Assay Preparation 6 (SP 1.0 500-60-40) 50 μL 40
Service Protocol 1 (Water Run) 50 μL 10
VERSANT kPCR Assays - Application Guide Addendum 10814065 Rev. C
Reference information48
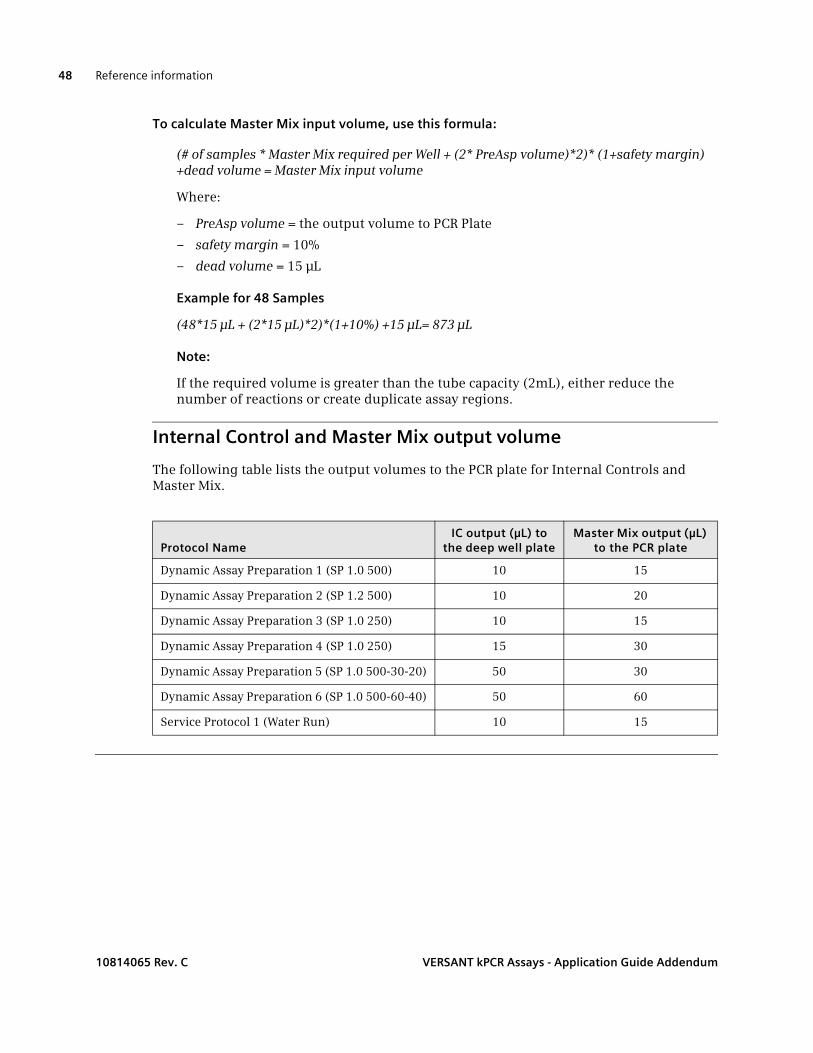
To calculate Master Mix input volume, use this formula:
(# of samples * Master Mix required per Well + (2* PreAsp volume)*2)* (1+safety margin) +dead volume = Master Mix input volume
Where:
– PreAsp volume = the output volume to PCR Plate
– safety margin = 10%
– dead volume = 15 μL
Example for 48 Samples
(48*15 µL + (2*15 µL)*2)*(1+10%) +15 µL= 873 µL
Note:
If the required volume is greater than the tube capacity (2mL), either reduce the number of reactions or create duplicate assay regions.
Internal Control and Master Mix output volume
The following table lists the output volumes to the PCR plate for Internal Controls and Master Mix.
Protocol NameIC output (μL) to
the deep well plateMaster Mix output (μL)
to the PCR plate
Dynamic Assay Preparation 1 (SP 1.0 500) 10 15
Dynamic Assay Preparation 2 (SP 1.2 500) 10 20
Dynamic Assay Preparation 3 (SP 1.0 250) 10 15
Dynamic Assay Preparation 4 (SP 1.0 250) 15 30
Dynamic Assay Preparation 5 (SP 1.0 500-30-20) 50 30
Dynamic Assay Preparation 6 (SP 1.0 500-60-40) 50 60
Service Protocol 1 (Water Run) 10 15
10814065 Rev. C VERSANT kPCR Assays - Application Guide Addendum
Reference information 49
Resolving conflicts with Siemens protocols
Running a Dynamic Assay Protocol, which defines a new filter set name and a new dye, can interfere with subsequent running of a Siemens protocol. When this conflict exists, opening a Siemens assay causes the Assay Name Conflicts with Dye Name to display.
If you see this message, perform the following steps:
1 Close the assay.
2 Create a new kPCR protocol.
3 Set well A1 to Unknown.
4 Under Collect Fluorescence Data, select the FAM dye name.
5 Close the protocol.
The assay should now open without problem.
VERSANT kPCR Assays - Application Guide Addendum 10814065 Rev. C

Reference information50
10814065 Rev. C VERSANT kPCR Assays - Application Guide Addendum