Embed Size (px)
Citation preview

W H I T E P A P E R
VERITAS Storage Foundation™ For Windows Technical Review Guide
Understanding Features, Options and Benefits Of Using VERITAS Storage Foundation for Windows
June, 2004
VERSION 1.0 1
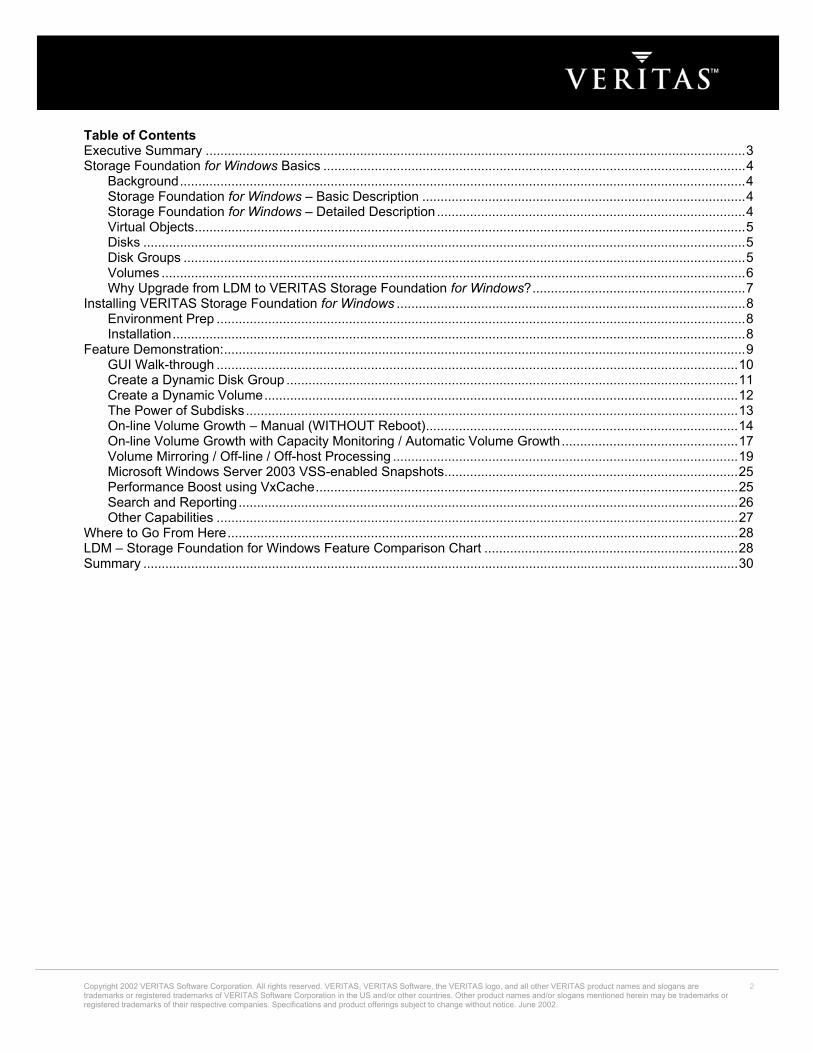
Table of Contents Executive Summary ...................................................................................................................................................3 Storage Foundation for Windows Basics ...................................................................................................................4
Background..........................................................................................................................................................4 Storage Foundation for Windows – Basic Description ........................................................................................4 Storage Foundation for Windows – Detailed Description....................................................................................4 Virtual Objects......................................................................................................................................................5 Disks ....................................................................................................................................................................5 Disk Groups .........................................................................................................................................................5 Volumes ...............................................................................................................................................................6 Why Upgrade from LDM to VERITAS Storage Foundation for Windows?..........................................................7
Installing VERITAS Storage Foundation for Windows ...............................................................................................8 Environment Prep ................................................................................................................................................8 Installation............................................................................................................................................................8
Feature Demonstration:..............................................................................................................................................9 GUI Walk-through ..............................................................................................................................................10 Create a Dynamic Disk Group ...........................................................................................................................11 Create a Dynamic Volume.................................................................................................................................12 The Power of Subdisks......................................................................................................................................13 On-line Volume Growth – Manual (WITHOUT Reboot).....................................................................................14 On-line Volume Growth with Capacity Monitoring / Automatic Volume Growth................................................17 Volume Mirroring / Off-line / Off-host Processing ..............................................................................................19 Microsoft Windows Server 2003 VSS-enabled Snapshots................................................................................25 Performance Boost using VxCache...................................................................................................................25 Search and Reporting........................................................................................................................................26 Other Capabilities ..............................................................................................................................................27
Where to Go From Here...........................................................................................................................................28 LDM – Storage Foundation for Windows Feature Comparison Chart .....................................................................28 Summary ..................................................................................................................................................................30
Copyright 2002 VERITAS Software Corporation. All rights reserved. VERITAS, VERITAS Software, the VERITAS logo, and all other VERITAS product names and slogans are trademarks or registered trademarks of VERITAS Software Corporation in the US and/or other countries. Other product names and/or slogans mentioned herein may be trademarks or registered trademarks of their respective companies. Specifications and product offerings subject to change without notice. June 2002.
2

EXECUTIVE SUMMARY In distributed client/server environments, users demand that databases, mission-critical applications and other resources be continuously available and safe from disk failure damage. Traditional disk storage management is a labor-intensive process, often requiring that machines be taken offline for tedious, manual intervention by system administrators. VERITAS Storage Foundation for Windows (VSFW) brings advanced volume management technology to Windows 2000 Server and Windows Server 2003. By creating virtual storage devices from physical disks and disk arrays, Storage Foundation for Windows removes the physical limitations of disk storage so you can configure, share, and manage storage for optimal results. Storage Foundation for Windows provides easy-to-use, online storage management for enterprise computing and Storage Area Network (SAN) environments. Organizations are beginning to use the enormous potential of SANs to keep server applications available in today’s ever-changing e-business-focused environment. VERITAS Storage Foundation for Windows is ideal for maximizing SAN-based application uptime. Storage Foundation for Windows has intrinsic features that allow organizations to increase application availability by virtualizing physical storage resources within a more complex, networked storage environment. Virtualizing and centralizing storage resources over a SAN reduces administrative overhead and provides a scaleable foundation to manage the unpredictable growth of Internet-driven businesses. Microsoft selected VERITAS Software, the leading enterprise-class storage management software provider, to develop the disk management software for Microsoft Windows 2000 and Windows Server 2003. Microsoft’s built-in disk and volume management software, Logical Disk Manager (LDM), was jointly developed by Microsoft and VERITAS. The fully featured VERITAS Storage Foundation for Windows extends and enhances the capabilities of Windows Server 2003 Disk Management. Data created in LDM is easily migrated to VERITAS Storage Foundation for Windows. The Storage Foundation for Windows enterprise-class storage-management capabilities offer you the most flexibility to create and manage storage configurations that grow and adapt with your business needs. To demonstrate the benefits of VERITAS Storage Foundation for Windows, you’re going to install Storage Foundation on your own system and perform the following:
• Install Storage Foundation for Windows • Create a Dynamic Disk Group and Dynamic Volume • Move the contents of a sub-disk with simple drag/drop while your application remains on-line • Demonstrate how a Dynamic Volume can be re-sized manually and automatically while your application
remains on-line • Perform a snapshot and recovery using VERITAS Flashsnap™ option • Explain how VERITAS Storage Foundation for Windows can perform Microsoft Windows Server 2003
Volume Shadow Copy Services-enabled snapshots • Explain how you can improve the performance of MS Exchange Server using VxCache • And much more..
After completing this document, you will have a good idea of how Storage Foundations for Windows works, understand key building blocks, and see first hand how Storage Foundation for Windows solves real-world problems. To accomplish these tasks, you’ll need administrator access to a system that has a minimum of 2 physical non-system disks. The exercises below use 2-1.5GB disks but your sizes may vary. Before we get started, here’s some background.
Copyright 2002 VERITAS Software Corporation. All rights reserved. VERITAS, VERITAS Software, the VERITAS logo, and all other VERITAS product names and slogans are trademarks or registered trademarks of VERITAS Software Corporation in the US and/or other countries. Other product names and/or slogans mentioned herein may be trademarks or registered trademarks of their respective companies. Specifications and product offerings subject to change without notice. June 2002.
3
STORAGE FOUNDATION FOR WINDOWS BASICS Background Many Microsoft Windows system administrators tend to think of a physical disk as equal to a volume. There are historical reasons why this is so, based on the original handling of partitions and volumes by Microsoft Windows NT4. In the startup phase of the Microsoft Windows operating system, the OS Loader reads the Master Boot Record (MBR) of a disk for information about the partitions that exist on the disk. Windows NT 4’s partitioning scheme, while appropriate for small systems that were managing 20 MB to 100 MB disks two decades ago, is inadequate for managing the mainframe-like storage available in today’s server environments. Logical Disk Manager (LDM) is the storage manager that comes with Microsoft Windows 2000 and Microsoft Windows Server 2003. VERITAS developed LDM in cooperation with Microsoft to address the need for larger storage volumes and simple storage formats (e.g. mirrored or concatenated). LDM is a subset of the features found in Storage Foundation for Windows. Storage Foundation for Windows – Basic Description Storage Foundation for Windows creates a virtual layer of storage above the physical device level and below the operating system and applications by using “virtual storage objects”. The virtual storage object that is visible to users and applications is called a volume. A volume is a virtual object that stores data and is made up of space from one or more physical disks on which the data is physically stored. Volumes created by Storage Foundation for Windows appear to the operating system as physical disks. All users and applications access volumes as contiguous address space in a manner similar to accessing a physical disk. A hardware-based RAID functions much like Storage Foundation. It presents a set of disks, also called spindles, tthe operating system as devices. A single device may be composed of multiple disks, or a disk may be presented as multiple devices (LUN), or a combination of these tmay be used. These devices are the hardware equivalent oStorage Foundation volumes. Storage Foundation foWindows sees and can make use of these devices as if thewere disks.
o
echniques f
r y
•
•
Storage Foundation for Windows – Detailed Description VERITAS Storage Foundation for Windows creates virtual objects on both dynamic disks and basic disks and establish logical connections between those objects and the underlying physical devices. When a Basic disk is upgraded to a Dynamic disk, Storage Foundation for Windows creates two regions on the disk:
Public region: The public region consists of the majority of the space on the disk and represents the available space that Storage Foundation can use to assign to volumes. Private region: The private region is the last 2MB of each dynamic disk and is reserved space. It stores information about virtual objects like the Storage Foundation name for the disk, which system "owns" that disk, which storage pool (disk group) the disks belongs to, and a globally unique identifier (GUID) for that disk
The private region's ability to hold this information means that the disk group is now not dependent on the registry in a single system which is where this information is stored for Basic disks. The disk group can, therefore, be switched between systems without having to download and update registry information.
Copyright 2002 VERITAS Software Corporation. All rights reserved. VERITAS, VERITAS Software, the VERITAS logo, and all other VERITAS product names and slogans are trademarks or registered trademarks of VERITAS Software Corporation in the US and/or other countries. Other product names and/or slogans mentioned herein may be trademarks or registered trademarks of their respective companies. Specifications and product offerings subject to change without notice. June 2002.
4
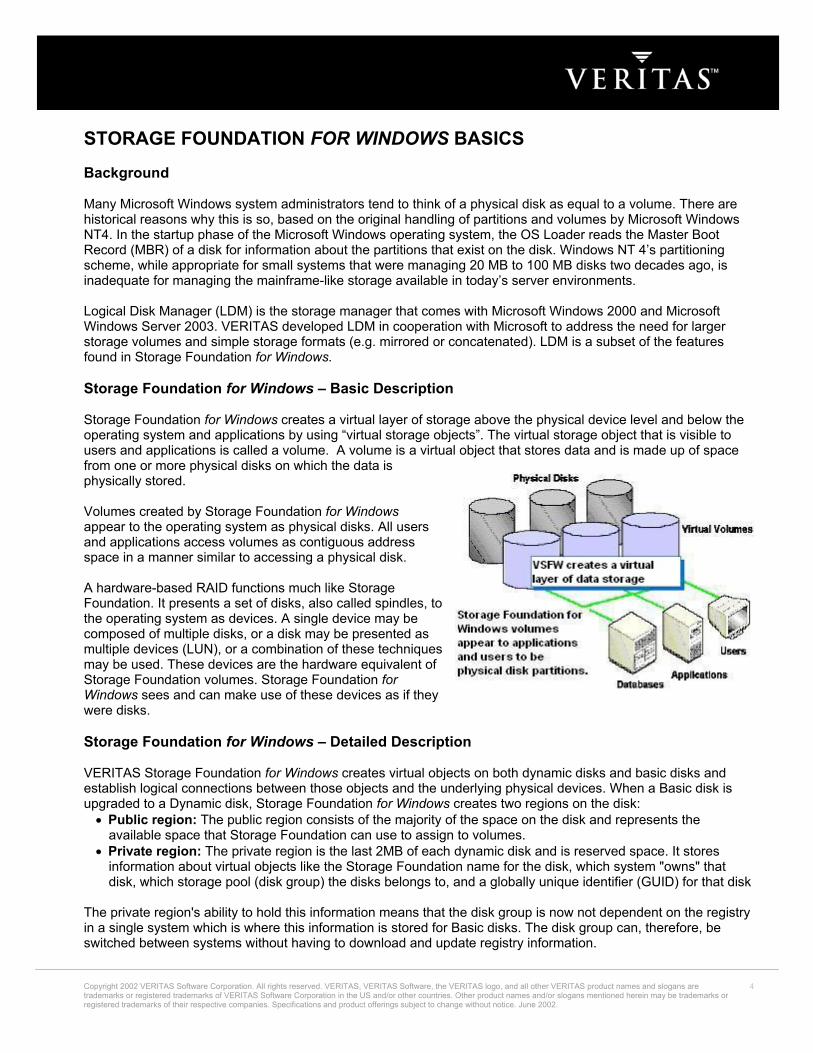
Virtual Objects A volume is a virtual object that records and retrieves data from one or more physical disks. Volumes are one of a variety of virtual object types used by Storage Foundation for storage management.
Storage Foundation for Windows virtual objects include:
Dynamic and Basic disks • • • • •
Disk groups Volumes Subdisks Plexes
Disks Storage Foundation for Windows defines all physical disks that it manages as either basic or dynamic disks. Each dynamic or basic disk corresponds to one physical disk. Basic Disks When you install Windows 2000 or Windows Server 2003, your physical disks are automatically initialized as basic. As stated earlier, a basic disk’s space is organized in a partition-oriented scheme rather than in dynamic volumes. Dynamic Disks After installing Storage Foundation for Windows, you can upgrade the disks to dynamic. On a dynamic disk, space is organized in dynamic volumes (explained later). Disk Groups Disk groups enable you to organize disks into logical collections. You assign disks to disk groups for management purposes, such as to hold the data for a specific application or set of applications. For example, data for MS Exchange Server can be placed in a disk group called exchdg. Further example, a customer may wish to store their application data on a JBOD (Just Bunch of Disks) that consists of 6 physical 30GB disks. Using VERITAS Storage Foundation for Windows, the disks in this JBOD could be configured in a single disk group then the available storage could be configured as a single 180GB concatenated volume or as a 90GB “mirrored” volume or as a 30GB “striped” volume. In most cases, changes can be made from one layout to another without a system re-boot. Disk groups also enable high availability, because a disk group and its components can be moved as a unit from one host machine to another. Physical disks can be simultaneously seen by two or more hosts, but can be accessed by only one host at a time. If one host crashes, the other host can take over the failed host's disk drives, as well as its disk groups. This is known as a Clustered Disk Group and is the only way a server and its storage can be clustered with Microsoft Cluster Server or VERITAS Cluster Server. There are three types of disk groups: dynamic disk group, cluster disk group, and basic disk group. Basic Disk Group VERITAS Storage Foundation for Windows has a single disk group for all basic disks. All non-dynamic disks are assigned to the Basic disk group. No persistent record is kept of these disks in Storage Foundation’s Private
Copyright 2002 VERITAS Software Corporation. All rights reserved. VERITAS, VERITAS Software, the VERITAS logo, and all other VERITAS product names and slogans are trademarks or registered trademarks of VERITAS Software Corporation in the US and/or other countries. Other product names and/or slogans mentioned herein may be trademarks or registered trademarks of their respective companies. Specifications and product offerings subject to change without notice. June 2002.
5
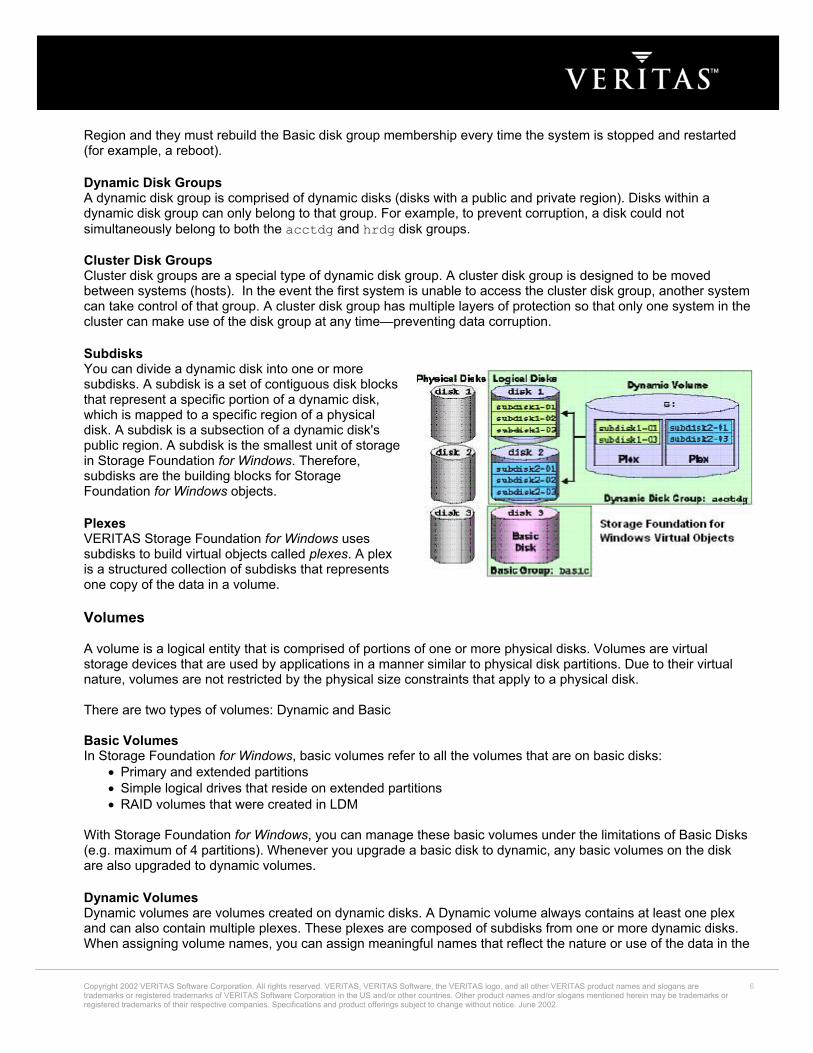
Region and they must rebuild the Basic disk group membership every time the system is stopped and restarted (for example, a reboot). Dynamic Disk Groups A dynamic disk group is comprised of dynamic disks (disks with a public and private region). Disks within a dynamic disk group can only belong to that group. For example, to prevent corruption, a disk could not simultaneously belong to both the acctdg and hrdg disk groups. Cluster Disk Groups Cluster disk groups are a special type of dynamic disk group. A cluster disk group is designed to be moved between systems (hosts). In the event the first system is unable to access the cluster disk group, another system can take control of that group. A cluster disk group has multiple layers of protection so that only one system in the cluster can make use of the disk group at any time—preventing data corruption. Subdisks You can divide a dynamic disk into one or more subdisks. A subdisk is a set of contiguous disk blocks that represent a specific portion of a dynamic disk, which is mapped to a specific region of a physical disk. A subdisk is a subsection of a dynamic disk's public region. A subdisk is the smallest unit of storage in Storage Foundation for Windows. Therefore, subdisks are the building blocks for Storage Foundation for Windows objects. Plexes VERITAS Storage Foundation for Windows uses subdisks to build virtual objects called plexes. A plex is a structured collection of subdisks that represents one copy of the data in a volume. Volumes A volume is a logical entity that is comprised of portions of one or more physical disks. Volumes are virtual storage devices that are used by applications in a manner similar to physical disk partitions. Due to their virtual nature, volumes are not restricted by the physical size constraints that apply to a physical disk. There are two types of volumes: Dynamic and Basic Basic Volumes In Storage Foundation for Windows, basic volumes refer to all the volumes that are on basic disks:
Primary and extended partitions • • •
Simple logical drives that reside on extended partitions RAID volumes that were created in LDM
With Storage Foundation for Windows, you can manage these basic volumes under the limitations of Basic Disks (e.g. maximum of 4 partitions). Whenever you upgrade a basic disk to dynamic, any basic volumes on the disk are also upgraded to dynamic volumes. Dynamic Volumes Dynamic volumes are volumes created on dynamic disks. A Dynamic volume always contains at least one plex and can also contain multiple plexes. These plexes are composed of subdisks from one or more dynamic disks. When assigning volume names, you can assign meaningful names that reflect the nature or use of the data in the
Copyright 2002 VERITAS Software Corporation. All rights reserved. VERITAS, VERITAS Software, the VERITAS logo, and all other VERITAS product names and slogans are trademarks or registered trademarks of VERITAS Software Corporation in the US and/or other countries. Other product names and/or slogans mentioned herein may be trademarks or registered trademarks of their respective companies. Specifications and product offerings subject to change without notice. June 2002.
6
volumes. For example, two volumes in exchdg can be sgvol, a volume that contains the Microsoft Exchange Server storage group, and tlvol, a volume that contains Microsoft Exchange Server Transaction Log. Dynamic Volume Layouts A volume's layout describes, in general terms, the number and default type of plexes that make up the volume. Dynamic volume layouts are based on the concept of disk spanning, which is the ability to logically combine multiple physical disks into a single map. This map is presented as a single device to whatever application is requesting I/O to that device. The map can be contiguous, in the case of a concatenated plex, or interleaved, in the case of a striped plex. Calculation of I/O offsets, no matter what the layout, is handled by Storage Foundation for Windows. Finally, with Storage Foundation for Windows you can change the dynamic volume layout without disrupting applications or file systems that are using the dynamic volume. A dynamic volume layout can be configured and tuned while the dynamic volume remains accessible.
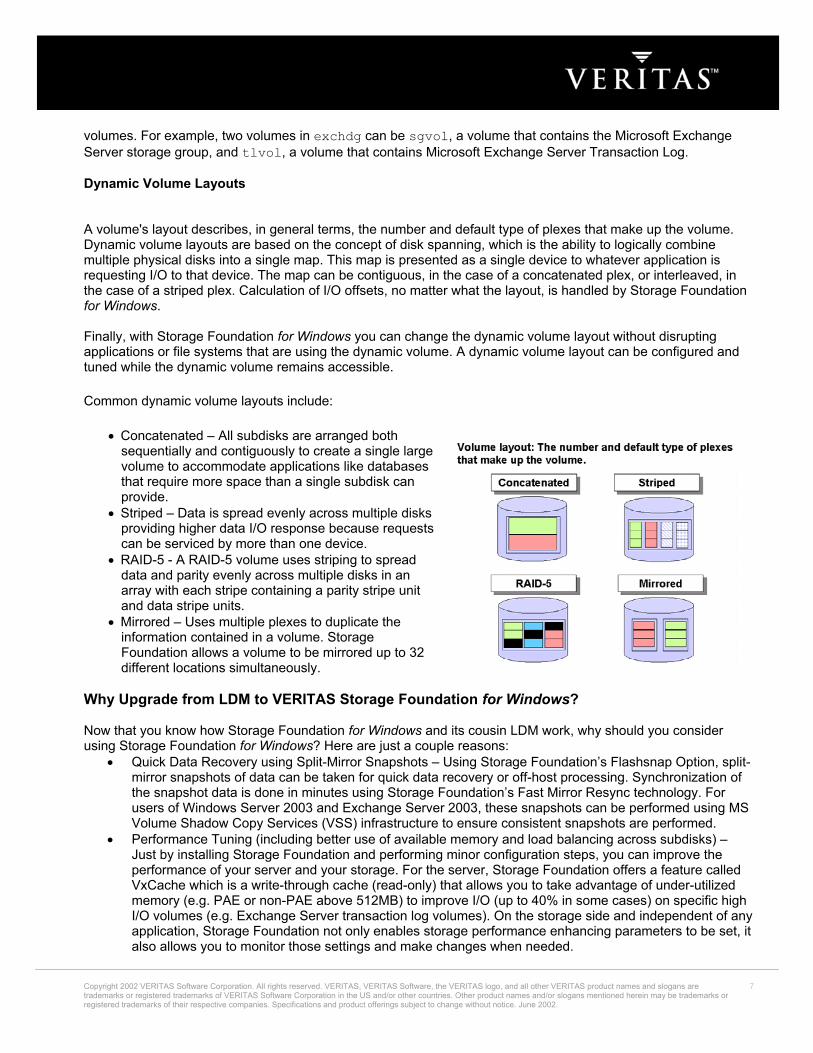
Common dynamic volume layouts include:
Concatenated – All subdisks are arranged both sequentially and contiguously to create a single large volume to accommodate applications like databases that require more space than a single subdisk can provide.
•
•
•
•
Striped – Data is spread evenly across multiple disks providing higher data I/O response because requests can be serviced by more than one device. RAID-5 - A RAID-5 volume uses striping to spread data and parity evenly across multiple disks in an array with each stripe containing a parity stripe unit and data stripe units. Mirrored – Uses multiple plexes to duplicate the information contained in a volume. Storage Foundation allows a volume to be mirrored up to 32 different locations simultaneously.
Why Upgrade from LDM to VERITAS Storage Foundation for Windows? Now that you know how Storage Foundation for Windows and its cousin LDM work, why should you consider using Storage Foundation for Windows? Here are just a couple reasons:
• Quick Data Recovery using Split-Mirror Snapshots – Using Storage Foundation’s Flashsnap Option, split-mirror snapshots of data can be taken for quick data recovery or off-host processing. Synchronization of the snapshot data is done in minutes using Storage Foundation’s Fast Mirror Resync technology. For users of Windows Server 2003 and Exchange Server 2003, these snapshots can be performed using MS Volume Shadow Copy Services (VSS) infrastructure to ensure consistent snapshots are performed.
• Performance Tuning (including better use of available memory and load balancing across subdisks) – Just by installing Storage Foundation and performing minor configuration steps, you can improve the performance of your server and your storage. For the server, Storage Foundation offers a feature called VxCache which is a write-through cache (read-only) that allows you to take advantage of under-utilized memory (e.g. PAE or non-PAE above 512MB) to improve I/O (up to 40% in some cases) on specific high I/O volumes (e.g. Exchange Server transaction log volumes). On the storage side and independent of any application, Storage Foundation not only enables storage performance enhancing parameters to be set, it also allows you to monitor those settings and make changes when needed.
Copyright 2002 VERITAS Software Corporation. All rights reserved. VERITAS, VERITAS Software, the VERITAS logo, and all other VERITAS product names and slogans are trademarks or registered trademarks of VERITAS Software Corporation in the US and/or other countries. Other product names and/or slogans mentioned herein may be trademarks or registered trademarks of their respective companies. Specifications and product offerings subject to change without notice. June 2002.
7

• Storage Area Network (SAN) support – Storage Foundation can use the optional Dynamic Multipathing
(DMP) technology to create redundant paths and I/O load balancing to SAN storage. (NOTE: DMP is available for most standard storage arrays as well. Check the Veritas Hardware Compatibility List at www.veritas.com for more info). LDM lacks support for this capability. Additionally, Storage Foundation has a “Boot from SAN” capability that when combined with DMP allows the system to be booted even if access to local storage and/or the primary path to the SAN are lost.
• Cluster Support – Storage Foundation allows up to 32 storage groups to be created (LDM supports only 1). When applications are clustered, it is easier to manage data when it’s divided into multiple storage groups. Additional benefits to using Storage Foundation in clustered environments are:
o Resize volumes without a system reboot o Ability to easily re-assign storage “ownership” from one host to another o Ability to mirror volumes which assists in creating “Campus Clusters” (aka “Geo Clusters”) where
cluster nodes are physically located in different buildings. o Ability to mirror quorum storage volumes for fault tolerance in Microsoft Cluster Server.
• Storage Management – Storage Foundation’s storage management capability vastly surpasses that of LDM. From simple drag-n-drop of entire volumes to capacity monitoring to hot-spot detection/reaction to creating volume snapshots, Storage Foundation provides the capabilities today’s storage administrators need to accomplish tasks quickly and easily.
• Support for Multiple Disk Groups (including Deport/Import) – Not only can you organize your storage according to business requirements instead of technical and proprietary limitations, with Storage Foundation you can “move” this storage from host to host to facilitate off-host processing of storage-intensive functions. This reduces impact on production hosts and improves storage management responsiveness.
• Data Availability – Redundant paths to storage enable applications to remain on-line and available to users in the event of a controller failure. Microsoft has published an architectural framework in Windows Server 2003 called Multipath I/O (MPIO). To date, there are no known HW vendors that have adopted this architecture. Meanwhile, Storage Foundation’s Dynamic Multipathing (DMP) is the most widely accepted multipathing solution with support for the leading storage devices. (For more information, go to www.veritas.com to view the DMP Hardware Compatibility List.)
• Paging/Email – Administrators can stay in touch with the condition of their storage via email and paging capabilities within Storage Foundation.
For more information, a detailed feature comparison chart between LDM and Storage Foundation for Windows has been provided at the end of this document. INSTALLING VERITAS STORAGE FOUNDATION FOR WINDOWS Environment Prep To complete the exercises below and see first-hand how easy Storage Foundation for Windows is to install, configure and use, you will need a Microsoft Windows 2000 Server or MS Windows Server 2003 with at least 2 non-system disks and administrator access. Installation Installation Requirements
• Microsoft Windows Server 2003 Standard Edition, Web Edition, Enterprise Edition or Datacenter Edition or Microsoft Windows 2000 Server, Advanced Server or Enterprise Server
• 200 MB of disk space is required for full installation including optional programs. At least 50 MB of additional disk space is needed for the proper operation of the software.
• The minimum requirement for system memory is 256 MB • No minimum processor is required although a 550 MHz or faster Pentium is suggested.
Copyright 2002 VERITAS Software Corporation. All rights reserved. VERITAS, VERITAS Software, the VERITAS logo, and all other VERITAS product names and slogans are trademarks or registered trademarks of VERITAS Software Corporation in the US and/or other countries. Other product names and/or slogans mentioned herein may be trademarks or registered trademarks of their respective companies. Specifications and product offerings subject to change without notice. June 2002.
8
• Minimum resolution of 800 x 600 pixels is required for the monitor, but a higher resolution, such as 1024 x
768 pixels, is recommended. If you plan to use large fonts, a resolution of 1024 x 768 pixels is required. • You must have administrator privileges to install and use this product.
NOTE: Only one instance of Storage Foundation for Windows should be running on a computer at a time. If you have a previous version already installed, uninstall it before installing Storage Foundation for Windows v4.x. Installing VERITAS Storage Foundation for Windows
1. To begin the installation, insert the CD on the test system. 2. Double-click on setup.exe in the root directory of the Storage Foundation for Windows program CD. 3. In the language dialog, select the appropriate language and click OK. 4. In the initial Storage Foundation installation window, initiate the install by clicking on Storage Foundation
4.1 for Windows. NOTE: On Microsoft Windows Server 2003, the Windows WMI provider is not installed by default. If you receive a message to install WMI, follow the steps provided to complete the install.
5. Select “Complete/Custom” option in the Install Type window. Click Next to continue the installation. 6. Click Next at the Welcome screen. 7. Accept the license agreement and click Next. 8. Enter the license key IEPV-32PF-8BIW-3D80-4C43-RRDN-P. Click Add to validate the key. Click
Next to continue. 9. The next screen displays all the options available for this installation. This document is only going to
cover the Flashsnap and VxCache options. Uncheck DMP, VVR, and MSCS options. Click Next to continue.
10. Leave the “VERITAS Storage Foundation 4.1 for Windows (Client Components)” option checked to allow the installation of the management console. Click Next to continue.
11. By default, Storage Foundation installs on the same system the install is running. For this exercise, click Add to validate the server you will be installing on. When accepted, click Next.
12. The Validation screen will validate the system chosen. NOTE: This may take a few seconds to finish. Click Next once the server has been validated.
13. View the Install Report if desired. Click Install to continue. 14. Click Next after the files have been copied. 15. Click Finish to complete the install. 16. Click Yes to reboot the system. 17. After your system reboots, Storage Foundation 4.1 for Windows is now installed.
FEATURE DEMONSTRATION: Now that Storage Foundation for Windows is installed on the system, we’re going to:
• Provide a brief description of the VEA console • Create a Dynamic Disk Group • Upgrade Basic disks to Dynamic disks • Create a Dynamic Volume • Demonstrate moving an entire sub-disk from one physical disk to another using Drag/Drop • Re-size a volume without rebooting and demonstrate how this can be done without admin intervention • Mirror a Volume • Demonstrate quick recovery of a volume - Take a snapshot, delete data on the production volume, and
resync the snapshot using FastResync • Take a snapshot using Storage Foundation for Windows’ in-box VSS Requester utility – VxSnap. (NOTE:
Storage Foundation 4.1 for Windows supports Microsoft Windows Server 2003 and Microsoft Exchange Server 2003 only. Snapshots on Microsoft Windows 2000 Server and Microsoft Exchange Server 2000 are also available but not through VSS since there is no VSS infrastructure available.
Copyright 2002 VERITAS Software Corporation. All rights reserved. VERITAS, VERITAS Software, the VERITAS logo, and all other VERITAS product names and slogans are trademarks or registered trademarks of VERITAS Software Corporation in the US and/or other countries. Other product names and/or slogans mentioned herein may be trademarks or registered trademarks of their respective companies. Specifications and product offerings subject to change without notice. June 2002.
9
trademarks or registered trademarks of VERITAS Software Corporatiregistered trademarks of their respective companies. Specifications
10
NOTE: The exercises below will refer to “disks” but these same capabilities could be applied to LUNs configured with different layout types such as hardware RAID-5. Storage Foundation sees and treats each LUN as if it were an individual disk. Because of this capability, Storage Foundation is a great way to add the flexibility you need even though you’ve already invested in a proprietary and sometimes restrictive hardware solution.
GUI Walk-through Description: This topic will walk you through using the VERITAS Enterprise Administrator (VEA) console. The VEA console enables cross-platform, cross-enterprise volume and storage management.
1. To launch VEA, select Start > Programs > VERITAS > VERITAS Enterprise Administrator. The VEA console comes up, the Storage Foundation 4.1 for Windows program is activated. If this is the first time you’ve launched VEA, a message will appear stating VEA is creating a Profile. Click OK.
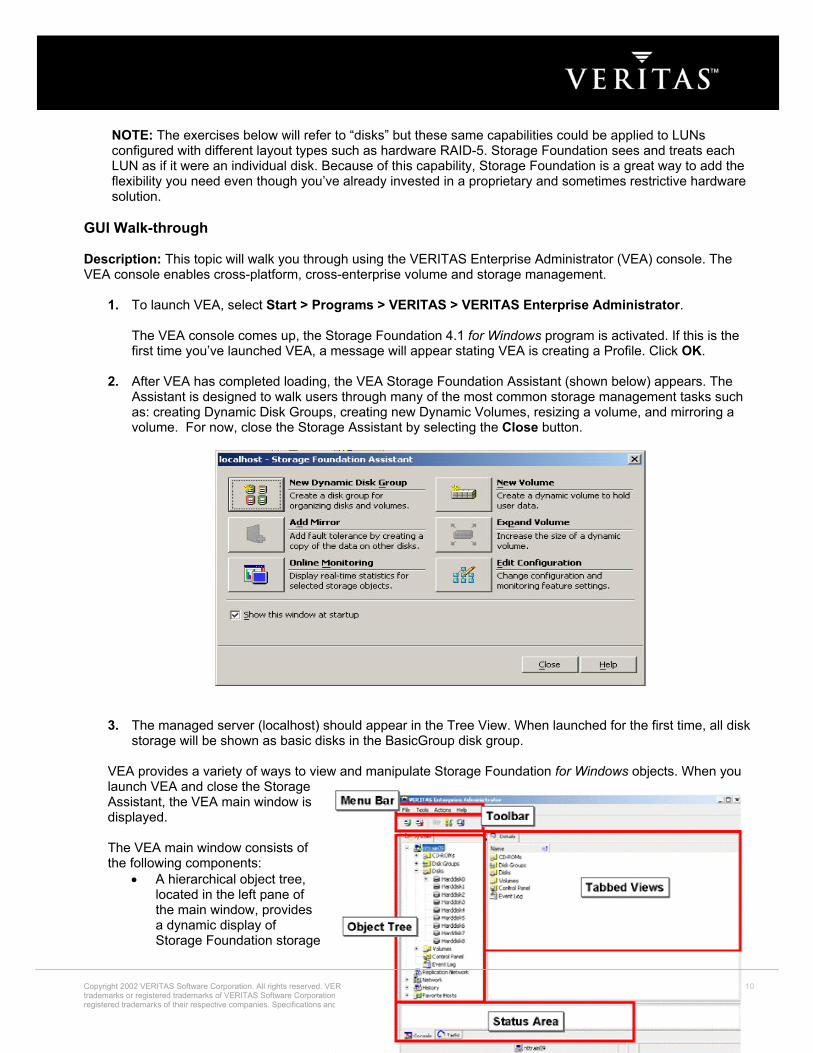
2. After VEA has completed loading, the VEA Storage Foundation Assistant (shown below) appears. The Assistant is designed to walk users through many of the most common storage management tasks such as: creating Dynamic Disk Groups, creating new Dynamic Volumes, resizing a volume, and mirroring a volume. For now, close the Storage Assistant by selecting the Close button.
3. The managed server (localhost) should appear in the Tree View. When launched for the first time, all disk storage will be shown as basic disks in the BasicGroup disk group.
ITAS, VERITAS Software, the VERITAS logo, and all other VERITAS product names and slogans are on in the US and/or other countries. Other product names and/or slogans mentioned herein may be trademarks or
and product offerings subject to change without notice. June 2002.
VEA provides a variety of ways to view and manipulate Storage Foundation for Windows objects. When you launch VEA and close the Storage Assistant, the VEA main window is displayed. The VEA main window consists of the following components:
• A hierarchical object tree, located in the left pane of the main window, provides a dynamic display of Storage Foundation storage
Copyright 2002 VERITAS Software Corporation. All rights reserved. VER
objects and other objects on the system.
• Tabbed views, located in the right pane of the main window, list information about the object selected in the object tree.
• A menu bar and toolbar provide access to tasks. • A status area, located at the bottom of the main window, displays information on processes initiated
by the program.
For more information on the VEA Admin Console, see the VERITAS Storage Foundation for Windows Getting Started Guide and Administrator’s Guide on the CD.
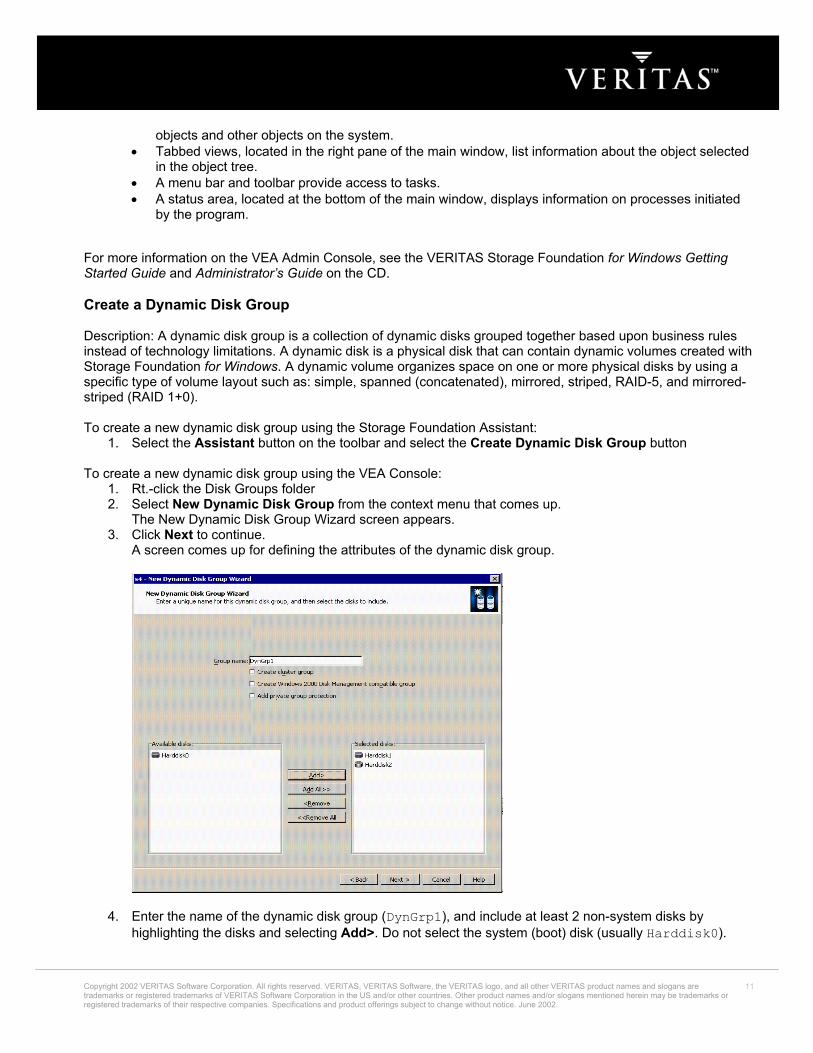
Create a Dynamic Disk Group Description: A dynamic disk group is a collection of dynamic disks grouped together based upon business rules instead of technology limitations. A dynamic disk is a physical disk that can contain dynamic volumes created with Storage Foundation for Windows. A dynamic volume organizes space on one or more physical disks by using a specific type of volume layout such as: simple, spanned (concatenated), mirrored, striped, RAID-5, and mirrored-striped (RAID 1+0). To create a new dynamic disk group using the Storage Foundation Assistant:
1. Select the Assistant button on the toolbar and select the Create Dynamic Disk Group button To create a new dynamic disk group using the VEA Console:
1. Rt.-click the Disk Groups folder 2. Select New Dynamic Disk Group from the context menu that comes up.
The New Dynamic Disk Group Wizard screen appears. 3. Click Next to continue.
A screen comes up for defining the attributes of the dynamic disk group.
4. Enter the name of the dynamic disk group (DynGrp1), and include at least 2 non-system disks by highlighting the disks and selecting Add>. Do not select the system (boot) disk (usually Harddisk0).
Copyright 2002 VERITAS Software Corporation. All rights reserved. VERITAS, VERITAS Software, the VERITAS logo, and all other VERITAS product names and slogans are trademarks or registered trademarks of VERITAS Software Corporation in the US and/or other countries. Other product names and/or slogans mentioned herein may be trademarks or registered trademarks of their respective companies. Specifications and product offerings subject to change without notice. June 2002.
11

NOTE: If working on a Storage Area Network (SAN), Harddisks will actually be LUNs but will appear to Storage Foundation as Harddisks.
5. Leave the disk group Types checkboxes blank. Note: For more information on optional Disk Group Types, see the Storage Foundation for Windows Admin Guide.
6. Choose Next to continue. Normally, you would add all the disks you want in the group. If you want to add more physical disks or LUNs later, you can add them to the disk group using Add Disks to Dynamic Disk Group command.
7. Select Next at Summary screen. 8. The prompt below denotes the Basic disks will be upgraded to Dynamic. Depending on the type of disks
you’ll be using, you may/may not see this prompt. If you do, select Yes.
9. Click Finish in the final screen.
NOTE: After creating the Dynamic Disk Group, Storage Foundation for Windows will import the disks and convert them to Dynamic Disks (allowing the creation of Dynamic Volumes). If you see Basic Volumes on each of the disks, note the Basic volume encompasses the entire disk of each imported disk preventing the ability to have more than 1 volume per disk. Therefore, before creating Dynamic volumes, these Basic volumes must be removed. To remove the Basic volumes:
a. In the tree view, right-click on any of the volumes except system volume (C: ). Select Delete Volume.
b. Repeat this until all volumes except system volume have been removed.
Once the Basic volumes have been removed, you’re ready to create new Dynamic volumes. Create a Dynamic Volume Description: Dynamic volumes are one of the many virtual storage objects used by Storage Foundation for Windows to manage storage. As the name describes, Dynamic volumes are re-sizable “on the fly” without a need for system reboots. They appear to the o/s and applications as a complete disk eliminating the need for application changes in the event storage modifications are made. To create a new dynamic volume:
1. In the Object Tree, expand the Disk Group object. 2. Right-click on the dynamic disk group you just created (DynGrp1) and select New Volume from the
context menu that comes up. 3. The New volume wizard appears. Click Next to continue. 4. In the Assign Disks for Volume screen, select Manually select disks and highlight one of the disks
(Harddisk1). Select Next to continue.
Copyright 2002 VERITAS Software Corporation. All rights reserved. VERITAS, VERITAS Software, the VERITAS logo, and all other VERITAS product names and slogans are trademarks or registered trademarks of VERITAS Software Corporation in the US and/or other countries. Other product names and/or slogans mentioned herein may be trademarks or registered trademarks of their respective companies. Specifications and product offerings subject to change without notice. June 2002.
12

5. Select the attributes listed in the picture above, and click Next to continue. This will create a dynamic
volume in the Dynamic disk group DynGrp1 on Harddisk1 and be named DynVol1 with a size of 1GB. 6. Select H: for the drive letter and click Next. NOTE: You can also assign the volume a Mount Point.
Mount Points are especially useful in environments where you need to create > 23 volumes and there are not enough letters in the alphabet to use.
7. In the Create File System dialog, select NTFS, check the Quick Format checkbox and use the Default allocation size. Click Next.
8. Click Finish at the Summary screen 9. Verify:
a. To see the newly created volume in the VEA console, highlight the Volumes folder in the left pane. In the right pane Volumes tab, there will be two volumes with the following information: Name Group Name Status C: Basic Group Healthy (Boot, System, Page File) DynVol1(H:) DynGrp1 Healthy
b. With the Volumes folder highlighted, select the Disks tab in the right pane. This view should look
familiar to those who have used Disk Administrator (LDM). If you only have 3 disks in your system, the view should show the system disk, a completely blank disk (showing only disk size), and the third disk showing the 1GB Dynamic volume (DynVol1) and the amount of space on disk not yet used.
c. Verify the new volume functions properly by copying test data from the system volume to the DynVol1(H:)volume using Microsoft Windows Explorer.
The Power of Subdisks Description: Another virtual storage object Storage Foundation for Windows uses is the Subdisk. You can divide a dynamic disk into one or more subdisks. A subdisk is a set of contiguous disk blocks that represent a specific portion of a dynamic disk, which is mapped to a specific region of a physical disk and is a subsection of a dynamic disk's public region. A subdisk is the smallest unit of storage in Storage Foundation. Therefore, subdisks are the building blocks for Storage Foundation objects. By creating a Dynamic volume comprised of multiple subdisks and tracking sub-disk I/O activity, an administrator can identify and then easily act on a performance bottleneck by
Copyright 2002 VERITAS Software Corporation. All rights reserved. VERITAS, VERITAS Software, the VERITAS logo, and all other VERITAS product names and slogans are trademarks or registered trademarks of VERITAS Software Corporation in the US and/or other countries. Other product names and/or slogans mentioned herein may be trademarks or registered trademarks of their respective companies. Specifications and product offerings subject to change without notice. June 2002.
13
moving the subdisk to a different disk and/or controller by simply dragging and dropping. Additionally, subdisks can be split and moved to other disks as needed. The exercises below demonstrate how easy it is to perform subdisk operations like moving and joining using simple drag/drop methods. To move a sub-disk using the VEA console:
1. Using the VEA console, highlight the Volumes folder and select the Disk view tab in the right pane. 2. Using the mouse, select the DynVol H: volume, drag and drop it on the other physical disk.
Immediately following the “drop” of the sub-disk to the new disk, select the Tasks tab in the lower pane. This will show the status of the move. This operation will not only move the volume to a completely separate disk and possibly a separate controller, it will also move all data stored on this disk all while the application accessing the data is on-line and available. To see a further example of this capability, use Microsoft Windows Explorer to copy a large dataset to DynVol H: volume. While Explorer is copying data, repeat the sub-disk move process this time moving the sub-disk back to the original disk. Note the sub-disk move process has no impact on the ability for Explorer to copy data.
To join a sub-disk using the VEA console:
Now that the DynVol H: volume is back on the original disk, we’re going to demonstrate how Storage Foundation can split and join a subdisk. Splitting and joining subdisks is useful for situations where a portion of a volume is experiencing a higher percentage of I/O compared to the rest of the volume. Splitting a subdisk allows an administrator to spread the load across more than one physical disk or LUN. At a later point, if the administrator desires to re-join the subdisks creating one single contiguous volume, sub-disk move can be used to accomplish this. To demonstrate this, we’re going to:
• Add a second volume to our physical disk (next to DynVol H:) • We’ll temporarily break away from Join demonstration to demonstrate how to Expand our
original volume online (DynVol H:) manually • Move both subdisks that make up DynVol H: from the original physical disk to a second physical
disk • Join the subdisks into one contiguous volume
To get started: 1. Using the VEA console, highlight the Volumes folder and select the Disk view tab in the right pane and
note DynVol is shown. 2. Create a second small volume on disk 1 using the steps provided earlier and using the following
parameters: a. Name: DynVol2 b. Drive Letter: I: c. Size: 50MB d. Hard Disk: Manually select the same disk as the first DynVol H: e. File System: NTFS f. Quick Format: Yes
On-line Volume Growth – Manual (WITHOUT Reboot) Description:
Copyright 2002 VERITAS Software Corporation. All rights reserved. VERITAS, VERITAS Software, the VERITAS logo, and all other VERITAS product names and slogans are trademarks or registered trademarks of VERITAS Software Corporation in the US and/or other countries. Other product names and/or slogans mentioned herein may be trademarks or registered trademarks of their respective companies. Specifications and product offerings subject to change without notice. June 2002.
14
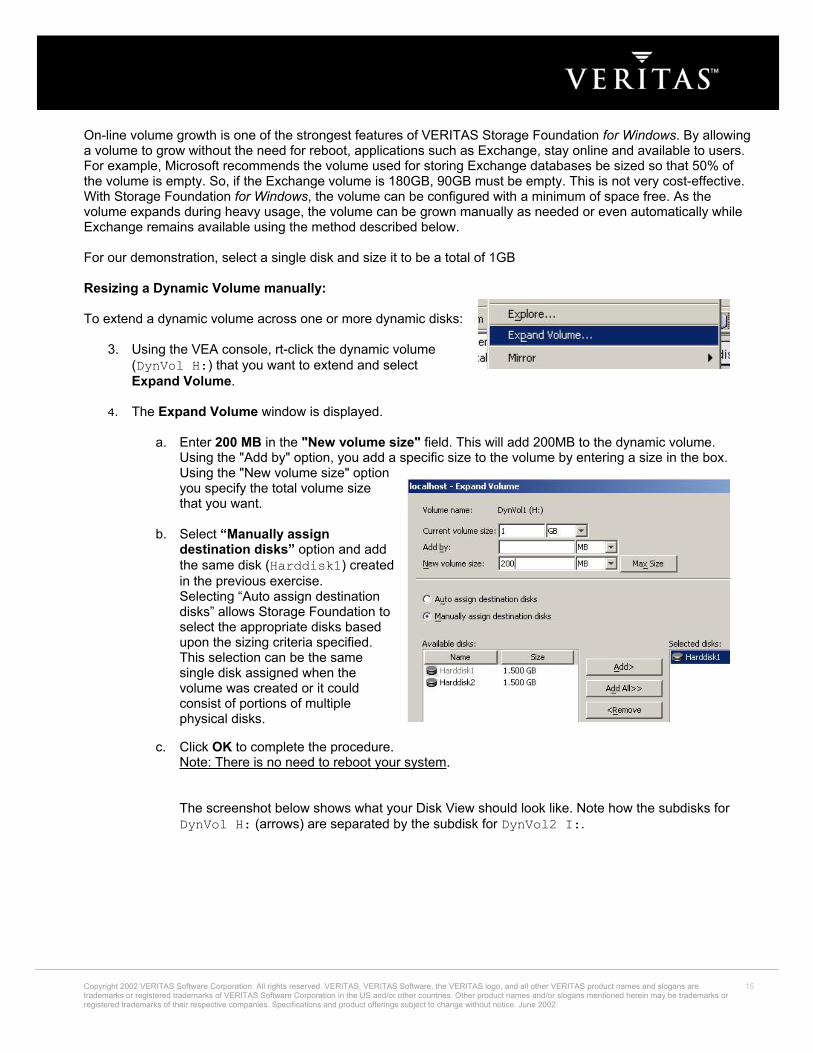
On-line volume growth is one of the strongest features of VERITAS Storage Foundation for Windows. By allowing a volume to grow without the need for reboot, applications such as Exchange, stay online and available to users. For example, Microsoft recommends the volume used for storing Exchange databases be sized so that 50% of the volume is empty. So, if the Exchange volume is 180GB, 90GB must be empty. This is not very cost-effective. With Storage Foundation for Windows, the volume can be configured with a minimum of space free. As the volume expands during heavy usage, the volume can be grown manually as needed or even automatically while Exchange remains available using the method described below. For our demonstration, select a single disk and size it to be a total of 1GB Resizing a Dynamic Volume manually: To extend a dynamic volume across one or more dynamic disks:
3. Using the VEA console, rt-click the dynamic volume (DynVol H:) that you want to extend and select Expand Volume.
4. The Expand Volume window is displayed.
a. Enter 200 MB in the "New volume size" field. This will add 200MB to the dynamic volume.
Using the "Add by" option, you add a specific size to the volume by entering a size in the box. Using the "New volume size" option you specify the total volume size that you want.
b. Select “Manually assign destination disks” option and add the same disk (Harddisk1) cin the previous exercise.
reated
Selecting “Auto assign destination disks” allows Storage Foundation to select the appropriate disks based upon the sizing criteria specified. This selection can be the same single disk assigned when the volume was created or it could consist of portions of multiple physical disks.
c. Click OK to complete the procedure. Note: There is no need to reboot your system.
The screenshot below shows what your Disk View should look like. Note how the subdisks for DynVol H: (arrows) are separated by the subdisk for DynVol2 I:.
Copyright 2002 VERITAS Software Corporation. All rights reserved. VERITAS, VERITAS Software, the VERITAS logo, and all other VERITAS product names and slogans are trademarks or registered trademarks of VERITAS Software Corporation in the US and/or other countries. Other product names and/or slogans mentioned herein may be trademarks or registered trademarks of their respective companies. Specifications and product offerings subject to change without notice. June 2002.
15

5. Highlight the Volumes folder in the left pane of the VEA Console and select the Disk View tab in the right pane to see all the physical disks available.
6. Move the first subdisk of DynVol H: (1GB subdisk) to the second Harddisk by dragging and dropping. When complete, the Disk View should look like the following. Note the arrows point to where each subdisk was dragged from and dropped onto.
At this point, both subdisks reside on Harddisk2 and remain separate showing their original size when they were initially created: 1GB and 100MB respectively.
7. Now we’ll Join the two subdisks into one contiguous volume. Highlight the DynVol H: volume in the left pane and select the Subdisk tab in the right pane. The view should show the details of all the subdisks that make up Dynvol H: (2 in this case). Using the mouse, rt.-click on one of the subdisks and select Join.
8. The subdisk you rt.-clicked on will automatically be added to the Add list. Select the other subdisk and select Add. The Join dialog should look like the following:
Copyright 2002 VERITAS Software Corporation. All rights reserved. VERITAS, VERITAS Software, the VERITAS logo, and all other VERITAS product names and slogans are trademarks or registered trademarks of VERITAS Software Corporation in the US and/or other countries. Other product names and/or slogans mentioned herein may be trademarks or registered trademarks of their respective companies. Specifications and product offerings subject to change without notice. June 2002.
16
9. Once all the subdisks have been added, select OK. Storage Foundation will join the disks and create one single contiguous volume of ~1.1GB. The volume can remain on the physical disk or you can now move it to another physical disk or LUN as needed. EVEN BETTER Imagine that your organization is preparing to deploy a Storage Area Network (SAN) and plans to migrate your Exchange server storage from direct-attached storage (DAS) to the SAN. Without Storage Foundation, you would need to:
1. Complete a FULL backup of the Exchange server 2. Come in on a weekend (to avoid user productivity impact) 3. Down the Exchange server 4. Migrate the data to the SAN 5. Reconfigure the Exchange server to point to the SAN 6. Remount the Exchange databases
With Storage Foundation for Windows, the steps to perform the same operation are:
1. Complete the FULL backup of the Exchange server 2. Drag/Drop the Exchange storage volumes from DAS to the SAN disks
As you can see, Storage Foundation for Windows eliminates many of the steps to perform this operation. This is not only easier to perform but reduces the risk of error. Even better, Exchange remains on-line and available for users!!
On-line Volume Growth with Capacity Monitoring / Automatic Volume Growth Resizing a Dynamic Volume automatically: During the previous exercise, you learned how easy it was to manually resize a dynamic volume. Now we’re going to demonstrate how easy it is to configure Storage Foundation to resize dynamic volumes automatically. Storage Foundation can be configured to resize a volume automatically based on pre-defined thresholds and growth parameters. Additionally, Storage Foundation can notify you each time a volume grows. To prevent maximum growth from situations like email viruses, a Maximum Growth parameter can be set. In this exercise below, we’ll set our volume to add 50MB of volume capacity as the threshold is met. Then, we’ll simulate an application filling up the volume by copying files with Microsoft Windows Explorer and watch the volume automatically re-size. To accomplish this, we’ll use the Capacity Monitor / Automatic Volume Growth dialog. To resize the Volume automatically, use the Capacity Monitoring / Automatic Volume Growth option:
1. Capacity monitoring / Automatic Volume Growth is a feature of Storage Foundation 4.1 for Windows that alerts you when any volume reaches user-defined thresholds and optionally grows a volume by a user-defined value. To turn on Capacity Monitoring: a. In the left pane, right-click on the DynVol1 volume and select Capacity Monitoring/AutoGrow
from the menu. b. The Capacity Monitor / Automatic Volume Growth dialog appears with the Manage Capacity tab
visible. NOTE: The SMTP tab is where notification parameters would be specified. This will not be covered in this exercise.
c. Leave the Enable Warning Threshold unchecked. d. Check the Enable Automatic Volume Growth checkbox and set to 90%. e. Uncheck the Send email notification when volume has reached its growth threshold
checkbox. f. Set the Volume Growth value to 50MB. g. Set the Maximum Volume Size to 1200MB. h. Leave the rest of the options as defaults.
Copyright 2002 VERITAS Software Corporation. All rights reserved. VERITAS, VERITAS Software, the VERITAS logo, and all other VERITAS product names and slogans are trademarks or registered trademarks of VERITAS Software Corporation in the US and/or other countries. Other product names and/or slogans mentioned herein may be trademarks or registered trademarks of their respective companies. Specifications and product offerings subject to change without notice. June 2002.
17
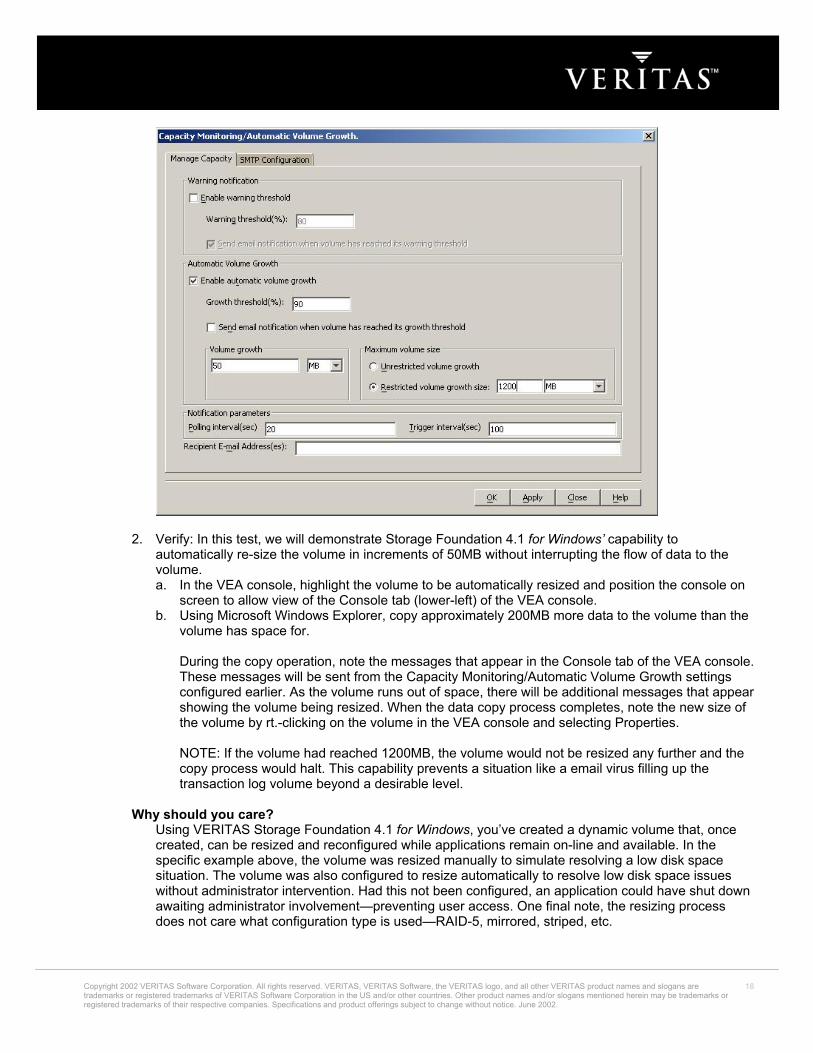
2. Verify: In this test, we will demonstrate Storage Foundation 4.1 for Windows’ capability to automatically re-size the volume in increments of 50MB without interrupting the flow of data to the volume. a. In the VEA console, highlight the volume to be automatically resized and position the console on
screen to allow view of the Console tab (lower-left) of the VEA console. b. Using Microsoft Windows Explorer, copy approximately 200MB more data to the volume than the
volume has space for.
During the copy operation, note the messages that appear in the Console tab of the VEA console. These messages will be sent from the Capacity Monitoring/Automatic Volume Growth settings configured earlier. As the volume runs out of space, there will be additional messages that appear showing the volume being resized. When the data copy process completes, note the new size of the volume by rt.-clicking on the volume in the VEA console and selecting Properties.
NOTE: If the volume had reached 1200MB, the volume would not be resized any further and the copy process would halt. This capability prevents a situation like a email virus filling up the transaction log volume beyond a desirable level.
Why should you care?
Using VERITAS Storage Foundation 4.1 for Windows, you’ve created a dynamic volume that, once created, can be resized and reconfigured while applications remain on-line and available. In the specific example above, the volume was resized manually to simulate resolving a low disk space situation. The volume was also configured to resize automatically to resolve low disk space issues without administrator intervention. Had this not been configured, an application could have shut down awaiting administrator involvement—preventing user access. One final note, the resizing process does not care what configuration type is used—RAID-5, mirrored, striped, etc.
Copyright 2002 VERITAS Software Corporation. All rights reserved. VERITAS, VERITAS Software, the VERITAS logo, and all other VERITAS product names and slogans are trademarks or registered trademarks of VERITAS Software Corporation in the US and/or other countries. Other product names and/or slogans mentioned herein may be trademarks or registered trademarks of their respective companies. Specifications and product offerings subject to change without notice. June 2002.
18

Volume Mirroring / Off-line / Off-host Processing Description: In this section, we’ll use VERITAS Storage Foundation for Windows to create a mirror of our dynamic volume to a separate physical disk and we’ll copy data to the volume to ensure redundancy. Then, we’ll use Storage Foundation’s ability to “snap” off a copy of the volume and demonstrate how the data can be made available for data mining, rapid recovery, or backup (off-host processing). Finally, we’ll re-add the mirror (“snap back”) to demonstrate a rapid recovery through the re-sync capabilities of Storage Foundation for Windows. Note: There are two ways to create a volume from a mirror of another volume to facilitate data testing, data mining, rapid recovery, or backup: One, by “Breaking” a mirror or by “Snapping” the volume. Breaking a mirror allows a mirrored volume to be “broken off”. When done, Storage Foundation 4.1 for Windows will assign it a drive letter, and allow the new volume to be used for data mining or other off-host processing tasks. Once the data has been broken away, it cannot be re-mirrored with the original volume. Meanwhile, snapping a volume does the same as breaking a mirror (exact copy of the mirrored volume at that point in time) with the exception that the volume can be re-added (snapped back) and the data is re-synchronized at the block level, using Storage Foundation’s Data Change Object (DCO) to track only the changes, instead of re-copied bit by bit. Therefore, snapping is preferred when the desire is to take point-in-time copies of quick recovery of data or for off-host processing tasks such as backups while mirroring is good for data redundancy. Volume Mirroring To Mirror a Volume using the VEA console:
1. In the VEA console, select the 1.5GB volume you created earlier (DynVol1). Right-click on it to bring up the context menu. Select Mirror, and then click Add on the submenu to access the Add Mirror dialog box.
2. Storage Foundation can support up to 32 mirrors. For this demonstration, accept the default number of
mirrors (1) you want to add to the volume and manually assign the second physical disk as the destination for the mirror.
3. Click OK to add the mirror and note the events displayed in the Console and Tasks tab of the VEA
console demonstrate the results. Further evidence of the disks that contain mirrored volumes can be seen by: a. Highlight the Dynamic volume in the left pane. b. Select the Disk View tab and note two physical disks are displayed showing volumes on both disks
are mirrored OR c. Select the Mirrors tab and note the volume mirror characteristics.
4. Verify: To demonstrate the volume is mirrored, we’re going to copy data to the volume, “break” the mirror and note the data on both the original volume and the mirrored volume are the same. To begin this test: a. Copy data to the original volume. As data is copied, it will be mirrored to both physical disks. b. In the left pane, rt.-click on the volume that is mirrored and select Mirror > Break.
Copyright 2002 VERITAS Software Corporation. All rights reserved. VERITAS, VERITAS Software, the VERITAS logo, and all other VERITAS product names and slogans are trademarks or registered trademarks of VERITAS Software Corporation in the US and/or other countries. Other product names and/or slogans mentioned herein may be trademarks or registered trademarks of their respective companies. Specifications and product offerings subject to change without notice. June 2002.
19
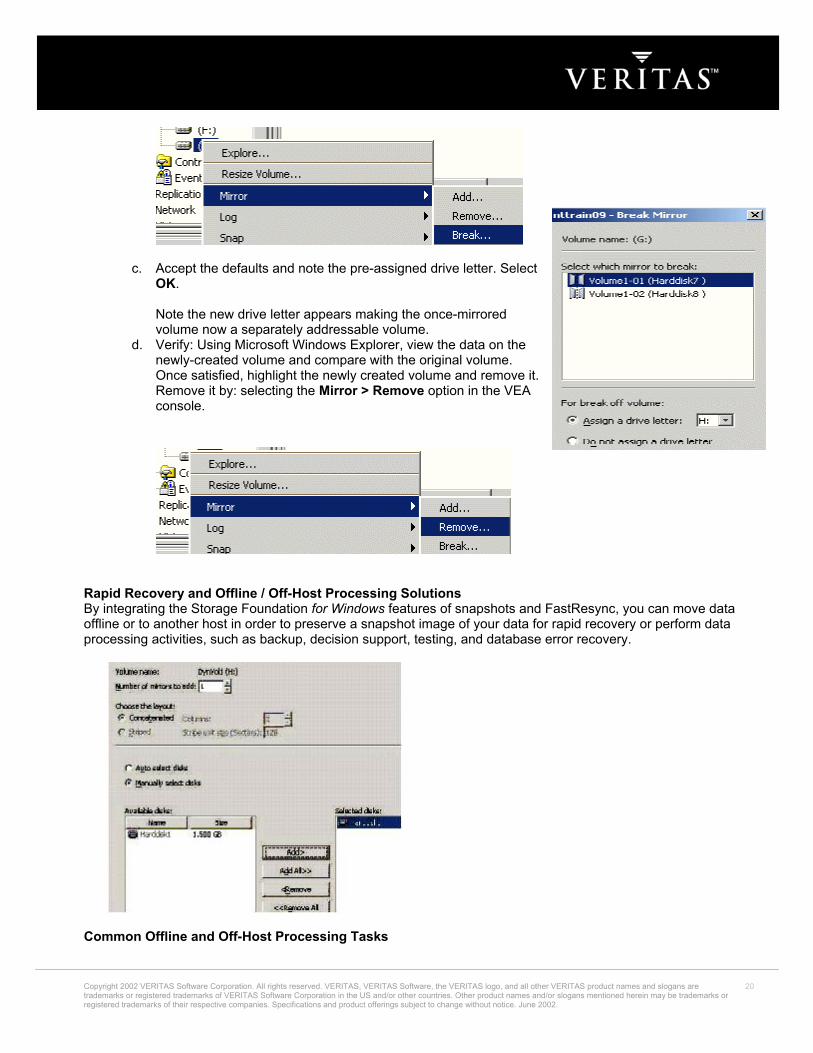
c. Accept the defaults and note the pre-assigned drive letter. Select OK. Note the new drive letter appears making the once-mirrored volume now a separately addressable volume.
d. Verify: Using Microsoft Windows Explorer, view the data on the newly-created volume and compare with the original volume. Once satisfied, highlight the newly created volume and remove iRemove it by: selecting the Mirror > Remove option in the VEconsole.
t. A
Rapid Recovery and Offline / Off-Host Processing Solutions By integrating the Storage Foundation for Windows features of snapshots and FastResync, you can move data offline or to another host in order to preserve a snapshot image of your data for rapid recovery or perform data processing activities, such as backup, decision support, testing, and database error recovery.
Common Offline and Off-Host Processing Tasks
Copyright 2002 VERITAS Software Corporation. All rights reserved. VERITAS, VERITAS Software, the VERITAS logo, and all other VERITAS product names and slogans are trademarks or registered trademarks of VERITAS Software Corporation in the US and/or other countries. Other product names and/or slogans mentioned herein may be trademarks or registered trademarks of their respective companies. Specifications and product offerings subject to change without notice. June 2002.
20
Rapid Recovery: If your business mandates minimal downtime, ability to recover quickly from data corruption or data loss is critical. Using Storage Foundation 4.1 for Windows’ snapshot and FastResync capabilities, you can take a snapshot of an entire volume or group of volumes periodically throughout the day. If the production volume becomes corrupt due to a virus or other conditions, you can recover in minutes by simply re-syncing back to the original volume from your snapshot.
•
•
•
•
•
• •
•
Data backup: If your business requires high availability, you cannot afford the downtime or impact of backing up critical data online. By taking a snapshot of your data and backing up from a snapshot, your business-critical applications can continue to run without extended downtime and without impacting performance. Decision support analysis and reporting: Because snapshots hold a point-in-time copy of a production database, you can construct a copy of the database by using snapshots to perform decision support analysis and business reporting. With FastResync enabled, you can quickly resynchronize the database copy with the data in the primary database as needed. Testing and training: Development or service groups can use snapshots as test data for new applications. Snapshot data provides developers, system test engineers, and QA groups with a realistic basis for testing the robustness, integrity, and performance of new applications. Database error recovery: Logic errors caused by an administrator or an application program can compromise the integrity of a database. By restoring database table files from a snapshot copy with FastResync enabled, you can recover a database more quickly than by full restoration from tape or other backup media.
VERITAS FlashSnap™ Option FlashSnap is a separately licensable option that combines several VERITAS technologies to perform quick recovery and offline and off-host processing tasks. VERITAS FlashSnap is a multi-step process that enables you to create independently addressable multipurpose volumes (MPVs) that are mirrors of the volumes on your server and move the MPV to a remote server. Therefore, you can perform these activities without affecting mission-critical applications on the original working server. Even when FlashSnap is performed on the same server, its very efficient mirror break-off and join process is much faster and takes less CPU availability than other mirror break-off procedures that use ordinary mirroring. FlashSnap is made possible by several features in Storage Foundation for Windows. These features are:
Snapshot Commands - Use the Snapshot commands to create the mirrored volumes or MPVs. Dynamic Disk Group Split and Join - Dynamic Disk Group Split and Join (DGSJ) is similar to Snapshot with the exception that entire groups of disks can be split from one group and joined to another. This is incredibly useful for server applications that require high availability and perform heavy I/O. In this case, a group of disks can be physically controlled by a separate host yet are members of a dynamic disk group storing data for the host server application. This functionality allows splitting a mirror for backup and having a separate server handle the backup. After the backup is completed, the split-off disk group is moved back to the original server and joined to its former disk group, and the mirror is re-associated with its mirror set and resynchronized. DGSJ also can be performed on the same server for same-host backup or for reorganizing the disk groups on the server. FastResync - FastResync supports re-synchronizing of mirrors by copying only changes for the temporarily split mirror by using FastResync logging. This reduces the time that it takes to rejoin a split mirror with the mirror set and also reduces the server CPU cycles needed to complete the resynchronization.
Creating a Snapshot Copy of a Volume Creating a volume snapshot provides a method for backing up the data contained in a volume with minimal interruption to users. A volume snapshot is an exact copy, or temporary mirror, of a volume at a specific point in time. When you create a snapshot, you create a temporary mirror of an existing volume. This mirror is then detached from the volume and placed into a new volume, called the snapshot volume. You can then backup the snapshot volume at a convenient time. When finished with the snapshot volume, it can be snapped back allowing for FastResync and continued mirror operation.
Copyright 2002 VERITAS Software Corporation. All rights reserved. VERITAS, VERITAS Software, the VERITAS logo, and all other VERITAS product names and slogans are trademarks or registered trademarks of VERITAS Software Corporation in the US and/or other countries. Other product names and/or slogans mentioned herein may be trademarks or registered trademarks of their respective companies. Specifications and product offerings subject to change without notice. June 2002.
21
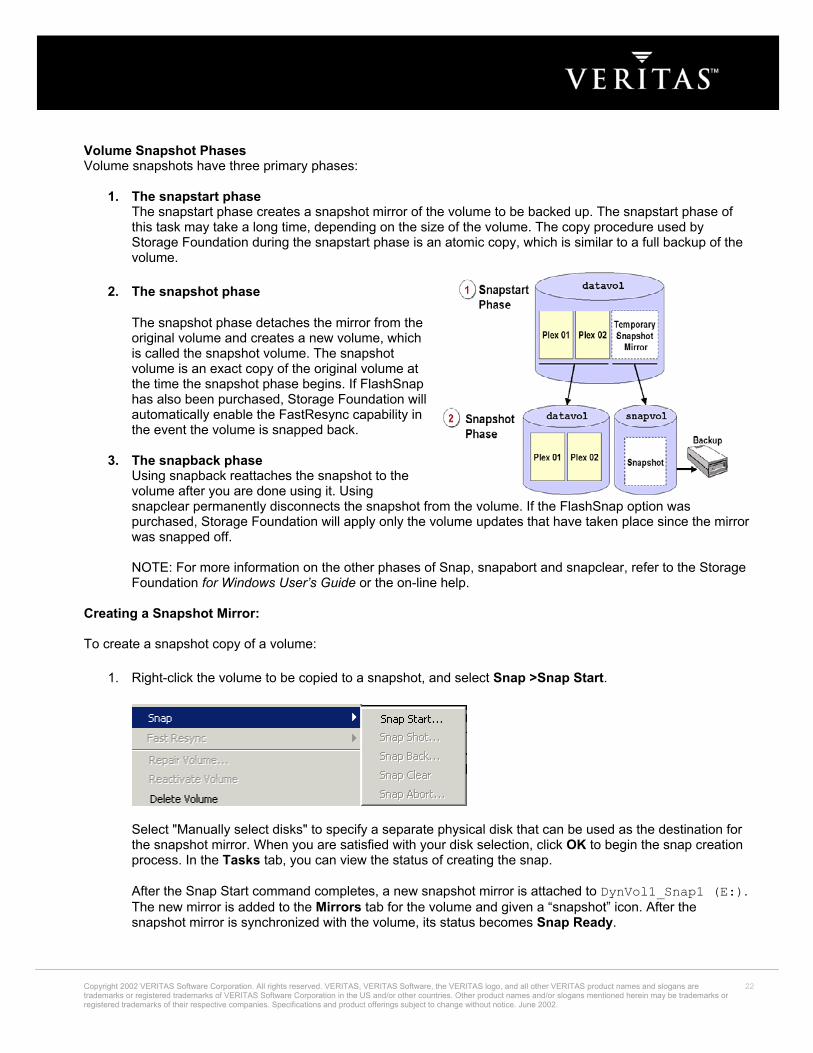
Volume Snapshot Phases Volume snapshots have three primary phases:
1. The snapstart phase The snapstart phase creates a snapshot mirror of the volume to be backed up. The snapstart phase of this task may take a long time, depending on the size of the volume. The copy procedure used by Storage Foundation during the snapstart phase is an atomic copy, which is similar to a full backup of the volume.
2. The snapshot phase
The snapshot phase detaches the mirror from the original volume and creates a new volume, which is called the snapshot volume. The snapshot volume is an exact copy of the original volume at the time the snapshot phase begins. If FlashSnap has also been purchased, Storage Foundation will automatically enable the FastResync capability in the event the volume is snapped back.
3. The snapback phase Using snapback reattaches the snapshot to the volume after you are done using it. Using snapclear permanently disconnects the snapshot from the volume. If the FlashSnap option was purchased, Storage Foundation will apply only the volume updates that have taken place since the mirror was snapped off. NOTE: For more information on the other phases of Snap, snapabort and snapclear, refer to the Storage Foundation for Windows User’s Guide or the on-line help.
Creating a Snapshot Mirror: To create a snapshot copy of a volume:
1. Right-click the volume to be copied to a snapshot, and select Snap >Snap Start.
Select "Manually select disks" to specify a separate physical disk that can be used as the destination for the snapshot mirror. When you are satisfied with your disk selection, click OK to begin the snap creation process. In the Tasks tab, you can view the status of creating the snap. After the Snap Start command completes, a new snapshot mirror is attached to DynVol1_Snap1 (E:). The new mirror is added to the Mirrors tab for the volume and given a “snapshot” icon. After the snapshot mirror is synchronized with the volume, its status becomes Snap Ready.
Copyright 2002 VERITAS Software Corporation. All rights reserved. VERITAS, VERITAS Software, the VERITAS logo, and all other VERITAS product names and slogans are trademarks or registered trademarks of VERITAS Software Corporation in the US and/or other countries. Other product names and/or slogans mentioned herein may be trademarks or registered trademarks of their respective companies. Specifications and product offerings subject to change without notice. June 2002.
22
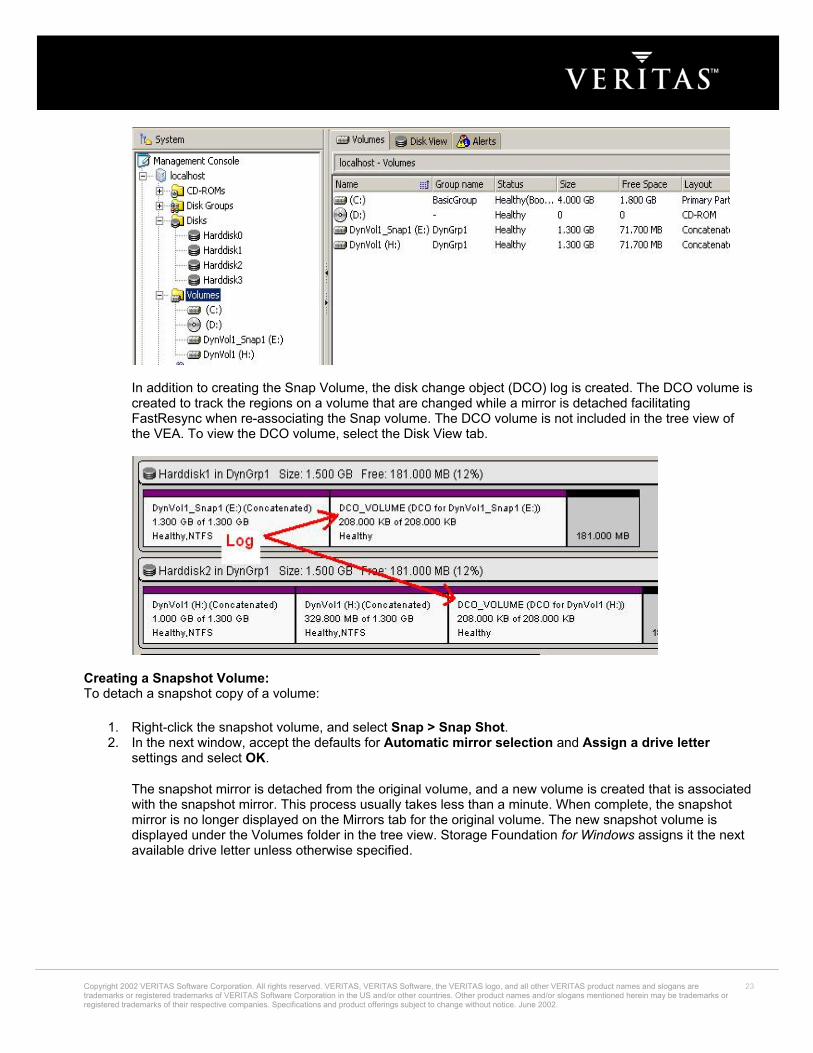
In addition to creating the Snap Volume, the disk change object (DCO) log is created. The DCO volume is created to track the regions on a volume that are changed while a mirror is detached facilitating FastResync when re-associating the Snap volume. The DCO volume is not included in the tree view of the VEA. To view the DCO volume, select the Disk View tab.
Creating a Snapshot Volume: To detach a snapshot copy of a volume:
1. Right-click the snapshot volume, and select Snap > Snap Shot. 2. In the next window, accept the defaults for Automatic mirror selection and Assign a drive letter
settings and select OK.
The snapshot mirror is detached from the original volume, and a new volume is created that is associated with the snapshot mirror. This process usually takes less than a minute. When complete, the snapshot mirror is no longer displayed on the Mirrors tab for the original volume. The new snapshot volume is displayed under the Volumes folder in the tree view. Storage Foundation for Windows assigns it the next available drive letter unless otherwise specified.
Copyright 2002 VERITAS Software Corporation. All rights reserved. VERITAS, VERITAS Software, the VERITAS logo, and all other VERITAS product names and slogans are trademarks or registered trademarks of VERITAS Software Corporation in the US and/or other countries. Other product names and/or slogans mentioned herein may be trademarks or registered trademarks of their respective companies. Specifications and product offerings subject to change without notice. June 2002.
23

At this point, the volume is a completely separate volume that is an exact copy of the previous volume. Operations such as backup can now point to this volume and perform their operation without any application disruption. Meanwhile, the DCO log is tracking the changes made to the primary volume while the snapped volume is detached.
3. Verify: To verify, we’re going to do the same test we did to verify a mirrored volume was successfully broken off.
a. Using Microsoft Windows Explorer, note there are now two volumes available, they are the same size and have the same amount of data on them.
b. Using Microsoft Windows Explorer, copy more data from the system volume to the primary data volume (not the snapped volume).
c. Using Notepad, create a file on the snapped volume and insert some text.
Note in each case, the volumes act completely independently of each other and that you’re able to add, edit and remove data from either volume. Once the Volume is snapped back, the data on both volumes will be synchronized based upon the changes recorded in the DCO log. If you choose to synchronize using the original volume, the text file that was created on the snapped volume will be removed. If you choose to synchronize using the shapshot, all the data that was added to the original volume will be removed and the text file will remain. By default, Storage Foundation for Windows synchronizes to the original volume.
Resynchronize using the Snapshot Volume (aka Quick Volume Recovery): Depending on your goals, you can resynchronize a snapshot copy of a volume with the original volume or you can resynchronize the original volume with your snapshot volume. If you just desire to “update” your snapshot image, you’ll want to resynchronize your snapshot with the original volume. However, if you need to recover a corrupted or lost volume, you need to resynchronize using your snapshot volume. In this exercise, we’re going to simulate recovering our production volume from corruption. For this demonstration, after taking a snapshot of your production volume, delete a bunch of files and directories. This will simulate a corrupted volume where you lost data. To recover from a snapshot volume:
1. Right-click the corrupted volume (production volume in this case), and select Snap >Snap Back.
2. In the next window, accept the default setting to Resynchronize using the snapshot and click OK.
Copyright 2002 VERITAS Software Corporation. All rights reserved. VERITAS, VERITAS Software, the VERITAS logo, and all other VERITAS product names and slogans are trademarks or registered trademarks of VERITAS Software Corporation in the US and/or other countries. Other product names and/or slogans mentioned herein may be trademarks or registered trademarks of their respective companies. Specifications and product offerings subject to change without notice. June 2002.
24
NOTE: If you receive a message stating the volume is currently in use, this usually means that Explorer has “locked” the volume. Close Explorer and try the snapback again.
3. Verify: Once the volume has re-synchronized, note the following:
a. The snapshot volume is no longer separately addressable b. The text file created on the snapped volume is gone.
Microsoft Windows Server 2003 VSS-enabled Snapshots With the release of Microsoft Windows Server 2003, Microsoft has introduced a new storage management technology called Volume Shadow Copy Services (VSS). VSS is a framework that allows users to perform volume data snapshots using VSS-enabled applications and storage. VSS’ framework coordinates the data snapshot by coordinating an application (e.g. Exchange Server 2003), storage (e.g. Storage Foundation Flashsnap or a hardware provider), and a requesting application (e.g. backup application). Through the VSS coordination, MS guarantees the integrity of the data snapshot. VERITAS Storage Foundation 4.1 for Windows (VSFW) enables VSS snapshots by providing 2 of the 3 components required: Requester (VxSnap utility) and Provider (VSFW Flashsnap). Using Storage Foundation in combination with the third VSS component, a Writer application like Exchange Server 2003, Storage Foundation can perform these highly reliable data snapshots. To perform a VSS-enabled snapshot using Storage Foundation, simply launch the VxSnap.exe command-line utility from a command window and provide the appropriate parameters. Storage Foundation will communicate with the VSS framework to perform the snapshot. When complete, the data is presented in its own volume and assigned a drive letter just like Storage Foundation does when doing a non-VSS snapshot. NOTE: To fully support a VSS snapshot, the application (called a Writer) creating the data to be snapshotted (e.g. MS Exchange Server) must be VSS-enabled. Currently, Exchange Server 2003 and SQL Server 2000 are the only known VSS-enabled “writer” applications. For more information on Volume Shadow Copy Services, see www.microsoft.com. Performance Boost using VxCache VxCache is a feature of Storage Foundation 4.1 for Windows that boosts certain applications’ performance by allowing the administrator to configure a portion of system memory as a cache for selected dynamic volumes. Once VxCache is enabled for a specific volume(s), Storage Foundation determines the most frequently accessed data on the volume and keeps the data in the cache. Since this data is stored in memory, access to this data will be much faster. Configuring VxCache requires setting just 2 settings: Size of the cache to use and the dynamic volume you’d like to target. Since VxCache will block out the specified portion of system memory, it’s important to understand how much of the system memory is being used by the operating system and applications. To assist in managing the VxCache settings, Storage Foundation provides a monitor that shows the performance boost based upon the settings specified. VxCache works best with Physical Addressable Extension (PAE) memory because it allows the system to address memory greater than 4GB. Read-intensive applications such as Microsoft Exchange Server that take advantage of PAE memory also benefit from using VxCache. For example, performance testing in VERITAS labs has shown Exchange performance improvements of as much as 40% just by configuring VxCache. For more information and instructions on how to configure VxCache, see the Administrator’s Guide found on the Storage Foundation CD.
Copyright 2002 VERITAS Software Corporation. All rights reserved. VERITAS, VERITAS Software, the VERITAS logo, and all other VERITAS product names and slogans are trademarks or registered trademarks of VERITAS Software Corporation in the US and/or other countries. Other product names and/or slogans mentioned herein may be trademarks or registered trademarks of their respective companies. Specifications and product offerings subject to change without notice. June 2002.
25

Search and Reporting Using the Search command, it is possible to generate a wide variety of reports that provide information on the disk groups, disks, and volumes on each server. The results of these searches can be saved and imported into Microsoft Excel or any other application that accepts tab-delimited text files. The results can be sorted, displayed as graphs or charts, and imported into written reports or Microsoft PowerPoint presentations. In the example below, we will conduct a search for free space across all the disks managed by Storage Foundation and save the results to a report.
1. Launch the Search dialog by selecting Search from the Tools menu. 2. In this search, we will look for all the disks managed by Storage Foundation that have at least 1GB of free
space. To do this: a. Select Disks in the Look for field. b. Select Free space, At least, and 1 GB in the Search criteria fields. c. Select Add button to add the search criteria. If desired, additional search criteria can be added for
more refined searches. For now, we’ll just search for available disk space.
3. Press Search Now to conduct the search. The result should look similar to that below where disks with at least 1GB free will be shown.
4. Select the Save Results button and save the file to the desired location without providing an extension. Storage Foundation will save the file at the specified location with a .txt extension. The results are now viewable in Excel similar to below:
Copyright 2002 VERITAS Software Corporation. All rights reserved. VERITAS, VERITAS Software, the VERITAS logo, and all other VERITAS product names and slogans are trademarks or registered trademarks of VERITAS Software Corporation in the US and/or other countries. Other product names and/or slogans mentioned herein may be trademarks or registered trademarks of their respective companies. Specifications and product offerings subject to change without notice. June 2002.
26

5. To open the file in MS Excel, launch Excel and select File > Open to open the .txt file saved by the Storage Foundation search. Make sure to select “All Files (*.*)” from the “Files of type” drop-down menu. Navigate to the correct file and click the Open button.
6. In the Text Import wizard that appears, do the following: a. In step 1 you are asked to choose the file type that best describes your data. Select the Delimited
radio button and click Next. b. In step 2 you are asked to choose a delimiter. Select the Tab radio button and click Next. c. In step 3 you are asked to choose the data format. Select the General radio button and click Next. d. Click Finish, and your report will appear in Excel.
Other Capabilities High Availability: Dynamic Multipathing The Dynamic Multipathing (DMP) option adds fault tolerance to disk storage by making use of multiple paths between a computer and a disk in a storage array. A path is the connection between the computer and the storage array’s disks and consists of a host adapter and a SCSI bus connection to one or more SCSI disks or a fiber optic channel connected to a hub or switch. Thus, multiple paths are made possible by connecting two or more host bus adapters (HBAs) with either SCSI or fiber optic cabling to the storage array. The DMP software manages the multiple paths so that only one path to the data on each of the array’s disks is accessible at a time to the host computer. If a path to a disk fails, DMP will automatically transmit data to and from the disk over an alternate path. DMP supports all the leading storage arrays including those listed in the table below. For the latest information, refer to the DMP Hardware Compatibility List at www.veritas.com. EMC Symmetric 3000 Series IBM FasT200/500/700 EMC Symmetric 8000 Series NEC iStorage 1000/2000/4000 Hitachi 9200 Thunder Series LSI E2400/4400/4600 Hitachi 9900 Lightning Series StorageTek D17x Series Compaq EMA12000/EMA16000 Hitachi Lightning 9900 V Series Compaq RA8000/MA8000 Hitachi Lightning 9500 IBM ESS Shark F10/F20 Fujitsu GR Series 7xxx IBM Shark ESS800 HP SureStore XP128/XP1024 HP SureStore XP256/XP512 CLARiiON/Dell CX Series Hitachi Freedom 5800 EMC Symmetrix 9000 Series Hitachi Freedom 7700E Cisco VSFN MTI Vivant 400 HP/Compaq EVA Campus or Geo-Clustering Clustering Support:
Copyright 2002 VERITAS Software Corporation. All rights reserved. VERITAS, VERITAS Software, the VERITAS logo, and all other VERITAS product names and slogans are trademarks or registered trademarks of VERITAS Software Corporation in the US and/or other countries. Other product names and/or slogans mentioned herein may be trademarks or registered trademarks of their respective companies. Specifications and product offerings subject to change without notice. June 2002.
27

Campus Clustering is rapidly growing as the preferred choice for small to medium enterprises. Campus clustering is the ability to combine two or more host systems with storage connected together via fiber channel in such a way that if one host fails, the applications running on these systems will “fail-over” to another system located in another building nearby (e.g. Campus). Storage Foundations 4.1 for Windows is a key technology in supporting this capability because data can be reliably mirrored across at fiber channel speeds and distances. Thus, if a clustered system in building A fails, the failover system in Building B has the most recent data available and can assume control immediately. Performance Tuning: S.M.A.R.T Monitoring Self-Monitoring, Analysis and Reporting technology (S.M.A.R.T.) is available on many new SCSI and ATAPI disks. S.M.A.R.T. provides a way for disks to self-check certain physical conditions that are useful predictors of disk failure and send an alert when conditions indicate that a failure may soon occur. This allows administrators to take preventative action to protect the data on the disk. In order to receive alerts in the Storage Foundation Event Log, S.M.A.R.T. monitoring must be enabled for the global configuration and also on each disk you want checked. The default is to have S.M.A.R.T. monitoring disabled. Performance Tuning: Historical Statistics Collection and Graphing The historical statistics collection and graphing function allows you to monitor one or more storage objects (disks, subdisks, or volumes) over time and to create individual graphs for these storage objects. You invoke the graphing function by rt.-clicking a storage object and then selecting the command Graph Historical Statistics Information from the context menu that appears. However, the command will not be available on the context menu without being setup first. This information can be very useful when determining device load over time or determining critical I/O bottlenecks. An example of statistic graphing is below:
WHERE TO GO FROM HERE
By now you’ve seen first-hand a few of the powerful capabilities of Storage Foundation for Windows v4.1 and how applications, administrators, and enterprises can benefit. For more information, go to the VERITAS web site (www.veritas.com) or contact a local VERITAS representative. LDM – STORAGE FOUNDATION FOR WINDOWS FEATURE COMPARISON CHART
Copyright 2002 VERITAS Software Corporation. All rights reserved. VERITAS, VERITAS Software, the VERITAS logo, and all other VERITAS product names and slogans are trademarks or registered trademarks of VERITAS Software Corporation in the US and/or other countries. Other product names and/or slogans mentioned herein may be trademarks or registered trademarks of their respective companies. Specifications and product offerings subject to change without notice. June 2002.
28

Feature Comparison W2K3
LDM VERITAS VSFW41
Storage Management Storage Management & Reporting x x
Heterogeneous Storage Management x x Command Line Interface (CLI) x x Storage Event Log x Drag & Drop GUI x
Proactive Storage Resource Monitoring x SNMP Framework Support x S.M.A.R.T. Disk Monitoring x Capacity Monitoring x Paging/Email x Custom Monitoring Settings x
Storage Reporting x Dynamic Disk Support Disk Group Support x
Multiple Disk Groups x Read Only Disk Groups x Importing/Deporting Dynamic Groups x
Dynamic Disk Support x x Simple Volumes x x Spanned Volumes x x Striped Volumes (RAID 0) x x Mirrored Volumes (RAID 1) 2 Sets 32 Sets Striped RAID Volumes (RAID 5) x x Mirrored Striped Volumes (RAID 0+1) x
Dynamic Online Volume Creation/Growth x x Simple/Spanned Volumes x x Striped Volumes (RAID 0) x Mirrored Volumes (RAID 1) x RAID-5 Volumes x Mirrored Striped Volumes (RAID 1+0) x Automatic Volume Growth x Dynamic Relayout x
Performance Performance Enhancement X
VxCache X Load Balancing: Sub-Disk Move x Preferred Read Plex (Mirror) x
Performance Reporting x Performance Monitoring & Tuning x Online Volume & Disk Statistics x Capacity Monitoring x Event Monitoring x Historical Graph of Disk Activity x Hot Spot Detection x Set Volume Usage x
Availability Root Disk Encapsulation x x Storage Availability x
Dirty Region Logging (DRL) x RAID Volume Logging x
Copyright 2002 VERITAS Software Corporation. All rights reserved. VERITAS, VERITAS Software, the VERITAS logo, and all other VERITAS product names and slogans are trademarks or registered trademarks of VERITAS Software Corporation in the US and/or other countries. Other product names and/or slogans mentioned herein may be trademarks or registered trademarks of their respective companies. Specifications and product offerings subject to change without notice. June 2002.
29

Disk Replacement x Disk Evacuation x Hot Relocation x
VERITAS Dynamic Multipathing Option Heterogeneous Array Support x Path Failover Protection x Path Load Balancing x VERITAS Flashsnap Option VSS Support x x
VSS Snapshot Provider x x VSS Snaphot Requester x
Snapshot Support x x Split Mirror Snapshots x Copy-on-Write Snapshots x
Dynamic Group Split & Join (DGSJ) x Veritas Fast Resync x
Clustering Option Campus Clustering x Dynamic Disk Support with MSCS x Fault Tolerant MSCS Quorum Resources x Private Disk Group Protection x HA/DR Options Clustering Option x x Volume Replicator Option x Global Clustering Option x
SUMMARY VERITAS Storage Foundation 4.1 for Windows saves you money by managing all storage of any kind in any location efficiently—maintaining application availability. This document introduced to you just a few of the many features within Storage Foundation 4.1 for Windows demonstrating “how” Storage Foundation 4.1 for Windows works and how it can solve real-world problems. Specifically, we covered:
• Basics of VERITAS Storage Foundation 4.1 for Windows • Installation of Storage Foundation 4.1 for Windows and creation of a Dynamic Disk Group • A brief walk-through of the VERITAS Enterprise Administrator console • Sub-disk move via drag/drop • On-line growth without system reboot • Create a mirrored volume • Create a snapshot of a volume and simulated off-host processing and then resynchronization • Demonstrated how to perform a rapid recovery of an entire volume • Discussed the advantages of using VSS-enabled snapshots • Demonstrated both Searching and how to create reports • Provided links to additional information
Why Use VERITAS Storage Foundation 4.1 for Windows? Imagine your Exchange server running out of disk space. To add more storage, you need to take the server down, attach a new drive, and resize the volume—disrupting service to users. If your Exchange server was using Storage Foundation 4.1 for Windows Storage, you could simply resize the volume—assigning storage from a separate physical disk or even from a totally separate controller/disk array—all while the Exchange server remains up and servicing users. Even better, using Storage Foundation 4.1 for Windows you could take a
Copyright 2002 VERITAS Software Corporation. All rights reserved. VERITAS, VERITAS Software, the VERITAS logo, and all other VERITAS product names and slogans are trademarks or registered trademarks of VERITAS Software Corporation in the US and/or other countries. Other product names and/or slogans mentioned herein may be trademarks or registered trademarks of their respective companies. Specifications and product offerings subject to change without notice. June 2002.
30

snapshot of the Exchange storage groups and transaction logs and use the snapshot to recover in minutes in the event of a virus, data corruption or other failure. Benefits of using VERITAS Storage Foundation 4.1 for Windows for virtual storage management include:
Rapid Recovery: Storage Foundation 4.1 for Windows’ Flashsnap can be used to take snapshots of application data volumes (like Exchange). These snapshots can then be used to perform rapid data recoveries in the event the production volume has become unusable.
•
•
•
•
•
•
•
High Availability: Storage Foundation 4.1 for Windows can be applied to hardware you already own to provide additional levels of RAID, system and path redundancies, and other features that will keep your systems up and running “24/forever.” With dynamic volume creation and online volume growth, there is no need to reboot or plan downtime for storage reconfigurations. Enhanced Performance/Data Migration: Storage Foundation 4.1 for Windows lets you optimize storage and Microsoft Exchange Server performance by leveraging underutilized memory and identifying storage bottlenecks and allowing you to migrate data from Direct-attached Storage (DAS) to Storage Area Networks (SAN) while applications and their data remain online and available. By simply configuring VxCache parameters, SFW will tell applications like Microsoft Exchange Server to provide write-thru caching for specific I/O-intensive volumes thereby improving performance of the application because heavy I/O can be stored and accessed from memory instead of from disk. On the storage side, data can be spread across several disks within an array to distribute or balance I/O operations across the disks. Using parallel I/O across multiple disks improves I/O performance by increasing data transfer speed and overall throughput for the array. When VxCache combines with Storage Foundation’s storage load balancing capability, the value of SFW really shines. Automation: Ability to automate the management of storage including growth without administrator intervention or server re-boots. Simplified, Centralized Storage Management: Storage Foundation 4.1 for Windows enables online administration from a single management console across multiple hosts. The easy-to-use interface simplifies disk administration tasks, such as adding or moving storage resources or data. Heterogeneous storage management: Abstraction of physical disks allows you to work with storage equipment from multiple vendors, and provides you with capabilities to migrate volumes dynamically, giving you more equipment choices. You no longer need to be locked into single vendor solutions. Furthermore, you can use the storage you have more efficiently by creating and managing volumes better, thus saving on additional disk purchases. Complex multi-disk configuration: Storage Foundation 4.1 for Windows virtual objects enable you to create complex disk configurations that enhance performance and reliability. Multi-disk configurations, such as striping, mirroring, or RAID configurations, can provide data redundancy, performance improvements, and high availability.
The features and functions highlighted above were meant to be just an introduction to VERITAS Storage Foundation 4.1 for Windows. If you manage large disk arrays, have applications that require high availability, have high recoverability, and/or you plan to deploy either Microsoft Cluster Server or VERITAS Cluster Server, VERITAS Storage Foundation 4.1 for Windows is an absolute must-have.
Copyright 2002 VERITAS Software Corporation. All rights reserved. VERITAS, VERITAS Software, the VERITAS logo, and all other VERITAS product names and slogans are trademarks or registered trademarks of VERITAS Software Corporation in the US and/or other countries. Other product names and/or slogans mentioned herein may be trademarks or registered trademarks of their respective companies. Specifications and product offerings subject to change without notice. June 2002.
31
For additional information about VERITAS Software, its products, or the location of an office near you, please call our corporate headquarters or visit our Web site at www.veritas.com.
VERITAS Software Corporation Corporate Headquarters 350 Ellis Street Mountain View, CA 94043 650-527-8000 or 866-837-4827
Copyright 2002 VERITAS Software Corporation. All rights reserved. VERITAS, VERITAS Software, the VERITAS logo, and all other VERITAS product names and slogans are trademarks or registered trademarks of VERITAS Software Corporation in the US and/or other countries. Other product names and/or slogans mentioned herein may be trademarks or registered trademarks of their respective companies. Specifications and product offerings subject to change without notice. June 2002.
32