Embed Size (px)
Citation preview

Technical Support(800) 966-5520 - Option 3Customer Service(800) 966-5520 - Option 4www.electronicpayments.com
VerifoneVx520Restaurant/RetailQuick Reference Guide

CREDIT CARD SALEDisplay Action
01/01/15 12:00 F1
Sale F2
Refund F3
Void F4
1. Swipe the credit card.
Sale F1
F2
F3
Server ID: F4
2. Enter server number if prompted, then press ENTER.RESTAURANT ONLY.
Sale F1
F2
F3
Amount: $ F4
3. Enter sale amount, then press ENTER.
Sale F1
Total: 0.00 F2
F3
Tip: 0.00 F4
4. Enter tip amount, then press ENTER.RESTAURANT ONLY.
Sale Credit F1
Choose Card: Debit F2
F3
F4
5. Choose type of card you wish to process using the F keys located to the right of the display.PROMPT WILL VARY BASED ON ACCEPTED CARD TYPES.
Sale F1
Total: 0.00 F2
Connected... F3
F4
6. The terminal will connect and send the transaction through and receive an authorization.
Sale YES F1
PRNT CUST COPY? NO F2
F3
F4
7. When prompted to print a receipt, select your choice using the F keys located to the right of the display.SCREEN ONLY AVAILABLE WHEN AUTOMATIC 2ND RECEIPT PRINT IS DISABLED.
MANUALLY KEYED IN SALEDisplay Action
01/01/15 12:00 F1
Sale F2
Refund F3
Void F4
1. Press F2 to select Sale.
Sale F1
F2
F3
Server ID: F4
2. Enter server number if prompted, then press ENTER.RESTAURANT ONLY.
Sale F1
F2
F3
Amount: $ F4
3. Enter sale amount, then press ENTER.
MANUALLY KEYED IN SALE (CONT.)
Display Action
Sale F1
Total: 0.00 F2
F3
Tip: 0.00 F4
4. Enter tip amount, then press ENTER.RESTAURANT ONLY.
Sale F1
0.00 F2
Card Entry/Account #: F3
F4
5. Type in the card number, then press ENTER.
Sale Credit F1
Choose Card: Debit F2
F3
F4
6. Choose the type of card you wish to process using the F keys located to the right of the display.PROMPT WILL VARY BASED ON ACCEPTED CARD TYPES.
Sale F1
F2
F3
Exp Date (MMYY) F4
7. Enter the card’s expiration date following the format of MMYY, then press ENTER.
Sale YES F1
Card Present? NO F2
F3
F4
8. If customer card is present, choose YES and proceed to step 10. If customer card is not present, choose NO and go to next step.
Sale YES F1
Phone Order? NO F2
F3
F4
9. Indicate whether or not this is a phone order using the F keys located to the right of the display.
Sale Skip F1
Enter CVV2 Code
Present F2
XRead F3
XPresent F4
10. If you choose Present, enter the CVV2 code on the back of the customer card, or the front of American Express cards. If card is not present or cannot be read, proceed to the next step.
Sale F1
F2
F3
Address: F4
11. Enter the house or P.O. Box number of the card’s billing address, then press ENTER. Next, enter the zip code of the card’s billing address, then press ENTER.NOT AVAILABLE ON ALL TERMINALS.
Sale F1
Total: 0.00 F2
Connected... F3
F4
12. The terminal will connect and send the transaction through and receive an authorization.
Sale YES F1
PRNT CUST COPY? NO F2
F3
F4
13. When prompted to print a receipt, select your choice using the F keys located to the right of the display.SCREEN ONLY AVAILABLE WHEN AUTOMATIC 2ND RECEIPT PRINT IS DISABLED.
NFC SALEDisplay Action
01/01/15 12:00 F1
Sale F2
Refund F3
Void F4
1. Press F2 to select Sale.
Sale F1
F2
F3
Server ID: F4
2. Enter server number if prompted, then press ENTER.RESTAURANT ONLY.
Sale F1
F2
F3
Amount: $ F4
3. Enter sale amount, then press ENTER.
Sale F1
Total: 0.00 F2
F3
Tip: 0.00 F4
4. Enter tip amount, then press ENTER.RESTAURANT ONLY.
Sale $0.00 F1
F2
Card Entry/Account #: F3
F4
5. Hold the device near the terminal. An audible alert will let you know the transaction has been picked up.
Sale F1
Total: 0.00 F2
Connected... F3
F4
6. The terminal will connect and send the transaction through and receive an authorization.
Sale YES F1
PRNT CUST COPY? NO F2
F3
F4
7. When prompted to print a receipt, select your choice using the F keys located to the right of the display.SCREEN ONLY AVAILABLE WHEN AUTOMATIC 2ND RECEIPT PRINT IS DISABLED.
NFC SALE VISUAL AID
LOGO
F1
F2
F3
F4
EMV CARD SALEDisplay Action
01/01/15 12:00 F1
Sale F2
Refund F3
Void F4
1. Press F2 to select Sale.
Sale F1
F2
F3
Server ID: F4
2. Enter server number if prompted, then press ENTER.RESTAURANT ONLY.
Sale F1
F2
F3
Amount: $ F4
3. Enter sale amount, then press ENTER.
Sale F1
Total: 0.00 F2
F3
Tip: 0.00 F4
4. Enter tip amount, then press ENTER.RESTAURANT ONLY.
Sale F1
0.00 F2
Card Entry/Account #: F3
F4
5. Insert chip card into card slot at the front of the terminal. Card will click into place. DO NOT REMOVE CARD UNTIL PROMPTED!
Sale F1
Total: 0.00 F2
Connected... F3
F4
6. The terminal will connect and send the transaction through and receive an authorization.
Sale F1
F2
F3
Remove Card F4
7. Remove card when prompted and terminal will display “Return Terminal to Clerk.”
Sale YES F1
PRNT CUST COPY? NO F2
F3
F4
8. When prompted to print a receipt, select your choice using the F keys located to the right of the display.SCREEN ONLY AVAILABLE WHEN AUTOMATIC 2ND RECEIPT PRINT IS DISABLED.
EMV SALE VISUAL AID

TICKET ONLY/FORCED SALEDisplay Action
Ticket Only F1
Settlement F2
Auth Only F3
Check F4
1. Press the DOWN key located on the left hand side, just above the number pad, then press F1 to select Ticket Only.
Ticket Only F1
F2
F3
Server ID: F4
2. Enter server number if prompted, then press ENTER.RESTAURANT ONLY.
Ticket Only F1
F2
F3
Amount: $ F4
3. Enter sale amount, then press ENTER.
Ticket Only F1
Total: 0.00 F2
F3
Tip: 0.00 F4
4. Enter tip amount, then press ENTER.RESTAURANT ONLY.
Ticket Only $0.00 F1
F2
Card Entry/Account #: F3
F4
5. Swipe the card, insert chip card, or key in the card number, then press ENTER.
Ticket Only Credit F1
Choose Card: Debit F2
F3
F4
6. Choose the type of card you wish to process using the F keys located to the right of the display.PROMPT WILL VARY BASED ON ACCEPTED CARD TYPES.
Ticket Only F1
F2
F3
Exp Date (MMYY) F4
7. Enter the card’s expiration date following the format of MMYY, then press ENTER.
Ticket Only F1
XXXXXXXXXXXX1234LAST/FIRST
F2
F3
Order Number: F4
8. Enter the order number, then press ENTER.
Ticket Only F1
Total: $0.00 F2
F3
Appr Code: F4
9. Enter the 6 digit authorization code given to you by the voice auth center. Then press ENTER. The terminal will print the merchant’s receipt.
IF A LETTER IS NEEDED, YOU MUST PRESS THE CORRESPONDING NUMBER KEY FOLLOWED BY ALPHA TO TOGGLE THE CORRECT SELECTION.
Ticket Only YES F1
PRNT CUST COPY? NO F2
F3
F4
10. When prompted to print a receipt, select your choice using the F keys located to the right of the display.SCREEN ONLY AVAILABLE WHEN AUTOMATIC 2ND RECEIPT PRINT IS DISABLED.
VOIDDisplay Action
01/01/15 12:00 F1
Sale F2
Refund F3
Void F4
1. Press F4 to select Void.USE PASSWORD AT THE END OF THIS DOCUMENT IF PROMPTED.
Void YES F1
Void Last Trans? NO F2
F3
F4
2. Press F1 to void the last successful transaction. Press F2 to void a previously run transaction from the current batch.
Void Inv# F1
Void By: Acct# F2
F3
F4
3. If you selected NO, you can search the transaction by Invoice Number or Account Number using the F keys located to the right of the display.
Void F1
F2
F3
Last 4 Digits: F4
4. If you select Acct#, enter the last 4 digits of the credit card number and press ENTER.
Void YES F1
CARD TYPETRANS TYPEINV# $0.00Last 4 of CC#Exp Date
NO F2
Next F3
F4
5. If you selected YES, the transaction information is displayed. Using the F keys you can void the displayed transaction or move to the next one in the batch.
Void YES F1
PRNT CUST COPY? NO F2
F3
F4
6. When prompted to print a receipt, select your choice using the F keys located to the right of the display.SCREEN ONLY AVAILABLE WHEN AUTOMATIC 2ND RECEIPT PRINT IS DISABLED.
REPORTSDisplay Action
01/01/15 12:00 F1
Sale F2
Refund F3
Void F4
1. Press the REPORTS key located on the right hand side, just above the number pad.
REPORTS F1
Totals Report F2
Detail Report F3
Store Fwd Rpt F4
Total: shows dollar amounts only.Detail: shows card and transactional info with amounts.
2. Using the F keys located to the right of the display, select the report you want to print.ADDITIONAL REPORTS AVAILABLE BY PRESSING THE DOWN KEY.
Server Reports F1
Shift Reports F2
Unadjust Report F3
Batch History F4
3. Using the F keys located to the right of the display, select the report you want to print.
REFUNDDisplay Action
01/01/15 12:00 F1
Sale F2
Refund F3
Void F4
1. Press F3 to select Refund.USE PASSWORD AT THE END OF THIS DOCUMENT IF PROMPTED.
Refund F1
F2
F3
Server ID: F4
2. Enter server number if prompted, then press ENTER.RESTAURANT ONLY.
Refund F1
F2
F3
Amount: $ F4
3. Enter refund amount, then press ENTER.
Refund $0.00 F1
$0.00 F2
Card Entry/Account #: F3
F4
4. Swipe the card, insert chip card, or key in the card number, then press ENTER.
Refund Credit F1
Choose Card: Debit F2
F3
F4
5. Choose the type of card you wish to process using the F keys located to the right of the display.PROMPT WILL VARY BASED ON ACCEPTED CARD TYPES.
Refund YES F1
PRNT CUST COPY? NO F2
F3
F4
6. When prompted to print a receipt, select your choice using the F keys located to the right of the display.SCREEN ONLY AVAILABLE WHEN AUTOMATIC 2ND RECEIPT PRINT IS DISABLED.
REPRINTDisplay Action
01/01/15 12:00 F1
Sale F2
Refund F3
Void F4
1. Press the REPRINT key located 2nd from the right, just above the number pad.
REPRINT F1
Last Receipt F2
Any Receipt F3
F4
2. Press F2 to reprint the last transaction’s receipt.
Press F3 to look up and reprint any other receipt.
Reprint Any Rcpt F1
F2
F3
Invoice Number: F4
3. If you pressed F3, enter the invoice number found on the merchant copy of the receipt you wish to reprint, then press ENTER.YOU CAN PRINT A DETAIL REPORT TO GET THE INVOICE NUMBER IF NEEDED.
SETTLEMENTDisplay Action
Ticket Only F1
Settlement F2
Auth Only F3
Check F4
1. Press the DOWN key located on the left hand side, just above the number pad, then press F2 to select Settlement.
Settlement F1
Sales: $ $0.00Refunds: $ $0.00Totals: $ $0.00Enter to Confirm
F2
F3
F4
Verify totals and press ENTER. Terminal will dial out and close the day’s transactions.SOME TERMINALS MAY REQUIRE THE TOTAL SALES DOLLAR AMOUNT BE ENTERED BEFORE YOU PRESS ENTER.
TIP ADJUST (NOT AVAILABLE ON EMV SALES)
Display Action
01/01/15 12:00 F1
Sale F2
Refund F3
Void F4
1. Press the REPORTS key located on the right hand side, just above the number pad.
Tip Adjust Srvr F1
Retrieve By: Amt F2
Acct F3
Inv# F4
Press F4 to find the sale by the invoice number.
Tip Adjust F1
F2
F3
Invoice Number: F4
Enter the invoice number from the receipt, then press ENTER.
Tip Adjust Adj F1
CARD TYPETRANS TYPEINV# $0.00Appr CodeExp Date
Prev F2
Next F3
Inv# F4
Press F1 to select Adj in order to adjust the transaction currently displayed.
Tip Adjust F1
F2
Tip Amount: $ 0.00 F3
New Tip: $ F4
Enter the tip amount and press ENTER.
Tip Adjust F1
F2
F3
Approved F4
Screen will display the total of the transaction, including the tip that you just added. Press CANCEL to return to idle prompt.
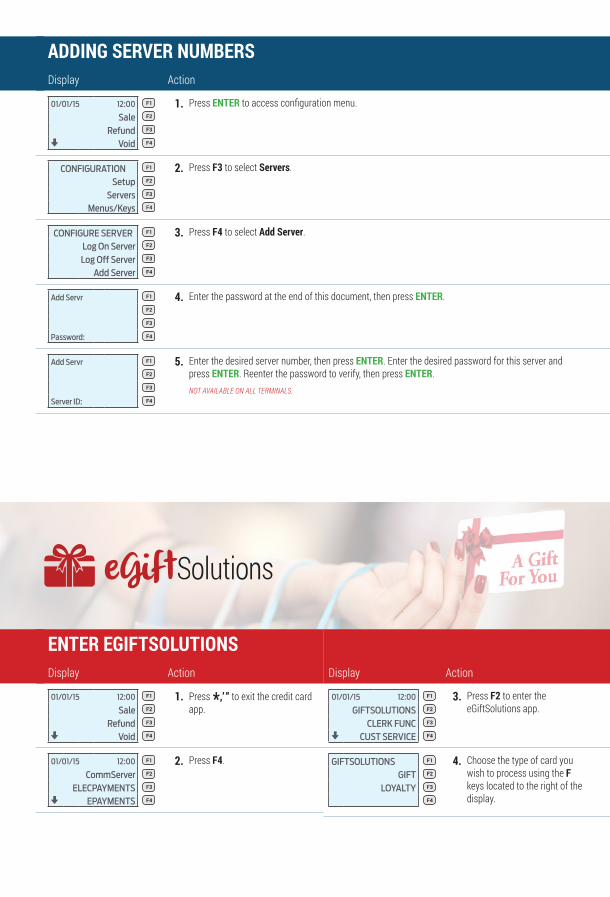
ENTER EGIFTSOLUTIONS Display Action
01/01/15 12:00 F1
Sale F2
Refund F3
Void F4
1. Press *,’ ” to exit the credit card app.
01/01/15 12:00 F1
CommServer F2
ELECPAYMENTS F3
EPAYMENTS F4
2. Press F4.
Display Action
01/01/15 12:00 F1
GIFTSOLUTIONS F2
CLERK FUNC F3
CUST SERVICE F4
3. Press F2 to enter the eGiftSolutions app.
GIFTSOLUTIONS F1
GIFT F2
LOYALTY F3
F4
4. Choose the type of card you wish to process using the F keys located to the right of the display.
ADDING SERVER NUMBERSDisplay Action
01/01/15 12:00 F1
Sale F2
Refund F3
Void F4
1. Press ENTER to access configuration menu.
CONFIGURATION F1
Setup F2
Servers F3
Menus/Keys F4
2. Press F3 to select Servers.
CONFIGURE SERVER F1
Log On Server F2
Log Off Server F3
Add Server F4
3. Press F4 to select Add Server.
Add Servr F1
F2
F3
Password: F4
4. Enter the password at the end of this document, then press ENTER.
Add Servr F1
F2
F3
Server ID: F4
5. Enter the desired server number, then press ENTER. Enter the desired password for this server and press ENTER. Reenter the password to verify, then press ENTER.NOT AVAILABLE ON ALL TERMINALS.

GIFT CARD REDEEMDisplay Action
GIFTSOLUTIONS F1
REDEEM F2
ACTIVATE F3
ADD VALUE F4
1. Press F2 to select REDEEM.
GIFTSOLUTIONS F1
REDEEM F2
Swipe Or Insert Card Or Enter Manually:
F3
F4
2. Swipe the card or key in the card number, then press ENTER.
GIFTSOLUTIONS F1
REDEEM F2
Enter Server ID# F3
F4
3. Enter server number if prompted, then press ENTER.
RESTAURANT ONLY.
GIFTSOLUTIONS F1
REDEEM F2
Enter Amt: $ 0.00 F3
F4
4. Enter sale amount, then press ENTER.
GIFTSOLUTIONS F1
REDEEM F2
Enter Tip: $ 0.00 F3
F4
5. Enter tip amount, then press ENTER.
GIFTSOLUTIONS F1
REDEEM F2
Connecting... F3
F4
6. The terminal will connect and send the transaction through and receive an authorization.
GIFTSOLUTIONS F1
Print Customer Receipt?
Yes F2
No F3
F4
7. Press F2 to print a customer copy, or F3 to cancel and return to the home screen.
ACTIVATE A NEW CARDDisplay Action
GIFTSOLUTIONS F1
REDEEM F2
ACTIVATE F3
ADD VALUE F4
1. Press F3 to select ACTIVATE.
GIFTSOLUTIONS F1
ACTIVATE F2
Swipe Or Insert Card Or Enter Manually:
F3
F4
2. Swipe the card or key in the card number, then press ENTER.
GIFTSOLUTIONS F1
REDEEM F2
Enter Server ID# F3
F4
3. Enter server number if prompted, then press ENTER.
RESTAURANT ONLY.
ACTIVATE A NEW CARD (CONT.)
Display Action
GIFTSOLUTIONS F1
ACTIVATE F2
Enter Amt: $ 0.00 F3
F4
4. Enter sale amount, then press ENTER.
GIFTSOLUTIONS F1
ACTIVATE F2
Connecting... F3
F4
5. The terminal will connect and send the transaction through and receive an authorization.
GIFTSOLUTIONS F1
Print Customer Receipt?
Yes F2
No F3
F4
6. Press F2 to print a customer copy, or F3 to cancel and return to the home screen.
VOID/RETURNDisplay Action
GIFTSOLUTIONS F1
VOID F2
BALANCE INQUIRY F3
TIP F4
1. Press the DOWN key located on the left, just above the number pad, then press F2 to select VOID.
GIFTSOLUTIONS F1
VOID F2
Swipe Or Insert Card Or Enter Manually:
F3
F4
2. Swipe the card or key in the card number, then press ENTER.
GIFTSOLUTIONS F1
VOID F2
Enter Server ID# F3
F4
3. Enter server number if prompted, then press ENTER.
RESTAURANT ONLY.
GIFTSOLUTIONS F1
VOID F2
Enter Trans# F3
F4
4. Enter transaction number, then press ENTER.
GIFTSOLUTIONS F1
Void the transactionAmount: $ 0.00Trans Id: 123456Confirm?YES NO
F2
F3
F4
5. The transaction information is displayed. Press DOWN to confirm, or REPORTS to cancel.
GIFTSOLUTIONS F1
VOID F2
Connecting... F3
F4
6. The terminal will connect and send the transaction through and receive an authorization.
GIFTSOLUTIONS F1
Print Customer Receipt?
Yes F2
No F3
F4
7. Press F2 to print a customer copy, or F3 to cancel and return to the home screen.

DEACTIVATE CARDDisplay Action
GIFTSOLUTIONS F1
DEACTIVATE F2
BALANCE TRANSFER F3
STORE CREDIT F4
1. Press the DOWN key twice, then press F2 to select DEACTIVATE.
DEACTIVATE F1
DEACTIVATE-WOREFUND F2
DEACTIVATE-WREFUND F3
F4
2. Press F2 if you are not issuing a refund on the balance of the card. Press F3 to have the receipt print the remaining balance.
GIFTSOLUTIONS F1
DEACTIVATE F2
Swipe Or Insert Card Or Enter Manually:
F3
F4
3. Swipe the card or key in the card number, then press ENTER.
GIFTSOLUTIONS F1
DEACTIVATE F2
Enter Server ID# F3
F4
4. Enter server number if prompted, then press ENTER.
RESTAURANT ONLY.
GIFTSOLUTIONS F1
DEACTIVATE F2
Connecting... F3
F4
5. The terminal will connect and send the transaction through and receive an authorization.
GIFTSOLUTIONS F1
Print Customer Receipt?
Yes F2
No F3
F4
6. Press F2 to print a customer copy, or F3 to cancel and return to the home screen.
STORE CREDITDisplay Action
GIFTSOLUTIONS F1
DEACTIVATE F2
BALANCE TRANSFER F3
STORE CREDIT F4
1. Press the DOWN key twice, then press F4 to select STORE CREDIT.
GIFTSOLUTIONS F1
STORE CREDIT F2
Swipe Or Insert Card Or Enter Manually:
F3
F4
2. Swipe the card or key in the card number, then press ENTER.
GIFTSOLUTIONS F1
STORE CREDIT F2
Enter Server ID# F3
F4
3. Enter server number if prompted, then press ENTER.
RESTAURANT ONLY.
GIFTSOLUTIONS F1
STORE CREDIT F2
Enter Amt: $ 0.00 F3
F4
4. Enter the amount you are issuing in store credit, then press ENTER.
ADD FUNDS TO CARDDisplay Action
GIFTSOLUTIONS F1
REDEEM F2
ACTIVATE F3
ADD VALUE F4
1. Press F4 to select ADD VALUE.
GIFTSOLUTIONS F1
ADD VALUE F2
Swipe Or Insert Card Or Enter Manually:
F3
F4
2. Swipe the card or key in the card number, then press ENTER.
GIFTSOLUTIONS F1
REDEEM F2
Enter Server ID# F3
F4
3. Enter server number if prompted, then press ENTER.
RESTAURANT ONLY.
GIFTSOLUTIONS F1
ADD VALUE F2
Enter Amt: $ 0.00 F3
F4
4. Enter the amount to add to the card, then press ENTER.
GIFTSOLUTIONS F1
ADD VALUE F2
Connecting... F3
F4
5. The terminal will connect and send the transaction through and receive an authorization.
GIFTSOLUTIONS F1
Print Customer Receipt?
Yes F2
No F3
F4
6. Press F2 to print a customer copy, or F3 to cancel and return to the home screen.
BALANCE INQUIRYDisplay Action
GIFTSOLUTIONS F1
VOID F2
BALANCE INQUIRY F3
TIP F4
1. Press the DOWN key located on the left, just above the number pad, then press F3 to select BALANCE INQUIRY.
GIFTSOLUTIONS F1
BALANCE INQUIRY F2
Swipe Or Insert Card Or Enter Manually:
F3
F4
2. Swipe the card or key in the card number, then press ENTER.
GIFTSOLUTIONS F1
BALANCE INQUIRY F2
Enter Server ID# F3
F4
3. Enter server number if prompted, then press ENTER.
RESTAURANT ONLY.
GIFTSOLUTIONS F1
BALANCE INQUIRY F2
Connecting... F3
F4
4. The terminal will connect and send the transaction through and receive an authorization.
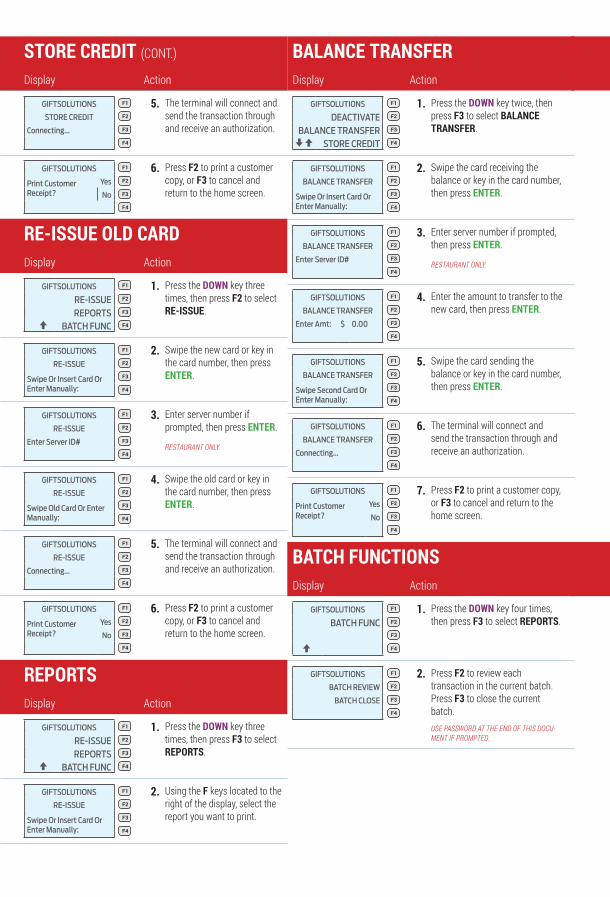
STORE CREDIT (CONT.)
Display Action
GIFTSOLUTIONS F1
STORE CREDIT F2
Connecting... F3
F4
5. The terminal will connect and send the transaction through and receive an authorization.
GIFTSOLUTIONS F1
Print Customer Receipt?
Yes F2
No F3
F4
6. Press F2 to print a customer copy, or F3 to cancel and return to the home screen.
RE-ISSUE OLD CARDDisplay Action
GIFTSOLUTIONS F1
RE-ISSUE F2
REPORTS F3
BATCH FUNC F4
1. Press the DOWN key three times, then press F2 to select RE-ISSUE.
GIFTSOLUTIONS F1
RE-ISSUE F2
Swipe Or Insert Card Or Enter Manually:
F3
F4
2. Swipe the new card or key in the card number, then press ENTER.
GIFTSOLUTIONS F1
RE-ISSUE F2
Enter Server ID# F3
F4
3. Enter server number if prompted, then press ENTER.
RESTAURANT ONLY.
GIFTSOLUTIONS F1
RE-ISSUE F2
Swipe Old Card Or Enter Manually:
F3
F4
4. Swipe the old card or key in the card number, then press ENTER.
GIFTSOLUTIONS F1
RE-ISSUE F2
Connecting... F3
F4
5. The terminal will connect and send the transaction through and receive an authorization.
GIFTSOLUTIONS F1
Print Customer Receipt?
Yes F2
No F3
F4
6. Press F2 to print a customer copy, or F3 to cancel and return to the home screen.
REPORTSDisplay Action
GIFTSOLUTIONS F1
RE-ISSUE F2
REPORTS F3
BATCH FUNC F4
1. Press the DOWN key three times, then press F3 to select REPORTS.
GIFTSOLUTIONS F1
RE-ISSUE F2
Swipe Or Insert Card Or Enter Manually:
F3
F4
2. Using the F keys located to the right of the display, select the report you want to print.
BALANCE TRANSFERDisplay Action
GIFTSOLUTIONS F1
DEACTIVATE F2
BALANCE TRANSFER F3
STORE CREDIT F4
1. Press the DOWN key twice, then press F3 to select BALANCE TRANSFER.
GIFTSOLUTIONS F1
BALANCE TRANSFER F2
Swipe Or Insert Card Or Enter Manually:
F3
F4
2. Swipe the card receiving the balance or key in the card number, then press ENTER.
GIFTSOLUTIONS F1
BALANCE TRANSFER F2
Enter Server ID# F3
F4
3. Enter server number if prompted, then press ENTER.
RESTAURANT ONLY.
GIFTSOLUTIONS F1
BALANCE TRANSFER F2
Enter Amt: $ 0.00 F3
F4
4. Enter the amount to transfer to the new card, then press ENTER.
GIFTSOLUTIONS F1
BALANCE TRANSFER F2
Swipe Second Card Or Enter Manually:
F3
F4
5. Swipe the card sending the balance or key in the card number, then press ENTER.
GIFTSOLUTIONS F1
BALANCE TRANSFER F2
Connecting... F3
F4
6. The terminal will connect and send the transaction through and receive an authorization.
GIFTSOLUTIONS F1
Print Customer Receipt?
Yes F2
No F3
F4
7. Press F2 to print a customer copy, or F3 to cancel and return to the home screen.
BATCH FUNCTIONSDisplay Action
GIFTSOLUTIONS F1
BATCH FUNC F2
F3
F4
1. Press the DOWN key four times, then press F3 to select REPORTS.
GIFTSOLUTIONS F1
BATCH REVIEW F2
BATCH CLOSE F3
F4
2. Press F2 to review each transaction in the current batch. Press F3 to close the current batch. USE PASSWORD AT THE END OF THIS DOCU-MENT IF PROMPTED.

ADDING A TIPDisplay Action
GIFTSOLUTIONS F1
VOID F2
BALANCE INQUIRY F3
TIP F4
1. Press the DOWN key located on the left, just above the number pad, then press F4 to select TIP.
GIFTSOLUTIONS F1
TIP F2
Enter Server ID# F3
F4
2. Enter server number if prompted, then press ENTER.
RESTAURANT ONLY.
GIFTSOLUTIONS F1
TIP F2
Enter Trans# F3
F4
3. Enter transaction number, then press ENTER.
GIFTSOLUTIONS F1
TIP F2
Enter Tip: $ 0.00 F3
F4
4. Enter the tip amount, then press ENTER.
GIFTSOLUTIONS F1
TIP F2
Connecting... F3
F4
5. The terminal will connect and send the transaction through and receive an authorization.
GIFTSOLUTIONS F1
Print Customer Receipt?
Yes F2
No F3
F4
6. Press F2 to print a customer copy, or F3 to cancel and return to the home screen.
CONTACT CUSTOMER SERVICE, ORDER PAPER OR CARDSDisplay Action
01/01/15 12:00 F1
GIFTSOLUTIONS F2
CLERK FUNC F3
CUST SERVICE F4
1. Press CANCEL twice to exit the GIFTSOLUTIONS app, the press F4 to select CUST SERVICE.
CUST SERVICE F1
HELP DESK F2
ORDER PAPER F3
ORDER CARDS F4
2. Using the F keys located to the right of the display, select function you require.
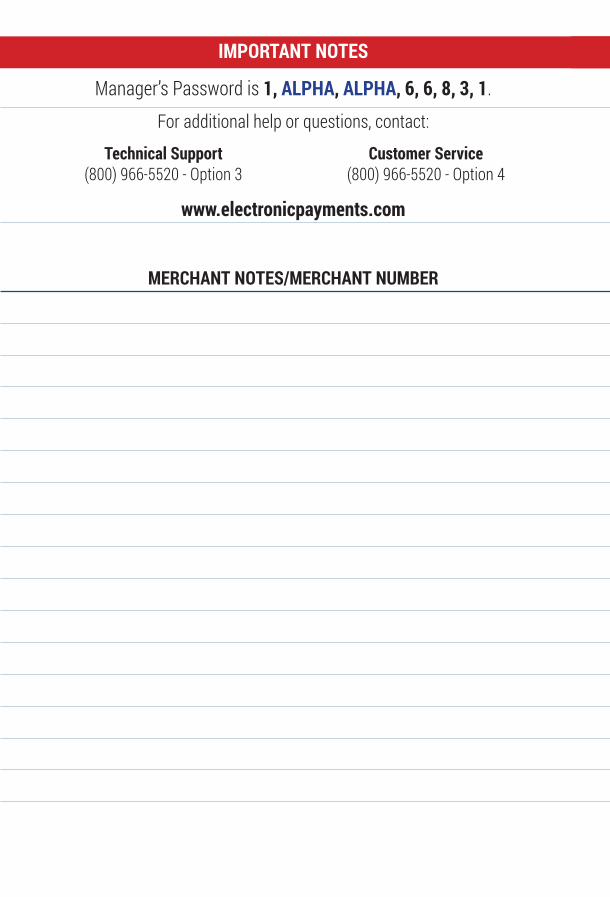
IMPORTANT NOTES
Manager’s Password is 1, ALPHA, ALPHA, 6, 6, 8, 3, 1.For additional help or questions, contact:
Technical Support(800) 966-5520 - Option 3
Customer Service(800) 966-5520 - Option 4
www.electronicpayments.com
MERCHANT NOTES/MERCHANT NUMBER