Embed Size (px)
Citation preview
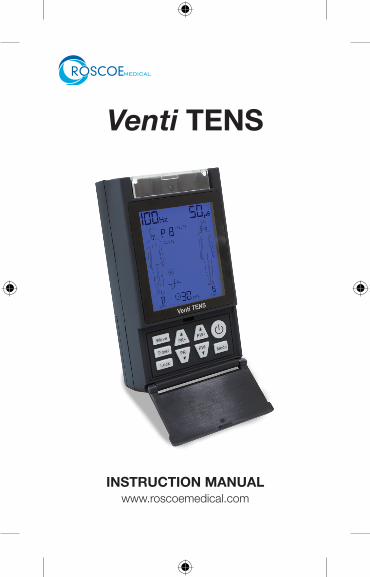
INSTRUCTION MANUALwww.roscoemedical.com
Venti TENS
2
Venti TENS Roscoe Medical
This manual is valid for the Venti TENS
This instruction manual is published by Roscoe Medical Inc.
Roscoe Medical Inc. reserves the right to improve and amend it at any time without prior notice. Amendments may however be published in new editions of this man-
ual.
All Rights Reserved 42_ DT2020_00 ©2015
United States Federal Law restricts this device to sale by or on the order of a physician or licensed practitioner
Conformity to safety standards
Roscoe Medical Inc. declares that the device complies with following normative documents:
IEC60601-1, IEC60601-1-2, IEC60601-2-10, ISO 7010, ISO14971, ISO10993-1,
ISO10993-5, ISO10993-10
3
Roscoe Medical Venti TENS
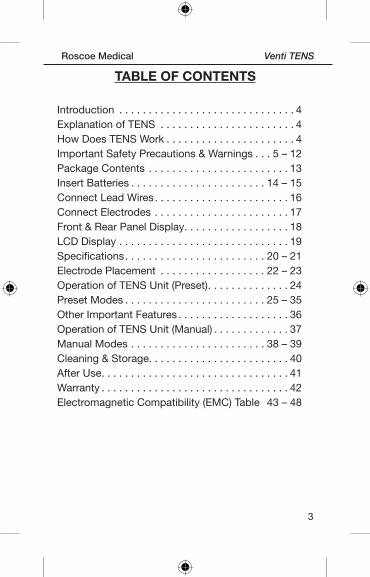
TABLE OF CONTENTS
Introduction . . . . . . . . . . . . . . . . . . . . . . . . . . . . . . 4Explanation of TENS . . . . . . . . . . . . . . . . . . . . . . . 4How Does TENS Work . . . . . . . . . . . . . . . . . . . . . . 4Important Safety Precautions & Warnings . . . 5 – 12Package Contents . . . . . . . . . . . . . . . . . . . . . . . . 13Insert Batteries . . . . . . . . . . . . . . . . . . . . . . . 14 – 15Connect Lead Wires. . . . . . . . . . . . . . . . . . . . . . . 16Connect Electrodes . . . . . . . . . . . . . . . . . . . . . . . 17Front & Rear Panel Display. . . . . . . . . . . . . . . . . . 18LCD Display . . . . . . . . . . . . . . . . . . . . . . . . . . . . . 19Specifications. . . . . . . . . . . . . . . . . . . . . . . . 20 – 21Electrode Placement . . . . . . . . . . . . . . . . . . 22 – 23Operation of TENS Unit (Preset). . . . . . . . . . . . . . 24Preset Modes . . . . . . . . . . . . . . . . . . . . . . . . 25 – 35Other Important Features . . . . . . . . . . . . . . . . . . . 36Operation of TENS Unit (Manual) . . . . . . . . . . . . . 37Manual Modes . . . . . . . . . . . . . . . . . . . . . . . 38 – 39Cleaning & Storage. . . . . . . . . . . . . . . . . . . . . . . . 40After Use. . . . . . . . . . . . . . . . . . . . . . . . . . . . . . . . 41Warranty . . . . . . . . . . . . . . . . . . . . . . . . . . . . . . . . 42Electromagnetic Compatibility (EMC) Table 43 – 48
4
Venti TENS Roscoe Medical
INTRODUCTION
TENS stands for Transcutaneous Electrical Nerve Stimulation. This device is used to provide symptomatic pain relief for chronic, acute or postoperative pain.
EXPLANATION OF TENS
TENS is commonly used to provide relief from many types of pain, including but not limited to the following:1) Symptomatic relief of chronic intractable pain2) Posttraumatic pain3) Postsurgical pain
HOW DOES TENS WORK?
TENS is intended to help relieve pain. TENS units send comfortable impulses through the skin to stimulate the nerve (or nerves) in the treatment area. In many cases, this stimulation will greatly reduce or eliminate the pain sensation the patient feels. Pain relief varies by individual patients, mode selected for therapy and the type of pain. You may discuss this with your physician or therapist.
5
Roscoe Medical Venti TENS
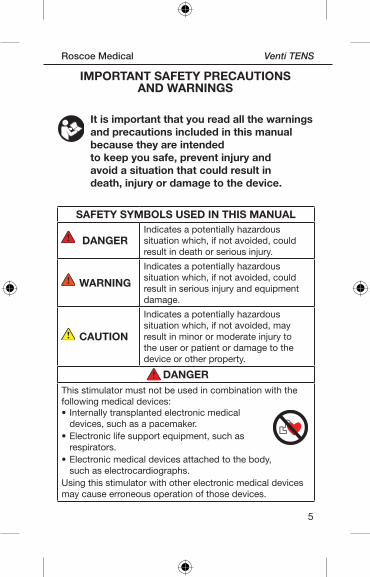
SAFETY SYMBOLS USED IN THIS MANUAL
DANGER Indicates a potentially hazardous situation which, if not avoided, could result in death or serious injury.
WARNING
Indicates a potentially hazardous situation which, if not avoided, could result in serious injury and equipment damage.
CAUTION
Indicates a potentially hazardous situation which, if not avoided, may result in minor or moderate injury to the user or patient or damage to the device or other property.
DANGERThis stimulator must not be used in combination with the following medical devices:• Internally transplanted electronic medical
devices, such as a pacemaker.• Electronic life support equipment, such as
respirators.• Electronic medical devices attached to the body,
such as electrocardiographs.Using this stimulator with other electronic medical devices may cause erroneous operation of those devices.
IMPORTANT SAFETY PRECAUTIONS AND WARNINGS
It is important that you read all the warnings and precautions included in this manual because they are intended to keep you safe, prevent injury and avoid a situation that could result in death, injury or damage to the device.
6
Venti TENS Roscoe Medical
WARNING
DO NOT USE THIS DEVICE UNDER THESE CONDITIONS
• Consult with your physician before using this device, because the device may cause lethal rhythm disturbances in certain susceptible individuals.
• If you have a cardiac pacemaker, implanted defibrillator, or other implanted metallic or electronic device. Such use could cause electric shock, burns, electrical interference, or death.
• Together with a life-supporting medical electronic device such as an artificial heart or lung or respirator.
• In the presence of electronic monitoring equipment (e.g., cardiac monitors, ECG alarms), which may not operate properly when the electrical stimulation device is in use.
• On open wounds or rashes, or over swollen, red, infected, or inflamed areas or skin eruptions (e.g., phlebitis, thrombophlebitis, varicose veins); or on top of, or in proximity to, cancerous lesions.
• Over areas of skin that lack normal sensation.• On the opposite sides of your head since the effects
of stimulation of the brain are unknown.
DO NOT USE ON THESE INDIVIDUALS• Pregnant women, because the safety of electrical
stimulation during pregnancy has not been established.• Children or infants, because the device has not been
evaluated for pediatric use.• Persons incapable of expressing their thoughts
or intentions.
7
Roscoe Medical Venti TENS
WARNING (cont.)
DO NOT USE THIS DEVICE DURING THESE ACTIVITIES
• When in the bath or shower.• While sleeping.• While driving, operating machinery, or during any
activity in which electrical stimulation can put you at risk for injury.
PAIN MANAGEMENT WARNINGS• If you have had medical or physical treatment for
your pain, consult with your physician before using this device.
• If your pain does not improve, becomes seriously chronic or severe, or continues for more than five days, stop using the device and consult with your physician.
• The mere existence of pain functions as a very important warning telling us that something is wrong. Therefore, if you suffer from any serious illness, consult your physician in order to confirm that it is advisable for you to use this TENS Stimulator.
WARNINGS AND PRECAUTIONS REGARDING THE ELECTRODES
• Apply electrodes to normal, healthy, dry, clean skin (of adult patients) because it may otherwise disrupt the healing process.
• If you experience any skin irritation or redness after a session, do not continue stimulation in that area of the skin.
• Never apply other therapeutic remedies (i.e. hot/cold packs or anything with condensation) directly on top of an electrode, as this could cause mild to severe skin burns and/or irritation.
8
Venti TENS Roscoe Medical
WARNING (cont.)
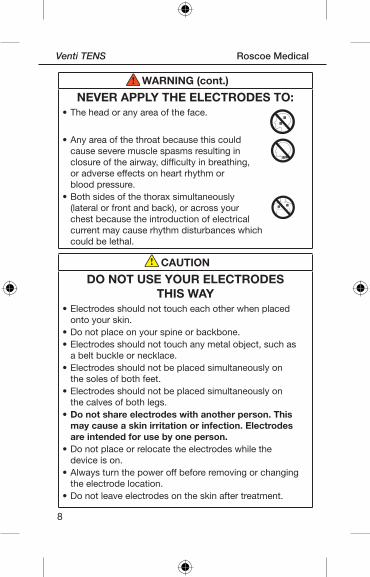
NEVER APPLY THE ELECTRODES TO:• The head or any area of the face.
• Any area of the throat because this could cause severe muscle spasms resulting in closure of the airway, difficulty in breathing, or adverse effects on heart rhythm or blood pressure.
• Both sides of the thorax simultaneously (lateral or front and back), or across your chest because the introduction of electrical current may cause rhythm disturbances which could be lethal.
CAUTION
DO NOT USE YOUR ELECTRODES THIS WAY
• Electrodes should not touch each other when placed onto your skin.
• Do not place on your spine or backbone.• Electrodes should not touch any metal object, such as
a belt buckle or necklace.• Electrodes should not be placed simultaneously on
the soles of both feet.• Electrodes should not be placed simultaneously on
the calves of both legs.• Do not share electrodes with another person. This
may cause a skin irritation or infection. Electrodes are intended for use by one person.
• Do not place or relocate the electrodes while the device is on.
• Always turn the power off before removing or changing the electrode location.
• Do not leave electrodes on the skin after treatment.
9
Roscoe Medical Venti TENS
CAUTION
WARNINGS AND PRECAUTIONS REGARDING THE ELECTRODES
• United States Federal Law restricts this device to sale by or on the order of a physician or licensed practitioner.
• Do not bend or fold because the electrode may not function properly. Place the electrodes onto the plastic film and then store in the sealed package when not in use.
• Do not apply ointment or any solvent to the electrodes or to your skin because it will disrupt the electrodes from functioning properly.
• The electrodes are already pre-gelled and will adhere to your skin.
• To avoid damage to the adhesive surface of the electrodes, put the electrodes only on the skin or on the plastic film provided.
• Place the electrodes at least 1½" apart on your skin. The electrodes should never touch each other.
• Make sure the components are connected well and the electrodes are fixed on the part of the body you wish to treat or the therapy may not be effective.
CAUTION WHILE USING THE STIMULATOR
• If the stimulator is not functioning properly or you feel discomfort, immediately stop using the device.
• Do not use for any other purpose except for what it is intended for.
• Do not insert the lead wire into any place other than the jack on the main unit.
• Do not mix different kinds of batteries as this will shorten the battery life.
• Do not pull on the lead wire cord during treatment.• Do not use the device while wearing electronic devices
such as watches as this may damage the device.

10
Venti TENS Roscoe Medical
CAUTION (cont.)
CAUTION WHILE USING THE STIMULATOR
• Do not use near a cell phone as this may cause the stimulator to malfunction.
• Do not bend or pull on the end of the cords.• When pulling out the cord from the device, hold the plug
and pull.• Replace the cord when broken or damaged.• Do not throw the batteries into a fire. The batteries
may explode.• Dispose of the device, batteries, and components
according to applicable legal regulations. Unlawful disposal may cause environmental pollution.
• The size, shape and type of electrodes may affect the safety and effectiveness of electrical stimulation.
• The electrical performance characteristics of electrodes may affect the safety and effectiveness of electrical stimulation.
• Using electrodes that are too small or incorrectly applied, could result in discomfort or skin burns.
GENERAL PRECAUTIONS• The long-term effects of electrical stimulation
are unknown.• Apply stimulation to only normal, intact, clean, dry,
and healthy skin.• TENS is not effective in treating the original source
or cause of the pain, including headache.• TENS is not a substitute for pain medications and
other pain management therapies.• TENS devices do not cure disease or injuries.
11
Roscoe Medical Venti TENS
GENERAL PRECAUTIONS (cont.)
• TENS is a symptomatic treatment and, as such, suppresses the sensation of pain that would otherwise serve as a protective mechanism.
• Effectiveness is highly dependent upon patient selection by a practitioner qualified in the management of pain patients.
• You may experience skin irritation or hypersensitivity due to the electrical stimulation or electrical conductive medium (gel).
• If you have suspected or diagnosed heart disease, you should follow precautions recommended by your physician.
• If you have suspected or diagnosed epilepsy, you should follow precautions recommended by your physician.
• Use caution if you have a tendency to bleed internally, such as following an injury or fracture.
• Consult with your physician prior to using the device after a recent surgical procedure, because stimulation may disrupt the healing process.
• Use caution if stimulation is applied over a menstruating uterus.
• Keep unit away from young children. The unit contains small pieces that may be swallowed. The electrode cord can cause strangulation. Immediately contact your physician should any of these things occur.
• Use this device only with the lead wires, electrodes, and accessories recommended by the manufacturer.
12
Venti TENS Roscoe Medical
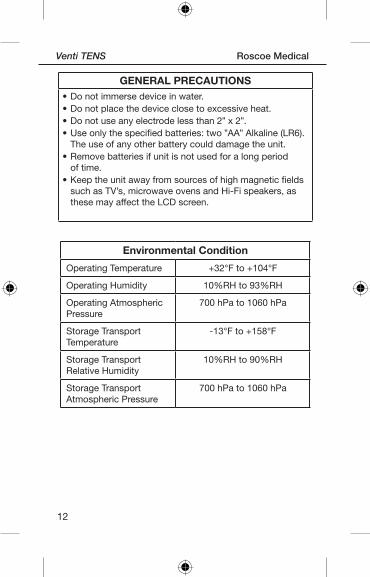
GENERAL PRECAUTIONS• Do not immerse device in water.• Do not place the device close to excessive heat.• Do not use any electrode less than 2" x 2".• Use only the specified batteries: two "AA" Alkaline (LR6).
The use of any other battery could damage the unit.• Remove batteries if unit is not used for a long period
of time.• Keep the unit away from sources of high magnetic fields
such as TV’s, microwave ovens and Hi-Fi speakers, as these may affect the LCD screen.
Environmental Condition
Operating Temperature +32°F to +104°F
Operating Humidity 10%RH to 93%RH
Operating Atmospheric Pressure
700 hPa to 1060 hPa
Storage Transport Temperature
-13°F to +158°F
Storage Transport Relative Humidity
10%RH to 90%RH
Storage Transport Atmospheric Pressure
700 hPa to 1060 hPa
13
Roscoe Medical Venti TENS
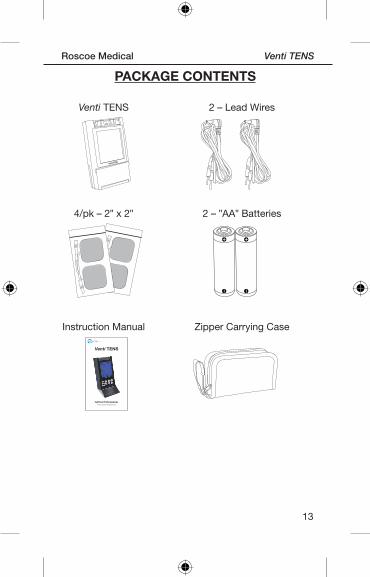
PACKAGE CONTENTS
Venti TENS 2 – Lead Wires
4/pk – 2" x 2" 2 – "AA" Batteries
Instruction Manual Zipper Carrying Case
INSTRUCTION MANUALwww.roscoemedical.com
Venti TENS
14
Venti TENS Roscoe Medical
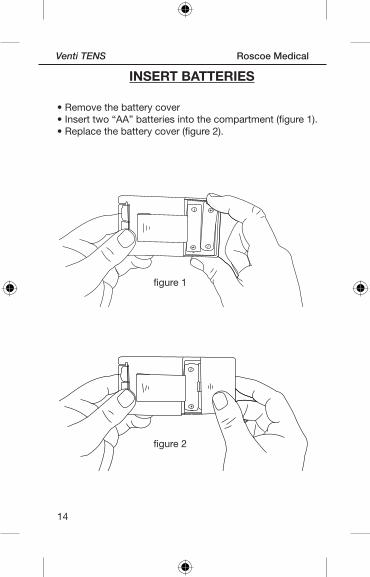
INSERT BATTERIES
• Remove the battery cover• Insert two “AA” batteries into the compartment (figure 1).• Replace the battery cover (figure 2).
figure 1
figure 2
15
Roscoe Medical Venti TENS
INSERT BATTERIES
• Remove the battery cover• Insert two “AA” batteries into the compartment (figure 1).• Replace the battery cover (figure 2).
Note: Your unit will not function if the batteries are inserted incorrectly. To check, press the ON/OFF key once and the LCD display will light up. Having made this check, press the ON/OFF key again to switch the unit off.
CAUTION
There is a risk of explosion if the batteries are fitted incorrectly. Replace with “AA” Alkaline batteries (LR6). Do not mix old and new batteries. Do not dispose of the batteries in a fire. Keep them out of reach of children. Remove the batteries from the unit if it is not going to be used for a long period of time.
16
Venti TENS Roscoe Medical
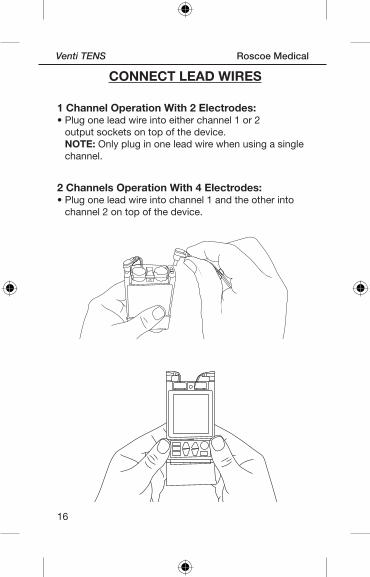
CONNECT LEAD WIRES
1 Channel Operation With 2 Electrodes:• Plug one lead wire into either channel 1 or 2
output sockets on top of the device. NOTE: Only plug in one lead wire when using a single channel.
2 Channels Operation With 4 Electrodes:• Plug one lead wire into channel 1 and the other into
channel 2 on top of the device.

17
Roscoe Medical Venti TENS
CONNECT ELECTRODES
• Remove electrodes from the bag (figure 3).• Connect the lead wires to the electrodes (figure 4).
NOTE: Each lead wire must have 2 electrodes attached for proper operation.
figure 3
figure 4
18
Venti TENS Roscoe Medical
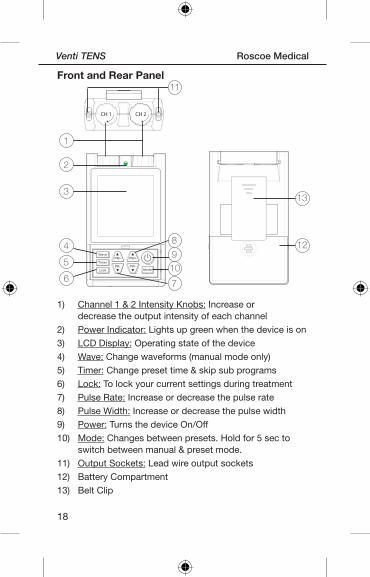
Front and Rear Panel
1) Channel 1 & 2 Intensity Knobs: Increase or decrease the output intensity of each channel
2) Power Indicator: Lights up green when the device is on3) LCD Display: Operating state of the device4) Wave: Change waveforms (manual mode only)5) Timer: Change preset time & skip sub programs6) Lock: To lock your current settings during treatment7) Pulse Rate: Increase or decrease the pulse rate8) Pulse Width: Increase or decrease the pulse width9) Power: Turns the device On/Off10) Mode: Changes between presets. Hold for 5 sec to
switch between manual & preset mode.11) Output Sockets: Lead wire output sockets12) Battery Compartment13) Belt Clip
CH 1 CH 2
1
2
3
48
5
6 7
10
129
13
11
19
Roscoe Medical Venti TENS
LCD Display
1
2
3
4
5
6
7
8
9
10
11
12
13
14
15
16
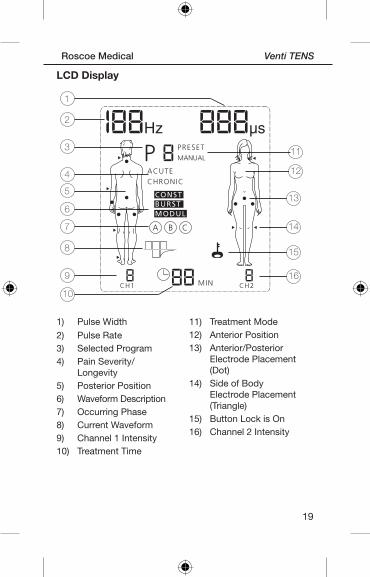
1) Pulse Width2) Pulse Rate3) Selected Program4) Pain Severity/
Longevity5) Posterior Position6) Waveform Description7) Occurring Phase8) Current Waveform9) Channel 1 Intensity10) Treatment Time
11) Treatment Mode12) Anterior Position13) Anterior/Posterior
Electrode Placement (Dot)
14) Side of Body Electrode Placement (Triangle)
15) Button Lock is On16) Channel 2 Intensity
20
Venti TENS Roscoe Medical
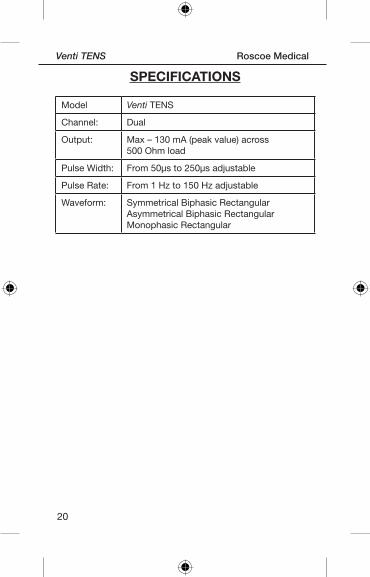
SPECIFICATIONS
Model Venti TENS
Channel: Dual
Output: Max – 130 mA (peak value) across 500 Ohm load
Pulse Width: From 50μs to 250μs adjustable
Pulse Rate: From 1 Hz to 150 Hz adjustable
Waveform: Symmetrical Biphasic Rectangular Asymmetrical Biphasic Rectangular Monophasic Rectangular
21
Roscoe Medical Venti TENS
SPECIFICATIONS (CONT.)
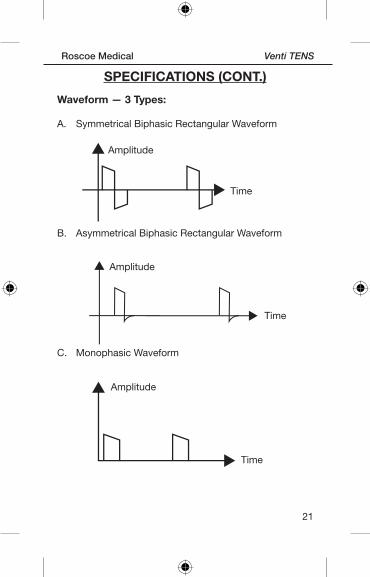
Waveform — 3 Types:
A. Symmetrical Biphasic Rectangular Waveform
B. Asymmetrical Biphasic Rectangular Waveform
C. Monophasic Waveform
Time
Time
Time
Amplitude
Amplitude
Amplitude
22
Venti TENS Roscoe Medical
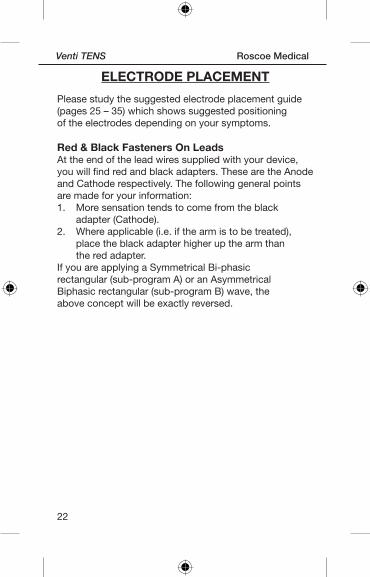
ELECTRODE PLACEMENT
Please study the suggested electrode placement guide (pages 25 – 35) which shows suggested positioning of the electrodes depending on your symptoms.
Red & Black Fasteners On LeadsAt the end of the lead wires supplied with your device, you will find red and black adapters. These are the Anode and Cathode respectively. The following general points are made for your information:1. More sensation tends to come from the black
adapter (Cathode).2. Where applicable (i.e. if the arm is to be treated),
place the black adapter higher up the arm than the red adapter.
If you are applying a Symmetrical Bi-phasic rectangular (sub-program A) or an Asymmetrical Biphasic rectangular (sub-program B) wave, the above concept will be exactly reversed.

23
Roscoe Medical Venti TENS
ELECTRODE PLACEMENT
• Ensure skin is clean and thoroughly dry before applying the electrodes.
• Remove the electrodes from the plastic shield (figure 5) and position them on your body — pressing firmly to ensure good contact (figure 6).
Note: Electrode placement suggestions are on pages 25 – 35.
figure 5
figure 6
24
Venti TENS Roscoe Medical
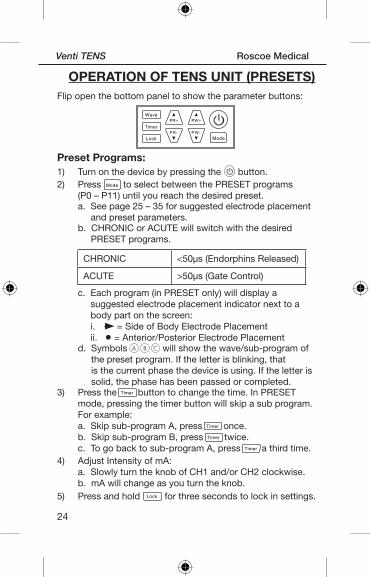
OPERATION OF TENS UNIT (PRESETS)Flip open the bottom panel to show the parameter buttons:
Preset Programs:1) Turn on the device by pressing the
WavePR+
PR-
PW+
PW-Timer
Lock Mode
button.2) Press
WavePR+
PR-
PW+
PW-Timer
Lock Mode to select between the PRESET programs (P0 – P11) until you reach the desired preset. a. See page 25 – 35 for suggested electrode placement and preset parameters. b. CHRONIC or ACUTE will switch with the desired PRESET programs.
CHRONIC <50μs (Endorphins Released)
ACUTE >50μs (Gate Control)
c. Each program (in PRESET only) will display a suggested electrode placement indicator next to a body part on the screen: i. = Side of Body Electrode Placement ii. • = Anterior/Posterior Electrode Placement
d. Symbols will show the wave/sub-program of the preset program. If the letter is blinking, that is the current phase the device is using. If the letter is solid, the phase has been passed or completed.
3) Press theWave
PR+
PR-
PW+
PW-Timer
Lock Mode
button to change the time. In PRESET mode, pressing the timer button will skip a sub program. For example: a. Skip sub-program A, press
WavePR+
PR-
PW+
PW-Timer
Lock Mode
once. b. Skip sub-program B, press
WavePR+
PR-
PW+
PW-Timer
Lock Mode
twice. c. To go back to sub-program A, press
WavePR+
PR-
PW+
PW-Timer
Lock Mode
a third time.4) Adjust Intensity of mA:
a. Slowly turn the knob of CH1 and/or CH2 clockwise. b. mA will change as you turn the knob.
5) Press and hold
WavePR+
PR-
PW+
PW-Timer
Lock Mode for three seconds to lock in settings.
WavePR+
PR-
PW+
PW-Timer
Lock Mode
25
Roscoe Medical Venti TENS
OPERATION OF TENS UNIT (PRESETS)Flip open the bottom panel to show the parameter buttons:
Preset Programs:1) Turn on the device by pressing the
WavePR+
PR-
PW+
PW-Timer
Lock Mode
button.2) Press
WavePR+
PR-
PW+
PW-Timer
Lock Mode to select between the PRESET programs (P0 – P11) until you reach the desired preset. a. See page 25 – 35 for suggested electrode placement and preset parameters. b. CHRONIC or ACUTE will switch with the desired PRESET programs.
CHRONIC <50μs (Endorphins Released)
ACUTE >50μs (Gate Control)
c. Each program (in PRESET only) will display a suggested electrode placement indicator next to a body part on the screen: i. = Side of Body Electrode Placement ii. • = Anterior/Posterior Electrode Placement
d. Symbols will show the wave/sub-program of the preset program. If the letter is blinking, that is the current phase the device is using. If the letter is solid, the phase has been passed or completed.
3) Press theWave
PR+
PR-
PW+
PW-Timer
Lock Mode
button to change the time. In PRESET mode, pressing the timer button will skip a sub program. For example: a. Skip sub-program A, press
WavePR+
PR-
PW+
PW-Timer
Lock Mode
once. b. Skip sub-program B, press
WavePR+
PR-
PW+
PW-Timer
Lock Mode
twice. c. To go back to sub-program A, press
WavePR+
PR-
PW+
PW-Timer
Lock Mode
a third time.4) Adjust Intensity of mA:
a. Slowly turn the knob of CH1 and/or CH2 clockwise. b. mA will change as you turn the knob.
5) Press and hold
WavePR+
PR-
PW+
PW-Timer
Lock Mode for three seconds to lock in settings.
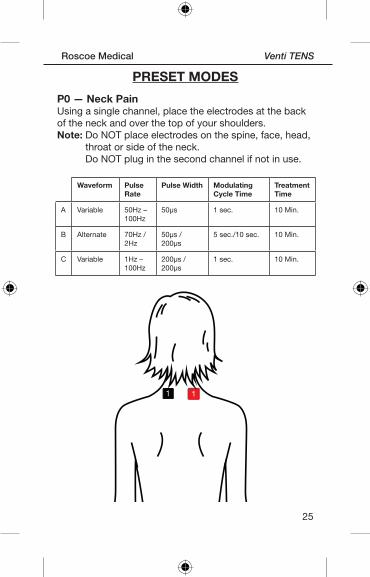
PRESET MODES
P0 — Neck PainUsing a single channel, place the electrodes at the back of the neck and over the top of your shoulders.Note: Do NOT place electrodes on the spine, face, head,
throat or side of the neck. Do NOT plug in the second channel if not in use.
1 1
Waveform Pulse Rate
Pulse Width Modulating Cycle Time
Treatment Time
A Variable 50Hz – 100Hz
50μs 1 sec. 10 Min.
B Alternate 70Hz / 2Hz
50μs / 200μs
5 sec./10 sec. 10 Min.
C Variable 1Hz – 100Hz
200μs / 200μs
1 sec. 10 Min.
26
Venti TENS Roscoe Medical
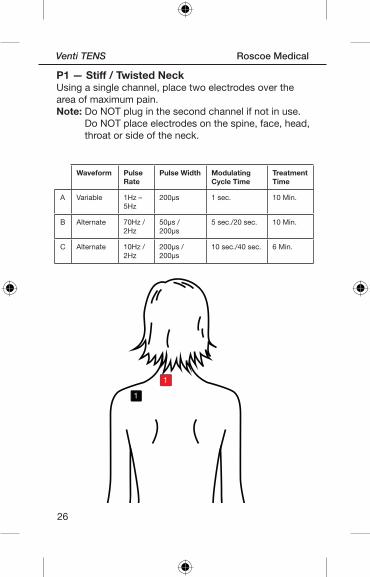
P1 — Stiff / Twisted NeckUsing a single channel, place two electrodes over the area of maximum pain.Note: Do NOT plug in the second channel if not in use.
Do NOT place electrodes on the spine, face, head, throat or side of the neck.
1
1
Waveform Pulse Rate
Pulse Width Modulating Cycle Time
Treatment Time
A Variable 1Hz – 5Hz
200μs 1 sec. 10 Min.
B Alternate 70Hz / 2Hz
50μs / 200μs
5 sec./20 sec. 10 Min.
C Alternate 10Hz / 2Hz
200μs / 200μs
10 sec./40 sec. 6 Min.
27
Roscoe Medical Venti TENS
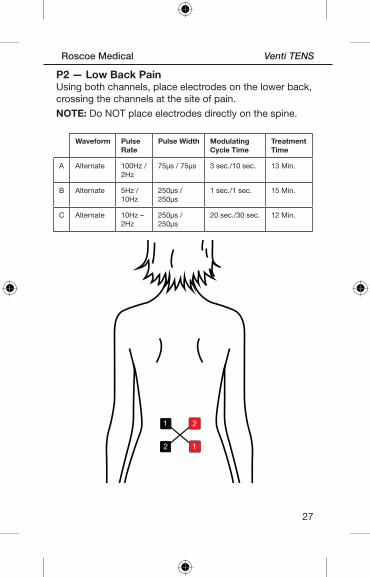
P2 — Low Back PainUsing both channels, place electrodes on the lower back, crossing the channels at the site of pain.
NOTE: Do NOT place electrodes directly on the spine.
1 2
2 1
Waveform Pulse Rate
Pulse Width Modulating Cycle Time
Treatment Time
A Alternate 100Hz / 2Hz
75μs / 75μs 3 sec./10 sec. 13 Min.
B Alternate 5Hz / 10Hz
250μs / 250μs
1 sec./1 sec. 15 Min.
C Alternate 10Hz – 2Hz
250μs / 250μs
20 sec./30 sec. 12 Min.
28
Venti TENS Roscoe Medical
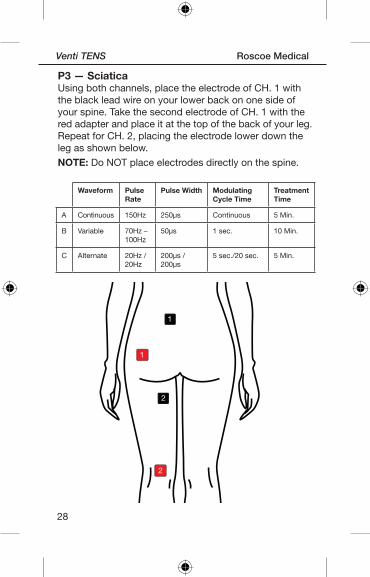
P3 — SciaticaUsing both channels, place the electrode of CH. 1 with the black lead wire on your lower back on one side of your spine. Take the second electrode of CH. 1 with the red adapter and place it at the top of the back of your leg.Repeat for CH. 2, placing the electrode lower down the leg as shown below.
NOTE: Do NOT place electrodes directly on the spine.
1
2
2
1
Waveform Pulse Rate
Pulse Width Modulating Cycle Time
Treatment Time
A Continuous 150Hz 250μs Continuous 5 Min.
B Variable 70Hz – 100Hz
50μs 1 sec. 10 Min.
C Alternate 20Hz / 20Hz
200μs / 200μs
5 sec./20 sec. 5 Min.
29
Roscoe Medical Venti TENS
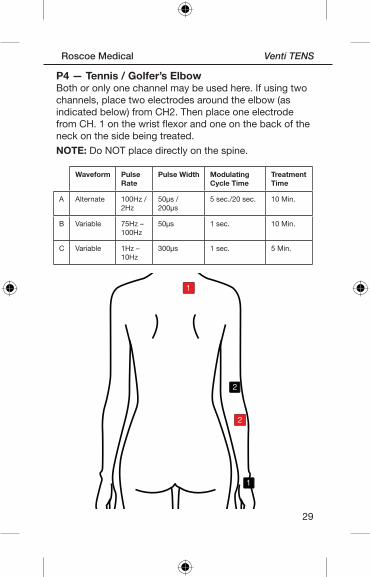
P4 — Tennis / Golfer’s ElbowBoth or only one channel may be used here. If using two channels, place two electrodes around the elbow (as indicated below) from CH2. Then place one electrode from CH. 1 on the wrist flexor and one on the back of the neck on the side being treated.
NOTE: Do NOT place directly on the spine.
1
2
2
1
Waveform Pulse Rate
Pulse Width Modulating Cycle Time
Treatment Time
A Alternate 100Hz / 2Hz
50μs / 200μs
5 sec./20 sec. 10 Min.
B Variable 75Hz – 100Hz
50μs 1 sec. 10 Min.
C Variable 1Hz – 10Hz
300μs 1 sec. 5 Min.
30
Venti TENS Roscoe Medical
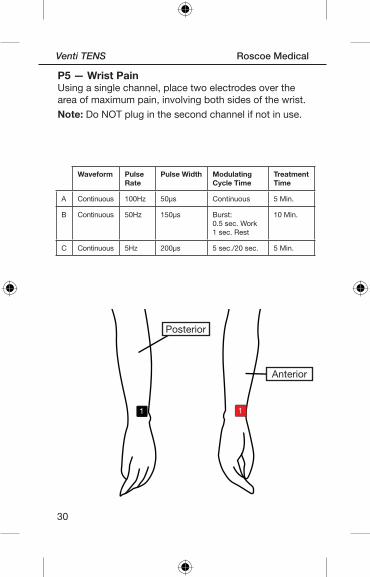
P5 — Wrist PainUsing a single channel, place two electrodes over the area of maximum pain, involving both sides of the wrist.
Note: Do NOT plug in the second channel if not in use.
1 1
Waveform Pulse Rate
Pulse Width Modulating Cycle Time
Treatment Time
A Continuous 100Hz 50μs Continuous 5 Min.
B Continuous 50Hz 150μs Burst: 0.5 sec. Work 1 sec. Rest
10 Min.
C Continuous 5Hz 200μs 5 sec./20 sec. 5 Min.
Anterior
Posterior

31
Roscoe Medical Venti TENS
P6/P8 — Knee Pain (Gonalgia)Using both channels, place electrodes over the top and base of the knee. Avoid placement directly on the kneecap.CAUTION: Do NOT stimulate both legs simultaneously.
1
12
2
22
11
Waveform Pulse Rate
Pulse Width Modulating Cycle Time
Treatment Time
P6
A Continuous 150Hz 250μs Continuous 5 Min.
B Variable 50Hz – 100Hz
50μs 1 sec. 10 Min.
C Continuous 75Hz 100μs Continuous 5 Min.
P8
A Variable 5Hz – 100Hz
50μs 1 sec. 10 Min.
B Continuous 150Hz 50μs Continuous 5 Min.
C Variable 5Hz – 20Hz
150μs 1 sec. 10 Min.
32
Venti TENS Roscoe Medical
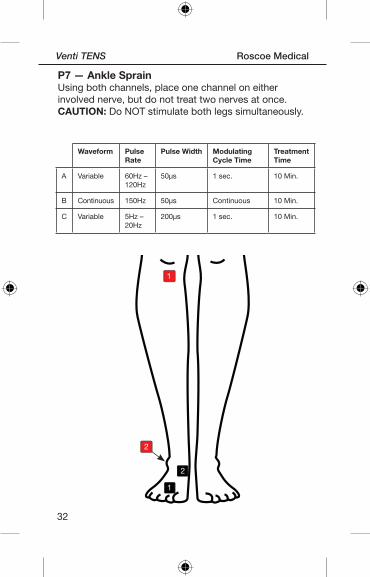
P7 — Ankle SprainUsing both channels, place one channel on either involved nerve, but do not treat two nerves at once.CAUTION: Do NOT stimulate both legs simultaneously.
1
2
2
1
Waveform Pulse Rate
Pulse Width Modulating Cycle Time
Treatment Time
A Variable 60Hz – 120Hz
50μs 1 sec. 10 Min.
B Continuous 150Hz 50μs Continuous 10 Min.
C Variable 5Hz – 20Hz
200μs 1 sec. 10 Min.
33
Roscoe Medical Venti TENS
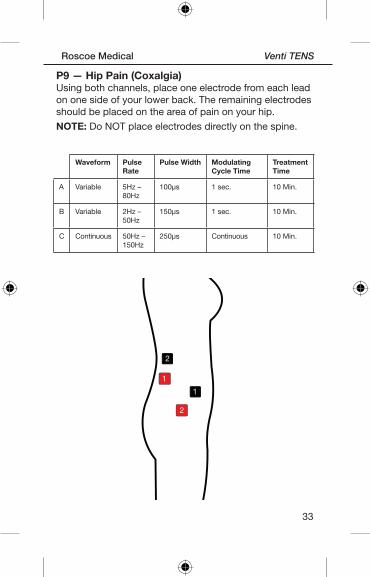
P9 — Hip Pain (Coxalgia)Using both channels, place one electrode from each lead on one side of your lower back. The remaining electrodes should be placed on the area of pain on your hip.
NOTE: Do NOT place electrodes directly on the spine.
1
2
2
1
Waveform Pulse Rate
Pulse Width Modulating Cycle Time
Treatment Time
A Variable 5Hz – 80Hz
100μs 1 sec. 10 Min.
B Variable 2Hz – 50Hz
150μs 1 sec. 10 Min.
C Continuous 50Hz – 150Hz
250μs Continuous 10 Min.
34
Venti TENS Roscoe Medical
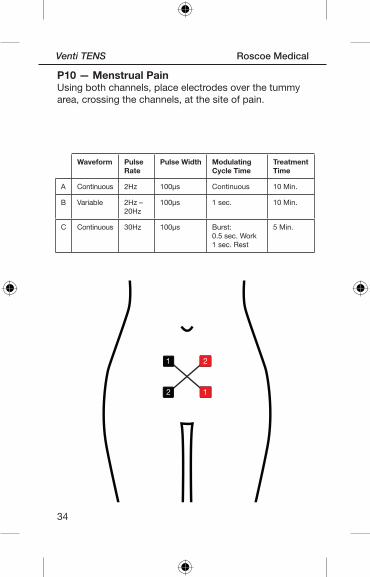
P10 — Menstrual PainUsing both channels, place electrodes over the tummy area, crossing the channels, at the site of pain.
1 2
2 1
Waveform Pulse Rate
Pulse Width Modulating Cycle Time
Treatment Time
A Continuous 2Hz 100μs Continuous 10 Min.
B Variable 2Hz – 20Hz
100μs 1 sec. 10 Min.
C Continuous 30Hz 100μs Burst: 0.5 sec. Work 1 sec. Rest
5 Min.
35
Roscoe Medical Venti TENS
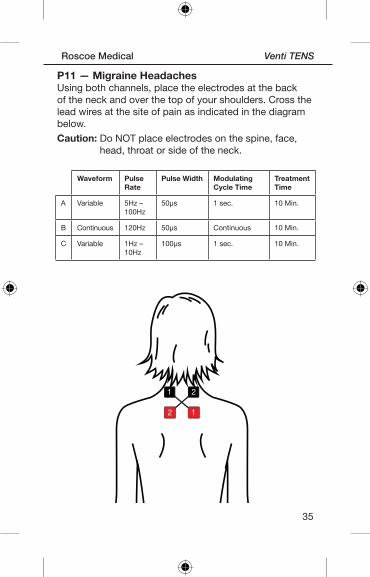
P11 — Migraine HeadachesUsing both channels, place the electrodes at the back of the neck and over the top of your shoulders. Cross the lead wires at the site of pain as indicated in the diagram below.
Caution: Do NOT place electrodes on the spine, face, head, throat or side of the neck.
1
2
2
1
Waveform Pulse Rate
Pulse Width Modulating Cycle Time
Treatment Time
A Variable 5Hz – 100Hz
50μs 1 sec. 10 Min.
B Continuous 120Hz 50μs Continuous 10 Min.
C Variable 1Hz – 10Hz
100μs 1 sec. 10 Min.
36
Venti TENS Roscoe Medical
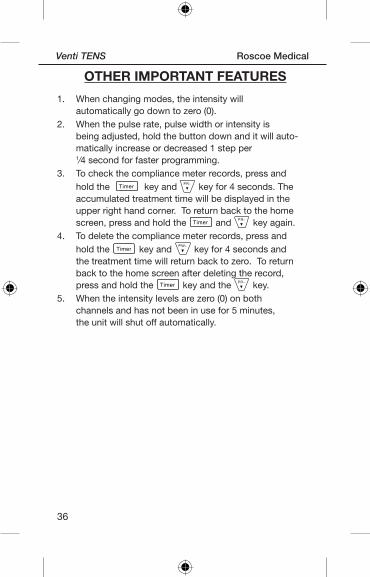
OTHER IMPORTANT FEATURES
1. When changing modes, the intensity will automatically go down to zero (0).
2. When the pulse rate, pulse width or intensity is being adjusted, hold the button down and it will auto-matically increase or decreased 1 step per 1∕4 second for faster programming.
3. To check the compliance meter records, press and hold the
WavePR+
PR-
PW+
PW-Timer
Lock Mode
key and
WavePR+
PR-
PW+
PW-Timer
Lock Mode key for 4 seconds. The accumulated treatment time will be displayed in the upper right hand corner. To return back to the home screen, press and hold the
WavePR+
PR-
PW+
PW-Timer
Lock Mode
and
WavePR+
PR-
PW+
PW-Timer
Lock Mode key again.4. To delete the compliance meter records, press and
hold the
WavePR+
PR-
PW+
PW-Timer
Lock Mode
key and
WavePR+
PR-
PW+
PW-Timer
Lock Mode key for 4 seconds and the treatment time will return back to zero. To return back to the home screen after deleting the record, press and hold the
WavePR+
PR-
PW+
PW-Timer
Lock Mode
key and the
WavePR+
PR-
PW+
PW-Timer
Lock Mode key.5. When the intensity levels are zero (0) on both
channels and has not been in use for 5 minutes, the unit will shut off automatically.
37
Roscoe Medical Venti TENS
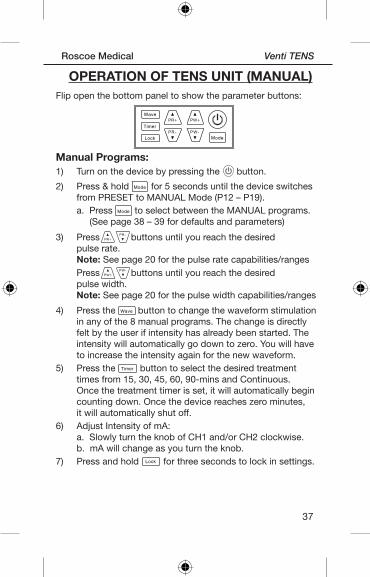
OPERATION OF TENS UNIT (MANUAL)Flip open the bottom panel to show the parameter buttons:
Manual Programs:1) Turn on the device by pressing the
WavePR+
PR-
PW+
PW-Timer
Lock Mode
button.
2) Press & hold
WavePR+
PR-
PW+
PW-Timer
Lock Mode for 5 seconds until the device switches from PRESET to MANUAL Mode (P12 – P19). a. Press
WavePR+
PR-
PW+
PW-Timer
Lock Mode to select between the MANUAL programs. (See page 38 – 39 for defaults and parameters)
3) PressWavePR+
PR-
PW+
PW-Timer
Lock Mode
WavePR+
PR-
PW+
PW-Timer
Lock Modebuttons until you reach the desired pulse rate. Note: See page 20 for the pulse rate capabilities/ranges PressWave
PR+
PR-
PW+
PW-Timer
Lock Mode
WavePR+
PR-
PW+
PW-Timer
Lock Modebuttons until you reach the desired pulse width. Note: See page 20 for the pulse width capabilities/ranges
4) Press the WavePR+
PR-
PW+
PW-Timer
Lock Mode
button to change the waveform stimulation in any of the 8 manual programs. The change is directly felt by the user if intensity has already been started. The intensity will automatically go down to zero. You will have to increase the intensity again for the new waveform.
5) Press theWave
PR+
PR-
PW+
PW-Timer
Lock Mode
button to select the desired treatment times from 15, 30, 45, 60, 90-mins and Continuous. Once the treatment timer is set, it will automatically begin counting down. Once the device reaches zero minutes, it will automatically shut off.
6) Adjust Intensity of mA: a. Slowly turn the knob of CH1 and/or CH2 clockwise. b. mA will change as you turn the knob.
7) Press and hold
WavePR+
PR-
PW+
PW-Timer
Lock Mode for three seconds to lock in settings.
WavePR+
PR-
PW+
PW-Timer
Lock Mode
38
Venti TENS Roscoe Medical
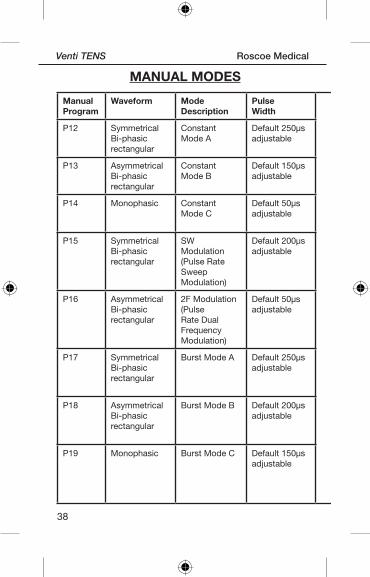
MANUAL MODES
Manual Program
Waveform Mode Description
Pulse Width
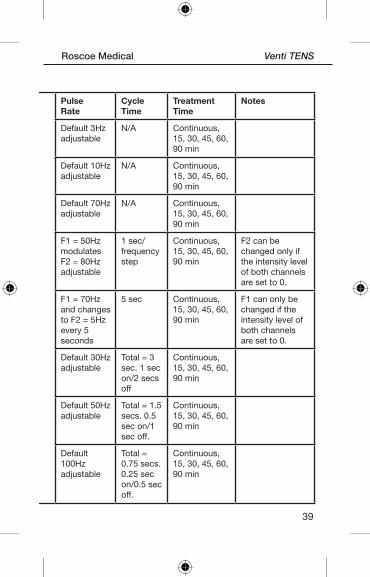
Pulse Rate
Cycle Time
Treatment Time
Notes
P12 Symmetrical Bi-phasic rectangular
Constant Mode A
Default 250μs adjustable
Default 3Hz adjustable
N/A Continuous, 15, 30, 45, 60, 90 min
P13 Asymmetrical Bi-phasic rectangular
Constant Mode B
Default 150μs adjustable
Default 10Hz adjustable
N/A Continuous, 15, 30, 45, 60, 90 min
P14 Monophasic Constant Mode C
Default 50μs adjustable
Default 70Hz adjustable
N/A Continuous, 15, 30, 45, 60, 90 min
P15 Symmetrical Bi-phasic rectangular
SW Modulation (Pulse Rate Sweep Modulation)
Default 200μs adjustable
F1 = 50Hz modulates F2 = 80Hz adjustable
1 sec/frequency step
Continuous, 15, 30, 45, 60, 90 min
F2 can be changed only if the intensity level of both channels are set to 0.
P16 Asymmetrical Bi-phasic rectangular
2F Modulation (Pulse Rate Dual Frequency Modulation)
Default 50μs adjustable
F1 = 70Hz and changes to F2 = 5Hz every 5 seconds
5 sec Continuous, 15, 30, 45, 60, 90 min
F1 can only be changed if the intensity level of both channels are set to 0.
P17 Symmetrical Bi-phasic rectangular
Burst Mode A Default 250μs adjustable
Default 30Hz adjustable
Total = 3 sec. 1 sec on/2 secs off
Continuous, 15, 30, 45, 60, 90 min
P18 Asymmetrical Bi-phasic rectangular
Burst Mode B Default 200μs adjustable
Default 50Hz adjustable
Total = 1.5 secs. 0.5 sec on/1 sec off.
Continuous, 15, 30, 45, 60, 90 min
P19 Monophasic Burst Mode C Default 150μs adjustable
Default 100Hz adjustable
Total = 0.75 secs. 0.25 sec on/0.5 sec off.
Continuous, 15, 30, 45, 60, 90 min
39
Roscoe Medical Venti TENS
Manual Program
Waveform Mode Description
Pulse Width
Pulse Rate
Cycle Time
Treatment Time
Notes
P12 Symmetrical Bi-phasic rectangular
Constant Mode A
Default 250μs adjustable
Default 3Hz adjustable
N/A Continuous, 15, 30, 45, 60, 90 min
P13 Asymmetrical Bi-phasic rectangular
Constant Mode B
Default 150μs adjustable
Default 10Hz adjustable
N/A Continuous, 15, 30, 45, 60, 90 min
P14 Monophasic Constant Mode C
Default 50μs adjustable
Default 70Hz adjustable
N/A Continuous, 15, 30, 45, 60, 90 min
P15 Symmetrical Bi-phasic rectangular
SW Modulation (Pulse Rate Sweep Modulation)
Default 200μs adjustable
F1 = 50Hz modulates F2 = 80Hz adjustable
1 sec/frequency step
Continuous, 15, 30, 45, 60, 90 min
F2 can be changed only if the intensity level of both channels are set to 0.
P16 Asymmetrical Bi-phasic rectangular
2F Modulation (Pulse Rate Dual Frequency Modulation)
Default 50μs adjustable
F1 = 70Hz and changes to F2 = 5Hz every 5 seconds
5 sec Continuous, 15, 30, 45, 60, 90 min
F1 can only be changed if the intensity level of both channels are set to 0.
P17 Symmetrical Bi-phasic rectangular
Burst Mode A Default 250μs adjustable
Default 30Hz adjustable
Total = 3 sec. 1 sec on/2 secs off
Continuous, 15, 30, 45, 60, 90 min
P18 Asymmetrical Bi-phasic rectangular
Burst Mode B Default 200μs adjustable
Default 50Hz adjustable
Total = 1.5 secs. 0.5 sec on/1 sec off.
Continuous, 15, 30, 45, 60, 90 min
P19 Monophasic Burst Mode C Default 150μs adjustable
Default 100Hz adjustable
Total = 0.75 secs. 0.25 sec on/0.5 sec off.
Continuous, 15, 30, 45, 60, 90 min
40
Venti TENS Roscoe Medical
CLEANING AND STORAGE
Cleaning the Unit1) Turn unit off and disconnect the lead wires from the unit.2) Clean the device after use with a soft, slightly
moistened cloth and wipe gently. • Do not use chemicals (like thinner, benzene). • Do not let water get into the internal area.Note: This device and accessories (including the
electrodes) do not require sterilization.
Care & Storage of Electrodes• Turn the power off and remove the lead wires from
the electrodes.• The electrodes supplied with your Venti TENS
device are self-adhesive and can be used several times (single-patient use).
• Skin must be allowed to breathe, so the electrodes should be removed periodically.
• When not in use, the electrodes should be placed onto the clear plastic shield and in a resealable polybag for storage
• The condition of the electrodes does affect the conductivity and, therefore, the performance of the device.
• Place a small drop of water on your clean fingertip and rub the water across the entire gel part. Place the adhesive part face up and let it air dry until the water is absorbed and has been reconstituted. Do not wipe with a tissue paper or cloth.
• If the electrode still does not stick properly, replace them with new electrodes.
41
Roscoe Medical Venti TENS
AFTER USE
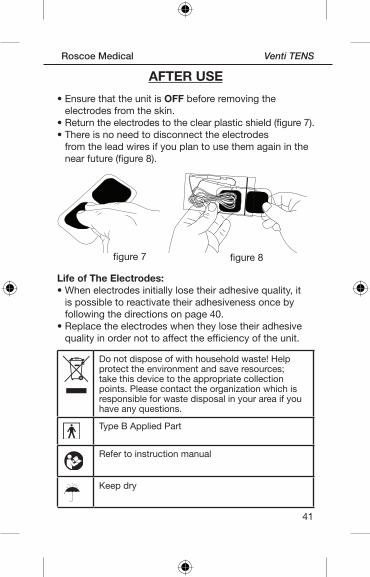
• Ensure that the unit is OFF before removing the electrodes from the skin.
• Return the electrodes to the clear plastic shield (figure 7).• There is no need to disconnect the electrodes
from the lead wires if you plan to use them again in the near future (figure 8).
Life of The Electrodes: • When electrodes initially lose their adhesive quality, it
is possible to reactivate their adhesiveness once by following the directions on page 40.
• Replace the electrodes when they lose their adhesive quality in order not to affect the efficiency of the unit.
Do not dispose of with household waste! Help protect the environment and save resources; take this device to the appropriate collection points. Please contact the organization which is responsible for waste disposal in your area if you have any questions.
Type B Applied Part
Refer to instruction manual
Keep dry
figure 7 figure 8
42
Venti TENS Roscoe Medical
WARRANTY
Please contact your dealer or the device center in case of a claim under the warranty. If you have to send in the unit, enclose a copy of your receipt and state what the defect is. The following warranty terms apply:
1) The warranty period for device is one year from date of purchase. In case of a warranty claim, the date of purchase has to be proven by means of the sales receipt or invoice.
2) Repairs under warranty do not extend the warranty period either for the device or for the replacement parts.
3) The following is excluded under the warranty: • All damage which has arisen due to improper
treatment, e.g. nonobservance of the user instruction.
• All damage which is due to repairs or tampering by the customer or unauthorized third parties.
• Damage which has arisen during transport from the manufacturer to the consumer or during transport to the service center.
• Accessories which are subject to normal wear and tear.
4) Liability for direct or indirect consequential losses caused by the unit is excluded even if the damage to the unit is accepted as a warranty claim.
Note: Shelf life is most influenced by several factors:
Exposure to light and heat, transmission of gases (including humidity), and mechanical stresses. This device and accessories do not require sterilization. The device is supplied to be used under non-sterile conditions.
43
Roscoe Medical Venti TENS
ELECTROMAGNETIC COMPATIBILITY (EMC) TABLES
Information for accompanying documents in the scope of IEC60601-1-2:2007
Important information regarding Electromagnetic Compatibility (EMC)
With the increased number of electronic devices such as PC’s and mobile (cellular) telephones, medical devices in use may be susceptible to electromagnetic interference from other devices. Electromagnetic interference may result in incorrect operation of the medical device and create a potentially unsafe situation. Medical devices should also not interfere with other devices.
In order to regulate the requirements for EMC (Electro- magnetic Compatibility) with the aim to prevent unsafe product situations, the EN60601-1-2 standard has been implemented. This standard defines the levels of immunity to electromagnetic interferences as well as maximum levels of electromagnetic emissions for medical devices.Medical devices manufactured for Roscoe Medical Inc. conform to this EN60601-1-2:2007 standard for both immunity and emissions.Nevertheless, special precautions need to be observed:• The use of accessories and cables other than those
specified by Roscoe Medical, with the exception of cables sold by Roscoe Medical as replacement parts for internal components, may result in increased emission or decreased immunity of the device.
• The medical devices should not be used adjacent to or stacked with other equipment. In case adjacent or stacked use is necessary, the medical device should be observed to verify normal operation in the configuration in which it will be used.
• Refer to further guidance below regarding the EMC environment in which the device should be used.
44
Venti TENS Roscoe Medical
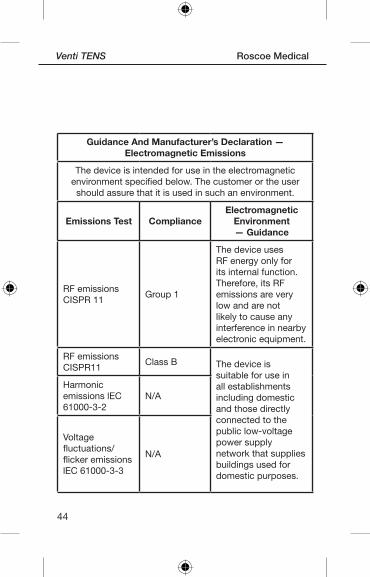
Guidance And Manufacturer’s Declaration — Electromagnetic Emissions
The device is intended for use in the electromagnetic environment specified below. The customer or the user should assure that it is used in such an environment.
Emissions Test ComplianceElectromagnetic
Environment— Guidance
RF emissions CISPR 11
Group 1
The device uses RF energy only for its internal function. Therefore, its RF emissions are very low and are not likely to cause any interference in nearby electronic equipment.
RF emissions CISPR11
Class B The device is suitable for use in all establishments including domestic and those directly connected to the public low-voltage power supply network that supplies buildings used for domestic purposes.
Harmonic emissions lEC 61000-3-2
N/A
Voltage fluctuations/ flicker emissions lEC 61000-3-3
N/A
45
Roscoe Medical Venti TENS
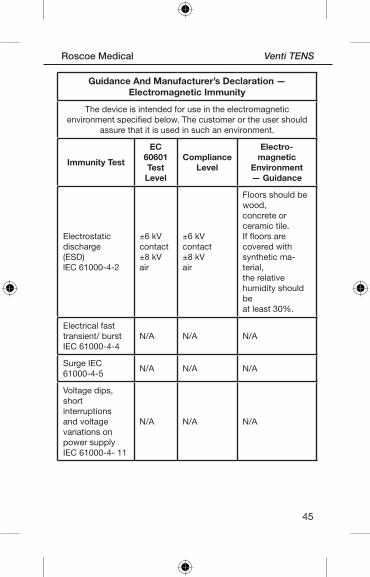
Guidance And Manufacturer’s Declaration — Electromagnetic Immunity
The device is intended for use in the electromagnetic environment specified below. The customer or the user should
assure that it is used in such an environment.
Immunity Test
EC 60601 Test Level
Compliance Level
Electro- magnetic
Environment — Guidance
Electrostaticdischarge (ESD)lEC 61000-4-2
±6 kV contact±8 kV air
±6 kV contact±8 kV air
Floors should be wood, concrete or ceramic tile. If floors are covered with synthetic ma-terial, the relative humidity should be at least 30%.
Electrical fasttransient/ burstIEC 61000-4-4
N/A N/A N/A
Surge IEC61000-4-5
N/A N/A N/A
Voltage dips, short interruptions and voltage variations on power supply IEC 61000-4- 11
N/A N/A N/A
46
Venti TENS Roscoe Medical
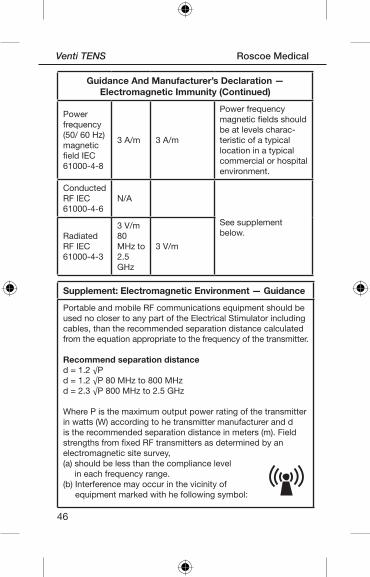
Guidance And Manufacturer’s Declaration — Electromagnetic Immunity (Continued)
Power frequency (50/ 60 Hz) magnetic field IEC 61000-4-8
3 A/m 3 A/m
Power frequency magnetic fields should be at levels charac-teristic of a typical location in a typical commercial or hospital environment.
Conducted RF IEC 61000-4-6
N/A
See supplement below.Radiated
RF IEC 61000-4-3
3 V/m80 MHz to2.5 GHz
3 V/m
Supplement: Electromagnetic Environment — Guidance
Portable and mobile RF communications equipment should be used no closer to any part of the Electrical Stimulator including cables, than the recommended separation distance calculated from the equation appropriate to the frequency of the transmitter.
Recommend separation distanced = 1.2 √P d = 1.2 √P 80 MHz to 800 MHz d = 2.3 √P 800 MHz to 2.5 GHz
Where P is the maximum output power rating of the transmitter in watts (W) according to he transmitter manufacturer and d is the recommended separation distance in meters (m). Field strengths from fixed RF transmitters as determined by an electromagnetic site survey, (a) should be less than the compliance level
in each frequency range.(b) Interference may occur in the vicinity of
equipment marked with he following symbol:
47
Roscoe Medical Venti TENS
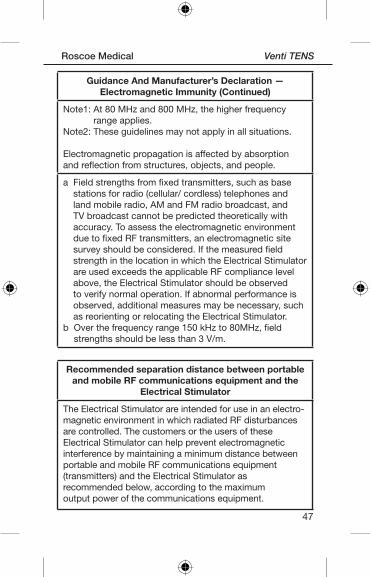
Guidance And Manufacturer’s Declaration — Electromagnetic Immunity (Continued)
Note1: At 80 MHz and 800 MHz, the higher frequency range applies.
Note2: These guidelines may not apply in all situations.
Electromagnetic propagation is affected by absorption and reflection from structures, objects, and people.
a Field strengths from fixed transmitters, such as base stations for radio (cellular/ cordless) telephones and land mobile radio, AM and FM radio broadcast, and TV broadcast cannot be predicted theoretically with accuracy. To assess the electromagnetic environment due to fixed RF transmitters, an electromagnetic site survey should be considered. If the measured field strength in the location in which the Electrical Stimulator are used exceeds the applicable RF compliance level above, the Electrical Stimulator should be observed to verify normal operation. If abnormal performance is observed, additional measures may be necessary, such as reorienting or relocating the Electrical Stimulator.
b Over the frequency range 150 kHz to 80MHz, field strengths should be less than 3 V/m.
Recommended separation distance between portable and mobile RF communications equipment and the
Electrical Stimulator
The Electrical Stimulator are intended for use in an electro-magnetic environment in which radiated RF disturbances are controlled. The customers or the users of these Electrical Stimulator can help prevent electromagnetic interference by maintaining a minimum distance between portable and mobile RF communications equipment (transmitters) and the Electrical Stimulator as recommended below, according to the maximum output power of the communications equipment.
48
Venti TENS Roscoe Medical
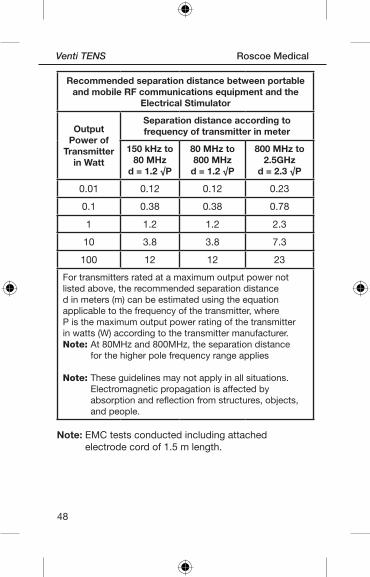
Recommended separation distance between portable and mobile RF communications equipment and the
Electrical Stimulator
Output Power of
Transmitter in Watt
Separation distance according to frequency of transmitter in meter
150 kHz to 80 MHz
d = 1.2 √P
80 MHz to 800 MHz
d = 1.2 √P
800 MHz to 2.5GHz
d = 2.3 √P
0.01 0.12 0.12 0.23
0.1 0.38 0.38 0.78
1 1.2 1.2 2.3
10 3.8 3.8 7.3
100 12 12 23
For transmitters rated at a maximum output power not listed above, the recommended separation distance d in meters (m) can be estimated using the equation applicable to the frequency of the transmitter, where P is the maximum output power rating of the transmitter in watts (W) according to the transmitter manufacturer.Note: At 80MHz and 800MHz, the separation distance
for the higher pole frequency range applies
Note: These guidelines may not apply in all situations. Electromagnetic propagation is affected by absorption and reflection from structures, objects, and people.
Note: EMC tests conducted including attached electrode cord of 1.5 m length.
49
Roscoe Medical Venti TENS
NOTES:
___________________________________________________ ___________________________________________________ ___________________________________________________ ___________________________________________________ ___________________________________________________ ___________________________________________________ ___________________________________________________ ___________________________________________________ ___________________________________________________ ___________________________________________________ ___________________________________________________ ___________________________________________________ ___________________________________________________ ___________________________________________________ ___________________________________________________ ___________________________________________________ ___________________________________________________ ___________________________________________________ ___________________________________________________ ___________________________________________________ ___________________________________________________ ___________________________________________________ ___________________________________________________ ___________________________________________________ ___________________________________________________ ___________________________________________________ ___________________________________________________ ___________________________________________________ _______________________________________________________________________________________________________________________________________________________________________________________________________________________________________________________________
50
Venti TENS Roscoe Medical
NOTES:
___________________________________________________ ___________________________________________________ ___________________________________________________ ___________________________________________________ ___________________________________________________ ___________________________________________________ ___________________________________________________ ___________________________________________________ ___________________________________________________ ___________________________________________________ ___________________________________________________ ___________________________________________________ ___________________________________________________ ___________________________________________________ ___________________________________________________ ___________________________________________________ ___________________________________________________ ___________________________________________________ ___________________________________________________ ___________________________________________________ ___________________________________________________ ___________________________________________________ ___________________________________________________ ___________________________________________________ ___________________________________________________ ___________________________________________________ ___________________________________________________ ___________________________________________________ _______________________________________________________________________________________________________________________________________________________________________________________________________________________________________________________________
51
Roscoe Medical Venti TENS
NOTES:
___________________________________________________ ___________________________________________________ ___________________________________________________ ___________________________________________________ ___________________________________________________ ___________________________________________________ ___________________________________________________ ___________________________________________________ ___________________________________________________ ___________________________________________________ ___________________________________________________ ___________________________________________________ ___________________________________________________ ___________________________________________________ ___________________________________________________ ___________________________________________________ ___________________________________________________ ___________________________________________________ ___________________________________________________ ___________________________________________________ ___________________________________________________ ___________________________________________________ ___________________________________________________ ___________________________________________________ ___________________________________________________ ___________________________________________________ ___________________________________________________ ___________________________________________________ _______________________________________________________________________________________________________________________________________________________________________________________________________________________________________________________________
Manufactured for:Roscoe Medical, Inc.
A division of Compass Health BrandsStrongsville, OH 4414942_DT2020_00 ©2015
Printed in China