Embed Size (px)
Citation preview
Vengeance Mastering Suite – Multiband Compressor
User Guide:
Version: 1.0 September 2010
Dear Vengeance customer
Thank you for choosing Vengeance Mastering Suite - Multiband Compressor (MBC).
Besides mixing, mastering is one of the most important activities in professional music production today. Especially Dance music only comes to life in a club environment if it has a modern, powerful sound. If it has volume, punch and presence. A well-mastered track stands out from the crowd. Mastering often makes the difference between an “amateur” and a “professional” track, and therefore plays an important role in its commercial success. As important as quality mastering is, it is a difficult process often requiring years of experience and practice. To present you with the most comfortable solution possible while allowing perfectly professional results, our own practical experience in this field has been crucial while developing MBC.
MBC is a so-called multiband compressor – up to 4 independent compressors process 4 separate frequency bands (usually bass, 2 x mid, treble). The use of multiband compression during mastering, particularly in the dance music genre, is considered an indispensable step these days. Only independent control over the dynamics of individual frequency bands can deliver the kind of pressure required – while avoiding the pumping / jittering volume artifacts too easily produced by using single-band compressors. However, MBC is also perfectly capable of handling individual instruments: Feel free to apply it to vocals, drum loops, lead or bass lines!
Some MBC features:
Vengeance-Sound MBC offers 4 full-spec compressors, each including an optional limiter, plus a master output limiter for the overall sum. Each compressor has independent threshold, ratio (1:1 to 1:infinity), soft- or hard-knee characteristic, attack, release and boost controls. MBC has a comfortable “Autogain” option, where any loss of level caused by the compression process is automatically compensated for. The number of compressors used can be freely selected – 1, 2, 3 or 4. These frequency bands are separated by first-rate filters with slope values ranging from 6db to 96db that, unlike standard filters, produce no phase artifacts whatsoever.
Despite all these parameters, MBC includes top-notch optical feedback so you can understand what is going on at a glance: 2 FFT analysers (1 pre-compressor, 1 post-compressor) as well as a live oscilloscope for each band showing the audio signal before as well as after compression within the same display (colour coded). Furthermore, each band has its own input and output level display. The main large input and output VUs can be switched between standard and a “Density” view, which shows how strongly different levels of signal are compressed.
MBC also offers a few unique innovations for a compressor. For instance, its DPC (Dynamic Pattern Compressor) lets you inject new life into flat, over-compressed audio material: Just select one of the many preset patterns to suit the rhythm of your track (e.g. 16ths for Hi-Hats, “Latin Grooves” for mid percussion, or strengthen on-beat or off-beat in the bass frequencies). You may be astonished by the results, but please be aware that DPC should only be applied in fine doses while mastering entire tracks. Of course there's nothing stopping you from processing individual signals (such as drum loops) much more drastically!
Enough introduction for now... have fun with your new mastering compressor!
the Vengeance-Sound Team
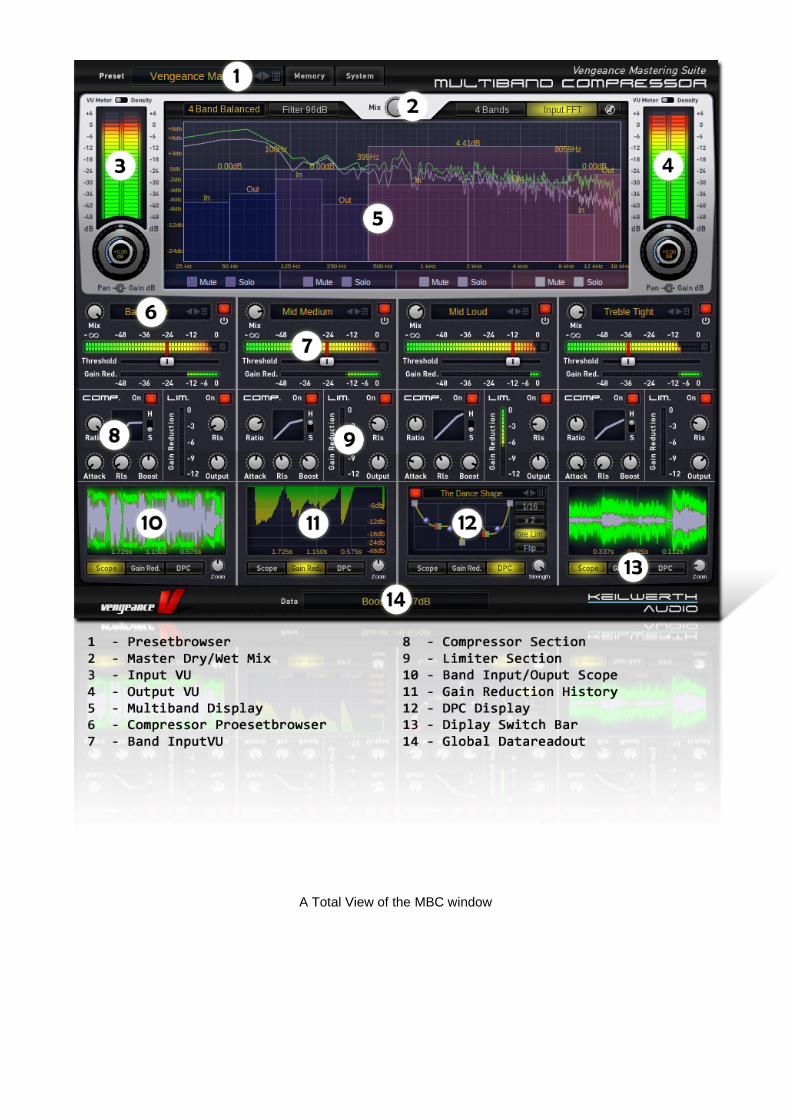
A Total View of the MBC window
Let's start from the beginning...
Installing copy-protection:
First of all, you will need a Steinberg Key (also known as Syncrosoft / eLicenser dongle) plugged into a spare USB port on your PC. The dongle serves as a license i.e. copy-protection for your software. If you don't already own such a dongle, you can order one online (they are not expensive) from one of several sources, e.g. here:
http://www.thomann.de/gb/steinberg_key.htm
You will also need the configuration software “License Control Center” (LCC):
www.elicenser.net
Please ensure that you have downloaded and installed the latest version of LCC. Immediately after ordering MBC, you will receive an e-mail containing your license information. All you have to do then is to activate your license using LCC (you should be connected to the Internet)
Installation (PC):
Unpack the file VMSMBCSetup.exe and install the plugin into your standard VSTPlugIns folder. Follow any further on-screen instructions. The plug-In should be available the next time you start your sequencer / host application.
Installation (Mac):
Unpack the file VMSMBC1.0.00.pkg.zip then start VMSMBC1.0.00.pkg. Follow any further on-screen instructions.
The standard installation path for the AU version is: ~/Library/Audio/Plug-Ins/Components. The standard installation path for the VST version is: ~/Library/Audio/Plug-Ins/VST.
After installing, please check that the VMS MBC file actually appears in that location. If installed correctly, VMS MBC should appear in the plugin list the next time you start your host application.

Vengeance Mastering Suite – Multiband Compressor – an Overview of Functions
For additional introductory information, we recommend that you watch our MBC product video, which is available at:
www.vengeance-sound.com
The Main Display
MBC's main display is divided into the 4 (or fewer) frequency bands, and this is where you can specify the number of bands you actually want to use.
MBC ships with several factory presets for the bands, including the most useful, tried-and-tested settings for everyday work. Presets are selected using the preset browser in the top left corner.
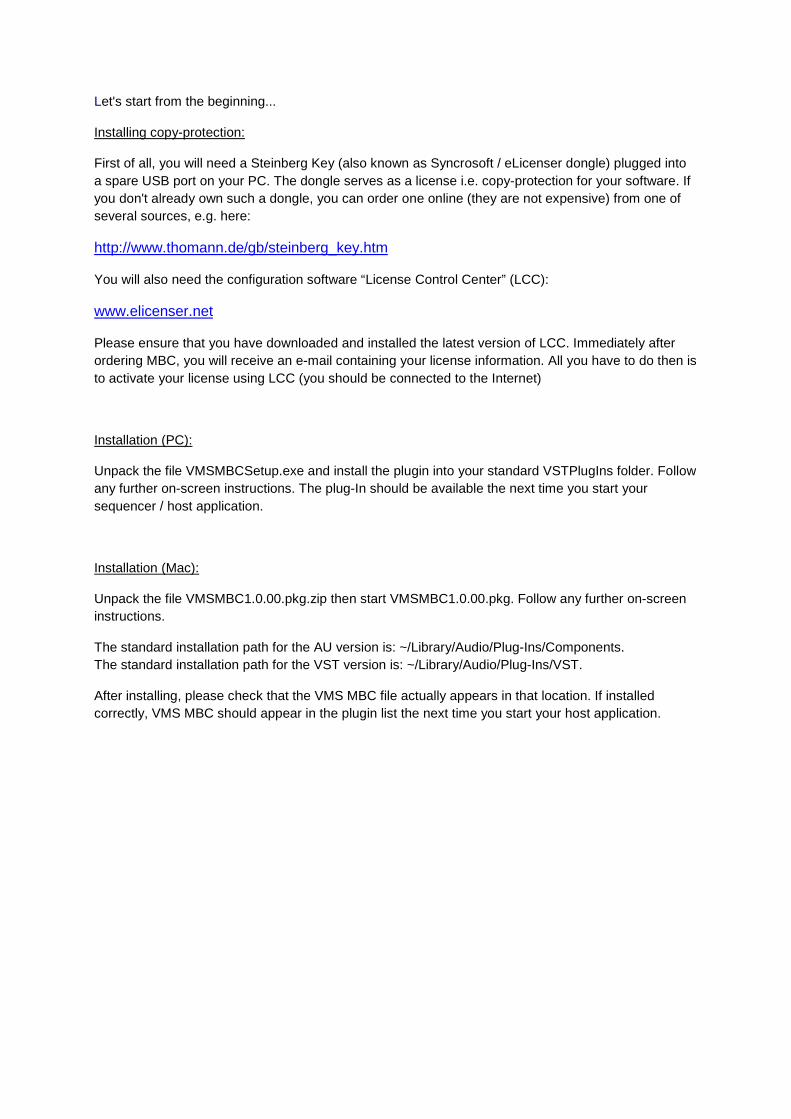
Note: if you have chosen to use fewer than 4 bands, the compressor(s) corresponding to the
inactive band(s) will be deactivated, and their settings cannot be adjusted.
Individual frequency bands are separated from each other
via filters. The slope of these filters can be specified in the
following pull-down menu:
Note: the steeper the slope, the stronger the separation – so fewer “neighbouring” frequencies will be processed by each band. At the maximum setting (96db), hardly any neighbouring frequencies will be processed by each band and, conversely, at minimum slope (6db), there will be quite a lot per band. There is no general rule “the steeper the slope, the better”. The slope setting should be decided according to audio material and the desired result, so you should experiment a little with the various slope values and discover how they audibly affect the output of a compressor.
Tip: if you are unsure, a good value to start with is 36 or 48db.
This switch lets you overlay a second FFT, which will appear grey. Unlike the standard (green) one, this second FFT comes before the
compressor. It is particularly useful for direct A/B comparisons – you
can see at a glance how your compressor settings are affecting the
various frequencies in your song.
The solo and mute buttons are used for checking individual bands (or any combination of bands).
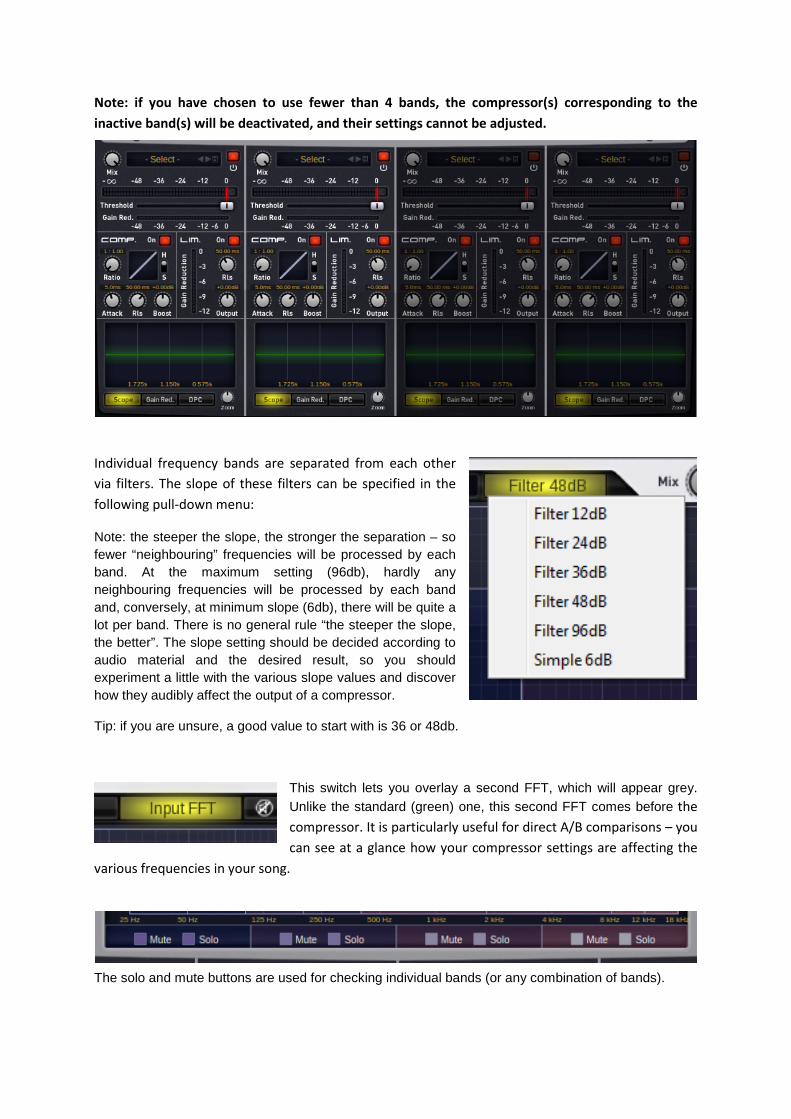
The “Unmute All” button lights up yellow as soon as any Solo or Mute buttons are
active. Unmute All instantly resets all Solo and Mute buttons to their initial states,
so all 4 bands become audible. It is purely a convenience function, saving you the
trouble of reactivating individual bands
The width of the frequency bands can be increased or decreased by clicking on the dividing lines,
holding the mouse button and dragging to the left or right. Frequency bands can also be moved
without changing the width: Click near the centre of a band, hold down the mouse button and move
to the left or right. Tip: If you also hold down the SHIFT key on your computer keyboard while moving
a band, it will not be automatically resized when you reach the edge of the window.
The volumes of individual bands are adjusted here. Click on the the upper frame, hold down the mouse button and move up or down. Please note that this affects the volume before the compressor i.e. this function effectively controls the input level of the corresponding compressor.
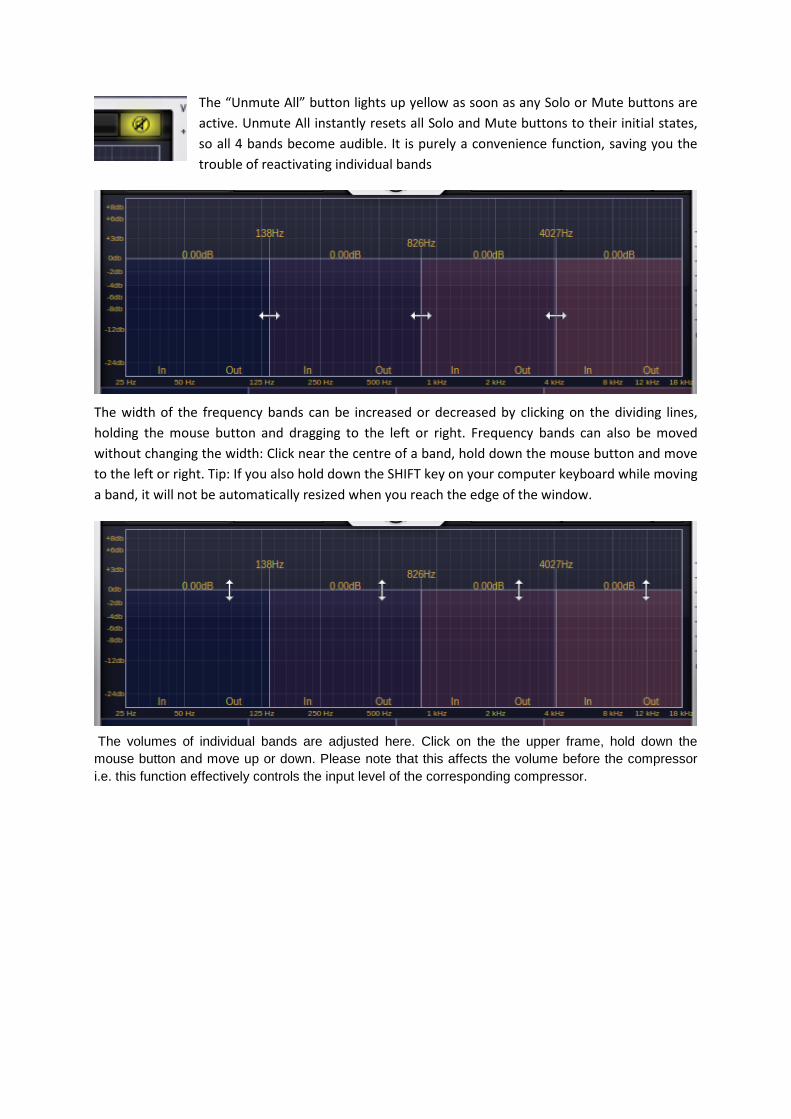
These pairs of bars show the signal levels before and after compression, giving you visual control
over the difference in volume. You can also get an idea of the amount of compression here: when
compression is strong, the bar doesn't flicker up and down very much.
If the signal is too loud (i.e. above 0db), clipping can occur. Whenever this happens, try reducing either the level of the band, or its input. Occasional jumps “into the red” at this stage can often be tolerated, as levels can be reduced by the compressor or limiter. In some situations e.g. when trying to achieve the absolute maximum perceived loudness, just a little clipping can be even acceptable.
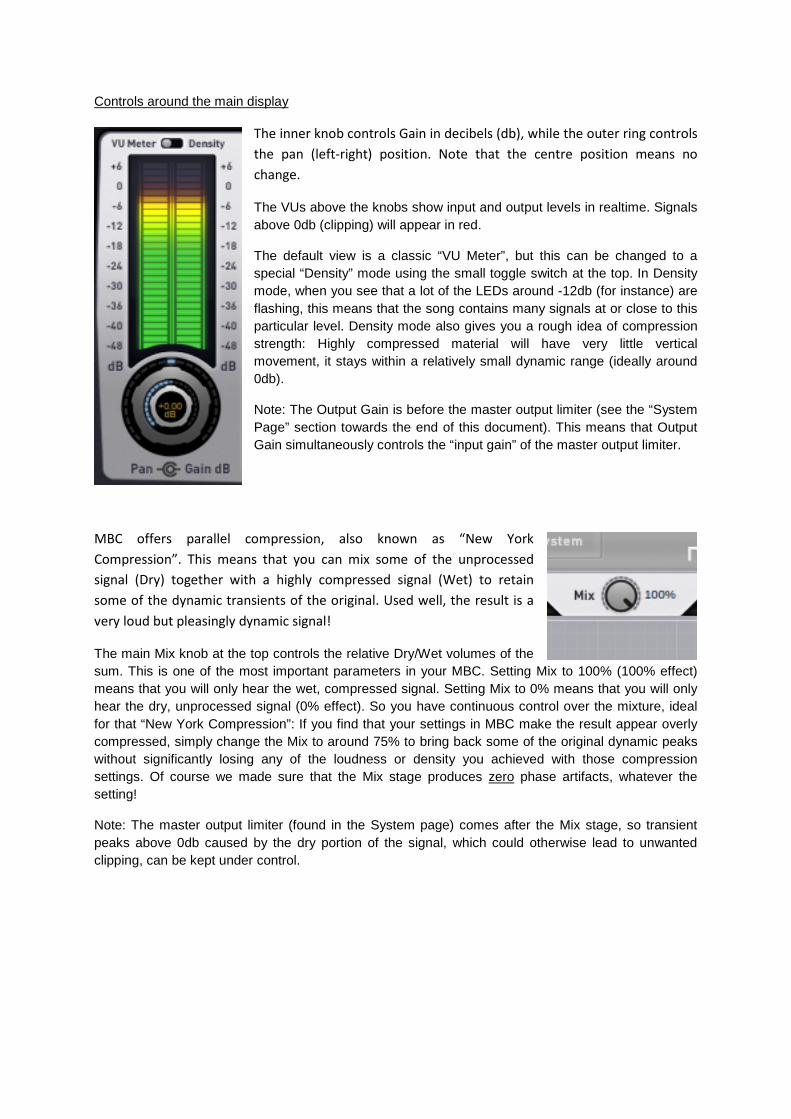
Controls around the main display
The inner knob controls Gain in decibels (db), while the outer ring controls
the pan (left-right) position. Note that the centre position means no
change.
The VUs above the knobs show input and output levels in realtime. Signals above 0db (clipping) will appear in red.
The default view is a classic “VU Meter”, but this can be changed to a special “Density” mode using the small toggle switch at the top. In Density mode, when you see that a lot of the LEDs around -12db (for instance) are flashing, this means that the song contains many signals at or close to this particular level. Density mode also gives you a rough idea of compression strength: Highly compressed material will have very little vertical movement, it stays within a relatively small dynamic range (ideally around 0db).
Note: The Output Gain is before the master output limiter (see the “System Page” section towards the end of this document). This means that Output Gain simultaneously controls the “input gain” of the master output limiter.
MBC offers parallel compression, also known as “New York
Compression”. This means that you can mix some of the unprocessed
signal (Dry) together with a highly compressed signal (Wet) to retain
some of the dynamic transients of the original. Used well, the result is a
very loud but pleasingly dynamic signal!
The main Mix knob at the top controls the relative Dry/Wet volumes of the sum. This is one of the most important parameters in your MBC. Setting Mix to 100% (100% effect) means that you will only hear the wet, compressed signal. Setting Mix to 0% means that you will only hear the dry, unprocessed signal (0% effect). So you have continuous control over the mixture, ideal for that “New York Compression”: If you find that your settings in MBC make the result appear overly compressed, simply change the Mix to around 75% to bring back some of the original dynamic peaks without significantly losing any of the loudness or density you achieved with those compression settings. Of course we made sure that the Mix stage produces zero phase artifacts, whatever the setting!
Note: The master output limiter (found in the System page) comes after the Mix stage, so transient peaks above 0db caused by the dry portion of the signal, which could otherwise lead to unwanted clipping, can be kept under control.

The Compressor Channel
What compressors do:
Compressors don't always make signals louder from the get-go, as is often assumed. In fact the initial effect is to make signals quieter! All peaks above a certain threshold are reduced in volume by a certain factor (or ratio). A compression ratio of 1:1 (“one-to-one”) means no reduction, a ratio of 1:2 means that the dynamic range above the threshold is halved. A ratio of 1:infinity effectively turns the compressor into a limiter – any peaks above the threshold will be completely flattened. So a compressor compresses a
signal by allowing quieter signals to pass unchanged
while the levels of louder signals are reduced. The
result is a more balanced level overall. As this is achieved by lowering the
peaks, the overall level can be higher (via “normalisation”). Traditionally,
compressors were used for live music, processing sources such as guitars,
acoustic drums and vocals. Once recorded, there used to be no way of
compensating for parts of the song that were too soft – that's where
compressors came into the realm of post-production. Today,
compressors are often used (even on purely electronic material) to attain
maximum overall loudness.
The MBC compressors offer “Autogain” as standard. This means that any loss of overall level due to compression is automatically compensated for in realtime – you don't have to keep adjusting the output level manually. If you ever wish to disable the Autogain feature, you can switch it off in the System page (see “System Page” towards the end of this document).
The Mix controls in each compressor channel:
The channel Mix controls have a similar function as
their global counterpart (the main Mix knob – see
above), but in this case for each individual
compressor channel.
The Preset Browser:
This is where you can manage, save and load
individual compressor presets. MBC ships with
several tried-and-tested factory settings, from soft
and subtle to hard and assertive. Use the left/right
(triangular) buttons to scroll through the list of presets. Clicking on the symbol to the right of the
navigation buttons opens a context menu containing Save and Load functions.
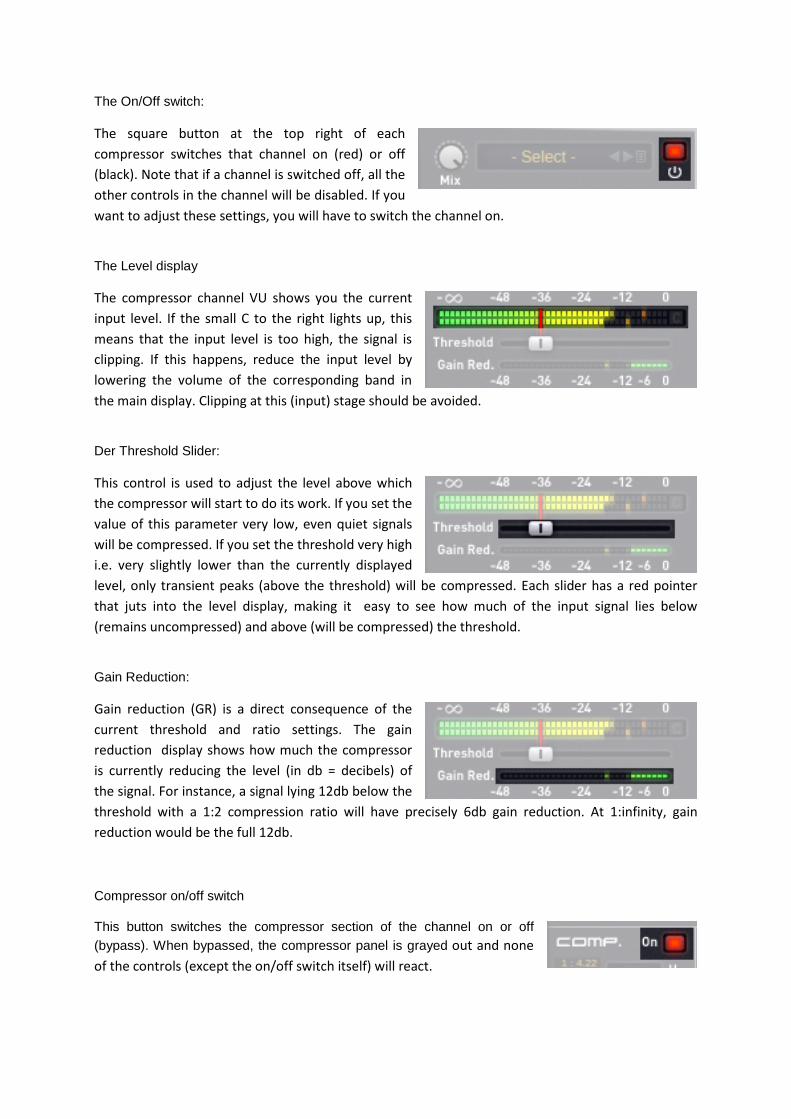
The On/Off switch:
The square button at the top right of each
compressor switches that channel on (red) or off
(black). Note that if a channel is switched off, all the
other controls in the channel will be disabled. If you
want to adjust these settings, you will have to switch the channel on.
The Level display
The compressor channel VU shows you the current
input level. If the small C to the right lights up, this
means that the input level is too high, the signal is
clipping. If this happens, reduce the input level by
lowering the volume of the corresponding band in
the main display. Clipping at this (input) stage should be avoided.
Der Threshold Slider:
This control is used to adjust the level above which
the compressor will start to do its work. If you set the
value of this parameter very low, even quiet signals
will be compressed. If you set the threshold very high
i.e. very slightly lower than the currently displayed
level, only transient peaks (above the threshold) will be compressed. Each slider has a red pointer
that juts into the level display, making it easy to see how much of the input signal lies below
(remains uncompressed) and above (will be compressed) the threshold.
Gain Reduction:
Gain reduction (GR) is a direct consequence of the
current threshold and ratio settings. The gain
reduction display shows how much the compressor
is currently reducing the level (in db = decibels) of
the signal. For instance, a signal lying 12db below the
threshold with a 1:2 compression ratio will have precisely 6db gain reduction. At 1:infinity, gain
reduction would be the full 12db.
Compressor on/off switch
This button switches the compressor section of the channel on or off (bypass). When bypassed, the compressor panel is grayed out and none
of the controls (except the on/off switch itself) will react.
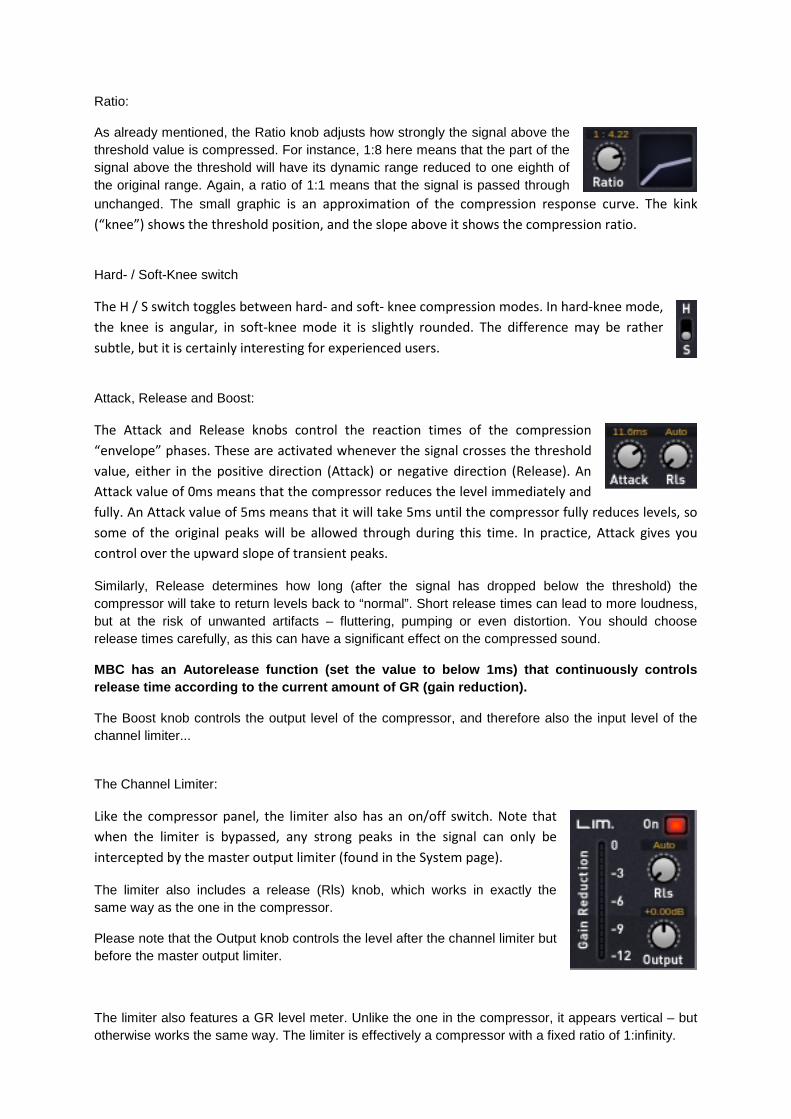
Ratio:
As already mentioned, the Ratio knob adjusts how strongly the signal above the threshold value is compressed. For instance, 1:8 here means that the part of the signal above the threshold will have its dynamic range reduced to one eighth of the original range. Again, a ratio of 1:1 means that the signal is passed through unchanged. The small graphic is an approximation of the compression response curve. The kink
(“knee”) shows the threshold position, and the slope above it shows the compression ratio.
Hard- / Soft-Knee switch
The H / S switch toggles between hard- and soft- knee compression modes. In hard-knee mode,
the knee is angular, in soft-knee mode it is slightly rounded. The difference may be rather
subtle, but it is certainly interesting for experienced users.
Attack, Release and Boost:
The Attack and Release knobs control the reaction times of the compression
“envelope” phases. These are activated whenever the signal crosses the threshold
value, either in the positive direction (Attack) or negative direction (Release). An
Attack value of 0ms means that the compressor reduces the level immediately and
fully. An Attack value of 5ms means that it will take 5ms until the compressor fully reduces levels, so
some of the original peaks will be allowed through during this time. In practice, Attack gives you
control over the upward slope of transient peaks.
Similarly, Release determines how long (after the signal has dropped below the threshold) the compressor will take to return levels back to “normal”. Short release times can lead to more loudness, but at the risk of unwanted artifacts – fluttering, pumping or even distortion. You should choose release times carefully, as this can have a significant effect on the compressed sound.
MBC has an Autorelease function (set the value to b elow 1ms) that continuously controls release time according to the current amount of GR (gain reduction).
The Boost knob controls the output level of the compressor, and therefore also the input level of the channel limiter...
The Channel Limiter:
Like the compressor panel, the limiter also has an on/off switch. Note that
when the limiter is bypassed, any strong peaks in the signal can only be
intercepted by the master output limiter (found in the System page).
The limiter also includes a release (Rls) knob, which works in exactly the same way as the one in the compressor.
Please note that the Output knob controls the level after the channel limiter but before the master output limiter.
The limiter also features a GR level meter. Unlike the one in the compressor, it appears vertical – but otherwise works the same way. The limiter is effectively a compressor with a fixed ratio of 1:infinity.
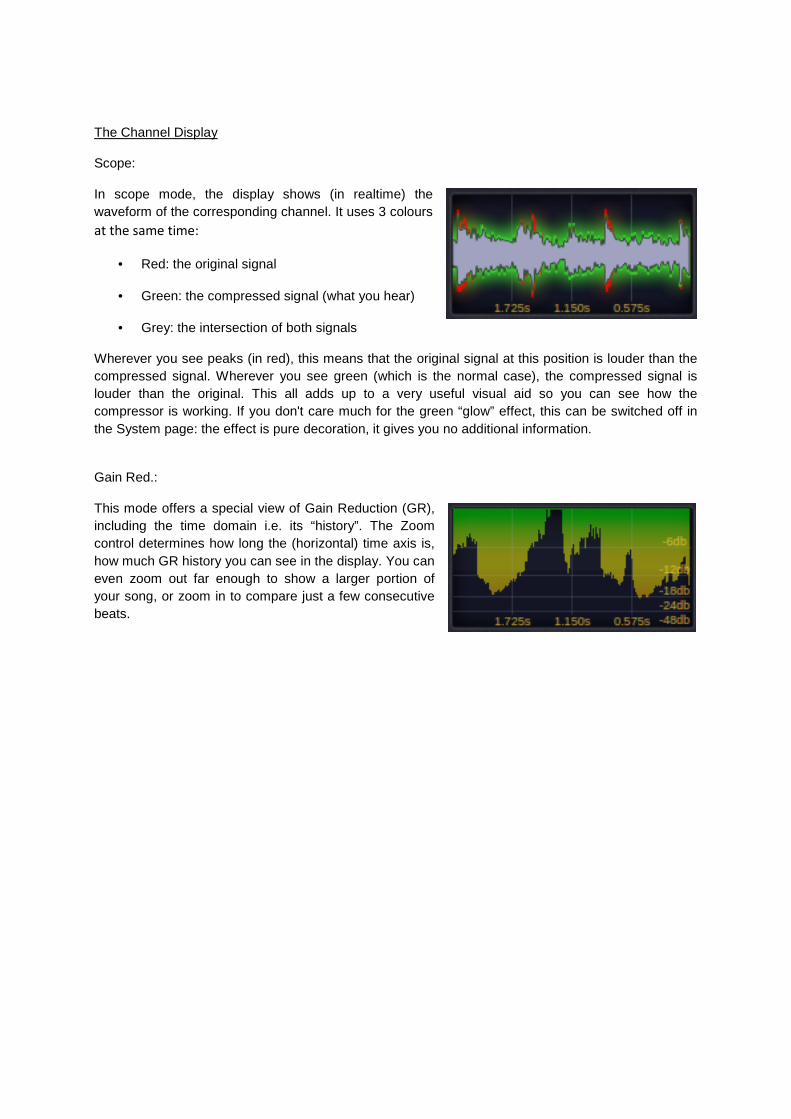
The Channel Display
Scope:
In scope mode, the display shows (in realtime) the waveform of the corresponding channel. It uses 3 colours
at the same time:
• Red: the original signal
• Green: the compressed signal (what you hear)
• Grey: the intersection of both signals
Wherever you see peaks (in red), this means that the original signal at this position is louder than the compressed signal. Wherever you see green (which is the normal case), the compressed signal is louder than the original. This all adds up to a very useful visual aid so you can see how the compressor is working. If you don't care much for the green “glow” effect, this can be switched off in the System page: the effect is pure decoration, it gives you no additional information.
Gain Red.:
This mode offers a special view of Gain Reduction (GR), including the time domain i.e. its “history”. The Zoom control determines how long the (horizontal) time axis is, how much GR history you can see in the display. You can even zoom out far enough to show a larger portion of your song, or zoom in to compare just a few consecutive beats.
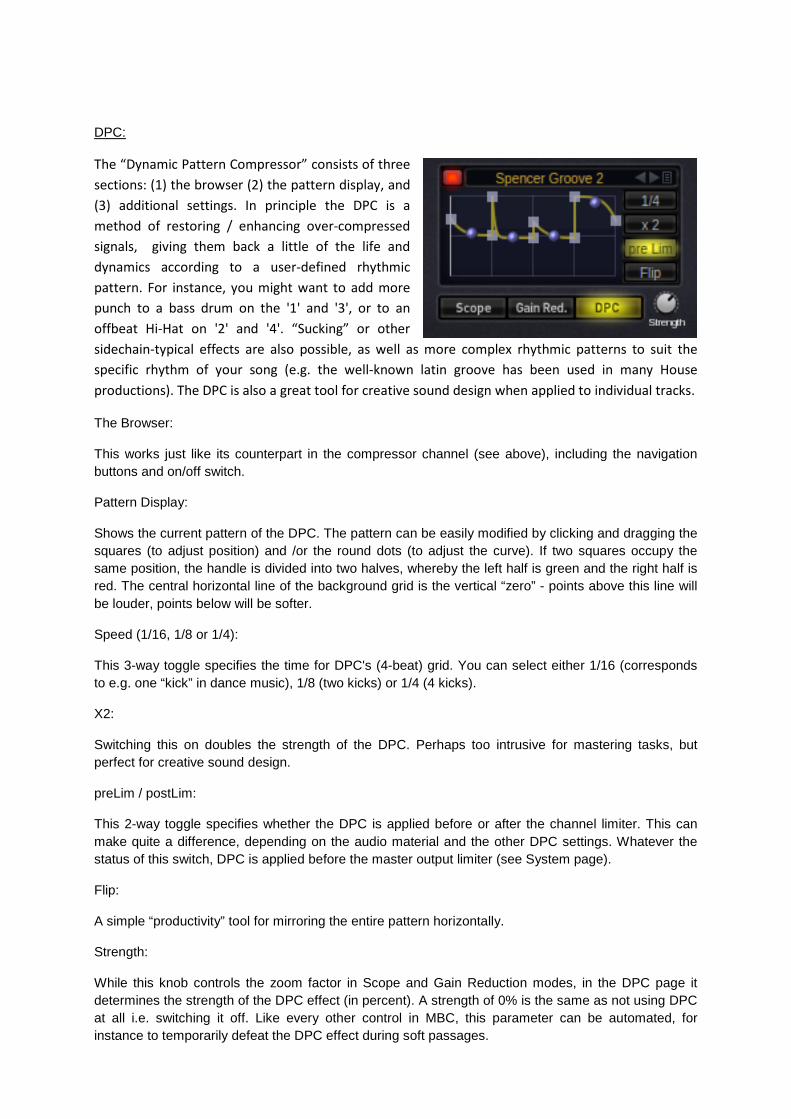
DPC:
The “Dynamic Pattern Compressor” consists of three
sections: (1) the browser (2) the pattern display, and
(3) additional settings. In principle the DPC is a
method of restoring / enhancing over-compressed
signals, giving them back a little of the life and
dynamics according to a user-defined rhythmic
pattern. For instance, you might want to add more
punch to a bass drum on the '1' and '3', or to an
offbeat Hi-Hat on '2' and '4'. “Sucking” or other
sidechain-typical effects are also possible, as well as more complex rhythmic patterns to suit the
specific rhythm of your song (e.g. the well-known latin groove has been used in many House
productions). The DPC is also a great tool for creative sound design when applied to individual tracks.
The Browser:
This works just like its counterpart in the compressor channel (see above), including the navigation buttons and on/off switch.
Pattern Display:
Shows the current pattern of the DPC. The pattern can be easily modified by clicking and dragging the squares (to adjust position) and /or the round dots (to adjust the curve). If two squares occupy the same position, the handle is divided into two halves, whereby the left half is green and the right half is red. The central horizontal line of the background grid is the vertical “zero” - points above this line will be louder, points below will be softer.
Speed (1/16, 1/8 or 1/4):
This 3-way toggle specifies the time for DPC's (4-beat) grid. You can select either 1/16 (corresponds to e.g. one “kick” in dance music), 1/8 (two kicks) or 1/4 (4 kicks).
X2:
Switching this on doubles the strength of the DPC. Perhaps too intrusive for mastering tasks, but perfect for creative sound design.
preLim / postLim:
This 2-way toggle specifies whether the DPC is applied before or after the channel limiter. This can make quite a difference, depending on the audio material and the other DPC settings. Whatever the status of this switch, DPC is applied before the master output limiter (see System page).
Flip:
A simple “productivity” tool for mirroring the entire pattern horizontally.
Strength:
While this knob controls the zoom factor in Scope and Gain Reduction modes, in the DPC page it determines the strength of the DPC effect (in percent). A strength of 0% is the same as not using DPC at all i.e. switching it off. Like every other control in MBC, this parameter can be automated, for instance to temporarily defeat the DPC effect during soft passages.
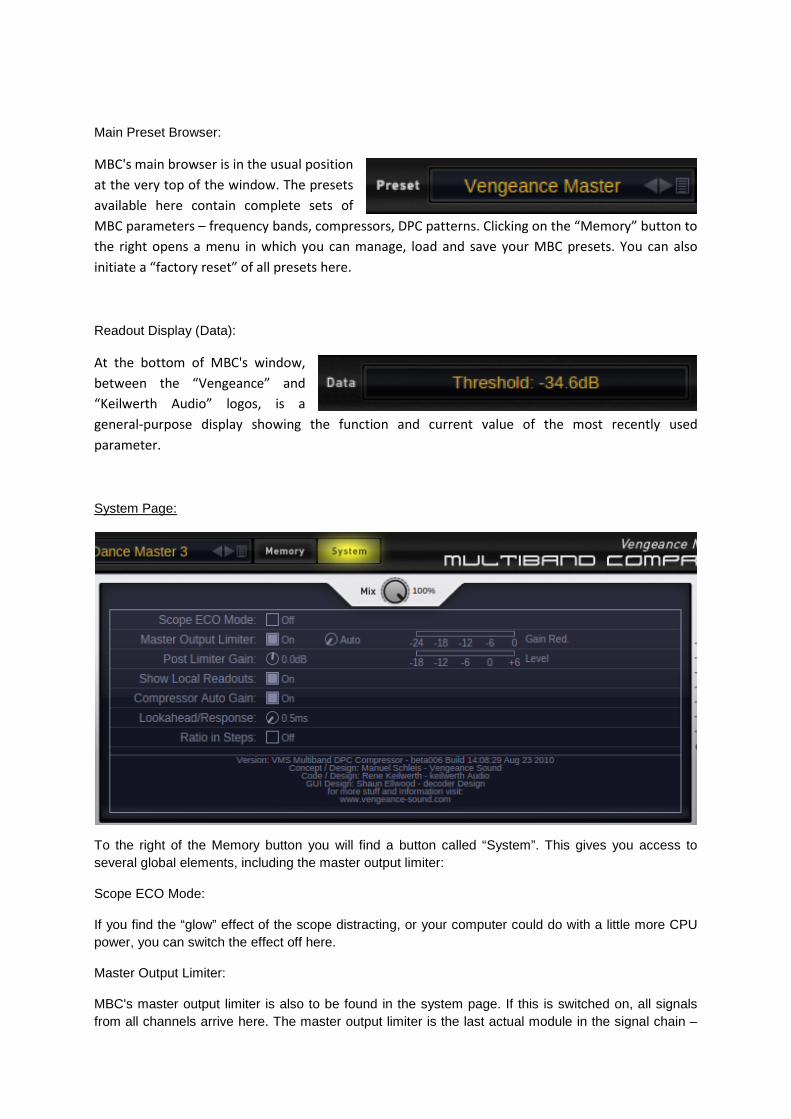
Main Preset Browser:
MBC's main browser is in the usual position
at the very top of the window. The presets
available here contain complete sets of
MBC parameters – frequency bands, compressors, DPC patterns. Clicking on the “Memory” button to
the right opens a menu in which you can manage, load and save your MBC presets. You can also
initiate a “factory reset” of all presets here.
Readout Display (Data):
At the bottom of MBC's window,
between the “Vengeance” and
“Keilwerth Audio” logos, is a
general-purpose display showing the function and current value of the most recently used
parameter.
System Page:
To the right of the Memory button you will find a button called “System”. This gives you access to several global elements, including the master output limiter:
Scope ECO Mode:
If you find the “glow” effect of the scope distracting, or your computer could do with a little more CPU power, you can switch the effect off here.
Master Output Limiter:
MBC's master output limiter is also to be found in the system page. If this is switched on, all signals from all channels arrive here. The master output limiter is the last actual module in the signal chain –
even Output Gain comes before the master output limiter. It is functionally the same as the individual limiters in each channel.
Post Limiter Gain:
This volume control is the final element in the signal chain, it comes directly after the master output limiter. If you have patched additional mastering plug-ins after MBC, this knob effectively controls the input level to the next plug-in.
Show Local Readouts:
The small values above the corresponding controls can be enabled or disabled here. If you prefer a very clear user interface and are more than happy using only the large Readout display (see above), you should disable this option.
Compressor Auto Gain
MBC includes an Autogain function in each compressor channel to compensate for loss of level due caused by the compression process. If required, you can switch off Autogain here.
Lookahead / Response:
MBC smooths out the signal to minimize the distortion that can easily occur while using short release times. The default lookahead/response value is the maximum (7.5ms), but this can be reduced to 1ms if necessary. Lower values result in a more immediate attack, but at the risk/expense of distortion artifacts when Release has been set very low (<5ms). If you generally work with longer release times (or “Auto” release), you can reduce the Lookahead/Response time without any risk.
Ratio in Steps:
This setting lets you change the Ratio knob to allow only integer values 1:1, 1:2, 1:3 etc..
Tips and new features via update:
We plan to continuously extend and improve “Vengeance Mastering Suite - Multiband Compressor” via regular updates. As soon as new functions have been tried, tested and delivered, they will appear in this section.
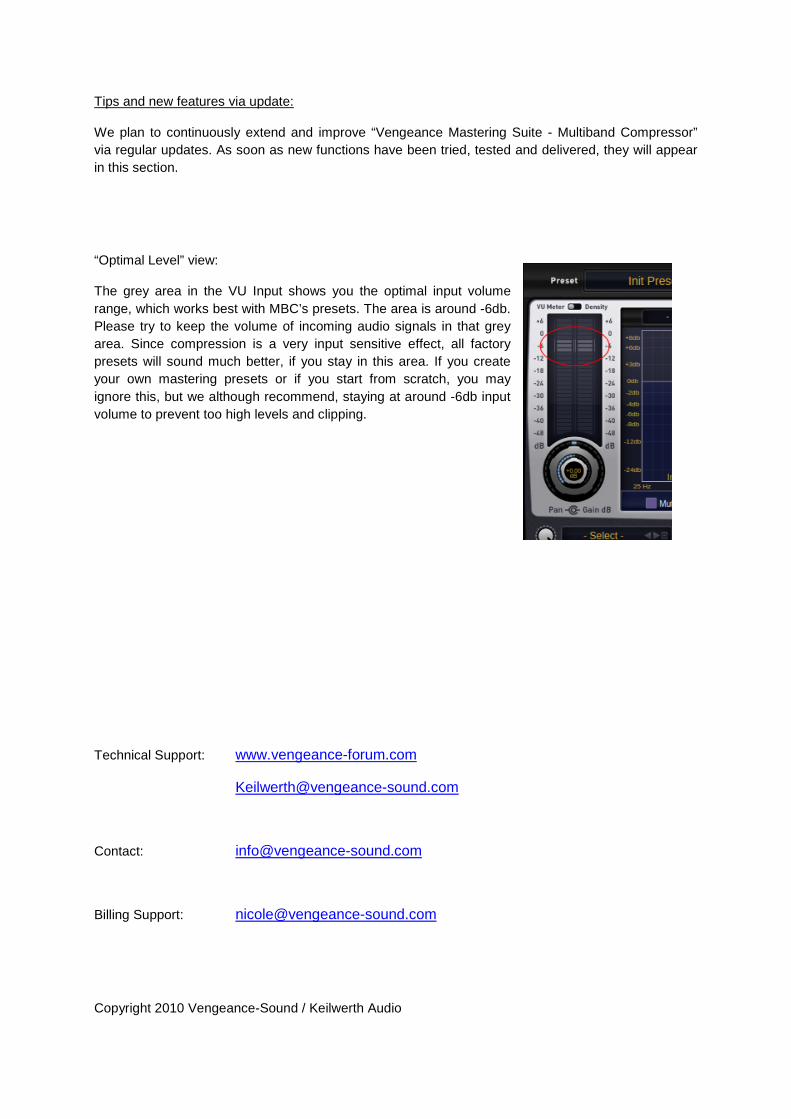
“Optimal Level” view:
The grey area in the VU Input shows you the optimal input volume range, which works best with MBC’s presets. The area is around -6db. Please try to keep the volume of incoming audio signals in that grey area. Since compression is a very input sensitive effect, all factory presets will sound much better, if you stay in this area. If you create your own mastering presets or if you start from scratch, you may ignore this, but we although recommend, staying at around -6db input volume to prevent too high levels and clipping.
Technical Support: www.vengeance-forum.com
Contact: [email protected]
Billing Support: [email protected]
Copyright 2010 Vengeance-Sound / Keilwerth Audio