Embed Size (px)
Citation preview
Vehicle Dynamics
In the world of performance automobiles, speed does not rule everything. However, ask any serious enthusiast what the most important performance aspect of a car is, and he'll tell you it's handling. To those of you who know little to nothing about automobiles, handling determines the vehicle's ability to corner and maneuver. A good handling car will be able to maneuver with ease, zig-zag between cones, and frolic through windy roads. A poor handling car, however, will have trouble maneuvering, knock over cones, and will most likely end up in the ditch if trying to make its way through windy roads. Want to have fun while driving? Buy a good handling car. A car that can maneuver well will be safer and much more fun to drive. According to Racing Legend Mario Andretti, "handling is an automobile's soul." It determines the difference between a car that's enjoyable to drive and one that's simply a means for getting from Point A to Point B. According to their handling properties, cars such as the BMW M3, the Porsche 911 Carrera 4, and the Lotus Elise should bring the driver the most excitement (The Ultimate Driving Experience). While cars like the Dodge Viper may provide the driver with an abundance of power and speed, the poor handling may take away from driver excitement. So what makes a car handle well? A car's handling abilities are solely determined by how they obey the laws of physics. The physics of handling involves everything from forces to torque, so evaluating handling is an extremely complicated affair. Handling feel is best measured through subjective ratings by the driver, but a car's handling properties can be determined through various tests involving the following topics.
Balance and Center of Gravity A good handling car will have little roll when maneuvering. When a car rolls, the weight of the car shifts from side to side due to the inertia of the car. Because this affects the center of gravity of the car, it can have disastrous effects by pushing parts of the car more than others, and creating unnecessary heat on some of the tires. Fortunately good handling cars will counteract body roll by increasing the stiffness in suspension, and improving other aspects of the car. A cars' balance strictly determines its ability to maneuver. Cars like the BMW M3, with an even 50/50 weight balance, will handle much better because when maneuvering around corners; the balance will not overly stress certain parts of the car, and all wheels will be able to work together as a unit. When maneuvering around corners there are many weight transfers that can cause a car to slip.
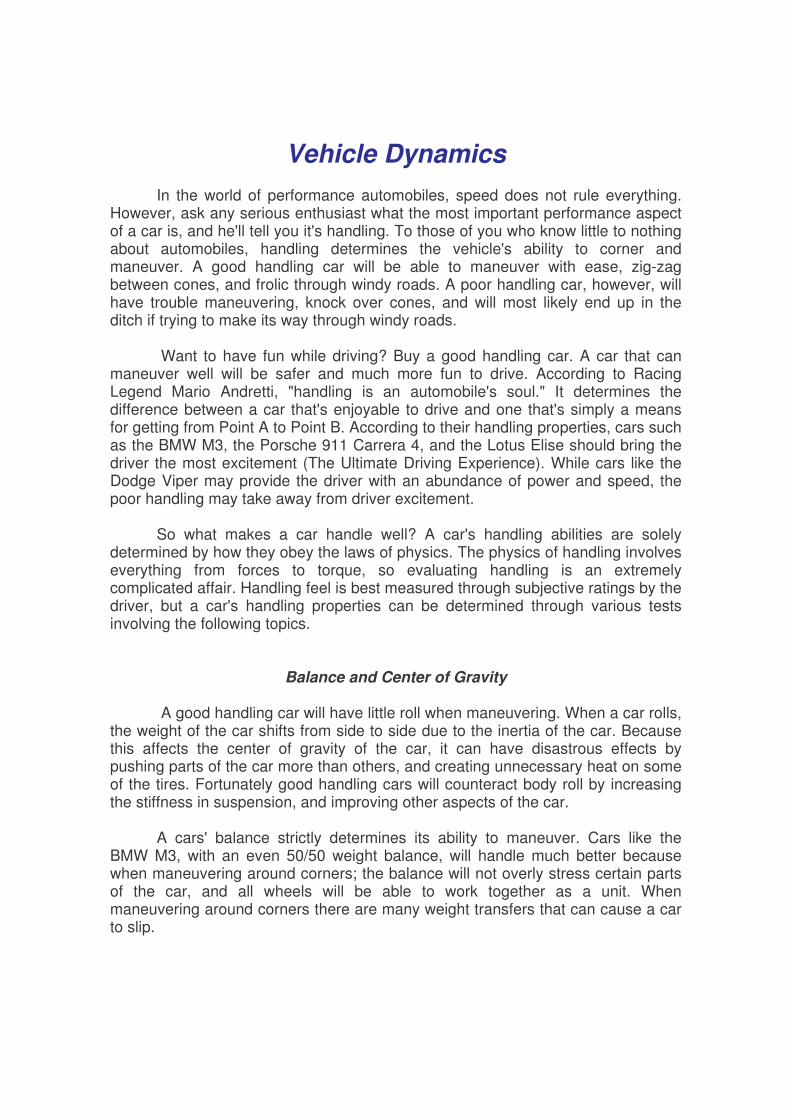
When coming into the turn and braking hard, a car's weight will shift forward. When moving left or right, a car's weight will shift to the opposite side of the direction of the turn because of the cars' inertia. When moving out of a turn, a car's acceleration will cause its weight to shift backward. The shifts from forward to backward, and side to side will be the main factors that cause a car to lose traction and slide off of the road. The two types of curves shown below show two different possibilities for a car's weight transfer.
Hairpin Curve Hard Braking: Weight will shift forward onto the front wheels.
Transitioning into pure cornering: Weight will shift either left or right. All force exerted by the tires are directed towards cornering. Hard Acceleration: Weight will shift backwards on the rear wheels.
Transition Curve Braking into Corner: Weight will shift forward onto the front wheels.
Cornering to the right: Weight will shift to the left side of the car, with soft suspension a torque will be produced and body roll will improperly balance the car. Cornering to the left: Weight will shift from the left to the right side of the car. Accelerating away: Weight will shift backwards on the rear wheels.
Skidpad - Maximum Forces The skidpad property of a car measures how much force it can take, both forward and back, left and right. Skidpad measurements are measured by "g's", which compare it to the acceleration of gravity. 1 G is defined as how energetically an object acclerates toward the ground in free fall. Skidpad measurements do not

strictly determine how well a car handles, rather it gives an indication as to how well the car can 'hold onto the road.' Going through the two types of turns (Hairpin and Transition) the g.analyst graphs measure how much acceleration a car can take both side to side and forward to back. While some cars are able to hold on to the road well (and have a high skidpad rating), they may have trouble maneuvering because body roll or improper balance. For skidpad testing, the Dodge viper tested a 1.02g, and the Porsche 911 Carrera 4 tested a 0.96g. While this test would show the Viper to have more grip, its ability to maneuver is impaired by heavy body roll, and improper balance.
Porsche 911 Carrera 4 Skidpad Evaluation
Overall, the hairpin plot shows that the 911 Carrera 4 is moving quite fluidly, but it's full-power exit doesn't show especially high acceleration. Graph Information: Porsche 911 Carrera 4 Skidpad Evaluation
(Road & Track) The Carrera 4's steering ration is on the quick side. Below the limit, the Porsche's handling is close to neutral, but at the limit the Carrera 4 pushes very slightly. No surprise here-and it might be the most controllable car of the group. Drop its throttle and it tucks in mildly, requiring a slight correction, through the effect is so slight that it really can't be characterized as starting to spin. (The tuck is accentuated only slightly if the stability system is turned off.) No matter how you apply the brakes, aggressively or softly, it continues to track the circle, regardless of the stability system's activation. The Carrera 4's low-speed steering effort nearly doubles as the car goes from about 0.25g to 0.4g, but beyond that it remains nearly constant.
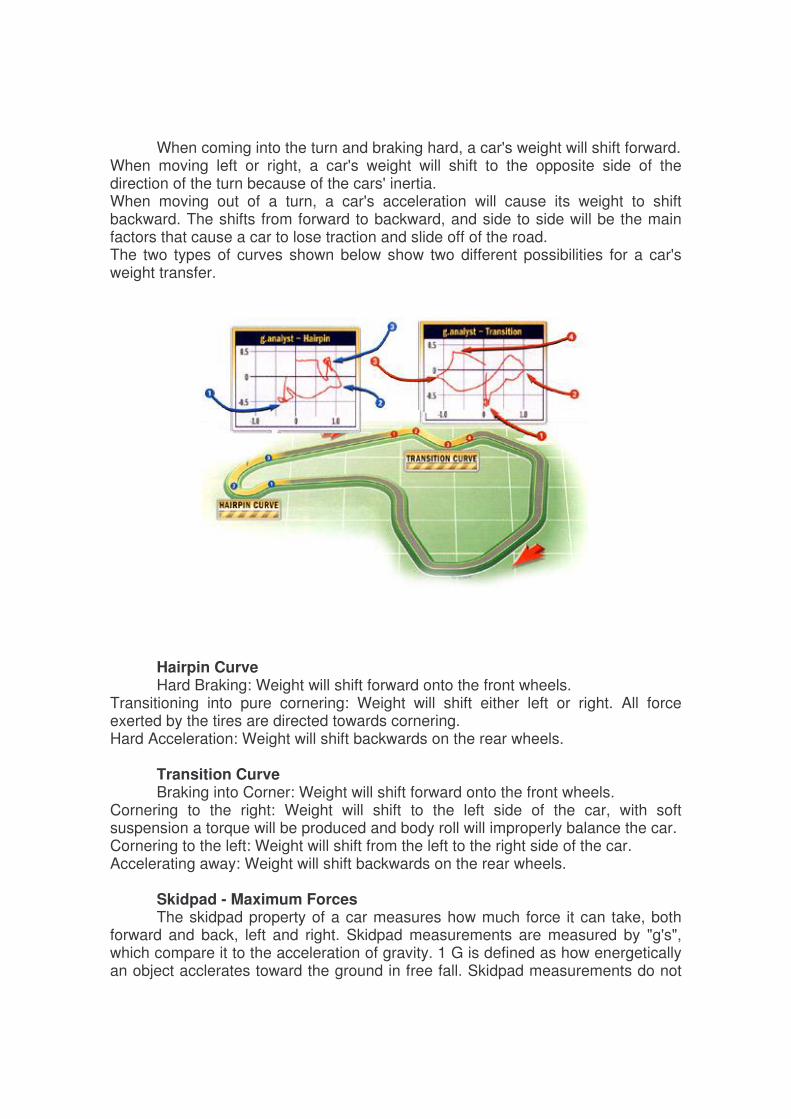
Dodge Viper Skidpad Evaluation
The hairpin graph shows instability and a fast steering correction with
tremendous acceleration. "It's sloppy through the transition because it rolls quite a bit" -Mario Andretti Graph Information : Dodge Viper Skidpad Evaluation
(Road & Track) The Viper's steering is quick and its handling balance nearly neutral at lower speeds, but as velocity rises, some steering correction is required through the bumpy section. With the large amount of power on tap, it's difficult to control your speed accurately, meaning small changes in throttle position can initiate either a slight plow or a spin. Likewise, the Viper's considerable engine braking makes it a challenge to reproduce the dropped-throttle tests. Generally, moderate and hard braking result in the Viper straightening up its path, but here again, the brake's light effort makes this hard to repeat. Regardless of speed, the Viper requires nearly constant steering-wheel torque; peculiarly, it's higher turning left.
How Grip Relates to Handling �
You should realize that the only part of a car actually touching the ground is the tires. That means all the power to stop, accelerate, and change direction come directly through the frictional forces maintained by your tires. The tires of a car must never leave it's state of Static Friction, or the car will go into a skid (which, when uncontrolled is a bad thing in the automotive world). To determine the handling qualities of a car you must push the tire's capabilities to the maximum; you must push the tires right to the brink of moving from static friction to kinetic friction. Because the tires are the only part of the car touching the ground, the friction force between them and the ground acts as a centripetal force, keeping the car from moving in a straight path. The stress on the tires varies from car to car and from curve to curve because of many different factors.
One, because curves are not perfectly circular, there is not a constant force exerted by the tires to keep it from moving straight. At a sharp curve, because it is a friction force with a limit, the tires can only focus their force on keeping the car in a circle, and not acceleration or deceleration.
The sharper the turn, the stronger the force must be because the radius of curvature is smaller.
F = (mv2)/r Because of weight shifts while cornering, accelerating, and decelerating
some wheels have less weight(Fn) on them and may slip because of a lack of force.
Fk = Fn * the coefficient of Kinetic Friction
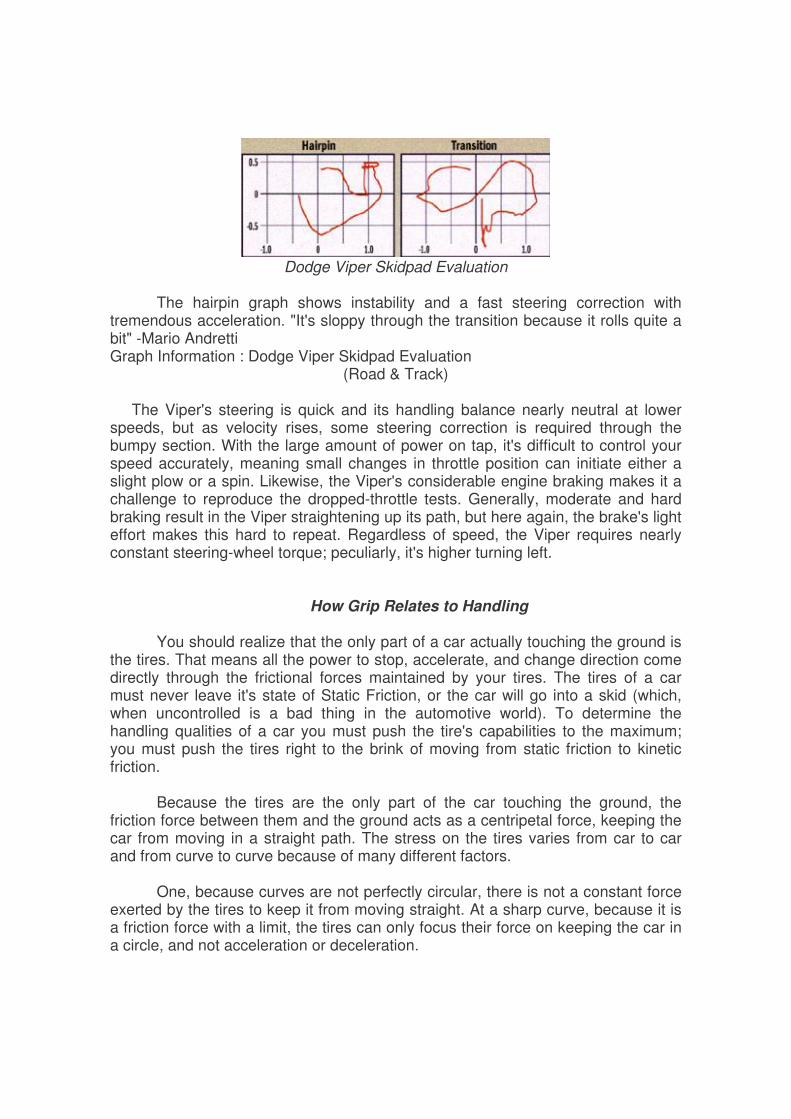
A good handling car will make the most of the grip that it has. Often times, the work done by various components of cars will often be lost through heat and sound. In that case, a car that utilizes the work done by the car's components will handle better than a car that does not. Below are examples of infrared images taken of the wheels of both a Dodge Viper and a Porsche Carrera 4.
Porsche 911 Carrera 4
Aspects of Heat:
In most cars, when turning left, the right front tire will produce the most heat. However, in the Porsche 911 Carrera 4, the heat distribution is fairly even.
This shows that the mechanical work done to accelerate, decelerate, and maneuver is more effective than that of the Dodge Viper because more of the work is transferred to produce a force by the tires.
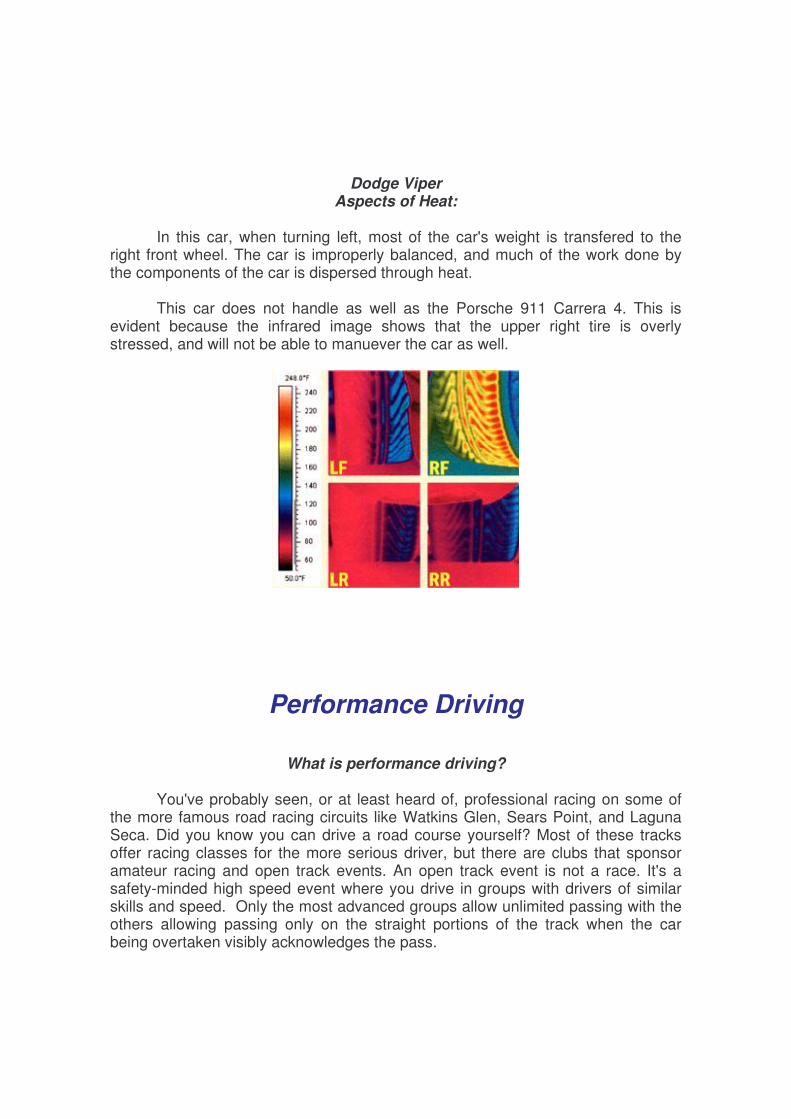
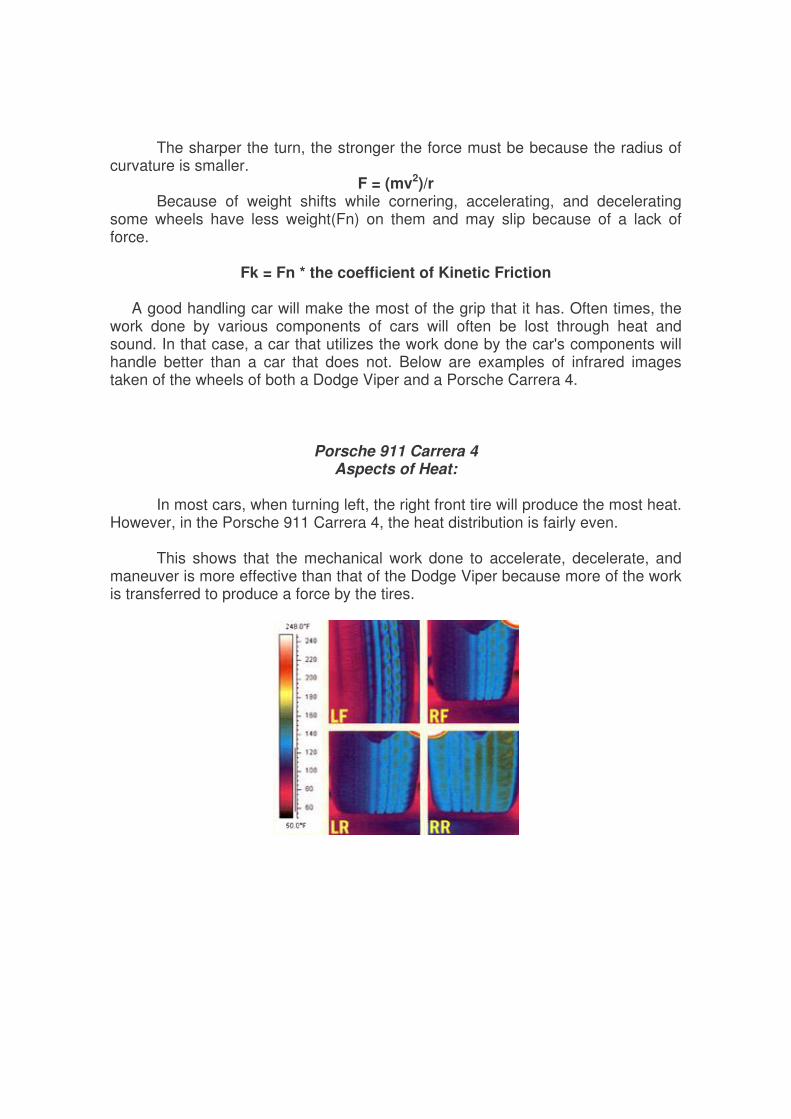
Dodge Viper Aspects of Heat:
In this car, when turning left, most of the car's weight is transfered to the
right front wheel. The car is improperly balanced, and much of the work done by the components of the car is dispersed through heat.
This car does not handle as well as the Porsche 911 Carrera 4. This is evident because the infrared image shows that the upper right tire is overly stressed, and will not be able to manuever the car as well.
Performance Driving
What is performance driving?
You've probably seen, or at least heard of, professional racing on some of the more famous road racing circuits like Watkins Glen, Sears Point, and Laguna Seca. Did you know you can drive a road course yourself? Most of these tracks offer racing classes for the more serious driver, but there are clubs that sponsor amateur racing and open track events. An open track event is not a race. It's a safety-minded high speed event where you drive in groups with drivers of similar skills and speed. Only the most advanced groups allow unlimited passing with the others allowing passing only on the straight portions of the track when the car being overtaken visibly acknowledges the pass.
Driving an open track event on a road course is about suspension, tires and brakes. Note this is a whole lot different from drag racing where the motor is your prime focus. An old muscle car or a car set up for the 1/4 mile is no match for a new Neon or Miata on a road course--unless you're willing to drop several thousand dollars into the chassis, tires and brakes. In an open track event you'll generally have cones marking the corners to tell you when to brake and turn.
To drive well there are some traits that also work in normal street driving
Be smooth in your driving. Don't jerk the steering wheel into a turn, don’t be sawing the wheel back and forth going through a turn. Don't slam of the brakes, squeeze them firmly and quickly. Likewise, squeeze on the throttle don't slam it down. Quick changes in throttle, brakes or turning upsets the chassis and if you are near your limit on grip this will send you in the wrong direction! Smoothness is the key to learning to drive quickly on the track. Always be aware of what's going on around you. Look up ahead, not just to the taillights of the car right ahead of you. Keep things under control in the driver's seat. Know what you're going to do beforehand. It's like they tell baseball fielders to know what they are going to do with a ball hit to them before it's hit so they don't have to take a moment to decide what to do after the ball's already in play. It's the same with driving. Don't get in a situation where you have to do something quickly from the driver's seat. You do this by paying attention to what the car is doing now and what you expect from it next. Be sure you are driving the car, don't let the car drive you. Don't get in a situation where things are happening too fast for you to be comfortable. You should be relaxed, but alert; even on a race track.
Adhesion Your car sticks to the road with four small contact patches from your tires.
Each is about the size of your fist. Tire inflation changes the contact patch as does vehicle weight transfer from braking, accelerating or turning. Also, what your suspension is doing to your tires determines how much adhesion you have. A tire has only so much adhesion to give. A tire past its limit of adhesion is either spinning, skidding or sliding. Once a tire is to this point it's of no use to you and you're no longer in control.
Car dynamics When you brake or let off the throttle weight transfers to the front of the car.
This increases the size of your tires' contact patches in front and lessens them in back. This means you have more traction in front than in back.
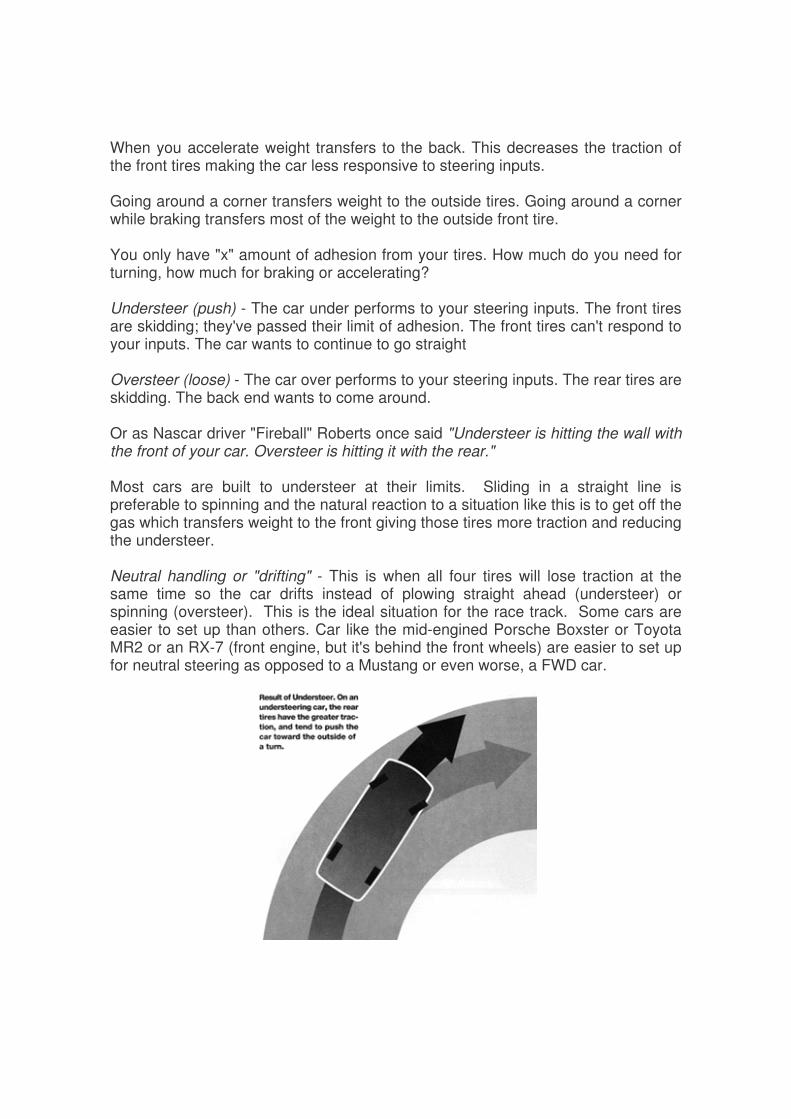
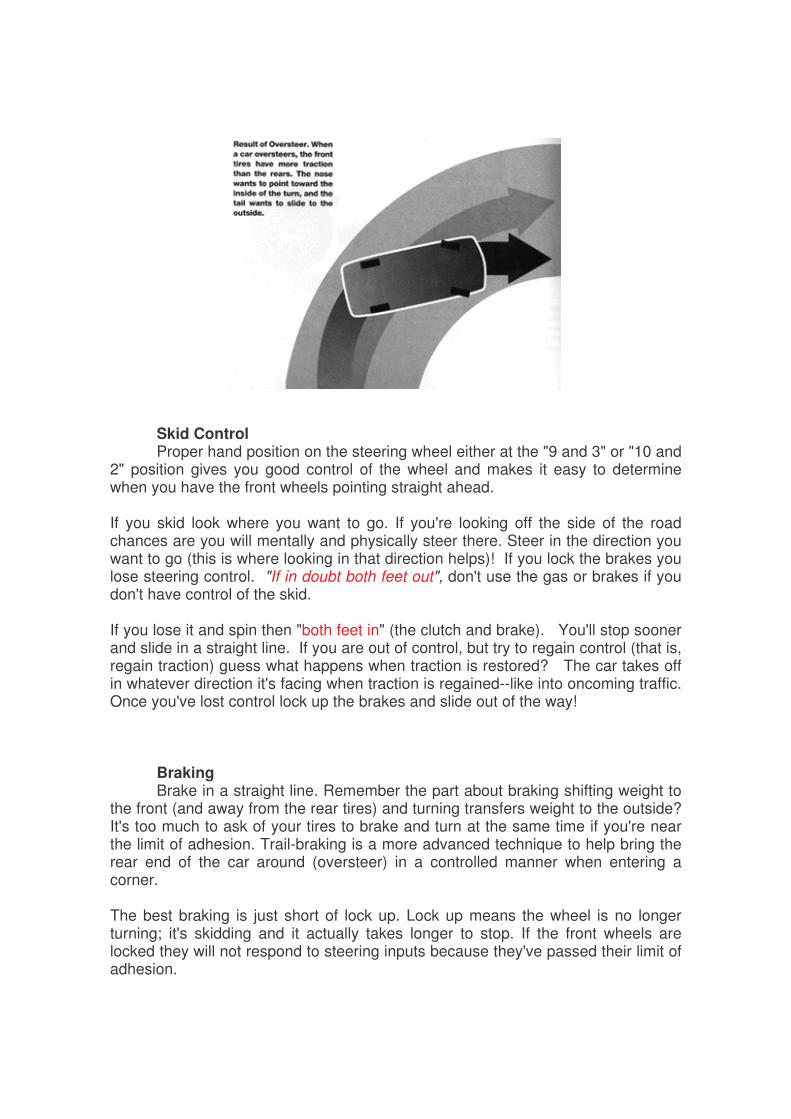
When you accelerate weight transfers to the back. This decreases the traction of the front tires making the car less responsive to steering inputs. Going around a corner transfers weight to the outside tires. Going around a corner while braking transfers most of the weight to the outside front tire. You only have "x" amount of adhesion from your tires. How much do you need for turning, how much for braking or accelerating? Understeer (push) - The car under performs to your steering inputs. The front tires are skidding; they've passed their limit of adhesion. The front tires can't respond to your inputs. The car wants to continue to go straight Oversteer (loose) - The car over performs to your steering inputs. The rear tires are skidding. The back end wants to come around. Or as Nascar driver "Fireball" Roberts once said "Understeer is hitting the wall with the front of your car. Oversteer is hitting it with the rear." Most cars are built to understeer at their limits. Sliding in a straight line is preferable to spinning and the natural reaction to a situation like this is to get off the gas which transfers weight to the front giving those tires more traction and reducing the understeer. Neutral handling or "drifting" - This is when all four tires will lose traction at the same time so the car drifts instead of plowing straight ahead (understeer) or spinning (oversteer). This is the ideal situation for the race track. Some cars are easier to set up than others. Car like the mid-engined Porsche Boxster or Toyota MR2 or an RX-7 (front engine, but it's behind the front wheels) are easier to set up for neutral steering as opposed to a Mustang or even worse, a FWD car.
Skid Control Proper hand position on the steering wheel either at the "9 and 3" or "10 and
2" position gives you good control of the wheel and makes it easy to determine when you have the front wheels pointing straight ahead. If you skid look where you want to go. If you're looking off the side of the road chances are you will mentally and physically steer there. Steer in the direction you want to go (this is where looking in that direction helps)! If you lock the brakes you lose steering control. "If in doubt both feet out", don't use the gas or brakes if you don't have control of the skid. If you lose it and spin then "both feet in" (the clutch and brake). You'll stop sooner and slide in a straight line. If you are out of control, but try to regain control (that is, regain traction) guess what happens when traction is restored? The car takes off in whatever direction it's facing when traction is regained--like into oncoming traffic. Once you've lost control lock up the brakes and slide out of the way!
Braking Brake in a straight line. Remember the part about braking shifting weight to
the front (and away from the rear tires) and turning transfers weight to the outside? It's too much to ask of your tires to brake and turn at the same time if you're near the limit of adhesion. Trail-braking is a more advanced technique to help bring the rear end of the car around (oversteer) in a controlled manner when entering a corner. The best braking is just short of lock up. Lock up means the wheel is no longer turning; it's skidding and it actually takes longer to stop. If the front wheels are locked they will not respond to steering inputs because they've passed their limit of adhesion.
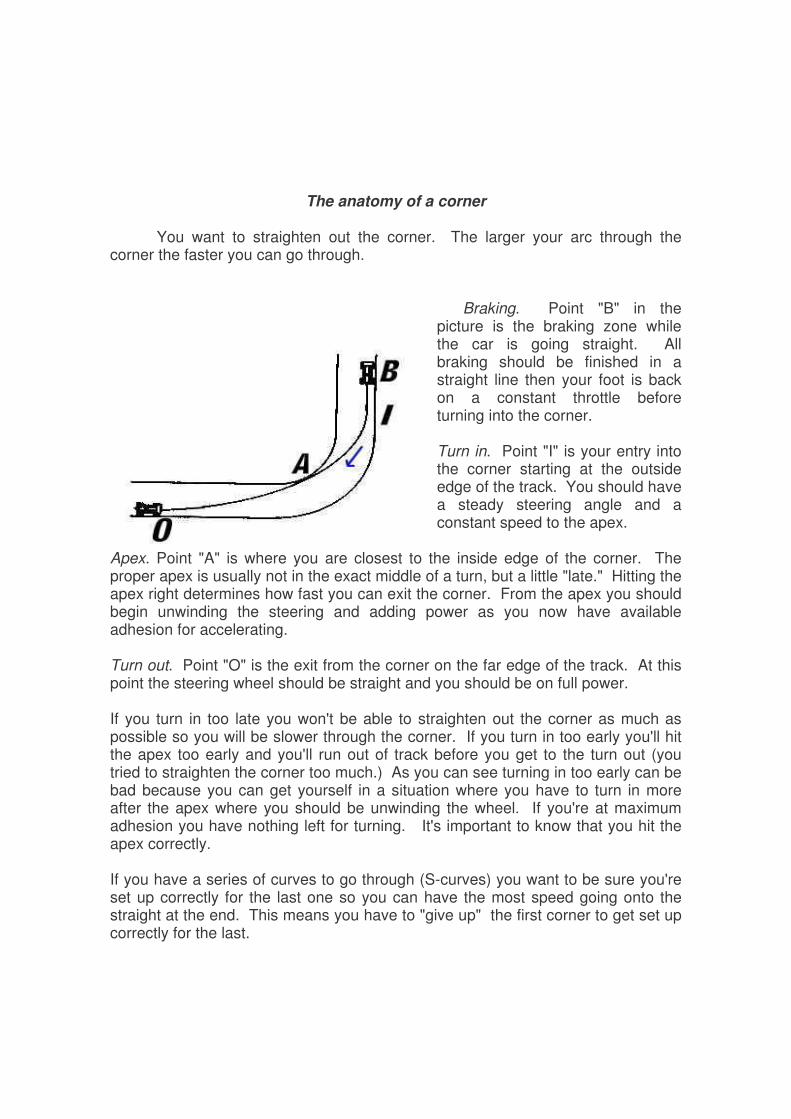
The anatomy of a corner
You want to straighten out the corner. The larger your arc through the corner the faster you can go through.
Braking. Point "B" in the picture is the braking zone while the car is going straight. All braking should be finished in a straight line then your foot is back on a constant throttle before turning into the corner. Turn in. Point "I" is your entry into the corner starting at the outside edge of the track. You should have a steady steering angle and a constant speed to the apex.
Apex. Point "A" is where you are closest to the inside edge of the corner. The proper apex is usually not in the exact middle of a turn, but a little "late." Hitting the apex right determines how fast you can exit the corner. From the apex you should begin unwinding the steering and adding power as you now have available adhesion for accelerating. Turn out. Point "O" is the exit from the corner on the far edge of the track. At this point the steering wheel should be straight and you should be on full power. If you turn in too late you won't be able to straighten out the corner as much as possible so you will be slower through the corner. If you turn in too early you'll hit the apex too early and you'll run out of track before you get to the turn out (you tried to straighten the corner too much.) As you can see turning in too early can be bad because you can get yourself in a situation where you have to turn in more after the apex where you should be unwinding the wheel. If you're at maximum adhesion you have nothing left for turning. It's important to know that you hit the apex correctly. If you have a series of curves to go through (S-curves) you want to be sure you're set up correctly for the last one so you can have the most speed going onto the straight at the end. This means you have to "give up" the first corner to get set up correctly for the last.

Handling
Traction Traction is the ability of the tire contact patch to grip the road surface and is
the most important of the handling parameters if higher cornering power is a consideration for a specific car or application. In any form of auto competition, increased traction is the most important consideration. Increases in traction may not be high on the priority list for street applications, however. The most obvious way to increase traction is to increase the effective size of the tire contact patch. In addition to using a wider tire, the effective size of the tire contact patch and be increased by changing suspension settings to allow the entire tire contact patch to lie flat on the road surface during cornering. Traction can also be increased by using a softer tire compound. The stickier tire provides more grip, but the tire will wear more quickly. A stickier tire may also provide less traction on slipper surfaces, such as wet roads.
Balance For a car to exhibit good handling characteristics, the front-to-rear traction
balance must be close to neutral. If the front tires lose traction first, the car pushes and the rear tires are just along for the ride, not really working to their maximum potential. In the opposite case, where the rear tires loose traction first, the car is loose. Neither condition is desirable in anything exceeding small quantities. The most important factors that dictate balance are the tires and the relative contact patch areas at the front versus the rear, the rates of the springs and the rates of the antiroll bars. Achieving a good handling balance will improve the handling characteristics of the car. And in most instances, cornering power will improve also, with no detrimental effects on ride or responsiveness. Often, simple alignment settings can improve the balance of a car. On the other hand, changing springs or antiroll bars can have a major effect on the balance.
Driving Experience Driving experience is especially important when a car is to be used for competition. Balance and responsiveness relate to driver experience. An experienced driver will likely want a different handling balance compared to an inexperienced driver. An experienced driver will also be able to utilize quicker vehicle response. Often, a newer driver in a responsive car cannot feel the feedback from the car quickly enough. It is possible to slow the response of the vehicle slightly so that a newer driver can keep up with the vehicle.
Three Steps to Good Handling 1. Requires the right pieces 2. Requires tuning the pieces to their maximum potential 3. Requires the use of good driving skills, not to extract maximum enjoyment form the improved handling of your vehicle, but also to live up to the potential of the vehicle from a safety point of view.

Tires and Traction
The most important aspect of handling is improved traction for the vehicle as
a whole. While improved traction is the key, the goal is to increase cornering speed, reduce braking distance and enhance acceleration. The tire is the link to the road and, by itself, is the most important factor in the handling equation. Additionally, everything else you change in the suspension system will ultimately have an effect at the tire contact patch. Thus, understanding the basics of the tire and how it develops traction is paramount to making handling improvements.
Increasing Tire Traction There are three factors that increase tire traction: 1. Increasing the friction between the tire and the road. 2. Increasing the number of rubber molecules at the tire contact patch. 3. Increasing the vertical load on the tire. These are rather general statements, requiring further explanation.
Increasing Friction Between Tire and Road This can occur in two ways. First, the coefficient of friction of the road
surface can increase. The coefficient of friction is an arbitrary measurement of grip created by a surface. The higher the coefficient, the greater the grip. Roads of varying materials - such as asphalt, concrete, dirt and so on - will have different coefficients of friction. This will let the tires grip the road more firmly. We have no control over this, short of choosing specific roads to drive on. Second, we can increase the coefficient of friction of the tire. This is done by choosing a softer rubber compound tire. The softer rubber molecules will grip the road more firmly, but will also wear more quickly.
Increasing Amount of Rubber at Contact Patch This can be accomplished in three ways. First, and most obvious, is a wider
tire. Second, we can choose a tire with fewer grooves in the tread, thus increasing the area of the tire contact patch. This has obvious flaws on wet, slippery surfaces, however. Fullest their to working actually are available molecules rubber of number maximum the that so system suspension and tuning properly by utilized efficiently more be can area patch contact existing importantly, most Finally,>
Increasing Vertical Load on Tire The traction a given tire can generate increases with vertical load on the tire.
Vertical load is the combination of vehicle weight resting on the tire contact patch, plus any aerodynamic downforce that may be present. The rubber molecules at the tire contact patch are further pushed into the road surface as the vertical load increases. This allows the rubber molecules to do more work. Vertical load can be increased by adding weight to the vehicle, so that the tire contact patch sees more vertical load. While this will increase traction, the work that each rubber molecule at the tire contact patch must do also increases.
Cornering speed, baking distances and acceleration will not improve. In fact, the performance in these categories will actually deteriorate.
Tire Contact Patch Area How large should the area of each tire contact patch be? This is an
important question. The initial obvious answer is: as large as possible. But that is not true. Yes, we want a large tire contact patch, but if it is too large for a given car, rolling resistance increases, and may negate any performance improvements added by traction gains. Additionally, as a tire increases in tread width, it becomes more difficult to keep tire contact patch flat on the ground when it is most needed. A basic rule of thumb is that as engine horsepower increases, the need for larger contact patches also increases. A corollary to this is: If the tires fit in the stock fender wells without rubbing during suspension travel or body roll, then the tire is probably not too large. The area of the tire contact patch is one factor that determines the handling horsepower of a car. The area of the contact patch should be proportional to the load on the tire. If the load at the front is equal to the load at the rear, then the contact patch areas should also be equal to each other. If they are not, then the end of the car with larger tire contact patches will have more traction capability than the other end, and handling balance will be affected.
Effect of Tire Pressure on Traction The pressure in the tire has a big effect on tire traction. The pressure
doesn't really affect the grip of each rubber molecule, but it certainly can affect how many of the molecules at the tire contact patch are in contact with the ground. A specific tire on a given car with a given load will have only one correct tire pressure. In practice it is a narrow range of pressure, within about 3 pounds per square in. (psi). If the tire pressure is outside this range, the tire contact patch is deformed and not fully contacting the road surface. In other words, fewer than the possible number of rubber molecules are in contact with the surface of the road. If the tire is overinflated, the edges of the tire will lose contact with the surface, and traction is reduced. Fewer rubber molecules are carrying the same load, so the tire will operate at a higher slip angle for a given cornering force, and the maximum cornering force will be lower. If the tire is underinflated, the center of the tire contact patch will not maintain optimum contact with the road surface, and again, fewer rubber molecules than possible will be doing the same work, resulting in higher slip angles for the same load and reduced cornering power.
Suspension and Steering Systems What function does a suspension system serve? Quite simply, its job is to
keep the tire contact patch flat on the road surface, thus allowing the maximum number of rubber molecules to work as much as possible.
Lowering Your Car Once of the most important ways to improve handling is to lower the center
of gravity. This increases traction by reducing weight transfer and reduces body roll for a given cornering force. The easiest way to lower a car is with the springs. Shorter springs lower the ride height easily and quickly. But there are many pitfalls awaiting those who lower their cars. Some are obvious, others are not. On the obvious side is reduced ground clearance. When a vehicle is lowered, it rests closer to the ground; in motion, during bump travel, especially over speed bumps and driveways, the bottom of the vehicle is more likely to contact solid ground, with possible damage to a variety of components. On the street, this is crucial, because the real world is much bumpier than the racetrack or autocross course. There are a number of less obvious potential hazards when a car is lowered. The most important is suspension bottoming in bump travel. When a car is lowered by the springs (as opposed to lower-profile tires), less bump travel is available. When the suspension bottoms on the bump stops, the problems is minimal because the bump stops are designed to slowly stop suspension travel. In many cases, the lowering will take all of the bump travel, leaving the car resting on the bump stops. This increases the suspension rate drastically, and can cause serious problems and dangerous handling characteristics. Even worse is the case where the bump stops are removed. The bump stop is designed to progressively limit bump travel and to keep the shock absorber from bottoming out. When the suspension bottoms out, the spring instantly rises to infinity and a sudden loss of traction can occur at the end of the vehicle if the car is cornering near the limit of adhesion. If the shock absorber bottoms first, the valving will be blown out, and little shock damping will remain. Either situation can have, at minimum, expensive consequences and, at worst, tragic results.
How to Lower Your Car It is common practice to cut springs to lower a vehicle. From a materials
standpoint, cutting springs is not a bad thing to do, assuming the proper methods are employed. But cutting springs can cause bottoming problems. The shorter spring will have a slightly stiffer spring rate, but usually not enough to limit bump travel adequately to keep the suspension from bottoming out over bo9mps. This often leads to the problems described above. And in many instances, vehicles with chopped springs ride horribly. The dollars savings often prove to be false. The best way to lower a vehicle is with springs designed to lower a specific amount, with increased spring rates that will minimize the possibility of bottoming during bump travel. Even in this instance, most aftermarket spring kits include new bump stops, designed to work in the specific application. The reliable and competent suspension and spring manufacturers like Eibach, Suspension Techniques and others have engineered a package that addresses these problems and eliminates them.
Cars with MacPherson strut suspension systems cause another set of problems. Most strut cars can be lowered about 1 in. with no bottoming problems, as long as the spring rates increase accordingly. If the car is to be lowered more than 1 in., then, in most cases, the strut tubes must be shortened or relocated to allow adequate bump travel. If this is not done, the same bottoming problems will occur as previously described. A competent fabricator can accomplish such work. When struts are shortened, often a shorter strut cartridge (shock absorber) must be used to insure adequate bump travel. Good suspension shops know the scoop and find the right parts for the job. But beware! Not all vehicles have the right strut cartridges available. Check before you begin your work. Overall, the nest way to lower a car for the street is with one of the aftermarket kits available for this purpose. The knowledgeable manufacturers have created packages that improve the look, lower the center of gravity and improve handling performance, while eliminating most of the hassles and possible problems.
Review on Springs Springs have two important jobs: to keep the suspension from bottoming or
the chassis from bottoming on the road surface; and to keep the tire contact patch on the road surface over bumps, dips and so on. These two criteria require opposite spring rate needs. Since maintaining tire contact with the road is crucial for good handling, we use the stiffest spring possible that allows good tire contact with the road. The bumpier the road, the softer the spring. We use the suspension frequency as a design tool for specific types of road surface conditions. The suspension frequency is proportional to the wheel rate of the spring and inversely proportional to the sprung weight resting on the spring. The wheel rate of a spring is equal to the spring rate in pounds per inch times the motion rations squared. Progressive rate springs offer substantial advantages over standard springs, allowing lower suspension frequencies and lower ride heights without bottoming. The progressive rate spring comes closer to meeting the opposing needs of soft spring rates for improved tire contact over bumps and stiff spring rates to allow minimum ride heights without bottoming.
Antiroll Bars
The antiroll bar which is also called a sway bar or stabilizer bar, controls the amount of body roll while cornering. The roll resistance provided by the antiroll bar is added to the roll resistance provided by the springs. The total roll resistance determines the total amount of body roll for a given situation. The total roll resistance at the front of the vehicle, compared to the total roll resistance for the entire vehicle, tells us the roll couple distribution; in other words, the front versus rear roll resistance. This determines the handling balance of the vehicle. If we have

too much rear roll resistance the car will oversteer. If we have too much front roll resistance, the car will understeer. For handling improvements, we use the antiroll bar for two purposes: controlling the amount of body roll, and controlling the roll couple distribution, which determines where weight is transferred.
How Antiroll Bars Work The antiroll bar resists body roll while cornering by twisting. When the body
begins to roll, the arms on the antiroll bar will twist the main section of the bar. This resists additional body roll. The arms are attached to a suspension arm (usually the lower control arm) on each side of the car. The other end of the arm (the arms are usually part of the main bar) is attached to the main bar. On independent suspension systems, the bars link the left and right sides, causing the suspension to no longer be completely independent. If the wheels encounter the same bump or dip, then the antiroll bar does not work. But when only one wheel hits a bump or dip, the antiroll bar adds to the spring rate by resisting, adding to the suspension frequency. An excessively stiff antiroll bar can cause tire contact problems over single wheel disturbances. The stiffness of an antiroll bar is determined by the stiffness of the material the antiroll bar is made of, the diameter of the main bar, the effective working length of the main bar and the effective length of the arms. Almost all antiroll bars are made from materials of similar stiffness. The diameter of the bar affects its stiffness to the fourth power: if you double the diameter of the bar, the stiffness will be sixteen times greater. Small changes in diameter can have a major effect on roll resistance. The effective length of the main bar is inversely proportional. To the stiffness, as is the arm length. For most applications, it is difficult to change the effective length of the bar, but the diameter of the bar can be altered, and the arm length can be easily adjusted.
Antiroll Bar Pros and Cons It may seem that the antiroll bar is the answer for tuning the handling of a
vehicle. It is an important factor in handling, but it is not the answer. It can be used to fine-tune the handling balance, and to limit body roll for improved tire contact with the road. Antiroll bars allow the springs to do their job, but there are limits. First, we can have too much roll resistance overall; second, the bars can provide too large a percentage of the total roll resistance. Let's examine how an antiroll bar works. When a turn is initiated, the outside suspension moves into bump and the inside into rebound. The antiroll bar begins to twist, with the outside end of the bar lowering and the inside end of the bar rising. The bar pushes down on the outside suspension, while it tries to lift the inside suspension. At the inside wheel, this is the opposite of the way a spring reacts. The spring pushes the inside wheel down, and the bar lifts the inside wheel. If the bar is too stiff, the inside wheel is unloaded too much and, if it is the drive wheel, may cause wheel spin as power is applied at the exit of a turn. This is a serious problem if the vehicle is not equipped with a limited-slip differential, and
has high horsepower. It will be worse in slow turns. The problem is unlikely in low horsepower circumstances, and less likely with a good limited slip. This is the reason we have found it best to have a higher suspension frequency at the end of the car with the drive wheels. The optimum percentage of roll resistance provided by the bars seems to be between twenty-five and fifty percent of the total roll resistance. Springs provide the balance of the roll resistance. Choosing the correct bar rates is a complex process, requiring a significant amount of data and plotting. To truly calculate the proper bar rates, the center of gravity height must be known, as well as the roll center locations and camber change curves. The work involved is extensive, and is best left to an experienced designer or antiroll bar manufacturer. Additionally, when complex bends are required in a bar design, the true rate cannot effectively be calculated. The actual rate of the bar must be measured on heavy-duty test equipment. The easiest approach is to purchase antiroll bars from an experienced manufacturer or to consult with a suspension design expert.
Overview The antiroll bar is used to limit body roll, allow the springs to keep the tire
contact patches on the ground over disturbances, and to adjust roll couple distribution. Antiroll bar rates are easily adjusted to fine-tune roll couple distribution. The major rate changes are best accomplished with the bar diameter, and fine-tuning adjustments with the arm length. The antiroll bar works by loading the outside tire, but lifting the inside. Excessive antiroll bar stiffness can hurt handling and traction, especially at the drive wheels during the exit phase of a turn. Excessive roll resistance will cause the inside wheel to lift off the ground in a turn. Finding the best compromise can be time consuming, but usually rewards substantial dividends to those who make the effort.
Shock Absorbers
If springs actually absorb shock, then just what do the shock absorbers do? The primary purpose of the shock absorber is to dampen vibrations or oscillations. In other countries, shock absorbers are called dampeners. The goal is to keep the spring from bouncing beyond one full cycle. If you have driven a car with bad shocks, you know how uncomfortable the ride is when the car bounces over every bump, dip and rut. The properly rated shock absorber stops this. The shock absorber has two jobs. First, it must control oscillations of the unsprung mass, that is, the wheels, tires, hubs, and so forth. Second, the shock absorber must control the sprung mass of the car. The spring does most of the work on bump travel, while the shock controls the return motion with rebound travel. Over dips, in rebound travel, the shock slows the downward movement of the body, allowing a more level ride. For this reason, the bump resistance is about one-third the rebound resistance for street use.
The shock absorber must be compatible with the spring rates to work effectively. It controls the rate of weight transfer, and therefore the transient handling response of a vehicle. A stiffer shock absorber means quicker weight transfer and faster vehicle response. It is best when the rate of weight transfer at the front is the same as the rear. If the rate of weight transfer is different from to rear, handling balance will likely be affected. The end with stiffer shock absorber settings will reach peak lateral acceleration first. It can be difficult to distinguish if a transient handling problem is caused by the shock absorber rates, or by driver inputs. Trying different combinations of shock absorber settings is the key to fine-tuning transient handling response.
Selecting Shock Absorbers One of the most difficult tuning jobs to improve handling is selection the
shock absorber. Since the shock has a major affect on ride and handling, it can be tricky business walking the fine line between good handling and good ride. In some cases, specifically competition, the nod goes to handling; ride is not a consideration. But on the road, while the pleasure of blasting a few quick corners is enhanced with firm shock valving, the price is a harsh ride for many commuter miles, often with less that sympathetic passengers. There are two important questions to ask when selecting the right shock for your car. First, do you need adjustable shocks for the kind of driving you do? Second, will you take the time to actually adjust them? Honest answers to these questions will save you time and money, and not take away from the driving pleasure you demand from your car. In most cases, especially where the vehicle is only driven on the street, nonadjustable shocks or shocks where the adjustment is easily made at the top of the shaft are the only practical solutions. The major shock absorber manufacturers do a good job of creating a valving for each application that is a good compromise between performance handing and ride. And most of the companies make a specific racing-application shock for competition purposes. It is not truly possible to have the best of both in a single set of shocks. �
�
Aerodynamics and Handling
Increasing Aerodynamic Downforce The reason to increase aerodynamic downforce is simple: the load created
by aerodynamic downforce increases the load on the tires. As we have seen, increasing the load on the tires increases traction, but the aerodynamic load does not add weight to the car, so the engine, brakes and tires do not have to work harder to accelerate, brake or corner the vehicle. This increase in cornering force is nearly free. The price for the increased downforce is more aerodynamic drag. How do we increase downforce on a production vehicle? The basic method is to change the airflow characteristics over and under the car. This is the principle behind the wing. A wing creates lift by altering airflow over its surface. Each side of the wing has a different surface shape, and the air must travel a greater distance across one surface. The air flowing across the longer surface may travel faster than the air
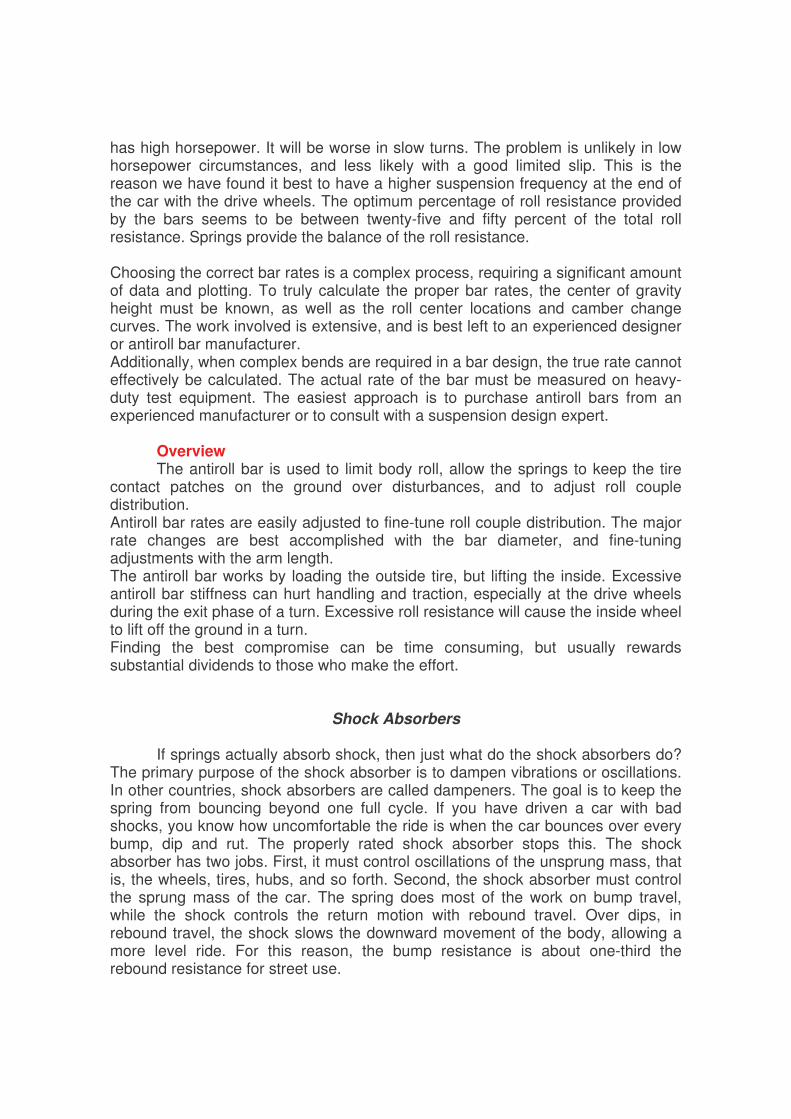
flowing across the shorter surface. The faster-flowing airstream creates less pressure, while the slower-flowing air is at a higher pressure. This pressure differential creates lift, or in the case of the car, with inverted wings, downforce. The wing also causes aerodynamic drag determines the efficiency of the wing shape. For a given wing profile, the larger the wing aspect ratio, the more efficient the wing will be. The aspect ratio is the comparison of the chord (the width at the widest section) of the wing to its length. The longer a wing of given width, the better the downforce-drag ratio becomes. Gliders, with their long, slender wings, have the highest efficiency of any aircraft wing.
A greater wing angle of attack will create more downforce than a smaller angle of attack, but will also create more aerodynamic drag. If the angle of attack is too great, the wing will stall and drag will increase while downforce decreases dramatically.
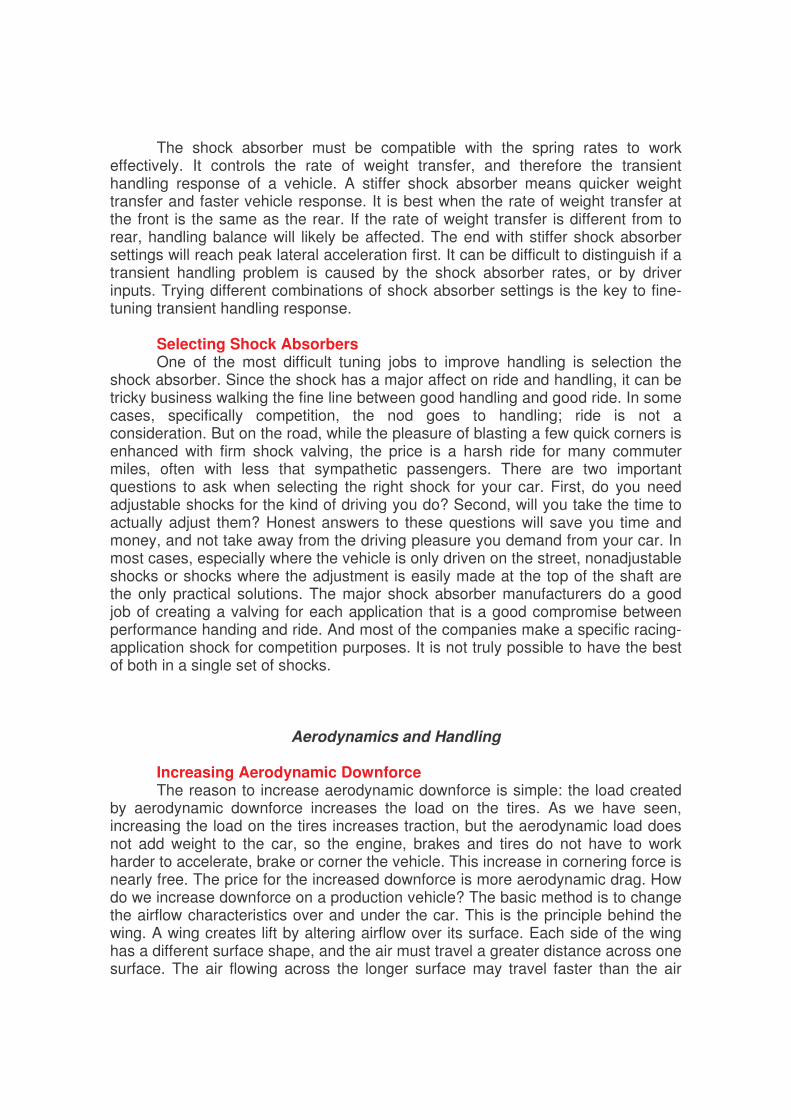
Automobile Rake Another way to increase downforce on a production car is to set the vehicle
on a slight rake, so that the front is lower than the rear. This increases surface area and improves flow over the body, but it also increases frontal area, which causes aerodynamic drag to increase as well. Rake is usually measured by the difference between front and rear ride height. The normal amount of rake, and a good starting point for most cars, is 0.5 in., with the front lower. Rake over 1 in. is excessive. Like setting wings and spoilers, rake adjustment requires testing and trial and error to find the best compromise between downforce and drag.
Rake is the tile of the chassis from level in side view.
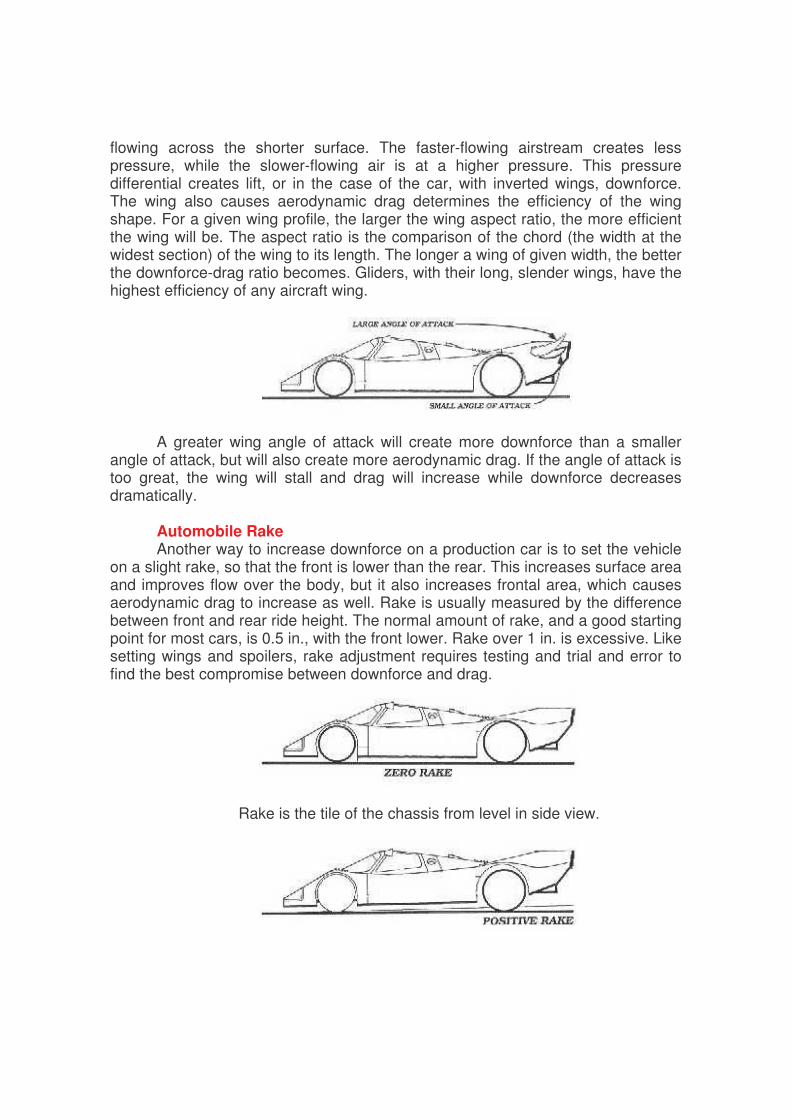
Most cars use some positive rake to increase downforce and minimize airflow underneath the vehicle. Positive rake can be overdone, resulting in
more drag due to an increase in effective frontal area.
In all cases, negative rake causes front-end lift and drag increases. Negative rake should always be avoided.
Ride height has an effect on aerodynamic drag. All cars generate the least drag when the ride height is as low as possible. This reduces the effective
frontal area to the minimum, and reduces turbulence underneath the vehicle. Unless dictated by rules, the ride height should be as low as
possible, taking suspension travel into account. If the car bottoms, either stiffer springs or higher ride height is needed.
Airflow Through the Car Airflow around the car is only half the picture. One of the most substantial
sources of aerodynamic drag is airflow thru the car. Any place air enters the car is a source of aerodynamic drag and so on can reduce drag. The exiting of the air from the car is also worthy of attention. The worst place to exit air s under the car, but that is exactly where most air exits. We have already seen that air flowing under the car causes increased aerodynamic drag. The goal should always be to exit airflow through the sides or top of the body structure. Fenderwells are often accessible and easy places to vent airflow. Forcing airflow under the car will increase drag and reduce any downforce.
Aerodynamics on the Street Possibly the best reason to add an aero kit to your vehicle is looks. Some of
the kits available not only improve performance, but enhance the look of the car as well. If you are in the market for an aero kit, make sure the design will actually enhance high-speed handling and stability. Also check the fit and finish of the parts, Installation can be difficult, so check into the availability of factory or dealer installations.
Flag Basics Green Go Yellow Caution. Slow down. No passing. There's a problem up ahead.
Maybe a car off the track. Black Get off the track the next time you get to the pits and check in. You
did a boo-boo. Red Pull over and stop now, but watch out for anyone coming up behind
you. There's an obstruction on the track Blue with a yellow stripe Someone wants to pass you
Performance driving tips Good braking and turn in are the most important and the most difficult to do right.
Once you turn in the steering wheel should stay at the same angle until the apex. If you're sawing the wheel then your turn in wasn't correct. Ideally, if you are smooth and the car neutral you'll start drifting after turn in. Hold the wheel lightly. Turning should be smooth, soft and firm. Maintain constant speed from turn in until apex. Enter the corner at a constant velocity. The car is neutral and easier to handle. This is for "beginners." Begin adding throttle as you unwind the steering wheel. Always be either on the brake or the accelerator. You shouldn't be coasting. To learn a particular corner: Keep the turn in the same, late apex and see where your track out is. Add speed until you run out of track at the turn out. Look at the turn in, then look at the apex, then your turn out point as you pass them. Watch the cone until you're at it so you know how close you're getting to these points. Drive to the apex and track out if you have to. Next time add speed so you'll drift to those points instead. Don't lift off the throttle and turn in more or you'll spin. If rear is at maximum adhesion you'll spin if you try to accelerate. As you're unwinding the wheel after the apex you have available adhesion to accelerate. It's better to turn in too late than too early. You're pointed off the road after apexing if you turn in too early. Start by driving slowly and doing things at the right time to develop a rhythm. Good quick, smooth driving is very rhythm oriented. Smoothness and visual skills are key.
Sliding - If accelerating the rear breaks loose then let off. If your velocity is neutral then accelerate. Trail braking - Two-thirds off the brake as you turn in. You still have some understeer. This is a more advanced technique. If you're going off the road go straight off. Don't try to save it. Some common beginner's mistakes: 1. Turning in too early. This happens because you think you're going to get through the corner faster because if you turn in early you're not turning in as tight, but by doing this you wind up sliding through the apex to turn out. It's gotta be "slow in fast out." 2. Entering the slower corners too damn fast, then scrubbing off speed as you squeal all the way through the turn. This may sound like #1 above, but it's not. Most new drivers are too fast into the slow corners, but too slow through the faster ones. 3. Don't be braking while turning in. It's best to brake too early then be back on a constant throttle well before turn in. Then on later laps you can slowly move up the braking zone closer to the turn in. This is especially good for the faster corners. 4. Look ahead so you know where you're going next to prevent having to make any mid-turn corrections. Just before the turn in pick up the apex (if you can see it). When you get almost to the apex look for the turn out point. Hand-eye coordination is what's going on here. Look where you want to go. 5. Use the whole track. Most of the first-timers quickly forget about hitting the turn in, apex & turn out cones. You shouldn't have more than a couple of feet between your wheels and the berms on the higher speed corners. On the slower ones actually being on the berm a bit is usually good. When you pass by one of these points take a quick glance over to see how close you are. Sometimes having a rider or someone following helps critique this. 6. Start off by worrying about technique & smoothness. Speed will come later. If you start off worrying about speed then after a couple of times at the track you'll get frustrated by a lack of progress in your times. 7. If you practice doing it right then after a few open-track or autoX events you'll come to a point where you think you've gotten slower, but you're actually faster. That's because if you're really smooth and anticipate your next moves then this lack of hurriedness on your part will seem like you're slow, but you're actually just better!

Track day preparation Generally, any club sponsoring a track event will want your car to be inspected by a mechanic looking at things like tire wear, brakes, fluid leaks, brake lights and seat belts. Start with a low tire pressure so the tires will have more sidewall flex and react slower to your inputs. Less likely to oversteer. Things to take with you to the track: For you: A folding chair, sun tan lotion, lots of water to drink, helmet For your car: Extra oil, window cleaner, paper towels, tire gauge, electrical tape, a few hand tools, numbers for your car (maybe just some colored tape).