Embed Size (px)
Citation preview

VDVD300R
SOUNDSTREAM
Thank you for purchasing our company multimedia player! CONTENTS To operate the unit correctly. please read the owners manual
carefully before using the unit . Keep these instructions and
.............................................................................. . retain this booklet for future reference . Notes on Installation 3
Precautlons ............................................................................................ 4
Wlrlng Dlagram ...................................................................................... 5
Locatlon of the Control .......................................................................... 7
Baslc Operatlon ..................................................................................... 8
..................................................................................... Radlo Operation 12
DVD Player Operation. ............................................................................ 13
Location of the Remote Control ............................................................. 16
Remote Control Operation .................................................................... 18 I ............................................................................................. Installation 22
Specification .......................................................................................... 24
Slmple Troubleshooting Guide .............................................................. 25

W T h e u n i t isdesigned for 12v DC , negative ground operation system
only. Before installing theunit,
make sure your vehicle is connected
to DC izv negative ground electrical
system
@The negative battery terminal
must be disconnected before
making Connections, which can
reduce damaging the unit due
to short circuit.
c p Be sure to connect the color coded
leadscorrectly according to the
diagram. Incorrect connections
may cause the unit malfunction or
damage thevehicle' selectrical
system.
@=Be sure to connect the speaker (-)
leads to the speaker ( - ) terminal.
Never connect the left and right
channel speaker cables each other
or to the vehicle body
*Do not block vents or radiator
panels. Blocking them will cause
heat to build up inside and may
result in fire
@= After the completion of the
installation and begin to play
the unit ( including replacing
the hattery),please press the
RESET button on the front panel
with pointed objects (suchas
ball-point pen)to set the unit to
initial status.
W This unit can play thc followingdiscsonly.
Nore: I3 Thsurzir iseompotible wirh DVD.VCD1.012.0f3 O~VCD.CD-RW.CD-R,PICNRE-CDV~R~O~ Disc.
@ Tl~emonuolconforn~sto DVD, VCD- MP3andCD. I f n o DVD. VCD or Mp3 onsome
models.gua shosldignom rhcm. Whileenjoyi,8g DVD. VCD. MP3 n,td CD, rhedisploy
willot~romatical1.v idenri/? rhe discs ondindieore rhe eorrespoading words.
C D
Do not attempt to modify the unit, modifying the unit may cause an accident.
Type o f d i s c
DVD
VCD
MP3
Stop the vehicle before carrying out any operation that could interfere
Label on t he disc
JY3
@ VIDEOCD
MP3
Recorded mater ia l Sound and moving
Pictures
Soundandmoving Pictures
Sound and moving Pictures
dm mmmm
with your driving.
S ize o f disc
12cm/8cm
12cml8cm
12cm18cm
Do not work in extreme high or low temperature inside the vehicle is between +60°c and - 2 0 " ~ before turning yourunit o n .
Sound only
To enjoy optimum sound and images while playing, handle the discs as follows : --Handle thedisc h: irv edge 10 keep tho disc
eleon, anddo not roach rkesurfnce.
12cml8cm
-- Do nor use CDs wit1 labels or stickers orroeked . which may /roue o sticky residue ivl8ile beginni~tg to peel ofl (Slto\vn ns pierttre)
-- Cleon the d i ~ a lvilll on oprionnl cleaning dod . Wipe each discfrom rbe eenrer our (Sltow,t ns picture)

STANDARD CONNECT
Audio In 0 * @ * * @
* @
1 1 1 1 0 Antenna Receptacle 1' From
Car Aerial
Yellow Memory back-up 12v
Front Lch eWhitelBlack
Speaker
Antenna Receptacle
@ AudioIn
@ AudioIn
@ Video Receptacle
@ Output Socket(male) @ Output Socket(female)
J)l\ Gre~lBlack id Fmnt R C ~
Grey Speaker
0 Fuse Holder ( 1 5A) @ Screw Holes @ Front Speaker Out ( L )
@ Front Speaker Out ( R )
@ Rear SpeakerOut ( L )
@ Rear SpeakerOut ( R )
THE ESPECIAL CONNECT
0 ?Zer Supcr
Audio In
-1' Out 1 1 1 Audio In
NOTE: I. Adjustingthc A M P \ frequency between 20-80 Hz irihc bcrl ~f fee f .
- ,
Rear L Rear R 0 speaker speaker 0 Q Rear L Rear R
speaker speaker @ Front L Front R 0 speaker speaker 0 Front L Front R @ speaker speaker
0 4 n 40-60w speaker
@ 4R tweeter
@ 12' super woofer
@ Match for tweeter

x x ~ ~ x ~ ~ x g x g x ~ ~ x x ~ g x ~ x
Turning Loudness OnlOff
dl 5 . Press (LOU) button to increase
the low frequency.This can improve the sensitivity for your ears. And
"LOUD" appears in the L c ~ w h e n the loudness mode is activated. (See the picture) Press it once more to shut down the LOU function.
. .. .. .. . - . .. ~~ ~~
, , , . , . . ..,: . . . . . .. ----
% x x x x x x x x x x x x x x x x x x x x Setting P-EQ
I
6. While listening to the popular music, classic musec and rock music, you can adjust the sound quality to make it perfect by pressingrn(P-EQ) button.
The procedure is as follows:
* POP mode is selected whenn(p-ea) button is first pressed .and "POP"
appears in the display.
(Shown as picture)
t CLASSIC mode is selected when pressing (P-EQ) button at the second time, a n d c ~ n s " appears on
the LCD .(Shown as picture)
* ROCK mode is selected when pressing rn (P-EQ) button at the third time, ROCK" appears in the display. (Shown as picture)
* Press rn (P-EQ) button at the forth time to turn offthep-EQ system.
Nore : Boss mode and Treble mode rerurn to
initialsettings wltenP-EQ system is on.
' B A S S " ~ ~ ~ ' T R E B L E ' disappear.
Mute Function
7. Press ( M U T ) button to cut down
the sound output," MUTE" and "a " appears in the LCD.(Press it again
to revert to previous volume level).
Displaying and Adjusting Time Mode Selector
8. r ime Dlsplaylng: Press (DSP)
button and the current time is displayed,and it returns to original
status after 5 seconds or press.
the button again.
r ime Adjusting: Press and hold
(DSP) button until the two points in the middle of the clock
stop blinking , you can rotatae
(VOL) knob to adjust hours and
minutes.
9. Press (MOD) button to select radio mode . playback mode or audio in mode.
x x x x x x x x x x x x x x x f x x x x x
Sensor
10,Receptor for the card remote commander.(for remote control version only) NoretT1,ir windour is used for rkeunir wirlt
remore eonrrolJi~ncrion. Without this
fincrion,jlou should ignore rke opernrion
conrenrs oboldr remole conrrolfidncrio,!.
x x x x x x x x x x x x x x x x x x x X I

x x x x ~ x x ~ x * ~ x x x * x x ~ . ~ x x B a n d S e l e c t o r
1. Press m(BAND)button repeatedly
to select bands in the following order:
FMl FM2 FM3
AMZ+--AMI (Fortwo bands)
FM 1 ---* FM2 -* FM3 I? LW MW
(Forthree bands) J
Nore:On Ployi,zgMode vcsiorr, pressm (BAND)
h,rfron rosw~ilch PAL or NTSC s,vsrea.
X x x x x x x x x X X x x x x x x x X x x
M a n u a l l A u t o m a t i c T u n i n g
!. Manual Tuning: Pressw ( +H or
H1-) button continuously to
select a station upward or downward
respectively. Automatic Tun1ns:Press and hold
lR ( +M or H(- ) button for more than 3 seconds, the radio automatically searches a station
I 1
upward or downward respectively
and plays when it finds a station.
X % E % X I I E % X K X X l l l B L L % R
LOlDX S e l e c t o r
di 3. Press IB (Lot) button to select
strong or weak station reception. * I t is set to LOC mode when 18
( LOC )button is first pressed:'~Oc" appears and only local station is available. (Shown as picture)
* It is switched to DX mode when IB ( ~ 0 c ) b u t t o n is pressed again. Both distance and local stations can be received.
Norc: @ The inirinl mode is DX n~ode. No" DX oppeors in LCD.
@ LOC is functional only in selecting srorions .
x x x x ~ ~ x x g X X x ~ g ~ x x x x ~ x MOIST S e l e c t o r
m 4. Pressm(ST.~i~)button to select MONO
mode or s ~ ~ ~ ~ o m o d e . * Stereo reception is charged when "ST "appears in the LCD . And "a" appears in the display. (See the picture) * It is switched to MONO mode when "ST" disappears. * During the player mode, press the button to switch left speaker / right speakeristereo.
X I I B X L X I ~ B X E X X X X t ~ % X ~
S c a n n i n g l M e m o r i z i n g S t a t i o n s A u t o m a t i o a l l v
5. Press (AMS) button to scan each stored station 10 seconds respe- ctively which stored in LU (1-6) number buttons. When AMS mode is carried out. " I N T " appears on display. (See the picture). You also can press the corresponding number bu t tonor AMS button when your desired station is charged. It
* Press and hold 18 (AMS) button for more than 3 seconds to activate
automatically memory storing
function. The radio automatically
selects a station and has it stored
in any one of the number buttons
mu-6 ) . hote: Tltr unit curl besroredirp lo 6srarions
,for eoch bond. Regording rbr/lr,zcrion of
number brrrtons.refer ro number buttons
/or details. B E X X l X X X X % % X % X X X X E X X %
N u m b e r B u t t o n s
6.Nurnber buttons can help you store your favorite station by pressing
any one of the number buttons.You can follow the steps as below:
Press and hold any number button
(1-6) u n t i l ' t ~ "appears in the
LCD display when receiving a
station. And now the station is
already stored in the corresponding
number button.
(See the picture) T - T y , I' ,,, - '. .~ .~.'1.!6 ? 1 1
1: ,. .-'.= i. ~~ . . . - . 1 ~- - - - - -
YOU can store up to-I x FM stations, up to 12 AM stations.
* Nore: Workirzgnr 3 bond folorEurope.AM represents MW and LW.
x X x X x x x % x x x x x x x x x x x x x
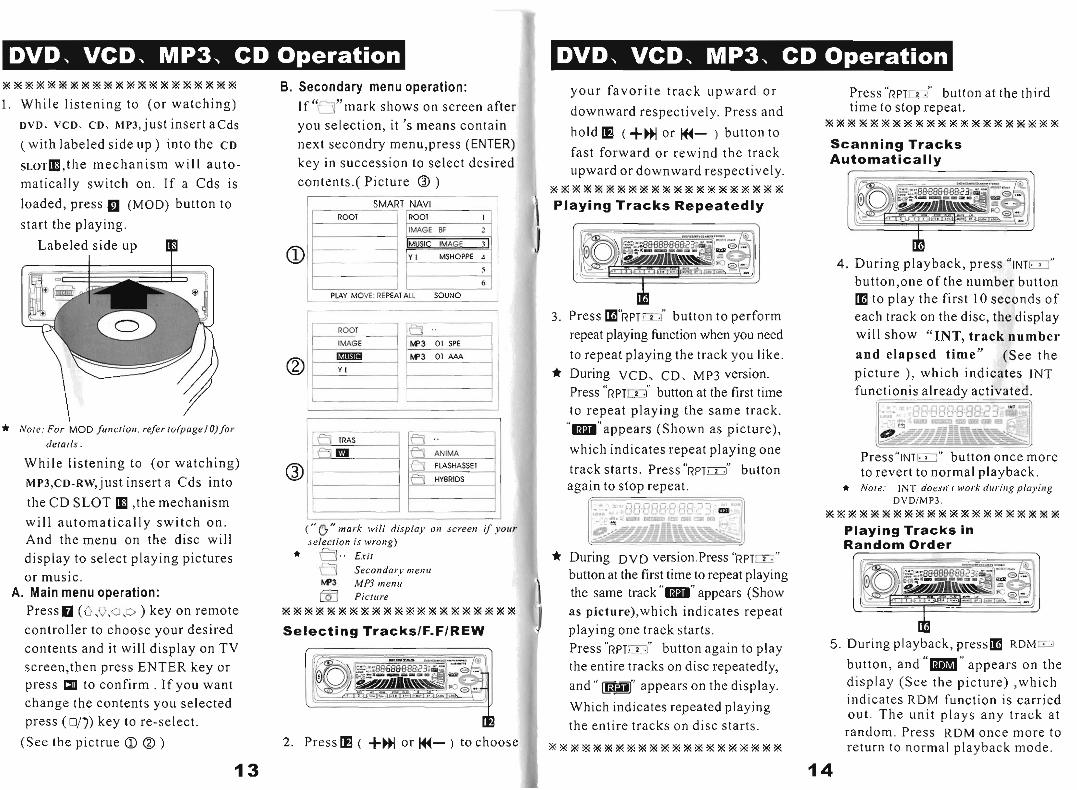
g x x x x x x x x x x x x x x x x x x x x . B. Secondary menu operation: 1. While listening to (or watching) I f " , " i n a r k shows on screen after
D ~ D . VCD, CD. ~ ~ 3 , j u s t insert aCds you selection, i t ' s means contain (with labeled side up) into the CD next secondry menu,press (ENTER) s ~ o ~ m , t h e mechanism will auto- key in succession to select desired matically switch on. If a Cds is contents.( Picture @ ) loaded, press (MOD) button to start the playing.
Labeled side up F
Note: For MOD funerion, r<lerro(pogelO) for deroiis.
While listening to (or watching) M P ~ , C D - ~ w , j u s t insert a Cds into theCD SLOT [El ,the mechanism will automatically switch on. And the menu on the disc will display to select playing pictures or music.
A. Main menu operation: Pressw (O.0,o.o ) key on remote controller to choose your desired contents and it will display on TV screen,then press ENTER key or press to confirm. If you want change the contents you selected press ( ~ 1 7 ) key to re-select.
(See the pictrue Q )
("D"mork will display on screen if your selecrion is wrong) a.. Erir
Secondary menu W3 MP3 menu E Picture
x x x x x x x x x x x x x x x x x f x x x Selecting TrackslF.FIREW
I 2. Pressm ( +ffl or HI- ) to choose
your favorite track u ~ w a r d or P ~ ~ T T " R P T _ ~ - " button at the third downward respectively. Press and
hold IQ ( +H( or HI- ) button to fast forward or rewind the track upward or downward respectively.
X Z B f % Z X % % X X B % % i % X % K B f
\ Playing Tracks Repeatedly
3. Press ~ " R P T 2 2 " button to perform repeat playing function when you need to repeat playing the track you like.
* During VCD, CD, ~ p 3 version. Press " R P T ~ " button at the first time to repeat playing the same track.
"="appears (Shown as picture), which indicates repeat playing one track starts. P r e s s " ~ p ~ m " button again to stop repeat.
* During DVD version.Press I P T ~ " button at the first time to repeat playing the same track "=" appears (Show
I as picture),which indicates repeat
- . ...
time to stop repeat. x x x x x x x x x x x x x x x x x x x x x
Scanning Tracks Automatically
4. During playback, press "INTEI" hlltton,one of the number button
to play the first I0 seconds of each track on the disc, the display will show "INT, t rack number and elapsed time" (See the nicture ), which indicates INT
...- . -.. . ~ ~~ - - ~
~ -
ton once I . . . , Press"lN1 nore to revert to normal p~ayaack. Note: INT d o e r ~ t I work drdr;!!p playing
DVDIMP3. x x x x x x x x x x x x x x x x x x x x %
Playing Tracks in Random Order
playing one track starts. Press " R P T ~ " button again to play 5. During playback, pressm RDMF
the entire tracks on disc repeatedly, button, and "m" appears on the and" appears on the display. display (See the picture) ,which
Which indicates repeated playing indicates RDM function is carried out. The unit plays any track at
the entire tracks on disc starts. random. Press RDM once more to X % x x x x x x x x x x x x x x x x x x x return to normal playback mode.
14

Nore: RDM is ,zor,fit,,crionol dsringpioying
DVDIMPB.
x x X x x x x x x x x x x x % i x x x x x Stop Playing
3 6. During playback,press ST OPE^'
button to s top the playback, LCD
will show t h e e lapsed t ime of t h e
en ks o n d i s c , " e mark t i r e t r a c
)ps runnil ng. To return to normal
play mode, p r e s s i b u t t o n on m. * Note:
I. Daring DVD rnode,press STOP butlo,,
on1.v rhejirst rime.rhe,n stop pioying.ord
"press play to continue "shows 011 TK
press STOP= ognin to srop.
2. During MP3 mode.press STOP S!l b t ~ f l o ~ l
one of rhe nunther button to srop
plnying. LCD nppears STOP
x l % x x x x x x x x x X x x x x x x x x Pause the Playback
7. Durlng p l ayback ,p re s smT (PAUSE)
button to suspend the playback,
'w mark stops running in the
d~sp lay . To return to normal play
mode,press it again,and ' ' ;nark
runs accordingly.
+ Note:
i . You eon olsopress[m"m~bt~rton to rerttne
piwback drrringsropployirgmode.
2. Press m"m'butron not toeject discduring
suspending mode,opernte theJi,netion after
coneeiing to suspend.
x x x x x x x % x x x % % x x x x x x x x Eject a CDs
8. Press [O Eject button (A) to eject the
d i s c , ' b ~ ~ ~ " w i l l appear on display.
Nore : please use original disc for this prodrrct
poor q,toliry disc nlight domoge the lens.
I/ rke prodrier ouromoricnliy locked.
P r e r s B ( ~ 0 D ) to change to radio mode
ortdpress the EJECT(m) button for 3
seconds to eject the disc.
Power Switch PauselPlay Button Mute Button Selecting Menu Button BandISystem Switch Enter Button Volume Control - a TuningISelecting TrackslF.FIREW a Program Playing On-Screen Display
m Setting the Sound Characteristics Repeat Playing
PI7 Random Playing PI7 Number Button PI7 Audio-Setting
PI7 PBCMenu P I 7 Subtitle-Setting
P I 7 PlayingTime-Setting PI8 Modeswitch
P I8 StopIReverse Button Angle-Setting
PI8 Slow-motion Play PI8 SetupMenu PI8 Menu-Display
PI8 Zoom-Setting
16

x g x x z x x x x x g x x x x x x x x x x Replacing the Battery * When the range ofthe operation of
the card remote control becomes short or no functions while operating. Replace the battety with a new button cell.Make sure the battery polarity before replace.
1 . Pull out the Battery Holder while
2. Put the button-type battery(+) mark upward into the Battery Holder.
3.Insert the Battery Holder into the Remote Control.
Note; Some model.? ore not equipped wirh renzore conrrol, yos rkotrld ignore the eonrenrs ahour renlorr eonrrol.
* Power Button -- Press (6 )button to turn
OnlOff the power. X x x x % % x x x x x x x x x x x X x I % * PauselPlay Button
-- P ~ ~ s s H ( H I )button to suspend
the playback of CD. MP3. VCD.
DVD. Press it again to return to
normal playback mode. % x x % % x x x x x x x % x x x % x x x % *Mute Button
-- Pressm( a )button to cut down the sound output, press it once more to resume the previous sound level.
X X X % % X # K % X % % I Z % H l % f % %
* Meau selector
--Press (0 I0 10 I G ) to select your desired meau,then press (ENTER)OT press the play button
(HI )to confirm.
Nore: Thisliincrio,, works ir, main menu
ntode onlj,.refer ropoge 13.
x x x x x x x x x x x x x x x x x x x f s
* BandlSystem Switch -- During radio mode, press rn
( B A N D I S Y S ) t o switch rec- -eiving band.
--During the player mode,press ( B A N D / S Y S ) ~ U ~ ~ O I ~ to switch
to AUTO. PAL or NTSC system.
x x x x x x x x % x x x x x X x x x x x x
X x x x x x x x x A x x x x x x L x x m
* Volume lncreasinglDecreasing
--Press (VOL+ or VOL-) button to increase or decrease the volume level respectively.
x x x x x X x % % x X x ~ x x x % x x x x * TuninglSelecting Tracks
lFastRewindlForward --During radio mode,continuously press m ( - m or m+ )button to manual search a station downward or upward respectively; if press and hold q ( -I44 or HI+) button for more than 3 seconds, the radio will automatically semch a station downward or upward respectively until it finds a station. --During the playing mode, press and holdm (-H orW+ )bunon to fast rewind or fast forward for you to reach your desired track quickly. When discontinuously press q (-morHI+)button, you can select your desired portion downward or upward respectively.
x x x x x x x x x x x x % x W x x x x x x * Program Playing -- During CD. VCD mode, you can set the program order to play, you can follow the steps as below: Firstly press (PBC) button, and then press (PGM) button, and the television displays programming P00:OO. You can set the program order to play them by using ( 0
- lo+) button, and then press g (HI to play.
.\'ate: Progront doesr 'rfitnerion in plnving MP3 .
x x x x x x x x x % x ~ x % ~ x x x x x x t On-Screen Display
--During CD. VCD, DVD mode, press (OSD) button. The display shows single t r ack elapsed time, single track left time or entire disc left t ime , and the t r ack being
played and the amount of the whole disc.
Nore: During M p 3 mode, o,!iysir~gle l u c k elapsed rime isdisplayedin OSD mode.
x x x x x x x % x x x x % x x x x x x x x + VOLlBASlTRElBALlFAD
Selector -- Repeatedly press (SEL)
button to select the desired mode in the following order:
VOL--$ BAS + TRE p F A D t B A L t 7
NOIP: Afier selecling your desired mode, you can
odjusr the eurrenr mode heing displayed bx
using(vo~+ orv0~-)hullons. When P-EQ
mode is ncrivored. press SELhslro,~ lo seleer
rhe modes. And Boss/Trrhlc mode ore ittvo- -LU.(sl#o~m os below)
fl VOL- BAL + FAD7
* Repeat PlayinglAMS --During DVD mode, firstly Press 10 (AmslRPT) to repeat
the current track being played; Press it again to repeat playing all the tracks.The third press i t to cancel the repeating functional. (LCD will display different designs)

--DuringCD, M P 3 , VCD mode, /,I PBCplaybnck mode.Nnmber Burron is I - g g g g g g g x g g g g g x g g g g g m X X ~ ~ x % % % % % % % % X i % % ~ % % X - firstly press B(Ams1RPT) to repeat the current track being played; press it again to cancel the repeating functional.
Nore: I n VCD. MP3. C D mode. The inirial
procedure is repenrploying all rbe rrocks.
Nore: In rodio mode.Press~(AmslRPT) loseon
enchsroredrrario,t IOreconds respeerively
which rroredin Number Bulfons.
x X t x % x x % x % % x x % x ~ % % % x x * Random Playing
--During the playing mode,press
IQ (RDM) button to play any track at random. (Viz. The unit plays
tracks out of turn.) Nore: RDM is norJimcrionnlin DVD mode.
f % X % % % X X X % % X % X % % X % X % X * Number Buttons
--During radio mode, you can select one of the 6 stored stations on each hand by pressing any one ofthe number button . -- During the playing mode, you can select any track directly by
using number button (0-lo+).
For example, if you need the fifteenth
track, you can first press button
l o + and then press button 5, the corresponding tarck ( 1 5 ) ' ~ ' will be played.
Nore: When burron 1 n+ is lirsr oressed.ir works os
t LeftlRightlStereo Selector -- During the playing mode,
con t inuous ly p ress (Audio)
can change the sound to left / right speaker or stereo mode.
Nore : There are 5 groder sttrrosnding effed in sttrrottndnmde. During VCD nzode..vou can
see rhe di//ere,tlpio,lres indicoring dfflerenr
efiers on rhe 1eIe1,ision.
* Playing pBC (menu) -- During VCD mode only, when pressing (PBC) button at the first time, PBC playback starts and the menu of entire disc appears on the television. And then you can
select your favorite track by using
numberbutton (0-lo+) .When a track is playing, you can press
(STOPIRETURN) button to return to the menu if you want to stop to select other tracks. To cancel PBC playing, press (PBC) button
again. % % x % x x x % % % x x x % % x % % % % % * Subtitle Selector
--During DVD mode, press 10 (SUB-T) button to switch the menu to Chinese or English.
Setting CDs Playback Time
-- In VCD, CD mode, press [10 (GOTO) key and set the time when you begin to play the track, and the television will display the time - - : - - , Enter your desired time by pressing number button
(o-lo+). For example, enter: 25:00, it will automatically start -- -- playing the track from point of the ~~ -
twenty-fifth minutes in the disc.
-- In DVD playing mode, press m ( G O T 0 ) key once and input a desirec track number, then press @(,I1 ) key to play the DVD from the position corresponding to the track number selected.
-- In DVD playingmode, press G GO TO) key twice and input a desired time to play the DVD from the position corresponding to the time selected.For example,press [10 (GOTO) key twice and the television will display the time .. : .. : .. .Enter your desired time by pressing number buttonm(0-lo+). Then press (bll)button, it will automatically start playing the track from point of your desirec time in the disc.
Mode Switch -- Press [D (MODE) button to switch to radio mode or playback mode .
% % f % x % x % % x x ~ x % % % x % % x x *Stop the Playback -- In DVD mode,press ( W ) button to suspend the playback and"press play to continue'$hown on TV,press it again to stop the
. . Nore: I n VCD, MP3 ond C D , press this key once
I0 Slop. % % x % x % x % x % % % % x x % x ~ x % % t MULT-ANGLE KEY
--In DVD playing mode, press (ANGLE) key, you can watch
the DVD content from diferent angle.
Note: In VCD. MP3 and CD,ir is nor tAe~i,ncrion
X % % % X % X % % % X X % % % % % % X % X
t SLOW REVERSE1 SLOW ADVANCE KEY
--In DVD playing mode,press (SLOW) key once for 2x slow
,advance,twice for 4x slow advance, third for 8x slow advance,fouthly for 2x slow reverse,fifthl-y for 4x slow reverse , sixth for 8x slow reverse,seventh for normal player. --In VCD playing mode,pressm (SLOW) key once for l x slow advance,twice for 2x slow advance, Third for 3x slow advance,press
. - , . l o+ , ir works as 20+ w,lrerr pressed or r6e I Nore: No rime playJiincrion for MP3. rn ( H I ) key to cancel slow reverse second time, rke third rime ... 30+. ... a,#drhe l ike .
x % x % % x X % x % % x x % % % x % % x x % x x x % % % % x x l % x % x % % % % % x
/Slow advance function. % % X % X % X % X % % % % % % t % f % X % Note: h MP3 and C D . ir is nor rhe finerion.

X g X X g X Z X X X X X X X X X X X X M
t SET UP KEY
--In playing mode,press EO key
(Setup) ,menu will be showed on
Screen.(see the pictrue)
GENERALSET
e PREFERENCES
Pressing q (ENTER) key to corfirm
after selecting your desired content:
1 GENERAL SET:set TV system,
pictrue mode, angle mark and
Language.
2 AUDIO SET : set audio output,
OPMODE, L+R . DYNANIC,
audio set and so on.(Note : some
of our products can't be used for '
digital power AMP)
3 PREFERENCES:set TV system,
Video output. etc. (Enter this
function in stop mode only)
4 Press (setup) key again to
cancel menu set. % ~ % % % X % t ~ ~ % % % % N % % % X % ~
X X X X X X ~ ~ ~ % % % ~ % ~ % % % X % ~
* TITLE KEY
-- In DVD, VCD playing mode,
Press (TITLE )key to show all
tracks iitle on TV screen. Then
press m(0-lo+) key or press
( 0/0, ' ,0 /0 ) key to choose your
desired track number and p r e s s a
(ENTER) key or (bII ) key to
start.
Note: I . No rille display in MP3. C D "lode
2. For choose a desired ln,,guoge
10 press lirle key.
* ZOOM KEY
-In DVD, VCD playing mode,
press (ZOOM ) key once for
1.5 x Mode, twice for 2 x Mode,
third time for 3 x Mode, forthly
time for cancel Mode.
Nore: NO ZOOMfttnerion CD/MP3 playing
mode.
X X X X X X X ~ X X X X X X ~ % ~ % ~ % ~ % ~ % ~ % % X ~ % ~ % % % ~ ~ % X % X ~ % % % %
Parts List (The numbers in the list are keyed to those in the instructions.)
Mounting Example a
Fasten the rear bracket screws and backside harness. and l i x

I'owcr Requirements .................. 1 4 . 4 ~ DC
Load Impedance .............. .. ...... 4 0
Max. Powerou tpu t ..................... 45W 4
Tone Controls ............................... iede(Bass ~ O o ~ z , T r e b l e l o ~ ~ ~ )
Dimensions .............................. Approx 192~178~50mm(d x w x h ) Mounting Dimens ions ............. ApproxS69~182~53mm(d x w x h ) Weight ...................................... Approx.1 .75 kg
x x x x x x x X x x x x x x x % x x x x x x x x x x x x x % x % x x x x % x % x % x % x ~
Mounting Example a
1 . Store sntoll articles inplaces ,lot nc- -cessible lo ehildrm.
2. I ,~srol /o,zl~ wirlz rlzesuppliedscrrws.
3. Insmllorion varies depending on the
types ofcors ondsuppliedporrs. You sBor,ld boverbeu,nir i,tsrolledb~
qnalifiedrechnicion.
Existing parts supplied
DETACHING THE FRONT PANEL
Discs Playcd ................................ DVD,VCDl.Oll.ll2.Ol3.O,MP3,CD,CD-R.CD-RW,PlCTURE-CD Vidco S y s t e ~ n .............................. AUTOIPALINTSC Mounting Angle .......................... o t o t l - 3 0 '
:a<> Before decaehingthe front panel. Be sure to press @ .Press @.then lure the front panel 6:. . -- tothelevel,slide it tothelen. and pull it off
8. -Q %%.,? ., , : towards you. . . {I. --,
* * ~ & -
............................... Vidco Systcm 4:3 Let te rBoxand4:3 Pan Scan
Video Output level ...................... I.OVp-p7Sohrns
Horizontal Resolution ................ 500
, M a x i m u ~ n Output Icvcl ............. 2Vrms(+l-3dB)
Frequency Response .................. 2 0 1 0 2 0 ~ h z
REPLACING THE FRONT PANEL p-~p
.* ,- <<i b~ First. insert the left side ofthe front panel
a* ..-, 1. into themainunit. Push the right sidcof the
B U l W front paneluntil it locks firmly intothemain F , p , , ; * ~0110~ ? .- pi YoIIo* unit, atone time, insen the right sideofthe
'A ...... ,% front panel into the main unit.
PRECAUTIONS
Do not touch thecontactson theront panel or ~- ---. --== * ~* ".
'R an the unit body, since this may result in poor
I----~-'I electricalcontact. contacts. wipethem Ifdin with a or clean, dust dry get cloth. on the
23
Signal-to-noise Ratio ................ 8SdB
Separation ................................. sodB
Frequency Range ........................ 522-1620~uropeIChina),S30-I7I0(U.S.A) IF Range ....................................... 1 0 . 7 ~ ~ ~
........... 2SdB
' r ~ n i l l g Range ............................... 87.5-lO8(EuropeIChina).87.5-107.9(U.S.A) IF Range ....................................... I0.7MHz
........... Usable sensitivity (-30dB) 1SdB
Signal-to-noise Ratio ................. 60dB
........................ Stereo Separation ~ O ~ B ( ~ K H Z ) ................... Frequency Response 30- lsoooHz
X x x % x % x x ~ % % % x x x x x x x x x z x % x ~ x x x x x x x x x x x ~ x x x x x x x * Note: Drre to ronrinuowsproducr imnprol.emenr. specljicorions nndderign n,us,,hjerr rochonge u~ilhoar norice.
24 END


![2016-09-07 R v Ware [2016] ACTSC 264€¦ · Web viewHe then stole a Soundstream subwoofer speaker, silver Soundstream amplifier, a black Phoenix amplifier, ... a Canon PowerShot](https://img.pdfslide.us/doc/110x75/5ea1b3746a89713041337b96/2016-09-07-r-v-ware-2016-actsc-264-web-view-he-then-stole-a-soundstream-subwoofer.jpg)