Embed Size (px)
Citation preview
Vanguard Software Builder
Overview
Introduction The Vanguard Software Builder application lets you create custom software images for all Vanguard products.
This application operates under any 32-bit version of Microsoft Windows and is available on the Vanguide CD-ROM which accompanies Vanguard products.
What is Vanguide Software Builder?
Vanguard Software Builder is a tool within the Vanguide Application Set and can be accessed using the Vanguide Application Manager.
Intended Use This document is intended for use by anyone wanting to install the Vanguard Software Builder and create custom software images for use on Vanguard products.
In This Manual Topic See Page
Installing Software Builder............................................................................ 3The Vanguard Software Builder Application ................................................ 4
Features and Protocol Group..................................................................... 8Menu Bar ....................................................................................................... 12SWBLDR.ini File .......................................................................................... 20Software Images ............................................................................................ 21Creating a Software Image ............................................................................ 24Updating Images for New Software Releases ............................................... 32Error Messages .............................................................................................. 36Upgrades and Patches.................................................................................... 42
Patch Installation....................................................................................... 44Manual Patch Uninstallation ..................................................................... 48
Related Documentation
Refer to these documents for information relating to other Vanguard Applications:
Part Number Documentation Includes
T0056 Vanguide Application Set Installer Manual
Instructions on installing and removing Vanguide Application Set Software.
T0057 Vanguard Software Loader
Instructions on transferring software images from you personal computer to Vanguard products.
T0058 Vanguard Configuration Loader
Instructions on transferring software configurations from you personal computer to Vanguard products.
Vanguard Software Builder 1
What Can You Do With Software Builder
Software Builder lets you create software images that best suit your network requirements. By selecting only the software you need, reduce the size of your image to save on the amount of DRAM needed, freeing it to increase device performance. This allows for more data buffers and station configurations, especially if you have a specific set of required features and protocols to run on a node; like voice relay (FRI and Voice) or front-ending an SNA FEP; (FRI and SDLC with LLC conversion).
Once Software Builder is installed:
• Select a specific software release.• Choose the Vanguard product which is to have a custom software image.• Customize a name and 2-digit number for the software images you want
to create.• Follow through from a series of prompts to select required features/protocols
to be included in your images.
Trademarks These are trademarks or registered trademarks of their respective companies or organizations:
• Windows XP, NT and Windows 95/98/2000 - Microsoft Corporation• Insignia Solutions SoftWindows™ 95 (V4.0) emulator - Insignia Solutions
Inc.
2 Vanguard Software Builder

Installing Software Builder
Installing Software Builder
Introduction The Vanguard Software Builder application can be installed on the hard disk of your computer. However, you must be able to access the Vanguide CD-ROM directly.
Installing Builder Vanguard Software Builder is installed as part of the Vanguide Applications Set. For instructions on loading the Software Builder, refer to the Vanguide Applications Set Installation Guide (Part Number T0056).
Builder Directory This table describes four Software Builder files placed in the Vanguide directory during installation.
In addition to the files and directories listed above, C:\Vanguard\Vanguide also contains many database files that correspond to the various software releases supported by your version of Software Builder.
CautionDo not delete these files!
File Name and Icon Description
The Tools folder contains system tools required by Software Builder to create software images.
The SWBLDR.ini file contains the configuration settings for the Vanguard Software Builder application.
The SWBLDR32.exe file is the executable file that launches the Software Builder application.
The SWBLDR32.hlp file contains the context sensitive help files for the SWBLDR32.exe program.
Vanguard Software Builder 3
T0030, Revision U Release 6.4
The Vanguard Software Builder Application
The Vanguard Software Builder Application
Introduction When you start the Vanguard Software Builder, the Serial Numbers dialog box appears, requesting the serial numbers for the software licenses you purchased for your release. These serial numbers allow you to create software images. For more information, please refer to the “Creating a Software Image” section on page 24.
Main Application Window
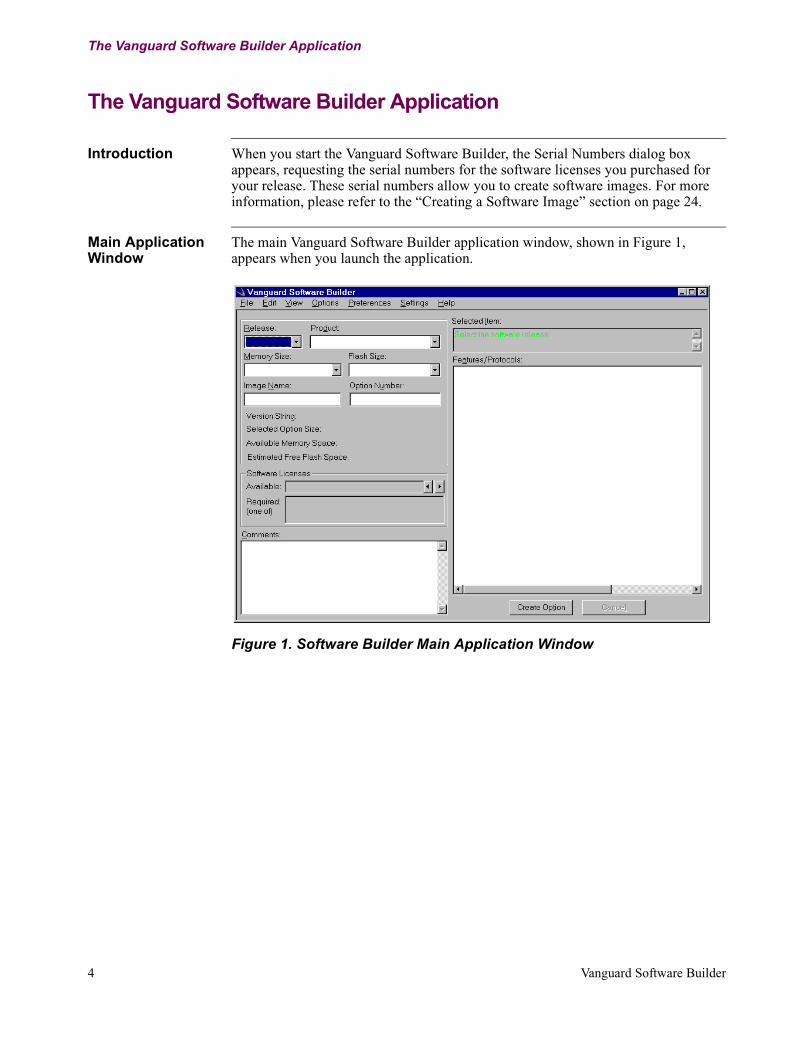
The main Vanguard Software Builder application window, shown in Figure 1, appears when you launch the application.
Figure 1. Software Builder Main Application Window
4 Vanguard Software Builder

The Vanguard Software Builder Application
Using The Main Application Window
This table explains how to use the fields, lists, and buttons in the Software Builder main application window:
Window Item Purpose
Release: Identifies the software releases available (including Patch Releases) with the application and supported by the Software Builder release database. The specific releases listed here depend on the ODBC data sources configured in the SWBLDR.ini file. When this menu appears, all software releases that Software Builder supports are listed. Contact Customer Service if your release is not listed when this drop-down appears.
Product: Contains the list of products supported by the selected release. If a specific product is not listed in this pop-up menu, it is not supported by the release selected and you have to select a different release.
Image Name: Identifies the name that identifies the option you are going to build (up to 8 characters). This name is included in the version string of the created software image.
Option Number: Identifies the number of the option (00 to 99). This number is included in the name of the software image file and must be two digits in length.
Memory Size: Contains the list of available memory configurations for the selected product.
NoteSome Vanguard products have fixed memory sizes so no selection may be necessary. Check your product’s documentation for FLASH size before making your selection.
Flash Size: Identifies possible flash memory configurations for the selected product. Check your product’s documentation before making the selection.
NoteSome Vanguard products have fixed memory sizes so no selection may be necessary.
6.4.R00A6.3.R00A6.2.R0006.1.R0006.0.R00A5.6.R0005.5.P015.55.4.P08
Vanguard 6435Vanguard 340Vanguard 340 Enhanced Vanguard 342Vanguard 6455Vanguard 7310Vanguard 7330
Vanguard Software Builder 5
T0030, Revision U Release 6.4
The Vanguard Software Builder Application
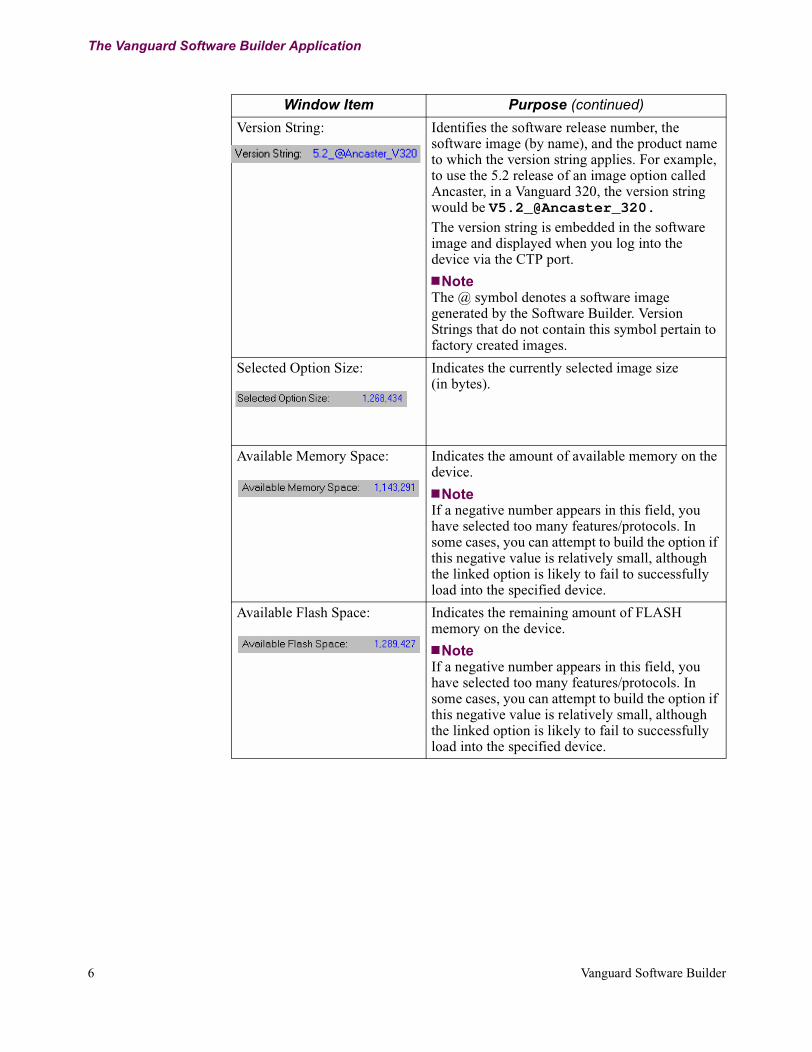
Version String: Identifies the software release number, the software image (by name), and the product name to which the version string applies. For example, to use the 5.2 release of an image option called Ancaster, in a Vanguard 320, the version string would be V5.2_@Ancaster_320.The version string is embedded in the software image and displayed when you log into the device via the CTP port.
NoteThe @ symbol denotes a software image generated by the Software Builder. Version Strings that do not contain this symbol pertain to factory created images.
Selected Option Size: Indicates the currently selected image size (in bytes).
Available Memory Space: Indicates the amount of available memory on the device.
NoteIf a negative number appears in this field, you have selected too many features/protocols. In some cases, you can attempt to build the option if this negative value is relatively small, although the linked option is likely to fail to successfully load into the specified device.
Available Flash Space: Indicates the remaining amount of FLASH memory on the device.
NoteIf a negative number appears in this field, you have selected too many features/protocols. In some cases, you can attempt to build the option if this negative value is relatively small, although the linked option is likely to fail to successfully load into the specified device.
Window Item Purpose (continued)
6 Vanguard Software Builder

The Vanguard Software Builder Application
Software Licenses: Available:The list of available software licenses for the current combination of a product and soft-ware release appears in this field. Click the left and right arrow buttons or press the left and right keys on the keyboard (when the cursor is in this field) to scroll through this field. You must enter the serial numbers for the software licenses in the Serial Numbers dialog box for the software licenses to appear in this field.
Required:This field displays the list of possible licenses required for the software image. Once you enter the required serial numbers for the required software licenses in the Serial Numbers tab of the Options dialog box, the Required field is then updated.
Comments: These comments are appended to the description file that gets created along with the option.
Selected Item: Serves two purposes:• When you select a feature, or a feature group
in the Features/Protocols list box, it displays a brief description on this item.
• Once you have completed making a menu or screen selection, it identifies the next step to follow. For example, if you have just finished selecting a product from the Product list box, the Selected Item box displays the prompt to Select Memory Size, if this selection is required.
Features/Protocols: Lists all the features and protocols that you might choose to include in an option. To include a feature into an option, you must select it from the displayed list. The features and protocols listed depend on the product you selected in the Product field.
Create Option This button creates the custom software image defined by the selected features and protocols.This function has the same effect as selecting the Create Option item from the Option menu.
Cancel This button cancels the creation process of a custom software image.This function has the same effect as selecting Cancel Option Creation from the Option menu.
Window Item Purpose (continued)
SNA+, IP+, Multiservice
Vanguard Software Builder 7
T0030, Revision U Release 6.4
The Vanguard Software Builder Application
Features and Protocol Group
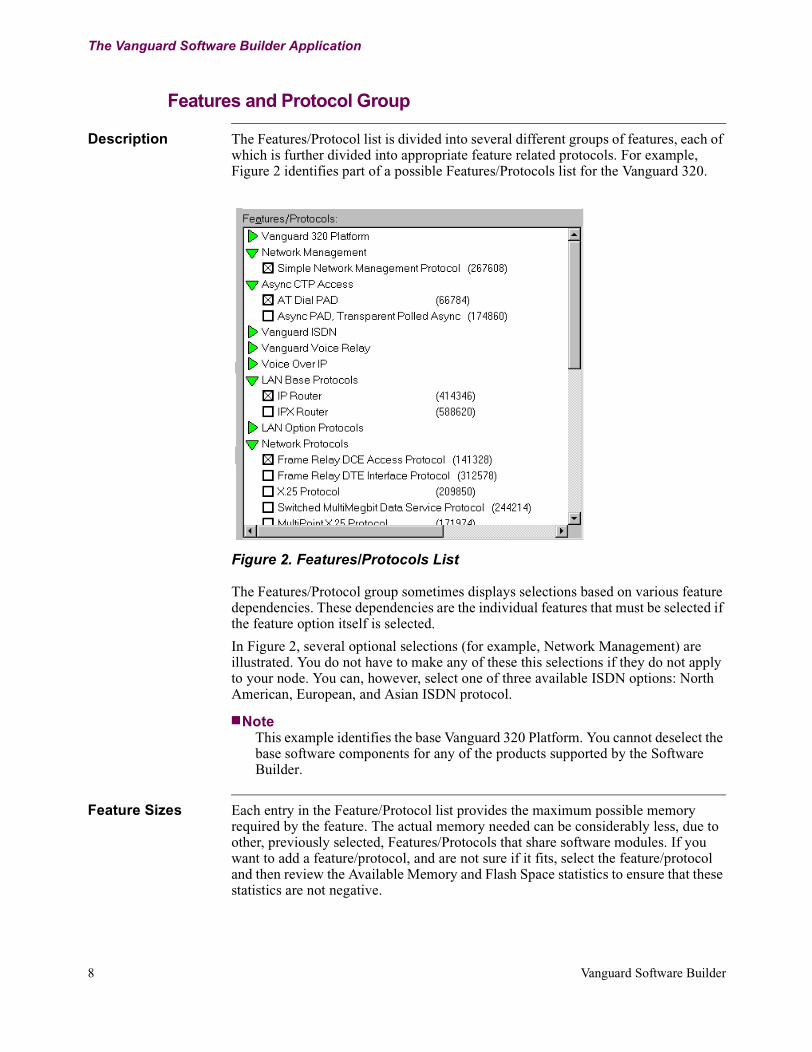
Description The Features/Protocol list is divided into several different groups of features, each of which is further divided into appropriate feature related protocols. For example, Figure 2 identifies part of a possible Features/Protocols list for the Vanguard 320.
Figure 2. Features/Protocols List
The Features/Protocol group sometimes displays selections based on various feature dependencies. These dependencies are the individual features that must be selected if the feature option itself is selected.
In Figure 2, several optional selections (for example, Network Management) are illustrated. You do not have to make any of these this selections if they do not apply to your node. You can, however, select one of three available ISDN options: North American, European, and Asian ISDN protocol.
NoteThis example identifies the base Vanguard 320 Platform. You cannot deselect the base software components for any of the products supported by the Software Builder.
Feature Sizes Each entry in the Feature/Protocol list provides the maximum possible memory required by the feature. The actual memory needed can be considerably less, due to other, previously selected, Features/Protocols that share software modules. If you want to add a feature/protocol, and are not sure if it fits, select the feature/protocol and then review the Available Memory and Flash Space statistics to ensure that these statistics are not negative.
8 Vanguard Software Builder

The Vanguard Software Builder Application
Symbols The Features/Protocols list contains different symbols that are used to identify specific types of features and protocols. These are listed and described in this table:
NoteYou can proceed with creating an option only if there are no red triangles in the Protocols/Features list.
Selection Criteria For Groups of Features/Protocols
This table lists the selection criteria that apply when making selections from the Protocols/Features list:
Window Item Purpose
Items that are identified by a plain black circle are selectable for the software image being created. When you click on one of these buttons, it is filled in to indicate that it is selected. If you select another item in the same group, the first is deselected. If a No Selection is permitted, double clicking on the same item also deselects it.
A square indicates a selectable feature. If the group only requires that one item be selected, the red cross changes to a green check mark when a selection is made.
Groups of items that are identified by a red triangle indicate that at least one of the items in the group must be selected. When your selections are complete, this symbol changes to a green triangle.
Groups of items identified by a green triangle indicate that selection of any feature in the group is optional. In some groups identified by these triangles (Token Ring Port for instance), selecting one feature automatically results in all features in that group being selected. If one of these features is de-selected, all are deselected.
Group Selection Criteria
Platform This group and the modules contained within the group are included in every software image. They are not selectable and the displayed modules can vary depending on the Vanguard product selected.
Ethernet Port andToken Ring Port
Selection of either Ethernet Port, Token Ring Port, or both, is allowed in this group.Change or deselect your selections as required.
NoteAll features under the group are included when a selection is made.
Vanguard Software Builder 9
T0030, Revision U Release 6.4

The Vanguard Software Builder Application
Network Management Multiple selections are permitted in this group. Change or deselect your selection as required.
NoteOnly one selection is currently offered in this group.
Async CTP Access Multiple selections are permitted in this group. Change or deselect your selection as required.
NoteSome platforms only offer a single choice.
Vanguard Voice Relay Only one selection is allowed from this group, although there is an additional optional check box for Release 5.3M.Change or deselect your selection as required.
NoteThe Frame Relay DTE Interface Protocol (FRI) is automatically added to the image when this feature is selected.
Vanguard ISDN/POTS Only one selection is permitted in this group. Change or deselect your choice as required.
NoteFor the X.25 Protocol and 5th SoftSCC Support over SMC device, features are automatically added to the image when this feature is selected.
LAN Base Protocols Multiple selections are permitted in this group. Change or deselect your selections as required, but at least one option must be selected.
Vanguard 650 Multiple selections are permitted in this group. Change or deselect your selections as required.
Voice Over IP Only one selection is permitted in this group. Change or deselect your choice as required.
IP Routing Only one selection is permitted in this group. Change or deselect your choice as required.
LAN Option Protocols orLAN Protocols
Multiple selections are permitted in this group. Change or deselect your selections as required.
Network Protocols Multiple selections are permitted in this group. Change or deselect your selections as required, but at least one option must be selected.
Serial Asynchronous Protocols Multiple selections are permitted in this group. Change or deselect your selections as required.
Serial Synchronous Bit Oriented Protocols
Multiple selections are permitted in this group. Change or deselect your selections as required.
Serial Character OrientedProtocols
Multiple selections are permitted in this group. Change or deselect your selections as required.
Group Selection Criteria (continued)
10 Vanguard Software Builder

The Vanguard Software Builder Application
Software Licenses As you make selections from the Features/Protocols list, additional Licensed Vanguard Applications Ware might be required (see Figure 3). If you select a non-licensed feature, a warning message appears. This message tells you that the feature is not currently licensed, cannot be created, and asks you if you want to proceed.
Figure 3. Software License Warning
You can choose to proceed with the selection. In this case, the Required Software Licenses field displays a list of possible choices for the required software licenses. After entering the required serial numbers for the licenses in the Serial Numbers dialog box, the Required Software Licenses field is updated accordingly.
You can choose to suppress any future warnings by checking the Do not display future warnings check box. This setting is only valid for the currently selected product. When you select another product, or when Software Builder is restarted, the license warning messages is reactivated.
NoteNon-licensed features are displayed, in pink, in the Features/Protocols list. As you enter new licenses, the display is automatically updated.
TPDU Adaptors Multiple selections are permitted in this group. Change or deselect your selections as required.
Node Features Multiple selections are permitted in this group. Change or deselect your selections as required.
IBM SNA Features Multiple selections are permitted in this group. Change or deselect your selections as required.
Group Selection Criteria (continued)
Vanguard Software Builder 11
T0030, Revision U Release 6.4
Menu Bar
Menu Bar
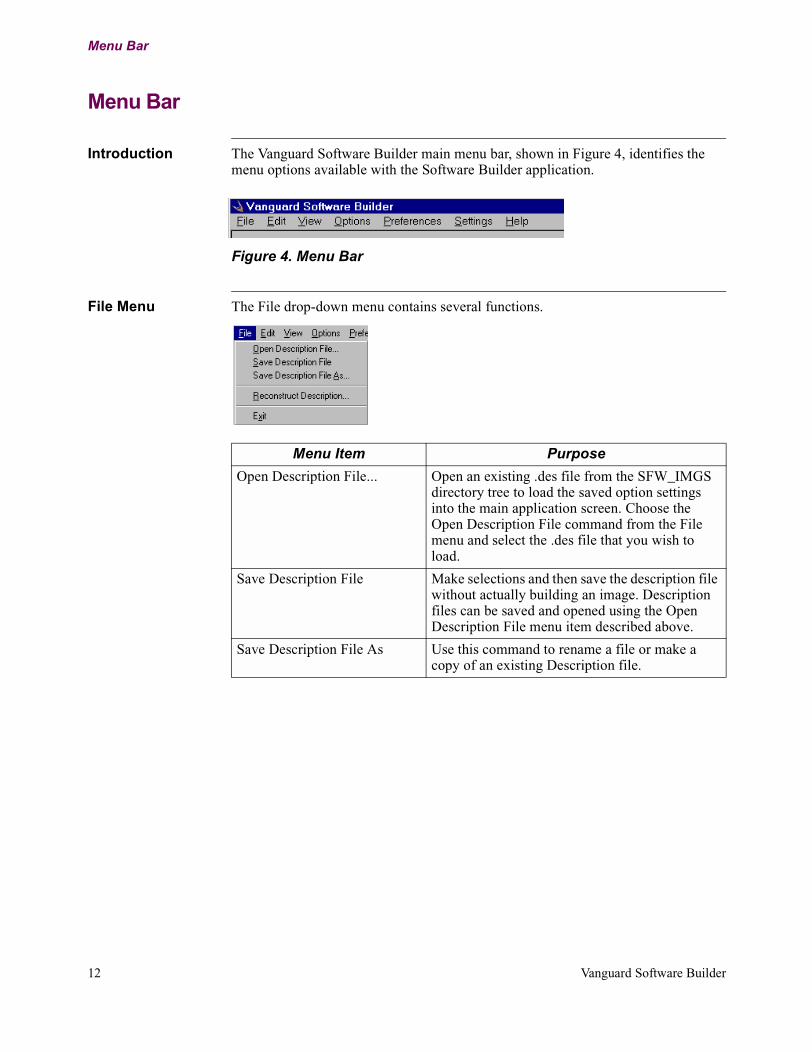
Introduction The Vanguard Software Builder main menu bar, shown in Figure 4, identifies the menu options available with the Software Builder application.
Figure 4. Menu Bar
File Menu The File drop-down menu contains several functions.
Menu Item Purpose
Open Description File... Open an existing .des file from the SFW_IMGS directory tree to load the saved option settings into the main application screen. Choose the Open Description File command from the File menu and select the .des file that you wish to load.
Save Description File Make selections and then save the description file without actually building an image. Description files can be saved and opened using the Open Description File menu item described above.
Save Description File As Use this command to rename a file or make a copy of an existing Description file.
12 Vanguard Software Builder

Menu Bar
Edit Menu The Edit drop-down menu contains three selectable options.
Reconstruct Description... You can reconstruct a description file (.des) for any image. This feature allows you to forward description files to Customer Service to troubleshoot difficulties. Reconstructing a description is as simple as making captures of various text screens from the CTP.
a)Connect to the device’s CTP port and capture the Node Stat screens into the text file.
b)Capture and append the screens from the DEBUG-List Software Modules menu, from the CTP, to the end of the same text file.
c)Capture the Detailed ISDN Port Stat screens into the text file.
d)Save the capture file and then select Reconstruct Description from the File menu. Software Builder attempts to reconstruct the complete *.des file from the information contained in the text capture file. You can enter the *.des filename and then save the created text file.
Exit This closes the application.
Menu Item Purpose (continued)
Menu Item Purpose
Clear Selection This clears all user-made feature selections in the Features/Protocols list. When you click this menu item, the Features/Protocols list returns to its initial state.
Clear All This clears all selections in all areas of the window that you have made. When you select this item, all fields on the window go blank, and the Release drop-down list appears, allowing you to make your first selection.
Vanguard Software Builder 13
T0030, Revision U Release 6.4

Menu Bar
View Menu The View drop-down menu contains several selectable options.
Copy Feature List This copies the text with all the groups and features in the Features/Protocols list to the clipboard. You can then paste the text into a text editor to review or print the list.In the Features/Protocols list,
• [X] identifies the checked check boxes.• (X) identifies the selected radio-buttons.• [D] identifies a DUMMY feature that is
included in the software image only if no other features are selected in this group of features/protocols.
• [C] identifies a common feature that is included in the software image only if some regular feature is selected in this group.
Menu Item Purpose (continued)
Menu Item Purpose
Module List... Use this to view a list of modules (files) that comprise the currently selected features. These modules are linked together into the software image in the process of creating an option. You can save the module list in a text file by selecting the Save Module List As... option from the Module List dialog.
Description File... This displays the View Description window that contains a complete description of created options. When the View Description window appears, clicking in the top left corner of the window causes a pop-up menu to appear. The pop-up allows you to save description files.
14 Vanguard Software Builder

Menu Bar
Options Menu The Options drop-down menu contains three selectable options.
To build an option, the application uses files (software modules) from the Vanguide CD-ROM, provided with this product. The application also uses a database from these modules when linking them into the software image, as well as the Builder tools and libraries.
License Profile This lets you review all the software licenses for which serial numbers have been provided. A dialog box appears, listing software licenses for the currently selected software release. The release name appears, followed by a list of platforms and available software licenses, and the number of available licenses given in parenthesis after the Licensed Vanguard Applications Ware name.
Close Groups This closes all groups in the Features and Protocols list that can be closed. The groups that have red triangles next to them can not be closed.
Open Groups This opens all groups in the Features and Protocols list.
Default Group Display This opens all the groups that have required selections, or a red triangle indicating unsatisfied selections/dependencies; otherwise it closes all the groups that do not have selections. This is the same display as when the .des is opened through the Open Description File command from the File menu item.
Menu Item Purpose (continued)
While an option is being created, the Cancel Option Creation menu item is still active.
Menu Item Purpose
Create Option This creates the selected option. Refer to the “Creating a Software Image” section on page 24 for detailed instructions on creating an option.
Create 6500PLUS Disk(s) This allows you to create a 6500PLUS NSO disk set. Refer to the 6500PLUS Installation Manual (T0002) for additional information on NSO disks.
Cancel Option Creation This cancels the creation of an option in progress and terminates any independent DOS processes on your computer. You can immediately start configuring another option.
Vanguard Software Builder 15
T0030, Revision U Release 6.4
Menu Bar
After creation, the option and its description file are placed in a software images directory tree in the sfw_imgs\Product\Release directory. You are asked whether you want to load the newly created option into the attached device. If you choose to do so, Vanguard Software Loader is started with the option already selected on its screen. For more information on Vanguard Software Loader, refer to its Help.
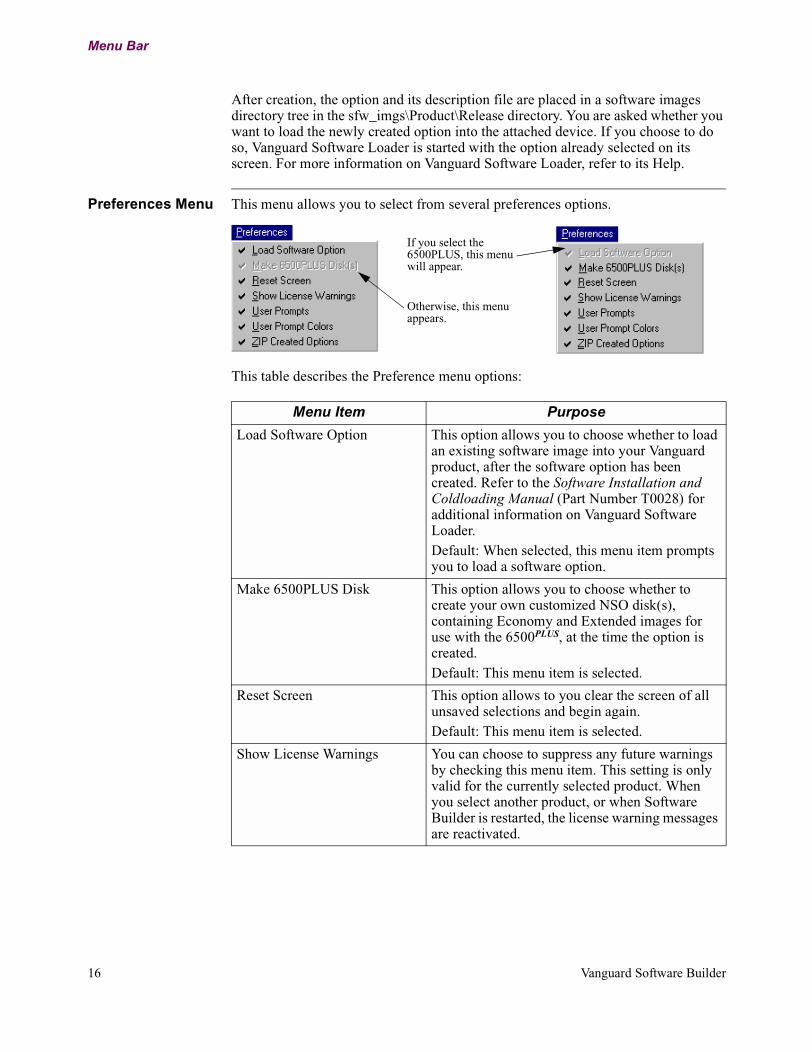
Preferences Menu This menu allows you to select from several preferences options.
This table describes the Preference menu options:
If you select the 6500PLUS, this menu will appear.
Otherwise, this menu appears.
Menu Item Purpose
Load Software Option This option allows you to choose whether to load an existing software image into your Vanguard product, after the software option has been created. Refer to the Software Installation and Coldloading Manual (Part Number T0028) for additional information on Vanguard Software Loader.Default: When selected, this menu item prompts you to load a software option.
Make 6500PLUS Disk This option allows you to choose whether to create your own customized NSO disk(s), containing Economy and Extended images for use with the 6500PLUS, at the time the option is created.Default: This menu item is selected.
Reset Screen This option allows to you clear the screen of all unsaved selections and begin again.Default: This menu item is selected.
Show License Warnings You can choose to suppress any future warnings by checking this menu item. This setting is only valid for the currently selected product. When you select another product, or when Software Builder is restarted, the license warning messages are reactivated.
16 Vanguard Software Builder

Menu Bar
Settings Menu When you select the Settings menu is selected, the two-tabbed Options dialog box is automatically displayed. The tabs are:
• Settings• Serial Numbers
Settings TabFigure 5 shows the Settings tab on the Options dialog box..
Figure 5. Options Dialog Box - Settings Tab
User Prompts This option turns on/off the user action prompts that are displayed in the Selected Item area at the top right corner of Software Builder’s main application screen. When this option is not selected, combination boxes are not opened automatically.Default: This menu item is selected.
User Prompt Colors This option turns on/off the use of single or multicolor display prompts.Default: This menu item is selected.
Zip Created Options This option allows you to choose whether to archive the option after it has been created, using the ZIP tool.
Default: This menu item is selected.
Menu Item Purpose (continued)
Vanguard Software Builder 17
T0030, Revision U Release 6.4

Menu Bar
This table defines the screen terms found in Figure 5:
Serial Numbers TabFigure 6 shows the Serial Numbers tab on the Options dialog box.
Figure 6. Options Dialog Box - Serial Numbers Tab
Window Item Purpose
ODBC data source name: Displays the data source name of the currently selected software release.
Hard drive directory: Displays the path pointed to by the HDRoot parameter, in the SWBLDR.ini file.
CD ROM directory: Displays the path pointed to by the CDRoot parameter, in the SWBLDR.ini file.
Builder tools directory: Displays the path pointed to by the FlashToolDir parameter, in the SWBLDR.ini file.
Software Loader directory: Displays the path pointed to by the VanguideDIR parameter in the SWBLDR.ini file.
18 Vanguard Software Builder

Menu Bar
This table defines the terms found in Figure 6:
Window Item Purpose
Text field Displays, line by line, all serial numbers for your software licenses. Type serial numbers directly into this field.
Import File...: Allows you to import the contents of a previously prepared text file containing the list of available serial numbers.
Vanguard Software Builder 19
T0030, Revision U Release 6.4
SWBLDR.ini File
SWBLDR.ini File
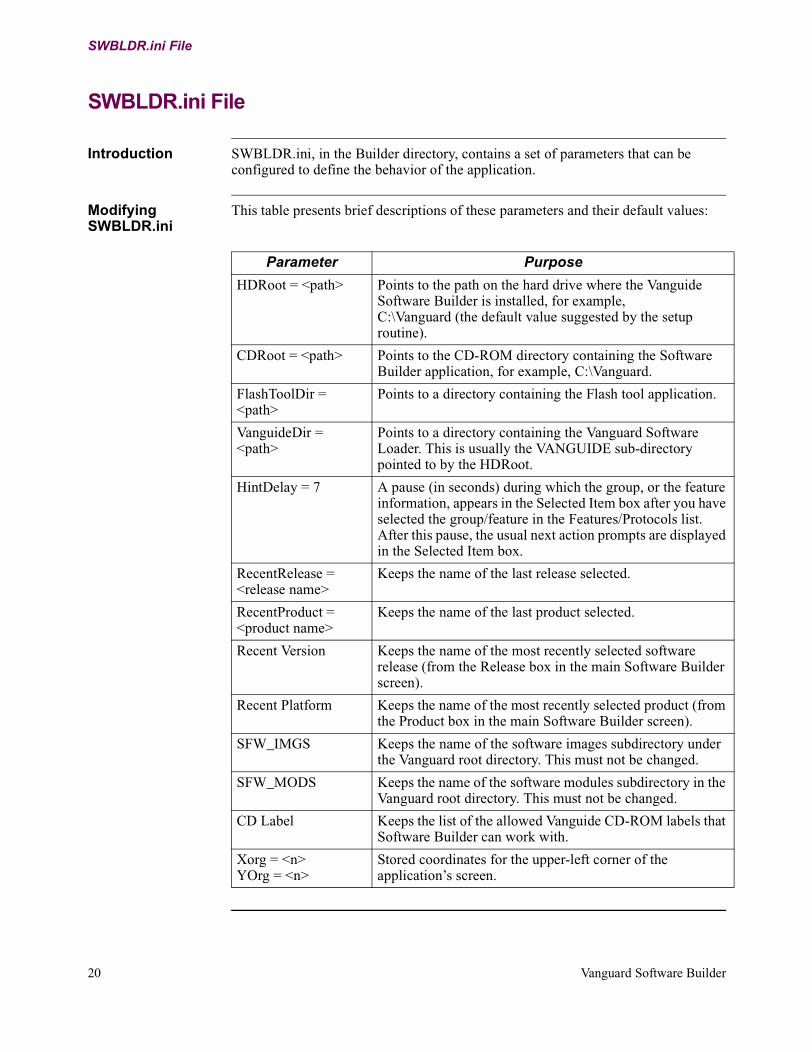
Introduction SWBLDR.ini, in the Builder directory, contains a set of parameters that can be configured to define the behavior of the application.
Modifying SWBLDR.ini
This table presents brief descriptions of these parameters and their default values:
Parameter Purpose
HDRoot = <path> Points to the path on the hard drive where the Vanguide Software Builder is installed, for example, C:\Vanguard (the default value suggested by the setup routine).
CDRoot = <path> Points to the CD-ROM directory containing the Software Builder application, for example, C:\Vanguard.
FlashToolDir = <path>
Points to a directory containing the Flash tool application.
VanguideDir = <path>
Points to a directory containing the Vanguard Software Loader. This is usually the VANGUIDE sub-directory pointed to by the HDRoot.
HintDelay = 7 A pause (in seconds) during which the group, or the feature information, appears in the Selected Item box after you have selected the group/feature in the Features/Protocols list. After this pause, the usual next action prompts are displayed in the Selected Item box.
RecentRelease = <release name>
Keeps the name of the last release selected.
RecentProduct = <product name>
Keeps the name of the last product selected.
Recent Version Keeps the name of the most recently selected software release (from the Release box in the main Software Builder screen).
Recent Platform Keeps the name of the most recently selected product (from the Product box in the main Software Builder screen).
SFW_IMGS Keeps the name of the software images subdirectory under the Vanguard root directory. This must not be changed.
SFW_MODS Keeps the name of the software modules subdirectory in the Vanguard root directory. This must not be changed.
CD Label Keeps the list of the allowed Vanguide CD-ROM labels that Software Builder can work with.
Xorg = <n>YOrg = <n>
Stored coordinates for the upper-left corner of the application’s screen.
20 Vanguard Software Builder
Software Images
Software Images
Serial Numbers for Software Licenses
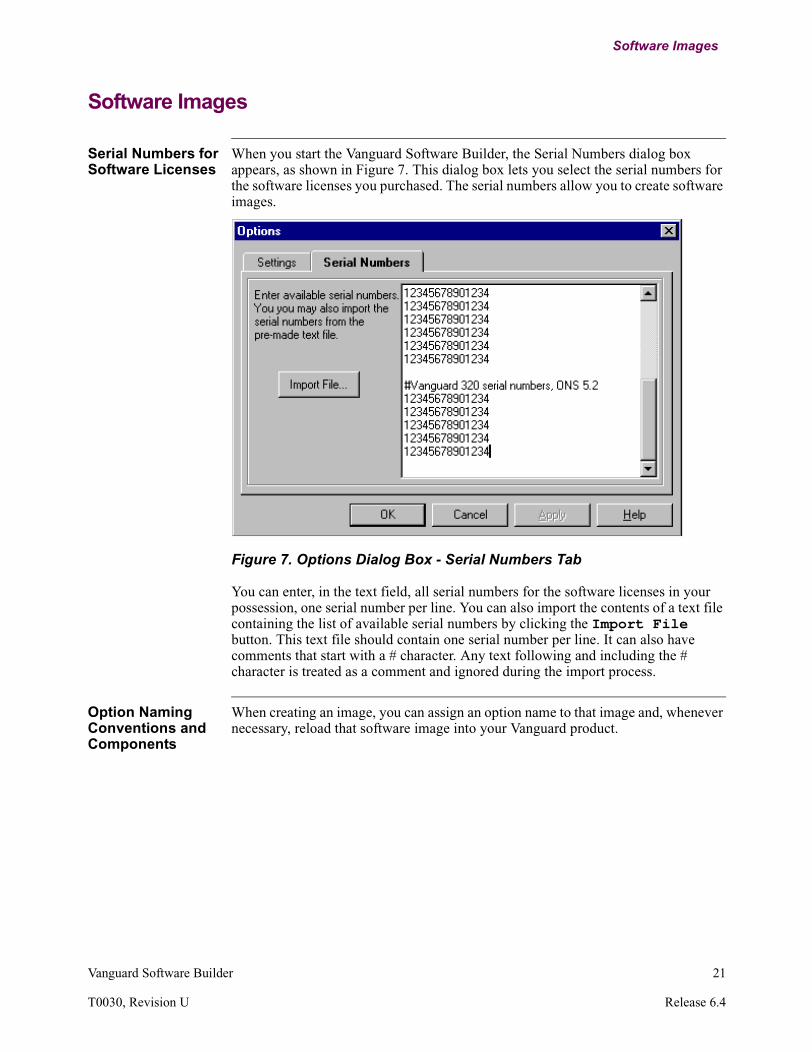
When you start the Vanguard Software Builder, the Serial Numbers dialog box appears, as shown in Figure 7. This dialog box lets you select the serial numbers for the software licenses you purchased. The serial numbers allow you to create software images.
Figure 7. Options Dialog Box - Serial Numbers Tab
You can enter, in the text field, all serial numbers for the software licenses in your possession, one serial number per line. You can also import the contents of a text file containing the list of available serial numbers by clicking the Import File button. This text file should contain one serial number per line. It can also have comments that start with a # character. Any text following and including the # character is treated as a comment and ignored during the import process.
Option Naming Conventions and Components
When creating an image, you can assign an option name to that image and, whenever necessary, reload that software image into your Vanguard product.
Vanguard Software Builder 21
T0030, Revision U Release 6.4
Software Images
Source Filename and Filename Description
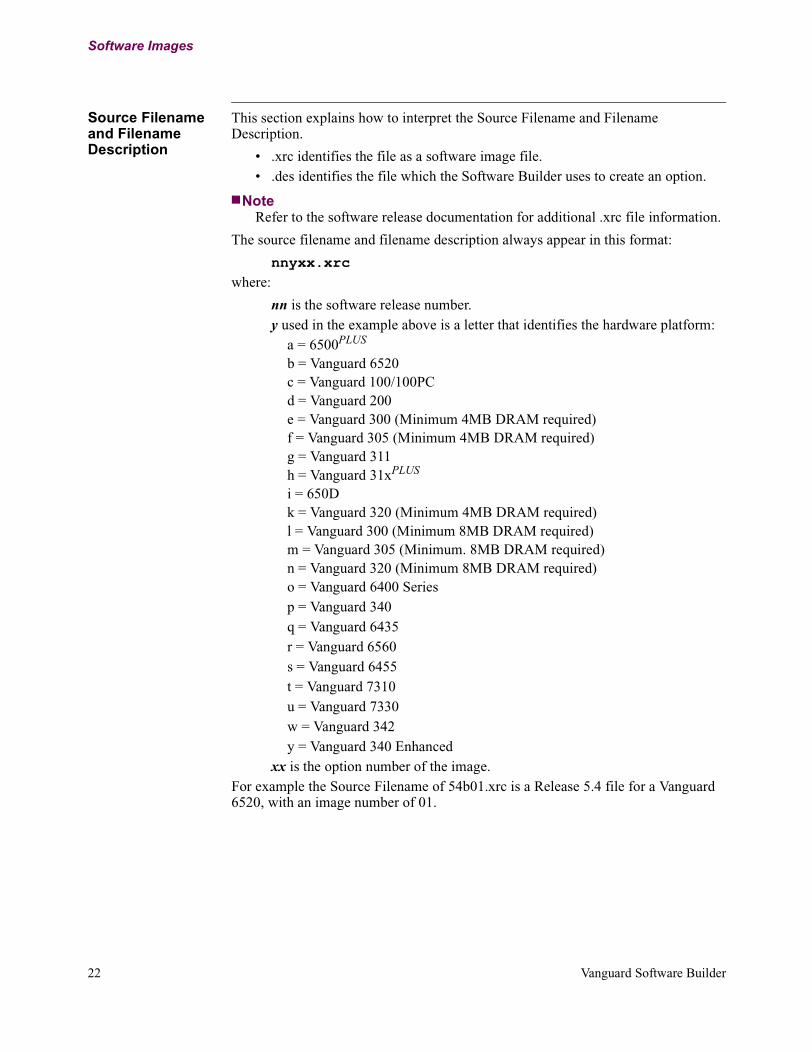
This section explains how to interpret the Source Filename and Filename Description.
• .xrc identifies the file as a software image file.• .des identifies the file which the Software Builder uses to create an option.
NoteRefer to the software release documentation for additional .xrc file information.
The source filename and filename description always appear in this format:
nnyxx.xrc
where:
nn is the software release number.y used in the example above is a letter that identifies the hardware platform:
a = 6500PLUS
b = Vanguard 6520 c = Vanguard 100/100PCd = Vanguard 200e = Vanguard 300 (Minimum 4MB DRAM required)f = Vanguard 305 (Minimum 4MB DRAM required)g = Vanguard 311h = Vanguard 31xPLUS
i = 650Dk = Vanguard 320 (Minimum 4MB DRAM required)l = Vanguard 300 (Minimum 8MB DRAM required)m = Vanguard 305 (Minimum. 8MB DRAM required)n = Vanguard 320 (Minimum 8MB DRAM required)o = Vanguard 6400 Seriesp = Vanguard 340q = Vanguard 6435r = Vanguard 6560 s = Vanguard 6455t = Vanguard 7310u = Vanguard 7330w = Vanguard 342y = Vanguard 340 Enhanced
xx is the option number of the image.For example the Source Filename of 54b01.xrc is a Release 5.4 file for a Vanguard 6520, with an image number of 01.
22 Vanguard Software Builder

Software Images
Version Strings The version string identifies the release number, the software image (by name), and the product name to which the version string applies.
The version string always appears in this format:
Vnn_@AAA_yyy
where:
Vnn is the software release number.@ indicates that the image was generated by Software Builder.AAA is the software image name.yyy used above refers to the platform number.
For example the Version String V5.5_@Ancaster_320 indicates that this applies to a Release 5.5 image called Ancaster for the Vanguard 320.
Vanguard Software Builder 23
T0030, Revision U Release 6.4
Creating a Software Image
Creating a Software Image
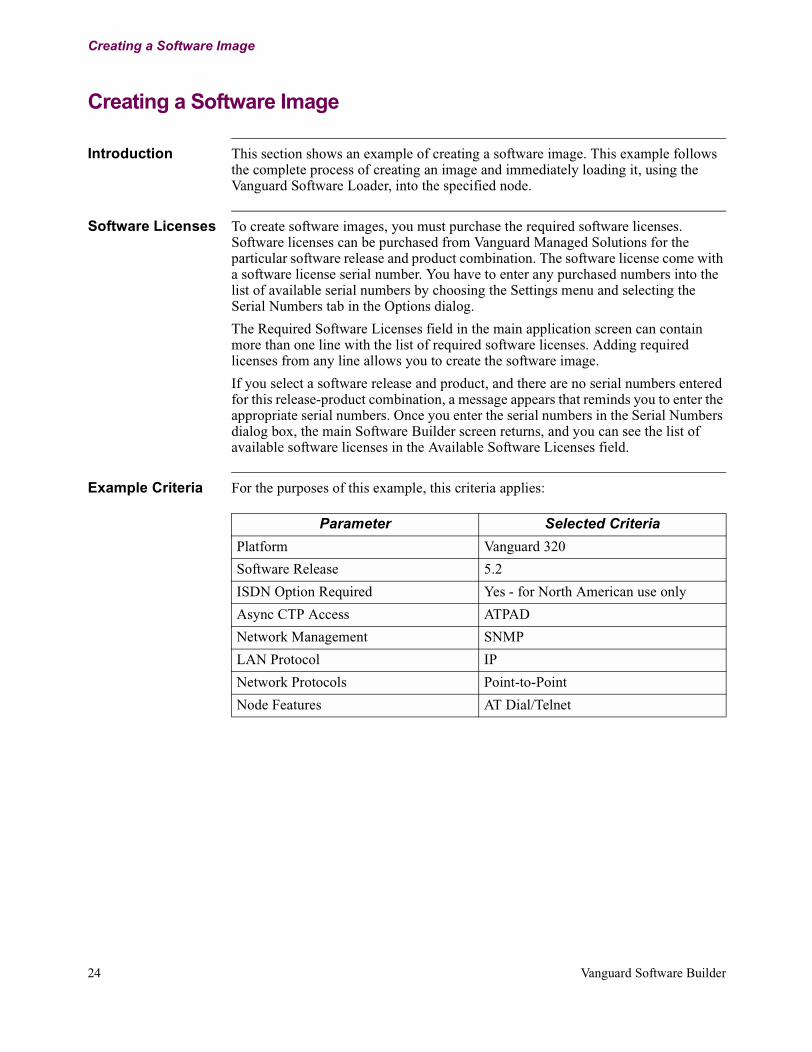
Introduction This section shows an example of creating a software image. This example follows the complete process of creating an image and immediately loading it, using the Vanguard Software Loader, into the specified node.
Software Licenses To create software images, you must purchase the required software licenses. Software licenses can be purchased from Vanguard Managed Solutions for the particular software release and product combination. The software license come with a software license serial number. You have to enter any purchased numbers into the list of available serial numbers by choosing the Settings menu and selecting the Serial Numbers tab in the Options dialog.
The Required Software Licenses field in the main application screen can contain more than one line with the list of required software licenses. Adding required licenses from any line allows you to create the software image.
If you select a software release and product, and there are no serial numbers entered for this release-product combination, a message appears that reminds you to enter the appropriate serial numbers. Once you enter the serial numbers in the Serial Numbers dialog box, the main Software Builder screen returns, and you can see the list of available software licenses in the Available Software Licenses field.
Example Criteria For the purposes of this example, this criteria applies:
Parameter Selected Criteria
Platform Vanguard 320
Software Release 5.2
ISDN Option Required Yes - for North American use only
Async CTP Access ATPAD
Network Management SNMP
LAN Protocol IP
Network Protocols Point-to-Point
Node Features AT Dial/Telnet
24 Vanguard Software Builder
Creating a Software Image
Procedure Complete this procedure to create an image.
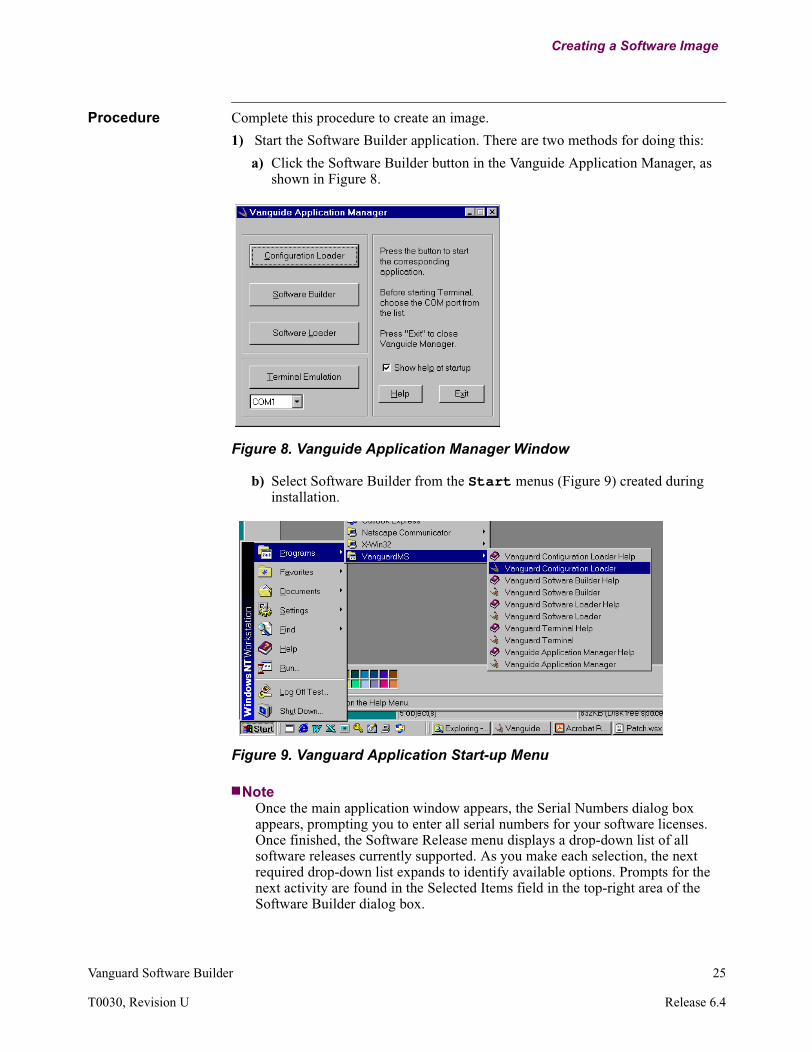
1) Start the Software Builder application. There are two methods for doing this:
a) Click the Software Builder button in the Vanguide Application Manager, as shown in Figure 8.
Figure 8. Vanguide Application Manager Window
b) Select Software Builder from the Start menus (Figure 9) created during installation.
Figure 9. Vanguard Application Start-up Menu
NoteOnce the main application window appears, the Serial Numbers dialog box appears, prompting you to enter all serial numbers for your software licenses. Once finished, the Software Release menu displays a drop-down list of all software releases currently supported. As you make each selection, the next required drop-down list expands to identify available options. Prompts for the next activity are found in the Selected Items field in the top-right area of the Software Builder dialog box.
Vanguard Software Builder 25
T0030, Revision U Release 6.4
Creating a Software Image
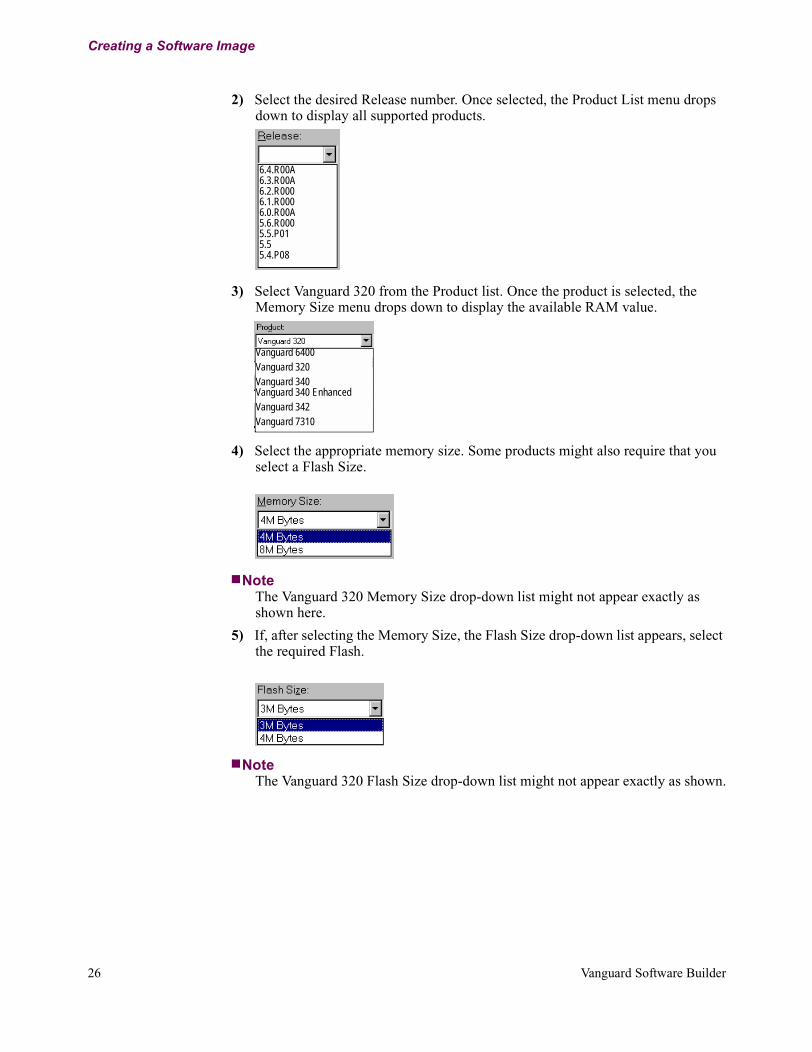
2) Select the desired Release number. Once selected, the Product List menu drops down to display all supported products.
3) Select Vanguard 320 from the Product list. Once the product is selected, the Memory Size menu drops down to display the available RAM value.
4) Select the appropriate memory size. Some products might also require that you select a Flash Size.
NoteThe Vanguard 320 Memory Size drop-down list might not appear exactly as shown here.
5) If, after selecting the Memory Size, the Flash Size drop-down list appears, select the required Flash.
NoteThe Vanguard 320 Flash Size drop-down list might not appear exactly as shown.
6.4.R00A6.3.R00A6.2.R0006.1.R0006.0.R00A5.6.R0005.5.P015.55.4.P08
Vanguard 6400Vanguard 320Vanguard 340Vanguard 340 EnhancedVanguard 342Vanguard 7310
26 Vanguard Software Builder
Creating a Software Image
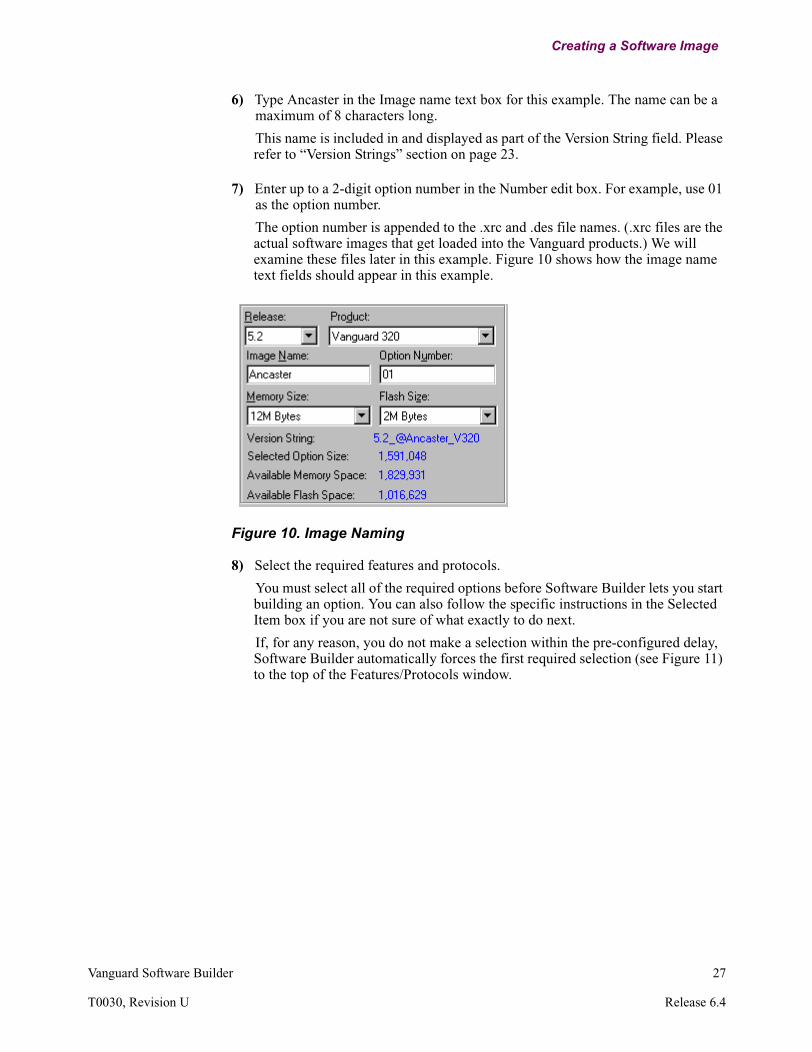
6) Type Ancaster in the Image name text box for this example. The name can be a maximum of 8 characters long.
This name is included in and displayed as part of the Version String field. Please refer to “Version Strings” section on page 23.
7) Enter up to a 2-digit option number in the Number edit box. For example, use 01 as the option number.
The option number is appended to the .xrc and .des file names. (.xrc files are the actual software images that get loaded into the Vanguard products.) We will examine these files later in this example. Figure 10 shows how the image name text fields should appear in this example.
Figure 10. Image Naming
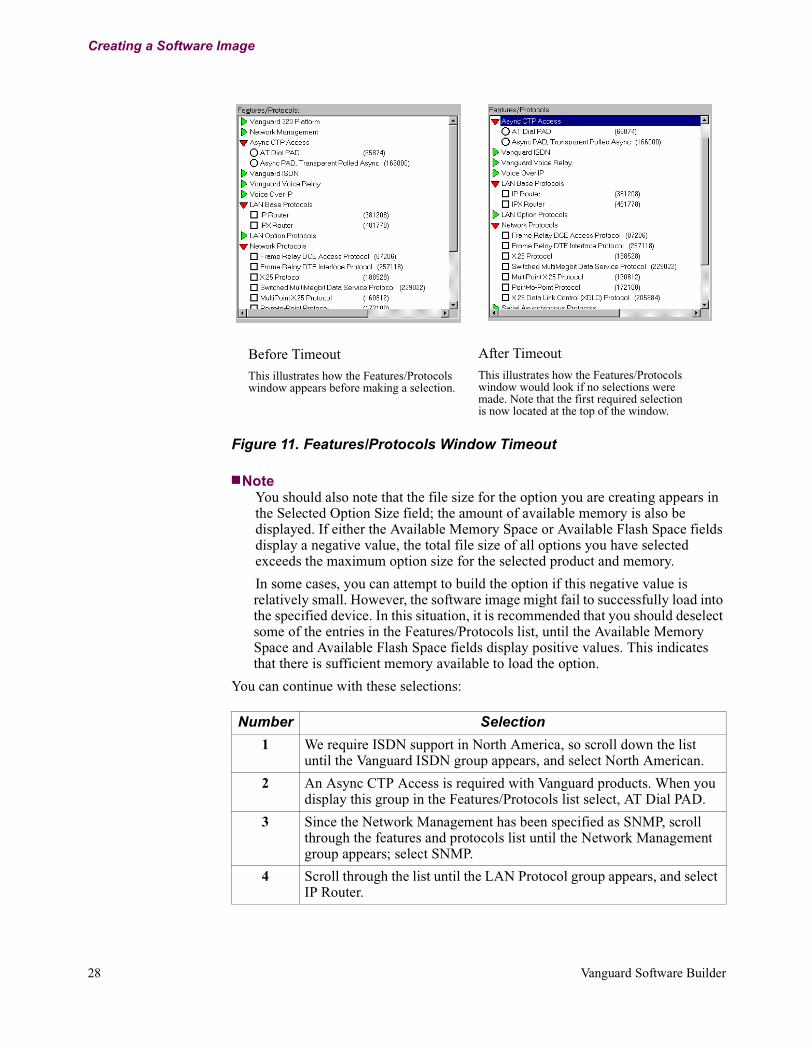
8) Select the required features and protocols.
You must select all of the required options before Software Builder lets you start building an option. You can also follow the specific instructions in the Selected Item box if you are not sure of what exactly to do next.
If, for any reason, you do not make a selection within the pre-configured delay, Software Builder automatically forces the first required selection (see Figure 11) to the top of the Features/Protocols window.
Vanguard Software Builder 27
T0030, Revision U Release 6.4
Creating a Software Image
Figure 11. Features/Protocols Window Timeout
NoteYou should also note that the file size for the option you are creating appears in the Selected Option Size field; the amount of available memory is also be displayed. If either the Available Memory Space or Available Flash Space fields display a negative value, the total file size of all options you have selected exceeds the maximum option size for the selected product and memory.
In some cases, you can attempt to build the option if this negative value is relatively small. However, the software image might fail to successfully load into the specified device. In this situation, it is recommended that you should deselect some of the entries in the Features/Protocols list, until the Available Memory Space and Available Flash Space fields display positive values. This indicates that there is sufficient memory available to load the option.
You can continue with these selections:
Before Timeout
This illustrates how the Features/Protocols window appears before making a selection.
After Timeout
This illustrates how the Features/Protocols window would look if no selections were made. Note that the first required selection is now located at the top of the window.
Number Selection
1 We require ISDN support in North America, so scroll down the list until the Vanguard ISDN group appears, and select North American.
2 An Async CTP Access is required with Vanguard products. When you display this group in the Features/Protocols list select, AT Dial PAD.
3 Since the Network Management has been specified as SNMP, scroll through the features and protocols list until the Network Management group appears; select SNMP.
4 Scroll through the list until the LAN Protocol group appears, and select IP Router.
28 Vanguard Software Builder
Creating a Software Image
9) After you have satisfied all the protocol selection requirements, you can enter any other specific information in the Comments edit box. While this is an optional step, your comments should document the purpose of the option you are creating.
10) Select the Option-Create Option menu item to create the option. Ensure the appropriate CD is inserted. When the linking process starts, the message CREATING THE OPTION. PLEASE WAIT... appears in the Selected Item field.
NoteThe process of creating an image might take several minutes depending on the speed of your computer and on the features and protocols selected.
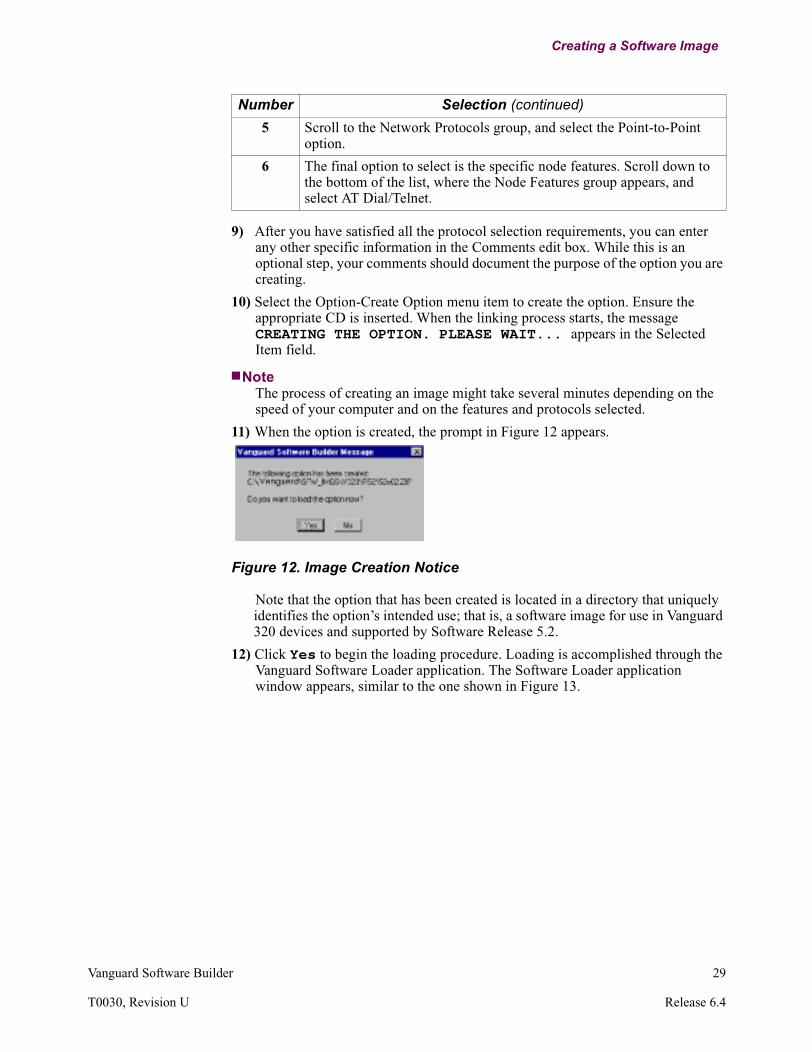
11) When the option is created, the prompt in Figure 12 appears.
Figure 12. Image Creation Notice
Note that the option that has been created is located in a directory that uniquely identifies the option’s intended use; that is, a software image for use in Vanguard 320 devices and supported by Software Release 5.2.
12) Click Yes to begin the loading procedure. Loading is accomplished through the Vanguard Software Loader application. The Software Loader application window appears, similar to the one shown in Figure 13.
5 Scroll to the Network Protocols group, and select the Point-to-Point option.
6 The final option to select is the specific node features. Scroll down to the bottom of the list, where the Node Features group appears, and select AT Dial/Telnet.
Number Selection (continued)
Vanguard Software Builder 29
T0030, Revision U Release 6.4
Creating a Software Image
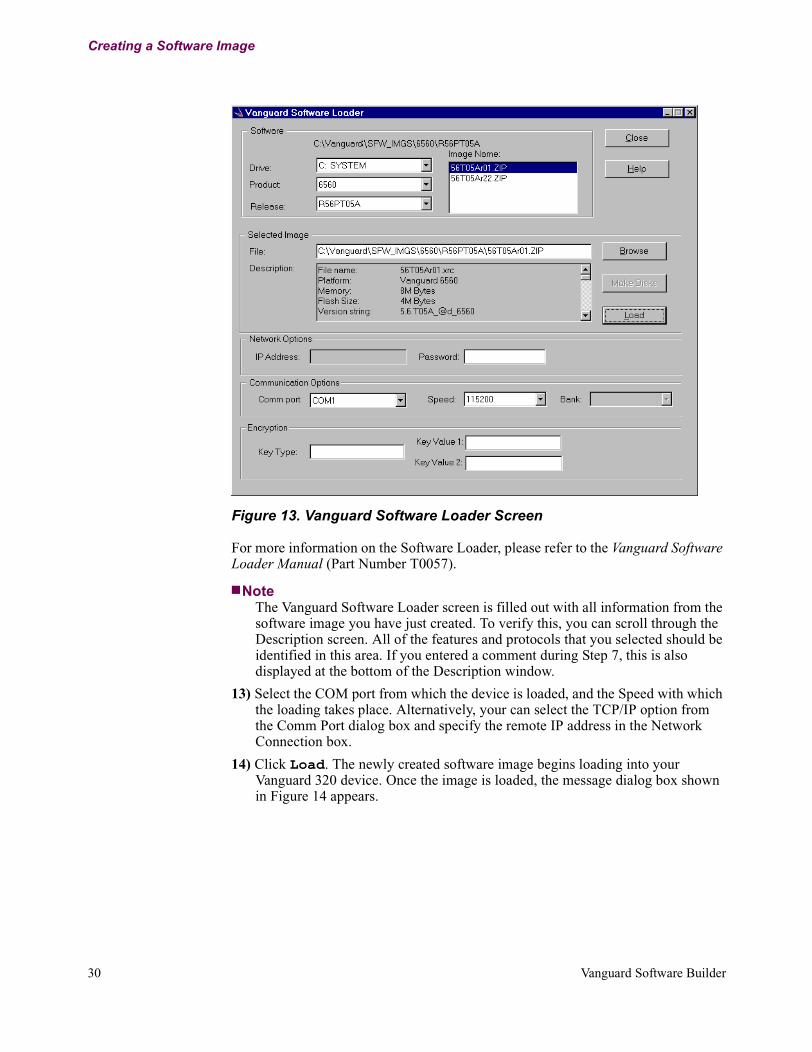
Figure 13. Vanguard Software Loader Screen
For more information on the Software Loader, please refer to the Vanguard Software Loader Manual (Part Number T0057).
NoteThe Vanguard Software Loader screen is filled out with all information from the software image you have just created. To verify this, you can scroll through the Description screen. All of the features and protocols that you selected should be identified in this area. If you entered a comment during Step 7, this is also displayed at the bottom of the Description window.
13) Select the COM port from which the device is loaded, and the Speed with which the loading takes place. Alternatively, your can select the TCP/IP option from the Comm Port dialog box and specify the remote IP address in the Network Connection box.
14) Click Load. The newly created software image begins loading into your Vanguard 320 device. Once the image is loaded, the message dialog box shown in Figure 14 appears.
30 Vanguard Software Builder
Creating a Software Image
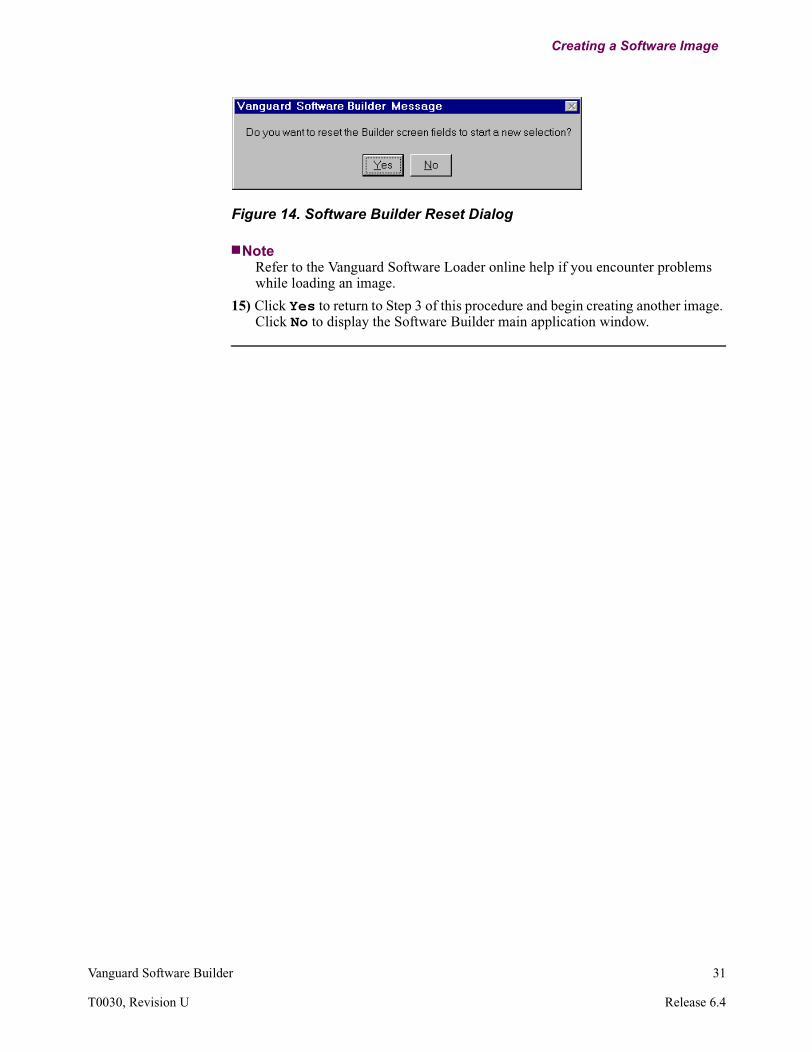
Figure 14. Software Builder Reset Dialog
NoteRefer to the Vanguard Software Loader online help if you encounter problems while loading an image.
15) Click Yes to return to Step 3 of this procedure and begin creating another image. Click No to display the Software Builder main application window.
Vanguard Software Builder 31
T0030, Revision U Release 6.4
Updating Images for New Software Releases
Updating Images for New Software Releases
Introduction As new software releases are made available, you might want to upgrade your Vanguard products to take advantage of new features.
Saving .des Files Without Creating An Image
When you create a software image, Vanguard Software Builder automatically saves the image’s Description file in the process. You can use the .des file for a software image in a new release without going through the process of re-creating the image.
Complete steps 1 through 7 from the “Creating a Software Image” section on page 24 for any Vanguard product.
NoteDo not create this example image.
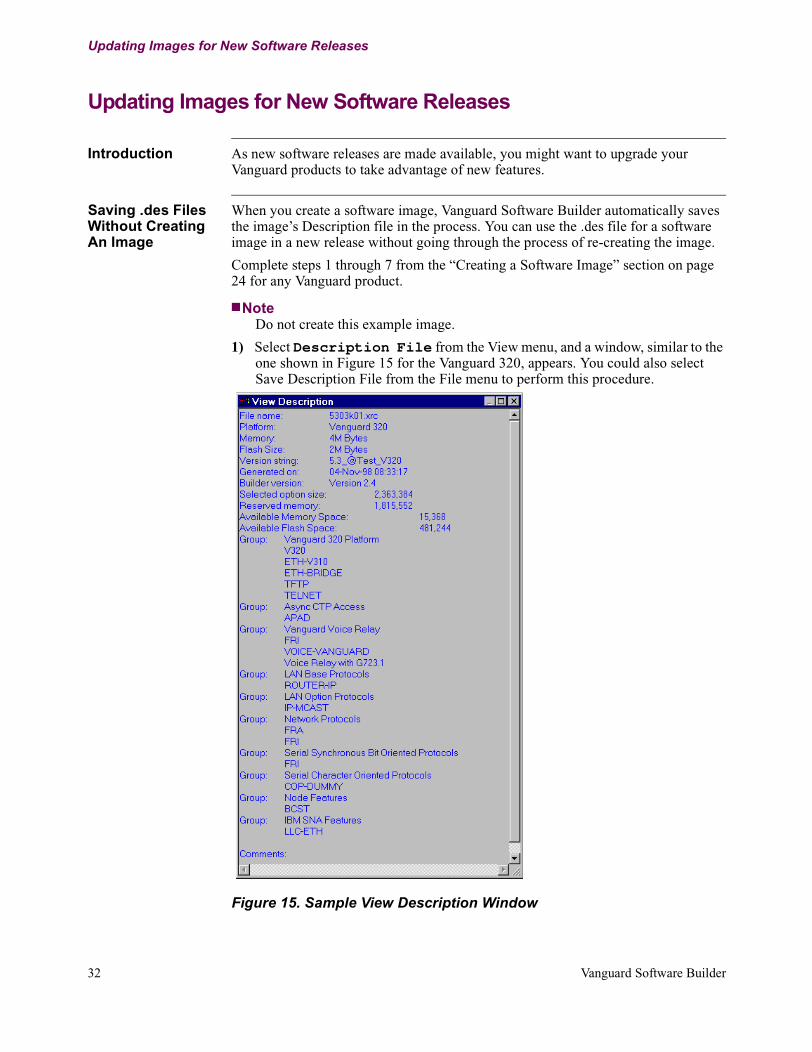
1) Select Description File from the View menu, and a window, similar to the one shown in Figure 15 for the Vanguard 320, appears. You could also select Save Description File from the File menu to perform this procedure.
Figure 15. Sample View Description Window
32 Vanguard Software Builder

Updating Images for New Software Releases
2) Click on the top-left corner of that window, and this pop-up menu appears.
3) Select Save Description As and then give the file a name just as you would any other file. You should leave this file in the original software release directory.
Updating Images For New Software Releases
Follow these steps to upgrade existing software images to operate with newly released software:
1) Select Open Description File from the File menu.
2) The Open Description File dialog similar to the one shown below appears. This dialog displays the contents of the default directory. This is the SFW_IMGS directory installed onto your hard drive.
To browse the directory tree:
a) Select the desired product under the SFW_IMGS directory (for example, V320 corresponding to the Vanguard 320).
b) Select the desired software release directory (for example, R54 corresponding to Release 5.5P01).
NoteThe SFW_IMGS directory is located under the directory where Vanguide Application Set has been installed; the default is C:\Vanguard.
V340V7310V7330
Vanguard Software Builder 33
T0030, Revision U Release 6.4
Updating Images for New Software Releases
3) Select a .des file in the directory selected in the previous step by highlighting it and clicking either the Open or OK button. If the selected .des file was created with one of the supported software releases, the .des file is loaded. The image name and option number fields are filled out, and the corresponding release and product is selected in the Release and Product fields of the Vanguard Software Builder screen. Also, the features recorded in the .des file are selected in the Protocols/Features list.
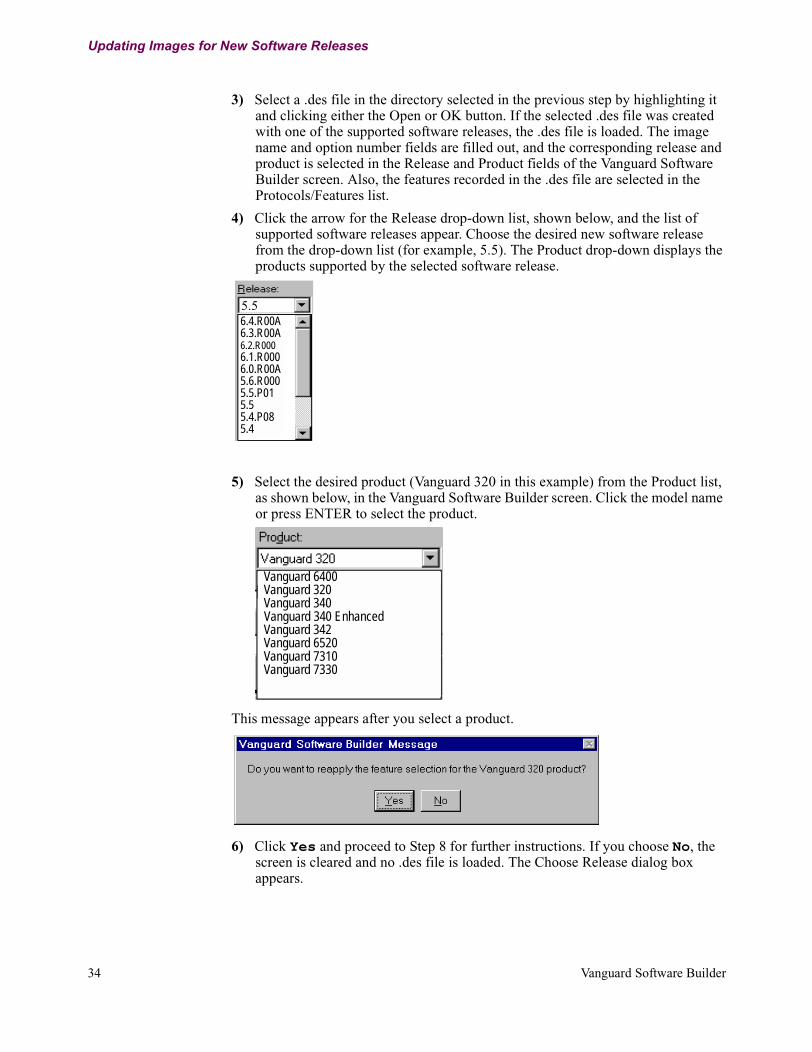
4) Click the arrow for the Release drop-down list, shown below, and the list of supported software releases appear. Choose the desired new software release from the drop-down list (for example, 5.5). The Product drop-down displays the products supported by the selected software release.
5) Select the desired product (Vanguard 320 in this example) from the Product list, as shown below, in the Vanguard Software Builder screen. Click the model name or press ENTER to select the product.
This message appears after you select a product.
6) Click Yes and proceed to Step 8 for further instructions. If you choose No, the screen is cleared and no .des file is loaded. The Choose Release dialog box appears.
6.4.R00A6.3.R00A6.2.R0006.1.R0006.0.R00A5.6.R0005.5.P015.55.4.P085.4
5.5
Vanguard 6400Vanguard 320Vanguard 340
Vanguard 340 EnhancedVanguard 342Vanguard 6520Vanguard 7310Vanguard 7330
34 Vanguard Software Builder

Updating Images for New Software Releases
7) Click the release you want to use. Click OK.
a) Choose the desired new software release from the list and click the OK button. Proceed to step 6 for further instructions.
b) If you cancel this dialog, the screen is cleared and no .des file is loaded.
8) If the dialog box appears, reselect the features listed in the Features/Protocols window of the Vanguard Software Builder screen.
Vanguide Software Builder attempts to select all the features from the .des file in the Features/Protocols list corresponding to the new software release. A message box similar to the one shown above appears whenever features present in the original software release are no longer available.
9) Save the .des file by selecting Save Description File from the File menu, or choosing the Create Option button in the Vanguard Software Builder screen to create a new software image. The latter action saves the description file before proceeding with the image creation.
6.4.R00A6.3.R00A6.2.R0006.1.R0006.0.R00A5.6.R0005.5.P015.5
Vanguard Software Builder 35
T0030, Revision U Release 6.4

Error Messages
Error Messages
List of Error Messages
These are the error messages generated by the Software Builder.
Error Message Description
Could not create the directory: <directory path>
The application could not create the <directory path> directory. Ensure that you have write permissions to create this directory.
Unable to open <file name> for reading/writing.
Check if the file is present, or whether you have write permissions to create or write to this file.
Failed to open the database. Please check the data source settings!
This is an error accessing the database. Check that the DataSource value in the SWBLDR.ini points to the valid data source in the ODBC Administrator list of data sources.
Unable to launch the linker (32 bit version of the Linker only).
Close some of the programs currently running on your system.
Could not find the SWBLDR.ini file In order to work properly, Software Builder must have a valid SWBLDR.ini file in its directory. If this file is corrupted or missing, you must reinstall the Vanguide Application Set to restore the file. Reinstall the application.
Can't access drive [X:]!Please insert (any of the) disk(s) labeled “<LABEL>” in drive [X:] and press OK when ready.
The drive pointed to in the CD ROM directory setting in the Settings dialog, is not accessible. Verify the drive letter of the CD ROM directory in the Settings dialog. Change the CD-ROM or modify the CD ROM directory setting to point to the right drive.
The CD disk label is “<LABEL1>”.Please insert (any of the) disk(s) labeled “<LABEL2>” in drive [X:] and press OK when ready.
The drive pointed by the CD ROM directory setting in the Settings dialog is incorrect. Change the CD-ROM or modify the CD ROM directory setting to point to the right drive. You can also verify the drive letter of the CD ROM directory in the Settings dialog.
Data source name not found and no default driver specified ORFailed to open the data source “<Data source name>”.Please verify the data source settings in ODBC Administrator!
The data source name has not been recognized. Verify the data source setting in the ODBC Administrator and check whether the specified .MDB file is present.
36 Vanguard Software Builder
Error Messages
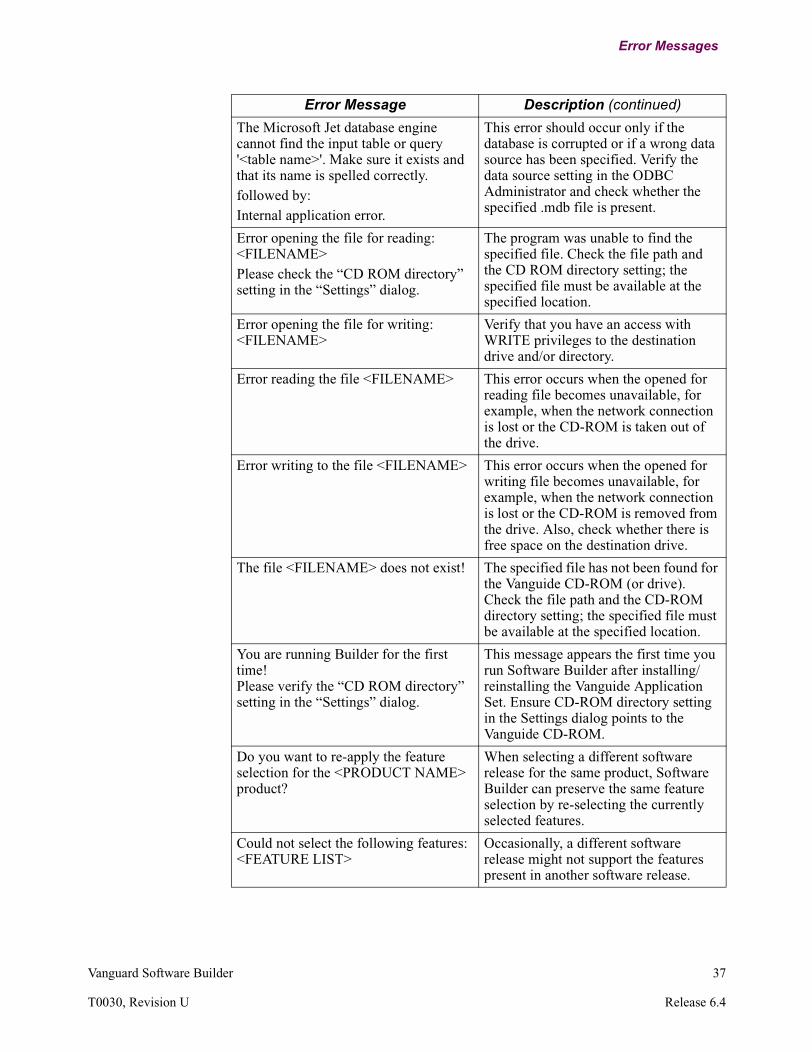
The Microsoft Jet database engine cannot find the input table or query '<table name>'. Make sure it exists and that its name is spelled correctly.followed by:Internal application error.
This error should occur only if the database is corrupted or if a wrong data source has been specified. Verify the data source setting in the ODBC Administrator and check whether the specified .mdb file is present.
Error opening the file for reading: <FILENAME>Please check the “CD ROM directory” setting in the “Settings” dialog.
The program was unable to find the specified file. Check the file path and the CD ROM directory setting; the specified file must be available at the specified location.
Error opening the file for writing: <FILENAME>
Verify that you have an access with WRITE privileges to the destination drive and/or directory.
Error reading the file <FILENAME> This error occurs when the opened for reading file becomes unavailable, for example, when the network connection is lost or the CD-ROM is taken out of the drive.
Error writing to the file <FILENAME> This error occurs when the opened for writing file becomes unavailable, for example, when the network connection is lost or the CD-ROM is removed from the drive. Also, check whether there is free space on the destination drive.
The file <FILENAME> does not exist! The specified file has not been found for the Vanguide CD-ROM (or drive). Check the file path and the CD-ROM directory setting; the specified file must be available at the specified location.
You are running Builder for the first time! Please verify the “CD ROM directory” setting in the “Settings” dialog.
This message appears the first time you run Software Builder after installing/reinstalling the Vanguide Application Set. Ensure CD-ROM directory setting in the Settings dialog points to the Vanguide CD-ROM.
Do you want to re-apply the feature selection for the <PRODUCT NAME> product?
When selecting a different software release for the same product, Software Builder can preserve the same feature selection by re-selecting the currently selected features.
Could not select the following features: <FEATURE LIST>
Occasionally, a different software release might not support the features present in another software release.
Error Message Description (continued)
Vanguard Software Builder 37
T0030, Revision U Release 6.4

Error Messages
Unable to launch the DOS linker. Software Builder uses a background DOS session to create images. If this message appears, you should close some of the other programs running on the system and try to create the image again.
Verify the “CD ROM directory” setting in the “Settings” dialog.
The drive pointed to by the CD ROM directory setting in the Settings dialog has been removed from the correct drive. Change the CD-ROM or modify the CD ROM directory setting to point to the right drive.
Please enter an option name and/or an option number!
You must provide the option name and option number before creating an image.
The option with the same option number already exists. Do you want to overwrite the file: <FILENAME>?The description file for the same option number already exists. Do you want to overwrite the file: <FILENAME>?
This message appears if an image with the same name as the one to be created already exists. You can change the option number in order to change the image filename.
There is no “Available Memory Space” or “Available Flash Space” left for the selected product. The software image might fail to successfully load into the selected product. Continue?
When the image size exceeds the available memory space of flash space, the image might fail to load into the device. Check the Available Flash Space and the Available Memory Space fields on the Software Builder screen. If either (or both) display large negative values, deselect some of the features.
Can not create the option because the following files do not exist <FILE LIST>
This message appears when the files necessary for image creation are missing. Verify that the Hard drive directory and CD ROM directory settings (in the Settings dialog) are correct.
Could not change current directory to <PATH>
Verify that the named directory exists.
Unable to create/open the file <FILENAME> for writing.
Verify that you have WRITE privileges in the specified directory.
Failed to copy <FILENAME1> to <FILENAME2>
Verify that you have WRITE privileges in the destination directory.
The total size of selected features is too large to fit into the flash memory! No option has been created! Please deselect some features and try to create the option again.
The image was not created because it would not fit into the flash memory of the device. You must deselect some of the features and try creating the image again.
Error Message Description (continued)
38 Vanguard Software Builder
Error Messages
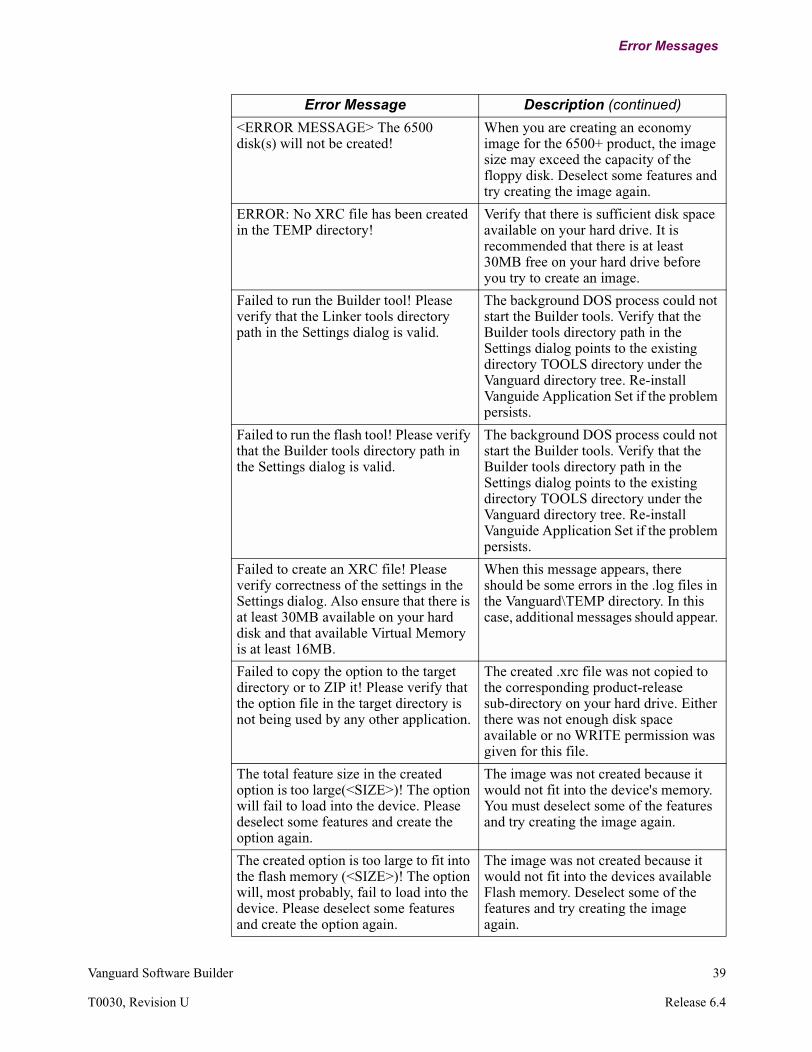
<ERROR MESSAGE> The 6500 disk(s) will not be created!
When you are creating an economy image for the 6500+ product, the image size may exceed the capacity of the floppy disk. Deselect some features and try creating the image again.
ERROR: No XRC file has been created in the TEMP directory!
Verify that there is sufficient disk space available on your hard drive. It is recommended that there is at least 30MB free on your hard drive before you try to create an image.
Failed to run the Builder tool! Please verify that the Linker tools directory path in the Settings dialog is valid.
The background DOS process could not start the Builder tools. Verify that the Builder tools directory path in the Settings dialog points to the existing directory TOOLS directory under the Vanguard directory tree. Re-install Vanguide Application Set if the problem persists.
Failed to run the flash tool! Please verify that the Builder tools directory path in the Settings dialog is valid.
The background DOS process could not start the Builder tools. Verify that the Builder tools directory path in the Settings dialog points to the existing directory TOOLS directory under the Vanguard directory tree. Re-install Vanguide Application Set if the problem persists.
Failed to create an XRC file! Please verify correctness of the settings in the Settings dialog. Also ensure that there is at least 30MB available on your hard disk and that available Virtual Memory is at least 16MB.
When this message appears, there should be some errors in the .log files in the Vanguard\TEMP directory. In this case, additional messages should appear.
Failed to copy the option to the target directory or to ZIP it! Please verify that the option file in the target directory is not being used by any other application.
The created .xrc file was not copied to the corresponding product-release sub-directory on your hard drive. Either there was not enough disk space available or no WRITE permission was given for this file.
The total feature size in the created option is too large(<SIZE>)! The option will fail to load into the device. Please deselect some features and create the option again.
The image was not created because it would not fit into the device's memory. You must deselect some of the features and try creating the image again.
The created option is too large to fit into the flash memory (<SIZE>)! The option will, most probably, fail to load into the device. Please deselect some features and create the option again.
The image was not created because it would not fit into the devices available Flash memory. Deselect some of the features and try creating the image again.
Error Message Description (continued)
Vanguard Software Builder 39
T0030, Revision U Release 6.4
Error Messages
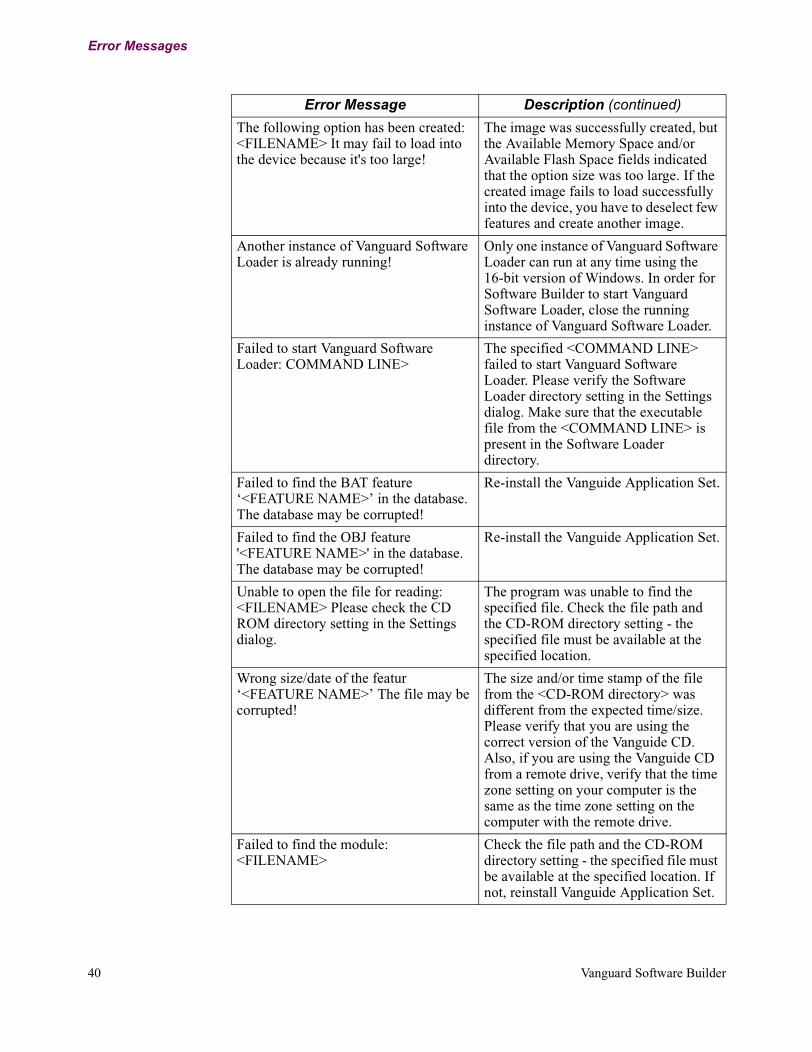
The following option has been created: <FILENAME> It may fail to load into the device because it's too large!
The image was successfully created, but the Available Memory Space and/or Available Flash Space fields indicated that the option size was too large. If the created image fails to load successfully into the device, you have to deselect few features and create another image.
Another instance of Vanguard Software Loader is already running!
Only one instance of Vanguard Software Loader can run at any time using the 16-bit version of Windows. In order for Software Builder to start Vanguard Software Loader, close the running instance of Vanguard Software Loader.
Failed to start Vanguard Software Loader: COMMAND LINE>
The specified <COMMAND LINE> failed to start Vanguard Software Loader. Please verify the Software Loader directory setting in the Settings dialog. Make sure that the executable file from the <COMMAND LINE> is present in the Software Loader directory.
Failed to find the BAT feature ‘<FEATURE NAME>’ in the database. The database may be corrupted!
Re-install the Vanguide Application Set.
Failed to find the OBJ feature '<FEATURE NAME>' in the database. The database may be corrupted!
Re-install the Vanguide Application Set.
Unable to open the file for reading: <FILENAME> Please check the CD ROM directory setting in the Settings dialog.
The program was unable to find the specified file. Check the file path and the CD-ROM directory setting - the specified file must be available at the specified location.
Wrong size/date of the featur ‘<FEATURE NAME>’ The file may be corrupted!
The size and/or time stamp of the file from the <CD-ROM directory> was different from the expected time/size. Please verify that you are using the correct version of the Vanguide CD. Also, if you are using the Vanguide CD from a remote drive, verify that the time zone setting on your computer is the same as the time zone setting on the computer with the remote drive.
Failed to find the module: <FILENAME>
Check the file path and the CD-ROM directory setting - the specified file must be available at the specified location. If not, reinstall Vanguide Application Set.
Error Message Description (continued)
40 Vanguard Software Builder
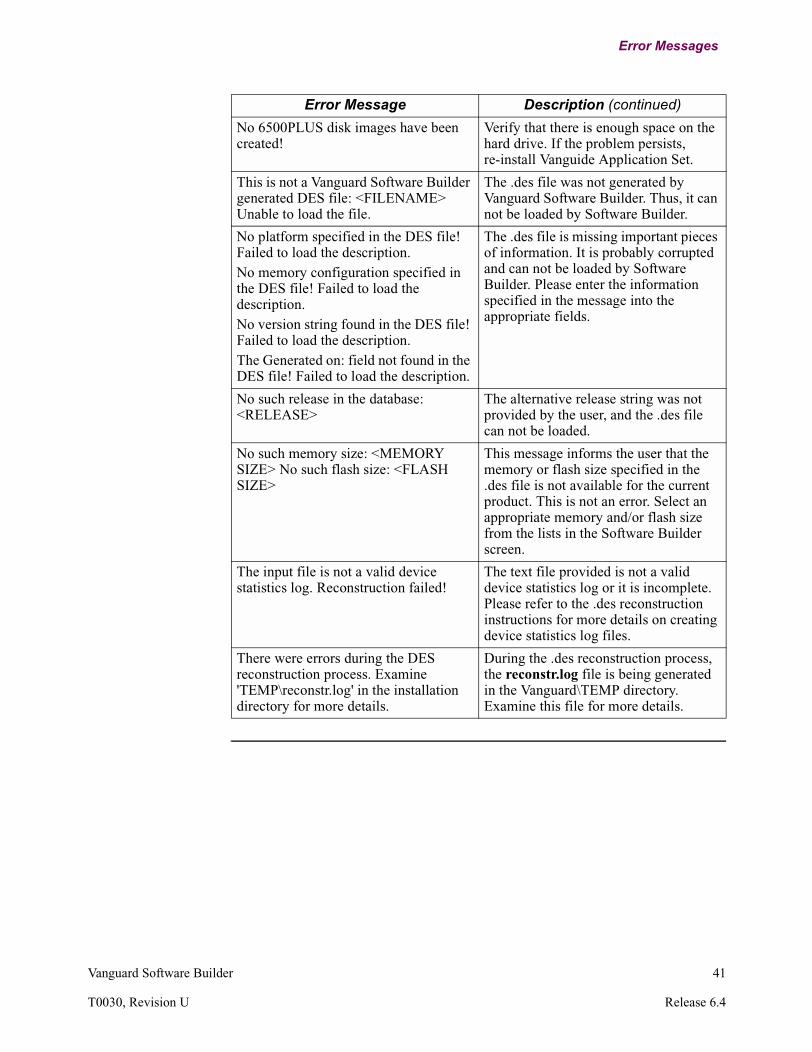
Error Messages
No 6500PLUS disk images have been created!
Verify that there is enough space on the hard drive. If the problem persists, re-install Vanguide Application Set.
This is not a Vanguard Software Builder generated DES file: <FILENAME> Unable to load the file.
The .des file was not generated by Vanguard Software Builder. Thus, it can not be loaded by Software Builder.
No platform specified in the DES file! Failed to load the description.No memory configuration specified in the DES file! Failed to load the description.No version string found in the DES file! Failed to load the description.The Generated on: field not found in the DES file! Failed to load the description.
The .des file is missing important pieces of information. It is probably corrupted and can not be loaded by Software Builder. Please enter the information specified in the message into the appropriate fields.
No such release in the database: <RELEASE>
The alternative release string was not provided by the user, and the .des file can not be loaded.
No such memory size: <MEMORY SIZE> No such flash size: <FLASH SIZE>
This message informs the user that the memory or flash size specified in the .des file is not available for the current product. This is not an error. Select an appropriate memory and/or flash size from the lists in the Software Builder screen.
The input file is not a valid device statistics log. Reconstruction failed!
The text file provided is not a valid device statistics log or it is incomplete. Please refer to the .des reconstruction instructions for more details on creating device statistics log files.
There were errors during the DES reconstruction process. Examine 'TEMP\reconstr.log' in the installation directory for more details.
During the .des reconstruction process, the reconstr.log file is being generated in the Vanguard\TEMP directory. Examine this file for more details.
Error Message Description (continued)
Vanguard Software Builder 41
T0030, Revision U Release 6.4

Upgrades and Patches
Upgrades and Patches
Introduction This section provides information concerning recent Software Upgrades and Patch releases for the current release of Operating Software.
New Releases Upgrades and patches to software releases can be obtained, in the form of executable files, from the WWW, at this URL:
http://www.vanguardms.com
What The Patch Executable Does
This sequence of events takes place when you install the Patch Executable on your PC:
Step Action
1 A patch sub-directory (for example R50P32) is created under SFW_MODS in the <Vanguard> directory. Therefore the installed Patch subdirectory would be C:\Vanguard\SFW_MODS\R50P32:
2 New and modified Patch Release modules are created in build subdirectories under the Patch directory, for example, C:\Vanguard\SFW_MODS\R50P32\68000, or C:\Vanguard\SFW_MODS\R50P32\68030.
3 A patch Uninstallation program (UNWISE.EXE) an uninstallation helper program, (UREPODBC.EXE) and an installation log file (INSTALL.LOG) are created in the Patch subdirectory.
4 A MS Access database for the Patch is created in the Patch directory. For example, this could be C:\Vanguard\SFW_MODS\R50P32\V50P32.MDB. This database is subsequently accessed by Vanguard Software Builder when working with the Patch Release.
5 A new data source entry is created in the Vanguard Software Builder INI file (in the “[Data Sources]” section), for example, 5.0.32= Patch Data V50P32.
6 The new data source is registered with the ODBC Administrator on the user’s PC.
7 The Patch Installation checks the list of obsolete Patches Release to uninstall, and prompts you to confirm every Patch Release uninstallation. You can elect not to uninstall a particular Patch Release.
42 Vanguard Software Builder
Upgrades and Patches
Obtaining The Patch Program
Vanguard Software Builder supports Patch Releases through execution of the Patch Installation program. The Patch Installation Executables are available thorough the Internet You need an approved account and password to access these executable files.
After successfully downloading the executable file it is installed over top of the existing Vanguide Application Set installation.
NoteThe Patch Installation Executable does not install over Pre-2.0 Versions of the Vanguide Application Set.
Vanguard Software Builder 43
T0030, Revision U Release 6.4
Upgrades and Patches
Patch Installation
Introduction After downloading the appropriate files, complete this procedure to install the Patch:
Step Action
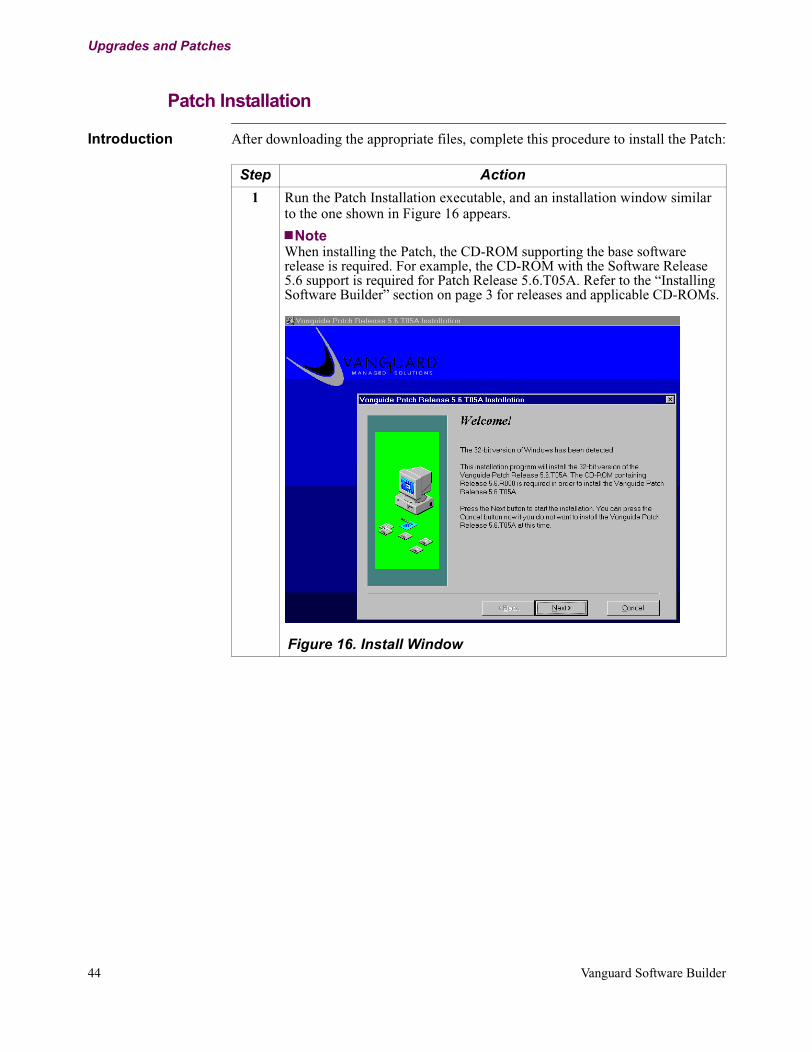
1 Run the Patch Installation executable, and an installation window similar to the one shown in Figure 16 appears.
NoteWhen installing the Patch, the CD-ROM supporting the base software release is required. For example, the CD-ROM with the Software Release 5.6 support is required for Patch Release 5.6.T05A. Refer to the “Installing Software Builder” section on page 3 for releases and applicable CD-ROMs.
Figure 16. Install Window
44 Vanguard Software Builder

Upgrades and Patches
2 Select, when prompted, the drive containing the appropriate CD-ROM with the base software release support (see Figure 17).
Figure 17. Select CD Drive Window
3 Install the Patch Release in the directory where the Vanguide Application Set has been installed.The currently installed Patch Release may make obsolete few previously installed patches. In this case, the Patch Installation program prompts you to uninstall the obsolete patch (see Figure 18).
Figure 18. Uninstall Obsolete Patch Prompt
Step Action (continued)
Vanguard Software Builder 45
T0030, Revision U Release 6.4
Upgrades and Patches
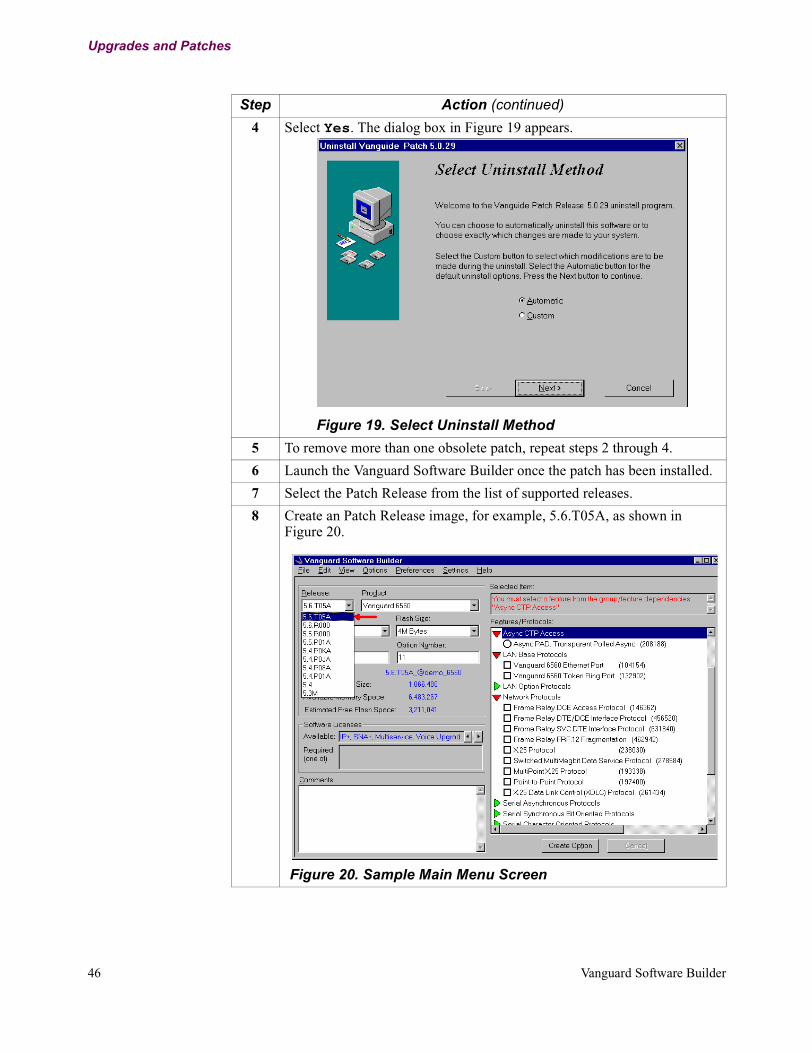
4 Select Yes. The dialog box in Figure 19 appears.
Figure 19. Select Uninstall Method
5 To remove more than one obsolete patch, repeat steps 2 through 4.
6 Launch the Vanguard Software Builder once the patch has been installed.
7 Select the Patch Release from the list of supported releases.
8 Create an Patch Release image, for example, 5.6.T05A, as shown in Figure 20.
Figure 20. Sample Main Menu Screen
Step Action (continued)
46 Vanguard Software Builder
Upgrades and Patches
NoteOnly those products affected by the Software Patch Release are displayed in the Product list of the Vanguard Software Builder. Unaffected products can be selected from the base software release.
Vanguard Software Builder 47
T0030, Revision U Release 6.4

Upgrades and Patches
Manual Patch Uninstallation
Introduction There are two methods that can be used to uninstall Patch Releases:
• From the Windows Control Panel• From the Windows Program Manager
Manually Uninstalling From The Control Panel
To manually uninstall an Patch Release (other than during the newer Patch Release installation) from the Windows Control Panel, perform these steps:
Manually Uninstalling From The Program Manager
To manually uninstall a Patch Release (other than during the newer Patch installation) from the Windows Program Manager, select Uninstall Patch <Patch ID> from the Vanguide Application Set group in the Program Manager. You then see the screen shown in Figure 18. Follow the instructions, and the Patch Release is uninstalled.
Step Action
1 Select Add-Remove Programs from the control panel, as shown in Figure 21.
Figure 21. Adding/Removing Programs
2 Find “Vanguide Patch Release <Patch ID>” in the list of installed software.
3 You then see the screen shown in Figure 18. Follow the instructions, and the Patch Release is uninstalled.
48 Vanguard Software Builder