Embed Size (px)
Citation preview

Instructions for GL-MiFi Developer
V2016-03-01
GL Tech.
Contributors @alzhao @xiaoxin
@ Dan

Instructions for GL-MiFi Developer .............................................................................................................................. 1 1. The hardware ....................................................................................................................................................... 3
1.1. Specifications ............................................................................................................................................... 3 1.2. Interfaces ...................................................................................................................................................... 3
2. Compatible 3g/4g modules .................................................................................................................................. 5 3. Quick start ............................................................................................................................................................ 5
3.1. Prepare ......................................................................................................................................................... 5 3.2. Web Setting .................................................................................................................................................. 6 3.3. Using winscp via SSH .................................................................................................................................... 6 3.4. Using vi via SSH/serial .................................................................................................................................. 7 3.5. Change the Ethernet to WAN or LAN ........................................................................................................... 7 3.6. Check 3G/4G status ...................................................................................................................................... 8
4. AT command ........................................................................................................................................................ 8
4.1. Comgt – a quick tool ..................................................................................................................................... 8 4.2. Request International Mobile Equipment Identity ...................................................................................... 8 4.3. Request SIM’S CCID ...................................................................................................................................... 9 4.4. Request IMSI ................................................................................................................................................ 9 4.5. Check Network Registration ......................................................................................................................... 9 4.6. Signal Quality Report .................................................................................................................................. 10 4.7. Query The Currently Selected Network Operator ..................................................................................... 10 4.8. Reset ........................................................................................................................................................... 10 4.9. Other AT Instructions ................................................................................................................................. 10
5. QMI Mode .......................................................................................................................................................... 10
5.1. Settings ....................................................................................................................................................... 11 5.2. Tools ........................................................................................................................................................... 11 5.3. AT commands ............................................................................................................................................. 11
6. GPS Location ....................................................................................................................................................... 12 7. Install packages and Compile firmware ............................................................................................................. 12
7.1. Install packages .......................................................................................................................................... 12 7.2. Compile your firmware (Ubuntu) ............................................................................................................... 12
8. Troubleshooting ................................................................................................................................................. 13
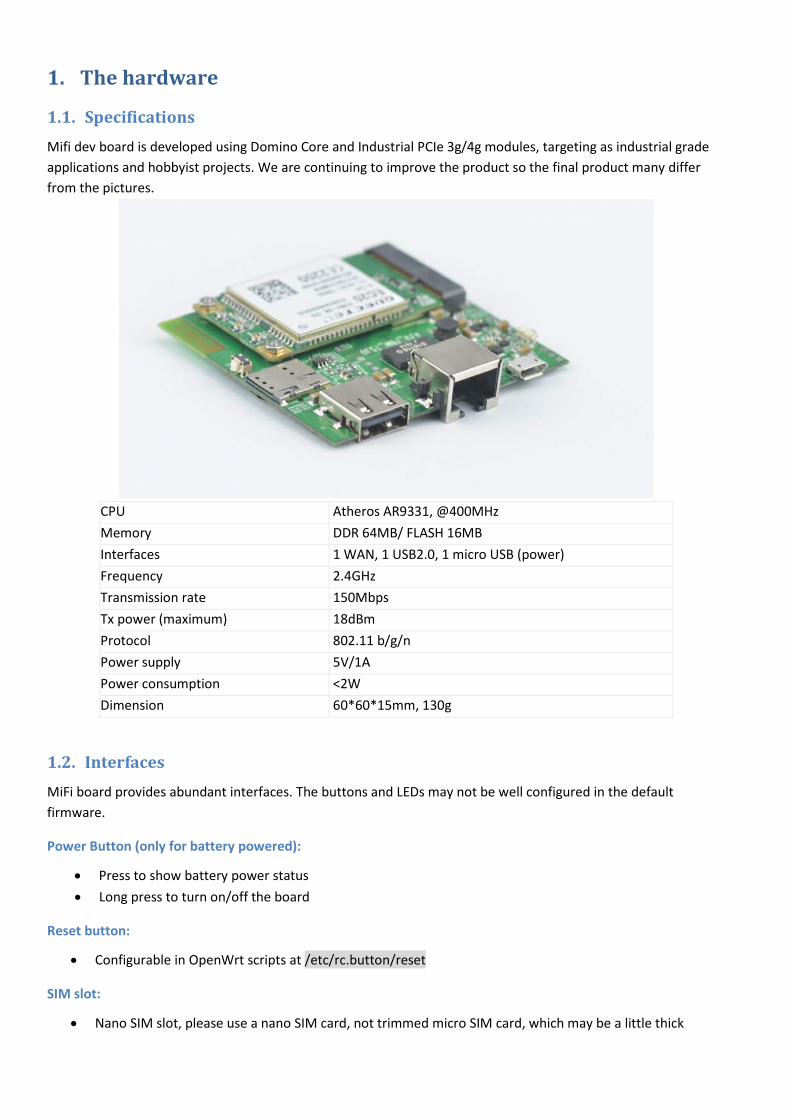
1. The hardware
1.1. Specifications Mifi dev board is developed using Domino Core and Industrial PCIe 3g/4g modules, targeting as industrial grade applications and hobbyist projects. We are continuing to improve the product so the final product many differ from the pictures.
CPU Atheros AR9331, @400MHz Memory DDR 64MB/ FLASH 16MB Interfaces 1 WAN, 1 USB2.0, 1 micro USB (power) Frequency 2.4GHz Transmission rate 150Mbps Tx power (maximum) 18dBm Protocol 802.11 b/g/n Power supply 5V/1A Power consumption <2W Dimension 60*60*15mm, 130g
1.2. Interfaces MiFi board provides abundant interfaces. The buttons and LEDs may not be well configured in the default firmware.
Power Button (only for battery powered):
• Press to show battery power status • Long press to turn on/off the board
Reset button:
• Configurable in OpenWrt scripts at /etc/rc.button/reset
SIM slot:
• Nano SIM slot, please use a nano SIM card, not trimmed micro SIM card, which may be a little thick

• Gently insert the SIM card to the slot. It should slip in easily. Don’t push with force, which may damage the slot.
Ethernet Port:
• Early version of the firmware configure it as WAN, only used to get IP from routers • The newest firmware configure it as LAN by default. Plug a cable to it from your computer will get an IP
address.
2. Compatible 3g/4g modules
GL-Mifi is compatible with most PCIe 3G/4G modules. We have three modules tested.
• 3G: Quectel UC20, • 4G: Quectel EC20, HUAWEI ME909s-821
During the first time when you use the MiFi board:
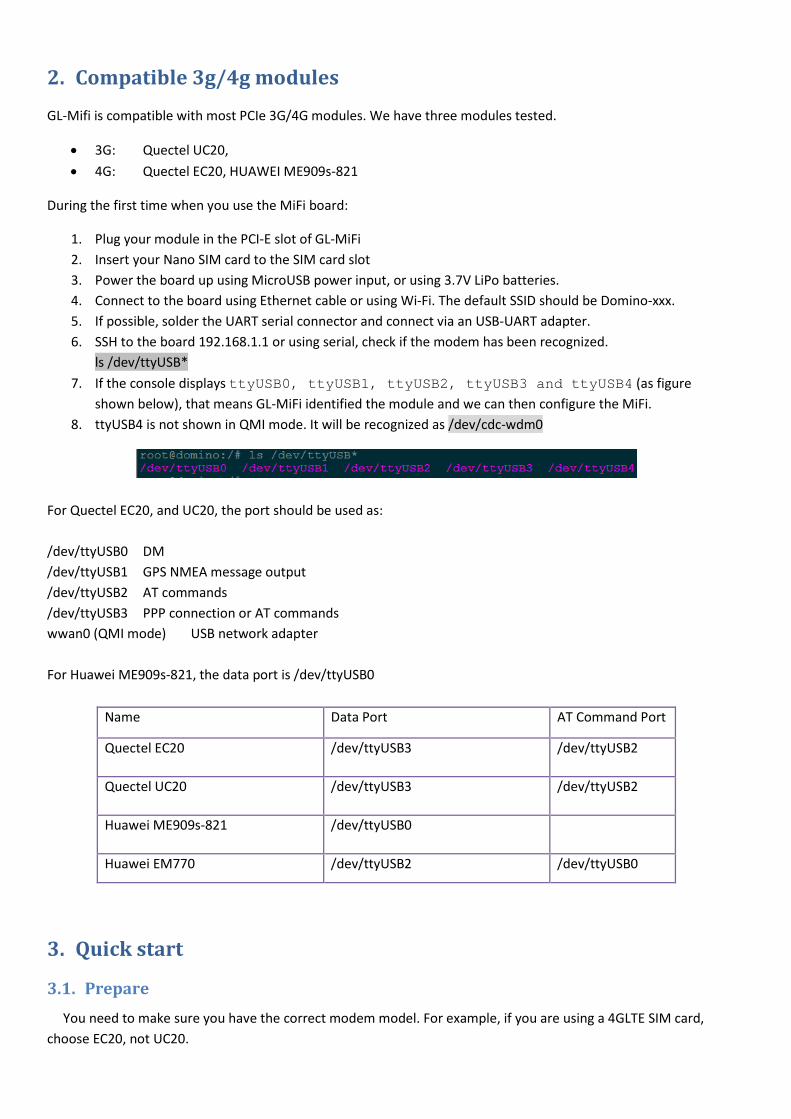
1. Plug your module in the PCI-E slot of GL-MiFi 2. Insert your Nano SIM card to the SIM card slot 3. Power the board up using MicroUSB power input, or using 3.7V LiPo batteries. 4. Connect to the board using Ethernet cable or using Wi-Fi. The default SSID should be Domino-xxx. 5. If possible, solder the UART serial connector and connect via an USB-UART adapter. 6. SSH to the board 192.168.1.1 or using serial, check if the modem has been recognized.
ls /dev/ttyUSB* 7. If the console displays ttyUSB0, ttyUSB1, ttyUSB2, ttyUSB3 and ttyUSB4 (as figure
shown below), that means GL-MiFi identified the module and we can then configure the MiFi. 8. ttyUSB4 is not shown in QMI mode. It will be recognized as /dev/cdc-wdm0
For Quectel EC20, and UC20, the port should be used as: /dev/ttyUSB0 DM /dev/ttyUSB1 GPS NMEA message output /dev/ttyUSB2 AT commands /dev/ttyUSB3 PPP connection or AT commands wwan0 (QMI mode) USB network adapter For Huawei ME909s-821, the data port is /dev/ttyUSB0
Name Data Port AT Command Port
Quectel EC20 /dev/ttyUSB3 /dev/ttyUSB2
Quectel UC20 /dev/ttyUSB3 /dev/ttyUSB2
Huawei ME909s-821 /dev/ttyUSB0
Huawei EM770 /dev/ttyUSB2 /dev/ttyUSB0
3. Quick start
3.1. Prepare You need to make sure you have the correct modem model. For example, if you are using a 4GLTE SIM card,
choose EC20, not UC20.

You need to get some basic information from your telecom service provider, including:
• Service Type: UMTS, EVDO or LTE • APN: This is generally needed • Username and password: may not be necessary • Dial number: may not be necessary
3.2. Web Setting After you connect to the board using Wi-Fi or Ethernet cable, you can using a browser to access
http://192.168.1.1. We have a WebUI so that you can set some basic parameters. Click the “NETWORK” link on the left and you can set the parameters. In the UI, there may be only UMTS and
EVDO to select. If you want to setup LTE connection, using SSH or UART.
3.3. Using winscp via SSH If you are using Windows, winscp is a good tool to manipulate the settings. First connect to the board using winscp. Second, modify file content directly. If you want to modify network configuration, “/etc/config/network” is the correct file to modify.

3.4. Using vi via SSH/serial If you are using Linux or OSX, you can use ssh directly or do this using the serial console. ssh [email protected] If you have set up a password, use the password to login. If you didn’t set up a password, don’t use ssh, use telnet instead. telnet 192.168.1.1
Using “vi” to modify network configurations:
For 4G-LTE, change the service to “fdd-lte”, for 3G umts, change service to “umts”, for evdo, change to “evdo”. After you change the settings, restart the network: /etc/init.d/network restart If you are sure that your settings are correct, after restarting the network or restarting the router, you keep
getting “error -2” error messages, please unplug the power then plug the power again, which does the trick.
3.5. Change the Ethernet to WAN or LAN If you board only has one Ethernet Port (V1), it can be configured as WAN or LAN. Change the settings by editing /etc/config/network Change to WAN
config interface ‘lan’ # option ifname ‘eth0’ #comment or delete this line config interface ‘wan’ option ifname ‘eth0’ option proto ‘dhcp’
Change to LAN
config interface ‘lan’ option ifname ‘eth0’ option …

config interface ‘wan’ # option ifname ‘eth0’ #comment or delete this line option proto ‘dhcp’
3.6. Check 3G/4G status If the device connected to the 3G/4G network successfully, you should be able to see “3g-wan” network interface. If it has an IP address now, it means you are connected now.
root@dominomifi:/# ifconfig 3g-wan 3g-wan Link encap:Point-to-Point Protocol inet addr:10.72.216.206 P-t-P:10.64.64.64 Mask:255.255.255.255 UP POINTOPOINT RUNNING NOARP MULTICAST MTU:1500 Metric:1 RX packets:2217 errors:0 dropped:0 overruns:0 frame:0 TX packets:1661 errors:0 dropped:0 overruns:0 carrier:0 collisions:0 txqueuelen:3 RX bytes:2600234 (2.4 MiB) TX bytes:152126 (148.5 KiB)
4. AT command
For UC20/EC20, /dev/ttyUSB2 is for AT commands. First send the commands to the port, then get the output from the port. For example: echo -e "AT+xxx \r\n" > /dev/ttyUSB2 cat /dev/ttyUSB2
4.1. Comgt – a quick tool There is a build-in tool called “comgt” which you can quickly check if you SIM card is registered or not. This should give the correct output before you set up the apn and start network connection.
root@dominomifi:/# comgt Trying list of devices SIM ready Waiting for Registration..(120 sec max) Registered on Home network: "one2free",6 Signal Quality: 14,99
4.2. Request International Mobile Equipment Identity Command: [echo -e "AT+GSN\r\n" > /dev/ttyUSB2] See the result: [cat /dev/ttyUSB2] Correct result:
AT+GSN 861075021617089 OK
If you get the similar number, it means that the connection is OK. Wrong result:
AT+GSN ERROR
4.3. Request SIM’S CCID
Command: [echo -e "AT+QCCID\r\n" > /dev/ttyUSB2] See the result: [cat /dev/ttyUSB2] Correct result:
AT+QCCID +QCCID: 89860115851079757018 OK
If you get the similar number, it means that the connection of SIM-card is OK. Wrong result:
AT+CCIDI ERROR
4.4. Request IMSI Command: [echo -e "AT+CIMI\r\n" > /dev/ttyUSB2] See the result: [cat /dev/ttyUSB2] Correct result:
AT+CIMI 460010529708870 OK
Wrong result:
AT+CIMI ERROR
4.5. Check Network Registration Command: [echo -e "AT+CREG?\r\n" > /dev/ttyUSB2] See the result: [cat /dev/ttyUSB2] Correct result:
AT+CREG? +CREG: 0,1 OK
If you get the similar result, it means that your SIM-card has registered in telecom operators Wrong result:
AT+CREG? ERROR

4.6. Signal Quality Report Command: [echo -e "AT+CSQ \r\n" > /dev/ttyUSB2] See the result: [cat /dev/ttyUSB2] Correct result:
+CSQ: 21,99 OK
This first number—“21” is the result. We usually get the value number is 18~23. Wrong result:
AT+CSQ ERROR
4.7. Query The Currently Selected Network Operator Command: [echo -e "AT+COPS?\r\n" > /dev/ttyUSB2] See the result: [cat /dev/ttyUSB2] Correct result:
AT+COPS? +COPS: 0,0,"CHN-UNICOM",6 OK
The currently network operator is ChinaUnicom Wrong result:
AT+COPS? ERROR
4.8. Reset You can reset the modem using AT command. The modem will be disconnected and connected again.
echo -e “AT+QRST=1,0” > /dev/ttyUSB2
4.9. Other AT Instructions If you want to know more, please refer Quectel_UC20_AT_Commands_Manual_V1.5.pdf
5. QMI Mode
The firmware is compiled with QMI drivers and you can use QMI mode. You will see a device called /dev/cdc-wdm0 which means that the driver is installed. For unknown reason, UC20 seems not work in this mode.

5.1. Settings For QMI mode, you need to change the network settings to dhcp and set the ifname to wwan0. config interface 'wwan' option proto 'dhcp' option ifname 'wwan0' You need to do a network restart
/etc/init.d/networe retart
5.2. Tools Check connection status root@OpenWrt:~# uqmi -d /dev/cdc-wdm0 --get-data-status "disconnected" Get signal info root@OpenWrt:~# uqmi -d /dev/cdc-wdm0 --get-signal-info { "type": "lte", "rssi": -71, "rsrq": -9, "rsrp": -94, "snr": 70 } To start the Internet connection, replace “apn” with your real apn uqmi -d /dev/cdc-wdm0 --start-network apn --autoconnect Then you will see you have wwan0 in your ifconfig
root@domino:/# ifconfig wwan0 wwan0 Link encap:Ethernet HWaddr 9A:02:75:A0:CA:59 inet6 addr: fe80::9802:75ff:fea0:ca59/64 Scope:Link UP BROADCAST RUNNING MULTICAST MTU:1500 Metric:1 RX packets:0 errors:0 dropped:0 overruns:0 frame:0 TX packets:254 errors:0 dropped:0 overruns:0 carrier:0 collisions:0 txqueuelen:1000 RX bytes:0 (0.0 B) TX bytes:82077 (80.1 KiB)
5.3. AT commands You can also use low level AT commands to start the Internet. The apn, username and password should be sent in the following format:
AT+QICSGP=1,1,"apn" [,"username","password" [,<authentication>]]]
For example, my apn is “pccw”, I am using the following command. cat /dev/ttyUSB2 & echo -en "AT+QICSGP=1,1,\"pccw\",\"\",\"\",0\r\n" > /dev/ttyUSB2 echo -en "AT+QCFG=\"rmnet/autoconnect\",1,0\r\n" > /dev/ttyUSB2 You need to do a RESET to make the changes take effect according to Quectel manual.
echo -e "AT+QRST=1,0\r\n" > /dev/ttyUSB2
6. GPS Location
This only applies to Quectel UC20 3g module, which has GPS built in. Initialization Command:
echo -e "AT+QGPSCFG=\"outport\",\"usbnmea\" \r\n" > /dev/ttyUSB2 echo -e "AT+QGPSCFG=\"nmeasrc\",1 \r\n" > /dev/ttyUSB2 echo -e "AT+QGPSCFG=\"gpsnmeatype\",1 \r\n" > /dev/ttyUSB2 echo -e "AT+QGPSCFG=\"glonassnmeatype\",4 \r\n" > /dev/ttyUSB2 echo -e "AT+QGPSCFG=\"glonassenable\",0 \r\n" > /dev/ttyUSB2 echo -e "AT+QGPSCFG=\"odpcontrol\",0 \r\n" > /dev/ttyUSB2 echo -e "AT+QGPSCFG=\"dpoenable\",0 \r\n" > /dev/ttyUSB2 echo -e "AT+QGPS=1 \r\n" > /dev/ttyUSB2
Location Command:
echo -e "AT+QGPSLOC? \r\n" > /dev/ttyUSB2 cat /dev/ttyUSB2
Module Closure:
echo -e "AT+QGPSEND \r\n" > /dev/ttyUSB2
7. Install packages and Compile firmware
7.1. Install packages You can install applications to your board from openwrt repo.
opkg update opkg install [package name]
The current firmware is still an engineering firmware so you may not install kernel modules directly in this way. You can compile your own firmware.
7.2. Compile your firmware (Ubuntu) We strongly suggest you get a Linux machine for development with the MiFi board. However, using Linux in virtual machine is fine. The following guide is for Ubuntu.

Install some software
#sudo apt-get update # sudo apt-get install subversion build-essential git-core libncurses5-dev zlib1g-dev gawk flex quilt libssl-dev xsltproc libxml-parser-perl mercurial bzr ecj cvs unzip
Get openwrt source
git clone https://github.com/domino-team/openwrt-cc.git openwrt-mifi
Update and install feeds
cd openwrt-mifi ./scripts/feeds update -a ./scripts/feeds install -a
Copy files
We need to copy some files to OpenWrt tree, including default configurations (“files”), software packages (“dl”) and Domino WebUI (“domino”).
cp files to openwrt-mifi/ -r cp dl to openwrt-mifi/ -r
cp domino to openwrt-mifi/package/ -r
Menuconfig and compile firmware
Type “make menuconfig” and choose the packages that you want to compile. Here you need to choose the Target profile as “GL-Domino” and then choose “domino-mifi” package. All the dependent packages will be selected automatically.
make menuconfig Target profile(Domino Wifi for things) ---> domino ---> <*>domino-mifi make V=s -j5
By adding “-j5” we use multi-thread to compile the firmware. If you have errors, just remove this parameter.
make
Finally, you can get what you want firmware at [openwrt-mifi/bin/ar71xx/],firmware’s name is [openwrt-ar71xx-generic-domino-squashfs-sysupgrade.bin]
8. Troubleshooting
No ttyUSB0~ttyUSB4
This generally means the driver is not installed or the module is not recognized. You may need to check the connections of the module

Field: [option_instat_callback: error -2] appears after startup
For some complicated reasons: (1) Bad contact of SIM Card. (2) No antenna inserted. (3) Wrong operator parameters. (4) No network. (5) Data interface (ttyUSBx) configured incorrectly.
When this happens:
• Check connection • Connect antennas • Correct network settings • After you have done the above, try to restart network by execute /etc/init.d/network restart . If the error
still exists, try to unplug the power and plug the power again. Simply reboot the device without unplug the device may not help.