Embed Size (px)
Citation preview

©2015 V-cube, Inc. All Rights Reserved.
V-CUBE Meeting 5
User Manual
V-CUBE, INC.
2015/09/01
This document is the user manual for the V-CUBE Meeting 5 (or 'Meeting'), a web conferencing system.

©2015 V-cube, Inc. All Rights Reserved.
Revision history
Revision date Details
2015/09/01 Changed the name ‘V-CUBE Meeting 5Lite ’ to ‘V-CUBE Meeting 5’ in accordance
with the change of the service name
2015/07/16 - Added description for video and audio
2015/06/18 - Added a function for administrator user and user who scheduled the meeting,
not requiring password input when changing or cancelling the password set
meeting
2015/05/15 - Added necessary softwares for installation
- Added system requirements information
2015/04/30 - Added description for PIN code entry method in V-CUBE Meeting 5 Lite site
- Added description for setting when right-click of application
- Added description for video and audio
2015/04/13 - Added a URL of a webpage presenting the installation procedure to follow when
users are not logged in
2015/03/25 - First version

©2015 V-cube, Inc. All Rights Reserved.
Contents
1 About this Manual .................................................................................................................................... - 1 -
2 About V-CUBE Meeting ........................................................................................................................... - 1 -
2.1 Overview .......................................................................................................................................... - 1 -
2.2 What Meeting Can Do...................................................................................................................... - 1 -
2.3 Meeting Participants ......................................................................................................................... - 1 -
2.3.1 Participants ............................................................................................................................... - 1 -
2.3.2 Invitees ...................................................................................................................................... - 1 -
3 Before using Meeting ............................................................................................................................... - 2 -
3.1 Installation ........................................................................................................................................ - 2 -
3.2 Devices Necessary to Use Meeting ................................................................................................. - 4 -
3.2.1 Preparing a Web Camera and a Microphone .......................................................................... - 4 -
3.3 System Requirements...................................................................................................................... - 5 -
4 Logging In ................................................................................................................................................ - 6 -
4.1.1 Logging in from V-CUBE One .................................................................................................. - 6 -
4.1.2 Logging in from V-CUBE Meeting 5 ......................................................................................... - 7 -
4.1.3 Participating in a Meeting by Entering a PIN Code ................................................................. - 8 -
4.2 About the V-Cube Meeting 5 Application ...................................................................................... - 9 -
4.3 Preferences .................................................................................................................................... - 10 -
4.3.1 Selecting Language ................................................................................................................ - 10 -
4.3.2 Setting the Time Zone ............................................................................................................ - 10 -
4.3.3 Setting the Name .................................................................................................................... - 10 -
4.3.4 Applying the Settings .............................................................................................................. - 11 -
5 Main Page .............................................................................................................................................. - 12 -
5.1 Menu Bar Functions ....................................................................................................................... - 13 -
5.1.1 Reservation ............................................................................................................................. - 13 -
5.1.2 Schedule ................................................................................................................................. - 13 -
5.1.3 Others ..................................................................................................................................... - 14 -
6 Scheduling Meetings ............................................................................................................................. - 15 -
6.1 Adding Contacts to Your Address Book ......................................................................................... - 15 -
6.2 Scheduling Meetings ...................................................................................................................... - 17 -
6.3 Changing Scheduled Meetings ...................................................................................................... - 23 -
6.4 Viewing Details of Scheduled Meetings ........................................................................................ - 25 -
6.5 Cancelling Scheduled Meetings .................................................................................................... - 27 -
6.5.1 Cancelling a Scheduled Meeting in Progress ........................................................................ - 27 -
6.5.2 Cancelling a Scheduled Meeting before the Meeting Starts ................................................. - 29 -
7 Participating in a Meeting ...................................................................................................................... - 30 -
7.1.1 Entering a Meeting Room ...................................................................................................... - 30 -
7.1.2 Participating in Scheduled Meetings ...................................................................................... - 33 -
7.1.3 Leaving a Meeting .................................................................................................................. - 35 -
8 Participating in a Meeting from an Invitation Email (Receiving an Invitation) ....................................... - 36 -
8.1 Invitation Emails ................................................................................................................................... - 36 -

©2015 V-cube, Inc. All Rights Reserved.
8.2 Before Entering a Meeting Room ........................................................................................................ - 38 -
8.2.1 Accessing a Meeting Room .......................................................................................................... - 38 -
8.2.2 Setting a Language, Time Zone and Name (Preferences) .......................................................... - 39 -
8.3 Participating in a Meeting from an Invitation Email ............................................................................. - 40 -
8.3.1 Entering a Meeting Room ............................................................................................................. - 40 -
9 Using Meeting Room Functionality ....................................................................................................... - 44 -
9.1 Names of Meeting Room Components ......................................................................................... - 44 -
9.1.1 Displaying Elapsed Meeting Time .......................................................................................... - 44 -
9.1.2 Changing the Meeting Name ................................................................................................. - 45 -
9.2 Audio and Video ............................................................................................................................. - 46 -
9.2.1 Switching Cameras ................................................................................................................ - 46 -
9.2.2 Switching Microphones .......................................................................................................... - 47 -
9.2.3 Switching Speakers ................................................................................................................ - 48 -
9.2.4 Video Display .......................................................................................................................... - 49 -
9.2.5 Checking Meeting Participants ............................................................................................... - 50 -
9.2.6 Removing a Participant from a Meeting Room ...................................................................... - 51 -
9.3 Instant Messaging .......................................................................................................................... - 52 -
9.3.1 Using Instant Messaging ........................................................................................................ - 52 -
9.4 Invite to Meeting ............................................................................................................................. - 53 -
9.4.1 Inviting by Email...................................................................................................................... - 53 -
9.4.2 Inviting by URL ....................................................................................................................... - 54 -
9.5 Meeting Settings ............................................................................................................................ - 55 -
9.5.1 Denying Entrance by New Users to a Meeting Room ........................................................... - 55 -
9.6 Other ............................................................................................................................................... - 56 -
9.6.1 Using PC Screen Sharing ...................................................................................................... - 56 -
9.7 Document Sharing Functionality .................................................................................................... - 57 -
9.7.1 Using the Document Sharing Functionality ............................................................................ - 57 -
9.7.2 Selecting a Colour .................................................................................................................. - 58 -
9.7.3 Selecting Text/Pen Size or Line Thickness ............................................................................ - 58 -
9.7.4 Freehand Drawing on the Whiteboard ................................................................................... - 59 -
9.7.5 Entering Text onto the Whiteboard using Your Keyboard ...................................................... - 59 -
9.7.6 Adding Shapes onto the Whiteboard ..................................................................................... - 59 -
9.7.7 Undoing Text Entry, Shapes, etc. ........................................................................................... - 60 -
9.7.8 Using the Pointing Tool ........................................................................................................... - 60 -
9.7.9 Uploading Files Saved on Your Computer ............................................................................. - 61 -
9.7.10 Moving to the First Page or Other Pages of Files on the Whiteboard ................................... - 64 -
9.7.11 Checking Documents Independently ..................................................................................... - 66 -
9.7.12 Zooming In on and Moving Whiteboard Documents ............................................................. - 68 -
9.7.13 Adding a Blank Page .............................................................................................................. - 69 -
9.7.14 Deleting Individual Whiteboard Documents ........................................................................... - 70 -
9.7.15 Deleting All Whiteboard Documents ...................................................................................... - 71 -
9.7.16 Printing the Displayed Whiteboard ......................................................................................... - 72 -
9.8 Leaving a Meeting Room ............................................................................................................... - 74 -

- 1 -
©2015 V-cube, Inc. All Rights Reserved.
1 About this Manual
This Manual provides instructions on how to use V-CUBE Meeting 5.
2 About V-CUBE Meeting
2.1 Overview
V-CUBE Meeting is a web conferencing system that links computers, smartphones, mobile phones and/or
tablets in a number of different locations over the Internet to allow the exchange of audio, video, data and
more. By using this system, widely separated locations can be linked through real-time audio and video,
allowing two-way visual communication.
2.2 What Meeting Can Do
・ Stream audio and video to all locations of meeting participants
・ Allow communication by instant messaging
2.3 Meeting Participants
22..33..11 PPaarrttiicciippaannttss
Participants have unlimited access rights to stream audio and video to all locations, and to use all Meeting
feature, including instant messaging and various meeting settings. All participants have equal rights to
perform any operations they want.
22..33..22 IInnvviitteeeess
When a participant has scheduled a meeting, invitations can be sent to people by email. An invitee can
enter the meeting room just by clicking the URL in the main body of the invitation email. They do not need to
have an ID or password.

- 2 -
©2015 V-cube, Inc. All Rights Reserved.
3 Before using Meeting
The “V-CUBE Meeting 5” application and the following software are required prior to using V-CUBE Meeting
5.
・.Net framework, version 4.5 or later (Windows only)
・ Most recent version of Flash Player
Check whether these are installed on your computer.
3.1 Installation
Step 1. Click Download V-CUBE Meeting 5 in the upper right of the screen after logging in.
If you are not logged in, go to <https://mtg5l.vcube.com/services/download/flow.php> to install the
application.
Step 2. Follow the instructions on the screen to install the application.
The application launches automatically once the installation is complete.
The application launches when logging in to Windows and remains in the Notifications area of the task bar.
On Macs, the application will remain in the menu bar after launch.
Note 1. On Windows, a Windows Security Alert dialogue box may appear when the application is launched for the first time.
Allow V-CUBE Meeting 5 access through Windows Firewall by clicking Allow access.

- 3 -
©2015 V-cube, Inc. All Rights Reserved.
If Flash Player is Not Installed
Download and install the latest Flash Player from the Adobe Systems website.
Flash Player is required to confirm whether the application is running when starting a meeting.
The screen below will appear when using a user account without Admin authorization. Enter the password to
the administrator account.
If a .Net Framework Version (4.5 or later) is Not Installed:
The screen below will appear.
Click Install and proceed with the installation of the V-CUBE Meeting 5 application. At the same time, install
a .Net framework.

- 4 -
©2015 V-cube, Inc. All Rights Reserved.
The screen below will appear when using a user account without Admin authorization. Enter the password to
the administrator account.
3.2 Devices Necessary to Use Meeting
33..22..11 PPrreeppaarriinngg aa WWeebb CCaammeerraa aanndd aa MMiiccrroopphhoonnee
Meeting makes possible interactive communication with audio and video streaming. You will need a web
camera, a microphone, a headset and a speaker.
Note 1. Please see our website or contact us directly for our recommended web cameras and headsets.

- 5 -
©2015 V-cube, Inc. All Rights Reserved.
3.3 System Requirements
Compatible with the following environments
Windows Mac
Browser *1 Internet Explorer 11
Internet Explorer 10
Internet Explorer 9
Internet Explorer 8
Internet Explorer 7
Mozilla Firefox (latest version)
Google Chrome (latest version)
Safari (latest version)
Google Chrome (latest version)
OS *2 *3 Windows 8.1
Windows 8
Windows 7
Mac OS X 10.9(Mavericks) and above
Flash Player Flash Player (latest version)
.Net Framework 4.5 and above
Flash Player (latest version)
Computer
Performance
<CPU>
Core 2 Duo 2GHz and above
CPU meeting the above requirements
< Built-in Memory>
2GB and above
<VRAM>
2GB and above
<CPU>
Core 2 Duo 2GHz and above
CPU meeting the above requirements
< Built-in Memory>
2GB and above
<VRAM>
2GB and above
Internet Speed *4 Download:512Kbps and above
Upload:384Kbps and above
Download:512Kbps and above
Upload:384Kbps and above
The abovementioned is based on the results of verifications conducted by our company. It does not
guarantee operations in all environments.
Note 1. Enable JavaScript and accept Cookies on your browser for the service to fully functions.
Note 2. Only Desktop mode is tested for Windows 8 and 8.1.
Note 3. Please note that the application is not compatible with Mac OS X 10.8(Mountain Lion) and below.
Note 4. Refers to absence of a proxy or handling of the bypass. Although connection is possible even when the line speed is
below the operating conditions, degradation or disconnection may occur.

- 6 -
©2015 V-cube, Inc. All Rights Reserved.
4 Logging In
V-CUBE Meeting (Meeting) can be used either by logging in from V-CUBE One or by logging in from the
Meeting website.
44..11..11 LLooggggiinngg iinn ffrroomm VV--CCUUBBEE OOnnee
Enter < https://one.vcube.com/> in the address bar of your web browser to access the login page.
Step 1. Enter your ID and password, and click the Login button.
Step 2. The services you can use are displayed. Click V-CUBE Meeting 5 .
You have now finished logging in.

- 7 -
©2015 V-cube, Inc. All Rights Reserved.
44..11..22 LLooggggiinngg iinn ffrroomm VV--CCUUBBEE MMeeeettiinngg 55
Step 1. Enter < https://mtg5l.vcube.com/services/login/> into the address bar of your web browser
to display the login page.
Step 2. Enter your ID and password, and click the Login button.
Click Language if you want to configure the language and timezone.
You have now finished logging in.

- 8 -
©2015 V-cube, Inc. All Rights Reserved.
44..11..33 PPaarrttiicciippaattiinngg iinn aa MMeeeettiinngg bbyy EEnntteerriinngg aa PPIINN CCooddee
You can enter a meeting room by entering a PIN code.
The PIN Code is included in the invitation email you have received sent for scheduled meetings and from
within meeting rooms. It can also be checked in the meeting room information after entering the meeting
room.
Step 1. Enter < https://mtg5l.vcube.com/services/login/> into the address bar of your web browser to
display the login page.
Step 2. Click User PIN Code to join
Step 3. Enter the PIN Code and click the Login button.
Click Language if you want to configure the language and timezone.

- 9 -
©2015 V-cube, Inc. All Rights Reserved.
4.2 About the V-Cube Meeting 5 Application
The V-CUBE Meeting 5 application appears on the task bar once installation is complete.
Right clicking on it allows you to check all settings.
Step 1. Right click on V-CUBE Meeting 5 in the task bar.
Check settings as needed.
View connection status
Displays the connection status.
Preference
No changes required when being accessed from the Cloud. Changes when accessed from an
on-premise environment.
Check for Update
Allows you to check information on updates.
Help
Allows you to check how to enter a room.
Visit V-CUBE Meeting 5 website
Displays the< https://mtg5l.vcube.com/services/login/>Log In page.
Quit V-CUBE Meeting 5
Quits V-CUBE Meeting 5

- 10 -
©2015 V-cube, Inc. All Rights Reserved.
4.3 Preferences
You can change the Language, Time Zone and Name from the Preferences menu.
The Preferences can also be changed by participants who are invited through invitation emails.
Step 1. Click Preferences in the Others tab.
Alternatively, click the Preferences link at the lower right of the page.
44..33..11 SSeelleeccttiinngg LLaanngguuaaggee
1) Select the language you want to use from the Language pull-down menu.
44..33..22 SSeettttiinngg tthhee TTiimmee ZZoonnee
2) You can select your time zone from the Time Zone pull-down menu.
44..33..33 SSeettttiinngg tthhee NNaammee
3) Entering a name in the Name field saves you from having to enter the name you will use when entering a
meeting room.
1)
2)
3)
4)

- 11 -
©2015 V-cube, Inc. All Rights Reserved.
44..33..44 AAppppllyyiinngg tthhee SSeettttiinnggss
4) When you have finished configuring the settings, click the Change button.

- 12 -
©2015 V-cube, Inc. All Rights Reserved.
5 Main Page
This provides information on the Main page that is displayed once you have logged in.
1) This is the menu bar for the Main page. Clicking the tabs for each page will take you there.
2) When there are multiple meeting rooms, the first five rooms are displayed in the Room List from the top
down.
When there are five or more meeting rooms, use the arrow buttons to navigate back and forth between
the pages of the Room List. The number of people currently in meeting rooms in use is displayed beside
the meeting room name.
(No number will be displayed if no one is in a room.)
3) Displays the meeting room status. The plate indicates in a Meeting if there is an ongoing meeting in the
meeting room whereas vacant is displayed when no meeting is held there.
4) Displays the meeting room name that has been set.
5) Displays the number of users currently using the meeting room. Also displays the names they entered when
they entered the room.
6) Allows you to select your language.
7) Allows you to enter a meeting room.
8) Click the Schedule Meeting link to move to the Schedule Meeting page.
9) Click the Scheduled Meeting link to check the details on scheduled meetings. Meetings currently in progress
can also be checked.
10) Click this to log out from the User page.
11) The same items as those listed in Others in the menu bar are displayed in the lower right of the page.
Clicking the tabs for each page will take you there.
12) Displays V-CUBE news.
13) Displays the version information of the V-CUBE Meeting you are using.
2) 5) 7)
1)
6)
3) 10) 1)
4)
8)
1)
9)
1)
11)
12)
13)

- 13 -
©2015 V-cube, Inc. All Rights Reserved.
5.1 Menu Bar Functions
55..11..11 RReesseerrvvaattiioonn
Click on this tab to schedule a meeting ahead of time.
You can let users who do not have a User ID or password participate in teleconferences by using the
invitation function.
55..11..22 SScchheedduullee
Click on this tab to view a list of scheduled meetings.
You can also check or change the details of the scheduled meetings, or cancel them.
The calendar display can be switched between daily view, weekly view and monthly view by clicking the
calendar icons.

- 14 -
©2015 V-cube, Inc. All Rights Reserved.
55..11..33 OOtthheerrss
Click on this tab to go to any of the following pages.
Manuals: Click on this item to download V-CUBE manuals.
Preferences: You can change Language, Time Zone and Name.
Admin Page: Click on this item to go to the Log in to Administrator page.
The items listed in Others are displayed also in the lower right of the page.

- 15 -
©2015 V-cube, Inc. All Rights Reserved.
6 Scheduling Meetings
This describes how to schedule a meeting.
6.1 Adding Contacts to Your Address Book
When using the Invitation function when scheduling a meeting, you can send invitations by email to your
contacts in your address book.
This will explain the steps for adding new contacts to your address book.
Note 1. You can add up to 2000 new contacts to your address book.
Note 2. The importing of contacts is possible using address book management on the Administrator page. Refer to ‘6.
Updating Administrator Page’ in the V-CUBE Meeting User Manual.
Step 1. Go to the Schedule Meeting page.
-- UUssiinngg tthhee RReesseerrvvaattiioonn ttaabb
-- UUssiinngg tthhee SScchheedduullee MMeeeettiinngg lliinnkk
The Schedule Meeting page is now displayed.

- 16 -
©2015 V-cube, Inc. All Rights Reserved.
Step 2. Click the Address Book button in Detail Settings.
Step 3. Click the Add Member button.
Step 4. Enter or select an option for each item.
A group can be created with Edit Group in Address Book on the Administrator page.
Step 5. Click the Submit button.
Once the addresses have been added, you will return to the list of members. The added addresses are
displayed.
Note 3. The address book display is sorted automatically. Therefore, please note that newly added contacts will be shown at
the bottom of the table.

- 17 -
©2015 V-cube, Inc. All Rights Reserved.
6.2 Scheduling Meetings
Step 1. Go to the Schedule Meeting page.
The Scheduled Meeting page is accessed by clicking the Reservation tab on the Main page or the
Schedule Meeting link at the bottom of the meeting room.
-- UUssiinngg tthhee RReesseerrvvaattiioonn bbuuttttoonn
-- UUssiinngg tthhee SScchheedduullee MMeeeettiinngg lliinnkk
This displays the Schedule Meeting page.
Step 2. Select the Meeting Room to schedule for a meeting.
Note 1. These are the settings when there is more than one meeting room. They are not required when your contract only
allows one meeting room.

- 18 -
©2015 V-cube, Inc. All Rights Reserved.
Step 3. Select the date and time to schedule a meeting.
(1) Set the date, start and finish times for the meeting.
Click the calendar icon ( ) to set the start date for the meeting from the displayed calendar.
Note 2. This calendar is based on the date settings of the computer you are using.
(2) Set the time difference from GMT.
Make your selection from the pull-down menu or type in your region and click the Narrow with region
button to filter your search.
Step 4. Enter the meeting room name.
Step 5. Configure the invitation email setting.
Invitation Email Settings is selected by default.
Deselect the check box if you do not want to send invitation emails and instead move on to schedule the
meeting.
If you want to configure the invitation email settings, make the necessary entries.
Step 6. Set whether to send a reminder email.
Selecting this option will cause the invitation email to be resent an hour or two before the meeting starts.
Note 3. The reminder will not be sent when there is less than an hour before the meeting starts when it is scheduled.
1)
2)

- 19 -
©2015 V-cube, Inc. All Rights Reserved.
Step 7. Configure the HTML setting for invitation emails.
You can send invitation emails in HTML format by selecting the check box.
Note 4. Once disable is selected for HTML Mail Settings in Invitation Email Settings on the Admin Page, the Send in
HTML format section will not appear on the Schedule Meeting page.
Step 8. Enter the data for the people you want to invite.
There are two ways to enter information about the people you are inviting: using your address book or by
directly entering their information.
-- UUssiinngg yyoouurr aaddddrreessss bbooookk
(1) Click the Address Book button.
(2) You can select the members to invite from Address Book.
Select the check boxes by the names of the members you want to invite.

- 20 -
©2015 V-cube, Inc. All Rights Reserved.
(3) Click a pulldown menu and select the option you want for an invitee to change the setting.
-- DDiirreecctt eennttrryy
1) Enter the person’s name. 2) Enter the person's email address.
3) Select the language the person being invited will
use.
4) Select the time zone for the person being
invited.
5) Click the button to delete the information for the
person in that row.
6) Use this option when you want to invite more
than one person.
Click to add a new line.
Step 9. Enter the inviter’s name, email address and message.
If you do not want to save the inviter’s name and email address, deselect Remember this.
1) 2)
3) 4)
5) 6)

- 21 -
©2015 V-cube, Inc. All Rights Reserved.
Step 10. Set up the organiser.
Use this option when the organiser of the meeting and the inviter of the invitation emails are different.
(Example: when the meeting is being scheduled by someone on behalf of the organiser)
Select the Same as Inviter check box. Alternatively, select the Enter organizer Information check box,
enter the name and email address of the organiser and set up the language and time zone.
If you do not want to save the organiser’s name and email address, deselect Remember this.
Step 11. Set a password.
You can set a password for entering a room to attend a scheduled meeting when you select the Password
Settings check box.
If you have set a password, it will be included in the invitation emails sent to the meeting participants.
Step 12. Click the Next button after all settings have been made.
This displays the details of the scheduled meeting.

- 22 -
©2015 V-cube, Inc. All Rights Reserved.
Step 13. Set whether the email addresses of the participants will be registered in the Address Book.
If you select the Add this contact to your Address Book check box, the selected email addresses are
registered in the Address Book. The registered email addresses in the Address Book can be used for
scheduling the next meeting.
Deselect the check boxes if the registration of email addresses is not necessary.
Note 5. The option to Add this contact to your Address Book and corresponding check boxes are not displayed for email
addresses that are already registered in the Address Book.
Step 14. Click the Submit button.
If the details are correct, click the Submit button.
This completes the process for scheduling a meeting.

- 23 -
©2015 V-cube, Inc. All Rights Reserved.
6.3 Changing Scheduled Meetings
Step 1. Go to the Schedule page.
Step 2. Select the scheduled meeting room.
Note 1. You do not need to select a meeting room if your subscription enables you to use only one room.
Step 3. Click the Edit button for the scheduled meeting.
If a password was set when the meeting was scheduled, you will need to enter the set password in the
password entry page.
However, administrator user or user who scheduled the meeting do not need password entry.
Step 4. Edit the scheduled time and time zone.
Step 5. Change the meeting room name.
Step 6. Configure the reminder setting.
Selecting this option will cause the invitation email to be resent an hour or two before the meeting starts.
Note 2. The reminder will not be sent when there is less than an hour before the meeting starts when it is scheduled.
Step 7. Configure the HTML setting for invitation emails.
You can send invitation emails in HTML format by selecting the check box.
Note 3. Once disable is selected for HTML Mail Settings in Invitation Email Settings on the Admin Page,
the Send in HTML format section will not appear on the Schedule Meeting page.

- 24 -
©2015 V-cube, Inc. All Rights Reserved.
Step 8. Change the data of the people you want to invite.
There are two ways to enter information about the people you are inviting: using your address book or by
directly entering their information.
Refer to Step 8 in '6.2. Scheduling Meetings'.
To delete an invitee, click the Delete button for the person to delete.
Step 9. Change the data of the inviter (inviting person).
Step 10. Change the data of the organiser.
Enter the updated data in order to change the organiser or set up a new organiser.
Step 11. Set the email notification.
Email notifications are sent to inform of any change when the check box is selected. Select whether the
email notifications are sent to all invitees or only to the invitees who were added, edited or deleted when a
change was made with the scheduled meetings.
Step 12. Set a password.
When setting a new password, select the check box and then set a password.
When changing a set password, select the Change check box and then change it.
Step 13. Click the Next button at the bottom of the page.
Step 14. Set if the email addresses of the participants will be registered in the Address Book.
If you select the Add this contact to your Address Book check box, the selected email addresses are
registered in the Address Book. The registered email addresses in the Address Book can be used for
scheduling the next meeting.
Deselect the check boxes if the registration of email addresses is not necessary.
Note 4. The option to Add this contact to your Address Book and corresponding check boxes are not displayed for email
addresses that are already registered in the Address Book.
Step 15. The Meeting Details page will be displayed for confirmation. If there are no
problems, click the Submit button.

- 25 -
©2015 V-cube, Inc. All Rights Reserved.
6.4 Viewing Details of Scheduled Meetings
You can check details of the scheduled meetings using the Scheduled Meeting link at the bottom of the
meeting room or the Schedule tab.
-- UUssiinngg tthhee SScchheedduullee ttaabb
(1) Select the scheduled meeting room.
Note 1. You do not need to select a meeting room if your subscription enables you to use only one room.
When you switch the view by clicking on the calendar icon inside the blue circle, the list shows that week’s
schedule for each meeting room. When you switch the view by clicking on the calendar icon inside the green
circle, the list shows that month’s schedule for each meeting room.
(2) Click the Detail button for the scheduled meeting.
If you click the calendar icon, click the name of the relevant meeting.
If a password was set when the meeting was scheduled, you will need to enter the set password in the
password entry page.
However, administrator user or user who scheduled the meeting do not need password entry.
(3) You are directed to the Meeting Details page, which shows the details of the scheduled meeting.

- 26 -
©2015 V-cube, Inc. All Rights Reserved.
-- UUssiinngg tthhee SScchheedduulleedd MMeeeettiinngg lliinnkk
(1) Click the Scheduled Meeting link for the scheduled meeting.
(2) A list of scheduled meetings is displayed.
(a) Displays the scheduled date and time, and the selected time zone.
(b) Displays the name of the scheduled meeting. Click the link that displays a meeting name to move to
the Schedule Meeting page and see the details of the scheduled meeting.
(a) (b)
- 27 -
©2015 V-cube, Inc. All Rights Reserved.
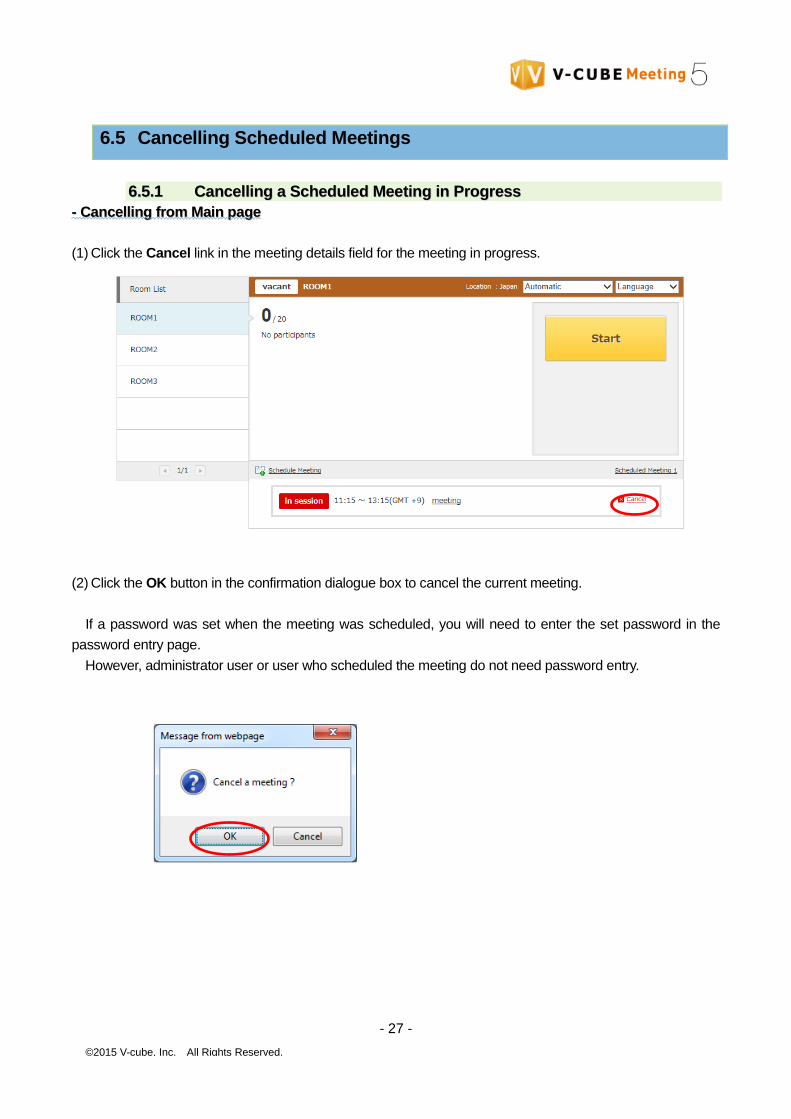
6.5 Cancelling Scheduled Meetings
66..55..11 CCaanncceelllliinngg aa SScchheedduulleedd MMeeeettiinngg iinn PPrrooggrreessss
-- CCaanncceelllliinngg ffrroomm MMaaiinn ppaaggee
(1) Click the Cancel link in the meeting details field for the meeting in progress.
(2) Click the OK button in the confirmation dialogue box to cancel the current meeting.
If a password was set when the meeting was scheduled, you will need to enter the set password in the
password entry page.
However, administrator user or user who scheduled the meeting do not need password entry.

- 28 -
©2015 V-cube, Inc. All Rights Reserved.
-- CCaanncceelllliinngg ffrroomm tthhee SScchheedduullee ppaaggee
(1) Click the Schedule tab.
(2) Click the Cancel button for the relevant scheduled meeting.
If a password was set when the meeting was scheduled, you will need to enter the set password in the
password entry page.
However, administrator user or user who scheduled the meeting do not need password entry.
(3) Check the details of the scheduled meeting and click the Cancel button at the bottom of the page.
This allows you to cancel a scheduled meeting that is currently in progress.

- 29 -
©2015 V-cube, Inc. All Rights Reserved.
6.5.2 CCaanncceelllliinngg aa SScchheedduulleedd MMeeeettiinngg bbeeffoorree tthhee MMeeeettiinngg SSttaarrttss
Step 1. Click the Schedule tab.
Step 2. Click the Cancel button for the relevant scheduled meeting.
If a password was set when the meeting was scheduled, you will need to enter the set password in the
password entry page.
However, administrator user or user who scheduled the meeting do not need password entry.
Step 3. Check the details of the scheduled meeting and click the Cancel button at the bottom of the
page.
The scheduled meeting has now been cancelled.

- 30 -
©2015 V-cube, Inc. All Rights Reserved.
7 Participating in a Meeting
77..11..11 EEnntteerriinngg aa MMeeeettiinngg RRoooomm
Step 1. Click the Start button.
Note 1. You need to download the application by clicking Download V-CUBE Meeting 5 in the upper right corner of the page in
advance. Follow the steps on the download page to install the application.
Note 2. If the following page is displayed, you need to start the V-CUBE Meeting 5 application.
The Start Meeting page will be displayed in another window.

- 31 -
©2015 V-cube, Inc. All Rights Reserved.
Step 2. Enter a display name to use in the meeting room.
Step 3. Click to check the camera, microphone and speaker to be used.
Selecting Same as system will configure the microphone and the speaker selected under your computer’s
sound settings to be used. (Not displayed on some devices)

- 32 -
©2015 V-cube, Inc. All Rights Reserved.
Step 4. Toggle the camera, microphone, and speaker On or Off
Note 3. Each button’s function is as described below.
Camera on/off
Microphone on/off
Speaker on/off
Step 5. Click the Start Meeting button.

- 33 -
©2015 V-cube, Inc. All Rights Reserved.
The meeting room browser window will now open.
You have now finished entering a meeting room.
77..11..22 PPaarrttiicciippaattiinngg iinn SScchheedduulleedd MMeeeettiinnggss
When there is a previously scheduled meeting, the name of the meeting currently in progress will be
displayed in the meeting room area of the Main page once the start time arrives.
The organiser's information is displayed to the right of the meeting name if the organiser has been set in the
invitation email settings.
The meeting room can be accessed via an invitation email.

- 34 -
©2015 V-cube, Inc. All Rights Reserved.
“Almost in session” is displayed when the scheduled meeting will start within the next ten minutes.
If there is a previously scheduled meeting that is running overtime when the start time for the scheduled
meeting arrives, “extending” will be displayed for that meeting as being in session.
If there is a meeting running over time, “session waiting” will be displayed for the current scheduled
meeting until that meeting ends.
Step 1. After checking the name of the meeting currently in progress, click the Start button.
Step 2. Follow the same steps as those described in "7.1.1 Entering a Meeting Room".
In some cases, the organiser of a meeting has password-protected the meeting room. In such cases, you will
need to enter a password to enter the meeting room. The password is shown in the invitation email.

- 35 -
©2015 V-cube, Inc. All Rights Reserved.
77..11..33 LLeeaavviinngg aa MMeeeettiinngg
Step 1. Click the Menu button.
Step 2. Click Exit.
Step 3. Click Exit in the confirmation dialogue box.
The window will now close and you can exit the meeting room.
To continue participating in the meeting, click the Back to Home button.

- 36 -
©2015 V-cube, Inc. All Rights Reserved.
8 Participating in a Meeting from an Invitation Email (Receiving
an Invitation)
V-CUBE Meeting allows you to log in from an invitation email, in addition to logging in using the ID and
password you were issued. Some plans may require your ID and password when you enter a meeting room
through an invitation email.
8.1 Invitation Emails
An invitation email is an email sent from the meeting organiser to inform people of the date and time of the
meeting.
A URL for joining a meeting is included in the text of the email. Click the URL at the time that the meeting is
scheduled to access the meeting room.
Two types of invitation emails are available.
(1) Invitation emails sent by using the Reservation tab or Edit Schedule tab
Two types of invitation emails are available.
-- HHTTMMLL eemmaaiill
Select the Send in HTML format check box while scheduling a meeting to send HTML emails.
Note 1. Once disable is selected for HTML Mail Settings in Invitation Email Settings on the Admin Page, the Send in
HTML format section will not appear on the Schedule Meeting page. Emails will be sent in text format.
Invitation URL

- 37 -
©2015 V-cube, Inc. All Rights Reserved.
-- TTeexxtt eemmaaiill
Text emails are delivered when a meeting is
scheduled while Send in HTML format is not selected
or when disable is selected for HTML Mail Settings
in Invitation Email Settings on the Admin Page.
Note 2. If you have set the Reminder feature when scheduling a meeting, an invitation email will be sent to you one to two
hours before the meeting starts, aside from the one which is sent to you when you scheduled the meeting. The email
subject will be ‘Reminder’. However, if a meeting you have scheduled will start within an hour from the time you
scheduled it, a reminder email will not be sent.
(2) Invitation email sent by using Invite users to this meeting during a meeting
Note 3. The Invite users to this meeting button is not displayed for some plans.
Note 4. The email is sent in plain text format.
Invitation URL
Invitation URL

- 38 -
©2015 V-cube, Inc. All Rights Reserved.
8.2 Before Entering a Meeting Room
88..22..11 AAcccceessssiinngg aa MMeeeettiinngg RRoooomm
Step 1. Click the URL shown in the invitation email at the time of the scheduled meeting.
Note 1. If you access the meeting room outside the meeting hours, a message saying ‘Please check your meeting schedule
and login again.’ will be displayed.
A browser window prior to a user’s participation in a meeting is displayed.
1) Allows you to enter a meeting room.
2) Displays the meeting room status. in a Meeting is displayed when a meeting is ongoing and vacant is
displayed when the room is empty.
3) Displays the number of users currently using the meeting room. Also displays the names they entered when
they entered the room.
4) Displays the name and time of the scheduled meeting.
The information of the organiser is displayed on the right side of the meeting name if the organiser is set
in the invitation email setting.
5) Clicking the links for each page will take you there.
3) 1)
2)
4)
5)

- 39 -
©2015 V-cube, Inc. All Rights Reserved.
88..22..22 SSeettttiinngg aa LLaanngguuaaggee,, TTiimmee ZZoonnee aanndd NNaammee ((PPrreeffeerreenncceess))
You can change Language, Time Zone and Name from the Preferences menu.
Step 1. Click Preferences link in the lower right of the page.
Step 2. Select items to change, or enter information.
1) Select the language to use from the Language pull-down menu.
2) You can select your time zone from the Time Zone pull-down menu.
3) Entering a name in the Name field saves you from having to enter a name you will use when entering a
meeting room.
4) Saves the settings.
Step 3. Click the Change button.
You have now finished setting Preferences.
1)
3)
4)
2)

- 40 -
©2015 V-cube, Inc. All Rights Reserved.
8.3 Participating in a Meeting from an Invitation Email
88..33..11 EEnntteerriinngg aa MMeeeettiinngg RRoooomm
Step 1. Click the Start button
In some cases, the organiser of a meeting has password-protected the meeting room. In such a case, you will
need to enter the password to enter the meeting room. The password is shown in the invitation email.
Note 1. You need to download the application by clicking Download V-CUBE Meeting 5 in the upper right corner of the page in
advance. Follow the steps in the download page to install the application.
Note 2. If the following page is displayed, you need to start the V-CUBE Meeting 5 application.
You have now finished entering a meeting room.

- 41 -
©2015 V-cube, Inc. All Rights Reserved.
Step 2. Enter a display name to use in the meeting room.
Step 3. Click to check the camera, microphone and speaker to be used.
Selecting Same as system will configure the microphone and the speaker selected under your computer’s
sound settings to be used. (Not displayed on some devices)

- 42 -
©2015 V-cube, Inc. All Rights Reserved.
Step 4. Toggle the camera, microphone, and speaker On or Off
Note 3. Each button’s function is as described below.
Camera on/off
Microphone on/off
Speaker on/off
Step 5. Click the Start Meeting button.

- 43 -
©2015 V-cube, Inc. All Rights Reserved.
The meeting room browser window will now open.
You have now finished entering a meeting room.
- 44 -
©2015 V-cube, Inc. All Rights Reserved.
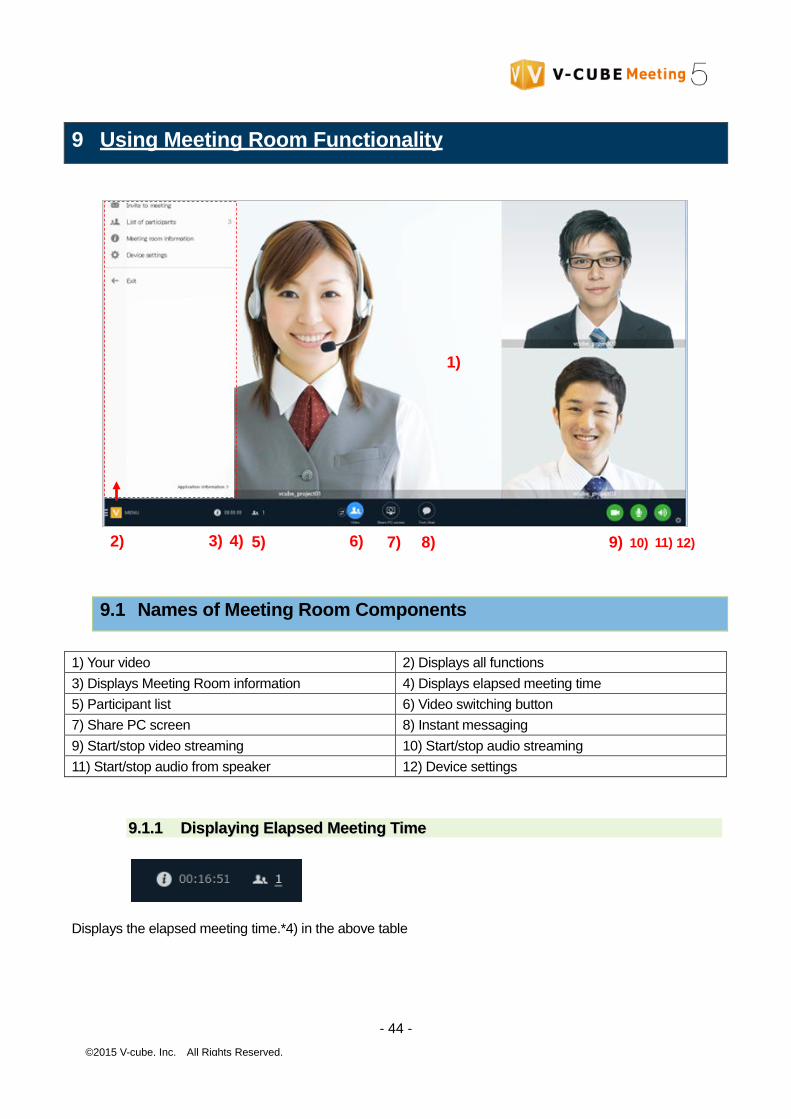
9 Using Meeting Room Functionality
9.1 Names of Meeting Room Components
1) Your video 2) Displays all functions
3) Displays Meeting Room information 4) Displays elapsed meeting time
5) Participant list 6) Video switching button
7) Share PC screen 8) Instant messaging
9) Start/stop video streaming 10) Start/stop audio streaming
11) Start/stop audio from speaker 12) Device settings
99..11..11 DDiissppllaayyiinngg EEllaappsseedd MMeeeettiinngg TTiimmee
Displays the elapsed meeting time.*4) in the above table
1)
2)
3) 4) 5) 6) 7) 8) 9) 10) 11) 12)

- 45 -
©2015 V-cube, Inc. All Rights Reserved.
99..11..22 CChhaannggiinngg tthhee MMeeeettiinngg NNaammee
There are two ways to change the meeting name.
Step 1. Display the Meeting Room Information.
(a) Click button at the bottom of the browser window.
(b) Click Menu button in the lower left corner the browser window.
Click Meeting room information.
Step 2. Enter a name for the meeting in Meeting name of the displayed dialogue box and click the
Change button.
You have now changed the meeting name.
The meeting name is shown in the meeting records. If the meeting has been named, that name is shown. If
the meeting has not been named, ‘-’ is shown instead.

- 46 -
©2015 V-cube, Inc. All Rights Reserved.
9.2 Audio and Video
99..22..11 SSwwiittcchhiinngg CCaammeerraass
There are two ways to switch cameras.
Step 1. Display the Camera Settings
(a) Click button at the lower right corner of the browser window.
(b) Click Menu button in the lower left corner of the browser window.
Select Device settings.
Step 2. Switch the camera.
You have now switched cameras.
- 47 -
©2015 V-cube, Inc. All Rights Reserved.
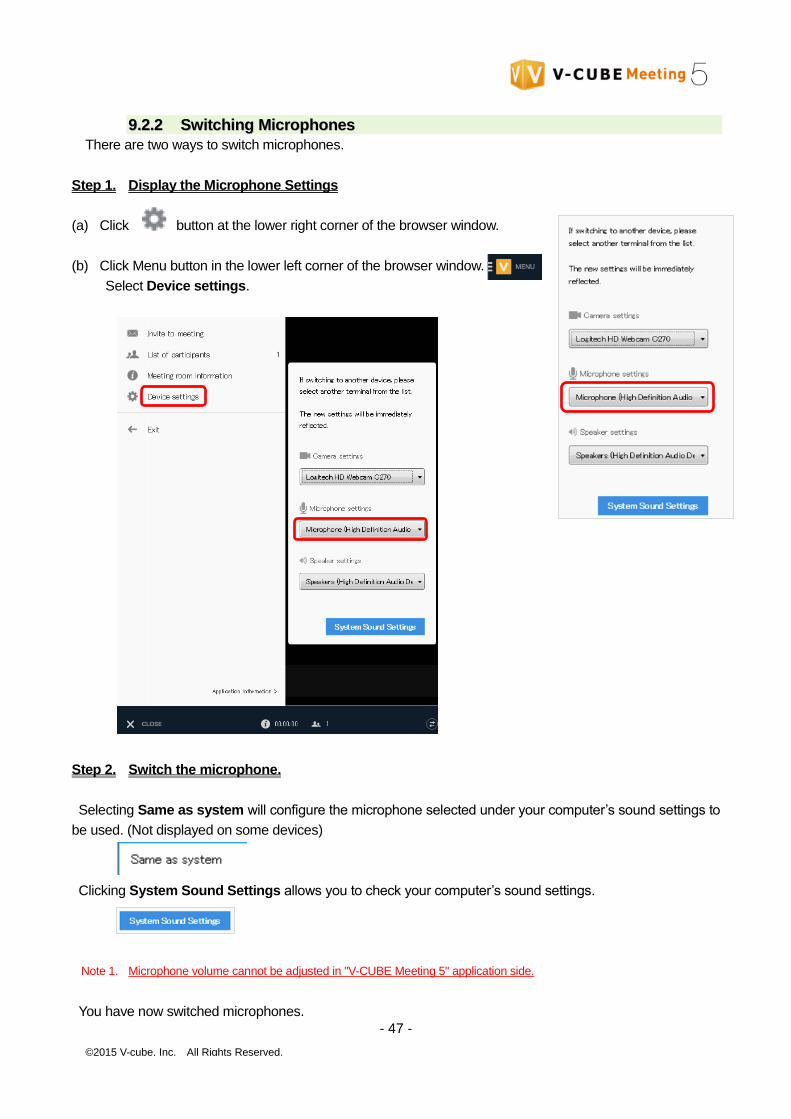
99..22..22 SSwwiittcchhiinngg MMiiccrroopphhoonneess
There are two ways to switch microphones.
Step 1. Display the Microphone Settings
(a) Click button at the lower right corner of the browser window.
(b) Click Menu button in the lower left corner of the browser window.
Select Device settings.
Step 2. Switch the microphone.
Selecting Same as system will configure the microphone selected under your computer’s sound settings to
be used. (Not displayed on some devices)
Clicking System Sound Settings allows you to check your computer’s sound settings.
Note 1. Microphone volume cannot be adjusted in "V-CUBE Meeting 5" application side.
You have now switched microphones.

- 48 -
©2015 V-cube, Inc. All Rights Reserved.
99..22..33 SSwwiittcchhiinngg SSppeeaakkeerrss
There are two ways to switch speakers.
Step 1. Display the Speaker Settings
(c) Click button at the lower right corner of the browser window.
(d) Click Menu button in the lower left corner of the browser window.
Select Device settings.
Step 2. Switch the speaker.
Selecting Same as system will configure the speaker selected under your computer’s sound settings to be
used. (Not displayed on some devices)
Clicking System Sound Settings allows you to check your computer’s sound settings.
Note 1. Speaker volume cannot be adjusted in "V-CUBE Meeting 5" application side.
You have now switched speakers.

- 49 -
©2015 V-cube, Inc. All Rights Reserved.
99..22..44 VViiddeeoo DDiissppllaayy
Click the video switching button to switch between normal mode and active speaker mode.
Active speaker mode Normal mode
Active speaker mode
Active speaker mode is a feature that preferentially displays the video of the participant who is speaking.
Up to eight locations can be displayed in video windows.
Layout will switch automatically according to the number of locations involved in meeting, and left (top left)
video window will be displayed larger.
When there are participants in nine or more locations, the video of the participant who is speaking is
preferentially displayed, while video of the other participants is not displayed.
The system detects how loudly people are speaking every few seconds, and the display switches to the
video of the participant who is speaking the loudest. Your own video is always displayed in the lower right
corner.
Normal mode
Up to eight locations can be displayed in video windows.
Layout will switch automatically according to the number of locations involved in meeting, and each location
window will be displayed in same size.
When there are participants in nine or more locations, the video of the participant who is speaking is
preferentially displayed, while video of the other participants is not displayed. Your own video is always
displayed in the lower right corner.

- 50 -
©2015 V-cube, Inc. All Rights Reserved.
99..22..55 CChheecckkiinngg MMeeeettiinngg PPaarrttiicciippaannttss
You can check the participants in the meeting room from the participant list.
There are two ways to check the meeting participants.
(a) Click button at the bottom of the browser window.
The names of the meeting participants are displayed.
(b) Click Menu button in the lower left corner the browser window.
Select List of participants.
You have now completed checking the meeting participants.

- 51 -
©2015 V-cube, Inc. All Rights Reserved.
99..22..66 RReemmoovviinngg aa PPaarrttiicciippaanntt ffrroomm aa MMeeeettiinngg RRoooomm
You can remove users in the meeting room from the participant list.
There are two ways of removing a participant.
Step 1. The names of the meeting participants are displayed. Click Alert.
(a) Click button at the bottom of the browser window.
(b) Click Menu button in the lower left corner the browser window.
Select List of participants.
Step 2. Click Alert on Eject the members below from the conference? on the confirmation dialogue
box.
You have now removed the meeting participant.

- 52 -
©2015 V-cube, Inc. All Rights Reserved.
9.3 Instant Messaging
99..33..11 UUssiinngg IInnssttaanntt MMeessssaaggiinngg
You can use instant messaging to communicate with other meeting participants by typing in text.
Step 1. Click the Text Chat button at the bottom of the browser window.
Step 2. Enter the text of your message in the instant messaging window.
Note 1. You can also send a message you have entered by pressing the Enter key.
The time at which you sent the message is displayed to the
right of the message.
Note 2. The time displayed depends on the time zone that is set for your
PC.
The date is not displayed.

- 53 -
©2015 V-cube, Inc. All Rights Reserved.
9.4 Invite to Meeting
You can send an invitation email for a meeting you are currently participating in or issue a URL to invite
someone to the meeting using the ‘Invite users to this meeting’ functionality.
99..44..11 IInnvviittiinngg bbyy EEmmaaiill
Step 1. Click Menu button in the lower left corner the browser window.
Step 2. Click Invite to meeting.
Step 3. Enter the email address of the person you want to invite.
Note 1. When inviting multiple people, separate their email addresses with commas.
Step 4. Click the Send invitation via e-mail button.
Invitation emails will be sent to the email addresses of the people you want to invite.
The invitation emails are sent in plain text format.

- 54 -
©2015 V-cube, Inc. All Rights Reserved.
99..44..22 IInnvviittiinngg bbyy UURRLL
There are two ways to invite users by issuing a URL.
Step 1. Click Menu button in the lower left corner the browser window.
Step 2. Click Invite to meeting.
Step 3. Copy the URL under Invitation URL.
Step 4. Send the URL you have copied to the users you want to invite.

- 55 -
©2015 V-cube, Inc. All Rights Reserved.
9.5 Meeting Settings
In Meeting Settings, you can configure settings for a meeting.
99..55..11 DDeennyyiinngg EEnnttrraannccee bbyy NNeeww UUsseerrss ttoo aa MMeeeettiinngg RRoooomm
Step 1. Click button at the bottom of
the browser window.
Step 2. Set Deny Entrance to ON to deny entry to the meeting room.
If you set Deny Entrance to off, users can enter the meeting room.
Note 1. This setting is set to off at the start of a meeting.
If a user tries to enter the meeting room when Deny Entrance is set to on, a message to the effect that there
is an entrance restriction will be displayed and he/she will be unable to enter the meeting room.

- 56 -
©2015 V-cube, Inc. All Rights Reserved.
9.6 Other
99..66..11 UUssiinngg PPCC SSccrreeeenn SShhaarriinngg
Step 1. Click Share PC Screen at the bottom of the browser window.
Step 2. Select the items you wish to share from the displayed list and click Begin sharing.
To cancel sharing, click Stop sharing .
The screen will split, and you can share the item(s) on your PC screen.

- 57 -
©2015 V-cube, Inc. All Rights Reserved.
9.7 Document Sharing Functionality
The document sharing functionality allows you to share documents with all the participants on a whiteboard
displayed in another window.
You can upload documents on the whiteboard, add graphics and text to them, and print out the documents
with your additions.
Note 1. If no meeting is being held, you cannot use the document sharing functionality.
99..77..11 UUssiinngg tthhee DDooccuummeenntt SShhaarriinngg FFuunnccttiioonnaalliittyy
Step 1. Click the Start Whiteboard or Begin sharing documents button on the Main page.
or
The whiteboard is displayed in a new window.
Place the cursor at the top of the window to display all of the functions.
1) Room: Displays the name of the meeting room you are in.
2) Total Time: Displays the time elapsed since document sharing started.
3) Close button: Ends document sharing.

- 58 -
©2015 V-cube, Inc. All Rights Reserved.
Note 2. If you leave the meeting, the following dialogue box will be displayed, and the document sharing will also end.
99..77..22 SSeelleeccttiinngg aa CCoolloouurr
Step 1. Select a colour to use from the Color at the top of the column of icons beside the
whiteboard.
Note 1. You can use the colour you have selected with the pen and shape tools.
You have now selected a colour to use for graphics and text.
99..77..33 SSeelleeccttiinngg TTeexxtt//PPeenn SSiizzee oorr LLiinnee TThhiicckknneessss
Step 1. Click Size to select a font size.
FFoorr tthhee ppeenn ttooooll
The size you have selected determines the size of the pen tool and line thickness for the shape tool.
WWhheenn uussiinngg tthhee tteexxtt ttooooll
You have now changed the font/pen size or line thickness.

- 59 -
©2015 V-cube, Inc. All Rights Reserved.
99..77..44 FFrreeeehhaanndd DDrraawwiinngg oonn tthhee WWhhiitteebbooaarrdd
Step 1. Select a pen.
The left-hand icon with a slim tip works like a pencil and the
right-hand one with a thick tip works like a marker.
Step 2. Draw on the whiteboard.
You can now draw on the whiteboard.
99..77..55 EEnntteerriinngg TTeexxtt oonnttoo tthhee WWhhiitteebbooaarrdd uussiinngg YYoouurr KKeeyybbooaarrdd
Step 1. Select a text tool.
You can select the text colour and size from the toolbar.
Step 2. Type into the text entry field.
Step 3. Click in the upper right corner of the entry field
or click outside the text entry field to confirm your text entry.
You have now entered text onto the whiteboard using your keyboard.
99..77..66 AAddddiinngg SShhaappeess oonnttoo tthhee WWhhiitteebbooaarrdd
Step 1. Select a shape from the shape tool.
You can change the colour of the shape and its line thickness
using the Color and Size tools.
Step 2. Add the shape onto the whiteboard.
You have now finished adding a shape.
- 60 -
©2015 V-cube, Inc. All Rights Reserved.
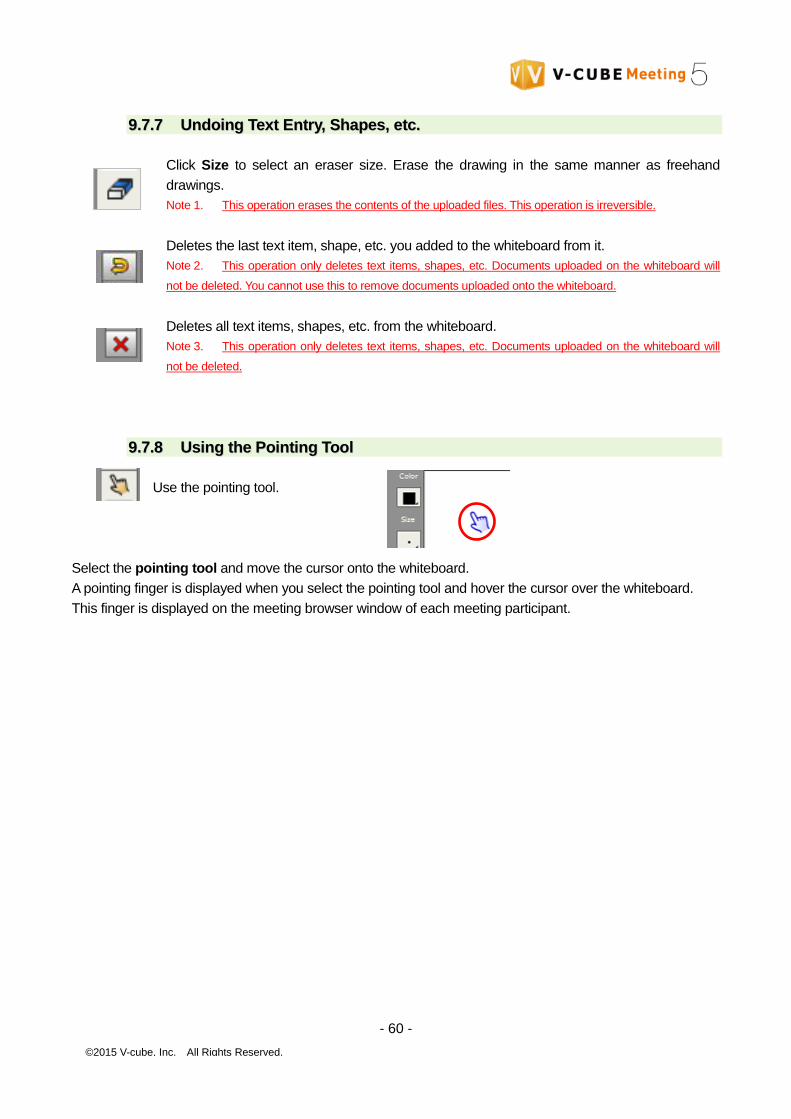
99..77..77 UUnnddooiinngg TTeexxtt EEnnttrryy,, SShhaappeess,, eettcc..
Click Size to select an eraser size. Erase the drawing in the same manner as freehand
drawings.
Note 1. This operation erases the contents of the uploaded files. This operation is irreversible.
Deletes the last text item, shape, etc. you added to the whiteboard from it.
Note 2. This operation only deletes text items, shapes, etc. Documents uploaded on the whiteboard will
not be deleted. You cannot use this to remove documents uploaded onto the whiteboard.
Deletes all text items, shapes, etc. from the whiteboard.
Note 3. This operation only deletes text items, shapes, etc. Documents uploaded on the whiteboard will
not be deleted.
99..77..88 UUssiinngg tthhee PPooiinnttiinngg TTooooll
Use the pointing tool.
Select the pointing tool and move the cursor onto the whiteboard.
A pointing finger is displayed when you select the pointing tool and hover the cursor over the whiteboard.
This finger is displayed on the meeting browser window of each meeting participant.

- 61 -
©2015 V-cube, Inc. All Rights Reserved.
99..77..99 UUppllooaaddiinngg FFiilleess SSaavveedd oonn YYoouurr CCoommppuutteerr
Step 1. Click the UPLOAD button.
Step 2. The Select file to upload dialogue box appears.
Step 3. Select the file from the dialogue box and click the Open button.
Step 4. Click YES to upload the file in high quality mode.
Click NO to upload the file in regular mode.
If you select High quality when pasting documents, the meeting participants can see the details of your
uploaded documents, including text and images, more clearly even when they zoom in on them. (However,
the conversion may take more time than regular mode.)

- 62 -
©2015 V-cube, Inc. All Rights Reserved.
The uploaded files are displayed in the order they were uploaded onto the whiteboard.
If an uploaded file consists of multiple pages, an icon indicating that the file has multiple pages is displayed.
When you click an icon indicating a file with multiple pages, the first page is displayed.
- 63 -
©2015 V-cube, Inc. All Rights Reserved.
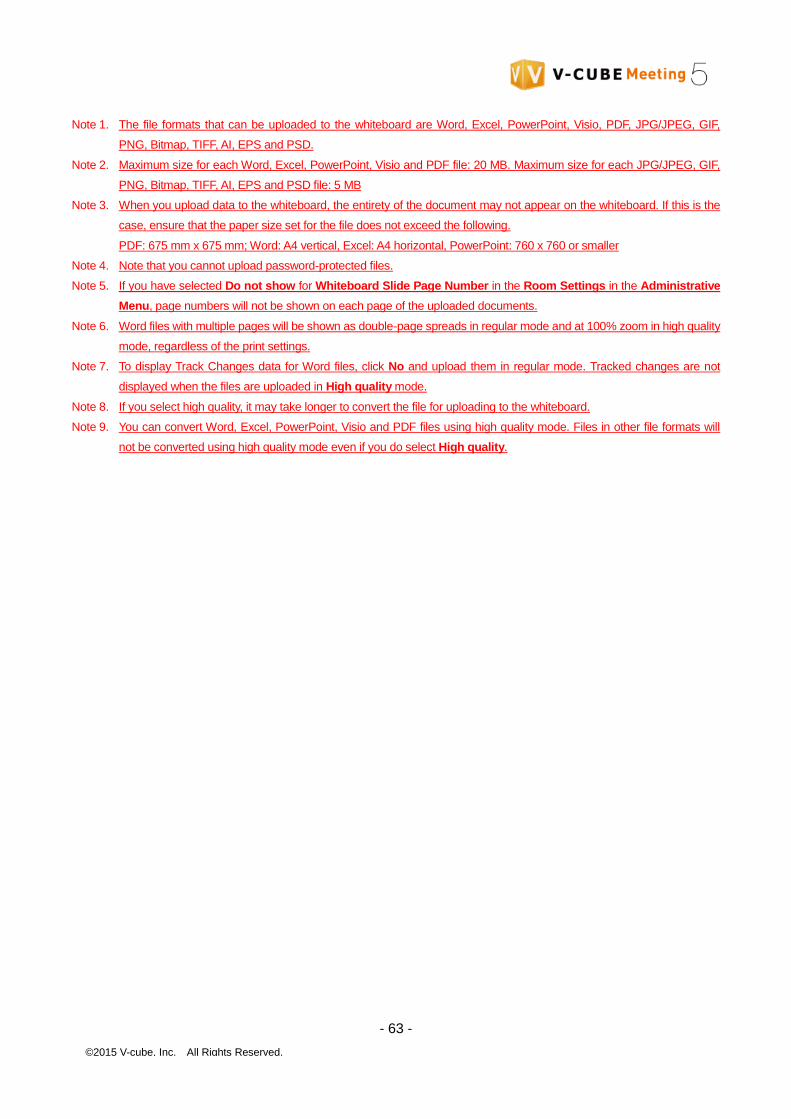
Note 1. The file formats that can be uploaded to the whiteboard are Word, Excel, PowerPoint, Visio, PDF, JPG/JPEG, GIF,
PNG, Bitmap, TIFF, AI, EPS and PSD.
Note 2. Maximum size for each Word, Excel, PowerPoint, Visio and PDF file: 20 MB. Maximum size for each JPG/JPEG, GIF,
PNG, Bitmap, TIFF, AI, EPS and PSD file: 5 MB
Note 3. When you upload data to the whiteboard, the entirety of the document may not appear on the whiteboard. If this is the
case, ensure that the paper size set for the file does not exceed the following.
PDF: 675 mm x 675 mm; Word: A4 vertical, Excel: A4 horizontal, PowerPoint: 760 x 760 or smaller
Note 4. Note that you cannot upload password-protected files.
Note 5. If you have selected Do not show for Whiteboard Slide Page Number in the Room Settings in the Administrative
Menu, page numbers will not be shown on each page of the uploaded documents.
Note 6. Word files with multiple pages will be shown as double-page spreads in regular mode and at 100% zoom in high quality
mode, regardless of the print settings.
Note 7. To display Track Changes data for Word files, click No and upload them in regular mode. Tracked changes are not
displayed when the files are uploaded in High quality mode.
Note 8. If you select high quality, it may take longer to convert the file for uploading to the whiteboard.
Note 9. You can convert Word, Excel, PowerPoint, Visio and PDF files using high quality mode. Files in other file formats will
not be converted using high quality mode even if you do select High quality.

- 64 -
©2015 V-cube, Inc. All Rights Reserved.
99..77..1100 MMoovviinngg ttoo tthhee FFiirrsstt PPaaggee oorr OOtthheerr PPaaggeess ooff FFiilleess oonn tthhee WWhhiitteebbooaarrdd
MMoovviinngg ttoo tthhee ffiirrsstt ppaaggee ooff aa ffiillee
(1) Click the icon of the file whose first page you want to see.
The first page of the selected file is now displayed.
Note 1. If you have selected Do not show for Whiteboard Slide Page Number in the Room Settings in the Administrative
Menu, page numbers will not be shown on each page of the uploaded documents.
SSwwiittcchhiinngg bbeettwweeeenn ppaaggeess ((uussiinngg tthhee kkeeyybbooaarrdd))
(1) Select the icon of a file that contains the page you want to move to.
(2) Switch between pages by using the cursor keys (←, ↑, ↓ or →) on your keyboard.
Press the cursor → or ↓ to move to the next page.
Press the cursor ← or ↑ to move to the previous page.

- 65 -
©2015 V-cube, Inc. All Rights Reserved.
SSwwiittcchhiinngg bbeettwweeeenn ppaaggeess ((uussiinngg tthhee ppaaggee lliisstt))
(3) Click PAGE LIST.
(4) Click the file you want to display on the whiteboard from the page list.
(5) Click OK or double-click the file to view the selected page.
(The current page number and total number of pages are displayed along with the file name below the
displayed file.)
Note 2. Hover the cursor over the page to view the file name.
- 66 -
©2015 V-cube, Inc. All Rights Reserved.
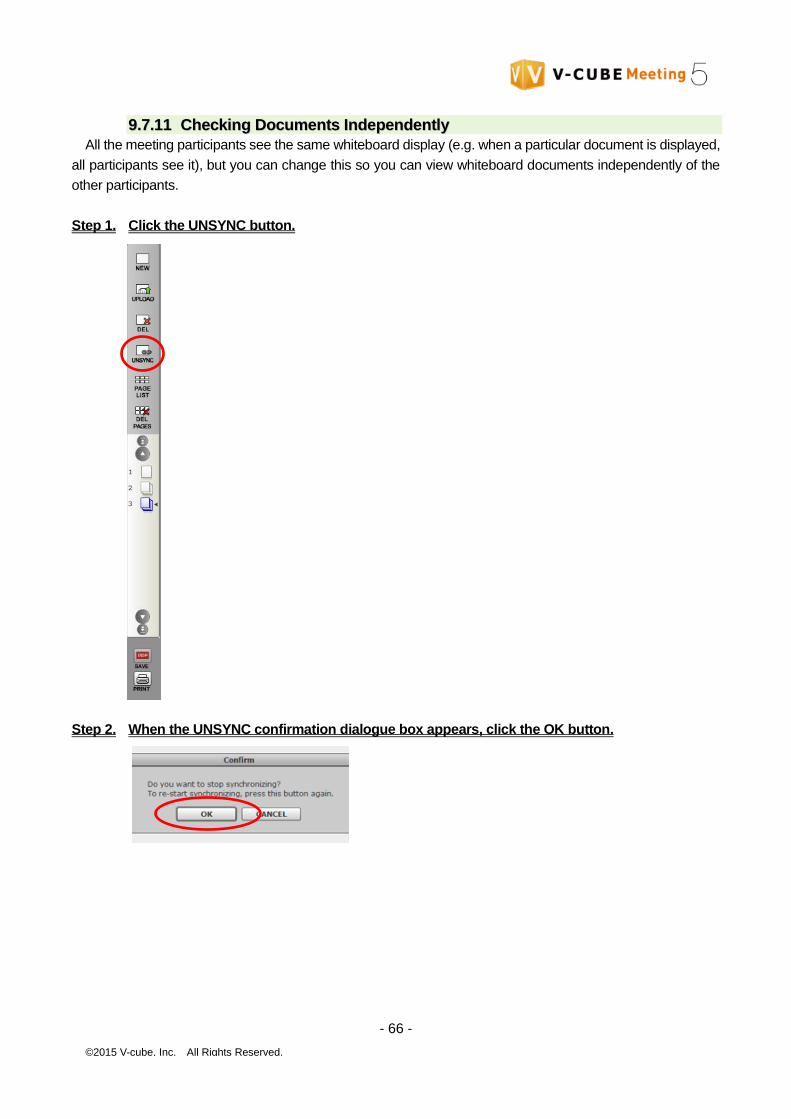
99..77..1111 CChheecckkiinngg DDooccuummeennttss IInnddeeppeennddeennttllyy
All the meeting participants see the same whiteboard display (e.g. when a particular document is displayed,
all participants see it), but you can change this so you can view whiteboard documents independently of the
other participants.
Step 1. Click the UNSYNC button.
Step 2. When the UNSYNC confirmation dialogue box appears, click the OK button.

- 67 -
©2015 V-cube, Inc. All Rights Reserved.
A message saying ‘Whiteboard Synchronization: OFF’ will appear on the browser window.
Note 1. While you are independently operating
the whiteboard, you can zoom into and move from
page to page in the documents. You cannot,
however, perform operations, such as writing
messages and deleting documents, which would
actually change the contents of the whiteboard.
Step 3. Click the SYNC button to stop independently operating the whiteboard.

- 68 -
©2015 V-cube, Inc. All Rights Reserved.
Now, all participants will see the same whiteboard display, and a message saying ‘Whiteboard
Synchronization: ON’ is displayed on the screen.
Note 2. If you have selected Do not show for Whiteboard Slide Page Number in the Room Settings in the Administrative
Menu, page numbers will not be shown on each page of the uploaded documents.
99..77..1122 ZZoooommiinngg IInn oonn aanndd MMoovviinngg WWhhiitteebbooaarrdd DDooccuummeennttss
Use the zoom slide bar below the magnifier icon to zoom in on documents uploaded to the
whiteboard.
You can use the hand tool to move a zoomed-in document around on the whiteboard by
clicking and dragging on the whiteboard.
Note 1. Note that you cannot enlarge the whiteboard itself.
Use the hand tool to move around in the documents you have zoomed in on the whiteboard.
- 69 -
©2015 V-cube, Inc. All Rights Reserved.
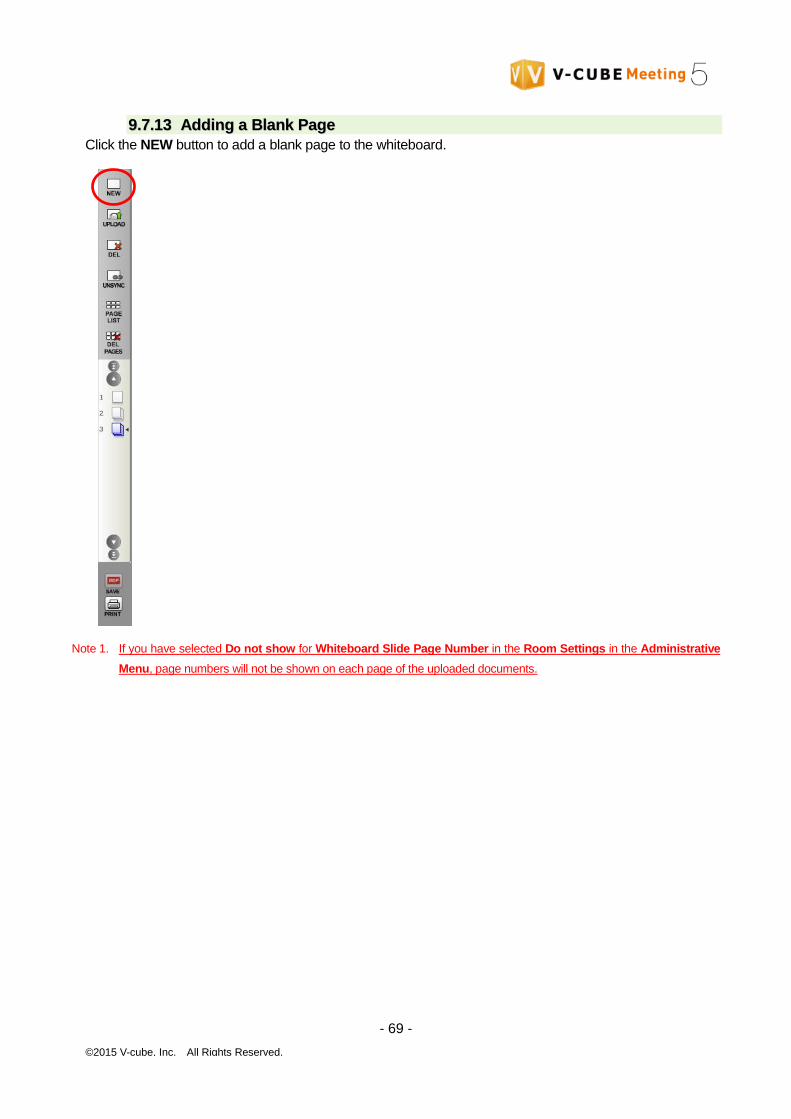
99..77..1133 AAddddiinngg aa BBllaannkk PPaaggee
Click the NEW button to add a blank page to the whiteboard.
Note 1. If you have selected Do not show for Whiteboard Slide Page Number in the Room Settings in the Administrative
Menu, page numbers will not be shown on each page of the uploaded documents.

- 70 -
©2015 V-cube, Inc. All Rights Reserved.
99..77..1144 DDeelleettiinngg IInnddiivviidduuaall WWhhiitteebbooaarrdd DDooccuummeennttss
Step 1. Select a document to delete.
Step 2. Click the DEL button.
You have now deleted the document you had selected.
Note 1. Deleted files cannot be restored.
Note 2. If the document you have selected has multiple pages, the
confirmation dialogue box shown below appears. Click the OK button
to delete all pages of the document.
Note 3. If you have selected Do not show for Whiteboard Slide Page Number in the Room Settings in the Administrative
Menu, page numbers will not be shown on each page of the uploaded documents.

- 71 -
©2015 V-cube, Inc. All Rights Reserved.
99..77..1155 DDeelleettiinngg AAllll WWhhiitteebbooaarrdd DDooccuummeennttss
Step 1. Click the DEL PAGES button.
Step 2. Select the pages you want to delete.
Step 3. Click the OK button.
Note 1. Deleted documents cannot be restored.
You have now deleted all the pages you selected.

- 72 -
©2015 V-cube, Inc. All Rights Reserved.
99..77..1166 PPrriinnttiinngg tthhee DDiissppllaayyeedd WWhhiitteebbooaarrdd
You can print the whiteboard as it is displayed.
Step 1. Click the PRINT button.
Note 1. If you have selected Do not show for Whiteboard Slide Page Number in the Room Settings in the Administrative
Menu, page numbers will not be shown on each page of the uploaded documents.

- 73 -
©2015 V-cube, Inc. All Rights Reserved.
Step 2. Select the pages you want to print.
Step 3. Click the OK button.
Note 2. Use print preview to check how the pages will be
printed and make the necessary adjustments. (When
you print documents from the whiteboard in landscape
A4 size, the actual printout may be shifted toward the
top-left. When you print them in A5, on the other hand,
the documents printed may be slightly cropped (i.e.,
will not be printed in the entirety.)
You are now able to print documents on the whiteboard from your printer.

- 74 -
©2015 V-cube, Inc. All Rights Reserved.
9.8 Leaving a Meeting Room
Step 1. Click Menu button in the lower left corner of the browser window.
Step 2. Click Exit.
Step 3. Click Exit on the confirmation dialogue box asking 'Do you want to leave this meeting?'
You have now left the meeting room.
To continue participating in the meeting, click the Back to Home button.