Embed Size (px)
Citation preview
Using XSL to Transform ContentCode snippets can be transformed to create pre-styled or pre-structured HTML widgets.
All websites make use of complex code structures, or “widgets,” and usually have very specificstyle formats. These aspects are usually built into the XSL templates, but often there is a needto have end-users easily be able to add and maintain these “widgets” in the middle of an editableregion.
This tutorial provides examples of how to use XSL to transform simple HTML tables into thefollowing fancy widgets: An introductory “Hero Unit,” a multi-column region, and a collapsibleaccordion widget. These XSL techniques can provide the tools to attack new and modern contentstyling that current websites employ. Twitter Bootstrap’s HTML and CSS structure are used as abase for the sample page templates and the code pieces.
In the examples provided, specially crafted HTML tables serve as the editable tool for storing thecomplex widgets’ content. Storing these tables as OU Campus snippets allow end-users to procurethese special tables for their pages. Users update the data in the table and save, and the XSLtakes care of the rest.
Getting StartedThe transforming content tutorial includes the use and modification of several files commonly usedin OU Campus. These include the following file types: .pcf, .html, .css, .txt, .js, and .xsl. Some codesnippets are provided in-context, but to work through tutorial requires modifying the various fileswithin OU Campus. The files used in the tutorial are provided in a ZIP file:
XSL Transformations (ZIP)
The ZIP file can be downloaded to a local computer and the uploaded to OU Campus using ZipImport, which by default will decompress the files and keep the existing folder structure. The filescan then be edited as necessary throughout the tutorial.
Provided are:
xsl-tranformations
index.pcf
sample.pcf
task1.html
task2.html
task3.html
_resources
css
bootstrap.css
OU Campus Using XSL to Transform Content Page 1 of 25
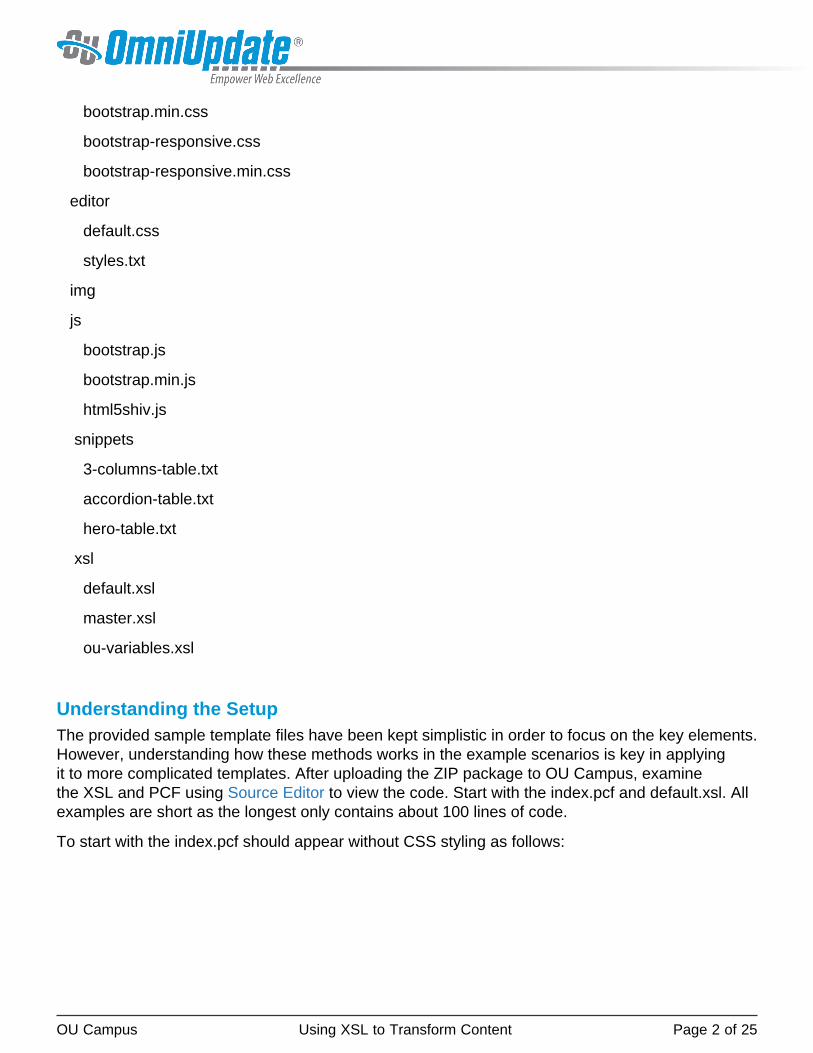
bootstrap.min.css
bootstrap-responsive.css
bootstrap-responsive.min.css
editor
default.css
styles.txt
img
js
bootstrap.js
bootstrap.min.js
html5shiv.js
snippets
3-columns-table.txt
accordion-table.txt
hero-table.txt
xsl
default.xsl
master.xsl
ou-variables.xsl
Understanding the SetupThe provided sample template files have been kept simplistic in order to focus on the key elements.However, understanding how these methods works in the example scenarios is key in applyingit to more complicated templates. After uploading the ZIP package to OU Campus, examinethe XSL and PCF using Source Editor to view the code. Start with the index.pcf and default.xsl. Allexamples are short as the longest only contains about 100 lines of code.
To start with the index.pcf should appear without CSS styling as follows:
OU Campus Using XSL to Transform Content Page 2 of 25

Linking to a CSS File in the XSLThe included default.xsl includes a broken dependency manager link.
OU Campus Using XSL to Transform Content Page 3 of 25

Locate the code in the XSL that links to a stylesheet. For example:
<!-- Le styles --> <link href="{{f:nnnnn}}" rel="stylesheet" />
Use the File Path/File Browser tool to navigate to the bootstrap.css that was uploaded with the ZIPpackage:
/xsl-transformations/_resources/css/bootstrap.css
If Dependency Manager is enabled for the site, the correct link tag will be inserted.
Navigate back to Preview of the index.pcf and the view should now show the styling similar to thescreen shot below:
OU Campus Using XSL to Transform Content Page 4 of 25
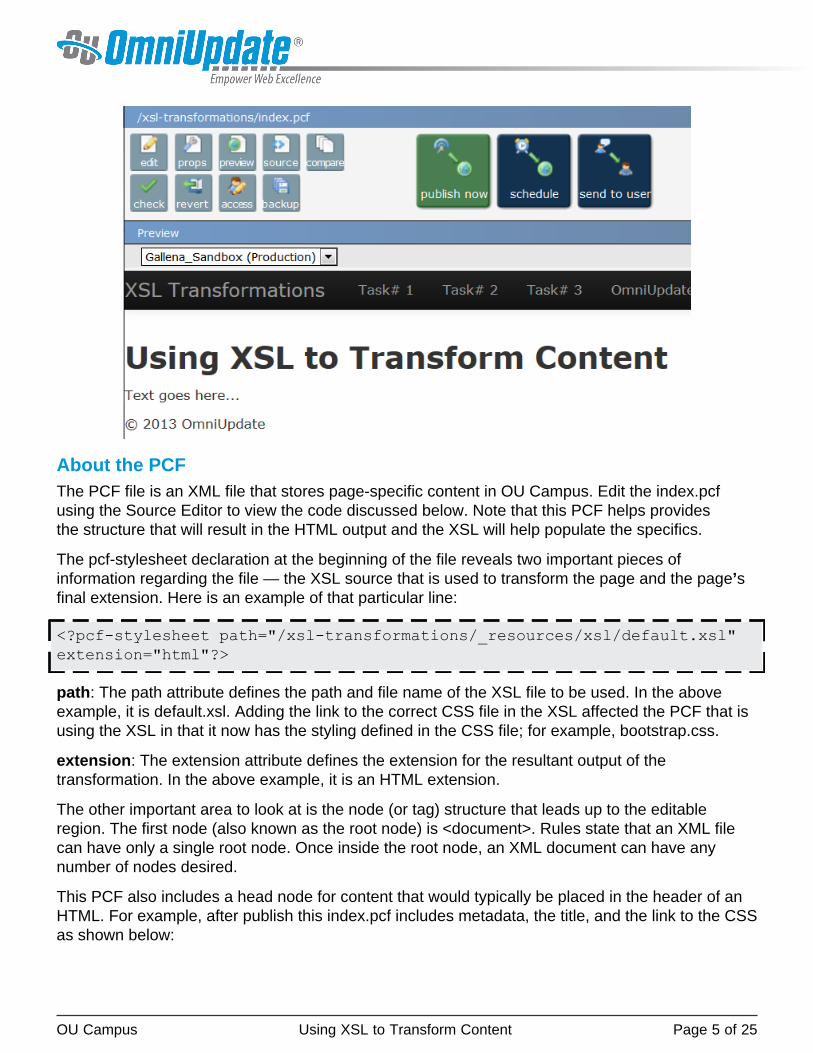
About the PCFThe PCF file is an XML file that stores page-specific content in OU Campus. Edit the index.pcfusing the Source Editor to view the code discussed below. Note that this PCF helps providesthe structure that will result in the HTML output and the XSL will help populate the specifics.
The pcf-stylesheet declaration at the beginning of the file reveals two important pieces ofinformation regarding the file — the XSL source that is used to transform the page and the page’sfinal extension. Here is an example of that particular line:
<?pcf-stylesheet path="/xsl-transformations/_resources/xsl/default.xsl"extension="html"?>
path: The path attribute defines the path and file name of the XSL file to be used. In the aboveexample, it is default.xsl. Adding the link to the correct CSS file in the XSL affected the PCF that isusing the XSL in that it now has the styling defined in the CSS file; for example, bootstrap.css.
extension: The extension attribute defines the extension for the resultant output of thetransformation. In the above example, it is an HTML extension.
The other important area to look at is the node (or tag) structure that leads up to the editableregion. The first node (also known as the root node) is <document>. Rules state that an XML filecan have only a single root node. Once inside the root node, an XML document can have anynumber of nodes desired.
This PCF also includes a head node for content that would typically be placed in the header of anHTML. For example, after publish this index.pcf includes metadata, the title, and the link to the CSSas shown below:
OU Campus Using XSL to Transform Content Page 5 of 25

In code view, it shows that there is a <config> node for Page Properties, and that OU Campus styletags are used to encapsulate certain nodes.
<!-- ouc:properties --><title>Using XSL to Transform Content</title><!-- /ouc:properties -->
For more information about page tagging syntax, styles, examples, and specifics in OU Campus,visit the Page Tagging page.
For this particular tutorial, the next important node is called <content>. The naming conventionfor nodes in a document depends on various factors; ideally the names should help developerseasily navigate through a document. In this particular file, there is only one editable region and it islocated inside the node called <main>.
The following example is just the <main> node from the index.pcf provided in the ZIP package.Note that within the start and end tags of the <main> node is the OU Campus transitional style tagfor an editable region:
Syntax Example
<!-- ouc:div label="MainContent" group="Everyone" button="700"break="break" --><!-- /ouc:div -->
OU Campus Using XSL to Transform Content Page 6 of 25

In-Context Example
<main><!-- ouc:div label="MainContent" group="Everyone" button="700"break="break" --><!-- ouc:editor csspath="/xsl-transformations/_resources/editor/default.css" cssmenu="/xsl-transformations/_resources/editor/styles.txt"width="1050"/ --><h2>Using XSL to Transform Content</h2><p>Text goes here...</p><table class="ou-hero-unit transform" style="width: 100%;"><caption>Hero Unit Table</caption><tbody><tr><th>Title</th><td><h3>Batman</h3></td></tr><tr><th>Description</th><td><p>Description Text</p></td></tr><tr><th>Button</th><td><a href="#">Read More about this</a></td></tr></tbody></table><!-- /ouc:div --></main>
Editable regions in OU Campus are controlled by ouc:div tags. These div tags are denoted by a setof opening and closing div comment tags. The label attribute value needs to be unique per div tag.In the above example, the label attribute and value are:
label="MainContent"
The other attributes allow additional behaviors, including defining the access group as everyone,defining a button for the editable region and adding a break after the editing button.
The ouc:editor tag controls how end-users are able to edit the region. The attributes of the editortag above, csspath and cssmenu, provide the locations for styling the WYSIWYG Editor. Learnmore about using these attributes:
Third Level Tagging (aka In-Context Editing)
OU Campus Using XSL to Transform Content Page 7 of 25
About the XSLsXSL (eXtensible Stylesheet Language) is a templating language used to transform, translate, orrender XML documents into a more readable format. In this case, the XSL transforms the PCFcontents into an HTML output file.
View the default.xsl file. Within the prolog the ou-variables.xsl is imported:
<xsl:import href="ou-variables.xsl" />
While the “default.xsl” defines the document layout, the “ou-variables.xsl” defines necessaryvariables and parameters for transformation.
A Few Good Elements
Default.xsl exemplifies the use of XSL elements as well as transforming content.
xsl:value-of
Within the head of the default.xsl, the title of the output file is defined by using both an xsl:value-ofelement and with text.
<title><xsl:value-of select="title" /> | OmniUpdate User Training Conference2013</title>
The xsl:value-of uses the select attribute to create a text string from the value of the attribute asdefined in the PCF, which is Using XSL to Transform Content.
<title>Using XSL to Transform Content</title>
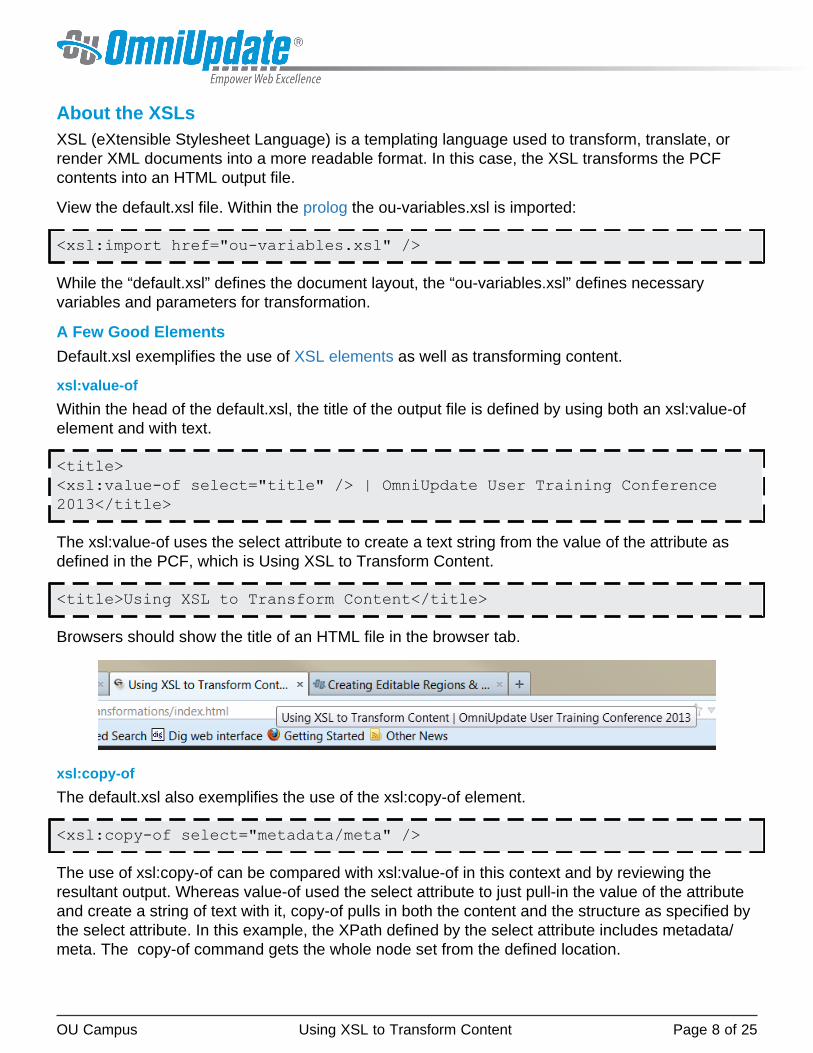
Browsers should show the title of an HTML file in the browser tab.
xsl:copy-of
The default.xsl also exemplifies the use of the xsl:copy-of element.
<xsl:copy-of select="metadata/meta" />
The use of xsl:copy-of can be compared with xsl:value-of in this context and by reviewing theresultant output. Whereas value-of used the select attribute to just pull-in the value of the attributeand create a string of text with it, copy-of pulls in both the content and the structure as specified bythe select attribute. In this example, the XPath defined by the select attribute includes metadata/meta. The copy-of command gets the whole node set from the defined location.
OU Campus Using XSL to Transform Content Page 8 of 25

In the PCF, the structure and content can be seen:
<metadata><!-- ouc:properties --><meta name="Description" content="Using XSL to Transform Content" /><meta name="Keywords" content="XSL transformations" /><!-- /ouc:properties --></metadata>
The metadata in the HTML output includes keywords and description meta tags with the definedcontent.
xsl:template
The opening template match (located at about line 19) defines the start of the output document.
<!-- START DOCUMENT --><xsl:template match="/document">
The HTML code (around line 71) includes a content region that resides inside a div node with aclass of span9.
Here is that portion of the code:
<div class="span9"><!-- GET CONTENT FROM <main> NODE --><xsl:apply-templates select="content/main/node()" /></div><!--/span-->
The path found in the select attribute defines the XPath to the content region in the PCF document.
Since this template’s match attribute targets the root node, in this case the <document> node, theopening slash in the XPath is not required.
For more information about XPath, visit the Introduction to XPath page.
Using Apply-Templates
The content to be transformed, the table snippet, needs in the middle of the content region, as theXSL will parse through every single item in the content area so that it can be singled out.
In order to get all the content to display, there must be a template match for every single item thatcould be inside the content region. Below is a single xsl:template element that uses the matchattribute to match every item:
OU Campus Using XSL to Transform Content Page 9 of 25

<!-- RECURSIVE TEMPLATE MATCH --> <xsl:template match="element()| attribute()|text()| comment()" > <xsl:copy> <xsl:apply-templates select="attribute()|node()" /> </xsl:copy> </xsl:template>
This recursive template uses generic XPath definitions to match all the types of nodes that couldbe found in the editable region. In this case element, attribute, text, and comment nodes. Fromthere, it makes a shallow copy using the xsl:copy element, which outputs the current item. On thatitem, it then uses apply-templates for everything found inside the current item, including itsattributes.
Essentially, this creates a soft version of the original copy-of command. What makes it soft is that itmatches all elements and items using generic identifiers, and so template matches that use a morespecific identifier take priority.
For example, this template <xsl:template match="p" > specifically targets paragraph tags, andtherefore catches all paragraph tags instead of the generic template defined above. This methodcreates templates that match specific tables that are defined with special classes for identification.
Hero Unit: Using Template MatchesThe goal of the exercise is to use the XSL to transform the data in the table snippet. The snippetprovided, hero-table.txt file (xsl-transformations/_resources/snippets/hero-table.txt), uses twoclasses to define the table: ou-hero-unit and transform. It includes a caption and three rowswith headers. The table will be dropped into the PCF and the XSL stylesheet is used to manipulatethe data. The final styling of the content will be similar to the screen shot below in that there is agray-blue box background with a bolded title (Title), a paragraph of text (Description), and a buttonwith a link (Read More).
OU Campus Using XSL to Transform Content Page 10 of 25

Edit the PCF
1. Insert the table snippet into the editable region in the index.pcf. The table snippet found in theprovided hero-table.txt file (xsl-transformations/_resources/snippets/hero-table.txt) and is alsoprovided below.
2. Customize the content within the three data cells to ensure successfully viewing of the contentlater. The data can be edited as follows:
<th>Title<th>: Change the data cell contents <td></td> for the first row should include the name ofthe hero. Note the h3.
<th>Description</th>: The data cell <td></td> for the second row should include the description ofthe hero. Notice that there's a p within the td.
<th>Button</th>: The data cell for the third row should include the button label. Notice that it is alink.
<table class="ou-hero-unit transform" style="width: 100%;"><caption>Hero Unit Table</caption><tbody><tr><th>Title</th><td><h3>Flash</h3></td></tr><tr><th>Description</th><td><p>The Fastest Man Alive</p></td></tr><tr><th>Button</th><td><a href="#">See Flash Run</a></td></tr></tbody></table><br />
Edit the XSL
Locate the Hero Unit template match in the default.xsl under the Special Template Matchescomment:
<!-- Hero Unit --><xsl:template match="table[contains(@class, 'ou-hero-unit')]"><!-- Hero Unit Code Goes Here ... --></xsl:template>
This xsl:template match specifically matches a table with a class attribute that has a value of ou-hero-unit. In this case, the table snippet that was added to the PCF included that class.
1. Replace the comment <!-- Hero Unit Code Goes Here ... --> with the following code:
<div class="hero-unit"> <h3>Title</h3> <p>Description</p> <p><a href="#" class="btn btn-primary btn-large">Read More</a></p></div>
The three HTML elements correspond to the data cells within each step of the provided snippettable. The next step is to replace the placeholder text for the table cells with XPath expressions.
OU Campus Using XSL to Transform Content Page 11 of 25
The following examples of XSL and XPath logic show different syntax for traversing the documenttree using XPath expressions.
2. Replace the Title content with the content from the table snippet as shown below:
<div class="hero-unit"> <h3><xsl:value-of select="./tbody/tr[1]/td" /></h3> <p>Description</p> <p><a href="#" class="btn btn-primary btn-large">Read More</a></p></div>
The text from the cell from the first row will be used. Literally, selects the current node then the firsttable row under table body and uses the value of the td to create the string.
3. Replace the Description content with the content in the table snippet from the second row asshown below:
<div class="hero-unit"> <h3><xsl:value-of select="./tbody/tr[1]/td" /></h3> <xsl:copy-of select="./tbody/tr[2]/td/node()" /> <p><a href="#" class="btn btn-primary btn-large">Read More</a></p></div>
The XPath expression in this case selects the current node, then the second row from the tablebody, then matches any node of the td.
4. Replace the link text with the link text from the table.
<div class="hero-unit"> <h3><xsl:value-of select="./tbody/tr[1]/td" /></h3> <xsl:apply-templates select="./tbody/tr[2]/td/node()" /> <p><a href="#" class="btn btn-primary btn-large"><xsl:value-ofselect="./tbody/tr[3]/td//a" /></a></p></div>
This XPath expression uses the current node, then the third table row, then all a elements that aredescendants of the td element and uses the value to create the string.
5. Also for the third row table cell, replace the href placeholder # with the expression shown below.
<p><a href="{./tbody/tr[3]/td//a/@href}" class="btn btn-primary btn-large"><xsl:value-of select="./tbody/tr[3]/td//a" /></a></p>
This is similar to the previous expression except that instead of selecting all a descendants of thetd only those a nodes with an href attribute are used to provide the string value.
OU Campus Using XSL to Transform Content Page 12 of 25

With the changes made and the table data customized, the styling for the page should look similarto the following:
The end-user can edit the text of the table using the WYSIWYG Editor.
OU Campus Using XSL to Transform Content Page 13 of 25

Complete XSL Code Snippet
<!-- Hero Unit --><xsl:template match="table[contains(@class, 'ou-hero-unit')]"><div class="hero-unit"> <!-- Title --> <h2><xsl:value-of select="./tbody/tr[1]/td" /></h2> <!-- Description --> <xsl:apply-templates select="./tbody/tr[2]/td/node()" /> <!-- Button --> <p> <a href="{./tbody/tr[3]/td[1]//a/@href}" class="btn btn-primarybtn-large"> <xsl:value-of select="./tbody/tr[3]/td//a" /> </a> </p></div></xsl:template>
TroubleshootingDo not be afraid of the bomb! Error messages may seem complicated and cryptic at first glance;however, error message dialogs may indicate an error as simple as a missing end tag or anundefined character entity as each error message below was caused by, respectively. Highlightingin the Source Editor is designed to help identify syntax errors of the selected language.
The following error message occurred as there was an ampersand included in the PCF.
The following error message, while verbose, precisely indicates the error. The last line indicatesthat there was a missing closing tag: </xsl:template>. It had been inadvertently deleted duringediting.
OU Campus Using XSL to Transform Content Page 14 of 25

Transforming a Table into Three Column ContentThe goal of this exercise is to transform content provided form of a table snippet in a PCF byusing template:match in the XSL. The styling and transformation creates a three-column area ofcontent by using the table. The steps and provided content are similar to the Hero Unit tutorial. Thexsl:template element is used to match a table that contains a specific class.
Example of Final Styling
XSL Template Match Example
<!-- Columns Layout --<xsl:template match="table[contains(@class, 'ou-columns')]"> <!-- Columns Code Goes Here --></xsl:template>
Editing the PCF
1. Drop the following table snippet into an editable region. It is also provided in the ZIP package:xsl-transformations/_resources/snippets /3-columns-table.txt.
OU Campus Using XSL to Transform Content Page 15 of 25

<table class="ou-columns transform" style="width: 100%;"> <caption>3 Column Layout Table</caption> <tbody> <tr> <td class="span4" style="vertical-align:text-top; width: 33%;"> <h3>Left Column</h3> <p>Content</p> </td> <td class="span4" style="vertical-align:text-top; width: 33%;"> <h3>Middle Column</h3> <p>Content</p> </td> <td class="span4" style="vertical-align:text-top; width: 33%;"> <h3>Right Column</h3> <p>Content</p> </td> </tr> </tbody></table><br />
2. Customize the content by replacing the word "Content" with text.
Editing the XSL
1. In the default.xsl, add the following HTML code into the pre-defined template match region,which is identified with the <!-- Columns Layout --> comment.
<div class="row-fluid"><div class="span4"><h3>Left Column</h3> <p>Content</p> </div> <div class="span4"> <h3>Middle Column</h3> <p>Content</p> </div><div class="span4"> <h3>Right Column</h3> <p>Content</p> </div></div>
OU Campus Using XSL to Transform Content Page 16 of 25

2. Use the following XSL and XPath logic, which will replace each column’s content withthe content from the table snippet.
<div class="row-fluid"> <div class="span4"> <xsl:apply-templates select="./tbody/tr[1]/td[1]/node()" /> </div> <div class="span4"> <xsl:apply-templates select="./tbody/tr[1]/td[2]/node()" /> </div> <div class="span4"> <xsl:apply-templates select="./tbody/tr[1]/td[3]/node()" /> </div></div>
Note how each of these div columns are nearly identical, except that the cell number grows by one.
Variations
The template can be made more dynamic by having it create a new column for each cell in the row.This involves using the for-each element to select every td in the first row and then apply-templatesis used to select all nodes within.
<div class="row-fluid"> <xsl:for-each select="./tbody/tr[1]/td"><div class="span4"> <xsl:apply-templates select="./node()" /> </div> </xsl:for-each></div>
The table snippet column layout uses the class identifier that matches the CSS width settings:
<td class="span4" style="vertical-align:text-top; width: 33%;">
This particular class, span4, follows Bootstrap’s grid system and creates a column with a particularwidth (300px). Any different number of table snippets can be created that utilize a different class.Included is inline styling for the cell to behave more like a column instead of a table cell.
The XSL has specified a class: <div class="span4">, but instead the class can be acquired fromthe table cell. Update the XSL template match to acquire the class from the table cell by replacingthe specific class with the syntax shown below.
OU Campus Using XSL to Transform Content Page 17 of 25

<div class="row-fluid"> <xsl:for-each select="./tbody/tr[1]/td"><div class="{./@class}"> <xsl:apply-templates select="./node()" /> </div> </xsl:for-each></div>
Complete Dynamic XSL Example
<!-- Columns Layout --><xsl:template match="table[contains(@class, 'ou-columns')]"> <div class="row-fluid"> <xsl:for-each select="./td"> <div class="{./@class}"> <xsl:apply-templates select="./node()" /> </div><!--/span--> </xsl:for-each> </div><!--/row--></xsl:template>
Advanced Solution
For a grid-like layout, add an extra for-each that allows the template to handle multiple rows:
<!-- Columns Layout --><xsl:template match="table[contains(@class, 'ou-columns')]"> <xsl:for-each select="./tbody/tr"> <div class="row-fluid"> <xsl:for-each select="./td"> <div class="{./@class}"> <xsl:apply-templates select="./node()" /> </div><!--/span--> </xsl:for-each> </div><!--/row--> </xsl:for-each></xsl:template>
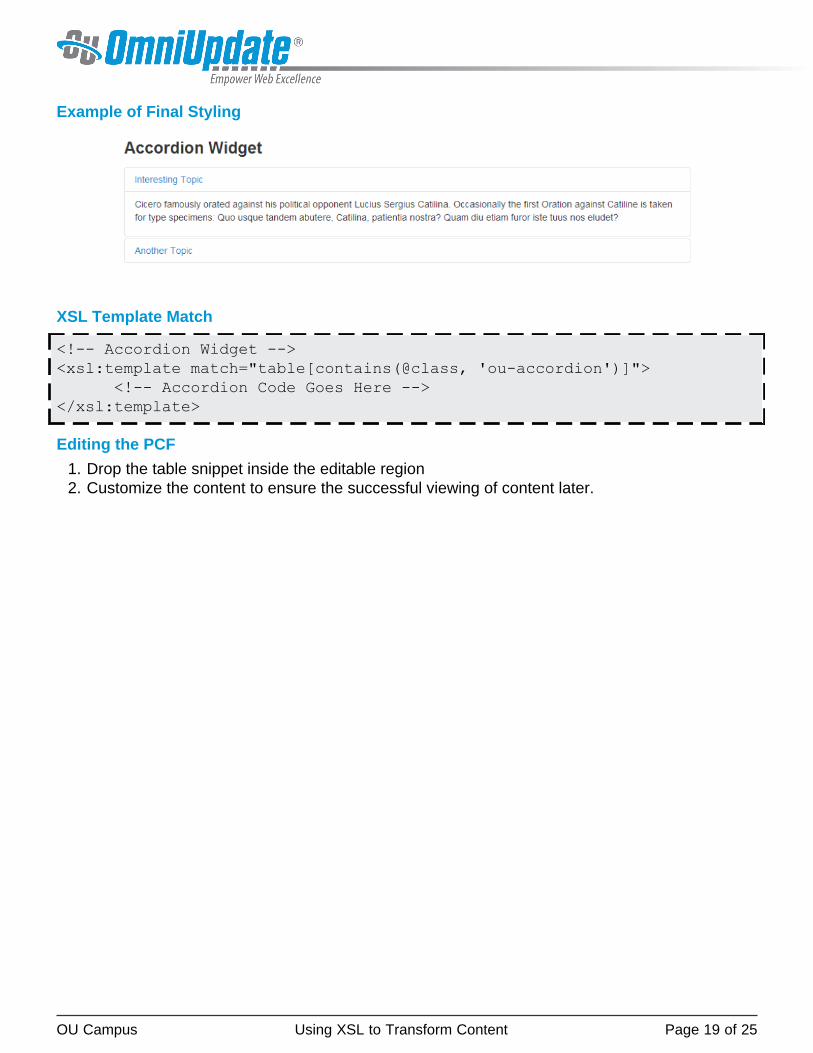
Transforming a Table into an Accordion Widget The goal of this exercise is to transform content provided form of a table snippet in a PCF by usingtemplate:match in the XSL. The styling and transformation creates an accordion widget. The stepsand provided content are similar to the Hero Unit tutorial. The xsl:template element is used tomatch a table that contains a specific class.
OU Campus Using XSL to Transform Content Page 18 of 25
Example of Final Styling
XSL Template Match
<!-- Accordion Widget --><xsl:template match="table[contains(@class, 'ou-accordion')]"> <!-- Accordion Code Goes Here --></xsl:template>
Editing the PCF
1. Drop the table snippet inside the editable region2. Customize the content to ensure the successful viewing of content later.
OU Campus Using XSL to Transform Content Page 19 of 25

Table Snippet
<h3>Accordion Widget</h3><table class="ou-accordion transform" style="width: 100%;"><caption>Accordion Widget Table</caption><thead><tr><th width="30%">Teaser</th><th>Content</th></tr></thead><tbody><tr><td><h5>Interesting Topic</h5></td><td><p>Interesting Content</p><p>Second Paragraph</p></td></tr><tr><td><h5>Another Topic</h5></td><td><p>Another content area.</p><ul><li>List Item</li><li>Another Item</li></ul></td></tr></tbody></table><br />
Editing the XSL
1. In the default.xsl, locate the xsl:template for the accordion widget.
<!-- Accordion Widget --><xsl:template match="table[contains(@class, 'ou-accordion')]"> <!-- Accordion Code Goes Here --></xsl:template>
OU Campus Using XSL to Transform Content Page 20 of 25
2. Add the following HTML code into after the comment: <!-- Accordion Code GoesHere ... -->.
<div class="accordion" id="accordion"> <div class="accordion-group"> <div class="accordion-heading"> <a class="accordion-toggle" data-toggle="collapse" data-parent="#accordion" href="#collapse-1"> Interesting Topic #1 </a> </div> <div id="collapse-1" class="accordion-body collapse in"> <div class="accordion-inner"> <p>Content #1</p> </div> </div> </div> <div class="accordion-group"> <div class="accordion-heading"> <a class="accordion-toggle" data-toggle="collapse" data-parent="#accordion" href="#collapse-2"> Interesting Topic #2 </a> </div> <div id="collapse-2" class="accordion-body collapse"> <div class="accordion-inner"> <p>Content #2</p> </div> </div> </div></div>
3. Using the following XSL and XPath logic, replace the first grouping’s content (i.e., "InterestingTopic #1" and "Content #1") with the content from the table snippet’s first content row.
OU Campus Using XSL to Transform Content Page 21 of 25

<div class="accordion" id="accordion"> <div class="accordion-group"> <div class="accordion-heading"> <a class="accordion-toggle" data-toggle="collapse"data-parent="#accordion" href="#collapse-1"> <xsl:value-of select="./tbody/tr[1]/td[1]" /> </a> </div> <div id="collapse-1" class="accordion-body collapse"> <div class="accordion-inner"> <xsl:copy-of select="./tbody/tr[1]/td[2]/node()" /> </div> </div> </div><div class="accordion-group"> <div class="accordion-heading"> <a class="accordion-toggle" data-toggle="collapse" data-parent="#accordion" href="#collapse-2"> Interesting Topic #2 </a> </div> <div id="collapse-2" class="accordion-body collapse"> <div class="accordion-inner"> <p>Content #2</p> </div> </div> </div></div>
4. The second group can be edited in a similar fashion by adding the appropriate copy-of andselect to copy the next row and its table cells, since the first grouping is almost identical to the restof the accordion items. However, like the previous three-column example, for-each and apply-templates elements can be used instead rather than defining each row and table cell.
For each according group, the row is selected and then the cells with a numerical predicator.
OU Campus Using XSL to Transform Content Page 22 of 25
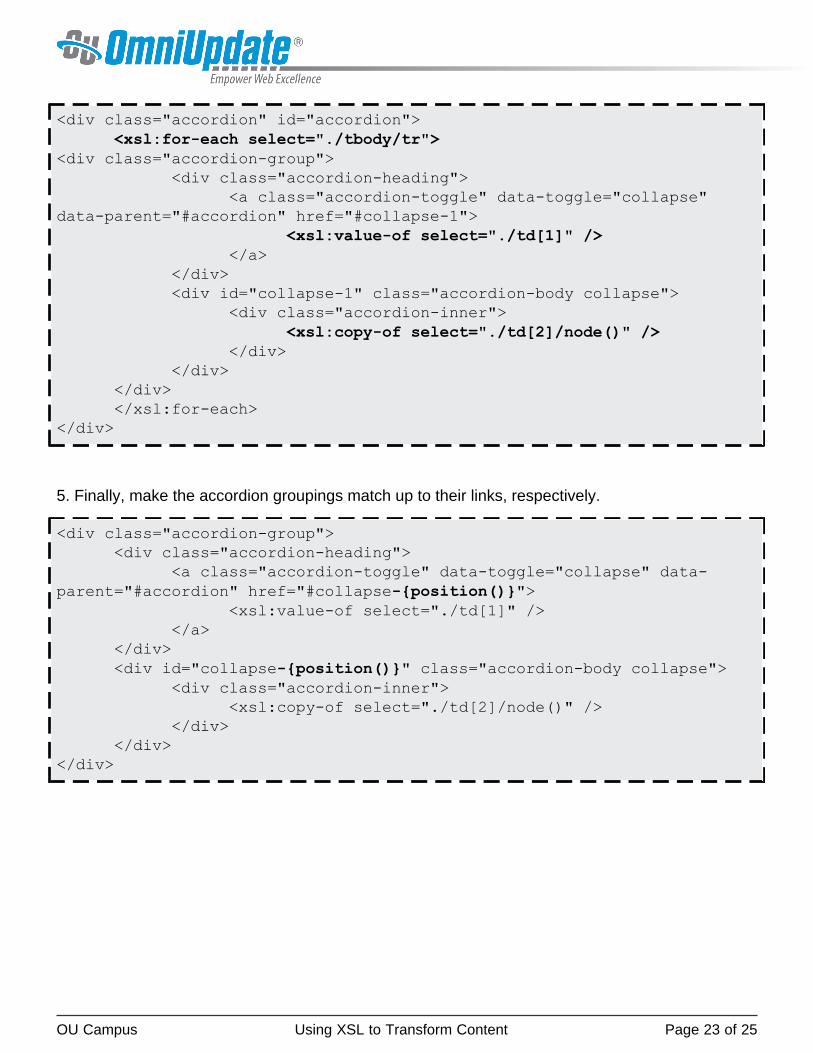
<div class="accordion" id="accordion"> <xsl:for-each select="./tbody/tr"><div class="accordion-group"> <div class="accordion-heading"> <a class="accordion-toggle" data-toggle="collapse"data-parent="#accordion" href="#collapse-1"> <xsl:value-of select="./td[1]" /> </a> </div> <div id="collapse-1" class="accordion-body collapse"> <div class="accordion-inner"> <xsl:copy-of select="./td[2]/node()" /> </div> </div> </div> </xsl:for-each></div>
5. Finally, make the accordion groupings match up to their links, respectively.
<div class="accordion-group"> <div class="accordion-heading"> <a class="accordion-toggle" data-toggle="collapse" data-parent="#accordion" href="#collapse-{position()}"> <xsl:value-of select="./td[1]" /> </a> </div> <div id="collapse-{position()}" class="accordion-body collapse"> <div class="accordion-inner"> <xsl:copy-of select="./td[2]/node()" /> </div> </div></div>
OU Campus Using XSL to Transform Content Page 23 of 25
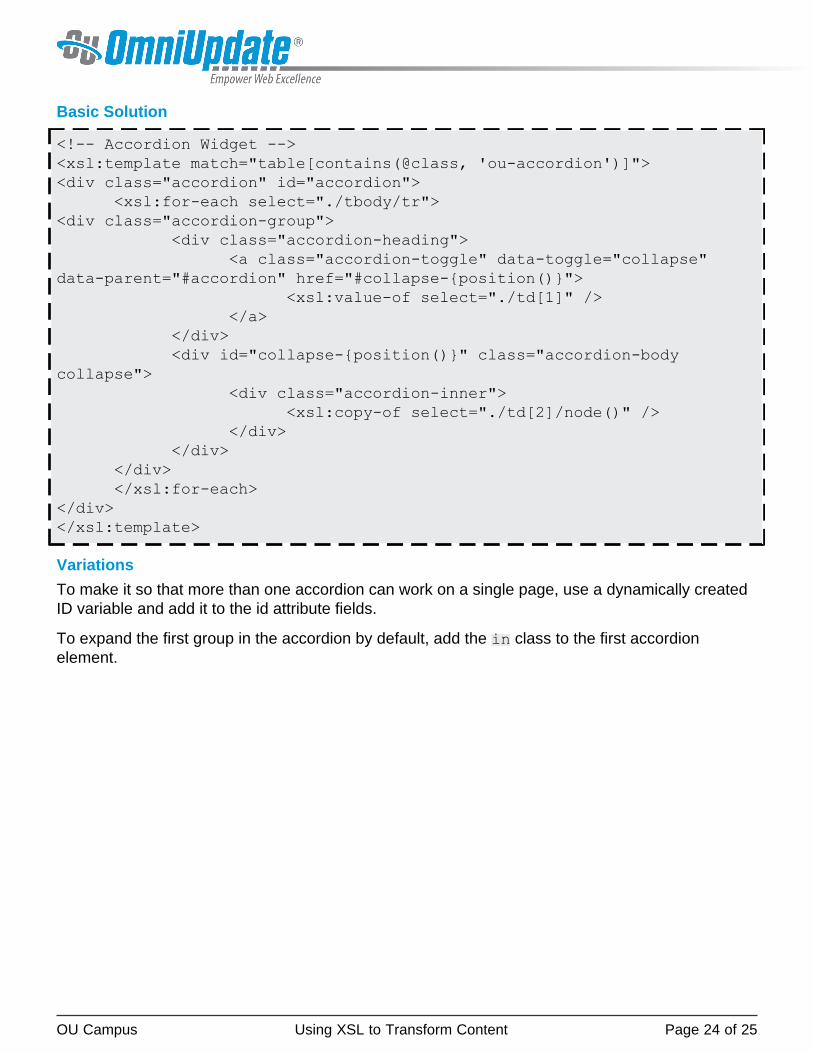
Basic Solution
<!-- Accordion Widget --><xsl:template match="table[contains(@class, 'ou-accordion')]"><div class="accordion" id="accordion"> <xsl:for-each select="./tbody/tr"><div class="accordion-group"> <div class="accordion-heading"> <a class="accordion-toggle" data-toggle="collapse"data-parent="#accordion" href="#collapse-{position()}"> <xsl:value-of select="./td[1]" /> </a> </div> <div id="collapse-{position()}" class="accordion-bodycollapse"> <div class="accordion-inner"> <xsl:copy-of select="./td[2]/node()" /> </div> </div> </div> </xsl:for-each></div></xsl:template>
Variations
To make it so that more than one accordion can work on a single page, use a dynamically createdID variable and add it to the id attribute fields.
To expand the first group in the accordion by default, add the in class to the first accordionelement.
OU Campus Using XSL to Transform Content Page 24 of 25

<!-- Accordion Widget --><xsl:template match="table[contains(@class, 'ou-accordion')]"> <xsl:variable name="id"> <xsl:number level="any" count="table" /> </xsl:variable> <div class="accordion" id="accordion{$id}"> <xsl:for-each select="./tbody/tr"> <div class="accordion-group"> <div class="accordion-heading"> <a class="accordion-toggle" data-toggle="collapse" data-parent="#accordion{$id}" href="#collapse-{$id}-{position()}"> <xsl:value-of select="td[1]" /> </a> </div> <div id="collapse-{$id}-{position()}"class="accordion-body collapse {if (position()=1) then 'in' else ''}"> <div class="accordion-inner"> <xsl:apply-templates select="td[2]/node()" /> </div> </div> </div><!--/accordion-group--> </xsl:for-each> </div><!--/accordion --></xsl:template>
OU Campus Using XSL to Transform Content Page 25 of 25