Embed Size (px)
Citation preview

PowerAlert Technical Bulletin #1209
Copyright © 2012 Tripp Lite, All Rights Reserved 11-Dec-2012
1
Using Windows 2008 RADIUS Authentication with Tripp Lite
SNMPWEBCARD
December 11, 2012
Summary
This Technical Bulletin describes how to configure Microsoft® RADIUS Server for authenticating users
for access to SNMPWEBCARD (built-in and accessory card versions).
Versions Affected
SNMPWEBCARD Version 12.06.0061 Revision D and later versions.
Solution
Steps for basic installation include:
1. Rename the server
2. Add Active Directory Domain Services
3. Add Network Policy and access Services
4. Configure AAA RADIUS Authentication
Step 1. Rename the Server
Windows 2008 Server is unique in that the server name is auto-generated and you are not given a chance during the
install to name the server so you must do before installing Active Directory.
In the “Initial Configuration Tasks” window, click the “Provide computer name and domain” link.

PowerAlert Technical Bulletin #1209
Copyright © 2012 Tripp Lite, All Rights Reserved 11-Dec-2012
2
Enter a Computer description and click the “Change…” button to change the computer name.
Enter the Computer name and click “OK” and reboot when prompted.
Step 2. Add Active Directory Domain Services
For this example we setup a new forest for the tlsw.net domain. Server 2008 abstracts most server function into “Roles”
so we’ll be adding the Active Directory Domain Services Role with the Server Manager by clicking “Roles” and clicking
“Add Roles.”

PowerAlert Technical Bulletin #1209
Copyright © 2012 Tripp Lite, All Rights Reserved 11-Dec-2012
3
Select the Active Directory Domain Services Role:
Click through the confirmation screens and click Install. You should see an installation progress screen and finally an
“installation success” message that asks you to run the command “dcpromo.exe” which will configure your domain.
Click the link to run “dcpromo” or click the “Start” button, select “Run” and enter “dcpromo.exe”. You should now see
the “Active Directory Domain Service” install wizard.
Click “Next“ to continue.

PowerAlert Technical Bulletin #1209
Copyright © 2012 Tripp Lite, All Rights Reserved 11-Dec-2012
4
Choose “Create a new domain in a new forest” and click “Next”.
For our example domain we’ll use “tlswdev.net”. Click “Next” and it will check to see if the name is already used on the
network.

PowerAlert Technical Bulletin #1209
Copyright © 2012 Tripp Lite, All Rights Reserved 11-Dec-2012
5
When asked to set which “Forest Functional Level” Use the 2008 level.
The next screen you’ll see is a warning that the DNS service isn’t installed and an offer to install it for you.
Click “Next” to accept and install.

PowerAlert Technical Bulletin #1209
Copyright © 2012 Tripp Lite, All Rights Reserved 11-Dec-2012
6
You’ll receive the following warning. Click “Yes” to continue.
Accept the defaults and click “Next”.
Now you’ll be prompted to enter a “Directory Services Restore Mode Administrator Password”. Enter a password and
click “Next”.

PowerAlert Technical Bulletin #1209
Copyright © 2012 Tripp Lite, All Rights Reserved 11-Dec-2012
7
Click “Next” at the Summary screen.
You’ll now see the Installation Wizard install DNS and Active Directory. Check the “Reboot on completion” box and once
the wizard finishes it’ll reboot and be ready for the next step.
Step 3. Add Network Policy and Access Services
In Windows 2008 Server you can no longer just install the Internet Authentication Service (IAS) and have RADIUS
functionality. You must now install Network Policy and Access Services, which now include everything from earlier
versions of Windows server such as RRAS/IAS/etc… but now includes NAP (think NAC for Windows). We will be installing
and configuring RADIUS functionality. So once again head to the Server Manager and “Add a Role” selecting “Network
Policy and Access Services” and click through the confirmation screen.

PowerAlert Technical Bulletin #1209
Copyright © 2012 Tripp Lite, All Rights Reserved 11-Dec-2012
8
Select “Network Policy Server”, “Routing and Remote Access Services”, “Remote Access Service” and “Routing”.
Click “Next”, click through the confirmation screen and click “Install”.
Installation will take a couple of minutes and present you with an install summary. Click “Close”.

PowerAlert Technical Bulletin #1209
Copyright © 2012 Tripp Lite, All Rights Reserved 11-Dec-2012
9
Step 4. Configure AAA RADIUS Authentication
Step 4.1 Add Active Directory User
In Server Manager, go to Roles -> Active DIrecotry Domain Service -> Active Directory Users and Computers -> Domain
Name (in example, it’s tlswdev.net) -> Users.
Right click Users -> New -> User to add a new user logon name - testuser

PowerAlert Technical Bulletin #1209
Copyright © 2012 Tripp Lite, All Rights Reserved 11-Dec-2012
10
Click Next to create password then Next and Finish
Step 4.2 Add RADIUS Client
Go to Server Manager -> Roles -> Network Policy and Access Services -> NPS -> RADIUS Clients and servers -> RADIUS
Clients
PowerAlert Technical Bulletin #1209
Copyright © 2012 Tripp Lite, All Rights Reserved 11-Dec-2012
11
Right click RADIUS Clients -> New to add new RADIUS Client. Give it a name, IP address of the SNMP web card, and select
“Manual” for the shared secret and type a password. Press OK when finished.

PowerAlert Technical Bulletin #1209
Copyright © 2012 Tripp Lite, All Rights Reserved 11-Dec-2012
12
Step 4.3 Configure Connection Request Policy
Go to Server Manager -> Roles -> Network Policy and Access Services -> NPS -> Policies, right click Connection Request
Policies -> New.
PowerAlert Technical Bulletin #1209
Copyright © 2012 Tripp Lite, All Rights Reserved 11-Dec-2012
13
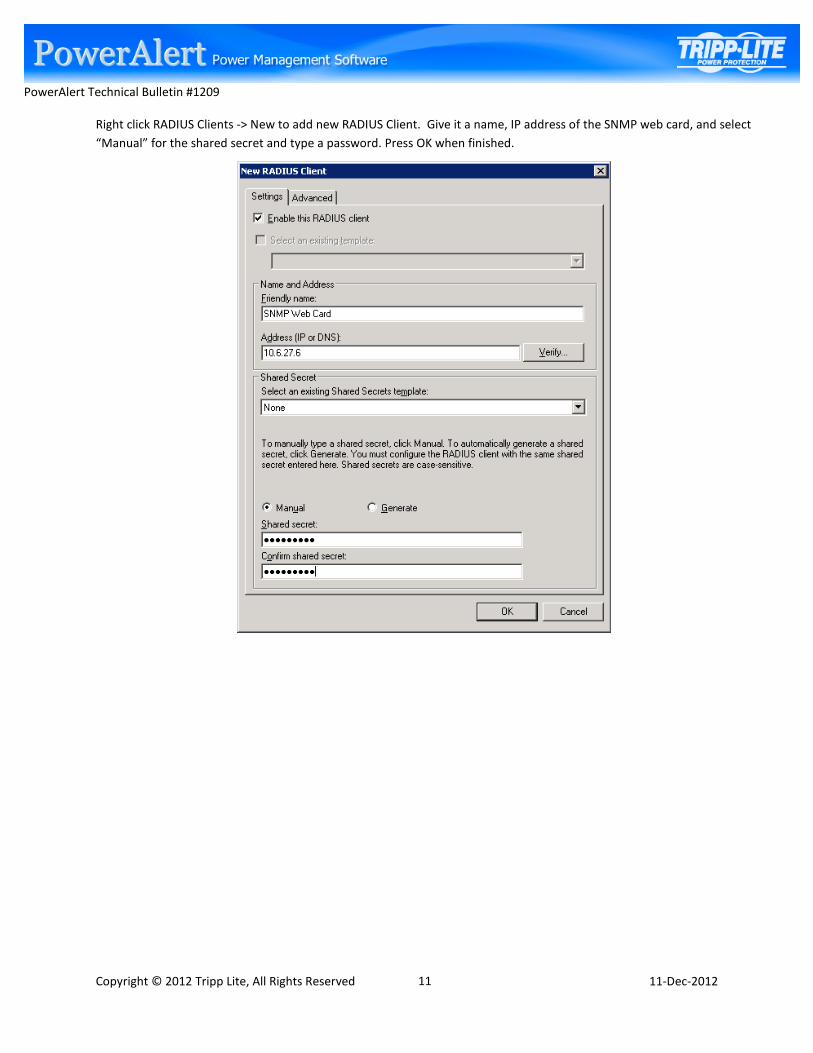
Click Next to add Conditions, Select User Name
Click Add and specify the user name “testuser” then OK

PowerAlert Technical Bulletin #1209
Copyright © 2012 Tripp Lite, All Rights Reserved 11-Dec-2012
14
Click Next and keep Authenticate requests on this server

PowerAlert Technical Bulletin #1209
Copyright © 2012 Tripp Lite, All Rights Reserved 11-Dec-2012
15
Click Next and make sure Override network policy authentication settings unchecked.

PowerAlert Technical Bulletin #1209
Copyright © 2012 Tripp Lite, All Rights Reserved 11-Dec-2012
16
Click Next, in RADIUS Attributes, select Standard -> Add
Add in the attribute “Service-Type” and select “Login” for “Others”
PowerAlert Technical Bulletin #1209
Copyright © 2012 Tripp Lite, All Rights Reserved 11-Dec-2012
17
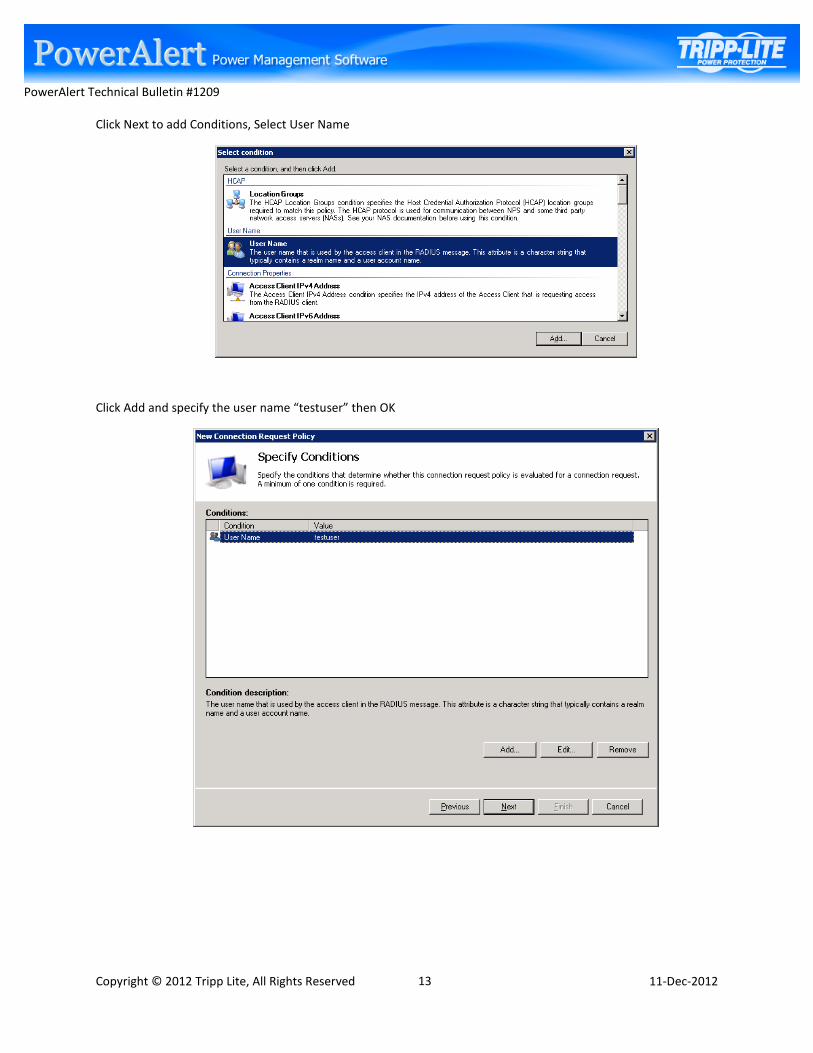
Select Vendor Specific -> Add, choose Vendor-Specific then Add
Add Tripp Lite vendor specific Radius attributes. Check “Enter Vendor Code”, input 850 for Tripp Lite vendor code.

PowerAlert Technical Bulletin #1209
Copyright © 2012 Tripp Lite, All Rights Reserved 11-Dec-2012
18
Check “Yes. It conforms” then “Configure Attribute…” to add Tripp Lite Authorization attribute (attribute number is 1),
For “Attribute value”, please refer to the followings:
# ----------------------------------------------------------------------------
# Access is granted to the various facilities within the PowerAlert software
# by means of the TrippLite-Authorization attribute, which is a comma-
# delimited string of facility-code to access-level pairs.
#
# Facility Codes: default, security, networksettings, systemsettings, info,
# logging, devicestatus, devicecontrols, deviceevents,
# deviceloads, actions, discovery
#
# Access Levels: “none” --> No Access (or 0),
# “ro” --> Read Only (or 1),
# “rw” --> Read-Write Access (or 2.)
#
# Example: default=rw,security=none,systemsettings=ro
#
# - The default access for all non-specified facilitys is read/write
# - The user has no access to the security facility
# - The user has read-only access to the system settings
# ----------------------------------------------------------------------------

PowerAlert Technical Bulletin #1209
Copyright © 2012 Tripp Lite, All Rights Reserved 11-Dec-2012
19
Click OK then “Configure Attribute” to add Tripp Lite outlet realms attribute (attribute number is 2)
Click OK then OK again

PowerAlert Technical Bulletin #1209
Copyright © 2012 Tripp Lite, All Rights Reserved 11-Dec-2012
20
Click OK, Close, then Next to Finish

PowerAlert Technical Bulletin #1209
Copyright © 2012 Tripp Lite, All Rights Reserved 11-Dec-2012
21
Step 4.4 Configure Network Policies
Go to Server Manager -> Roles -> Network Policy and Access Services -> NPS -> Policies, right click Network Policies ->
New, then Next

PowerAlert Technical Bulletin #1209
Copyright © 2012 Tripp Lite, All Rights Reserved 11-Dec-2012
22
add condition -> Authentication Type, check CHAP and PAP, OK then Next

PowerAlert Technical Bulletin #1209
Copyright © 2012 Tripp Lite, All Rights Reserved 11-Dec-2012
23
Specify Access Permission, check Access granted, then Next

PowerAlert Technical Bulletin #1209
Copyright © 2012 Tripp Lite, All Rights Reserved 11-Dec-2012
24
Configure Authentication Methods, check CHAP and PAP, then Next and No for “View the corresponding Help topic?”

PowerAlert Technical Bulletin #1209
Copyright © 2012 Tripp Lite, All Rights Reserved 11-Dec-2012
25
Configure Constraints. Leave unchanged.
PowerAlert Technical Bulletin #1209
Copyright © 2012 Tripp Lite, All Rights Reserved 11-Dec-2012
26
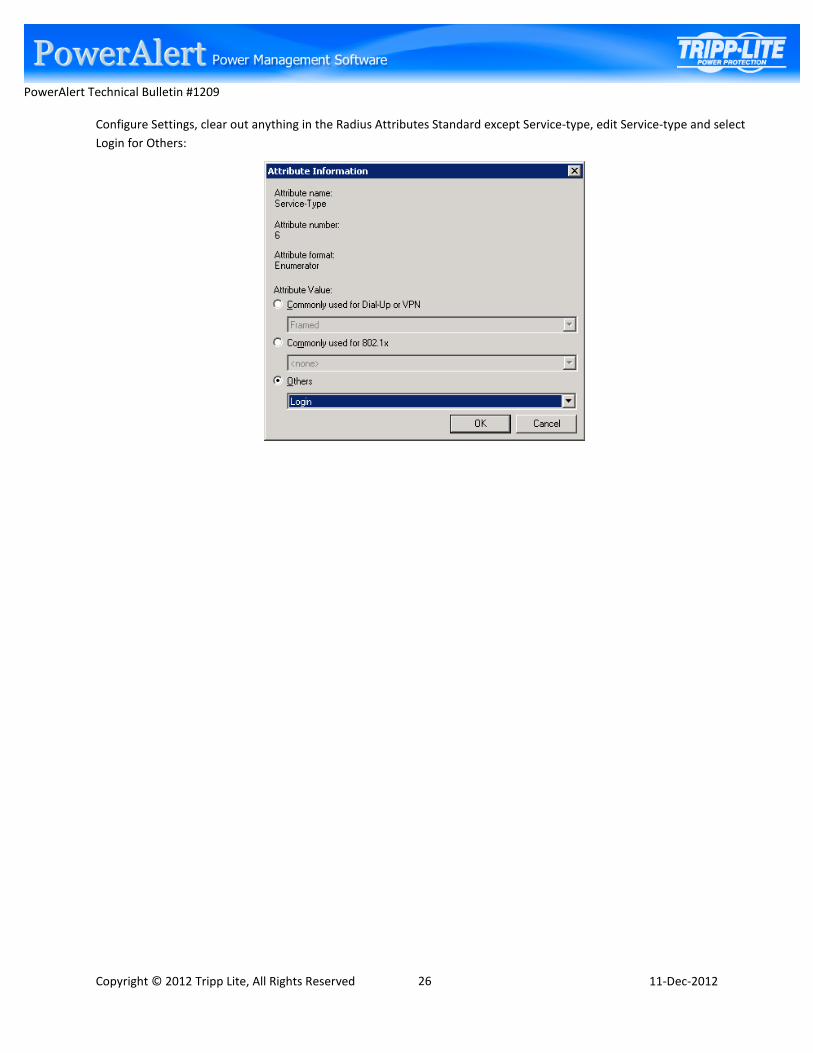
Configure Settings, clear out anything in the Radius Attributes Standard except Service-type, edit Service-type and select
Login for Others:

PowerAlert Technical Bulletin #1209
Copyright © 2012 Tripp Lite, All Rights Reserved 11-Dec-2012
27
Ok then click Next to Finish
Status
Effective until further notice.
![Windows iSeries Access - ibm.com · .Comm RC=xxxx - ( ) xxxx 16 . .: ID iSeries Access Windows iSeries Access . 22 IBM - iSeries: Windows iSeries Access: iSeries DB2 UDB [IBM] [iSeries](https://img.pdfslide.us/doc/110x75/5ad38ee67f8b9a92258ea836/windows-iseries-access-ibmcom-rcxxxx-xxxx-16-id-iseries-access-windows.jpg)